

A mobile home does not need dozens of store-bought decorations to feel ready for Halloween. In a compact footprint, one well-placed handmade project can create more atmosphere than several pumpkins, signs, and figurines competing for the same counter or floor space.
That is where DIY Halloween mobile home decor becomes especially useful. The strongest projects work with surfaces the home already gives you: blank walls, cabinet-top gaps, windows, doors, ceiling corners, mirrors, narrow entries, and small porch rails. They can also stay lightweight, removable, and easier to store once October is over.
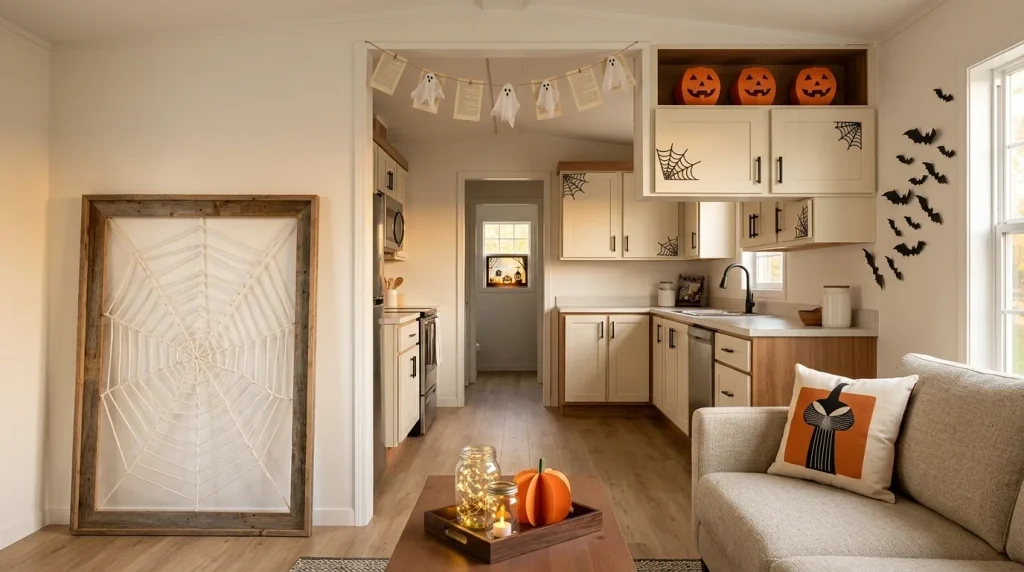
The 21 ideas below move from flat wall projects and hanging decorations to lighting, textiles, windows, and compact outdoor DIYs. Some are simple enough for an afternoon; others create a larger focal point from inexpensive materials. Use the project finder first when the available zone is unclear, then choose the project that gives an underused surface a clear seasonal job without making daily routines harder.
Small-Space Project Finder
Where can Halloween live?
Choose the part of your mobile home where you actually have room. The recommendation changes according to the space that is available, not only the decorating style you like.
Step 1 · Pick your available zone
Which space can handle a DIY project?
You are choosing by available footprint, so the projects later in this guide can be edited to fit your home while daily function stays in charge.
1. Turn an Old Frame Into a Cord Spiderweb Statement Piece
An unused picture or mirror frame can become one of the largest decorations in the room without requiring a deep shelf or another piece of furniture. Remove the backing and glass if the frame has them, then stretch white cord, yarn, or thin rope between points around the inside edge. Begin with several lines crossing near an off-center point; join those spokes with loose curved rows until the web fills most of the opening.
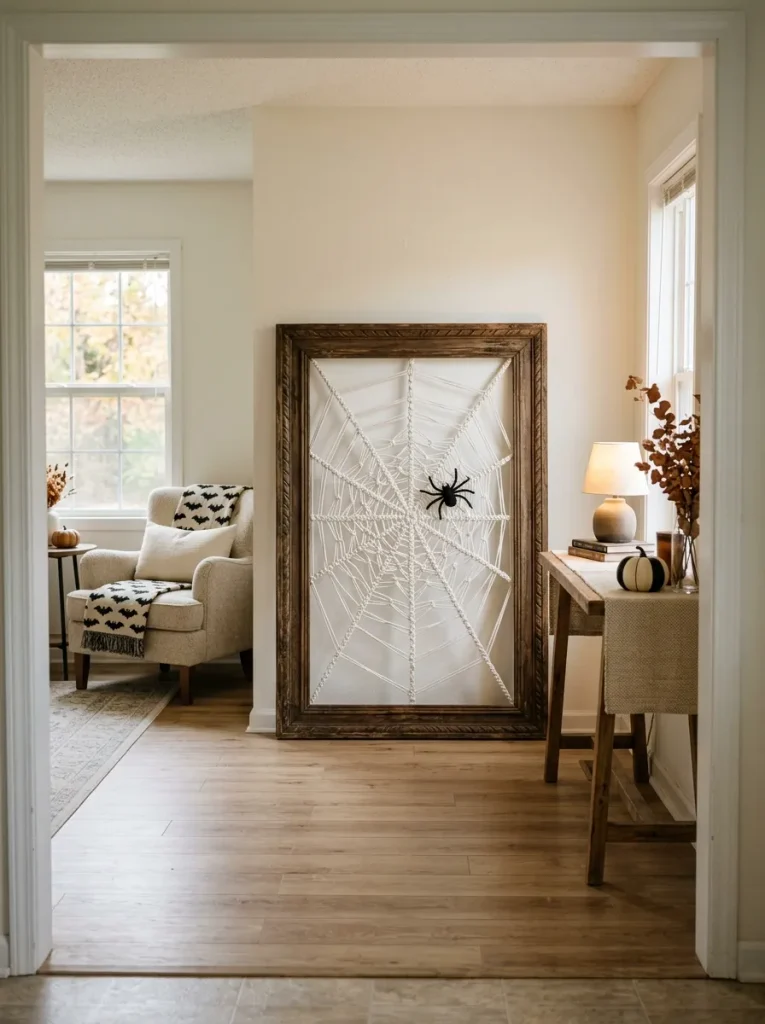
The frame matters almost as much as the web. A warm wood or aged finish gives pale cord enough contrast to show from across the room, while an ornate thrifted frame can make the project feel more collected than crafty.
Check the placement before finishing the web: lean or temporarily hold the empty frame where it will live. If its outer edge crowds a doorway, thermostat, lamp, or nearby furniture, size down now. In a narrow mobile-home room, one confidently scaled piece is usually easier to absorb visually than several smaller DIYs competing along the same wall.
2. Build a Fold-Flat Bat Flight Panel for a Narrow Wall
Paper bats are easy to make; the useful upgrade is turning them into a removable composition.
Cut bats in three or four sizes from black cardstock, then arrange them on a lightweight dark or wall-toned backing panel before anything goes onto the wall. Start with a denser group low on one side and let the flight loosen as it rises. Slight differences in wing angle keep the silhouettes from looking stamped in rows.
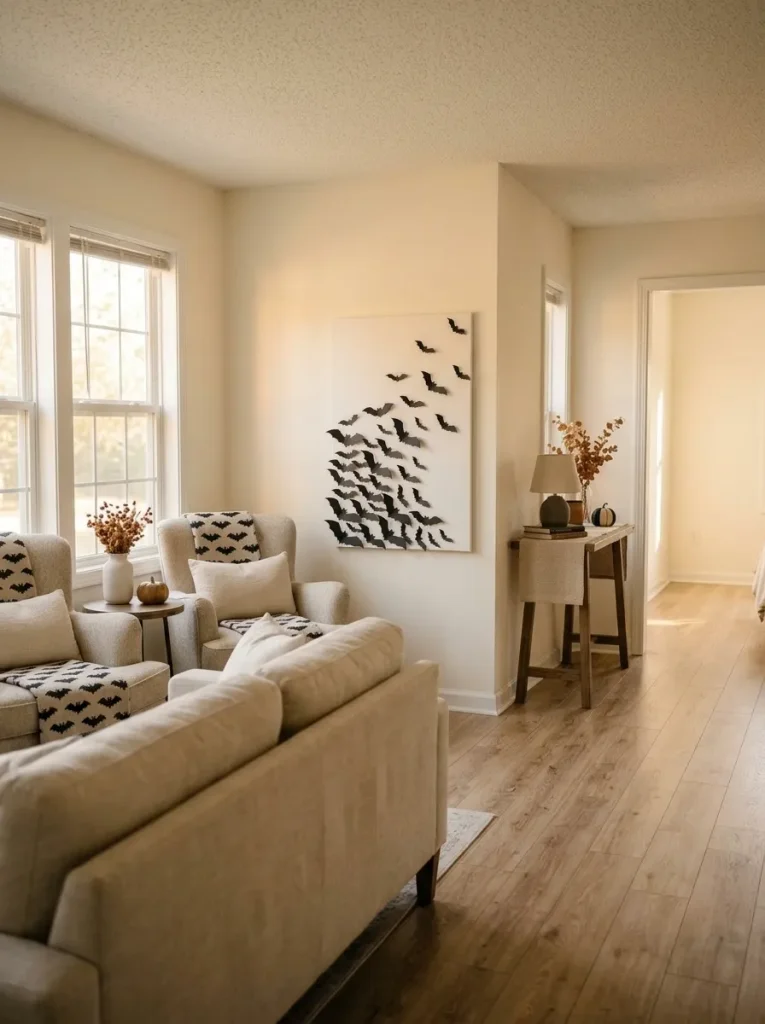
Once the layout works, attach the bats to the panel and mount the finished piece using a method appropriate for your wall surface and the panel’s weight. At the end of the season, the entire arrangement comes down together and can store nearly flat.
This is particularly useful in a single wide where a long sightline can make dozens of separately placed decorations feel busier than expected. For a deeper budget-first decorating strategy, continue with the site’s Cheap Halloween Mobile Home Decor guide.
Cheap Halloween Mobile Home Decor guide
3. Suspend a Single-Branch Bat Mobile Where Floor Space Is Tight
Look at the room from the doorway. Is there an upper corner that feels visually empty while every usable surface below it already has a job? That is a better home for this project than the center of the ceiling.
Use one dry branch with an interesting but not overly tangled silhouette. Cut several bats from stiff black paper and hang them at uneven heights with fine dark thread. Five well-spaced shapes may read more clearly than fifteen overlapping ones in a small room. Rotate a few bats so the mobile changes slightly as air moves through the space.
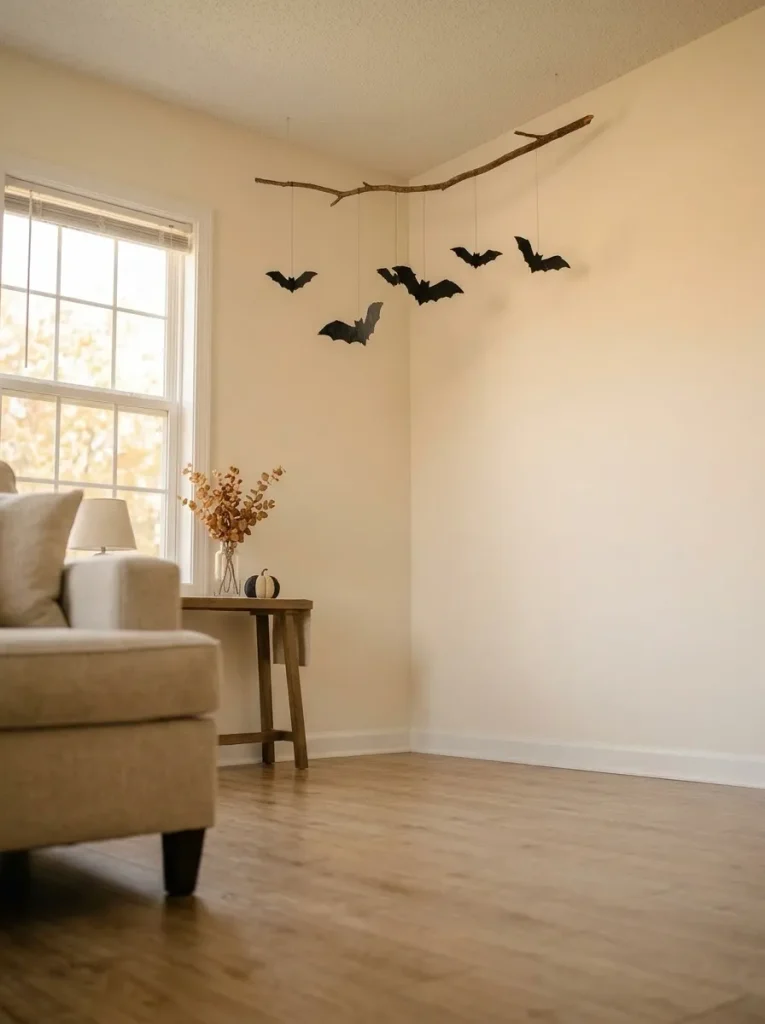
Before hanging the finished branch, decide where people stand, walk, open cabinet doors, and reach for things. The lowest bat should remain outside those everyday movements. That constraint changes the shape of the DIY: mobile-home scale generally favors a wide, shallow flight over a dramatic floor-reaching installation.
If the available ceiling position would force the project into normal circulation, skip the branch and use the flat bat panel from Idea 2.
4. Make an Embroidery-Hoop Ghost Cloud for a Low Ceiling
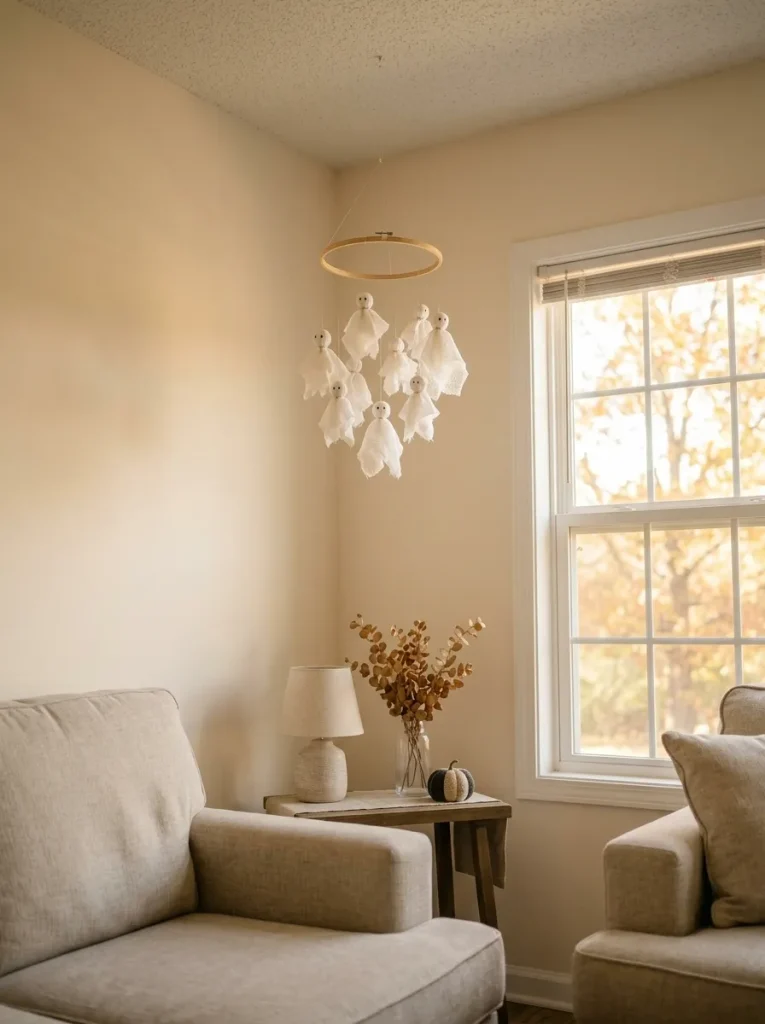
The mistake: making hanging ghosts long enough to look dramatic in photos, then discovering that they visually lower an already modest ceiling.
A better version starts with a small embroidery hoop or another lightweight ring. Tie several short lengths of translucent white fabric, cheesecloth, muslin scraps, or lightweight paper beneath it. Give each ghost a simple head form and vary the finished lengths by only a few inches. The grouping should read as a cloud of small figures, not a chandelier-sized curtain.
Hang the hoop close enough to the ceiling that there is still a clear band of open space beneath the decoration. This makes it useful over a corner table, beside a window, or above an area that people do not normally walk through.
For an especially compact room, reduce the number of ghosts before reducing their spacing. A little air between the forms lets each silhouette remain recognizable; once the pieces overlap into one white mass, the mobile loses the floating effect that made it worth hanging.
5. Shape a Crescent Grapevine Bat Wreath With Tiny Warm Lights
A full circular wreath can look unexpectedly heavy on a small manufactured-home door. A crescent gives you Halloween texture while leaving part of the door visible.
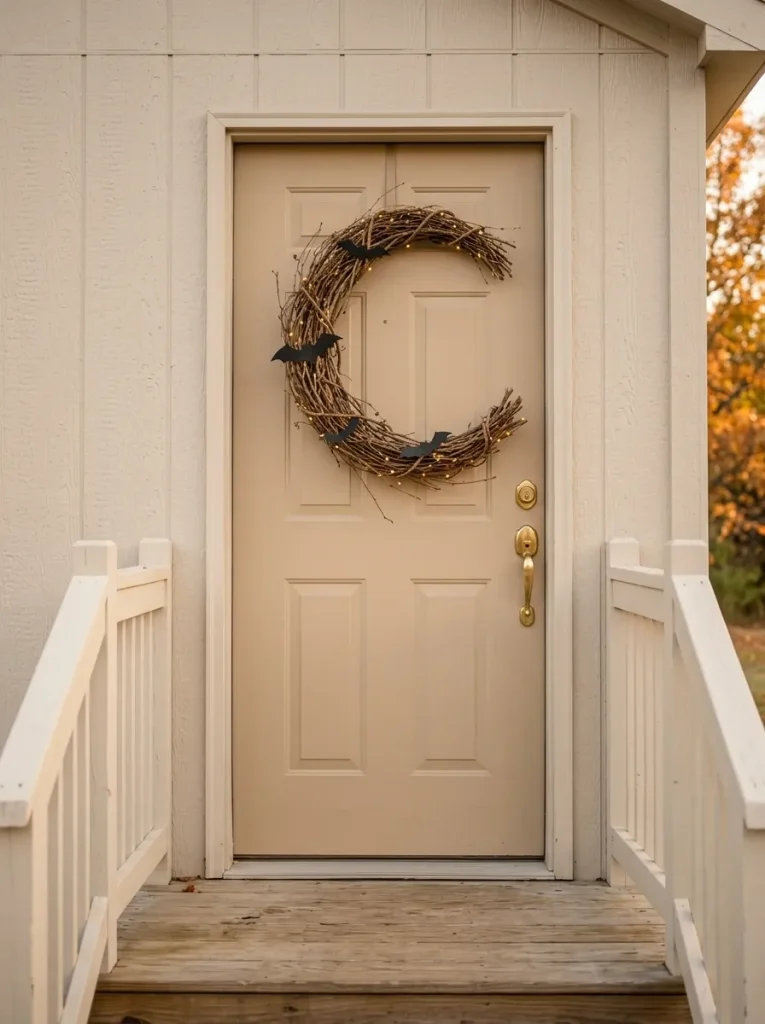
Start with a lightweight grapevine or flexible twig base and build only one side into a crescent. Let a few natural branches extend beyond the main curve so the outline stays loose. Add several matte-black paper or lightweight craft bats in different sizes, concentrating the largest one near the thickest part of the wreath. For illumination, weave a short battery-operated micro-light strand through the twig structure and follow the light manufacturer’s placement instructions.
Then perform a simple edit from several feet away:
- If the bats disappear: increase size before adding quantity.
- If the crescent looks bulky: remove filler from the middle.
- If the lights become the focal point: reduce the illuminated area.
- If the door feels visually narrowed: rotate the crescent until its open side restores more negative space.
For a more aged or nostalgic Halloween direction, the site’s Vintage Halloween Mobile Home Decor guide develops that aesthetic further. Here, the construction decision is simpler: keep the wreath lightweight, asymmetrical, and visually open.
Vintage Halloween Mobile Home Decor guide
Will the wreath stay light enough visually?
Keep a meaningful portion of the door showing around and through the crescent.
Let one larger silhouette lead so every bat does not compete at equal volume.
A few irregular tips add movement. Too many turn the outer edge into visual fuzz.
The eye should register the crescent and bats first, then notice the warm points of light.
If another bat, bow, sign, ribbon, or filler piece no longer improves the silhouette from across the room, the wreath is finished.
6. String Book-Page Ghosts Into a Lightweight Halloween Garland
An old paperback, damaged book, or stack of unwanted printed pages can become a Halloween garland that barely occupies any physical space.
Tear or cut the paper into loose ghost silhouettes with intentional variation from piece to piece. Slightly irregular edges make the finished strand feel handmade. Draw simple black eyes, punch a small hole near the top of each ghost, then tie them onto thin twine with enough distance between pieces for each silhouette to remain recognizable.
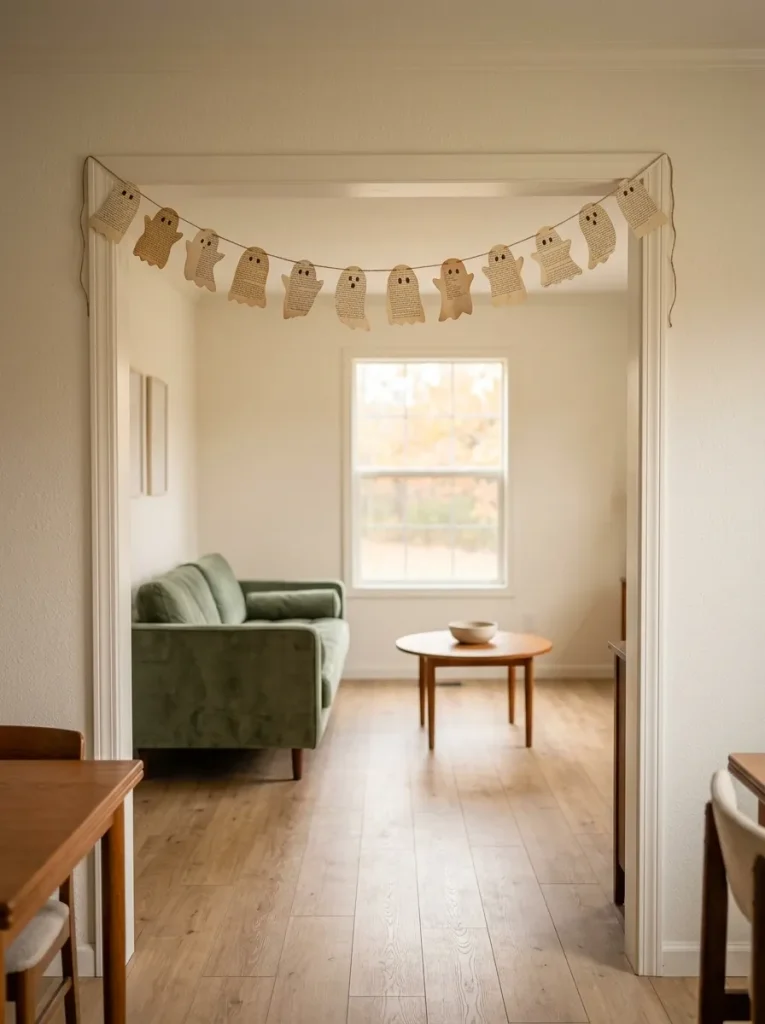
Where this DIY becomes especially useful in a mobile home is placement. Run a short strand across a narrow architectural opening, beneath an open shelf, along a cabinet-top edge, or over a small window. Avoid stretching one garland across every available wall; the warm paper tone works best when it forms one concentrated line.
For a more aged look, vary the paper tone slightly before adding extra embellishment. Stop once the strand reads clearly from the doorway and leave some neighboring wall or cabinetry undecorated.
7. Build a Shallow Twig Web Mobile Above a Dining Nook
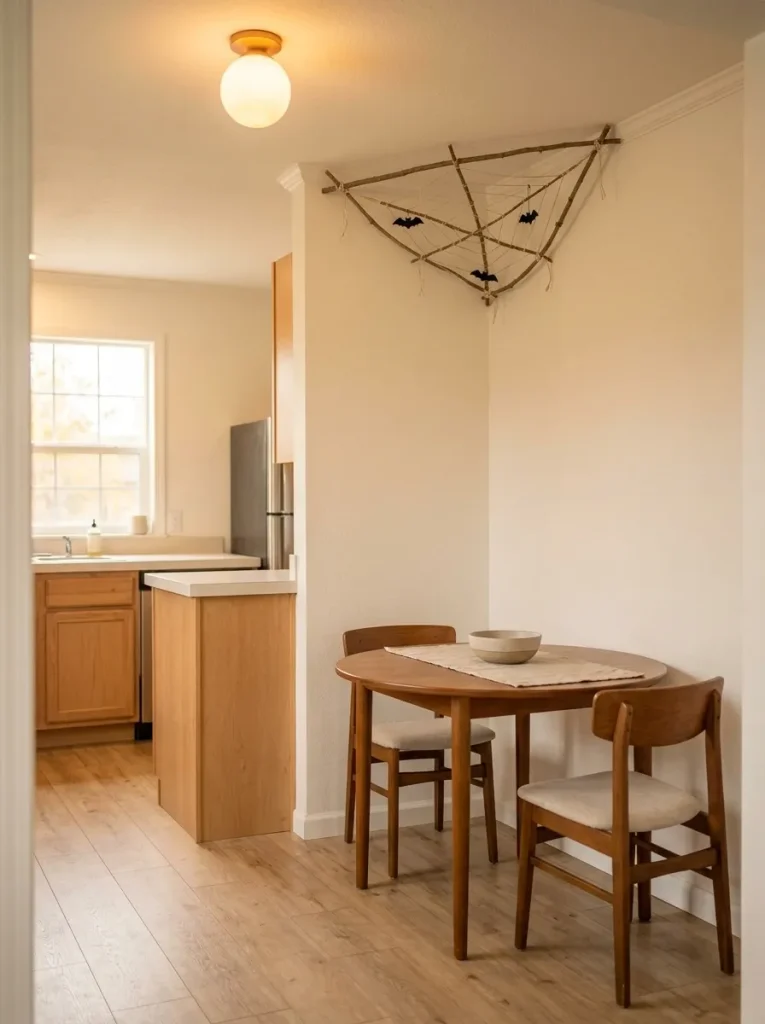
Picture a round twig mobile filled with webs, branches, and dangling pieces. It may look atmospheric in a tall room, but in a compact mobile home the same construction can quickly feel too deep.
The better move is to redesign the project almost like a floating flat sculpture. Connect several thin dry branches into an open web-like framework. Add a few smaller crossed twigs inside the structure and tie selected intersections with pale string. A small spider, bone-white yarn detail, or two tiny bats can provide the Halloween cue.
Before hanging it, sit in every chair around the dining area and look upward. The piece should occupy otherwise unused visual space without entering the zone where someone stands, pulls out a chair, or carries food.
Use this decision rule
- High, unused corner: a hanging twig web can work.
- Directly over active seating: shorten the drop.
- Very low ceiling: mount the twig web flat against a wall.
- Busy dining/kitchen sightline: reduce the number of dangling pieces.
The project succeeds when it adds an unexpected overhead detail without making the dining nook feel physically smaller.
8. Cut a Two-Layer Window Silhouette That Changes After Dark
A small mobile-home window can become one of the most efficient Halloween surfaces in the house because the same DIY can be seen from inside during the day and from outside at night.
Cut the primary silhouette—perhaps a crooked house, tree branches, bats, a cat, or a row of uneven rooftops—from black cardstock or lightweight poster board. Then create a simpler second layer from translucent tracing paper, vellum, or another diffusing material. Leave selective openings so the scene can gain depth after sunset.
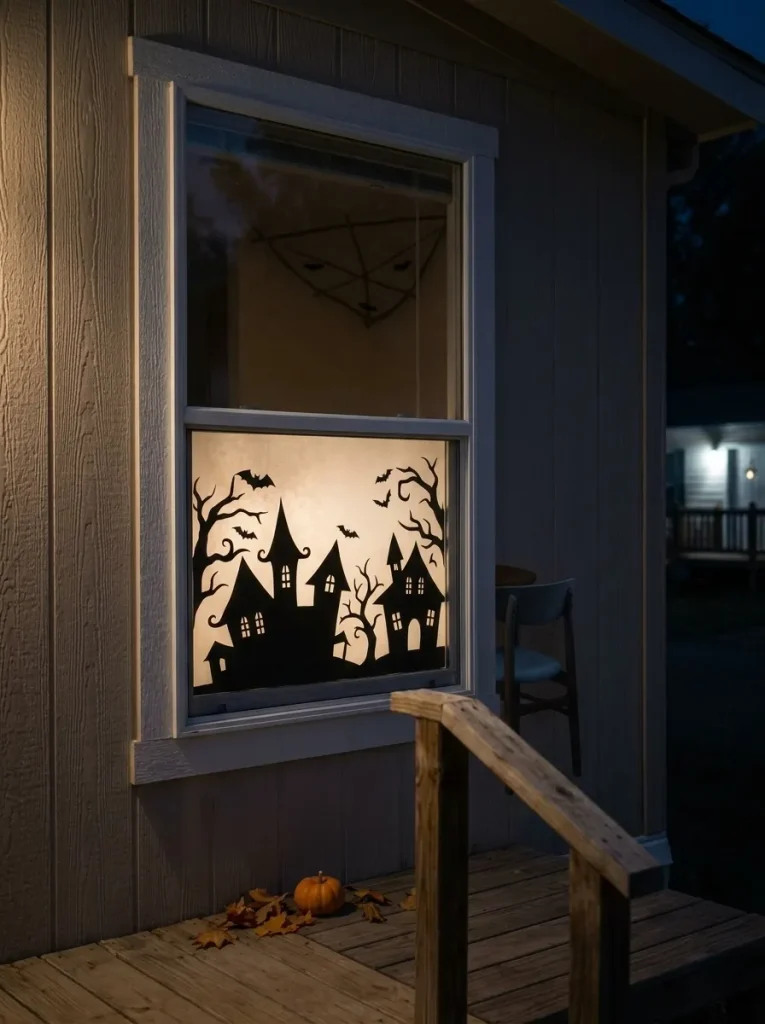
During the day, the eye sees the black graphic against the glass. After dark, a suitable battery-operated light can illuminate selected openings. U.S. Fire Administration Halloween guidance recommends flashlights or battery-operated candles for decorations and advises keeping decorations away from open flames, light bulbs, and heaters. (U.S. Fire Administration)
That makes the design decision clear: use contrast to create daytime interest and controlled backlighting to create the nighttime version. If the scene only works after the light comes on, simplify the silhouette until the daylight view can stand on its own.
Two-view window test
One project. Two moods.
The silhouette should still look complete before the light comes on. Illumination is the second layer, not the entire design.
9. Fold Cardstock Jack-o’-Lantern Lanterns for the Cabinet-Top Gap
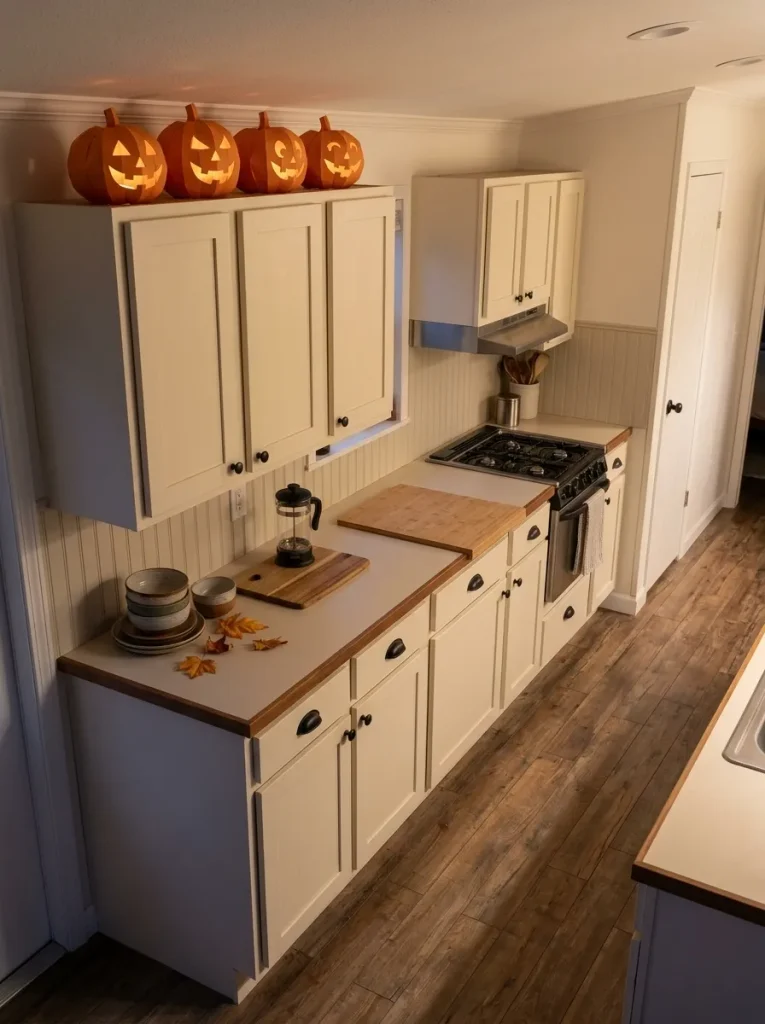
The narrow space above kitchen cabinets often has enough visibility to carry seasonal decor but too little accessibility to make complicated styling worthwhile. That makes it useful for lightweight folded pumpkins.
Cut orange cardstock into simple lantern sleeves or faceted pumpkin forms. Black paper eyes and mouths create the jack-o’-lantern expression without requiring paint. Make several pumpkins with related proportions, but vary the faces enough that the row feels handmade.
Do not automatically fill the entire cabinet run. Make three lanterns first, place them where the cabinet line is most visible from the adjoining room, and look at the kitchen from its main entrance. Add another only if the first group looks visually incomplete. Leave at least one section of cabinet top quiet.
If illumination is desired, use battery-operated lighting intended for the project and follow its instructions; avoid open flames around paper decorations. U.S. Fire Administration guidance specifically recommends flashlights or battery-operated candles for Halloween decorations. (U.S. Fire Administration)
For a deliberately nostalgic orange-light look, continue with the site’s 90s Halloween Mobile Home Decor guide.
90s Halloween Mobile Home Decor guide
10. Add Removable Spiderweb Corners to Plain Cabinet Doors
You do not need to cover an entire kitchen in spiderwebs for the cabinets to participate.
Cut several fine web-corner shapes from a removable craft material compatible with your cabinet finish, or create lightweight paper webs that can be attached temporarily. Place them on selected upper cabinet corners, concentrating the strongest group near one visual zone such as the range hood or a short cabinet run.
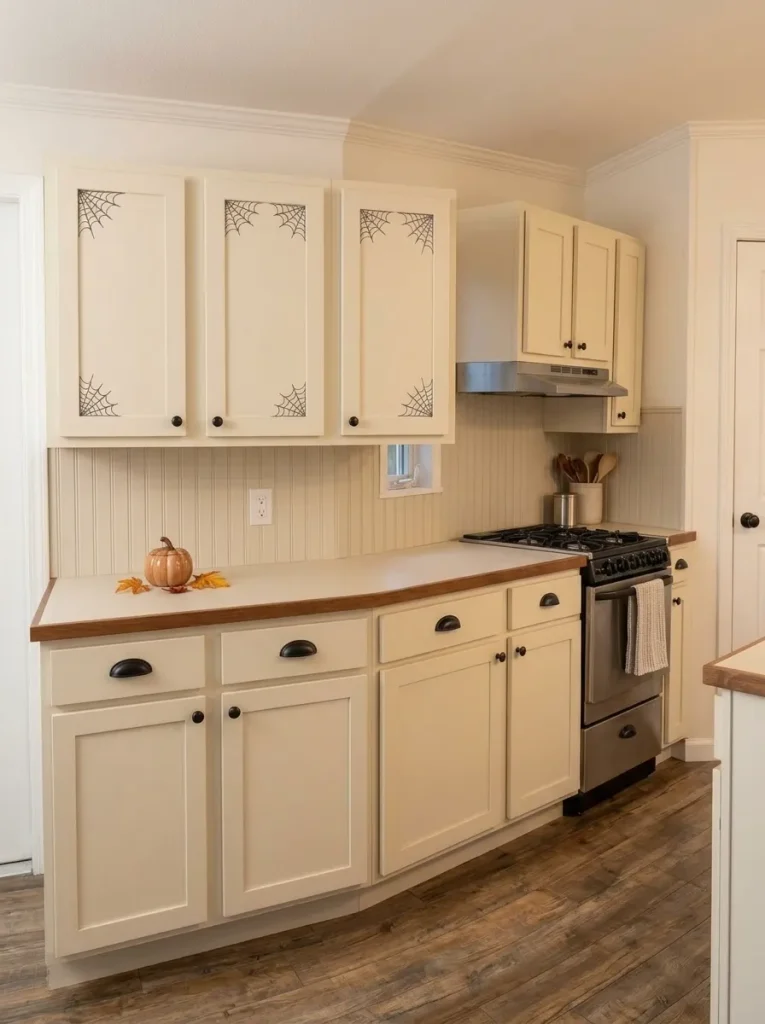
Then stop and look from the kitchen entrance.
A doorway view that reads web → web → web → web signals that the treatment has become another repeated pattern layered over doors, handles, appliances, backsplash lines, and countertop objects.
If it reads Halloween detail → breathing space → focal kitchen area, the cabinet treatment is doing enough.
Keep the working backsplash and counter mostly clear. In a compact mobile-home kitchen, preserving prep space is more useful than squeezing one more seasonal object onto a surface that already works hard.
11. Make a No-Sew Halloween Pillow Sleeve Instead of Buying Another Pillow
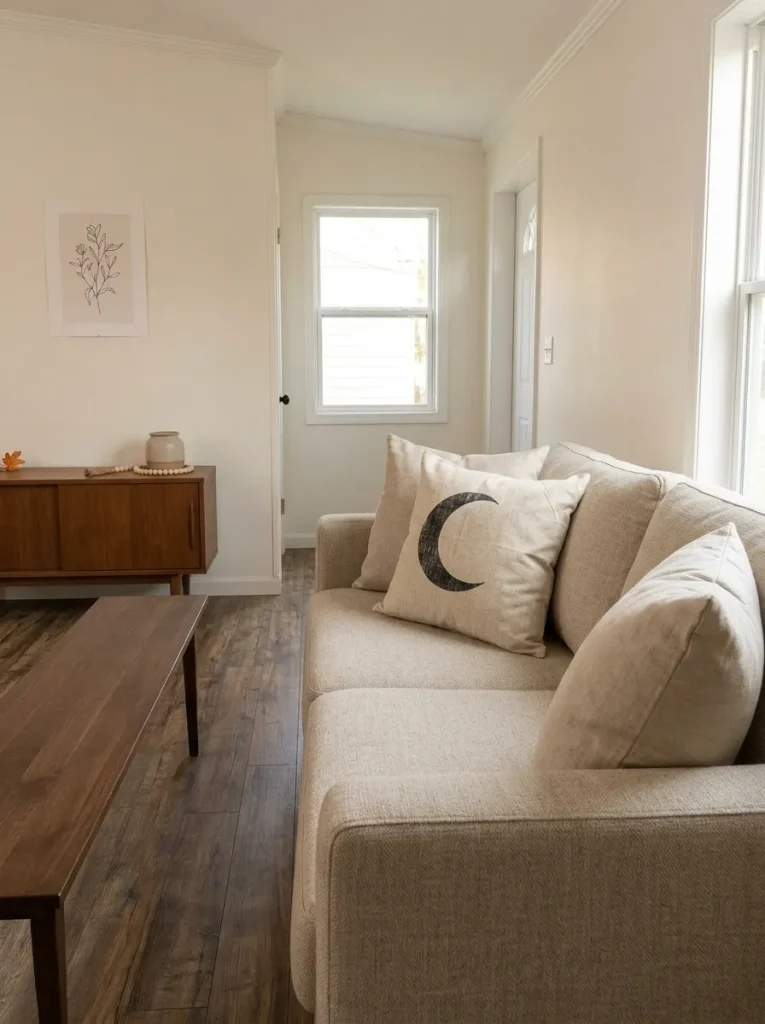
A seasonal pillow looks harmless in the store. The hidden problem arrives in November, when the entire insert needs somewhere to live.
A removable cover gives you the Halloween change without multiplying the amount of soft furnishing you own. Use felt, fleece, cotton, or another fabric that works with the pillows already in your living room or bedroom. Construct an envelope-style sleeve, tie-on cover, or another no-sew closure appropriate for the material.
Keep the motif large enough to read from across the room: one ghost, black cat, moon, pumpkin face, or simple spiderweb usually has more visual strength than many tiny details.
A busy sofa or patterned bed needs a simpler cover. A plain neutral surface can carry the stronger graphic.
If the pillow is for a bedroom, let this remain one textile intervention. The site’s Halloween Mobile Home Bedroom Decor guide owns the deeper decisions around bedding, headboard walls, windows, pathways, and the room’s overall seasonal balance.
Halloween Mobile Home Bedroom Decor guide
The practical decision is storage: change the cover and reuse the insert.
12. Knot a Scrap-Fabric Garland for a Short Window or Interior Opening
Scrap fabric is ideal for a Halloween garland because imperfect edges can improve the handmade look.
Cut or tear fabric into strips of similar length. Mix only a controlled family of colors—perhaps faded orange, black, oatmeal, muted plaid, and one warm brown. Tie each strip around a cord using the same simple knot.
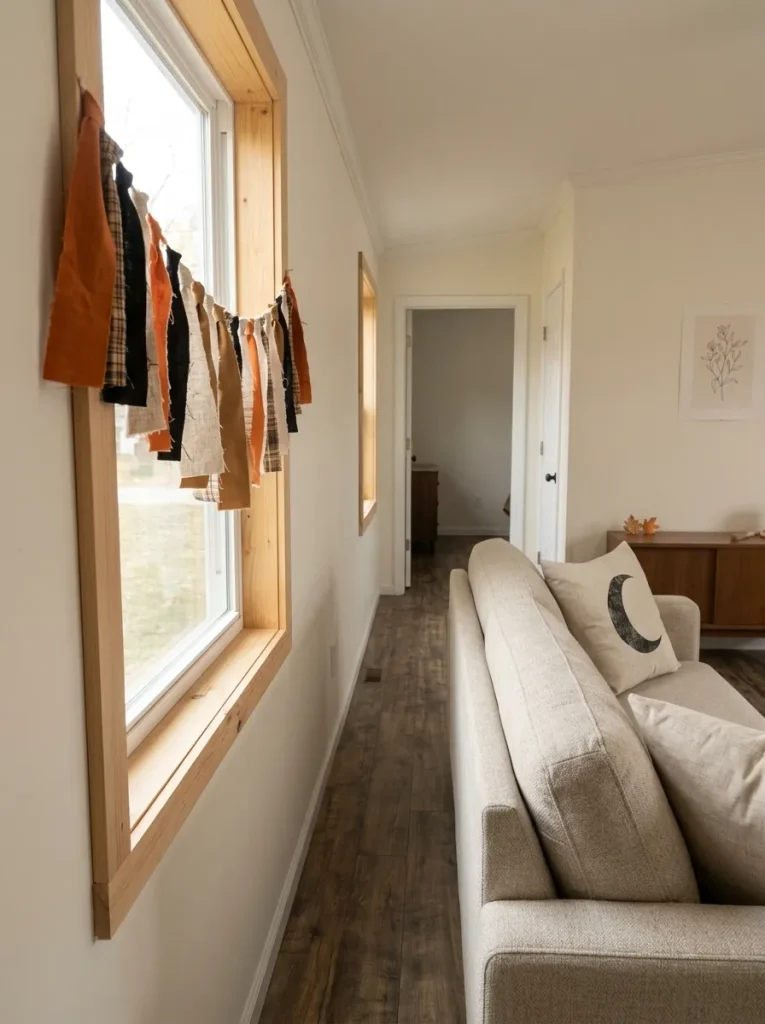
The important choice is where the garland ends. In a small mobile home, it does not need to cross the entire living room to feel intentional. A short length can frame one small window, the top of an interior doorway, a breakfast-nook opening, an open shelf, or a compact faux-mantel arrangement.
Try alternating denser and more open areas so the material has rhythm without becoming a solid band of fabric. A short run also reduces the amount you need to store later.
Skip this project where loose fabric would sit close to cooking heat, heaters, candles, or other heat sources. NFPA Halloween guidance recommends keeping decorations away from open flames and heat sources such as light bulbs and heaters. (NFPA)
13. Turn Recycled Jars Into Battery-Lit Halloween Specimen Lanterns
Group several jars as one controlled object family rather than scattering them across the room.
Clean a few jars of different heights. Add paper silhouettes, translucent labels, drawn specimen shapes, gauze, pressed-looking faux botanicals, or other lightweight details. A suitable battery-operated light can give selected jars a softer nighttime effect without adding an open flame.
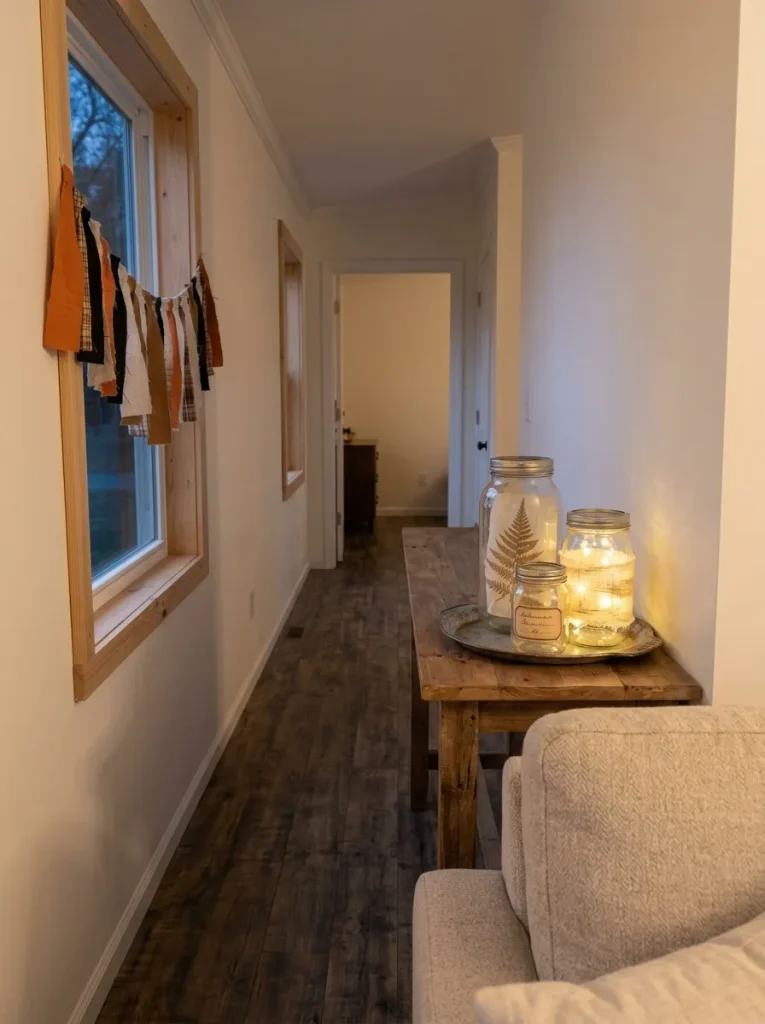
Then group the jars vertically: tallest at the back, medium beside it, smallest toward the front. That height change prevents the display from reading like a row of identical containers.
A tray makes the group even more practical. If the kitchen table or console needs to return to normal use, the entire Halloween arrangement moves in one lift.
Avoid making every jar equally complicated. One can hold the detailed “specimen,” another can provide glow, and a third may need little more than a label or silhouette. That hierarchy is what keeps recycled materials from looking like random leftovers.
Where should the glow come from?
Use the location to determine the shape of your jar group. The same lanterns should not be arranged identically on every surface.
Keep the jars on one compact tray, place the tallest container at the rear, and preserve usable surface beside the group.
Decision: prioritize a small footprint and easy one-lift removal.A shallow shelf usually benefits from two or three pieces with noticeable height differences. Too many similar jars become a horizontal row.
Decision: remove quantity before shrinking every individual object.Place the strongest illuminated piece where it can contribute to the outdoor view, then keep supporting jars simpler so reflections remain readable.
Decision: design for both the room and the exterior sightline.14. Build a Slim Cardboard Haunted-House Backdrop for a Console
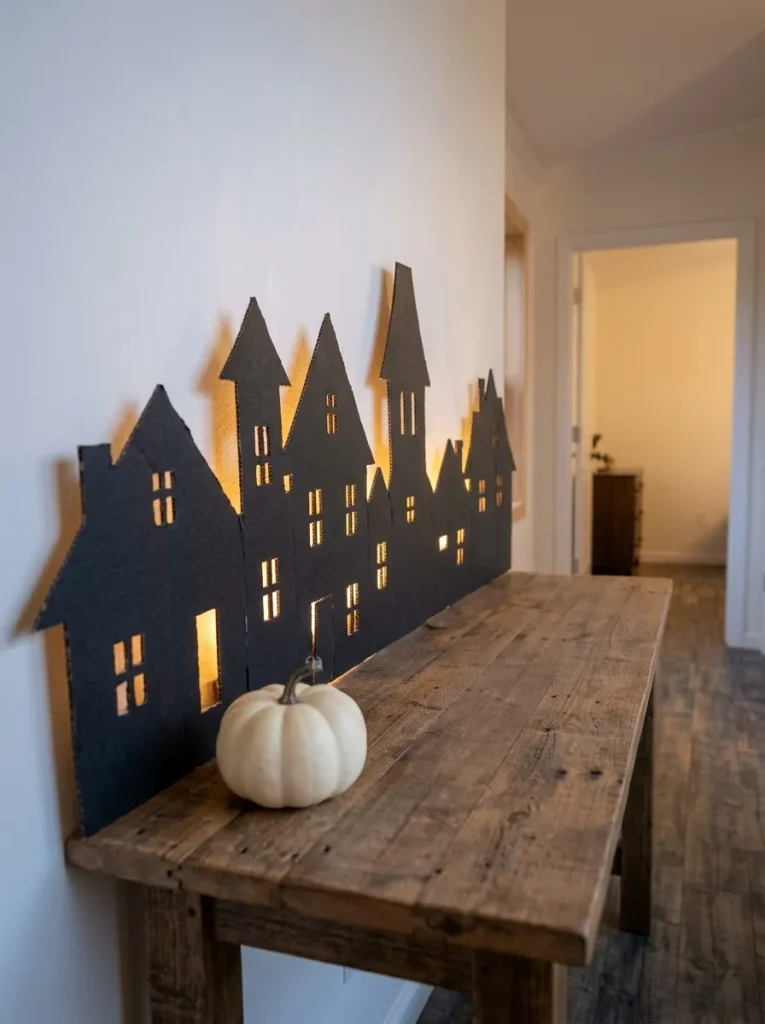
A miniature Halloween village can consume surprising amounts of tabletop depth. A flat haunted-house skyline delivers much of the same storytelling with almost none of the footprint.
Start with sturdy cardboard, foam board, or another lightweight sheet material. Sketch two or three connected building silhouettes as one continuous skyline. Vary the rooflines: one steep peak, one crooked chimney, one lower adjoining section.
Cut out only a few windows and doors, then paint the front matte black, charcoal, or very deep brown. Stand the finished backdrop near the rear edge of a console or shelf. For backlighting behind selected openings, follow the light manufacturer’s instructions and keep the project away from heat sources.
The critical measurement is depth. On a shallow console that still needs to hold daily items, keep the haunted houses nearly flat and let the vertical silhouette provide the drama. A lamp, bowl, or one small pumpkin can sit in front; you do not need to populate an entire miniature village.
15. Send Flat Black Mice or Cats Along One Baseboard Line
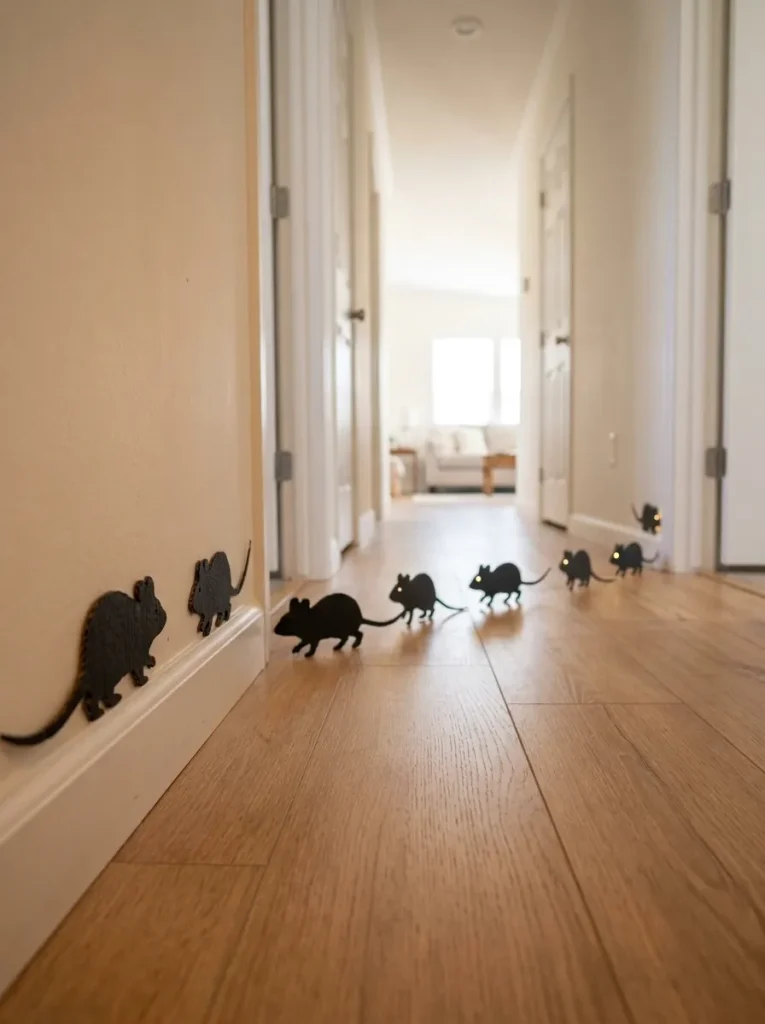
Halloween decorating usually moves upward—walls, shelves, windows, cabinet tops. That makes the baseboard an unexpectedly effective place for a small DIY surprise.
Cut several mouse, rat, or cat silhouettes from matte black cardstock or another lightweight removable material. Choose poses that look as though the animals are moving along the wall: one facing forward, one pausing, another turning.
Then choose one short baseboard route. A hallway edge, the wall beneath a console, or the approach to a living-room corner can work well.
Avoid creating separate animal trails throughout the home. The idea is more memorable when someone discovers it unexpectedly.
Keep the floor itself empty
The silhouettes belong on the vertical wall surface, not in the walking path. That distinction matters in narrow mobile-home circulation areas. If the route passes directly behind furniture where almost none of the silhouettes can be seen, shorten the trail and move the strongest figures into the visible section.
16. Paint a Reversible Halloween Doormat Insert for a Tiny Entry
A small entry rarely needs another freestanding decoration. It already has a surface doing useful work: the mat.
Create a reversible seasonal insert or decorate a suitable plain mat using materials designed for its surface and intended location. Keep the graphic bold—oversized ghost eyes, a crescent moon, a simple “BOO” composition, black cats, or a large jack-o’-lantern face.
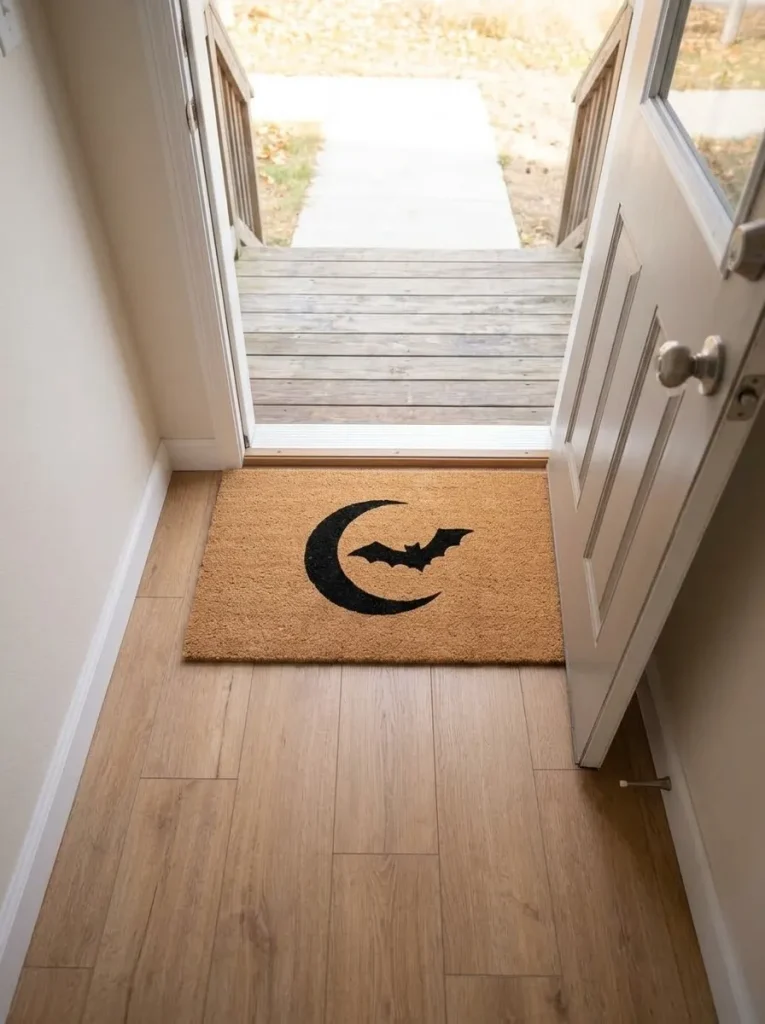
The project becomes more valuable when the reverse side is usable for another season or remains neutral. Off-season storage is one of the hidden costs of decorating a compact home, so a flat object serving two visual jobs earns its space more easily than a single-use prop.
Before adding anything else around it, open the door completely and walk the entry route. If a basket, lantern, sign, or decorative pumpkin would narrow that route, let the mat carry the Halloween message by itself. NFPA Halloween guidance recommends keeping exits clear of decorations so escape routes are not blocked. (NFPA)
A functional entry that happens to look festive is a stronger outcome than an elaborately styled doorway that becomes awkward to use.
17. Attach a Lightweight Haunted Silhouette Strip to a Small Porch Rail
On a mobile home with a narrow porch, the railing may offer more decorating area than the floor. Use that edge.
Create a long but shallow silhouette from weather-suitable lightweight material: crooked rooftops, cats, grave markers, bats, bare branches, or a continuous haunted-fence motif. Keep the upper profile interesting while the lower edge follows the rail.
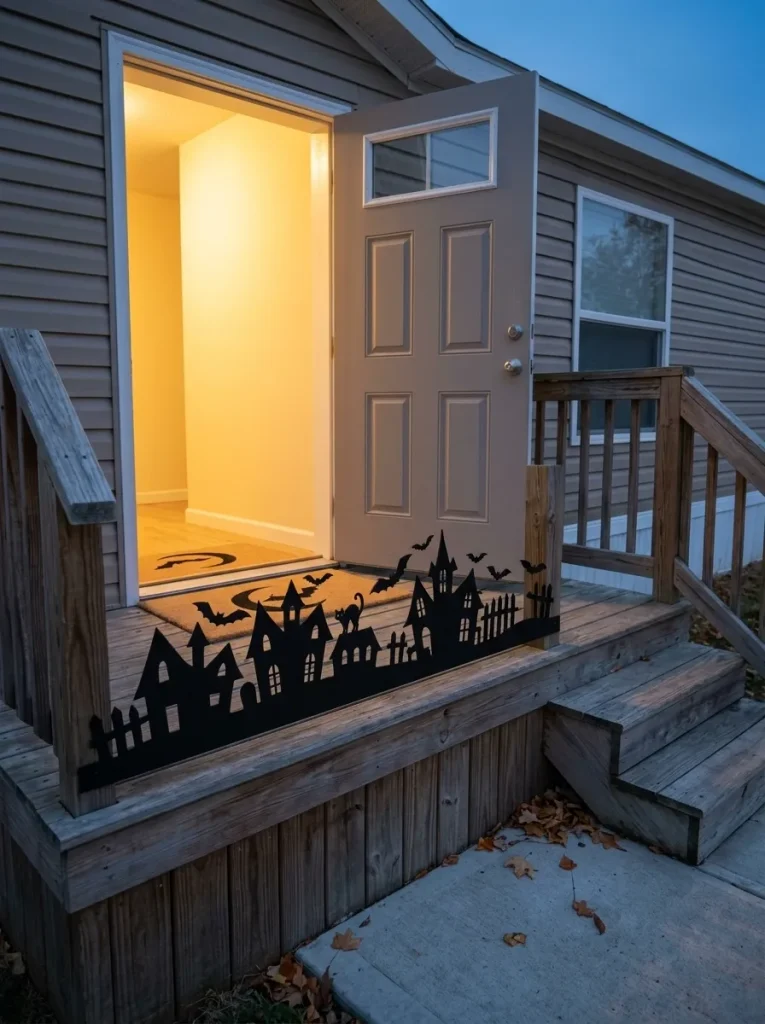
Viewed from the yard, the strip reads as one large Halloween gesture. Viewed from the porch, it consumes very little walking space. The rail also supplies a built-in horizontal line, so you do not need to compensate with multiple signs, pumpkins, baskets, and lanterns below it.
Before installing anything, confirm that the decoration and attachment method suit the specific railing, exposure, and material you have. Do not cover hardware, steps, access points, or the route to the door.
The useful question is: Which unused edge can create the largest Halloween effect while the porch continues working normally?
Decorate the space you actually have.
Select the exterior plane with the most usable room. The recommended DIY changes so the entry remains visually festive without requiring a pile of floor props.
The rail already provides length. Keep the DIY shallow and let rooftops, bats, or crooked fence shapes create the scene above that line.
If the door is the only reliable decorating surface, return to the crescent wreath and resist surrounding it with floor pieces that constrict the entry.
A window silhouette gives the exterior Halloween presence while keeping the porch itself almost completely free.
Keep them near the visual edge of the small yard or landscaping area and preserve a direct, unobstructed route to the entrance.
18. Make Fold-Flat Foam-Board Tombstones for a Tiny Yard or Porch Edge
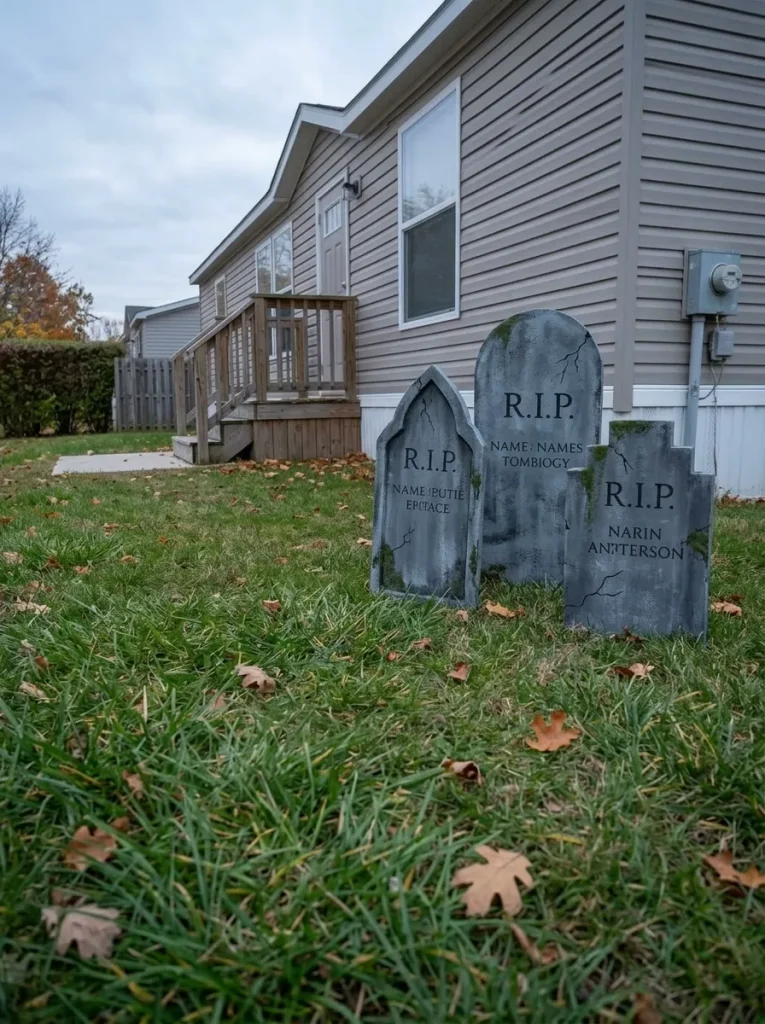
Tombstones are effective because they create recognizable Halloween shapes at a larger scale, but bulky store-bought versions can be frustrating to store. Build yours with storage already in mind.
Cut tombstone faces from lightweight board appropriate to the intended setting, then create detachable or folding supports and avoid permanently attaching a deep base. Vary the tops: rounded, pointed, stepped, or slightly crooked. A small group looks more convincing when the silhouettes differ.
Paint the stones in related gray, charcoal, taupe, or weathered tones. From several feet away, shape and contrast matter more than tiny inscriptions.
Try one tall tombstone, one medium piece, and one lower stone first. Position them so their profiles overlap slightly from the main viewing direction while the entry route remains clear.
Then ask the question that matters in December: Can these pieces flatten against a wall in storage? If yes, the project has solved both the Halloween problem and the off-season problem.
19. Hang a Tension-Rod Ghost Scene Inside the Front Window
A porch-facing window gives you Halloween presence outside without exposing a delicate handmade decoration to wind or weather.
Use a tension rod only where it is compatible with the window opening and does not interfere with normal window operation. Hang lightweight ghosts, paper silhouettes, or short translucent fabric shapes from the rod at different heights.
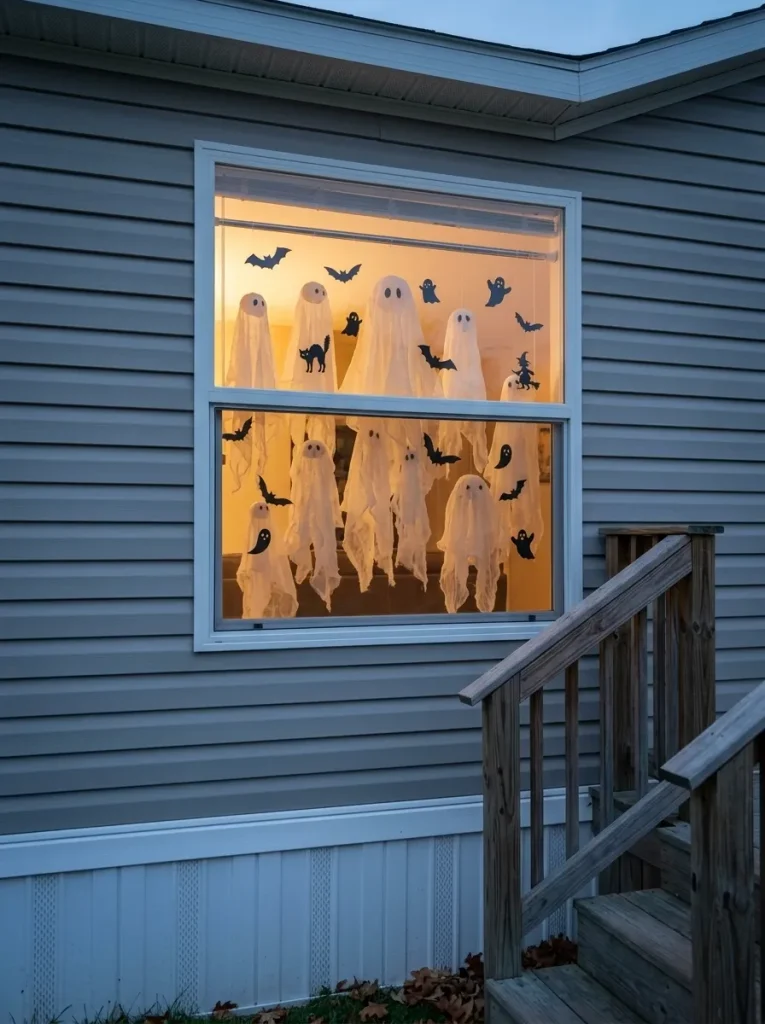
Treat the window as a framed scene. Keep the outer edges calmer and concentrate the most recognizable shapes near the visual center. From indoors, leave enough open glass that the room does not suddenly feel sealed off.
At night, nearby interior lighting may make the silhouettes more visible from outside. For deliberate illumination, use lighting intended for the setting and keep decorative materials away from open flames, bulbs, and heaters. (U.S. Fire Administration)
Choose this project when the porch is extremely narrow, weather makes exterior crafts impractical, the door already has a wreath, or you want Halloween visibility without adding another object near the entrance. The glass becomes the display case.
20. Turn One Existing Tray Into a Completely Handmade Halloween Scene
Suppose your coffee table has only one genuinely free corner. You could distribute four little Halloween decorations across it, or place the same visual story inside one tray and recover the rest of the table.
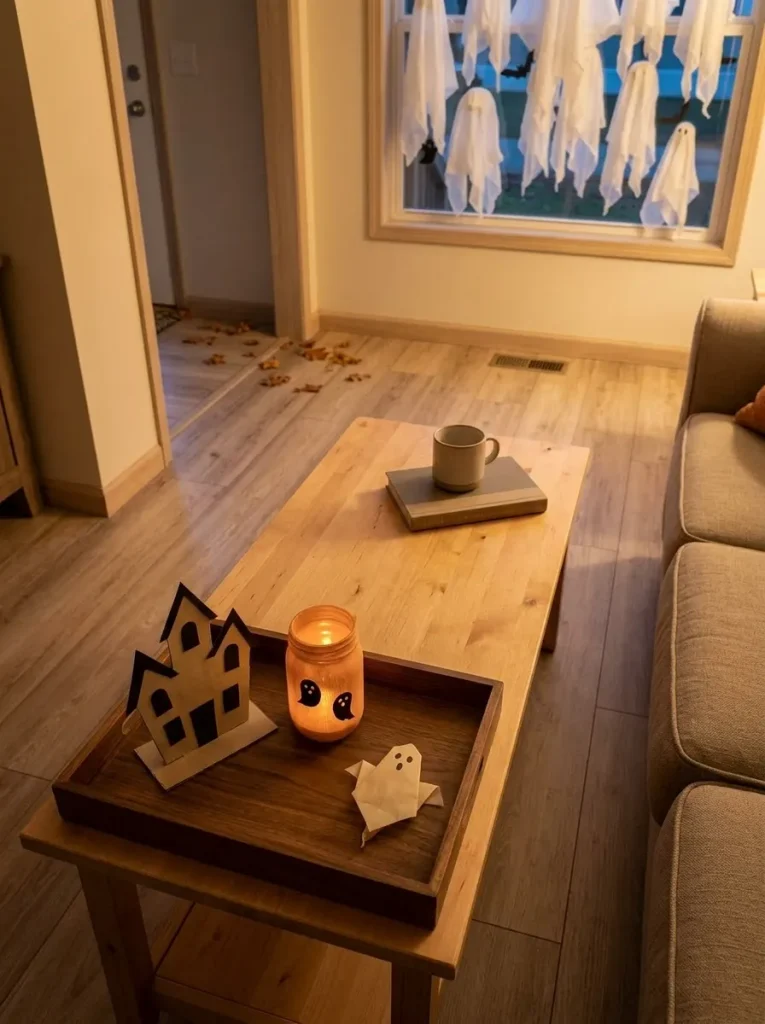
Start with a tray you already own. Build a simple scene using two or three handmade elements: perhaps a small cardboard house at the back, one recycled jar lantern, and a paper pumpkin or ghost in front. Repeat one material or color so the objects feel related.
The tray test
Pick up the entire display.
Can the table return to normal use in one movement?
If yes, the vignette has passed. If plates, remotes, books, or daily objects still have to weave around loose Halloween pieces left outside the tray, tighten the composition.
The visible boundary is the advantage. Halloween occupies one deliberate footprint; everyday life keeps the rest. That also makes the tray a useful alternative to a seasonal centerpiece whose storage volume is larger than the surface it decorates.
Think about its November shape.
A compact home makes seasonal storage part of the design decision. The easiest projects often change shape once Halloween is over.
Paper bats, silhouettes, foam-board tombstones, cardboard houses.
Best storage profileFabric garlands, lightweight banners, selected textile projects.
Low storage pressureJars, trays, small containers, or decor that fits inside another object.
Useful when plannedLarge dimensional crafts that remain the same size all year.
Make only if worth the space21. Draw a Temporary Spiderweb Across a Mirror With a Removable Medium
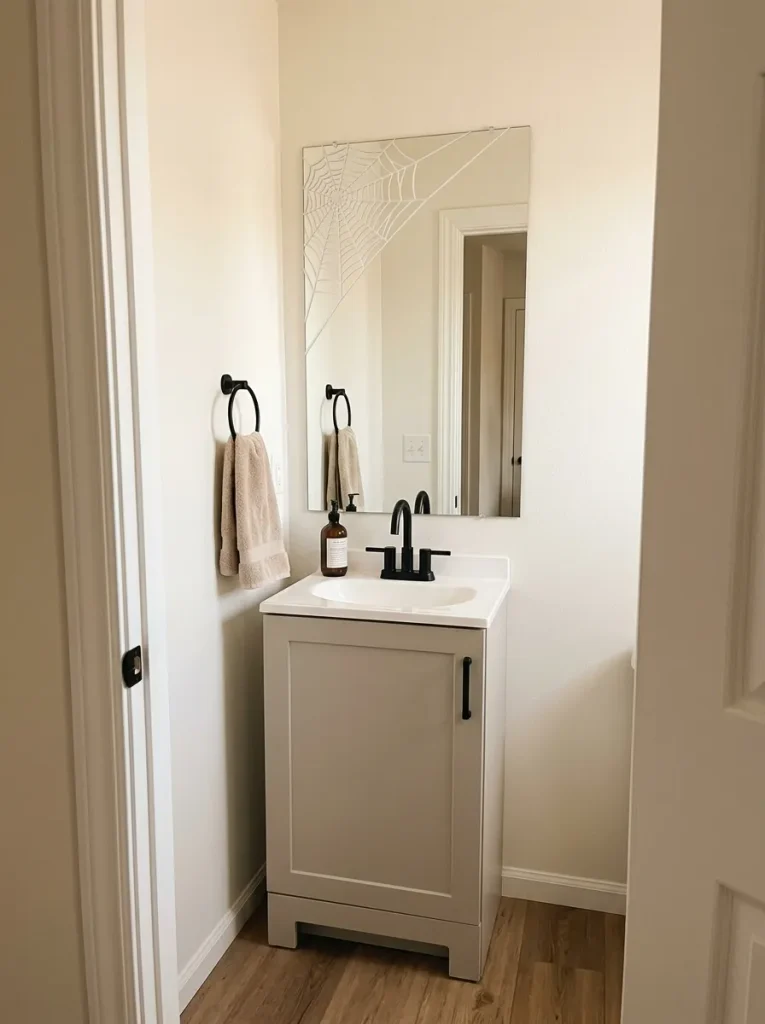
The final DIY requires almost no new physical object at all.
Use a removable medium specifically suitable for the mirror or glass surface you plan to decorate, and test it in an inconspicuous area first. Draw a spiderweb beginning from one upper or lower corner so the design occupies only part of the reflection.
That partial coverage matters. In a compact bathroom or bedroom, the mirror often contributes useful reflected light and visual depth. Keep most of that function intact.
Start with several long spokes, connect them with loose curved lines, then step into the doorway and look at the mirror from the position where it is normally seen. Add a small spider only if the web still needs a focal detail.
Stop before the reflection disappears. The mirror should still behave like a mirror first and Halloween decor second.
If this project is going into a bathroom, let it remain a small DIY intervention. The site’s Halloween Mobile Home Bathroom Decor guide owns the deeper decisions around the sink, shower, storage, textiles, windows, and compact-room balance.
The Best DIY Halloween Decor Leaves the Mobile Home Easier to Live In
The strongest project here is not necessarily the most elaborate one. It is the project that gives an underused wall, window, cabinet edge, ceiling corner, mirror, or porch rail a clear Halloween job without taking useful space away from everyday life.
Start with one visible zone and make something large enough to matter there. Then look through the home before starting the next craft. If the Halloween story is already clear, let the quiet spaces stay quiet.
For future projects, add one more question to the materials list: How will this store after October? Fold-flat, removable, reusable, and multi-purpose DIYs usually make more sense in a compact home than decorations that demand permanent storage volume. The finished home should feel more atmospheric, not more crowded.