

In a mobile home, the coffee table, kitchen counter, and narrow walking paths already have important jobs. Filling those surfaces with pumpkins, signs, and baskets can make fall decorating feel crowded surprisingly fast. That is why DIY fall wall decor for a mobile home can be such a useful seasonal strategy: you get the warmth, texture, and color of autumn while leaving everyday surfaces easier to use.
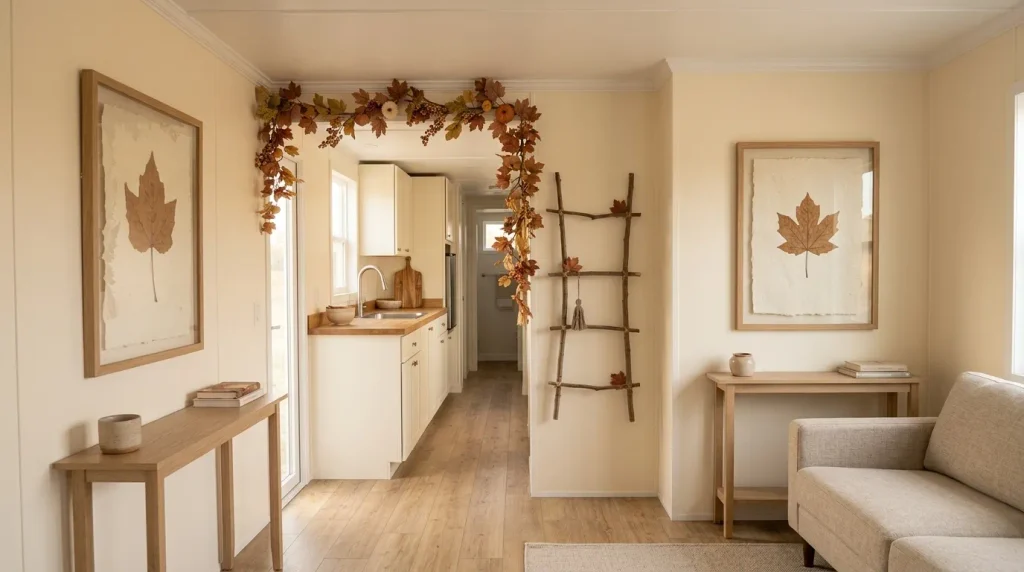
The best projects are not simply smaller versions of décor made for larger houses. They work with narrow wall strips, connected kitchen-and-living-room sightlines, shallow passageways, cabinet ends, and the limited seasonal-storage space common in compact homes.
The 17 ideas below move from almost-flat crafts to slightly more dimensional statement pieces. You will work with leaves, branches, fabric, paper, reclaimed wood, dried citrus, denim, pumpkins, and materials you may already have. Before choosing a project, use the wall-space matchmaker in the first idea to see which type fits your available surface best.
1. Make an Asymmetrical Leaf-and-Pumpkin Vine for a Kitchen Pass-Through
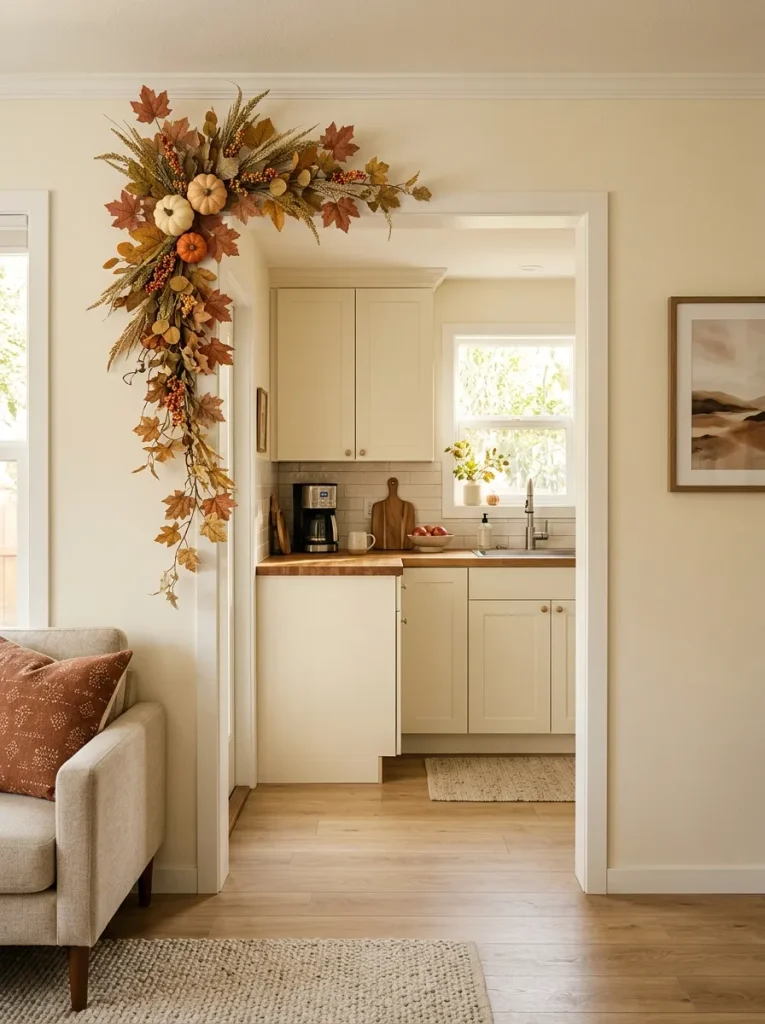
A pass-through or open doorway between the kitchen and living area is already a strong visual boundary. Following just one side and part of the top edge with fall foliage turns that existing architecture into seasonal décor without occupying the counter underneath.
Start with a flexible faux-leaf garland or lightweight vine. Concentrate the fullest cluster near one upper corner using rust leaves, berry stems, and two or three small faux pumpkins. Let the arrangement gradually become lighter as it travels downward. That taper matters: covering the entire opening evenly can make a small opening feel visually tighter, while asymmetry preserves more breathing room.
Before attaching anything, open nearby cabinets and check the normal walking route. The vine should decorate the edge without competing with doors, switches, or the opening itself. Use a mounting method suitable for the actual wall surface and décor weight, following the mounting product’s instructions.
Wall-Space Matchmaker
Use this before choosing among the projects in the article. Pick the wall condition that most closely matches the space you actually have.
Wall-Space Matchmaker
Which wall are you actually working with?
Choose the closest wall condition. Your selection changes the recommended project type, its ideal direction, and what to avoid.
Best fits: stacked-pumpkin board, felt leaf cascade, harvest string, or twig ladder.
Avoid: broad wreaths and wide paper clusters.Best fit: the asymmetrical leaf-and-pumpkin vine concentrated near one upper corner.
Keep one side lighter so the opening still reads as open.Best fits: botanical frame, hoop trio, paper medallion cluster, or harvest triptych.
Keep the composition visually connected to the furniture below.Best fits: denim pocket planter, crescent wreath, pumpkin board, or cabinet-end charm.
One deliberate object usually works better than several miniature decorations.Best fit: Use this vine where the opening itself is already worth drawing attention to. If the fall décor begins to visually shrink the passage, remove material from the lower half before adding anything else.
2. Build a Shallow Branch Mobile With Soft White Pumpkins
A hanging pumpkin mobile can look beautiful in photographs, yet a ceiling-hung version is not always the best answer for a compact mobile-home room. A more practical interpretation is to mount the branch against the wall plane and let lightweight faux pumpkins hang only a short distance below it.
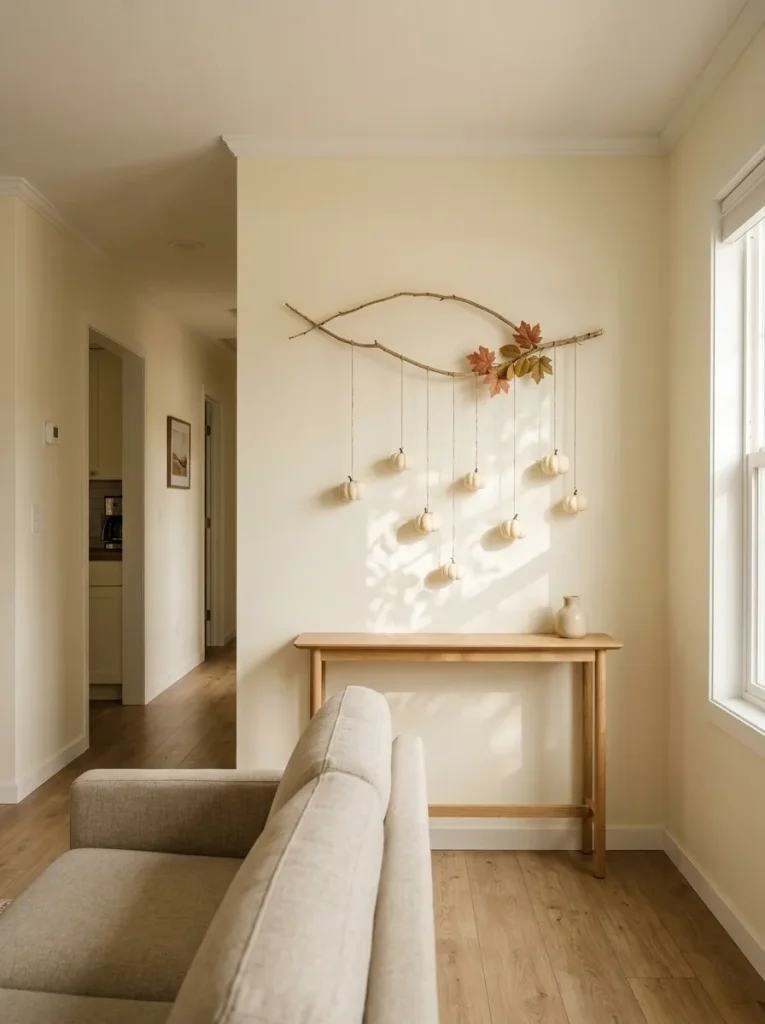
The branch establishes one horizontal line while the pumpkin strings create movement underneath. Using white or cream pumpkins keeps the piece calmer than an all-orange arrangement, especially when the surrounding room already contains warm wood cabinetry or brown furniture.
A simple build sequence
- Choose a dry decorative branch with an interesting natural bend.
- Add a few faux autumn leaves near one side rather than covering the whole branch.
- Tie lightweight mini faux pumpkins at several different lengths.
- Step back from the main seated view and shorten any string that makes the composition feel bottom-heavy.
- Mount the finished piece using hardware or a hanging product appropriate to the wall surface and total weight.
Do not let the strings drift into a doorway or frequent walking path. On an open wall above a console, the same mobile can afford slightly more width.
3. Dried Citrus and Pinecones Become a Flat Harvest Hoop
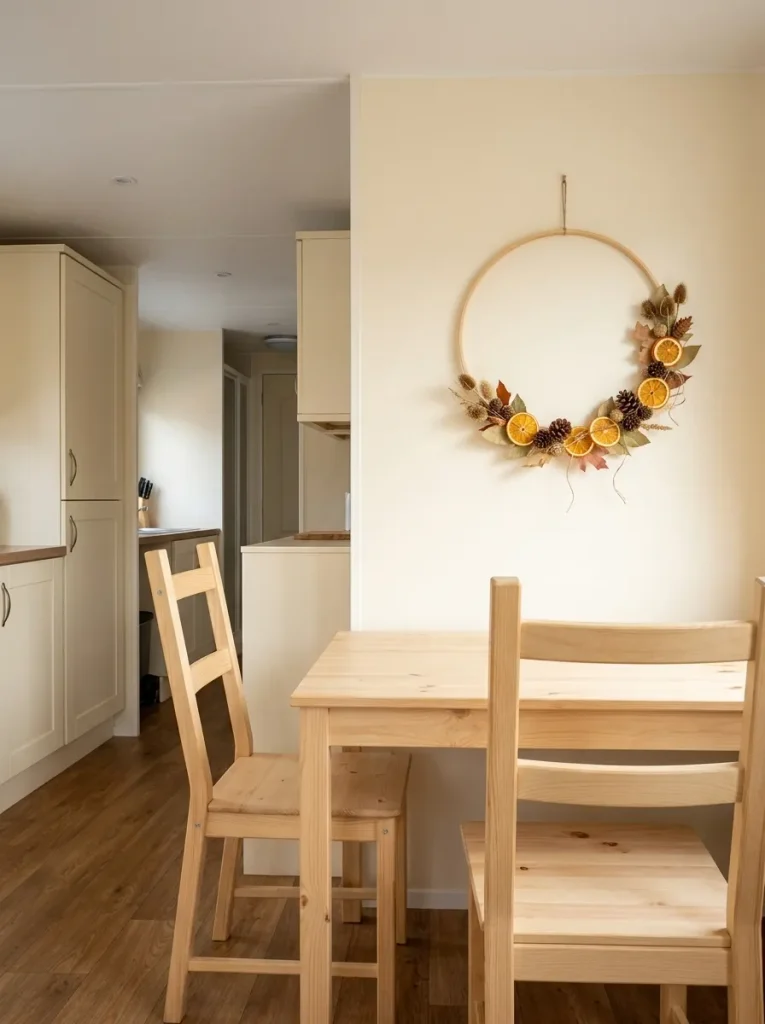
Dried orange slices, pinecones, seed heads, and autumn leaves already contain enough color variation to make an interesting wall piece; they usually do not need a large sign or extra lettering. An embroidery hoop or thin wooden ring gives those small ingredients a boundary, making the composition feel intentional instead of crafty clutter.
Build the densest material cluster along the lower-left or lower-right portion of the hoop. Leave part of the ring visible. That open section creates contrast between the natural materials and the wall behind them, which is especially useful in a smaller room where a completely packed wreath may read as visually heavy.
A hoop works well on a dining wall, beside a kitchen opening, or above a short cabinet because its physical profile can remain shallow. Dried materials should also stay away from open flames and strong heat sources.
Fall Decor Profile Gauge
Wall-Depth Guide
How dimensional should your fall wall décor become?
Match physical depth to the wall location. Walls close to circulation usually benefit from flatter projects; protected surfaces can carry more sculptural texture.
Nearly Flat
Paper leaves, pressed botanicals, flat fabric work, thin plaques, and lightweight framed projects.
Best near movement routesShallow Texture
Embroidery hoops, thin wreaths, tassels, citrus, pinecones, and low-relief paper pumpkins.
Best all-round profileMore Sculptural
Branch arrangements and fuller natural clusters where the wall sits above furniture or away from regular traffic.
Best on protected wallsFor this hoop, stop while individual ingredients are still identifiable. Once every gap disappears, the piece loses the airy quality that makes it useful on a smaller wall.
4. Turn a Tall Scrap Board Into a Wordless Pumpkin Stack
That slim wall between a doorway and a cabinet often looks too narrow for conventional artwork. It is exactly the kind of surface a vertical fall project can use well.
Start with a long scrap board or lightweight backing panel. Create three or four pumpkin shapes from thin wood, sturdy cardboard, fabric-covered board, or another material you are comfortable crafting with. Stack them vertically with a small gap between each pumpkin. Variation can come from surface treatment—a cream pumpkin, a muted plaid pumpkin, a rust-colored one, then perhaps a smaller natural-texture shape near the bottom.
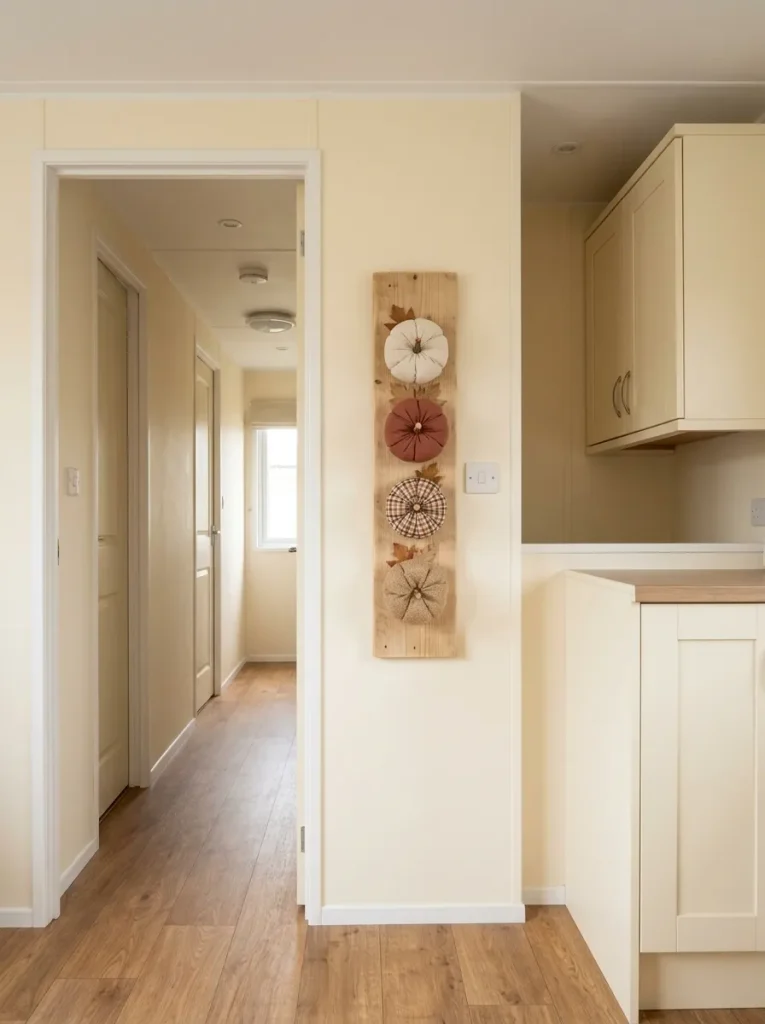
Skip the oversized letters spelling FALL. The pumpkins already communicate the season, and removing typography makes the finished piece easier to combine with the rest of the room.
Decision rule: if the wall is narrow, let the project become taller before making it wider. The vertical proportion uses the neglected strip while reducing the chance that the décor visually collides with nearby trim, switches, or cabinet fronts.
5. Could an Old Jeans Pocket Become a Harvest Wall Planter?
A worn pair of jeans can produce one of the easiest upcycled wall accents in the article. Cut out the back pocket with a generous fabric border, then mount the denim to a small wooden panel, stretched canvas, sturdy embroidery hoop backing, or another rigid craft base.
The pocket becomes a tiny seasonal vessel. Tuck in faux eucalyptus, wheat-colored stems, small rust leaves, or dried-looking foliage. Because the “planter” is decorative, use faux or dry materials instead of anything that needs soil or watering.
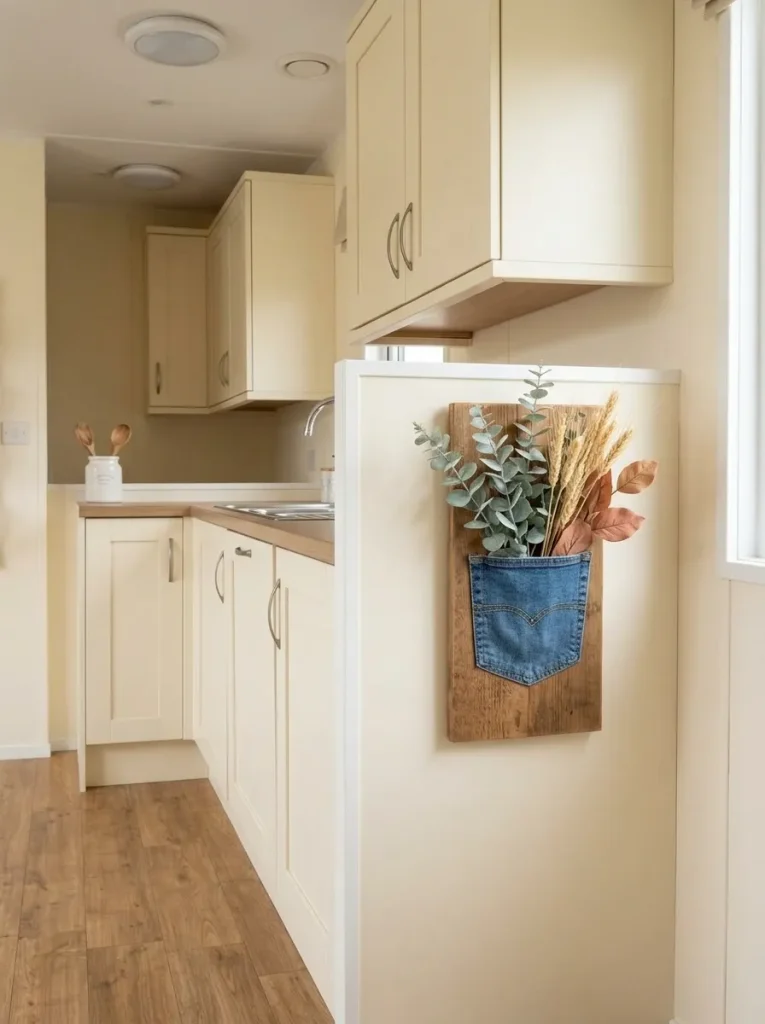
This project works particularly well on a cabinet-end wall, near an entry hook zone, or on a small wall section that would look crowded with a conventional framed print. Denim also introduces cooler blue into an otherwise orange-and-brown fall palette, which keeps the room from becoming excessively warm.
One pocket is usually enough. A cluster of several pockets can quickly turn the idea into a themed craft display, while a single piece reads more like an intentional found-material accent.
6. Cut Old Book Pages Into a Warm Leaf-and-Light Garland
Paper is useful in a mobile home because it gives you visual volume without much physical depth. For this project, cut maple, oak, or simple oval leaf shapes from discarded book pages, kraft paper, or both. Mix in a few muted rust and ochre leaves so the garland reads as autumn from across the room.
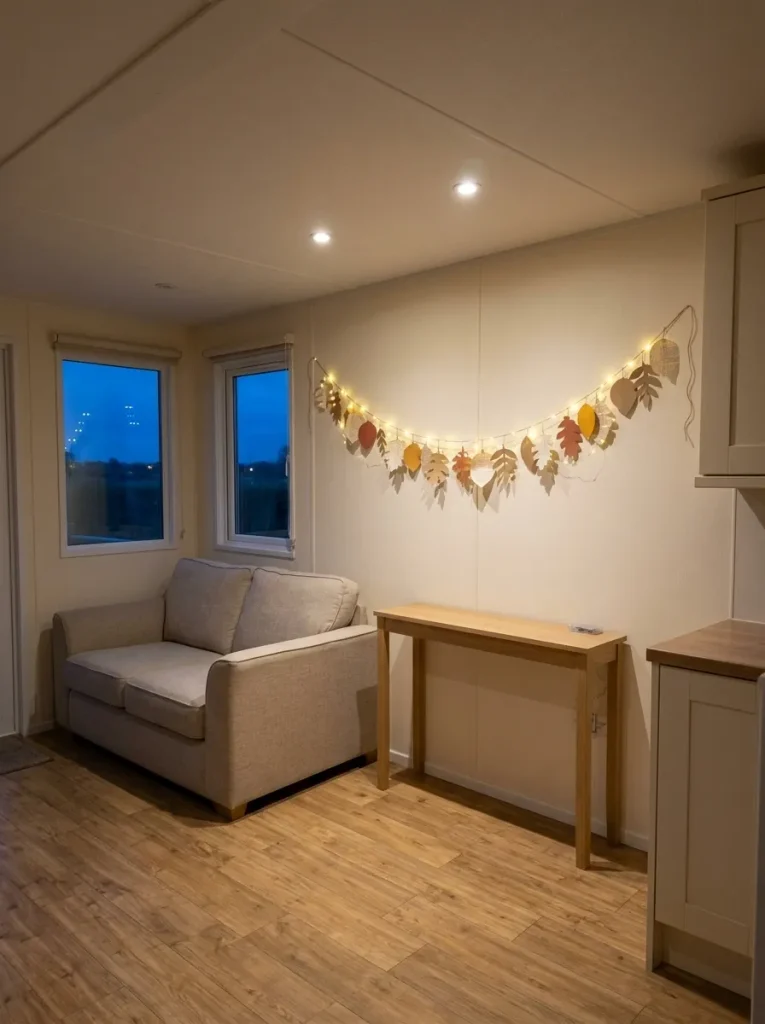
Thread the leaves along thin twine and weave the strand around a battery-operated micro-light string. Keep the lights secondary; the paper should still look intentional in daylight.
Hang the garland across a blank wall section, along the upper edge of a headboard wall, or in a shallow swag above a console. Avoid wrapping paper directly around bulbs or placing the decoration near open flames or strong heat.
At night, the tiny points of light create shadows behind the leaves, giving an almost-flat project more dimension without adding another object to the floor or furniture.
What Can You Upcycle?
Upcycle Route Finder
Start with the material you already have.
Choose your leftover material. The project recommendation, styling logic, and next move all change with your selection.
Cut repeated leaf silhouettes and use only a few colored accents so the book-page texture stays visible.
Next move: build one loose horizontal swag.Mix two or three textures and vary the lower edge so the banner adds softness without becoming bulky.
Next move: choose one dominant fall color and two supporting neutrals.Use one denim pocket as the structured base and let faux foliage supply the seasonal color.
Next move: mount it on a cabinet end or small blank wall.Keep irregular natural shapes visible and avoid covering them with large bows or heavy ribbon.
Next move: choose whether the wall needs a circle or a vertical line.The best version is the one that solves a wall problem while using material you already own—not the project with the longest supply list.
7. Press Autumn Leaves Inside One Oversized Botanical Frame
Several tiny seasonal frames can turn a compact wall into a grid of visual interruptions. One larger botanical composition is calmer.
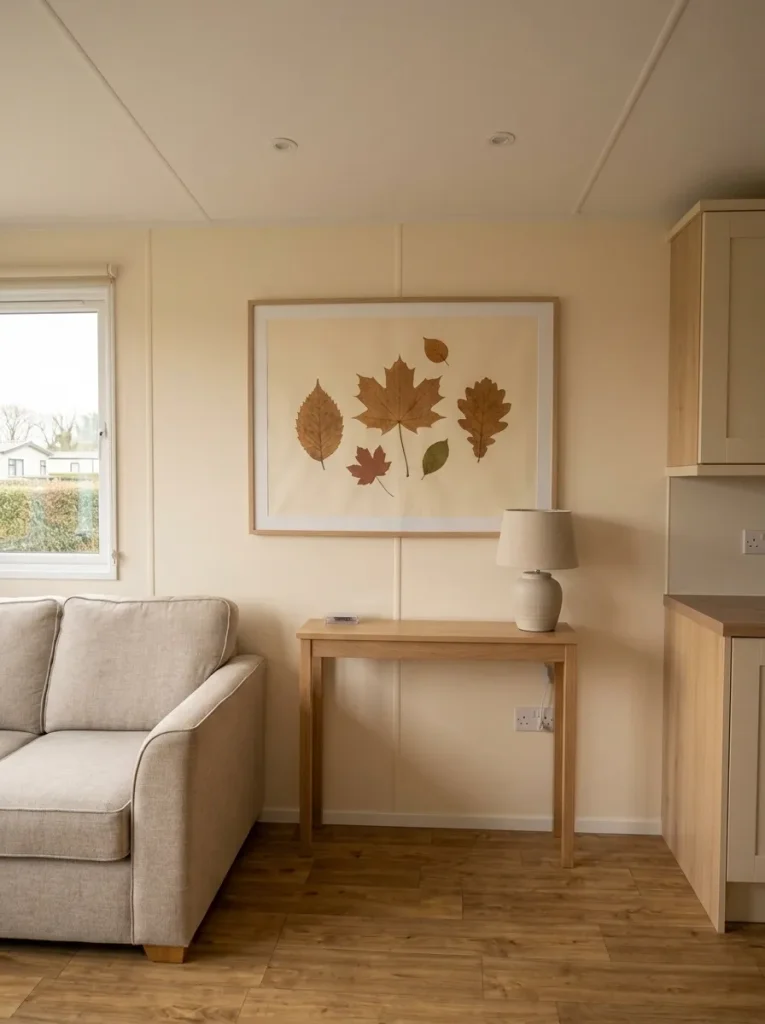
Collect pressed faux leaves, preserved-looking paper leaves, or flat natural specimens that are fully dry. Arrange them on warm cream paper with generous negative space between each shape. A single oversized maple leaf can sit off-center, supported by two or three smaller leaves in related colors. Then frame the entire composition behind glass or in a simple poster frame.
The frame works especially well above a dresser, console, dining bench, or narrow sideboard because the furniture gives the artwork a visual base. Keep the frame narrower than the piece of furniture beneath it so the two elements read as one composed zone.
If you like the layered, collected character of reclaimed frames and found objects, StylishGalore’s thrifted fall décor ideas for mobile homes offers a broader route into that look.
Skip this idea when: the wall already contains several permanent frames you intend to keep visible. Adding another framed seasonal layer may create more fragmentation than autumn warmth.
8. Let a Felt Leaf Cascade Follow an Inside Corner or Panel Line
A visible wall seam or inside corner can feel awkward when you treat it as a flaw that needs hiding. For seasonal decorating, it can become the guide.
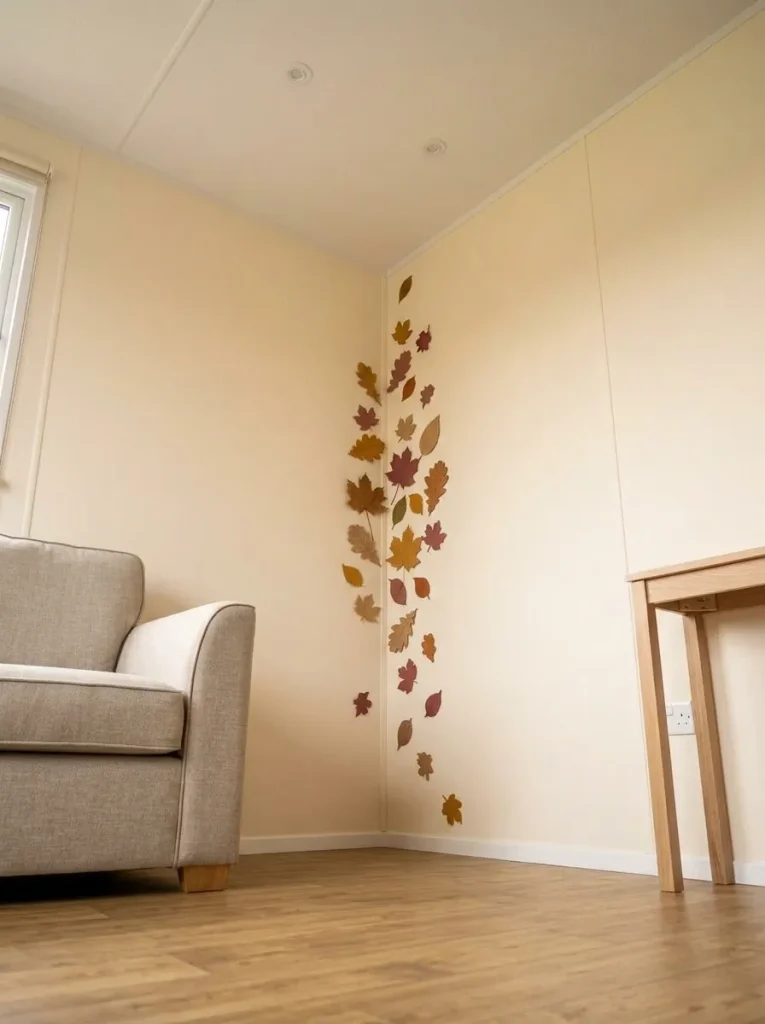
Cut felt leaves in three or four sizes and a restrained palette—perhaps mustard, rust, muted burgundy, and camel. Lay them out on the floor first, creating a loose trail that widens near the middle and becomes sparse at both ends. Then transfer that rhythm vertically to the wall.
The strongest placement is often beside the seam instead of directly covering it. The architectural line stays readable while the leaf trail gives it purpose.
Corner test: Stand at the main doorway into the room. If the cascade looks like a colored stripe from that distance, remove every third leaf. The project should feel like leaves drifting through the corner, not wallpaper edging.
This is also one of the easiest decorations to flatten into a storage envelope after fall.
9. Braid Yarn, Tassels, and Wooden Beads Into a Soft Harvest Banner
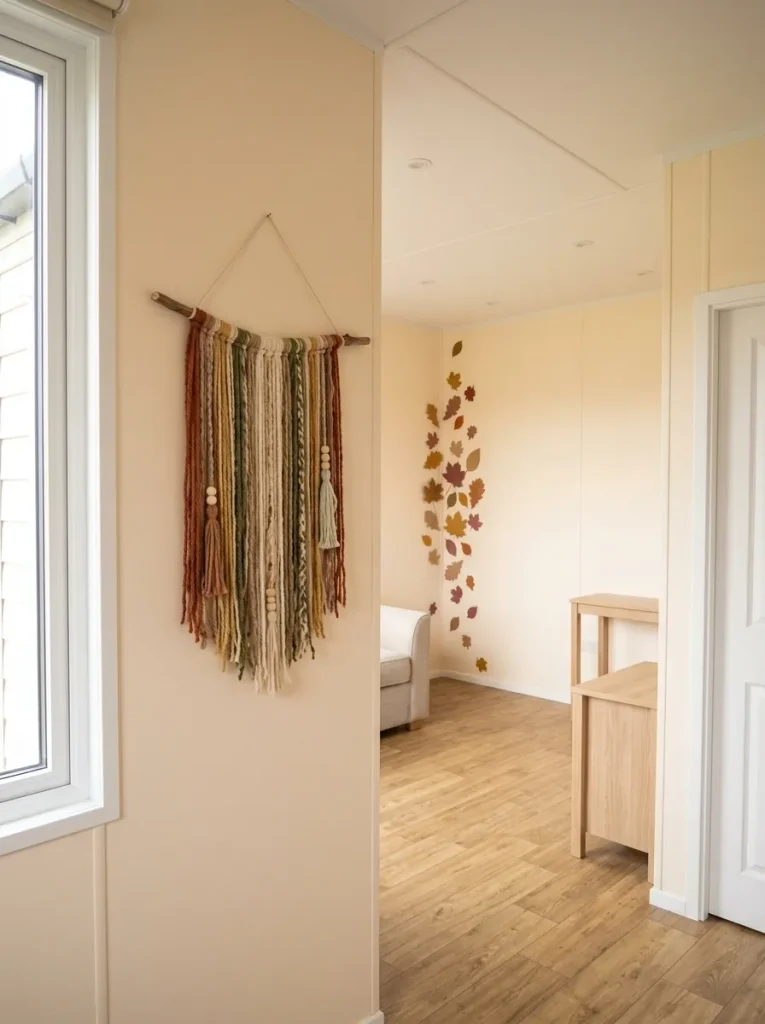
A textile banner brings fall color to the wall without the hard edges of another frame or plaque. That softness can be valuable in mobile homes with wood cabinets, laminate surfaces, and multiple door or window trims already creating strong lines.
Start with a short dowel, smooth twig, or narrow wooden rod. Add several strands of yarn in different textures, mixing rust, wheat, cream, moss, and brown. Work in a few wooden beads or simple tassels, but avoid making every strand identical.
The lower edge should vary in length. A perfectly straight fringe can look formal; an uneven silhouette feels more relaxed and hand-made.
Choose this project when:
- seasonal storage space is tight;
- the wall already contains several rigid shapes;
- you want color without significant physical projection;
- the room needs texture more than another recognizable pumpkin motif.
Roll or fold the yarn loosely for storage after the season. If your wall is very narrow, reduce the dowel width and let the fibers fall longer rather than widening the banner.
10. Make Three Mini Pumpkin Textile Pieces With Embroidery Hoops
Three embroidery hoops can create a coordinated fall focal point without becoming a traditional gallery wall. The difference comes from treating the trio as one composition.
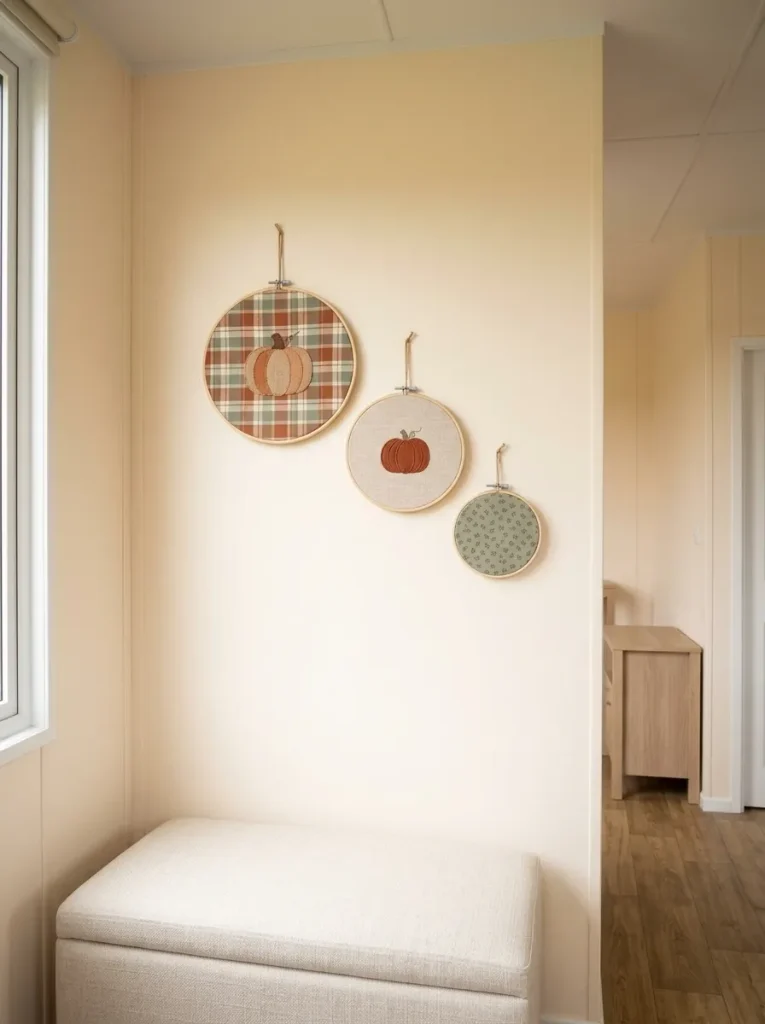
Use related fabrics: perhaps a muted plaid, a small floral, and a solid oatmeal linen. Add a simple pumpkin silhouette to each hoop using felt, stitched fabric, or a lightly padded appliqué. Keep the pumpkins similar enough to feel connected, but alter scale or material so they are not clones.
Arrange the hoops before hanging them. One should lead, one should support, and one should remain quieter. A straight horizontal row is not required; a gentle diagonal arrangement often works better above a small bench or compact dresser.
Texture Pairing Studio
Texture Pairing Studio
Let the wall behind the hoops choose the fabric mix.
Select the closest backdrop. The recommended pattern level, color direction, and editing move change with your choice.
The trio should add one textural event to the wall, not three independent focal points.
11. Fold Paper Pumpkin Medallions Into a Shallow 3D Wall Cluster
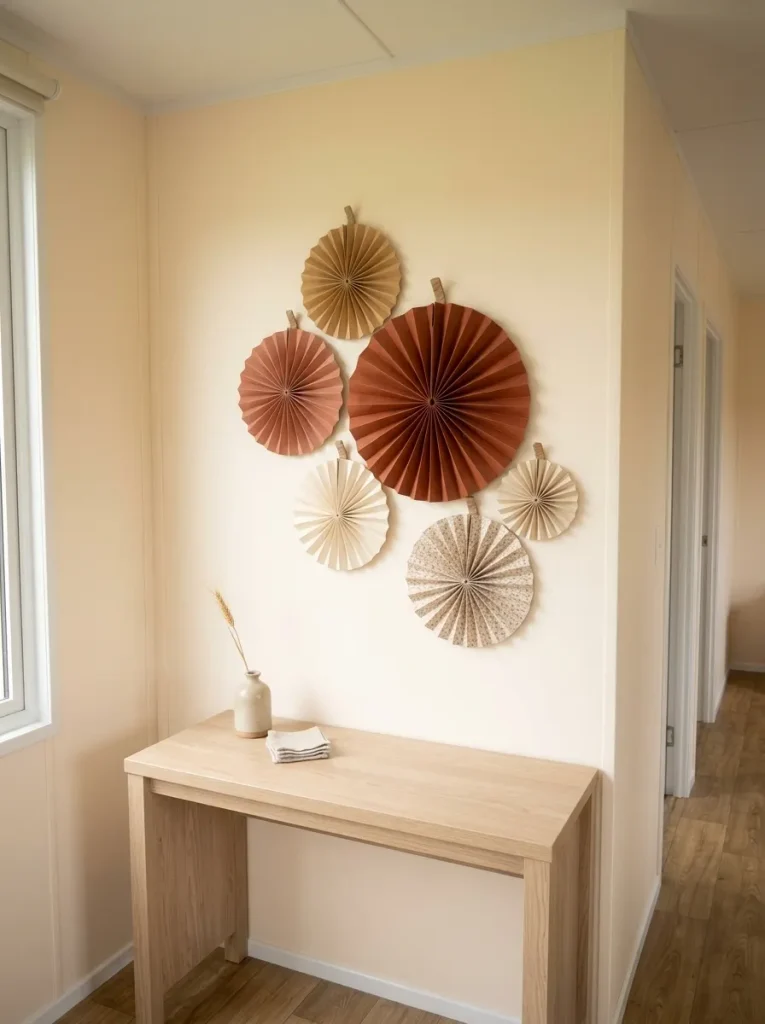
Paper medallions give you shadows and dimensionality while remaining much shallower than shelves or deep seasonal signs.
Fold heavyweight paper accordion-style, join the ends into circles, and pinch each circle slightly so it suggests a pumpkin rather than a perfect rosette. Add a small kraft-paper or twig-colored stem. Use three or five pumpkins in different sizes.
Compare two layouts
Scattered cluster: Best on a broad open wall above a console. Space the pumpkins irregularly, with one larger form acting as the anchor.
Compressed vertical cluster: Better on a narrow mobile-home wall strip. Keep the shapes closer together and build upward.
Before attaching them permanently, tape paper templates to the wall and look from the room entrance. The cluster should relate to the furniture or architectural feature below it; floating too high can make the wall feel disconnected.
For more inexpensive material sources and seasonal craft directions, continue with StylishGalore’s dollar-store fall décor ideas for mobile homes.
12. Turn Seed Pods and Acorns Into a Vertical Harvest String
Not every fall wall project needs to survive unchanged for years. A vertical harvest string can be deliberately temporary.
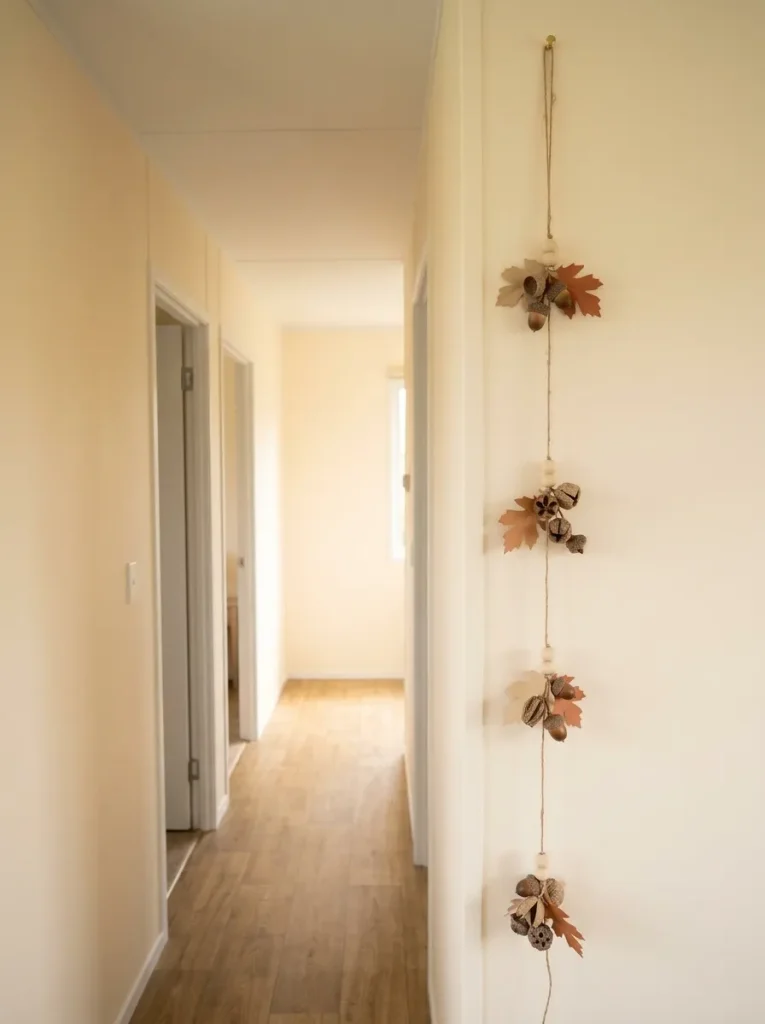
Use twine as the backbone, then attach lightweight faux acorns, seed pods, paper leaves, small wood beads, or thoroughly dried decorative natural material at uneven intervals. Leave visible stretches of twine between clusters; those gaps keep the strand from becoming a heavy rope of objects.
For a narrow wall: make one long strand.
For a broader wall: hang three strands at related but unequal lengths.
For a renter: keep the entire project light enough to work with an appropriate removable hanging method for the actual surface.
The practical advantage is editability. Damaged or faded natural pieces can be replaced individually next season, while the beads, twine, and structural parts remain useful.
Stop adding objects once the eye can follow the strand from top to bottom without getting stuck on one oversized cluster.
13. A Crescent Twig Wreath Makes a Quieter Alternative to a Full Round Wreath
A traditional full wreath creates a strong circle. That is useful on a door, but the same visual weight can feel oversized on a small interior wall.
A crescent wreath leaves more open space.
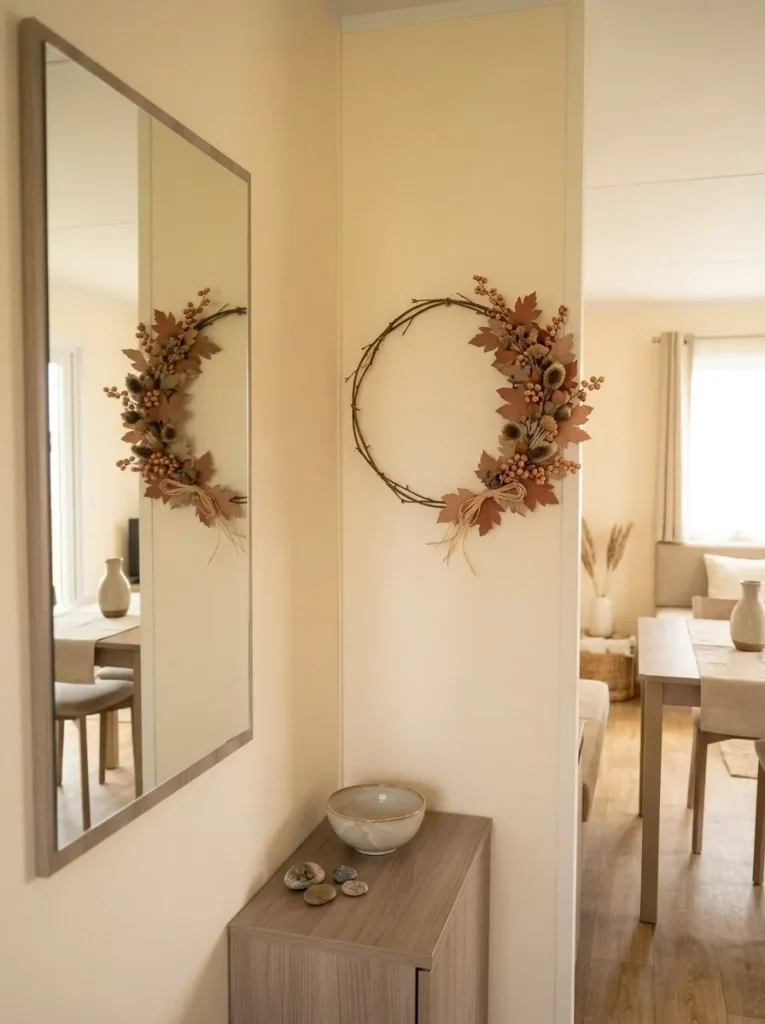
Start with a thin twig ring or lightweight wreath base. Concentrate foliage, berries, seed heads, raffia, and small leaves around roughly one side of the ring. Keep the opposite side visibly sparse.
The exposed structure becomes part of the design. That negative space lets the wall show through and reduces the visual mass of the decoration without making it feel unfinished.
A crescent arrangement works particularly well:
- beside a mirror;
- on a short dining wall;
- over a small cabinet;
- next to an opening where a full circle would compete with the doorway shape.
Use the fuller side to point inward toward the room’s focal area. Reverse the crescent when needed; its direction should respond to the surrounding furniture, not to a fixed craft template.
14. Build a Slim Twig-and-Leaf Ladder for a Short Hall Wall
Hallway walls are tempting seasonal-decorating territory because they are visible, but they are also close to movement. Deep baskets, projecting shelves, and thick arrangements can be poor fits there.
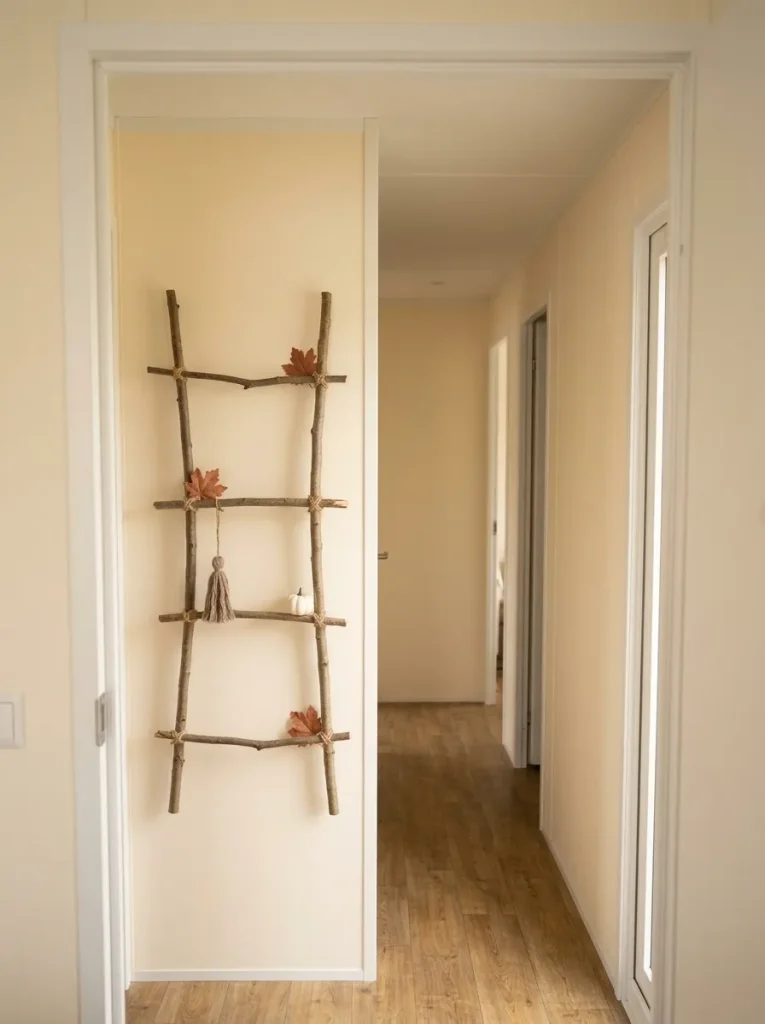
A twig ladder stays visually interesting while keeping the composition narrow.
Choose two slender vertical branches and connect them with three or four short horizontal twigs. Wrap the joints with jute or thin cord. Add only a few leaves, a small tassel, or one miniature pumpkin ornament to selected rungs.
The open areas between the rungs are important. They allow the wall color to remain part of the composition and keep the project from looking like a solid slab.
Narrow-Wall Composer
Narrow-Wall Composer
Let the wall shape determine the fall composition.
Choose the awkward wall you are dealing with. The recommended project width, profile, and styling density change with your selection.
Before hanging the finished ladder, walk through the hallway naturally. If sleeves, bags, or shoulders could catch it, move it to a more protected vertical surface or flatten the embellishments further.
15. Make One Lighted Branch Silhouette the Evening Fall Moment
By the time a room already has pumpkins, warm textiles, and a few autumn colors, adding more daytime objects may not improve it. Evening atmosphere can be the missing layer.
Use one sculptural branch or a small grouping of slender twigs and arrange them against a blank wall. Add only a few leaves or tiny pumpkin ornaments, then weave a battery-operated micro-light strand through the branch structure.
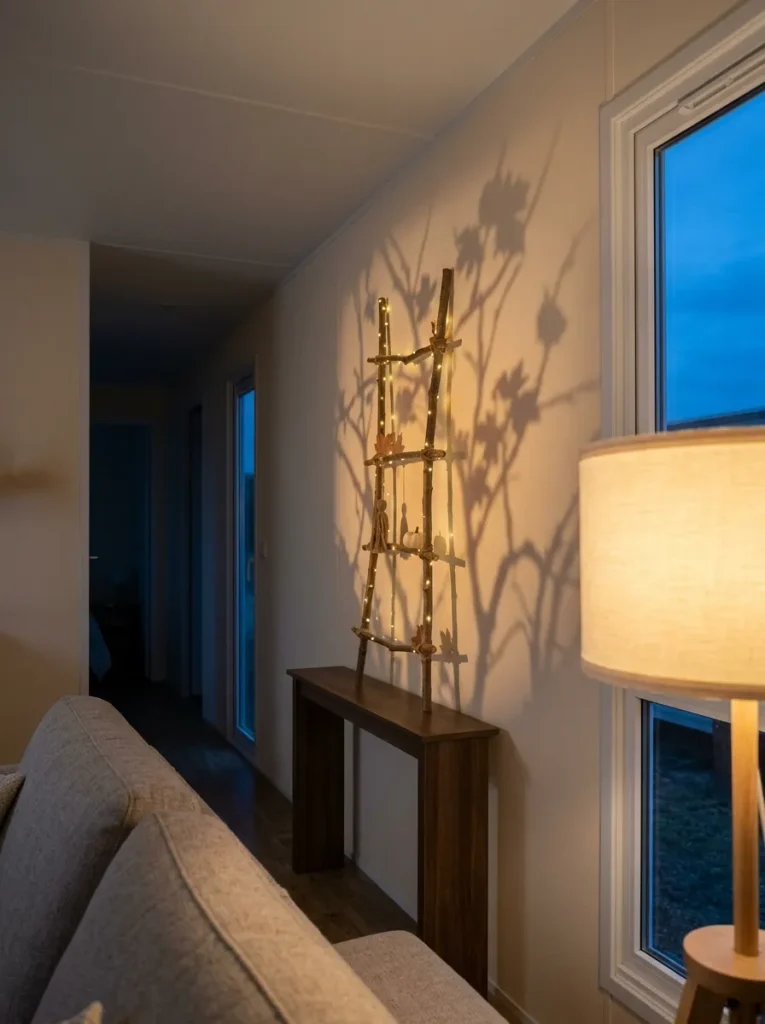
During the day, it reads as a sparse natural installation. After dark, the light creates a second composition through the shadows on the wall.
That dual identity is the reason to keep the branch restrained. Too many leaves or dangling ornaments can hide the silhouette and make the lighting less noticeable.
For a fuller room-wide approach beyond the wall itself, StylishGalore’s cozy fall mobile home decorating ideas continues the seasonal atmosphere through textiles, surfaces, and connected spaces.
Editing signal: once the branch looks finished in daylight, switch the room lights off before adding anything else. If its shadow already gives you the autumn mood you wanted, stop.
16. Shape Corn Husk, Raffia, and Fabric Into a Cabinet-End Wall Charm
A visible cabinet end can be surprisingly useful decorating territory because it adds fall character close to the kitchen while leaving the worktop untouched.
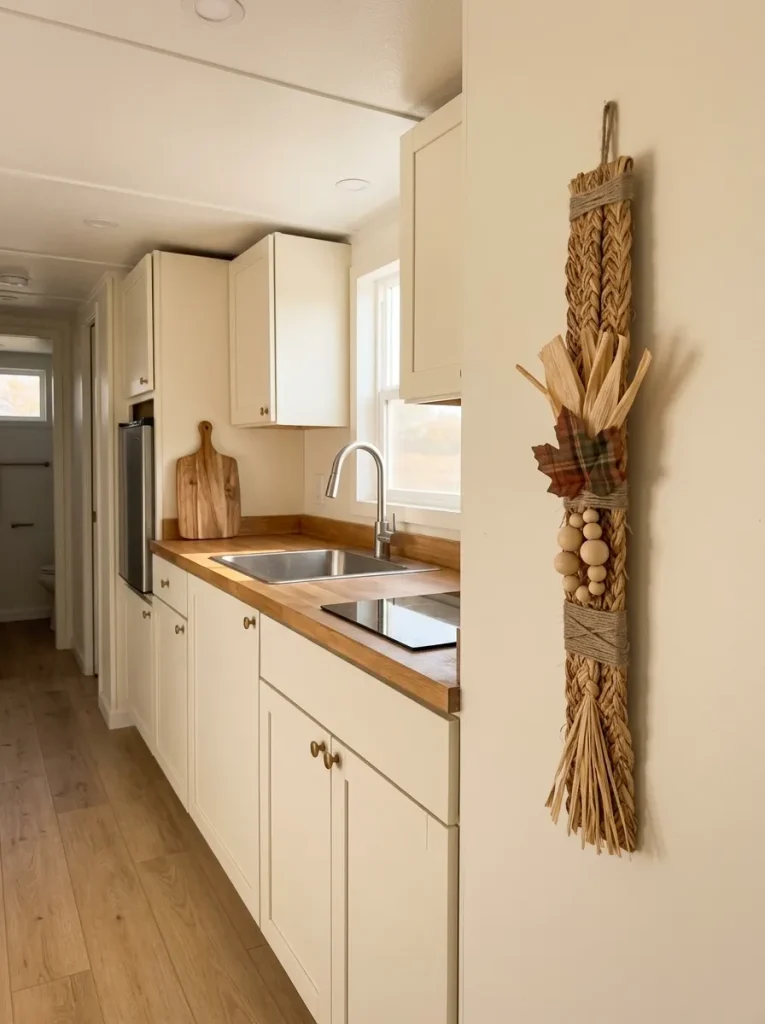
Bundle raffia or decorative corn-husk-like craft material into a tapered shape. Add one fabric leaf, a small plaid ribbon, or a few wooden beads near the top, then finish with a loop for hanging. Keep the profile narrow and the lower end loose.
The craft should look intentionally vertical from the adjoining room. A thick bow plus several pumpkins plus multiple signs will compete for attention; one textured bundle is enough.
Place it on an exposed cabinet-end panel or nearby wall only where it will not interfere with drawers, doors, appliances, switches, or normal kitchen work.
Quick material balance
Dominant texture: raffia or husk-like fiber
Supporting texture: one fabric
Small accent: wood bead, twine, or muted ribbon
What to leave out: extra wording or several miniature ornaments
The restraint gives the piece a rustic character without turning the kitchen into a themed display.
17. Use Leftover Materials to Build a Three-Panel Harvest Triptych
The final project is designed for the materials left over from the first sixteen ideas.
Choose three small matching boards, canvases, sturdy cardboard panels, or frame backs. Treat them as one artwork. Panel one might use a paper leaf; panel two can carry a fabric pumpkin shape; panel three might hold a twig or seed-pod arrangement.
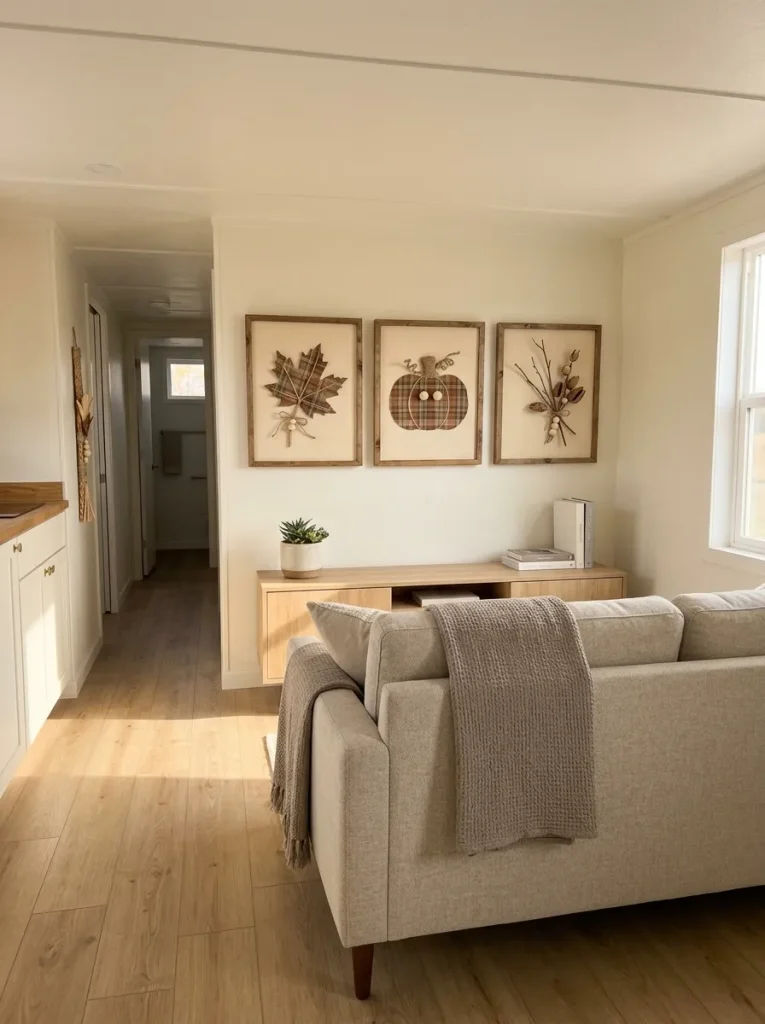
Repeat one element across all three panels—the same cream background, one rust accent, similar twine, or matching border treatment. That repetition is what turns unrelated scraps into a triptych.
Keep the relief shallow enough for the wall location, especially above a sofa or along a narrow living-room sightline.
Leftover-Material Triptych Builder
Scrap-to-Triptych Builder
Use your largest leftover material category to lead the design.
Pick what you have most of. Your choice changes the three-panel recipe, the visual palette, and the element that should repeat across the set.
If the triptych will become the main autumn feature in your living room, use StylishGalore’s fall mobile home living room ideas to coordinate the wall with the furniture and surrounding seasonal accents without repeating the same motifs everywhere.
The final test is simple: cover one panel with your hand. If the other two still look like a complete pair, the three panels may be too independent. Repeat one material, shape, or color until the eye reads them as a family.
Final Thoughts
The strongest DIY fall wall decor in a mobile home does more than put autumn objects on empty walls. It uses surfaces that are already visible while protecting counters, tables, walking paths, and everyday work areas.
Start with the wall condition first. A narrow strip may need one vertical project; a wall above furniture can handle a broader composition; an architectural edge may need only a light seasonal accent. Then reuse one or two colors or materials elsewhere so the room feels connected without becoming themed.
Choose the single project that solves your most noticeable blank-wall problem, make that first, and only add another after seeing the room as a whole.
Love one of these ideas? Save this article to Pinterest so you can come back to the project when your fall craft supplies are ready.