Look around your home. Does your furniture feel tired? Maybe that dresser, or those chairs, look like they belong to another decade. It’s easy to feel stuck with outdated pieces.
The start of a new year is a great time for a fresh beginning. This often means wanting to refresh our living spaces. But new furniture costs a lot of money.

You do not need to buy all new things to get a new look. A little creativity can go a long way. A small amount of effort can completely change your furniture.
This list gives you 35 budget-friendly makeovers. These projects are simple, smart, and will help you start the year with a home that feels new.
1.The Two-Tone Dresser Refresh

That old, dark wood dresser in the corner doesn’t need to be replaced. You can give it a major update with just paint and new hardware. This piece gets a clean, modern farmhouse look by combining a crisp white body with a warm, stained wood top.
The contrast is timeless. Swapping dated handles for sleek black cup pulls and knobs completes the transformation. It moves from an overlooked item to a central piece. This project is a classic for a reason and a great way to build your furniture-flipping skills.
DIY: The Two-Tone Dresser Refresh
Materials Needed:
- Screwdriver
- Medium-grit (120) and fine-grit (220) sandpaper
- Cleaning rags and a good furniture cleaner (like TSP)
- Painter’s tape
- Stain-blocking primer
- Paint (chalk paint or a satin/semi-gloss latex)
- Paintbrush and/or small foam roller
- Wood stain (for the top)
- Clear topcoat (Polycrylic is good over white paint as it doesn’t yellow)
- New hardware (knobs and pulls)
- Drop cloth
Step-by-Step Instructions:
- Prep Your Piece: Lay down your drop cloth. Remove all the drawers from the dresser. Use your screwdriver to take off all the old hardware from the drawers and doors.
- Clean Thoroughly: Clean the entire dresser frame and all drawer fronts. Use a good degreasing cleaner to remove any grime or furniture polish. Let it dry completely.
- Sand the Body: Use your medium-grit sandpaper to lightly “scuff sand” the dresser frame and drawer fronts. You don’t need to remove all the old finish. Just rough it up so the primer has something to grip.
- Sand the Top: For the top, you’ll need to sand more. Use the medium-grit sandpaper to sand all the way down to the raw wood, removing the old stain and finish. Once you see bare wood, go over it with the fine-grit sandpaper to make it smooth.
- Clean Again: Wipe away all sanding dust with a clean, damp rag or a tack cloth. Dust is the enemy of a smooth finish.
- Tape it Off: Carefully apply painter’s tape along the edge of the top, protecting it from the paint you’ll use on the body.
- Prime the Body: Apply a thin, even coat of stain-blocking primer to the dresser frame and all the drawer fronts. Primer stops old wood stains from “bleeding” through your new white paint. Let it dry completely.
- Stain the Top: While the primer dries, apply your new wood stain to the sanded raw wood top using a clean rag. Follow the instructions on the can. Usually, you wipe it on, let it sit for a few minutes, and wipe off the excess.
- Paint: Once the primer is dry, apply your first coat of white paint to the frame and drawer fronts. Use a small roller for flat areas and a brush for details. Let it dry, then apply a second coat.
- Seal and Protect: After the paint and stain are fully dry (wait at least 24 hours), apply 2-3 thin coats of your clear topcoat to everything. This protects your work from scuffs and spills. Lightly sand with fine-grit sandpaper between coats for an extra-smooth feel.
- Install New Hardware: Once the topcoat is cured, install your new knobs and pulls.
- Reassemble: Put the drawers back into the dresser, and step back. You have a new piece of furniture.
2.The Textured Ceramic Lamp Upcycle

An old, glossy lamp base can feel very dated. This project turns a thrift-store find into a high-end, earthy piece using simple texture. The makeover involves adding a plaster-like compound directly onto the lamp’s body. This creates a rough, organic surface.
Painting the base in sections of neutral and terracotta tones finishes the handcrafted look. You can use your hands or a putty knife to create the unique pattern. It’s a very quick way to add a piece of designer-style decor to your room.
DIY: The Textured Ceramic Lamp Upcycle
Materials Needed:
- An old lamp base
- Cleaner and rags
- Painter’s tape
- Joint compound or spackle (pre-mixed is easiest)
- Putty knife or a pair of disposable gloves
- Fine-grit sandpaper
- Acrylic or chalk paint in 2-3 colors
- Paintbrushes
- Clear matte spray sealer
Step-by-Step Instructions:
- Prep the Lamp: Unplug the lamp. Remove the lampshade and harp (the metal piece the shade sits on).
- Clean and Tape: Clean the lamp base thoroughly to remove all dust and grime. Let it dry. Use painter’s tape to carefully tape off the light socket at the top and the electrical cord at the bottom.
- Add Texture: Put on your gloves. Scoop some joint compound and spread it onto the lamp base with your fingers. You can also use a putty knife. Work in sections, dabbing and swirling to create a rough, stucco-like texture. Don’t overthink it; the imperfections are what make it look good.
- Let it Dry: This is the most important step. Let the compound dry completely, which might take 24-48 hours.
- Sand (Lightly): Once bone dry, gently sand any sharp “peaks” or crumbs off with fine-grit sandpaper. Just smooth it slightly. Wipe away the dust.
- Paint: Use painter’s tape to create “color block” sections. Paint one section, let it dry, then move the tape and paint the next.
- Seal: Once all the paint is dry, spray the entire base with a clear matte sealer. This protects the finish.
- Reassemble: Remove all the tape and put the lamp harp and shade back on.
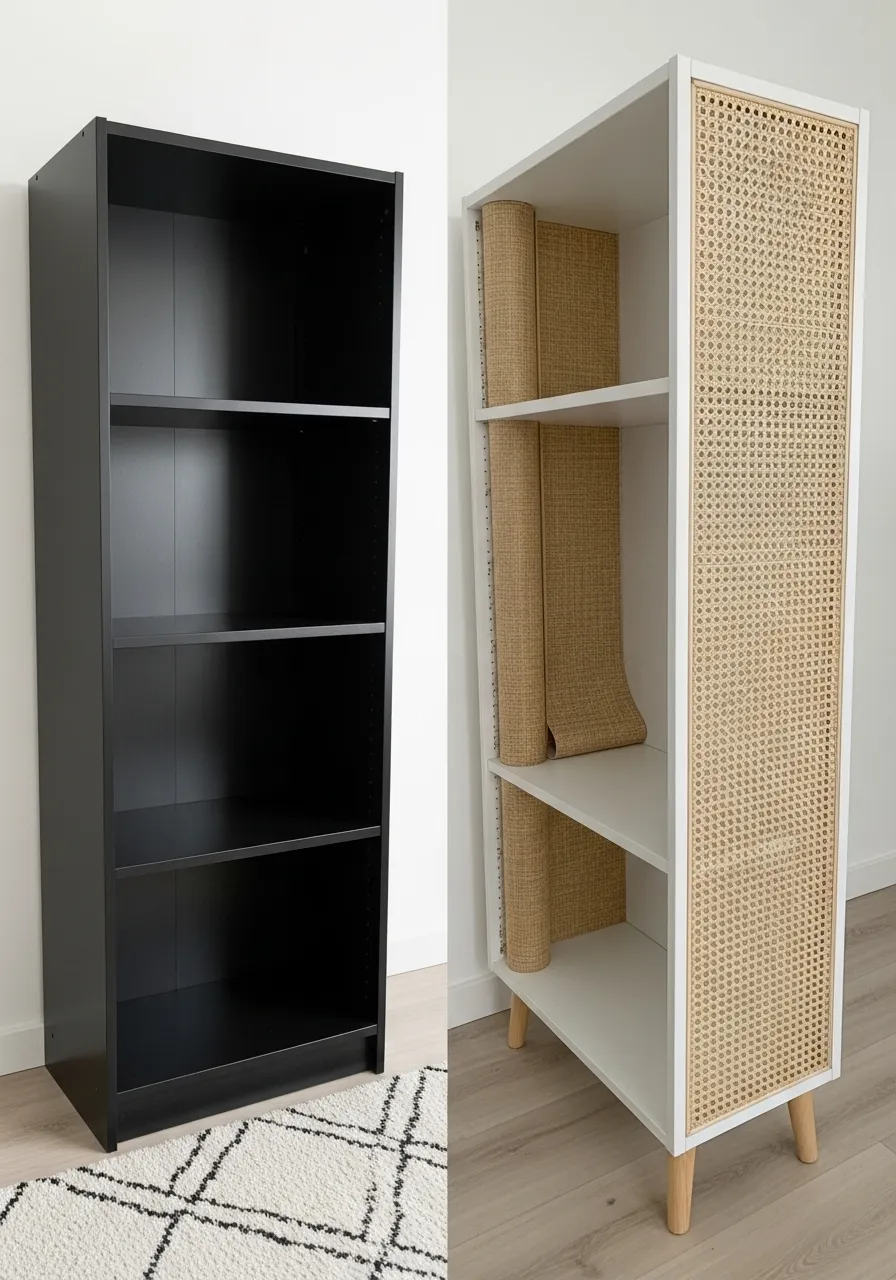
3.The Modern Cane Webbing Bookshelf

This project completely overhauls a basic, boxy bookshelf. It goes from a heavy, dark item to a light and airy piece. A fresh coat of white paint brightens it up instantly.
Adding simple, light-colored wooden legs lifts the shelf off the floor. This change gives it a more delicate, furniture-like appearance. The real star is the cane webbing. It adds texture and warmth, turning the boring sides into a key design feature.
DIY: The Modern Cane Webbing Bookshelf
Materials Needed:
- Old bookshelf
- Sandpaper (medium-grit)
- Cleaner and rags
- Stain-blocking primer
- White paint (satin or semi-gloss)
- Paint roller and brush
- 4 furniture legs and 4 mounting plates (angled or straight)
- Drill
- A roll of cane webbing
- Staple gun
- Heavy-duty scissors or a utility knife
- (Optional) Thin wood trim
Step-by-Step Instructions:
- Prep the Bookshelf: Clean the entire unit. Lightly sand all surfaces to help the primer stick. Wipe away all the dust.
- Prime and Paint: Apply a coat of stain-blocking primer, especially since you’re painting over black. Let it dry. Then, apply 2-3 coats of white paint, letting it dry between coats.
- Add Legs: Flip the (empty) bookshelf upside down. Attach the four mounting plates to the corners of the base using your drill. Screw the new legs into the plates.
- Prep the Cane: Measure the side panels of your bookshelf. Cut your cane webbing with scissors, leaving about an extra inch on all sides.
- Soak the Cane: Submerge the cut cane webbing in warm water for 30-60 minutes. This makes it soft and flexible.
- Attach the Cane: Take the damp cane out and pat it dry with a towel. Stretch it over one of the side panels, pulling it taut as you go. Use your staple gun to attach the cane to the inside edges of the bookshelf’s side panels. Place staples every few inches.
- Let it Dry: As the cane dries, it will shrink and become very tight and flat. This creates a professional-looking finish.
- Trim: Once dry, use a sharp utility knife to trim any excess cane from the inside. You can also add thin, painted wood trim over the stapled edges for an extra-clean look.
- Repeat: Do the same process on the other side panel.
4.The Faux Concrete Coffee Table

A dated coffee table can get a serious industrial-chic update. This makeover uses a feather-finish concrete mix to completely change the look of a boring tabletop. The result is a heavy, textured surface that looks like solid, expensive concrete.
Paired with the original dark legs, the table becomes a strong focal point. This is a surprisingly simple way to get a high-end look on a very small budget. It adds a modern, minimalist feel to a living room.
DIY: The Faux Concrete Coffee Table
Materials Needed:
- Old coffee table
- Sandpaper (medium-grit)
- Cleaner and rags
- Painter’s tape
- Feather-finish concrete mix (like Ardex Feather Finish)
- Mixing bucket and a stir stick
- Wide putty knife or trowel
- Clear, matte concrete or polyurethane sealer
- Drop cloth
Step-by-Step Instructions:
- Prep your Table: Move your table onto a drop cloth. Clean the tabletop thoroughly.
- Sand and Tape: Sand the tabletop to rough up the old finish. This helps the concrete stick. Wipe away all the dust. Tape off the table legs and the underside of the tabletop to protect them.
- Mix the Concrete: Follow the package directions. Mix small batches at a time, as it dries fast. You want a consistency like peanut butter or thick pancake batter.
- Apply the First Layer: Scoop the mix onto the table and spread it with your putty knife. Don’t worry about it being smooth. Just get a thin, even-ish layer covering the whole top and sides.
- Dry and Sand: Let the first layer dry completely (a few hours). It will be a light gray. Sand it lightly to knock down any high ridges. Wipe the dust.
- Apply More Layers: Repeat the process. Apply a second, and maybe even a third, thin layer. Each time, you can smooth it more. The final layer determines the texture.
- Final Sanding: After the final layer is bone dry, give it a good sanding with fine-grit sandpaper for a smooth feel.
- Seal: Wipe the table clean of all dust. Apply 2-3 coats of a matte sealer. This is crucial for protecting the surface from stains and spills.
5.The Mid-Century Two-Tone Dresser

This mid-century modern dresser was suffering from a peeling, fake wood-grain finish. The solution is a clean, two-tone look that saves the piece. The outer frame is painted a bright, crisp white, creating a sharp contrast.
The drawer fronts are the main focus. The old, damaged laminate is carefully stripped away. This reveals the actual wood (or a new wood veneer) underneath. This method highlights the piece’s good bones and classic, simple lines.
DIY: The Mid-Century Two-Tone Dresser
Materials Needed:
- Dresser
- Painter’s tape
- Sandpaper (medium and fine)
- Stain-blocking primer
- White paint (satin)
- Paint roller and brush
- Heat gun or a chemical stripper (if removing laminate/veneer)
- Putty knife
- Wood cleaner
- Wood stain or oil (like Danish oil)
Step-by-Step Instructions:
- Prep: Remove the drawers. Clean the entire piece.
- Tape Off: Carefully tape off the drawer fronts to protect them from the white paint. Also tape off the top edges of the drawer openings on the frame.
- Paint the Frame: Lightly sand the outer frame of the dresser. Wipe the dust. Apply a coat of primer, then 2 coats of white paint.
- Address the Drawers: This is the key step. If the drawers have a peeling laminate, use a heat gun to warm the adhesive and slowly peel it off with a putty knife. If it’s a thick varnish, you may need a chemical stripper.
- Clean the Wood: Once the old finish is gone, clean the bare wood underneath with a wood-safe cleaner.
- Sand the Wood: Sand the bare wood drawer fronts with medium, then fine-grit sandpaper until they are smooth.
- Finish the Wood: Wipe away all dust. Apply a wood stain or a penetrating oil (like Danish oil) with a clean rag. This protects the wood and makes the grain look rich.
- Reassemble: Once everything is dry, remove all the tape and put the drawers back in.
6.The Gold-Dipped Stool

A simple wooden stool gets a touch of glam with this easy project. This update involves “dipping” the legs in metallic gold paint. It’s a very fast project that adds a custom, expensive feel to a cheap piece of furniture.
The key to this look is the sharp, clean line created by painter’s tape. This technique works on almost any furniture leg. You can use it on chairs, tables, or stools to tie a room together.
DIY: The Gold-Dipped Stool
Materials Needed:
- Stool or small table
- Cleaner and rags
- High-quality painter’s tape (like FrogTape)
- Measuring tape
- Pencil
- Metallic gold spray paint
- Drop cloth or old newspaper
- Plastic bags (to cover the stool top)
Step-by-Step Instructions:
- Clean: Clean the stool legs thoroughly. The paint needs a clean surface to stick.
- Measure: Decide how high you want the “dipped” section to be. Use your measuring tape and pencil to make a small, light mark on each leg at the exact same height from the floor.
- Tape: This is the most important step. Wrap your painter’s tape around each leg, using your pencil mark as the guide. Make sure the top edge of the tape is perfectly level. Press the edge down firmly with your fingernail to prevent any paint from bleeding underneath.
- Cover: Cover the top of the stool and the parts of the legs above the tape. A plastic bag taped in place works well.
- Spray: Take the stool outside or to a well-ventilated area. Place it on a drop cloth.
- Paint: Shake the spray paint can well. Apply 2-3 very light coats of gold paint, letting it dry for a few minutes between coats. A light coat prevents drips.
- The Reveal: Let the final coat of paint dry for about 20-30 minutes. You want to remove the tape while the paint is still slightly tacky, but not wet.
- Peel: Slowly and carefully peel the tape off at a 45-degree angle. This will give you the sharpest, cleanest line.
7.The Quick-Change Sofa Slipcover

A faded, patterned, or stained sofa can instantly date an entire room. A modern stretch slipcover is the fastest, no-paint-required makeover you can do. This dark grey cover gives the old sofa a solid, contemporary look.
It neatly conceals the old fabric and provides a neutral base for new pillows and throws. This is a very practical update for homes with kids, pets, or just a sofa that has seen better days. It’s like getting a new couch for a fraction of the price.
DIY: The Quick-Change Sofa Slipcover
Materials Needed:
- Your dated sofa
- A new stretch slipcover (make sure you buy the right size for your sofa: 1-seater, 2-seater, etc.)
- (Optional) Pool noodles or slipcover tuck-in grips
Step-by-Step Instructions:
- Prep the Sofa: Remove all pillows and cushions. Vacuum the entire sofa, getting deep into the crevices.
- Find the “Back”: Unfold your new slipcover. Most have a tag on the inside that says “Back.”
- Drape and Align: Drape the slipcover over your sofa, aligning the “Back” tag with the center-back of the sofa.
- Pull it Down: Pull the cover down over the back, then over the arms, and finally down the front. Adjust it so the seams line up with the edges of your sofa.
- Tuck, Tuck, Tuck: This is the key to a good fit. Take all the excess fabric and tuck it deep into the creases between the arms, the back, and the seat deck. Use a wooden spoon or your hands to push it in.
- Secure it: For a tighter fit, cut a pool noodle into three sections (one for the back, one for each arm). Shove these foam pieces into the crevices over the tucked fabric. This holds the cover in place when people sit down.
- Add Cushions: If your slipcover has separate cushion covers, put those on your seat cushions now. Place the cushions back on the sofa.
- Final Adjustments: Stand back, smooth any remaining wrinkles, and enjoy your “new” sofa.
8.The Wallpapered “Back-Splash” Bookshelf

An open-back or plain-white-back bookshelf can look boring, especially when the items on it are moved. Adding a pattern to the back panels gives the piece instant personality and a custom feel.
This example uses three different, coordinating patterns for a fun, eclectic look. You can use removable peel-and-stick wallpaper for an easy, renter-friendly update. It’s a great way to add a pop of color or pattern to a room without committing to a full wall.
DIY: The Wallpapered “Back-Splash” Bookshelf
Materials Needed:
- Bookshelf (with a solid back)
- Cleaner and rags
- Peel-and-stick wallpaper
- Measuring tape
- A sharp utility knife or craft knife
- A straight edge (like a metal ruler)
- A smoothing tool (a plastic putty knife or even a credit card will work)
Step-by-Step Instructions:
- Prep the Bookshelf: Empty the bookshelf and clean the inside surfaces, especially the back panels. Make sure they are dry.
- Measure: Measure the height and width of the first back panel (the space between two shelves).
- Cut the Paper: Roll out your wallpaper and cut a piece that is slightly larger than your measurements (about an inch extra on the height and width).
- Apply: Peel back the top few inches of the wallpaper backing. Align the paper with the top edge of the panel.
- Smooth: Slowly pull the backing off with one hand while using your smoothing tool (or credit card) to press the paper onto the surface. Work from the center out to push out any air bubbles.
- Trim: Once the panel is covered, take your sharp utility knife and the straight edge. Press the straight edge into the corner and run the knife along it to trim the excess paper for a clean edge.
- Repeat: Repeat this process for all the other panels inside your bookshelf.
9.The Modern Black Painted Chairs

Mismatched, old-fashioned dining chairs get a dramatic and modern update. A single coat of matte or satin black paint unifies this random set. The simple change erases the “country” or “dated” feel.
This project turns them into a sleek, cohesive group. The dark black finish highlights their classic spindle shapes in a new, sophisticated way. This is a very affordable way to create a striking, modern dining set.
DIY: The Modern Black Painted Chairs
Materials Needed:
- Old wood chairs
- Cleaner (TSP is a strong cleaner for grime) and rags
- Sandpaper (medium-grit)
- Drop cloth
- Stain-blocking primer (spray-on is easiest for spindles)
- Black paint (spray paint is fastest, but a paint-on satin finish is very durable)
- (Optional) Clear topcoat in a matte or satin finish
Step-by-Step Instructions:
- Clean: Clean the chairs very well. Old dining chairs often have a buildup of grime and oils. Let them dry.
- Prep Area: Lay down your drop cloth in a well-ventilated area (outside is best).
- Sand: Sand all surfaces of the chairs. You don’t need to remove the old finish, just “scuff it up” so the new primer has something to grip.
- Wipe Down: Wipe off all the sanding dust with a damp rag or a tack cloth.
- Prime: Apply a thin, even coat of primer. If using spray primer, hold the can about 10-12 inches away and use short, sweeping motions. Don’t forget the undersides.
- Paint: Once the primer is dry, apply your black paint. If spraying, use 2-3 light coats instead of one heavy coat. This prevents drips. Get all the angles, spindles, and legs.
- Seal (Optional): For a dining chair, a topcoat is a good idea. Once the paint is fully dry, apply 2 coats of a clear matte or satin topcoat. This protects the finish from scuffs and scratches.
10.The Faux Card Catalog

A plain, boring dresser is transformed into a vintage-inspired card catalog. This clever project uses paint and new hardware to create a completely new look. The dresser frame is painted a deep, moody green, while the drawer fronts get a mix of black paint and dark wood stain.
The final, crucial touch is the set of bronze label-holder pulls. These complete the illusion and give the piece a sense of history. It’s a fantastic way to add character to a generic piece of furniture.
DIY: The Faux Card Catalog
Materials Needed:
- A dresser (one with many small drawers is great, but you can fake it on large drawers too)
- Cleaner and rags
- Sandpaper
- Painter’s tape
- Paint (dark green, black)
- Wood stain (dark walnut or ebony)
- Stain-blocking primer
- Paint rollers and brushes
- New hardware (label-holder pulls)
- Drill (for new hardware holes)
- Paper and a pen for labels
Step-by-Step Instructions:
- Prep: Remove all drawers and the old hardware.
- Clean and Sand: Clean the entire piece. Sand the dresser frame and all drawer fronts to scuff the old finish. Wipe all the dust away.
- Paint the Frame: Apply primer to the dresser frame. Let it dry. Then, paint the frame with your dark green paint (2 coats).
- Prep the Drawers: This is where you can get creative. In the picture, the center-line of the drawers is stained wood, and the outer parts are black.
- Tape and Stain: Tape off the sections of the drawers you want to paint black. On the un-taped wood sections, apply your dark wood stain with a rag. Wipe off the excess.
- Tape and Paint: Let the stain dry. Remove the tape. Now, tape off the stained sections to protect them.
- Prime and Paint: Apply primer to the remaining parts of the drawer fronts. Let dry. Then, paint these sections black.
- Install Hardware: Once everything is dry, measure and drill new holes for your label-holder pulls. Make sure they are all centered and level. This is the key to the “card catalog” look.
- Add Labels: Install the new hardware. Cut small pieces of paper, write labels (like “Misc,” “Photos,” etc.), and slide them into the holders.
- Reassemble: Put all the drawers back in and step back to admire your new, old-looking piece.
11.The Bold Floral Decoupage Desk

This once-plain desk is now an impossible-to-ignore statement piece. The body is painted a vibrant green, pulling a background color from the pattern. The real transformation comes from the floral paper.
It’s been carefully applied to the top and drawer fronts using decoupage. This technique turns any flat-pack or simple furniture item into a piece of art. The new, ornate knobs are the finishing touch that ties the bold look together.
DIY: The Bold Floral Decoupage Desk
Materials Needed:
- Old desk
- Cleaner and rags
- Sandpaper (medium and fine-grit)
- Primer
- Green paint for the frame
- Decorative paper (wallpaper, gift wrap, or special decoupage paper)
- Mod Podge (or a similar decoupage glue)
- Foam brush or paintbrush
- A brayer or plastic smoothing tool (like a credit card)
- Sharp craft knife (X-Acto knife)
- Clear topcoat (Polycrylic)
- New knobs
Step-by-Step Instructions:
- Prep: Remove all drawers and hardware.
- Clean and Sand: Clean the entire desk frame and drawer fronts. Sand all surfaces to scuff them up, which helps the paint and glue stick. Wipe away all dust.
- Prime and Paint: Apply primer to the desk frame. Let it dry. Then, apply 2-3 coats of your green paint.
- Cut Your Paper: Measure your drawer fronts and desktop. Cut your floral paper to be slightly larger (about 1 inch) than the surface you’re covering.
- Apply Mod Podge: Working one section at a time, apply a thin, even coat of Mod Podge to the surface (e.g., one drawer front).
- Lay the Paper: Carefully lay your paper on the wet Mod Podge. Start from one edge and smooth it down as you go.
- Smooth: Use your brayer or the edge of a credit card to smooth the paper, pushing out any air bubbles or wrinkles from the center outwards.
- Top Coat: Apply a thin layer of Mod Podge over the top of the paper to seal it.
- Trim: Let it dry for about an hour. Once it’s dry, use your sharp craft knife to trim the excess paper for a perfectly clean edge.
- Seal Everything: Once all parts are dry, apply 2-3 coats of a clear topcoat over the entire desk (painted and papered parts) for durability.
- New Hardware: Install your new knobs.
12.The Classic Gingham Chair Seat

This project is a fast and simple update for any dining chair with a removable seat. The dated or stained fabric is replaced with a classic black-and-white gingham pattern.
This simple swap gives the traditional oak chair a fresh, modern farmhouse feel. It requires no painting or sanding, just a few basic tools. This is a great beginner project that can change the look of your whole dining set in an afternoon.
DIY: The Classic Gingham Chair Seat
Materials Needed:
- Dining chair with a screw-on seat cushion
- Screwdriver
- New fabric (like the gingham, about 6 inches larger than the seat on all sides)
- Heavy-duty staple gun and staples
- Pliers (for removing old staples)
- Scissors
Step-by-Step Instructions:
- Remove the Seat: Flip the chair over. Use your screwdriver to remove the screws that hold the seat pad onto the chair frame.
- Remove Old Fabric: Flip the seat pad over. Use pliers to pull out all the old staples and remove the old fabric. (You can skip this and staple over the old fabric if it’s not too thick, but removing it gives a cleaner result).
- Cut New Fabric: Lay your new fabric flat on the floor, pattern-side down. Place the seat cushion (foam side down) on top of it.
- Use as Template: Cut the new fabric, leaving about 3-4 inches of extra fabric on all four sides of the cushion.
- Staple: Start on one side. Pull the fabric taut (but not so tight it warps the pattern) and place one staple in the center of that side, stapling into the wooden base.
- Opposite Side: Go to the directly opposite side, pull the fabric taut, and place one staple in the center.
- Other Sides: Repeat this for the remaining two sides. Your fabric should now be held on with four staples (like a compass: north, south, east, west).
- Fill in: Continue stapling, working from the center staples out towards the corners, pulling the fabric taut as you go. Place staples every 1-2 inches.
- The Corners: The corners are the trickiest part. Pull the fabric tight and fold it over neatly, like you’re wrapping a present. Use extra staples to secure the folds.
- Trim and Re-attach: Trim any excess fabric. Screw the seat pad back onto the chair frame.
13.The Blue Ombre Waterfall Dresser

This is a fun, creative way to paint a dresser. The piece uses an ombre “waterfall” effect, where the color flows from light to dark. The frame and top drawers are a crisp white.
Each drawer front below gets a slightly darker shade of blue, creating a beautiful gradient. The knobs are even painted to match their specific drawer, helping them blend in. This technique turns a simple dresser into a playful, custom piece.
DIY: The Blue Ombre Waterfall Dresser
Materials Needed:
- Dresser
- Cleaner and sandpaper
- Primer
- White paint (for the frame and top drawers)
- A dark blue paint (sample pot size)
- 5-6 small, numbered plastic cups or containers for mixing
- Paintbrushes and a small roller
- Painter’s tape
- (Optional) Clear topcoat
Step-by-Step Instructions:
- Prep: Remove all drawers and hardware.
- Clean and Sand: Clean the dresser frame and all drawer fronts. Scuff-sand all surfaces and wipe away the dust.
- Prime: Apply primer to the frame and all drawer fronts. Let dry.
- Paint Frame: Paint the dresser frame white (2 coats).
- Paint Drawers: Paint the top one or two drawer fronts white. Let them dry.
- Create Your Colors: This is the fun part. Line up your plastic cups.
- Cup 1: Pour in some white paint. This is for the first “color” drawer.
- Cup 2: Pour in the same amount of white paint, then add one drop of the dark blue. Mix well.
- Cup 3: Pour in the white paint, then add two or three drops of dark blue. Mix well.
- Cup 4: Continue this process, adding slightly more blue to each cup.
- Last Cup: Use the dark blue paint straight from the container.
- Paint the Gradient: Paint each remaining drawer front with your new custom colors, from lightest to darkest. Let dry and apply a second coat.
- Paint Knobs: Sand and prime the knobs. Paint each knob to match the drawer it belongs to.
- Reassemble: Once everything is fully dry, install the matching knobs on their drawers and put the drawers back in the dresser.
14.The Rustic Leather Belt Shelf

This project is a brilliant example of upcycling. Two old leather belts are used to create a simple, stylish hanging shelf. The belts act as rustic brackets for a plain pine board.
This creates a unique, floating-style shelf that is surprisingly strong. It has a rustic, minimalist, and slightly industrial feel. It’s a very low-cost project that adds a lot of character to a wall.
DIY: The Rustic Leather Belt Shelf
Materials Needed:
- 2 identical leather belts (check a thrift store)
- 1 wooden board, cut to your desired length
- Sandpaper
- (Optional) Wood stain and a rag
- A level
- Drill
- 2 wall anchors and 2 screws (make sure they are long enough to go through the belt and into the wall)
Step-by-Step Instructions:
- Prep the Board: Sand your wooden board until it’s smooth on all sides and edges. You can stain it, paint it, or leave it natural.
- Prep the Belts: Buckle both belts to the exact same hole so they are two identical loops.
- Mark the Wall: Hold the first belt loop against the wall, folded flat (like a ‘V’ shape). Decide where you want it. Mark a dot inside the loop, right at the top, where the screw will go.
- Second Mark: Use your level and measuring tape to decide where the second belt goes. Hold the level on top of your first mark and extend it horizontally. Mark your spot for the second belt.
- Install Anchors: At your two marks, drill holes and insert your wall anchors.
- Attach Belts: Hold the first belt loop up, placing the pre-drilled hole (or just the top fold) over the anchor. Drill your screw through the belt and into the wall anchor until it’s secure. Repeat for the second belt.
- Add Shelf: Slide your wooden board into the two belt loops.
- Level It: Place your level on the board and adjust the board (sliding it forward or back) until it sits perfectly straight. The tension from the belts will hold it in place.
15.The Faux Marble Countertop (Contact Paper)

This is a game-changing update for a dated kitchen or bathroom, especially for renters. An old-fashioned laminate countertop is being covered with marble-patterned contact paper.
This instantly brightens the space and gives it a modern, high-end look for very little money. The hairdryer is a pro tip: it heats the vinyl, making it soft and stretchy. This helps it wrap smoothly around edges and corners without creases.
DIY: The Faux Marble Countertop (Contact Paper)
Materials Needed:
- Marble-patterned contact paper (buy extra for mistakes)
- A very sharp craft knife or utility knife (with new blades)
- A smoothing tool (a plastic putty knife or a credit card)
- Measuring tape
- Cleaner (an alcohol-based cleaner is good for removing grease)
- Hairdryer
- (Optional) A pin
Step-by-Step Instructions:
- Clean: This is the most important step. Clean your countertops until they are spotless. Any crumb or speck of dust will show up as a bump under the paper. Let it dry completely.
- Measure and Cut: Measure your countertop. Cut a piece of contact paper that is several inches longer and wider than the surface.
- Peel a Corner: Start at one end. Peel back only about 6-10 inches of the paper backing.
- Align: Carefully align the paper with the back edge and one side. Let the sticky side hang down. Make sure it’s straight.
- Smooth: Press the paper down. Use your smoothing tool (or credit card) to smooth the paper onto the counter. Work from the center out to the edges, pushing any air bubbles.
- Peel and Smooth: Slowly pull more of the backing off with one hand, while smoothing the paper with your other hand. Work in small sections. Do not pull the whole backing off at once.
- Bubbles: If you get a stubborn bubble, poke a tiny hole in it with a pin and press the air out.
- Edges: For the front edge, let the paper hang over. Use the hairdryer on a low setting to warm the vinyl. It will become soft. Gently stretch and wrap it under the counter’s edge.
- Corners: For corners, you’ll need to make a few precise cuts with your knife, like wrapping a present. Warm it with the hairdryer, stretch, and smooth.
- Trim: Use your sharp knife to trim all the excess paper from the sink-hole and the back edge.
16.The Wire Basket Side Table

This is less of a makeover and more of a brilliant assembly. The project combines two common items: a black metal wire basket and a round, stained wood top.
Together, they create a functional, stylish side table. This design is very popular in modern farmhouse and industrial decor. The hollow basket also doubles as a clever storage spot for a blanket or books.
DIY: The Wire Basket Side Table
Materials Needed:
- A sturdy metal wire basket (a laundry basket or-storage bin)
- A pre-cut round wood panel (from a hardware store, or cut your own)
- Sandpaper
- Wood stain
- A clean rag
- (Optional) Clear topcoat
Step-by-Step Instructions:
- Get Your Pieces: Find a wire basket you like. Make sure the top has a flat, solid rim for the wood to sit on. Then, buy or cut a round wood panel that is the same diameter as the top of the basket, or slightly larger.
- Prep the Wood: Sand the wood panel, starting with medium-grit sandpaper and finishing with fine-grit. Make sure all edges are smooth.
- Wipe Clean: Wipe all the sanding dust off the wood with a clean, dry rag.
- Stain: Dip your rag into the wood stain. Wipe the stain onto the wood, following the grain. Let it sit for a few minutes (check the can for timing), then use a clean part of the rag to wipe off all the excess stain.
- Dry: Let the stain dry completely.
- Seal (Optional): Apply 1-2 coats of a clear topcoat to protect the wood from spills.
- Assemble: Once the top is dry, simply place it on top of the wire basket. For a more permanent fix, you could add small brackets underneath or use construction adhesive, but leaving it loose lets you use the storage inside.
17.The French Provincial Stenciled Dresser

This curvy, ornate dresser is given a soft, romantic update. The frame is painted a clean, antique white, which provides a great base.
The drawer fronts are painted in three different, muted pastel shades: a soft blue, a light green, and a pale lavender. To tie it all together, delicate white stencils are added to the center of each drawer. Light distressing on the edges gives it a gently aged, French country feel.
DIY: The French Provincial Stenciled Dresser
Materials Needed:
- Dresser
- Cleaner and sandpaper
- Primer
- White paint (for frame)
- 3 pastel paint colors (sample pots)
- Stencils
- A stencil pouncing brush or a foam sponge
- White paint (for stenciling)
- Painter’s tape
- (Optional) Fine-grit sandpaper for distressing
Step-by-Step Instructions:
- Prep: Remove drawers and hardware. Clean and scuff-sand the frame and drawer fronts. Wipe away dust.
- Prime: Apply primer to all pieces.
- Paint Frame: Paint the dresser frame with 2 coats of your white paint.
- Paint Drawers: Paint each drawer front a different pastel color. Let dry, and apply a second coat.
- Stencil: Once the drawers are dry, find the center. Place your stencil and tape it down with painter’s tape.
- Apply Stencil Paint: Dip your stencil brush into the white paint. Dab off most of the paint onto a paper towel. You want a “dry brush.”
- Pounce: Use an up-and-down pouncing motion to apply the paint over the stencil. Do not use side-to-side strokes, as this will push paint under the stencil. Build up the color in light layers.
- Reveal: Carefully peel the stencil off. Let it dry. Repeat for the other drawers.
- Distress (Optional): Lightly sand the edges of the frame and drawers to let a little of the original wood peek through.
- Reassemble: Install the hardware and put the drawers back.
18.The Spray-Painted Ombre Armchair

This is a very bold and unconventional makeover. The project involves using fabric spray paint to completely change the chair’s color and create a dramatic ombre effect.
The color fades from a deep forest green on the arms and sides to a bright, sunny yellow in the center. This is a high-risk, high-reward project that turns a plain chair into a one-of-a-kind piece of pop art.
DIY: The Spray-Painted Ombre Armchair
Materials Needed:
- A light-colored upholstered chair (fabric must be absorbent, not vinyl or leather)
- Fabric spray paint (like Simply Spray) in 2 colors (e.g., green and yellow)
- Lots of painter’s tape and plastic drop cloths
- Cleaning supplies (vacuum, upholstery cleaner)
Step-by-Step Instructions:
- Prep: Clean the chair thoroughly. Vacuum it, and spot-clean any stains. Let it dry.
- Tape: This is a crucial step. Tape off all the wooden legs and any other part of the chair you don’t want painted.
- Protect: Move the chair outside or to a very well-ventilated garage. Put it on a large drop cloth.
- Start with One Color: Shake the first can (e.g., green) very well. Start spraying on the arms and outer edges. Follow the can’s instructions, usually spraying from 8-10 inches away.
- Apply Second Color: Shake the second can (e.g., yellow) and start spraying in the center of the cushions, back, and seat.
- Blend: To create the ombre effect, you need to overlap the colors. While the paint is still wet, lightly “dust” the green paint over the edge of the yellow, and the yellow over the edge of the green, from a further distance.
- Dry: Let the chair dry completely. Fabric paint often needs to cure for 72 hours. It will make the fabric feel stiffer.
- Remove Tape: Once fully cured, carefully remove all the tape.
19.The Cohesive Gallery Wall

This image shows the power of paint in unifying a random collection. Mismatched, thrift-store, and old picture frames are given a new life.
By spray-painting them in a tight color palette—black, white, gold, and red—the collection is transformed. It goes from a pile of “junk” to a cohesive set, ready to be arranged into a large, dramatic gallery wall. This is a classic budget decorating trick.
DIY: The Cohesive Gallery Wall
Materials Needed:
- A collection of mismatched picture frames
- Cleaner and rags
- Spray paint in your chosen colors (e.g., matte black, satin white, metallic gold)
- A large drop cloth
- (Optional) Spray-on primer
Step-by-Step Instructions:
- Collect Frames: Gather all the frames you want to use.
- Prep: Disassemble all the frames. Remove the glass and any backing or art.
- Clean: Wipe down all the frames to remove dust and grime. Let them dry.
- Set Up: Go outside or to a well-ventilated area. Lay down your drop cloth.
- Arrange: Place all your frames on the drop cloth, leaving a few inches between them.
- Prime (Optional): If you are painting over a very dark or glossy frame, a light coat of spray primer is a good idea.
- Paint: Shake your first can of spray paint well. Holding the can 10-12 inches away, apply a light, even coat. Use sweeping motions. Don’t try to cover it all in one go.
- Second Coat: Let the paint dry for 15-20 minutes, then apply a second light coat.
- Dry: Let the frames dry completely according to the paint can’s instructions.
- Reassemble: Once cured, put the glass and backing back into the frames. They are now ready to be hung as a unified collection.
20.The Faux Shiplap Dresser

This is a clever illusion. A plain, flat-front white dresser is given a farmhouse-style makeover using only a marker. This project creates the look of shiplap or planked wood without any cutting or nailing.
Using a ruler for precision, simple horizontal lines are drawn on. Short vertical dashes are added to mimic the seams where planks would meet. It’s a low-cost, high-impact, and easily reversible update.
DIY: The Faux Shiplap Dresser
Materials Needed:
- A plain white dresser
- A long ruler or a T-square level
- A pencil
- A black permanent marker (a paint pen gives a cleaner, more durable line)
- An eraser
Step-by-Step Instructions:
- Plan: Decide how “wide” you want your shiplap planks to be (e.g., 5 inches).
- Measure and Mark: Use your ruler and pencil to measure and make small tick marks down the sides of the dresser, marking where each line will go.
- Draw Pencil Lines: Use your long ruler to connect your tick marks, drawing light, straight pencil lines across the drawer fronts and frame. Use your level to make sure they are straight.
- Draw “Plank” Lines: Once you’re happy with your pencil lines, take your paint pen or permanent marker. Carefully and slowly trace over the pencil lines.
- Add Seams (Optional): To make it look more realistic, add small vertical dashes at random intervals along your horizontal lines. This mimics the look of separate planks. Stagger them on different “planks.”
- Clean Up: Let the marker dry. Go back and erase any visible pencil marks.
21.The Patriotic Rustic Stool

This small wooden stool has a charmingly aged, distressed look. It’s painted with a base of white that has been intentionally chipped away to reveal layers of red and blue underneath.
The cracked, weathered finish gives it a very rustic, country feel. This piece makes a statement, showing off its history and character. It brings a pop of color and a sense of cozy, lived-in charm to any space.
DIY: The Patriotic Rustic Stool
Materials Needed:
- Wooden stool or small table
- Cleaner and rags
- Medium-grit sandpaper
- Paintbrushes
- Red paint
- Blue paint
- White paint
- Petroleum jelly (Vaseline) or a wax candle
- (Optional) Clear matte topcoat
Step-by-Step Instructions:
- Clean and Sand: Clean the stool thoroughly. Give it a light sanding to ensure the paint sticks. Wipe away all dust.
- Base Coat (Red): Paint the entire stool with one coat of red paint. Let it dry completely.
- Second Coat (Blue): Once the red is dry, paint the entire stool with a coat of blue paint. Let it dry completely.
- Apply Resist: This is the key to the chippy look. Rub petroleum jelly or a wax candle sparingly on the areas where you want the red and blue to show through the top white coat. Focus on edges and corners, where natural wear would occur.
- Top Coat (White): Paint the entire stool with white paint. Be careful not to brush too hard over the petroleum jelly areas, as it can smudge.
- Distress: Once the white paint is mostly dry (but not fully cured), use a scraper, fine-grit sandpaper, or even your fingernail to gently scrape away the white paint from the areas where you applied petroleum jelly. This will reveal the red and blue layers beneath.
- Final Sand (Optional): If you want a smoother, more aged feel, lightly sand the entire stool with fine-grit sandpaper.
- Seal (Optional): Apply a clear matte topcoat to protect the distressed finish and prevent further chipping if desired.
22.The Plaid Upholstered Bench

This project transforms a plain, white storage bench into a cozy, custom-upholstered piece. The bench’s base is painted a deep, grounding black.
The real update comes from the new cushion. It’s covered in a crisp, black-and-white plaid fabric. This choice adds a classic, warm, and inviting touch. The bench goes from simple utility to a stylish, functional piece of furniture.
DIY: The Plaid Upholstered Bench
Materials Needed:
- Bench (with a removable top or a flat surface to build a cushion on)
- Sandpaper
- Cleaner and rags
- Black paint
- Paintbrush or roller
- Foam cushion (cut to size)
- Plywood or MDF (same size as cushion)
- Batting (thin, fluffy material)
- Plaid fabric (enough to wrap around cushion + batting)
- Heavy-duty staple gun and staples
- Screwdriver (to remove/attach bench top)
Step-by-Step Instructions:
- Prep the Bench Base: If your bench has a top that can be removed, take it off. Clean and sand the bench base. Wipe away dust.
- Paint the Base: Paint the bench base with 2-3 coats of black paint. Let it dry completely.
- Prepare the Cushion Base: If your bench does not have a removable top, cut a piece of plywood or MDF to the exact size of the bench top. This will be your new cushion base.
- Layer the Cushion: Place your foam cushion on a flat surface. Lay the batting over the foam, making it slightly larger than the foam.
- Cut Fabric: Lay your plaid fabric, pattern-side down, on a clean surface. Place the layered foam and batting on top. Place your plywood/MDF piece on top of the batting.
- Wrap and Staple: Pull one side of the fabric up over the batting and foam, wrapping it tightly around the plywood/MDF. Staple it to the underside of the plywood/MDF, starting in the middle.
- Opposite Sides: Pull the fabric tightly from the opposite side and staple it in the middle. Repeat for the other two sides.
- Corners: Work from the center staples out towards the corners, pulling the fabric taut and stapling every 1-2 inches. For the corners, fold the fabric neatly, like wrapping a present, and staple securely.
- Attach Cushion: Once the cushion is fully upholstered, attach it to the bench base. If the original bench had screw holes, align them and screw the new cushion base onto the bench. If not, you can use L-brackets for a secure attachment.
23.The Hardware Swap Cabinet

This image highlights the simplest and fastest way to update tired cabinetry. A crisp white bathroom vanity looks fresh, but the old hardware can make it feel dated.
Replacing the existing gold knob with a sleek black one instantly modernizes the look. Similarly, swapping a single handle for a pair of black bar pulls on the double doors provides a clean, contemporary upgrade. It’s a small change that makes a huge visual impact.
DIY: The Hardware Swap Cabinet
Materials Needed:
- Cabinet or vanity with existing hardware
- New knobs and pulls (make sure the screw spacing matches or is easily adaptable)
- Screwdriver
- (Optional) Drill and drill bits (if needing new holes)
- (Optional) Wood filler and sandpaper (if old holes need filling)
Step-by-Step Instructions:
- Remove Old Hardware: Use a screwdriver to remove all the old knobs and pulls from your cabinets and drawers.
- Check Fit: Before making new holes, try to fit your new hardware.
- Knobs: If your new knob has one screw, and your old knob had one screw, you can simply put the new one in the old hole.
- Pulls: If your new pull has the same “center-to-center” screw spacing as your old pull, you can use the old holes.
- New Holes (If Needed):
- Same Type, Different Spacing: If you’re going from a pull to a pull with different spacing, or a knob to a pull, you will need to fill the old holes. Use wood filler, let it dry, and sand it smooth.
- Mark: Decide where you want your new hardware to go. Use a measuring tape and a pencil to mark the exact spots for the new screw holes. A template can be very helpful here.
- Drill: Use a drill bit that is slightly smaller than your hardware screws to drill new pilot holes. Be careful not to drill all the way through the front of the cabinet if you can help it.
- Install New Hardware: Insert the screws from the inside of the cabinet or drawer and attach the new knobs and pulls. Tighten them by hand, not overtightening.
- Stand Back: Enjoy the instant update.
24.The Leather Pull Entryway Table

This entryway table is a testament to how small details can make a big impact. A simple white console table with a warm wood top gets a fresh, modern update.
The old hardware (presumably knobs) has been replaced with stylish, rustic leather pull straps. This choice adds a touch of organic texture and a unique, handcrafted feel. This is a subtle yet significant detail that elevates the entire piece.
DIY: The Leather Pull Entryway Table
Materials Needed:
- Console table or dresser with drawers
- Sandpaper
- Cleaner and rags
- White paint for the base
- Wood stain and rag for the top
- Leather straps (can be cut from an old belt, or purchased)
- Heavy-duty scissors or a craft knife
- Drill
- Screws with washers (to secure the leather)
- (Optional) Clear topcoat
Step-by-Step Instructions:
- Prep the Table: Remove drawers and any old hardware. Clean the table thoroughly.
- Sand: Lightly sand the entire table. Sand the top down to raw wood if you want to re-stain it. Wipe away dust.
- Paint Base: Paint the table base and drawer boxes white (2 coats).
- Stain Top: Stain the tabletop with your chosen wood stain. Apply with a rag, let sit, and wipe off excess. Let dry.
- Seal (Optional): Apply a clear topcoat to both painted and stained areas for protection.
- Cut Leather: Measure and cut your leather straps. For each pull, you’ll want two pieces. The length depends on how big you want the loop to be. A good starting point is 5-6 inches per piece.
- Mark Holes: For each leather piece, decide where you want the screw to go. Use a pencil to mark where you will drill a hole in the leather. For a loop, you’ll need two pieces of leather, each with one hole.
- Drill Leather: Use your drill to create holes in the leather straps.
- Attach Leather Pulls: On each drawer front, mark where the screws will go. You’ll have two screws per “loop” pull. Drill pilot holes in the drawer front.
- Assemble: Take one piece of leather, line up its hole with a pilot hole, and insert a screw with a washer. Do not tighten fully. Take the second piece of leather, cross it over the first to form a loop, and attach its hole with a second screw and washer. Tighten both screws securely.
- Reassemble: Put the drawers back in the table.
25.The Modern Blanket Ladder

An old, rustic wooden ladder gets a sleek, modern transformation in this project. The worn, paint-splattered wood is completely hidden under a fresh coat of matte black paint.
This changes the ladder from a functional tool to a stylish decorative piece. It’s now a minimalist blanket or towel holder. This makeover is surprisingly easy and updates a functional item into an eye-catching accent.
DIY: The Modern Blanket Ladder
Materials Needed:
- An old wooden step ladder (or a basic A-frame ladder)
- Cleaner and rags
- Medium-grit sandpaper
- Black spray paint (matte or satin finish)
- Drop cloth
Step-by-Step Instructions:
- Clean: Clean the ladder thoroughly, removing any dirt, dust, or cobwebs.
- Sand: Lightly sand the entire ladder. You don’t need to remove all the old paint or finish, just rough it up so the new paint has something to stick to.
- Wipe Down: Wipe off all the sanding dust with a damp rag, then let it dry.
- Set Up: Place your ladder on a large drop cloth outside or in a very well-ventilated area.
- Spray Paint: Shake your can of black spray paint well. Hold the can 10-12 inches away from the ladder. Apply thin, even coats, using sweeping motions. Don’t try to cover everything in one go, as this will cause drips.
- Rotate: Paint one side, let it dry for 15-20 minutes, then rotate the ladder and paint another side. Get all the rungs and supports.
- Multiple Coats: Apply 2-3 light coats in total, letting each coat dry before the next.
- Dry and Cure: Let the ladder dry completely for at least 24 hours, or according to the paint can’s instructions, before you lean anything against it or put blankets on it.
26.The Minimalist Media Console

This is a great example of how a fresh coat of paint can make a basic piece look intentional and expensive. A generic media console (likely an IKEA item) gets a sophisticated update.
It’s painted a deep, matte black to match the wall behind it. This creates a seamless, built-in appearance. The dark color helps the television recede into the background, making the whole setup feel clean and modern.
DIY: The Minimalist Media Console
Materials Needed:
- Basic media console or open-shelf unit
- Sandpaper (medium-grit)
- Cleaner and rags
- Painter’s tape
- Primer (black tinted if painting black)
- Matte black paint
- Small foam roller and paintbrush
- (Optional) Cord organization clips/ties
Step-by-Step Instructions:
- Prep: Remove all items, electronics, and cords from the console. If possible, disassemble it slightly for easier painting.
- Clean and Sand: Clean the entire console. Lightly sand all surfaces to scuff the old finish, especially if it’s glossy. Wipe away all dust.
- Tape: If any parts are not being painted, tape them off.
- Prime: Apply a coat of primer. If you can get a black-tinted primer, it will make the black paint cover much better.
- Paint: Once the primer is dry, apply 2-3 thin, even coats of matte black paint. Use a foam roller for flat surfaces and a paintbrush for edges and corners. Let each coat dry completely before applying the next.
- Dry: Allow the paint to dry and cure fully (check paint can instructions, often 24-72 hours) before putting electronics back on it.
- Organize Cords: Once dry, put your electronics back. Use cord organization clips or ties to neatly bundle and hide wires for a cleaner look.
27.The Tufted Headboard Hack

This image shows the basic components for creating a custom upholstered headboard. It typically starts with a piece of plywood or pegboard as the base.
Foam padding is attached, followed by a layer of batting. The fabric, in this case, a dark gray velvet, is then pulled taut and stapled around the back. The final touch is the classic tufting. This is achieved by pulling string through the layers and securing buttons.
DIY: The Tufted Headboard Hack
Materials Needed:
- Plywood or MDF board (cut to desired headboard size)
- Foam (at least 2 inches thick, cut to board size)
- Batting (enough to wrap foam and board)
- Fabric (e.g., velvet, enough to wrap board, foam, and batting)
- Heavy-duty staple gun and staples
- Upholstery needle (long, sturdy needle)
- Strong upholstery thread or twine
- Fabric-covered buttons (same number as desired tufts)
- Drill and small drill bit
- Measuring tape and marker
- Sawtooth hangers or D-rings for hanging
Step-by-Step Instructions:
- Prepare the Base: Cut your plywood/MDF to your desired headboard size. Mark a grid on it for where you want your tufts to be. Drill a small hole at each marked spot.
- Layer: Glue the foam to the front of the board. Let it dry.
- Wrap with Batting: Lay the batting flat. Place the foam-side-down board on top. Pull the batting taut around the edges and staple it to the back of the board. Trim excess.
- Wrap with Fabric: Lay your chosen fabric (velvet) face down. Place the batting-wrapped board on top. Pull the fabric taut over the batting and staple it to the back of the board. Start in the middle of each side, pulling tightly, then work your way to the corners, folding neatly. Trim excess.
- Tuft: This is the tricky part. Thread your upholstery needle with strong thread/twine. Start from the back of the headboard, pushing the needle through one of the pre-drilled holes, through all the layers, and out the front.
- Attach Button: On the front, thread the needle through the shank of a fabric-covered button. Push the needle back through the button, through the layers, and out the same hole on the back.
- Secure Tuft: Pull the thread very tightly on the back to create the “dimple” of the tuft. Staple the thread securely to the back of the board, making sure it won’t unravel. You might want to tie a knot before stapling. Repeat for all tufts.
- Hang: Attach sawtooth hangers or D-rings to the back of the headboard and hang it on the wall.
28.The Tropical Distressed End Table

This small end table has a charming, beachy vibe. It’s painted in layers, with a distressed finish that reveals pops of vibrant blue, yellow, and the natural wood underneath a creamy white topcoat.
The top features a bold compass rose stencil, while the drawer front has a playful palm tree silhouette. This is a creative way to give an old piece a fun, coastal-inspired look, making it a lively accent in any room.
DIY: The Tropical Distressed End Table
Materials Needed:
- Small wooden end table with a drawer
- Cleaner and sandpaper
- Paintbrushes
- Creamy white paint
- Blue paint
- Yellow paint
- Compass stencil
- Palm tree stencil (or a freehand design)
- Petroleum jelly or wax candle
- (Optional) Clear topcoat
Step-by-Step Instructions:
- Prep: Remove the drawer and any hardware. Clean the table thoroughly. Lightly sand all surfaces to prepare them for paint. Wipe away dust.
- Base Layer: Paint the entire table (frame and drawer front) with a vibrant blue paint. Let it dry.
- Second Layer: Once the blue is dry, apply spots of petroleum jelly or wax to areas where you want the blue to show through the topcoat.
- Third Layer: Paint the entire table (frame and drawer front) with yellow paint. Let it dry.
- Fourth Layer: Apply petroleum jelly or wax to areas where you want the yellow and blue to peek through the white topcoat.
- Top Coat: Paint the entire table with your creamy white paint.
- Distress: While the white paint is still slightly tacky, gently scrape away paint from the areas where you applied the resist, revealing the layers beneath.
- Stencil Top: Once the paint is fully dry, center your compass stencil on the tabletop. Tape it down. Use a small amount of blue paint on a stencil brush, pouncing it over the stencil.
- Stencil Drawer: Center your palm tree stencil on the drawer front and repeat the stenciling process with blue paint.
- Seal: Apply a clear topcoat to protect your work.
- Reassemble: Put the drawer back and add new hardware if desired.
29.The Child’s Art Station

This bright and playful cabinet has been transformed into a functional art station for a child. The body is painted a sunny yellow, immediately making it inviting.
The top surface is painted with black chalkboard paint, providing a canvas for drawing. Clever additions include a paper roll dispenser at the bottom and a towel bar on the side. The colorful stools perfectly complement the cheerful palette.
DIY: The Child’s Art Station
Materials Needed:
- Small cabinet or end table with a drawer
- Sandpaper
- Cleaner and rags
- Yellow paint (for cabinet body)
- Orange paint (for trim)
- Chalkboard paint (for tabletop)
- Paintbrushes and small roller
- Round wooden dowel (for paper roll)
- Paper roll (artist’s paper)
- Small towel bar (for side)
- Drill
- Screws
- Small stool for painting (refer to next item for ideas)
Step-by-Step Instructions:
- Prep: Remove the drawer and any hardware. Clean and sand the entire cabinet. Wipe away dust.
- Paint Yellow: Paint the main body of the cabinet and drawer yellow (2 coats).
- Paint Trim: Paint the top edge of the cabinet and any other trim pieces (like around the chalkboard section) with orange paint.
- Chalkboard Top: Tape off the orange trim on the tabletop. Apply 2-3 thin, even coats of chalkboard paint to the top surface. Follow the instructions on the chalkboard paint can for curing time before use.
- Install Paper Roll: On the inside of the cabinet, measure and drill two holes on opposite sides, near the bottom. These should be big enough for your wooden dowel to fit through. Insert the dowel with the paper roll on it.
- Install Towel Bar: On one side of the cabinet, measure and mark where you want the towel bar to go. Drill pilot holes and screw the towel bar into place.
- Reassemble: Put the drawer back in and add new hardware if desired.
30.The Modern Console Table with Marble Top

This console table makeover is about contrast and sleek design. An ordinary console is painted a deep, sophisticated matte black. This provides a strong, modern foundation.
The real transformation is the addition of a faux marble top, likely achieved with contact paper. This gives the piece an expensive, luxurious feel without the cost of real marble. Gold pulls complete the elegant, contemporary look.
DIY: The Modern Console Table with Marble Top
Materials Needed:
- Console table
- Sandpaper (medium and fine-grit)
- Cleaner and rags
- Primer (black tinted)
- Matte black paint
- Small foam roller and paintbrush
- Marble-patterned contact paper (for top)
- Sharp utility knife
- Smoothing tool (credit card)
- Gold hardware (pulls)
- Screwdriver
- (Optional) Clear topcoat
Step-by-Step Instructions:
- Prep: Remove drawers and any old hardware. Clean the table thoroughly.
- Sand: Lightly sand the entire table. If the top is laminate, scuff it well. Wipe away all dust.
- Prime and Paint: Apply a black-tinted primer to the entire table (frame and drawer fronts). Let dry. Then, apply 2-3 thin coats of matte black paint. Let each coat dry fully.
- Apply Marble Contact Paper:
- Clean Top: Ensure the tabletop is absolutely spotless.
- Measure & Cut: Measure the tabletop and cut the contact paper a few inches larger on all sides.
- Peel & Smooth: Peel back a small section of the backing. Align the paper with one edge of the tabletop. Slowly pull off more backing while smoothing the paper with your tool, working out air bubbles.
- Edges: Heat the paper with a hairdryer to make it pliable for wrapping around the edges.
- Trim: Use your sharp utility knife to trim off the excess paper for a clean finish.
- Install Hardware: Mark and drill holes for your new gold pulls on the drawer fronts. Screw them into place.
- Reassemble: Put the drawers back into the table.
31.The Two-Tone Wood and White Nightstand

This nightstand offers a fresh take on a classic. It features a natural wood top and mid-section, contrasting with a clean white painted base and lower drawer.
The raw, light wood brings warmth and texture to the piece. Simple leather pull straps replace traditional knobs, adding a modern, rustic touch. This combination creates a Scandinavian-inspired, minimalist look that is both inviting and stylish.
DIY: The Two-Tone Wood and White Nightstand
Materials Needed:
- Nightstand (especially one with a visible wood grain)
- Sandpaper (medium and fine-grit)
- Wood cleaner and rags
- Painter’s tape
- Primer
- White paint
- Wood stain or clear topcoat (if desired for the wood sections)
- Leather straps for pulls
- Drill
- Screws with washers
- Heavy-duty scissors or craft knife
Step-by-Step Instructions:
- Prep: Remove drawers and any existing hardware. Clean the entire nightstand thoroughly.
- Sand: If the top and mid-sections are varnished, sand them down to the raw wood for staining. Lightly scuff-sand the bottom section and lower drawer for painting. Wipe away all dust.
- Tape Off: Carefully tape off the sections you want to keep as natural wood (the top and the wooden drawer front).
- Prime and Paint: Apply primer to the bottom section of the nightstand and the lower drawer. Let it dry. Then, paint these areas with 2 coats of white paint.
- Finish Wood: While the white paint is drying, apply your chosen wood stain to the natural wood top and the wooden drawer front. Apply with a rag, let it sit for a few minutes, then wipe off the excess.
- Seal: Once all paint and stain are dry, apply a clear topcoat (Polycrylic is good for white paint and wood) to all surfaces for protection.
- Cut and Drill Leather: Measure and cut your leather straps to size. For each pull, you will need two holes per strap. You’ll fold the strap into a loop. Drill holes in the leather.
- Attach Leather Pulls: On each drawer front, mark where the screws for the pulls will go. Drill pilot holes. Attach the leather straps using screws with washers, ensuring the loop is secure.
- Reassemble: Put the drawers back into the nightstand.
32.The Vintage Suitcase Storage Table

This clever project transforms an old, sturdy suitcase into a quirky side table or storage ottoman. The vintage suitcase itself is given new life.
Modern, tapered wooden legs are added, elevating the piece. This makes it a functional and charming addition to any room. It adds character and a sense of wanderlust, while also providing hidden storage inside.
DIY: The Vintage Suitcase Storage Table
Materials Needed:
- A sturdy vintage suitcase
- Four furniture legs (tapered wood or metal)
- Four furniture leg mounting plates
- Drill
- Screws (for mounting plates)
- (Optional) Felt pads for leg bottoms
- (Optional) Wood glue (for extra secure mounting plates)
Step-by-Step Instructions:
- Choose Your Suitcase: Find a suitcase that is in good condition, sturdy, and has a flat bottom.
- Prepare Mounting Plates: Lay the suitcase on its back. Position the four mounting plates on the bottom of the suitcase, one near each corner. Make sure they are evenly spaced and in from the edges.
- Mark and Drill: Mark the screw holes for each mounting plate with a pencil. Use your drill to create pilot holes. Be careful not to drill all the way through the suitcase!
- Attach Mounting Plates: Screw the mounting plates securely to the bottom of the suitcase. You might want to use a little wood glue on the underside of the plate before screwing for extra hold.
- Attach Legs: Screw your new furniture legs into the attached mounting plates.
- Add Felt (Optional): Attach felt pads to the bottom of the new legs to protect your floors.
- Flip and Enjoy: Carefully flip the suitcase over onto its new legs. It’s ready to be used as a table or storage.
33.The Stenciled Mandala Accent Table

A simple square side table is transformed into a decorative focal point with this project. The tabletop is painted a deep, rich navy blue, providing a dramatic backdrop.
A large, intricate mandala stencil is then applied in crisp white. This geometric pattern creates a striking contrast and adds an exotic, bohemian flair. The white painted legs ensure the design remains the star of the show.
DIY: The Stenciled Mandala Accent Table
Materials Needed:
- Small square table or stool
- Cleaner and sandpaper
- Painter’s tape
- Navy blue paint
- White paint
- Mandala stencil
- Small stencil pouncing brush or dense foam roller
- Clear topcoat (matte or satin)
Step-by-Step Instructions:
- Prep: Clean the entire table. Lightly sand all surfaces to help the paint stick. Wipe away all dust.
- Paint Base: Paint the entire table (top and legs) with two coats of navy blue paint. Let it dry completely.
- Position Stencil: Find the exact center of your tabletop. Carefully place your mandala stencil on the center, aligning it. Use painter’s tape to secure the stencil in place, making sure it’s flat and there are no gaps.
- Apply Stencil Paint: Dip your stencil brush or foam roller into the white paint. Offload most of the paint onto a paper towel. You want a “dry brush” to prevent bleeding under the stencil.
- Pounce: Gently pounce or roll the white paint over the stencil. Apply several thin layers rather than one thick one.
- Reveal: Carefully remove the stencil while the paint is still slightly tacky. If there are any small bleeds, use a tiny paintbrush with navy blue paint to touch them up.
- Dry and Seal: Let the stenciled paint dry completely. Then, apply 2-3 coats of a clear topcoat over the entire tabletop (and legs if you want) to protect the design.
34.The Chalkboard Message Calendar

This project turns a plain picture frame into a highly functional and customizable wall calendar. The glass and backing are removed, and the backing is spray-painted with chalkboard paint.
Once reassembled, a permanent calendar grid is drawn on the chalkboard surface using a white paint marker. This creates a reusable, erasable calendar. It’s a stylish and practical way to organize schedules and grocery lists.
DIY: The Chalkboard Message Calendar
Materials Needed:
- A large picture frame (with glass and backing)
- Chalkboard spray paint
- Painter’s tape
- Drop cloth
- White paint marker (fine or medium point)
- Ruler or straight edge
- Pencil
- Chalk (for testing)
Step-by-Step Instructions:
- Disassemble: Remove the glass, backing, and any art from the picture frame.
- Prep Backing: Clean the backing board thoroughly. If it’s very shiny or dark, a light scuff sanding might help the chalkboard paint stick.
- Spray Paint: Take the backing board outside or to a well-ventilated area. Lay it on a drop cloth. Apply 2-3 thin, even coats of chalkboard spray paint. Follow the instructions on the can for drying time between coats.
- Cure the Chalkboard: Once the paint is fully dry (this can take 24-72 hours, check the can), “cure” the chalkboard surface. Rub the side of a piece of chalk all over the entire surface, then erase it. This prevents ghosting.
- Reassemble: Put the newly painted chalkboard backing back into the frame. Put the glass back in front of it.
- Draw Grid: Using your ruler and pencil, lightly draw a grid for your calendar on the glass. You will need 7 columns for days and 5-6 rows for weeks.
- Trace with Marker: Carefully trace over your pencil lines with the white paint marker. Let it dry completely.
- Add Labels: Write in the days of the week (“SUN,” “MON,” etc.) and any permanent sections like “To-Do” or “Groceries” with the paint marker.
- Erase Pencil: Once the paint marker is dry, use an eraser to remove any remaining pencil lines.
35.The Mobile Crate Storage Solution

This project transforms simple wooden crates into versatile, rolling storage units. The crates are stacked and oriented to create open cubbies.
Casters are then screwed onto the bottom, making the unit easy to move. The natural wood with stenciled “STORAGE” labels gives it an industrial, rustic appeal. These are great for toys, books, or craft supplies.
DIY: The Mobile Crate Storage Solution
Materials Needed:
- 2-4 sturdy wooden crates
- Wood glue
- Clamps (if gluing)
- Sandpaper
- (Optional) Wood stain and rag
- (Optional) Stencils (for “STORAGE”) and black paint/stencil brush
- 4-8 swivel casters (with screws)
- Drill
Step-by-Step Instructions:
- Prep Crates: Clean your crates. Lightly sand any rough edges to prevent splinters.
- Stain/Decorate (Optional): If desired, stain the crates. Once dry, use stencils to paint “STORAGE” or other labels onto the crates. Let dry.
- Assemble Crates: Decide how you want to stack your crates. You can glue them together for more stability. Apply wood glue to the edges where the crates will meet. Clamp them together and let the glue dry completely.
- Attach Casters: Flip your assembled crate unit upside down. Position the casters one in each corner, ensuring they are inset slightly from the edges.
- Mark and Drill: Mark the screw holes for each caster with a pencil. Use your drill to create pilot holes.
- Screw Casters: Screw the casters securely into place.
- Flip and Use: Flip your new mobile storage unit over. It’s ready to roll!
Giving your home a fresh look does not mean you have to empty your wallet. A new year is a great opportunity to rethink the items you already own.
These 35 ideas show that a can of paint, some new hardware, or a clever upcycle can make a huge difference. You can turn a dated piece into something you truly enjoy.
Your home can feel new and stylish on a budget. All it takes is a weekend afternoon and a little bit of work.
So pick a project that inspires you. Roll up your sleeves, and start creating a space you love for the year ahead.
Key Takeaways
Here are the main points to remember from this guide:
- Paint is Powerful: A new coat of paint is the fastest way to change a piece’s whole look.
- Hardware Matters: Swapping knobs or pulls is a 10-minute update that makes furniture look more modern.
- Add Texture: Using materials like cane, fabric, or even concrete mix adds depth and character.
- Upcycle Smart: Old items like belts, baskets, and suitcases can become stylish new furniture.
- Details Count: Simple additions like stencils, contact paper, or vinyl can create a high-end look for less.