Your home should tell a story. Often that story feels stuck in the past because of dated wood and worn fabrics. You look at your dresser or chair and see only age. You wonder why it stayed this way for so long.

Replacing every piece costs a fortune. Most people think they need a massive budget to modernize their space. This is a common mistake. You can rescue what you already own.
We gathered forty two creative projects to refresh your home. These makeovers focus on simple tools and clever tricks. You will turn your old furniture into statement pieces that look brand new.
1 Sophisticated Matte Charcoal Dresser
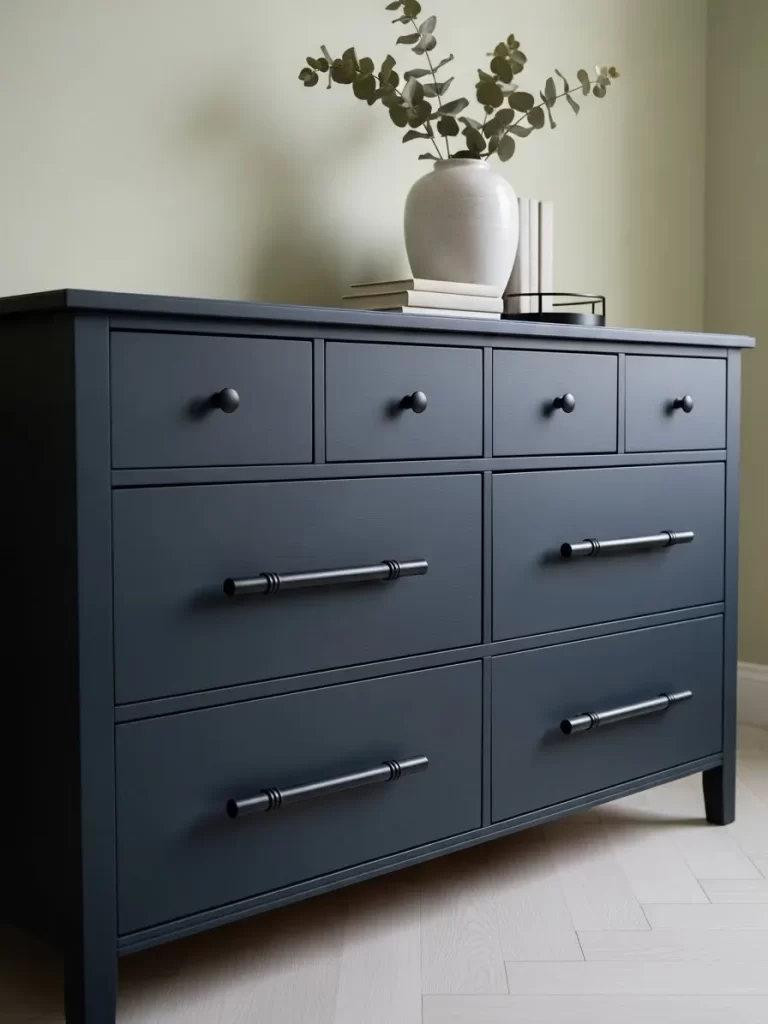
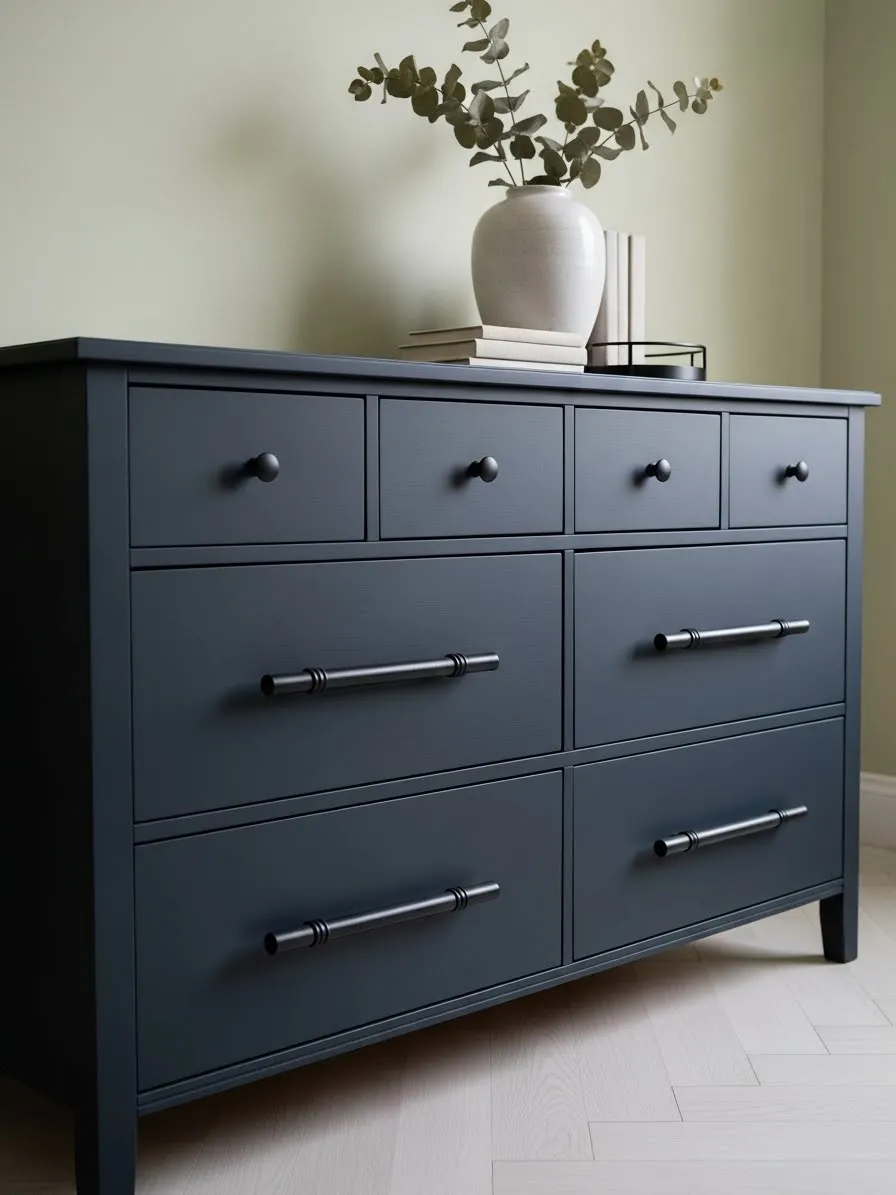
Old wooden furniture often feels heavy and outdated because of orange or brown wood tones. This transformation solves that problem by using a deep matte charcoal paint. The dark hue hides scratches and wood grain while giving the piece a modern edge.
Small changes make a big impact on a budget. Swapping out original knobs for sleek black bar handles creates a high-end look without a high price tag. This style works beautifully in bedrooms or entryways where you want a clean and calm atmosphere.
Neutral colors like this charcoal allow your decor to shine. A simple vase or a few books on top can finish the look. You do not need expensive tools to achieve this professional finish at home.
Material Required
- Matte charcoal furniture paint
- High quality primer
- Medium and fine grit sandpaper
- New black bar handles and knobs
- Tack cloth or microfiber rag
- Painter’s tape
Equipment Required
- Small foam roller
- Synthetic bristle paintbrush
- Screwdriver
- Power drill
- Drop cloth
DIY Instructions
- Remove all drawers from the dresser frame. Use your screwdriver to take off all old handles and knobs.
- Sand the entire surface of the dresser and drawer fronts. Start with medium grit sandpaper to remove the old glossy finish.
- Wipe away all dust using a damp tack cloth or microfiber rag. A clean surface ensures the paint sticks well.
- Apply a thin layer of primer to the wood. Let this dry completely according to the time listed on the can.
- Lightly sand the primer with fine grit sandpaper to smooth out any bumps. Wipe it clean again.
- Use the foam roller to apply the first coat of charcoal paint. Use the paintbrush for tight corners or edges where the roller cannot reach.
- Allow the first coat to dry for at least four hours. Apply a second coat for full color coverage.
- Let the paint cure for twenty four hours before touching it. This prevents fingerprints or smudges.
- Attach your new black bar handles to the large drawers. Screw the small round knobs into the top drawers.
- Slide the drawers back into the frame and style the top with your favorite accessories.
2 Scandinavian Dip Painted Chair
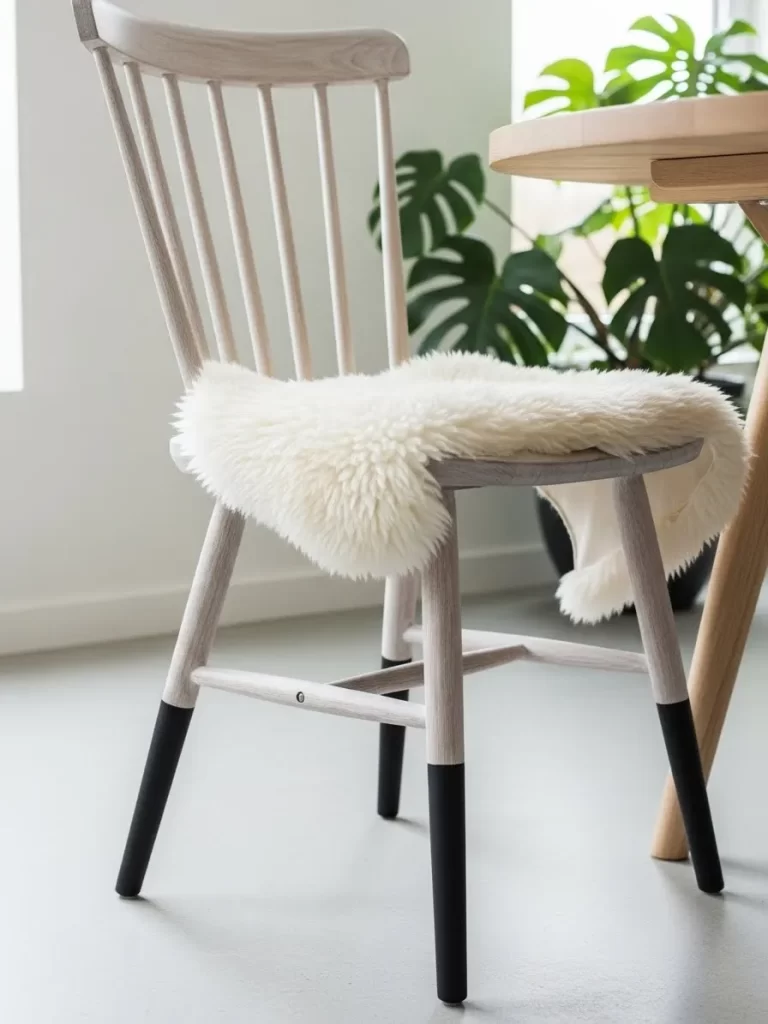
Old wooden chairs often feel dated because of yellowing stains or worn finishes. This transformation refreshes a classic spindle chair using a light whitewash and a bold dipped leg effect. The contrast between the soft wood grain and the solid black feet adds an instant designer touch to any dining room.
This makeover focuses on highlighting the natural beauty of the wood grain. By using a watered-down paint or light stain, you keep the texture visible while removing old orange tints. Adding dark paint to the bottom of the legs makes the piece feel grounded and current.
Varying your decor, like adding a faux sheepskin rug, completes the cozy look. You can customize this for any room by changing the dip color to match your palette. It is a fast way to make thrifted furniture look like a curated collection.
Material Required
- Light oak or white wood stain
- Black matte furniture paint
- Low tack painter’s tape
- Lint free rags
- Faux sheepskin rug
Equipment Required
- Sanding block 120 and 220 grit
- Small paintbrush
- Measuring tape
- Microfiber cloth
DIY Instructions
- Clean the chair thoroughly with soap and water to remove any grease or wax.
- Sand the entire chair with 120 grit sandpaper to break the old glossy seal.
- Finish with 220 grit sandpaper to create a silky smooth surface for the stain.
- Wipe away all dust using a damp microfiber cloth to ensure a clean finish.
- Apply your light stain using a lint free rag, rubbing it into the grain and wiping off the excess.
- Use a measuring tape to mark exactly five inches up from the bottom of each leg.
- Wrap painter’s tape tightly around this five inch mark to create a straight border.
- Paint the bottom section of the legs with two thin coats of black matte paint.
- Peel the tape away slowly while the paint is still slightly tacky for a sharp line.
- Drape a faux sheepskin rug over the seat once the paint is fully dry.
3 Mood Lit Coffee Station Hutch
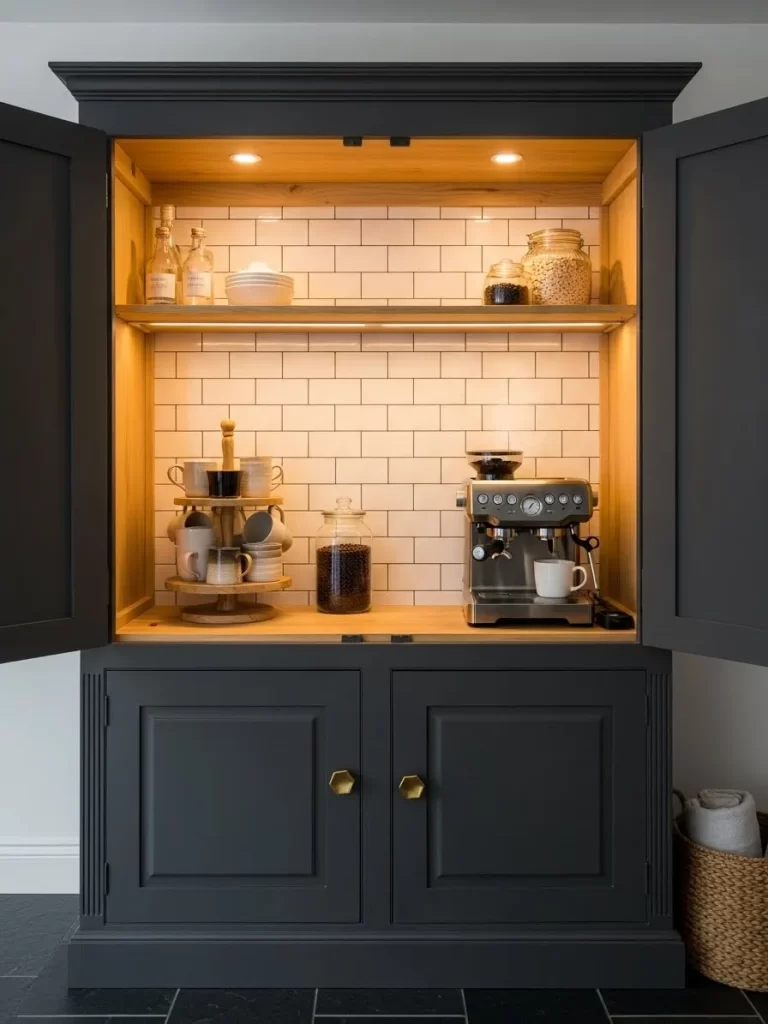
Large traditional hutches can look bulky and dark in a modern kitchen. Painting the exterior in a deep charcoal gray updates the silhouette instantly. Opening the doors reveals a warm wood interior that makes the piece feel like a custom high end installation.
The addition of white subway tile inside the cabinet creates a clean and bright backdrop. It reflects light and makes the small space feel much larger than it is. This setup keeps your counters clear while providing a dedicated spot for your morning caffeine routine.
Brass hardware provides a bright contrast against the dark paint. Hexagonal knobs add a geometric element that feels fresh and purposeful. This transformation turns basic storage into a functional and beautiful focal point for your home.
Material Required
- Charcoal gray furniture paint
- Peel and stick subway tiles
- Battery operated LED puck lights
- Brass hexagonal knobs
- Clear wood wax
Equipment Required
- Screwdriver
- Small foam roller
- Utility knife
- Level
- Sandpaper
DIY Instructions
- Remove the cabinet doors and all existing shelves with your screwdriver.
- Sand the exterior surfaces of the cabinet to prepare the wood for the new paint.
- Wipe the piece clean of all dust before applying the first coat of charcoal paint.
- Apply two coats of paint to the exterior and the doors using a foam roller.
- Clean the back wall of the upper cabinet section where the tiles will be placed.
- Measure the back wall and cut your peel and stick tiles to fit using a utility knife.
- Start applying the tiles from the bottom center and work outward to keep them straight.
- Rub wood wax into the bare interior shelves to bring out the natural warmth of the wood.
- Stick the LED puck lights to the underside of the shelves to illuminate the workspace.
- Install the new brass knobs and reattach the doors to complete your coffee bar.
4 Mid Century Modern Cube Sideboard
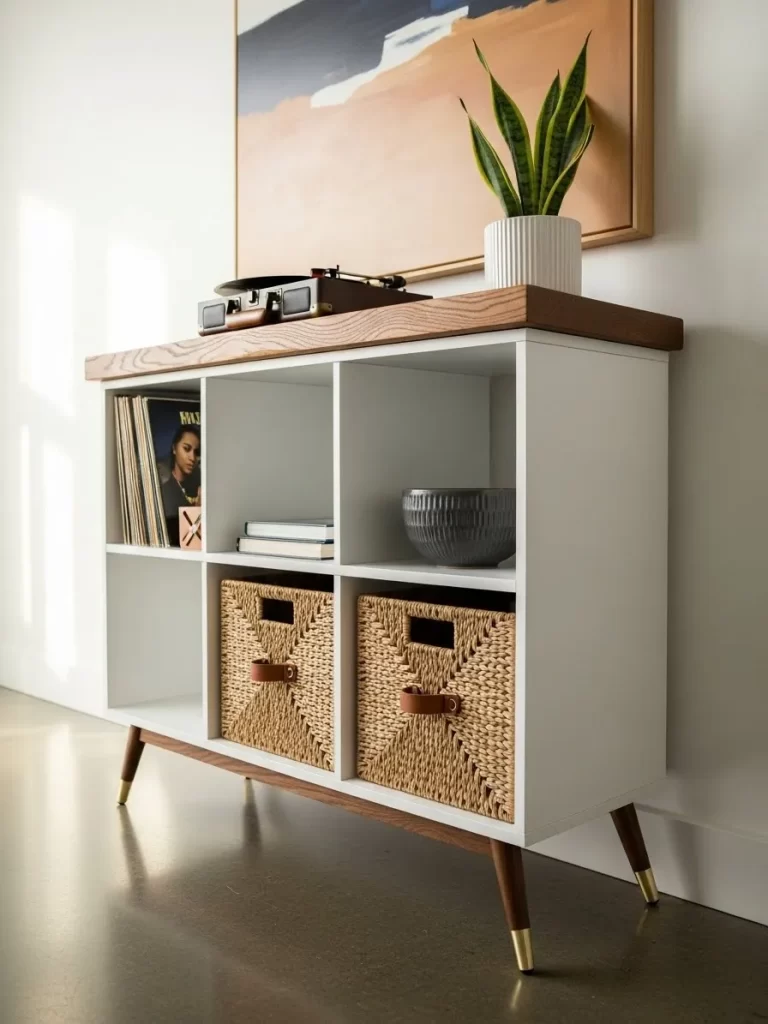
Standard white cube organizers are functional but often lack a unique personality. You can elevate a basic unit by adding a thick wood top and tapered wooden legs. These simple additions transform a budget item into a sophisticated mid century modern sideboard.
The combination of white laminate and rich wood tones creates a professional look. Using woven baskets in the bottom cubbies add texture while hiding household clutter. This piece works as a record player stand, a media console, or an entryway table.
Gold accents on the feet add a hint of luxury that catches the eye. It is an easy detail that makes the furniture look much more expensive than the original price. This project is great for anyone needing stylish storage that is easy to move.
Material Required
- White 6 cube organizer
- Pre cut wood board sized for the top
- Tapered wooden furniture legs with gold tips
- Leg mounting plates
- Walnut wood stain
- Woven storage baskets
Equipment Required
- Power drill
- Wood glue
- Clamps
- Screwdriver
- Paintbrush
DIY Instructions
- Assemble the white cube unit according to the instructions provided in the box.
- Sand the edges of the wood board until they are smooth and free of splinters.
- Apply walnut stain to the wood board and the wooden legs with a paintbrush.
- Flip the cube unit upside down to access the base for leg installation.
- Mark the four corners and screw the mounting plates into the bottom of the unit.
- Twist the tapered legs into the mounting plates until they are tight and secure.
- Flip the unit back over and apply a generous amount of wood glue to the top.
- Place the stained wood board on top and use clamps to hold it while the glue cures.
- Slide your woven baskets into the bottom cubes once the glue is dry.
- Style the top with a plant or record player to finish your new sideboard.
5 Ornate Plaster Texture Mirror
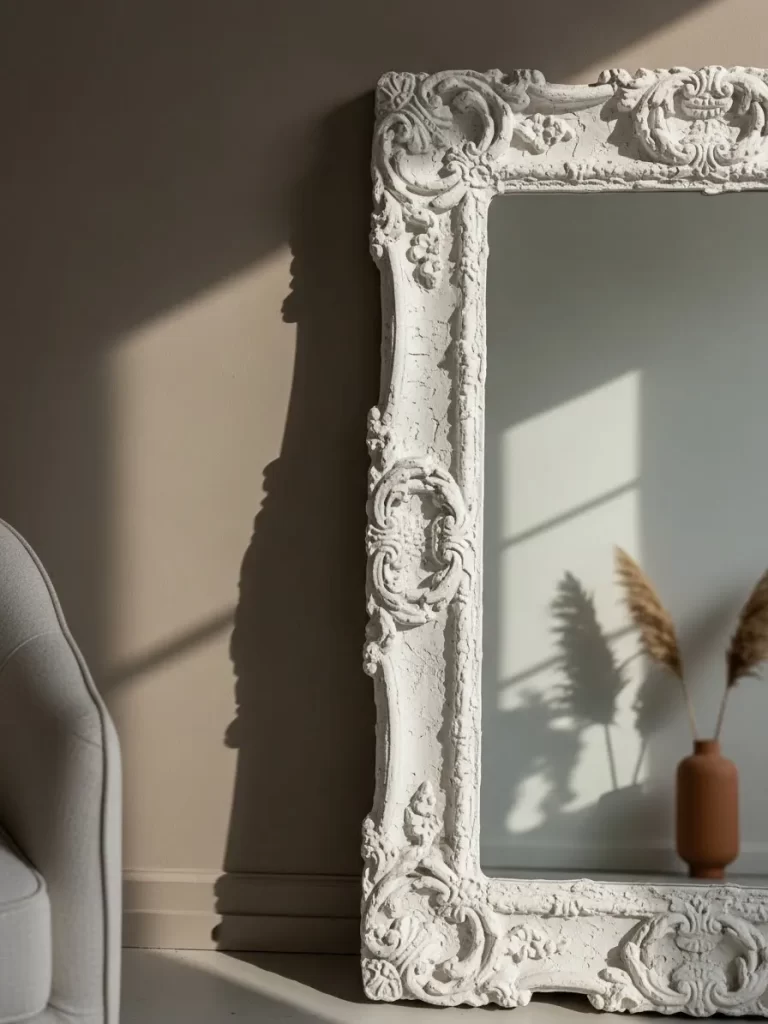
Standard gold or wood mirrors can feel too traditional for a modern home. Applying a thick joint compound over an ornate frame creates a stone like texture. This bone white finish makes the mirror look like a found antique from a European villa.
The heavy texture catches the light and creates beautiful shadows throughout the day. It softens the sharp details of the carvings while maintaining the grand scale of the piece. This technique works on almost any frame material, including plastic or metal.
A matte finish is the secret to making this look authentic and high end. It removes the cheap shine often found on mass produced decor items. This mirror becomes a sculptural element that anchors a room and adds visual depth.
Material Required
- Large ornate mirror
- All purpose joint compound
- Matte white or cream paint
- Painter’s tape
- Primer
Equipment Required
- Putty knife
- Old stiff paintbrush
- Disposable gloves
- Fine sandpaper
DIY Instructions
- Lay the mirror flat and tape off the glass edges to keep them clean.
- Apply a coat of primer to the frame to help the compound stick to the original finish.
- Scoop out the joint compound and spread it over the frame using a putty knife.
- Use your gloved hands to build up texture and create organic ridges and bumps.
- Dab the compound into deep crevices with an old paintbrush to cover the original color.
- Let the plaster dry for twenty four hours until it is hard and chalky.
- Lightly sand any areas that are too sharp or jagged with fine sandpaper.
- Paint the entire textured frame with matte white or cream paint to seal the plaster.
- Carefully peel away the painter’s tape from the glass once the paint is dry.
- Lean the mirror against a wall to create a relaxed and artistic atmosphere.
6 Industrial Hammered Metal Nightstand
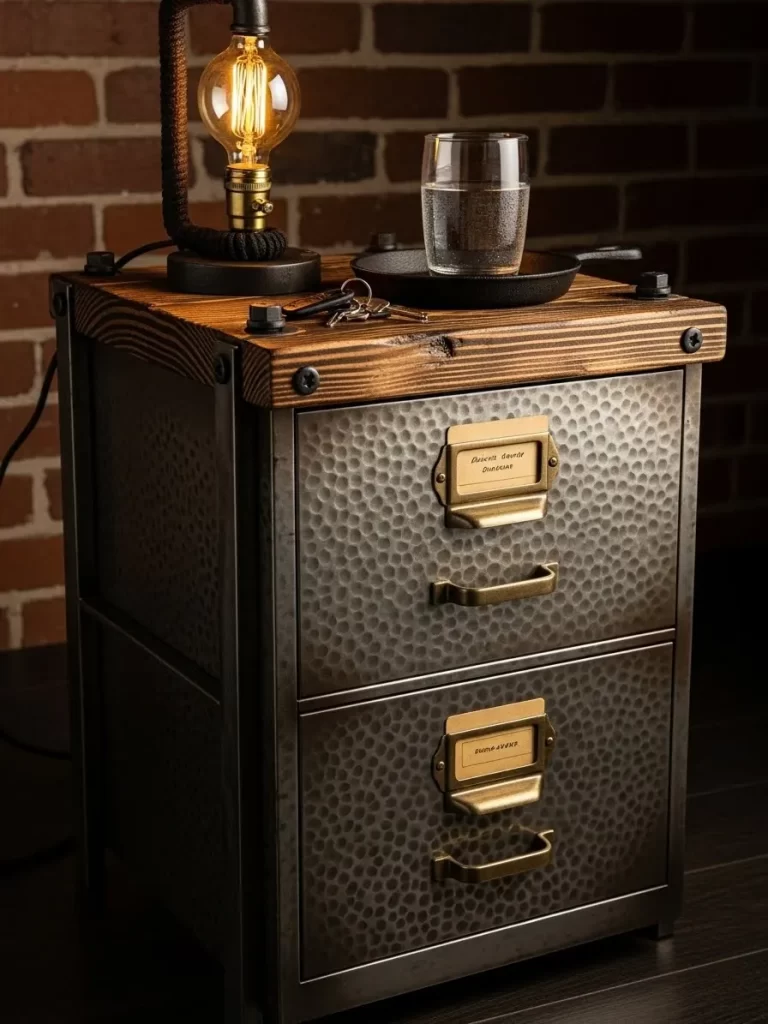
Old metal filing cabinets or small nightstands often look clinical and boring. You can give them a rugged personality by adding a hammered metal texture. This look mimics the appearance of hand forged steel or vintage factory equipment.
The dark, textured finish is great for hiding dents or imperfections in old metal. Adding a reclaimed wood top softens the coldness and provides a sturdy surface. It creates an industrial or loft style aesthetic that fits well in home offices.
Brass label holders and drawer pulls complete the vintage office look. These small details provide a sense of history and purpose to the piece. This makeover proves that even basic utility furniture can become a bold statement.
Material Required
- Metal 2 drawer chest
- Hammered finish spray paint bronze or silver
- Reclaimed wood board
- Industrial brass drawer pulls and label holders
- Construction adhesive
Equipment Required
- Screwdriver
- Fine grit sandpaper
- Degreaser
- Power drill
DIY Instructions
- Remove the drawers and take off any existing plastic handles or hardware.
- Clean the metal surfaces with a degreaser to remove oils and dirt.
- Lightly sand the metal so the new spray paint has a surface to grip.
- Spray the frame and drawer fronts with the hammered finish paint using thin coats.
- Allow the paint to dry completely so the textured pattern can fully develop.
- Measure the top of the chest and cut your wood board to fit flush.
- Stain the wood board a dark color to match the industrial theme.
- Apply construction adhesive to the top of the metal chest and press the wood into place.
- Drill holes for your new brass hardware if the old ones do not line up.
- Screw on the new handles and add labels to the holders for a finished look.
7 Boucle Textured Round Ottoman
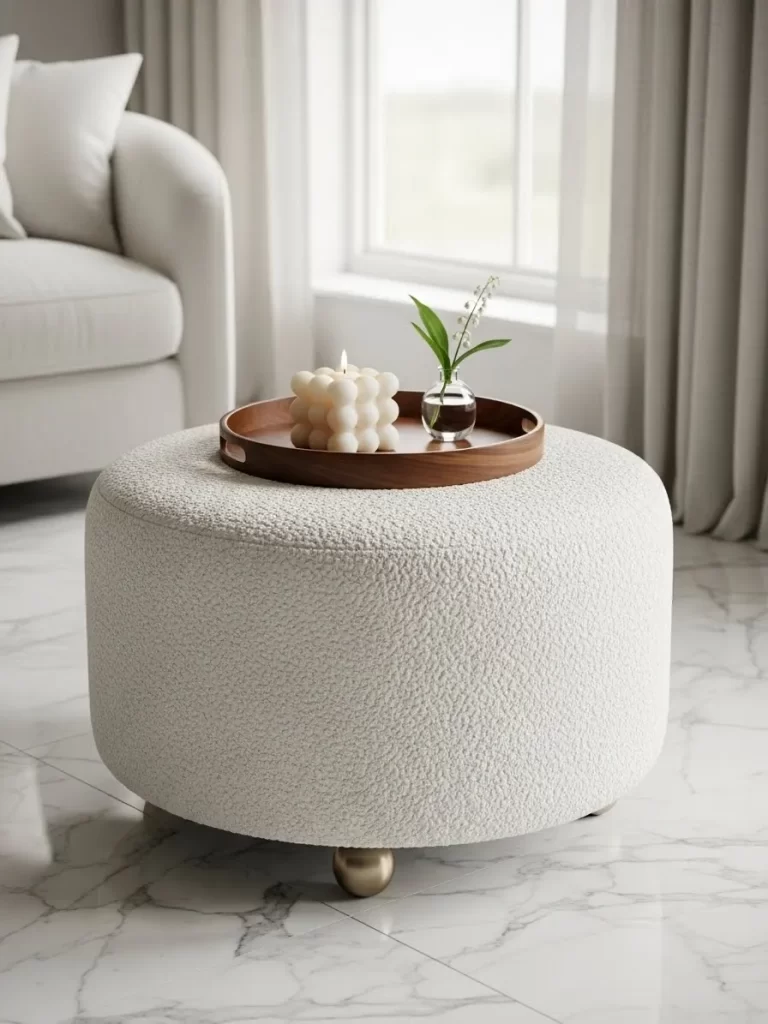
Dated footstools are easy to refresh with high texture fabrics like boucle. This nubby, wool like material is forgiving for beginners because it hides uneven staples or folds. It adds a layer of cozy luxury that makes any living space feel more high end.
Replacing old legs with brass spheres adds a modern, rounded silhouette to the piece. Placing a dark wood tray on top provides a stable surface for candles or coffee. This makeover turns a thrift store find into a boutique style furniture staple.
Boucle fabric handles wear well and feels soft against the skin. It is the leading choice for those who want a minimalist yet warm home. You can finish this project in a single afternoon.
Material Required
- Round footstool or ottoman
- Cream boucle fabric
- Upholstery batting
- Brass sphere furniture legs
- Large circular wood tray
Equipment Required
- Heavy duty staple gun
- Fabric scissors
- Screwdriver
- Measuring tape
DIY Instructions
- Turn the ottoman over and remove the old legs with a screwdriver.
- Remove the old fabric if it is bulky or dirty.
- Wrap the batting over the top and sides. Staple it to the bottom of the frame.
- Lay your boucle fabric on the floor and place the ottoman in the center.
- Pull the fabric up and staple it to the bottom. Work in a North, South, East, West pattern.
- Make small pleats as you work around the circle to keep the sides tight.
- Trim any extra fabric from the bottom to keep the base neat.
- Screw the new brass sphere legs into the bottom corners of the frame.
- Flip the ottoman over and smooth the fabric with your hands.
- Center the wooden tray on top to finish the transformation.
8 Brutalist Faux Concrete Coffee Table
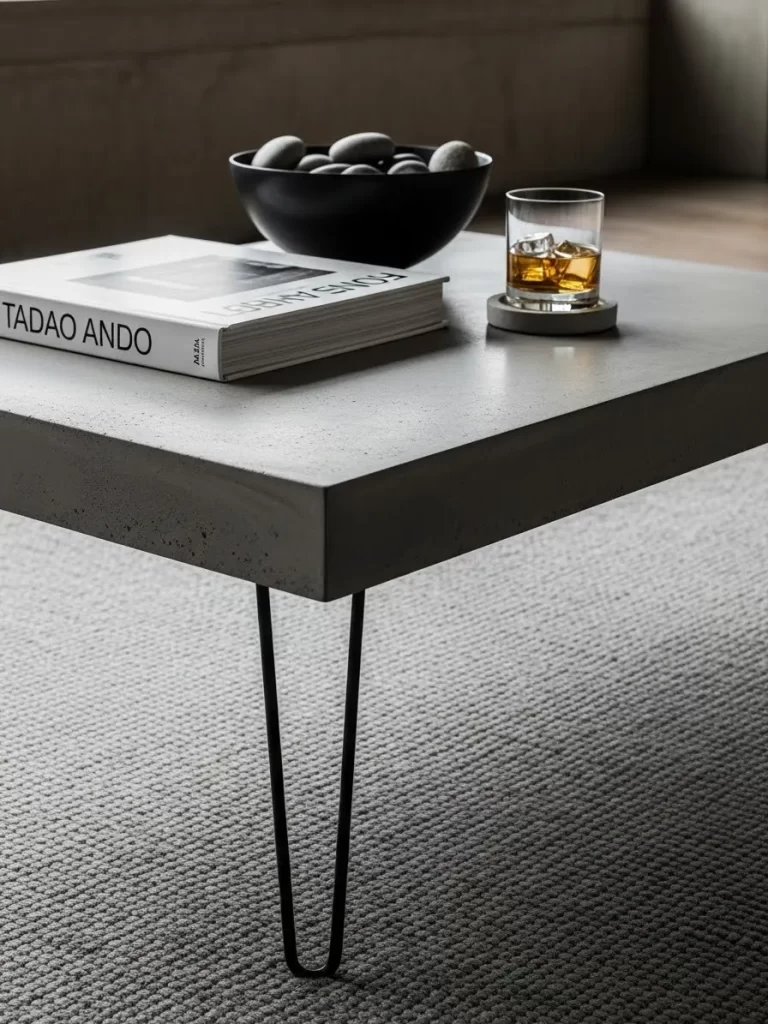
Heavy wood coffee tables can sometimes feel outdated or mismatched. Applying a micro cement finish gives them a minimalist, brutalist look that is very popular right now. This technique provides the appearance of solid stone without the massive weight.
Sleek black hairpin legs replace bulky wooden ones to create a sense of airiness. This style is for modern or industrial homes where you want a clean, neutral center piece. It is a fantastic way to save a table that has a damaged top surface.
The gray tones of the cement work with any color palette. It feels cool to the touch and handles spills much better than wood. You can achieve this sculptural look with just a few layers of product.
Material Required
- Flat top coffee table
- Feather finish concrete powder
- Black metal hairpin legs
- Concrete sealer matte
- Sanding paper
Equipment Required
- Putty knife or trowel
- Power drill
- Mixing bucket
- Microfiber cloth
DIY Instructions
- Remove the old legs and sand the tabletop to remove any gloss.
- Mix the concrete powder with water until it looks like thick frosting.
- Use a trowel to spread a very thin layer of concrete over the top and edges.
- Let the first coat dry for about four hours.
- Lightly sand away any large bumps or ridges.
- Apply a second coat. Try to make this one as smooth as possible.
- Once dry, sand the entire surface with fine grit sandpaper for a silky finish.
- Apply two coats of matte concrete sealer to protect against spills.
- Flip the table and screw the hairpin legs into the bottom corners.
- Wipe the table clean and style it with a few black accessories.
9 Modern Fluted Wardrobe Doors
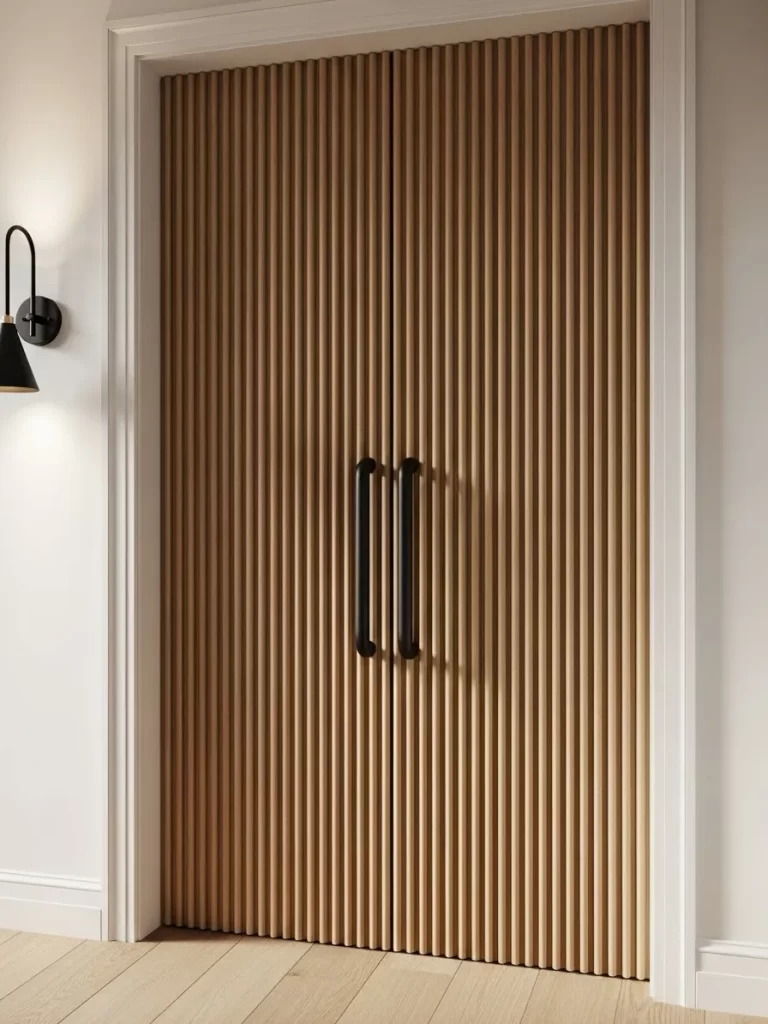
Plain wardrobe doors often lack character and can make a bedroom feel uninspired. You can add immediate architectural interest by installing thin wooden dowels to create a trendy fluted texture. The vertical lines draw the eye upward, which helps a small room feel much taller.
Natural wood tones paired with long black handles offer a sophisticated, organic modern look. This project is a clever way to cover up old doors that are scratched or boring. It turns a large, functional piece of furniture into a beautiful textured feature wall.
The texture creates shadows that change throughout the day. It adds a premium feel to a room without the cost of custom carpentry. You will love how much more expensive your closet looks after this simple update.
Material Required
- Half round wooden dowels
- Wood glue
- Clear matte wood sealer
- Long black vertical handles
- Small finish nails
Equipment Required
- Miter saw or hand saw
- Hammer
- Measuring tape
- Level
- Power drill
DIY Instructions
- Measure the exact height of your wardrobe doors from top to bottom.
- Cut your wooden dowels to this measured length using a saw.
- Apply a thin bead of wood glue to the flat back of the first dowel.
- Place the dowel on the outer edge of the door and use a level to ensure it is vertical.
- Secure the dowel by tapping a small finish nail into the top and bottom.
- Glue and press the next dowel tightly against the first one, repeating this across the door.
- Wipe away any glue that squeezes out between the dowels with a damp cloth.
- Apply a clear matte sealer over the wood once the glue is dry to protect it from dust.
- Mark the center point for your new handles and drill holes through the dowels.
- Screw the long black handles into place to complete your custom fluted wardrobe.
10 Organic Modern Bar Cart
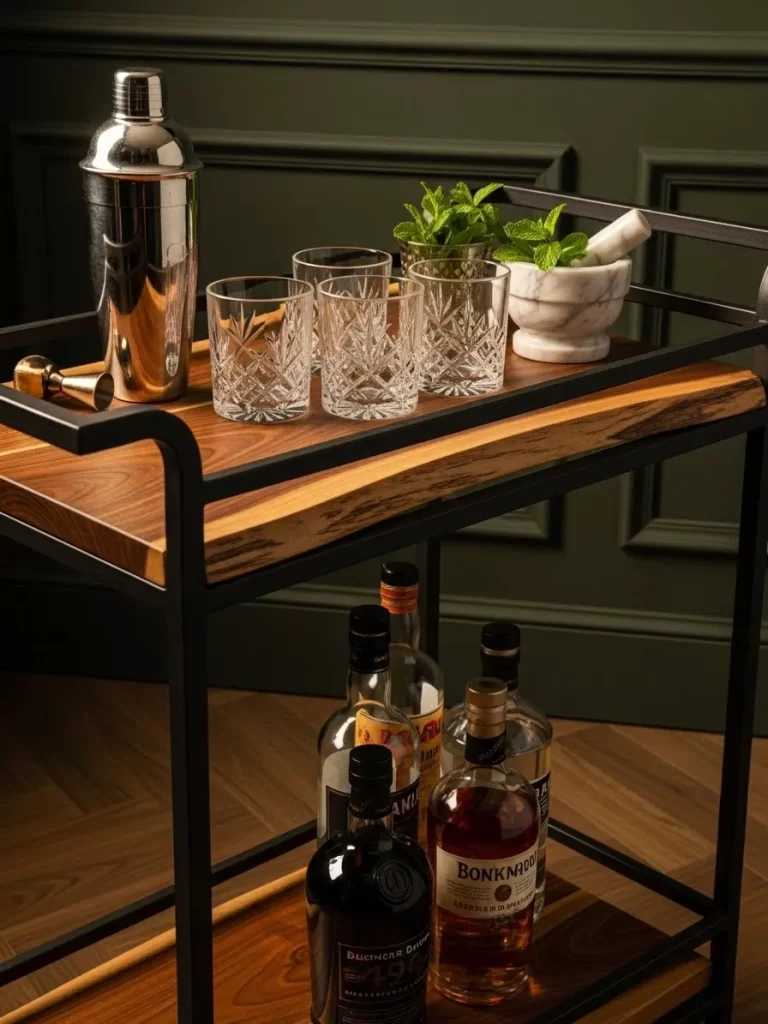
Standard metal bar carts often lack warmth or a high end feel. Replacing the shelves with live edge wood slabs adds a touch of natural luxury to your home. The contrast between the black metal frame and the raw wood edges creates a professional and sophisticated look.
This project is for turning a basic utility cart into an entertaining focal point. The rich wood grain provides a beautiful background for crystal glassware and spirits. It is a simple way to bring an organic element into a modern kitchen.
A bar cart should feel like an invitation for guests to relax. The heavy wood makes the cart feel grounded and sturdy. It is an update that combines industrial metal with the softness of nature.
Material Required
- Metal bar cart frame
- Two live edge wood slabs
- Clear wood oil or polyurethane
- Black matte spray paint
- Wood screws
Equipment Required
- Power drill and bits
- Sanding block 120 and 220 grit
- Paintbrush or rag
- Measuring tape
DIY Instructions
- Take the old shelves out of the metal frame.
- If the frame is a color you do not like, spray paint it matte black.
- Sand the wood slabs thoroughly, finishing with 220 grit for a silky feel.
- Wipe away all dust and apply a coat of wood oil to the slabs.
- Let the oil soak in and dry according to the manufacturer’s instructions.
- Measure the supports on the cart to ensure the wood will sit level.
- Place the bottom slab onto the metal supports.
- Drill pilot holes from the bottom of the metal frame into the wood.
- Secure the slabs with screws that are shorter than the wood thickness.
- Arrange your favorite glasses and a silver shaker on top to finish.
11 Library Style Built in Bookshelf
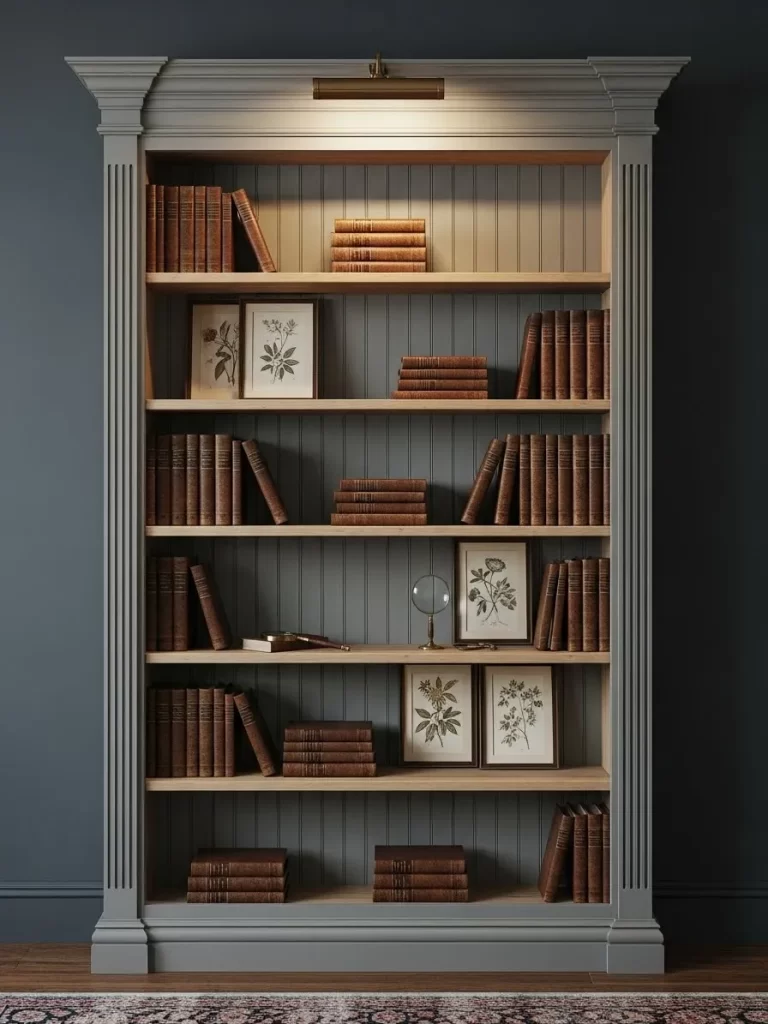
Old freestanding bookshelves can look cluttered and temporary. You can make them look like expensive custom built ins by adding crown molding and a dark painted back. Using a moody gray or blue green creates a sophisticated library vibe.
Adding a brass picture light at the top is the final touch for a professional look. It highlights your books and decor, making the whole room feel more expensive. This transformation turns a cheap unit into the main feature of your living room.
You do not need a massive budget for a grand library look. Small architectural details like molding trick the eye. It makes the furniture feel like it was built with the house itself.
Material Required
- Standard wooden bookshelf
- Crown molding strips
- Dark gray or green furniture paint
- Brass picture light battery operated
- Wood glue and finish nails
Equipment Required
- Miter saw
- Hammer
- Paint roller and brush
- Level
- Measuring tape
DIY Instructions
- Remove all shelves and sand the entire unit to prepare for paint.
- Paint the back panel of the bookshelf in your chosen dark accent color.
- Paint the frame and shelves in a matching or slightly lighter shade.
- Measure the top of the bookshelf for the crown molding.
- Cut the molding at 45 degree angles so the corners fit together tightly.
- Glue and nail the molding to the top front edge of the bookshelf.
- Use wood filler to hide any nail holes or gaps in the corners.
- Once dry, paint the molding to match the rest of the frame.
- Center the brass picture light on the top molding and mount it.
- Put the shelves back in and organize your books to complete the look.
12 Fluted Velvet Statement Headboard
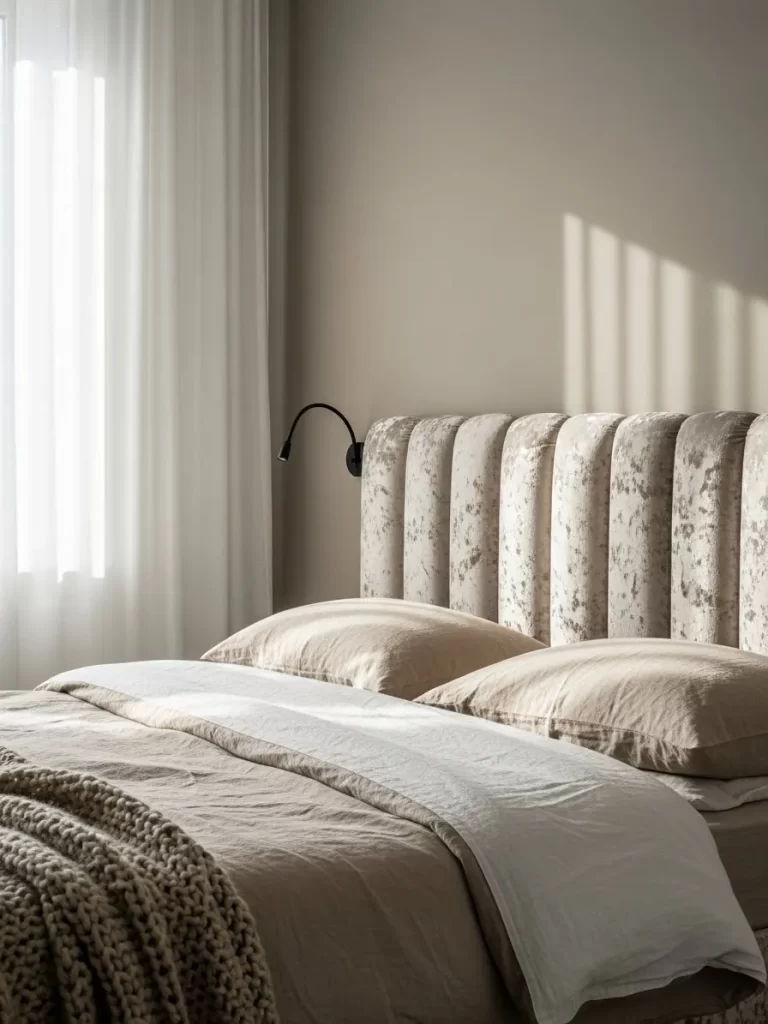
An old bed frame can be updated without buying entirely new furniture. Creating a fluted, upholstered headboard adds soft texture and a touch of glamour. The vertical channels give the bed a high end designer look that feels very current.
Using a crushed velvet or metallic fabric catches the light and adds depth to the room. This project is easier than it looks and provides a comfortable backrest for reading. It makes the bed look more substantial and luxurious.
Soft headboards make a bedroom feel quiet and serene. The fabric absorbs sound and adds a layer of comfort. You can choose any color to match your bedding and wall paint.
Material Required
- Large sheet of plywood
- High density upholstery foam
- Batting
- Crushed velvet fabric
- Spray adhesive
Equipment Required
- Staple gun
- Fabric scissors
- Bread knife
- Power drill
DIY Instructions
- Cut your plywood to the desired width and height of your bed.
- Cut vertical strips of foam that are about 4 to 5 inches wide.
- Use spray adhesive to stick the foam strips vertically onto the plywood.
- Leave a very small gap between each foam strip to create the channels.
- Wrap batting over the entire front and staple it to the back of the board.
- Cut your velvet fabric into strips wide enough to wrap around each foam section.
- Start at one side and pull the fabric into the gaps between the foam.
- Staple the fabric into the gaps first, then wrap it around the back of the plywood.
- Repeat this for every vertical section until the whole headboard is covered.
- Mount the finished headboard securely to the wall behind your bed.
13 Natural Cane Nightstand
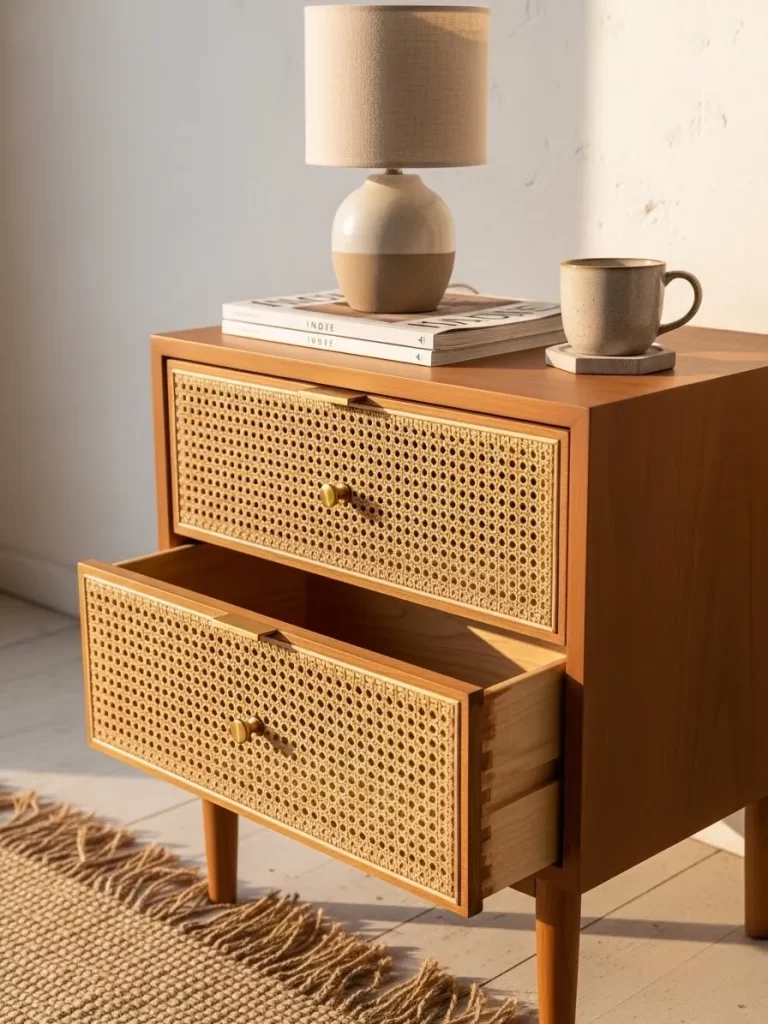
Old wooden nightstands often feel heavy and closed off in a bedroom. Replacing the drawer fronts with natural cane webbing adds a breezy, tropical feel. This style works beautifully in boho or coastal themed spaces.
Small brass knobs provide a clean, modern contrast against the textured cane. This makeover is a great way to update furniture that has damaged or boring drawer fronts. It makes the nightstand feel like a unique, handmade boutique item.
The woven cane adds texture without taking up extra space. It is light, durable, and very easy to clean. You can achieve this look with just a few basic tools and a roll of cane.
Material Required
- Wooden nightstand
- Natural cane webbing roll
- Small brass knobs
- Wood glue
- Light wood stain
Equipment Required
- Staple gun
- Utility knife
- Screwdriver
- Sandpaper
DIY Instructions
- Remove the drawers and take off the original handles.
- Sand the nightstand and apply a light wood stain to the frame.
- Use a utility knife to cut out the center panel of your drawer fronts.
- Soak the cane webbing in warm water for 30 minutes to make it flexible.
- Pat the cane dry and stretch it over the open hole in the drawer front.
- Staple the cane to the inside of the drawer frame, pulling it very tight.
- The cane will tighten further as it dries, creating a flat surface.
- Glue thin wood trim over the staples to hide them and create a clean edge.
- Drill a hole in the center and install your new brass knobs.
- Slide the drawers back in and style with a modern lamp.
14 Vibrant Outdoor Adirondack Chair
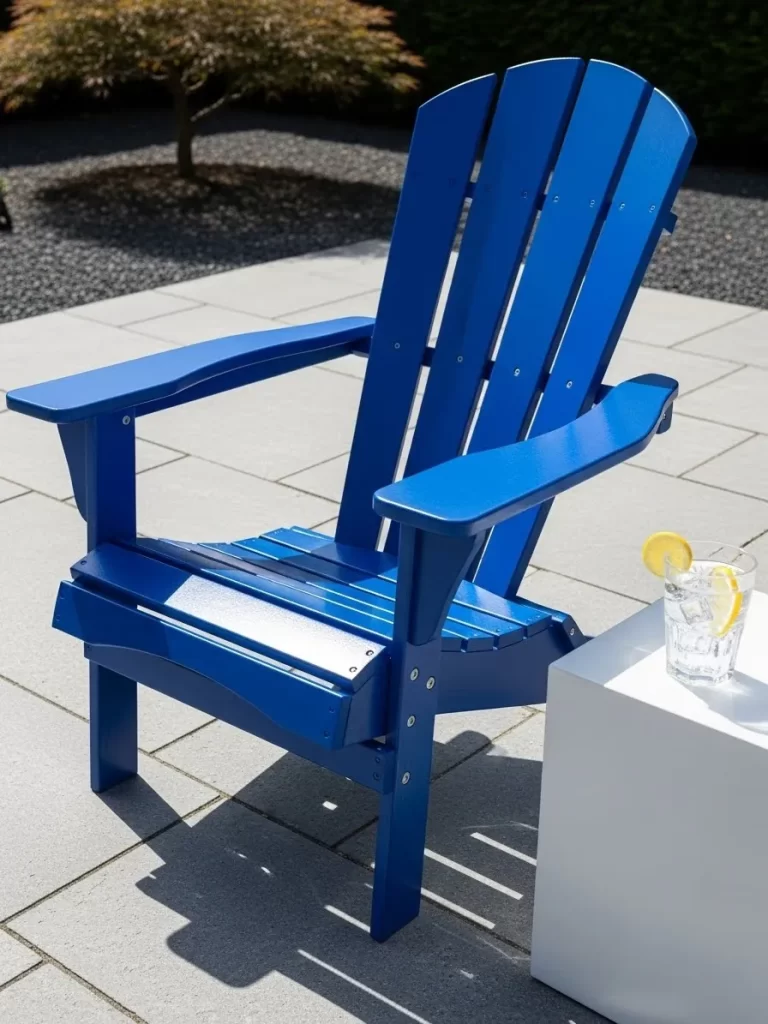
Outdoor furniture often fades or rusts over time, making your patio look tired. A bold coat of vibrant blue paint can give a classic Adirondack chair a whole new life. This bright color makes the chair a fun focal point in a garden or on a porch.
Using a high quality outdoor paint ensures the color stays bright through sun and rain. It is a quick and cheap way to refresh your outdoor seating without buying new sets. This look pairs well with modern white side tables and fresh green plants.
Refreshing your outdoor space makes it feel like a new room in your home. Bold colors stand out against green grass and trees. It is the fastest way to prepare for a summer of relaxing outdoors.
Material Required
- Wooden Adirondack chair
- Exterior grade spray paint vibrant blue
- Sandpaper medium grit
- Exterior wood primer
Equipment Required
- Cleaning brush
- Drop cloth
- Microfiber cloth
DIY Instructions
- Scrub the chair with a brush and soapy water to remove dirt.
- Let the wood dry completely before you start the sanding process.
- Sand any rough spots or peeling old paint with medium grit sandpaper.
- Wipe the chair with a damp cloth to get rid of all the dust.
- Apply a coat of exterior primer to help the paint stick and last longer.
- Once the primer is dry, spray the first coat of vibrant blue paint.
- Use long, even motions to avoid drips or thick spots.
- Make sure to get the paint into the gaps between the wooden slats.
- Let the chair dry for at least twelve hours between coats.
- Place the chair on your patio and enjoy your refreshed outdoor space.
15 Vintage Trunk Entryway Bench
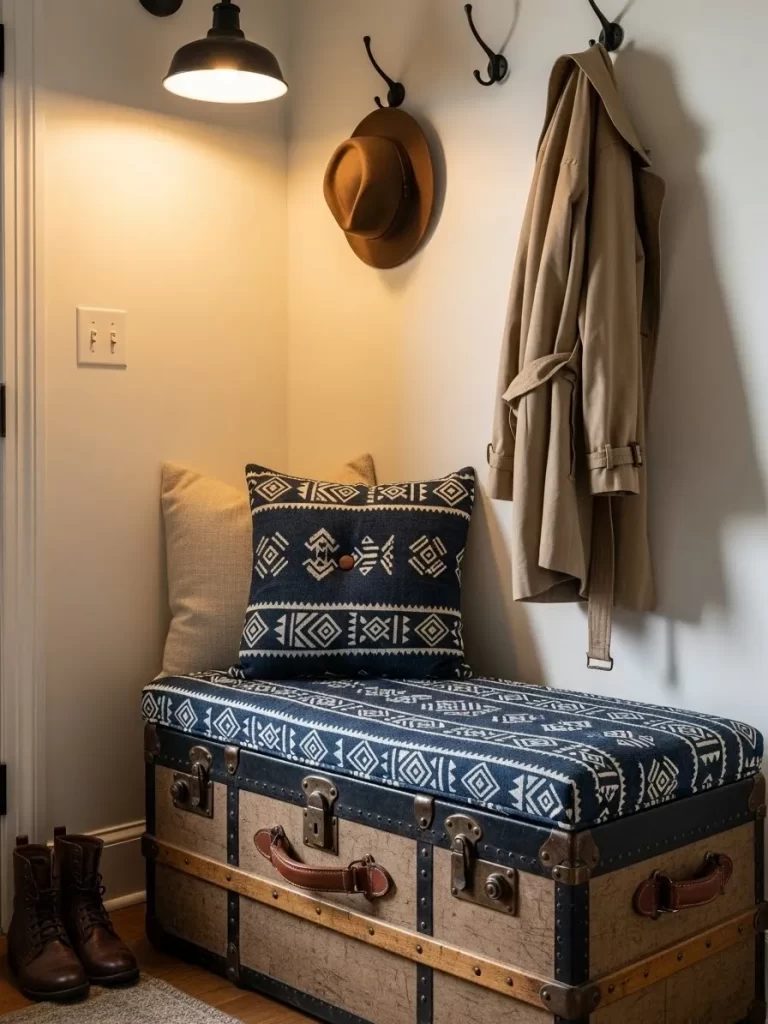
Old travel trunks are often tucked away in attics because they feel awkward to store. Adding a padded seat to the top transforms a vintage trunk into a functional entryway bench. It provides a place to sit while putting on shoes and extra storage inside for blankets.
Using a patterned fabric like a blue geometric print adds a modern touch to the antique look. This piece works well in mudrooms where you want to create a cozy, welcoming feel. It is a smart way to use an heirloom item in a practical way.
Trunks bring a sense of history into a home. The heavy metal locks and worn leather contrast with soft modern fabrics. You gain a piece of furniture that is both a seat and a large storage box.
Material Required
- Vintage steamer trunk
- Thick upholstery foam
- Patterned fabric
- Plywood board cut to the size of the trunk lid
- Spray adhesive
Equipment Required
- Staple gun
- Fabric scissors
- Screwdriver
- Measuring tape
DIY Instructions
- Clean the exterior of the trunk thoroughly with a damp cloth.
- Measure the top of the trunk lid and cut a piece of plywood to fit.
- Use spray adhesive to attach the upholstery foam to the plywood board.
- Lay your patterned fabric face down on a clean floor surface.
- Place the foam topped plywood in the center of the fabric.
- Pull the fabric tight and staple it to the back of the plywood.
- Make sure the pattern is straight and even as you go.
- Use strong adhesive or short screws to attach the seat to the trunk lid.
- Ensure any screws used do not poke through the top of the cushion.
- Place the trunk in your hallway and add a few wall hooks above it.
16 Apothecary Style Moody Green Chest
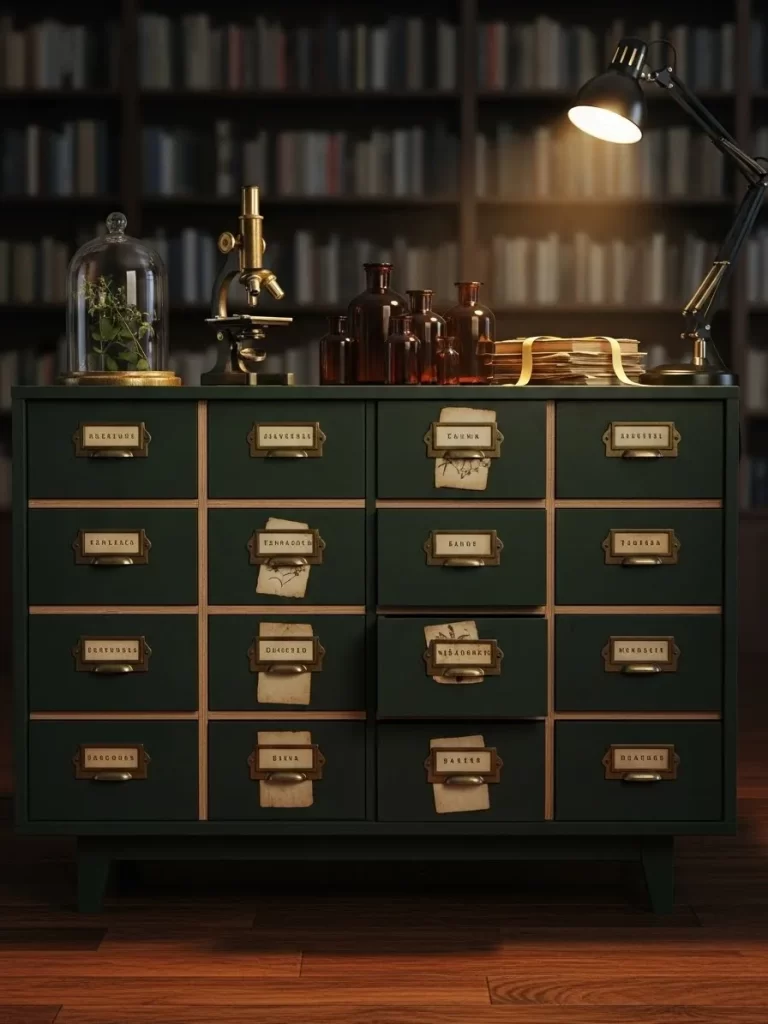
Large dressers can be transformed into antique looking apothecary chests with a few tricks. Painting the piece a deep forest green gives it a moody, historical feel. Adding many small label holders makes it look like it has dozens of tiny drawers.
This faux drawer effect is a great way to add character to a plain, modern dresser. The brass hardware stands out beautifully against the dark green paint. This piece is excellent for home offices where you need organized storage with a vintage soul.
Deep colors hide the simple lines of modern furniture. The repetitive hardware creates a rhythmic pattern that looks expensive and custom. It is an update that completely changes the identity of the piece.
Material Required
- Wide wooden dresser
- Forest green furniture paint
- Many brass label holders with handles
- Wood trim or thin molding
- Wood glue
Equipment Required
- Measuring tape
- Level
- Screwdriver
- Paint roller and brush
- Power drill
DIY Instructions
- Remove all the large drawers and take off the original handles.
- Paint the dresser frame and the drawer fronts in deep forest green.
- Apply two coats for a rich, even color and let them dry completely.
- Use a measuring tape to divide your large drawer fronts into smaller sections.
- Glue thin wood trim vertically on the drawer fronts to create the small drawer look.
- Paint the trim to match the rest of the drawer front.
- Once dry, measure the center of each small drawer section.
- Drill holes for your new brass label holders and handles.
- Screw the holders into place and add little paper labels if desired.
- Slide the drawers back in and style with vintage style accessories.
17 Fluted Pedestal Column Dining Table
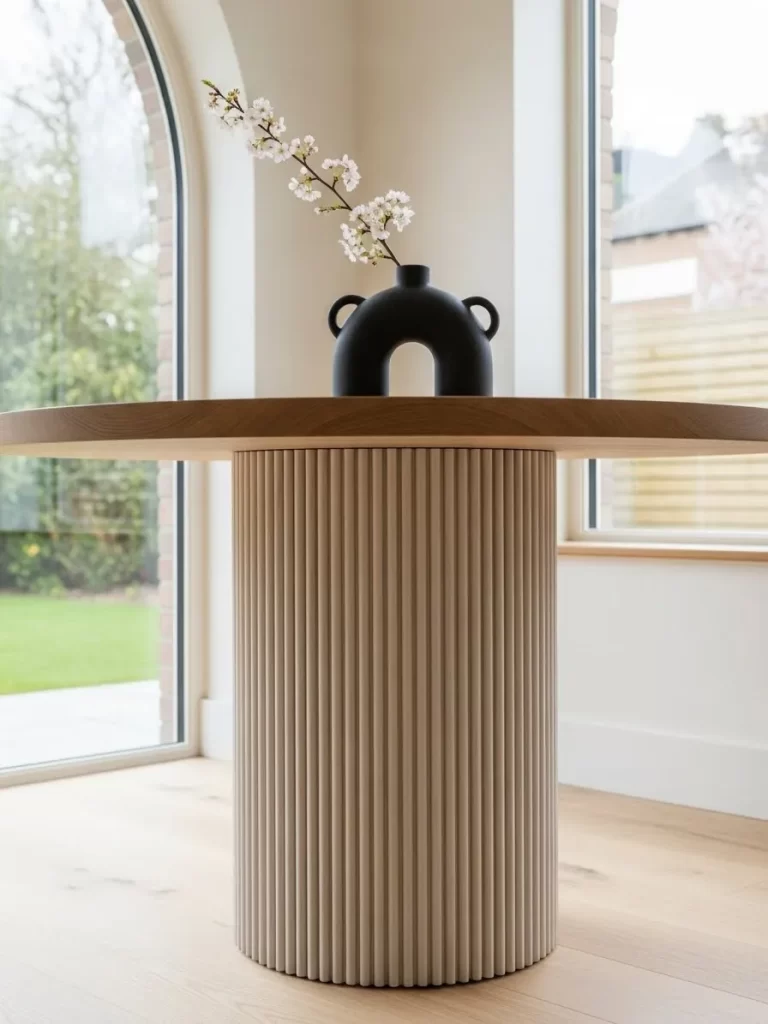
Round dining tables with dated pedestal bases are perfect candidates for a fluted makeover. Wrapping the base in wooden dowels creates a thick, architectural column that looks very expensive. This transformation makes a standard table look like a custom high end piece.
The natural wood texture on the base contrasts beautifully with a smooth, clean tabletop. This style works well in minimalist homes where simple shapes and textures are key. It is an easy way to hide a scuffed or unattractive table base.
A fluted base adds weight and presence to a room. It feels solid and permanent compared to thin metal legs. You can stain the wood to match your chairs for a unified look.
Material Required
- Round pedestal table
- Half round wooden dowels
- Wood glue
- Light wood stain or clear sealer
- Painter’s tape
Equipment Required
- Miter saw
- Measuring tape
- Sandpaper
DIY Instructions
- Clean the table base and sand it lightly so the glue will stick better.
- Measure the height of the pedestal from the floor to the tabletop.
- Cut your wooden dowels to this exact height using a miter saw.
- Apply wood glue to the back of the first dowel and press it against the base.
- Use painter’s tape to hold the dowels in place while the glue dries.
- Continue gluing dowels all the way around the pedestal until it is fully covered.
- Once the glue is dry, sand any rough edges at the top or bottom of the dowels.
- Apply a light stain or a clear sealer to the wood to protect it from dirt.
- Let the finish dry for twenty four hours before using the table.
- Style the tabletop with a minimalist vase and fresh flowers to finish.
18 Industrial Wire and Live Edge Shoe Bench
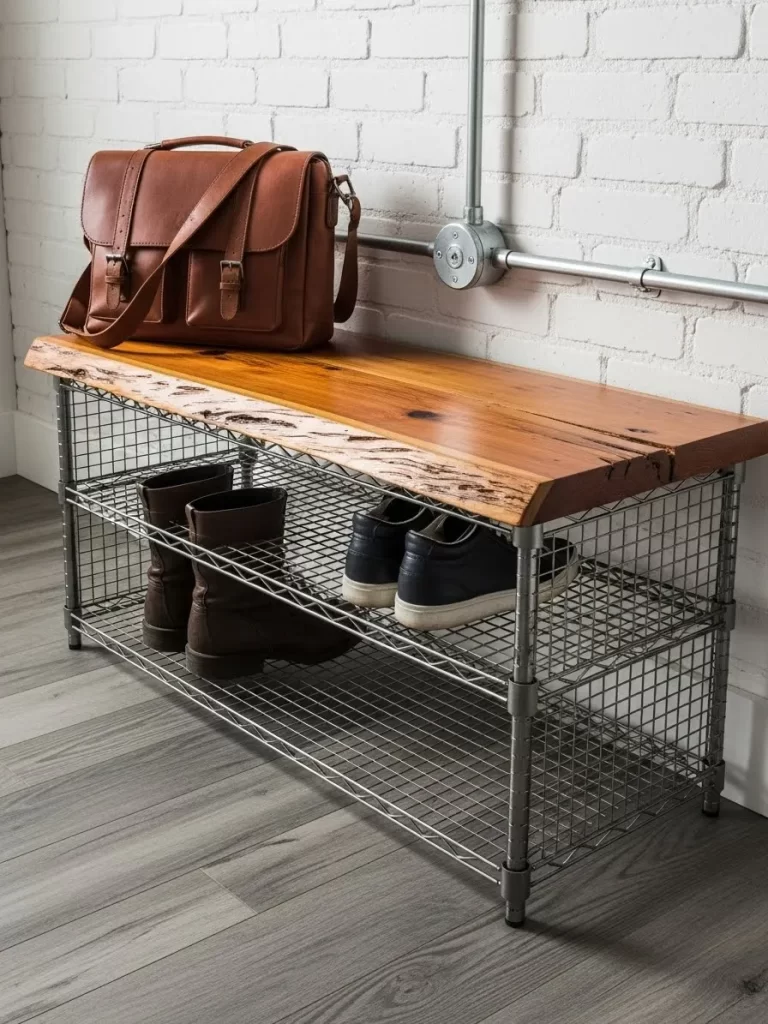
Basic wire shelving units can be elevated with a thick wood top to create a sturdy entryway bench. This industrial look is for families who need a place to store shoes and bags. The open wire shelves allow for airflow, which helps keep footwear dry.
The warm, live edge wood top provides a comfortable place to sit and softens the look of the metal. This project is great because it uses simple, functional materials that are easy to find. It turns a utility item into a piece of stylish greeting furniture.
Natural wood makes industrial metal feel warmer and more approachable. It is a durable choice for high traffic areas like entryways. You get the benefit of open storage without a messy look.
Material Required
- Small 2 tier wire shelving unit
- Thick live edge wood slab
- Metal pipe straps or heavy duty zip ties
- Wood oil or sealer
Equipment Required
- Sanding block
- Screwdriver
- Measuring tape
- Rag for oiling
DIY Instructions
- Assemble the wire shelving unit according to the provided directions.
- Sand your live edge wood board until it is smooth and safe to sit on.
- Apply a coat of wood oil to bring out the grain and protect the surface.
- Let the oil dry completely before proceeding with assembly.
- Place the wood slab on top of the wire unit and align it carefully.
- Ensure the wood has an even overhang on all sides of the frame.
- Use metal pipe straps on the underside to secure the wood to the wire frame.
- Screw the straps into the wood, ensuring the screws are not too long.
- If you prefer not to use screws, you can use black zip ties for a similar result.
- Place the bench in your mudroom and organize your boots on the shelves.
19 Matte Black Wicker Statement Chair
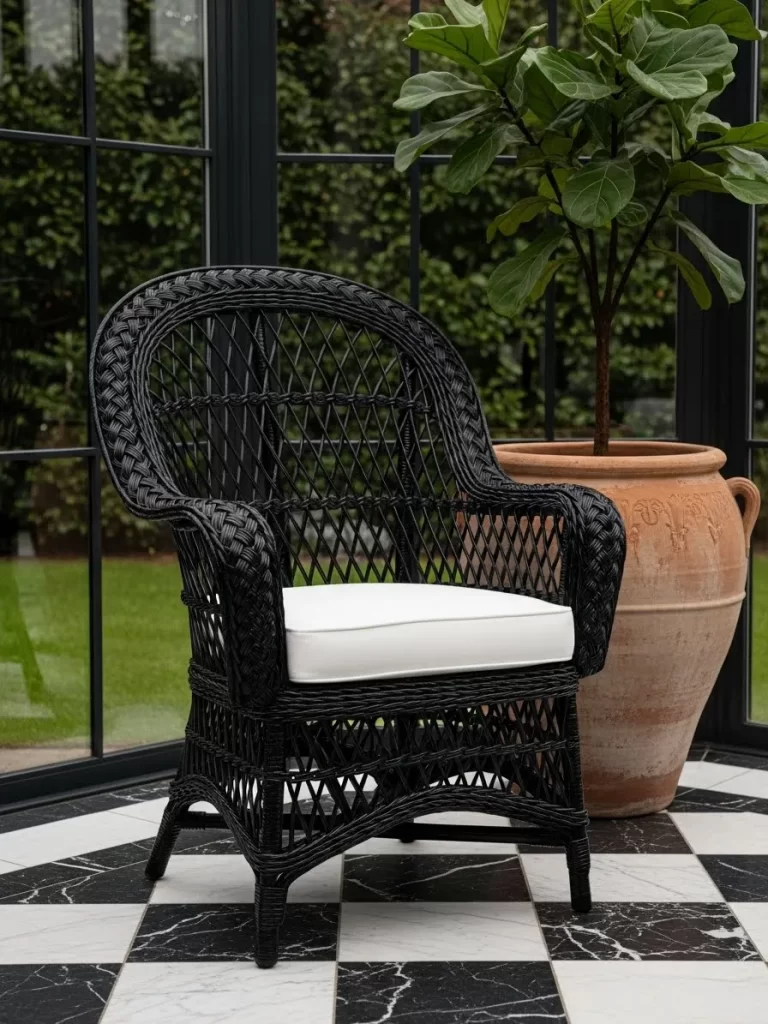
Old wicker or rattan chairs can start to look yellow and dated over time. Painting them a solid matte black gives them a modern, graphic look that stands out. The dark color makes the intricate weaving pattern pop beautifully.
Adding a crisp white cushion creates a classic high contrast look that feels very chic. This makeover is an easy way to save a chair that has minor damage or discoloration. It turns a forgotten piece into a designer style accent chair.
Black wicker feels sophisticated and edgy compared to natural brown tones. It works indoors as a reading chair or outdoors as a patio statement. You will be surprised how much the texture stands out after a coat of paint.
Material Required
- Wicker or rattan armchair
- Matte black spray paint
- White outdoor chair cushion
- Cleaning vinegar
Equipment Required
- Soft scrub brush
- Vacuum with brush attachment
- Drop cloth
DIY Instructions
- Use a vacuum to get all the dust and debris out of the wicker weave.
- Scrub the chair with a mix of water and vinegar to remove any old wax.
- Let the chair dry in the sun for several hours before painting.
- Lay down a drop cloth in a well ventilated outdoor area.
- Turn the chair upside down first and spray the bottom and inner legs.
- Flip the chair upright and spray the rest of the woven frame.
- Use several thin coats and move the can constantly to avoid drips.
- Ensure you spray from different angles to cover all the gaps in the weave.
- Let the paint dry completely until it is no longer tacky to the touch.
- Place your white cushion on the seat for a bold, modern finish.
20 Grid Style Architectural Window Mirror
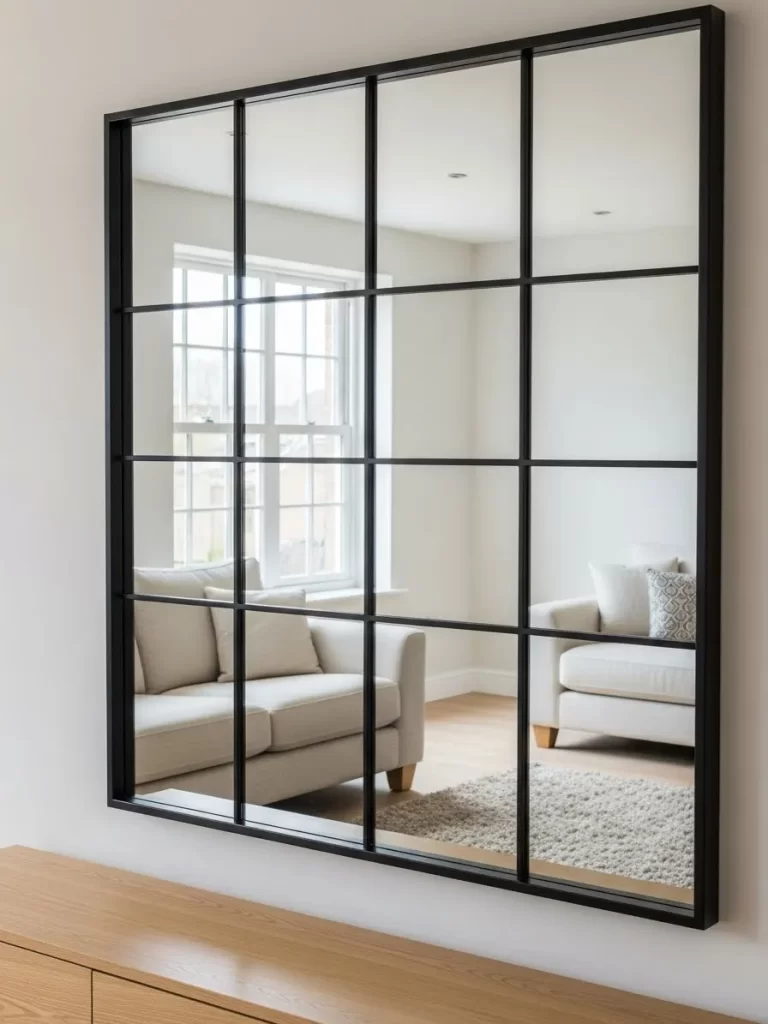
Standard large mirrors can look plain on a large, empty wall. You can create a window pane look by adding a black wooden grid over the top of the glass. This makes the mirror look like a large industrial window and adds architectural interest.
The grid reflects more light and makes the space feel like it has an extra window. This is a very popular look for living rooms and entryways. It is a budget friendly way to get the look of expensive metal mirrors.
Mirrors make a room feel bigger and brighter. The grid pattern adds structure and a sense of depth to a flat wall. You can customize the number of panes to fit the size of your mirror.
Material Required
- Large rectangular mirror
- Thin wooden lath strips or balsa wood
- Matte black paint
- Strong clear adhesive or double sided tape
Equipment Required
- Miter saw or utility knife
- Measuring tape
- Level
- Paintbrush
DIY Instructions
- Measure the height and width of your mirror inside the existing frame.
- Decide how many panes you want to create for example a 4×4 grid.
- Measure and cut your wooden strips to fit vertically and horizontally across the glass.
- Paint all the wooden strips matte black and let them dry completely.
- Clean the mirror glass thoroughly so the adhesive will stick properly.
- Use a level and a ruler to mark exactly where your vertical strips will go.
- Apply a tiny amount of clear adhesive to the back of the vertical strips and press them on.
- Measure and place your horizontal strips between the vertical ones to complete the grid.
- Ensure everything is straight and level before the glue sets firmly.
- Clean any fingerprints off the glass and hang your new window mirror.
21 Natural Oak File Cabinet Makeover
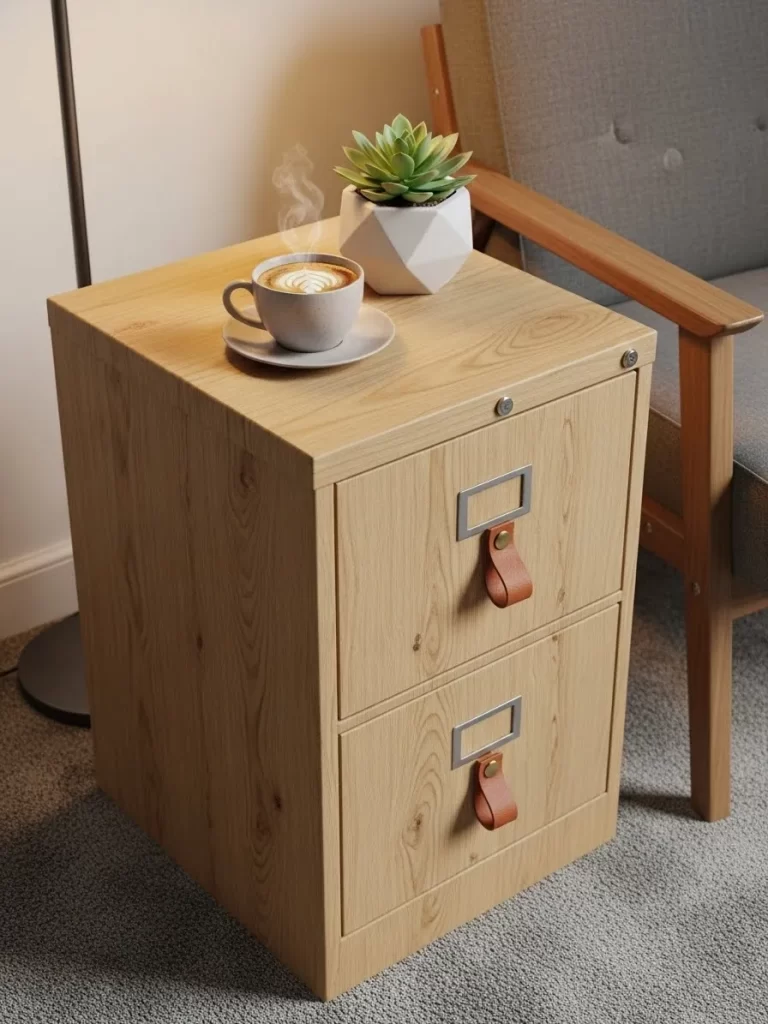
Metal filing cabinets are often ugly and industrial, but wooden ones can feel dated too. This transformation uses a light oak contact paper or veneer to cover a basic cabinet. The natural wood tone makes it look like a piece of high end Scandi furniture.
Adding leather pull handles instead of metal ones adds a soft, tactile element. This piece works as a nightstand that also holds important documents. It is a smart way to add functional storage that actually looks good in a room.
Contact paper is the easiest way to change the surface of any piece of furniture. It is durable and hides the original color completely. You can finish this office upgrade in less than an hour.
Material Required
- 2 drawer filing cabinet
- Oak wood grain contact paper or vinyl wrap
- Two leather strap handles with brass studs
- Alcohol or degreaser
Equipment Required
- Utility knife
- Squeegee or credit card
- Screwdriver
- Power drill
DIY Instructions
- Remove the old handles and clean the cabinet thoroughly with alcohol.
- Measure the height and width of each side and drawer front of the cabinet.
- Cut your contact paper slightly larger than the measured surfaces.
- Start at the top edge and slowly peel and stick the paper to the cabinet side.
- Use a squeegee to push out any air bubbles as you go down.
- Use a utility knife to trim the excess paper at the corners for a clean edge.
- Repeat this process for the drawer fronts and the top of the cabinet.
- Mark the spots for your new leather handles on the drawer fronts.
- Drill small holes and screw the leather straps into place with the brass studs.
- Place your new oak cabinet by your favorite chair and add a coffee cup.
22 Large Cane TV Console
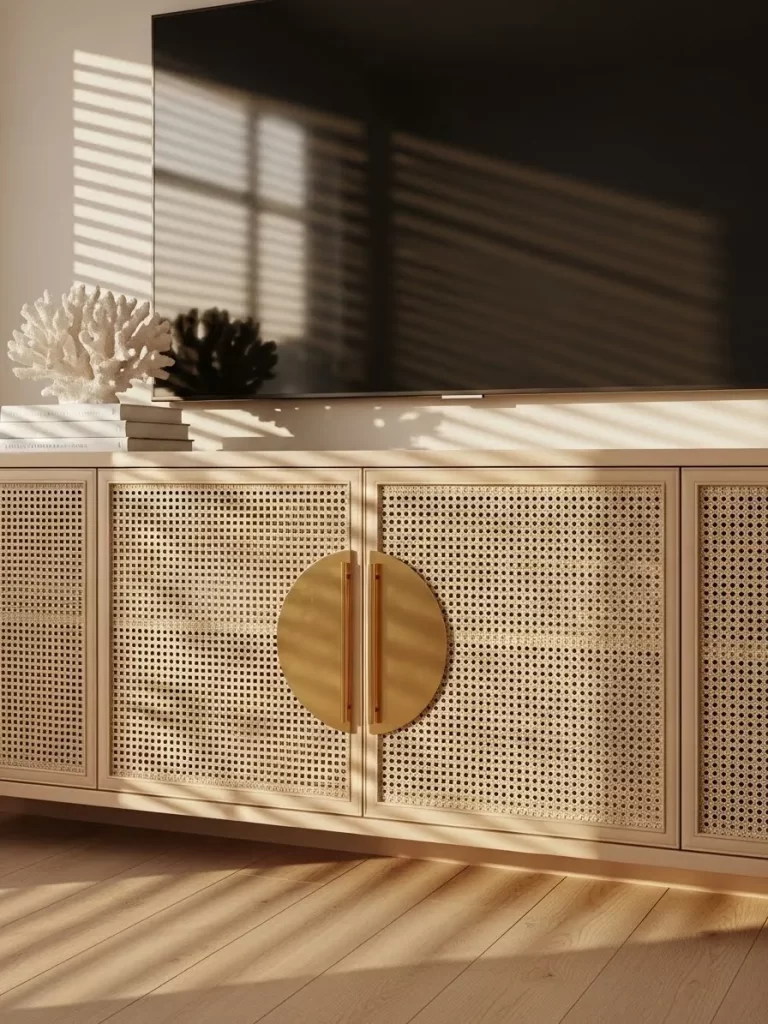
Large black TV stands can feel like a black hole in a living room. Adding cane webbing panels to the doors and painting the frame a light cream color softens the piece. Circular gold handles provide a stunning focal point in the center.
The cane allows remote signals to pass through while hiding messy electronics inside. This transformation makes a bulky item feel light and airy. It is a way to match your TV area to a modern or bohemian home style.
The large handles act like jewelry for the furniture. They draw the eye away from the screen when the TV is off. It turns a piece of utility furniture into a beautiful part of the room.
Material Required
- Long TV console or sideboard
- Natural cane webbing
- Cream or off white furniture paint
- Two large semi circle gold handles
- Wood glue
Equipment Required
- Screwdriver
- Staple gun
- Paint roller
- Utility knife
DIY Instructions
- Remove the cabinet doors and take off the old hardware.
- Paint the main frame of the console with two coats of cream paint.
- If the doors are solid, cut out the center panel to leave just the frame.
- Soak your cane webbing in warm water for 20 minutes to make it pliable.
- Staple the cane to the back of the door frames while it is still damp.
- Pull the cane tight as you staple; it will tighten further as it dries.
- Paint the door frames cream to match the rest of the unit.
- Measure the center point where the two doors meet.
- Install the large gold semi circle handles so they form a full circle when closed.
- Reattach the doors and place your TV on top of your new designer console.
23 Emerald Green and Gold Folding Chair
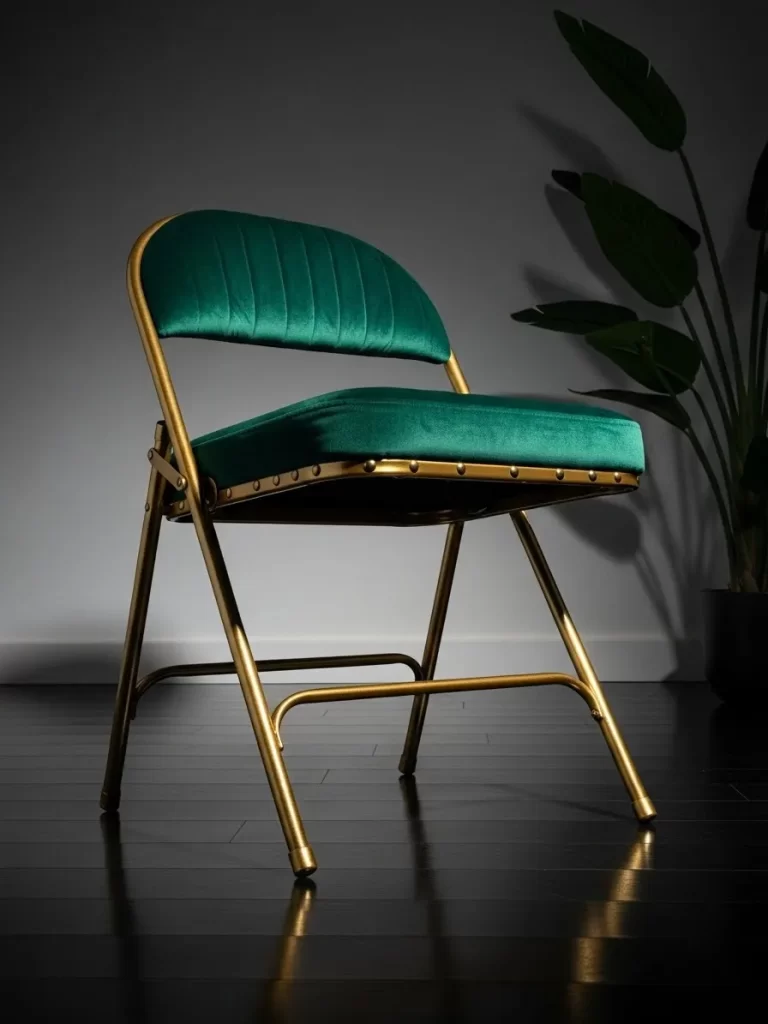
Standard metal folding chairs are usually hidden in closets until extra guests arrive. You can make them a permanent part of your decor by painting them gold and adding emerald velvet cushions. This makes them look like high end boutique seating.
The vertical channel stitching on the backrest adds a touch of retro glamour. This is a very budget friendly project that uses chairs you might already own. These chairs are for adding extra seating that actually looks stylish.
Rich colors like emerald and gold feel sophisticated. Velvet is soft and comfortable for long dinners or game nights. You gain beautiful extra chairs that do not take up much space.
Material Required
- Metal folding chair
- Gold metallic spray paint
- Emerald green velvet fabric
- Upholstery foam and batting
- Decorative brass upholstery tacks
Equipment Required
- Screwdriver
- Staple gun
- Hammer
- Fine sandpaper
DIY Instructions
- Use a screwdriver to remove the seat and backrest pads from the chair.
- Lightly sand the metal frame so the gold paint will stick better.
- Spray the frame with several thin coats of gold metallic paint and let it dry.
- Wrap the seat and backrest with new foam and a layer of batting.
- Cover the pads with the green velvet fabric and staple it tightly to the back.
- For the backrest, use a sewing machine or hand stitch vertical lines to create the fluted look.
- Secure the velvet to the backrest frame using brass upholstery tacks.
- Tap the tacks in evenly with a hammer for a professional, studded finish.
- Reattach the padded seat and backrest to the gold metal frame.
- Place the chair in your living room as a stylish and functional accent piece.
24 Weathered Sage Herb Ladder
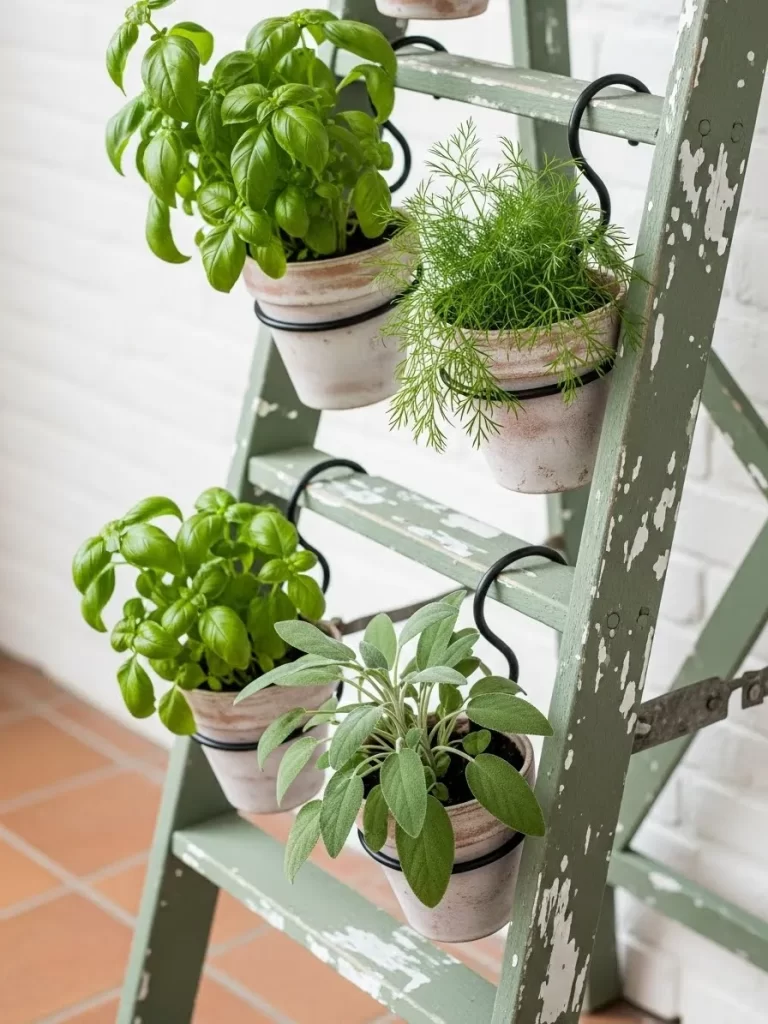
An old wooden ladder can be repurposed into a beautiful vertical herb garden for your kitchen. Painting it a weathered sage green gives it a soft, farmhouse aesthetic that feels fresh. Hanging terracotta pots from the rungs makes the plants easy to access and water.
This project is for small kitchens where counter space is limited. The vertical design allows you to grow many herbs in a very small footprint. It turns a piece of junk into a living, breathing part of your home.
Fresh herbs make any kitchen feel alive and organized. The sage green color blends in with the leaves of the plants. You can keep your basil and rosemary right where you need them for cooking.
Material Required
- Old wooden ladder
- Sage green chalk paint
- S hooks black or silver
- Small terracotta pots
- Pot hangers or heavy duty wire
Equipment Required
- Sandpaper
- Paintbrush
- Power drill
- Pliers
DIY Instructions
- Clean the ladder and sand away any old, peeling paint or splinters.
- Apply a coat of sage green chalk paint. Use a dry brush technique for a weathered look.
- Let the paint dry and lightly sand the edges to reveal a bit of wood for an aged feel.
- Wrap heavy duty wire around the rim of each terracotta pot and form a loop.
- Ensure the wire is tight so the pots do not slip out when full of soil.
- Attach an S hook to each wire loop on the pots.
- Hang the pots from the rungs of the ladder, spacing them out evenly.
- Plant your favorite herbs like basil, sage, and rosemary in the pots.
- Secure the ladder to the wall with a single screw at the top for safety.
- Place the ladder near a sunny window so your herbs can thrive indoors.
25 Terracotta Checkered Tiled Coffee Table
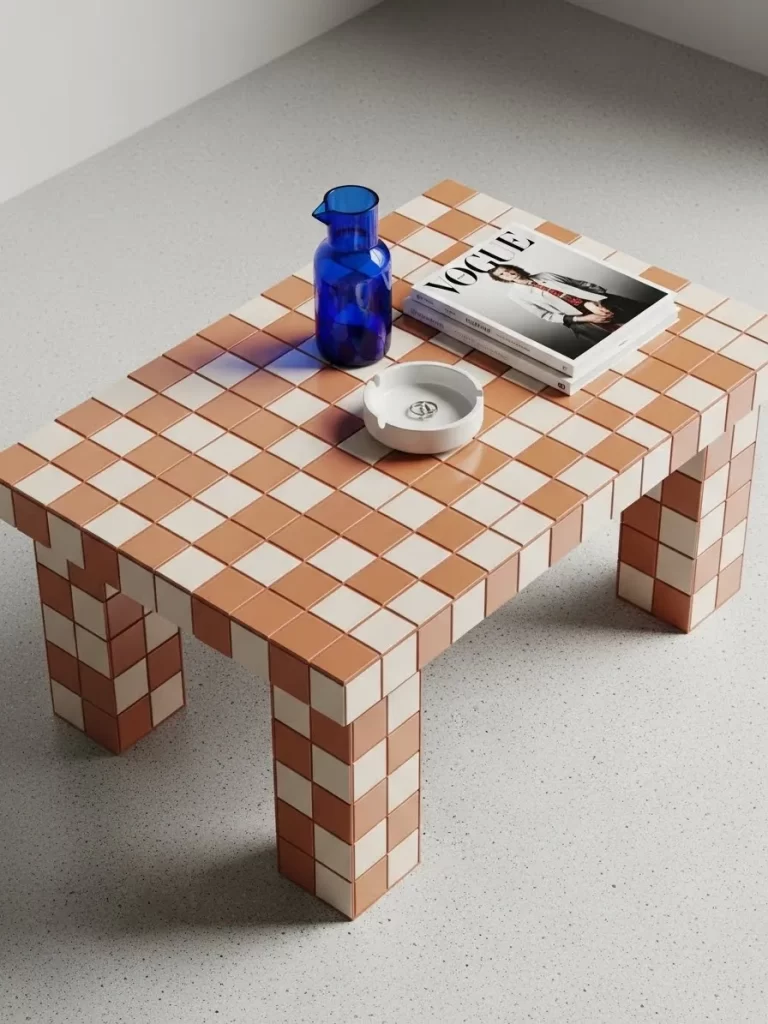
Standard square coffee tables can be updated with a playful checkered tile pattern. Using terracotta and cream tiles creates a warm, mediterranean vibe that is very popular. The grid pattern adds a geometric element that makes the table look like a modern art piece.
This transformation is for tables with scratched or damaged tops. The tiled surface is very durable and easy to clean, making it great for daily use. It turns a boring item into a bold and colorful focal point.
Tiles add weight and a sense of permanence to a piece of furniture. They are resistant to heat and water, so you do not need coasters. It is a stylish upgrade that is also very practical for a busy home.
Material Required
- Square wooden coffee table
- Small square tiles terracotta and cream
- Tile adhesive or mastic
- Pre mixed tile grout
- Sponge and bucket
Equipment Required
- Grout float
- Trowel
- Measuring tape
- Level
DIY Instructions
- Clean the table surface and sand it lightly to help the adhesive bond.
- Measure the table and mark the center point to ensure your pattern stays straight.
- Spread a thin layer of tile adhesive over a small section of the table.
- Press the tiles into the adhesive in a checkered pattern, alternating colors.
- Work your way from the center out to the edges of the table.
- Let the adhesive dry for twenty four hours before you start grouting.
- Spread the grout over the tiles using a grout float, pushing it into the gaps.
- Let the grout sit for twenty minutes, then wipe the excess off with a damp sponge.
- Buff the tiles with a dry cloth once the grout has fully cured.
- Style your new tiled table with a blue glass pitcher and some art books.
26 Textured Stone Look Jewelry Box
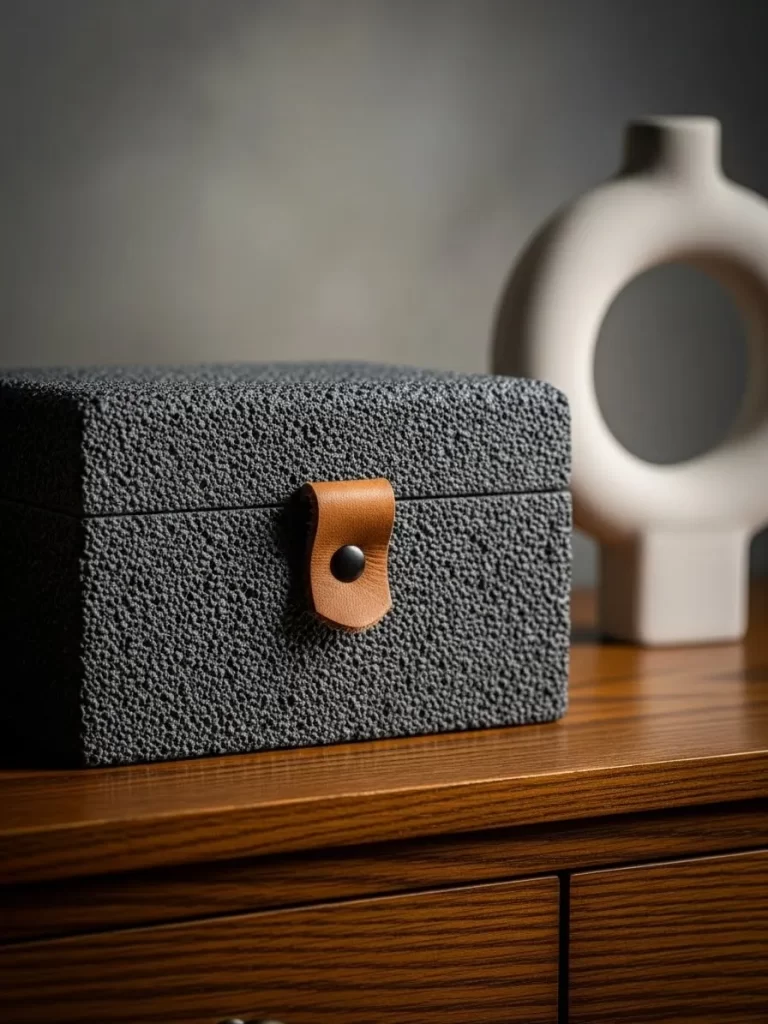
Small wooden boxes can be elevated with a thick, textured finish that looks like natural stone. Using a spray on stone texture or a thick joint compound creates a rugged and high end feel. Adding a leather tab handle provides a soft, organic contrast to the hard texture.
This transformation is for hiding cheap wood or plastic materials. The dark gray color makes the box look heavy and expensive. It is a great way to create a designer style storage piece for your dresser.
Texture adds a tactile quality to small decor items. A stone look box feels modern and sophisticated next to your jewelry and perfumes. It is a fast project that makes a big impact on your styling.
Material Required
- Small wooden or plastic box
- Stone texture spray paint dark gray
- Small scrap of brown leather
- One black decorative screw or stud
- Matte sealer spray
Equipment Required
- Sandpaper
- Power drill
- Screwdriver
- Cleaning cloth
DIY Instructions
- Clean the box and sand the surface so the textured paint will stick.
- Spray the entire box with several coats of stone texture spray paint.
- Let the paint dry completely until the gritty texture is fully formed.
- Apply a matte sealer spray to protect the texture from chipping or peeling.
- Cut a small rectangular strip of brown leather for the handle.
- Fold the leather strip in half to create a loop or tab.
- Drill a small hole in the center of the box lid where the handle will go.
- Secure the leather tab to the lid using the black decorative screw.
- Ensure the screw is tight so the handle does not wobble when used.
- Place the box on your dresser and use it to store your favorite jewelry.
27 Blue Marble and Gold Executive Desk
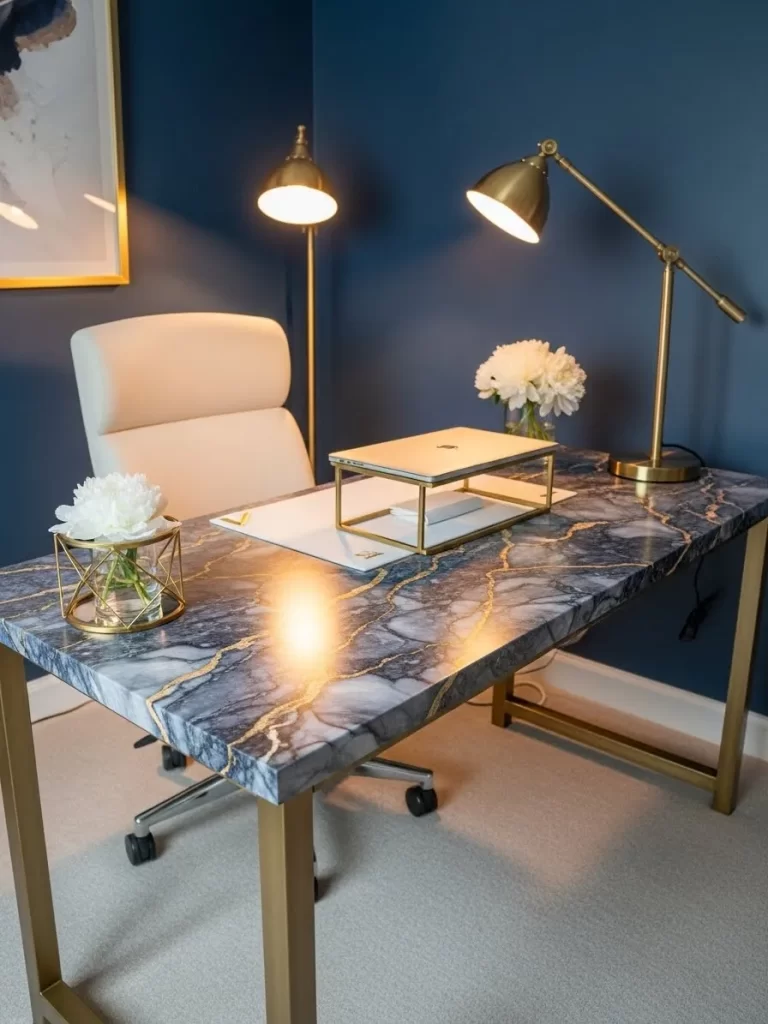
A basic wooden desk can be transformed into a luxury workspace with blue marble contact paper. The deep blue tones and gold veins create a stunning and professional surface. Painting the legs a soft gold color completes the high end executive look.
This transformation is much cheaper than buying a real marble desk and is easy to do. The marble surface is easy to wipe clean and provides a beautiful backdrop for work. It turns a simple office into a sophisticated and inspiring space.
A beautiful desk makes you want to sit down and be productive. The blue and gold combination feels powerful and refined. You get a high end look for just the price of a roll of contact paper.
Material Required
- Simple wooden desk
- Blue marble contact paper
- Gold metallic furniture paint
- Clear protective desk mat
- Degreaser
Equipment Required
- Utility knife
- Squeegee
- Paintbrush
- Screwdriver
DIY Instructions
- Remove the legs from the desk top and clean all surfaces with a degreaser.
- Paint the desk legs with two coats of gold metallic paint and let them dry.
- Measure the desk top and cut the marble contact paper slightly larger.
- Start at one edge and slowly apply the contact paper to the desktop.
- Use a squeegee to smooth out any air bubbles as you move across the surface.
- Use a utility knife to trim the paper exactly at the edges for a clean look.
- For the corners, make a small diagonal cut and fold the paper underneath.
- Reattach the gold legs to the desk top once everything is dry and set.
- Place a clear desk mat on top if you want extra protection for the paper.
- Style your new desk with gold lamps and white flowers for a polished finish.
28 Pastel Sage and Wood Step Stool
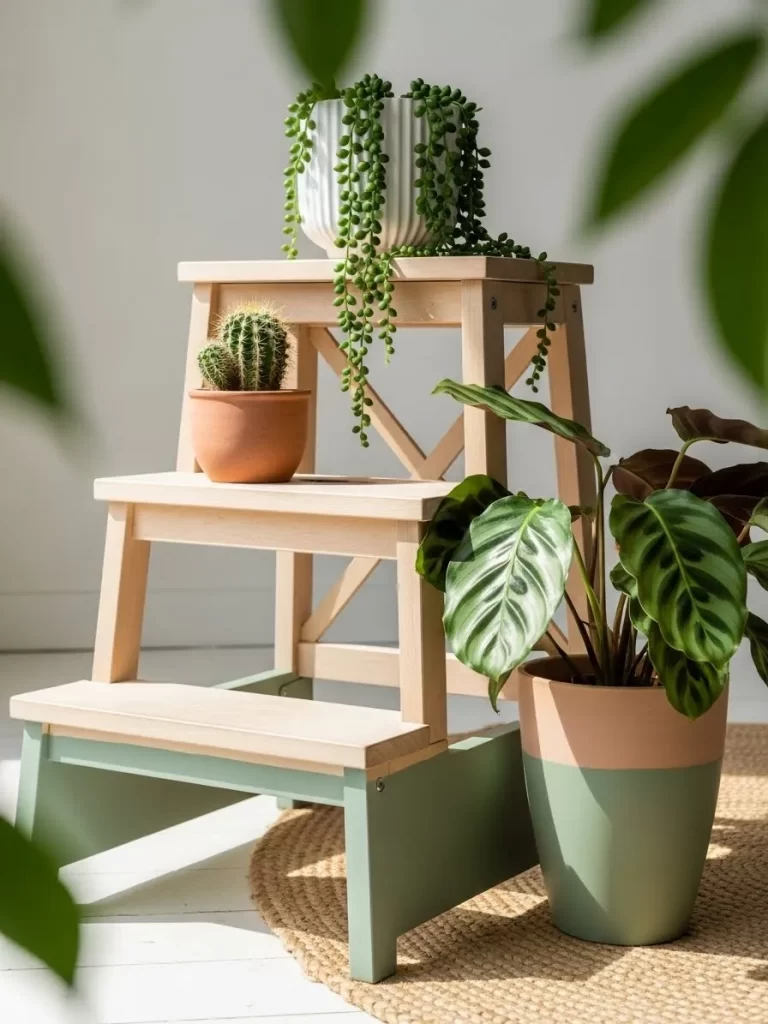
Basic wooden step stools from the hardware store are very useful but often boring. Painting the bottom half in a soft pastel sage green adds a fresh and modern touch. Leaving the top steps in natural wood creates a beautiful two tone Scandi look.
This stool is for holding plants or acting as a small side table. The light green color pairs with natural terracotta pots and green foliage. It is a simple way to add a bit of color and function to any corner.
Two tone furniture feels intentional and modern. It keeps the warmth of the wood while adding a soft pop of color. You can finish this simple project in just an hour.
Material Required
- Wooden 3 step stool
- Pastel sage green paint
- Clear wood wax or sealer
- Painter’s tape
- Fine sandpaper
Equipment Required
- Paintbrush
- Sanding block
- Measuring tape
- Cleaning cloth
DIY Instructions
- Clean the stool and sand the entire surface to remove any splinters.
- Decide where you want the paint line to be on the legs of the stool.
- Use painter’s tape to wrap the legs tightly at that point for a clean line.
- Paint the bottom section of the legs and the lowest step with sage green paint.
- Apply two thin coats for an even and durable finish.
- Carefully remove the painter’s tape while the second coat is still slightly damp.
- Let the paint dry completely for twenty four hours.
- Apply clear wood wax to the natural wood sections to protect them from dirt.
- Buff the wax with a dry cloth until it has a soft, healthy shine.
- Place a trailing plant on the top step to create a beautiful tiered display.
29 Lava Textured Gradient Table Lamp
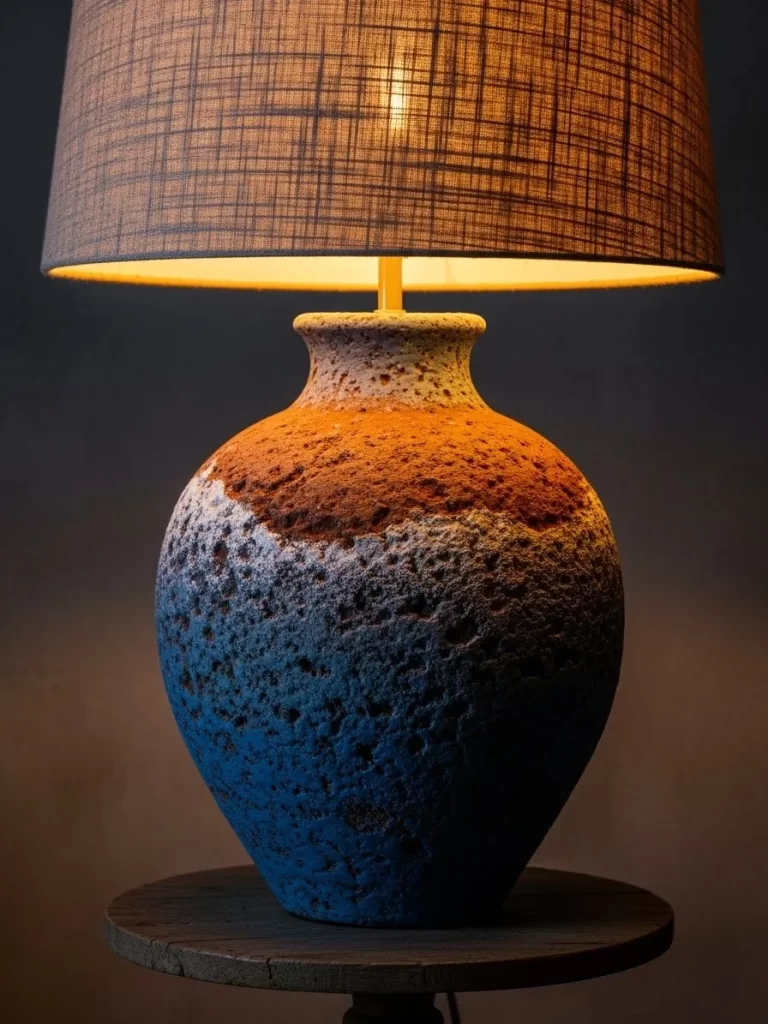
A plain ceramic lamp can be transformed into a sculptural statement piece with lava texture. Using a mix of coarse sand and paint creates a rugged, volcanic surface. A color gradient from dark blue to orange red mimics the look of cooling lava.
The textured surface catches the light from the bulb and creates beautiful shadows. This transformation turns a functional item into an eye catching work of art. It is a way to add a bold and organic element to a dark room.
Texture makes simple lighting feel much more artistic. The gradient colors add a warm glow even when the lamp is off. It is an update that makes a cheap lamp look like a gallery piece.
Material Required
- Simple ceramic table lamp
- Coarse sand or texture additive
- Acrylic paints dark blue, gray, and orange red
- Neutral colored fabric lampshade
- Matte sealer
Equipment Required
- Paintbrush
- Mixing bowls
- Painter’s tape
- Protective gloves
DIY Instructions
- Remove the lampshade and tape off the light socket and cord to keep them clean.
- Mix the coarse sand into your gray paint to create a thick lava paste.
- Apply the gray paste to the entire lamp base, creating lumps and ridges as you go.
- While the base is still wet, dab dark blue paint onto the bottom section.
- Apply orange red paint to the top section, blending it into the gray in the middle.
- Use a dabbing motion with your brush to create a natural transition between colors.
- Let the textured paint dry for twenty four hours until it is completely hard.
- Apply a coat of matte sealer to protect the texture and colors.
- Remove the painter’s tape from the socket and attach your fabric shade.
- Turn on the lamp and enjoy the warm, glowing lava effect in your home.
30 Symmetrical Minimalist Gallery Wall
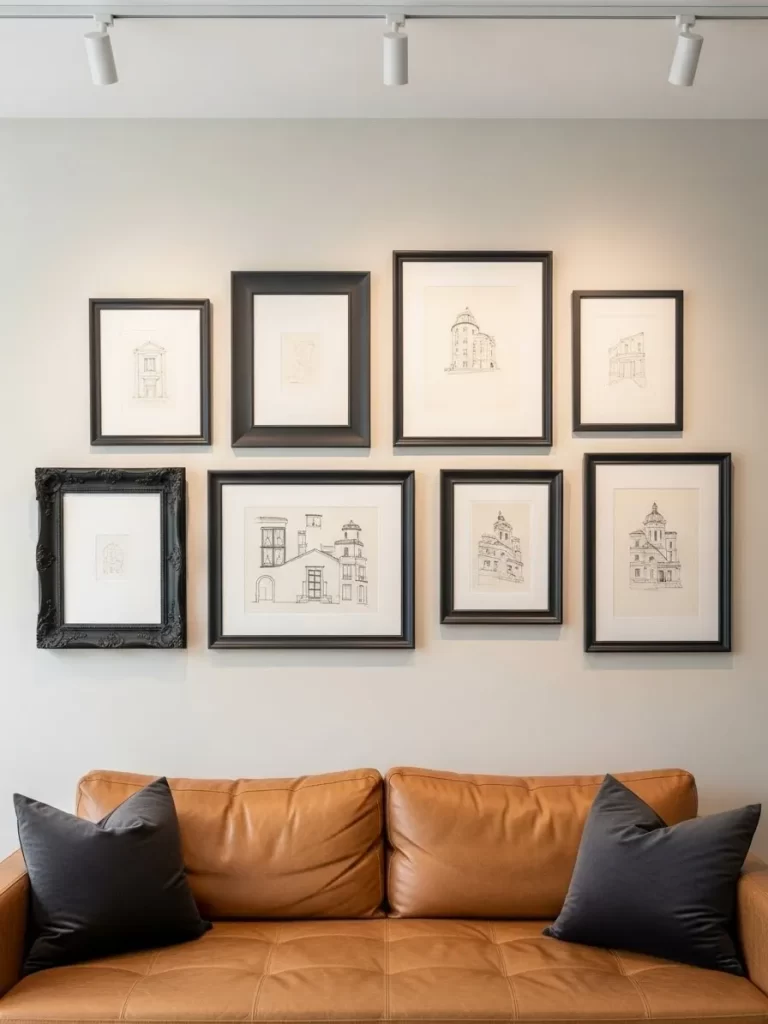
An empty wall above a sofa can be transformed into a sophisticated gallery with symmetrical frames. Using simple black frames with large white mats creates a clean and professional look. Simple line drawings or architectural sketches add a refined and artistic touch.
The symmetrical layout makes the room feel more organized and balanced. This is a way to display small art pieces in a way that feels impactful and intentional. It turns a boring wall into a curated focal point for your living room.
Art brings your personality into a room. A large grid of frames makes a bigger impact than one small picture. You gain a high end gallery look for just the cost of basic frames.
Material Required
- Set of 8 matching black picture frames
- White paper or cardstock for mats
- Simple black and white art prints or sketches
- Picture hanging strips or nails
- Painter’s tape
Equipment Required
- Level
- Measuring tape
- Pencil
- Hammer
DIY Instructions
- Choose your art pieces and ensure they are all in a similar style and color palette.
- Place your art inside the frames with the white mats to create a clean border.
- Measure the width of your sofa and find the center point on the wall.
- Mark the center point with a pencil and draw a faint vertical line using a level.
- Decide on the spacing between your frames for example 3 inches.
- Use painter’s tape to mark the layout on the wall before you start hanging.
- Start hanging the middle frames first and work your way outward.
- Use a level to ensure every single frame is perfectly straight.
- Check that the spacing between all the frames is equal and consistent.
- Step back and admire your new balanced and professional gallery wall.
31 Toile Pattern Plastic Drawer Refresh
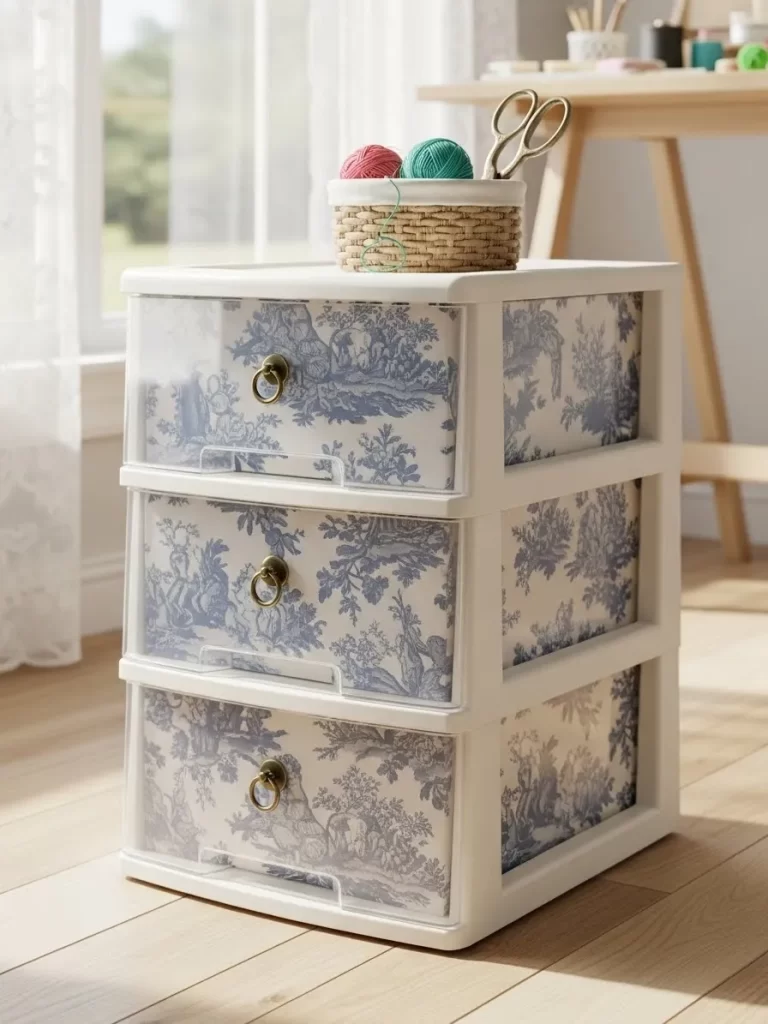
Plastic storage units are often seen as purely functional and visually dull. You can transform a basic three drawer chest by adding elegant blue and white toile pattern liners to the drawer fronts. This simple addition masks the contents inside while giving the piece a sophisticated, vintage inspired charm.
Adding small brass ring pulls creates a high end feel that elevates the entire unit. This makeover is a clever way to make budget friendly organization look like a custom piece of furniture. It works beautifully in craft rooms where you want style and order.
Toile is a timeless pattern that adds a sense of history. It makes cheap plastic feel like part of a curated room. You can change the paper whenever you want to update the style.
Material Required
- 3 drawer plastic storage unit
- Toile pattern contact paper
- Three brass ring drawer pulls
- Strong adhesive glue
- Rubbing alcohol
Equipment Required
- Measuring tape
- Sharp utility knife
- Straight edge or ruler
- Microfiber cloth
DIY Instructions
- Remove all drawers from the plastic frame.
- Clean the front surface of each drawer with rubbing alcohol to remove oils.
- Measure the exact width and height of the front panel of one drawer.
- Cut three pieces of your toile pattern paper to match these measurements exactly.
- Peel the backing from the paper and carefully align it with the top edge.
- Smooth the paper down slowly to avoid air bubbles, working from the center outward.
- Repeat this process for the remaining two drawer fronts.
- Mark the exact center of each drawer front for the new hardware.
- Use a strong adhesive to attach the brass ring pulls to the plastic surface.
- Slide the drawers back into the frame once the glue has fully cured.
32 Slatted Wood Illuminated Headboard
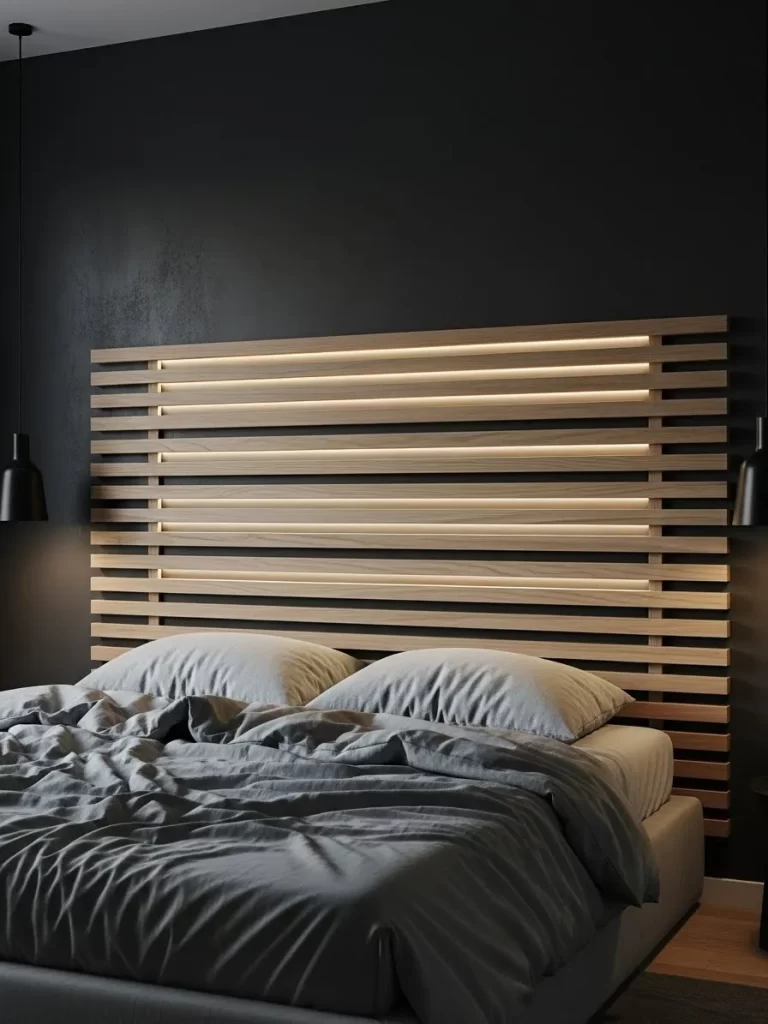
A plain bedroom wall can feel cold without a proper focal point. Creating a wide, horizontal slatted wood headboard adds warmth and architectural interest to the space. The addition of integrated LED backlighting creates a soft, ambient glow for a relaxing night.
The natural wood tones against a dark accent wall offer a modern and grounded aesthetic. This project is an excellent way to make a standard bed feel more substantial and luxurious. It provides a clean, contemporary look that fits many home styles.
Lighting behind a headboard adds depth to the room. It makes the wall feel like a three dimensional feature. You gain a peaceful atmosphere that is perfect for winding down.
Material Required
- Pine or oak wood slats
- Vertical support boards
- LED light strips with remote
- Wood stain or clear matte sealer
- Wood screws
Equipment Required
- Power drill and bits
- Level
- Measuring tape
- Miter saw
- Sanding block
DIY Instructions
- Measure the width of your bed and how far past the sides the headboard should reach.
- Cut your horizontal wood slats to the desired width using a saw.
- Sand all sides of the slats to remove any rough edges or splinters.
- Apply a clear sealer or stain to the wood and allow it to dry completely.
- Layout your vertical support boards on the floor and place the slats on top.
- Use a spacer scrap of wood to ensure even gaps between each horizontal slat.
- Screw each slat into the vertical supports from the back for a clean front.
- Attach the LED light strips to the back of the horizontal slats along the gap lines.
- Use a level to mark the wall and mount the entire structure securely.
- Plug in the lights and enjoy the high end resort feel of your new headboard.
33 Bone Inlay Style Blue Side Table
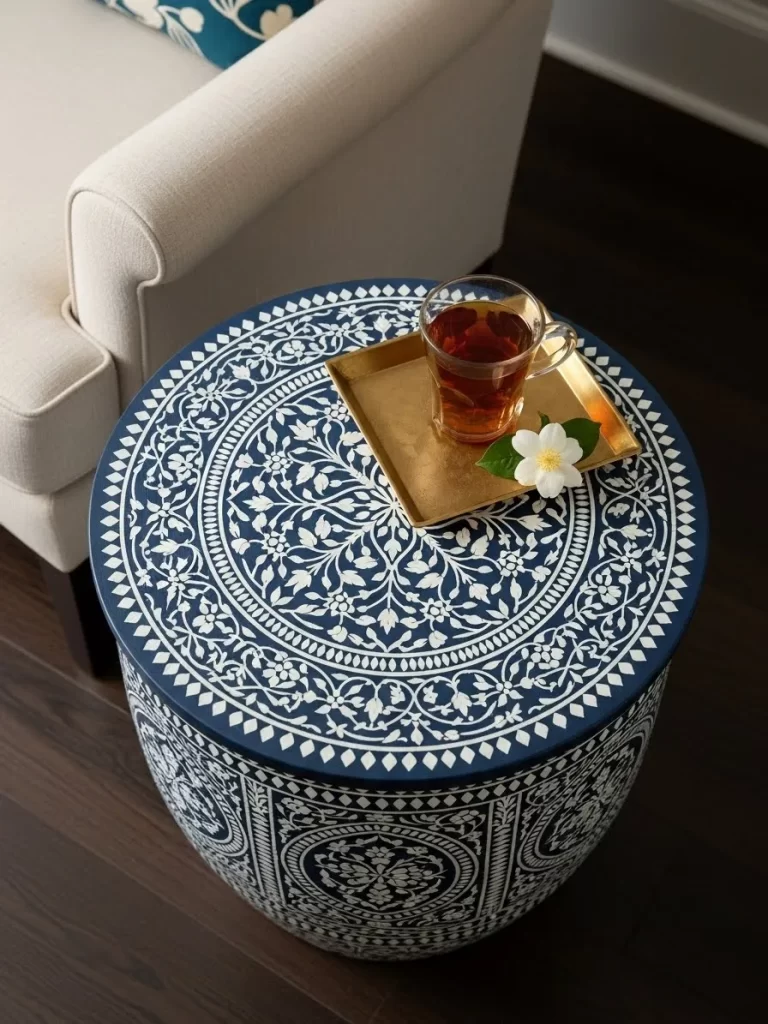
Bone inlay furniture is beautiful but often carries a very high price tag. You can recreate this intricate look by using a detailed white stencil over a deep navy blue base. The swirling floral patterns add a sense of history and global style to a simple round table.
The contrast of the crisp white pattern against the dark blue is striking and elegant. This makeover is for refreshing a tired or scratched wooden side table. It turns a basic item into a conversation piece that anchors a cozy reading nook.
Stenciling is an affordable way to add high end details. The navy and white combination is classic and timeless. You get a piece of furniture that looks hand painted by a skilled artist.
Material Required
- Round wooden side table
- Navy blue furniture paint
- White chalk paint
- Large circular stencil floral motifs
- Clear protective topcoat
Equipment Required
- Stencil brush
- Painter’s tape
- Sandpaper
- Small paint roller
DIY Instructions
- Sand the entire table lightly to create a smooth surface for the new paint.
- Wipe away all dust and apply two coats of navy blue paint using a roller.
- Allow the base coat to dry for at least twelve hours.
- Center your stencil on the tabletop and secure the edges with painter’s tape.
- Dip your stencil brush in white paint and dab it on a paper towel to remove excess.
- Apply the white paint over the stencil using a light tapping motion to prevent bleeding.
- Carefully lift the stencil and repeat the pattern on the sides of the table.
- Touch up any small imperfections with a tiny artist’s brush.
- Once the pattern is completely dry, apply a clear topcoat to protect your work.
- Top the table with a gold tray and a warm cup of tea for a finished look.
34 Neon Dipped Kitchen Bar Stools
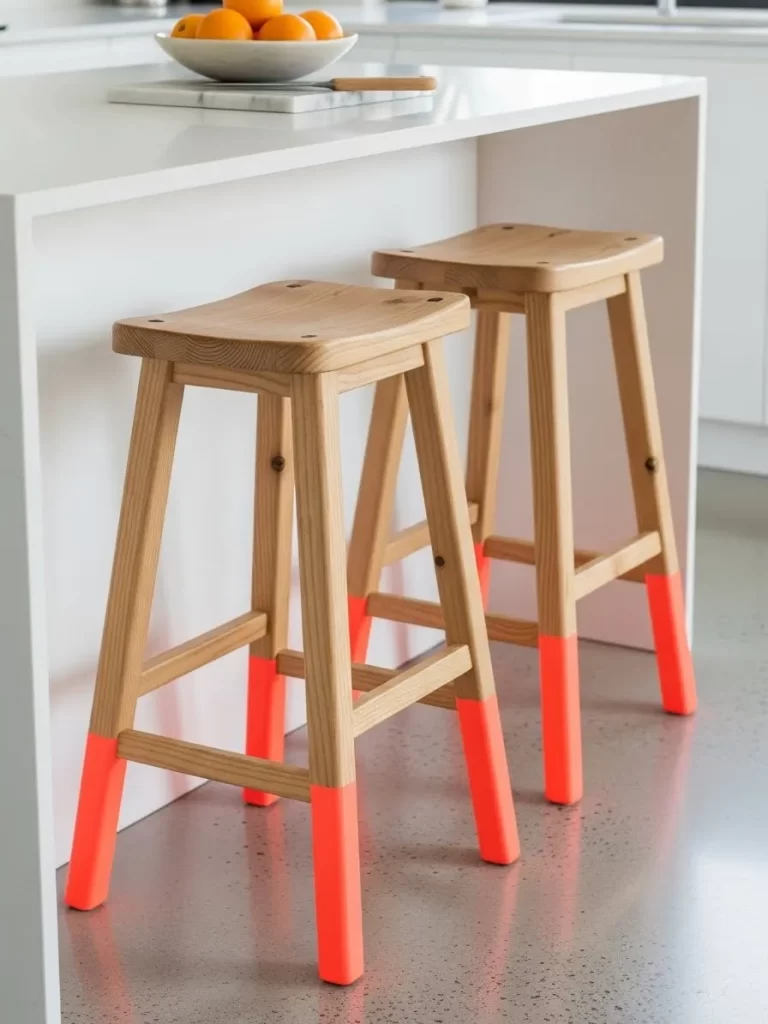
Standard wooden bar stools can feel a bit plain in a bright, modern kitchen. Adding a pop of neon orange to the bottom of the legs creates a fun dipped effect. This simple change adds a burst of energy and a contemporary edge to your dining area.
The combination of natural wood grain and high visibility color is a popular designer trick. This makeover is incredibly fast and requires very little paint. It is a way to tie in other colorful accessories in your home.
Neon colors add a youthful and playful feel to a room. They stand out against white cabinets and wood floors. You can refresh a whole set of stools in a single morning.
Material Required
- Natural wood bar stools
- Neon orange furniture paint
- White primer
- Painter’s tape
Equipment Required
- Measuring tape
- Pencil
- Sanding block
- Drop cloth
DIY Instructions
- Clean the legs of the stools to remove any kitchen grease or dust.
- Lightly sand the bottom section of each leg where the paint will go.
- Use a measuring tape to mark exactly eight inches from the bottom of each leg.
- Wrap painter’s tape tightly around the legs at these marks for a straight line.
- Apply a thin layer of white primer to the bottom section to make the neon pop.
- Once the primer is dry, apply two coats of neon orange paint.
- Wait for the paint to be dry to the touch before carefully peeling off the tape.
- Check that the lines are crisp and even on all four legs.
- Let the paint cure for twenty four hours before using the stools.
- Place the stools at your kitchen island for an instant modern update.
35 Leather Sling Magazine Rack
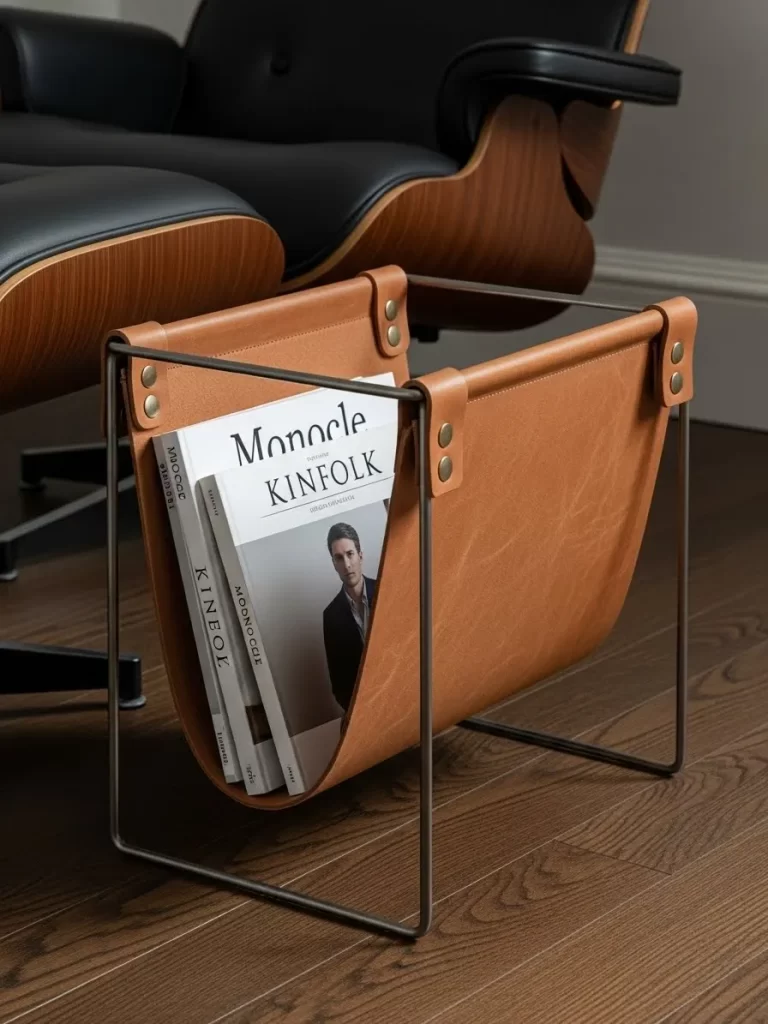
Old metal frames or folding stands can be repurposed into a luxury leather magazine rack. Replacing a fabric or mesh center with a thick tan leather sling adds warmth and a tactile feel. The brass stud details provide a professional and finished look.
This project fits next to a classic lounge chair or a modern sofa. The leather will age beautifully over time, developing a unique patina. It is a smart way to keep your favorite books and magazines organized.
Tan leather feels soft and natural in a living room. It pairs well with metal or wood furniture. You gain a functional storage piece that feels like a boutique accessory.
Material Required
- Small metal folding frame
- Large piece of thick tan leather
- Eight brass upholstery tacks
- Leather conditioner
Equipment Required
- Sharp fabric scissors
- Measuring tape
- Hammer
- Power drill
DIY Instructions
- Remove any old fabric from the metal frame so you have just the structure.
- Measure the width of the frame and the depth for the sling.
- Cut your leather to these dimensions, leaving extra for the loops.
- Apply leather conditioner to the surface to make it soft.
- Fold the top edge of the leather over the top bar of the metal frame.
- Use a hammer to tap the brass upholstery tacks through the leather for the loop.
- Repeat this on the other side of the frame so the sling hangs evenly.
- Check that the leather is secure and can hold the weight of magazines.
- Trim any uneven edges for a clean and professional look.
- Fill the rack with your favorite journals and place it in your reading spot.
36 Tribal Pattern Upholstered Bench
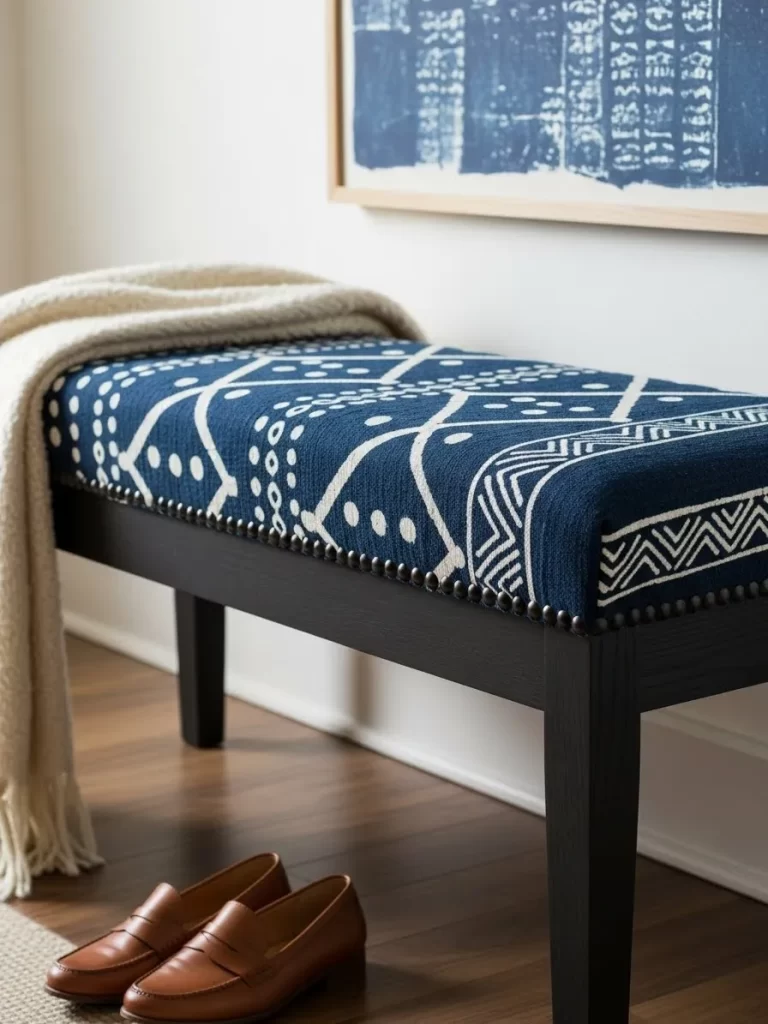
A basic black bench can be given a bold new look with a striking blue and white tribal pattern. This makeover adds a layer of texture and visual interest that makes a simple piece feel custom. The addition of black upholstery studs along the edge provides a clean border.
This style works exceptionally well in an entryway or at the foot of a bed. The heavy fabric is durable and hides minor wear and tear. It is a fantastic way to introduce a global or bohemian feel to your home.
Patterned furniture acts like art for your floors. It brings energy into a neutral hallway or bedroom. You gain a stylish seat that also adds a layer of soft texture to the room.
Material Required
- Simple black bench with a padded top
- Heavy blue and white patterned fabric
- Strip of black decorative upholstery tacks
- Upholstery batting
Equipment Required
- Heavy duty staple gun
- Fabric scissors
- Rubber mallet
- Measuring tape
DIY Instructions
- Remove the padded seat from the bench frame if possible.
- Measure the seat and cut a piece of batting to fit over the top.
- Staple the batting to the underside of the seat to hold it in place.
- Lay your patterned fabric face down and place the seat on top.
- Pull the fabric tight and staple it to the center of each side first.
- Work your way to the corners, folding the fabric neatly.
- Trim any excess fabric from the bottom surface.
- Line up your black upholstery tacks along the edge for a finished look.
- Use a rubber mallet to gently tap the tacks into place with even spacing.
- Reattach the seat to the frame and place the bench in your hallway.
37 Color Blocked Sage and Coral Desk Lamp
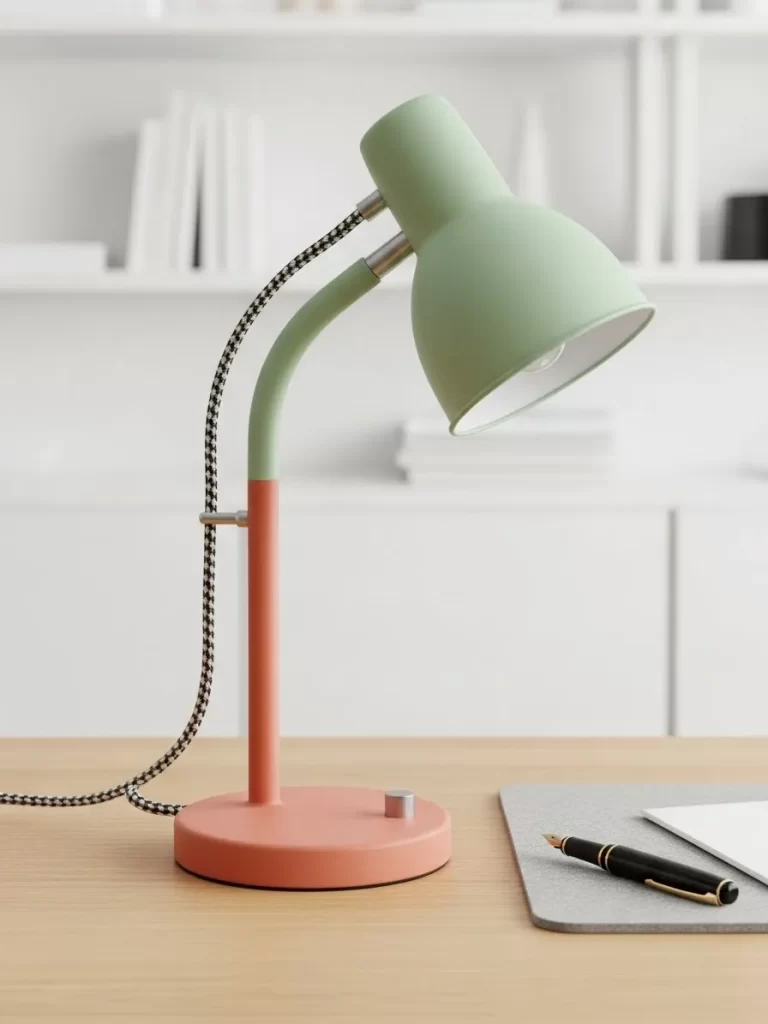
A standard office lamp can be transformed into a playful decor piece with a fresh color blocked look. Combining a soft sage green shade with a warm coral base creates a modern aesthetic. The addition of a black and white checkered cord adds a fun graphic detail.
This makeover is a way to save a lamp with a scratched or boring finish. The matte texture makes the colors look more sophisticated and intentional. It is a quick project that adds personality to any desk or bedside table.
Color blocking is an easy way to make old items look contemporary. The green and coral combination feels fresh and bright. You get a unique accessory that you cannot find in stores.
Material Required
- Simple metal desk lamp
- Sage green spray paint matte
- Coral spray paint matte
- Black and white decorative cord cover
- Painter’s tape
Equipment Required
- Small screwdriver
- Sandpaper
- Drop cloth
- Cleaning cloth
DIY Instructions
- Remove the light bulb and unplug the lamp for safety.
- Use painter’s tape to cover the light socket and the cord.
- Lightly sand the metal surfaces to help the new paint stick.
- Use tape to define your color zones on the shade and base.
- Spray the top shade and arm with two thin coats of sage green paint.
- Once dry, cover the green section and spray the base with coral paint.
- Carefully remove the tape once the paint is dry to the touch.
- If using a cord cover, slide it over the cord and secure the ends.
- Let the paint cure fully for twenty four hours before using the lamp.
- Place the lamp on your desk and enjoy your unique color blocked accessory.
38 Tropical Wallpaper Wardrobe Interior
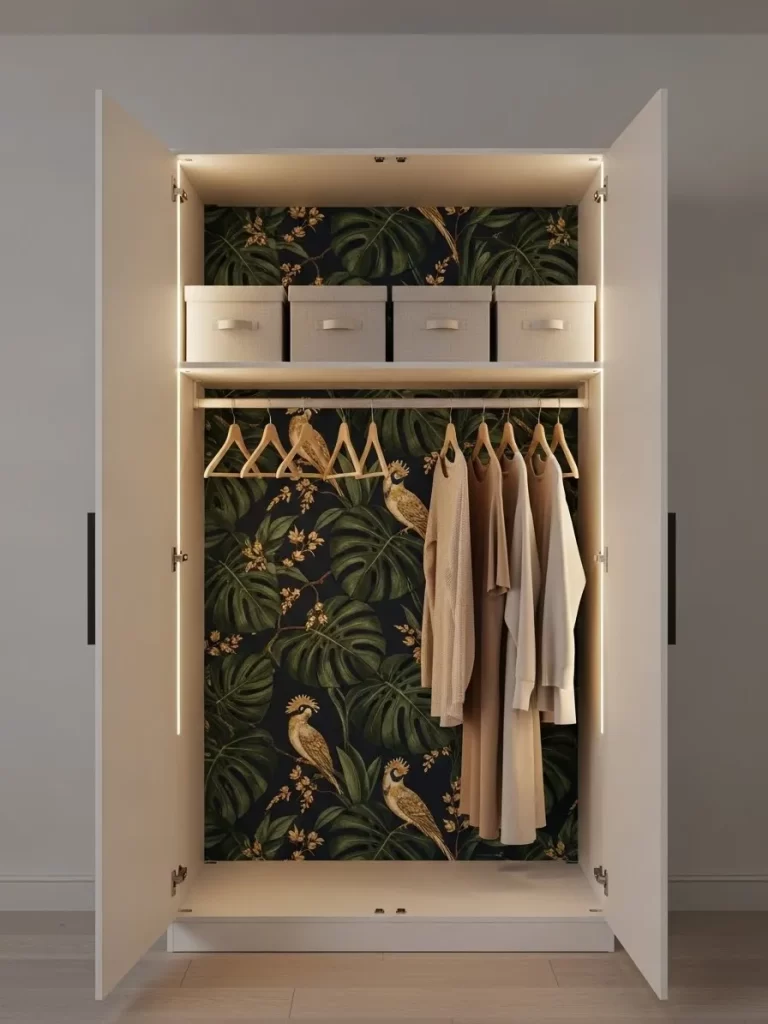
Standard white wardrobes can feel a bit clinical and boring on the inside. Adding a bold tropical wallpaper with bird motifs creates a surprise burst of style every time you open the doors. The dark background of the paper makes colorful clothing stand out.
Integrated vertical LED lighting makes the interior feel like a high end boutique closet. This transformation is a way to add personality to a rental home without changing the exterior. It makes the daily routine of getting dressed feel more luxurious.
Wallpapering the inside of furniture is a hidden secret of designers. It adds a layer of depth and interest to large storage pieces. You gain a closet that feels like a private curated space.
Material Required
- White double door wardrobe
- Tropical pattern peel and stick wallpaper
- Two vertical LED light strips
- Fabric storage boxes
- Wooden hangers
Equipment Required
- Measuring tape
- Level
- Squeegee
- Utility knife
DIY Instructions
- Empty the wardrobe and remove any adjustable shelves.
- Clean the back wall of the wardrobe with a damp cloth.
- Measure the height and width of the back panel exactly.
- Cut your wallpaper into strips that are slightly longer than the height.
- Start in one corner and peel the backing from the first strip.
- Align the paper with the top edge and smooth it down using a squeegee.
- Match the pattern for the next strip and continue across the back wall.
- Use a utility knife to trim the excess paper at the bottom.
- Install the LED light strips vertically along the inside front edges.
- Replace the shelves and organize your items with matching hangers.
39 Textured Concrete Round Side Table
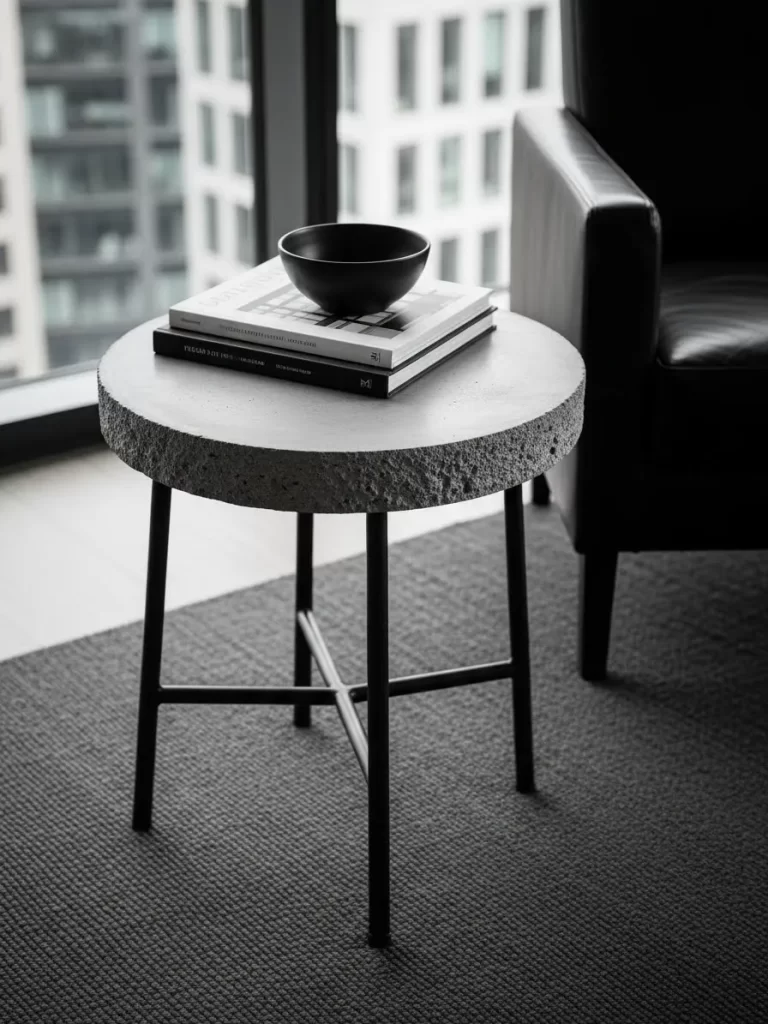
Heavy wooden side tables can be given a modern sculptural look with a faux concrete finish. The rough pitted edge of the tabletop adds an organic and found feel to the piece. Sleek black metal legs provide a clean contrast that keeps the look grounded.
This makeover is for saving a table with a damaged top or a dated style. The neutral gray tones work well in any room and provide a sturdy surface for books. It is a budget friendly way to get the look of expensive industrial furniture.
Faux concrete feels cool and heavy like real stone. It adds an architectural element to a soft living room. You can achieve this premium texture with just a few simple steps.
Material Required
- Small round side table
- Concrete feather finish kit
- Black metal tripod legs
- Matte concrete sealer
- Sandpaper medium and fine grit
Equipment Required
- Putty knife or trowel
- Power drill
- Mixing bucket
- Microfiber cloth
DIY Instructions
- Remove the old legs and sand the tabletop to create a rough surface.
- Mix the concrete finish according to the package instructions.
- Apply a thin layer over the entire tabletop using a putty knife.
- For the edges, dab the concrete on more thickly for organic texture.
- Let the first coat dry, then apply a second smoother coat to the top.
- Once dry, sand the top surface with fine grit sandpaper for a smooth feel.
- Keep the edges rough for that natural stone appearance.
- Apply two coats of matte sealer to protect the concrete from stains.
- Flip the table and screw the black metal legs into the underside.
- Style the table with a black bowl and a few dark books.
40 Whitewashed Rustic Dining Set
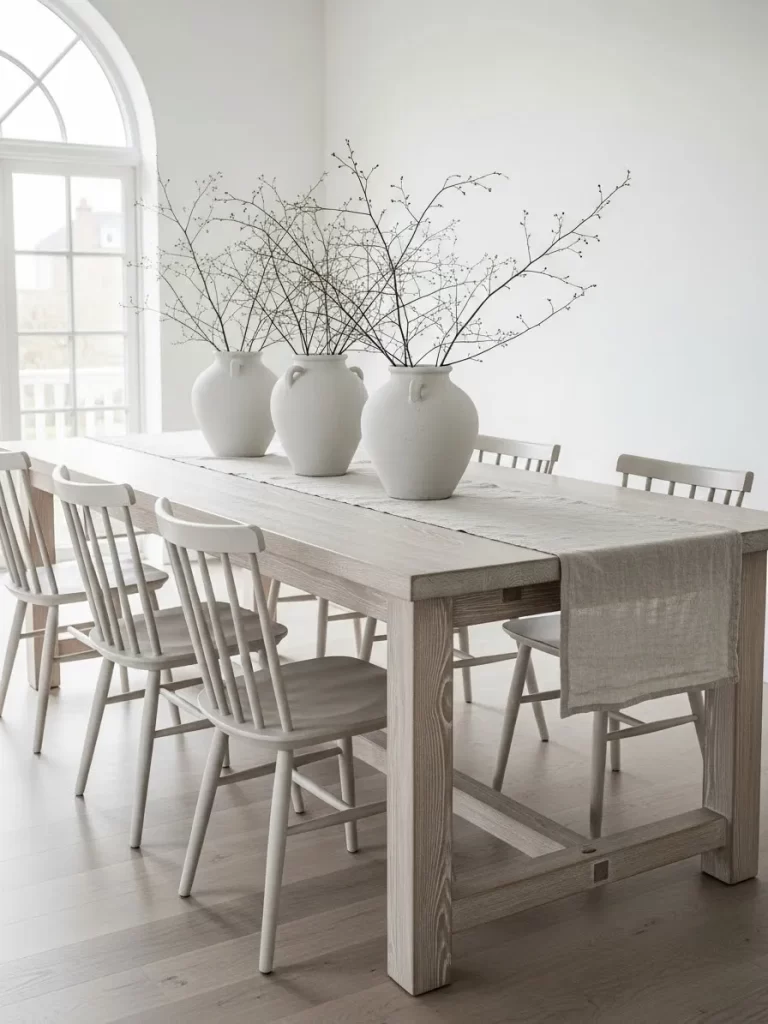
Dark heavy dining tables can make a small room feel crowded and dim. Applying a light whitewash finish to a large wooden table and chairs instantly brightens the space. This look highlights the natural wood grain while creating a soft airy atmosphere.
The addition of a simple linen runner and large white ceramic vases completes the rustic look. This transformation is for dated furniture that is still sturdy and functional. It turns a formal dining room into a relaxed and welcoming place for family meals.
Whitewashing allows the natural character of the wood to shine through. It feels much lighter than a solid coat of paint. You gain a dining set that feels fresh and modern for a fraction of the cost.
Material Required
- Wooden dining table and matching chairs
- White chalk paint or watered down latex paint
- Clear matte sealer
- Linen table runner
- Large white ceramic vases
Equipment Required
- Large paintbrush
- Lint free rags
- Sanding block
- Drop cloth
DIY Instructions
- Clean the table and chairs to remove any old wax or residue.
- Sand the entire set lightly to break the old seal.
- Mix one part white paint with one part water to create your whitewash.
- Brush the whitewash onto one section of the table at a time.
- Immediately wipe away the excess with a clean rag following the grain.
- Repeat this process until you achieve the level of brightness you want.
- Let the set dry for twenty four hours.
- Apply two coats of clear matte sealer to protect against spills.
- Once the sealer is cured, place your linen runner and vases on the table.
- Add some tall dried branches to the vases for a final touch of style.
41 Built in Terracotta Arched Shelving
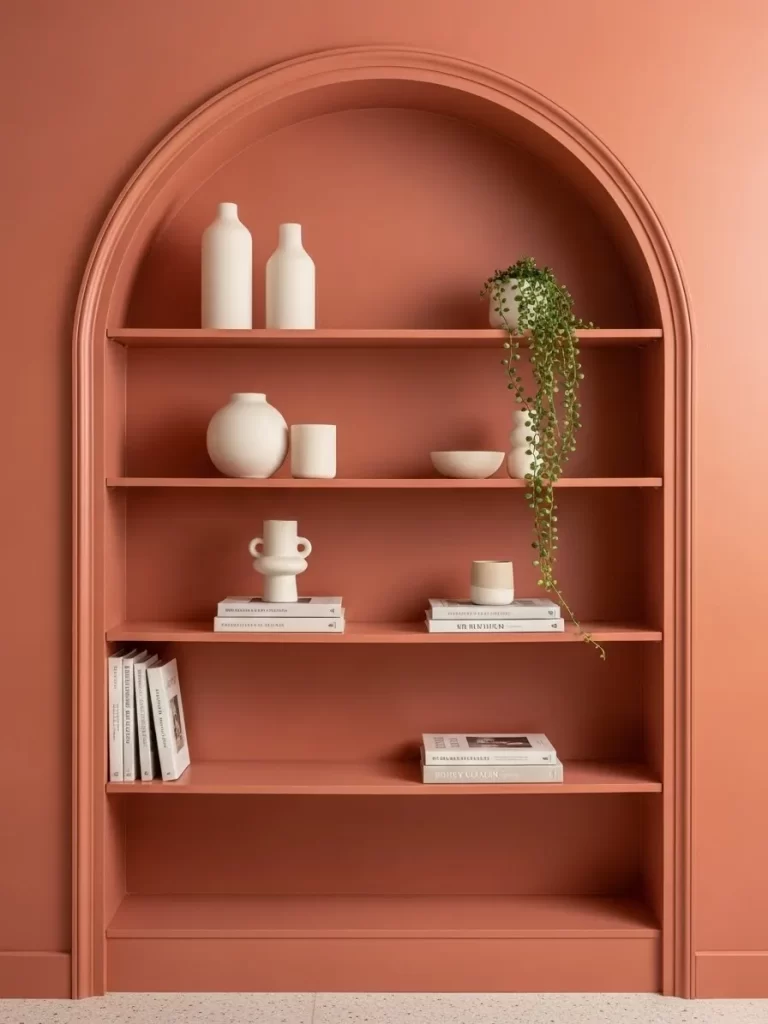
Plain alcoves or flat walls can feel like wasted space in a living room. Creating a faux built in arched bookshelf adds architectural depth and a custom feel. The monochromatic terracotta paint job blends the shelves into the wall for a seamless look.
This makeover uses a warm earthy tone that creates a cozy and grounding atmosphere. It provides a stunning backdrop for displaying white ceramic vases and books. It is a way to add storage without cluttering the floor with heavy furniture.
Arches soften the sharp lines of a standard room. They bring a sense of luxury and character that standard shelving cannot match. You gain a beautiful focal point that looks like it was part of the original house.
Material Required
- Flexible plywood or MDF sheets
- Wooden studs for the frame
- Terracotta matte interior paint
- Drywall compound and joint tape
- Wood glue and screws
Equipment Required
- Jigsaw
- Power drill
- Paint roller and brushes
- Level
- Measuring tape
DIY Instructions
- Measure your wall space and mark the width of the desired arch.
- Build a sturdy rectangular frame using wooden studs.
- Cut two identical arch shapes out of MDF using a jigsaw for the face.
- Attach the MDF faces to your wooden frame using a power drill.
- Use flexible plywood to line the inside of the arch curve and glue it.
- Install horizontal wooden cleats inside the frame at your shelf heights.
- Slide your cut to size shelves onto the cleats and secure them.
- Use drywall compound to smooth over all seams and screw holes.
- Sand the entire structure until it is perfectly smooth and wipe away dust.
- Apply two coats of terracotta paint to the shelves and the surrounding wall.
42 Pastel Lavender Bubble Mirror
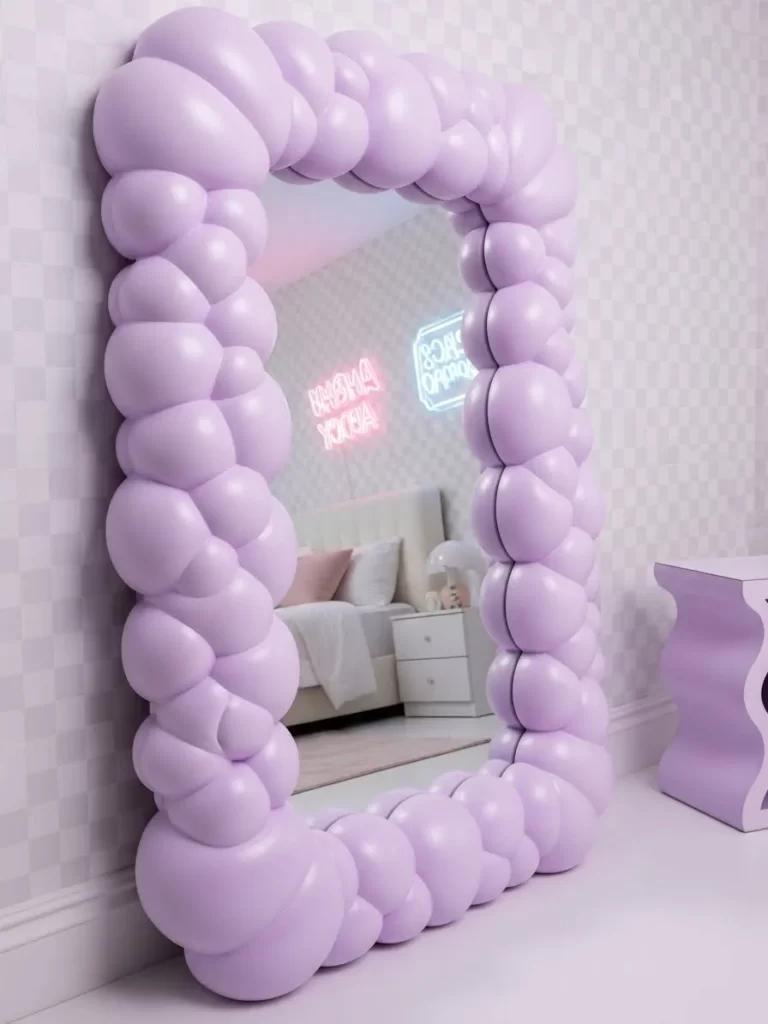
Standard rectangular mirrors are functional but can often lack a fun personality. You can transform a basic mirror into a playful statement piece by adding a bulky bubble texture frame. The soft lavender color and rounded shapes create a trendy cloud like aesthetic.
This makeover is for covering up a cheap or damaged mirror frame. The glossy finish of the bubbles reflects light and adds a sculptural quality to your wall. It turns a simple household item into a bold piece of modern art.
Bubble mirrors add a whimsical touch to a bedroom or entryway. They feel soft and organic compared to sharp glass edges. You gain a unique mirror that reflects your personal style.
Material Required
- Large rectangular mirror with a flat frame
- Expanding spray foam
- Lavender glossy spray paint
- Plastic drop cloth
- Painter’s tape
Equipment Required
- Disposable gloves
- Utility knife
- Sandpaper
- Microfiber cloth
DIY Instructions
- Lay the mirror flat on a plastic drop cloth in a ventilated area.
- Use painter’s tape to carefully cover the entire glass surface.
- Put on gloves and begin spraying the expanding foam onto the frame.
- Move the can in a slow undulating motion to create large round bubbles.
- Allow the foam to dry and expand fully for twenty four hours.
- Use a utility knife to trim any stray bits of foam if needed.
- Lightly sand the foam if you want a smoother surface for the paint.
- Apply three thin coats of lavender glossy spray paint into all crevices.
- Let the paint dry completely before removing the tape from the glass.
- Lean the mirror against the wall to add a whimsical vibe to your room.
Key Takeaways
Preparation is the most important part of any project. Sanding and cleaning ensure your paint sticks for years.
Hardware changes everything. New knobs or handles act like jewelry for your drawers and cabinets.
Texture adds a sense of luxury. Use materials like cane or boucle to make budget items look expensive.
Bold colors create focal points. A single vibrant chair can change the mood of an entire room.
Refreshing your home does not require a total renovation. You now have forty two ways to breathe life into your space. Each project proves that small changes lead to massive results.
Pick one piece of furniture this weekend. Trust your hands and the process. You will soon see your house transform into a curated sanctuary.