Does your home feel a little too new? Sometimes, a space filled with only brand-new items can feel like it’s missing a soul. It lacks the layers, stories, and unique quirks that make a house truly feel like a home.

If you’re looking around and feeling like your rooms are lacking personality, the answer isn’t always in a big-box store. The most interesting homes are curated over time, filled with objects that have a past and a story to tell.
This list is your guide to changing that. We’ve gathered 42 unique vintage and thrifted finds that are guaranteed to inject character into your space. From dramatic statement pieces to humble, hardworking objects, get ready to discover the joy of the hunt and the satisfaction of making your home one-of-a-kind.
1. The Statement Gilded Mirror

Nothing transforms a room quite like a large, ornate mirror. This gilded piece over the fireplace acts as a stunning focal point. It reflects light, making the entire space feel brighter and more expansive. The intricate details in the frame add a layer of history and elegance that new items often lack.
Finding a mirror like this is a true treasure hunt. Look for them at flea markets, antique shops, or even online marketplaces. A piece with this much character tells a story. It brings a sense of grandeur to an otherwise simple wall, turning it into a work of art.
DIY Your Own Gilded Mirror
You can create a similar look with a little effort. It’s a fun project!
What You’ll Need:
- A plain, old mirror with a wooden frame.
- Some decorative wood pieces (you can find these at a craft store, they are called appliques).
- Strong wood glue.
- Gold spray paint or gold craft paint and a brush.
- Old newspapers.
Step-by-Step Instructions:
- Get Your Mirror Ready: First, find a mirror. It can be one you already have or a cheap one from a thrift store. Lay it down on your old newspapers to keep things clean.
- Clean the Frame: Take a cloth and wipe down the mirror’s frame. You want to get rid of all the dust and dirt so the glue and paint will stick well.
- Plan Your Design: Place your decorative wood pieces on the frame. Move them around until you like how they look. The top center is a great place to put the biggest piece.
- Glue on the Decorations: Pick up one wood piece at a time. Put a good amount of wood glue on the back and press it firmly onto the frame where you want it. Do this for all your pieces. Let the glue dry completely. This might take an hour or two.
- Time to Paint: Now, make it shine! In a well-ventilated area (like outside), spray paint the entire frame and your new decorations gold. If you are using a brush, paint everything carefully. You might need two coats of paint to get a really nice finish. Let it dry completely.
- Hang It Up: Once everything is dry, your mirror is ready. Find a special wall in your home and hang it for everyone to see.
2. The Pop-Art Neon Sign

A neon sign injects a blast of color and personality into any room. This vibrant orange piece brings a playful, retro energy to the space. It’s more than just a light source; it is a piece of glowing art. These signs are conversation starters. They show off your fun side.
You can find authentic vintage neon signs, but they can be fragile and costly. A modern reproduction or a custom sign with a favorite word or shape can have a similar effect. It’s a bold way to add a personal touch that truly lights up your home.
DIY Your Own Neon-Look Sign
You can make a safe, cool-looking sign with LED rope lights.
What You’ll Need:
- LED light strip (any color you like).
- A piece of clear acrylic or a wire grid.
- Strong glue or clear zip ties.
- Paper and a pencil.
- Scissors.
Step-by-Step Instructions:
- Draw Your Design: On a large piece of paper, draw the word or shape you want to create. Make it simple, like a heart or a single word in cursive.
- Place Your Backing: Put your clear acrylic sheet or wire grid on top of your drawing. You should be able to see your design through it.
- Shape the Light: Carefully bend the LED light strip to follow your drawing. Be gentle so you don’t break it. If you’re using a wire grid, you can weave the light strip through the grid to hold the shape.
- Attach the Light: If you are using an acrylic sheet, use small dots of strong glue to stick the LED strip down along your design. If you’re using a wire grid, use small, clear zip ties to attach the light strip securely. Snip off the extra ends of the zip ties.
- Light It Up: Once the glue is dry, plug in your new sign. Hang it on the wall and watch it glow!
3. The Calming Wall Scroll

A hanging scroll brings a sense of peace and history to a room. This Japanese-style piece features a simple, elegant painting of nature. It creates a tranquil mood. Unlike a framed picture, a scroll has a soft, flowing quality. It feels both ancient and timeless.
These are wonderful for adding a touch of minimalist beauty. They work well in quiet corners, bedrooms, or any space where you want to feel relaxed. You can find them with various designs, from calligraphy to landscapes. Each one tells its own quiet story.
DIY Your Own Wall Scroll
Making a scroll is easier than it looks and is a great way to display a favorite print or piece of fabric.
What You’ll Need:
- A piece of paper or fabric with a picture you like.
- Two thin wooden dowels (a little wider than your paper/fabric).
- String or twine for hanging.
- Strong glue.
Step-by-Step Instructions:
- Prepare Your Art: Lay your picture or fabric flat on a table. Make sure it’s smooth and has no wrinkles.
- Attach the Top Dowel: Take one wooden dowel. Put a thin line of glue along the top edge of your picture. Carefully press the dowel onto the glue and roll the paper around it once. Hold it for a minute to make sure it sticks.
- Attach the Bottom Dowel: Do the same thing with the second dowel at the bottom edge of your picture. This dowel adds weight to help your scroll hang straight. Let the glue dry.
- Add the Hanger: Take your string and cut a piece that’s long enough to hang the scroll. Tie each end of the string to the ends of the top wooden dowel. Make sure the knots are tight.
- Hang Your Scroll: Your beautiful wall scroll is finished. Find a nice spot on your wall to hang it.
4. The Classic Banker’s Lamp

A banker’s lamp adds a touch of studious charm. With its signature green glass shade and brass base, it brings a classic, academic feel to a desk or side table. This lamp provides a focused, warm light that is great for reading or working. It’s a design that has remained popular for over a century.
This type of lamp suggests a love of books, history, and quiet moments. Finding an original at a thrift store feels like discovering a piece of the past. It’s a functional item that adds a lot of character and sophistication.
DIY a Banker’s-Style Lamp
You can give an old lamp a similar look with some paint.
What You’ll Need:
- An old desk lamp with a metal or glass shade.
- Green glass paint (if the shade is glass) or green metallic spray paint (if the shade is metal).
- Gold or brass-colored spray paint for the base.
- Painter’s tape and old newspapers.
Step-by-Step Instructions:
- Prepare Your Lamp: First, make sure the lamp is unplugged. Clean the whole lamp with a cloth to remove any dust.
- Tape It Up: Use painter’s tape to cover any parts you don’t want to get paint on. For example, tape over the lightbulb socket and the power cord.
- Paint the Base: On your newspapers and in a space with good airflow, spray paint the base of the lamp with the gold or brass paint. Use smooth, even strokes. Let it dry completely. You might need a second coat.
- Paint the Shade: Now for the green part. If your shade is glass, use the green glass paint to paint the outside of it. If it’s metal, use the green spray paint. Let it dry fully.
- Put It Back Together: Once everything is completely dry, carefully remove all the painter’s tape. Put a lightbulb in, and your new lamp is ready to use.
5. The Wicker Peacock Chair

The peacock chair is a true showstopper. Its grand, fan-like back makes it feel like a throne. This chair instantly brings a relaxed, bohemian vibe to any space. It’s made of wicker or rattan, which adds a natural, earthy texture to your decor.
While it is a comfortable seat, this chair is mostly about style. It fills a corner with dramatic flair. You can toss a colorful pillow or a soft sheepskin on it to make it cozier. Finding one of these at a thrift store is a major score for anyone who loves boho design.
DIY a Macrame Wall Hanging
You can’t easily build a peacock chair, but you can create a macrame wall hanging to get that same boho feeling.
What You’ll Need:
- A wooden dowel or a nice-looking tree branch.
- Macrame cord (you can find this at a craft store).
- Scissors.
Step-by-Step Instructions:
- Cut Your Cords: Cut many long pieces of macrame cord. They should all be the same length. A good starting length is about 6 feet for a small hanging. You’ll need about 20-30 pieces.
- Attach Cords to the Dowel: Take one piece of cord and fold it in half to make a loop at the top. Place the loop over the dowel. Then, pull the two loose ends through the loop and tighten it. This is called a Lark’s Head knot. Do this with all your cords.
- Start Knotting: Now you’ll make Square Knots. This is the most common knot in macrame. Take a group of 4 cords. Take the left cord and cross it over the middle two cords. Take the right cord, bring it under the middle two cords, and pull it through the loop made by the left cord. Pull it tight.
- Complete the Square Knot: Do the same thing again but start with the right cord. Cross the right cord over the middle two. Bring the left cord under the middle two and through the right loop. That’s one full Square Knot.
- Create a Pattern: Make rows of these knots. You can alternate them to create a triangle or diamond pattern. Keep going until you are happy with your design.
- Finish the Bottom: You can leave the bottom cords long and loose, or you can cut them into a shape, like a point or a straight line.
- Hang It Up: Tie a long piece of cord to both ends of the dowel to hang your new creation.
6. The Worldly Wooden Trunk

An old wooden trunk is a fantastic multi-purpose find. It can serve as a coffee table, a storage chest at the foot of a bed, or even extra seating. This piece brings a sense of adventure and history into the home. You can almost imagine the journeys it has taken.
The rich wood and metal details add warmth and texture. It’s a heavy, substantial item that grounds a room. Plus, the hidden storage is a huge bonus. You can hide away blankets, books, or games inside. Look for trunks with interesting hardware or old travel stickers on them.
DIY a Vintage-Look Trunk
You can make a simple wooden box look like an old traveler’s trunk.
What You’ll Need:
- A plain wooden box or chest.
- Dark wood stain.
- An old rag or paintbrush.
- Sandpaper.
- New hardware like old-fashioned latches and handles (optional).
Step-by-Step Instructions:
- Sand the Box: Lightly rub the sandpaper all over the outside of the wooden box. This helps the stain soak in better. Wipe away the dust with a cloth.
- Stain the Wood: Dip your rag or brush into the wood stain. Rub the stain all over the outside of the box. The stain will make the wood look older and richer. Let it dry. If you want it darker, add another coat.
- Make it Look Old: Once the stain is dry, you can distress it. This means making it look a little worn out. Use your sandpaper to gently rub some of the stain off the corners and edges. This makes it look like it’s been used for a long time.
- Add Hardware (Optional): If you want, you can screw on some new, old-looking handles on the sides and a latch on the front. This will really complete the look.
- Use Your Trunk: Your vintage-style trunk is ready! Place it in your living room or bedroom.
7. The Breezy Rattan Console

Rattan and bentwood furniture create a light, airy, and tropical feeling. This console table and matching mirror are full of beautiful curves. They add a natural, handmade texture to the wall. This style makes you think of sunny vacations and relaxed, happy places.
This kind of furniture is great for entryways or dining areas. It doesn’t feel heavy or bulky. The open design of the shelving offers a nice spot to display colorful glass, plants, or travel souvenirs. It’s a fun style that feels both vintage and very current.
DIY Retro Travel Posters
The posters in the picture add to the vibe. You can make your own!
What You’ll Need:
- A poster board or thick white paper.
- Craft paints in bright colors (like orange, blue, green).
- Pencil and a black marker.
- Pictures of places you like for inspiration (look online for “vintage travel posters”).
- A picture frame.
Step-by-Step Instructions:
- Choose Your Place: Think of a place you love. It could be a beach, a city, or the mountains.
- Sketch Your Design: Look at the vintage travel posters for ideas. They often have simple shapes and big letters. Lightly sketch a simple picture of your place on the poster board.
- Add Big Letters: Sketch the name of the place in big, bold letters at the top or bottom of the poster.
- Paint Your Poster: Now, fill in your drawing with the bright craft paints. Don’t worry about being too detailed. Vintage posters often have big blocks of color. Let the paint dry.
- Outline in Black: Once the paint is dry, use your black marker to outline the shapes and the letters. This will make everything stand out and look like a real poster.
- Frame It: Put your finished poster in a simple frame. Now you have custom art that adds a retro, personal touch to your room.
8. The Industrial Metal Locker

Vintage metal lockers bring a cool, edgy, and industrial feel to a space. Originally used in schools or gyms, they offer an unexpected and practical storage solution for a home. Their sturdy construction means they are built to last. The metal finish and simple design add a raw, utilitarian look.
You can use them in an office for supplies, in a mudroom for shoes and bags, or even in a living room as a unique cabinet. A bit of wear, like scuffs or small dents, only adds to their character. They are a great way to add a masculine or industrial touch.
DIY Your Own Locker Look
Give a plain cabinet a tough, industrial makeover.
What You’ll Need:
- A simple wood or metal cabinet.
- Gray or black metal-look spray paint.
- Number stencils and white or black craft paint.
- A small sponge brush.
- Painter’s tape.
Step-by-Step Instructions:
- Clean the Cabinet: Wipe down your cabinet to make sure it’s clean and ready for paint.
- Paint it Metal: In a well-ventilated area, spray paint the entire cabinet with your gray or black paint. Let it dry completely. You may need two coats for good coverage.
- Add Numbers: Decide where you want your locker numbers. Use painter’s tape to hold a number stencil in place on the door.
- Stencil the Numbers: Dip your sponge brush into the craft paint. Dab off any extra paint on a paper towel. Then, gently dab the paint over the stencil. This prevents the paint from leaking under the stencil.
- Reveal Your Work: Carefully remove the stencil while the paint is still a little wet. Let it dry. You can add more numbers to other doors if you have them. Your cabinet now has a cool, industrial locker look.
9. The Farmhouse Pendulum Clock

A traditional pendulum clock adds a comforting, rhythmic presence to a home. This simple, white wall clock has a clean, Scandinavian farmhouse feel. It is both a practical timepiece and a lovely piece of wall decor. The gentle swing of the pendulum can make a room feel more calm and peaceful.
These clocks connect us to a time before smartphones. They remind us to slow down. Finding an old one that still works is special. Even if it doesn’t tick anymore, it can serve as a beautiful object that adds a touch of rustic history to your walls.
DIY a Faux Farmhouse Clock
Create the look of a vintage clock without the complicated mechanics.
What You’ll Need:
- A round piece of wood.
- A clock-making kit (from a craft store).
- Black craft paint and a thin brush, or number stickers.
- A ruler.
- A small, thin piece of wood for the pendulum.
- A small wooden circle or bead.
- Strong glue.
Step-by-Step Instructions:
- Make the Clock Face: Find the center of your round wood piece and drill a small hole for the clock kit. Use a ruler to mark where the numbers 12, 3, 6, and 9 should go.
- Add the Numbers: Carefully paint the numbers on the clock face with your thin brush. You can also use number stickers if you don’t want to paint. Let it dry.
- Install the Clock Kit: Follow the instructions on your clock kit to attach the hands and the battery pack to the back.
- Make the Pendulum: Take the small, thin piece of wood. Glue the small wooden circle or bead to the bottom of it. This is your pretend pendulum.
- Attach the Pendulum: Glue the top of the pendulum stick to the back of your clock, at the bottom. Make sure it hangs straight down. Let the glue dry completely.
- Hang Your Clock: Put a battery in, set the time, and hang your new farmhouse clock on the wall.
10. The Rustic Wooden Bench

A simple, rustic wooden bench is a wonderfully versatile piece. It can be used for seating, as a low table for books and decor, or as a plant stand. This bench’s raw, unfinished look adds an earthy, organic element to the room. The imperfections in the wood—the knots, the grain, the uneven surface—are what give it so much character.
This style of furniture connects us to nature. It feels solid and honest. A bench like this works well in many decor styles, from Southwestern to farmhouse to modern. It’s a humble piece that provides both function and a touch of natural beauty.
DIY Your Own Rustic Bench
You can build a simple bench that looks like it’s been around for ages.
What You’ll Need:
- One thick, solid piece of wood for the top.
- Four shorter, thick pieces of wood for the legs.
- Long, strong screws and a drill.
- Sandpaper.
- Optional: a hammer, some old nuts and bolts, and dark wax.
Step-by-Step Instructions:
- Sand Everything: Use sandpaper to smooth down all the pieces of wood. You don’t want anyone to get a splinter, but you don’t have to make it perfectly smooth. A little roughness adds to the look.
- Attach the Legs: Flip the top piece of wood upside down. Place one leg at each corner. From the top of the bench, drill long screws down into each leg to attach them securely. Use at least two screws per leg.
- Make it Look Old (Optional): This is the fun part. Gently hit the bench with a hammer in a few places. Press the threads of a bolt into the wood to make interesting marks. This is called distressing.
- Add Some Color (Optional): Rub a small amount of dark wax all over the bench with a cloth. The wax will sink into the marks you made and make the bench look older and more finished.
- Your Bench is Ready: Flip it over. You now have a strong, rustic bench ready to be used in your home.
11. The Bold Memphis-Style Table

This style is all about fun. A Memphis-style table, with its bright colors and quirky shapes, refuses to be boring. It brings the playful energy of the 1980s right into your living room. The terrazzo pattern on the legs adds another layer of texture and visual interest.
This is a statement piece for a home that loves to be different. It’s a celebration of bold design and creative freedom. You can build an entire room’s color scheme around a table like this. It’s a thrifted find that guarantees your space will have a unique personality.
DIY Your Own Terrazzo Tray
Get the Memphis look on a smaller scale by making a terrazzo-style tray.
What You’ll Need:
- A plain wooden or plastic tray.
- White craft paint.
- Craft paints in several bright and dark colors (like black, pink, yellow, blue).
- Small paintbrushes.
Step-by-Step Instructions:
- Paint the Base: First, paint your entire tray with the white craft paint. This will be your background color. You might need two coats. Let it dry completely.
- Get Your Colors Ready: Put a little bit of each of your other paint colors onto a paper plate.
- Make the Chips: Use a small paintbrush to paint little random shapes all over the white tray. Make some small dots, some bigger blobs, and some crooked rectangles. This is supposed to look like little chips of stone, so don’t make them neat.
- Fill the Space: Use all your different colors. Overlap some of the shapes. Keep adding colored “chips” until you are happy with how it looks.
- Let it Dry: Let the paint dry completely. You can add a clear coat of sealant on top to protect it if you plan to use it a lot.
12. The Timeless Floral Sofa

A floral sofa brings a cozy, welcoming feel to a living room. This is the heart of “grandmillennial” style, mixing traditional patterns with a fresh look. The soft colors and classic flower design make the whole room feel comfortable and pretty. It’s like getting a warm hug from a piece of furniture.
This type of sofa is a beautiful anchor piece. It pairs wonderfully with solid-colored pillows and other vintage items, like the blue and white lamps seen here. Hunting for a floral sofa in good condition is a rewarding challenge for any thrifter.
DIY No-Sew Floral Pillows
You can add a touch of floral pattern without buying a whole sofa.
What You’ll Need:
- A piece of floral fabric, big enough for a pillow.
- An old pillow or pillow insert.
- Fabric glue or iron-on hem tape.
- Scissors.
- An iron (if using hem tape).
Step-by-Step Instructions:
- Cut Your Fabric: Lay your fabric on the floor, pattern-side down. Place your pillow in the middle. Cut the fabric so you have a big rectangle that can wrap around the pillow like a birthday present.
- Fold the Sides: Fold the two long sides of the fabric in toward the middle of the pillow. They should overlap by a few inches.
- Glue the Seam: Where the fabric overlaps, run a line of fabric glue between the two layers. Press it down firmly. If using hem tape, place the tape between the layers and press it with a hot iron.
- Close the Ends: Now you should have a fabric tube with the pillow inside. Fold the open ends in, like you’re wrapping a gift.
- Seal the Ends: Use your fabric glue or hem tape to neatly seal the ends shut. Let everything dry completely. You now have a beautiful floral pillow with no sewing needed.
13. The Space-Age Ball Chair

The ball chair is pure 1960s futurism. It’s a piece of furniture that looks like it belongs on a spaceship. Sitting in one feels like you’re in your own private pod. This chair is a bold design choice that immediately sets a retro, playful tone for the room.
Finding an original is a dream for vintage collectors. Its simple shape and cocoon-like design are iconic. It’s more than just a place to sit; it’s a piece of design history. This chair proves that your home can be a fun and imaginative space.
DIY a Starburst Clock
Capture that mid-century modern feeling with a starburst clock.
What You’ll Need:
- A simple clock-making kit.
- A small, round piece of wood.
- 12 thin wooden dowels.
- A ruler.
- Strong glue.
- Spray paint (gold or black looks great).
Step-by-Step Instructions:
- Prepare the Center: Drill a hole in the middle of your round wood piece for the clock kit.
- Mark Your Points: Use a ruler to mark 12 evenly spaced spots around the edge of the wood circle, just like the numbers on a clock.
- Glue the Dowels: Put a dot of strong glue on each mark you made. Stick the end of one wooden dowel onto each dot of glue. The dowels should stick out like rays of sunshine. Let the glue dry completely.
- Paint Everything: In a well-ventilated area, spray paint the entire starburst—the center circle and all the dowels. Let it dry.
- Add the Clock: Follow the instructions on your clock kit to attach the clock hands to the front and the battery pack to the back. Put in a battery, set the time, and hang your cool new clock.
14. The Classic Ginger Jar

Blue and white porcelain, like these ginger jars, brings a touch of timeless elegance. This classic color combination is always fresh and clean. Ginger jars were originally used for storing spices, but now they are beautiful decorative objects. They add a sophisticated, coastal feel to any room.
You can find them in many shapes and sizes at thrift and antique stores. Grouping a few together on a console table or mantel makes a strong visual statement. They can be left empty or used as a striking vase for fresh flowers.
DIY a “Ginger Jar” Painted Vase
Give a plain vase a classic blue-and-white makeover.
What You’ll Need:
- A plain white ceramic or glass vase.
- Blue craft paint that works on ceramic or glass.
- A thin paintbrush.
- A pencil.
- Pictures of ginger jars for inspiration.
Step-by-Step Instructions:
- Clean Your Vase: Make sure your vase is clean and dry.
- Plan Your Design: Look at pictures of real ginger jars. They often have designs of flowers, vines, or simple patterns. Lightly sketch a simple design on your vase with a pencil.
- Start Painting: Dip your thin paintbrush into the blue paint. Carefully paint over the lines you drew. Take your time.
- Fill it In: Fill in any larger areas of your design. You can paint stripes around the top and bottom of the vase to create a border.
- Let it Dry: Let the paint dry completely. Some paints need to be baked in the oven to become permanent—read the instructions on your paint bottle. Now you have a vase that looks like a classic piece.
15. The Vintage Typewriter

A vintage typewriter is a beautiful object from a different era. It adds an intellectual and nostalgic feel to any desk. The sound of the keys and the mechanical complexity are fascinating. It’s a solid piece of history that reminds us of a time before computers.
Even if it doesn’t work, a typewriter is a stunning decorative piece. It suggests a love for writing, stories, and craftsmanship. Placing one in your office or study instantly adds character and makes the space feel more curated and personal.
DIY a Curio Shadow Box
Create a curated display that shares the same collector’s vibe.
What You’ll Need:
- A shadow box frame.
- A piece of scrapbook paper or fabric for the background.
- A collection of small, interesting things (like old keys, buttons, shells, stamps, or small toys).
- Strong craft glue or hot glue.
Step-by-Step Instructions:
- Prepare the Box: Open the back of the shadow box. Cut your scrapbook paper or fabric to fit perfectly against the back panel. Glue it in place.
- Arrange Your Items: Lay the shadow box flat. Arrange your small treasures inside the box. Move them around until you like the way they look. Try to create a balanced design.
- Glue Everything Down: Pick up one item at a time. Put a small dot of glue on the back and press it firmly onto the background paper. Do this for all your items.
- Let it Dry: Let the glue dry completely with the box lying flat.
- Display Your Collection: Close up your shadow box. You can now hang it on the wall or stand it on a shelf. It’s your own personal museum.
16. The Groovy Lava Lamp

Nothing says 1970s like the mesmerizing glow of a lava lamp. It’s a kinetic piece of art that brings a funky, retro vibe to a room. The slow, endless motion of the colorful wax is calming and hypnotic. It’s a fun and playful addition to a bedroom or living space.
A lava lamp provides soft, ambient light that creates a relaxed mood. Finding a working vintage one is a fantastic thrift store success. It’s a piece of pure nostalgia that will always be a conversation starter.
DIY a Beaded Curtain
Get that 70s vibe by making a cool beaded curtain for a doorway.
What You’ll Need:
- A tension rod that fits your doorway.
- Lots of beads.
- Clear fishing line or strong string.
- Scissors.
Step-by-Step Instructions:
- Set Up Your Rod: Place the tension rod in your doorway at the height you want your curtain.
- Cut Your Strings: Cut many long pieces of fishing line. They should be the length you want your curtain to be, plus a little extra for tying knots.
- Tie on the First String: Tie one piece of fishing line to the tension rod.
- Start Beading: Start threading beads onto the string. You can make a random pattern or a repeating one. After every few beads, tie a small knot to help keep them in place.
- Finish the Strand: Continue adding beads until you get to the bottom. Tie a big knot around the last bead so none of them can slip off.
- Repeat: Keep making beaded strands and tying them to the rod until your whole curtain is finished.
17. The Curious Specimen Cloche

A glass cloche, or bell jar, turns any object into a treasure. It has a scientific, Victorian naturalist feel. Displaying items under glass, like the objects in this office, makes them seem important and worthy of study. It’s a way to highlight the beauty of natural finds.
You can place anything inside: a bird’s nest, interesting stones, dried flowers, or a beautiful seashell. It protects the item from dust while also drawing attention to it. Hunting for these glass domes in thrift stores can be a lot of fun.
DIY Pressed Botanical Art
Create your own naturalist-style art by pressing leaves or ferns.
What You’ll Need:
- Some nice-looking leaves or ferns from your yard.
- A big, heavy book.
- Two pieces of paper towel.
- A picture frame.
- White or black paper for the background.
Step-by-Step Instructions:
- Collect Your Leaves: Choose a few leaves or ferns that are flat and not too thick.
- Press Them: Open your heavy book to the middle. Lay down one piece of paper towel. Arrange your leaves on the paper towel so they are not overlapping. Place the second paper towel on top.
- Wait: Carefully close the heavy book. Place a few more heavy books on top of it for extra weight. Now, you have to wait for about one or two weeks for the leaves to dry out completely.
- Create Your Art: Once the leaves are flat and dry, open the book. Carefully lift them off the paper towel. Arrange them on your piece of background paper.
- Frame It: Place a few tiny dots of glue on the back of the leaves to hold them in place on the paper. Then put your artwork in the picture frame. You now have beautiful, scientific-looking art.
18. The Art Nouveau Vanity

Art Nouveau furniture is like functional sculpture. This vanity and chair are defined by their flowing, organic curves inspired by plants and flowers. The style is elegant, romantic, and highly artistic. It turns a simple piece of bedroom furniture into a true work of art.
The craftsmanship in Art Nouveau pieces is remarkable. The swirling wood and delicate details are a centerpiece for any room. A Tiffany-style lamp, with its stained-glass shade, is another hallmark of this beautiful design period.
DIY a Faux Stained-Glass Jar
Get the colorful, Tiffany-lamp look on a small scale.
What You’ll Need:
- A clean, empty glass jar.
- Black dimensional paint (puffy paint).
- Different colors of glass paint.
- A small paintbrush.
Step-by-Step Instructions:
- Draw Your Outline: Use the black dimensional paint to draw a design on the outside of the glass jar. Art Nouveau designs often look like flowers, dragonflies, or swirling vines. Let this black outline dry completely. It will feel raised and bumpy.
- Create the “Lead” Lines: The black outline looks like the lead that holds real stained glass together.
- Fill in the Color: Now, use your small paintbrush to fill in the spaces between the black lines with your colored glass paints. It’s like a coloring book.
- Let it Dry: Let the glass paint dry completely. The colors will look bright and shiny, like real stained glass.
- Use Your Jar: You can put a battery-operated tea light inside to make it glow, or use it as a vase for flowers.
19. The Humble Shaker Peg Rail

Shaker design is all about simplicity and usefulness. A peg rail is a classic example of this style. It’s a clean, simple, and incredibly handy way to organize a room. The smooth wood and evenly spaced pegs have a quiet beauty.
Originally, Shakers would hang everything on these rails to keep floors clear for cleaning—even chairs. Today, they are great in bedrooms for clothes, in entryways for coats and bags, or in kitchens for utensils. A vintage peg rail adds a touch of minimalist, farmhouse character.
DIY Your Own Shaker Peg Rail
This is a simple and rewarding woodworking project.
What You’ll Need:
- A smooth, flat wooden board.
- Several wooden pegs (you can buy these at a craft or hardware store).
- A ruler and a pencil.
- A drill.
- Wood glue.
Step-by-Step Instructions:
- Mark Your Holes: Lay your wooden board flat. Use a ruler to make pencil marks where you want your pegs to go. Make sure they are all evenly spaced.
- Drill the Holes: Use a drill bit that is the same size as the bottom of your pegs. Drill a hole at each spot you marked. Don’t drill all the way through the board.
- Glue the Pegs: Put a small amount of wood glue into one of the holes. Push a wooden peg firmly into the hole. If you have a hammer, you can tap it gently to make sure it’s snug.
- Repeat: Do this for all the pegs. Wipe away any extra glue that squeezes out.
- Let it Dry: Let the glue dry for several hours. You can leave the wood natural, or you can paint or stain it. Once it’s ready, attach it securely to your wall.
20. The Glamorous Mirrored Chest

Mirrored furniture brings instant Hollywood glamour to a room. This chest reflects light and makes the space feel brighter, bigger, and more luxurious. It’s a bold and dramatic choice that works well in a modern, high-fashion setting.
The combination of mirrors, metallic finishes, and plush textures creates a feeling of opulence. While it is a very striking look, you can often find mirrored pieces from the 70s and 80s at thrift stores. It’s a way to add a bit of sparkle and drama to your home.
DIY a Mirrored Tray
Add a small touch of glamour with a simple mirrored tray.
What You’ll Need:
- An old picture frame with a flat, wide frame.
- A piece of mirror cut to fit inside the frame (a glass shop can do this for you).
- Gold or silver spray paint.
- Strong glue that works on mirrors.
Step-by-Step Instructions:
- Prepare the Frame: Take the glass and the backing out of the picture frame.
- Paint the Frame: In a well-ventilated area, spray paint the frame with your gold or silver paint. Let it dry completely.
- Glue the Mirror: Run a thin line of strong glue around the inside edge of the frame where the glass would normally sit.
- Place the Mirror: Carefully place your mirror into the frame, pressing down gently so it sticks to the glue.
- Let It Dry: Let the glue dry completely. You now have a beautiful and glamorous tray, great for putting perfume bottles or decorative items on.
21. The Scholarly Cork Board

A simple cork board adds a layer of personality and organization to a study space. It’s a canvas for your thoughts, inspirations, and memories. Pinning up photos, notes, and sketches creates a visual collage of your life. It makes a workspace feel active and deeply personal.
This is an easy and affordable way to add character. You can find old cork boards at thrift stores or office supply shops. Paired with a sturdy wooden desk and a comfortable leather chair, it helps create a cozy and productive atmosphere for work or study.
DIY a Fabric-Covered Cork Board
Give a plain cork board a stylish upgrade with your favorite fabric.
What You’ll Need:
- A plain cork board.
- A piece of fabric (like linen or cotton) that is a few inches bigger than the board on all sides.
- A staple gun or hot glue gun.
- Scissors.
Step-by-Step Instructions:
- Prepare Your Fabric: Lay your fabric on a clean floor, pattern-side down. Iron it to get rid of any wrinkles.
- Position the Board: Place the cork board face down on top of the fabric.
- Start Stapling: Fold one edge of the fabric over onto the back of the board. Pull it tight and use your staple gun to secure it. Place a staple every few inches.
- Work on the Opposite Side: Move to the opposite side of the board. Pull the fabric very tight and staple it to the back. This keeps the fabric smooth on the front.
- Finish the Sides and Corners: Do the same for the other two sides. At the corners, fold the fabric neatly like you are wrapping a present before you staple it down. Trim any extra fabric. Your stylish new board is ready to hang.
22. The Romantic Wrought-Iron Bed

A wrought-iron bed brings a touch of rustic, old-world romance to a bedroom. The delicate scrolls and curves of the metalwork create a beautiful silhouette. It feels both strong and graceful. This style of bed is timeless, fitting perfectly in a farmhouse, Tuscan, or traditional setting.
This bed frame is a statement piece that doesn’t overwhelm the room. It allows light to pass through, making the space feel open. Finding a vintage one adds an authentic layer of history. Paired with simple white linens, it creates a serene and inviting atmosphere.
DIY an “Aged” Terracotta Pot
Get that rustic, earthy look of the pots in the picture.
What You’ll Need:
- A new terracotta (clay) pot.
- Plain yogurt.
- A paintbrush.
- A shady spot outside.
Step-by-Step Instructions:
- Get Your Pot Ready: Make sure your new terracotta pot is clean.
- Paint with Yogurt: Dip your paintbrush in the plain yogurt. Paint a thin layer of yogurt all over the outside of the pot. Don’t make it perfectly even; some splotches are good.
- Let Nature Do the Work: Place the pot in a shady, damp spot in your yard. The yogurt will encourage moss and natural aging to happen.
- Be Patient: This takes time. After a few weeks or a month, you will start to see a beautiful, aged patina develop on your pot. It will look like it has been in a garden for years.
- Display It: Once you like the way it looks, you can bring it inside to hold a plant or just for decoration.
23. The Traveler’s Tapestry Headboard

Hanging a large, patterned tapestry behind the bed is a brilliant way to create a dramatic and worldly headboard. This piece, with its intricate design and rich colors, instantly becomes the room’s focal point. It adds softness, texture, and a story of faraway places.
This idea is great for adding a big impact without spending a lot of money. You can find beautiful textiles, rugs, or tapestries at flea markets and thrift stores. It’s a simple way to express a bohemian, well-traveled style and make a bedroom feel like a special sanctuary.
DIY No-Sew Wall Hanging
You can hang any beautiful piece of fabric as art.
What You’ll Need:
- A beautiful piece of fabric, a scarf, or a thin rug.
- A thin wooden dowel, a little wider than your fabric.
- Hot glue gun or strong fabric glue.
- String or twine for hanging.
Step-by-Step Instructions:
- Prepare the Fabric: Lay your fabric face down. Make sure it’s clean and ironed.
- Create a Pocket: Fold the top edge of the fabric over by about two inches to create a pocket for the dowel.
- Glue the Pocket: Use your hot glue gun or fabric glue to run a line of glue along the edge of the fabric you just folded over. Press it down to seal the pocket. Let it dry.
- Insert the Hanger: Slide your wooden dowel into the pocket you created.
- Add the String: Tie a piece of string or twine to both ends of the wooden dowel. Now you can easily hang your beautiful textile on the wall.
24. The Mid-Century Modern Dresser

Mid-century modern furniture is known for its clean lines, simple shapes, and beautiful wood grain. This teak dresser is a perfect example of the style. The tapered legs and minimalist hardware give it a light, elegant look. It’s a functional piece that doubles as a beautiful object.
This design era (roughly 1945-1970) focused on quality craftsmanship. Finding a piece like this at a thrift store is a great investment. It brings a sense of understated cool and sophistication to a bedroom, and it mixes well with many other styles.
DIY Abstract Geometric Art
Create art that matches the mid-century vibe.
What You’ll Need:
- A canvas or thick piece of paper.
- Craft paints in 3-4 colors that you like (mid-century colors are often orange, teal, mustard yellow, and gray).
- Painter’s tape.
- Paintbrushes.
Step-by-Step Instructions:
- Create Your Shapes: Use the painter’s tape to tape off different geometric shapes on your canvas. Make some big triangles, some rectangles, and some overlapping lines.
- Paint the First Color: Choose one color and paint inside some of the taped-off shapes.
- Let it Dry and Repeat: Let the paint dry completely. Then, carefully remove the tape. Now, add new pieces of tape to create different shapes and paint with your second color.
- Keep Going: Repeat the process until you have filled the canvas with interesting, overlapping shapes and colors.
- The Big Reveal: Once everything is dry, remove all the tape. You will have a cool piece of abstract art with clean, sharp lines. Frame it and hang it up.
25. The French Provincial Vanity

French Provincial furniture brings a feeling of romantic, countryside elegance. This vanity, with its curved legs, gentle carvings, and soft white finish, is incredibly charming. It creates a beautiful, dedicated spot for getting ready in the morning.
The matching upholstered bench and the three-part mirror add to the classic, feminine feel. This style is all about grace and beauty. Finding a full set like this is a wonderful thrift store discovery that can transform a bedroom into a peaceful, Parisian-inspired retreat.
DIY a Distressed Paint Finish
You can give any piece of wooden furniture that soft, aged, French look.
What You’ll Need:
- A piece of wooden furniture.
- Chalk paint in a light color (like white or pale blue).
- A candle.
- Fine-grit sandpaper.
- A clean, dry cloth.
Step-by-Step Instructions:
- Prepare Your Furniture: Make sure your piece of furniture is clean.
- The Candle Trick: Rub the wax from the candle along the edges and corners of the furniture where it would naturally get worn over time.
- Paint It: Paint the entire piece with your chalk paint, right over the wax spots. Let it dry completely. You may need two coats.
- Reveal the Age: Once the paint is dry, take your sandpaper and gently rub it over the areas where you put the candle wax. The paint will easily come off in those spots, revealing the wood underneath.
- Wipe it Down: Use a clean cloth to wipe away all the paint dust. Your furniture now has a beautiful, soft, distressed finish.
26. The Bauhaus Cantilever Chair

This chair is a masterpiece of modern design. The Bauhaus movement focused on combining art and industrial function. The cantilever chair, with its tubular steel frame, seems to float. It has no back legs, which was a revolutionary idea.
This chair is simple, elegant, and surprisingly comfortable. The mix of cool metal and warm leather is a classic combination. Finding a vintage one is a score for any design lover. It adds a dose of intellectual, architectural style to a home office.
DIY a Geometric Mobile
Create a simple hanging mobile inspired by Bauhaus shapes.
What You’ll Need:
- A few thin wooden dowels or sticks.
- Cardboard or thick cardstock in primary colors (red, yellow, blue, black, white).
- Scissors.
- A needle and thread.
- A ruler and pencil.
Step-by-Step Instructions:
- Cut Your Shapes: On your cardstock, draw and cut out some simple geometric shapes: circles, squares, triangles, and rectangles.
- Create the Hanger: Tie two dowels together in the middle with thread to make a cross shape. This will be the main part of your mobile.
- Attach the Shapes: Use the needle to poke a small hole in the top of each cardboard shape. Thread a piece of string through the hole and tie a knot.
- Hang the Shapes: Tie the other end of the strings to the dowels. Hang them at different lengths to make it interesting.
- Balance It: Move the shapes around until your mobile is balanced and hangs straight. You can add more dowels hanging from the main ones to make it more complex. Hang your new mobile where it can spin gently.
27. The Dramatic Gothic Bed

This bedroom is a dive into dark, romantic drama. The Gothic style is defined by its pointed arches, intricate details, and moody atmosphere. The wrought-iron bed with its high arches mimics the windows of an ancient cathedral. It creates a powerful and theatrical focal point.
This look is all about creating a sense of mystery and history. The heavy velvet drapes, ornate candelabras, and dark color palette complete the fantasy. A bed like this is a rare find, but it provides the perfect foundation for a truly unique and immersive bedroom theme.
DIY a Gothic-Style Candelabra
Give a simple candelabra a dark and moody makeover.
What You’ll Need:
- An old metal candelabra (you can find these at thrift stores).
- Black matte spray paint.
- Old newspapers.
- Dark red or black candles.
Step-by-Step Instructions:
- Clean Your Candelabra: Wipe down the candelabra to get rid of any dust or old wax.
- Set Up Your Space: Lay down your newspapers in a well-ventilated area, like outside.
- Paint it Black: Spray paint the entire candelabra with the black matte paint. Use long, even strokes to avoid drips. Let the first coat dry.
- Add a Second Coat: Flip the candelabra over and spray it again to make sure you have covered every spot. Let it dry completely.
- Add Candles: Once it’s totally dry, place your dark red or black candles in the holders. Your new gothic candelabra is ready to add a bit of drama to your room.
28. The Nostalgic College Pennant

Vintage pennants are a fun and colorful way to decorate a wall. They tell a story of school spirit, travel, and personal history. Grouping several together creates a graphic and nostalgic display. They add a casual, retro, and slightly academic feel to a room.
These are easy to find at flea markets and antique shops. You can collect pennants from places you’ve been, schools you love, or just ones with colors and designs you like. They are a simple, lightweight way to add a lot of personality to a dorm room, office, or kid’s room.
DIY Your Own Personal Pennant
Create a pennant for your own “team” or favorite place.
What You’ll Need:
- A piece of felt in your main color.
- A few smaller pieces of felt in other colors.
- Fabric glue.
- Scissors.
- A ruler and a pencil.
Step-by-Step Instructions:
- Cut the Pennant Shape: Use your ruler and pencil to draw a long triangle shape on your main piece of felt. Cut it out.
- Add the Border: Cut a thin strip from a different colored piece of felt. This will be the border on the straight edge of your pennant. Glue it in place.
- Cut Out Your Letters: On another piece of felt, draw the letters for a word you want on your pennant. It could be your name, your town, or a fun word like “READ.” Carefully cut the letters out.
- Glue on the Letters: Arrange the letters on your pennant. Once you like how they look, use fabric glue to stick them down.
- Let it Dry: Let the glue dry completely. You can now pin your personal pennant to the wall.
29. The Utilitarian Pegboard Organizer

A pegboard is a wonderfully practical and visually pleasing way to organize a kitchen. It turns a blank wall into a hardworking storage space. The grid of holes allows you to customize it with hooks and shelves for all your pots, pans, and utensils.
This is a classic organization tool that has a simple, utilitarian charm. Painting it to match your walls helps it blend in, while the outlines of the pots add a playful, graphic touch. It keeps your most-used items within easy reach and displays a beautiful collection of cookware.
DIY Your Own Kitchen Pegboard
This is a great weekend project to get your kitchen in order.
What You’ll Need:
- A piece of pegboard, cut to the size you want.
- Four pieces of wood (1x2s) for the frame.
- Screws and a drill.
- A level.
- Pegboard hooks and accessories.
Step-by-Step Instructions:
- Build the Frame: You need a frame behind the pegboard so there is space for the hooks to go in. Screw the four pieces of wood together to make a rectangle the same size as your pegboard.
- Attach the Pegboard: Lay the pegboard on top of the frame and screw it down at the corners and along the sides.
- Find the Studs: Use a stud finder to locate the strong support beams in your wall. Mark them with a pencil.
- Mount the Frame: Hold your pegboard up to the wall. Use a level to make sure it’s straight. Drill long screws through the frame and into the wall studs to hang it securely.
- Organize It: Now for the fun part. Put your hooks into the pegboard and hang all your kitchen tools.
30. The Retro Diner Booth

A diner booth instantly creates a fun and nostalgic eating area. The combination of shiny vinyl, chrome details, and a checkerboard floor takes you right back to the 1950s. It’s a comfortable and space-saving way to build a breakfast nook.
This is a commitment to a theme, and it pays off in personality. Thrifting an authentic diner booth is a rare find, but there are many great reproductions available. Paired with vintage-style appliances and memorabilia, it creates a cheerful and unique kitchen experience.
DIY a Checkerboard Floor Mat
Get the diner look without redoing your whole floor.
What You’ll Need:
- A plain, light-colored floor mat (vinyl or canvas).
- Black paint that is suitable for floors or fabric.
- A ruler and a pencil.
- Wide painter’s tape.
- A paintbrush or small roller.
Step-by-Step Instructions:
- Measure Your Squares: Use your ruler and pencil to measure and draw a grid of equal-sized squares on your floor mat.
- Tape Off the Pattern: This is the most important step. Carefully place painter’s tape along the outside edges of every other square. You will be painting the squares that are not covered by tape.
- Paint the Black Squares: Use your brush or roller to paint the open squares black. Don’t worry if you get paint on the tape.
- Let it Dry and Peel: Let the paint dry completely according to the directions on the can. Once it’s dry, carefully peel off all the painter’s tape.
- Enjoy Your New Mat: You should have a crisp checkerboard pattern. Place your new mat in your kitchen for an instant retro feel.
31. The Unfitted Plate Rack

There is a special charm to an “unfitted” kitchen, where each piece feels like individual furniture. A wooden plate rack is a key part of this look. It’s a simple, honest piece of storage that displays your everyday dishes as decor. The open design makes a kitchen feel warm and accessible.
This style is about practicality and beauty combined. A vintage plate rack brings a sense of history and craftsmanship. Paired with a deep farmhouse sink and a sturdy work table, it helps create a kitchen that feels like it has been lovingly pieced together over many years.
DIY an “Aged” Wood Finish
Give a new shelf or board an old, rustic look.
What You’ll Need:
- A piece of new, unfinished wood.
- A hammer, a chain, and some screws.
- Dark wood stain.
- An old rag.
Step-by-Step Instructions:
- Distress the Wood: This is the fun part. Gently hit the wood with the hammer and the chain. Press the threads of a screw into the surface. This creates little dents and marks that look like years of use.
- Get Ready to Stain: Wipe off any dust from the wood.
- Apply the Stain: Dip your old rag into the wood stain. Rub the stain all over the piece of wood. Make sure to get it into all the little dents and marks you made.
- Wipe it Off: Before the stain dries, use a clean part of the rag to wipe off the excess. The stain will stay in the distressed marks, making them stand out.
- Let it Dry: Let the wood dry completely. It will now look like a piece of aged, reclaimed lumber.
32. The Colorful Talavera Tile

Hand-painted Talavera tile turns a kitchen into a vibrant work of art. The bold colors and intricate patterns bring an incredible amount of energy and personality. This style is inspired by traditional Mexican pottery. It makes a kitchen backsplash or countertop the star of the show.
Each tile is slightly different, which adds to the rustic, handmade charm. Thrifting reclaimed tiles can result in a truly unique mosaic. Paired with a copper sink and colorful pottery, it creates a warm, festive space that celebrates artisan craft.
DIY Painted Tile Coasters
Get the look of decorative tile with this simple project.
What You’ll Need:
- Plain, cheap ceramic tiles (from a hardware store).
- Craft paints in several bright colors.
- A thin paintbrush.
- Clear sealant spray.
- Small felt pads.
Step-by-Step Instructions:
- Clean Your Tiles: Make sure your ceramic tiles are clean and dry.
- Paint Your Design: Use your thin paintbrush and bright paints to create a pattern on the tile. You can look up “Talavera tile patterns” online for ideas. Don’t worry about being perfect; the handmade look is part of the charm.
- Let them Dry: Let the paint dry completely.
- Seal Your Work: In a well-ventilated area, spray a coat of clear sealant over the painted tiles. This will protect your design from water. Let it dry.
- Add Feet: Stick one small felt pad on each corner of the bottom of the tile. This will prevent it from scratching your table. Your new coasters are ready to use.
33. The Art Deco Mirrored Bar

Art Deco style is all about glamour and sophistication. This mirrored home bar captures the spirit of the Roaring Twenties. The use of antiqued mirrors, geometric shapes, and gold accents creates a sense of luxury. It’s a dedicated space for celebration and entertaining.
Finding vintage Art Deco furniture adds an authentic touch of history to your home. The fan-shaped sconces and the repeating patterns on the cabinet are hallmarks of the style. This look turns any corner into a chic cocktail lounge.
DIY a Gold Geometric Tray
Add a touch of Art Deco flair to your home.
What You’ll Need:
- A plain tray (wood, plastic, or metal).
- Gold spray paint.
- Painter’s tape.
Step-by-Step Instructions:
- Prepare Your Tray: Make sure your tray is clean and dry.
- Tape Your Pattern: Use the painter’s tape to create a geometric pattern on the inside surface of the tray. You can make stripes, triangles, or a sunburst shape like a fan.
- Paint it Gold: In a well-ventilated area, spray paint the entire tray gold. The paint will only stick to the parts not covered by tape.
- Let it Dry: Let the paint dry completely.
- Reveal the Design: Carefully peel off all the painter’s tape. You will have a sharp, glamorous geometric pattern.
34. The Mismatched Schoolhouse Chair

There’s a playful charm in not having everything match perfectly. Using vintage schoolhouse chairs in different colors around a simple dining table creates a relaxed and eclectic look. These chairs are sturdy, simple, and full of nostalgic character.
The bent plywood and metal frames are a classic mid-century design. The mix of bright colors adds a cheerful, lighthearted feel to the room. Hunting for these chairs one by one at thrift stores is part of the fun. It’s a great way to build a dining set with a personal story.
DIY a Two-Tone Chair Makeover
Give any old wooden chair a fresh, colorful look.
What You’ll Need:
- An old wooden chair.
- Sandpaper.
- Two colors of paint you like.
- Painter’s tape.
- A paintbrush.
Step-by-Step Instructions:
- Sand the Chair: Lightly sand the entire chair to help the new paint stick. Wipe off all the dust with a cloth.
- Paint the First Color: Paint the whole chair with your lighter color. This will be your base. Let it dry completely.
- Tape Your Design: Decide where you want your second color to be. A popular look is to “dip” the legs. Use painter’s tape to tape off the top of the legs in a straight line.
- Paint the Second Color: Paint the bottoms of the legs with your second, bolder color.
- Peel and Dry: While the paint is still a little bit wet, carefully peel off the tape. Let the chair dry completely before using it.
35. The Apothecary Drawer Cabinet

Apothecary cabinets bring a sense of old-world order and mystery. With their many small drawers and metal label pulls, they feel like they belong in a scientist’s lab or an old pharmacy. They are a beautiful and practical way to store small items.
This is a fantastic find for organizing a pantry, a craft room, or an office. You can fill the drawers with spices, beads, screws, or any other tiny collection. The dark wood and vintage hardware add a sophisticated, historic feel to your shelves.
DIY Faux Apothecary Jars
Label simple jars to get that old-timey, organized look.
What You’ll Need:
- A set of plain glass jars.
- Tan or off-white paper.
- A printer or a pen with nice handwriting.
- A tea bag and a little warm water.
- Glue stick or spray adhesive.
Step-by-Step Instructions:
- Design Your Labels: On your computer, type out the names of what you want to store in your jars. Use a simple, old-fashioned font. Or, write them out by hand. Print or cut them out.
- Age the Paper: Dip the tea bag in warm water and gently dab it all over your paper labels. This will give them a stained, old look. Let them dry.
- Glue Them On: Once the labels are dry, use your glue stick or spray adhesive to attach them to the front of your glass jars.
- Fill Them Up: Fill your jars with flour, sugar, beans, or buttons. Your pantry will look like an old general store.
36. The Farmhouse Stoneware Collection

There is a humble beauty in vintage stoneware. Collecting these sturdy crocks, pitchers, and bowls creates a display with rustic, farmhouse character. The simple shapes and neutral, creamy colors are calming. They feel connected to the earth.
A large wooden hutch is the perfect place to show off a growing collection. These pieces were made to be used, so they are heavy and durable. Finding them at flea markets and thrift stores is a slow and rewarding hunt. Grouped together, they create a powerful, cohesive statement.
DIY a Faux Stoneware Finish
You can make any cheap vase look like heavy, rustic stoneware.
What You’ll Need:
- A glass or ceramic vase from a thrift store.
- Craft paint in a neutral color (like white, tan, or gray).
- Baking soda.
- A small bowl and a paintbrush.
Step-by-Step Instructions:
- Mix Your Paint: Squeeze some craft paint into your bowl. Start adding a little bit of baking soda and mix it in. Keep adding baking soda until your paint is thick and slightly gritty.
- Paint Your Vase: Use your paintbrush to cover the entire outside of the vase with your paint mixture. Use dabbing and crisscross strokes to create a lot of texture.
- Let it Dry: The paint will dry into a matte, chalky finish that looks and feels a lot like real stoneware. You can add a second coat if you want more texture.
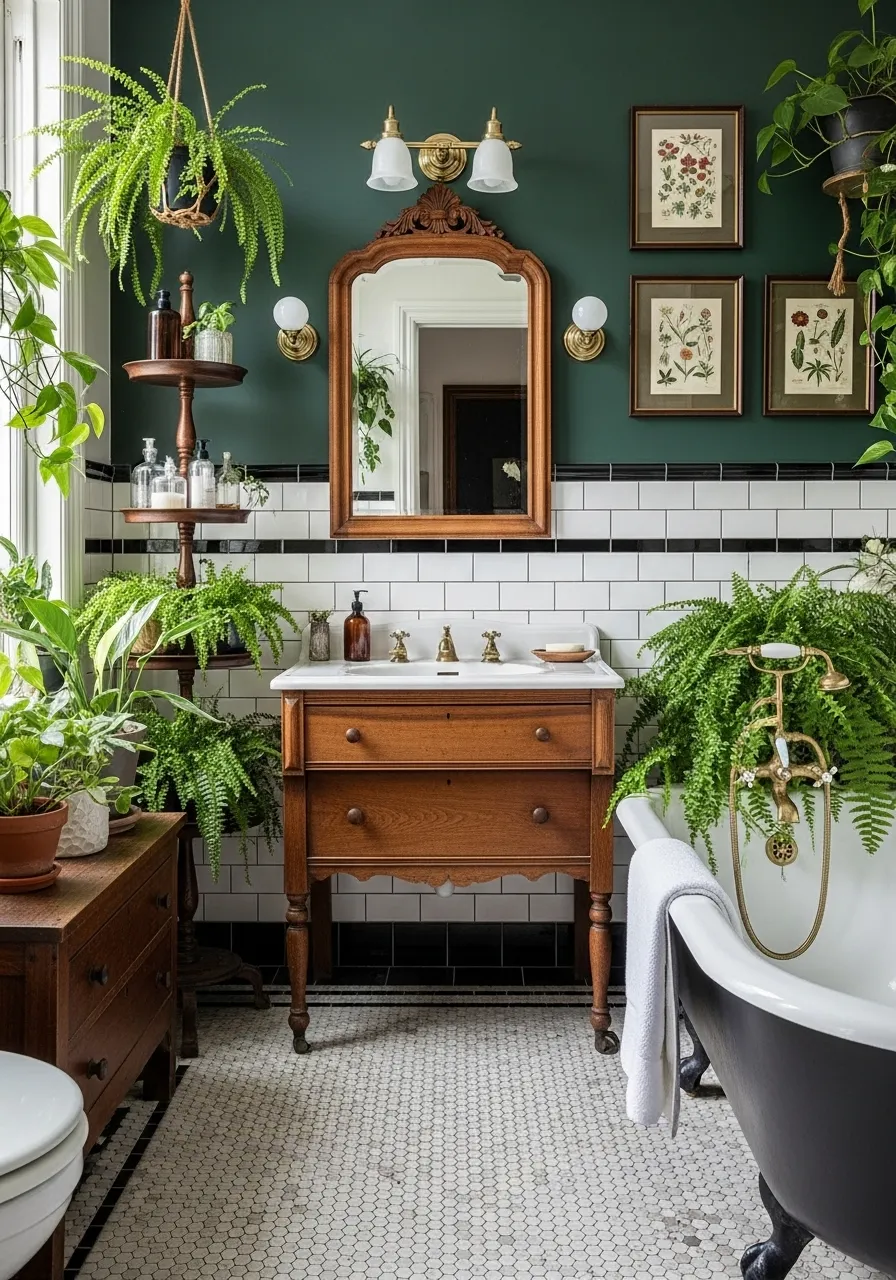
37. The Repurposed Wooden Vanity

Using a piece of furniture in an unexpected way adds instant character. This vintage wooden dresser has been cleverly repurposed as a bathroom vanity. The warm, rich wood provides a beautiful contrast to the cool tile and porcelain of the bathroom. It makes the space feel unique and custom-made.
This is a great way to add storage and style. You can hunt for a small dresser or table at a thrift store that is the right height. A carpenter or plumber can help cut a hole for the sink and plumbing. It’s a project that results in a one-of-a-kind bathroom centerpiece.
DIY Framed Botanical Prints
Create the elegant, scientific art seen in the picture.
What You’ll Need:
- A set of matching picture frames from a thrift store.
- Off-white or cream-colored paper.
- A printer.
- Access to the internet.
Step-by-Step Instructions:
- Find Your Images: Search online for “public domain botanical illustrations.” There are thousands of beautiful, free pictures of plants and flowers you can use.
- Save and Print: Save a few of your favorite images. Print them out on your nice paper, making sure they are the right size to fit in your frames.
- Frame Them: Carefully place each print into one of your thrifted frames.
- Create a Gallery: Hang your framed prints together on a wall. A group of three or four in a neat grid looks very sophisticated and stylish.
38. The Nautical Rope Mirror

A rope-wrapped mirror is a classic way to bring a touch of the coast into your home. The natural texture of the rope adds a rustic, nautical feel. It’s a simple detail that makes a big impact, especially in a smaller space like a bathroom.
This mirror feels rugged and adventurous, like something you might find on a ship. Paired with a framed map, beadboard walls, and blue and white towels, it creates a clean and timeless maritime theme. It’s an easy find that sets a clear and charming mood.
DIY Your Own Rope Mirror
You can give any plain mirror this nautical makeover.
What You’ll Need:
- A simple round or oval mirror with a flat frame.
- Thick, natural rope (enough to go around the mirror).
- A hot glue gun and plenty of glue sticks.
- Scissors.
Step-by-Step Instructions:
- Start Gluing: Find a starting point on the edge of the mirror frame. Put a generous line of hot glue on a small section of the frame.
- Press the Rope: Firmly press the end of your rope into the hot glue. Hold it for a few seconds until it sticks.
- Work in Sections: Continue this process, working in small sections. Add a line of glue, then press the rope down neatly next to the part you just glued.
- Keep it Tight: Make sure to keep the rope tight and snug against the previous row as you go all the way around the mirror.
- Finish the End: When you get back to the start, cut the rope and glue the end down securely. Your mirror now has a whole new nautical personality.
39. The Classic Wooden Coat Tree

A wooden coat tree is a handsome and hardworking piece for an entryway. It’s a traditional solution for hanging coats, hats, and scarves. A vintage one, with its solid wood construction and classic shape, brings a sense of timeless style and welcome to your front door.
This is more than just a place to drop your things. It’s a beautiful, sculptural object that adds height and character to a corner. Look for one with interesting hooks or a warm wood finish. It’s a simple, elegant piece of furniture that is always useful.
DIY a Wall-Mounted Brush Holder
Display a collection of old brushes like the ones in the picture.
What You’ll Need:
- A collection of 3-5 old brushes with leather straps or holes in the handles.
- A small, beautiful piece of wood.
- Simple brass or black hooks.
- A drill or screwdriver.
Step-by-Step Instructions:
- Prepare the Board: Make sure your piece of wood is clean and smooth. You can stain or paint it if you like.
- Attach the Hooks: Decide on the spacing for your brushes. Screw the hooks into the wooden board.
- Mount the Board: Securely attach the board to your wall with screws.
- Hang Your Collection: Hang your vintage brushes from the hooks. This turns a simple, everyday object into an interesting and decorative piece of wall art.
40. The Cozy Reading Nook

Sometimes the best vintage find isn’t a single item, but a feeling. Creating a cozy reading nook in a forgotten corner is a way to add immense character to your home. A comfortable wicker chair, a small side table, and a good reading lamp are all you need to start.
The real magic comes from filling the space with life. A collection of houseplants in simple terracotta pots turns the nook into a personal jungle. The mix of textures from the wicker, the plants, and a soft rug creates a perfect little escape. It’s a thrifted corner of peace and quiet.
DIY a Macrame Plant Hanger
This is an easy project that adds to the bohemian, plant-filled vibe.
What You’ll Need:
- Macrame cord.
- A small potted plant.
- Scissors.
- A metal or wooden ring (optional).
Step-by-Step Instructions:
- Cut Your Cords: Cut eight long pieces of macrame cord, all the same length (about 5-6 feet long is good for a small plant).
- Tie the Base Knot: Take all eight cords and tie them together in one big knot at the bottom. Leave a few inches of cord at the end like a tassel.
- Make Your First Row of Knots: Separate the cords into four groups of two. About two inches up from the big knot, tie each pair of cords together in a simple knot.
- Make the Second Row: Now, take one cord from one pair and one cord from the neighboring pair. A couple of inches up from the first row of knots, tie these two new partners together. Do this all the way around. This will create a diamond-patterned net.
- Finish the Top: Gather all eight cords together at the top. Slide them through your ring if you are using one. Tie one big, strong knot to create a loop for hanging. Your plant now has a stylish new home.
41. The Craftsman-Style Mudroom Built-in

A solid wood, craftsman-style built-in brings incredible order and warmth to an entryway or mudroom. This piece is all about quality and function. The deep cubbies for each family member, sturdy hooks for coats, and storage for shoes below create a system for an organized life.
The beauty of this style is in its solid construction and simple, honest materials. Vintage pieces like this were built to last for generations. A mudroom bench adds a sense of permanence and welcome right at the front door. It’s a piece of furniture that becomes part of the home’s architecture.
DIY a Vintage-Style Wooden Caddy
Create a small wooden toolbox or caddy that shares the same craftsman spirit.
What You’ll Need:
- One wide wooden board for the bottom.
- Two shorter boards for the sides.
- Two smaller, identical pieces for the ends (you can cut a handle shape in the top).
- A wooden dowel for the handle.
- Wood glue and nails or screws.
- A saw and a drill.
Step-by-Step Instructions:
- Cut Your Pieces: If you haven’t already, cut all your wood pieces to the desired size for your caddy.
- Shape the Ends: On your two smaller end pieces, you can draw and cut out a handle shape at the top. Below that, drill a hole through each one that is the same size as your dowel.
- Assemble the Box: Use wood glue and nails to attach the long side pieces to the edges of the bottom board. Then, attach the two end pieces. You should now have a simple wooden box.
- Add the Handle: Put some wood glue on the ends of your dowel. Slide the dowel through the holes you drilled in the end pieces to create the handle.
- Finish it: You can sand it, stain it, or paint it to match your decor. This little caddy is great for holding mail, tools, or art supplies.
42. The Unexpected Laundry Room Mirror

Why should functional rooms be boring? Adding an elegant, decorative mirror to a laundry room is an unexpected touch that makes the space feel special. This beautiful mirror, with its antiqued gold frame, elevates a room meant for chores. It turns the laundry room into a well-designed space.
The warm metallic finish of the mirror and the soft light from the sconce create a cozy, moody atmosphere. They contrast beautifully with the modern washing machines. Thrifting a beautiful old mirror is an easy way to add a touch of glamour and personality to any utility space in your home.
DIY an Antiqued Mirror Frame
You can give any plain picture frame an aged, elegant look.
What You’ll Need:
- A plain wooden picture or mirror frame.
- Black craft paint.
- Gold or brass metallic craft paint.
- A couple of clean, dry rags.
- A small paintbrush.
Step-by-Step Instructions:
- Paint it Black: First, paint the entire frame with the black craft paint. This will be your base layer that peeks through. Let it dry completely.
- Add the Gold: Put some of the gold metallic paint onto a paper plate. Dab your clean rag into the paint, then dab most of it off on the plate. You want very little paint on the rag.
- Dry Brush the Frame: Lightly rub the paint-dusted rag over the raised details and edges of the frame. The gold paint will stick to the high points, while the black paint stays in the crevices. This is called dry brushing.
- Soften the Look: Keep building up the gold color slowly until you like how it looks. You can use a clean rag to gently buff some areas to blend the gold and black.
- Let it Dry: Let the paint dry completely. Your frame now has a rich, antiqued finish that looks like it came from a fancy estate sale.
Adding character to your home doesn’t have to be expensive or complicated. As you’ve seen, a single, well-chosen piece from a thrift store or flea market can completely transform the feeling of a room. It’s about finding things that speak to you and tell a little story.
The real joy comes from the hunt itself and the creativity that follows. Whether you display your find as is or give it a new life with a simple DIY project, you are creating a space that is uniquely yours.
So next time you pass a thrift store, stop in. You never know what treasure is waiting inside to give your home the character you’ve been looking for. Your next great find is out there.
Key Takeaways
- Character Comes from History: Vintage and thrifted items bring a sense of history and a unique story that new items can’t replicate.
- Look for Unique Silhouettes: Pieces like a peacock chair or a wrought-iron bed add dramatic shapes that become instant focal points.
- Don’t Underestimate Small Objects: A collection of stoneware, a vintage typewriter, or a set of apothecary jars can add immense personality to a shelf or desk.
- DIY Adds a Personal Touch: A simple coat of paint, a new frame, or a bit of creativity can turn a cheap find into a custom piece that perfectly suits your style.
- Every Room Can Be Special: Even functional spaces like laundry rooms and bathrooms can be elevated with decorative, unexpected finds like an elegant mirror or a piece of art.