Your front door serves as the first handshake your home gives to the world. A bare entrance often feels cold and uninviting during the month of love. You can easily change that by adding a handmade wreath that reflects your personal style.

This collection offers dozens of creative ways to celebrate Valentine Day with flair. You will find projects that use everything from soft velvet to rustic wood beads. These ideas help you transform a simple entryway into a stunning focal point.
Making your own decor saves money while allowing your creativity to shine. Most of these designs require basic tools you likely already own. Follow our simple steps to create a beautiful welcome for your family and friends.
1 Velvet Fabric Bloom Wreath
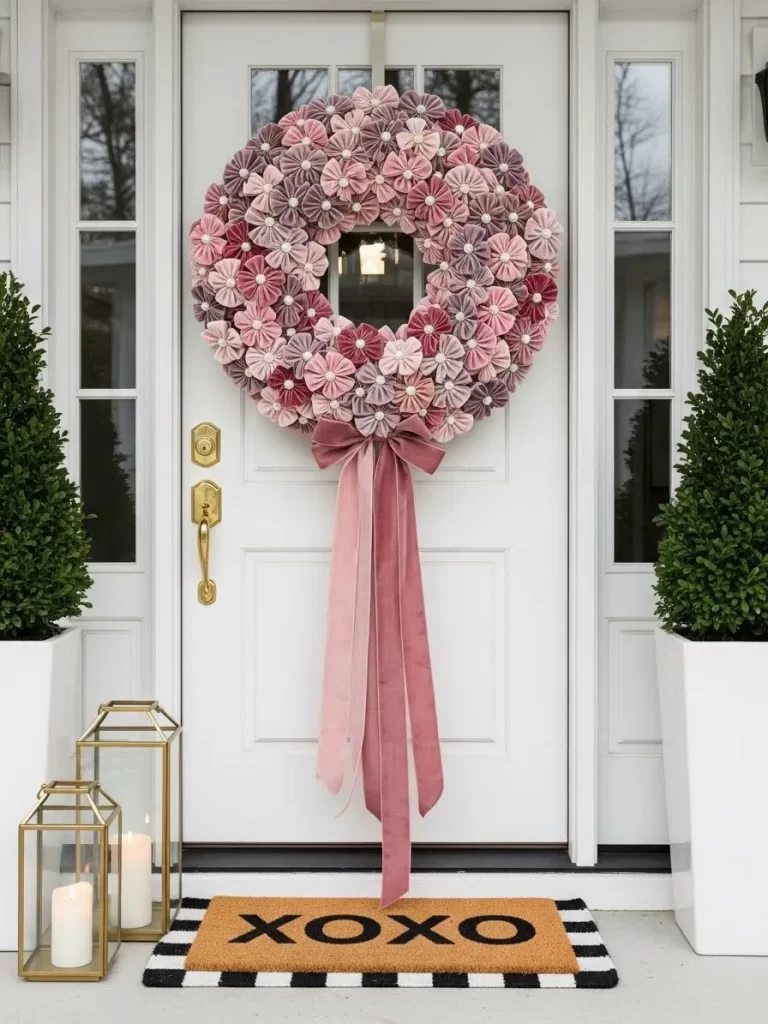
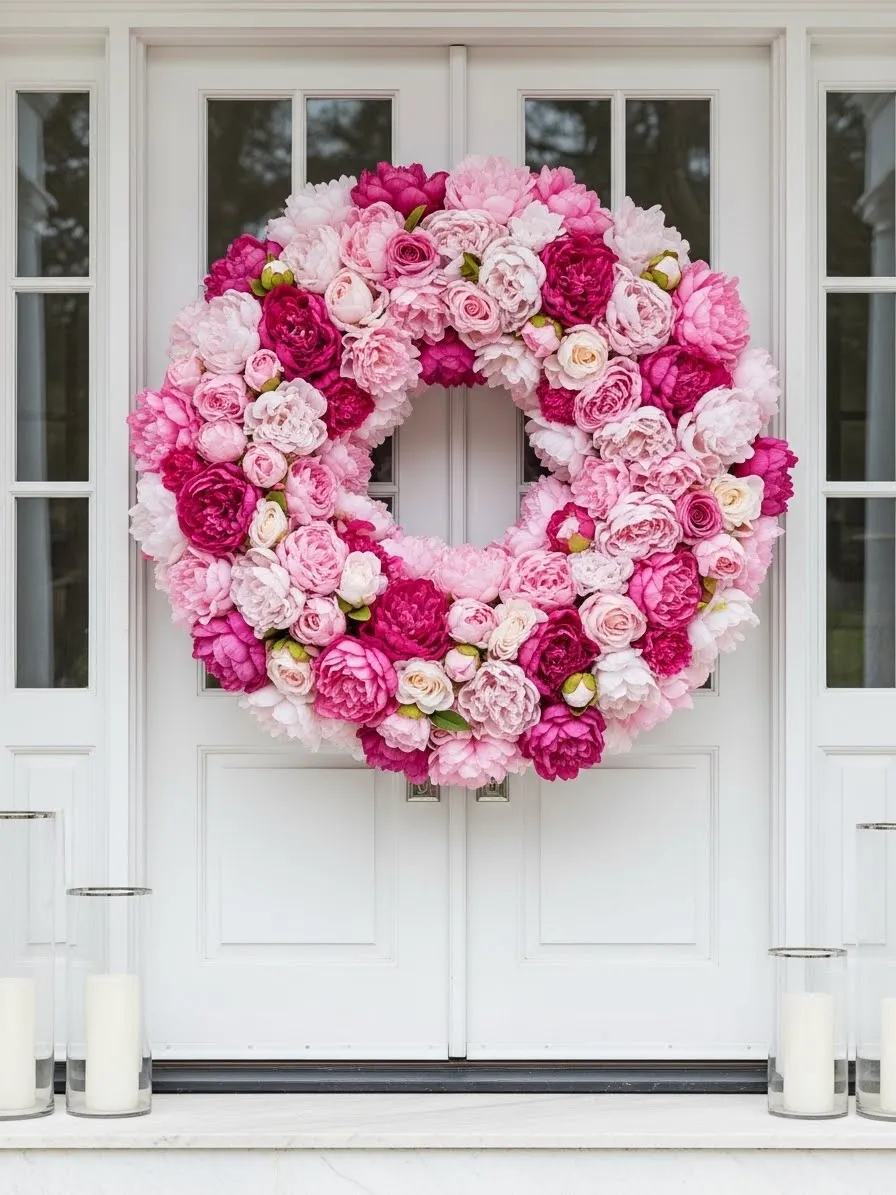
This beautiful wreath uses soft velvet fabric to create a romantic look for your front entrance. Layers of handmade fabric blossoms cover the entire surface with rich texture. Various shades of pink and purple blend together to catch the eye of every guest who visits.
Small white pearls sit in the center of each flower to add a touch of elegance and shine. A long velvet bow drapes down from the bottom of the circle for extra drama. Each petal feels soft and looks high quality against a white door. You can easily match these colors to your existing porch decor. Crafting this piece allows you to express your creative side while making something unique.
Materials Required
- Foam wreath base
- Pink velvet fabric
- Mauve velvet fabric
- Purple velvet fabric
- Large white pearl beads
- Long velvet ribbon
- Sewing thread
Equipment Required
- Hot glue gun
- Extra glue sticks
- Sharp fabric scissors
- Sewing needle
- Round template for circles
DIY Instructions Step by Step
- Cut out many circles from the different colors of velvet fabric using your template.
- Sew a loose stitch around the outer edge of one fabric circle using your needle and thread.
- Tug the thread to pull the edges into the center to create a gathered flower.
- Tie a knot to hold the gathered fabric shape together tightly.
- Place a drop of glue in the center of the flower and add a pearl bead.
- Continue making these fabric blossoms until you have a large pile ready.
- Apply hot glue to the back of a finished flower and press it onto the foam base.
- Arrange the colors in a random pattern to cover the whole front of the circle.
- Make sure you cover the sides of the foam so no white gaps are visible.
- Form a large bow with the long ribbon and glue it to the bottom center.
2 Natural Wood Bead Heart
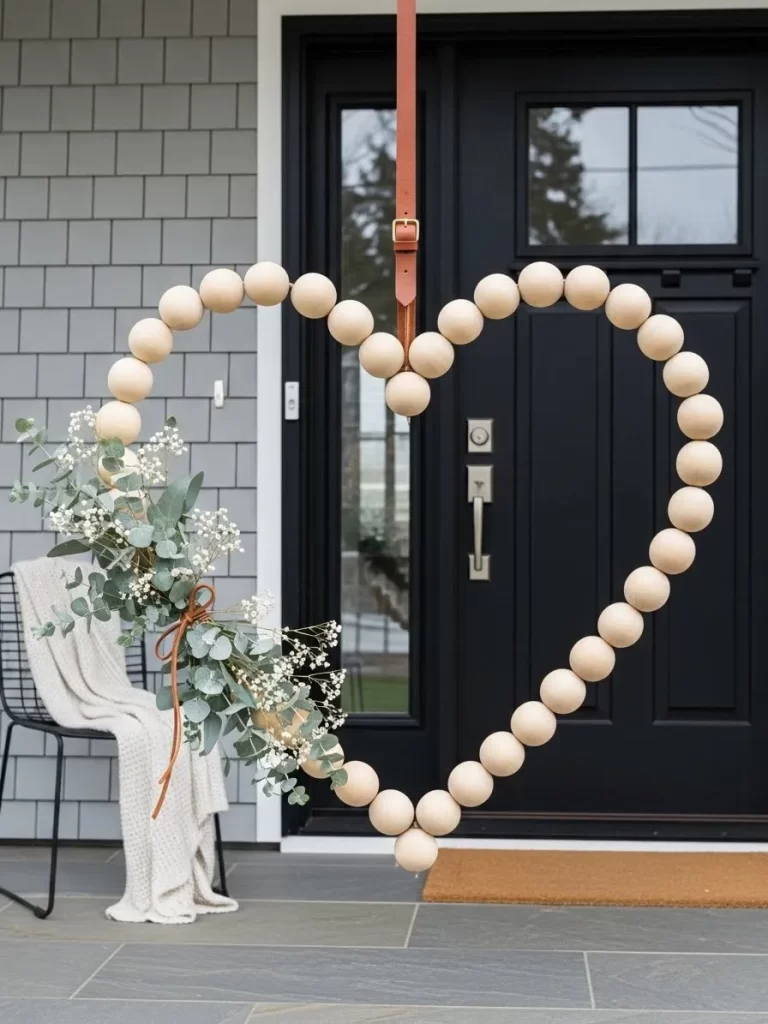
This minimalist heart shaped decoration brings a modern touch to your entry. Large unfinished wooden beads create a clean silhouette that stands out against dark doors. A lush cluster of eucalyptus and white baby breath adds a soft organic feel to one side. The natural tones work well for any season beyond just February.
Leather straps hold the piece securely while adding a rustic vibe. You will love how the light reflects off the smooth round surfaces. This design proves that simple shapes can make a bold statement. It invites guests into your home with a warm and stylish greeting.
Materials Required
- Large unfinished wooden beads
- Heavy gauge craft wire
- Fresh or faux eucalyptus stems
- Dried baby breath flowers
- Brown leather strip or ribbon
- Thin floral wire
Equipment Required
- Wire cutters
- Pliers
- Hot glue gun
- Glue sticks
- Scissors
DIY Instructions Step by Step
- Bend your heavy craft wire into a large heart shape.
- Use pliers to twist the ends of the wire together at the top center.
- Slide the wooden beads onto the wire one by one until the heart is full.
- Close the wire ends tightly so the beads cannot slide off.
- Gather a small bunch of eucalyptus and baby breath.
- Wrap thin floral wire around the stems to hold them together.
- Attach the flower bunch to the left side of the heart using more floral wire.
- Hide the wire by tucking stems under the beads.
- Loop the leather strip through the top of the heart.
- Tie a knot or use glue to secure the leather for hanging.
3 Moody Floral Grapevine Wreath

Deep red roses and crisp white anemones create a striking contrast on this grapevine base. Dark greenery fills the gaps to provide a rich and moody atmosphere. This piece feels romantic yet sophisticated for a grown up Valentine theme. The circular frame uses natural branches for an earthy foundation.
Placement of the flowers on one side creates an asymmetrical look that feels very current. Every bloom looks realistic and stays vibrant through the winter weather. A dark door provides the backdrop for these bold colors to shine. Your neighbors will surely notice this elegant display from the sidewalk.
Materials Required
- Large grapevine wreath base
- Faux white anemones with black centers
- Dark red silk roses
- Artificial eucalyptus leaves
- Dark green ivy vines
- Floral tape
Equipment Required
- Wire cutters
- Hot glue gun
- Glue sticks
- Floral picks
DIY Instructions Step by Step
- Lay your grapevine wreath on a flat work surface.
- Cut the stems of your silk flowers to about four inches long.
- Push the rose stems into the left side of the grapevine branches.
- Add the white anemones around the roses to create a full cluster.
- Apply hot glue to the stems where they meet the wood for a strong hold.
- Tuck green ivy leaves behind the flowers to fill in any empty spaces.
- Insert eucalyptus sprigs at the top and bottom of the floral group.
- Check the balance of the wreath by holding it up against a wall.
- Add more small leaves if any part of the grapevine looks too bare.
- Attach a wire loop to the back of the frame for easy hanging.
4 Coastal Driftwood Heart
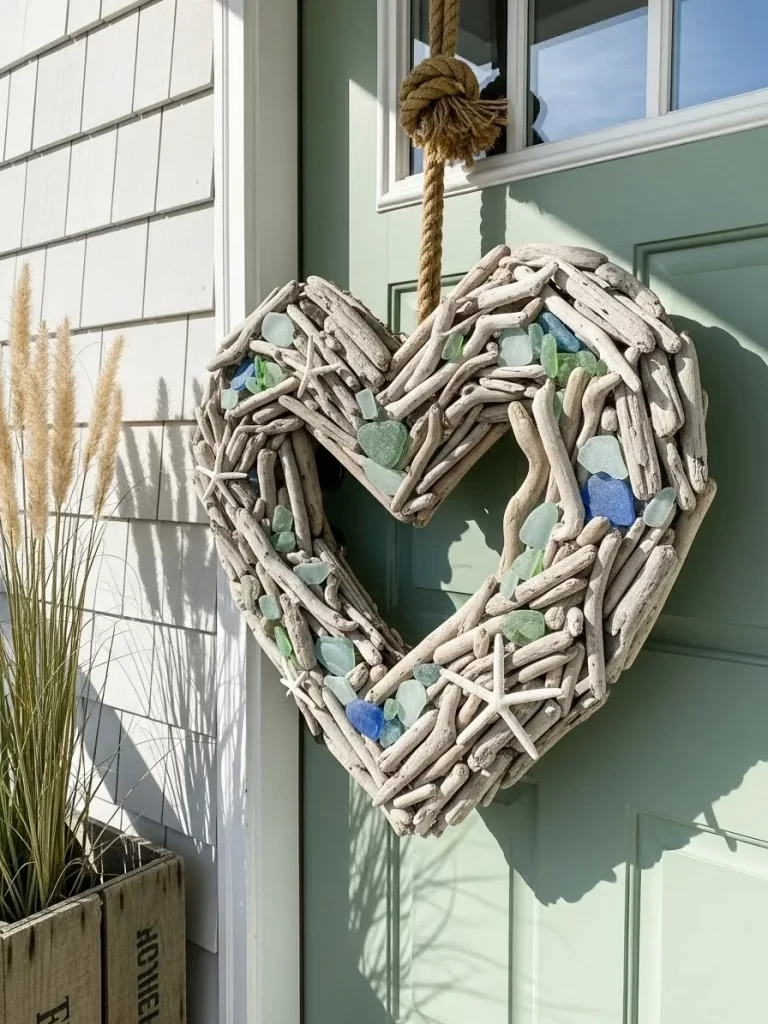
Capture a beach vibe with this unique driftwood heart decoration. Weathered pieces of wood fit together like a puzzle to form a sturdy shape. Frosted sea glass in shades of blue and green adds pops of coastal color. Tiny white starfish nestle among the timber for a finished nautical look.
Thick rope allows you to hang this piece with ease on any hook. It brings a sense of calm and vacation memories to your porch. Using found materials makes this a wonderful project for nature lovers. You can enjoy this seaside charm long after the holiday ends.
Materials Required
- Flat wooden heart shaped backing
- Assorted small driftwood pieces
- Tumbled sea glass in blue and green
- Small white resin starfish
- Heavy jute rope
- Strong wood glue
Equipment Required
- Hot glue gun
- Glue sticks
- Scissors
- Pencil
DIY Instructions Step by Step
- Trace your heart shaped backing onto a piece of paper to plan your layout.
- Arrange the driftwood pieces on the wooden base to cover the surface.
- Glue the largest pieces of wood down first using strong wood glue.
- Fill the smaller gaps with tiny wood scraps until no backing shows.
- Apply hot glue to the back of the sea glass pieces.
- Scatter the glass across the wood to mimic treasures washed ashore.
- Press the small starfish onto the driftwood in three different spots.
- Let the glue dry completely for at least one hour.
- Flip the heart over and glue the ends of the jute rope to the top.
- Ensure the rope loop is centered so the heart hangs straight.
5 Floating Dried Flower Hoop
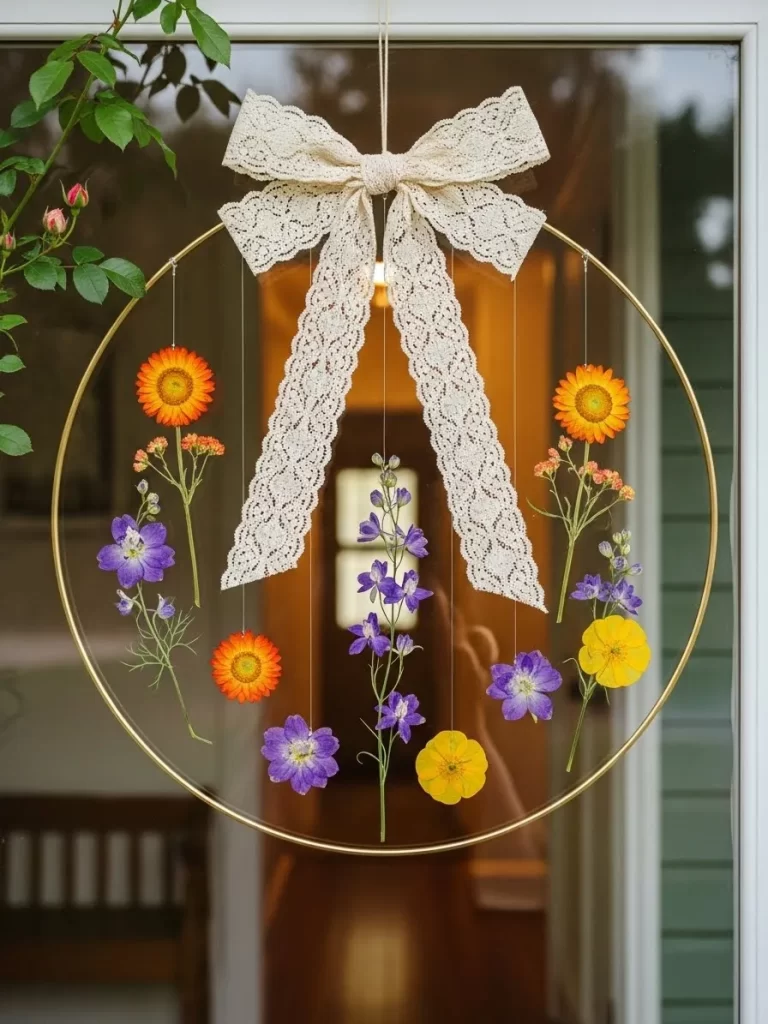
Bright dried flowers seem to float within this delicate gold hoop. Thin strings hold the blossoms at various heights for a magical effect. A wide lace bow sits at the top to give the piece a vintage feel. This design looks airy and light against a glass door.
Golden metal provides a sleek frame for the colorful petals. You can use your favorite spring colors to customize the look. It adds a whimsical touch to your home exterior. This project is a great way to preserve a special bouquet.
Materials Required
- Large gold metal craft hoop
- Assorted dried flowers like strawflowers and larkspur
- Clear fishing line or thin thread
- Wide cream lace ribbon
- Twine for hanging
Equipment Required
- Scissors
- Hot glue gun
- Glue sticks
- Tweezers
DIY Instructions Step by Step
- Cut several lengths of clear fishing line in different sizes.
- Tie one end of a line to the top of the gold hoop.
- Use a tiny drop of glue to attach a dried flower to the bottom of the line.
- Repeat this process with different flowers until you have five or seven strands.
- Space the hanging flowers evenly across the top half of the circle.
- Make a large multi loop bow using the wide lace ribbon.
- Glue the lace bow to the very top center of the metal hoop.
- Trim the ends of the ribbon so they hang down gracefully.
- Tie a piece of twine to the hoop behind the bow.
- Hang the hoop on your door and adjust the flowers so they do not tangle.
6 Buffalo Plaid Love Heart
Classic buffalo plaid ribbon creates a cozy and bold heart shape for your home. One side features ruffled fabric while the other shows off natural grapevine textures. A wooden sign with the word love sits across the middle to share a clear message. White berries and evergreen sprigs add a wintery touch near the top.
Matching bows tie the whole look together with a professional finish. This piece looks wonderful on a farmhouse style door. Bold red and black patterns make a festive statement that people can see from a distance. It combines rustic charm with modern holiday colors.
Materials Required
- Heart shaped grapevine wreath
- Red and black buffalo plaid ribbon
- Wooden love sign
- Artificial pine needles
- White berry sprigs
- White acrylic paint
Equipment Required
- Hot glue gun
- Glue sticks
- Paintbrush
- Floral wire
DIY Instructions Step by Step
- Paint the wooden love sign white and let it dry completely.
- Wrap the plaid ribbon around the left side of the grapevine heart.
- Pinch the ribbon as you go to create a ruffled and full texture.
- Secure the ends of the ribbon with hot glue on the back.
- Position the white sign across the center of the heart.
- Glue the sign firmly to the grapevine branches on both sides.
- Create a large bow with the remaining plaid ribbon.
- Attach the bow to the top right corner of the wreath using wire.
- Tuck pine needles and white berries behind the bow.
- Use glue to make sure the greenery stays in place against the wind.
7 Vintage Sheet Music Cone Wreath
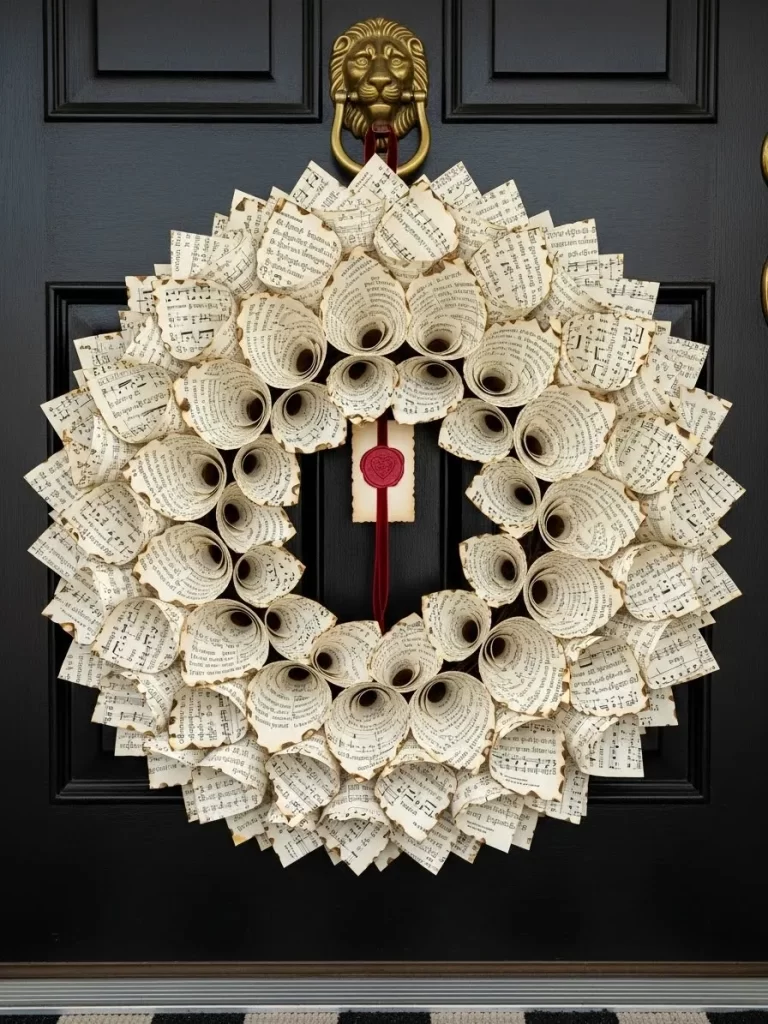
Roll up old sheet music to create this stunning vintage paper wreath. Each cone shows off musical notes for a nostalgic and artistic appearance. A red wax seal in the center adds a pop of color and a romantic detail. The tiered layers give the project incredible depth and shadow.
Burnt edges on the paper provide an aged look that feels like an antique. This is a great way to recycle old books or scores. It tells a story of love and melody to everyone who enters. Your guests will spend time looking at all the small details.
Materials Required
- Cardboard circle base
- Old sheet music or book pages
- Red wax beads
- Red velvet ribbon
- Small piece of parchment paper
Equipment Required
- Hot glue gun
- Glue sticks
- Wax seal stamp
- Lighter or candle
- Tea light spoon
DIY Instructions Step by Step
- Cut your sheet music into square pieces of equal size.
- Roll each square into a cone shape with a pointed bottom.
- Glue the edge of the paper to keep the cone from unrolling.
- Stick a row of cones around the outer edge of the cardboard base.
- Start a second row of cones closer to the center to overlap the first.
- Continue adding rows until the entire cardboard circle is hidden.
- Melt the red wax in a spoon over a small candle flame.
- Pour the wax onto parchment paper and press the heart stamp into it.
- Peel the cooled wax seal off and glue it to a small paper tag in the center.
- Loop the velvet ribbon through the back for a classic hanger.
8 Gilded Feather Eucalyptus Hoop
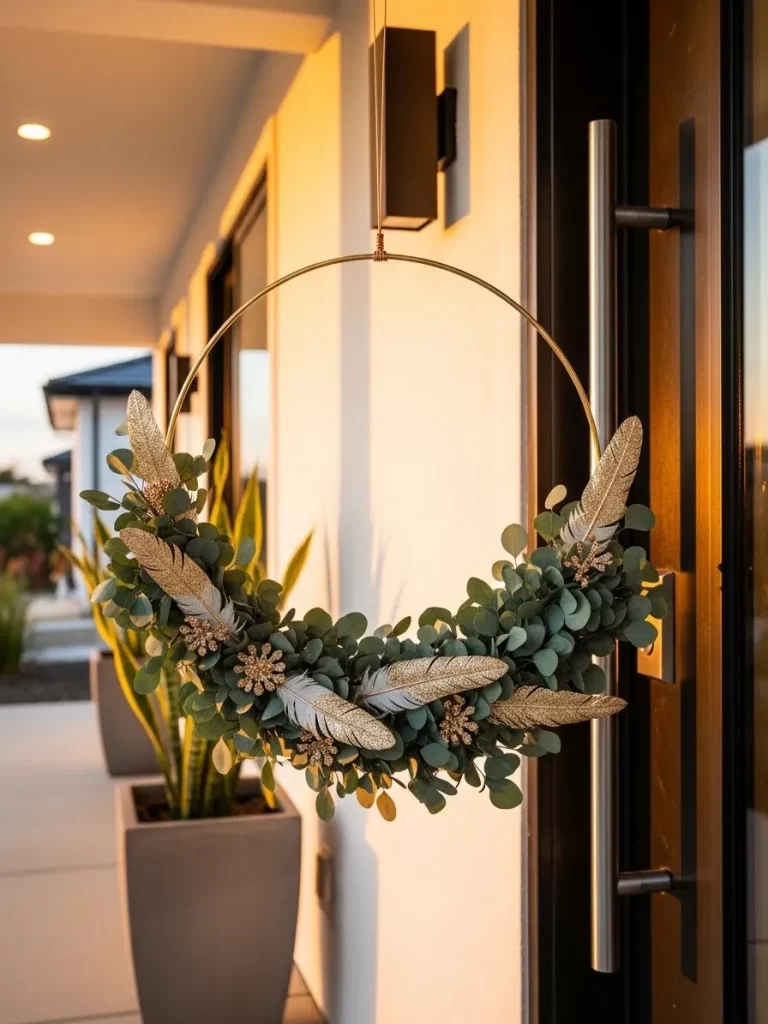
Elegant gold feathers and soft green eucalyptus leaves decorate this thin metal ring. Small glittery floral accents add a bit of sparkle for the evening light. This wreath offers a contemporary take on traditional holiday decor. It feels light and sophisticated for a modern house.
Copper wire wraps around the top to hold the hanging string in place. The asymmetrical design keeps the eye moving around the circle. You can easily adjust the leaves to fit your specific style. This piece brings a touch of luxury to your curb appeal.
Materials Required
- Thin gold metal hoop
- Artificial silver dollar eucalyptus
- Large white feathers
- Gold glitter spray or paint
- Thin copper wire
- Hanging cord
Equipment Required
- Wire cutters
- Paintbrush
- Hot glue gun
- Glue sticks
DIY Instructions Step by Step
- Spray the tips of the white feathers with gold glitter and let them dry.
- Attach a long eucalyptus branch to the bottom half of the hoop.
- Use thin copper wire to bind the stem to the metal frame.
- Layer more leaves on top to create a thick and lush base.
- Glue the gold tipped feathers among the leaves so they point outward.
- Add small gold floral clusters to the center of the greenery.
- Wrap extra copper wire around the starting point for a decorative look.
- Ensure all stems are hidden by overlapping the leaves.
- Tie a clear cord to the top of the ring for a floating effect.
- Trim any long wire ends with your cutters for safety.
9 Pink Feather Conversation Heart Wreath
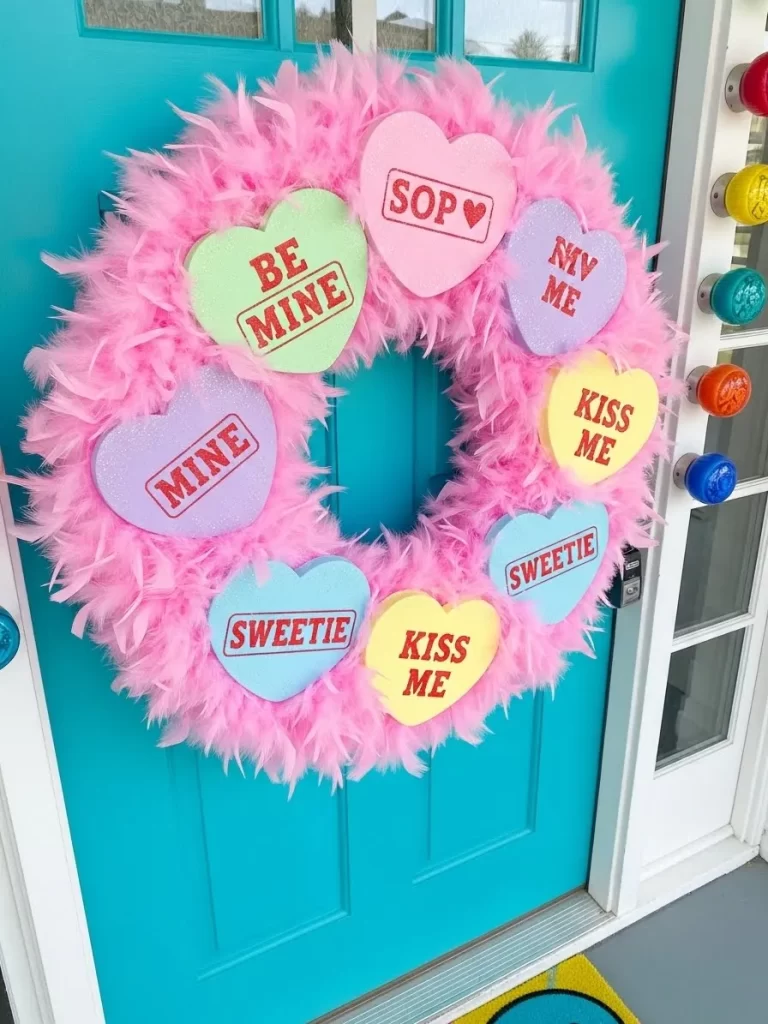
Fluffy pink feathers make this wreath a fun and playful choice for your door. Iconic conversation hearts with sweet messages like kiss me and be mine stand out clearly. The bright colors look fantastic against a turquoise or white background. It brings a sense of joy and childhood nostalgia to the holiday.
Soft textures invite people to touch and admire the craft. Glitter on the heart signs adds a festive shimmer to the front porch. This is a great project to do with kids who enjoy bright colors. It makes your house the most cheerful one on the block.
Materials Required
- Foam wreath form
- Two pink feather boas
- Pastel colored foam sheets
- Red glitter glue or markers
- U shaped floral pins
Equipment Required
- Hot glue gun
- Glue sticks
- Scissors
- Heart shaped cookie cutter for tracing
DIY Instructions Step by Step
- Wrap the pink feather boas around the foam ring until it is fluffy.
- Use floral pins to secure the ends of the feathers into the foam.
- Trace heart shapes onto the colorful foam sheets using your cutter.
- Cut out the hearts carefully with your scissors.
- Write fun Valentine phrases on each heart using red glitter glue.
- Wait for the glitter glue to dry completely before touching the hearts.
- Apply a large dab of hot glue to the back of each foam heart.
- Press the hearts into the feathers in a circle pattern.
- Space the colors out so the pink, blue, and yellow hearts alternate.
- Shake the wreath gently to make sure no feathers or hearts fall off.
10 Rustic Red Berry Twig Heart
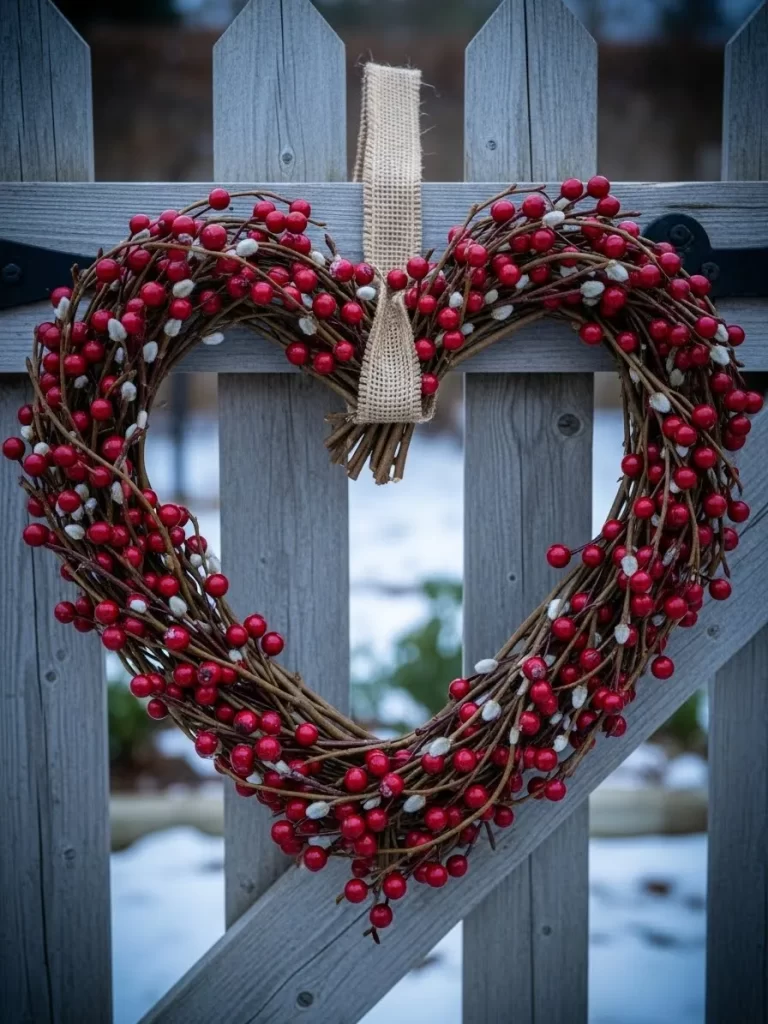
Vibrant red berries cover this heart shaped twig frame for a classic look. Small white pussy willow buds add a soft contrast to the bright red fruit. A simple burlap ribbon hangs the piece with a rustic and humble charm. This design feels timeless and works perfectly for the month of love.
Twisted branches provide a strong and natural structure for the berries. The deep red color pops against a snowy or grey background. You can display this on a fence or a front door with equal beauty. It represents a simple and heartfelt welcome for your family.
Materials Required
- Pre made grapevine heart wreath
- Multiple red berry floral stems
- Faux pussy willow branches
- Wide burlap ribbon
- Brown floral wire
Equipment Required
- Wire cutters
- Hot glue gun
- Glue sticks
DIY Instructions Step by Step
- Cut the red berry stems into smaller sections using wire cutters.
- Poke the stems into the gaps of the grapevine heart.
- Follow the curve of the heart so the berries look like they are growing.
- Add hot glue to the base of each stem to keep it secure.
- Intersperse the white pussy willow buds among the red berries.
- Group the berries more thickly at the bottom point of the heart.
- Wrap a piece of burlap ribbon around the top center of the frame.
- Tie a simple knot and leave a loop for hanging.
- Adjust the branches so the heart shape remains sharp and clear.
- Remove any visible glue strings with your fingers once they cool.
11 Chunky Knit Cream Heart
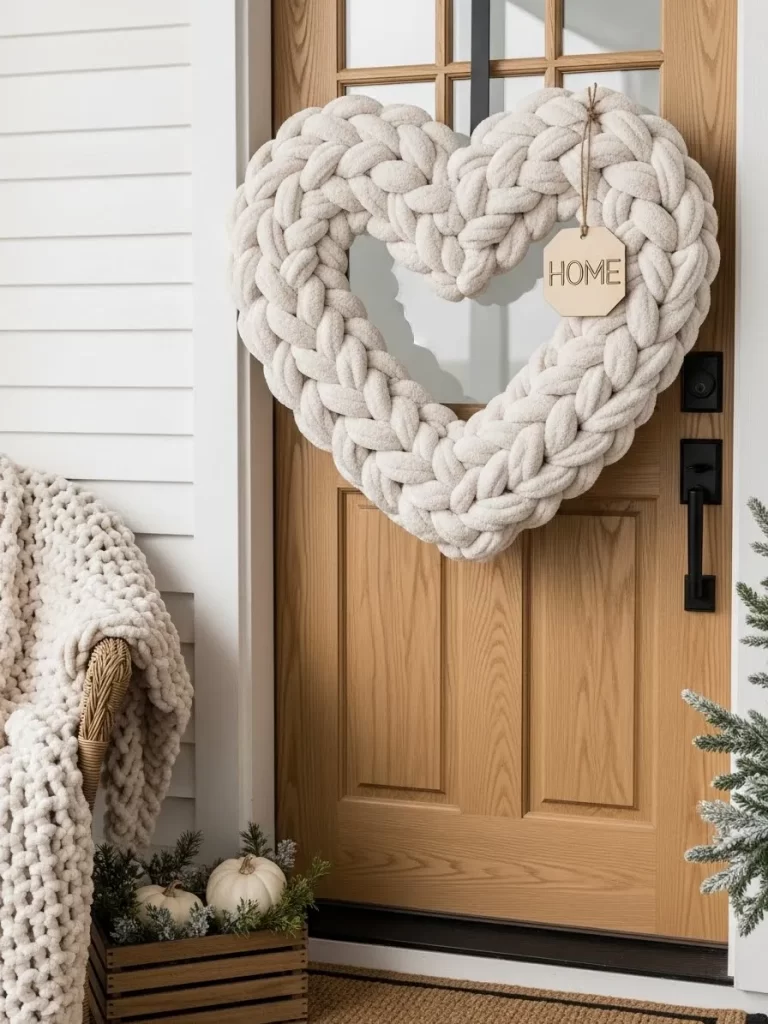
Soft textures make this heart decoration a wonderful addition to your home. Thick cream yarn forms a beautiful braided pattern across the whole surface. A simple wooden tag hangs near the top to give the piece a personal touch. This design looks amazing on a wooden door during the cold winter months.
Everything about this project feels cozy and high quality. The neutral white color matches any porch style or theme you already have. You can easily create this using only a few basic supplies and a little time. It brings a sense of handcrafted warmth to your Valentine Day display.
Materials Required
- Foam heart base
- Extra thick cream chenille yarn
- Small wooden home tag
- Jute twine for hanging
- Hot glue sticks
Equipment Required
- Hot glue gun
- Sharp scissors
- Ruler
DIY Instructions Step by Step
- Start at the top center of the foam heart base.
- Glue the end of the thick yarn to the back of the foam.
- Wrap the yarn around the frame in a tight loop.
- Cross the yarn over the previous loop to create a braided look.
- Continue wrapping and crossing until the whole heart is covered.
- Ensure no gaps of foam show through the thick yarn layers.
- Cut the yarn and glue the final end to the back.
- Tie the wooden tag to the top using a short piece of twine.
- Loop more twine through the top to make a hanger.
- Hang the piece and fluff the yarn to hide any visible glue.
12 Ombre Felt Rose Circle
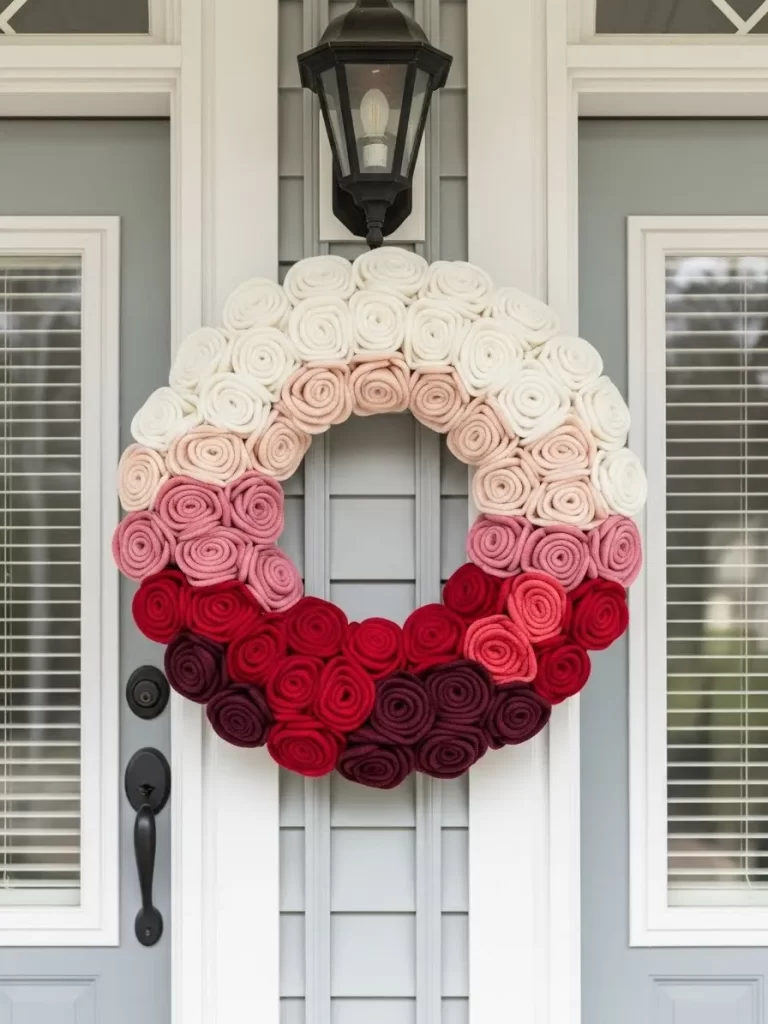
Dozens of hand rolled felt roses create a stunning ombre effect on this circular wreath. Colors transition from a deep burgundy at the bottom to a crisp white at the top. This gradient design adds a professional and artistic look to your front entrance. Each flower provides a soft and rich texture that looks great in photographs.
Soft felt is a durable material that stays pretty in the outdoor air. The circular shape is classic but the color flow makes it feel modern. You will enjoy the process of making each individual bloom. This project creates a bold focal point for your holiday curb appeal.
Materials Required
- Cardboard or foam wreath form
- Felt sheets in white blush pink rose and burgundy
- Hot glue sticks
Equipment Required
- Fabric scissors
- Hot glue gun
- Round object for tracing circles
DIY Instructions Step by Step
- Cut out many circles from the burgundy felt first.
- Start a spiral cut from the outer edge into the center of the circle.
- Roll the spiral from the outside in to form a rose shape.
- Put a drop of glue on the bottom to hold the rose together.
- Glue the burgundy roses to the bottom section of the wreath.
- Repeat the flower making process with the rose pink felt.
- Attach the pink flowers just above the dark burgundy ones.
- Continue with the light blush pink and finally the white roses.
- Fill in any small empty spots with tiny rolled felt buds.
- Attach a ribbon or wire to the back for hanging on your door.
13 Boho Tassel Bead Hoop

Large wooden beads and colorful yarn tassels give this hoop a bohemian spirit. Shades of mustard gold and dusty rose blend together for a warm palette. This vertical design breaks away from the traditional circle shape to add height. It looks lovely swaying gently in a porch breeze.
Natural wood beads provide a clean and organic texture at the top. Long yarn strands hang down to create a soft and flowing movement. This piece is a great choice for a modern or eclectic home style. You can personalize the colors to match your favorite winter scarf.
Materials Required
- Gold metal hoop
- Large wooden beads
- Yarn in mustard rose and terracotta
- Thin wire
Equipment Required
- Scissors
- Cardboard for tassel making
- Hot glue gun
DIY Instructions Step by Step
- Slide the wooden beads onto the top half of the metal hoop.
- Secure the last bead on each side with a drop of glue.
- Wrap yarn around a piece of cardboard twenty times to make a tassel.
- Tie a string around the top loop of the wrapped yarn.
- Cut the bottom edges of the yarn to release the strands.
- Tie a second string an inch below the top to form a tassel head.
- Make twelve tassels in the different yarn colors you chose.
- Tie the tassels to the bottom of the hoop at varying lengths.
- Add a wooden bead to the string of each tassel for extra detail.
- Hang the hoop using the thin wire attached to the top.
14 Macrame Heart Fringe
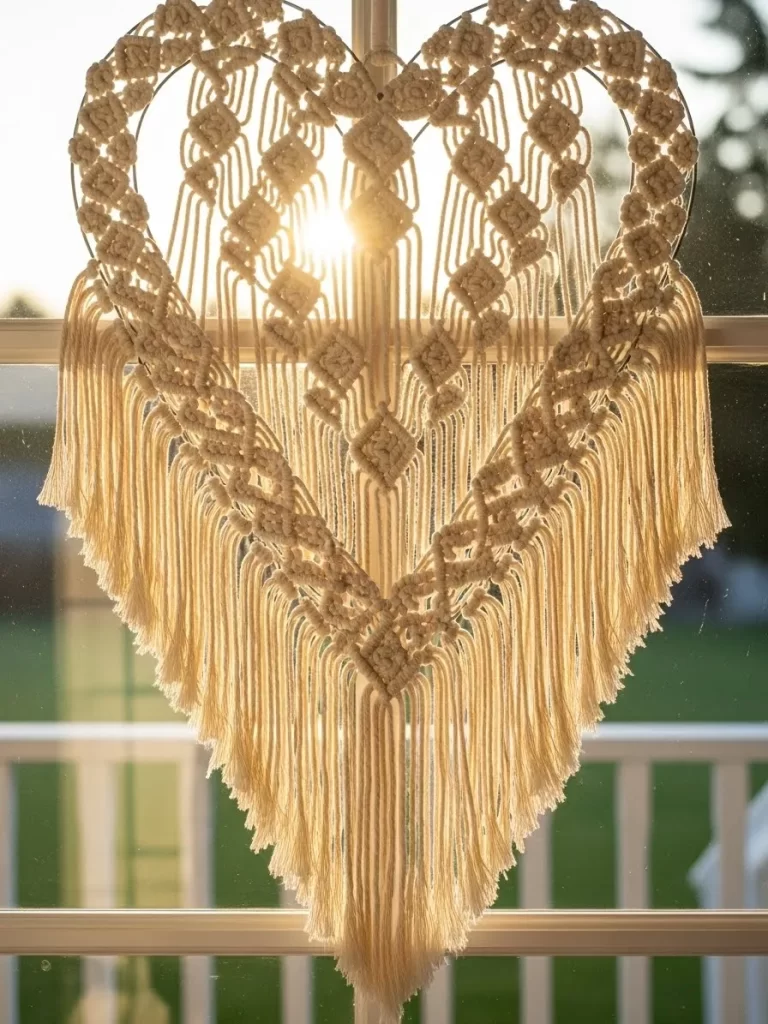
Intricate knots form a beautiful heart shape in this cream macrame hanging. Long fringes trail down from the bottom to create a soft and romantic look. This piece works well for a window or a protected front door. The natural cotton cord gives it a handcrafted and vintage feel.
Sunlight passes through the open knots to create pretty shadows on the wall. This project allows you to practice basic knotting techniques while making art. It adds a gentle and calm vibe to your Valentine Day decor. Everyone will admire the detail and patience put into this design.
Materials Required
- Heart shaped metal wire frame
- Three millimeter cotton macrame cord
- Masking tape
Equipment Required
- Sharp scissors
- Measuring tape
- Large comb for fringe
DIY Instructions Step by Step
- Cut several pieces of cotton cord to ten feet in length.
- Fold a cord in half and loop it over the top of the heart frame.
- Pull the ends through the loop to create a larks head knot.
- Fill the entire top edge of the frame with these knots.
- Use square knots to create a diamond pattern within the heart.
- Continue knotting until you reach the bottom point of the frame.
- Let the remaining cord hang down past the metal edge.
- Trim the bottom cords into a sharp V shape with your scissors.
- Use a comb to brush out the cord ends for a fluffy fringe.
- Tie a single loop of cord to the top center for hanging.
15 Red Burlap Ruffle Monogram
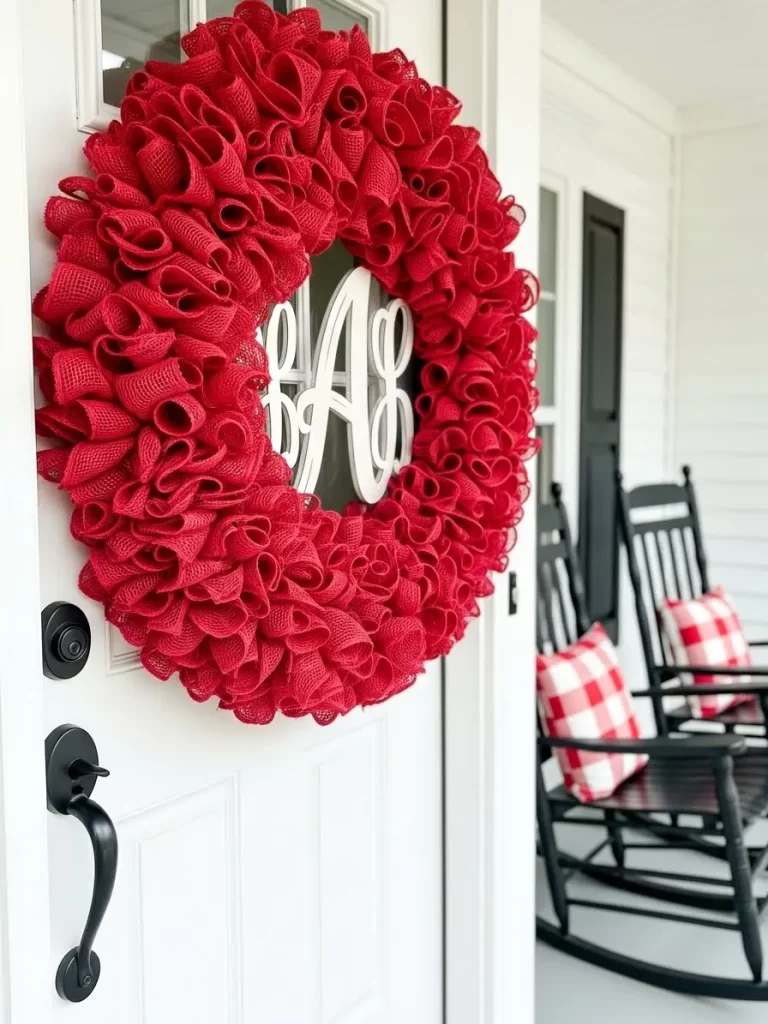
Bright red burlap creates a thick and ruffly texture on this festive wreath. A large white letter sits in the center to represent your family name. This bold piece stands out beautifully against a white or light grey door. It brings a traditional and cheerful holiday look to your home.
Burlap is a sturdy material that handles the outdoor elements well. The deep red color remains vibrant and attracts attention from the street. You can easily switch the letter to customize the gift for a friend. This design feels both classic and personal for a lovely greeting.
Materials Required
- Wire wreath frame
- Red burlap ribbon rolls
- Large wooden monogram letter
- White acrylic paint
- Floral wire
Equipment Required
- Hot glue gun
- Paintbrush
- Scissors
DIY Instructions Step by Step
- Paint your wooden letter white and let it dry completely.
- Tie the end of the red burlap to the wire frame with a knot.
- Push loops of burlap through the gaps in the frame from the back.
- Twist the burlap on the back side after every three loops.
- Continue this process until the entire frame is full and fluffy.
- Secure the end of the ribbon with a piece of floral wire.
- Use hot glue to attach the white letter to the center of the wreath.
- Press the letter firmly into the burlap loops for a good hold.
- Check the front to make sure the loops are even and round.
- Attach a wire loop to the back of the frame for hanging.
16 Multi Colored Pom Pom Wreath
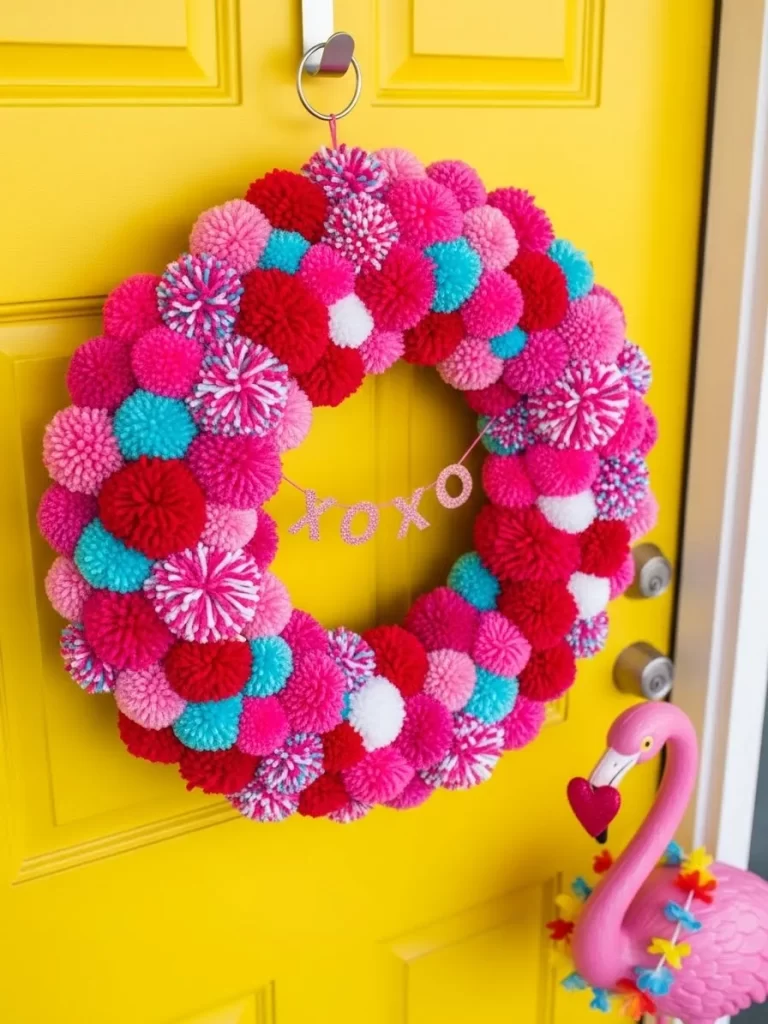
Soft pom poms in shades of pink red and turquoise cover this playful wreath. Tiny glittery letters spell out XOXO across the center for a sweet message. This colorful design brings a modern and fun energy to your front porch. It looks especially bright against a bold yellow door.
Each pom pom is handmade for a unique and fluffy appearance. The mixture of sizes creates a dynamic look that kids and adults will love. You can use up small scraps of yarn from previous craft projects. This wreath is a great way to celebrate the holiday with joy.
Materials Required
- Foam wreath base
- Yarn in red pink light pink and turquoise
- Small wooden X and O letters
- Pink glitter
- Thin string
Equipment Required
- Pom pom maker tool
- Scissors
- Hot glue gun
DIY Instructions Step by Step
- Use your pom pom tool to create many balls in different colors.
- Trim the edges of the pom poms with scissors to make them round.
- Coat the wooden letters in glue and cover them with pink glitter.
- Let the letters dry for thirty minutes before you move them.
- Glue the pom poms to the foam base starting with the largest ones.
- Fill the gaps between the large balls with smaller pom poms.
- Mix the colors randomly to keep the design looking energetic.
- String the glittery letters together with a thin piece of thread.
- Stretch the letter string across the middle of the wreath.
- Glue the ends of the string to the back of the foam base.
17 Upcycled Denim Heart
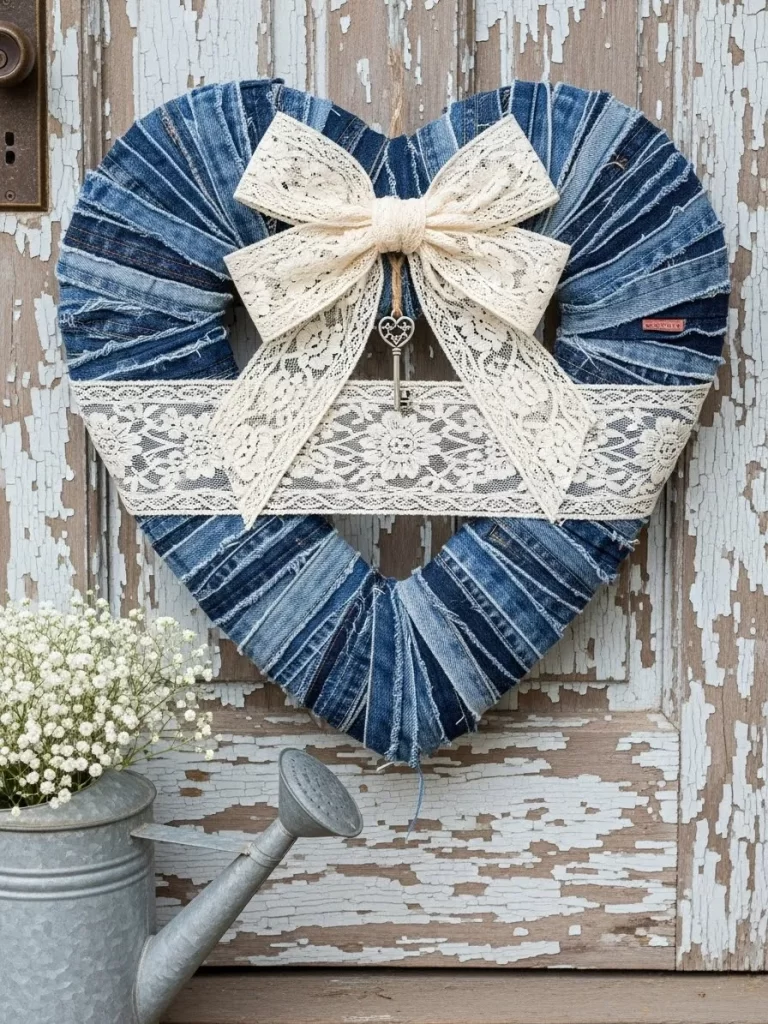
Old blue jeans find new life in this charming heart shaped decoration. Strips of denim wrap around the frame to create a rugged and rustic texture. A wide lace ribbon and a vintage silver key add a touch of elegance. This piece looks wonderful against a weathered wood background.
The different shades of blue denim create a natural and cool color flow. Lace provides a soft contrast to the heavy fabric for a balanced look. Using recycled materials makes this an eco friendly choice for your home. It tells a story of creative reuse and classic style.
Materials Required
- Cardboard heart base
- Strips of old denim jeans
- Wide white lace ribbon
- Small silver vintage key
- Twine
Equipment Required
- Fabric glue
- Scissors
- Hot glue gun
DIY Instructions Step by Step
- Cut your denim into strips that are two inches wide.
- Wrap the denim strips tightly around the heart base.
- Use fabric glue to secure the ends of the denim on the back.
- Overlap the edges slightly so no cardboard is visible.
- Wrap a wide piece of lace horizontally across the middle.
- Glue the lace ends to the back of the heart frame.
- Form a large multi loop bow with the remaining lace ribbon.
- Attach the bow to the top center of the heart with hot glue.
- Tie a silver key to a piece of twine and hang it from the bow.
- Add a twine loop to the top for a simple and rustic hanger.
18 Studded Leather Wrap Wreath
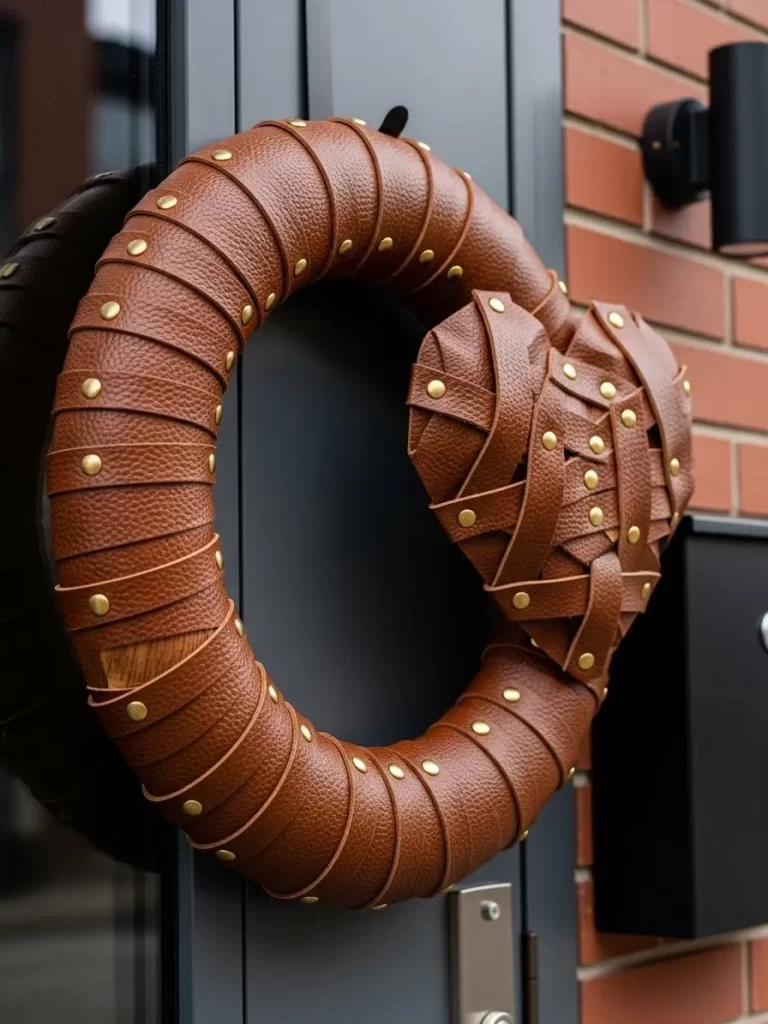
Rich brown leather wraps around a thick base for a sophisticated and masculine look. Small gold studs line the edges to add a touch of metallic shine. A smaller leather heart sits on the side to complete the Valentine Day theme. This design feels high end and very modern on a dark door.
The texture of the leather brings a sense of luxury to your entryway. It is a durable choice that will last for many years of holiday use. The warm brown tones look great with brick or stone house exteriors. This project shows that Valentine decor can be both tough and sweet.
Materials Required
- Thick foam wreath base
- Faux leather strips in brown
- Small gold upholstery tacks
- Leather scrap for a heart
- Strong adhesive
Equipment Required
- Scissors
- Hammer for studs
- Measuring tape
DIY Instructions Step by Step
- Cut the leather into long strips of equal width.
- Glue the end of the first strip to the back of the foam.
- Wrap the leather around the base with a slight overlap.
- Continue adding strips until the entire circle is covered in leather.
- Ensure the seams are all located on the back of the wreath.
- Press the gold studs into the leather along the inner and outer edge.
- Use a small hammer to tap the studs if the foam is very firm.
- Cut a small heart shape out of your extra leather scrap.
- Glue the small heart to the right side of the wreath base.
- Attach a heavy wire hanger to the back for a secure mount.
19 Double Velvet Ribbon Bow Wreath
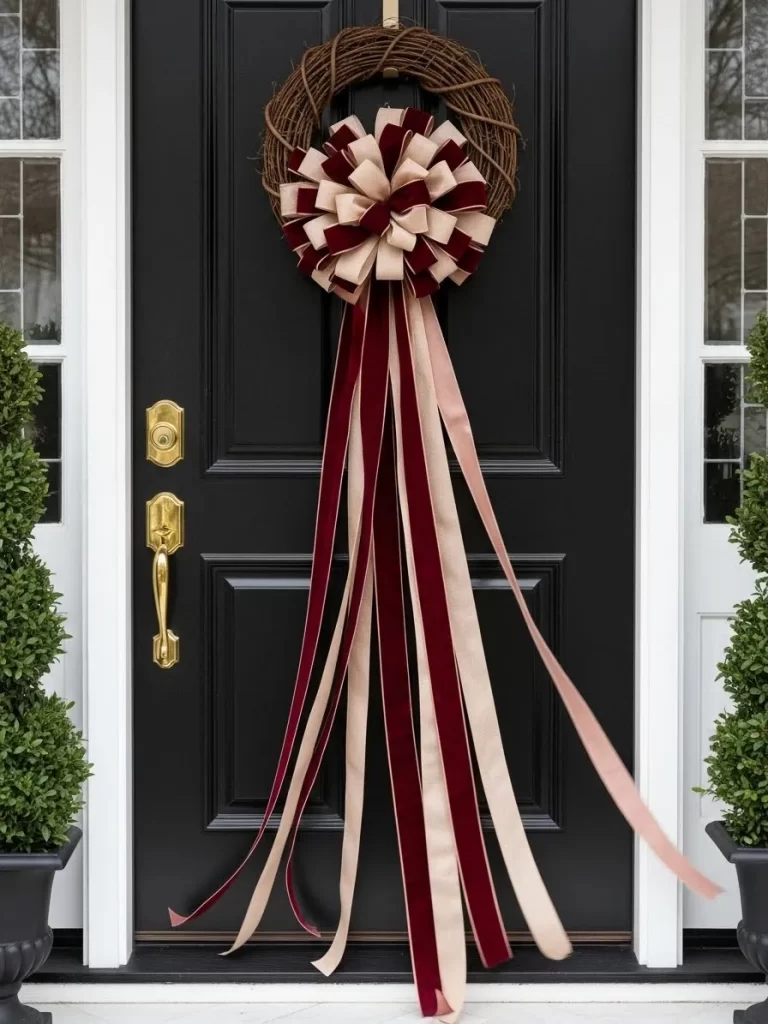
A simple grapevine wreath gets a major upgrade with extra long velvet ribbons. Two shades of pink and burgundy drape down far below the wooden base. A massive multi layered bow sits at the top to create a dramatic focal point. This piece offers a chic and romantic greeting for your guests.
The soft velvet fabric catches the light and adds a deep rich color. Long trailing ends move beautifully when the door opens and closes. This is a very easy project that makes a massive impact on curb appeal. It brings a touch of classic elegance to any home style.
Materials Required
- Natural grapevine wreath
- Wide velvet ribbon in blush pink
- Wide velvet ribbon in dark burgundy
- Floral wire
Equipment Required
- Sharp scissors
- Wire cutters
- Hot glue gun
DIY Instructions Step by Step
- Lay your grapevine wreath on a flat and clean surface.
- Cut four long lengths of velvet ribbon in both colors.
- Tie the long ribbons to the bottom of the wreath so they hang down.
- Vary the lengths of the hanging ribbons for a natural look.
- Create a large bow with the blush pink ribbon for the top.
- Make a slightly smaller bow with the burgundy ribbon.
- Layer the burgundy bow over the pink one and wire them together.
- Attach the double bow to the top center of the grapevine frame.
- Fluff the ribbon loops to give the bow a full and round shape.
- Secure a wire loop to the back of the grapevine for hanging.
20 Crochet Heart Mobile Hoop

Delicate crochet hearts hang inside a rustic twine wrapped hoop. Shades of pink and cream yarn create a soft and whimsical mobile effect. This lightweight decoration looks wonderful on a glass door or a nursery entrance. It adds a handmade and gentle touch to your holiday celebrations.
The open design feels airy and lets the door color show through. Each small heart is a work of art that shows off your crafting skills. You can easily adjust the height of the hearts to fit your space. This project is a lovely way to share your love for crochet with others.
Materials Required
- Metal craft ring
- Natural jute twine
- Cotton yarn in pink and cream
- Clear thread or fishing line
Equipment Required
- Crochet hook
- Hot glue gun
- Scissors
DIY Instructions Step by Step
- Wrap the metal ring completely with the natural jute twine.
- Use hot glue at the start and end of the twine to hold it.
- Crochet five or seven small hearts using your favorite pattern.
- Weave in the yarn ends so the hearts look neat and finished.
- Cut different lengths of clear thread for each crochet heart.
- Tie one end of the thread to the top of a heart.
- Attach the other end of the thread to the inside of the hoop.
- Space the hearts out so they hang at different levels in the center.
- Ensure the hearts can swing freely without hitting each other.
- Tie a loop of twine to the top of the hoop for easy hanging.
21 Rustic Lavender Heart
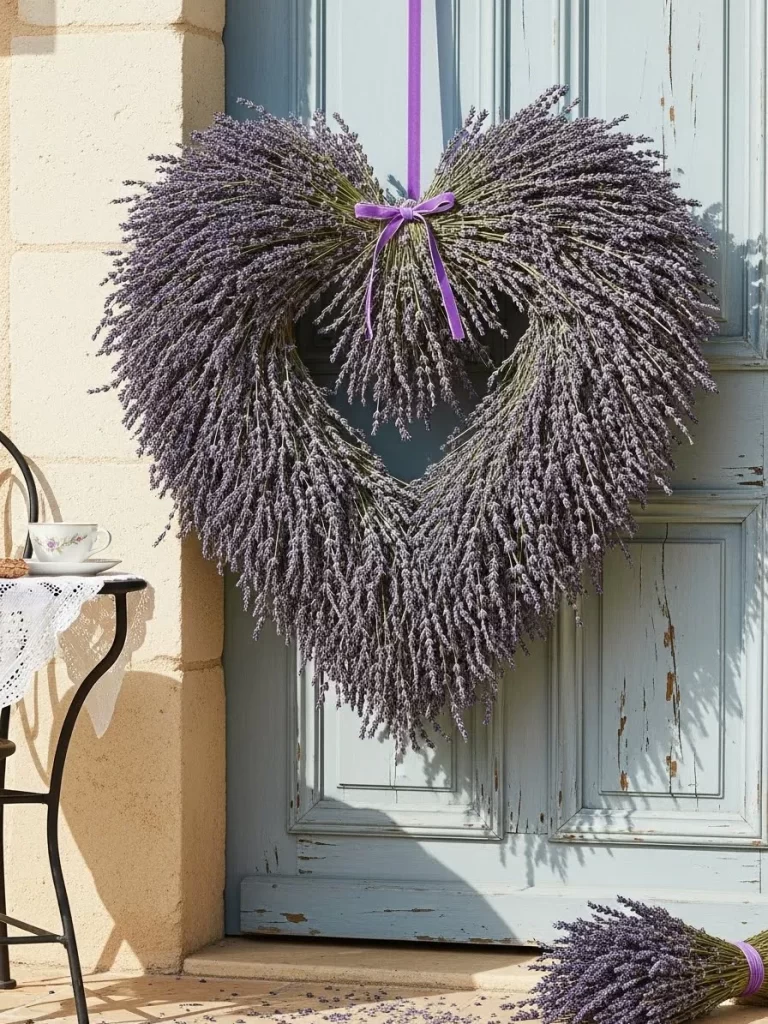
Fragrant dried lavender stems come together to form this stunning purple heart. A delicate violet ribbon ties at the top to complete the monochromatic look. This piece brings a scent of summer gardens to your front door during the chilly winter months.
The texture is soft yet full of intricate details from each tiny blossom. It serves as a romantic and natural greeting for any visitor. You will appreciate how the silver green leaves provide a subtle backdrop for the deep purple flowers. Crafting this design is simple for a home with a farmhouse or cottage style.
Materials Required
- Heart shaped wire wreath frame
- Large bundles of dried lavender
- Purple velvet ribbon
- Thin floral wire
- Green moss for filling
Equipment Required
- Wire cutters
- Hot glue gun
- Glue sticks
- Scissors
DIY Instructions Step by Step
- Lay your wire heart frame on a flat work area.
- Fill the inner channel of the frame with green moss to create a base.
- Cut your lavender stems so they are about four inches long.
- Gather a small bunch of lavender and wrap floral wire around the bottom.
- Attach the bunch to the bottom point of the heart using the wire.
- Layer the next bunch of lavender slightly higher to cover the previous stems.
- Continue this overlapping process up both sides of the heart frame.
- Make sure the flower heads point outward to create a full and fluffy shape.
- Glue extra individual sprigs into any thin spots with your glue gun.
- Tie a purple ribbon around the top center and create a simple loop for hanging.
22 Living Succulent Heart
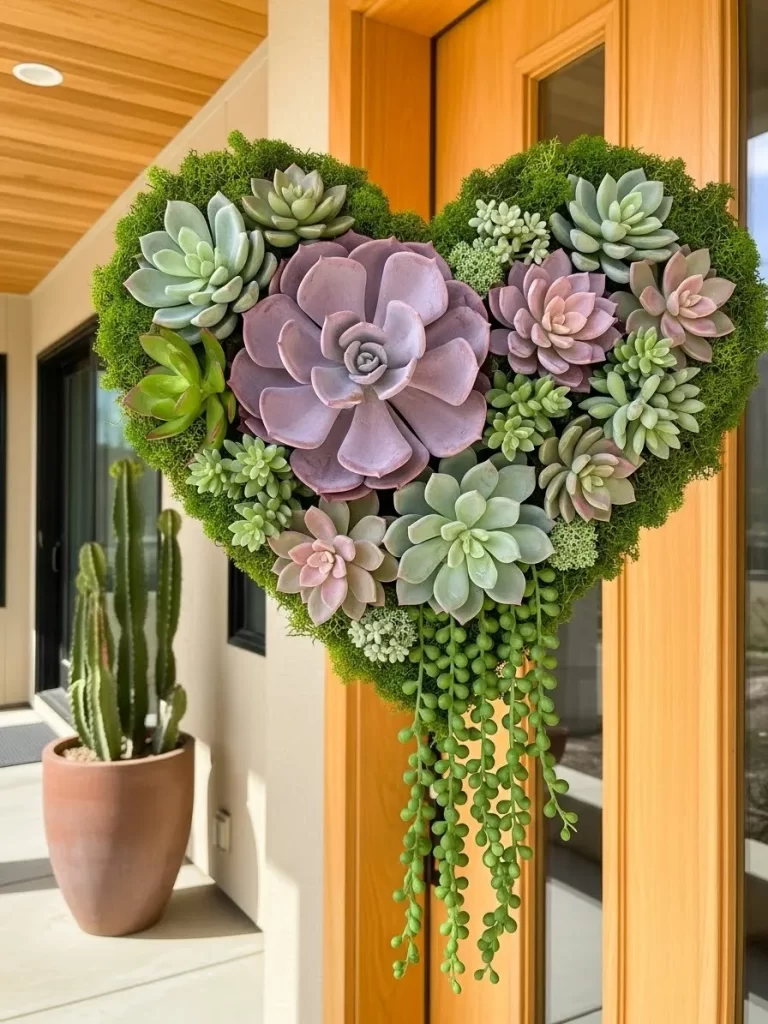
Living succulents in shades of dusty rose and sage green fill this lush heart shaped frame. Green moss peeks out from behind the plants to add a vibrant and earthy base. A long string of pearls succulent drapes down the bottom for a unique trailing effect.
This wreath is a great way to showcase a variety of textures and shapes. Each plant is a little piece of art that survives well in bright light. It offers a fresh alternative to traditional floral designs. Your porch will feel like a botanical oasis with this gorgeous display.
Materials Required
- Heart shaped moss wreath form
- Assorted small succulent plants
- String of pearls succulent
- Floral pins or U pins
- Extra loose sphagnum moss
Equipment Required
- Small garden trowel or spoon
- Spray bottle with water
- Scissors
DIY Instructions Step by Step
- Soak your moss wreath form in a basin of water for ten minutes.
- Remove the succulents from their plastic pots and gently shake off excess soil.
- Use a spoon to poke a small hole into the damp moss of the frame.
- Place the roots of a succulent into the hole and press the moss around it.
- Secure the plant in place by pushing a floral pin over the base of the stem.
- Continue planting succulents close together until the entire heart is full.
- Mix different colors and sizes to create an interesting and random pattern.
- Pin the string of pearls succulent to the very bottom point of the heart.
- Let the long strands hang down naturally for a beautiful trailing look.
- Keep the wreath flat for one week so the roots can settle before you hang it.
23 Romantic Peony Cloud Wreath

Lush pink peonies in every shade from blush to magenta cover this massive circular wreath. Soft petals create a cloud like appearance that feels incredibly romantic. This piece is a show stopper that people will see from far down the street.
The variety of sizes adds depth and a sense of luxury to your entryway. It looks expensive and very professional despite being a simple craft project. White doors provide a clean background for these vibrant floral tones to pop. You can enjoy this cheerful display throughout the entire spring season.
Materials Required
- Large foam wreath base
- Silk peony flowers in various shades of pink
- Artificial green leaves
- Pink silk ribbon
Equipment Required
- Hot glue gun
- Glue sticks
- Wire cutters
DIY Instructions Step by Step
- Pull the silk peony heads off their plastic stems using your hands.
- Trim any remaining plastic bits from the bottom of the flower heads.
- Sort your flowers into piles based on their color and size.
- Apply a large amount of hot glue to the back of the biggest peony.
- Press the flower onto the front of the foam base and hold it for ten seconds.
- Place the other large flowers around the circle with even spacing.
- Fill the remaining gaps with smaller peonies and rose buds.
- Glue green leaves behind the flowers so they peek out around the edges.
- Ensure that no part of the white foam base is visible from the front.
- Wrap a silk ribbon around the top and tie a bow to hide your door hook.
24 Boxwood XO Letter Set

Create a bold statement with these two separate wreaths shaped like an X and an O. Dense green boxwood leaves provide a classic and timeless foundation. Bright red satin bows hang from the top of each letter to add a festive holiday touch.
This set is a creative way to decorate double doors or a large wall space. The green and red color scheme feels traditional but the letter shapes are modern. It sends a clear message of love to everyone who passes by. You can easily store these and use them for years to come.
Materials Required
- Letter X and letter O wire or wood frames
- Preserved or faux boxwood sprigs
- Thin green floral wire
- Wide red satin ribbon
Equipment Required
- Wire cutters
- Scissors
- Hot glue gun
DIY Instructions Step by Step
- Cut your boxwood sprigs into small pieces about three inches long.
- Gather three sprigs together to form a tiny bundle.
- Place the bundle on the frame and wrap floral wire around the stems.
- Move down one inch and place the next bundle to cover the first wire.
- Continue this process around the entire shape of the X and the O.
- Pay close attention to the corners of the X to keep the shape sharp.
- Use hot glue to attach extra leaves to any spots that look thin.
- Trim away any wild or long leaves with your scissors for a tidy look.
- Cut two long pieces of red ribbon to hang the letters.
- Loop the ribbon through the top of each letter and tie a large bow.
25 Vibrant Red Tulip Circle
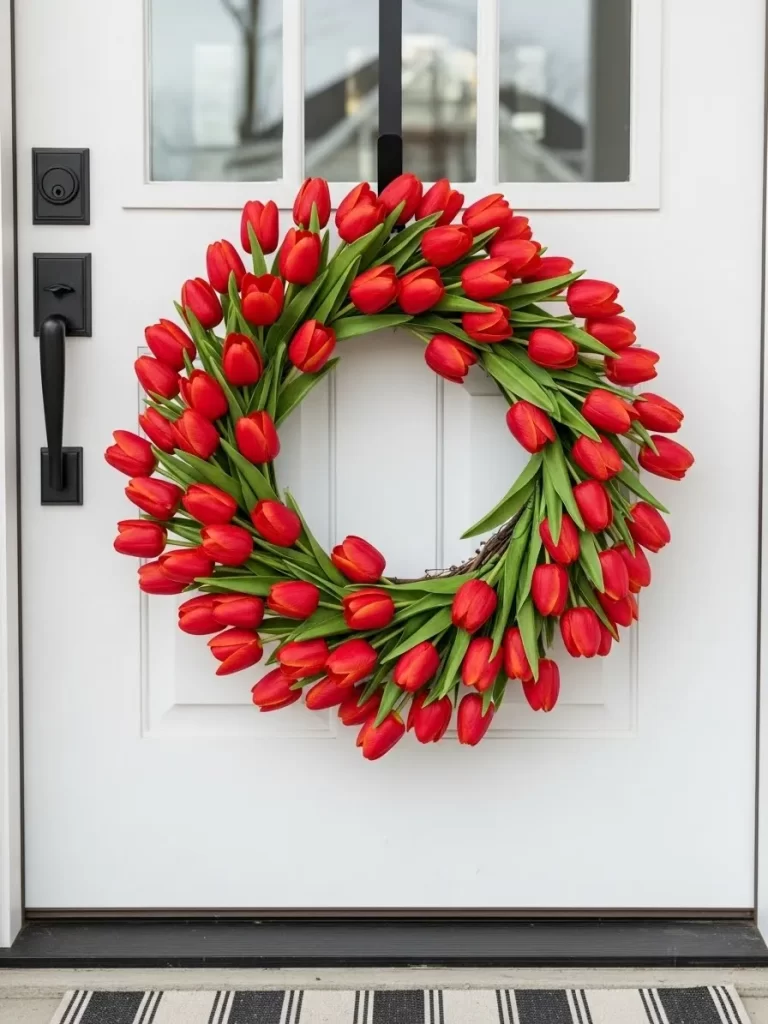
Dozens of bright red tulips wrap around this circular frame for a high impact look. The green stems and leaves peek through to add a natural touch of color. This design captures the feeling of a blooming spring garden on your front door.
Each bloom sits closely to the next to create a very full and dense texture. The vibrant red hue symbolizes love and passion for the holiday. It looks sleek and tidy against a white or light colored house. This wreath is a wonderful way to welcome warmer weather and friendly guests.
Materials Required
- Grapevine wreath base
- Multiple bundles of faux red tulips
- Green floral tape
- Brown twine
Equipment Required
- Wire cutters
- Scissors
- Hot glue gun
DIY Instructions Step by Step
- Separate the tulip bundles into individual flower stems using wire cutters.
- Trim the stems so they are all about five inches in length.
- Lay a tulip on the grapevine base so it follows the curve of the circle.
- Use twine or floral tape to secure the stem to the branches.
- Place the next tulip so the flower head hides the stem of the first one.
- Work your way around the entire wreath in one direction.
- Angle some tulips toward the inside and others toward the outside for width.
- Tuck the last few stems under the first flowers to complete the circle.
- Add a drop of hot glue to any flowers that feel loose.
- Tie a loop of twine to the back of the grapevine for a hidden hanger.
26 Airy Baby Breath Halo
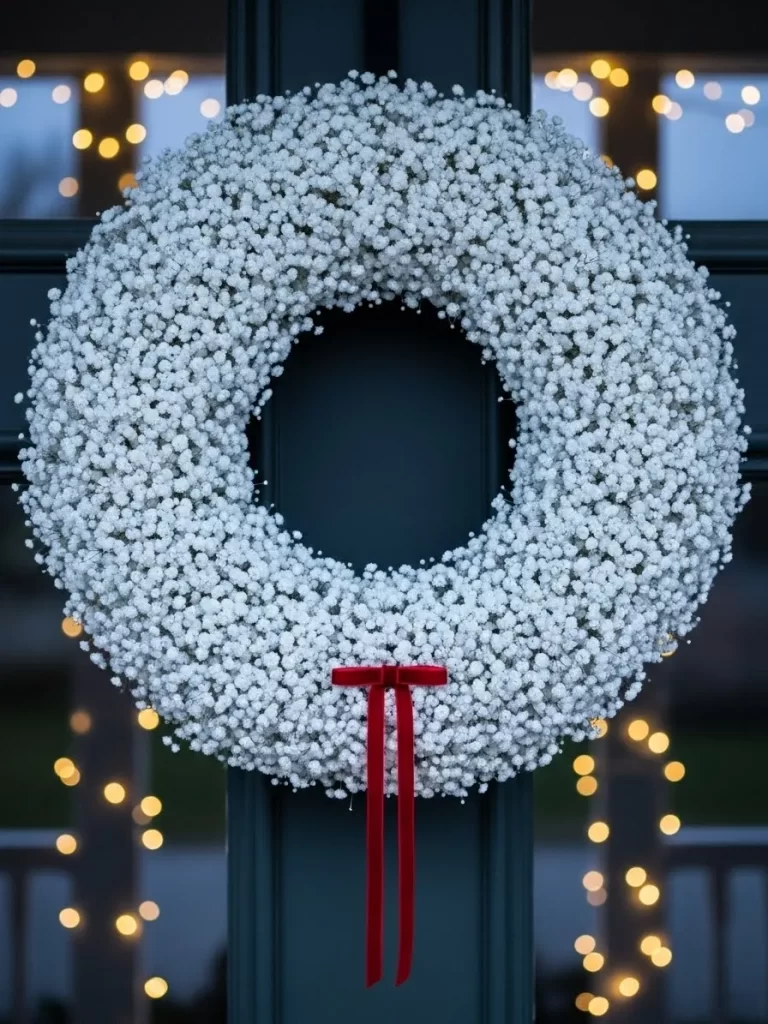
Cloud like baby breath flowers form a light and airy circle for your door. A small red velvet bow sits at the bottom to provide a tiny but powerful pop of color. This wreath feels delicate and dreamy against a dark or navy background.
The thousands of tiny white blossoms create a soft halo effect. It is a sophisticated choice for a minimalist or classic home exterior. You can use fresh flowers for a short event or faux ones for a long lasting display. This project proves that simple materials can result in a truly stunning piece of decor.
Materials Required
- Thin metal hoop or straw wreath base
- Large amount of faux or dried baby breath
- Small red velvet ribbon
- White floral wire
Equipment Required
- Scissors
- Wire cutters
- Hot glue gun
DIY Instructions Step by Step
- Cut the baby breath stems into very small clusters.
- Wrap white floral wire around the metal hoop to start your base.
- Place a cluster of flowers against the hoop and secure it with wire.
- Add the next cluster right next to the first to create a thick layer.
- Continue wrapping and adding flowers until the ring is completely white.
- Shake the wreath gently over a table to remove any loose petals.
- Use hot glue to fill in any gaps with tiny individual flower sprigs.
- Ensure the wreath looks round and balanced from all angles.
- Create a small and neat bow with the red velvet ribbon.
- Glue the bow to the bottom center of the wreath for a final accent.
27 Gilded Magnolia Leaf Wreath

Glossy green magnolia leaves are arranged in a thick circle with gold accents and red berries. Some leaves feature a painted gold finish to add a touch of sparkle. Tiny clusters of red berries provide a festive contrast to the deep green foliage.
This wreath feels traditional and stately for a grand front entrance. The mix of natural and metallic textures creates a high end designer look. It is a sturdy design that holds up well against the wind and winter cold. You will love the way the gold leaves catch the morning sunlight on your porch.
Materials Required
- Large grapevine or foam base
- Fresh or faux magnolia leaves
- Gold spray paint
- Artificial red berry picks
- Brown floral wire
Equipment Required
- Hot glue gun
- Glue sticks
- Wire cutters
DIY Instructions Step by Step
- Select one third of your magnolia leaves and lay them on a newspaper.
- Spray the leaves with gold paint and let them dry for one hour.
- Apply hot glue to the stem of a green leaf and press it into the base.
- Layer the leaves in a circular pattern like scales on a fish.
- Mix in a gold leaf after every three or four green leaves.
- Ensure the leaves all point in the same clockwise direction.
- Tuck the red berry picks into the gaps between the leaves.
- Use floral wire to secure the berry stems to the wreath frame.
- Check the inner and outer edges to make sure the base is hidden.
- Add a heavy wire loop to the back for a secure mounting point.
28 Pink Tipped Pampas Grass Wreath
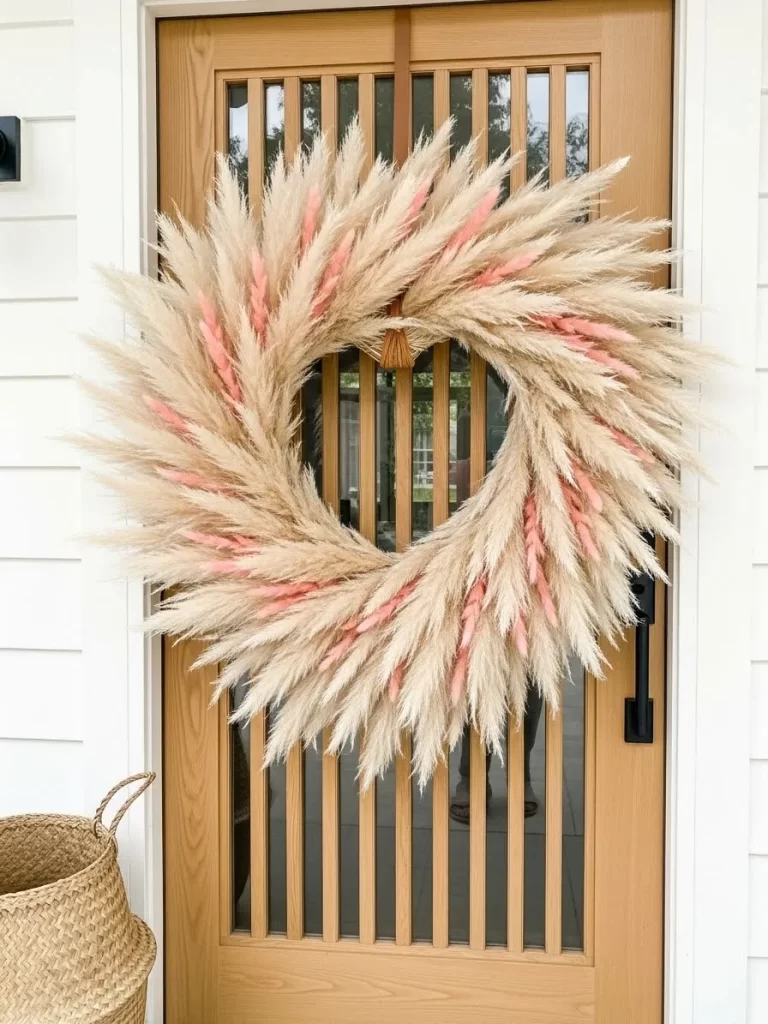
Soft and fluffy pampas grass creates a wild and bohemian silhouette for your home. Small sprigs of pink dyed grass are scattered throughout for a subtle holiday vibe. This piece adds a massive amount of texture and movement to your door.
The neutral beige tones work well with any color of house or trim. It brings a trendy and relaxed feel to your Valentine Day celebrations. You can easily customize the amount of pink to suit your own personal style. This wreath is a great choice for those who love modern and natural decor.
Materials Required
- Metal craft ring
- Dried natural pampas grass plumes
- Pink dried grass or dyed pampas sprigs
- Floral tape
Equipment Required
- Scissors
- Hairspray
- Hot glue gun
DIY Instructions Step by Step
- Spray the pampas grass plumes with hairspray to prevent shedding.
- Cut the plumes into shorter lengths about eight inches long.
- Attach a plume to the metal ring using floral tape.
- Overlap the plumes so the fluffy tops cover the tape of the previous one.
- Work in a circle until the entire ring is thick and feathered.
- Glue small sprigs of pink grass into the center of the beige plumes.
- Spread the pink accents evenly around the circle for a balanced look.
- Trim any overly long or messy stems with your scissors.
- Give the finished wreath a final light coating of hairspray.
- Attach a thin string to the top of the ring for a floating look.
29 Rustic Pinecone Heart
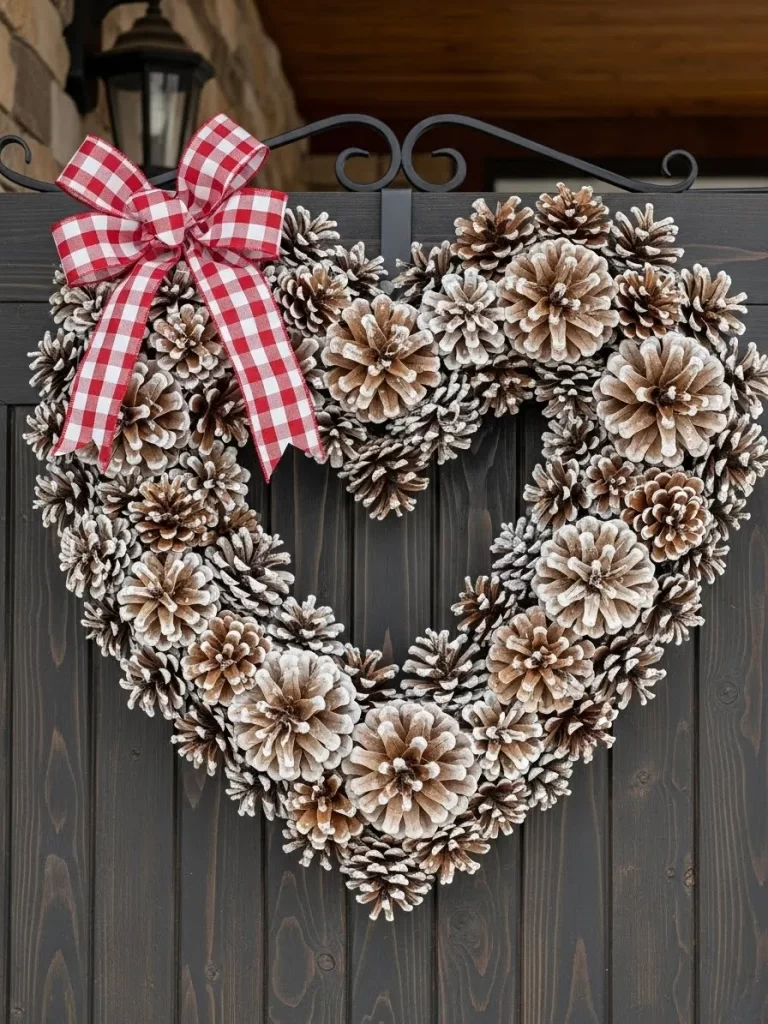
Nature provides the materials for this rustic heart made entirely from pinecones. Different sizes of cones fit together to form a sturdy and earthy shape. A red and white gingham bow adds a playful country touch at the top corner.
The brown tones of the wood look wonderful against a dark or wooden door. This project is a great way to use items found in your own backyard. It feels cozy and warm for a winter holiday display. Your guests will admire the handcrafted and natural beauty of this unique piece.
Materials Required
- Plywood or cardboard heart cutout
- Assorted pinecones in various sizes
- White acrylic paint for frosted tips
- Red and white gingham ribbon
Equipment Required
- Hot glue gun
- Plenty of glue sticks
- Paintbrush
DIY Instructions Step by Step
- Clean your pinecones with a brush to remove any dirt or needles.
- Paint the tips of the pinecone scales white to look like light snow.
- Allow the paint to dry completely before you start the assembly.
- Glue the largest pinecones around the outer edge of the heart base.
- Fill the center of the heart with medium sized cones.
- Use the smallest cones to hide any gaps or visible base material.
- Turn the cones in different directions to create a natural texture.
- Press each cone firmly until the hot glue sets and holds.
- Tie a large bow with the gingham ribbon and glue it to the top left.
- Screw a small eye hook into the back of the wood for hanging.
30 Spicy Herbal Kitchen Wreath

Fresh rosemary and sage branches are woven into a fragrant green circle. Dried red chili peppers and cinnamon sticks are tied with red string for a spicy look. This wreath brings a wonderful herbal scent to your entryway and a pop of color.
The combination of culinary elements makes this a great choice for a kitchen door or porch. It looks very natural and rustic with its varied green textures. You can even use the dried herbs for cooking after the holiday is over. This design is both functional and beautiful for a cozy home greeting.
Materials Required
- Small grapevine wreath base
- Fresh rosemary branches
- Dried sage leaves
- Whole dried red chili peppers
- Cinnamon sticks
- Red baker twine
Equipment Required
- Scissors
- Hot glue gun
- Floral wire
DIY Instructions Step by Step
- Tuck long rosemary branches into the grapevine base and wire them down.
- Layer the rosemary until you have a thick and aromatic green ring.
- Glue groups of three sage leaves at random spots around the circle.
- Tie two cinnamon sticks together with a piece of red twine.
- Attach the cinnamon bundles to the wreath using the ends of the twine.
- Use a small drop of glue to stick a red chili pepper near each bundle.
- Space these spicy accents evenly to create visual interest.
- Ensure the rosemary is secure so it does not droop as it dries.
- Smell the wreath to enjoy the natural perfume of the herbs.
- Hang the piece using a simple loop of red twine at the top.
31 Wine Cork Heart

This charming piece repurposes used corks into a rustic symbol of love. Natural wood textures provide your door with a warm and cozy appearance. A small cluster of dark grapes in the corner adds a touch of vineyard style.
Everything about this design feels earthy and unique. You can see various wine stains on the cork ends which add character to the piece. It makes an excellent gift for any wine enthusiast who visits your home. This wreath looks heavy but hangs easily with a simple wire loop.
Materials Required
- Flat wooden heart base
- Many used wine corks
- Artificial purple grape cluster
- Strong wood glue
- Hanging wire
Equipment Required
- Hot glue gun
- Extra glue sticks
- Utility knife
DIY Instructions Step by Step
- Gather your wine corks and clean off any dust.
- Sort them by size to plan an even pattern.
- Apply a line of glue to the side of one cork.
- Press the cork onto the outer edge of your heart base.
- Work your way inward until the entire wood surface is hidden.
- Glue smaller cork pieces into any tiny gaps you see.
- Place the artificial grapes in the top right corner.
- Hold the grapes firmly until the glue sets completely.
- Flip the heart over once the glue is dry.
- Attach the hanging wire to the back with two small screws.
32 Disco Ball Glam Wreath

Sparkling silver disco balls create a fun and energetic greeting for your guests. Shimmering pink ornaments add a bold pop of color to the metallic circle. A large holographic bow sits at the top to catch every bit of sunlight.
Every angle of this wreath reflects light across your porch. It brings a party atmosphere to your Valentine Day celebrations. You will love how the different sizes of spheres create a modern and full look. This design stands out beautifully against a dark or black door.
Materials Required
- Large foam wreath base
- Assorted silver disco balls
- Bright pink ornaments
- Large holographic ribbon
- Silver tinsel garland
Equipment Required
- Hot glue gun
- Glue sticks
- Scissors
- Floral wire
DIY Instructions Step by Step
- Wrap the silver tinsel garland around the foam base to cover it.
- Glue the ends of the tinsel to the back of the foam.
- Start by gluing the largest disco balls to the front of the wreath.
- Space the pink ornaments evenly between the silver spheres.
- Fill the remaining small gaps with tiny disco balls.
- Check that the ornaments are secure and do not wiggle.
- Form a massive bow with your holographic ribbon.
- Wire the bow to the top center of the wreath frame.
- Trim the ribbon tails so they match the curve of the circle.
- Loop a piece of wire through the back for hanging.
33 Mossy Message Word Wreath
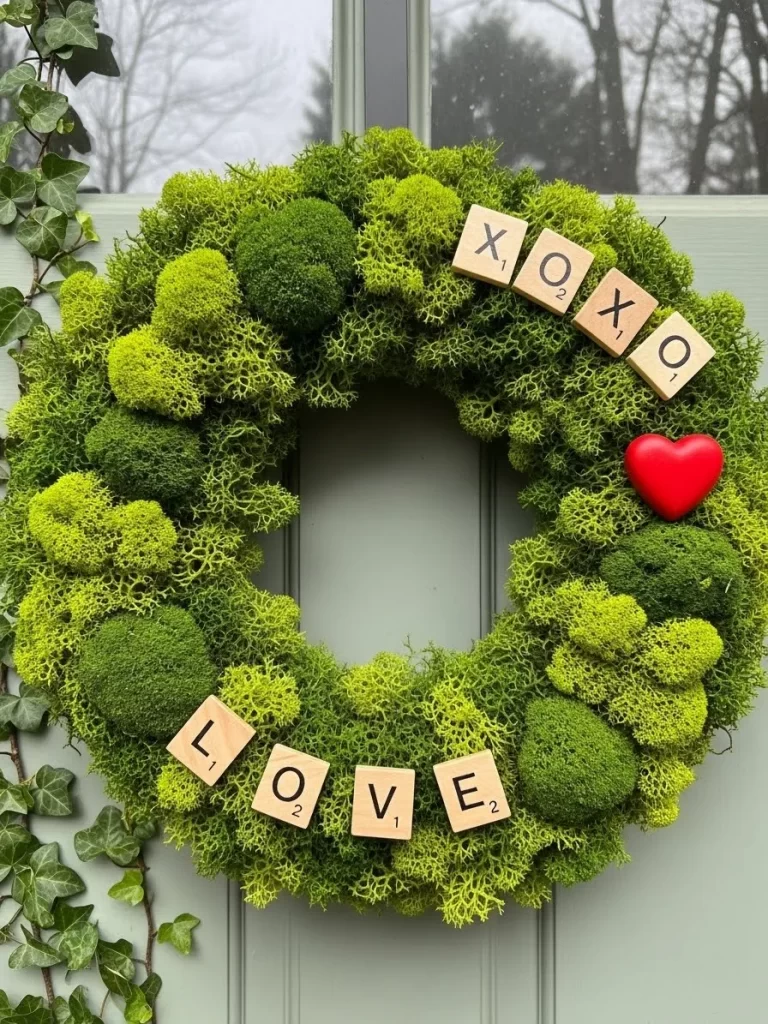
Lush green moss covers this circular frame for a very natural look. Small wooden tiles spell out sweet words like love and xoxo across the greenery. A single bright red heart provides a focal point on the right side.
Textured moss brings a sense of the forest to your front entry. The combination of green and wood creates a soft and organic palette. It offers a subtle and sophisticated way to share a message of affection. You can enjoy this fresh design throughout the entire spring season.
Materials Required
- Straw wreath form
- Preserved green sheet moss
- Wooden letter tiles
- Small red plastic heart
- Floral pins
Equipment Required
- Hot glue gun
- Glue sticks
- Scissors
DIY Instructions Step by Step
- Lay the sheet moss over the top of the straw frame.
- Use floral pins to secure the moss into the straw base.
- Trim any long or messy bits of moss with your scissors.
- Arrange your wooden tiles to spell out love at the bottom.
- Place the xoxo tiles near the top right of the circle.
- Glue each tile firmly onto the surface of the moss.
- Add the small red heart next to the letters for color.
- Press the heart down until the glue cools and holds.
- Ensure no straw base is visible through the green layers.
- Tie a piece of clear string to the back for hanging.
34 Industrial Copper Pipe Heart
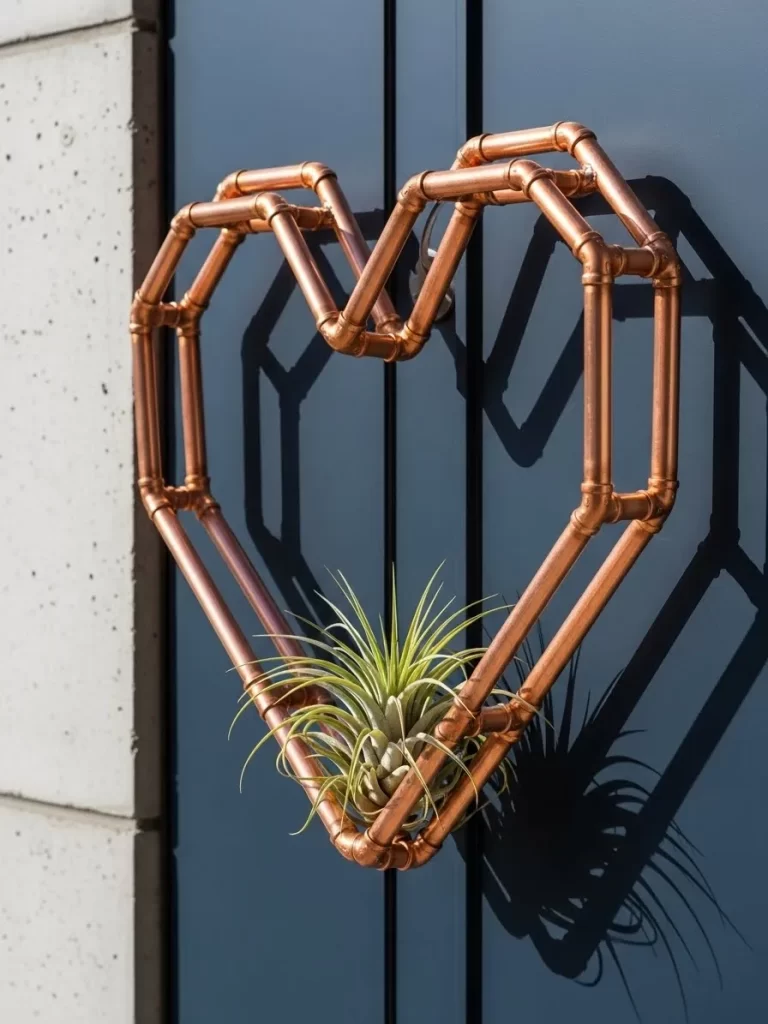
Clean lines and metallic tones define this modern copper pipe decoration. The heart shape features a double layer for added depth and shadow. A single green air plant nestles at the bottom point to soften the metal.
Everything about this piece feels minimal and very current. It looks fantastic against a contemporary home exterior or a glass door. You will appreciate the way the copper shines when the porch lights turn on. This project proves that plumbing supplies can become beautiful art.
Materials Required
- Half inch copper pipes cut to various sizes
- Copper elbow joints
- Copper T joints
- One live air plant
- Industrial strength adhesive
Equipment Required
- Pipe cutter
- Cleaning cloth
- Measuring tape
DIY Instructions Step by Step
- Measure and cut your copper pipes into twelve equal pieces.
- Connect the pipes using the elbow joints to form a heart.
- Add a second layer of pipes behind the first for thickness.
- Apply a small drop of adhesive inside each joint for safety.
- Wipe the copper with a cloth to remove any fingerprints.
- Let the glue dry for at least four hours.
- Place your air plant inside the bottom corner of the heart.
- Secure the plant with a tiny bit of clear wire if needed.
- Check the balance of the metal frame by holding it up.
- Hang the heart directly on a hook using the top pipe.
35 Keepsake Photo Hoop
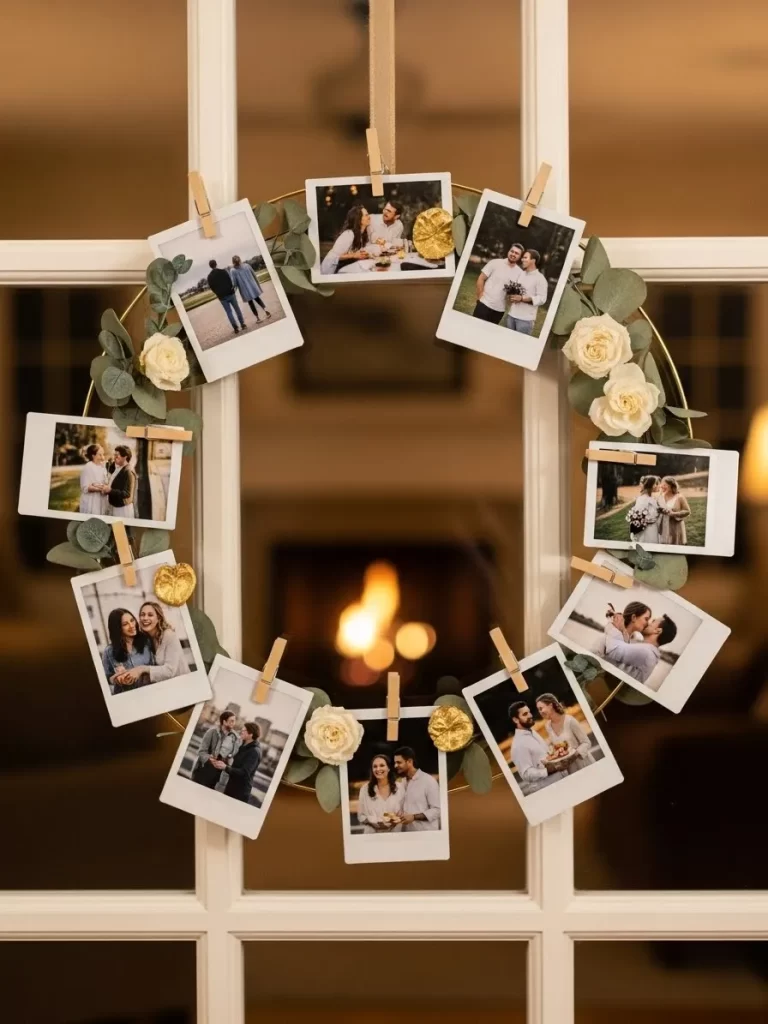
Celebrate your favorite memories with this unique polaroid photo wreath. Small wooden clips hold pictures of loved ones around a thin gold hoop. White roses and green leaves fill the spaces between the snapshots.
This design tells a personal story of love and friendship. It invites guests to stop and look at the special moments you have shared. You can easily swap out the photos for different holidays or events. It adds a very personal and sentimental touch to your home curb appeal.
Materials Required
- Large gold metal ring
- Several polaroid style photos
- Small wooden clothespins
- Faux white roses
- Artificial eucalyptus leaves
Equipment Required
- Hot glue gun
- Glue sticks
- Scissors
DIY Instructions Step by Step
- Arrange your photos around the gold ring to find the best spacing.
- Glue a small wooden clothespin to the metal ring for each photo.
- Clip your pictures into the pins once the glue is dry.
- Attach eucalyptus leaves to the hoop behind the photos.
- Glue white roses between the pictures to add a floral touch.
- Ensure the flowers do not cover the faces in your photos.
- Add small gold leaf accents for a bit of extra sparkle.
- Check that every clip is strong enough to hold a picture.
- Tie a thin gold cord to the top of the hoop.
- Hang the wreath and adjust the photos so they sit straight.
36 Farmhouse Jar Lid Wreath
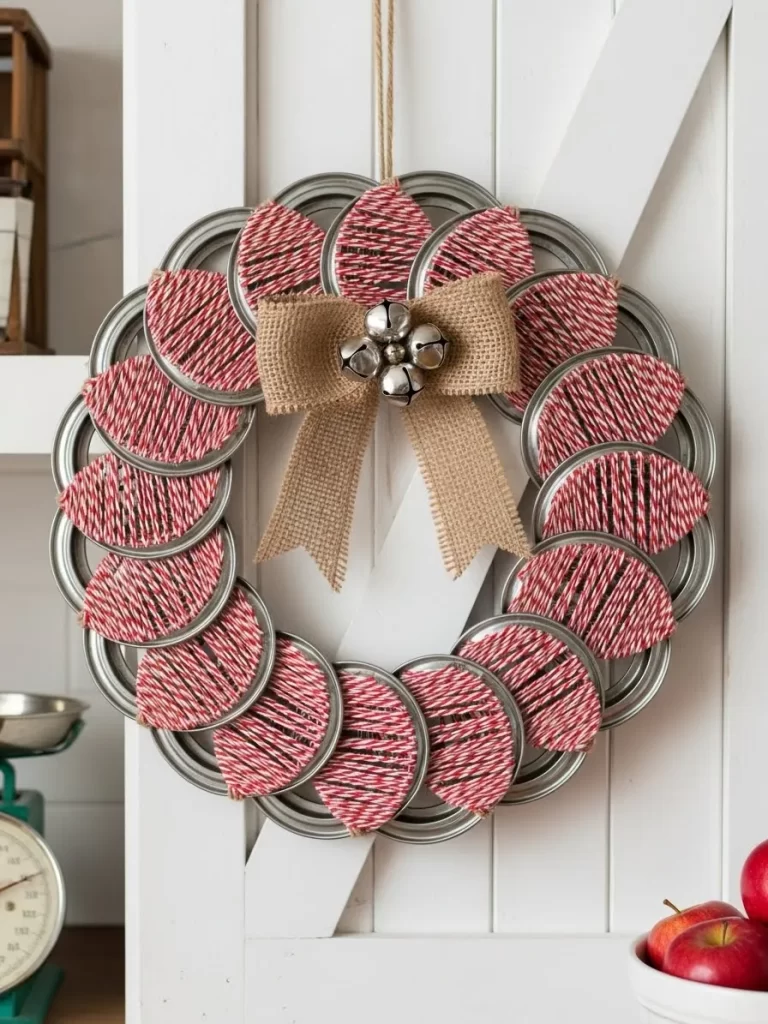
Recycled mason jar lids create a wonderful and rustic circle for your door. Each lid is wrapped in red and white twine for a candy cane effect. A simple burlap bow and silver bells sit at the top for a country finish.
Various textures from the metal and twine give this piece a handmade feel. It is an excellent way to use up extra kitchen supplies in a creative way. The red and white colors look very festive and bright against a white door. You will love the gentle sound of the bells when people enter.
Materials Required
- Twenty mason jar lid rings
- Red and white baker twine
- Wide burlap ribbon
- Small silver craft bells
- Strong twine for the base
Equipment Required
- Hot glue gun
- Glue sticks
- Scissors
DIY Instructions Step by Step
- Wrap the red and white twine around a jar lid ring.
- Glue the ends of the twine to the inside of the metal.
- Repeat this process for all twenty lid rings you have.
- String the finished rings onto a long piece of heavy twine.
- Tie the ends of the heavy twine to form a large circle.
- Arrange the lids so they overlap slightly in a neat row.
- Create a large bow with your wide burlap ribbon.
- Glue the silver bells to the center of the burlap bow.
- Attach the bow to the top of your ring cluster.
- Use a small wire to make a loop for hanging on your door.
37 Sweet Message Grapevine Wreath

A classic grapevine base holds a large chalkboard heart in the center. Bright red berries and a festive bow decorate the top of the frame. You can write your own personal greeting with chalk to welcome your family.
This wreath allows you to change your message as often as you like. The dark chalkboard contrasts beautifully with the natural wood of the branches. It brings a cozy and interactive element to your front porch decor. Everything about this design feels warm and inviting for the holiday.
Materials Required
- Large grapevine wreath
- Heart shaped chalkboard sign
- Red berry floral picks
- Wide red satin ribbon
- White chalk
Equipment Required
- Hot glue gun
- Glue sticks
- Wire cutters
DIY Instructions Step by Step
- Write a sweet message on the chalkboard heart using your chalk.
- Center the heart inside the open space of the grapevine wreath.
- Use wire or glue to secure the heart to the inner branches.
- Tuck red berry picks into the top section of the grapevine.
- Glue the berry stems deeply into the wood for a strong hold.
- Make a large multi loop bow with the red satin ribbon.
- Attach the bow to the very top of the wreath frame.
- Let the ribbon tails drape down over the sides of the chalkboard.
- Check the back to make sure no sharp wires are sticking out.
- Hang the wreath on a sturdy hook and enjoy your greeting.
38 Doily Bloom Wreath

Delicate paper doilies are folded into beautiful flowers for this white and red wreath. Each blossom features a tiny white pearl in the center for a touch of elegance. This lightweight design looks very soft and intricate on any door color.
Layers of paper create a wonderful sense of depth and airy texture. It offers a vintage and romantic look that feels very unique. You can make this project with simple supplies found in most craft stores. It is a lovely way to celebrate the holiday with a soft and feminine style.
Materials Required
- Foam wreath base
- Red paper doilies
- White paper doilies
- Large white pearl beads
Equipment Required
- Hot glue gun
- Glue sticks
- Scissors
DIY Instructions Step by Step
- Fold a white doily into quarters and twist the bottom to make a flower.
- Repeat the folding process with the red doilies to create more blooms.
- Glue a pearl bead into the center of each paper flower.
- Start gluing the white flowers to the front of your foam base.
- Mix in the red flowers to create a balanced and colorful pattern.
- Place the flowers very close together so the foam is hidden.
- Fluff the edges of the paper to give the wreath more volume.
- Add a second layer of flowers to the outer edge of the circle.
- Ensure every pearl is glued tightly so they do not fall off.
- Attach a thin ribbon to the back to hang your new creation.
39 Glowing Tulle XOXO Wreath
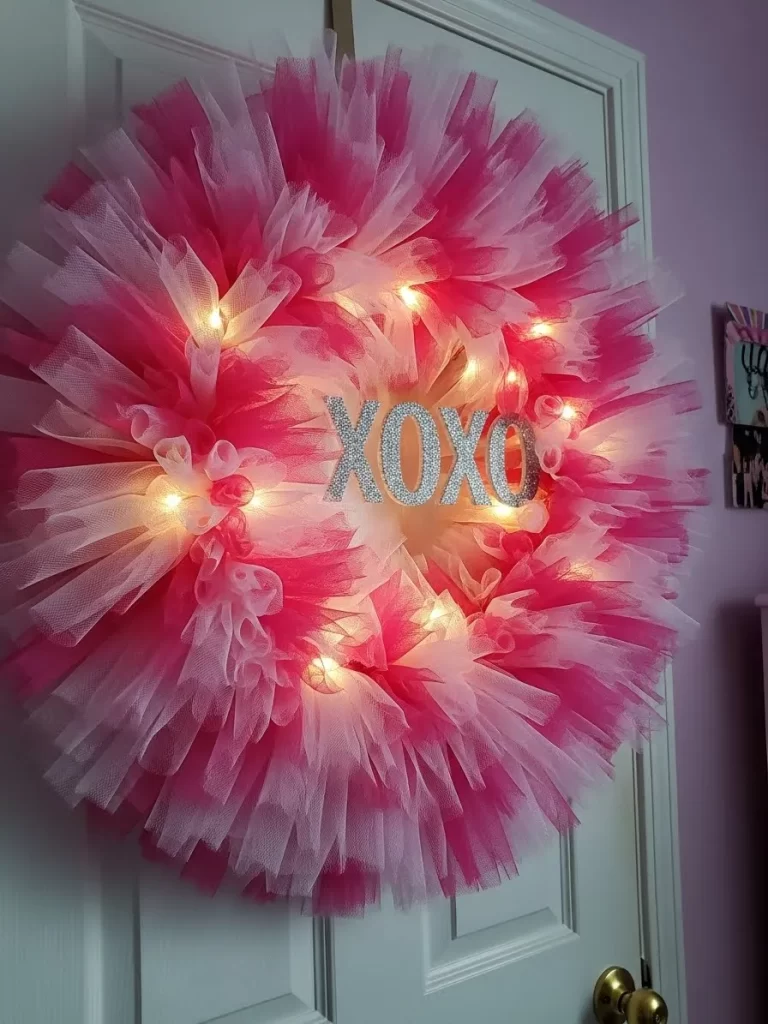
Hundreds of tulle strips create a massive and fluffy cloud for your front entrance. Soft white and pink colors blend together for a very dreamy appearance. Built in fairy lights make the entire piece glow beautifully during the evening hours.
Glittery letters spelling out xoxo sit in the middle of the soft fabric. This wreath brings a magical and festive energy to your home at night. You will love how the light shines through the thin layers of tulle. It makes a bold and cheerful statement that everyone will admire.
Materials Required
- Wire wreath frame
- Six inch wide tulle rolls in pink and white
- Battery operated fairy lights
- Glittery xoxo sign
Equipment Required
- Scissors
- Hot glue gun
- Glue sticks
DIY Instructions Step by Step
- Cut your tulle rolls into hundreds of ten inch long strips.
- Tie a strip of tulle around the wire frame using a double knot.
- Alternate between pink and white strips until the frame is very full.
- Push the knots close together to create a fluffy and dense look.
- Wrap the string of fairy lights around the wire frame under the tulle.
- Hide the battery pack on the back side of the wreath base.
- Glue the glittery xoxo sign to the center of the tulle cloud.
- Press the sign into the fabric so it stays secure when the door moves.
- Turn on the lights to check for any dark spots in the circle.
- Use a piece of ribbon to hang the wreath on your front door.
40 Sparkling Red Sequin Ring
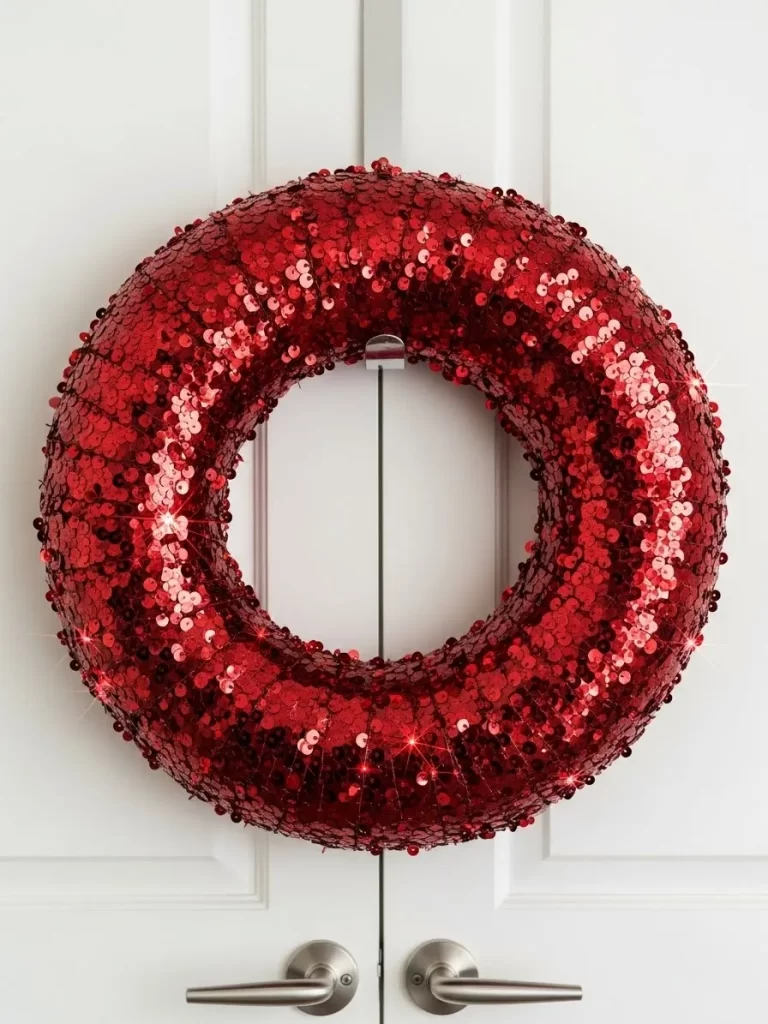
Dozens of red sequins cover this entire wreath for a high shine and festive look. The deep crimson color sparkles brilliantly even in low lighting. This sleek and simple design feels very modern and sophisticated for your entry.
Everything about this project is about the power of a single bold color. The texture is smooth and professional with a lot of holiday charm. It looks fantastic against a white or light grey house exterior. This piece provides a clean and stylish way to boost your curb appeal.
Materials Required
- Foam wreath base
- Red sequin trim or ribbon
- Red acrylic paint
Equipment Required
- Hot glue gun
- Glue sticks
- Paintbrush
- Scissors
DIY Instructions Step by Step
- Paint your foam base red and let it dry for one hour.
- Start at the bottom of the ring and glue the end of the sequin trim.
- Wrap the sequin trim around the base in a tight spiral.
- Overlap each row slightly so the foam base is completely hidden.
- Keep the trim tight as you move around the entire circle.
- Glue the final end of the trim to the back of the wreath.
- Check for any gaps where the paint might be showing through.
- Add extra individual sequins to any small spots that need more shine.
- Smooth down the sequins with your hand to make them lie flat.
- Attach a clear plastic loop to the back for a hidden hanger.
41 Floral Monogram Masterpiece

Bold red roses create a striking statement on these large wooden letters. This design features your initials in a lush and romantic way. Every bloom sits tightly together to ensure a full and rich texture. You can choose letters that represent your last name or perhaps the word love for the holiday.
Your front entrance will look very high end with this personalized touch. Bright crimson petals stand out against dark paint colors for maximum contrast. It offers a warm greeting that feels both elegant and very welcoming. Guests will surely stop to admire the craftsmanship of your custom display. This project adds a professional look to your curb appeal without costing too much money.
Materials Required
- Large wooden letters
- Small red silk roses
- Red spray paint
- Floral adhesive
- Hanging strips
Equipment Required
- Hot glue gun
- Extra glue sticks
- Wire cutters
- Measuring tape
DIY Instructions Step by Step
- Spray paint the wooden letters red and allow them to dry for two hours.
- Cut the stems off each silk rose using your wire cutters.
- Apply a large dab of hot glue to the flat back of a rose.
- Press the rose firmly onto the front surface of the painted letter.
- Work in small sections to cover the entire front of each letter.
- Glue smaller rose buds into any gaps to ensure a dense look.
- Check the sides of the letters and add more flowers if needed.
- Remove any thin glue strings with your fingers once the glue cools.
- Attach hanging strips to the back of the wooden letters for mounting.
- Position the letters on your front door and press firmly to secure them.
42 Map of My Heart Wreath
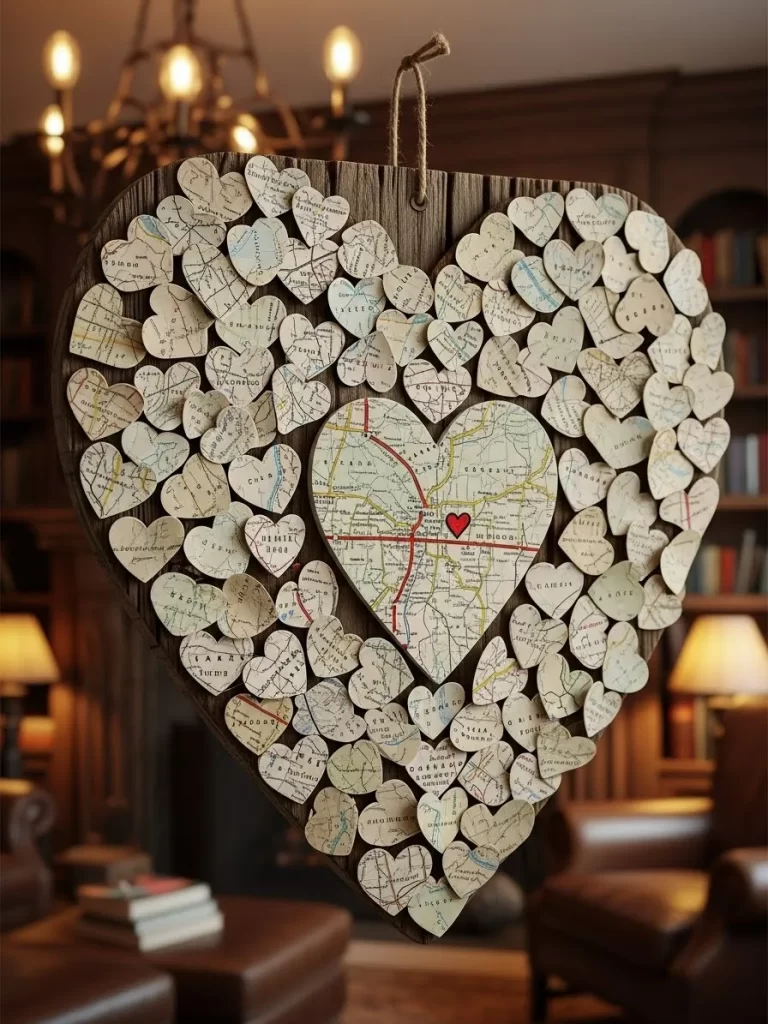
Tiny paper hearts cut from vintage maps cover a large wooden base for a nostalgic feel. This unique design tells a story of travel and shared adventures with your partner. Natural wood tones provide a rustic backdrop for the aged paper textures. You could use maps from places you have visited together to make it even more special.
A large map heart sits right in the center to highlight a specific and meaningful location. Red accents bring a soft holiday vibe to the weathered appearance of the maps. It serves as a beautiful conversation piece for anyone who visits your home. This project is a wonderful way to recycle old atlases or meaningful documents while adding charm to your porch.
Materials Required
- Heart shaped wood board
- Old map paper
- Red cardstock paper
- Liquid glue
- Thick twine
Equipment Required
- Heart shaped paper punch
- Scissors
- Sponge brush
- Pencil
DIY Instructions Step by Step
- Punch many small hearts out of the old map paper using your tool.
- Fold each paper heart slightly down the middle to give it volume.
- Use a sponge brush to apply liquid glue to a small area of the wood.
- Stick the map hearts onto the wood in overlapping rows like scales.
- Continue gluing the small hearts until the whole board is covered.
- Cut one large heart out of a map that shows a favorite city.
- Paste the large map heart onto a piece of red cardstock for a border.
- Trim the cardstock so a tiny red edge shows around the map heart.
- Glue this large double layered heart into the center of the board.
- Attach a loop of thick twine to the back for a rustic hanger.
Key Takeaways
Personalizing your entrance increases the beauty of your property. Using unique textures like leather or feathers creates a high end look for very little money. You can express your personality through the colors and materials you choose to display.
Recycling items from around your house makes these projects environmentally friendly. Old maps, used corks, and denim jeans find new life as beautiful art pieces. This approach ensures your holiday decor is unique and full of character.
Simple instructions allow anyone to create professional results at home. You do not need expert skills to follow our step by step guides. Each project is designed to be accessible for people who are new to crafting.
Creating a handmade wreath is a wonderful way to celebrate the season of love. You have explored many unique designs ranging from modern metal hoops to cozy knit hearts. Every project in this guide helps you add a personal touch to your home exterior.
Picking the right style depends on your porch vibe and the materials you enjoy using. Your front door will surely stand out in the neighborhood after you hang your new creation. We hope these ideas inspire you to start crafting today.
Share your finished work with friends to spread the holiday joy. A little effort goes a long way in making your house feel like a home. Enjoy the process of building something beautiful with your own two hands.