Walking into a home filled with seasonal charm instantly lifts your mood. Tiered trays offer a wonderful way to showcase small treasures without taking up too much counter space. Valentine’s Day provides the best opportunity to experiment with soft pinks, bold reds, and rustic textures.

Many people struggle with a bare stand because they feel overwhelmed by the empty levels. You might look at your tray and wonder where to begin or how to layer items naturally. This guide features forty unique ideas to transform that blank space into a festive focal point.
Creating a themed display does not require a large budget or professional design skills. You can use everyday kitchen items alongside simple handmade crafts to build a beautiful story. Let these tips inspire you to fill your home with warmth and affection this February.
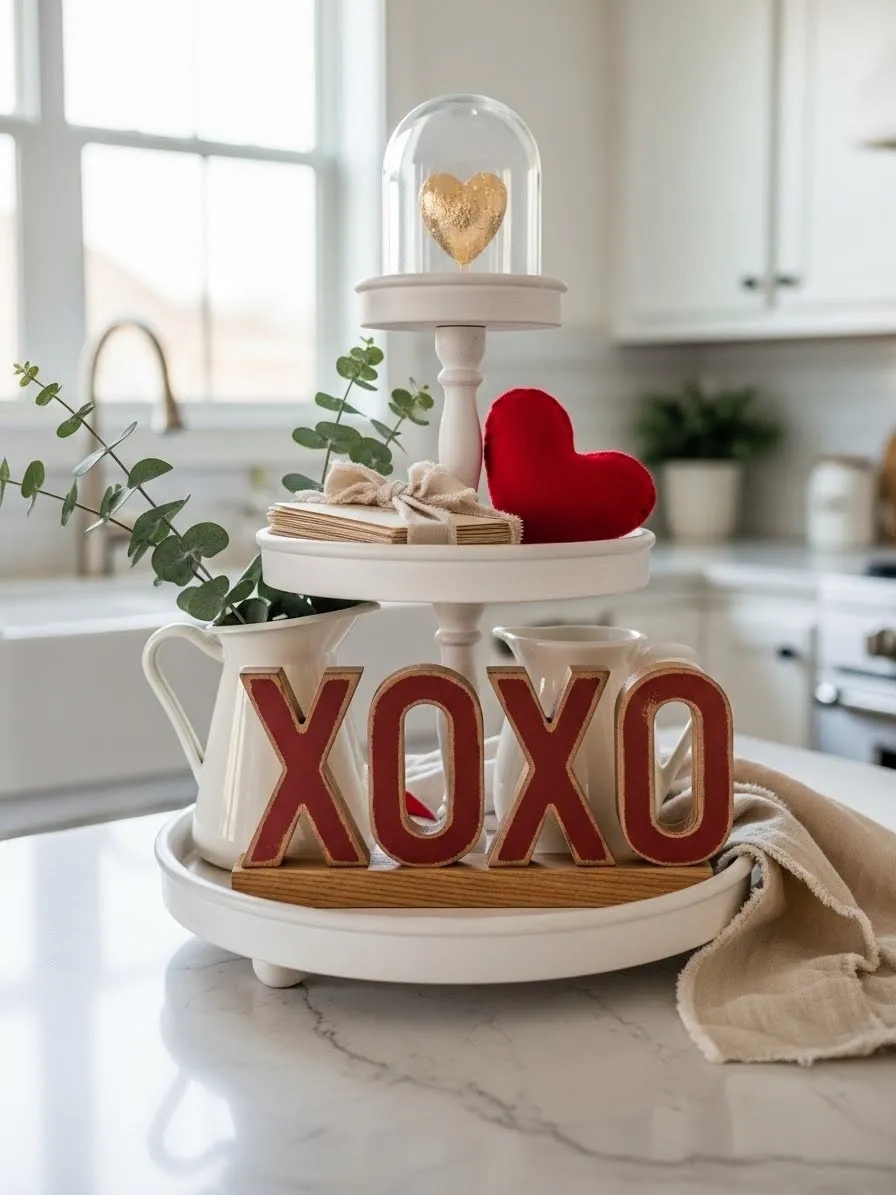
1 Rustic Valentine Tiered Stand

This beautiful display captures the spirit of Valentine’s Day through soft textures and classic symbols. A clean white three tier stand serves as the foundation for various charming accents. Red XOXO letters stand boldly at the base to greet guests with love and warmth.
Small white pitchers hold fresh greenery to add a natural touch to the arrangement. A plush red heart sits next to a bundle of letters tied with a simple ribbon. These layers create a cozy feeling that warms any kitchen or dining area throughout the season.
The top features a shimmering gold heart safely tucked inside a small glass dome. Every piece works together to tell a story of affection. You can easily recreate this look to brighten your home while keeping the atmosphere light and airy.
Red Wooden XOXO Sign
Material Required List
- Four unfinished wooden letters spelling XOXO
- One rectangular wooden strip for the base
- Red acrylic paint
- Wood glue
- Small amount of sandpaper
Equipment Required List
- One medium paintbrush
- A flat surface covered in old newspaper
DIY Instructions
- Rub the sandpaper over the wooden letters to make the surfaces smooth.
- Use your paintbrush to cover each letter with a thin coat of red paint.
- Let the letters sit until the paint feels completely dry to your touch.
- Apply a small line of wood glue to the bottom edge of each letter.
- Press the letters onto the wooden strip in the correct order.
- Hold each letter for a few seconds to ensure it sticks firmly.
- Allow the glue to dry for at least one hour before moving the sign.
Gold Glitter Heart Cloche
Material Required List
- One small glass dome with a white base
- A small foam heart or a sturdy paper heart
- Craft glue
- Gold glitter
Equipment Required List
- One small paintbrush for glue
- A paper plate to catch extra glitter
DIY Instructions
- Spread a thin layer of glue over the entire surface of your foam heart.
- Hold the heart over your paper plate and pour gold glitter over the glue.
- Shake the heart gently to remove any glitter that did not stick.
- Put a tiny drop of glue on the center of the white cloche base.
- Set the gold heart upright on that glue drop and let it dry.
- Place the glass dome over the heart once it is no longer moving.
- Set the completed decoration on the top tier of your tray.
2 Pastel Gnome Garden
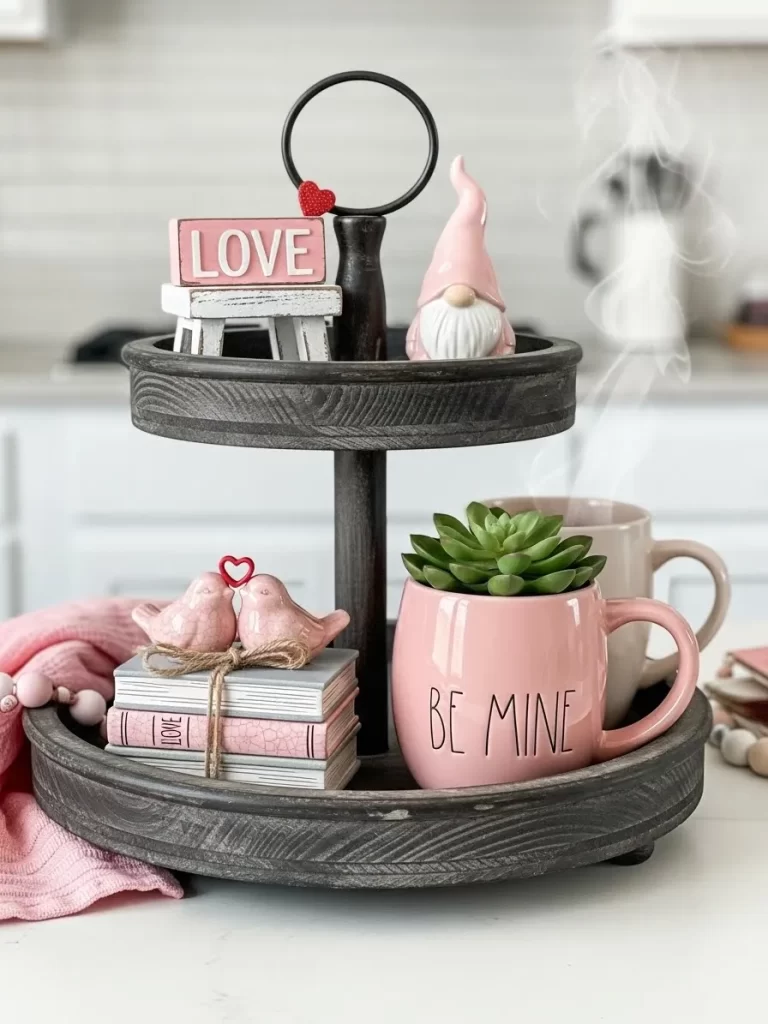
This dark wooden stand creates a moody background for soft pink and white accents. A ceramic gnome with a tall blush hat sits on the top tier to add a touch of whimsy. Small succulents in ceramic mugs provide a fresh green contrast against the dark wood grain.
Two tiny pink birds rest on a stack of books wrapped in twine to symbolize a quiet moment of love. These books use muted colors to keep the theme looking sophisticated and modern. Your kitchen will feel much more inviting with these gentle textures and colors.
The overall look balances organic elements like plants with playful characters. Every piece feels intentional and brings a sense of joy to a small corner of your home. You can easily swap items to match your favorite shades of pink.
Twine Wrapped Bird Books
Material Required List
- Three small paperback books
- Natural jute twine
- Two miniature ceramic birds
- Strong adhesive or glue gun
Equipment Required List
- One pair of scissors
- A flat table for working
DIY Instructions
- Find three books that are roughly the same size and thickness.
- Remove any paper jackets so the plain covers are visible.
- Place the books in a neat stack on your table.
- Hold one end of the twine against the top of the stack.
- Wrap the twine around the entire bundle of books three times.
- Cut the twine and tie the two ends into a simple bow.
- Put a small drop of glue on the bottom of each ceramic bird.
- Press the birds firmly onto the top book right next to the twine bow.
- Let the glue dry completely before moving the books to your tray.
3 Galvanized Candle Glow
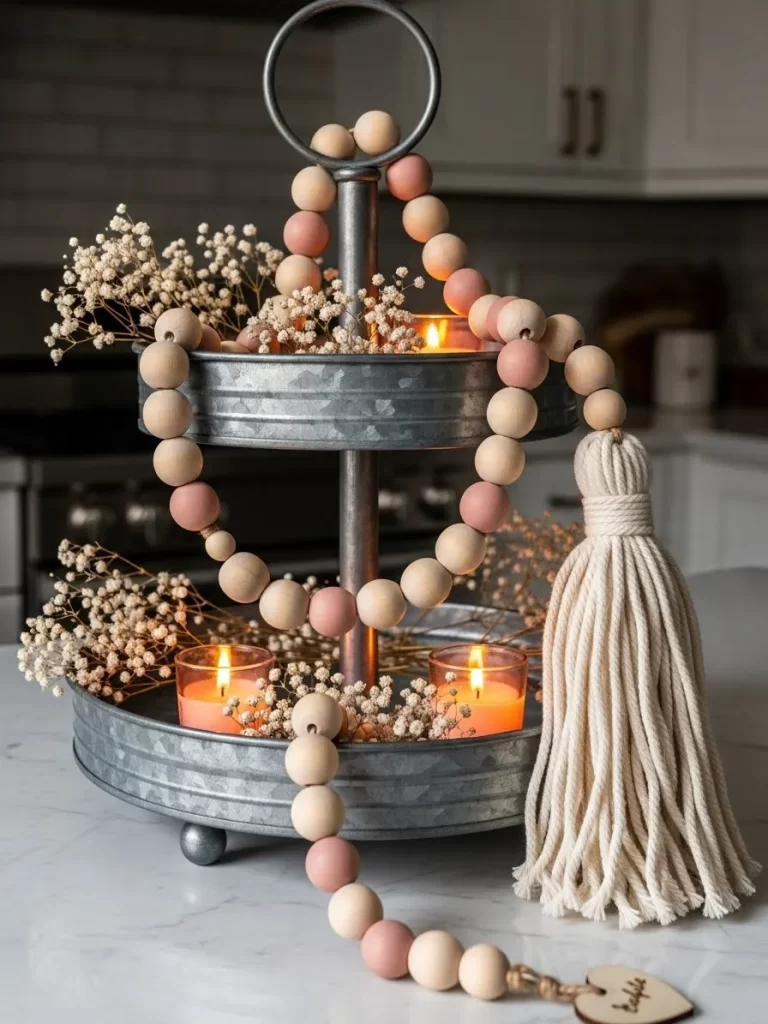
Galvanized metal trays offer a wonderful rustic feel that suits any farmhouse kitchen. Warm candlelight from small jars creates a romantic atmosphere for a cozy evening. Soft white flowers known as babys breath fill the gaps to add a light and airy texture.
A long strand of wooden beads in natural and dusty rose tones drapes across the levels. This piece features a large cream tassel that hangs off the edge to provide visual length. Every element works together to make the cold metal feel inviting and warm.
Using candles is a great way to add movement to your display. The flickering flames reflect off the silver surfaces to brighten up a dark room. You can enjoy this setup throughout the winter months to keep your home feeling cheerful.
Rose Wood Bead Garland
Material Required List
- Thirty large round wooden beads
- Pink and tan craft paint
- Thick white cotton string
- One bunch of cream yarn for a tassel
- Small wooden heart charm
Equipment Required List
- Two small bowls for the paint
- A large needle with a wide eye
- Scissors
DIY Instructions
- Pour a little pink paint into one bowl and tan paint into the other.
- Roll half of your beads in the pink paint and the other half in the tan.
- Place the wet beads on a tray to dry for two hours.
- Thread your cotton string through the needle.
- Slide the beads onto the string while switching between pink and tan colors.
- Wrap your yarn around a piece of cardboard twenty times to start the tassel.
- Tie the top of the yarn loops together with a separate piece of string.
- Cut the bottom of the loops to create the fringe for the tassel.
- Tie the tassel to one end of your bead string and the wooden heart to the other.
4 Nesting Bird Display
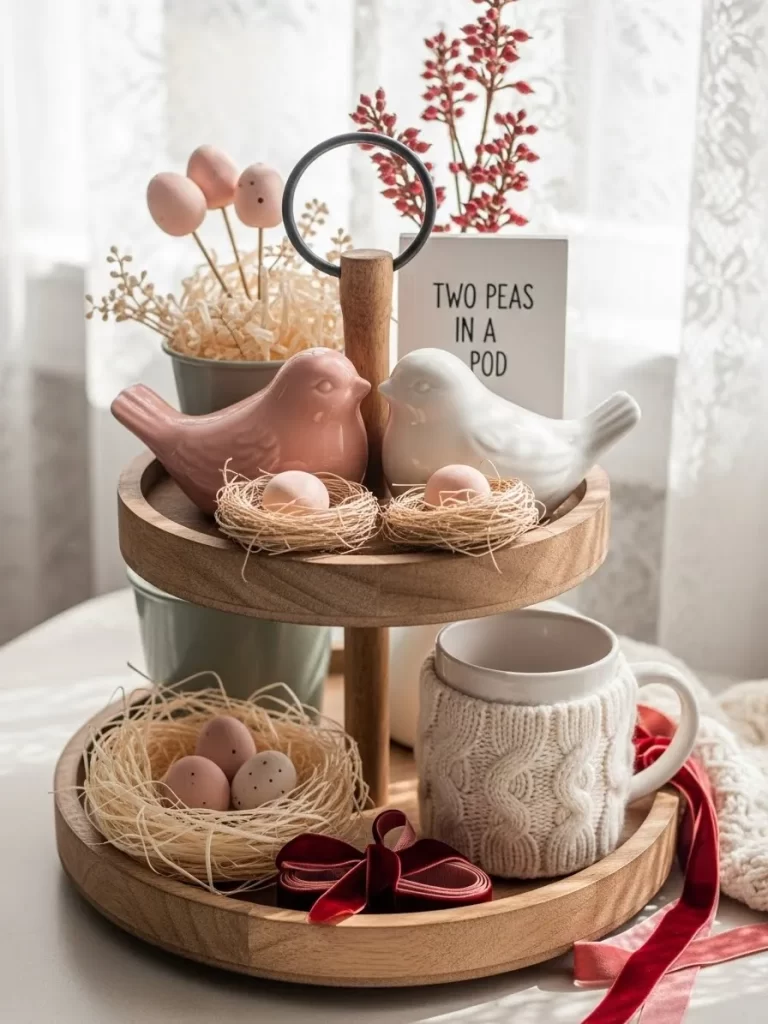
Light wood tiers provide a soft and natural foundation for this animal themed arrangement. A pink bird and a white bird sit close together on the middle level to represent a sweet pair. They are surrounded by tiny straw nests that hold small speckled eggs in pastel colors.
A white mug wearing a thick white knitted sleeve adds a cozy layer to the bottom tray. Delicate red branches reach upward to provide height and a splash of bold holiday color. This setup feels very organic and brings a little bit of nature into your living space.
The mix of yarn and straw creates a tactile experience that looks very high end. Your guests will love the small details like the tiny dots on the eggs. It is a wonderful way to celebrate affection with a gentle and earthy touch.
Speckled Egg Nests
Material Required List
- Handful of dry raffia or thin straw
- Three small foam eggs
- Brown craft paint
- Clear craft glue
Equipment Required List
- A small paintbrush
- A round cup to help shape the straw
DIY Instructions
- Dip your paintbrush into the brown paint and tap it lightly on the foam eggs.
- Make sure the brown dots are small so the eggs look like real bird eggs.
- Take a bunch of straw and twist it into a long rope.
- Coil the straw rope inside a cup to form a circular nest shape.
- Put a little glue between the layers of straw to keep the nest from falling apart.
- Press your thumb into the center of the straw to make a hollow spot.
- Place a drop of glue on the bottom of your speckled eggs.
- Tuck the eggs into the center of the nest and let them dry for an hour.
5 Stitched Heart Hearth

Black wooden trays offer a sharp and modern look that contrasts well with red decorations. This display features many handmade fabric hearts in various patterns like plaid and velvet. Some hearts have vintage labels that say Tea Stained to give them a lived in feel.
A red wooden thread spool sits on the top tier to symbolize the threads of love. Small baskets on the bottom level help keep the smaller pillows organized and upright. This arrangement feels very personal and looks great sitting near a warm fireplace.
The different sizes of hearts create a lot of visual interest for the viewer. You can use old fabric scraps to make this display more meaningful for your family. It is a cozy way to add a pop of color to a neutral room.
Plaid Fabric Hearts
Material Required List
- Red and white plaid fabric scraps
- Bag of soft cotton stuffing
- Small wooden buttons
- Needle and red thread
Equipment Required List
- Fabric scissors
- Sewing pins
DIY Instructions
- Draw a heart shape on the back of two pieces of plaid fabric.
- Cut the shapes out using your fabric scissors.
- Pin the two fabric pieces together so the bright sides are touching.
- Sew along the edge of the heart but leave a small hole at the bottom.
- Turn the heart inside out through the hole so the pattern is now on the outside.
- Stuff the heart with cotton until it feels firm and bouncy.
- Use your needle to sew the small hole closed.
- Stitch a wooden button onto the front of the heart for a decorative touch.
6 Crimson Floral Elegance
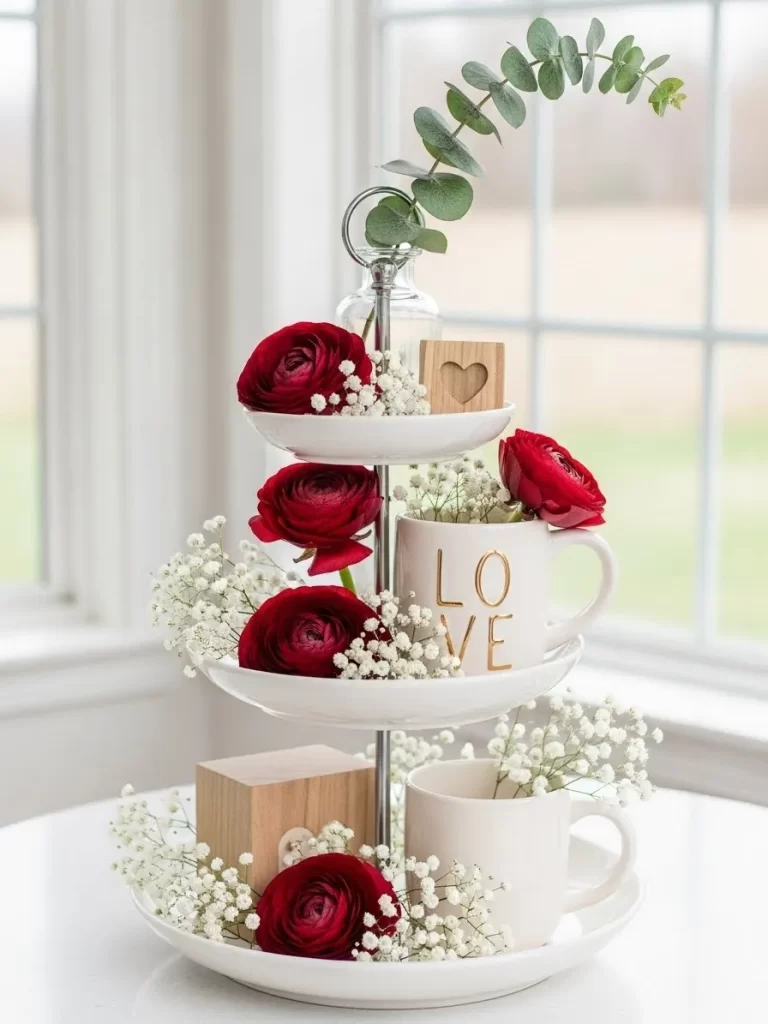
Pure white ceramic trays create a crisp look that makes red flowers stand out beautifully. Large red ranunculus blooms are placed on every level to provide a lush and romantic feeling. Tiny white flowers fill the remaining spaces to create a full garden appearance.
A tall glass bottle holds a single green branch that adds height to the top of the stand. Two white mugs sit on different tiers with one showing the word LOVE in gold letters. These vertical pieces guide the eye upward and make the display look very grand.
Natural wood blocks with carved hearts add a rustic element to the shiny ceramic. This style is excellent for a fancy brunch or a bathroom counter. The combination of deep red and white is a classic choice for the season of love.
Floral Love Mug
Material Required List
- One white ceramic mug with gold lettering
- Small block of green floral foam
- Three large silk red flowers
- Bunch of dried white flowers
Equipment Required List
- A knife to trim the foam
- Scissors
DIY Instructions
- Use your knife to trim the green foam so it fits inside the mug.
- Push the foam down into the mug until it is hidden from view.
- Trim the stems of your silk flowers to a length of four inches.
- Poke the stems into the center of the foam so the petals sit on the rim.
- Cut small sprigs of the white flowers and tuck them around the red ones.
- Make sure no green foam is visible through the petals.
- Place the mug on the middle tier of your tray to act as a centerpiece.
7 Chalkboard and Lavender Charm
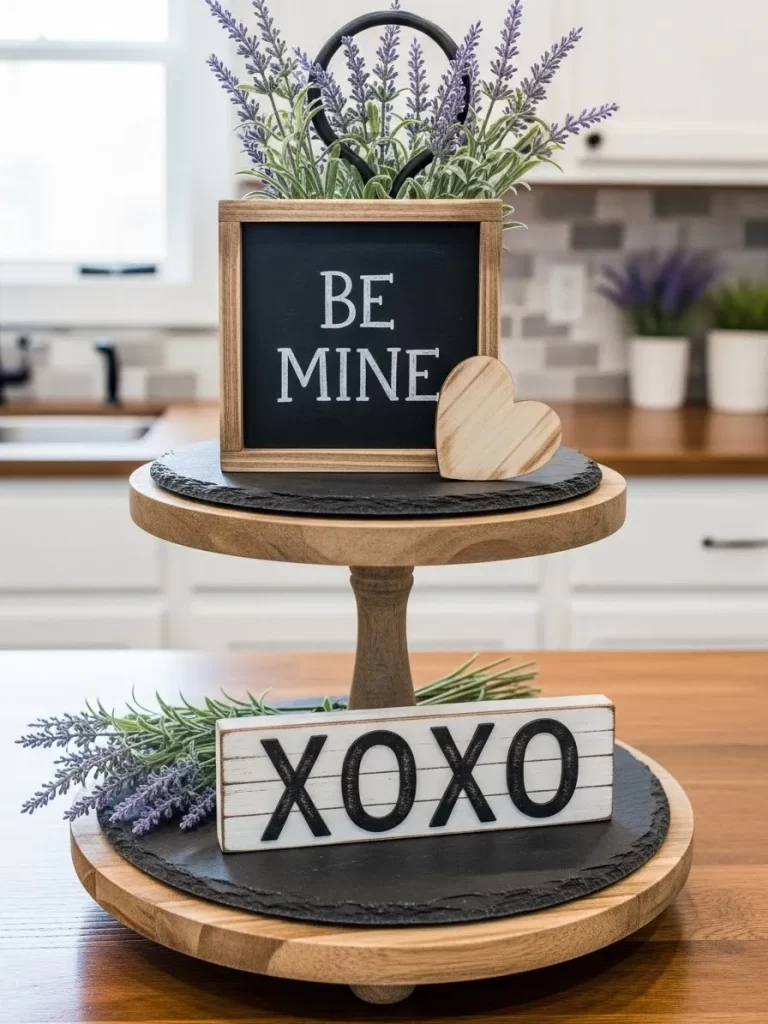
Wooden trays with dark slate inserts offer a sophisticated and earthy vibe. A small square chalkboard displays the phrase Be Mine in simple white lettering. This message is framed by natural wood that matches the center pole of the tiered stand.
Fragrant lavender sprigs are bunched together and placed behind the signs to add a soft purple hue. A white wooden block at the bottom features black XOXO letters in a clean font. These horizontal pieces help balance the height of the tall lavender stems.
Using slate provides a non slip surface for all your delicate decorations. The purple and green colors offer a unique break from the traditional red and pink palette. This look is wonderful for anyone who prefers a more muted and natural home style.
Mini Message Chalkboard
Material Required List
- Small wooden picture frame
- Black chalkboard paint
- White chalk or a chalk marker
- Small wooden heart cutout
Equipment Required List
- Foam paint brush
- Sandpaper
DIY Instructions
- Remove the glass and backing from your wooden picture frame.
- Paint the backboard of the frame with two coats of black chalkboard paint.
- Sand the edges of the wooden frame if you want a slightly worn look.
- Use your white chalk marker to write a sweet message like Be Mine on the board.
- Put the painted backboard back into the frame and secure the clips.
- Glue a small wooden heart to the bottom corner of the frame for a 3D effect.
- Lean the chalkboard against the center post of your top tray tier.
8 Evergreen Heart Wreath

Rich green boxwood wreaths bring a sense of life to dark wooden tiers. A bright red ceramic heart sits in the center of the top wreath as a bold focal point. Small red berries are scattered throughout the leaves to tie the colors together beautifully.
Long ivy vines wrap around the handle and drape down to the table surface below. This creates a flowing look that connects the decoration to the rest of the room. Two round boxwood spheres sit on the bottom level to provide a sense of symmetry.
The dark wood grain shows through the greenery and makes the red heart look very glossy. This design is excellent for a kitchen island where it can be seen from all sides. It feels classic and remains stylish even after the holiday passes.
Heart Center Wreath
Material Required List
- Six inch artificial boxwood wreath
- One large red ceramic or plastic heart
- Small cluster of fake red berries
- Thin floral wire
Equipment Required List
- Wire cutters
- Hot glue gun
DIY Instructions
- Place your boxwood wreath flat on your workspace and fluff the leaves.
- Cut three small sections of red berries and space them evenly around the wreath.
- Use a tiny bit of hot glue to secure the berries deep inside the green leaves.
- Set your red heart in the very center of the wreath to see how it fits.
- Wrap a piece of floral wire around the back of the heart if it has a loop.
- Twist the wire onto the wreath frame so the heart stays centered.
- Place the finished wreath on the top tier of your tray so it lays flat.
9 Velvet Ribbon Book Stack
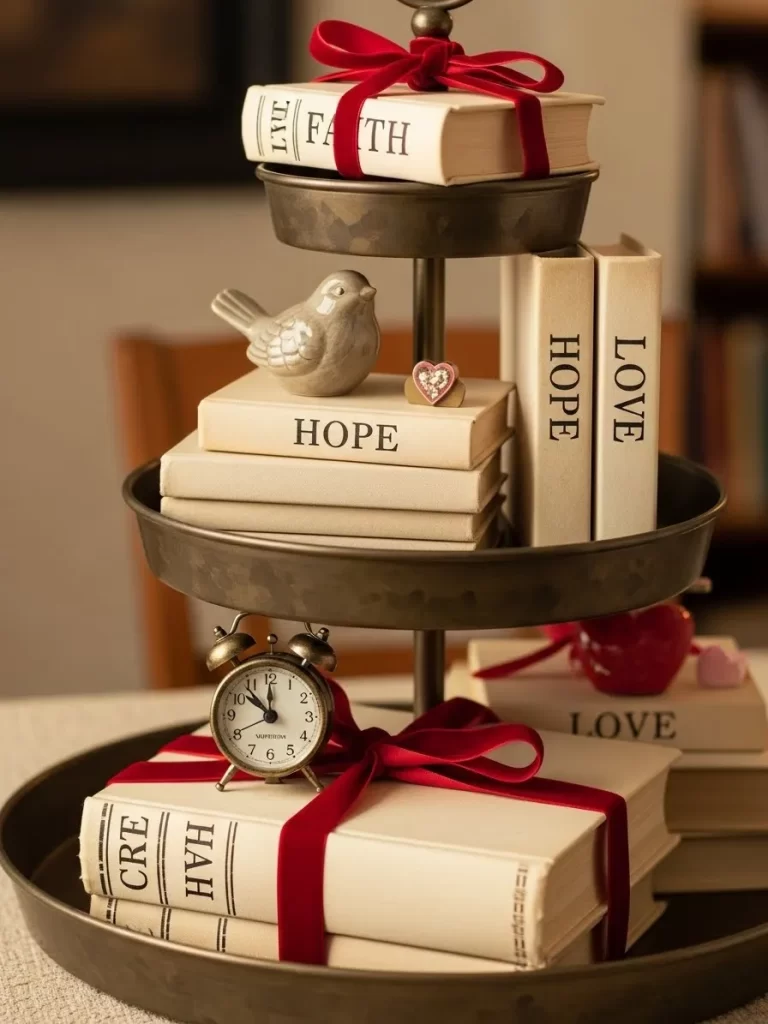
Pewter colored metal trays offer a vintage and slightly aged appearance for your home. This display uses stacks of white books with words like Faith, Hope, and Love printed on the spines. Each stack is tied with a luxurious red velvet ribbon that ends in a soft bow.
A grey ceramic bird rests on one stack while a tiny gold heart sits nearby. A miniature brass alarm clock adds a nostalgic touch to the bottom level of the tray. These items suggest a theme of timeless love and cherished memories.
The white covers of the books keep the display looking bright despite the dark metal base. Using velvet adds a touch of high end texture that feels very special. This arrangement would look lovely in a home office or a cozy reading nook.
Velvet Ribbon Book Bundle
Material Required List
- Six small books with white or cream covers
- Three yards of red velvet ribbon
- Small bird figurine
- Miniature vintage clock
Equipment Required List
- Sharp fabric scissors
- Measuring tape
DIY Instructions
- Group your books into three separate stacks based on their size.
- Cut a piece of velvet ribbon long enough to go around the stack twice.
- Center the ribbon on the top of the stack and wrap it underneath.
- Bring the ribbon back to the top and tie a large decorative bow.
- Angle the ends of the ribbon by cutting them into a V shape.
- Place your bird figurine on the middle stack so it looks like it is resting.
- Set the mini clock next to the largest book stack on the bottom tier.
10 Twinkling Heart Light Display
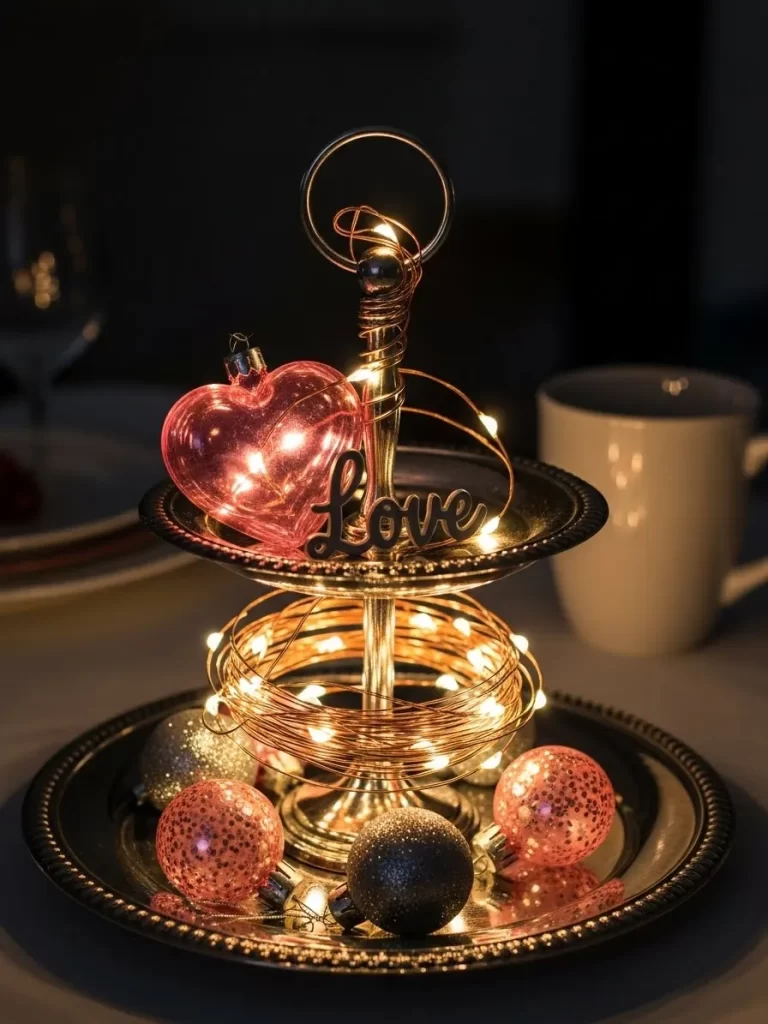
Silver trays reflect light beautifully and create a magical evening glow. A transparent pink heart ornament stands on the top level while surrounded by thin copper fairy lights. These lights wrap around the center pole to illuminate every corner of the display.
Sparkling baubles in pink, silver, and charcoal are scattered across the bottom tier. A small metal sign with the word Love sits nestled among the glowing wires. This setup transforms a simple tray into a stunning centerpiece for a romantic dinner.
The warm glow of the lights makes the metallic surfaces shimmer and shine. You can hide the battery pack behind one of the larger ornaments to keep the look clean. It is a fantastic way to add sparkle to your Valentine celebrations.
Lighted Heart Centerpiece
Material Required List
- One set of battery operated copper fairy lights
- Large hollow pink heart ornament
- Assorted glittery ornaments in pink and silver
- Small metal Love script sign
Equipment Required List
- Fresh batteries for the lights
- Clear adhesive tape
DIY Instructions
- Place the batteries into the light pack and turn them on to check the bulbs.
- Wrap the string of lights around the center pole of your tiered tray.
- Set the pink heart ornament on the top tier and tuck a few lights inside it.
- Arrange the glittery ornaments on the bottom tier to fill up the empty spaces.
- Thread the remaining lights through the ornaments so the glitter reflects the glow.
- Place the metal Love sign in front of the ornaments where it is easiest to read.
- Tape the battery pack to the back of the center pole or hide it under a large ball.
11 Sweet Conversation Candy Hearts
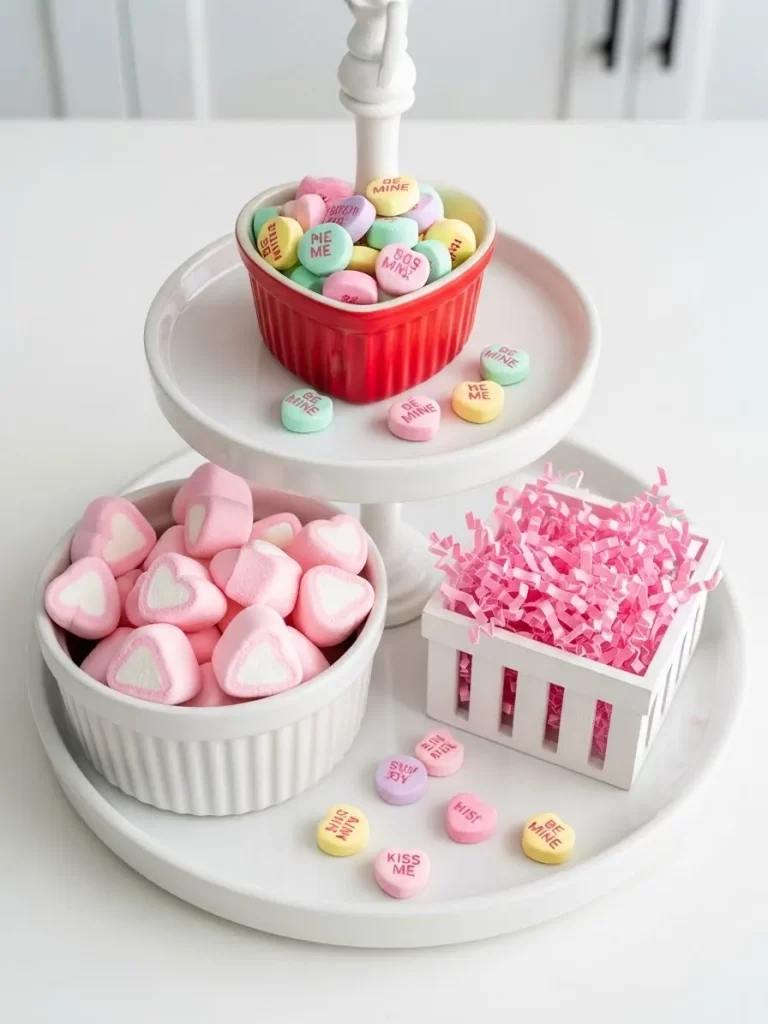
A heart shaped red bowl sits on the top level of this white stand. It overflows with colorful conversation hearts that feature sweet messages. These candies bring a playful and nostalgic energy to your kitchen.
Small pink marshmallows fill a white scalloped bowl on the bottom tier. A white crate filled with pink shredded paper sits nearby to add volume and texture. This sugary display is a treat for the eyes and a great way to share sweets with your family.
Scattered candies across the base help unify the two levels. Every shade of pastel pink and yellow pops against the clean white background. You can keep this setup near your coffee station for a cheerful morning boost.
Material Required List
- One red heart shaped ceramic bowl
- Two bags of conversation heart candies
- One white scalloped ceramic bowl
- One bag of heart shaped marshmallows
- One small white wooden crate
- Pink shredded craft paper
Equipment Required List
- One clean spoon for scooping candy
DIY Instruction Step by Step
- Wash both ceramic bowls with warm soapy water and dry them completely.
- Place the red heart bowl on the top shelf of your tiered stand.
- Pour the conversation heart candies into the red bowl until they reach the brim.
- Set the white scalloped bowl on the bottom shelf of the stand.
- Fill the scalloped bowl with the pink marshmallows.
- Put the pink shredded paper inside the small white crate until it is full.
- Place the crate next to the marshmallow bowl on the bottom tier.
- Sprinkle a few extra conversation hearts around the base of the stand for a finished look.
12 Scrabble Tile Love Message

Wooden racks hold letter tiles that spell out Love You and XOXO. This game inspired theme adds a fun twist to your holiday decor. Soft lighting from a nearby window highlights the natural wood grain of the trays.
Small rolled scrolls tied with red and white string sit in glass jars on the corners. An antique key rests on a stack of old papers to suggest a locked heart. These vintage elements make the tray feel like a collection of precious artifacts.
The dark wood offers a warm and grounded feel to the room. Every detail encourages guests to look closer and read the hidden messages. Using common game pieces is a clever way to reuse items you already own.
Material Required List
- Two wooden Scrabble tile holders
- Individual Scrabble letter tiles
- Two small glass jars
- White paper for scrolls
- Red and white baker twine
- One decorative vintage metal key
Equipment Required List
- Scissors
- Glue stick
DIY Instruction Step by Step
- Select the letters needed to spell Love You and XOXO from your tile set.
- Place the letters into the wooden holders and space them out evenly.
- Set one holder on the top tier and the other on the bottom tier.
- Cut two small squares of white paper using your scissors.
- Roll the paper squares tightly to look like miniature scrolls.
- Wrap a piece of red and white twine around each scroll and tie a knot.
- Drop the scrolls into the glass jars and place the jars on the tray levels.
- Lay the vintage key on top of the bottom holder to complete the display.
13 Checkered Bow Galvanized Stand
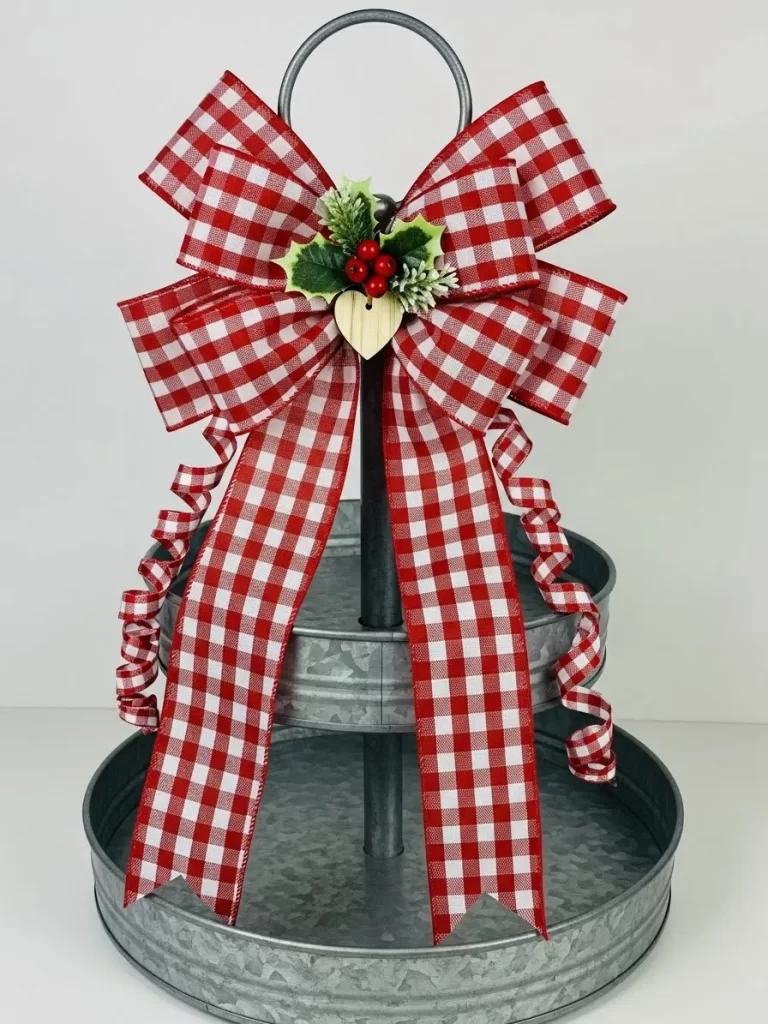
A massive red and white checkered bow serves as the focal point for this industrial tray. The fabric loops are large and full to create a sense of drama. Tiny green holly leaves and red berries sit at the center of the knot for a festive touch.
Long ribbon tails curl down toward the bottom tier like elegant vines. A small wooden heart charm hangs just below the berries to tie in the theme. The silver metal of the tray provides a cool background that makes the red fabric stand out.
This design is bold yet simple to put together. You can use this tray to hold napkins or silverware during a party. The classic pattern works well in a farmhouse or modern kitchen setting.
Material Required List
- Three yards of red and white checkered wired ribbon
- One small wooden heart cutout
- Artificial holly leaves and red berries
- Thin floral wire
Equipment Required List
- Sharp fabric scissors
- Hot glue gun
DIY Instruction Step by Step
- Cut a long piece of the checkered ribbon to start your bow.
- Fold the ribbon back and forth to create four large loops.
- Pinch the center of the loops and wrap a piece of floral wire around the middle.
- Cut two shorter pieces of ribbon and attach them to the back for the tails.
- Use your hot glue gun to stick the holly leaves and berries onto the center wire.
- Glue the small wooden heart just below the berries.
- Take a pencil and wrap the ribbon tails around it to create a curled shape.
- Slide the center wire through the top handle of your galvanized tray and twist it to secure the bow.
14 Crystal Sands and Heart Jewels

Clear glass tiers offer a light and airy look for a modern home. This display features jars filled with fine pink sand to add a soft color foundation. Transparent heart ornaments in white and blush sit on the middle shelf to catch the light.
A tall glass bottle on the top level holds a delicate crystal flower. This vertical element makes the entire stand look tall and elegant. Pink tea light holders on the bottom level add a warm glow to the reflective glass surfaces.
Every item in this arrangement feels precious and clean. The lack of heavy wood or metal makes it suitable for a vanity or a bathroom. It is a sophisticated way to celebrate the holiday with a gentle touch.
Material Required List
- Three tier glass or acrylic stand
- One glass jar with a lid
- Two cups of fine pink decorative sand
- Three large glass heart ornaments
- One tall thin glass vase
- One crystal or glass flower stem
Equipment Required List
- A funnel for the sand
- Soft cloth for cleaning glass
DIY Instruction Step by Step
- Wipe all the glass tiers with a soft cloth to remove any dust or fingerprints.
- Use your funnel to pour the pink sand into the glass jar.
- Place the lid on the jar and set it on the bottom tier of the stand.
- Arrange the glass heart ornaments on the middle tier in a small group.
- Set the tall thin vase on the very top tier of the stand.
- Place the crystal flower stem inside the vase so it stands up straight.
- Position the stand where it can catch natural light to make the glass sparkle.
15 Slate and Stone Zen Display
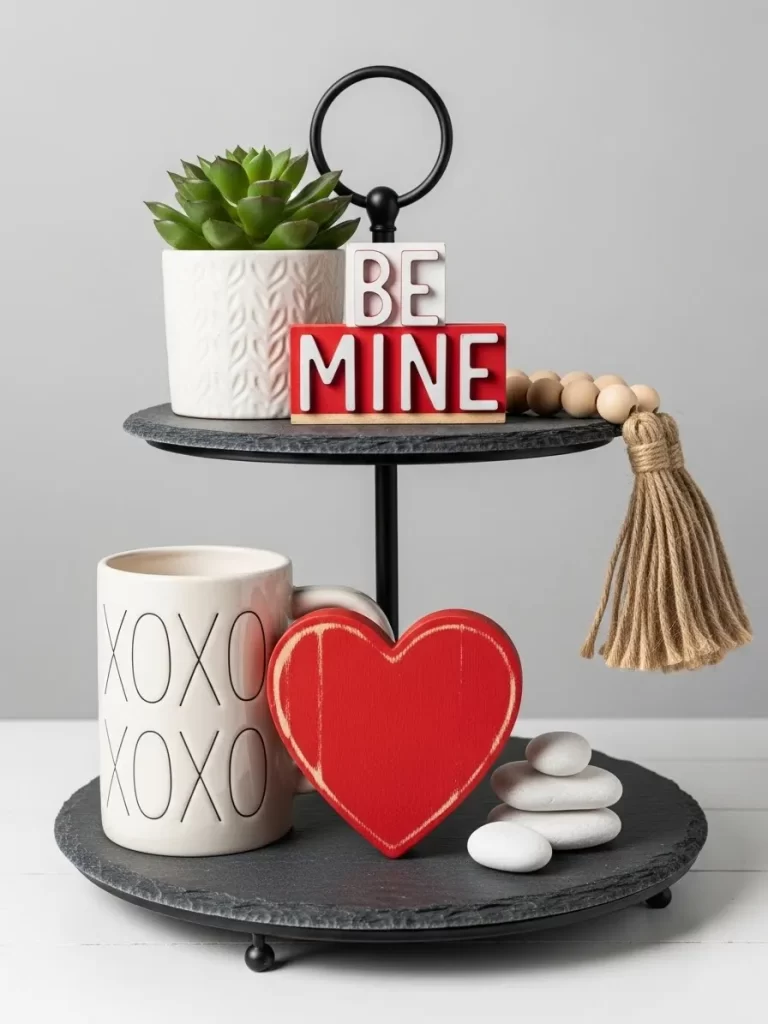
Dark slate trays provide a matte black background that feels very grounded. A stack of smooth white stones sits on the bottom level to add a natural element. A white mug with black text stands next to a large red wooden heart.
The top tier features a white ceramic pot holding a vibrant green succulent. Small wooden blocks spell out the words Be Mine in a clean and modern font. A tan bead garland with a thick tassel drapes off the side for added texture.
This look is excellent for someone who prefers a minimal and calm environment. The contrast between the black slate and white accessories is very striking. It brings a sense of peace and balance to your Valentine decorations.
Material Required List
- Two tier black slate stand
- Three large smooth white river stones
- One white ceramic mug with black lettering
- One large red wooden heart
- One small potted green succulent
- Wooden letter blocks
- One tan wooden bead garland with a tassel
Equipment Required List
- Damp cloth for cleaning slate
DIY Instruction Step by Step
- Wipe the slate trays with a damp cloth to make the black color look deep and clean.
- Place the potted succulent on the top tier of the stand.
- Stack the wooden letter blocks next to the succulent to spell Be Mine.
- Set the white mug on the bottom tier and place the red heart right next to it.
- Pile the white river stones in a small stack on the other side of the bottom tier.
- Drape the wooden bead garland over the top tier so the tassel hangs down past the bottom shelf.
- Adjust the items so they are spaced out and do not look crowded.
16 Plaid Gnome and Mushroom Forest
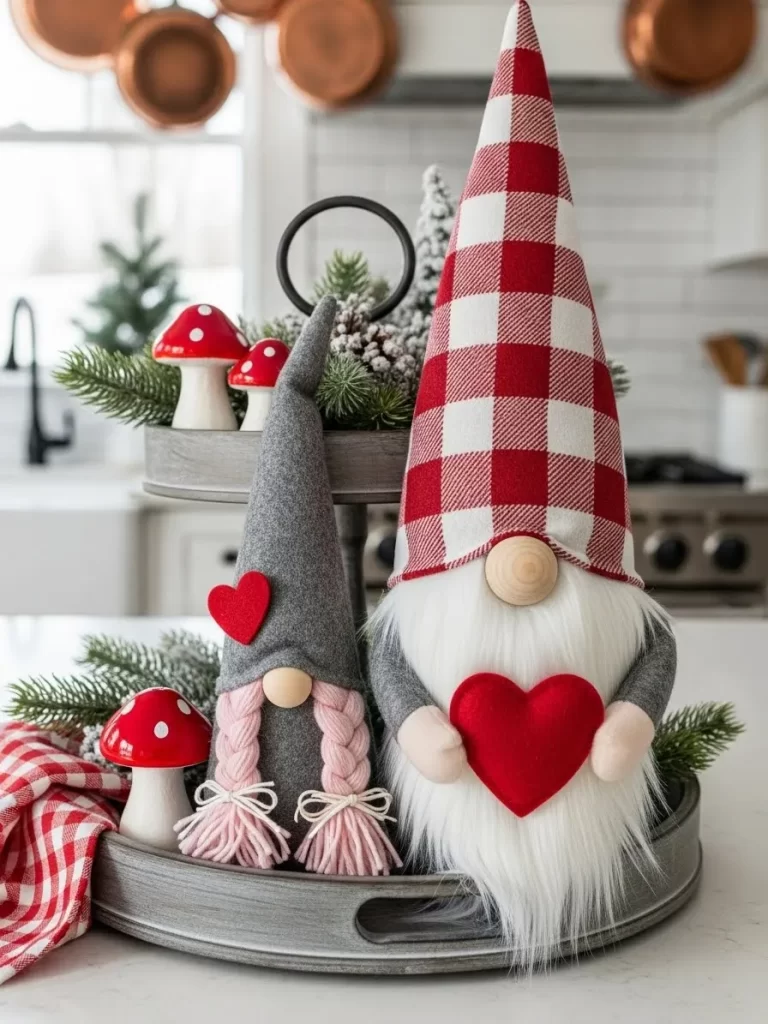
Large fabric gnomes with long white beards dominate this cozy display. One gnome wears a red and white checkered hat while the other has a grey felt hat. They sit on a grey wooden tray that looks like a forest floor.
Small red mushrooms with white dots are tucked between the gnomes to create a magical scene. A soft red heart is held by one of the gnomes to show affection. Green evergreen branches fill the back of the tray to provide a lush background.
This playful setup is wonderful for a childs room or a living room table. The soft fabrics make the display feel warm and inviting during the winter. You can enjoy the whimsical characters as they guard your holiday treats.
Material Required List
- One large red plaid gnome
- One medium grey felt gnome
- Three ceramic red and white mushrooms
- One small red fabric heart
- Artificial evergreen sprigs
- Grey wooden circular tray
Equipment Required List
- None
DIY Instruction Step by Step
- Place the grey wooden tray on a flat surface like a table or counter.
- Set the largest gnome toward the back of the tray on the right side.
- Place the grey gnome on the left side and lean the red fabric heart against its hands.
- Tuck the evergreen sprigs into the space behind the gnomes to create a wall of green.
- Group the three ceramic mushrooms together in the front left corner.
- Fluff the gnomes beards so they look full and cover the base of the tray.
- Adjust the hats so they point upward and add height to your display.
17 Vintage Love Letter Collection
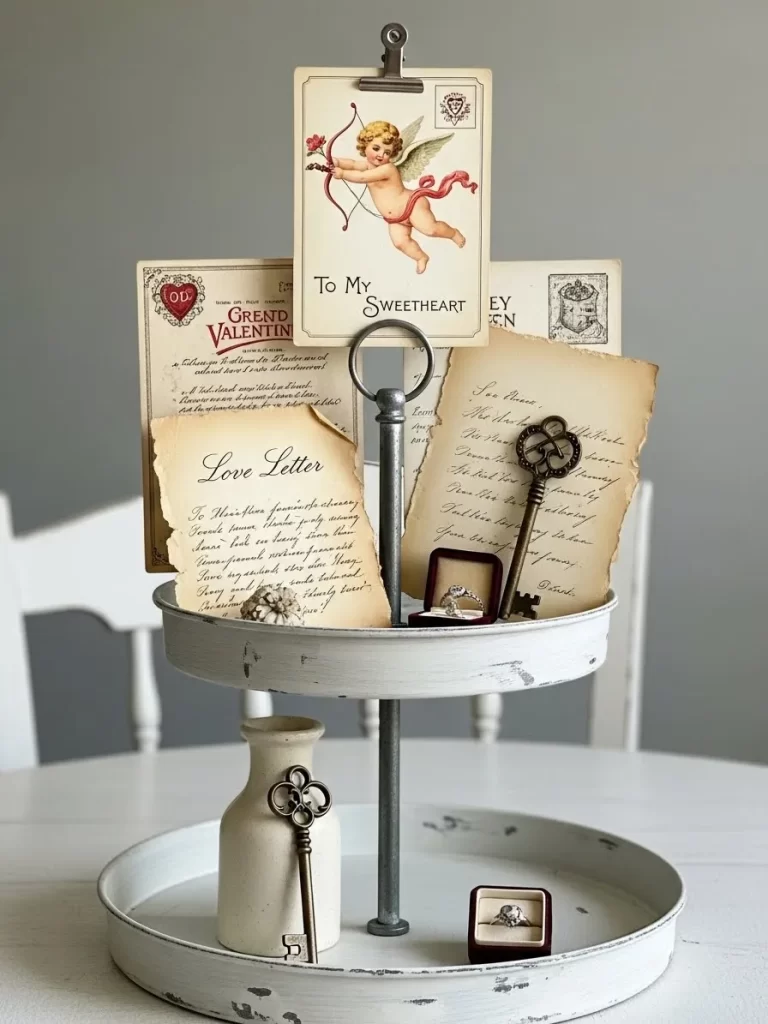
White distressed metal trays hold a collection of old fashioned romantic items. Antique postcards with drawings of cupids are clipped to the center post. Yellowed paper scrolls with handwritten script rest on the tiers to suggest old love letters.
Small velvet ring boxes sit open to reveal sparkling jewelry pieces. Heavy bronze keys are scattered across the levels to represent the key to ones heart. A simple white vase holds a key on the bottom level to add a vertical touch.
This arrangement feels very nostalgic and full of history. It is a beautiful way to display family heirlooms or vintage finds from a thrift store. The muted colors and aged paper create a very romantic and quiet atmosphere.
Material Required List
- Distressed white metal tiered stand
- Three vintage style postcards
- Two sheets of aged parchment paper
- Two bronze skeleton keys
- Small white ceramic bud vase
- One velvet ring box
- Metal clips for the postcards
Equipment Required List
- A lighter or cold tea for aging paper
DIY Instruction Step by Step
- Soak your parchment paper in a bowl of cold tea for five minutes to make it look old.
- Let the paper dry completely before writing a few romantic words in cursive.
- Roll the paper into a loose scroll and set it on the middle tier.
- Use the metal clips to attach your postcards to the top handle of the stand.
- Place the white bud vase on the bottom tier and drop a skeleton key inside.
- Set the velvet ring box next to the vase and leave it open.
- Scatter the remaining keys on the different levels of the tray.
- Place the stand in a quiet corner where guests can read the letters.
18 Valentine Baker Helper Tray
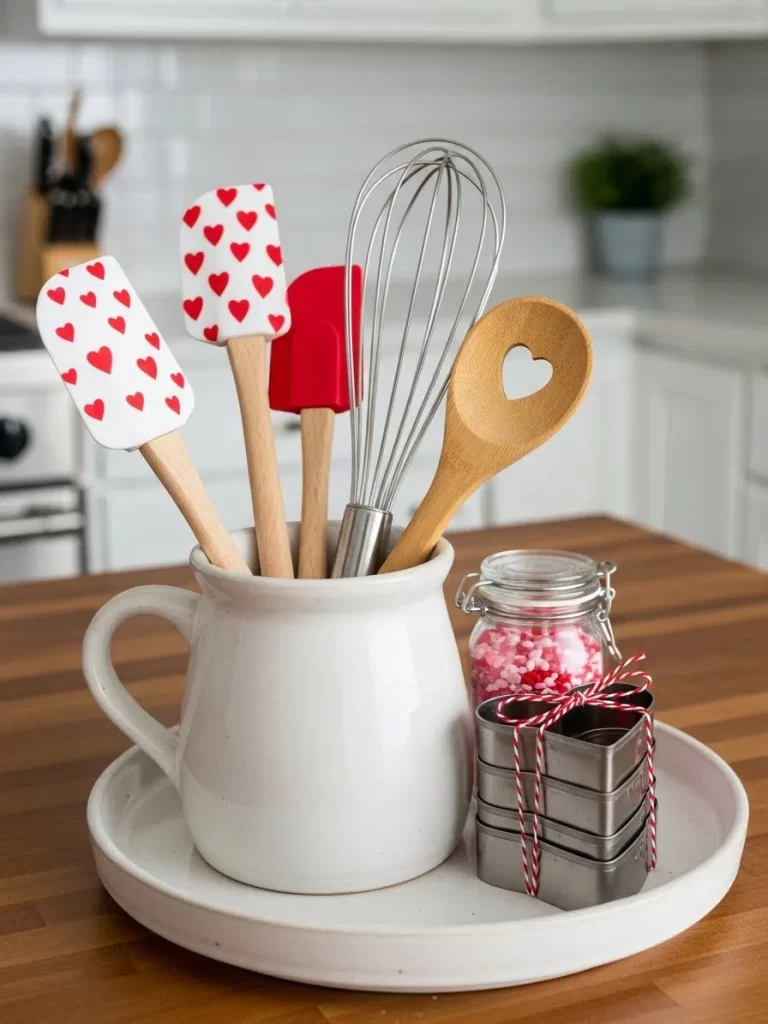
A white ceramic pitcher holds several kitchen tools with heart designs. Red and white spatulas with heart patterns stand next to a wooden spoon with a heart cutout. A large metal whisk is included to show that love is the main ingredient.
Stacked metal heart cookie cutters are tied together with a red and white string. A small glass jar filled with red and pink sprinkles sits nearby for a pop of color. This display is functional and looks great on a kitchen island.
Using baking tools as decor is a smart way to use items you already have. It makes your kitchen feel ready for a holiday cookie party. The bright red colors against the white ceramic look very fresh and clean.
Material Required List
- Large white ceramic pitcher
- Two spatulas with red heart patterns
- One wooden spoon with a heart cutout
- One metal balloon whisk
- Four metal heart cookie cutters in different sizes
- One glass jar of red and pink sprinkles
- Red and white baker twine
Equipment Required List
- None
DIY Instruction Step by Step
- Place the white ceramic pitcher on the center of your tray or counter.
- Insert the spatulas, wooden spoon, and whisk into the pitcher so they fan out.
- Stack the heart cookie cutters from largest to smallest.
- Wrap a piece of baker twine around the stack of cutters and tie a bow.
- Set the cookie cutter stack next to the base of the pitcher.
- Place the jar of sprinkles on the other side of the pitcher to balance the look.
- Adjust the tools so the heart patterns are facing forward and easy to see.
19 Felt Envelope Love Notes
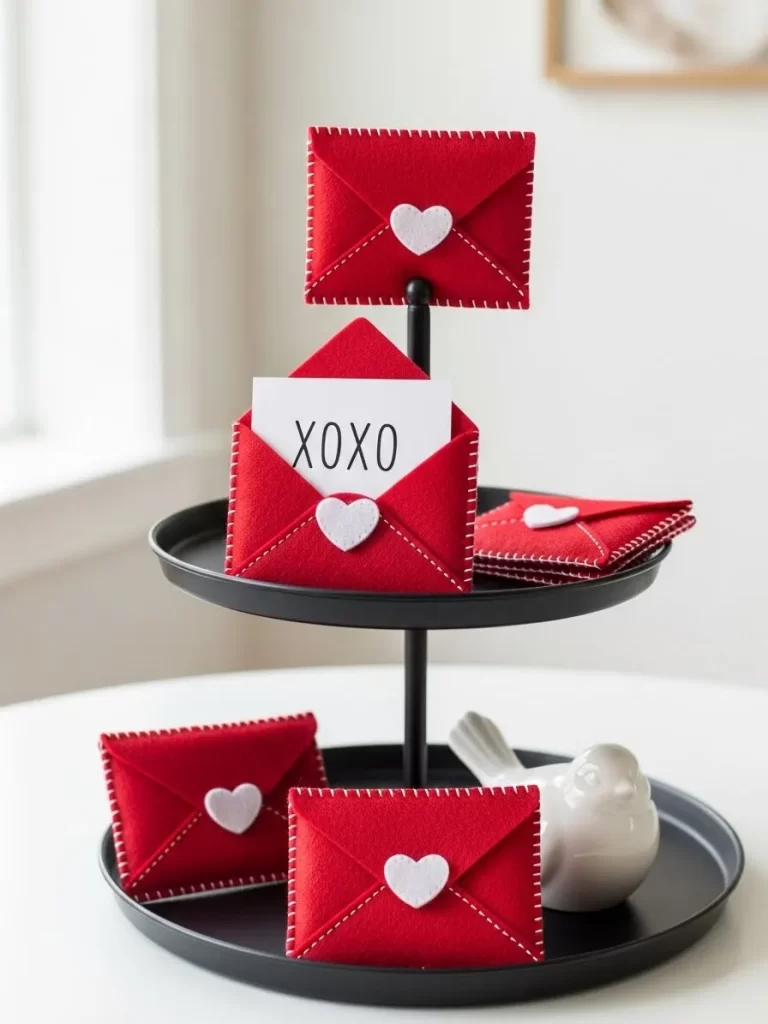
Black metal trays provide a stark background for bright red felt envelopes. Each envelope features white stitching and a small white heart on the flap. One envelope is open to reveal a card that spells out XOXO in black ink.
A small white ceramic bird sits on the bottom level to add a sense of peace. This display is simple and uses only three colors to make a strong impact. The soft texture of the felt contrasts beautifully with the hard metal tray.
This setup is a great way to leave hidden messages for your partner or children. You can put a small treat or a note inside each envelope every day. It is a fun and interactive way to count down to the holiday.
Material Required List
- Four red felt envelopes with white heart buttons
- One white card with XOXO written on it
- One small white ceramic bird figurine
- Two tier black metal stand
Equipment Required List
- Black marker
DIY Instruction Step by Step
- Write the letters X O X O on your white card using the black marker.
- Place the card inside one of the red felt envelopes so the top of the card sticks out.
- Set the open envelope on the top tier of your black stand.
- Arrange the other three envelopes in a small pile on the bottom tier.
- Place the white ceramic bird figurine next to the pile of envelopes.
- Angle the envelopes so the white heart buttons are visible to anyone walking by.
- Ensure the stand is placed at eye level so the messages are easy to read.
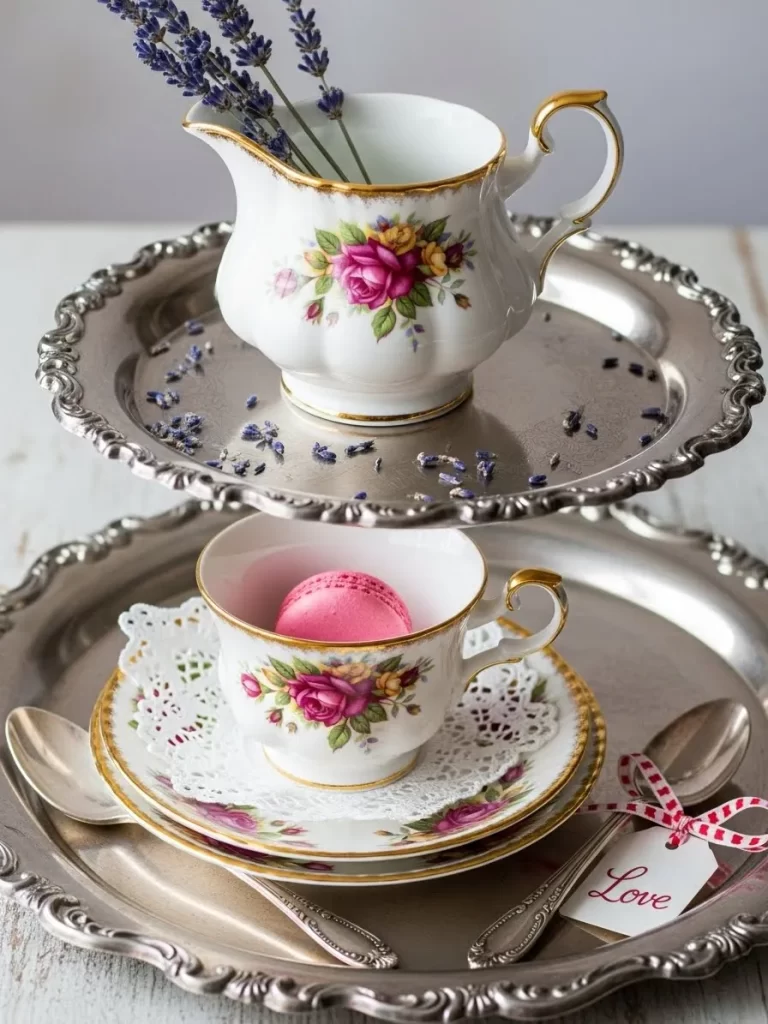
20 Rose Garden Tea Party

Glass trays with delicate white paper doilies create a very feminine and soft look. A vintage teacup with pink rose patterns sits on the top level. A single pink macaron rests on the saucer to suggest a sweet afternoon snack.
The white doilies hang over the edges of the glass to look like lace. This arrangement is light and uses pastel colors to create a romantic garden feel. It is a wonderful choice for a bridal shower or a ladies brunch.
The transparency of the glass keeps the display from looking too heavy. You can use your best china to make this tray feel extra special. It is a timeless design that celebrates the beauty of classic roses.
Material Required List
- Three tier glass stand
- Three large white paper doilies with lace edges
- One floral teacup and matching saucer
- One pink macaron or decorative faux cookie
- One silver teaspoon
Equipment Required List
- None
DIY Instruction Step by Step
- Center a white paper doily on each of the three glass tiers.
- Press the edges of the doilies down so they drape elegantly over the sides.
- Place the saucer on the top tier and set the teacup on top of it.
- Lay the silver teaspoon on the saucer next to the cup.
- Put the pink macaron on the saucer to add a splash of color.
- Ensure the floral pattern on the cup is facing the front.
- Step back and check that the doilies are straight and even on all levels.
21 Golden Love Elegance

Contrast is key in this sophisticated setup. Dark matte trays provide a bold background for shimmering gold accents. A large golden heart sits centered on the middle tier to grab attention immediately.
The top level features a cursive Love sign that adds height and grace. White ceramic hearts are tucked around the base to soften the look. This combination feels expensive and modern for a romantic dinner setting.
Everything about this design screams luxury without being too loud. The gold surfaces catch the light from every angle of the room. You can use this piece to anchor a formal dining table during your Valentine feast.
Material Required List
- One large ceramic heart ornament
- Gold metallic spray paint
- Clear gloss sealer
- Old cardboard box
Equipment Required List
- Pair of disposable gloves
- Soft lint free cloth
DIY Instructions
- Wipe your ceramic heart with a soft cloth to remove all dust and fingerprints.
- Place the heart inside an old cardboard box to protect your workspace from paint.
- Shake the gold spray paint can for at least one minute before you start.
- Hold the can ten inches away from the heart and apply a light even coat.
- Wait twenty minutes for the paint to dry before turning the heart over.
- Spray the other side and let it sit until the surface is no longer sticky.
- Apply a final layer of clear gloss sealer to give the heart a high shine.
- Let the heart cure for a full day before placing it on your black tray.
22 Enclosed Eternal Rose
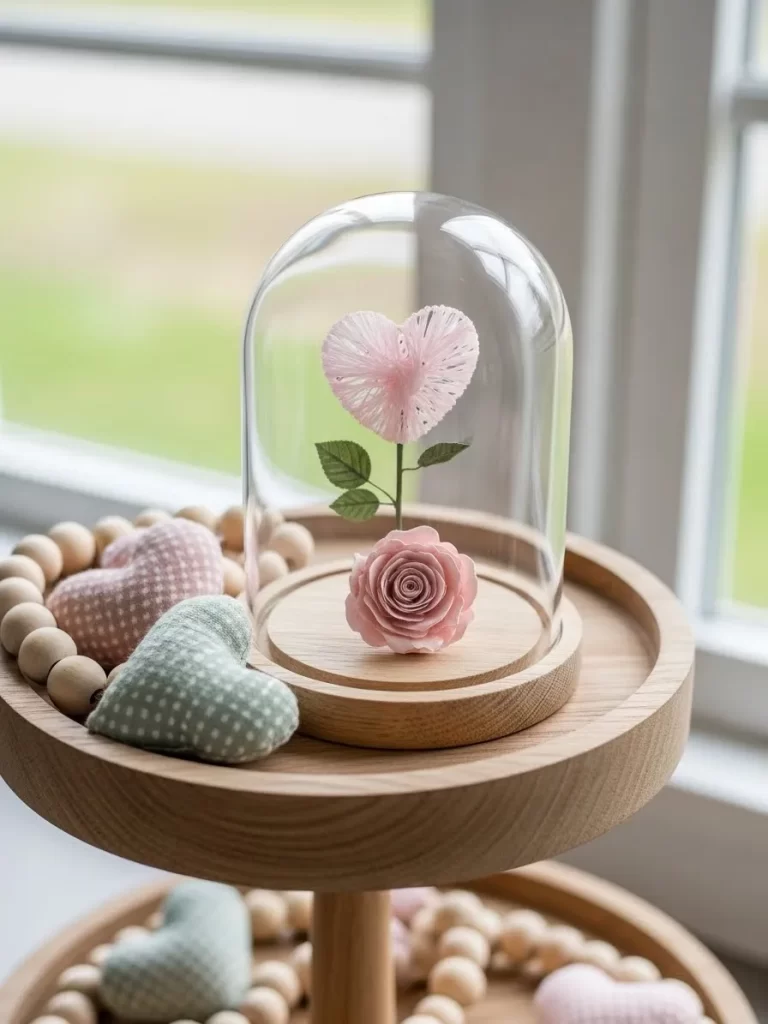
Nature meets art in this delicate glass display. A single pink rose sits at the base of a clear dome. Above it, a heart crafted from fine pink thread appears to float in the air.
Wooden trays offer a warm and organic frame for the fragile glass. Neutral wooden beads wrap around the levels to add a cozy texture. This piece works well on a bedside table or a quiet reading corner.
The transparent dome protects the delicate items while making them look like museum treasures. It creates a sense of wonder that guests will stop to admire. You can customize the thread color to match your specific room decor.
Material Required List
- One clear glass cloche with a wooden base
- Thin pink embroidery floss
- White craft glue
- One small balloon
- Small silk rose
Equipment Required List
- Small bowl for glue
- Safety pin
DIY Instructions
- Blow up a small balloon until it is the size of a lemon and tie the end.
- Mix two parts glue with one part water in a small bowl.
- Soak a long piece of pink thread in the glue mixture until it is fully coated.
- Wrap the wet thread around the balloon in many different directions.
- Leave the balloon to hang in a dry area for twelve hours.
- Pop the balloon with a safety pin once the thread feels hard and stiff.
- Pull the balloon pieces out through a gap in the thread carefully.
- Glue the silk rose to the center of the wooden cloche base.
- Set your thread heart on top of the rose and cover it with the glass dome.
23 Playful Pom Pom Garland
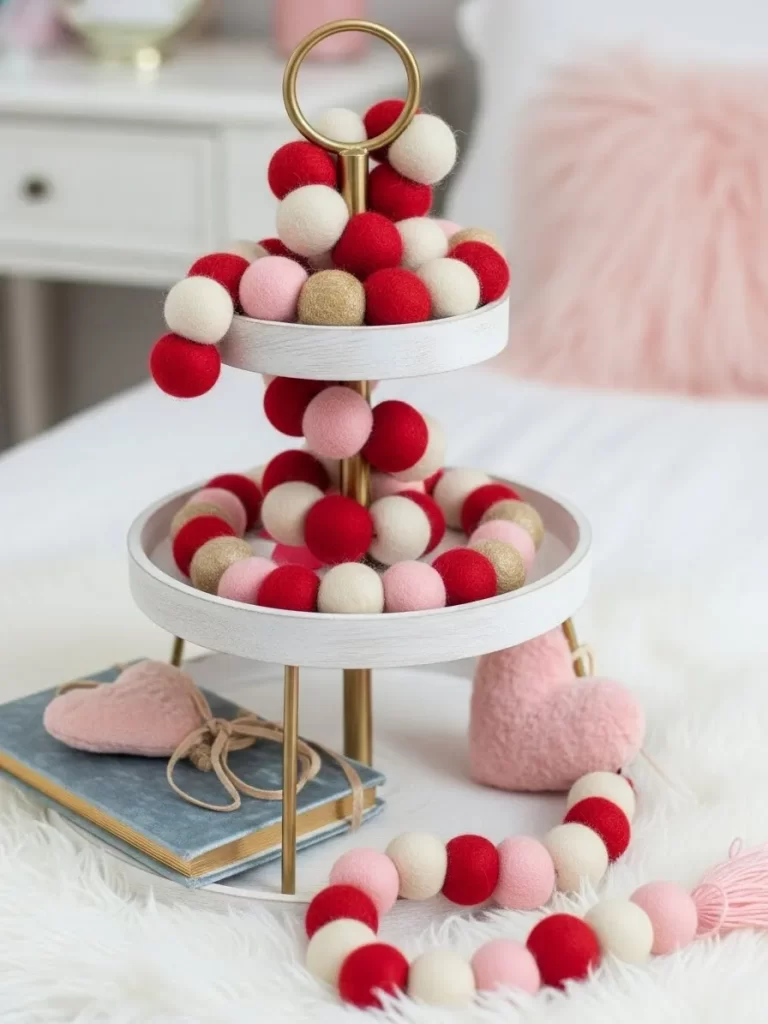
Texture takes center stage with this soft felt arrangement. A long string of red, white, and pink balls winds around the center post. This adds a pop of color to a simple white wooden stand.
Small plush hearts sit on the bottom level to continue the cozy theme. A blue book provides a cool base for the decorations to rest upon. It is a lighthearted design that feels very friendly and approachable.
The round shapes of the felt balls offer a nice contrast to the sharp edges of the tray. This style is excellent for a family home where you want things to feel soft. It brings a youthful energy to your seasonal decorations.
Material Required List
- Twenty felt balls in red, pink, and white
- Thick white embroidery thread
- One large needle
- Two small pink plush hearts
Equipment Required List
- Sharp scissors
- Measuring tape
DIY Instructions
- Measure out four feet of white thread and cut it with your scissors.
- Thread your needle and tie a large knot at the very end of the string.
- Push the needle through the center of a red felt ball.
- Slide the ball all the way down to the knot.
- Repeat this process with the pink and white balls until the string is full.
- Leave three inches of empty thread at each end to help with hanging.
- Tie the ends of the thread around the center pole of your tiered stand.
- Tuck the pink plush hearts into the loops of the garland for extra detail.
24 Succulent Sweetness
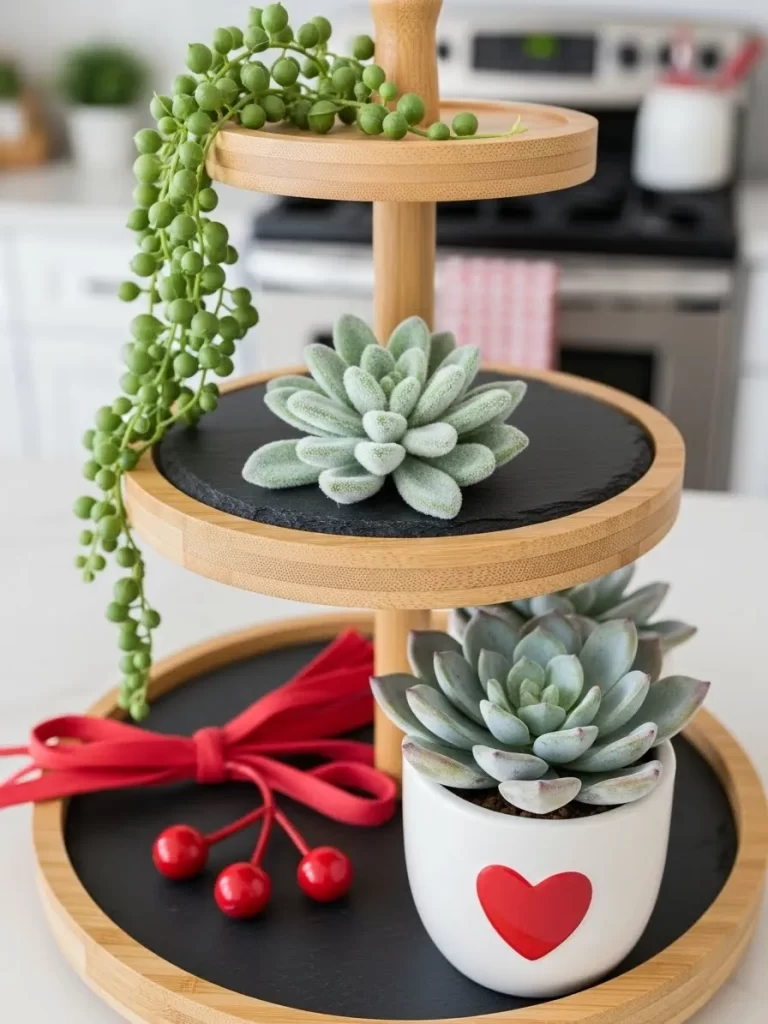
Greenery brings life to this Valentine display. A white mug featuring a red heart holds a healthy succulent on the bottom tier. Another plant sits on a dark slate coaster above to create a layered effect.
Bright red berries and a matching ribbon provide the necessary holiday flair. The natural wood of the stand keeps everything looking fresh and balanced. This is a great way to use year round plants for a seasonal holiday.
The mixture of stone, wood, and living plants creates an earthy atmosphere. It feels calm and provides a nice break from more traditional glittery decor. You will enjoy the splash of green on your counter all through February.
Material Required List
- One white ceramic mug
- Red oil based paint marker
- Small bag of potting soil
- One medium sized succulent plant
- Handful of small white pebbles
Equipment Required List
- Paper towel
- Small spoon
DIY Instructions
- Clean the surface of your mug and dry it with a paper towel.
- Draw a simple red heart on the front of the mug using your paint marker.
- Let the paint dry for thirty minutes so it does not smudge.
- Fill the bottom third of the mug with white pebbles to help with drainage.
- Use a spoon to add potting soil until the mug is half full.
- Place the succulent inside the mug and fill the gaps with more soil.
- Press the soil down gently with your fingers to secure the plant.
- Wipe any dirt off the outside of the mug before setting it on your tray.
25 Marshmallow Hot Cocoa Stack
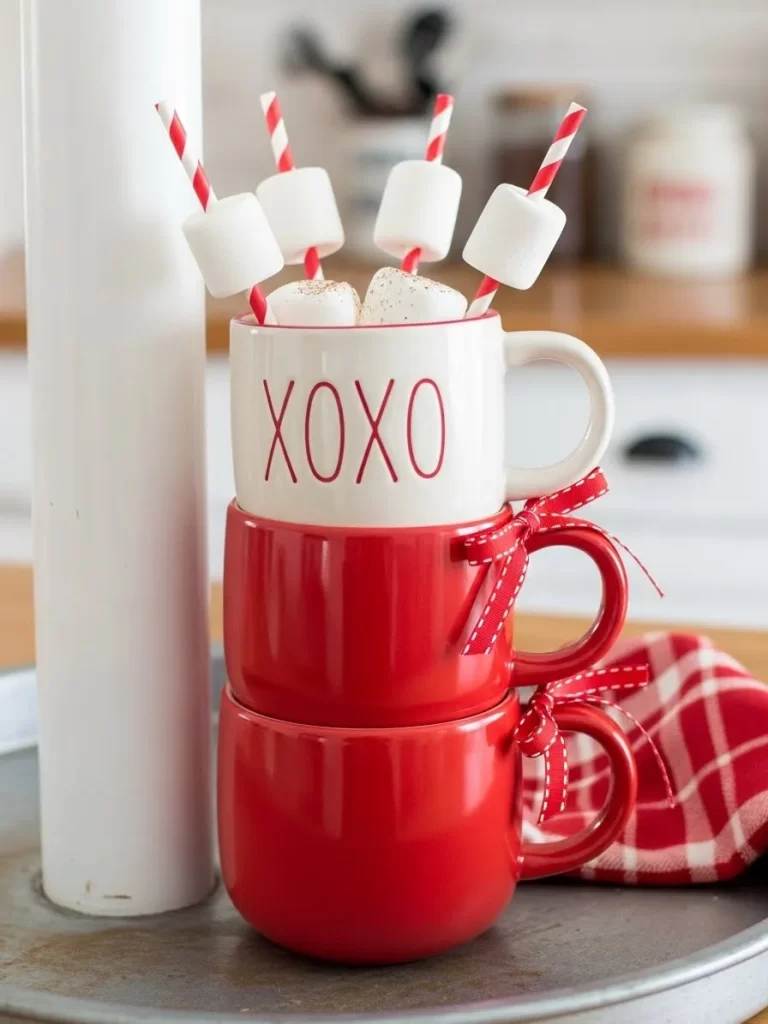
Celebrate the chilly weather with a sweet beverage theme. Three mugs are stacked high to create a vertical focal point. The top white mug features red XOXO text and holds fluffy marshmallows on sticks.
Red mugs below are tied with dainty checkered ribbons for a coordinated look. This setup is excellent for a kitchen counter or a hot cocoa bar. It invites everyone to grab a drink and enjoy a treat together.
The height of the stack makes a bold statement in a small space. Using edible items as part of your decor makes the home feel lived in and cozy. Your kids will especially love this playful and tasty arrangement.
Material Required List
- One white mug with text
- Two plain red mugs
- Two yards of red checkered ribbon
- Five large marshmallows
- Three red and white paper straws
Equipment Required List
- Scissors
- Clear tape
DIY Instructions
- Place your two red mugs on the tray and stack the white mug on top.
- Cut a piece of checkered ribbon long enough to wrap around one mug handle.
- Tie the ribbon into a pretty bow on each of the red mug handles.
- Use your scissors to trim the ends of the bows so they look neat.
- Slide a marshmallow onto the end of each paper straw.
- Use a small piece of tape to secure the straws inside the top mug so they fan out.
- Dust the marshmallows with a little cocoa powder if you want a realistic look.
26 Chalkboard Love Tags

Personalized messages add a custom touch to your decor. A tall white vase is draped with a black tag that spells out Love in white script. A smaller bowl holds a tag marking the date of February 14.
Red and white twine connects the tags to the vessels for a cohesive style. The natural wood tray provides a rustic foundation for these crisp white pieces. You can easily change the words to suit any special occasion.
The black and white contrast looks very clean and professional. It is a simple way to add information or dates to your holiday display. These tags are sturdy and can be reused for many years to come.
Material Required List
- Two pieces of black cardstock paper
- White paint pen or chalk marker
- Red and white baker twine
- One small hole punch
Equipment Required List
- Ruler
- Pencil
DIY Instructions
- Use your ruler and pencil to draw two rectangle shapes on the black paper.
- Cut the rectangles out and trim the top corners to make them look like tags.
- Punch a small hole in the center of the top edge of each tag.
- Write words like Love or Feb 14 on the tags using your white pen.
- Let the ink dry for a few minutes so it does not smear.
- Cut a ten inch piece of baker twine for each tag.
- Loop the twine through the hole and tie the tag around your vase or bowl.
27 Melodic Love Scrolls
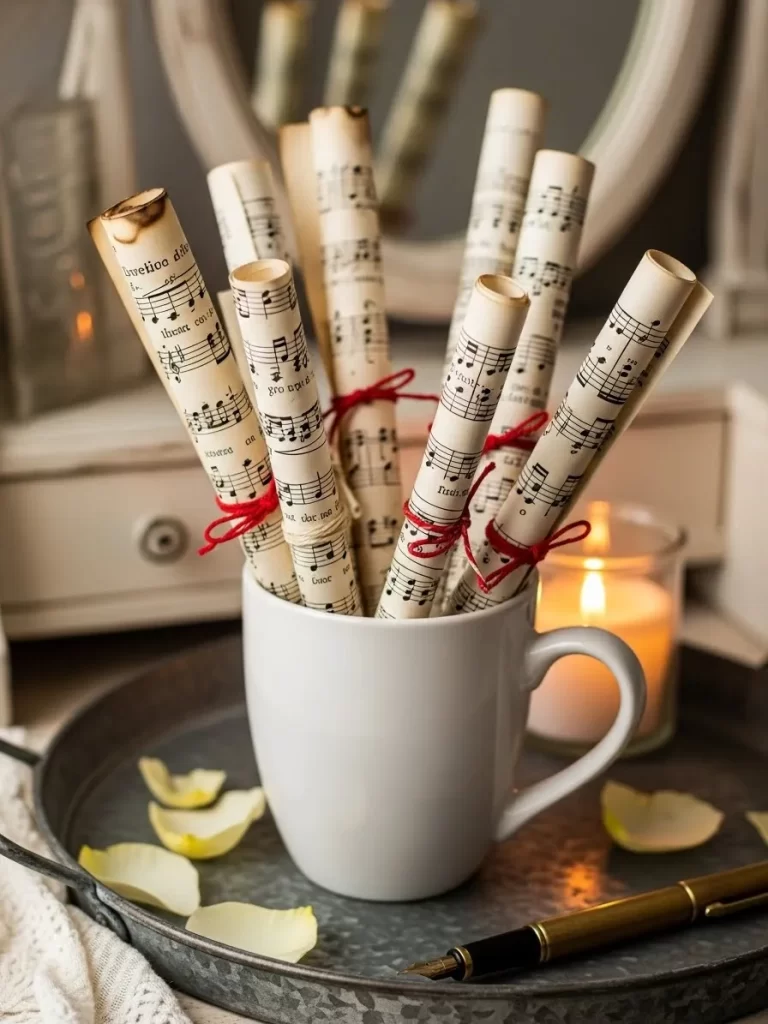
Music lovers will appreciate this vintage inspired arrangement. A white mug serves as a holder for several scrolls made from sheet music. Each roll is tied with a thin red string to keep it secure.
The edges of the paper are slightly singed to give an aged appearance. A gold fountain pen rests on the tray to suggest a letter is being written. This scene evokes a feeling of old world romance and classic beauty.
The soft cream color of the old paper adds a warm glow to your stand. It feels like a piece of history captured in a simple kitchen decoration. You can use your favorite love song lyrics to make this even more special.
Material Required List
- Three sheets of paper with printed music
- Small cup of black tea
- Two feet of thin red string
- White ceramic mug
Equipment Required List
- Sponge brush
- Cookie sheet
- Lighter or matches
DIY Instructions
- Lay your music paper flat on a cookie sheet.
- Use a sponge brush to coat the paper with a layer of black tea.
- Let the paper dry completely until it looks yellow and wrinkled.
- Carefully use a lighter to burn the very edges of the paper for a worn look.
- Blow out any sparks immediately to stay safe.
- Roll the paper up tightly starting from one short side.
- Tie a piece of red string around the middle of the roll to keep it closed.
- Place all three scrolls into your white mug so they stand upright.
28 Cinnamon Scented Bundles
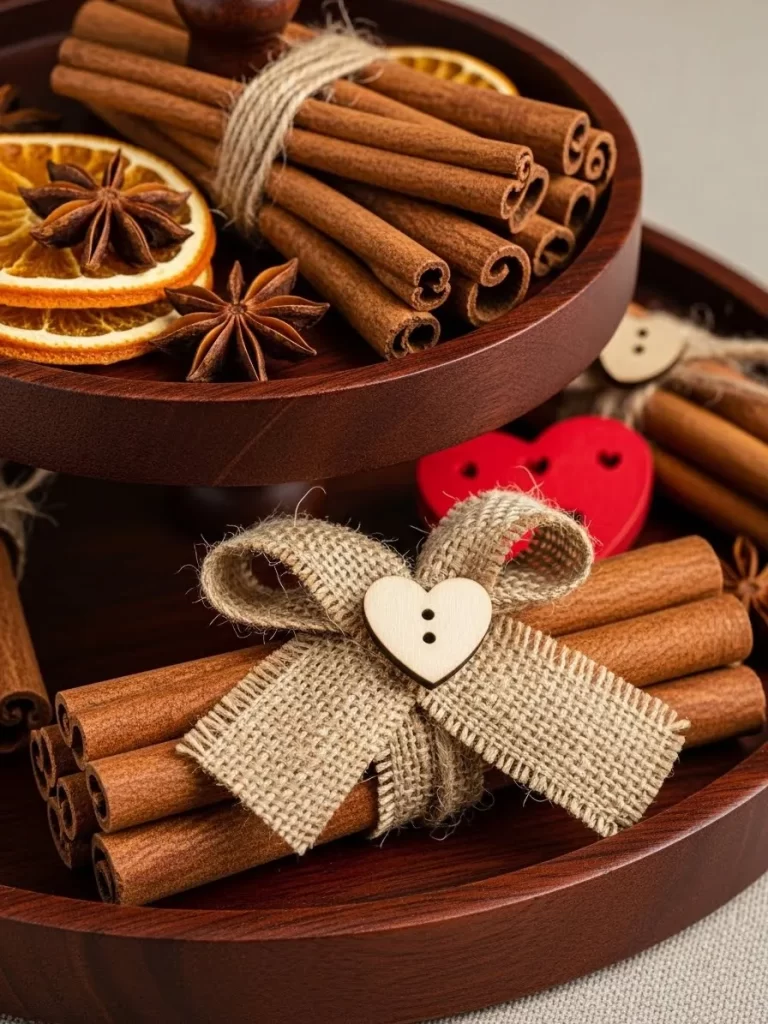
Fragrance and style combine in this warm wooden tray. Bundles of cinnamon sticks are tied together with rough burlap ribbons. A small wooden heart button sits at the center of each bow.
Dried orange slices and star anise are scattered around to add a natural harvest feel. The deep brown wood of the stand enhances the earthy tones of the spices. Your home will smell wonderful while looking incredibly festive.
This arrangement is a treat for the senses. The rough texture of the burlap pairs perfectly with the smooth cinnamon bark. It brings a rustic farmhouse charm to your Valentine celebrations.
Material Required List
- Twelve large cinnamon sticks
- One yard of thin burlap ribbon
- Two wooden heart buttons
- Glue dots or a glue gun
Equipment Required List
- Scissors
DIY Instructions
- Group your cinnamon sticks into two piles of six.
- Hold one pile together and wrap a piece of burlap ribbon around the center.
- Tie the ribbon into a tight knot and then make a small bow.
- Trim the ends of the ribbon with your scissors at an angle.
- Apply a small amount of glue to the back of a wooden heart button.
- Press the button onto the center of the burlap bow.
- Repeat these steps for the second bundle of cinnamon sticks.
- Set the bundles on your tray next to some dried orange slices.
29 Disco Heart Sparkle
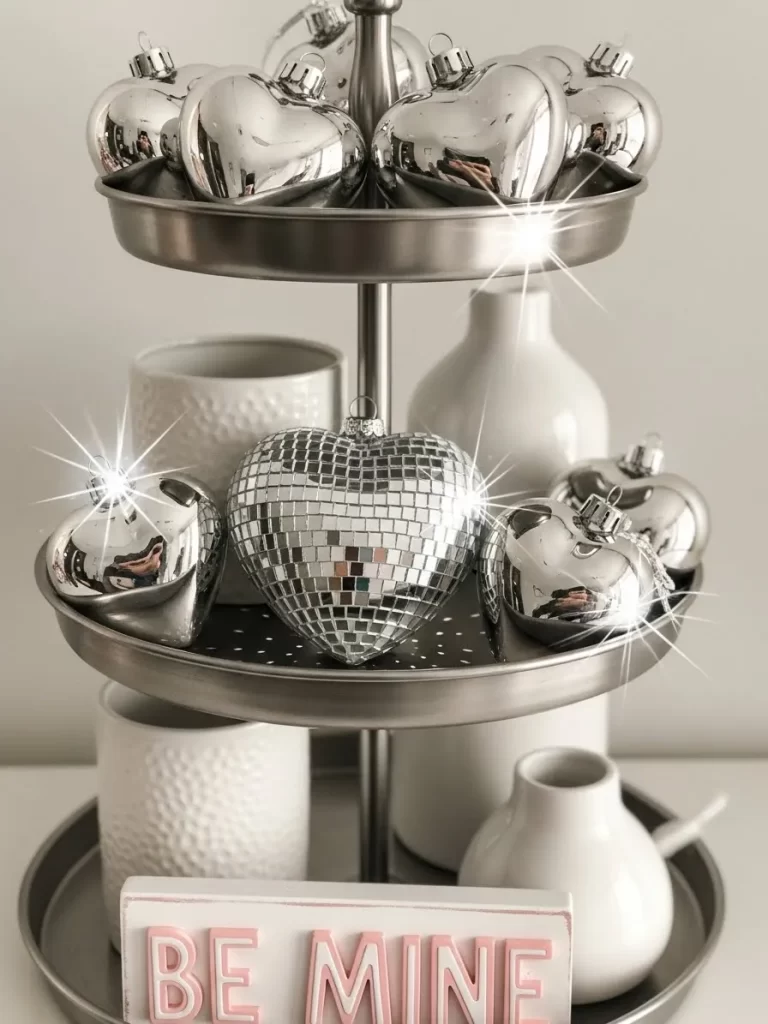
Bring the party to your tray with these reflective disco hearts. A large mirrored heart sits on the middle tier and catches every bit of light. Smaller silver hearts surround it to create a glittering effect.
White ceramic vases provide a neutral background so the silver can truly shine. The metallic stand adds to the high energy and festive mood of the display. This is a fun choice for a New Year or Valentine celebration.
The way the mirrors bounce light around the room is truly stunning. It adds a modern and glamorous touch to an otherwise simple setup. You will feel like dancing every time you walk past this sparkling tray.
Material Required List
- One large foam heart
- One sheet of small self adhesive mirror tiles
- Silver craft wire
Equipment Required List
- Tweezers
- Scissors
DIY Instructions
- Peel a single square mirror tile off the backing sheet using your tweezers.
- Press the tile onto the center of your foam heart.
- Continue adding tiles side by side until the entire front of the heart is covered.
- Cut the tiles with scissors if you need smaller pieces for the curved edges.
- Flip the heart over and cover the back with mirror tiles as well.
- Poke a small hole in the top of the heart with your wire.
- Create a small loop with the wire so you can hang the heart or let it sit.
- Polish the mirrors with a soft cloth to make them extra bright.
30 Warm Berry Glow
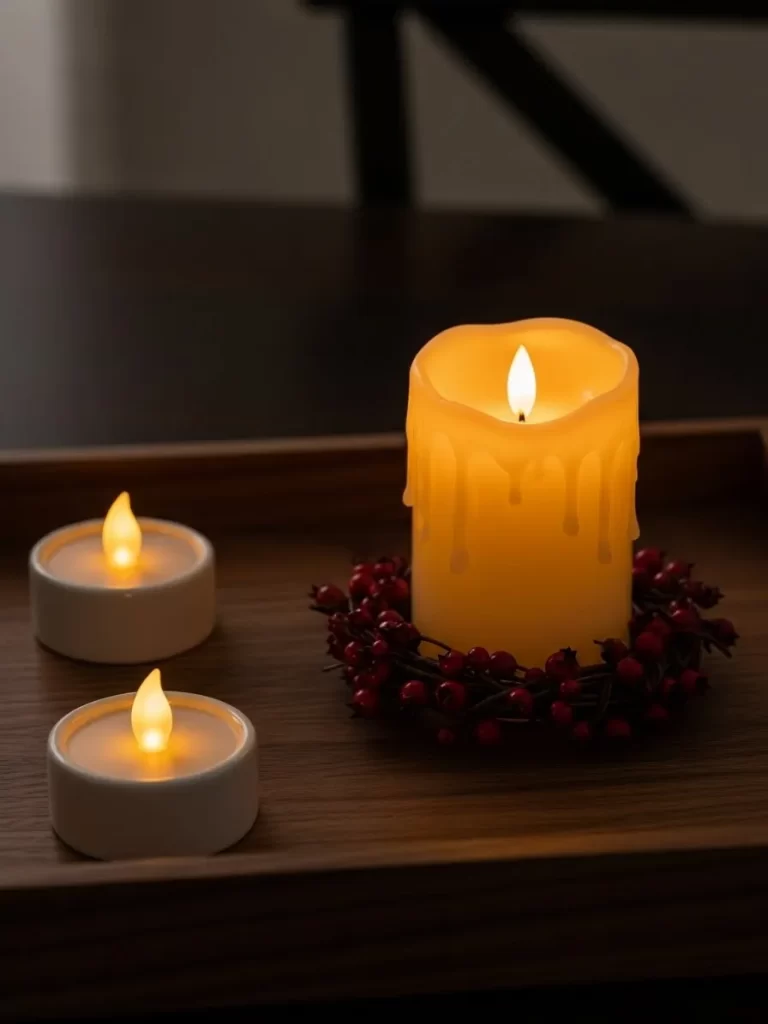
Lighting creates a soothing mood for this simple wood tray. A large LED candle sits inside a small wreath made of red berries. Smaller tea lights are placed nearby to spread the warm glow.
The dripping wax detail on the main candle adds a realistic and cozy touch. This arrangement is safe and beautiful for a coffee table or dining area. It provides a soft light that makes the whole room feel more intimate.
Using battery operated lights means you never have to worry about a flame. The red berries add a pop of holiday color without being overwhelming. It is a peaceful way to end your Valentine Day celebration.
Material Required List
- One large LED pillar candle
- One strand of artificial red berry garland
- Thin brown floral wire
- Two LED tea lights
Equipment Required List
- Wire cutters
DIY Instructions
- Measure the width of your large LED candle using the berry garland.
- Cut the garland so it is two inches longer than the distance around the candle.
- Form the garland into a circle and overlap the ends.
- Wrap a small piece of floral wire around the overlapping ends to hold the shape.
- Fluff the berries so they cover the wire and look full.
- Slide the berry ring over the top of the candle until it sits at the base.
- Place the tea lights on either side of the main candle to create a triangle of light.
31 Baker Accents and Twine
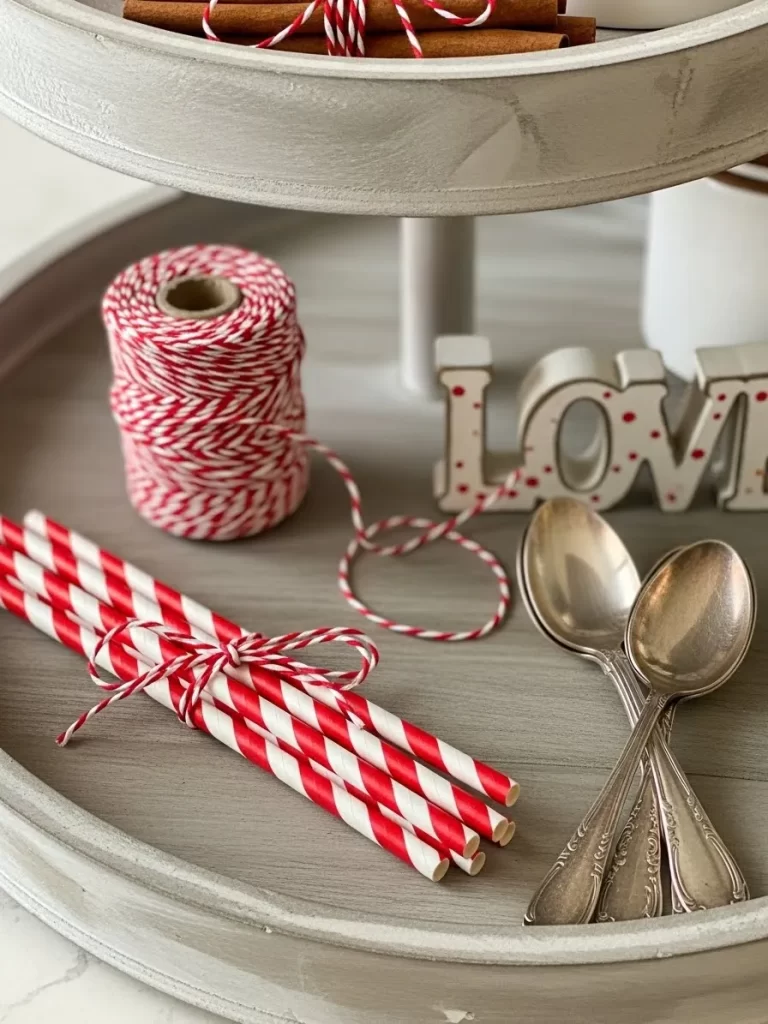
A rustic grey tray provides a neutral backdrop for these vibrant red and white accessories. A large spool of bakers twine sits ready for wrapping gifts or tying tags. You can see a bundle of striped paper straws tied with a neat bow nearby.
Three vintage silver spoons rest on the side to add a touch of antique charm. This arrangement looks excellent on a coffee bar or in a farmhouse kitchen. The repeating patterns of red and white create a cheerful and festive energy.
Every item is chosen to bring a sense of handmade warmth to the display. Using simple craft supplies as decor is a clever and budget friendly way to style your home. Your guests will love the playful and nostalgic feel of these items.
Material Required List
- Ten red and white striped paper straws
- One foot of red and white bakers twine
- Small white cardboard tag
Equipment Required List
- One pair of scissors
- A flat surface
DIY Instructions
- Gather all ten paper straws into a neat circular bundle in your hand.
- Make sure all the straws are level at the top and bottom so they can stand up.
- Wrap the bakers twine around the center of the straw bundle two times.
- Pull the twine tight enough to hold the straws together but do not crush them.
- Tie a simple double knot to secure the string in place.
- Create a pretty bow over the knot using the remaining length of the twine.
- Trim the ends of the bow with your scissors so they are even.
- Slide your small white tag onto one of the bow loops for an extra detail.
32 Heart Waffle Breakfast Tier
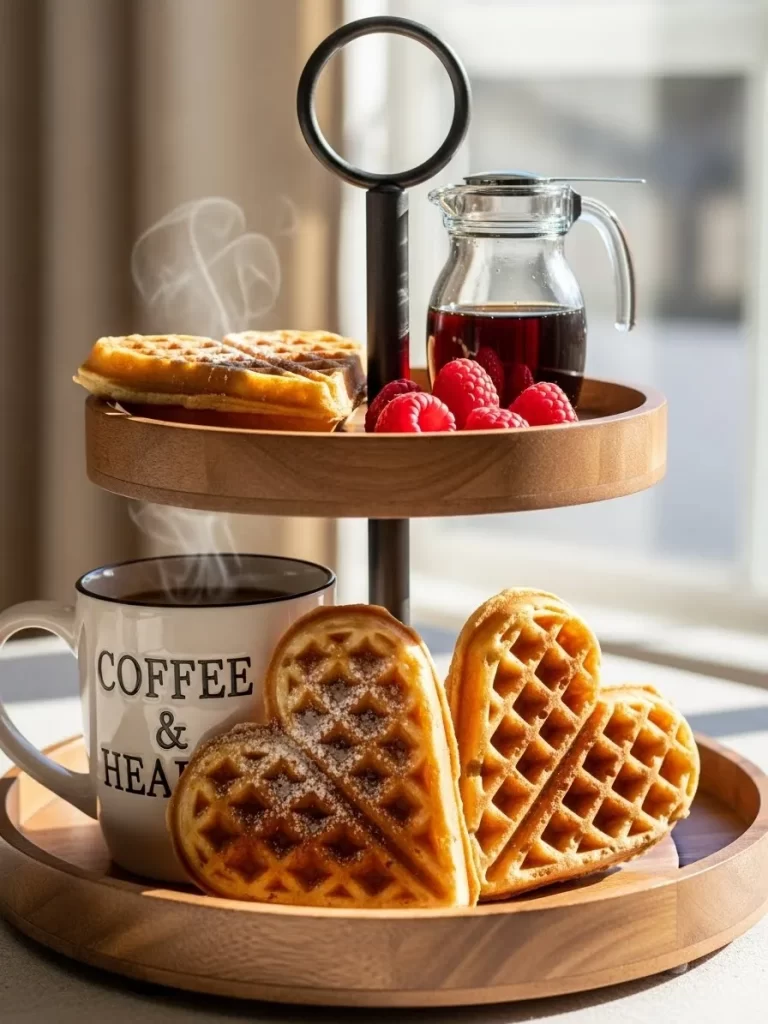
Warm golden waffles in the shape of hearts are the star of this morning display. They sit on a wooden tiered stand alongside a glass pitcher of rich maple syrup. Fresh red raspberries add a pop of color and a burst of flavor to the top level.
A white mug filled with hot coffee stands ready for a relaxing Valentine breakfast. Light steam rises from the cup to create a cozy and inviting scene. This setup is a wonderful way to surprise someone special with a delicious meal.
The natural wood grain of the tray complements the golden tones of the food. Every detail makes the morning feel intentional and full of affection. You can enjoy a quiet moment while the sunlight brightens your dining area.
Material Required List
- Four heart shaped waffles
- One tablespoon of powdered sugar
- Half a cup of fresh raspberries
- Small glass pitcher of maple syrup
Equipment Required List
- One fine mesh sieve or sifter
- A toaster or oven to warm the waffles
DIY Instructions
- Warm your heart shaped waffles in a toaster until they are slightly crisp.
- Place two waffles on the bottom tier of your wooden stand.
- Set the other two waffles on the top tier so they lean against the center post.
- Put the powdered sugar into your mesh sieve.
- Shake the sieve gently over the waffles to create a light dusting of white sugar.
- Scatter the fresh raspberries around the base of the waffles on both levels.
- Place your small pitcher of syrup on the tray next to the waffle stack.
- Serve immediately while the food is still warm and the sugar is visible.
33 Woven Basket Love Notes
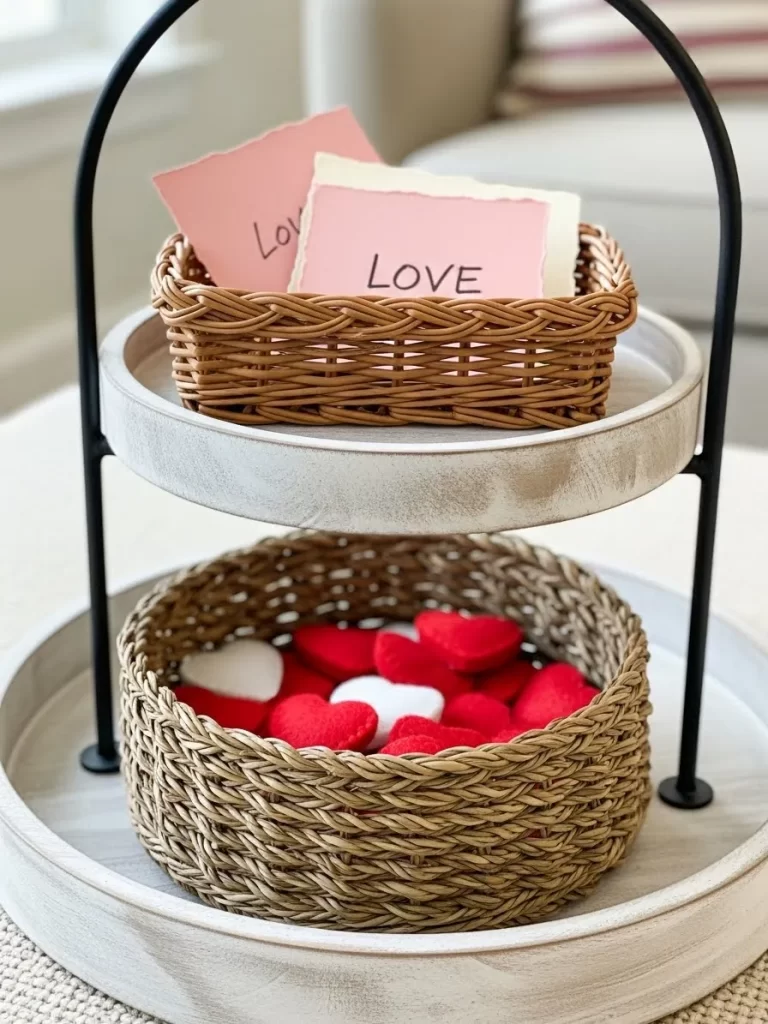
Textured woven baskets sit on a whitewashed wooden stand to hold sweet seasonal surprises. The top basket contains paper cards with the word Love written in simple black ink. These notes offer a charming way to share kind thoughts with your family.
Soft felt hearts in red and white fill the larger basket on the bottom tier. The rough texture of the wicker pairs beautifully with the smooth felt shapes. This arrangement brings a cozy and organic feel to any tabletop or shelf.
Your home will feel much more personal with these handwritten elements. Each piece is easy to handle and move around for a casual look. You can use these baskets to organize small trinkets while staying on theme.
Material Required List
- Five small pieces of heavy cream cardstock
- Five slightly larger pieces of pink paper
- One glue stick
- Black ink pen
Equipment Required List
- One pair of scissors with wavy edges if possible
- A ruler
DIY Instructions
- Cut your pink paper into rectangles that are four inches wide and three inches tall.
- Cut your cream cardstock into smaller rectangles that are three inches wide.
- Use the wavy scissors to give the cream paper a decorative border.
- Apply glue to the back of the cream paper and center it on the pink paper.
- Press the two pieces together firmly so they stay flat.
- Use your black pen to write the word Love in the center of the cream paper.
- Place the finished notes inside your top woven basket so they lean forward.
- Invite your family members to write their own messages on the back of the cards.
34 Pink Confetti Celebration
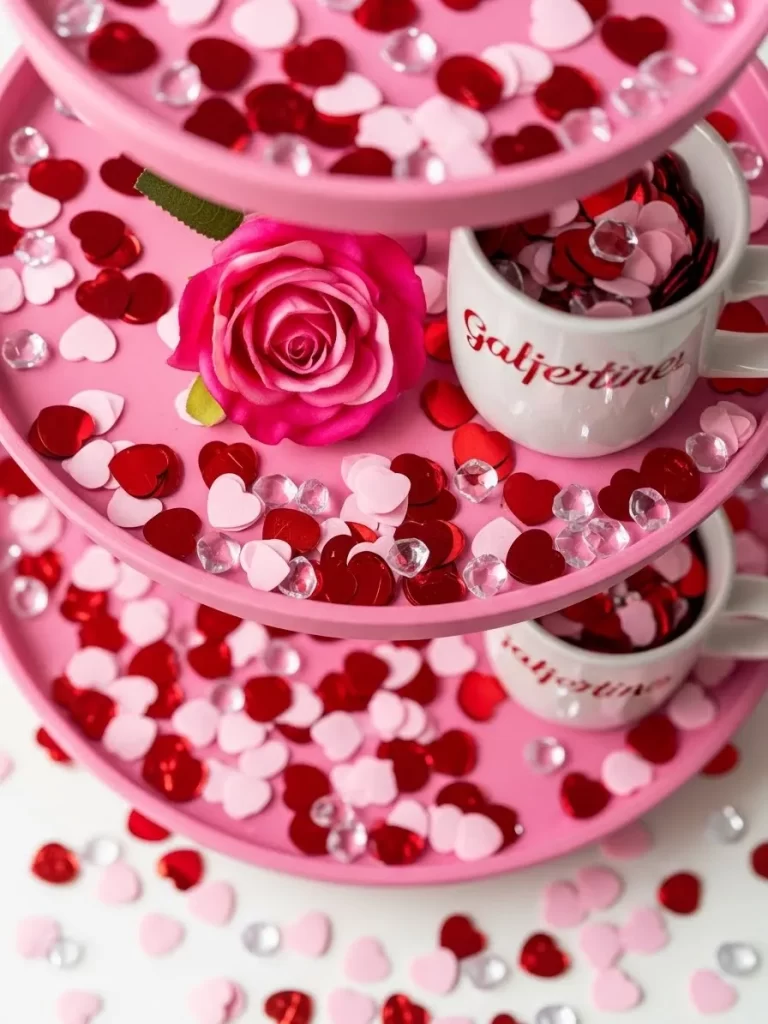
Vibrant pink tiers are covered in a shower of red and pink heart shaped confetti. A single large rose bloom rests on the middle level to add a touch of natural beauty. Small clear crystals are scattered among the hearts to provide a bit of sparkle.
White mugs with red script are tucked into the arrangement for a coordinated look. This display is high energy and celebrates the playful side of Valentine decorations. The bright colors make it a standout piece for a party or a girls brunch.
The layers of hearts create a sense of abundance and joy. You can easily recreate this look by using simple paper cutouts. Every angle of this tray offers something bright and cheerful to look at.
Material Required List
- One bag of red paper heart confetti
- One bag of pink paper heart confetti
- Twenty small clear plastic craft crystals
- One large artificial pink rose head
Equipment Required List
- A small bowl for mixing
DIY Instructions
- Pour the red and pink heart confetti into a small bowl.
- Toss the paper hearts together with your hands until the colors are mixed well.
- Sprinkle the mixed confetti over every level of your pink tiered tray.
- Make sure the hearts cover the bottom of the trays completely.
- Drop the clear crystals randomly over the confetti so they catch the light.
- Place your pink rose head on the middle tier among the hearts.
- Gently blow on the confetti to spread it out into the corners of the stand.
35 Modern Red XOXO Display
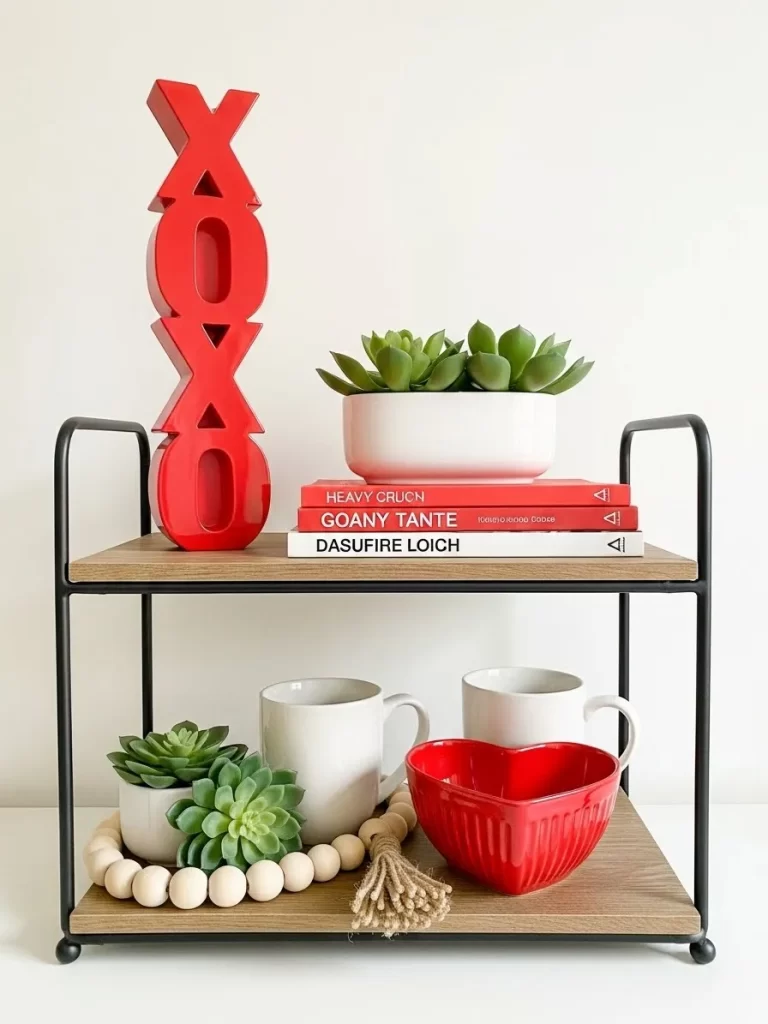
A tall red XOXO sign stands boldly against a clean white wall on this wooden shelf. Below it, a white ceramic bowl holds a lush green succulent to add a fresh element. Stacked books with red and white covers provide a sturdy base for the decorations.
Another small plant in a white pot sits on the bottom tier next to a wooden bead garland. The combination of bright red and natural wood creates a very modern and clean aesthetic. This setup is excellent for an office or a minimalist living room.
The vertical height of the sign draws the eye upward and makes the space feel larger. Using greenery helps balance the bold primary colors of the holiday. Your home will feel updated and stylish with these simple geometric shapes.
Material Required List
- One tall wooden XOXO cutout
- Bright red acrylic paint
- Small bottle of clear matte sealer
- Fine sandpaper
Equipment Required List
- One medium foam paintbrush
- A tray to hold the paint
DIY Instructions
- Rub the sandpaper over the wooden sign to remove any rough spots.
- Wipe the wood with a dry cloth to get rid of the dust.
- Dip your foam brush into the red paint and apply a thin layer to the front.
- Let the first coat dry for thirty minutes before adding a second layer.
- Paint the sides of the letters so the wood is completely covered.
- Wait for the paint to dry fully until it is no longer tacky.
- Brush on a layer of clear sealer to protect the red color from fading.
- Set the sign upright on your top shelf once it is dry to the touch.
36 Silver Tea and Lavender
Shimmering silver trays offer a sophisticated base for a romantic tea service. A floral teacup with pink roses sits on a delicate lace doily on the bottom tier. A small pink macaron rests on the saucer as a sweet treat to enjoy.
The top level holds a white pitcher filled with fragrant lavender stems. Dried lavender buds are scattered across the silver surface to add texture and a calming scent. This arrangement feels very elegant and timeless for a quiet afternoon.
The reflective surfaces of the silver catch the light and add a high end feel. Using lavender provides a unique color alternative to the typical reds and pinks. You can treat yourself to a peaceful moment with this beautiful setup.
Material Required List
- One bunch of dried lavender stems
- Two tablespoons of loose dried lavender buds
- Two white paper lace doilies
- One white ceramic creamer or small pitcher
Equipment Required List
- None
DIY Instructions
- Place a white lace doily on the center of each silver tray level.
- Set your teacup and saucer on the bottom doily.
- Place the small white pitcher on the top doily.
- Trim the lavender stems so they are twice as tall as the pitcher.
- Put the stems into the pitcher so they fan out toward the sides.
- Take a handful of loose lavender buds and sprinkle them around the teacup.
- Add more buds to the top tray to fill the empty silver spaces.
- Enjoy the relaxing aroma that fills the room from the dried flowers.
37 Thread Spool Memories
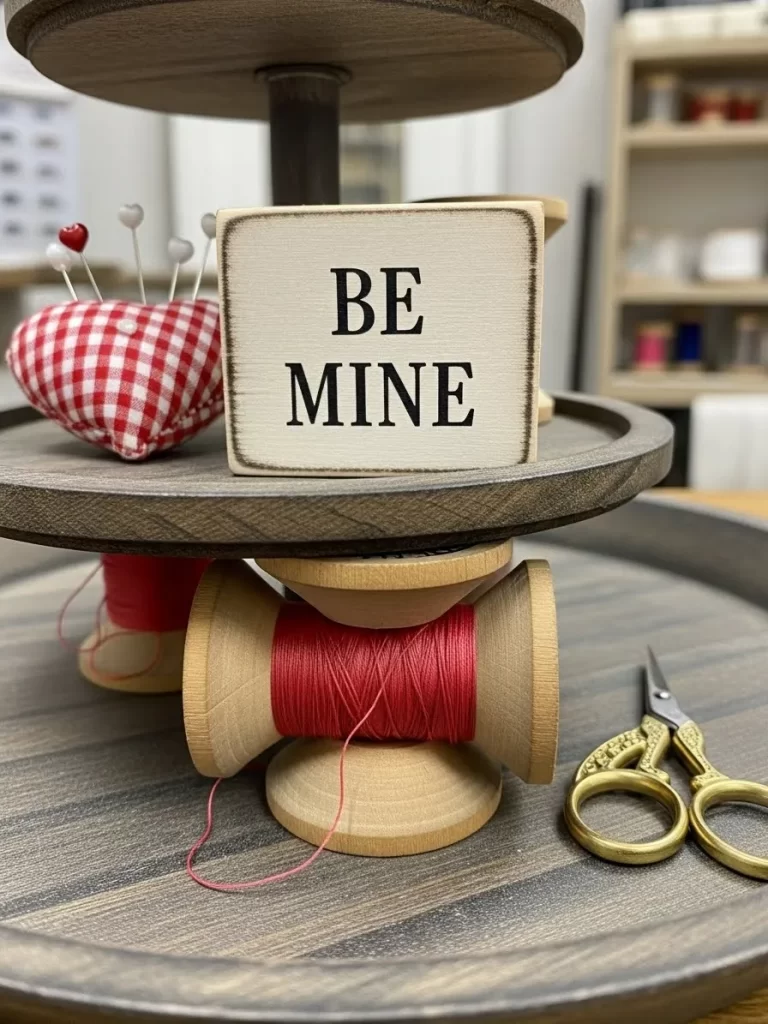
Vintage wooden spools wound with bright red thread bring a nostalgic craft theme to the tray. A white wooden block with the words Be Mine sits atop a spool to create height. A small red and white checkered pin cushion is nearby to hold decorative pins.
Gold handled scissors rest on the dark wood surface to suggest a handmade project in progress. This display celebrates the effort and care that goes into creating love for others. The warm wood tones and rich red thread create a very cozy atmosphere.
The different heights of the spools keep the arrangement visually interesting. Every piece feels like it has a story to tell about past creative projects. You can use family heirlooms to make this display even more meaningful.
Material Required List
- One large empty wooden thread spool
- Three yards of thick red embroidery thread
- Small wooden block painted white
- Black alphabet stickers or a marker
- Clear craft glue
Equipment Required List
- Scissors
DIY Instructions
- Apply the alphabet stickers to the white block to spell out Be Mine.
- Tie the end of the red thread to the center of the wooden spool.
- Wrap the thread around the spool until the wood is completely hidden.
- Secure the end of the thread with a tiny dot of glue.
- Put a generous amount of glue on the top flat surface of the spool.
- Press the white wooden block onto the glue and hold it for one minute.
- Let the glue dry for two hours so the sign is stable.
- Place the finished spool stand on the middle tier of your tray.
38 Ombre Forest Whimsy
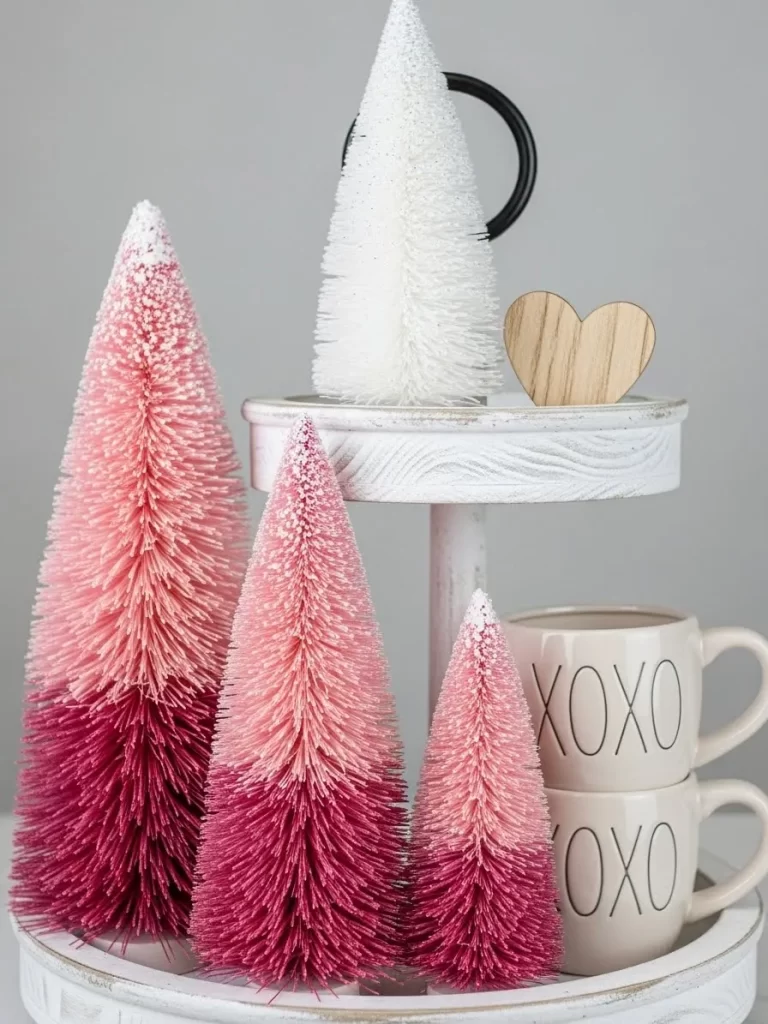
A collection of bottle brush trees in shades of pink and red creates a whimsical miniature forest. The trees vary in height and color density to form a beautiful ombre effect. A simple wooden heart sits on the top tier to tie the theme together.
Stacked mugs with XOXO text provide a solid background for the delicate bristles of the trees. This display is playful and adds a touch of fantasy to your holiday decor. The white wooden tray makes the pink colors look even more vibrant.
The textures of the trees and the smooth ceramic mugs create a nice contrast. Your kids will love looking at this magical little scene in the kitchen. It is a quick and easy way to add a lot of color to a small space.
Material Required List
- Five white bottle brush trees in different sizes
- Pink and red liquid fabric dye
- Three plastic cups
- Paper towels
Equipment Required List
- One pair of tongs
- Warm water
DIY Instructions
- Fill three plastic cups with warm water and add dye to each one.
- Put a small amount of pink dye in the first cup and a lot of pink in the second.
- Use the red dye for the third cup to create a very dark shade.
- Dip one tree into the light pink water using your tongs for ten seconds.
- Place the tree on a paper towel to dry.
- Repeat this with the other trees using the different cups to get various colors.
- Let the trees dry overnight so the colors become permanent.
- Arrange the trees on your tray from lightest to darkest to create the ombre look.
39 Tulip Garden Toppers
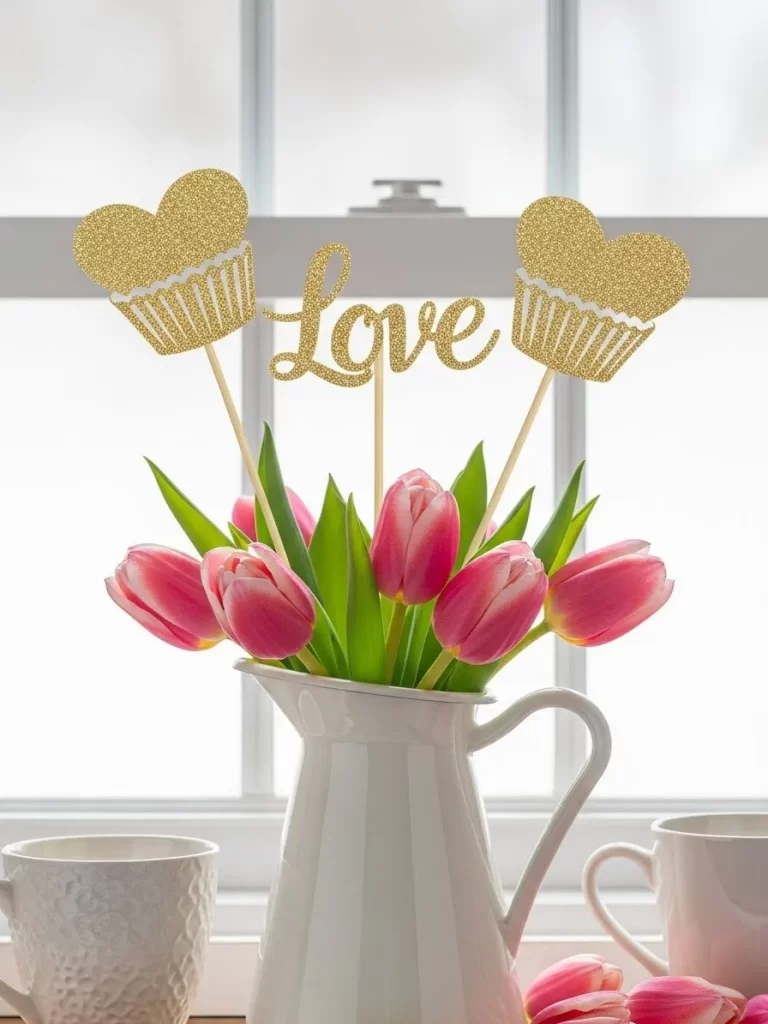
Bright pink tulips are gathered in a white ceramic pitcher to bring a sense of spring indoors. Gold glittery toppers shaped like cupcakes and hearts are tucked into the flowers. These accents add a touch of sparkle and height to the floral arrangement.
A cursive Love sign in gold glitter stands tall in the center of the bouquet. This centerpiece is simple yet makes a very large impact on any table. The combination of fresh flowers and gold glitter feels very celebratory and happy.
The natural green leaves provide a wonderful contrast to the pink petals and gold accents. Every flower helps brighten the room and lift the mood. You can enjoy the fresh scent of the tulips throughout the day.
Material Required List
- Gold glitter cardstock
- Five long wooden BBQ skewers
- Hot glue gun
- Cardboard for a template
Equipment Required List
- One pair of scissors
- A pencil
DIY Instructions
- Draw a heart and a cupcake shape on your cardboard to use as a guide.
- Trace these shapes onto the back of your gold glitter cardstock.
- Cut out ten heart shapes and ten cupcake shapes with your scissors.
- Lay one wooden skewer flat and put a line of hot glue on the top end.
- Press one glitter shape onto the glue.
- Apply glue to the back of a second matching shape and press it onto the other side.
- This covers the top of the stick so the glitter is visible from both sides.
- Slide the finished toppers into your vase of tulips so they sit above the flowers.
40 Strawberry Sweetness Tier
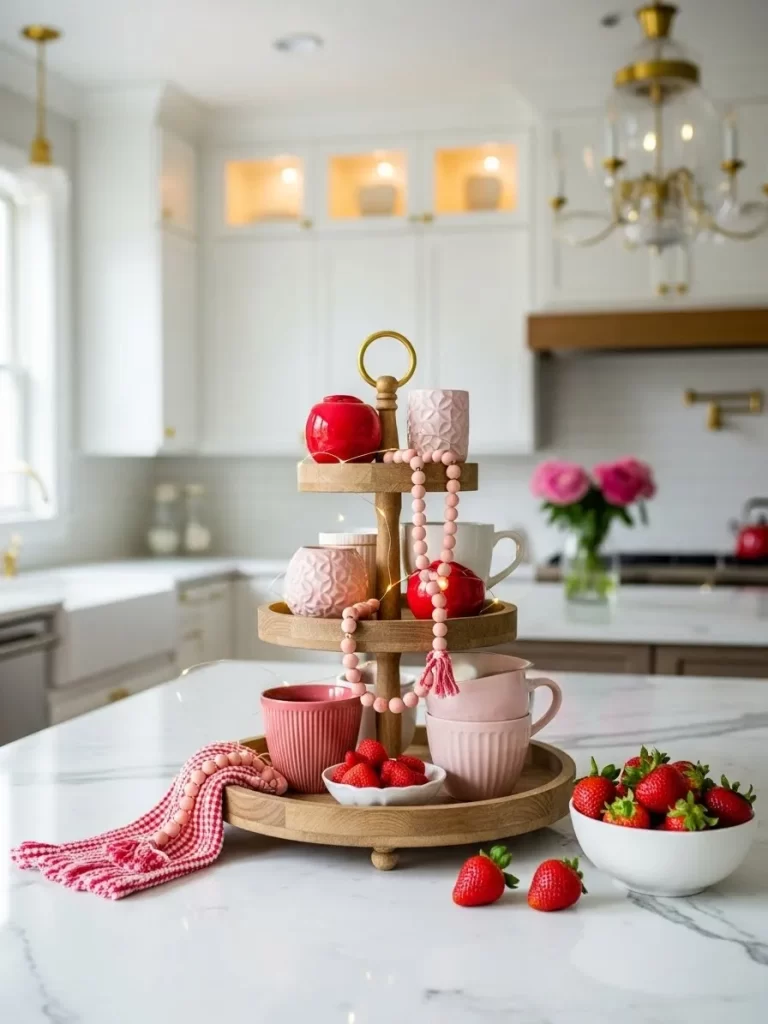
Natural wood tiers are filled with pink mugs and fresh red strawberries for a delicious look. A strand of pink wooden beads with a tassel drapes across the levels to add movement. A bowl of ripe fruit sits on the table base to invite guests to help themselves.
Small pink ceramic vases with geometric patterns are scattered throughout the display. This arrangement is excellent for a kitchen island or a dining room buffet. The light wood and soft pink tones create a very airy and fresh feeling.
Your kitchen will feel ready for a celebration with these sweet treats on display. Every item is easy to grab and enjoy during a casual get together. You can add fairy lights to the tiers for an extra touch of magic in the evening.
Material Required List
- Twenty medium wooden beads
- One bottle of light pink craft paint
- Three yards of pink yarn
- Strong cotton string
Equipment Required List
- One large needle
- Scissors
DIY Instructions
- Paint all your wooden beads with the light pink paint and let them dry.
- Thread your cotton string through the large needle.
- Slide the pink beads onto the string until it is about two feet long.
- Wrap your pink yarn around your hand thirty times to start the tassel.
- Slide the yarn off your hand and tie a small string through the top loop.
- Wrap another piece of yarn around the top of the bundle to create a head.
- Cut the bottom loops of the yarn to create the tassel fringe.
- Tie the tassel to the end of your bead string and drape the garland over your tray.
Key Takeaways
1 Layer different heights to create visual interest across all levels of your tray.
2 Use a consistent color palette to ensure the various items look cohesive and intentional.
3 Combine hard surfaces like ceramic with soft elements like felt or fabric for balance.
4 Incorporate greenery or natural wood to keep the display looking fresh and organic.
5 Personalize your arrangement with handwritten notes or family heirlooms for a unique touch.
Filling your tiered tray is an ongoing process of creativity and personal expression. You now have a complete toolkit of forty diverse styles to brighten your living space. Each arrangement offers a unique perspective on the season of love through colors and textures.
Mixing store bought finds with DIY projects ensures your display feels authentic and warm. Your home will benefit from these small touches of personality and festive spirit. Remember that there are no strict rules when it comes to styling your own space.
Gather your favorite mugs, ribbons, and greenery to start your decorating journey today. You will find joy in the simple act of arranging these charming Valentines accents. May your home be filled with light and love throughout this special holiday.