Valentine Day often brings to mind simple bouquets that wilt within a week. Most people want something more meaningful for their loved ones this year. You can choose a gift that stays beautiful for months or even years. This list features forty creative ways to celebrate love through lasting floral art.

Traditional roses are lovely but they eventually fade away far too soon. Modern preserved flowers and silk alternatives offer a fresh perspective on romance. These designs use unique containers and artistic techniques to stand out. Every item on this list aims to spark joy without the need for constant care.
Starting a DIY project allows you to add a personal touch to your gift. You do not need professional skills to build these stunning pieces. Detailed guides help you through every step of the process. Your home will feel more vibrant with these long lasting floral treasures.
1 Midnight Ember Preserved Roses
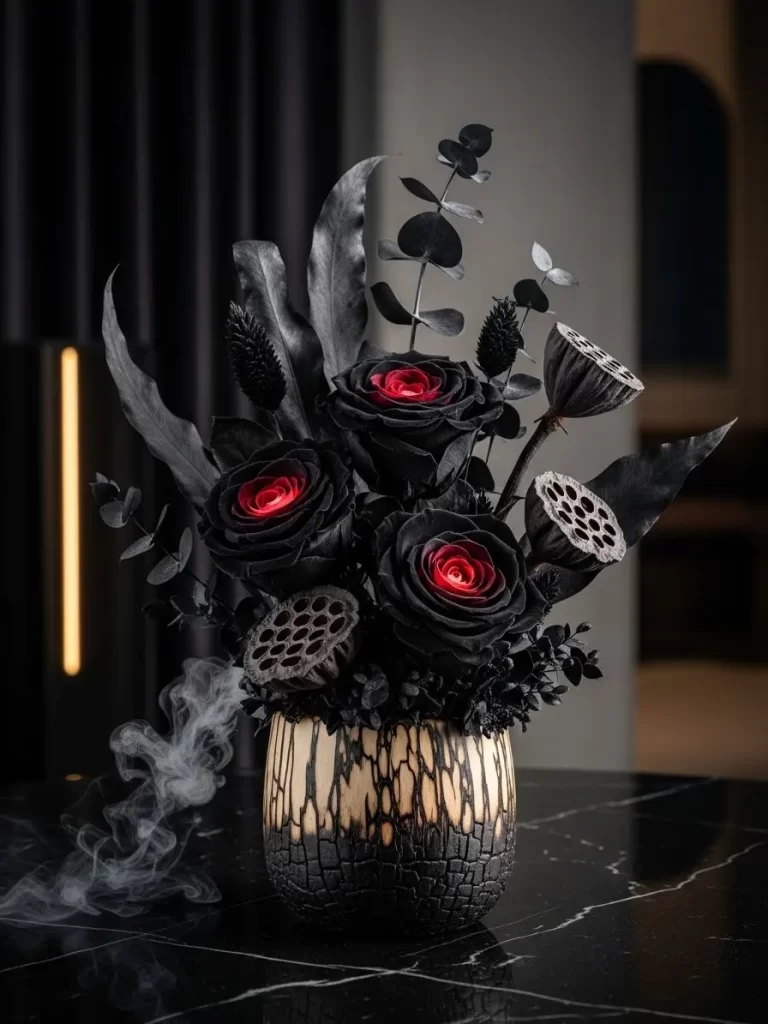
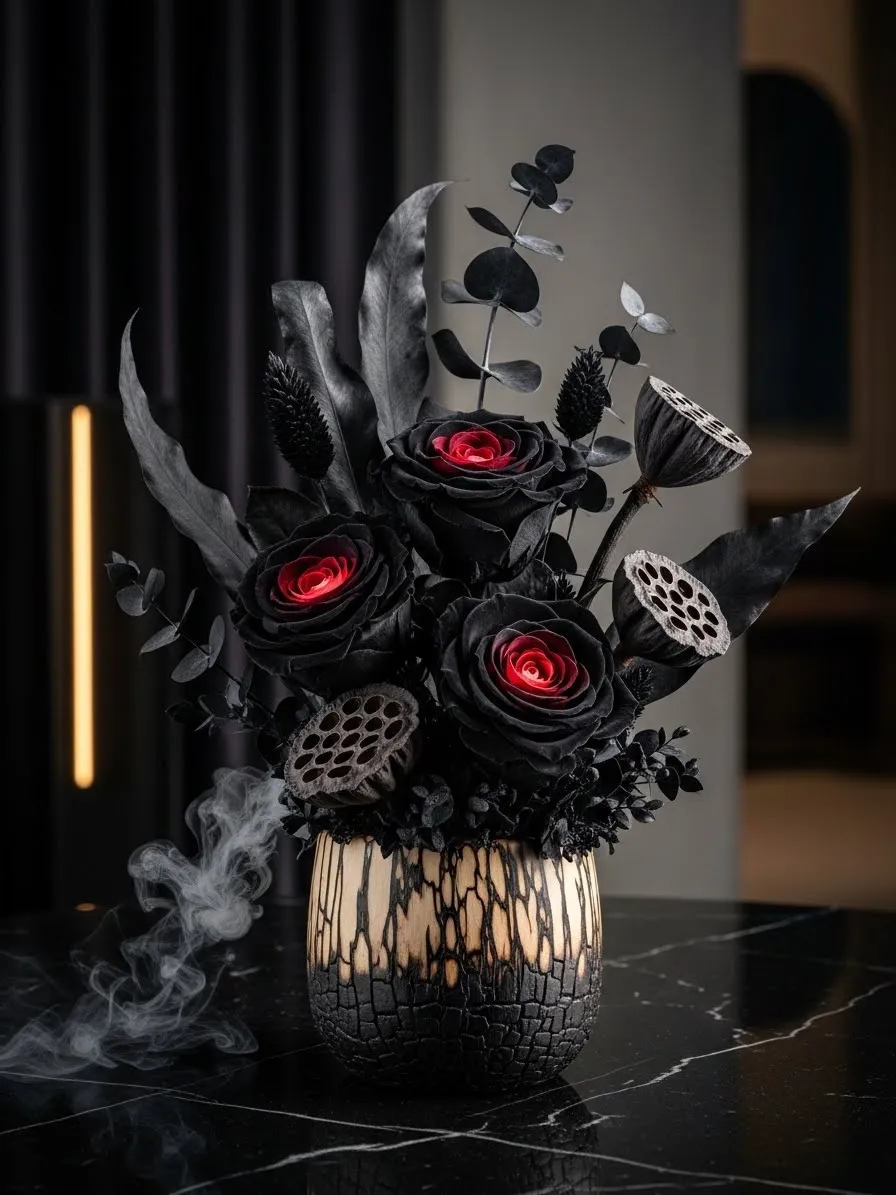
Deep black roses glow with a fiery crimson heart in this striking display. Architectural feels emerge from the dried eucalyptus leaves and textured lotus pods. These dark tones create a sophisticated look that breaks away from traditional bright bouquets.
Natural grains and charred textures ground the arrangement via a rustic wooden vase. Preservation ensures every element remains beautiful for years to come. Bold seekers will love this alternative to standard floral designs. Guests will notice this edgy centerpiece on any table.
Material Required List
- Preserved black roses with red centers
- Dried lotus pods
- Black preserved eucalyptus stems
- Textured wooden vase
- Floral foam
- Black dried filler grass
Equipment Required List
- Floral scissors
- Wire cutters
- Wooden skewers
DIY Instructions
- Trim the floral foam with your scissors so it fits tightly inside the wooden vase.
- Press the foam down until it sits just below the top rim of the container.
- Cut the rose stems to your desired height using the wire cutters.
- Insert the black roses into the middle of the foam block in a cluster.
- Push the eucalyptus stems into the back of the foam to create height.
- Mount the lotus pods onto wooden skewers if the stems are too short.
- Place the pods around the roses to add a unique texture to the base.
- Tuck the black filler grass into any visible holes to hide the foam.
- Inspect the arrangement from all angles to ensure the shape looks balanced.
2 Floating Alabaster Bloom Cloud
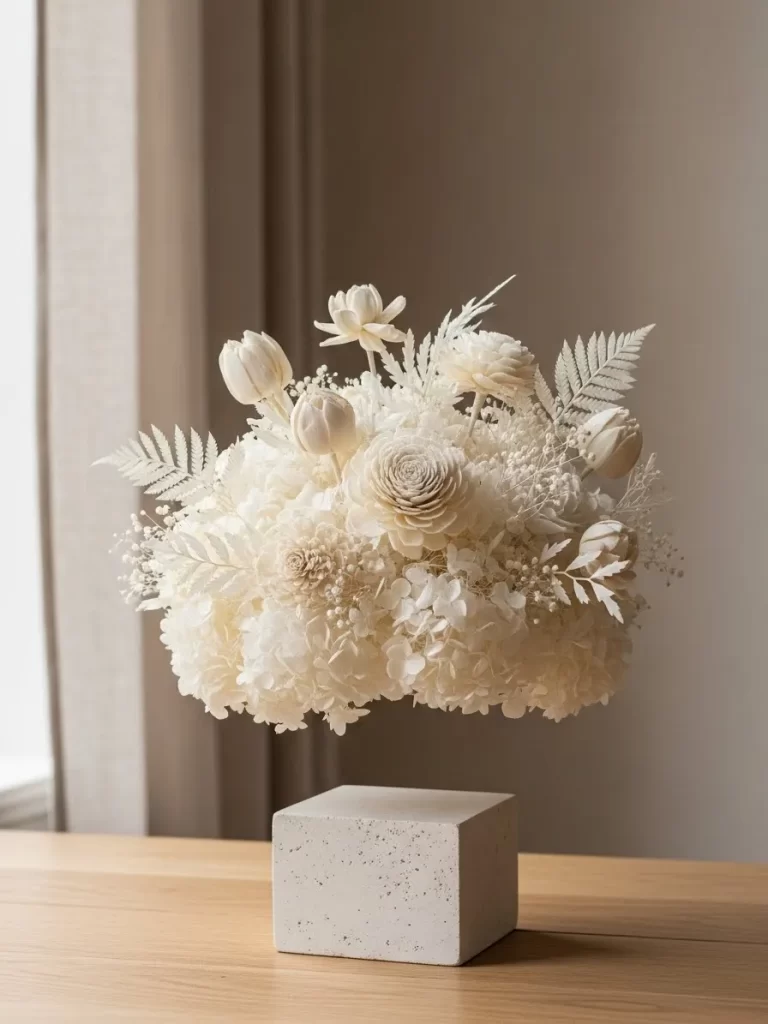
Preserved white hydrangea stems gather in a soft mass to form this airy centerpiece. A clear support rod creates the illusion that the flowers hover above the table. This contrast between light petals and the heavy concrete base makes a bold statement. Your guests will love the minimalist look of this modern design.
Maintenance is unnecessary because these flowers stay soft for a long time. The concrete block provides a solid anchor that keeps the arrangement steady. It fits well in a brightly lit room with clean lines. You can enjoy organic textures without worrying about wilting or watering.
Material Required List
- White preserved hydrangea heads
- Sola wood roses
- Dried white fern leaves
- Clear acrylic rod
- Small round floral foam ball
- Square concrete block
- Clear construction adhesive
Equipment Required List
- Hot glue gun
- Glue sticks
- Sharp scissors
DIY Instructions
- Wipe the top of the concrete block with a cloth to remove dust.
- Apply a large bead of clear adhesive to the center of the block.
- Stand the clear rod in the glue and hold it until the bond is firm.
- Push the floral foam ball onto the top end of the rod.
- Apply a drop of hot glue to the foam so it does not spin.
- Cut the hydrangea stems into small clusters about two inches long.
- Insert the stems into the foam ball until the surface is covered.
- Glue a few sola wood roses to the top for different textures.
- Tuck white fern leaves into the gaps to add a whimsical feeling.
- Verify that the rod is hidden behind the hanging flowers for the effect.
3 Copper Geometric Succulent Haven
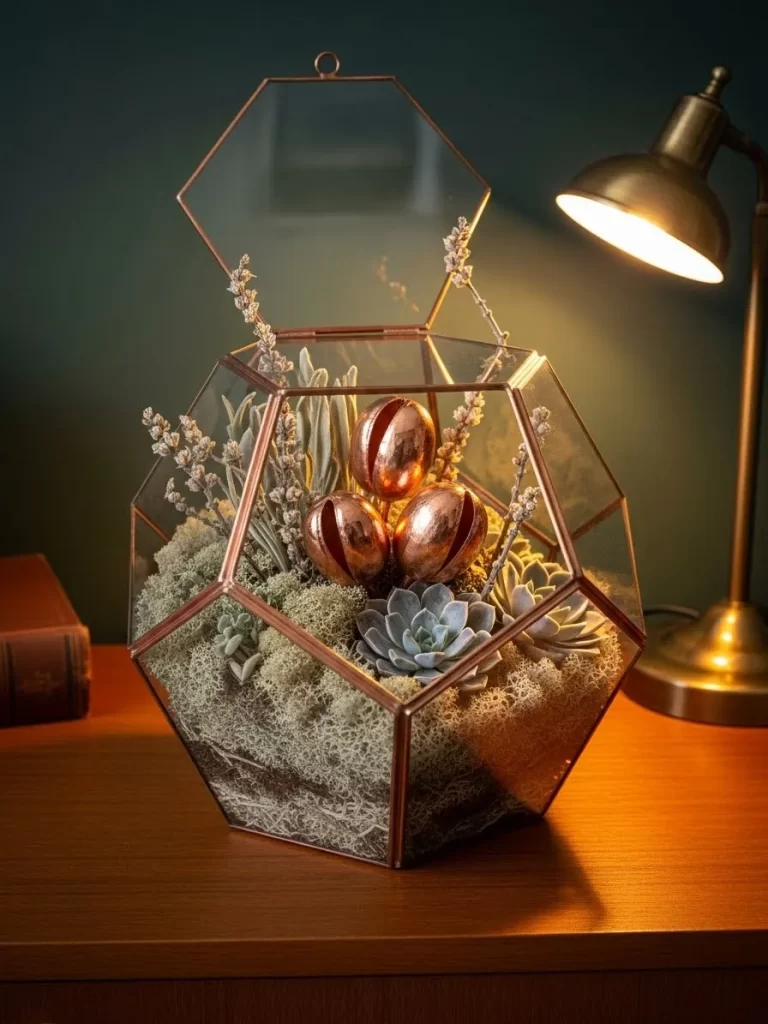
Warm metallic tones meet natural greenery in this striking glass terrarium. A hexagonal copper frame houses several realistic succulents nestled on a bed of soft moss. Three copper seed pods rise from the center to act as bold sculptural accents. Glass panels reflect light to create a cozy glow on your shelf.
Greenery stays vibrant in this arrangement without any need for soil or sunlight. This design works well for someone who wants the look of a garden with zero effort. The copper finish adds a touch of industrial elegance to the organic plants. Every element is secured to stay in place even if you move the container.
Material Required List
- Hexagonal glass terrarium with copper edges
- Preserved reindeer moss
- Assorted artificial succulents
- Dried seed pods
- Copper metallic spray paint
- Small pebbles
Equipment Required List
- Long tweezers
- Hot glue gun
- Small paintbrush
DIY Instructions
- Spray the dried seed pods with copper paint and let them dry.
- Pour a thin layer of pebbles into the bottom of the terrarium.
- Place a thick layer of green moss over the stones for a soft base.
- Arrange your largest succulent in the front corner using the tweezers.
- Nestle smaller succulents around the main plant to fill the space.
- Put a small dab of hot glue on the bottom of each painted pod.
- Stick the copper pods into the moss so they stand upright.
- Use a dry paintbrush to sweep away loose moss from the glass walls.
- Adjust the plants until you are happy with the visual balance.
4 Vintage Botanical Specimen Frame
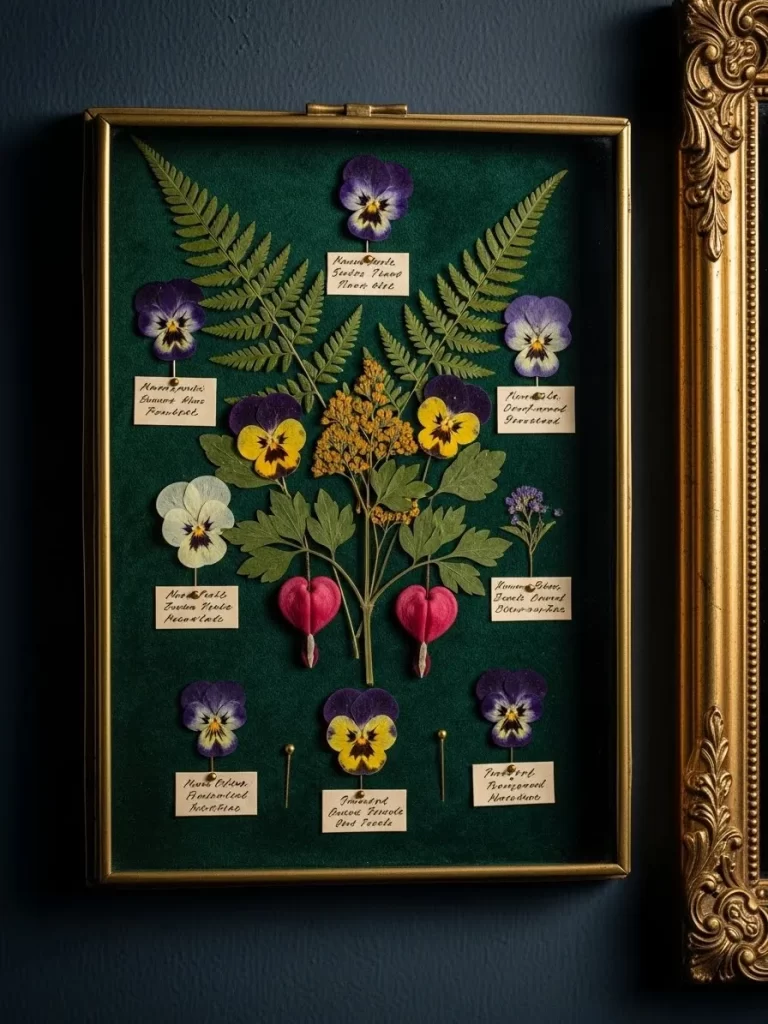
Delicate pansies and reaching ferns decorate this elegant vintage style frame. Pressed flowers sit on a deep green velvet background to create a royal look. Every specimen is carefully flattened to keep the vivid purple and yellow colors. Tiny paper labels give the piece a scientific feel similar to a museum collection.
Display this botanical art on a dark wall to make the colors stand out. Intricate patterns in the fern leaves show the true beauty of nature. The gold frame adds a touch of luxury to the simple pressed plants. This timeless gift will never fade away or lose its charm over the years.
Material Required List
- Gold metal picture frame with glass
- Dark green velvet fabric
- Assorted pressed pansies
- Pressed bleeding heart flowers
- Dried fern fronds
- Small pieces of cream cardstock
- Acid free glue
Equipment Required List
- Tweezers
- Fine tip black pen
- Scissors
DIY Instructions
- Cut the green velvet fabric to fit the dimensions of your frame backing.
- Glue the fabric to the backing board and wait for it to dry.
- Position the large fern fronds at the top to create a green background.
- Use tweezers to place the pansies in a balanced layout across the velvet.
- Put the red bleeding heart flowers in the lower center for a focal point.
- Write fake botanical names on the cardstock pieces using your pen.
- Apply tiny drops of glue to the back of each flower and leaf.
- Press the plants firmly onto the velvet so they do not slide.
- Glue the labels next to each plant to complete the specimen look.
- Place the glass over the arrangement and secure the frame clips.
5 Golden Majesty Protea Pillar
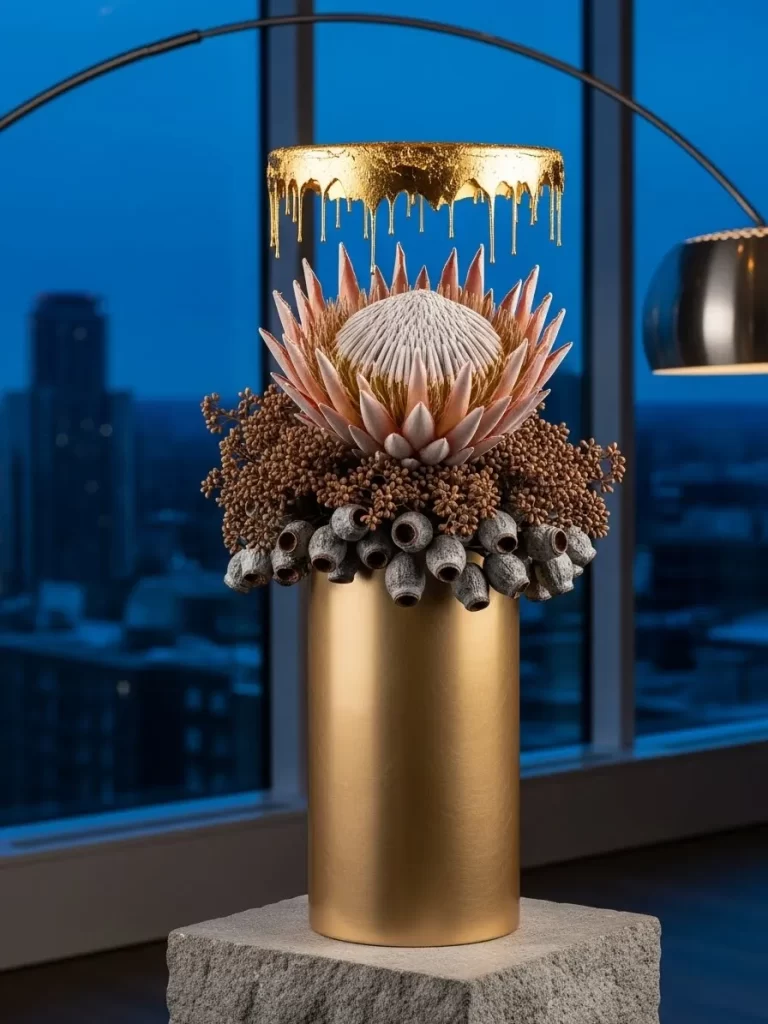
Bold shapes and metallic finishes define this high fashion floral centerpiece. A large king protea sits at the summit of a tall gold cylinder vase. Rich brown berries and silver pods circle the base of the bloom for texture. Above the flower, a dripping gold halo creates a sense of movement.
Modern homes will benefit from the architectural strength of this unique piece. Textured elements provide a nice balance to the smooth metal surface. This arrangement works well as a statement piece in a hallway or entryway. Your friends will notice the creative use of height and metallic shine.
Material Required List
- Large dried king protea flower
- Dried eucalyptus pods
- Dried pepper berries
- Gold metal cylinder vase
- Circular gold metal ring
- Metallic gold paint
- Floral foam block
Equipment Required List
- Heavy duty wire cutters
- Hot glue gun
- Sturdy floral wire
DIY Instructions
- Trim the floral foam so it fits tightly inside the gold vase.
- Rub a little bit of gold paint onto the tips of the protea petals.
- Cut the protea stem and push it into the middle of the foam.
- Glue the eucalyptus pods around the edge of the vase to hide the foam.
- Layer the brown pepper berries over the pods to add more depth.
- Cut three pieces of thick wire to a length of six inches.
- Dip the gold metal ring into paint to create a dripping halo effect.
- Attach the three wires to the ring and insert them into the foam.
- Position the halo so it sits about two inches above the flower.
6 Celestial Blue Rose Sphere
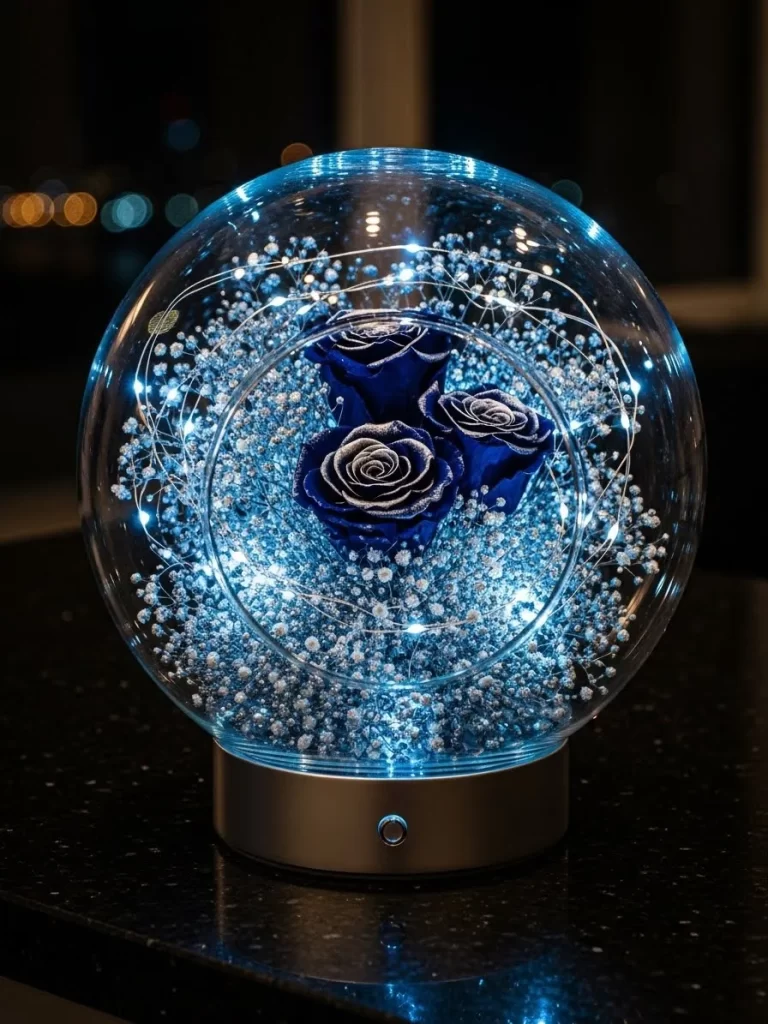
Shimmering navy roses glow inside this enchanted glass sphere. Deep blue petals feature silver glitter to mimic a frosty winter night. Tiny white flowers fill the space around the roses like a cloud of stars. A silver base holds the globe steady while providing a soft internal light.
The internal glow makes this arrangement a wonderful night light for a bedroom. Light reflects off the glass to create a magical atmosphere. This item requires no care other than an occasional dusting of the glass surface. Give this to someone who loves fantasy or celestial themes for Valentine’s Day.
Material Required List
- Three preserved blue roses
- Dried white baby’s breath flowers
- Large glass globe with a bottom opening
- LED lighted silver base
- Silver glitter spray
Equipment Required List
- Long tweezers
- Hot glue gun
- Scissors
DIY Instructions
- Spray the blue roses lightly with glitter and let them dry.
- Apply a small dot of hot glue to the bottom of the rose stems.
- Use the tweezers to stand the roses on the center of the base.
- Hold each flower for a moment until the glue hardens.
- Cut the baby’s breath into very small bunches using your scissors.
- Pack the white flowers around the base of the roses until it is full.
- Ensure the flowers do not block the LED bulbs on the silver base.
- Clean the inside of the glass globe with a soft cloth.
- Lower the globe over the roses and rest it on the silver rim.
- Flip the power switch to see the blue roses shine from within.
7 Rustic Harvest Citrus Medley
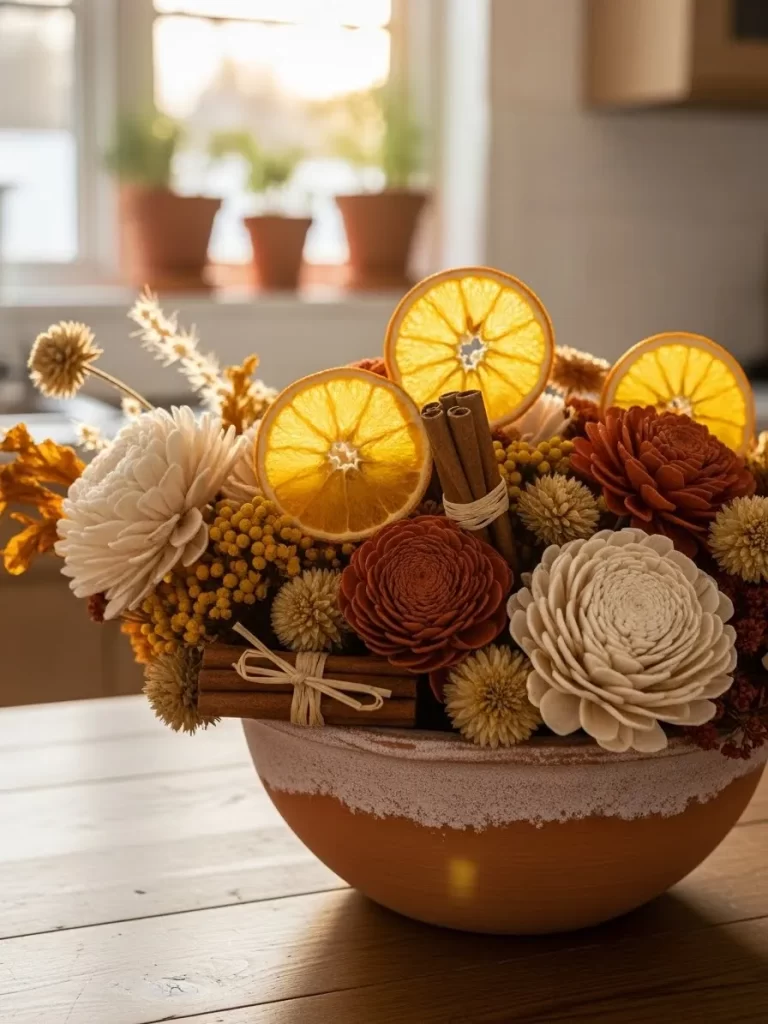
Vibrant citrus slices and fragrant cinnamon sticks fill this earthy terracotta bowl. Sola wood flowers in shades of cream and rust provide a soft contrast. Slices of dried orange catch the light and add sunny warmth. Textured pods and yellow berries complete the rustic autumn look for your table.
Cinnamon bundles give off a light scent that makes the home feel cozy. Place this arrangement on a dining table to invite conversation. Every piece is natural and dried to last for a long time without wilting. This design brings the beauty of a garden harvest indoors for the winter months.
Material Required List
- Terracotta bowl
- Dried orange slices
- Cinnamon sticks
- Sola wood roses
- Dried craspedia flowers
- Preserved autumn leaves
- Natural twine
Equipment Required List
- Hot glue gun
- Floral foam
- Scissors
DIY Instructions
- Wedge a piece of floral foam into the bottom of the bowl.
- Tie three cinnamon sticks together with twine to make bundles.
- Glue the cinnamon bundles into the foam at different angles.
- Push the stems of the sola wood roses into the foam to fill the middle.
- Insert the yellow craspedia balls between the roses for color.
- Tuck the dried orange slices into the gaps so they stand up.
- Surround the edge of the bowl with preserved autumn leaves.
- Fill any remaining small holes with extra bits of moss or berries.
- Place the bowl in a sunny spot to highlight the orange textures.
8 Radiant Orchid Glass Sanctuary
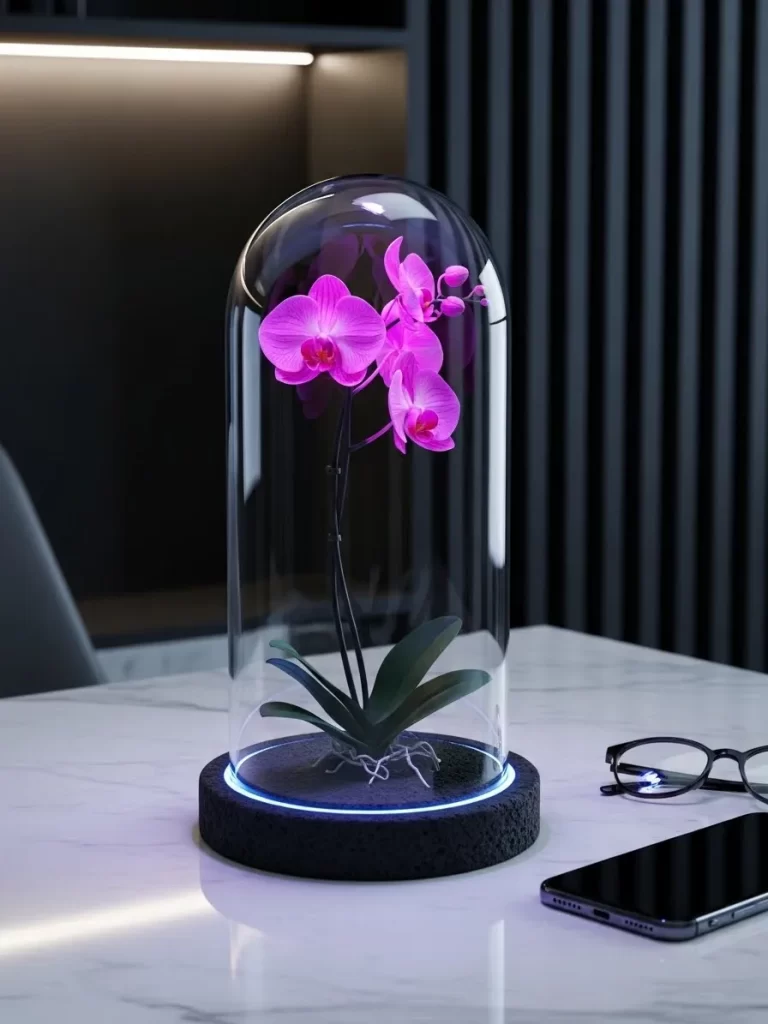
Vivid pink orchids stand tall under a protective glass cloche. This arrangement features a realistic silk stem that stays beautiful without any sunlight. Glowing blue light at the base illuminates the roots and the bottom petals. A dark textured pedestal keeps the focus on the bright floral display.
Protect your artificial plant from dust while keeping it visible on a desk. Add a futuristic touch to your decor with the integrated LED lighting. High quality materials ensure the petals look soft and natural. This piece is a great choice for tech lovers who enjoy a bit of nature.
Material Required List
- Silk pink orchid stem
- Artificial orchid leaves
- Tall glass cloche
- Circular black stone base
- Blue LED strip light
- Adhesive putty
Equipment Required List
- Wire cutters
- Cleaning cloth
DIY Instructions
- Trim the orchid stem so it fits safely inside the glass dome.
- Install the LED strip around the inner rim of the base.
- Attach the green leaves to the bottom of the stem using glue.
- Use adhesive putty to stand the orchid in the center of the base.
- Coil artificial roots around the base to cover the putty.
- Clean the glass dome with a cloth to remove fingerprints.
- Carefully place the dome over the orchid and rest it on the stone.
- Plug in the lights to see the neon glow hit the pink flowers.
- Check the wires to ensure they are tucked out of sight.
9 Bohemian Pampas Mirror Wreath
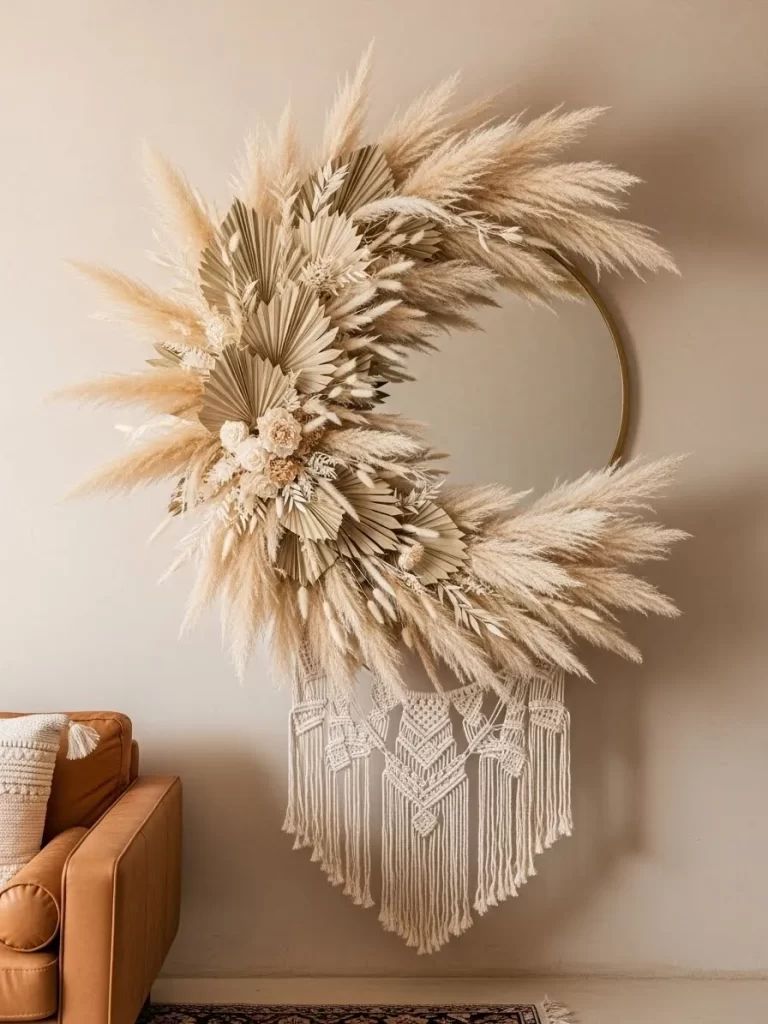
Feathery pampas grass and dried palm leaves circle this round wall mirror. Neutral tones of beige and cream create a soft bohemian vibe. Large fronds reach outward to give the arrangement an organic and wild shape. Hand woven macrame hangs from the bottom to add soft textile art.
Elevate your wall decor by combining a functional mirror with floral beauty. Transform a plain wall into a focal point with these natural materials. Large spaces feel warmer and more inviting with this oversized wreath. Every stem is secured to ensure the design holds its shape over time.
Material Required List
- Round wall mirror with a gold frame
- Large dried pampas grass stems
- Dried palm leaf spears
- Sola wood flowers
- Macrame wall hanging
- Strong floral wire
Equipment Required List
- Hot glue gun
- Wire cutters
- Hairspray
DIY Instructions
- Brush the pampas grass gently to make the plumes look full.
- Mist the grass with hairspray to prevent it from shedding.
- Lay the mirror flat on a large table to begin assembly.
- Use floral wire to attach pampas stems to the outer frame.
- Glue the dried palm spears behind the grass in a fan shape.
- Cluster small sola flowers on the left side for a point of interest.
- Attach the macrame piece to the bottom of the mirror frame.
- Apply extra glue to any loose stems to ensure they are stable.
- Hang the mirror on a sturdy wall hook and fluff the grass.
10 Urban Resilience Red Rose Block
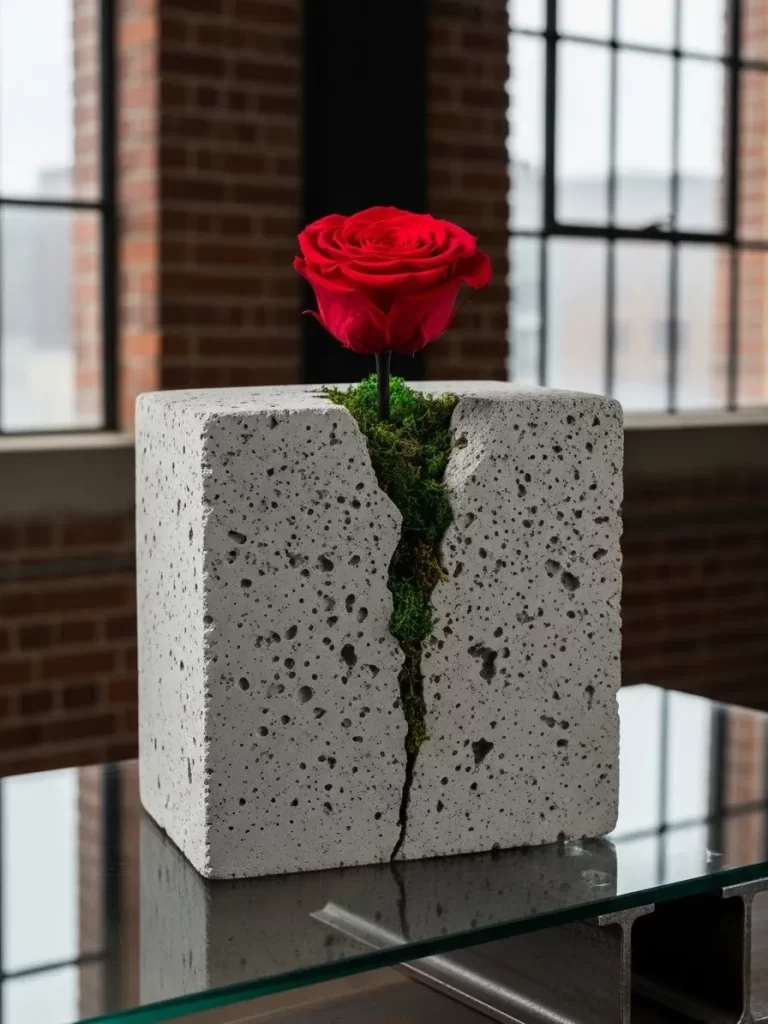
Industrial concrete meets the softness of a single red rose in this daring piece. A large grey block features a jagged crack filled with green moss. Vivid red petals contrast sharply against the rough and porous stone surface. Soft moss peeks out from crevices to show life emerging from a hard place.
Showcase this arrangement on a glass table to emphasize the heavy weight. Bring a touch of modern art into your home with this simple concept. One flower makes a powerful statement of love and strength. This display requires no water and stays looking fresh for many years.
Material Required List
- Single preserved red rose
- Large square concrete block
- Preserved green sheet moss
- Thin floral wire
- Industrial strength adhesive
Equipment Required List
- Hammer
- Chisel
- Protective eyewear
DIY Instructions
- Put on your safety glasses before working with the stone block.
- Use the hammer and chisel to create a vertical crack in the block.
- Clean out any loose dust or debris from the new crevice.
- Apply adhesive inside the deepest part of the crack.
- Push the stem of the preserved rose into the glue and hold it.
- Stuff small pieces of green moss into the crack around the stem.
- Layer more moss until it spills out of the edges of the stone.
- Use floral wire to support the rose head if it feels heavy.
- Wipe the exterior of the block with a dry cloth to finish.
11 Miniature Pergola Floral Stand
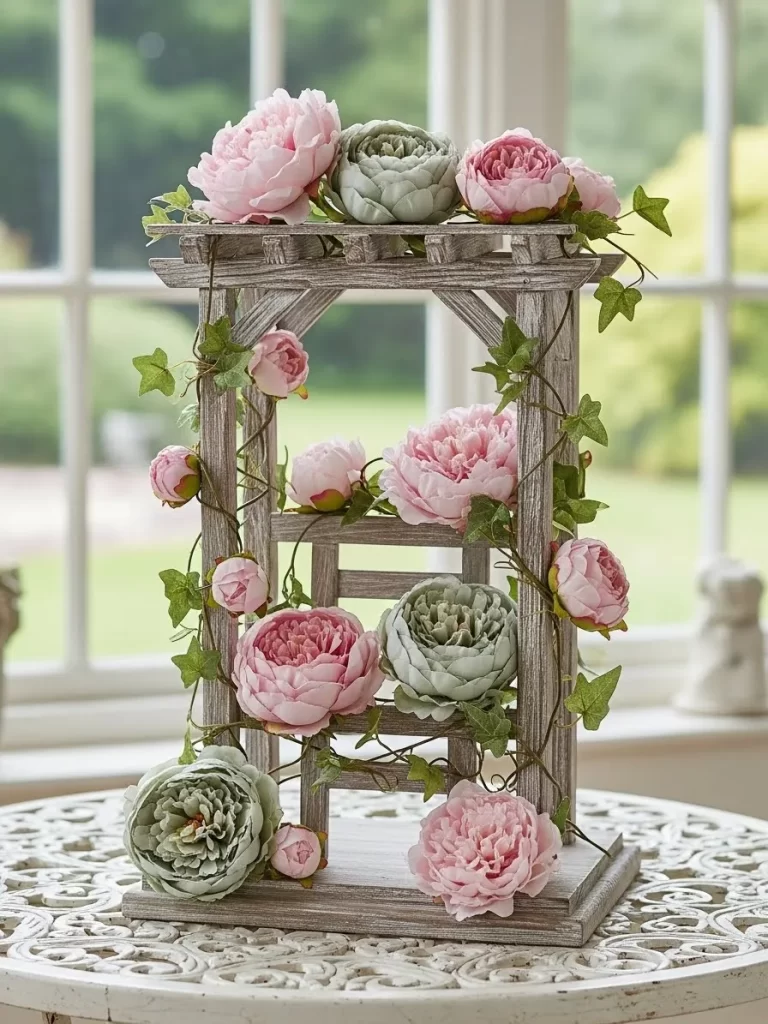
Soft pink peonies and sage green blooms climb this weathered wooden trellis. The design mimics a romantic garden walk in a compact form. It brings a touch of outdoor charm to your dining table or window sill. You can enjoy the look of a spring garden without the need for a backyard.
Green ivy vines wrap around the pillars to add a layer of natural detail. This arrangement stays fresh looking because the silk flowers do not require water or sunlight. The rustic wood finish provides a beautiful contrast to the delicate petals. You will find this piece adds a peaceful and calming energy to any room in your home.
Material Required List
- Miniature wooden pergola stand
- Silk pink peonies in various sizes
- Artificial sage green desert blooms
- Faux ivy vines
- Floral adhesive
Equipment Required List
- Floral wire cutters
- Small scissors
DIY Instructions
- Place the wooden pergola on a flat surface to ensure it stands level.
- Inspect the structure and use a small amount of adhesive on any loose joints.
- Take a long strand of faux ivy and start at the bottom of the left pillar.
- Wrap the vine tightly around the wood moving upward toward the roof.
- Repeat this wrapping process on the right pillar until both sides look green.
- Cut the stems of your pink peonies using the wire cutters.
- Leave about two inches of stem on each flower for easy placement.
- Wedge the larger peonies into the roof slats to create a heavy floral top.
- Tuck the smaller sage green blooms into the gaps around the pillars.
- Wrap any remaining ivy across the top crossbeams to finish the garden look.
12 Weathered Driftwood Botanical Centerpiece
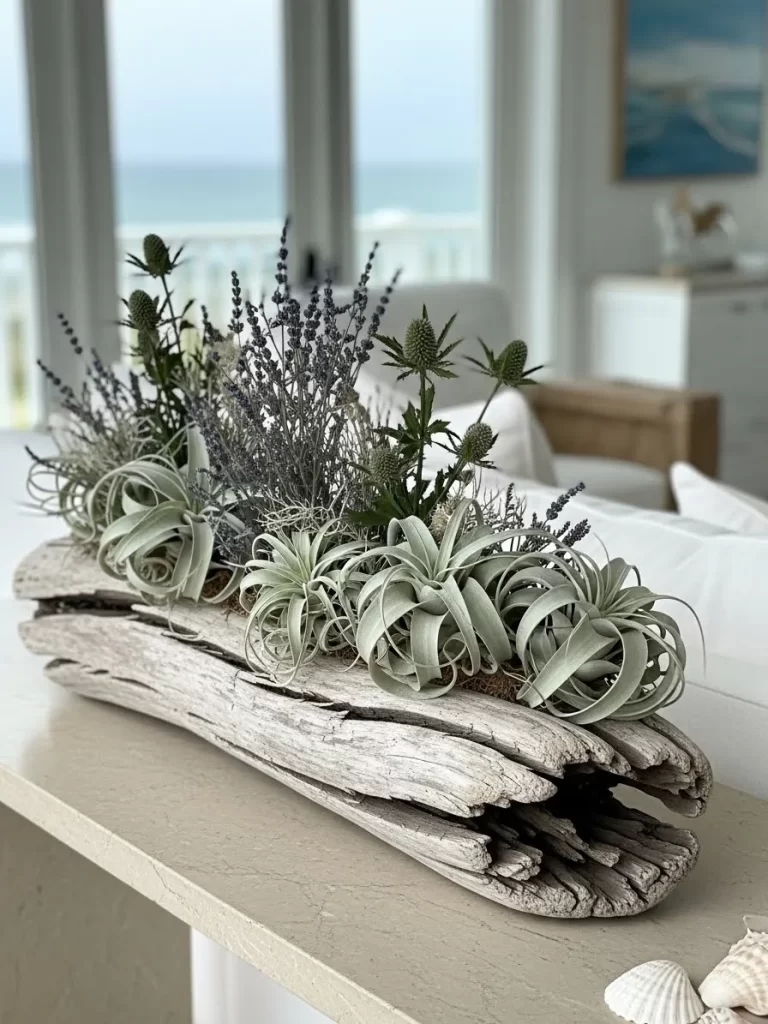
Coastal vibes meet desert beauty in this long driftwood arrangement. Pale green air plants and spiky thistles nestle inside the deep grooves of the salvaged wood. The natural grey tone of the wood highlights the soft colors of the living greenery. This piece serves as a striking focal point for a long farmhouse table.
Small clusters of dried lavender add a hint of fragrance and texture to the display. This design is excellent for busy people since air plants require very little attention. Every angle of the wood reveals a new hidden detail or plant. You will appreciate how this organic sculpture brings a sense of the seashore into your living space.
Material Required List
- Large piece of natural driftwood with deep hollows
- Assorted live air plants
- Dried blue thistles
- Preserved lavender stems
- Natural reindeer moss
- Floral putty
Equipment Required List
- Small soft brush
- Spray bottle for water
DIY Instructions
- Use a soft brush to remove any sand or loose debris from the driftwood.
- Locate the natural holes and crevices where plants can sit securely.
- Place a small amount of floral putty into the bottom of a deep groove.
- Press the base of an air plant into the putty so it stays upright.
- Surround the base of the plant with bits of reindeer moss to hide the putty.
- Insert the blue thistles into the smaller cracks near the ends of the wood.
- Group three lavender stems together and tuck them behind the air plants.
- Balance the weight by placing larger plants in the center of the wood.
- Mist the air plants lightly with water using your spray bottle.
- Position the finished log on a table where it will receive indirect light.
13 White Drip Fringed Tulip Box
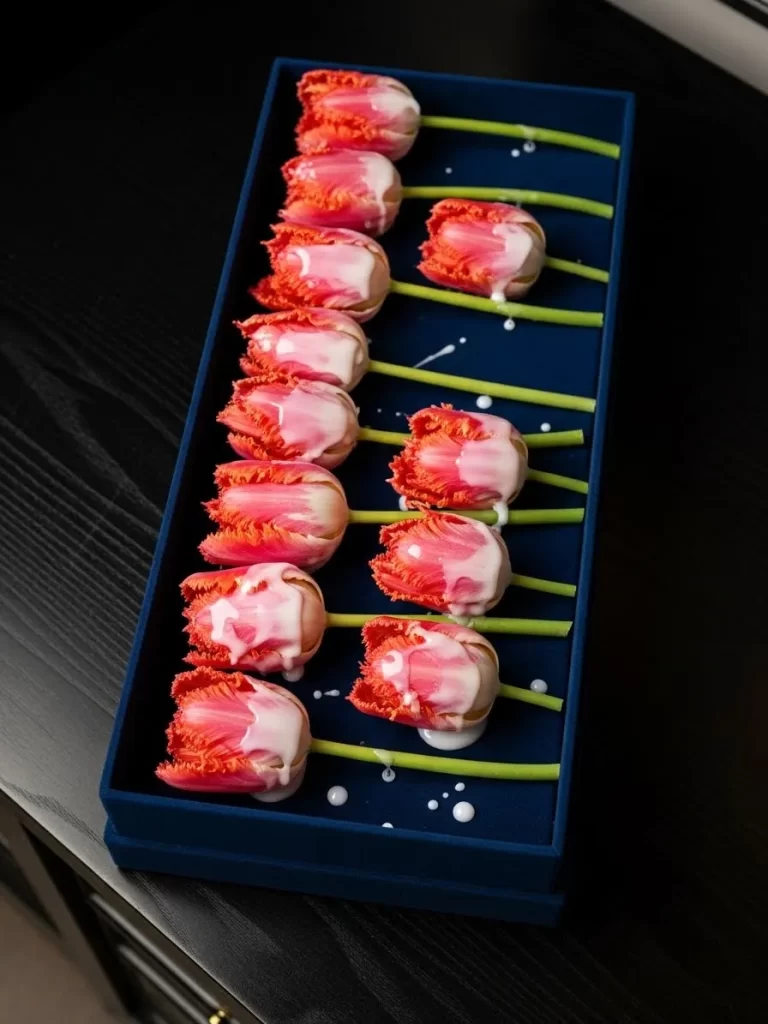
Bright pink fringed tulips sit in a deep blue velvet box for a dramatic effect. A unique white glaze drips down each flower head to create a modern art look. This contrast between the soft petals and the thick liquid texture is very eye catching. It offers a bold twist on the classic Valentine bouquet.
The organized rows of flowers provide a clean and satisfying visual pattern. Fringed edges on the tulips add a layer of intricate detail that regular flowers lack. This arrangement feels both luxurious and experimental at the same time. Your recipient will be amazed by the creative use of color and texture in this gift.
Material Required List
- Square navy blue velvet flower box
- Fresh pink fringed tulips
- White floral wax or thick acrylic paint
- Floral foam block
- Plastic liner for the box
Equipment Required List
- Small melting pot for wax
- Tongs
- Sharp floral knife
DIY Instructions
- Trim the floral foam to fit the inside of the navy blue box.
- Place the plastic liner inside the box before inserting the foam.
- Soak the foam in water until it is fully saturated.
- Cut the tulip stems to a height that allows the heads to clear the box rim.
- Push the stems into the foam in straight rows until the box is full.
- Melt your floral wax in the pot until it reaches a thick liquid state.
- Use tongs to hold the box at a slight angle over a protected surface.
- Pour a small amount of wax carefully over the top of each tulip.
- Allow the wax to run down the petals to create the dripping effect.
- Let the wax cool and harden completely before moving the arrangement.
14 Artisan Leather Eucalyptus Wrap
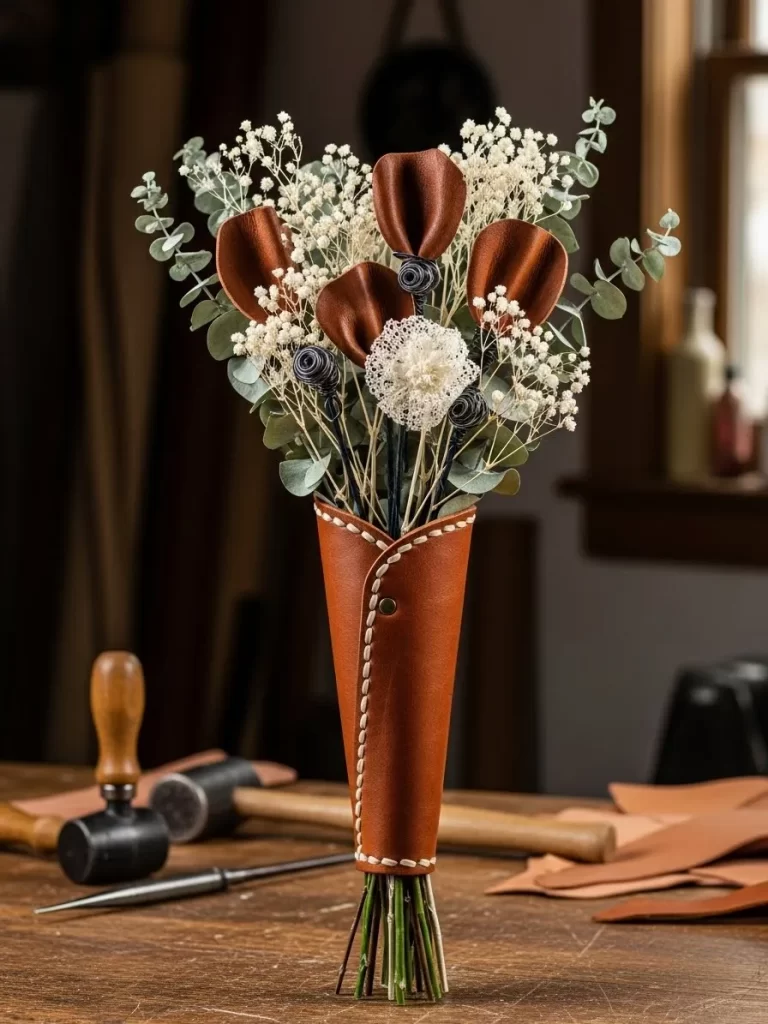
Scented eucalyptus and delicate baby’s breath emerge from a hand stitched leather cone. This arrangement replaces the standard paper wrap with a durable and stylish material. The warm brown tone of the leather complements the cool green leaves beautifully. It is a sophisticated choice for those who appreciate fine craftsmanship.
White dried flowers add a soft and airy feel to the dense greenery. This bouquet is designed to be held or displayed in a narrow vase. The leather can be reused long after the flowers have finished their display. You will find that this piece makes a strong masculine or modern feminine statement.
Material Required List
- Sheet of thick brown craft leather
- Preserved eucalyptus stems
- Dried baby’s breath
- White sola wood flowers
- Heavy duty waxed thread
- Copper rivet
Equipment Required List
- Leather hole punch
- Two stitching needles
- Hammer
DIY Instructions
- Cut your leather into a large semi circle shape using sharp scissors.
- Roll the leather into a cone shape to test the size of the opening.
- Punch a series of holes along the straight edges where they overlap.
- Use the waxed thread to sew the edges together with a cross stitch pattern.
- Secure the bottom tip of the cone with a copper rivet and a hammer.
- Bundle the eucalyptus stems together and trim them to the same length.
- Place the white sola flowers in the center of the green bundle.
- Surround the main flowers with sprigs of dried baby’s breath.
- Wrap a small rubber band around the bottom of the flower stems.
- Slide the entire bundle into the leather cone until it fits snugly.
15 Radiant Resin Floral Heart Keepsake
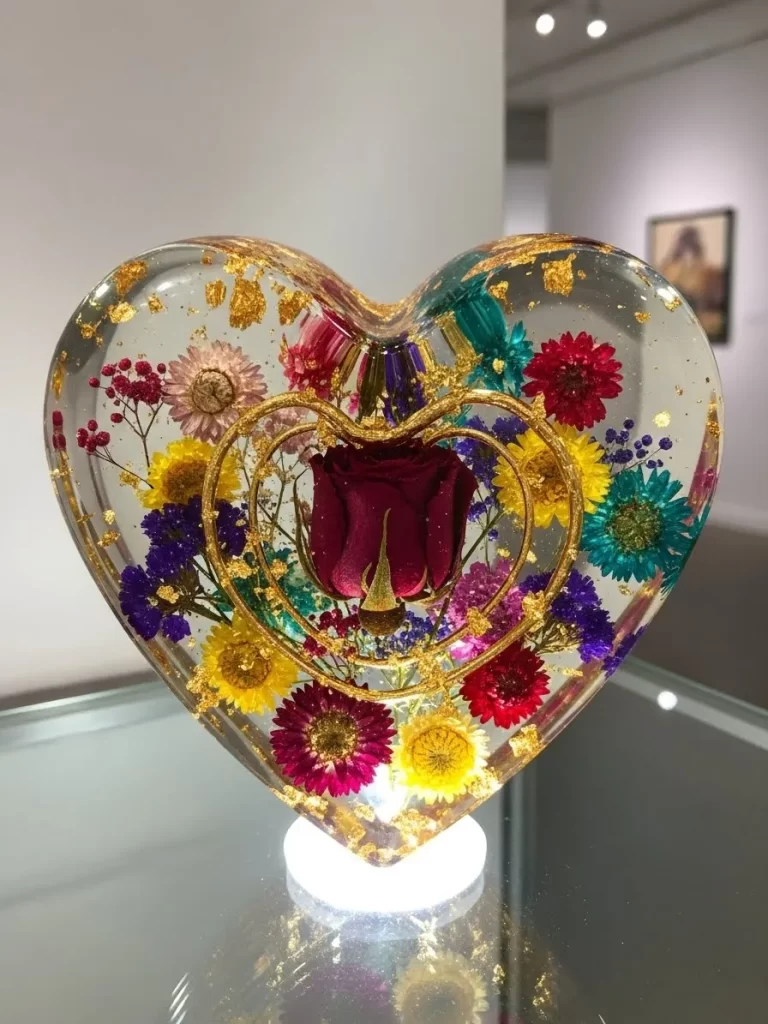
Colorful dried daisies and gold leaf flakes are frozen in time within this resin heart. A large red rose sits at the very center of the transparent display. This piece acts as a permanent garden that will never lose its bright colors. The clear resin allows light to pass through and illuminate every tiny petal.
A glowing white base makes the entire heart shine from the bottom up. This is a wonderful alternative to a bouquet because it lasts a lifetime. You can see different flowers and details from every side of the heart. It serves as a beautiful paperweight or a glowing bedside light for a loved one.
Material Required List
- Large heart shaped silicone mold
- Clear casting resin and hardener
- Dried colorful daisies
- One large preserved red rose
- Gold leaf flakes
- LED light base
Equipment Required List
- Mixing cups
- Wooden stir sticks
- Level surface
DIY Instructions
- Mix a small batch of resin and hardener according to the box directions.
- Pour a thin layer of resin into the bottom of the heart mold.
- Use a stick to pop any small bubbles that rise to the surface.
- Let this first layer sit for an hour until it becomes tacky.
- Place the large red rose in the center of the mold.
- Arrange the smaller dried daisies and gold flakes around the rose.
- Mix a second batch of resin and pour it slowly over the flowers.
- Fill the mold to the top and check that all flowers stay in place.
- Let the resin cure for twenty four hours in a dust free area.
- Remove the heart from the mold and place it on the LED base.
16 Geometric Emerald Moss Wall Art
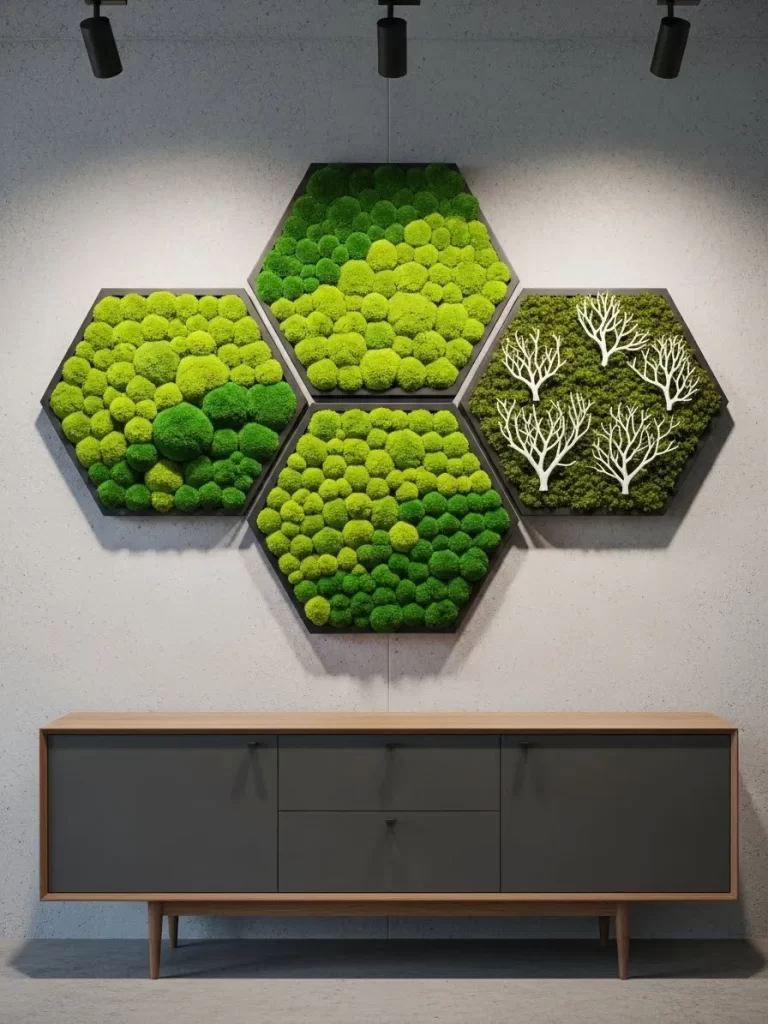
Lush green moss fills these hexagonal frames to create a living wall experience. Different shades of emerald and lime moss provide a rich and textured landscape. White wooden branch accents add a touch of winter forest magic to the design. This arrangement brings a massive amount of life to a plain office or living room wall.
Maintenance is not a concern as this preserved moss requires no water or light. The geometric shapes allow you to arrange the pieces in any pattern you like. It acts as a natural sound absorber while looking incredibly stylish. You will enjoy the feeling of being surrounded by nature without the work of a real garden.
Material Required List
- Four hexagonal wooden frames
- Preserved reindeer moss in various greens
- Preserved sheet moss
- Small white decorative branches
- Strong wood adhesive
Equipment Required List
- Hot glue gun
- Glue sticks
DIY Instructions
- Lay your four hexagonal frames on a flat table in your desired pattern.
- Apply a layer of glue to the inside back panel of the first frame.
- Press large pieces of flat sheet moss into the glue to cover the wood.
- Take clumps of reindeer moss and glue them on top of the sheet moss.
- Mix the different green colors to create a natural and hilly look.
- Make sure the moss is packed tightly so no wood shows through.
- Break the white branches into small pieces that fit the frame height.
- Glue the branches into one of the frames to create a forest scene.
- Repeat the process for the remaining three hexagons.
- Use wall strips to hang the frames together in a tight cluster.
17 Golden Art Deco Fan and Calla Lily Display
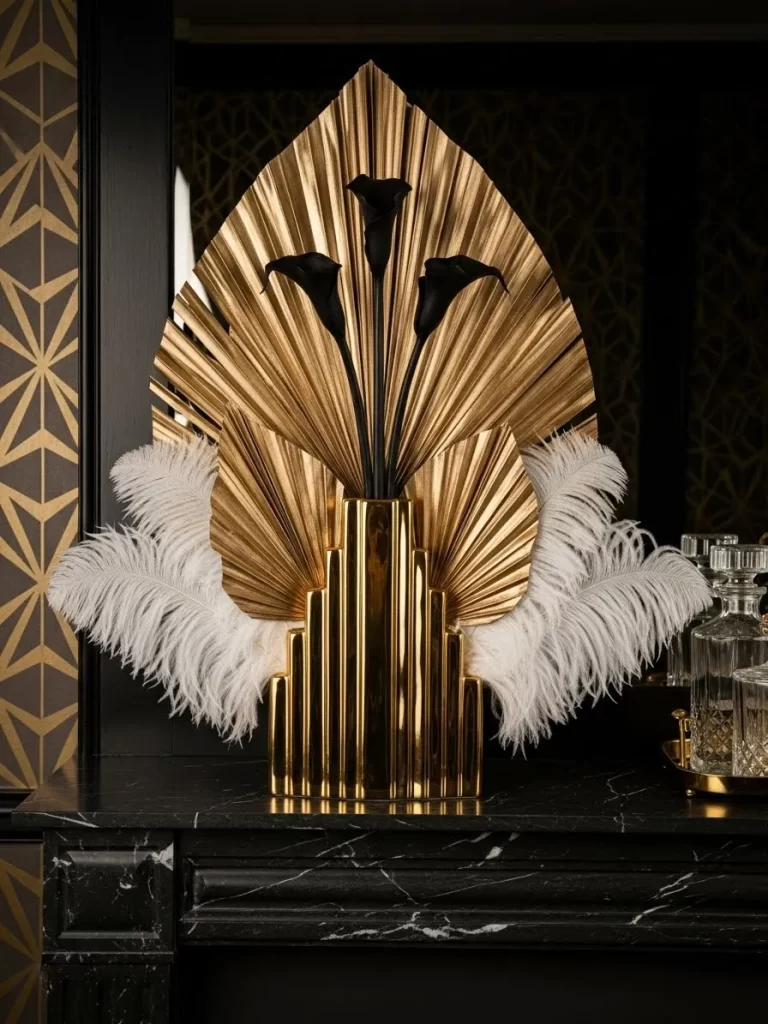
Art Deco style shines through in this bold gold and black floral sculpture. Three sleek black calla lilies rise from a stepped metallic vase. Large golden palm fronds fan out behind the flowers to create a royal backdrop. Soft white ostrich feathers add a touch of vintage glamour to the base of the design.
The symmetrical lines and high contrast colors make this a very formal piece. It fits well on a black marble fireplace or a grand entryway table. Every element is chosen for its architectural shape and striking finish. You will find that this arrangement creates a sense of luxury and drama in your home.
Material Required List
- Stepped gold metallic vase
- Three artificial black calla lilies
- Large gold painted palm spears
- White ostrich feathers
- Floral foam
Equipment Required List
- Wire cutters
- Hot glue gun
DIY Instructions
- Push a block of floral foam into the center of the gold vase.
- Trim the foam so it sits two inches below the top of the container.
- Insert the largest gold palm spear into the very back of the foam.
- Place two smaller palm spears on either side of the main one.
- Fan them out so they create a wide and even golden background.
- Cut the black calla lily stems so they stand at different heights.
- Place the lilies in a row in front of the gold palm spears.
- Tuck the white ostrich feathers into the front of the vase.
- Angle the feathers so they curve outward and hide the foam.
- Use a small dot of glue to keep the feathers from shifting.
18 Majestic Purple Ombre Floral Sphere
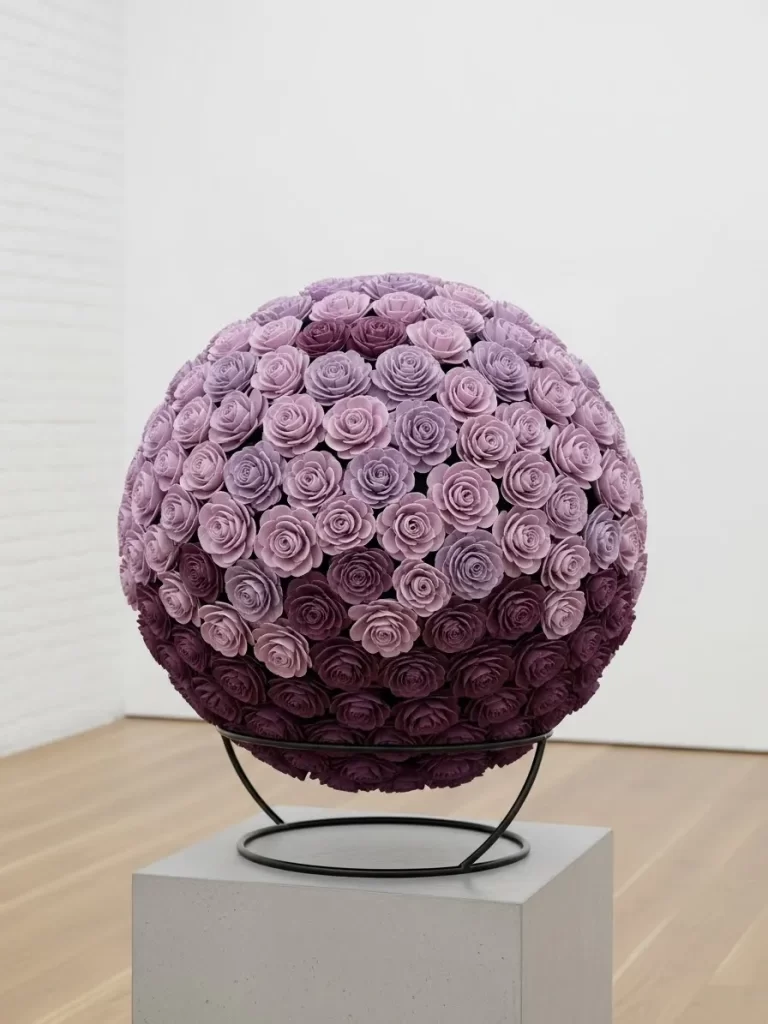
Hundreds of small purple roses gather to form this perfect floral globe. The colors shift from a light lavender at the top to a deep plum at the bottom. This ombre effect creates a sense of depth and artistry that is truly unique. A simple black wire stand holds the sphere so it appears to float in the room.
This massive arrangement makes a incredible statement in a large gallery or hallway. Each rose is made of soft foam or fabric to ensure it never wilts. The round shape provides a satisfying sense of balance and harmony. You will love how the rich purple tones add a royal feeling to your decor.
Material Required List
- Large styrofoam ball
- Hundreds of small artificial roses in four shades of purple
- Black metal bowl stand
- Hot glue sticks
Equipment Required List
- High temp glue gun
- Tweezers for small petals
DIY Instructions
- Sort your purple roses into four piles based on their color shade.
- Place the styrofoam ball on a stable surface like a large bowl.
- Start at the very top of the ball with your lightest lavender roses.
- Apply glue to the base of a rose and press it firmly into the foam.
- Continue adding the light roses until you have covered the top quarter.
- Move to the next darkest shade and create a wide band around the middle.
- Ensure there are no white gaps between the flower heads as you work.
- Use the darkest plum roses for the bottom third of the sphere.
- Allow the glue to dry completely for at least one hour.
- Carefully lift the sphere and rest it on the black wire stand.
19 Vintage Book Paper Poppy Vase
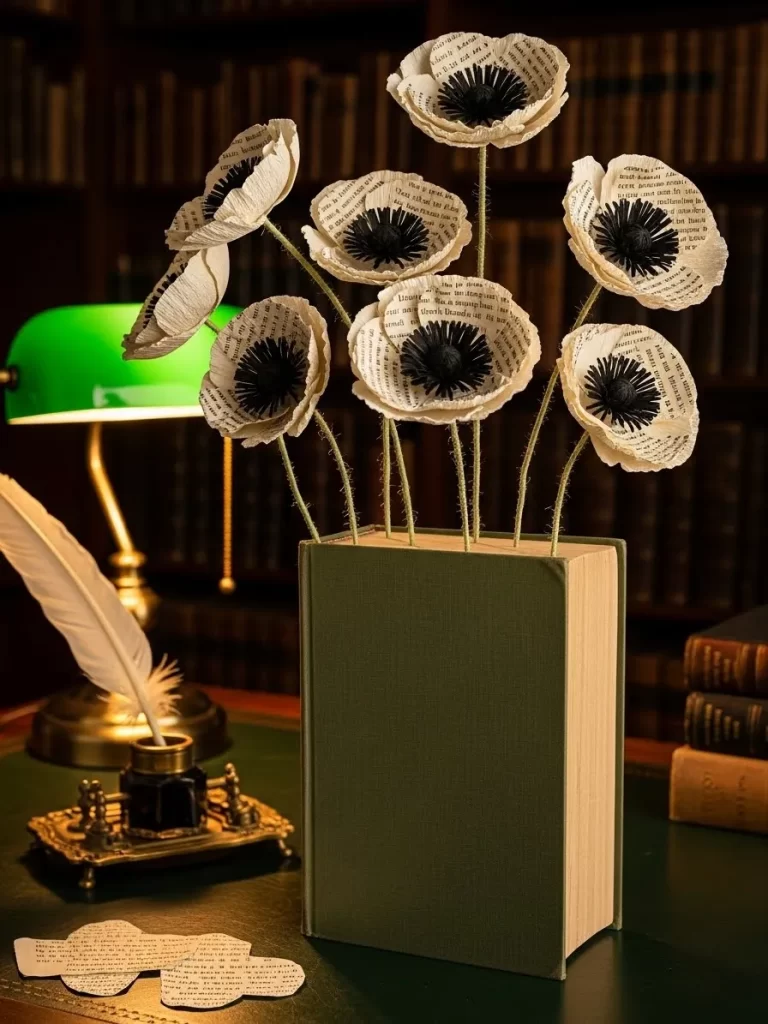
An old green book is transformed into a whimsical vase for paper poppies. The flowers are crafted from aged book pages with dark textured centers. Long wire stems allow the blooms to reach upward in a natural and graceful way. This arrangement is the ultimate gift for a book lover or a writer.
Scraps of paper lie at the base of the book to add a sense of creative history. The dark green cover of the book provides a solid foundation for the cream colored petals. No water is needed for this display so it can sit safely on a wooden library shelf. You will enjoy the clever way this piece combines literature and nature.
Material Required List
- Thick hardcover book with an attractive cover
- Aged book pages or sheet music
- Black yarn or felt
- Thin floral wire
- Green floral tape
Equipment Required List
- Electric drill
- Hot glue gun
- Scissors
DIY Instructions
- Choose a thick book that can stand upright on its bottom edge.
- Drill five small holes into the top edge of the book pages.
- Cut five circles out of the aged book paper to make the petals.
- Scallop the edges of the circles with your scissors for a flower look.
- Create a small ball of black yarn and glue it to the center of each circle.
- Wrap your floral wire with green tape to make the stems look real.
- Glue the back of each paper flower to the top of a wire stem.
- Slide the wire stems into the holes you drilled in the book.
- Bend the wires slightly to give the flowers a more natural shape.
- Place the book on your desk and scatter a few paper scraps nearby.
20 Eucalyptus and Moonflower Hoop Wreath
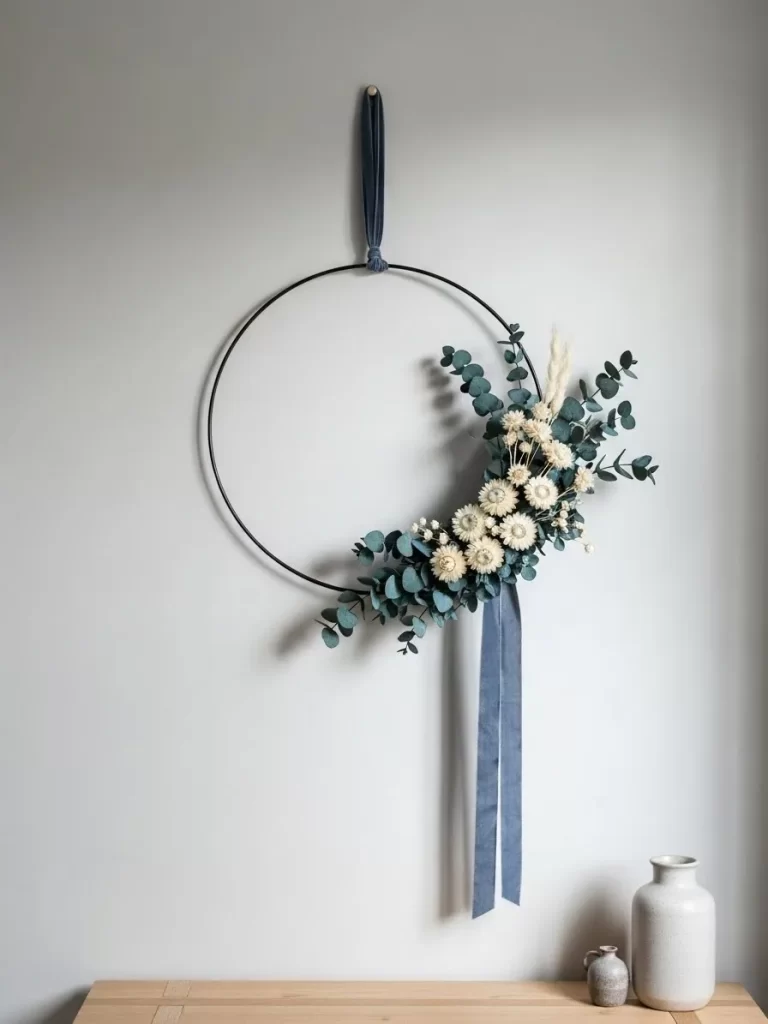
A simple black metal hoop serves as the frame for this elegant minimalist wreath. Silvery green eucalyptus leaves cluster on one side for a modern asymmetrical look. Small white moonflowers add a touch of brightness against the dark metal. A long blue velvet ribbon hangs from the bottom for a soft finishing touch.
This wreath is light enough to hang on a single small nail or hook. The neutral colors allow it to blend seamlessly into a modern or rustic home. It offers a fresh alternative to traditional round and heavy evergreen wreaths. You will find that this clean design brings a sophisticated and calm feel to your wall.
Material Required List
- Black metal floral hoop
- Preserved eucalyptus stems
- Small dried white flowers
- Long blue velvet ribbon
- Thin black floral wire
Equipment Required List
- Wire cutters
- Scissors
DIY Instructions
- Lay the metal hoop on a flat surface to plan your flower placement.
- Take a large branch of eucalyptus and curve it along the right side.
- Use short pieces of black wire to secure the branch to the metal hoop.
- Layer smaller stems of eucalyptus on top to create a thick and lush base.
- Tuck the white moonflowers into the center of the greenery.
- Twist the flower stems around the hoop and hide them under the leaves.
- Ensure all wires are tucked away so they do not scratch your wall.
- Cut a long piece of blue velvet ribbon for the bottom decoration.
- Tie the ribbon in a simple knot at the base of the floral cluster.
- Loop a small piece of ribbon at the top of the hoop for hanging.
21 Zen Floating Lotus Basin
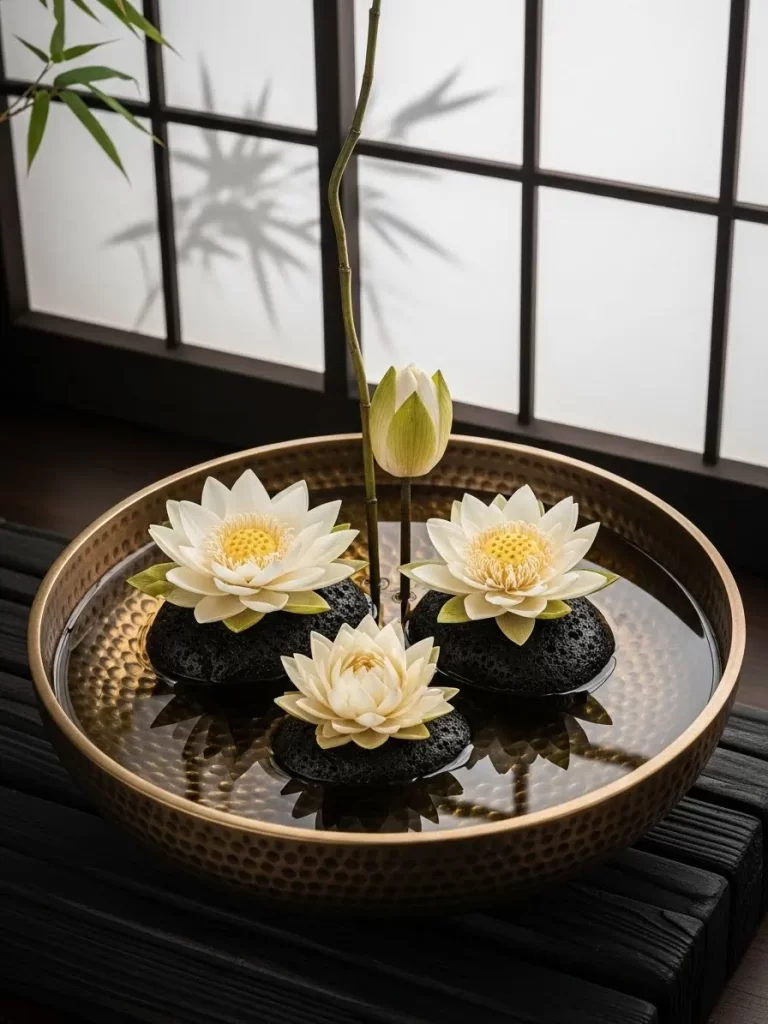
Serene white lotus blossoms drift atop smooth black river stones in this hammered bronze bowl. This arrangement brings the peaceful atmosphere of a Japanese water garden into your home. A single green bamboo stalk rises from the center to provide a vertical element of strength.
Water reflects the soft petals and the metallic glow of the basin for a calming effect. These silk lotuses stay pristine without the mess of real aquatic plants. This piece serves as a beautiful centerpiece for a low coffee table or a meditation corner. You will love how the organic shapes create a sense of balance.
Material Required List
- Hammered bronze wide basin
- Three silk white lotus flowers
- One artificial green bamboo stalk
- Large black river stones
- Distilled water
Equipment Required List
- Soft cloth for polishing
- Scissors
DIY Instructions
- Polish the inside of your bronze basin with a soft cloth to ensure a bright shine.
- Fill the bottom of the bowl with a single layer of large black river stones.
- Pour distilled water into the basin until the stones are halfway covered.
- Trim the bamboo stalk so it stands about ten inches above the bowl rim.
- Wedge the base of the bamboo between two heavy stones to keep it upright.
- Place the three lotus flowers on the surface of the water around the bamboo.
- Space the flowers evenly so they have room to float naturally.
- Add a few smaller stones around the bamboo base to hide the stem bottom.
- Wipe away any water splashes from the exterior of the bronze bowl.
22 Velvet Luxe Two Tone Rose Box
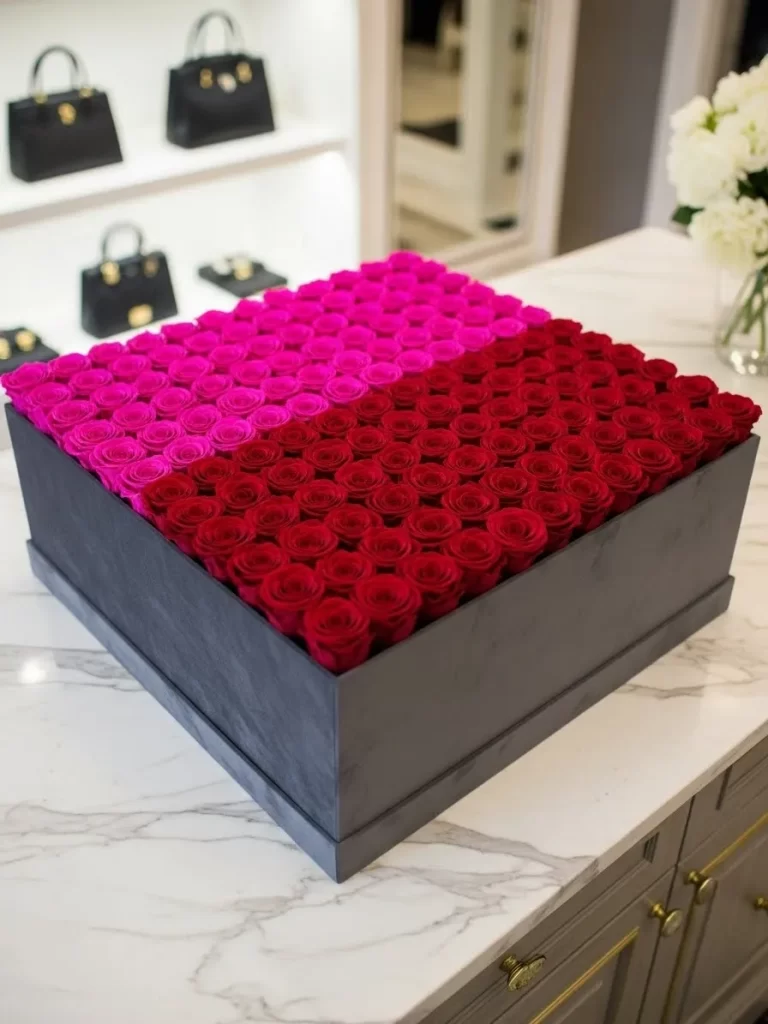
Rich fuchsia and deep red roses are packed tightly into this oversized square velvet box. This design creates a striking color block effect that feels incredibly high fashion. The soft texture of the velvet container matches the luxury of the preserved petals inside. It makes a grand statement of romance for a special Valentine surprise.
Symmetry and clean lines define this modern take on a classic rose delivery. These roses are treated to last for a full year without any water or light. This large display fits well on a vanity or a central console table in a stylish home. Your recipient will appreciate the bold contrast between the two vibrant shades.
Material Required List
- Large square black velvet flower box
- 50 Preserved fuchsia roses
- 50 Preserved deep red roses
- Floral foam block
- Cardboard divider
Equipment Required List
- Long ruler
- Sharp floral knife
DIY Instructions
- Place the floral foam inside the velvet box so it fills the entire space.
- Use your ruler to find the exact center line of the foam block.
- Insert a thin piece of cardboard into the center to act as a temporary guide.
- Start on the left side by pushing fuchsia roses into the foam in straight rows.
- Keep the rose heads at the same height so the surface looks flat.
- Fill the entire left half of the box with the fuchsia roses.
- Switch to the deep red roses for the right side of the container.
- Remove the cardboard divider once both sides are nearly full.
- Pack the center row tightly to ensure the color split looks sharp and clean.
23 Heirloom Botanical Journal
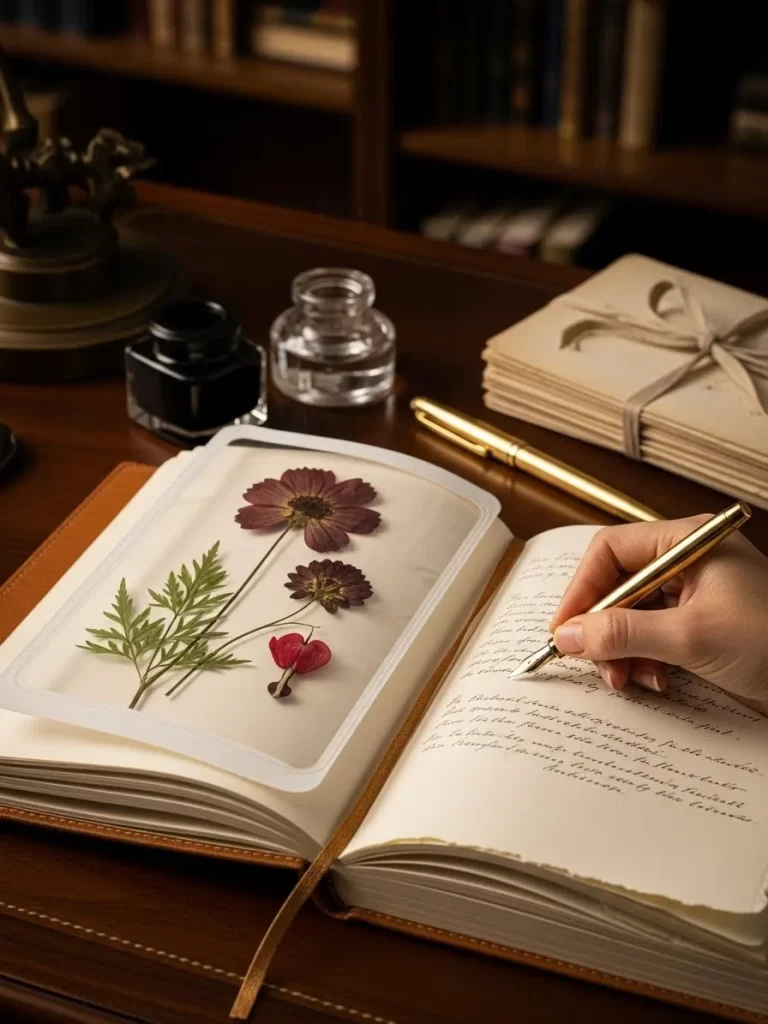
Pressed autumn flowers and delicate ferns are preserved within the pages of this leather bound diary. A clear protective overlay keeps the fragile petals safe from the oils on your hands. This piece celebrates the art of slow living and the beauty of captured memories. It serves as a unique decor item for a vintage desk or a nightstand.
Golden pens and ink bottles surround the journal to complete the scholarly aesthetic. Every leaf and bloom tells a story of a garden in peak season. This item allows you to enjoy nature while writing your own daily thoughts. You will find that this botanical book adds a touch of classic elegance to your library.
Material Required List
- Leather bound journal with blank pages
- Assorted pressed flowers like cosmos and bleeding hearts
- Dried fern leaves
- Clear self adhesive laminate sheets
- Acid free glue pen
Equipment Required List
- Tweezers
- Scissors
DIY Instructions
- Open your journal to a fresh page and decide on a layout for your plants.
- Use tweezers to move the fragile pressed ferns onto the paper first.
- Apply small dots of acid free glue to the back of the largest flowers.
- Press the flowers onto the page and hold them for ten seconds.
- Layer smaller blooms on top of the ferns to create a natural scene.
- Cut a piece of clear laminate slightly smaller than the journal page.
- Peel the backing off the laminate and carefully lower it over the flowers.
- Smooth out any air bubbles with your fingers moving from the center outward.
- Close the book and place a heavy object on top for one hour to set the seal.
24 Silver Tankard Blue Thistle Bouquet
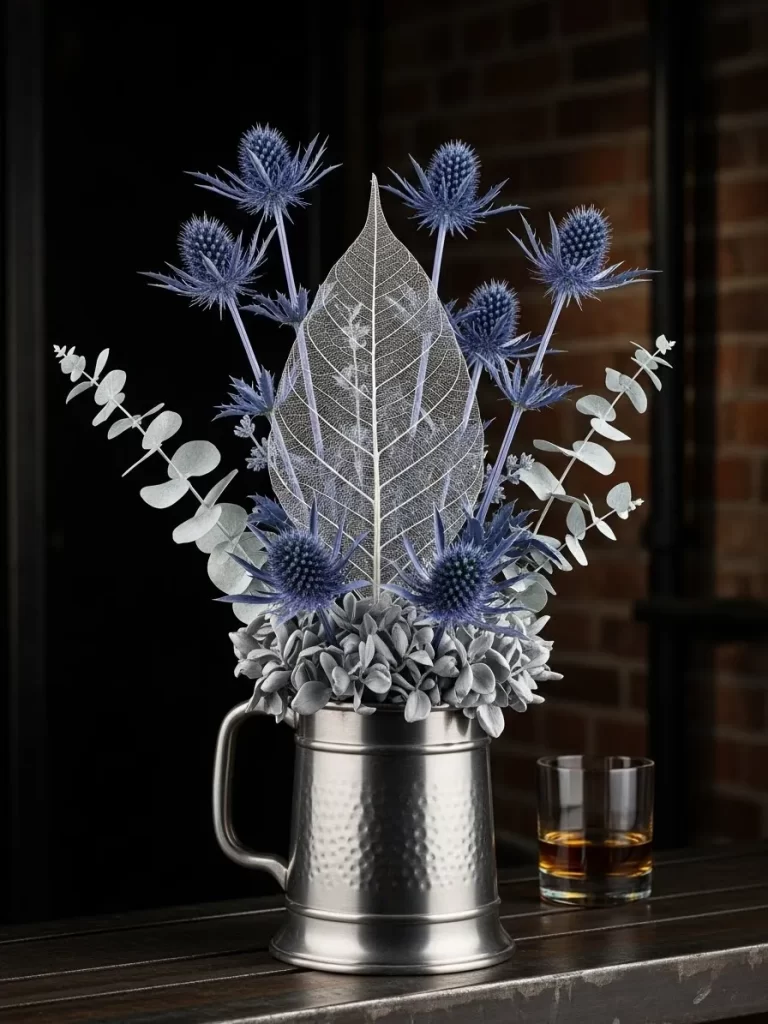
Spiky blue sea holly and skeleton leaves emerge from a vintage silver tankard. This arrangement offers a rugged and masculine take on floral design. Cool tones of slate blue and silver create a sophisticated winter palette for your home office. The translucent skeleton leaf acts as a ghostly centerpiece for the textured thistles.
Eucalyptus sprigs add a soft dusty green to the background of the sharp flowers. This metal container provides a heavy and durable base that won’t tip over. It looks wonderful on a dark wood bar top or a study bookshelf. You will enjoy how the different textures of metal and thorns play together.
Material Required List
- Polished silver or pewter tankard
- Dried blue sea holly thistles
- Large white skeleton leaf
- Preserved silver dollar eucalyptus
- Floral foam
Equipment Required List
- Wire cutters
- Polishing cloth
DIY Instructions
- Rub the silver tankard with a cloth to remove any tarnish or fingerprints.
- Cut a block of floral foam to fit snugly inside the metal cup.
- Place the large skeleton leaf in the center of the foam towards the back.
- Surround the leaf with three tall stems of blue sea holly.
- Insert shorter thistle stems at the front to create a full look.
- Tuck eucalyptus branches into the sides to soften the edges of the tankard.
- Adjust the height of the thistles so they fan out in a symmetrical shape.
- Ensure the skeleton leaf remains visible through the gaps in the flowers.
- Set the tankard on a coaster to protect your furniture surfaces.
25 Wisteria Waterfall Ceiling Installation
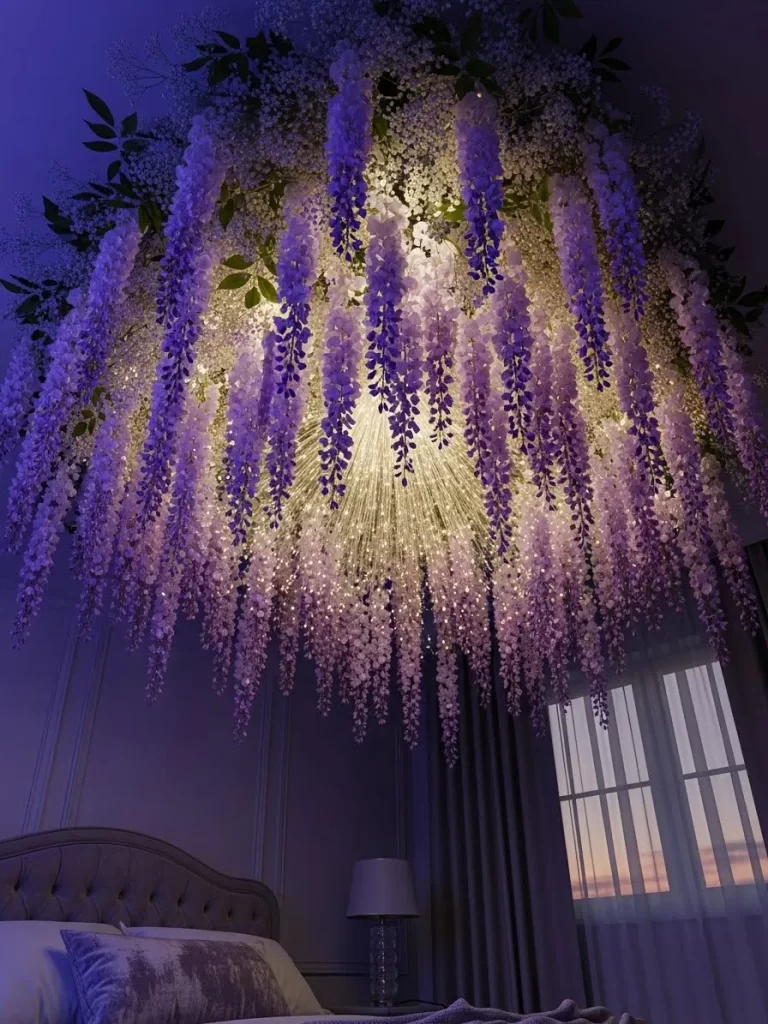
Breathtaking clusters of purple wisteria hang from the ceiling to create a floral canopy. This massive installation transforms a bedroom into a magical woodland sanctuary. Tiny fairy lights are woven through the petals to mimic a starry night sky. The hanging vines move gently with the air to bring a sense of life to the room.
Purple and white tones blend together for a soft and romantic appearance above the bed. This design uses high quality silk flowers so it stays beautiful without any maintenance. It is a bold choice for anyone who wants to live inside a fairytale. You will feel a sense of peace every time you look up at this bloom cloud.
Material Required List
- 40 Long silk wisteria hanging vines
- Large circular wire mesh frame
- 100 Foot string of warm LED fairy lights
- Clear fishing line
- Ceiling hooks
Equipment Required List
- Wire cutters
- Step ladder
- Pliers
DIY Instructions
- Attach four ceiling hooks in a square pattern above your desired area.
- Use fishing line to hang the wire mesh frame from the hooks.
- Ensure the frame is level and secure before adding the flowers.
- Take a wisteria vine and thread the stem through the mesh.
- Bend the wire stem over the mesh to lock it in place.
- Repeat this process until the entire frame is covered in hanging purple vines.
- Space the white vines evenly among the purple ones for a natural mix.
- Weave the fairy lights through the mesh so they hang down between the flowers.
- Plug in the lights and adjust the vines to hide any visible wires or mesh.
26 Crystal Garden Light Bulb Terrarium
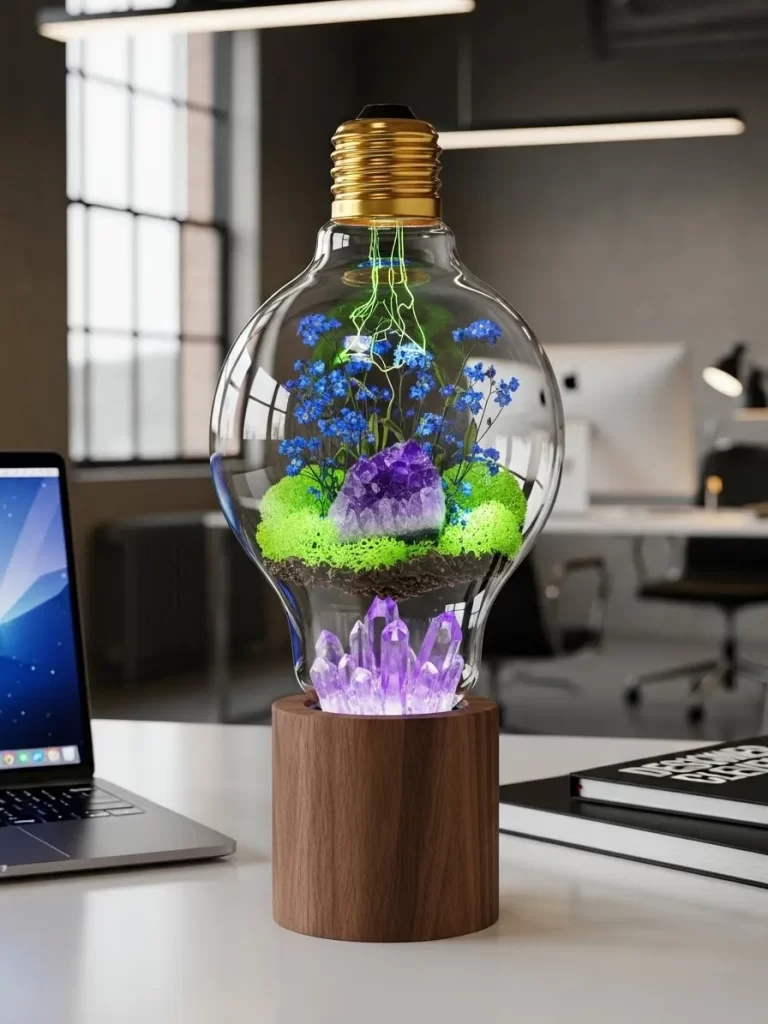
Vivid blue flowers and green moss grow around a large purple amethyst inside a glass bulb. This miniature ecosystem sits on a warm wooden base that glows with soft light. The contrast between the organic plants and the sharp crystal creates a mystical vibe. It serves as a great desk accessory for a modern and creative workspace.
Internal lighting highlights the intricate details of the moss and the crystal facets. This terrarium requires no water as it uses preserved and artificial elements. It brings a touch of fantasy and nature to any small corner of your home. You will appreciate the tiny world contained within the glass.
Material Required List
- Extra large clear glass light bulb decor
- Large purple amethyst crystal cluster
- Preserved green cushion moss
- Tiny artificial blue forget me nots
- Round wooden LED light base
- Clear glue
Equipment Required List
- Long tweezers
- Small funnel
DIY Instructions
- Clean the inside of the glass bulb to ensure maximum clarity.
- Place a small amount of glue on the bottom of your amethyst crystal.
- Lower the crystal through the bulb opening using long tweezers.
- Press the crystal into the center and wait for the glue to dry.
- Use the tweezers to tuck pieces of green moss around the base of the crystal.
- Drop the small blue flowers into the moss to add a pop of color.
- Arrange the flowers so they appear to be growing out of the moss.
- Set the glass bulb carefully onto the wooden LED base.
- Turn on the light to illuminate the crystal and the garden from below.
27 Festive Pomegranate Dining Runner

Lush cedar branches and bright red pomegranates stretch across this long wooden table. This runner brings a fresh and fruity energy to a winter dinner party. Sliced fruit reveals a jewel like interior that catches the warm light of nearby candles. Gold painted pinecones and cinnamon sticks add layers of holiday texture and scent.
The dark green needles provide a rich background for the vibrant red fruit. This arrangement is easy to assemble and looks incredibly professional. It creates a cozy and inviting atmosphere for your guests to enjoy. You will find that the natural materials make the room feel much more festive.
Material Required List
- Fresh cedar or pine boughs
- 6 Whole red pomegranates
- 3 Pomegranates cut in half
- Gold spray painted pinecones
- Cinnamon stick bundles
- Whole walnuts
Equipment Required List
- Garden shears
- Gold spray paint
- Twine
DIY Instructions
- Lay the green cedar branches down the center of your table to create a base.
- Overlap the stems so the runner looks like one continuous piece of greenery.
- Place the whole pomegranates at even intervals along the length of the runner.
- Nestle the cut pomegranate halves between the whole fruit for a messy look.
- Scatter the gold pinecones in the gaps to add a bit of metallic shine.
- Tie cinnamon sticks into small bundles with twine and tuck them into the green.
- Fill any remaining small holes with whole walnuts for extra detail.
- Place tall brass candlesticks behind the runner to illuminate the fruit.
- Light the candles just before your guests arrive for a warm glow.
28 Cyan Orchid Crystal Prism
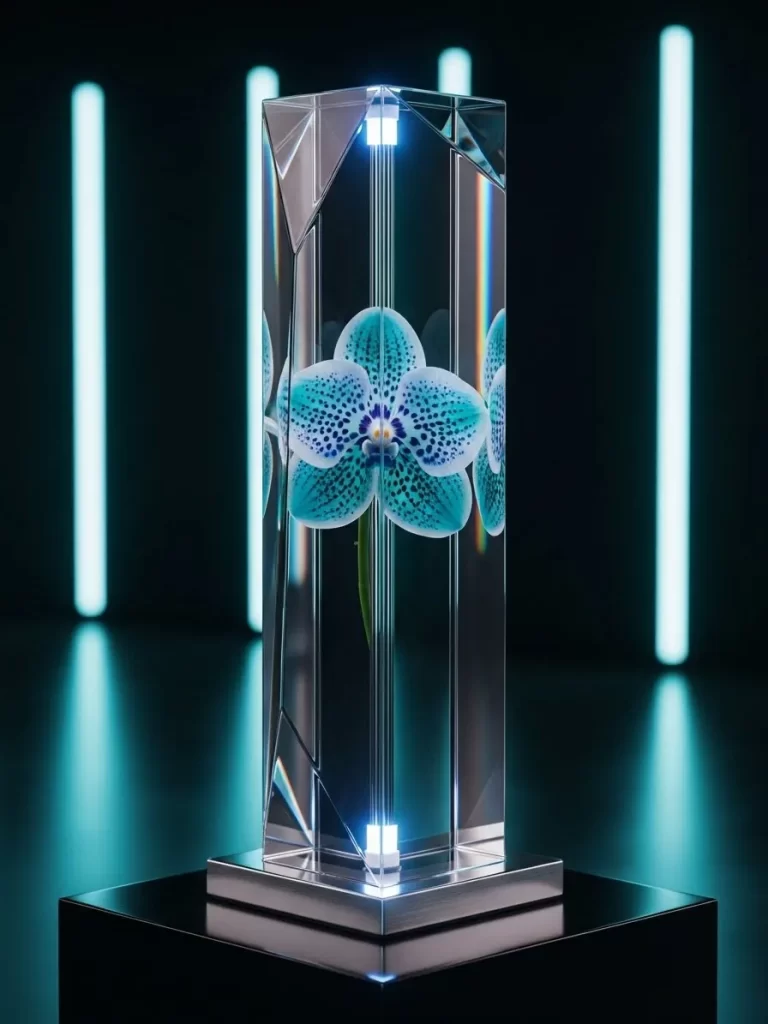
A single cyan orchid is suspended inside a tall glass prism with sharp geometric edges. This futuristic design uses internal lighting to make the blue petals glow intensely. The glass facets reflect the flower from multiple angles to create a kaleidoscopic effect. It is a stunning statement piece for a minimalist or high tech home.
The cool blue tones and clear glass offer a very clean and modern aesthetic. This display protects the flower from dust and damage while keeping it visible. It looks like a specimen from a high end laboratory of the future. You will love how the light changes as you walk around this crystalline pillar.
Material Required List
- Single silk cyan orchid bloom
- Tall rectangular glass prism vase
- LED lighted metal base
- Clear acrylic mounting rod
- Strong clear epoxy
Equipment Required List
- Glass cleaner
- Level
DIY Instructions
- Glue the clear acrylic rod to the center of the metal base using epoxy.
- Wait for the glue to dry completely before attaching the flower.
- Glue the silk orchid to the top of the rod so it looks like it is floating.
- Clean every side of the glass prism with a streak free cleaner.
- Lower the glass prism over the orchid and onto the base.
- Use a level to ensure the prism sits straight and centered.
- Secure the glass to the base with a tiny drop of clear glue on each corner.
- Set the prism on a dark surface to emphasize the internal light.
- Turn on the LED base to see the blue orchid glow through the glass.
29 Lavender Field Woven Tapestry
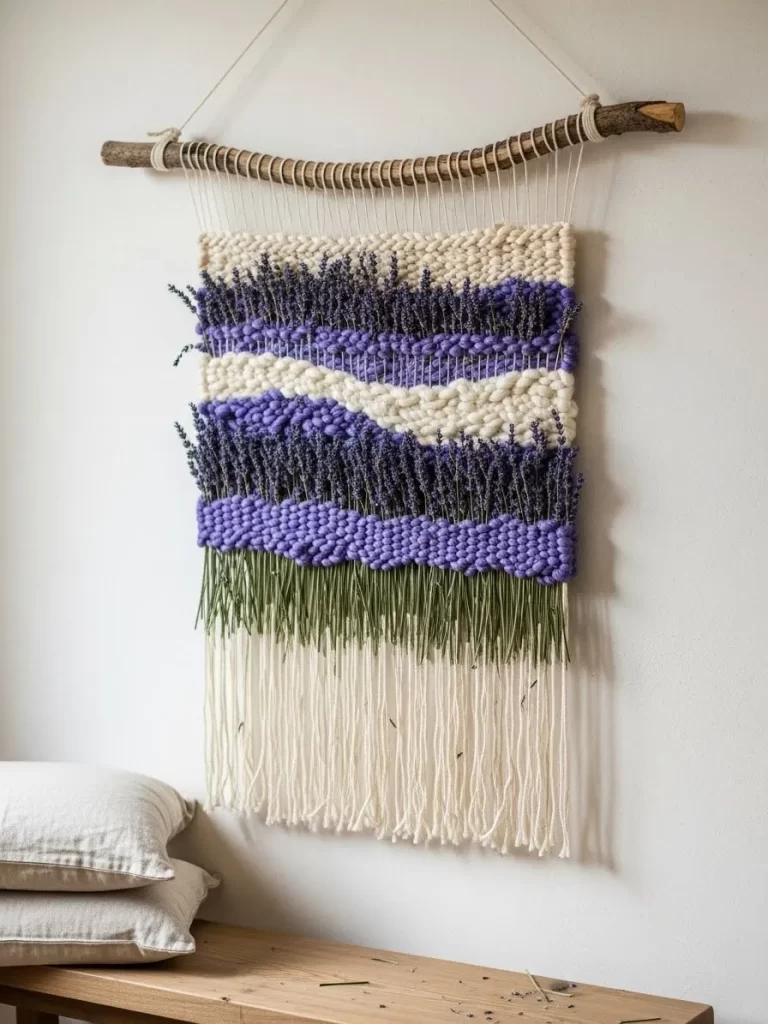
Dried lavender stems are woven directly into this soft textile wall hanging. The purple flowers create textured rows that resemble a blooming field in France. A natural wooden branch acts as a rustic hanger for the cream and purple yarns. This piece adds a gentle scent and a soft visual texture to your bedroom wall.
Bohemian styles often use natural materials like this to create a cozy feel. The hanging fringe at the bottom gives the tapestry a sense of movement. It is a wonderful way to display dried flowers without using a traditional vase. You will find that the calming scent of lavender helps you relax at night.
Material Required List
- Large bundles of dried lavender
- Cream and purple chunky wool yarn
- Natural wooden branch for hanging
- Strong cotton warp thread
Equipment Required List
- Weaving loom or large cardboard frame
- Scissors
- Large needle
DIY Instructions
- Tie your cotton warp threads vertically across your loom or frame.
- Start at the bottom by weaving several rows of cream yarn in a basic pattern.
- Take a small bunch of lavender and slide the stems behind the warp threads.
- Weave a row of purple yarn over the lavender stems to lock them in place.
- Repeat this by alternating rows of thick yarn and fresh lavender bundles.
- Create a wavy pattern with the yarn to mimic the look of rolling hills.
- Finish the top with more cream yarn to secure the entire structure.
- Slide the wooden branch through the top loops of the warp thread.
- Tie a piece of yarn to both ends of the branch to create a hanger.
- Trim the bottom yarn into a long fringe for a finished bohemian look.
30 Forged Iron Rose Sculpture

A hand forged iron rose stands proudly on a base made from a heavy metal gear. The petals feature a heat treated finish that creates a beautiful iridescent glow. This industrial art piece combines the toughness of steel with the delicate shape of a flower. It is an incredible gift for someone who appreciates metalwork or mechanical design.
This rose will never fade or break, making it a true symbol of eternal love. The sharp thorns on the stem add a realistic and edgy detail to the sculpture. It looks best when placed near a fireplace where the flames can dance off the metal. You will admire the craftsmanship required to turn hard iron into soft petals.
Material Required List
- Pre made forged iron rose kit
- Heavy industrial metal gear for the base
- Black smithing wax or clear coat
- High strength metal adhesive
Equipment Required List
- Propane torch
- Heavy pliers
- Sandpaper
DIY Instructions
- Sand the bottom of the iron rose stem until the metal is bright and clean.
- Clean the center of the metal gear to remove any old oil or rust.
- Apply a generous amount of metal adhesive to the bottom of the rose stem.
- Press the rose into the gear hole and hold it until it stands on its own.
- Use a propane torch to heat the tips of the petals until they turn blue.
- Move the flame quickly to create a rainbow effect on the metal surface.
- Let the rose cool down completely before touching it.
- Rub a thin layer of black smithing wax over the entire piece to prevent rust.
- Buff the wax with a soft cloth to give the rose a professional satin finish.
31 Sunset Wheat and Larkspur Bundle
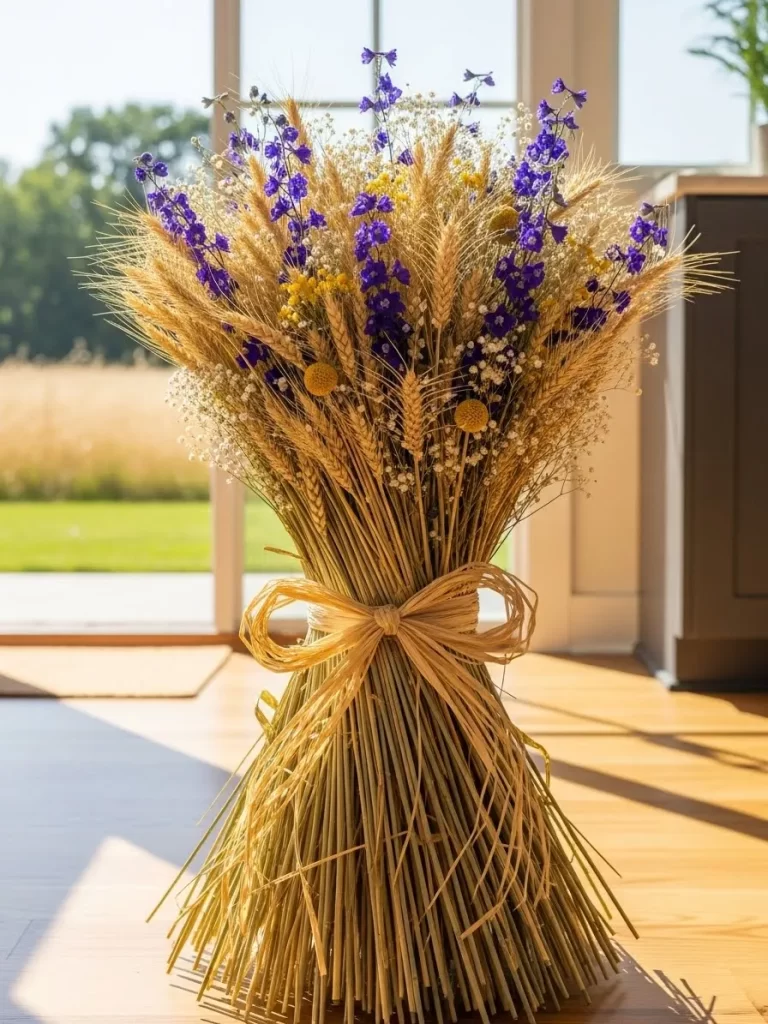
Golden wheat stalks are tied together with vibrant purple larkspur for a rustic harvest look. This upright bundle stands on its own without the need for a vase. A simple raffia bow holds the stems tightly to create a clean and organized shape. It brings the warmth of a summer field into your kitchen or dining room.
Tiny yellow balls of craspedia add a pop of sunny color among the purple flowers. The dry materials ensure this arrangement stays perfect for many months. It is an excellent choice for a farmhouse style home or a country wedding. You will love how the light catches the textured heads of the dried grain.
Material Required List
- Large bundle of dried golden wheat
- Dried purple larkspur stems
- Yellow craspedia (billy balls)
- Dried white baby’s breath
- Natural raffia
Equipment Required List
- Heavy duty scissors
- Rubber bands
DIY Instructions
- Gather all your wheat stalks and tap the bottoms on a table to level them.
- Hold the wheat in one hand and start inserting larkspur stems into the middle.
- Place the purple flowers at different heights to create a natural look.
- Add the yellow billy balls around the edges for a bright contrast.
- Wrap a rubber band around the center of the bundle to hold everything steady.
- Cut the bottom of the stems so they are all exactly the same length.
- Stand the bundle on a flat surface to make sure it does not tip over.
- Take a long piece of raffia and wrap it around the rubber band several times.
- Tie the raffia into a large decorative bow to hide the rubber band.
32 Preserved Moss Bonsai Tree
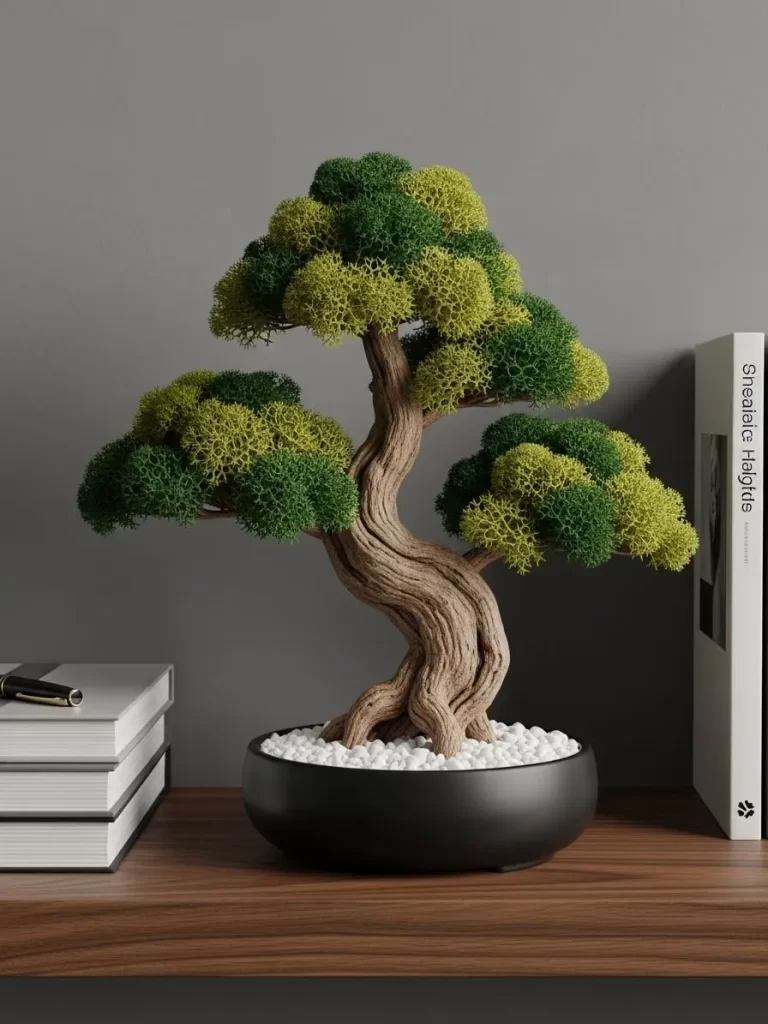
Soft green moss forms the canopy of this miniature bonsai tree with a twisted wood trunk. This maintenance free plant brings a sense of ancient wisdom to your desk or bookshelf. The dark ceramic bowl is filled with white stones to create a clean and modern contrast. You can enjoy the look of a real bonsai without the years of difficult pruning.
Different shades of light and dark moss give the tree a realistic and healthy appearance. The gnarled trunk features deep textures that look like a tree in a mountain forest. It serves as a great focal point for a minimalist room or a Zen garden display. You will appreciate how this piece brings a calm energy to your workspace.
Material Required List
- Twisted natural wood branch or grapevines
- Preserved reindeer moss in two shades of green
- Round black ceramic bonsai pot
- Small white decorative pebbles
- Floral foam
Equipment Required List
- Hot glue gun
- Wire cutters
DIY Instructions
- Wedge a piece of floral foam into the bottom of the black ceramic pot.
- Push your main wooden branch into the foam so it stands firmly.
- Use hot glue at the base of the branch to ensure it does not wiggle.
- Take small clumps of the darker green moss and glue them to the branch ends.
- Layer the lighter green moss on top of the dark moss to create highlights.
- Build up the moss until each branch looks like a full and fluffy cloud.
- Cover the top of the floral foam with the white decorative pebbles.
- Make sure the pebbles are level and cover every bit of the foam.
- Wipe the outside of the pot to remove any stray glue or dust.
33 Scientific Fern Specimen Gallery
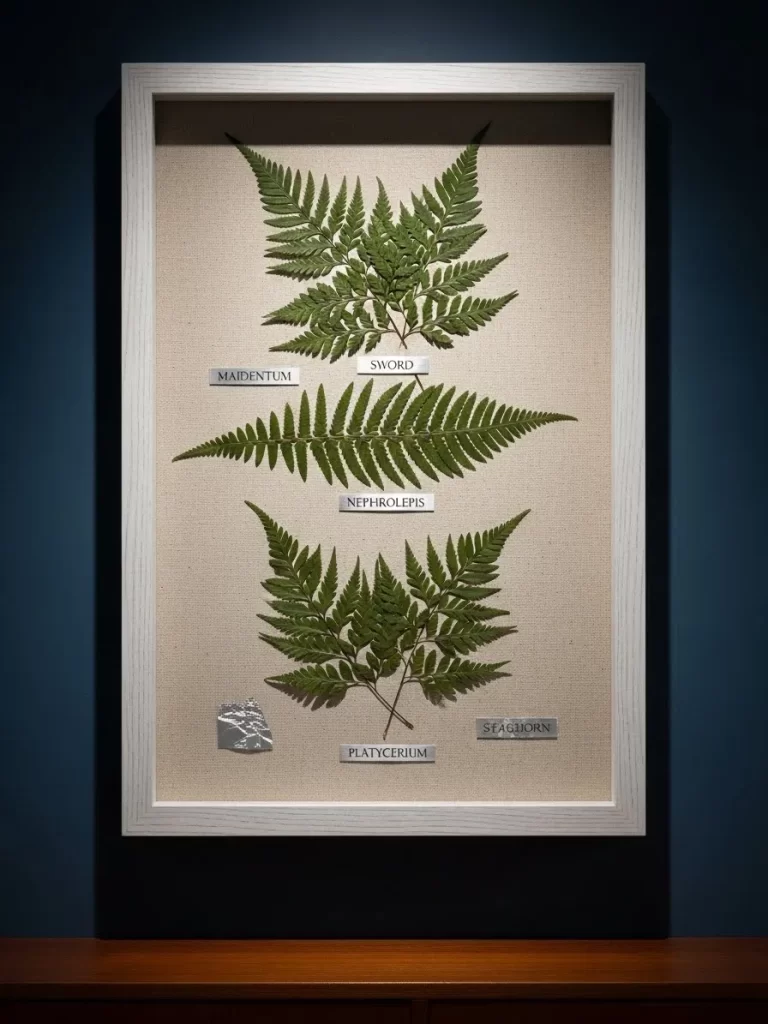
Three different species of green ferns are carefully mounted and labeled in a white shadow box. This arrangement follows the style of old botanical studies found in natural history museums. The neutral linen background makes the intricate patterns of the leaves stand out. It is a sophisticated piece of wall art for a study or a hallway.
Small metal tags give the scientific names for each fern to add an educational touch. The clean white frame keeps the focus on the organic beauty of the green plants. Every leaf is pressed perfectly to preserve its original shape and color. You will enjoy the organized and classic look of this botanical collection.
Material Required List
- Large white shadow box frame
- Cream colored linen fabric
- Three pressed ferns
- Small silver paper or metal labels
- Acid free glue
Equipment Required List
- Tweezers
- Fine tip pen
- Ruler
DIY Instructions
- Glue the linen fabric to the back board of the shadow box frame.
- Use a ruler to mark three even spots where the ferns will be placed.
- Apply tiny dots of glue to the back of the largest fern leaf.
- Use tweezers to center the fern on the top third of the linen.
- Repeat this process for the other two ferns in the middle and bottom rows.
- Write the scientific names on your labels using a fine tip pen.
- Glue the labels directly below each corresponding fern specimen.
- Check that everything is straight before placing the glass over the board.
- Secure the frame and hang it on a wall that does not get direct sun.
34 Amethyst and Air Plant Crystal Cluster
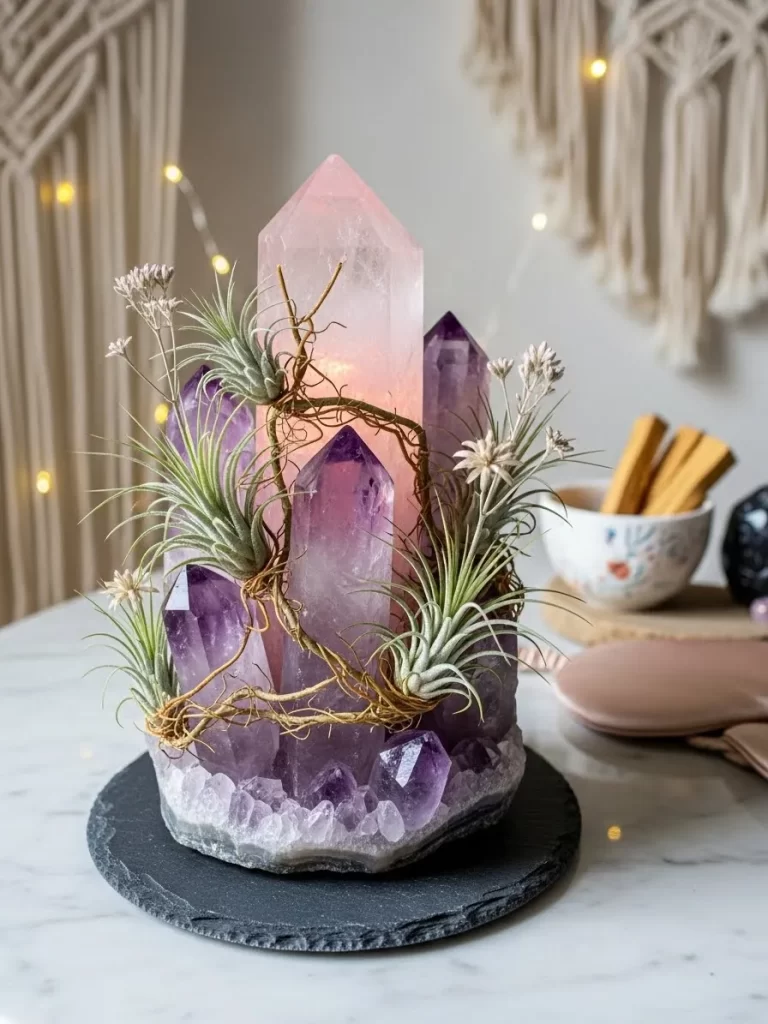
Spiky green air plants wrap around a massive pink and purple amethyst crystal. This arrangement combines the healing energy of stones with the fresh life of desert plants. The crystal sits on a black stone base to provide a solid and modern foundation. It serves as a beautiful and powerful centerpiece for a coffee table or an altar.
Internal light from the base makes the amethyst glow with a warm and inviting pink hue. Air plants are the perfect companion for crystals because they don’t need soil to grow. This piece is a wonderful gift for anyone who loves crystals or modern decor. You will find that this glowing garden adds a touch of magic to your home.
Material Required List
- Large amethyst crystal tower
- Three live air plants (Tillandsia)
- Round black slate base
- Thin natural grapevine or brown wire
- LED puck light
Equipment Required List
- Hot glue gun
- Spray bottle for water
DIY Instructions
- Glue the LED puck light to the center of the black slate base.
- Place the amethyst crystal directly on top of the light.
- Wrap a thin piece of grapevine around the middle of the crystal.
- Tuck the base of the air plants into the grapevine loops.
- Do not glue the plants so you can remove them for watering.
- Arrange the plants so they look like they are climbing the stone.
- Use the spray bottle to mist the air plants once a week.
- Turn on the light at night to see the crystal glow through the plants.
- Make sure to keep the base dry when you mist the greenery.
35 Giant Cherry Blossom Glass Floor Vase
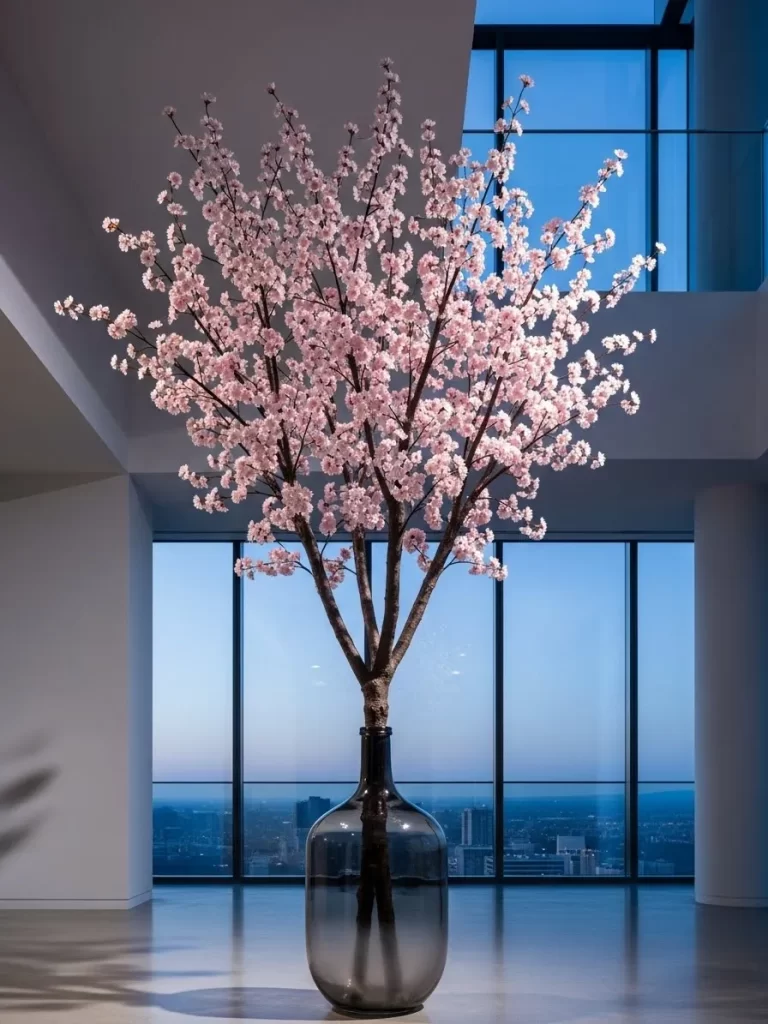
A massive branch of pink cherry blossoms stands tall in a floor length glass bottle. This arrangement brings the scale of a Japanese spring morning into a modern living room. The delicate pink petals contrast beautifully with the dark and gnarled wood of the branch. It serves as a towering focal point that fills empty corners with life and color.
High quality silk flowers ensure that the petals never fall on your floor. The clear glass vase shows the full length of the stem for a clean and minimalist look. This piece works well in rooms with high ceilings and large windows. You will love how this simple branch adds a sense of grandeur to your home.
Material Required List
- One 6 foot tall silk cherry blossom branch
- Extra large clear glass floor bottle
- Clear acrylic water
- Large smooth river stones
Equipment Required List
- Long stick for stirring
- Glass cleaner
DIY Instructions
- Clean the inside of the large glass bottle to remove any dust or streaks.
- Place a few large river stones at the bottom to provide weight and stability.
- Insert the tall cherry blossom branch into the center of the bottle.
- Mix the clear floral resin according to the package instructions.
- Carefully pour the resin into the bottom of the vase to cover the stones.
- Hold the branch steady for ten minutes until the resin starts to set.
- Let the resin cure for twenty four hours to create a permanent water look.
- Place the vase in a corner where it has plenty of space to branch out.
- Dust the silk petals occasionally to keep the pink color looking fresh.
36 Blue Morpho Butterfly Glass Dome

Three vibrant Blue Morpho butterflies seem to flutter around a column of dried wildflowers. This arrangement is protected by a tall glass cloche with a classic black base. The bright blue wings offer a stunning contrast to the earthy yellows and oranges of the flowers. It is a piece of natural art that feels like a discovery from a tropical forest.
Each butterfly is carefully mounted to show the intricate patterns and shimmering colors. This display brings a touch of curiosity and wonder to your bookshelf or mantel. It is a timeless gift for nature lovers and collectors of beautiful things. You will enjoy the sense of life and motion captured inside the glass.
Material Required List
- Three ethically sourced Blue Morpho butterfly specimens
- Tall column of dried strawflowers and baby’s breath
- Glass cloche with a black wooden base
- Thin floral mounting wire
- Clear adhesive
Equipment Required List
- Tweezers
- Small pliers
DIY Instructions
- Glue a small bunch of dried flowers to the center of the wooden base.
- Ensure the flowers stand tall enough to fill the height of the glass dome.
- Use tweezers to hold the butterfly by its body, not the fragile wings.
- Attach a tiny piece of thin wire to the back of each butterfly.
- Poke the other end of the wire into the flower column at different heights.
- Position the butterflies so they look like they are in mid flight.
- Angle the wings slightly to catch the light and show off the blue shine.
- Clean the glass dome thoroughly before lowering it over the base.
- Seal the bottom of the dome with a tiny bead of glue to keep out dust.
37 Fragrant Rose and Herb Wax Sachet

Dried red rosebuds and green leaves are embedded in a rectangular white wax tablet. This sachet is designed to hang in a bathroom or closet to provide a light and natural scent. A soft peach ribbon allows you to easily display this botanical art on any door or hook. It combines the beauty of a floral arrangement with the function of a home fragrance.
Small pieces of clear sea salt add a sparkling texture to the smooth wax surface. These tablets last for many months and make wonderful handmade gifts for friends. You can see every tiny detail of the herbs and flowers through the semi clear wax. You will find that this small piece adds a touch of luxury to your daily routine.
Material Required List
- White soy wax flakes
- Dried red rosebuds and petals
- Fresh green leaves
- Large sea salt crystals
- Rose essential oil
- Peach satin ribbon
Equipment Required List
- Rectangular silicone sachet mold
- Wax melting pot
- Straw for making the hole
DIY Instructions
- Melt the soy wax in a pot until it is completely liquid.
- Add ten drops of rose essential oil to the wax and stir gently.
- Pour the wax into the silicone mold until it is half an inch thick.
- Wait two minutes for the wax to start cooling and turn slightly white.
- Place the rosebuds and green leaves into the wax in a decorative pattern.
- Sprinkle the sea salt crystals over the remaining empty spaces.
- Push a straw through the top center of the wax to create a hanging hole.
- Let the wax harden completely for at least four hours.
- Remove the sachet from the mold and pull out the straw.
- Thread the peach ribbon through the hole and tie it in a neat loop.
38 Black Bamboo and Green Orchid Zen Bowl

Sleek black bamboo stalks rise behind a single stem of lime green orchids in this modern display. A large Monstera leaf sits at the base to add a bold and tropical feel to the design. This arrangement uses high contrast colors and simple shapes to create a feeling of luxury. It is a perfect choice for an entryway or a modern dining room table.
The dark textured bowl provides a grounding element for the tall and airy plants. Every piece is artificial but features realistic textures that look like the real thing. This display requires no care and will stay looking fresh forever. You will enjoy how the vertical lines of the bamboo add height and drama to your room.
Material Required List
- Four black artificial bamboo stalks
- One silk lime green orchid stem
- One large artificial Monstera leaf
- Round black matte ceramic bowl
- Black floral foam
- Preserved dark moss
Equipment Required List
- Wire cutters
- Glue gun
DIY Instructions
- Place the black floral foam into the center of the ceramic bowl.
- Insert the bamboo stalks into the back of the foam in a tight cluster.
- Fan the bamboo slightly so they don’t look too stiff or straight.
- Push the Monstera leaf into the foam so it lays flat over the bowl rim.
- Insert the green orchid stem in front of the bamboo stalks.
- Bend the orchid stem so it curves gracefully toward the left side.
- Cover the remaining foam with the preserved dark moss.
- Use a little glue to keep the moss from falling out of the bowl.
- Wipe the black bamboo with a damp cloth to make it shine.
39 Ancient Stone Vase Banksia Display
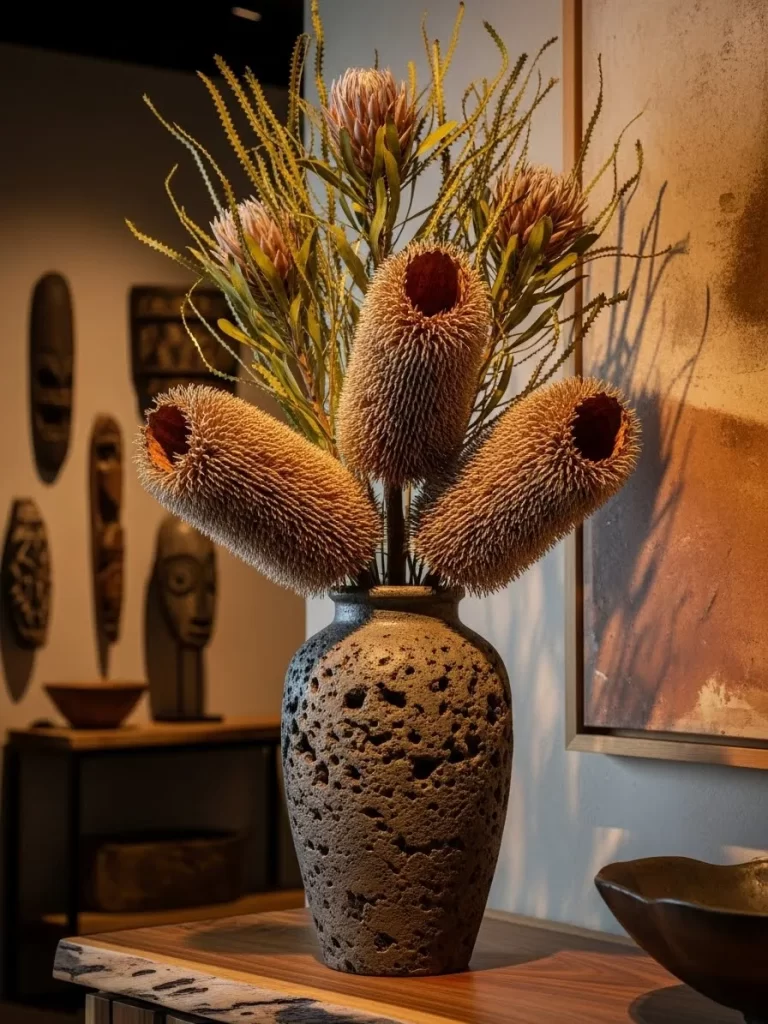
Textured brown banksia pods and tall yellow grass stems sit in a rough stone vase. This arrangement looks like it was plucked from a wild coastal garden. The porous surface of the vase adds a prehistoric feel to the organic materials. It is a strong and masculine design that works well in a modern rustic home.
Natural light highlights the fuzzy textures of the pods and the sharp lines of the grass. This display uses only dried materials, so it will last for years with no water. It serves as a great conversation piece on a heavy wooden console or mantel. You will love the earthy and grounded energy this arrangement brings to your space.
Material Required List
- Three dried banksia pods
- Bundle of tall yellow dried grass
- Two small protea flowers
- Heavy stone vase
- Sand for weight
Equipment Required List
- Gardening gloves
- Heavy duty shears
DIY Instructions
- Fill the bottom of your stone vase with sand to keep it from tipping over.
- Put on your gloves to protect your hands from the rough banksia pods.
- Insert the tall yellow grass stems into the back of the vase first.
- Place the three banksia pods in the center at different heights.
- Angle the pods so they face outward toward the room.
- Tuck the two small protea flowers into the base of the grass.
- Ensure the stems are buried deep in the sand so they don’t move.
- Check the balance of the arrangement by stepping back a few feet.
- Place the vase on a sturdy table that can handle the heavy weight of the stone.
40 Red Hydrangea Wall Heart

Thousands of tiny red hydrangea petals form a massive and plush heart on the wall. This romantic installation serves as a bold alternative to a traditional headboard in a bedroom. The deep crimson color adds a sense of passion and warmth to the entire room. It is a soft and textured piece of art that feels like a permanent Valentine.
The heart shape is perfectly symmetrical and fills the wall with a rich floral landscape. Silk petals ensure that this heart stays vibrant and full for many years. It is a stunning way to show your love through home decor. You will find that this floral heart becomes the most talked about feature of your home.
Material Required List
- Large heart shaped wooden backing board
- 50 Large silk red hydrangea heads
- Wall mounting brackets
- Strong floral adhesive
Equipment Required List
- Hot glue gun
- Level
- Screwdriver
DIY Instructions
- Attach the mounting brackets to the back of your heart board first.
- Lay the heart board flat on the floor to begin adding the flowers.
- Pull the individual petals off the hydrangea heads to make them easier to glue.
- Start at the outer edge of the heart and apply a thick layer of glue.
- Press the red petals into the glue so they overlap and look very full.
- Work your way toward the center until the entire board is covered.
- Make sure no part of the backing board is visible through the petals.
- Let the glue dry completely for twenty four hours before hanging.
- Use a level to ensure the heart is straight when you mount it on the wall.
- Gently fluff the petals with your hands to give the heart more volume.
Key Takeaways
Preserved materials like dried roses and silk stems offer beauty that lasts for years.
DIY arrangements allow for complete customization to match any home decor style.
Unique containers such as concrete or leather add a modern edge to classic flowers.
Low maintenance designs remain great for busy lifestyles since they require no water.
Handmade gifts carry a deeper message of care and effort compared to store bought items.
Creating a unique floral display shows deep care for your partner. These arrangements prove that beauty does not have to be temporary or fragile. You now have forty different ways to brighten up your living space for the holiday. Every project offers a chance to build something memorable.
Personalize these ideas to match your specific home style and color palette. Using preserved materials ensures your hard work remains visible for a long time. Gifts that last carry a special message of enduring affection and strength. Your Valentine will surely appreciate the effort put into a handmade creation.
Explore the different materials to see which ones resonate with your creative side. Building these items can be a fun and relaxing way to spend an afternoon. Your home will look refreshed and festive once you display your new floral art. Enjoy the process of bringing lasting life to your interior design.