Halloween is just around the corner, and the excitement is brewing! For families with little ones, decorating is less about terrifying haunts and more about creating a fun, festive atmosphere where imaginations can run wild. It’s about the joy of making things together and seeing their faces light up.

This season is a wonderful opportunity to start traditions and make memories. Finding decorations that are more sweet than scary allows everyone, from toddlers to grandparents, to get in on the fun. The goal is to create a space that feels magical, playful, and full of Halloween spirit.
We’ve gathered 45 wonderfully creative and kid-friendly decor ideas to help you transform your home. Each one comes with simple, step-by-step DIY instructions designed to be easy enough for your little helpers to follow along. Get ready to craft some amazing memories!
1. Mad Scientist’s Bug Collection

Transform a boring shelf into a creepy-crawly laboratory. This display creates a fun sense of spooky discovery for everyone. Your kids will enjoy pretending they are bug collectors who have found some strange new creatures.
The setup looks like a real science exhibit with its specimen jars and magnifying glasses. It’s a great way to add a touch of mystery to your home without being too scary. Little explorers can get a close-up look at all the fascinating insects, sparking their imagination for Halloween adventures.
DIY Mad Scientist’s Bug Collection
What You’ll Need:
- Clean, empty glass jars with lids (pickle jars or mason jars work well)
- A bag of plastic bugs, spiders, and insects
- Some dirt, sand, or craft moss
- Small twigs and leaves from your yard
- Small pieces of paper or mini chalkboards for labels
- A black marker or chalk pen
- Optional: A magnifying glass and some fake spiderwebs
Instructions:
Step 1: Prepare Your Lab Jars First, make sure all your jars are completely clean and dry. If you’re using old food jars, ask an adult to help you wash them with warm, soapy water to get rid of any leftover smells.
Step 2: Build a Bug Habitat Next, spoon a little bit of dirt, sand, or moss into the bottom of each jar. This creates a base that looks like a real home for your bugs. You can add a tiny twig or a couple of small leaves to make it look even more realistic.
Step 3: Add Your Creepy Crawlies Carefully place one or two of your plastic bugs inside each jar. Don’t put too many in one jar, because you want to be able to see each one clearly. Arrange them so they look like they are crawling around.
Step 4: Label Your Specimens Now for the fun part! Use your marker or chalk pen to write a cool, scientific-sounding (or silly!) name for your bug on a label. You can call them things like “Six-Eyed Crawler” or “The Fuzzy Jumper.” Stick the label onto the front of the jar.
Step 5: Arrange Your Spooky Display Line up your finished bug jars on a shelf or table. For a final touch, place a magnifying glass nearby. You can also stretch some fake spiderwebs over and around the jars to make your collection look extra spooky and old.
2. Friendly Porch Scarecrow Patch

Create a warm and welcoming autumn scene right on your front porch. This setup uses classic harvest elements to greet guests with a smile. The friendly scarecrow stands guard over a cheerful collection of pumpkins and hay.
This decoration is all about celebrating the cozy feeling of fall. It avoids scary themes, making it pleasant for even the youngest visitors. The mix of hay bales, wooden crates, and lanterns adds a rustic touch that feels like a visit to a real pumpkin patch.
DIY Friendly Porch Scarecrow Patch
What You’ll Need:
- A friendly-looking scarecrow (store-bought or homemade)
- 2-3 hay bales of different sizes
- A variety of pumpkins (real or craft pumpkins)
- A few old wooden crates
- An old blanket or plaid throw
- Fake autumn leaves
- A wooden pole or sturdy stick for the scarecrow
Instructions:
Step 1: Build Your Base Start by arranging the hay bales on your porch. Don’t just line them up; stack them at different heights to make the display more interesting. This will be the foundation of your patch.
Step 2: Position the Scarecrow If your scarecrow is on a pole, you can stick it securely into one of the hay bales. Make sure it’s standing up straight and tall. If it doesn’t have a pole, you can sit it comfortably on the tallest hay bale.
Step 3: Add Crates and Pumpkins Place the wooden crates next to and on top of the hay bales. Now, start adding your pumpkins! Put bigger pumpkins on the hay and smaller ones inside and on top of the crates. Mix up the colors and sizes.
Step 4: Make it Cozy Drape the plaid blanket over one of the hay bales or crates. This adds a nice pop of color and makes the whole scene feel cozier.
Step 5: Final Touches Scatter the fake autumn leaves all around the base of your display. This makes it look like the leaves have just fallen from the trees. Your welcoming scarecrow patch is now ready to greet everyone!
3. Goblin’s Secret Swamp Village

Turn a quiet corner of a room into a mysterious and glowing goblin swamp. This magical scene invites kids to imagine a hidden world of tiny, mischievous creatures. Green lights and glowing candy create an enchanting atmosphere that is more wondrous than worrisome.
Little houses and goblin figures are tucked into mossy landscapes. Footprints on the floor suggest the creatures have been wandering about. It’s an imaginative setup that tells a story and sparks curiosity.
DIY Goblin’s Secret Swamp Village
What You’ll Need:
- Two small wooden birdhouses
- Green craft paint and a paintbrush
- Craft moss (from a craft store)
- A black cauldron bowl
- Green candy or green glass beads
- Smooth, round stones
- Green and black paint pens or markers
- Green construction paper and scissors
- A string of green LED lights
Instructions:
Step 1: Paint the Goblin Houses First, paint your two wooden birdhouses with the green craft paint. You might need two coats to cover them completely. Let them dry all the way.
Step 2: Lay Down the Mossy Ground Find a corner on the floor where you want to build your village. Lay down the craft moss to create a soft, swampy ground for your scene.
Step 3: Create Your Goblin Rocks Use the green paint pen to color your smooth stones. Once the green is dry, use the black marker to draw silly goblin faces on them. You can make them happy, surprised, or sleepy.
Step 4: Fill the Cauldron Place the black cauldron in the middle of your mossy area. Fill it to the top with the shiny green candy or glass beads. This looks like a pot of goblin treasure or a magic potion.
Step 5: Make Goblin Footprints Draw a small footprint shape on the green construction paper and carefully cut it out. Use this first one as a template to trace and cut out about 6-8 more footprints. Arrange them on the floor as if a goblin has just walked through.
Step 6: Assemble Your Village Place your finished goblin houses on the moss. Arrange your goblin rocks around the houses and cauldron. Finally, tuck the string of green lights in and around the moss to make your whole village glow.
4. Count Veggie’s Vampire Garden

Bring some silly fun to your kitchen counter with a garden of vampire vegetables. This display features adorable vampire gnomes watching over their spooky produce. It’s a hilarious twist on Halloween that will make everyone giggle.
Red peppers and beets become “Count Veggie” and his friends with the simple addition of plastic fangs. Little signs add to the humor, warning visitors to “Beware the Gardener.” This decoration is a lighthearted way to celebrate the season with a healthy dose of fun.
DIY Count Veggie’s Vampire Garden
What You’ll Need:
- A few small garden gnomes
- Small pieces of black and red felt
- Glue or double-sided tape
- A few fresh vegetables, like red bell peppers and beets
- Small plastic vampire fangs (the kind for kids)
- Small potted plants or herbs to create the “garden”
- White paper, black marker, and toothpicks for the signs
Instructions:
Step 1: Dress Up Your Gnomes Cut small cape shapes out of the black felt. Make them long enough to go around the gnomes’ shoulders. You can add a little red collar with the red felt. Use glue or tape to attach the capes to your gnomes, turning them into little vampires.
Step 2: Create the Vampire Veggies Ask an adult to help you carefully cut a small slit in the front of the red pepper or beet where a mouth would be. Gently push a set of plastic vampire fangs into the slit. Your veggie is now a vampire!
Step 3: Make Your Warning Signs Cut small rectangles out of the white paper. Use the black marker to write funny warnings like “Count Veggie” or “Beware The…”. Tape a toothpick to the back of each sign so you can stick them into the plant pots.
Step 4: Set Up Your Garden Arrange the potted plants on a table or countertop. Place your vampire gnomes among the plants as if they are the gardeners.
Step 5: Place Your Spooky Produce Set your vampire vegetables in front of the gnomes and plants. Stick your handmade signs into the soil of the potted plants. Your silly vampire garden is complete!
5. Fire-Breathing Dragon’s Feast

Set the table for an adventure with this exciting dragon-themed party setup. A giant dragon appears to breathe fire over a cauldron centerpiece, creating a scene from a fantasy story. This is a thrilling theme for any kid who loves myths and legends.
The details make this table special, from the shimmering dragon eggs in a nest to the gold coins scattered around. The fiery colors of red, orange, and yellow tie everything together for a bold and dramatic look. It’s a feast fit for a hero.
DIY Fire-Breathing Dragon’s Feast
What You’ll Need:
- Colorful plastic or foam craft eggs (look for ones that are egg-shaped)
- Metallic paint in purple, green, and orange
- Glitter
- A small paintbrush and glue
- A round, shallow basket or a wreath base for the nest
- A small black cauldron
- Cotton balls
- Red, yellow, and orange construction paper
- A large dragon decoration (like a wall sticker or inflatable)
Instructions:
Step 1: Paint the Dragon Eggs Paint your craft eggs with the metallic paints. While the paint is still a little wet, sprinkle glitter on them to make them sparkle. Let them dry completely. These are your precious dragon eggs.
Step 2: Build the Nest Place the basket or wreath base in the center of your table. This will be the nest for your eggs and cauldron.
Step 3: Create a Smoking Cauldron Put the small black cauldron in the middle of the nest. Gently stretch out some cotton balls and place them inside and overflowing from the cauldron. This will look like smoke.
Step 4: Add Paper Flames Cut out flame shapes from the red, orange, and yellow paper. Make some big and some small. You can tuck these into the cotton “smoke” in your cauldron to make it look like a fire is inside.
Step 5: Arrange the Feast Table Place your shiny dragon eggs in the nest around the cauldron. If you have a large dragon decoration, position it behind the table so it looks like it’s guarding the nest. Scatter some chocolate gold coins around the table for a final touch.
6. Spooky Detective’s Evidence Wall

Create a fun Halloween mystery with an interactive detective wall. This clever setup turns a blank wall into the headquarters for a spooky investigation. It’s filled with “clues,” “secret files,” and mysterious footprints.
Kids will love following the red string that connects all the evidence. The board is a great way to engage their problem-solving skills and imagination. You can even hide a treat at the end of the “mystery” as a fun reward for your little detectives.
DIY Spooky Detective’s Evidence Wall
What You’ll Need:
- A large piece of yellow or beige poster board
- A black marker and a red marker
- Black construction paper
- Red yarn or string
- Tape and push pins
- White paper
- A few pieces of candy
- A black fedora hat and a magnifying glass (optional props)
Instructions:
Step 1: Make the Main Evidence Board Write “DETECTIVE EVIDENCE” in big letters at the top of the poster board with a black marker. Use the marker to draw a striped border around the edges, like caution tape.
Step 2: Create Your Clues On smaller pieces of white paper, draw some clues. You could draw a picture of a skeleton, a mysterious footprint, or write a riddle. Use the red marker to circle one of the clues and write “Clue!” next to it.
Step 3: Add the Candy Evidence Tape a few pieces of wrapped candy directly onto your evidence board. These are part of the mystery that your detectives need to solve.
Step 4: Connect the Dots Tape your paper clues onto the wall around the main poster board. Use the red yarn and push pins to connect the different clues. Crisscross the yarn to make it look like a real investigation.
Step 5: Add Secret Files Fold a few sheets of black construction paper in half to look like folders. Write “TOP SECRET” on the front with a white or silver marker. Pin these “files” up on the wall as part of the evidence. Your detective wall is now ready for inspection!
7. Witch’s Colorful Potion Station

Brew up some magical fun with a vibrant witch’s potion station. This enchanting corner is filled with colorful elixirs and spooky spell ingredients. It’s a playful take on a witch’s lab that focuses on bright colors instead of dark scares.
Bottles of “Giggle Juice” and “Dragon’s Breath” sit next to a bubbling cauldron. The scene is brought to life with glittery spiders and stacked books that look like ancient spellbooks. This setup is a fantastic backdrop for imaginative play.
DIY Witch’s Colorful Potion Station
What You’ll Need:
- A few empty glass bottles or jars in different shapes and sizes
- Water and food coloring (green, purple, blue)
- Paper, a pen, and some string for labels
- A small black cauldron
- Cotton balls or dry ice (for adult use only!)
- A few old books you can paint
- Black and green paint
- Glittery plastic spiders
Instructions:
Step 1: Mix Your Potions Fill your empty glass bottles almost to the top with water. Add a few drops of different food coloring to each bottle to make them bright green, purple, and blue. Put the lids back on tightly.
Step 2: Label the Potions Cut out small rectangles of paper for your labels. Write spooky and silly potion names on them, like “Frog’s Breath” or “Sunshine Elixir.” Use a small piece of string to tie a label around the neck of each bottle.
Step 3: Create the Spellbooks Take a few old hardcover books and paint their covers black and green. These will look like old spellbooks. Let them dry completely.
Step 4: Set Up the Bubbling Cauldron Place your cauldron on the table. For a safe, smoky effect, gently stretch out cotton balls and place them inside so they overflow. (An adult can add a small piece of dry ice and a little warm water for a real bubbling effect, but this must be done with great care).
Step 5: Assemble Your Station Stack your painted “spellbooks” on the table. Arrange your colorful potion bottles on top of and next to the books. Place your cauldron in the center and scatter a few glittery spiders around to complete the magical scene.
8. Pet Halloween Costume Paw-ty

Don’t forget your furry friends this Halloween! Set up an adorable photo booth to show off your pet’s cute costume. This decoration idea makes your pets the star of the show and creates wonderful memories.
A simple backdrop with “Happy Halloween” and paw prints is all you need. Add some themed balloons and pumpkins for extra flair. It’s a sweet and simple way to include the four-legged members of your family in the holiday festivities.
DIY Pet Halloween Costume Paw-ty Booth
What You’ll Need:
- A large white sheet or a large piece of white poster board
- Black felt or black construction paper
- Scissors and fabric glue (or regular glue for poster board)
- Balloons with paw prints on them (or plain black balloons and a white marker)
- A few small pumpkins
- Your pet’s cutest Halloween costume
Instructions:
Step 1: Create Your Backdrop Hang the white sheet against a clear wall, making sure it’s smooth. If you’re using poster board, you can prop it up on a table against the wall.
Step 2: Add the Lettering Cut out the letters for “HAPPY HALLOWEEN” from the black felt or paper. Arrange them in an arch at the top of your backdrop and glue them in place.
Step 3: Decorate with Paw Prints Cut out several paw print shapes from the black felt or paper. You’ll need one big circle for the main pad and four smaller circles for the toes for each paw. Glue them scattered around the backdrop.
Step 4: Set the Scene Inflate your balloons and place them on either side of the backdrop. If you have plain black balloons, you can draw white paw prints on them with a marker. Place a few pumpkins on the floor in front of your booth.
Step 5: Time for a Photo Shoot! Dress your pet in their costume. Have them sit or stand in front of the backdrop and get ready to take some adorable pictures. Have some treats ready to reward your model!
9. Enchanted Autumn Forest Entryway

Welcome guests and trick-or-treaters with a magical woodland scene at your front door. This charming decor uses natural elements to create the feeling of an enchanted forest. It’s a beautiful and gentle way to decorate for the season.
Friendly gnomes and wise owls peek out from behind mushrooms and pinecones. The warm glow from the lights wrapped around the branches adds a cozy and inviting touch. This entryway is like stepping into a fairy tale.
DIY Enchanted Autumn Forest Entryway
What You’ll Need:
- Two tall, sturdy tree branches
- Two buckets or large pots and some rocks or sand to hold the branches
- A string of orange or warm white fairy lights
- Fake autumn leaves (some loose and some on a garland)
- A fall-themed wreath for the door
- Woodland creature figures, like gnomes, owls, and foxes
- Fake mushrooms
Instructions:
Step 1: Set Up Your Trees Place a branch in each pot or bucket. Ask an adult to help you fill the container with rocks or sand to hold the branch firmly in place so it stands up straight. Put one on each side of your front door.
Step 2: Light Up the Branches Carefully wrap the string of fairy lights around each branch, weaving in and out of the smaller twigs.
Step 3: Add the Leaves Drape the leafy garland around the door frame, connecting the two branches. You can also use wire or string to attach more fake leaves directly onto the branches themselves.
Step 4: Hang the Wreath Place your autumn wreath in the center of your front door. This will be the focal point of your enchanted entryway.
Step 5: Invite the Forest Creatures Arrange your gnome, owl, and fox figures at the base of the branches. Tuck the fake mushrooms in between them. Scatter some loose leaves on the ground to complete the forest floor look.
10. Skeleton Disco Dance Party

Get ready to boogie with a hilarious skeleton dance party. This decoration proves that skeletons aren’t just for scaring—they love to have fun too! It’s a playful and energetic scene that will make everyone smile.
Posed skeletons groove under a sparkling disco ball, surrounded by colorful music notes. A “Bone-to-Boogie” banner sets the mood for this lively party. This is a fantastic way to use those classic Halloween skeletons in a new and funny way.
DIY Skeleton Disco Dance Party
What You’ll Need:
- Several plastic skeletons of different sizes (the kind with joints that can move)
- A disco ball
- A black poster board or black fabric for a backdrop
- Brightly colored paper (neon green, pink, blue, orange)
- Scissors and string
- Thin wire or clear fishing line
- Colorful party lights or a rotating colored light bulb
Instructions:
Step 1: Create the Party Backdrop Hang the black poster board or fabric on a wall. This will make all the bright colors pop.
Step 2: Make the Banner and Music Notes Cut out letters from the colorful paper to spell “BONE-TO-BOOGIE.” Tape them to a piece of string to make a banner and hang it on your backdrop. Then, cut out several music note shapes from the different colored papers and tape them all over the backdrop.
Step 3: Hang the Disco Ball Hang the disco ball from the ceiling in the center of your party area. Aim your colorful party lights at the disco ball so it scatters dancing lights all over the room.
Step 4: Pose Your Skeletons This is the most fun part! Bend the joints of your skeletons to put them in dancing poses. You can make one look like it’s waving its arms in the air and another doing a cool dance move.
Step 5: Make Them Stand To help your skeletons stand up and stay in their poses, you might need to use thin wire or fishing line. You can wrap it around their waists and discreetly tie it to a piece of furniture, or use it to hang them from the ceiling as if they’re jumping. Your disco is now open!
11. Glow-in-the-Dark Ghostly Gala

Light up the night with a room that comes alive when the lights go out. This glowing ghost party is an exciting way to decorate for a sleepover or a nighttime celebration. The real magic happens in the dark, creating a super cool surprise for everyone.
Friendly ghosts float from the ceiling, and strange creatures stick to the walls. The glowing pumpkins and balloons add to the otherworldly feel. It’s a room full of spooky fun that feels like stepping into a different dimension.
DIY Glow-in-the-Dark Ghostly Gala
What You’ll Need:
- White balloons
- Cheesecloth or thin white fabric
- Glow sticks (thin ones for balloons, thicker ones for costumes)
- Glow-in-the-dark wall stickers (bugs, footprints, etc.)
- Glow-in-the-dark paint and a paintbrush
- A few small pumpkins
- Black clothing (sweatshirt and pants)
- Tape and clear fishing line
Instructions:
Step 1: Create Floating Ghosts Blow up a few white balloons. Drape a piece of cheesecloth or white fabric over each balloon. Use a black marker to draw two simple eyes. Use clear fishing line and tape to hang them from the ceiling.
Step 2: Activate the Glow Carefully crack a thin glow stick and slip it inside another white balloon before you tie it. This will make the whole balloon glow.
Step 3: Decorate the Room Stick the glow-in-the-dark stickers all over the walls. Paint jack-o’-lantern faces on your small pumpkins using the glow-in-the-dark paint. Let them “charge” under a bright light before turning the lights off.
Step 4: Make a Glow-Stick Costume Lay the black clothing on the floor. Arrange glow sticks in the shape of a stick figure on the front of the sweatshirt and pants. Use clear tape to securely attach them.
Step 5: Let the Gala Begin! Turn off all the lights in the room to see your amazing glowing creations. The ghosts will float, the walls will crawl with light, and the costumes will be ready to dance.
12. Prehistoric Pumpkin Patch

Travel back in time to when dinosaurs roamed the pumpkin patch. This fun outdoor scene combines two things kids love: dinosaurs and Halloween. It’s an adventurous setup that imagines a world where a T-Rex might carve a pumpkin.
Toy dinosaurs, both scary and friendly, are placed among carved jack-o’-lanterns. A “Dinosaur Crossing” sign serves as a funny warning to visitors. This display is a great way to use old toys to create an exciting and imaginative yard decoration.
DIY Prehistoric Pumpkin Patch
What You’ll Need:
- A variety of toy dinosaurs (plastic ones and skeleton models look great)
- 2-3 pumpkins, carved with simple, happy faces
- A few very small pumpkins or gourds
- A yellow poster board and a black marker
- A wooden stake or sturdy stick
- Fake ferns and large leaves (from a craft store or your yard)
Instructions:
Step 1: Create the Dino Crossing Sign Cut the yellow poster board into a diamond shape. Use the black marker to draw the outline of a T-Rex skeleton in the middle. Write “DINAR CROSSINGS” (or “Dino Crossing”) in big, bold letters. Tape the sign to the top of your wooden stake.
Step 2: Build Your Jungle Base Find a spot in your yard or on your porch. Arrange the fake ferns and large leaves on the ground to create a lush, jungle-like area.
Step 3: Place Your Pumpkins Set your large, carved jack-o’-lanterns in the middle of your jungle base. These are the main pumpkins for your patch.
Step 4: Add the Dinosaurs Now, let the dinosaurs roam! Arrange your toy dinosaurs all around the pumpkins. You can have some peeking out from behind the leaves and others looking like they are about to take a bite of a pumpkin.
Step 5: Final Touches Place the tiny pumpkins on the backs of some of the bigger dinosaurs, as if they are carrying them. Stick your “Dino Crossing” sign into the ground behind your scene to complete your prehistoric adventure.
13. Cozy Black Cat Corner

Create a charming and sweet spot dedicated to Halloween’s most famous feline. This black cat theme is more cute than creepy, making it a lovely decoration for any room. It uses simple crafts and cozy textures to celebrate this furry icon.
Pumpkins painted to look like cats become the main attraction. A simple garland and cat-faced pillows complete the theme. It’s a gentle and playful way to decorate that everyone will find adorable.
DIY Cozy Black Cat Corner
What You’ll Need:
- One orange pumpkin and one smaller black craft pumpkin (or a white one you can paint)
- Black and white craft paint and paintbrushes
- Black construction paper and scissors
- Glue or a hot glue gun (for adult use)
- Black yarn and orange yarn
- A hole punch and string for the garland
Instructions:
Step 1: Paint Your Cat Pumpkins If you have a white pumpkin, paint it completely black and let it dry. For both the orange and black pumpkins, use white paint to add two dots for eyes, a little nose, and some whiskers.
Step 2: Add Cat Ears Cut out two triangle shapes from the black construction paper for each pumpkin. These are the ears. Fold a small tab at the bottom of each triangle and use glue to attach them to the top of your pumpkins.
Step 3: Make a Cat and Pumpkin Garland Cut out several small cat head shapes from black paper and small pumpkin shapes from orange paper. Use a black marker to draw faces on them. Use a hole punch to make a hole at the top of each shape and thread them onto a piece of string.
Step 4: Arrange Your Corner Place your finished cat pumpkins on a shelf or table. Drape your garland in front of them or hang it on a window or wall nearby.
Step 5: Add a Playful Touch Loosely roll some of the orange and black yarn into balls and place them next to your cat pumpkins. This will look like the cats have been playing with them.
14. Autumn Owl Hootenanny

Celebrate the beauty of a crisp autumn night with this peaceful woodland scene. This decoration is filled with wise owls perched among pumpkins and gourds. It’s a calm and natural display that captures the cozy feeling of the season.
The scene is perfect for a porch or entryway, using branches and a starry backdrop to create a nighttime forest feel. It also includes a fun craft activity, making little owls from pinecones. This decor is all about the quiet magic of nature.
DIY Autumn Owl Hootenanny
What You’ll Need:
- A few large pinecones
- Brown felt and scissors
- Googly eyes and glue
- A sturdy branch
- A collection of small pumpkins and gourds
- A large piece of dark brown or black cardboard for the backdrop
- Yellow paper for a moon and stars
Instructions:
Step 1: Craft Your Pinecone Owls For each owl, cut out two wing shapes and a small V-shape for a beak from the brown felt. Glue the wings onto the sides of a pinecone. Then, glue two googly eyes near the top. Your little pinecone owl is ready!
Step 2: Create the Night Sky Cut a large crescent moon shape and several small stars from the yellow paper. Glue them onto the dark cardboard backdrop to create a starry night sky.
Step 3: Build Your Perch Prop your backdrop up against a wall. Lay the sturdy branch on some blocks or books in front of the backdrop so it is raised off the ground.
Step 4: Arrange the Harvest Place your pumpkins and gourds on the ground underneath and around the branch. Mix up the shapes, colors, and sizes.
Step 5: Let the Owls Settle In Place your finished pinecone owls and any other owl figures you have on the branch. You can also nestle a few among the pumpkins on the ground. Your peaceful owl hootenanny is now complete.
15. Ghostly Pirate’s Treasure Cove

Ahoy, mateys! Turn your porch into a spooky pirate ship searching for treasure. This exciting theme is full of adventure, from a tattered treasure map to chests overflowing with gold. It’s a scene that will capture the imagination of any young explorer.
Ghostly pirates stand guard over their loot, adding a fun and spooky Halloween twist. A ship’s wheel, fishing nets, and a skull-and-crossbones flag make the scene feel like a real pirate’s den. This setup is all about creating a story.
DIY Ghostly Pirate’s Treasure Cove
What You’ll Need:
- Two small treasure chests (from a craft store)
- Chocolate gold coins
- A white sheet and a black marker
- A large piece of brown kraft paper
- A black fishing net
- A skull-and-crossbones flag (or make one with black fabric and white paint)
- Blue fabric or a blue tablecloth
Instructions:
Step 1: Make Your Ghost Pirate Drape the white sheet over a hanging plant hook, a chair, or a tomato cage to give it a body shape. Use the black marker to draw a simple ghost face with two oval eyes and a round mouth. You can add a pirate hat on top.
Step 2: Create the Treasure Map Crumple up the brown kraft paper into a tight ball, then carefully flatten it out again to make it look old and wrinkly. Use a black or brown marker to draw a map with a dotted line leading to a big “X.”
Step 3: Set the Ocean Scene Drape the blue fabric on the floor of your porch to look like the ocean. Hang the black fishing net on the wall behind your scene.
Step 4: Guard the Treasure Fill your treasure chests with the chocolate gold coins, letting them spill out onto the ground. Place your ghost pirate nearby as if it is guarding the treasure.
Step 5: Add Pirate Details Lay your treasure map on the floor. Hang your pirate flag on the wall. If you have a toy ship’s wheel or an anchor, add them to the scene to complete your spooky pirate cove.
16. The Haunted Library

Bring a touch of magic and mystery to your bookshelf with a haunted library theme. This enchanting decoration makes it look like books are flying through the air on their own. It’s a spellbinding scene that feels like it’s straight out of a wizard’s school.
Friendly paper ghosts peek out from behind old books, and spooky spiderwebs cover the shelves. The whole display is lit by the gentle flicker of electric candles, creating a cozy yet mysterious atmosphere that invites you to come and read a spooky story.
DIY The Haunted Library
What You’ll Need:
- 5-6 old paperback books you don’t need anymore
- Clear fishing line and a needle
- Small, clear adhesive hooks
- White paper and scissors
- A black marker
- Fake spiderweb material
- Electric candles (the battery-powered kind)
Instructions:
Step 1: Prepare the Flying Books Open a book to the middle. Ask an adult to help you use the needle to thread a long piece of clear fishing line through the spine of the book. Tie a strong knot so the book can hang from the string. Do this for all the books you want to “fly.”
Step 2: Make the Books Float Stick the clear adhesive hooks to the ceiling above your bookshelf. Tie the other end of the fishing line from each book to a hook. Hang them at different heights so they look like they are floating in the air.
Step 3: Create Friendly Ghosts Cut out some simple ghost shapes from the white paper. Use the black marker to draw happy or surprised faces on them.
Step 4: Decorate the Shelves Gently stretch the fake spiderweb material over the books and shelves. Tuck your little paper ghosts in between the books so they are peeking out.
Step 5: Add a Spooky Glow Place a few electric candles on the shelves. Turn them on to give your haunted library a warm, flickering light that is safe for being around books and paper.
17. Silly Monster Mash Welcome

Invite guests to your home with a burst of color and goofy monster grins. This front door decoration is all about fun, using bright colors and fuzzy textures to create monsters that are impossible not to love. It’s a cheerful and friendly way to say “Happy Halloween.”
Big, fluffy monsters greet everyone with open arms, surrounded by balloons and playful wreaths. This theme avoids anything scary and focuses on pure, silly fun. It’s a wonderful way to make your front door the most cheerful one on the block.
DIY Silly Monster Mash Welcome
What You’ll Need:
- Large pieces of blue and green poster board
- White and black paper for eyes and mouths
- A styrofoam wreath form
- Lots of colorful pom-poms in different sizes
- A hot glue gun (for adult use)
- A colorful tassel garland
- Brightly colored balloons
Instructions:
Step 1: Build Your Big Monsters Cut a large, round monster body shape from the blue poster board. Cut out two big white circles for eyes and smaller black circles for pupils. Glue them on. Then, cut out a happy, toothy grin from white paper and a smiling mouth from black paper and glue those on too. Do the same to create a green monster.
Step 2: Make a Pom-Pom Wreath Ask an adult to help you use the hot glue gun to cover the styrofoam wreath form with colorful pom-poms. Don’t leave any white spots showing. Make one or two of these.
Step 3: Decorate Your Door Tape your big blue monster to the center of your front door. Hang the pom-pom wreaths on either side of the door. Hang the tassel garland above the door frame.
Step 4: Add More Monster Friends You can tape the green monster to the wall next to the door. If you have fuzzy pillows, you can set them on your porch steps to add to the soft, monster-y feel.
Step 5: Finish with Balloons Inflate your colorful balloons and tie them to your porch railing. Your silly monster welcome is now ready to make everyone smile!
18. Spooky Scoops Ice Cream Shoppe

Serve up some sweet and spooky treats with a pastel Halloween ice cream parlor. This unique theme uses soft, candy-like colors to create a friendly and imaginative scene. It’s a delightful twist on Halloween that looks good enough to eat.
Pumpkins are painted to look like scoops of ice cream, and friendly ghosts in top hats are ready to take your order. A charming menu board lists fun flavors like “Phantom Chip” and “Boo-Berry.” This decor is a recipe for a truly sweet Halloween.
DIY Spooky Scoops Ice Cream Shoppe
What You’ll Need:
- A few pumpkins in different sizes (real or craft)
- Pastel-colored craft paint (like mint green and light pink)
- White paper, a black marker, and a small easel or chalkboard for the menu
- Two white plastic tablecloths or white sheets for the ghosts
- Black felt for eyes and mouths
- Small paper top hats (from a party store)
- A large paper ice cream cone decoration (or make one from brown kraft paper)
Instructions:
Step 1: Paint Your Pumpkin Scoops Paint your pumpkins with the pastel colors and let them dry completely. You can paint one pink and one mint green.
Step 2: Add Toppings and Faces For the “ice cream” pumpkins, you can paint on some “sprinkles” or glue on some colorful pom-poms. For your main pumpkin stack, paint a happy jack-o’-lantern face on the bottom one.
Step 3: Create Your Ghost Servers Drape a white tablecloth or sheet over a tall lamp or a stool to create a ghost shape. Cut out two oval eyes and a mouth from black felt and glue them on. Place a small paper top hat on each ghost’s “head.”
Step 4: Write the Menu Use the black marker to write a fun menu on your chalkboard or a large piece of white paper. List spooky flavors like “Mint Phantom Chip” or “Strawberry Scream.” Place it on a small easel.
Step 5: Set Up Your Shoppe Arrange your ice cream parlor scene. You can stack a painted pumpkin on top of the paper cone. Place your pumpkin scoops and ghost servers on a table or counter to complete your sweet shop.
19. Superhero Halloween Headquarters

Calling all heroes! Transform your party room into a superhero training center and command post. This action-packed theme is great for kids who want to save the day this Halloween. It uses bold colors and iconic symbols to create a world of adventure.
A city skyline backdrop sets the scene for heroic deeds. Comic book words like “POW!” and “BAM!” add to the energy. An entryway becomes the “Hall of Justice,” getting everyone excited to join the mission.
DIY Superhero Halloween Headquarters
What You’ll Need:
- Several large sheets of black poster board
- Yellow construction paper
- A large sheet of blue paper for the sky
- Red and yellow paper for the “POW!” signs
- A printer for the bat symbol (or you can draw it)
- Pillows in red, blue, and yellow
- Tape and scissors
Instructions:
Step 1: Build the City Skyline Cut the tops of the black poster boards into different skyscraper shapes. Tape them to the bottom of the large blue paper to create a city skyline at night. Hang this on your main party wall.
Step 2: Add Windows and Symbols Cut small yellow squares from the construction paper and stick them onto your black buildings as lighted windows. Print out and cut out some bat symbols and tape them onto the skyline and your colorful pillows.
Step 3: Create Action Words Draw big, explosive bubble shapes on yellow paper. Inside them, write words like “POW!” and “BAM!” in red letters. Cut them out and tape them around the room.
Step 4: Make the Hall of Justice Entrance Use more black poster board to frame a doorway in your house. You can create a pointed arch at the top. Make a sign that says “Hall of Justice” and hang it above the door.
Step 5: Set Up the Training Area Lay a blanket on the floor in front of your skyline. Arrange the superhero pillows for a comfortable place to plan missions. You can even lay down small strips of yellow tape on the floor for an “obstacle course.”
20. A Zombie’s Morning Meal

Add some hilarious, gross-out fun to your Halloween with a breakfast table set for zombies. This silly setup will make kids laugh with its goofy take on what zombies eat for the most important meal of the day.
The menu features green gelatin brains and boxes of “Brains & Grains” cereal. Little zombie figures are posed at the table, ready to dig in. It’s a playful scene that is more funny than frightening.
DIY A Zombie’s Morning Meal
What You’ll Need:
- A plastic brain-shaped gelatin mold
- Lime green gelatin mix
- A few empty cereal boxes
- Paper and a printer (or markers and creativity!)
- A few zombie action figures or dolls
- Plates, bowls, spoons, and mugs
Instructions:
Step 1: Make the Jello Brains Ask an adult to help you prepare the lime green gelatin according to the package directions. Pour the mixture into the brain-shaped mold and let it set in the refrigerator for several hours until it is firm.
Step 2: Design Your Cereal Boxes Measure the front of your empty cereal boxes. On a computer, design a new front that says “Brains & Grains” or “Fiber Fiend.” You can add funny pictures, too. Print them out, cut them to size, and glue them onto the front of the real boxes.
Step 3: Set the Zombie Table Set the table just like you would for a normal breakfast, with plates, cutlery, and mugs. You can even pour some milk (or green-tinted milk!) into the mugs.
Step 4: Serve Breakfast Carefully turn the gelatin mold upside down onto a plate to release the brain. It should wobble just like a real one! Place a jello brain at each seat.
Step 5: Invite the Guests Position your zombie figures at the table. You can put a spoon in one of their hands and have another one looking like it’s about to take a big bite. Your silly and spooky zombie breakfast is served!
21. Cozy Scarecrow Reading Nook

Create a charming autumn hideaway right in the corner of a room. This setup is a warm and inviting space, filled with the cozy feelings of fall. It’s a wonderful spot for kids to curl up with a good book on a chilly day.
Friendly scarecrows and smiling pumpkins are nestled between hay bales and soft pillows. Garlands of colorful leaves hang on the walls, making the whole corner feel like a mini pumpkin patch. This decoration is all about comfort and seasonal cheer.
DIY Cozy Scarecrow Reading Nook
What You’ll Need:
- 2 small hay bales
- A few cute scarecrow dolls
- A variety of small and medium-sized pumpkins
- Cozy pillows and blankets
- Fake autumn leaf garlands
- A string of warm white fairy lights
- A small wooden crate
Instructions:
Step 1: Build the Nook’s Foundation Place the two hay bales in a corner of the room, leaving a little space between them to sit. This will form the base of your reading nook.
Step 2: Add Comfort Drape a soft blanket over each hay bale and place a few cozy pillows on and between them. This is where your little reader will sit.
Step 3: Decorate the Walls Use tape or small hooks to hang the autumn leaf garlands on the walls around the corner. You can also weave the string of fairy lights through the leaves for a magical glow.
Step 4: Arrange Your Pumpkins Place the small wooden crate next to the hay bales. Start arranging your pumpkins! Put a few on the crate, and scatter the rest on and around the hay bales.
Step 5: Invite the Scarecrows Sit your scarecrow dolls on the hay bales among the pillows. They will be the friendly guardians of this cozy autumn nook, ready for story time.
22. Full Moon Werewolf Den

Transform a corner of a room into a cozy den for a friendly werewolf pack. This theme is more about cuddly creatures than scary monsters. It uses soft textures and a glowing moon to create a magical nighttime scene.
Fuzzy blankets and plush wolf toys make the space feel warm and inviting. A large, illuminated moon on the wall is the centerpiece, casting a soft glow. Paw prints on the wall and floor add a playful touch, as if the pups have been padding around.
DIY Full Moon Werewolf Den
What You’ll Need:
- A large, round paper lantern or a piece of round cardboard
- Yellow or warm white fairy lights
- A few plush wolf or husky toys
- A very fuzzy or faux-fur blanket
- Black and silver glitter paper
- Scissors and tape
- A pair of wolf-ear headbands
Instructions:
Step 1: Craft the Glowing Moon If using a paper lantern, carefully place the fairy lights inside. If using cardboard, you can poke small holes and push the individual lights through from the back. Hang your finished moon on the wall.
Step 2: Create a Cozy Den Drape the fuzzy blanket over a chair or the corner of a bed to create a soft, nest-like den.
Step 3: Make the Paw Prints Cut out paw print shapes from the black paper. You’ll need one large pad and four small toes for each print. Cut out a few smaller, sparkly paw prints from the silver glitter paper.
Step 4: Decorate the Space Stick the black paw prints on the floor or a nearby table, as if a wolf has just walked through. Place the sparkly silver ones on the wall around the moon.
Step 5: Settle the Wolf Pack Arrange your plush wolf toys in and around the cozy den you created. For a final fun touch, you can hang the werewolf-ear headband on the wall right under the moon.
23. Frankenstein’s Friendly Flower Shop

Set up a quirky and fun centerpiece featuring Frankenstein’s monster as a happy gardener. This display is a playful mix of spooky and sweet, showing the softer side of a classic monster. It’s a wonderful way to add some humor and color to your table.
Frankenstein holds his gardening tools, surrounded by unique plants and flowers. A little succulent gets a monster makeover in a decorated pot, and vases get silly googly eyes. This setup is all about unexpected, cheerful fun.
DIY Frankenstein’s Friendly Flower Shop
What You’ll Need:
- A friendly-looking Frankenstein’s monster figure
- A small terracotta pot and a succulent plant
- Purple and black craft paint
- Googly eyes and glue
- A few small black vases
- Some colorful flowers (real or fake)
- A small wooden craft stick and a black marker for the sign
Instructions:
Step 1: Create the Frankenstein Pot Paint the terracotta pot purple and let it dry. Use the black paint to add some stitches around the rim. Glue two googly eyes on the front to give it a silly, monster face. Plant your succulent inside.
Step 2: Make the Vases Watching Stick a few googly eyes onto your black vases. This simple touch instantly gives them personality and makes them look like little monster helpers.
Step 3: Arrange Your Flowers Fill your googly-eyed vases with bright, colorful flowers. You can even add a fun plant like a Venus flytrap if you can find a fake one.
Step 4: Write Your Shop Sign Use the black marker to write “Frank’s Flowers” on the small wooden craft stick.
Step 5: Set Up the Shop Place your Frankenstein figure in the center of the table. Arrange the vases of flowers around him. Put your Frankenstein-faced succulent pot in front and stick the little sign into the soil.
24. Silly and Spooky Graveyard

Turn your front yard into a graveyard that will make people laugh instead of scream. This display is filled with funny tombstones and friendly ghosts. It’s a lighthearted take on a classic Halloween scene that’s fun for all ages.
The tombstones feature hilarious puns and names like “Ben Better” and “I. Emma Ghost.” Cute, happy ghosts on sticks pop up between the graves, and flamingo skeletons add a surprising and silly twist. This graveyard is all about having a good chuckle.
DIY Silly and Spooky Graveyard
What You’ll Need:
- Several pieces of grey or black foam board or sturdy cardboard
- White paint or a white paint pen
- Wooden stakes or dowels and strong tape
- White craft foam sheets or styrofoam balls and white fabric
- A black marker
- A few plastic lawn flamingos (optional)
Instructions:
Step 1: Craft Your Tombstones Cut the foam board or cardboard into tombstone shapes. Make some with rounded tops and some with square tops.
Step 2: Write Funny Epitaphs Use the white paint or paint pen to write silly names and phrases on your tombstones. Think of puns like “U. R. Next” or “Will B. Back.” Let them dry completely.
Step 3: Make the Ghosts on Sticks Cut out friendly ghost shapes from the white craft foam and draw happy faces on them with a black marker. Or, you can drape a piece of white fabric over a styrofoam ball and draw a face on that. Use strong tape to attach a wooden stake to the back of each ghost.
Step 4: Set Up Your Yard Tape stakes to the back of your tombstones as well. Push the stakes for the tombstones and ghosts into your lawn, scattering them around to look like a real graveyard.
Step 5: Add a Silly Surprise If you have lawn flamingos, you can paint skeleton bones on them with white paint for an extra funny touch. Place them among the graves to surprise your visitors.
25. Scarecrow County Fair Contest

Bring the fun of a county fair right to your own backyard. This adorable display features a lineup of charming scarecrows ready to be judged. It’s an interactive and cheerful scene that celebrates the harvest season.
The scarecrows, each with a number, are perched on a hay bale, creating a festive competition. A “Voting” sign invites family and friends to pick their favorite. This decoration is a great way to get everyone involved in the Halloween fun.
DIY Scarecrow County Fair Contest
What You’ll Need:
- 5-6 small scarecrow decorations
- A large hay bale
- A variety of pumpkins and sunflowers (real or fake)
- A small yellow poster board and a black marker
- White paper or number stickers
- Safety pins or tape
Instructions:
Step 1: Set Up the Stage Place the large hay bale in a prominent spot in your yard. This will be the main stage for your scarecrow contest.
Step 2: Introduce the Contestants Arrange your scarecrows along the top of the hay bale. You can use garden stakes to help them stand up straight if needed.
Step 3: Give Them Numbers Assign a number to each scarecrow. You can use number stickers or write numbers on small pieces of white paper. Use safety pins or tape to attach a number to the front of each scarecrow’s overalls.
Step 4: Create the Voting Sign Write the word “VOTING” in big, bold letters on the yellow poster board. You can prop this sign up in the middle of the hay bale, in front of the scarecrows.
Step 5: Decorate the Fairgrounds Complete your scene by placing pumpkins and pots of sunflowers all around the base of the hay bale. Now you’re ready to let everyone cast their vote for the best-dressed scarecrow!
26. Welcome, Great Pumpkin! Patch

Celebrate a Halloween classic with a scene dedicated to the Great Pumpkin. This heartwarming display brings the beloved Peanuts characters to your front yard. It’s a nostalgic and sweet decoration that will delight both kids and adults.
Snoopy, Charlie Brown, and friends are all here, waiting patiently in the pumpkin patch. A handmade sign welcomes the guest of honor. This setup is simple, cheerful, and full of timeless charm.
DIY Welcome, Great Pumpkin! Patch
What You’ll Need:
- Large pieces of white foam board or cardboard
- Craft paint in various colors (red, yellow, black, etc.) and paintbrushes
- A printer to find images of the Peanuts characters
- Wooden stakes and strong tape
- A variety of real pumpkins
- A white poster board for the sign
Instructions:
Step 1: Create Your Characters Find simple coloring-page style images of Snoopy on his doghouse, Charlie Brown as a ghost, and other characters online. Print them large, or draw them by hand onto the foam board.
Step 2: Paint the Cutouts Carefully paint your characters, using the images as a guide. Use black paint to outline them once the colors are dry. This will make them look like they came right out of the cartoon. Cut them out.
Step 3: Make the Welcome Sign Use markers or paint to write “WELCOME GREAT PUMPKIN” on the white poster board. You can draw a couple of little pumpkins on it, too.
Step 4: Set Up the Patch Attach wooden stakes to the back of your character cutouts and the sign using strong tape. Arrange a bunch of real pumpkins in a spot on your lawn to create a “sincere” pumpkin patch.
Step 5: Place Your Friends Push the stakes of your character cutouts into the ground in and around the pumpkins. Put the welcome sign in a visible spot. Now all you have to do is wait for the Great Pumpkin to arrive!
27. Spooky Bat Cave Hallway

Turn a plain hallway into a mysterious bat cave that kids have to travel through. This immersive decoration is an easy way to create a big impact. The dark colors and dramatic lighting make for an exciting and spooky experience.
Paper bats seem to fly down from the ceiling, leading the way through the passage. Draped fabric and purple lights enhance the cave-like atmosphere. It’s a fun surprise for anyone walking through the house.
DIY Spooky Bat Cave Hallway
What You’ll Need:
- A large pack of black construction paper
- Scissors
- A bat-shaped stencil or cookie cutter (or you can draw them freehand)
- Clear tape or sticky tack
- A long, dark grey or black sheet or tablecloth
- Push pins
- A string of purple LED fairy lights
Instructions:
Step 1: Create a Bat Army Use your stencil to trace dozens of bat shapes onto the black construction paper. Cut them all out. To make them look like they are flying, gently fold the wings up on each side of the body.
Step 2: Hang the Bats Use small pieces of clear tape or sticky tack to attach the bats to the ceiling and walls of your hallway. Place them close together at one end and have them spread out, as if they are flying out of the cave.
Step 3: Drape the Cave Entrance Use push pins to hang the dark sheet or tablecloth over the entrance to the hallway. Let it drape down and swag in the middle to create a soft, cave-like ceiling.
Step 4: Add Spooky Lighting Weave the string of purple fairy lights through the draped fabric at the top of the hallway. This will cast a cool, eerie glow down the passage.
Step 5: Add a Final Touch You can make a few larger bats and tape them to round paper plates to hang on the walls, adding more dimension to your spooky cave.
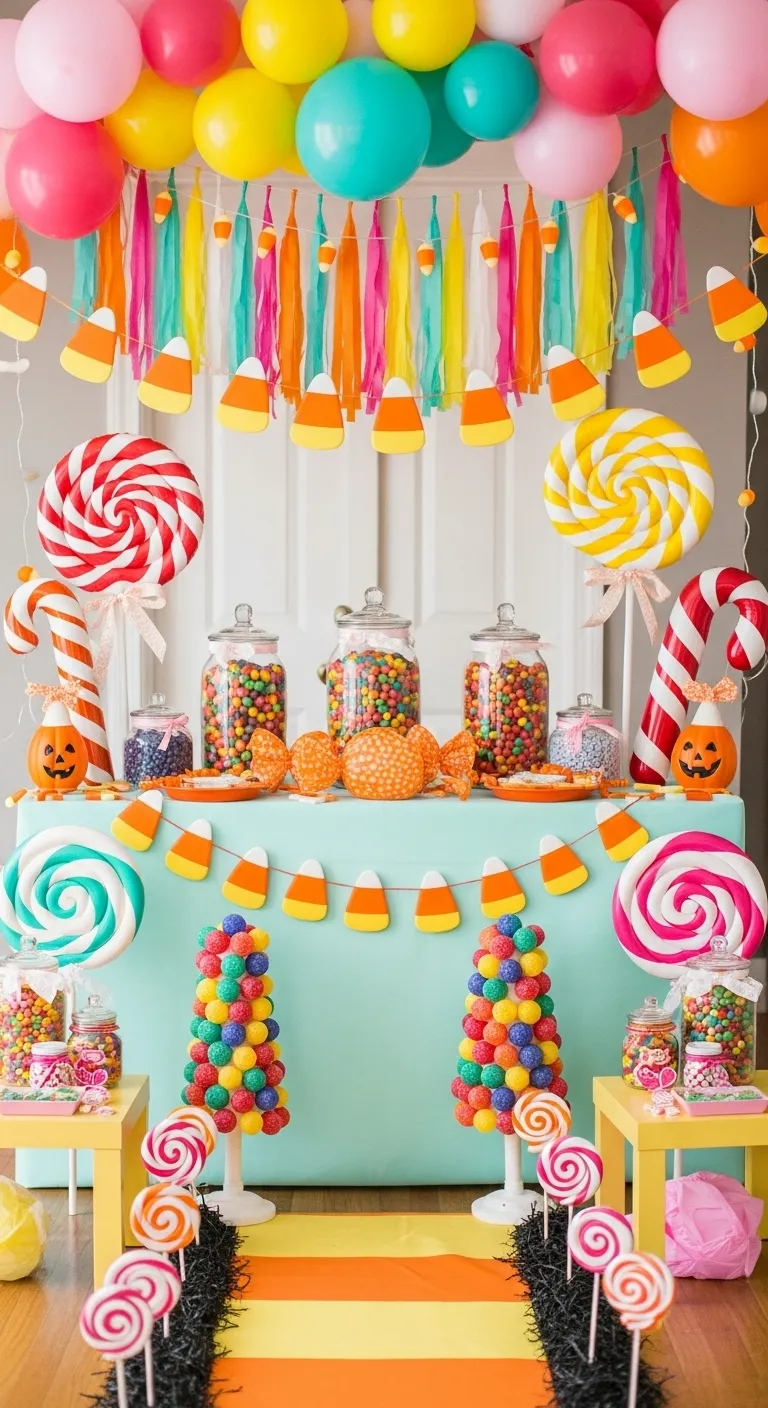
28. Candy Land Halloween Extravaganza

Create a super sweet and colorful candy-themed wonderland. This decoration uses the bright and cheerful colors of Halloween candy to build a scene that is pure joy. It’s a vibrant and exciting theme for a party.
A table is loaded with jars of colorful treats, giant lollipops, and candy corn garlands. The scene is bursting with energy, from the rainbow balloon arch to the candy-topped topiaries. This is a sugar-filled dream come to life.
DIY Candy Land Halloween Extravaganza
What You’ll Need:
- Lots of colorful balloons
- A bright blue or mint green tablecloth
- Several large glass jars with lids
- A variety of colorful candies (gumballs, jelly beans, etc.)
- White styrofoam cones and a bag of colorful pom-poms
- Large, round styrofoam discs and wooden dowels for lollipops
- A hot glue gun (for adult use)
Instructions:
Step 1: Build the Candy Topiaries Ask an adult to help you use the hot glue gun to cover a styrofoam cone with colorful pom-poms. Start at the bottom and work your way up in circles. Place the finished cone in a small pot or on a candlestick holder.
Step 2: Craft Giant Lollipops Paint a colorful swirl on a large styrofoam disc. Once it’s dry, an adult can help you carefully poke a wooden dowel into the bottom to act as the stick.
Step 3: Set Up Your Candy Buffet Cover a table with the bright tablecloth. Fill your glass jars with all the different kinds of colorful candy and arrange them on the table.
Step 4: Add Your Giant Candy Place your pom-pom topiaries and giant lollipops on and around the table. You can also make a simple candy corn garland by stringing paper cutouts together.
Step 5: Finish with Balloons Create a big, beautiful arch of colorful balloons to go over your candy table. This will be the amazing centerpiece for your sweet celebration.
29. Neon Glow-in-the-Dark Pathway

Light up the path for trick-or-treaters with a cool and spooky neon display. This idea uses the magic of glow-in-the-dark items to create a vibrant and exciting walkway. The bright colors against the darkness make for a really impressive sight.
Neon signs with spooky words like “BOO” and “EEK!” set the mood. Pumpkins with glowing faces and a friendly milk jug ghost light up the steps. The path is lined with colorful glow sticks, safely guiding visitors to your door.
DIY Neon Glow-in-the-Dark Pathway
What You’ll Need:
- A clean, empty plastic milk jug
- A black marker
- Neon or glow-in-the-dark craft paint
- A few craft pumpkins
- A battery-powered tea light or a string of fairy lights for the jug
- A large pack of multicolored glow sticks
- Optional: Neon rope lights (the battery-powered kind)
Instructions:
Step 1: Make a Milk Jug Ghost Wash out the milk jug and let it dry completely. Use a black marker to draw a simple ghost face on the front (two eyes and a mouth).
Step 2: Paint Glowing Pumpkins Use the neon or glow-in-the-dark paint to create jack-o’-lantern faces on your craft pumpkins. Let them sit under a bright light for a while to “charge” up the glow.
Step 3: Light Up Your Ghost Carefully cut a small flap in the back of the milk jug. Place the battery-powered tea light or a small bundle of fairy lights inside. The whole jug will light up with a ghostly glow.
Step 4: Arrange Your Spooky Friends Place your glowing pumpkins and the milk jug ghost on your porch steps or near your front door.
Step 5: Create the Glowing Pathway Activate all of your glow sticks by cracking them. Line the edges of your walkway or steps with the glow sticks, pushing them gently into the grass or placing them in small jars to keep them in place.
30. Nursery Rhyme Halloween Town

Bring beloved storybook characters to life with a gentle and imaginative Halloween scene. This decoration combines the sweetness of nursery rhymes with a touch of spooky fun. It’s a unique theme that is great for younger children.
Characters like Humpty Dumpty and the Itsy Bitsy Spider are the stars of this display. A clever “water spout” made of streamers pours down the side of a table. This setup is all about creative, playful storytelling.
DIY Nursery Rhyme Halloween Town
What You’ll Need:
- A large plastic egg or a small white pumpkin for Humpty Dumpty
- Blue and black markers
- A small toy sheep
- A large, friendly-looking plastic spider and a craft store spider web
- Blue and light blue paper streamers
- A black bowl or small bucket
- Green paper streamers
- Tape and scissors
Instructions:
Step 1: Create Humpty Dumpty On your plastic egg or white pumpkin, use the black marker to draw a simple, happy face. Use the blue marker to draw a little shirt on the bottom half with the words “Humpty Dumpty.”
Step 2: Build the Water Spout Tape the ends of the blue streamers inside the black bowl. Then, tape the bowl to the edge of a table so it is tilted down. Let the streamers cascade down to the floor like a waterfall.
Step 3: Set Up the Itsy Bitsy Spider Use tape or hooks to hang the spider web on the wall above your scene. Place the large plastic spider in the middle of the web.
Step 4: Decorate the Scene You can create “grass” by taping strips of green streamers to the front of the table. Place Humpty Dumpty on a small “wall” made of toy blocks.
Step 5: Add More Friends Place the toy sheep nearby. You can also add other nursery rhyme elements, like printed and cutout pictures of other characters, to complete your storybook Halloween town.
31. Mad Monster Laboratory

Step into the lab of a mad scientist who specializes in creating monsters! This electrifying setup is full of glowing potions and fascinating monster charts. It’s a fun theme that mixes a little bit of spooky science with bright, bubbling colors.
A lab coat hanging on the wall makes it feel like the scientist just stepped out. Beakers and flasks glow with mysterious liquids, and a plasma ball adds a touch of real science magic. This is a great way to spark a child’s curiosity.
DIY Mad Monster Laboratory
What You’ll Need:
- A few clear glass or plastic bottles and flasks (different shapes are best)
- Water and food coloring (green, blue, red)
- A white lab coat or an oversized white shirt
- Two large pieces of poster board for the charts
- Markers to draw your monsters
- A black tray
- Optional: A plasma ball, glow sticks, or submersible LED lights
Instructions:
Step 1: Brew Your Potions Fill your bottles and flasks with water. Add a few drops of different colored food coloring to each one to create red, blue, and green “potions.”
Step 2: Make Them Glow For a cool glowing effect, have an adult drop an activated glow stick or a small, waterproof LED light into each potion. The colors will look amazing in a dark room.
Step 3: Draw the Monster Charts On your poster boards, draw different kinds of silly or spooky monsters. You can make charts that look like they are explaining how each monster is made. Hang these on the wall behind your lab table.
Step 4: Set Up Your Lab Hang the lab coat on the wall between your two monster charts. Arrange your glowing potions on the black tray.
Step 5: Add the Final Experiment If you have a plasma ball, place it in the middle of your tray. When you turn it on, it will look like the centerpiece of your monster-making experiment.
32. Harvest Hoedown Porch Party

Set up a friendly fall festival right on your front porch. This welcoming display is overflowing with the cheerful spirit of autumn. It’s a classic, country-style decoration that’s all about harvest fun and hospitality.
A group of smiling scarecrows gathers for a party, surrounded by pumpkins and gourds. A gingham tablecloth and a crate of fresh apples add to the rustic charm. The “Happy Fall Y’all” banner makes everyone feel right at home.
DIY Harvest Hoedown Porch Party
What You’ll Need:
- A few friendly scarecrow figures
- A small table and a red-and-white checkered tablecloth
- A couple of hay bales
- A large bunch of corn stalks
- A burlap banner kit (or just pieces of burlap and a marker)
- Lots of pumpkins and gourds in all shapes and sizes
- A wooden bucket or pot for mums
Instructions:
Step 1: Set Your Foundation Place the hay bales on your porch. Stand the corn stalks up in a corner and tie them together near the top.
Step 2: Create Your Party Table Cover your small table with the checkered tablecloth. You can place a small scarecrow here, along with a bowl of apples or a few small pumpkins.
Step 3: Make Your Banner If you are making your own banner, cut triangle shapes from the burlap. Use a black marker to write “Happy Fall Y’all,” one letter on each triangle. Use string and small clothespins or hot glue to attach the letters to a long piece of twine.
Step 4: Arrange the Harvest Hang your banner across a window or porch railing. Place the pot of mums on a hay bale and arrange all of your pumpkins and gourds on and around the hay, steps, and table.
Step 5: Invite Your Scarecrow Guests Position your scarecrow figures around the scene. You can have one sitting on a hay bale, and others standing among the pumpkins, ready to greet your visitors.
33. Snoopy vs. Cthulhu: The Great Old Pumpkin

What happens when a beloved cartoon dog meets a cosmic horror? You get this hilarious and creative yard display! This mashup is a funny surprise for anyone who loves Snoopy or spooky stories.
Snoopy sits on his iconic red doghouse, which has been taken over by the tentacled monster Cthulhu. Instead of waiting for the Great Pumpkin, handmade signs say they are “Waiting for Great Old One.” It’s a clever and silly twist on two very different classics.
DIY Snoopy vs. Cthulhu
What You’ll Need:
- A Snoopy on his doghouse decoration (or make one from a cardboard box painted red)
- A large, plush Cthulhu toy or several green pool noodles for tentacles
- Two small white poster boards and a black marker
- Two wooden stakes
- A few pumpkins
- Green craft foam or pipe cleaners for pumpkin tentacles
Instructions:
Step 1: Prepare the Doghouse Set up your Snoopy doghouse in the yard. Drape the plush Cthulhu over the top, so it looks like it’s capturing the doghouse. If you are using pool noodles, you can cut them and attach them to look like tentacles coming from inside and around the house.
Step 2: Create the Signs On the white poster boards, use the black marker to write “WAITING FOR” on one and “GREAT OLD ONE” on the other. Make the lettering look a little shaky and spooky. Tape a wooden stake to the back of each sign.
Step 3: Make Tentacle Pumpkins Cut long, wavy tentacle shapes out of the green craft foam. You can also twist a few green pipe cleaners together. Use tape or a small tack to attach these tentacles to your pumpkins.
Step 4: Assemble the Silly Scene Place your tentacle-covered pumpkins around the doghouse. Stick the two signs into the ground on either side of the scene.
Step 5: Add Snoopy Don’t forget the hero! Place your Snoopy figure on top of the doghouse, looking confused by his new, monstrous roommate.
34. Enchanted Gnome and Ghost Grove

Create a magical little world where friendly forest gnomes meet some shy, floating ghosts. This whimsical scene is set in a mossy grove, sparkling with tiny lights. It’s a sweet and gentle decoration that feels like a fairy tale.
The simple, classic-style ghosts hang from a branch above the gnomes, who are busy holding tiny jack-o’-lanterns. The whole display is soft and enchanting, with no scares to be found. It’s a lovely way to bring a bit of magic into your home.
DIY Enchanted Gnome and Ghost Grove
What You’ll Need:
- A few small garden gnome figures
- A sturdy branch with some smaller twigs
- A bag of green craft moss
- A few styrofoam balls
- White fabric or cheesecloth
- A black marker
- Thin string or clear fishing line
- A string of warm white fairy lights
Instructions:
Step 1: Make Your Floating Ghosts Drape a square piece of white fabric over a styrofoam ball. Cinch the fabric under the ball and tie it with a piece of string to create the ghost’s head. Use the black marker to draw two simple oval eyes and a round “O” for a mouth.
Step 2: Hang the Ghosts Tie a long piece of clear fishing line to the top of each ghost’s head. Then, tie the other end to the twigs of your branch so the ghosts hang down at different lengths.
Step 3: Create the Forest Floor Find a good spot on a table or mantel. Prop up your branch so it stands securely. Spread the green craft moss all over the surface to create a lush, forest floor.
Step 4: Add a Magical Glow Weave the string of fairy lights through the moss on the ground. This will make it look like the grove is sparkling with magic.
Step 5: Place Your Gnomes Arrange your gnome figures throughout the mossy grove. You can place them among little mushrooms or have them looking up at the friendly ghosts hanging above them.
35. Googly-Eyed Mummy Jars

Turn simple glass jars into an adorable family of mummies! This is a quick and easy craft that makes for a charming and useful Halloween decoration. The googly eyes give these wrapped-up jars a ton of silly personality.
These mummy jars are great for holding Halloween party utensils, straws, or even candy. You can make a whole set of them in different sizes to create a cute mummy family. They are a simple, clean, and fun addition to any Halloween setup.
DIY Googly-Eyed Mummy Jars
What You’ll Need:
- A few clean, empty glass jars of different sizes (jam jars, mason jars, etc.)
- A roll of white gauze, cheesecloth, or strips of old white fabric
- Googly eyes in various sizes
- A hot glue gun (for adult use) or strong craft glue
- A small strip of black felt or paper
Instructions:
Step 1: Start Wrapping Put a small dot of glue at the bottom of the jar and press the end of your gauze or fabric strip onto it. Now, start wrapping the fabric around and up the jar.
Step 2: Make It Messy Don’t worry about wrapping perfectly! Mummies are supposed to look a little old and messy. Overlap the fabric strips and wrap in different directions. When you get to the top, secure the end with another dot of glue.
Step 3: Create the Eye Strip Cut a piece of black felt or paper that is just wide enough to fit your googly eyes, and long enough to go around the jar. Glue this strip onto your wrapped jar where you want the eyes to be.
Step 4: Give Your Mummy Sight Glue a pair of googly eyes onto the black strip. You can use different sizes for different jars to give each one a unique expression.
Step 5: Make a Whole Family Repeat the steps for all of your jars. Once they are all done, you can group them together on a table or use them to hold straws and spoons for a party.
36. Creepy Carnival Midway

Step right up and experience the thrills of a spooky, old-fashioned carnival. This theme turns a room into a midway full of strange attractions and fun games. The classic red-and-white stripes and string lights create a festive but eerie atmosphere.
Instead of a regular fun house, there are fun house mirrors with a spooky twist. The main attraction is “The Amazing Two-Headed Teddy Bear.” Hay bales provide seating for guests to enjoy some popcorn while they take in the weird and wonderful sights.
DIY Creepy Carnival Midway
What You’ll Need:
- Large cardboard boxes
- Red and white craft paint and paintbrushes
- Hay bales
- Popcorn boxes and other carnival snacks
- A yellow poster board and a black marker for the sign
- Fun house mirrors or regular mirrors in ornate frames
Instructions:
Step 1: Build Your Ticket Booth Use a large cardboard box to create a booth. Cut a window in the front. Paint the whole box with vertical red and white stripes. You can write “TICKETS” above the window.
Step 2: Create the Main Attraction Sign On the yellow poster board, write “The Amazing TWO-HEADED TEDDY BEAR” with a black marker. You can hang this on a wall or on top of another striped cardboard booth.
Step 3: Set Up Seating and Games Arrange the hay bales as seats for your carnival-goers. You can set up simple games like a ring toss on a nearby table.
Step 4: Add the Spooky Mirrors Hang your fun house mirrors or regular mirrors on the walls of your carnival booths. The distorted reflections will add to the creepy carnival feel.
Step 5: Don’t Forget the Snacks! Set up a snack station with popcorn boxes, cotton candy, and other carnival treats. Place them on a table or on top of a hay bale for easy access.
37. Sunken Skeleton Sea Adventure

Explore a spooky world under the sea with this creative underwater theme. This bathroom or corner decoration creates an amazing deep-sea environment. Blue and green streamers look like seaweed, and bubbles float through the “water.”
A treasure chest is guarded by skeleton fish and a ghostly octopus pirate. The scene is full of fun details, from bones on the ocean floor to little sea creatures hiding in the coral. It’s an imaginative adventure waiting to be discovered.
DIY Sunken Skeleton Sea Adventure
What You’ll Need:
- Rolls of dark blue, light blue, and green streamers
- A fishing net
- Skeleton fish decorations (or print and cut them from paper)
- A small treasure chest
- Fake plastic bubbles or clear balloons
- Blue fabric for the ocean floor
- Tape and clear fishing line
Instructions:
Step 1: Create the Ocean Water Tape the ends of the blue and green streamers to the ceiling. Let them hang all the way down to the floor to create a wall of “seaweed” and water.
Step 2: Hang the Net Drape the fishing net on the wall over your streamer backdrop. You can hang a few of your skeleton fish and other sea creatures so they look like they’ve been caught in the net.
Step 3: Set Up the Treasure Lay the blue fabric on the floor to look like the bottom of the ocean. Place your treasure chest in the middle. You can fill it with plastic gold coins, necklaces, or even candy.
Step 4: Add the Skeletons and Bubbles Arrange your skeleton fish around the treasure chest. Use clear fishing line to hang some from the ceiling so they look like they are swimming. Tape the plastic bubbles or clear balloons to the walls at different heights.
Step 5: Finish Your Seascape You can add other details like seashells, coral, or a spooky pirate ghost made from a white balloon and some cheesecloth to complete your underwater world.
38. Vibrant Day of the Dead Fiesta

Celebrate a beautiful tradition with a colorful Day of the Dead, or Día de los Muertos, display. This setup is not about being scary; it’s a joyful and vibrant tribute to remembering loved ones. The scene is filled with bright colors, flowers, and iconic sugar skulls.
Colorful papel picado banners are hung on the wall, and handmade marigold flowers are everywhere. Painted sugar skulls, or calaveras, are the smiling centerpieces of the table and the ofrenda (altar). This decoration is a wonderful way to learn about and appreciate a rich cultural celebration.
DIY Vibrant Day of the Dead Fiesta
What You’ll Need:
- Sheets of brightly colored tissue paper (orange, yellow, pink, blue)
- Pipe cleaners
- Colored craft paper and scissors
- String
- White ceramic or paper skulls to decorate
- Colorful permanent markers
Instructions:
Step 1: Make Paper Marigolds Take about 4-5 sheets of orange or yellow tissue paper stacked together. Fold them like an accordion, back and forth. Tightly wrap a pipe cleaner around the middle. Then, carefully pull each layer of tissue paper up toward the center to create a fluffy flower.
Step 2: Create Papel Picado Banners Fold a piece of colored craft paper in half a few times. Cut small shapes (triangles, diamonds, hearts) along the folded edges, like you’re making a paper snowflake. Carefully unfold it to reveal your design. Make several in different colors and tape them to a long piece of string.
Step 3: Decorate Your Sugar Skulls Use the colorful markers to draw beautiful designs on your skulls. You can add flowers around the eyes, swirls on the cheeks, and intricate patterns on the forehead.
Step 4: Set Your Table or Altar Use a colorful blanket or tablecloth as your base. Arrange your decorated skulls and paper marigolds on the table.
Step 5: Hang the Banners Hang your handmade papel picado banners on the wall behind your table to complete the festive and beautiful scene.
39. Wizard’s Great Hall Halloween Feast

Welcome witches and wizards to a magical feast straight out of your favorite fantasy books. This enchanting dining room setup creates the look and feel of the Great Hall at a school of magic. It’s a dream come true for any fan of wizarding worlds.
Candles appear to float magically in mid-air below the house banners. Carved pumpkins cast a spooky glow on the table, which is set with wands at every seat. This theme is all about creating a truly spellbinding atmosphere.
DIY Wizard’s Great Hall Halloween Feast
What You’ll Need:
- Several empty paper towel or toilet paper tubes
- White craft paint
- Battery-powered LED tea lights
- Clear fishing line and push pins
- Red, green, blue, and yellow fabric or poster board for banners
- A printer for the house crests (like a lion, snake, eagle, and badger)
- A few pumpkins and old books
Instructions:
Step 1: Craft the Floating Candles Paint the paper towel tubes white and let them dry. They don’t have to be perfect; some texture will make them look more like real wax candles.
Step 2: Make Them Glow Place a battery-powered tea light in the top of each painted tube. It should fit snugly. The “flame” will stick out the top.
Step 3: Hang the Candles Use a needle to poke a small hole on either side of the top of the tube, just below the tea light. Thread a piece of fishing line through the holes and tie a knot. Use a push pin to hang the candle from the ceiling. Hang many candles at different heights.
Step 4: Create the House Banners Cut your fabric or poster board into a banner shape (a rectangle with a point at the bottom). Print out the four house crests, cut them out, and glue one onto the center of each banner. Hang the banners on the wall.
Step 5: Set the Table Stack some old books in the center of the table and place your pumpkins on top. For a final touch, you can place a toy magic wand at each place setting.
40. Tiny Haunted Hamlet

Build a charming and spooky little village right on your mantel or sideboard. This miniature Halloween town is full of delightful details and personality. It’s a fun decoration to look at closely to discover all the tiny scenes.
Little ghosts and witches walk along a pebble path between colorful haunted houses. Bottle brush trees and tiny pumpkins complete the miniature landscape. The whole village glows with a warm, inviting light, making it more sweet than spooky.
DIY Tiny Haunted Hamlet
What You’ll Need:
- Several small wooden birdhouses in different shapes
- Craft paint in Halloween colors (orange, purple, grey, green)
- A small bag of pebbles or gravel
- Green craft moss
- Small bottle brush trees
- Tiny ghost, witch, and black cat figures
- A string of fairy lights
Instructions:
Step 1: Paint Your Haunted Houses Paint each of your birdhouses a different color. You can use a fine-tipped black marker to draw on windows, doors, and maybe a few spooky cracks in the walls.
Step 2: Lay Out Your Village Find a flat surface for your village. Use the small pebbles to create a winding path from one end to the other.
Step 3: Add the Landscaping Tuck pieces of the green craft moss around the outside of your pebble path to create “grass.” Place the bottle brush trees throughout the moss.
Step 4: Place the Houses and Lights Arrange your painted houses along the path. Weave the string of fairy lights in and around the houses and trees to make your little hamlet glow.
Step 5: Let the Residents Move In Place your tiny ghost, witch, and cat figures along the path and in the mossy yards. You can create little scenes, like a witch standing outside her purple house or a ghost floating near a tree.
41. Alien Invasion Glow Party

Prepare for an extraterrestrial visit with a party that’s out of this world! This glowing alien theme turns any dark room into the site of a UFO landing. The bright, neon green against the dark background creates a super cool, futuristic vibe.
Friendly, wide-eyed aliens and their flying saucers are everywhere, lit by an eerie glow. A silver tinsel curtain makes a great backdrop that looks like a spaceship’s shimmering force field. It’s a fun, sci-fi adventure that’s more awesome than alarming.
DIY Alien Invasion Glow Party
What You’ll Need:
- A blacklight bulb or fixture
- Neon green and black balloons
- Neon green alien head decorations (or make them from paper)
- Silver paper plates and clear plastic bowls for UFOs
- A silver tinsel curtain
- Glow-in-the-dark stars
- Green slime (optional)
Instructions:
Step 1: Set Up the Blacklight First, have an adult help you swap a regular lightbulb for a blacklight bulb. This is what will make all your neon decorations glow brightly.
Step 2: Create the Spaceship Backdrop Hang the silver tinsel curtain against a wall. This will be the main backdrop for your alien landing party.
Step 3: Build Your Flying Saucers Make simple UFOs by gluing a clear plastic bowl upside down onto the center of a silver paper plate. You can hang these from the ceiling with clear fishing line at different heights.
Step 4: Decorate the Space Inflate your green and black balloons and let them float around the room. Stick glow-in-the-dark stars on the walls. Arrange your alien figures on a table in front of the tinsel curtain.
Step 5: Add the Finishing Touches For an extra fun element, you can have a little puddle of green slime on the table where the aliens have “landed.” Turn off the regular lights and let your glowing alien world come to life!
42. Colorful Spider Web Window Art

Brighten up your windows with some colorful and creative spider webs. This is a great craft for kids who want to make something a little spooky but also beautiful. It uses simple materials to create a big, vibrant impact.
These webs aren’t dark and dusty; they are made in fun colors like purple, orange, and green. You can combine different styles, from stretchy store-bought webs to handmade yarn creations. It’s a fun way to decorate that lets a lot of creativity shine through.
DIY Colorful Spider Web Window Art
What You’ll Need:
- Colorful puff paint or window clings in spider web shapes
- White paper plates
- A hole punch
- Yarn in different colors (black, orange, purple)
- Stretchy white spider web material
- Plastic spider rings
Instructions:
Step 1: Decorate Your Windows If you have window clings, you can simply press them onto the corners of your window panes. To make your own, an adult can help you draw spider web designs on wax paper with puff paint, let them dry completely, and then peel them off to stick to the glass.
Step 2: Make Paper Plate Webs Use a hole punch to make holes all around the edge of a paper plate. Cut a long piece of yarn. Tape one end to the back of the plate, then start weaving the yarn from one hole to another, crisscrossing the middle to create a web design.
Step 3: Stretch the Main Web Take the stretchy spider web material and carefully pull it apart. Stretch it across the center of your window, taping the corners to the window frame.
Step 4: Assemble Your Display Place your finished paper plate webs on the windowsill. Add a few plastic spiders to the big, stretchy web in the middle to complete your creepy-crawly art show.
43. Retro Video Game Halloween Arcade

Level up your Halloween decorations by turning a room or hallway into a real-life video game. This retro arcade theme is a blast from the past that kids will find incredibly cool. It’s an immersive experience that makes you feel like you’ve jumped right into the game.
The walls are decorated with pixelated ghosts and the hero of the game. Power pellets and coins line the floor, showing you the path. Even the pumpkins get in on the fun, painted to look like characters and power-ups from the game.
DIY Retro Video Game Halloween Arcade
What You’ll Need:
- Large rolls of black paper to cover the walls and floor
- Construction paper in bright colors (blue, green, red, yellow)
- Scissors and tape
- A few pumpkins
- Yellow and white craft paint
- A few empty cardboard boxes
Instructions:
Step 1: Create the Game Board Cover the walls and the floor of your hallway or room with the black paper. This will be the background for your entire game level.
Step 2: Make Your Characters Cut out large, pixelated shapes of the game’s ghosts and the main chomping hero from the colored paper. Think in simple squares to get that 8-bit look. Tape these characters to the walls.
Step 3: Create the Path Cut out smaller yellow circles or squares to be the pellets and coins. Tape them to the black paper on the floor to create a path for players to follow.
Step 4: Paint Your Power-Up Pumpkins Paint some of your pumpkins to look like the special items from the game, like the bonus fruit or the power stars. For question mark blocks, paint your cardboard boxes yellow and add a white question mark to each side.
Step 5: Assemble Your Arcade Place your painted pumpkins and question mark blocks along the path. Your amazing retro arcade is now ready for players to start their Halloween adventure!
44. A Gathering of Friendly Ghosts

Fill your home and yard with a group of the friendliest ghosts you’ve ever seen. This classic decoration is all about creating happy, smiling spirits that welcome guests instead of scaring them away. It’s a versatile theme that can be used in lots of fun and creative ways.
These ghosts can be made from many different materials, from simple balloons and sheets to fluffy cotton balls. They are perfect for hanging from trees, sticking on windows, or making into a fun art project. It’s a simple and sweet way to say “Boo!”
DIY A Gathering of Friendly Ghosts
What You’ll Need:
- A few white balloons and a black permanent marker
- White fabric or small white tablecloths
- Styrofoam balls and string
- White paper and cotton balls
- Glue
- Black construction paper
Instructions:
Step 1: Make Ghost Balloons Inflate the white balloons. Use the black marker to draw different happy and silly ghost faces on them. You can tie ribbons to the bottom and let them float around a room.
Step 2: Craft Hanging Ghosts Drape a piece of white fabric over a styrofoam ball. Tie a string under the ball to make a head. Use small circles of black paper or a marker to create the eyes and mouth. Use another string attached to the top to hang them from a tree branch.
Step 3: Create Cotton Ball Ghost Art Draw a simple ghost shape on a piece of white paper and cut it out. Glue cotton balls all over the shape until it’s completely covered and fluffy. Glue on two black paper eyes. You can hang these on a wall or a window.
Step 4: Make Ghost Window Clings Cut ghost shapes out of plain white paper. Make them in different sizes and with different expressions. Use a small loop of clear tape to stick them on your window panes, so it looks like a group of ghosts is peeking inside.
45. Mad Hatter’s Spooky Tea Party

Take a trip down the rabbit hole with a tea party that’s gotten a little spooky. This “Mad Hatter” theme is a wonderfully weird and whimsical way to decorate. It combines the fantasy of a storybook with some fun Halloween twists.
A tower of mismatched, teetering teacups is the star of the show. The teapot has a creepy skull design, and a black top hat sits ready for the party’s host. Little tags that say “Eat Me” and “Drink Me” invite guests to join in the spooky fun.
DIY Mad Hatter’s Spooky Tea Party
What You’ll Need:
- An old teapot and several mismatched teacups and saucers
- A hot glue gun (for adult use)
- A black top hat
- A small clock
- Colorful feathers
- White paper tags, a marker, and string
- A checkerboard-patterned placemat or piece of fabric
Instructions:
Step 1: Build a Topsy-Turvy Teacup Tower Have an adult help you use a hot glue gun to carefully stack the teacups and saucers on top of the teapot. Glue them at silly, crooked angles. This will be your main centerpiece.
Step 2: Decorate the Mad Hatter’s Hat Place the black top hat on the table. Tuck a few bright, colorful feathers into the band of the hat for a touch of whimsy.
Step 3: Add the “Eat Me” and “Drink Me” Tags Use a marker to write “Eat Me” and “Drink Me” on the small paper tags. Tie them with string to a small plant, a cupcake, or a bottle.
Step 4: Set the Scene Lay down your checkerboard placemat. Place your teacup tower in the middle. Set the clock nearby—it’s always tea time here!
Step 5: Add a Spooky Touch For a final spooky effect, you can have an adult place a small piece of dry ice and a little warm water in a bowl behind your teacup tower. The smoky vapor will drift around the table, making it look mysterious and magical.
There you have it—45 unique ways to bring some kid-friendly Halloween magic into your home. From silly monster welcomes and spooky science labs to enchanted forests and retro video game adventures, there is a creative spark for every family.
Remember, the most beautiful decorations are not the ones that look the most professional, but the ones that hold the happiest memories. The smudges of paint and slightly crooked googly eyes are all part of the charm.
So pick a favorite, gather your craft supplies, and get ready to make something wonderful with your little monsters. We hope these ideas inspire you to have a fun, creative, and memorable Halloween season.
Key Takeaways
- Fun Over Fright: Kid-friendly Halloween decorating focuses on cheerful, silly, and magical themes rather than genuine scares, making the holiday enjoyable for all ages.
- Creativity with Simple Supplies: You don’t need expensive materials to create amazing decorations. Everyday items like paper plates, glass jars, paint, and pumpkins can be transformed into incredible creations.
- DIY is a Family Activity: The step-by-step projects in this guide are designed to be a bonding experience, turning decoration time into quality family time.
- Themes for Every Interest: Whether your kids love dinosaurs, superheroes, outer space, or classic monsters, there is a theme that can be adapted to their unique personality.
- Memories Matter Most: The ultimate goal is to build lasting holiday traditions and memories through the shared joy of creating something together.