Halloween is more than costumes and candy. It’s about a feeling. It’s the chill that runs down your spine when you walk past a dimly lit house. It’s the sense that something is lurking just beyond what you can see.

The secret to creating that feeling is light. Good Halloween lighting doesn’t just help you see in the dark; it creates the darkness. It carves out shadows, paints walls in eerie colors, and transforms the familiar into something strange and unsettling.
Forget the simple string of orange lights on the porch. This guide explores 38 ways to use light to build a truly spooky atmosphere. From ghostly projections to bubbling toxic waste, you’ll find plenty of inspiration and simple DIY projects to make your home the most haunted on the block.
1. Ghostly Candle Congregation

A silent gathering of spirits seems to be taking place. Hundreds of tall, slender white tubes stand clustered together, glowing with a cold, internal light. They resemble candles, but their sheer number and unnatural height create an unnerving effect.
Beams of light shine down from an unseen source, cutting through a light mist and illuminating a cross in the background. The scene is solemn and spooky. It feels like a church service for the dead. This powerful display turns a simple concept into a breathtaking and eerie spectacle.
DIY Ghostly Candle Congregation Instructions
You can create this ghostly gathering of lights with some simple items from a hardware store.
What You’ll Need:
- Lots of white cardboard mailing tubes or PVC pipes of different lengths
- Small, battery-powered LED lights (sometimes called “puck lights” or “tap lights”)
- A can of white spray paint
- Optional: A fog machine
Step-by-Step Guide:
- Prepare Your Candles: If your tubes or pipes aren’t already white, lay them on some newspaper outside and spray paint them white. Let them dry completely.
- Create the Glow: Take your small LED lights and turn them on. Place one inside the bottom of each cardboard tube or pipe. The light will shine up through the tube.
- Arrange Your Congregation: Find a dark corner or an area against a wall. Start standing your light-up tubes upright. Cluster them close together, putting the taller ones in the back and the shorter ones in the front to create depth.
- Add Some Atmosphere (Optional): If you have a fog machine, place it nearby. A little bit of fog floating around the base of the glowing “candles” will make the scene look extra spooky and mysterious.
- Enjoy the Haunting: Turn off the other lights in the room. Your eerie gathering of ghostly lights is now complete and ready to give visitors a chill.
- Eerie Slime Trail
A glowing green river of slime snakes its way down a dark hallway. The trail seems to ooze from under one door, flow across the floor, and disappear under another, leading to a mysterious red glow in the room beyond.
The edges of the slime are defined by bright neon green ropes of light, while the center looks wet and textured, like real goo. The most unsettling part is the drips of slime that appear to be melting down from the top of the doorframe, making the whole scene feel active and alive.
2. DIY Eerie Slime Trail Instructions

You can make a safe and clean-looking slime trail that glows, and it’s easier than you think!
What You’ll Need:
- A roll of clear plastic sheeting or a clear shower curtain
- Green or neon green LED rope light (the flexible kind)
- Clear school glue (like Elmer’s)
- Green and yellow food coloring
- A disposable bowl and spoon for mixing
- Scissors and clear tape
Step-by-Step Guide:
- Map Your Trail: Decide where you want your slime to go. Lay your clear plastic sheeting on the floor in that shape. Cut it into a wavy, puddle-like path. Cut out some drip shapes, too.
- Outline with Light: Use clear tape to carefully attach your green LED rope light along the edges of your plastic slime shape on the floor.
- Mix the Goo: In your bowl, squeeze a good amount of clear glue. Add a few drops of green and a drop of yellow food coloring and mix it up until you get a nice, slimy color.
- Make it Slimy: Drizzle your colored glue mixture all over the clear plastic sheeting, inside the rope light border. Spread it around so it looks like a real, wet puddle of goo. Do the same for your drip shapes.
- Let it Dry: Let the glue dry completely. This might take a day. When it’s dry, it will still look wet and shiny.
- Install the Drips: Tape your finished slime drips above a doorframe so they look like they’re oozing down.
- Light It Up: Plug in your rope light and turn off the other lights. You now have a glowing, slimy path leading through your house!
- Glitchy Digital Portal
An archway that should lead into a simple room has been transformed into a chaotic digital nightmare. The entire surface of the wall is a flickering, glitching screen of red, blue, green, and white pixels, like a computer that is crashing in a spectacular way.
The doorway itself is outlined in a sharp, menacing red light, creating a clear portal in the middle of the visual noise. It feels like a doorway to a broken part of the internet, a place you are not meant to enter. The effect is modern, disorienting, and deeply unsettling.
3. DIY Glitchy Digital Portal Instructions

You can turn a doorway into a cool, corrupted computer screen with a projector.
What You’ll Need:
- A doorway or archway
- A digital projector
- A laptop
- A white sheet or white wall
- Red LED light strips or rope light
- Tape
Step-by-Step Guide:
- Find Your Glitch: On your laptop, search on a site like YouTube for “static screen effect” or “glitch effect video.” Find a video that looks like a broken computer screen and have it ready to play.
- Set the Stage: If your wall isn’t white, tape a plain white sheet flat against the wall around your chosen doorway. This will be your projector screen.
- Create the Portal: Use tape to carefully attach your red LED light strip around the frame of the doorway.
- Set Up the Projector: Place your projector so that it shines onto the wall and the sheet. Connect it to your laptop.
- Project the Chaos: Play the glitch video on a loop. Adjust the size and focus of the projector so the static effect covers the entire wall, right up to the edges of the red glowing doorway.
- Enter the Matrix: Plug in your red doorway lights and dim the other lights in the room. It will now look like you have a portal to a broken digital world right in your house.
- Crimson Dance Macabre
The entire room is plunged into a deep, blood-red darkness. The only light comes from a disco ball on the floor, which casts hundreds of frantic red dots and slashes of light across the walls and ceiling.
The light patterns create a sense of chaotic movement and energy, as if unseen spirits are dancing wildly in the room. The symmetrical reflection on the floor adds to the disorienting effect. This simple setup transforms an empty space into a vibrant, pulsating, and menacing dance floor for the damned.
4. DIY Crimson Dance Macabre Instructions

It’s super easy to turn any room into a spooky, red dance party with just two things.
What You’ll Need:
- A disco ball or a half-sphere mirror ball
- One or two spotlights or bright flashlights with red light bulbs or a red filter
Step-by-Step Guide:
- Choose Your Room: Find a room that you can make completely dark. An empty room or a basement works great for this.
- Place the Ball: Put your disco ball on the floor, right in the middle of the room.
- Set the Lights: Place your red spotlights on the floor a few feet away from the disco ball. Aim the lights directly at the disco ball. If you have two lights, place them on either side.
- Let’s Party: Turn on your red lights and turn off all the other lights in the room.
- Enjoy the Show: The red light will hit the mirrors on the disco ball and splash hundreds of moving red dots all over the walls and ceiling. It’s an instant spooky party! If you want the lights to move, you can put the disco ball on a slow-turning motor.
- Bubbling Potion Globes
Several round glass bowls sit in a smoky cauldron, each one glowing with an intense, otherworldly light. Inside the bowls, a strange, glittery liquid bubbles away, with dozens of yellow and green glow sticks rising from the surface like magical stirring rods.
A thick, heavy smoke pours over the sides of the bowls and pools around them, suggesting the potions are potent and possibly dangerous. The combination of the glowing liquid, the bright sticks, and the smoke creates a fantastic and whimsical witch’s brew.
5. DIY Bubbling Potion Globes Instructions

You can make your own glowing, smoking, and bubbling potions that are safe and look amazing.
What You’ll Need:
- Several round glass bowls (like fishbowls)
- Water
- Glitter
- Yellow and green glow sticks
- Small, waterproof LED lights (the kind you can put in water)
- Dry ice (an adult MUST handle this part with gloves!)
- A large bucket or cauldron
- Thick gloves for the adult
Step-by-Step Guide:
- Mix Your Potions: Fill your glass bowls about halfway with water. Sprinkle a good amount of glitter into each bowl and stir it up.
- Add the Glow: Activate your glow sticks by bending them until they snap, then shaking them. Place a bunch of them inside each bowl, sticking out in all directions.
- Light it From Below: Turn on your waterproof LED lights and drop one into the bottom of each bowl. The whole potion will now glow from within.
- The Smoking Cauldron: Place your finished potion bowls inside the large cauldron.
- The Magic Bubbles (Adults Only!): An adult needs to put on thick gloves. They should carefully place a few small pieces of dry ice into the water in each of the glass bowls.
- Watch the Magic: The potions will immediately start to bubble and release a thick, cool smoke that will spill over the sides of the bowls and fill the cauldron. It’s a real-life bubbling witch’s brew!
- Pillars of Molten Light
In the darkness of a yard, several tall porch pillars have been transformed into columns of what looks like flowing lava. Hundreds of orange string lights have been wrapped tightly around each pillar from top to bottom.
At the base of each pillar, the lights are not wrapped neatly. Instead, they spill out onto the ground in a chaotic pattern, looking like the roots of a magical tree or pools of molten rock. The intense orange glow against the pitch-black night creates a powerful and dramatic effect.
6. DIY Pillars of Molten Light Instructions

You can make any tree or pole in your yard look like it’s made of fire with this simple wrapping technique.
What You’ll Need:
- A tree, a porch column, or any tall pole in your yard
- Many strands of orange or amber colored outdoor string lights (the more, the better!)
- An outdoor extension cord
Step-by-Step Guide:
- Start at the Top: With an adult’s help if it’s high, secure the end of your first string of lights at the very top of your pillar or tree trunk.
- Wrap it Tight: Begin wrapping the string lights around the pillar. Keep the strands very close together so there are no gaps. You want it to look like a solid column of light.
- Connect and Continue: When you get to the end of one string, plug the next one into it and continue wrapping. Keep going all the way down to the bottom.
- Create the Roots: When you reach the base of the pillar, don’t stop. Continue laying the string lights out on the ground, spreading them out from the base in a random, root-like pattern.
- Light it Up: Plug the lights into your extension cord.
- Enjoy the Glow: Wait until it’s dark outside to see the full effect. Your pillar will look like a glowing column of magma, with fiery roots spreading into the ground.
- Theater of Shadows
On a brightly lit white screen, a spooky story is being told using only shadows. The silhouettes of two adults and two children are holding up intricate shadow puppets of demons and monsters. In the center, a rocking horse stands alone, the focus of the eerie scene.
The shadows are crisp and black, creating a high-contrast image that is both charmingly old-fashioned and genuinely creepy. This is a creative and engaging form of decoration that uses light to tell a story and invites the viewer to imagine the narrative.
7. DIY Theater of Shadows Instructions

You can put on your own spooky shadow puppet show for your friends and family.
What You’ll Need:
- A plain white wall or a white sheet stretched tight
- A bright, single-bulb lamp or a strong flashlight
- Black construction paper
- Scissors
- Tape
- Thin sticks or wooden skewers
Step-by-Step Guide:
- Set Your Stage: Find a dark room with a plain white wall. If you don’t have one, hang a white sheet up tightly.
- Position Your Light: Place your lamp on a table or the floor, pointing at the center of the wall. This light will create the shadows.
- Create Your Actors: Draw some spooky monster and character shapes on your black construction paper. They don’t have to be fancy! Cut them out.
- Make Your Puppets: Tape your paper monster cutouts to the end of your thin sticks. Now you can hold them and make them move.
- It’s Showtime!: Turn on your lamp and turn off all the other lights in the room.
- Tell a Story: Stand between the light and the wall. Hold up your puppets so their shadows appear on the screen. You can even use your hands to make shadow puppets. Make the puppets talk and act out a scary story for your audience!
- Sinister Laboratory Lamp
A single heat lamp casts an intense, blood-red glow over a strange scene. The light illuminates a square metal tray filled with a bubbling, frothing liquid that looks like blood. The whole setup is enclosed in what looks like a plastic-wrapped chamber.
The atmosphere is clinical, disturbing, and mysterious. It feels like a scientific experiment gone horribly wrong, or the incubation chamber for some kind of monster. The single, focused red light is what gives the scene its deeply unsettling and dangerous feeling.
8. DIY Sinister Laboratory Lamp Instructions

You can create a creepy, bubbling experiment with a few simple kitchen and craft items.
What You’ll Need:
- A glass baking dish or a metal tray
- Water
- Red food coloring
- A little bit of dish soap
- An Alka-Seltzer tablet
- A desk lamp or a clip-on lamp
- A red light bulb
Step-by-Step Guide:
- Set the Scene: Place your glass dish on a table in a dark room.
- Mix the “Blood”: Fill the dish with about an inch of water. Add several drops of red food coloring and stir until it’s a deep red color. Add a single drop of dish soap.
- Position the Light: Screw the red light bulb into your lamp. Position the lamp so it is shining directly down into the red liquid.
- The Mad Science: This is the fun part! Break an Alka-Seltzer tablet in half and drop it into the red water.
- Watch the Reaction: The liquid will immediately start to fizz and bubble, creating a creepy, frothing effect. The red light from above will make the whole thing glow and look like a dangerous experiment. The bubbles will last for a few minutes, so you can add more Alka-Seltzer whenever you want to restart the effect.
- Monsters Under the Bed
Two terrifying creatures are hiding under a bed, waiting to grab an unsuspecting victim’s ankles. Each monster is trapped in its own box-like cage, one glowing with a sinister red light and the other with a sickly green light.
The colored lights illuminate the monsters’ horrible faces and claws, casting long, spooky shadows across the floor. This classic childhood fear is brought to life in a vivid and colorful way. The use of contained, colored light makes the monsters feel like they are charging up with some kind of evil energy.
9. DIY Monsters Under the Bed Instructions

You can make it look like there are real monsters hiding under your bed with this easy project.
What You’ll Need:
- Two scary monster masks or props
- Two cardboard boxes, big enough to fit the masks
- Red and green battery-powered LED light strips
- Tape
- Scissors
Step-by-Step Guide:
- Prepare the Cages: Take your two cardboard boxes. Cut off the top flaps and one of the long sides of each box, so you have two three-sided “cages” or dioramas.
- Install the Lights: Take your red LED light strip and tape it along the inside top edge of one of the boxes. Do the same with the green light strip in the other box.
- Place Your Monsters: Put one monster mask inside the red box and the other inside the green box. Arrange them so they are peeking out and looking scary.
- Time to Hide: When it’s dark, slide your two monster boxes under a bed.
- The Reveal: Turn on the LED light strips. The boxes will fill with red and green light, revealing the monsters hiding in their lairs. The colored light will spill out onto the floor, making it look extra spooky.
- Abandoned Room Spotlight
A harsh, blue-white light beams down from several stage lights, illuminating a forgotten and unsettling scene. Two pieces of furniture, a chair and a grandfather clock, are covered in dusty plastic sheets, the kind used when a house has been abandoned for a long time.
The intense, cold light makes the plastic gleam, and the rest of the room is lost in shadow. The scene tells a story of time standing still and of a place that has been left to decay. It feels like the setting of a ghost story, frozen and waiting for something to happen.
10. DIY Abandoned Room Spotlight Instructions

You can create a spooky, frozen-in-time scene with things you probably already have at home.
What You’ll Need:
- A chair
- A tall object, like a coat rack, a bookshelf, or a large lamp
- An old, thin white sheet or a clear plastic drop cloth
- A bright spotlight or a powerful flashlight with a cool, blue-white bulb
Step-by-Step Guide:
- Set the Scene: In a dark corner of a room, place your chair. Next to it, place your tall object that will pretend to be the grandfather clock.
- Cover in Dust: Gently drape your sheet or plastic cloth over both the chair and the tall object. Let it fall naturally, like it’s been covered in a dusty sheet for years.
- Position the Light: Place your spotlight on the floor or on a high shelf. Aim it directly at the two covered pieces of furniture.
- Create the Ghost Story: Turn on your spotlight and turn off all the other lights in the room. The harsh light will make the covered furniture look lonely and abandoned. It will look like a scene from a haunted house where time has stopped.
- Ritualistic Fire Circle
In the center of a grassy yard, a fire pit burns brightly, the flames dancing wildly against the night sky. The area is bathed in an intense, flickering red light from spotlights on the ground. Flanking the scene are two ornate, fiery fan-like structures that glow with an inner heat, looking like pagan sun symbols.
The entire setup feels like the site of some ancient, powerful ritual. The combination of the real flames and the dramatic red uplighting creates an atmosphere of primal energy and foreboding. It’s a bold outdoor statement that turns your lawn into a ceremonial ground.
11. DIY Ritualistic Fire Circle Instructions

You can create a spooky ritual circle in your own backyard for a Halloween bonfire.
What You’ll Need:
- A portable fire pit
- Wood for the fire (and an adult to manage it!)
- Two or more outdoor spotlights with red light bulbs
- An outdoor extension cord
- Optional: Two large, round folding fans (like the kind used for dancing)
- Optional: Orange spray paint
Step-by-Step Guide:
- Set Up the Fire Pit: With an adult’s help, place your fire pit in a safe, open area in your yard, away from the house or any trees. The adult will be in charge of building and watching the fire.
- Create Fiery Symbols (Optional): If you have the large folding fans, open them up. Spray paint them bright orange. Once they are dry, you can place them on stands or lean them against something on either side of your fire pit area.
- Position Your Spotlights: Place your red spotlights on the ground, pointing towards the fire pit and the fiery fan symbols. You can hide the lights behind bushes or chairs to make the glow seem more mysterious.
- Power the Lights: Run your extension cord from an outdoor outlet to your spotlights and plug them in. Make sure the cord is placed where nobody will trip over it.
- Start the Ritual: Have an adult light the fire in the pit. Once it’s dark outside, turn on your red spotlights. The red light mixing with the real fire will make your whole yard glow and look like a scene from a scary movie!
- Trapped Soul in the Window
A shadowy figure is pressed against a window, its hands spread wide as if trying to break free. The shape is a perfect silhouette, making it impossible to see any features, which only adds to the horror. The ghost is caught between shifting bars of colored light.
A vibrant green glow illuminates one side while a cool blue lights up the other, with a splash of menacing red in the center. This creates a disorienting, otherworldly effect, as if the spirit is trapped between dimensions. It’s a fantastic way to turn any window into a portal for a captured ghost.
12. DIY Trapped Soul in the Window Instructions

You can make it look like a ghost is trapped in your window with this super easy project.
What You’ll Need:
- A thin white sheet or a white shower curtain liner
- A dark hoodie or robe
- Tape
- Three battery-powered LED light bars or strips (one red, one green, one blue)
Step-by-Step Guide:
- Set the Stage: Go to the window you want to decorate, from the inside of the house. Tape the white sheet or shower curtain liner flat against the window frame, covering the entire glass.
- Place the Lights: Stick your LED light bars to the inside of the window frame. Put the blue and green ones vertically on the left and right sides. Place the red one horizontally at the bottom or top.
- Create the Ghost: This is the fun part! Get a family member or friend to help. Have them stand right in front of the sheet, facing you. They should put on the dark hoodie and press their hands and body against the sheet.
- Trace the Shape (Optional but helpful): While they are posing, you can lightly trace their spooky shape on the sheet with a pencil. This gives you a guide for where the “ghost” is.
- Hang the Costume: Now, tape the dark hoodie or robe inside the outline you drew, right against the sheet. This will become the permanent shadow figure.
- Reveal the Ghost: Turn on your LED lights and turn off the room lights. From outside, people will see a terrifying, colorful ghost trying to get out of your window!
- Creature in the Spotlight
Out of the complete darkness, a single, brilliant beam of light descends from above. It illuminates a monstrous figure standing alone, as if caught in the act. Tiny particles of dust or mist float in the light, making the beam feel solid and powerful.
The creature is frozen in the harsh white light, its details thrown into sharp relief while everything around it remains pitch black. This technique creates a huge amount of drama and suspense. It feels like a climactic scene from a horror movie, where the monster is finally revealed.
13. DIY Creature in the Spotlight Instructions

Make one of your Halloween props the star of the show by putting it in a dramatic spotlight.
What You’ll Need:
- Your scariest Halloween prop (like a zombie, monster, or skeleton)
- A very bright spotlight or a powerful flashlight that can be propped up
- An extension cord
- Optional: A small fog machine or a can of “fog in a can”
Step-by-Step Guide:
- Choose Your Location: Find a very dark corner in your house or a dark spot in your yard. The darker the area, the better this will look.
- Position Your Creature: Place your scary monster prop in the center of the dark area.
- Set Up the Light: Mount your spotlight high up, on a ladder, a tree branch, or a tall shelf. Point it directly down at your creature. The light should make a circle on the floor with the monster in the middle.
- Add Some Atmosphere (Optional): If you have a fog machine, place it near your creature and let a little bit of fog fill the air. If you have fog in a can, spray a few puffs into the air around the light beam. This will make the light beam visible.
- The Big Reveal: Plug in and turn on your spotlight. Make sure it’s the only light on in the area. Your creature will now be isolated in a bright, scary beam of light, ready to frighten anyone who sees it.
- Eyes in the Dark
From the deep shadows of the lawn, dozens of small, glowing red eyes stare out. They appear in pairs, low to the ground, scattered across the darkness. They don’t move, they just watch, silent and menacing.
The effect is incredibly unnerving because it suggests the presence of many small, unseen creatures hiding just out of sight. It plays on the fear of the unknown. This simple idea can turn your entire yard into a place filled with hidden monsters waiting to pounce.
14. DIY Eyes in the Dark Instructions

This is one of the easiest and creepiest decorations you can make for your yard.
What You’ll Need:
- Several empty cardboard toilet paper or paper towel tubes
- Scissors
- A roll of duct tape
- Red glow sticks (make sure you get a lot!)
Step-by-Step Guide:
- Cut the Eye Holes: Take one of your cardboard tubes. With the scissors, carefully cut two eye-shaped holes on one side of the tube. They should look like spooky, slanted eyes. Do this for all the tubes you have.
- Cover One End: Tear off a piece of duct tape and use it to completely cover one of the open ends of the cardboard tube. This will keep the glow stick from falling out.
- Activate the Glow: When it starts to get dark outside, take your red glow sticks. Bend them until you hear them snap, then shake them up so they glow brightly.
- Make Them Watch: Drop one glowing glow stick into the open end of each of your prepared cardboard tubes.
- Hide the Creatures: Take your glowing eye tubes outside and place them in your bushes, in the tall grass, or under trees. Hide them so you can only see the glowing eyes peeking out.
- Enjoy the Spooks: Look at your yard from the street. It will look like little red-eyed creatures are hiding everywhere, watching and waiting!
- Haunted Wall Wash
A plain exterior wall is transformed into a beautiful but spooky canvas of light. A series of ground-level lights project colors upward, washing the wall in a smooth gradient. The colors shift from a fiery orange and red on one end to a ghostly purple and pink on the other.
This technique, known as wall washing, uses light to paint a surface. For Halloween, these specific colors create a mood that is both eerie and enchanting, like a haunted sunset. It’s a simple, elegant way to give your entire home an otherworldly glow.
15. DIY Haunted Wall Wash Instructions

You can paint the outside of your house with light to give it a cool, colorful, and spooky look.
What You’ll Need:
- Several outdoor-rated floodlights or uplights (the more you have, the better it looks)
- Colored light bulbs for your lights (in Halloween colors like orange, red, purple, and pink) OR lights that can change colors
- An outdoor extension cord or power strip
Step-by-Step Guide:
- Choose Your Wall: Find a large, plain wall on the outside of your house. A wall without many windows works best.
- Set Up Your Lights: Place your floodlights on the ground in a line, a few feet away from the base of the wall. Space them out evenly.
- Add the Color: Screw your colored bulbs into the lights. Arrange them in a cool pattern. For example, you could go orange, red, purple, pink. If your lights can change color, set them to the spooky colors you want.
- Aim for the Sky: Tilt each light so it’s pointing up and slightly back at the wall. This will cause the light to spread up the wall in a “wash.”
- Power Them Up: Connect all your lights to the extension cord and plug it in.
- Adjust the Look: Wait until it’s completely dark outside to see the full effect. You can move the lights closer to the wall for a taller, thinner beam of light, or farther away for a shorter, wider wash. Play with it until your wall looks perfectly haunted!
- A Ghostwriter’s Fury
In a pitch-black room, a single desk is illuminated by a small lamp. An open book sits on the desk, waiting to be read. But the real story is happening all around it. Dozens of loose pages are frozen in mid-air, swirling and flying through a beam of light from the ceiling.
This scene tells a story of a poltergeist or a frustrated spirit, a writer whose words have literally been torn from the page and thrown into chaos. The dramatic lighting makes the simple paper pages look like a whirlwind of ghostly energy.
16. DIY A Ghostwriter’s Fury Instructions

You can create this amazing flying paper effect that will wow everyone who sees it.
What You’ll Need:
- A desk and a chair
- An old book you don’t mind taking pages from
- A desk lamp
- A spotlight or a bright flashlight
- Clear fishing line or thin string
- A needle
- Tape
- A ladder or a step-stool
Step-by-Step Guide:
- Set the Scene: Place your desk and chair in a dark corner. Put the desk lamp on the desk and open the old book in front of it.
- Prepare the Pages: Carefully tear about 20-30 pages out of the old book.
- Thread the Pages: Cut long pieces of fishing line. Use the needle to carefully poke a hole in the corner of one of the paper pages and thread the fishing line through it. Tie a small knot so the page doesn’t fall off. Do this for all your pages.
- Hang the Pages: This is the tricky part. Get on your ladder and tape the other end of the fishing lines to the ceiling above and around the desk. Hang them at all different heights and angles to make it look like they are flying around in a storm.
- Add the Drama: Clamp or place your spotlight high up on a shelf or the top of a door, pointing down at the desk and the hanging pages.
- Lights, Camera, Action!: Turn on the desk lamp and the main spotlight. Turn off all the other lights in the room. The fishing line will be nearly invisible, and it will look like the pages are magically flying through the air!
- Curse of the Pharaoh’s Tomb
The air in this ancient hallway is thick with history and dread. The stone walls are covered in glowing hieroglyphics that seem to pulse with a life of their own. Flickering torches cast a warm, dancing light, creating long, moving shadows that make the space feel alive.
Sarcophagi stand guard along the wall, their surfaces also catching the projected symbols. The combination of ancient torchlight and modern projection technology creates a stunning and immersive effect. It feels like you have just broken the seal on a cursed tomb.
17. DIY Curse of the Pharaoh’s Tomb Instructions

Turn any hallway in your house into an ancient Egyptian tomb with some clever lighting tricks.
What You’ll Need:
- A digital projector and a laptop
- Battery-powered flickering torches (the LED kind are safest)
- Wall mounts or strong tape for the torches
- Optional: Large cardboard boxes to make “sarcophagi”
Step-by-Step Guide:
- Find Your Hieroglyphics: On your computer, search online for an image of “Egyptian hieroglyphics.” Find a clear, black and white pattern that you like and save it.
- Set Up the Projector: Place your projector at one end of a dark hallway. Connect it to your laptop and project the hieroglyphics image onto the wall. Adjust the size and focus until the wall is covered in the ancient writing.
- Mount the Torches: Turn on your battery-powered torches. Attach them to the wall along the hallway. Space them out every few feet. The flickering light from the torches will mix with the projected light.
- Build a Tomb (Optional): If you have large cardboard boxes, you can stand them up against the wall to look like ancient tombs or sarcophagi. The projected light and torchlight will shine on them too.
- Enter if You Dare: Turn off all the other lights in the hallway. Now it will look and feel like you are walking through a mysterious, glowing Egyptian tomb.
- The Final Heartbeat
In the blackness, a single, fragile lightbulb glows with a warm, amber light. Behind it, a vibrant red line charts the frantic peaks and valleys of a heartbeat on an EKG monitor. The red neon line is the only other source of light, casting a clinical, urgent glow.
The image is simple but powerful. It combines a vintage, warm light source with a modern, life-or-death symbol. It creates a feeling of tension and suspense, making you wonder if you are witnessing the final moments of a life.
18. DIY The Final Heartbeat Instructions

This striking light-up wall art is easy to make and looks very professional.
What You’ll Need:
- A large piece of black foam board or a painted black canvas
- Red EL wire (a thin, flexible neon-like wire) with a battery pack
- A vintage-style “Edison” light bulb with a small base and socket
- Tape or hot glue (ask an adult for help with hot glue)
- A pencil
Step-by-Step Guide:
- Draw the Line: On your black foam board, use a pencil to lightly draw a heartbeat line (an EKG line). It should go up and down in sharp peaks. You can look up a picture online to get it right.
- Attach the Wire: Starting at one end, carefully tape or glue your red EL wire down, right on top of the pencil line you drew. Be patient and follow the line exactly.
- Add the Bulb: Find the spot in the middle of your heartbeat line where you want the light bulb to go. Carefully cut a small hole in the foam board just big enough for the back of the light bulb socket to push through.
- Secure Everything: Push the socket through from the back and secure it. Tape the EL wire battery pack and the light bulb’s cord to the back of the board so you can’t see them from the front.
- Light It Up: Screw the Edison bulb in. Turn on the EL wire and plug in the light bulb. Hang your creation on the wall in a dark room. It will look like a glowing, beating heart monitor.
- Infested Spider’s Nest
The entire ceiling is gone, replaced by a massive, thick canopy of spiderwebs. Caught in the sticky mess are dozens, if not hundreds, of black spiders, crawling in every direction. At the center, a monstrous mother spider lurks, its red eyes glowing.
The whole scene is bathed in an eerie, vibrant purple light, which makes the white webs glow and the black spiders stand out. This is a truly immersive decoration that creates a feeling of being trapped inside an arachnid’s nest. It is not for the faint of heart.
19. DIY Infested Spider’s Nest Instructions

Turn the ceiling of any room into a creepy-crawly spider’s lair with this fun project.
What You’ll Need:
- Lots of stretchy spider web material (the more bags, the better)
- Many small plastic spiders
- One large plastic spider
- Purple string lights (LED lights are safest because they don’t get hot)
- Thumb tacks or removable wall hooks
Step-by-Step Guide:
- Create the Web Foundation: Start in one corner of the room. Use a thumb tack or a hook to secure the end of your spider web material. Then, stretch it across the ceiling to another corner and secure it. Keep doing this, crisscrossing the room, until you have a good base layer of webs.
- Make it Thicker: Open up more bags of spider web and stretch them over and under the base layer you just made. The goal is to make it look thick and messy, like a real spider has been working for a long time. Let some of it hang down.
- Weave in the Lights: Take your purple string lights and carefully weave them through the spiderwebs. Drape them and wrap them around the web strands so the whole ceiling starts to glow purple.
- Add the Spiders: Now for the fun part! Take your small plastic spiders and stick them all over the webs. Put them in clumps, have them crawling in lines, and hide them in the thick parts.
- Place the Queen: Take your one big spider and place it right in the middle of the ceiling so it looks like it’s in charge of all the others.
- Light the Lair: Plug in your purple lights and turn off the regular room lights. Your room is now a glowing, purple, spider-infested nest!
- Voodoo Garland of Dread
Hanging in the darkness is a string of festive lights, but this is no ordinary celebration. Dangling between the colorful bulbs are small, creepy voodoo dolls and clumps of dried Spanish moss. In the background, a line of flaming tiki torches provides a flickering, primal glow.
This decoration expertly blends the cheerful and the chilling. The familiar party lights contrast with the unsettling dolls and natural elements, creating a scene straight out of a bayou horror story. It is a unique and creepy way to light up an outdoor space.
20. DIY Voodoo Garland of Dread Instructions

You can make your own creepy garland to hang outside for a spooky, swampy vibe.
What You’ll Need:
- A strand of outdoor string lights (the kind with bigger bulbs look great)
- Several small voodoo dolls (you can buy these or make them out of twine and buttons)
- Dried Spanish moss (from a craft store)
- Thin twine or string
- Scissors
- Optional: Battery-powered tiki torches
Step-by-Step Guide:
- Hang Your Lights: First, hang your string of lights where you want your decoration to be, like between two trees or along a porch. Don’t plug them in yet.
- Prepare Your Dolls: If your voodoo dolls don’t have strings on them, cut a piece of twine, loop it around the doll’s neck or body, and tie a knot so you can hang it.
- Tie on the Spooks: Take a voodoo doll and tie it onto the main cord of the string lights, letting it hang down between two of the light bulbs.
- Add the Moss: Take a small handful of Spanish moss. Use a piece of twine to tie it in the middle, then tie that twine onto the string light cord as well. Let the moss hang down like spooky hair.
- Fill the Garland: Keep adding voodoo dolls and bunches of moss along the whole length of the string lights. Space them out however you think looks best.
- Light the Night: If you have them, place your battery-powered tiki torches in the ground behind your garland. Now, plug in your string lights. The mix of the colorful bulbs and the flickering torches will make your creepy garland look amazing.
- Phantom Projection
A terrifying spirit appears in the window, not as a solid figure, but as a being of pure light and energy. It presses against the glass, its mouth open in a silent scream. The ghost glows with a cold, blue-white light, its form semi-transparent and ethereal.
This modern haunting is created by a projector, turning a simple window into a high-tech portal to the other side. The effect is startlingly realistic and dynamic, bringing a cinematic quality to your Halloween display. It is a surefire way to make passersby do a double-take.
21. DIY Phantom Projection Instructions

You can summon a ghost to appear in your window with a few simple tools. It’s like a movie special effect at your own house!
What You’ll Need:
- A digital projector
- A laptop or a media player
- A ghost video effect (you can find these online, often called “digital decorations”)
- A window
- A thin, white, semi-transparent curtain or a piece of white projection material
- Tape or a curtain rod
Step-by-Step Guide:
- Prepare Your Screen: Hang your thin white curtain or projection material over the entire inside of your chosen window. It should be as smooth and tight as you can get it. This is what the projector will shine on.
- Set Up the Projector: Place your projector inside your house, pointing towards the window screen you just hung up. You might need to put it on a box or a tripod to get the height just right.
- Connect and Play: Connect the projector to your laptop. Find your ghost video file and play it on a loop. Adjust the size and focus of the projector until the ghost looks like it’s the right size for the window.
- Rear or Front Projection?: For the best effect, you want people outside to see the ghost. If you project from inside onto a sheer curtain, people outside will see the ghost floating in the window. This is called “rear projection.”
- Check Your Haunting: Go outside and take a look. The ghost should appear to be floating inside your window! Make the room as dark as possible to make the ghost look brighter and scarier.
- Seance Circle of Light
On a dark floor, a perfect circle of candles flickers, their warm glow pushing back the shadows. The sheer number of flames creates a powerful and mesmerizing display, looking like a magical barrier or the site of an important summoning ritual.
In the center of the ring of light sits a modern Bluetooth speaker, a mysterious addition to the ancient-looking scene. Perhaps it is broadcasting ghostly whispers or an eerie soundtrack for the seance. This setup blends classic candlelight with new technology to create an intimate and deeply atmospheric focal point.
22. DIY Seance Circle of Light Instructions

You can create a beautiful and mysterious candle circle that’s completely safe and easy to set up.
What You’ll Need:
- A lot of battery-operated LED pillar candles (at least 20-30 to make a good circle)
- A Bluetooth speaker
- A spooky sounds or music playlist on your phone or tablet
Step-by-Step Guide:
- Choose Your Spot: Find an open area on the floor in a room that can be made very dark. This is where you will summon the spirits (or at least, pretend to!).
- Place Your Speaker: Put your Bluetooth speaker right in the middle of the spot you chose.
- Form the Circle: Turn on all of your LED candles. Carefully place them on the floor in a circle around your speaker. You can make one perfect ring, or make a couple of rings to make it look fuller.
- Connect to the Other Side: Connect your phone to the Bluetooth speaker. Find a playlist of spooky sounds, like whispers, wind, or ghostly music.
- Set the Mood: Start playing the spooky sounds from the speaker in the middle of the circle.
- Dim the Lights: Turn off all the lights in the room. The only light will be the warm, flickering glow from your candle circle, and the creepy sounds will seem to come from the center of the magic. It’s a great spot to tell ghost stories!
- The Boiler Room’s Glow
This long, industrial corridor feels like the fiery heart of a haunted factory or the engine room of a ghost ship. The entire space is drenched in a hellish red light. Glowing red ropes of light trace the paths of pipes along the walls and ceiling, making them look like arteries carrying boiling blood.
On the floor, small pits of fire flicker and dance, casting an intense, warm light upwards and adding to the feeling of overwhelming heat. This immersive environment uses light to transform a simple hallway into a dangerous and terrifying place you would not want to get trapped in.
23. DIY The Boiler Room’s Glow Instructions

You can turn your basement, garage, or even just a hallway into a scary, industrial boiler room.
What You’ll Need:
- A dark hallway or room
- Red LED rope lights or light strips
- Several small, black cardboard boxes or buckets
- Small, battery-powered uplights or tap lights
- Orange, red, and yellow cellophane sheets
- Tape
Step-by-Step Guide:
- Map the Pipes: Look at your walls and ceiling. Use tape or removable hooks to run your red LED rope lights along any existing pipes, beams, or just in straight, industrial-looking lines.
- Create the Floor Fires: Take your small black boxes and place them on the floor, spaced out along the hallway.
- Add the Flames: Turn on your small uplights and place one inside each box, pointing up. Crinkle up some pieces of the red, orange, and yellow cellophane and loosely place them in the box on top of the light. The light will shine through and look like flickering fire.
- Power the Room: Plug in your red rope lights.
- Enter the Inferno: Turn off all the normal lights. The whole room will now be glowing red. The glowing “pipes” on the walls and the “fire pits” on the floor will make it feel like a terrifyingly hot and dangerous place.
- Mad Scientist’s Magnum Opus
The laboratory is alive. Bathed in a sickly green glow from shelves of strange chemicals, a central table holds a diabolical experiment. A plasma ball shoots purple tendrils of energy under a bare, hanging bulb. The air itself seems to crackle as a huge bolt of lightning arcs across the ceiling.
This is the classic mad scientist’s lab, turned up to eleven. Every element, from the glowing beakers to the raw electricity, screams of forbidden knowledge and creations that defy nature. It is a dynamic and energetic scene, capturing the very moment a monster might be brought to life.
24. DIY Mad Scientist’s Magnum Opus Instructions

It’s alive! You can build your own exciting mad scientist laboratory for Halloween.
What You’ll Need:
- A table
- Green LED light strips or string lights
- A plasma ball
- An assortment of glass jars, bottles, and vases
- Water and food coloring (green and other weird colors)
- A string of bright blue or white LED fairy lights
- Thumb tacks
- A hanging lamp with a vintage-style bulb (optional)
Step-by-Step Guide:
- Set Up Your Lab: Place your table in the middle of a room. If you have shelves behind it, great! If not, you can put some boxes behind the table to make shelves.
- Mix Your Chemicals: Fill your glass jars with water and add different food coloring to each one. Place them on the shelves behind your lab table.
- Add the Eerie Glow: Run your green LED light strips along the back of the shelves, behind the jars. When you turn them on, all your “chemicals” will glow with a spooky green light.
- The Centerpiece: Place your plasma ball right in the middle of the table and turn it on.
- Create a Lightning Bolt: Take your blue or white fairy lights. Use thumb tacks to attach the string to the ceiling above your table in a zig-zag lightning bolt shape.
- It’s Alive!: Turn on your green shelf lights, the plasma ball, and the lightning bolt lights. Turn off the regular room lights. Your laboratory will now be crackling with scientific energy!
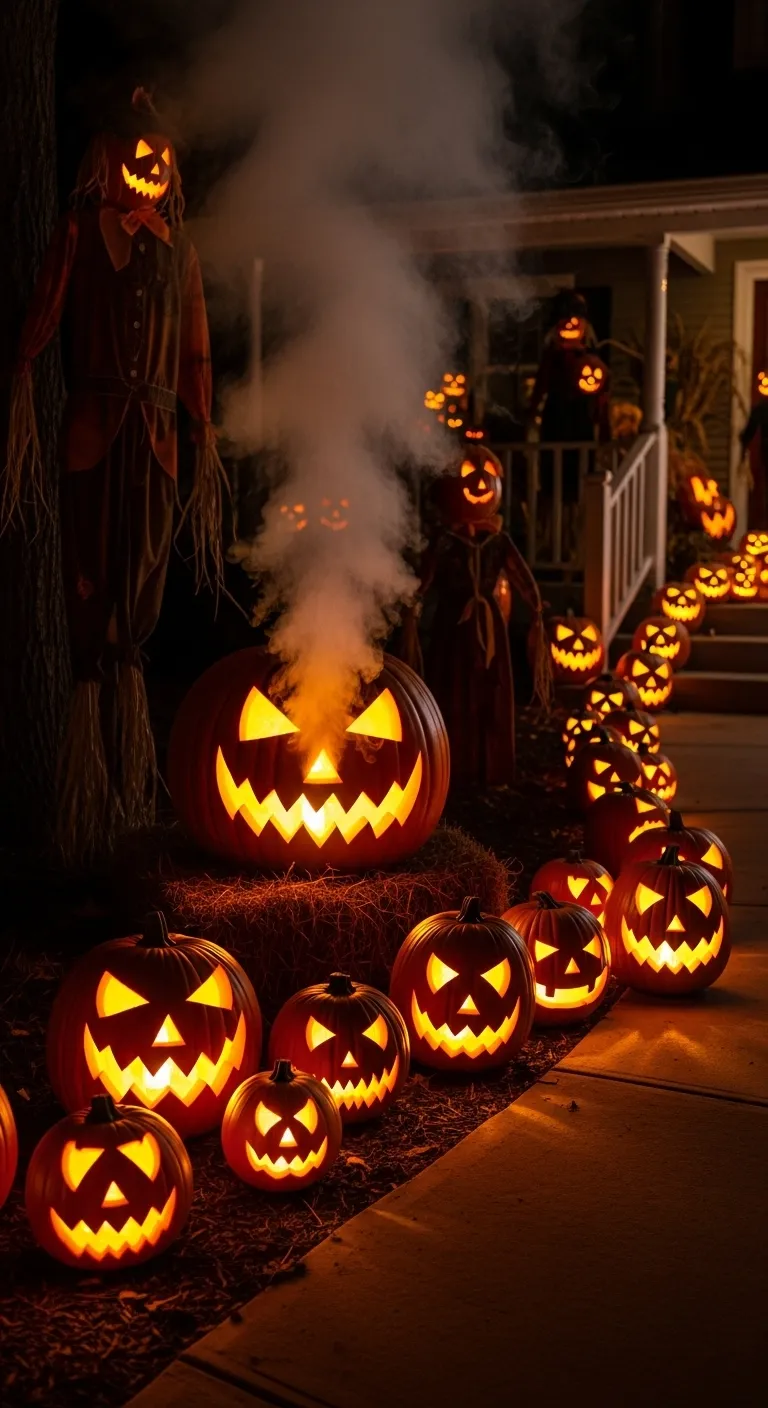
- Jack-o’-Lantern Procession
An army of pumpkins guards the path to the front door. Dozens of jack-o’-lanterns, with freshly carved, glowing grins, line the walkway and spill out onto the yard. Their expressions are a mix of spooky and mischievous, and their sheer numbers create an impressive and intimidating sight.
The leader of the pack, a massive pumpkin at the front, has a plume of thick smoke billowing from its carved top, as if it is powered by some internal furnace. This classic Halloween decoration becomes a powerful spectacle through repetition and a touch of smoky magic.
25. DIY Jack-o’-Lantern Procession Instructions

Make the path to your house extra spooky by creating a whole army of glowing pumpkins.
What You’ll Need:
- Lots of pumpkins (a mix of real ones and reusable craft pumpkins is great)
- Pumpkin carving tools (ask an adult for help)
- Battery-operated LED candles or puck lights for each pumpkin
- Optional: One large pumpkin
- Optional: A small fog machine with a tube attachment
Step-by-Step Guide:
- Carve Your Army: With an adult’s help, carve spooky, funny, or scary faces into all of your real pumpkins. If you have craft pumpkins, they might already have faces. The more pumpkins you have, the better it will look.
- Light Them Up: Place one or two battery-operated lights inside each pumpkin. This is much safer than real candles, especially for a big display.
- Arrange the Procession: When it gets dark, place your pumpkins along both sides of your walkway. Don’t just make a straight line! Cluster them together in groups, have some on the grass, and use pumpkins of different sizes.
- The Smoky Leader (Optional): Take your largest pumpkin. The adult helping you should cut a small hole in the back of it, near the bottom.
- Add the Fog: Place your fog machine on the ground behind the big pumpkin. Feed the machine’s tube into the hole you just cut. When you turn the machine on, the fog will fill the pumpkin and pour out of its eyes, nose, and mouth!
- Behold the Pumpkin Patch: Turn on all the lights inside your pumpkins. Your glowing, smoking pumpkin army is now ready to greet your visitors.
- Gaslight Apparition Alley
This hallway feels like a street plucked from a foggy, 19th-century ghost story. The air is thick with a heavy mist, so dense you can barely see to the other end. A series of old-fashioned lanterns and sconces on the wall provide the only illumination.
Their soft, warm, yellow light struggles to cut through the fog, casting a gentle glow that seems to float in the air. The atmosphere is quiet, mysterious, and full of suspense. You can’t help but feel that a ghostly figure could emerge from the mist at any moment.
26. DIY Gaslight Apparition Alley Instructions

You can turn any hallway in your home into a spooky, foggy alley from an old-timey horror movie.
What You’ll Need:
- A hallway
- A fog machine
- Several battery-operated, vintage-style lanterns or wall sconces
- Removable adhesive hooks to hang the lights
Step-by-Step Guide:
- Choose Your Lights: Gather your old-fashioned looking lanterns and sconces. Battery-powered ones are the easiest and safest to use. Make sure they all have batteries and are working.
- Hang the Lights: Use your removable hooks to hang the lanterns and sconces on the walls along your hallway. Stagger them on both sides and try to space them out evenly.
- Set Up the Fog: Place your fog machine at one end of the hallway, on the floor. It’s a good idea to put a towel underneath it in case it drips a little water.
- Wait for Dark: This effect works best when it’s dark. Close any doors that let light into the hallway.
- Create the Fog: Turn on your fog machine. It will start to pump out a thick, spooky fog that will fill the hallway. Use it in short bursts so it doesn’t get too thick.
- Light the Alley: Turn on all of your hanging lanterns. Their warm light will glow beautifully in the fog. Now your hallway is a mysterious alley, perfect for ghosts to wander through.
- Decadent Decay Candelabras
This room is a breathtaking vision of forgotten grandeur. Every surface is covered with ornate, silver candelabras holding hundreds of lit candles. The sheer volume of candlelight fills the space with a warm, flickering, and deeply romantic glow.
But this is a haunted beauty. The elegant scene is draped in thick, dusty cobwebs, suggesting a place that has been abandoned for a century, where the ghostly residents have just lit the candles for a spectral ball. It is a stunning display that is both beautiful and deeply sorrowful.
27. DIY Decadent Decay Candelabras Instructions

You can create a beautiful, haunted ballroom look with lots of candles and webs.
What You’ll Need:
- Several candelabras and single candlesticks (you can find cheap ones at thrift stores)
- Lots of battery-operated LED taper candles and pillar candles
- Stretchy spider web material
- Optional: A hot glue gun (with an adult’s help)
Step-by-Step Guide:
- Arrange Your Candlesticks: Place your candelabras and candlesticks all over your tables and mantelpiece. Group them together to create big clusters of candles.
- Add the Candles: Put your LED taper candles into the candelabras. Place the fatter LED pillar candles on the table in between the candelabras to fill in the space.
- Create Dripping Wax (Optional): For an extra spooky look, ask an adult to help you with a hot glue gun. They can carefully drip hot glue from the top of the LED candles down the sides to look like melted wax. Let it cool completely.
- Add the Cobwebs: Take your stretchy spider web material. Start at one end of the table and stretch it over and around all the candelabras. The more you stretch it, the more realistic it looks. Drape it so it hangs off the table.
- Turn On the Glow: Switch on all of your LED candles.
- Welcome to the Ghost Ball: Turn off the regular room lights. The room will be filled with the flickering light of hundreds of candles, shining through the spooky cobwebs.
- Leaking Toxic Waste Barrels
In a dark space, several barrels of toxic waste are glowing ominously. Each barrel, marked with a black radioactive symbol, shines with an intense inner light, one green, one purple. A thick, heavy fog pours from the tops and pools on the floor, looking like a dangerous chemical spill.
The scene feels hazardous and unstable, as if these containers could rupture at any moment. The combination of the glowing toxic colors and the rolling fog creates a dynamic and scary display straight out of a sci-fi horror film.
28. DIY Leaking Toxic Waste Barrels Instructions

You can make your own glowing, smoking toxic waste barrels for a spooky science experiment gone wrong.
What You’ll Need:
- Three round, plastic laundry baskets or large buckets
- Black spray paint and yellow craft paint
- A radioactive symbol stencil (you can print one from the internet)
- A small paintbrush or sponge
- Three bright, waterproof LED lights (often called submersible LEDs), one green and two purple
- Dry ice and a container of warm water (an adult MUST handle the dry ice with gloves!)
- Thick gloves and tongs
Step-by-Step Guide:
- Prepare the Barrels: If your baskets aren’t black, take them outside and spray paint them black. Let them dry completely.
- Add the Warning Symbol: Place your stencil on the side of a barrel. Use your sponge or small brush to dab yellow paint over the stencil. Carefully lift the stencil off. Do this for all three barrels.
- Light the Waste: Place one waterproof LED light at the bottom of each barrel.
- The Chemical Spill: This part is for an adult. The adult needs to put on thick gloves. Using tongs, they should carefully place a few pieces of dry ice into each barrel.
- Activate the Fog: The adult should then carefully pour a little bit of warm water into each barrel, over the dry ice. The barrels will immediately start to bubble and produce a thick fog that will spill out and cover the floor.
- Run for Your Life!: Turn on your LED lights inside the barrels and turn off the room lights. Your glowing, smoking toxic waste spill is now complete!
- Monster House Takeover
This house is no longer a home; it has been taken over by monsters. In each of the upstairs windows, a different creature appears as a brightly colored silhouette. A menacing figure in red is flanked by two ghoulish beings in green, all trapped behind the glass.
Down below, a projector on the lawn reveals the truth: these are digital decorations. The display cleverly shows both the high-tech setup and the creepy final effect. It’s a modern and highly effective way to make it seem like your entire house is infested with ghouls.
29. DIY Monster House Takeover Instructions

Make it look like different monsters are trapped in every window of your house using a projector.
What You’ll Need:
- A house with several windows visible from the street
- A digital projector
- A laptop or media player
- A digital decoration video that shows multiple monsters in windows (look for “window projection effects”)
- An outdoor extension cord
- A small table or stand for the projector
Step-by-Step Guide:
- Find the Right Spot: Go outside into your front yard at night. Find the best place to put your projector so that it can shine on the windows you want to decorate.
- Set Up Your Gear: Place your small table in the spot you chose. Put the projector on the table and connect it to your laptop and the extension cord.
- Choose Your Monsters: Load your monster video file onto your laptop. These special videos are often made to fit perfectly into window shapes.
- Project the Scare: Aim the projector at your house and play the video. You will need to adjust the position, size, and focus of the projector until the monsters line up perfectly inside your real windows.
- Check the View: Walk back to the street to see how it looks. The monsters should look like they are really inside the rooms, glowing in different scary colors. This is an easy way to decorate your whole house at once!
- The Haunting from Above
In an otherwise normal, sterile-looking hallway, the overhead fluorescent light has become a source of terror. The light itself flickers with a sickly, greenish-white glow, casting a nauseating light down the empty corridor.
But the truly horrifying part is the cluster of pale, ghostly hands reaching out from the light fixture itself. They seem to be phasing through the plastic cover, trying to claw their way into our world from a dimension just beyond the ceiling. This simple trick turns a mundane object into a point of pure nightmare fuel.
30. DIY The Haunting from Above Instructions

You can make a regular ceiling light fixture into a portal for a ghost with this simple, creepy trick.
What You’ll Need:
- A room with a fluorescent light fixture that has a plastic cover you can remove
- Two or three fake, plastic hands (from a Halloween or craft store)
- A sheet of green lighting gel or green cellophane
- Scissors
- Tape
Step-by-Step Guide:
- Turn Off the Power: IMPORTANT! Before you touch any light fixture, go to your house’s fuse box and turn off the power to that room. Ask an adult to make sure it’s off.
- Open the Light: Carefully open or remove the plastic cover from the fluorescent light fixture.
- Add the Creepy Color: Cut your green gel or cellophane so it’s the same size as the plastic cover. Lay it inside the cover. This will make the light glow a sickly green color.
- Place the Hands: This is the fun part. Arrange the fake hands inside the light fixture, near the bulbs. Position them so it looks like they are pushing their way out.
- Close it Up: Carefully put the plastic cover (with the green filter inside it) back onto the light fixture. The hands should be trapped inside, pressed against the cover.
- Turn On the Terror: Go back to the fuse box and turn the power back on. When you flip the light switch in the room, the light will be a spooky green, and it will look like a ghost is trying to break through your ceiling!
- Whispering Spirit Lanterns
A winding path of light leads through a dark and misty wood. The lights are not flames, but countless tiny sparks of cold, white light, captured in glass jars. Some jars hang from the gnarled branches above, while others line the trail, their glow illuminating a low-lying fog.
The scene is magical and beautiful, but also deeply eerie. It feels like a path for fairies or, perhaps, the trail of captured souls lighting the way through a haunted forest. This is an enchanting way to transform a backyard or path into a mystical space.
31. DIY Whispering Spirit Lanterns Instructions

You can create your own magical pathway of captured lights. This is a very simple and beautiful decoration.
What You’ll Need:
- Many clear glass mason jars with lids
- Several strings of battery-powered, cool white “fairy lights” (the kind on thin wire)
- Twine or wire for hanging
- Optional: A fog machine or dry ice (with adult supervision)
Step-by-Step Guide:
- Prepare the Jars: Make sure all your mason jars are clean and dry.
- Capture the Lights: Take one string of fairy lights. Carefully bunch the wire and feed it into one of the jars. The battery pack can be hidden inside or taped to the lid. Put the lid back on the jar. Repeat this for all your jars and light strings.
- Create Your Path: Take your finished light jars outside. Place them on the ground to create a winding path. Arrange them in little clusters to make it look more natural.
- Hang Some Lanterns: For some of the jars, wrap twine or wire securely around the neck of the jar to create a handle. Hang these from tree branches above your path.
- Add the Mist (Optional): If you have a fog machine, you can place it at the beginning of your path and let the fog drift among the lights. If an adult is helping with dry ice, they can place a bowl of warm water with a few pieces of dry ice in it to create a similar effect.
- Light the Way: Turn on all your fairy lights. The glowing jars will create a magical and spooky path through the darkness.
- Anxious Tangle of Light
A single, bare lightbulb hangs in the center of a chaotic mess. It is surrounded by a tangled web of wires dotted with tiny, sharp red lights. The central bulb gives off a warm, steady glow, but it seems trapped and overwhelmed by the frantic red sparks all around it.
This display creates a feeling of anxiety and being ensnared. The contrast between the one calm light and the hundreds of aggressive red ones is striking and unsettling. It is a simple but highly effective way to create a piece of abstract horror.
32. DIY Anxious Tangle of Light Instructions

You can make this cool and creepy light installation with just a few items.
What You’ll Need:
- A single bare bulb on a hanging cord (an Edison bulb looks great)
- One or two long strings of red LED fairy lights
- A few cotton balls
- A large, clear wall space
Step-by-Step Guide:
- Hang the Main Light: First, hang your single bulb from the ceiling so it’s right in the middle of the wall space you want to decorate.
- Create the Tangle: Take your red fairy light strings. Start tacking them to the wall around the central bulb. Don’t make it neat! Create a messy, random, tangled web of wires. Crisscross the wires over each other.
- Add Some Texture: Gently pull apart some cotton balls to make them wispy. Tuck these small, fluffy pieces into the tangle of red wires. It will give the display a soft, creepy texture.
- Light the Scene: Plug in both the main bulb and the red fairy lights.
- Feel the Anxiety: Dim the rest of the room lights. The contrast between the calm central bulb and the chaotic red web will create a really cool and unsettling piece of wall art.
- Alien Forest Invasion
The woods have become something alien and unnatural. Hundreds of sharp, green laser beams cut through the darkness, slicing through the trees and leaves. The beams originate from the forest floor, shooting upwards to create a canopy of geometric light.
The air is slightly hazy, allowing each individual beam to be seen clearly, turning the entire forest into a stunning and disorienting grid of green light. It feels less like a haunting and more like a close encounter, as if you have stumbled upon the landing site of a UFO.
33. DIY Alien Forest Invasion Instructions

Turn your backyard into an alien landscape with some awesome laser lights.
What You’ll Need:
- A backyard with some trees or tall bushes
- One or two laser “party light” projectors (the kind that create many beams)
- An outdoor extension cord
- A fog machine
Step-by-Step Guide:
- Choose Your Spot: Find a good spot on the ground in your yard where you can hide your laser projectors. Under a bush or behind a rock is a great place.
- Aim for the Sky: Place your laser projectors on the ground and aim them upwards, into the branches of your trees.
- Set Up the Fog: Place your fog machine nearby on the ground. The fog is the most important part, because it will allow you to see the laser beams.
- Power Up: Run your extension cord from an outlet to your lasers and your fog machine.
- Start the Invasion: Wait until it’s completely dark. Turn on the fog machine and let a good amount of fog drift up into the trees.
- Activate the Lasers: Turn on your laser projectors. You will see hundreds of bright green beams shooting up through the fog and trees. It will look like your backyard is being scanned by an alien ship!
- Psychedelic Blacklight Bubble Zone
Walking into this hallway is like stepping into another dimension. The entire space is plunged into darkness, lit only by the deep purple glow of blacklights. Floating through the air are dozens of shimmering bubbles, each one glowing as if it is lit from within.
The walls are covered in neon shapes that also glow intensely under the UV light. The effect is surreal, disorienting, and incredibly fun. It turns a simple hallway into an interactive and otherworldly experience.
34. DIY Psychedelic Blacklight Bubble Zone Instructions

You can turn a hallway or a room into a glowing, bubbly, super-fun zone for your Halloween party.
What You’ll Need:
- A dark hallway or room
- One or two blacklight bulbs or fixtures
- A bubble machine
- UV-reactive or blacklight bubble solution (you can find this online)
- Optional: Neon or fluorescent paint and paper
Step-by-Step Guide:
- Install the Blacklights: Replace the regular light bulbs in your hallway with blacklight bulbs. If you have plug-in blacklight fixtures, set them up at either end of the hall.
- Decorate the Walls (Optional): If you want, you can paint some spooky or weird shapes on paper with your neon paint. When the paint is dry, tape the papers to the walls of the hallway.
- Prepare the Bubbles: Fill your bubble machine with the special UV-reactive bubble solution. Place the bubble machine at one end of the hallway.
- Let’s Get Psychedelic: Turn on your blacklights and turn off all other lights in the house. The neon paintings on the walls should be glowing brightly.
- Release the Bubbles: Turn on your bubble machine. It will start filling the hallway with bubbles.
- Enter the Zone: Walk through the hallway. The bubbles will be glowing and floating all around you in the dark! It’s a really cool and surprising effect for your guests.
- Extraterrestrial Abduction Beam
In the dead of night, a powerful beam of turquoise light descends from an unseen source high above. It illuminates a perfect circle of grass on the ground, but the beam itself is the main event. It looks solid and tangible, like a physical column of light.
This is the classic image of a UFO tractor beam, caught in the act of beaming something—or someone—up. The simple, clean execution makes it incredibly effective and creepy. It creates a sense of imminent danger and a story that plays out in the viewer’s imagination.
35. DIY Extraterrestrial Abduction Beam Instructions

Make it look like a UFO is visiting your backyard with this awesome light beam effect.
What You’ll Need:
- A powerful outdoor spotlight with a colored bulb (blue or green works best)
- A tall tree, a second-story window, or the edge of your roof
- An outdoor extension cord
- A fog machine
Step-by-Step Guide:
- Find a High Place: You need to mount your spotlight high up. With an adult’s help, securely place your spotlight in a tall tree, or have it pointing out of an upstairs window. It needs to be pointing straight down at the ground.
- Power the Light: Safely run your extension cord from an outlet to the spotlight.
- Set the Scene: Place your fog machine on the ground, near where the light beam will hit.
- Wait for Darkness: This effect only works when it is very dark outside.
- Create the Atmosphere: Turn on your fog machine. Let the fog drift through your yard and up into the air. The fog is what will make the beam of light visible.
- Activate the Beam: Turn on your spotlight. You should see a bright, solid-looking beam of light coming down from the sky and hitting the ground. It will look exactly like a spaceship is about to abduct someone from your yard!
- Cursed Treasure’s Gaseous Gold
An old wooden treasure chest has been opened, but its contents are not what you would expect. Instead of just gold, the chest is overflowing with glowing, magical orbs. Some glow with a ghostly blue light, while others pulse with the warmth of enchanted gold.
But the real treasure is the thick, blue vapor that is pouring from the center of the chest. A mysterious device shoots a column of glowing blue smoke into the air, as if releasing a curse that was trapped inside with the treasure. It is a magical and mysterious scene that tells a fantastic story.
36. DIY Cursed Treasure’s Gaseous Gold Instructions

You can make your own cursed pirate treasure chest that’s filled with glowing jewels and a mysterious fog.
What You’ll Need:
- An old wooden box or a craft store treasure chest
- Fake gold coins and beaded necklaces
- Several battery-operated, color-changing LED “orb” lights or tap lights
- A mini personal humidifier or a small fog machine
- Blue food coloring
Step-by-Step Guide:
- Fill Your Chest: Open your treasure chest. Fill the bottom with a thick layer of fake gold coins and beaded necklaces.
- Add the Glowing Jewels: Turn on your LED orb lights. Set some to a blue color and some to a gold or orange color. Bury them partially in the treasure, so they are peeking out from among the coins.
- The Magical Mist: If you are using a mini humidifier, fill it with water and add a few drops of blue food coloring. Place the humidifier in the middle of the chest, hiding its base among the coins.
- Release the Curse: Turn on the humidifier or fog machine. A thick, blue-tinted mist will start to rise out of the center of your treasure chest.
- Display Your Booty: Place your finished treasure chest in a dark corner. The glowing orbs and the blue mist will make it look like a truly magical and cursed discovery.
- Holiday Horror House
Something is very wrong here. The yard is decorated with familiar Christmas lights—a festive green wreath and a cheerful gingerbread house outlined in red. But instead of feeling jolly, the scene is deeply unsettling.
The aggressive tangle of red lights in the foreground looks like exposed entrails, and the glowing green and red in the deep darkness feels sinister. By taking the cheerful colors of one holiday and placing them in the spooky context of Halloween, this display creates a creepy and disorienting “Christmas nightmare” effect.
37. DIY Holiday Horror House Instructions

Create a creepy, confusing holiday scene by using your Christmas decorations for Halloween.
What You’ll Need:
- Your red and green Christmas string lights
- Any Christmas light-up decorations you have, like wreaths or candy canes
- A cardboard box to make a “gingerbread house”
- Scissors and tape
Step-by-Step Guide:
- Build a Scary House: Take your cardboard box and cut out a door and windows to make it look like a little house.
- Decorate with “Icing”: Take a string of your red Christmas lights and use tape to outline the door, windows, and roof of your cardboard house.
- Make a Creepy Wreath: If you have a light-up Christmas wreath, you’re all set. If not, you can take a string of green lights and just wrap it into a circle shape.
- Set the Scene: Place your light-up house and wreath in your front yard.
- Create a Gory Mess: Take a big bundle of red string lights and just pile them on the ground in a messy, tangled heap in front of the house. Don’t arrange them neatly!
- Turn On the Confusion: When it’s dark, plug in all the lights. People will see Christmas decorations, but because it’s Halloween, it will feel spooky and wrong. It’s a great way to creep people out!
- The Scarecrow’s Soul Stealer
A terrifying scarecrow with glowing red eyes and a stitched-up grin stands silently in a field. It’s a classic spooky sight, but a strange light effect makes it truly unique. A bright spotlight from the ground illuminates the figure, but something is happening in front of its chest.
A small fan creates a vortex of air, and a ghostly white light seems to be pulled into it, as if the scarecrow’s very soul is being sucked out by an invisible force. This clever use of light and motion creates a dynamic and narrative-driven scare.
38. DIY The Scarecrow’s Soul Stealer Instructions

You can make your scarecrow extra scary by adding a cool “soul-sucking” special effect.
What You’ll Need:
- A scarecrow prop
- A small, battery-powered personal fan
- A small, solar-powered or battery-powered spotlight
- A few thin strips of lightweight white fabric or cheesecloth (about 1 foot long)
- Tape
Step-by-Step Guide:
- Set Up Your Scarecrow: Place your scarecrow in your yard where you want it to stand.
- Position the Fan: Place the small fan on the ground in front of the scarecrow, pointing up at its chest.
- Attach the “Soul”: Take your thin strips of white fabric. Tape one end of each strip to the center of the fan’s grill. The strips should be loose and able to fly around.
- Place the Light: Stake your spotlight into the ground a few feet in front of the scarecrow, pointing up at its face and chest.
- Activate the Effect: When it gets dark, turn on the fan. The blades will spin, and the white fabric strips will fly around in a circle, creating a ghostly vortex.
- Shine a Light on the Horror: Make sure your spotlight turns on. The light will illuminate the scarecrow and, more importantly, it will catch the spinning white fabric, making it look like a glowing, ghostly soul is being pulled from the scarecrow’s body.
The best Halloween decorations are the ones that create an experience. They do more than just sit there; they change the way a space feels. As you’ve seen, light is your most powerful tool to achieve this. It can tell a story, create suspense, and give even the simplest prop a terrifying new life.
Whether you choose a single, dramatic spotlight or fill your yard with an army of glowing pumpkins, the goal is the same: to craft a mood. So pick an idea, grab your supplies, and get ready to create your own haunting glow.
Key Takeaways for a Spooky Vibe
- Color Sets the Mood: Use reds, greens, blues, and purples to create feelings of danger, sickness, or mystery. A simple color change can make a scene feel completely different.
- Shadows are Your Friend: Don’t be afraid of the dark. Aim your lights from the ground up to cast long, distorted shadows on walls and ceilings.
- Fog Makes Light Visible: Adding fog or mist is the best way to make beams of light look solid. This is key for effects like UFO abduction beams or magical projections.
- Get Creative with DIY: You don’t need to buy expensive props. Cardboard tubes, household items, and simple string lights can be transformed into amazing effects with a little imagination.