When it comes to holiday decorating, the kitchen is often the last room to get a festive touch. It’s the heart of the home, a place of constant activity, and it deserves to join in on the spooky fun. Forget just a lonely pumpkin on the counter; it’s time to transform your culinary space into a Halloween haven.

This year, let’s make the kitchen a central part of the celebration. Creating a spooky vibe doesn’t have to be complicated or expensive. With a little creativity, you can craft a memorable atmosphere that delights family and guests alike.
From elegant gothic dinners to playful monster diners, there’s a theme for every taste. We’ve gathered 36 imaginative ideas to spark your inspiration. Each one comes with simple, step-by-step DIY instructions to help you bring the look to life. Get ready to stir up some serious Halloween spirit.
1. Vampire’s Kiss Tablescape

Create an atmosphere of gothic romance with a vampire-themed tablescape. This elegant decor uses a dramatic color palette of deep black and blood red, accented with luxurious gold. A rich, red velvet table runner creates a striking contrast against a black tablecloth, setting the stage for a sophisticated and spooky meal.
The details are what bring this theme to undeath. Matte black plates are paired with gold cutlery and crimson napkins, held by golden bat-shaped rings. Tall, brass candlesticks with glowing red candles cast a flickering, intimate light, while a single red rose in a black vase adds a touch of timeless, dark romance.
DIY Instructions: Bat Napkin Rings
Let’s make some simple, spooky bat rings for your napkins!
What you’ll need:
- An empty cardboard tube (like from paper towels or toilet paper)
- Black paint
- A paintbrush
- Scissors
- A pencil
- Gold paint or a gold marker (optional)
Step-by-Step Guide:
- Cut Your Rings: First, press the cardboard tube flat. Use your scissors to cut the tube into rings that are about one inch wide. Each ring will become a napkin holder.
- Draw the Wings: On one of the flattened rings, use your pencil to draw a simple bat wing shape on each side of the ring. Think of a stretched-out letter ‘M’ on its side.
- Cut Out the Bat Shape: Carefully cut along the lines you drew. When you’re done, gently pop the ring open. It should look like a ring with two wings.
- Time to Paint: Paint your bat ring completely black. Let it dry.
- Add a Golden Touch (Optional): Once the black paint is dry, you can use a gold marker or a small brush with gold paint to add little details, like eyes or highlights on the wings. Slide a rolled-up napkin through the ring, and your vampire table is ready!
2. Friendly Ghost Bake Shop

Turn your kitchen into the cutest bake shop on the block with an adorable ghost theme. This decor uses a clean and simple black and white color palette, which makes the friendly ghost faces pop. A “Boo-tiful Bake Shop” banner hangs cheerfully over the counter, setting a lighthearted and fun tone.
Everything in this space is designed to be sweet, not scary. White ceramic canisters, a cake stand, and even little pumpkins feature simple, smiling ghost faces. Ghost-shaped string lights add a soft, warm glow. This theme is all about playful charm, creating a happy and inviting spot for all your Halloween baking adventures.
DIY Instructions: Ghostly Canister Faces
Let’s give your plain white canisters a friendly ghost personality!
What you’ll need:
- White ceramic or glass canisters
- A black dry-erase marker (this is important so it can be removed later!)
- A steady hand
Step-by-Step Guide:
- Make Sure It’s Clean: Wipe the outside of your canister with a clean, dry cloth to make sure there is no dust on it.
- Draw the Eyes: Use your black dry-erase marker to draw two simple ovals for eyes. You can make them big and round for a cute look.
- Add a Smile: Below the eyes, draw a small, happy mouth. A simple curved line or a little ‘o’ shape works great.
- Check Your Work: Step back and look at your ghost’s face. If you don’t like it, the dry-erase marker will wipe right off with a paper towel, and you can try again!
- Decorate Them All: Do this for all of your canisters. After Halloween, you can simply wipe the faces off, and they’ll be back to normal.
3. Retro Monster Mash Diner

Take a trip back in time to a diner where all the customers are classic monsters. This fun and colorful theme is inspired by vintage monster movies and 1950s diners. The checkerboard pattern on the placemats and surfaces immediately creates that retro diner feel. Bright, graphic posters of Dracula and Frankenstein’s monster adorn the walls.
The tableware is the star of this show. Trays, mugs, and bowls feature the friendly, cartoonish faces of these beloved monsters. Even the snacks get a monstrous makeover, with a jello brain served on a plate. This decor is full of nostalgia and playful energy, making it a great choice for a family-friendly Halloween breakfast or lunch.
DIY Instructions: Frankenstein’s Monster Mug
Let’s decorate a plain mug to look like Frankenstein’s monster!
What you’ll need:
- A plain green or white mug
- Black and white oil-based paint markers (Sharpie brand works well)
- An oven (you’ll need a grown-up’s help for this part)
Step-by-Step Guide:
- Wash and Dry: Make sure your mug is super clean and completely dry before you start.
- Draw the Hair: Use the black paint marker to draw a jagged, spiky hairline around the top rim of the mug. Fill it in with black.
- Add the Face: Below the hair, draw two sleepy-looking eyes with half-closed lids. Give him a simple line for a mouth and a few stitches on his forehead or cheek.
- Create the Bolts (Optional): If your mug has a handle, you can draw a little gray or silver bolt on each side of the mug to look like the ones on his neck.
- Bake It Permanent: This is the grown-up step! Place the mug in a cool oven. Turn the oven on to 350°F (175°C). Let the mug heat up with the oven and bake for 30 minutes. Then, turn the oven off and let the mug cool down completely inside the oven before taking it out. Now the design is permanent!
4. Enchanted Forest Nook

Create a cozy and charming kitchen corner inspired by a magical woodland. This theme uses warm, earthy tones and natural textures to bring the feeling of an autumn forest indoors. Whimsical characters like cute gnomes and friendly foxes are tucked among the decorations, giving the space a storybook feel.
Mushroom-shaped canisters and decorations add to the enchanted atmosphere. Wooden cutting boards, bowls, and utensils enhance the natural, rustic look. This decor is less about being spooky and more about celebrating the cozy, magical feeling of the fall season, making your kitchen a warm and inviting haven.
DIY Instructions: Pinecone Gnomes
Let’s make some adorable little gnomes using pinecones!
What you’ll need:
- A pinecone for each gnome
- A small piece of felt (any color you like for the hat)
- A small wooden bead or a fuzzy pom-pom for the nose
- A bit of white craft fur or cotton balls for the beard
- A hot glue gun (ask a grown-up for help!)
- Scissors
Step-by-Step Guide:
- Make the Hat: Cut a triangle shape out of the felt. Roll the triangle into a cone shape and use a line of hot glue from a grown-up to secure it. This will be your gnome’s pointy hat.
- Glue on the Beard: Take a small piece of the craft fur or a stretched-out cotton ball. A grown-up can put a dab of hot glue near the top of the pinecone, and you can press the “beard” material onto it.
- Add the Nose: Now, have the grown-up put another small dot of glue right on top of the beard. Gently press the wooden bead or pom-pom onto the glue. This is the gnome’s nose, peeking out from under his hat.
- Put on the Hat: Finally, the grown-up should put a little ring of glue around the top of the pinecone, just above the nose. Place the felt hat on top and press it down gently. Now you have a little forest gnome to watch over your kitchen!
5. Pastel Ghostly Gathering

Who says Halloween has to be dark and scary? This theme uses a soft pastel color palette of pink, lavender, and mint green for a look that is sweet and stylish. A “Happy Halloween” banner in a gentle script font sets a friendly and welcoming tone. Little white ghosts are the main characters here, appearing as cute cookies and charming candle holders.
The decor is light and airy. Shiny silver skull ornaments add a touch of glamour without being frightening. Pink and lavender pumpkins are scattered across the table, tying the whole color scheme together. This is a fresh and modern take on Halloween, creating a space that is more chic than shriek.
DIY Instructions: Ghost Votive Holders
Let’s make some cute ghost candle holders from clay!
What you’ll need:
- White air-dry clay
- A small ball or some crumpled aluminum foil
- A rolling pin or a smooth bottle
- A black permanent marker
- A small, battery-operated tea light candle
Step-by-Step Guide:
- Create the Ghost Form: Take a small ball or crumple up some foil into a ball shape, about two inches tall. This will be the mold for your ghost’s head.
- Roll Out the Clay: Take a piece of your air-dry clay and roll it out flat, like you’re making a cookie. It should be about a quarter-inch thick.
- Drape the Clay: Gently drape the flat circle of clay over the top of your ball or foil form. Let the clay hang down and create a wavy, ghostly shape at the bottom.
- Let it Dry: Carefully lift the clay shape off the form and stand it on a flat surface. Let it dry completely. This might take a day or two.
- Draw the Face: Once your clay ghost is hard and dry, use your black marker to draw two simple oval eyes and a little mouth. Pop a battery-operated tea light underneath, and your ghost will glow!
6. Witch’s Brew Apothecary

Transform a shelf in your kitchen into a mysterious witch’s pantry. This theme is all about creating the look of a well-stocked apothecary, filled with magical herbs and potion ingredients. A variety of glass jars are filled with different seeds, herbs, and spices, giving the shelf an authentic, cluttered feel.
The details make this scene magical. A human skull sits among the jars, while old, dark bottles hold unknown liquids. A string of little burlap sacks hangs like a garland, perhaps filled with secret spells. This decor is wonderfully atmospheric, making it feel like a powerful witch could step in at any moment to start brewing a magical concoction.
DIY Instructions: Potion Ingredient Jars
Let’s make some spooky ingredient jars for your witch’s shelf.
What you’ll need:
- Empty glass jars with lids (like old jam or spice jars)
- A black pen or marker
- Masking tape or plain white sticker labels
- Interesting things to put inside (like lentils for “Bat Eyes,” rice for “Spider Eggs,” or twigs for “Wand Pieces”)
Step-by-Step Guide:
- Make Your Labels: Tear off a piece of masking tape or get one of your sticker labels. Use your pen to write a spooky ingredient name on it. Use your imagination! “Dragon Scales,” “Frog’s Breath,” or “Goblin Teeth” are all great ideas.
- Stick it On: Peel the backing off your label (or just stick the tape) and press it firmly onto the front of your clean, empty jar.
- Fill it Up: Fill the jar with the interesting item you chose. For example, if you wrote “Spider Eggs,” fill the jar with white rice.
- Seal Your Potion: Put the lid on the jar tightly.
- Stock Your Shelves: Repeat these steps with different jars and different “ingredients.” Soon you’ll have a whole shelf full of potion supplies for your spells!
7. Werewolf Woods Diner

Unleash your wild side with a kitchen theme inspired by a werewolf’s full moon transformation. This decor uses a rustic, woodsy color palette of brown and red, creating the feel of a cabin deep in the haunted woods. A large art piece showing a werewolf under a full moon sets the scene perfectly.
The theme is carried through with clever details. Sharp claw mark decals are stuck to the refrigerator and cutting boards, as if a beast has just run through. Red and black buffalo check placemats add to the cozy-yet-creepy cabin vibe. It’s a rugged and adventurous theme that brings the thrill of the hunt right into your kitchen.
DIY Instructions: Claw Mark Coasters
Let’s make some coasters that look like a werewolf slashed them!
What you’ll need:
- Plain wooden or cork coasters
- A pencil
- A black permanent marker
Step-by-Step Guide:
- Sketch the Marks: Take one of your coasters. Use a pencil to lightly draw three or four long, slightly curved lines across it. Stagger them a bit so they don’t look too perfect.
- Make them Jagged: Go back over your lines and make the edges a little bit jagged and messy. A claw mark wouldn’t be a perfectly smooth line.
- Thicken the Lines: Make the lines thicker and more defined. They should look like deep gashes in the wood.
- Ink the Claws: Carefully trace over your pencil sketch with the black permanent marker. Fill in the shapes completely so they are solid black.
- Let it Dry: Let the marker dry for a few minutes. Now you have a coaster that looks like it survived a werewolf attack! Repeat for as many coasters as you need.
8. Celestial Celebration

Host a dinner party guided by the stars and the moon. This mystical theme uses a deep navy blue and gold color palette to create a magical, celestial atmosphere. A table runner with a gold constellation pattern lays the foundation for this starry night feast. Moon-phase wall art adds to the cosmic vibe.
The tableware is heavenly. Crescent moon-shaped plates and serving dishes are paired with mugs that look like the night sky. Tarot cards and beautiful crystals are scattered across the table, inviting guests to look into their future. This is an elegant and enchanting theme, perfect for a magical evening with friends.
DIY Instructions: Constellation Mugs
Let’s decorate a plain mug with your favorite constellation!
What you’ll need:
- A plain dark blue or black mug
- A white or gold oil-based paint marker
- A picture of a simple constellation (like the Big Dipper or Orion’s Belt) for reference
- An oven (you’ll need a grown-up’s help)
Step-by-Step Guide:
- Clean Your Canvas: Make sure your mug is clean and completely dry.
- Dot the Stars: Look at your picture of the constellation. Use your paint marker to make small dots on your mug that match the pattern of the main stars in the constellation.
- Connect the Dots: Use the marker to draw thin, straight lines connecting the dots, just like in a star chart.
- Add More Stars: Add a few more random dots around your constellation to make it look like a starry night sky.
- Make it Permanent: Just like with the Frankenstein mug, ask a grown-up to place the mug in a cool oven, heat it to 350°F (175°C) for 30 minutes, and then let it cool down completely in the oven. Now you can drink your hot cocoa from the stars!
9. Neon Frights Kitchen

Light up the night with a Halloween theme that glows with electric energy. This modern and edgy decor uses bright neon lights to create a cool, futuristic horror vibe. The room is kept dark to let the glowing signs of a jack-o’-lantern, a ghost, and the word “BOO” be the main focus.
The neon theme is carried down to the smallest details. Coasters and drink stirrers also have a glowing, electric look. This is a super fun and high-energy theme, especially for a nighttime party. It turns your kitchen into a cool, glowing arcade of spooky fun.
DIY Instructions: Neon Glow Coasters
Let’s make some coasters that look like they’re glowing!
What you’ll need:
- Plain black coasters (cardboard or craft foam)
- Neon-colored “puffy” fabric paint (in green, orange, and white)
- A pencil
Step-by-Step Guide:
- Choose Your Design: Decide on a simple spooky shape for each coaster, like a ghost, a pumpkin, or a bat.
- Sketch it Out: Lightly sketch your design onto the black coaster with a pencil.
- Trace with Puffy Paint: Take the puffy paint and carefully squeeze it out as you trace over your pencil lines. The paint will be raised and look like a neon light tube.
- Let it Puff Up and Dry: Don’t touch the paint! Let the coasters sit on a flat surface for at least a full day. The puffy paint needs a lot of time to dry and harden completely.
- Glow Up: Once they are totally dry, your coasters are ready. The bright neon color against the black will make them look like they are glowing, especially in a dimly lit room.
10. Day of the Dead Fiesta

Celebrate a vibrant and colorful tradition with a kitchen decorated for Día de los Muertos. This theme is a joyful explosion of bright colors and beautiful, intricate details. Colorful paper banners, called “papel picado,” are strung across the window, instantly creating a festive atmosphere. Bright orange marigolds, the traditional flower of the holiday, are everywhere.
The decor is filled with beautifully decorated sugar skulls, appearing on plates, towels, and as ceramic figures. This theme is not about being scary; it’s a happy and heartfelt celebration of life and memory, turning your kitchen into the heart of a lively fiesta.
DIY Instructions: Papel Picado (Simple Paper Banners)
Let’s make some colorful paper banners to hang in your window.
What you’ll need:
- Several sheets of brightly colored tissue paper (like orange, pink, and blue)
- Scissors
- String
- A glue stick
Step-by-Step Guide:
- Fold the Paper: Take one sheet of tissue paper and fold it in half, then in half again, until you have a small rectangle.
- Cut Some Shapes: While the paper is folded, use your scissors to cut small shapes along the edges. You can cut out little triangles, diamonds, or half-circles. Be creative!
- Unfold Your Design: Carefully unfold the tissue paper. You’ll see a beautiful, symmetrical pattern of cutouts.
- Make More: Repeat this with all your different colors of tissue paper.
- String Them Up: Lay out a long piece of string. One by one, lay the top edge of each piece of paper over the string. Put a line of glue along the edge of the paper and fold it over the string to secure it. Leave a little space between each color. Let the glue dry, and your festive banner is ready to hang!
11. Ghostly Pirate’s Galley

Ahoy, matey! Turn your kitchen into the galley of a haunted pirate ship. This theme is built on a foundation of dark, moody colors and rustic textures. Deep blue walls create the feeling of the open sea at night. Weathered wood shelves and cabinets look like they’ve been salvaged from a centuries-old shipwreck.
The space is filled with nautical treasures and spooky touches. Fishing nets are draped across the counters, while skulls and skeletons serve as the ship’s ghostly crew. A treasure chest overflows with bread, and old-fashioned lanterns cast a dim, eerie glow. It’s a wonderfully immersive decor that will make you feel like you’re on a swashbuckling adventure.
DIY Instructions: Skull and Crossbones Banner
Let’s make a pirate banner to hang in your galley!
What you’ll need:
- Black felt or stiff black paper
- A white crayon or chalk
- Scissors
- A hole punch
- String or twine
Step-by-Step Guide:
- Cut Your Flags: First, cut the black felt or paper into triangle shapes. These will be the flags for your banner. Make them all about the same size.
- Draw the Skull: On one of the flags, use your white crayon or chalk to draw a simple skull. Think of a circle with two dots for eyes and a little line for a mouth.
- Add the Crossbones: Below the skull, draw two long bones crossing over each other in an ‘X’ shape.
- Decorate All Flags: Repeat this on all the triangle flags you cut out. You are the captain, so you can make them all look the same or give each one a unique spooky face.
- String it Up: Use your hole punch to make a hole in the top two corners of each flag. Carefully thread your string through the holes to connect all the flags. Leave a little extra string at the ends for hanging, and your pirate banner is ready for adventure!
12. Smashing Pumpkins Café

Fill your kitchen with the cheerful spirit of the pumpkin patch. This decor is a classic celebration of autumn’s most iconic symbol. Bright orange is the star color here, creating a warm and inviting atmosphere. A jack-o’-lantern cookie jar and a matching smiling mug bring a sense of playful fun to the countertop.
The space is filled with pumpkins of all shapes and sizes, from tiny gourds in a wooden bowl to larger ones lining the windowsill. A kitchen towel with a repeating pumpkin pattern ties the whole look together. This theme is a happy and traditional way to decorate, turning your kitchen into a cozy café on a crisp autumn day.
DIY Instructions: Painted Mini Pumpkins
Let’s decorate some small pumpkins to place around your kitchen!
What you’ll need:
- A few small pumpkins (real or fake)
- Black paint (acrylic craft paint works well)
- A thin paintbrush
- A pencil
Step-by-Step Guide:
- Wash Your Pumpkins: If you’re using real pumpkins, give them a gentle wipe with a damp cloth to make sure they are clean and dry. This helps the paint stick better.
- Sketch a Face: Use a pencil to lightly draw a jack-o’-lantern face on your pumpkin. You can do a happy face, a spooky face, or a silly face. Draw two triangle eyes, a little triangle nose, and a big smiling mouth.
- Time to Paint: Dip your thin paintbrush into the black paint. Carefully paint over the pencil lines you drew. Try to stay inside the lines for a neat look.
- Let it Dry: Set your painted pumpkin aside and let the paint dry completely. This usually takes about an hour.
- Create a Pumpkin Family: Repeat the steps with your other pumpkins, giving each one a different expression. You can then group your little pumpkin family together on a counter or shelf.
13. Haunted Harvest Farmhouse

Combine the cozy charm of farmhouse style with a few spooky touches for a sophisticated Halloween look. This decor uses a neutral color palette of white, black, and natural wood, creating a calm and clean backdrop. A tiered galvanized metal tray becomes the centerpiece, filled with pumpkins in different textures and colors, like white, orange, and black plaid.
Subtle spooky elements are tucked in throughout the space. Black crow figures perch on the shelves, watching over the room. A rustic wreath made of dark twigs hangs on the door, adding a touch of eerie nature. This style is about creating a festive feeling that is both welcoming and just a little bit haunted.
DIY Instructions: Simple Felt Crows
Let’s make some little black crows to perch on your shelves!
What you’ll need:
- Black felt
- Scissors
- A pencil or white chalk
- Craft glue
- Two small black beads for eyes (for each crow)
Step-by-Step Guide:
- Draw the Body: On the black felt, draw the shape of a bird’s body from the side. It should look a bit like the number ‘2’ lying down, with a head, a body, and a tail.
- Cut it Out: Carefully cut out two of these body shapes for each crow you want to make.
- Make the Wings: Draw a simple wing shape on the felt. It should look like a leaf or a teardrop. Cut out two wing shapes for each crow.
- Assemble Your Crow: Take one of the body pieces and glue a wing onto the middle of it. Then, glue a small black bead on the head for an eye.
- Finish the Crow: Put glue all over the back of that body piece. Place the second body piece directly on top, lining it up perfectly. Then glue the second wing on the outside. Press it all together and let it dry. Now you have a little crow to add to your decor!
14. The Carn-Evil of Eats

Step right up to the creepiest show on Earth! This theme transforms your kitchen into a sinister circus or a haunted carnival. The decor has a weathered, vintage look, with distressed signs and faded red-and-white stripes. A tattered banner reading “Freak Show” sets the unsettling tone.
Creepy clown heads peer out from behind a miniature popcorn machine, while jars are filled with colorful, questionable candies. Red and white striped containers hold snacks, and aged “Admit One” tickets are scattered about. This creative theme is full of unsettling details that combine the fun of the fair with the chills of a horror story.
DIY Instructions: Vintage “Admit One” Tickets
Let’s make some old-looking tickets to scatter around your carnival scene!
What you’ll need:
- A sheet of light brown or cream-colored paper (cardstock is good)
- A ruler
- A pencil
- A black pen or marker
- Scissors
- A cool, wet tea bag
Step-by-Step Guide:
- Measure Your Tickets: Use your ruler and pencil to draw several small rectangles on your paper. A good size for a ticket is about 2 inches long and 1 inch wide.
- Write on Them: Inside each rectangle, use your black pen to write “ADMIT ONE” in big letters. You can also add a number to each ticket, like “No. 1313.”
- Cut Them Out: Carefully cut out each ticket along the pencil lines.
- Make Them Look Old: Lay your tickets out on a plate. Gently dab the cool, wet tea bag all over them. This will stain the paper and make it look old and used. Don’t make them too wet!
- Let Them Dry: Let the tickets dry completely. They might curl up a little, which makes them look even more authentic. Once dry, they are ready for your Carn-Evil!
15. The Sweet Hereafter Bakery

Set up a delightful baking station inspired by the beautiful artistry of Día de los Muertos. This theme is a celebration of color, life, and delicious treats. A tiered stand is filled with sugar skull cookies, each one a miniature work of art with brightly colored icing and intricate designs.
The counter is a riot of cheerful color. A ceramic sugar skull jar holds flowers, while another serves as a utensil holder. Even the oven mitts and measuring spoons are decorated with vibrant floral and skull patterns. Jars of colorful sprinkles line the shelf, ready for the next baking project. This decor creates a happy and festive atmosphere for making and sharing sweets.
DIY Instructions: Easy Sugar Skull Cookies
Let’s decorate some simple sugar skull cookies. No baking required!
What you’ll need:
- Plain sugar cookies (you can buy these from the store)
- White frosting
- Tubes of different colored icing with thin tips (like black, blue, pink, and yellow)
- Sprinkles (optional)
Step-by-Step Guide:
- Frost the Base: Take a plain cookie and use a knife or the back of a spoon to spread a smooth, even layer of white frosting over the top. This is your blank canvas.
- Draw the Eyes: Use the black icing tube to draw two circles or ovals for the eyes. You can then draw little flower petals or dots around the eyes with another color.
- Add a Nose and Mouth: Draw an upside-down heart for the nose. For the mouth, draw a straight line with little vertical lines going through it, like stitches.
- Get Creative: This is the fun part! Use all the different colored icing tubes to draw swirls, dots, flowers, and lines on the rest of the cookie’s “face.” Be as colorful and creative as you want!
- Add Sprinkles: If you like, you can add a few sprinkles while the icing is still wet. Let your cookies sit for a while so the icing can harden before you enjoy them.
16. Glam Skull Masquerade

Get ready for a Halloween party that is all about sparkle and drama. This glamorous decor uses a bold color combination of hot pink and black, accented with plenty of glitter and gold. A black sequin table runner provides a dazzling foundation for the rest of the tablescape.
A large, rhinestone-covered skull serves as the undeniable centerpiece, shining under a disco ball. Fluffy pink and black feather boas are draped around the table, adding a touch of showgirl flair. Black candles in silver holders and gold-rimmed plates complete this luxurious and over-the-top look. It’s a fabulous way to host a Halloween that is chic and exciting.
DIY Instructions: Glitter Coasters
Let’s make some super sparkly coasters for your glam party drinks!
What you’ll need:
- Plain cork or ceramic coasters
- Craft glue
- A paintbrush
- Lots of glitter (silver or black would look great)
- A paper plate
Step-by-Step Guide:
- Get Ready for Glitter: Pour a good amount of glitter onto a paper plate. This will make it easy to cover your coaster and to put the extra glitter back in the bottle later.
- Paint with Glue: Take one of your coasters and use the paintbrush to apply a thin, even coat of craft glue all over the top surface.
- Add the Sparkle: Place the glue-covered coaster face down into the pile of glitter on the paper plate. Press down gently to make sure the glitter sticks everywhere.
- Tap and Dry: Lift the coaster and gently tap the edge to shake off any loose glitter. Place it somewhere safe to dry completely.
- Seal it (Optional but Recommended): Ask a grown-up to help with this step. Once the glue is dry, they can spray a thin layer of clear sealant (like Mod Podge spray) over the top. This will keep the glitter from flaking off onto your cups.
17. Hedge Witch’s Hearth

Create the cozy and mystical kitchen of a friendly neighborhood witch. This decor focuses on natural elements and the tools of the trade. The area around the stove becomes the witch’s workspace, with a black cauldron sitting ready for a bubbling brew. A well-loved potion book lies open, displaying a secret recipe.
The shelves above are stocked with glass jars of herbs and potion ingredients, each with a handwritten label. Bundles of dried herbs hang from the shelves, filling the air with their scent. A rustic broom leans against the wall, not for cleaning, but for magical flights. This theme creates a warm, earthy, and enchanting atmosphere.
DIY Instructions: Hanging Herb Bundles
Let’s make some simple bundles of herbs to hang in your kitchen!
What you’ll need:
- Fresh herbs with long stems (like rosemary, thyme, or lavender)
- String or twine
- Scissors
Step-by-Step Guide:
- Gather Your Herbs: Take a small handful of your fresh herbs. Group them together so all the leafy parts are at one end and the stems are at the other. You can mix different kinds of herbs in one bundle.
- Trim the Stems: Use your scissors to trim the stems so they are all the same length. This will make your bundle look neat.
- Tie it Tight: Cut a long piece of string, about 12 inches long. Tightly wrap the string around the stem-end of your herb bundle several times.
- Make a Knot and a Loop: Tie a tight double knot to secure the string. Don’t cut the extra string off! Use the long ends to tie another knot, creating a loop for hanging.
- Hang to Dry: Find a place in your kitchen to hang your herb bundle, like from a cabinet knob or a hook on the wall. They will look great and make your kitchen smell wonderful as they dry.
18. The Tangled Web Café

Let creepy crawlies take over your kitchen with a spooky spider theme. This decor uses a stark black and white color palette to create a high-contrast, graphic look. Stretchy white spiderwebs are draped everywhere—from the light fixtures to the cabinets—instantly transforming the space.
Spiders of all sizes, from tiny ones on the counter to a giant one climbing the wall, make their home in the webs. The table is set with web-patterned plates, placemats, and even wine glasses. Black canisters on the counter also feature a simple spider motif. This is a classic Halloween theme that is sure to give your guests a delightful fright.
DIY Instructions: Pipe Cleaner Spiders
Let’s make some little spiders to hide in your webs!
What you’ll need:
- Black pipe cleaners
- Scissors
- A pencil
Step-by-Step Guide:
- Cut the Legs: Take one black pipe cleaner and cut it in half. Then cut both of those halves in half again. You should now have four small, equal-sized pieces. These will be the spider’s legs.
- Form the Legs: Line up the four small pieces of pipe cleaner so they are all together in a bundle.
- Make the Body: Take another black pipe cleaner and start wrapping it tightly around the middle of the leg bundle. Keep wrapping it around itself to form a small, fuzzy ball in the center. This is your spider’s body. Tuck the end of the pipe cleaner in so it doesn’t unravel.
- Bend the Legs: Now you should have a body in the middle with eight legs sticking out (four on each side). Bend each leg in the middle to make a little ‘knee.’
- Pose Your Spider: You can bend the legs to make your spider look like it’s crawling or standing up. Make a bunch of them and place them all around your kitchen!
19. The Overlook Café

Check into a kitchen inspired by a famously haunted hotel. This theme is full of subtle, chilling references to the classic horror film “The Shining.” The decor has a vintage, slightly unsettling feel. A classic typewriter sits on the counter, displaying the unnerving message, “All work and no play…”
The color scheme of red, black, and navy blue, along with the geometric pattern on the table runner, hints at the hotel’s iconic and creepy carpet. A “Do Not Disturb” sign and an old-fashioned room key add to the immersive experience. It’s a clever and sophisticated theme for movie lovers who appreciate a good psychological thrill.
DIY Instructions: “Do Not Disturb” Sign
Let’s make a door hanger sign just like one from a spooky old hotel.
What you’ll need:
- A piece of stiff black paper or cardstock
- A piece of white paper
- A ruler
- A pencil
- Scissors
- A glue stick
- A large cup or round object to trace
Step-by-Step Guide:
- Make the Hanger Shape: On your black cardstock, draw a long rectangle. At the top of the rectangle, use your cup to trace a circle. Draw a smaller circle inside the big one. Then, draw a line from the small circle down to the edge of the rectangle, creating a slit. Carefully cut out the whole shape, including the small circle and the slit, so it can hang on a doorknob.
- Create the White Panel: Cut a rectangle from the white paper that is slightly smaller than the black rectangle part of your hanger.
- Glue it On: Use your glue stick to attach the white rectangle to the center of the black hanger.
- Add the Words: Use a black pen or marker to neatly write “DO NOT DISTURB” in the middle of the white paper. You can use your ruler to draw light pencil lines first to make sure your letters are straight.
- Hang it Up: Your spooky hotel sign is complete! You can hang it on your kitchen cabinet knobs or any door in the house.
20. The Black Cat Club

Create a sleek and stylish lounge with a sophisticated black cat theme. This decor is modern and chic, with a cool art deco vibe. A simple black, white, and gold color palette keeps the look elegant. A framed print of a stylish black cat hangs above a gold bar cart, establishing the club’s mascot.
The details are what make this theme shine. Decals of cool cats with green eyes adorn the black wall. Gold and green glassware add a pop of color, while black plates and bowls keep the table setting sharp. Even the drink stirrers are topped with tiny golden cat heads. It’s a purr-fectly fashionable way to celebrate Halloween.
DIY Instructions: Golden Cat Drink Stirrers
Let’s make some fancy cat-themed stirrers for your drinks!
What you’ll need:
- Gold-colored paper straws or thin wooden dowels
- Black cardstock paper
- A pencil
- Scissors
- A glue stick or a small dot of strong craft glue
Step-by-Step Guide:
- Draw the Cat Head: On the black cardstock, draw a very small, simple cat head shape. It should be a circle with two pointy triangle ears on top. Make it about one inch tall.
- Cut it Out: Carefully cut out the cat head shape. Use this first one as a tracer to make a second identical one. You’ll need two cutouts for each stirrer.
- Glue the First Side: Take one of your straws or wooden dowels. Put a small dot of glue on the back of one of your cat head cutouts, right at the top.
- Attach to the Stirrer: Press the top of the straw firmly into the glue on the cat head.
- Add the Second Side: Put a little glue on the back of the second cat head cutout. Carefully place it on the other side, lining it up exactly with the first one. This will sandwich the top of the straw between the two cat heads. Let it dry completely, and you’ll have a stylish stirrer for your Halloween drinks!
21. The Bone Appétit Bistro

Dine with the most charming skeleton in town. This theme beautifully blends the spooky with the sweet, creating an elegant and whimsical bistro setting. A friendly, life-sized skeleton is the guest of honor, seated at the table and crowned with a lovely flower wreath. The entire scene is softened by bouquets of fresh flowers in shades of pink, purple, and white.
A floral table runner and vintage-style plates add to the romantic, garden-party feel. The use of gold cutlery provides a touch of luxury. This decor proves that Halloween can be pretty and sophisticated, mixing classic spooky elements with delicate, beautiful details for a truly unique look.
DIY Instructions: Skeleton Hand Place Card Holders
Let’s make some creepy-cool hands to hold your guests’ name cards!
What you’ll need:
- Plastic skeleton hands (from a craft or dollar store)
- A small block of wood or a flat, heavy washer for a base
- Strong glue (like E6000 or a hot glue gun – ask a grown-up for help!)
- White or gold spray paint (optional)
Step-by-Step Guide:
- Create the Base: If you want your hands to stand up, you need a sturdy base. Take your wooden block or washer and put a good amount of strong glue on it.
- Attach the Hand: Press the wrist part of the plastic skeleton hand firmly into the glue on the base. You might need to hold it in place for a minute until the glue starts to set. Make sure the hand is standing up straight.
- Let it Dry: Let the glue dry completely. This is very important so the hand doesn’t fall over.
- Paint it (Optional): If you want, a grown-up can take the hand outside and give it a coat of white or gold spray paint to make it look fancier. Let the paint dry completely.
- Set the Table: Once everything is dry, you can write a name on a small piece of paper and gently place it between the bony fingers of the skeleton hand.
22. The Abyssal Galley

Take your kitchen decor to the mysterious depths of the ocean. This theme creates an underwater world filled with strange and glowing creatures. A dark, deep-blue color scheme makes you feel like you’re in the midnight zone. The cabinets are haunted by mysterious blue tentacles that seem to be reaching out from another dimension.
Jars on the counter are filled with lights that mimic the glow of bioluminescent jellyfish. The table is set with dark, textured bowls and coasters featuring anglerfish and old sea maps. This unique theme is a fantastic way to explore a different kind of spooky, one that comes from the dark and unknown parts of the sea.
DIY Instructions: Glowing Jellyfish Jars
Let’s create some jars that look like they have glowing jellyfish inside!
What you’ll need:
- A clear glass jar with a lid
- Glow-in-the-dark string or thin plastic cord (you can find this at a craft store)
- Water
- Scissors
Step-by-Step Guide:
- Cut the Tentacles: Cut several pieces of your glow-in-the-dark string. Make them different lengths, but make sure they are all shorter than the height of your jar. These will be the jellyfish tentacles.
- Charge the Glow: Before you put them in the jar, you need to “charge” the strings. Lay them under a bright lamp or in a sunny spot for about 10-15 minutes. This will make them glow brightly.
- Fill the Jar: Fill your glass jar almost to the top with plain water.
- Add the Tentacles: Take your glowing strings and gently drop them into the water. They will float and move around, looking like glowing tentacles in the dark.
- Seal and Display: Screw the lid on the jar tightly. Turn off the lights in the room and watch your jellyfish jar glow! It will look like you’ve captured a creature from the deep sea.
23. Poisonous Plants Conservatory

Cultivate a dangerously beautiful corner in your kitchen with a poisonous plant theme. This decor creates the look of a botanist’s study dedicated to deadly flora. Vintage-style botanical illustrations of plants like Belladonna and Nightshade hang on the wall, setting an academic yet ominous tone.
The counter is filled with a variety of interesting plants, including the famous Venus flytrap. Small, apothecary-style bottles with handwritten labels add to the scientific feel. Skulls are hidden among the leaves, hinting at the plants’ perilous nature. This theme is a sophisticated and clever way to bring a touch of natural danger indoors.
DIY Instructions: Faux Venus Flytrap
Let’s make a little Venus flytrap that you don’t have to feed!
What you’ll need:
- Green and red pipe cleaners
- A small terracotta pot
- A piece of brown or black felt
- Scissors
- A small rock or some play-doh
Step-by-Step Guide:
- Make the “Mouths”: Take a green pipe cleaner and fold it in half. Twist the two ends together a little bit. Now, bend the folded part into a shape that looks like an open mouth or a little Pac-Man.
- Add the Teeth: Cut tiny little pieces of another green pipe cleaner. Twist these little pieces around the edge of the “mouth” to look like teeth or cilia.
- Create the Stem: Take another green pipe cleaner and attach it to the bottom of the mouth to act as the stem. Make a few of these, maybe three or four.
- Put it in the Pot: Place a small rock or a ball of play-doh in the bottom of your terracotta pot to hold the stems. Stick the ends of your pipe cleaner stems into the play-doh so they stand up.
- Add the “Dirt”: Cut a circle out of the brown or black felt that is the same size as the opening of your pot. Cut a little slit to the middle of the circle and small holes for the stems. Slide the felt down over the stems to cover the play-doh. Now you have your very own carnivorous plant!
24. Alien Invasion Zone

Prepare your kitchen for an out-of-this-world encounter. This retro alien theme is full of fun, sci-fi details that feel like a classic B-movie. UFO-shaped light fixtures hang from the ceiling, casting an extraterrestrial glow over the scene. Green canisters with alien heads store kitchen staples, while lava lamps bubble with mysterious cosmic energy.
A “Restricted Area” sign on the refrigerator warns of secret government experiments. The whole space has an industrial, top-secret lab feel, with aluminum foil backsplashes and yellow and black warning stripes. This theme is a playful and imaginative way to turn your kitchen into a landing zone for visitors from another planet.
DIY Instructions: UFO Colander Light
Let’s make a simple UFO using a kitchen colander!
What you’ll need:
- A metal colander (the kind with little feet)
- A battery-operated puck light or string of fairy lights
- Tape or glue dots
Step-by-Step Guide:
- Prepare your Light: Turn on your puck light or fairy lights. If using fairy lights, bunch them up into a ball.
- Attach the Light: Turn your colander upside down. The little feet now look like landing gear.
- Place the Light Inside: Use tape or glue dots to stick the light source to the inside top of the colander. The light will shine down through all the little holes.
- Land Your UFO: Place your finished UFO colander on a countertop.
- Observe: Turn off the room lights to see the cool patterns the light makes as it shines through the holes. It looks like a spaceship that has just landed in your kitchen!
25. The Last Stand Diner

Barricade the doors and get ready to survive the apocalypse. This theme turns your kitchen into a makeshift diner at the end of the world. A boarded-up window with fake blood splatters immediately sets a grim, survivalist scene. Warning signs for a “Zombie Outbreak” and “Zombie Crossing” are posted everywhere.
The decor has a rough, thrown-together feel. Canned goods, the currency of the new world, are stockpiled on the shelves. A first-aid kit hangs on the wall, ready for any emergency. This is a gritty and immersive theme that tells a story, making your kitchen the last safe haven in a world overrun by the undead.
DIY Instructions: Bloody Handprint Towel
Let’s make a towel that looks like a survivor left their mark!
What you’ll need:
- A plain white or light-colored kitchen towel
- Red fabric paint
- A paper plate
- Your own hand!
Step-by-Step Guide:
- Set Up Your Paint: Squeeze a good amount of red fabric paint onto a paper plate. Spread it out a little bit.
- Get Your Hand Ready: Place your hand, palm down, into the paint. Wiggle your fingers around to make sure your whole palm and all your fingers are covered in the red paint.
- Make Your Mark: Lay your kitchen towel flat on a protected surface (like newspaper). Carefully press your paint-covered hand firmly onto the towel.
- Lift and Reveal: Lift your hand straight up to reveal a spooky, bloody handprint. You can add a few more if you like, or even some red paint splatters by flicking a paintbrush.
- Let it Dry: Let the fabric paint dry completely according to the instructions on the bottle. Once it’s dry, you can hang it in your kitchen as a warning to any zombies that might be lurking.
26. Gothic Moth Study

Embrace the dark and delicate beauty of the night with a gothic moth theme. This elegant decor is a sophisticated alternative to more common Halloween creatures. Framed scientific illustrations of various moths create a stunning gallery wall, turning the kitchen into a naturalist’s study. The color palette is a simple and chic black, white, and gray.
White ceramic canisters are adorned with beautiful moth designs, and a matching kitchen towel continues the theme. A glass cloche on the shelf holds black paper butterflies, like a captured collection. This is a subtle and artistic way to celebrate the season, focusing on the mysterious beauty of nocturnal insects.
DIY Instructions: Paper Moth Cloche
Let’s make a beautiful display of moths under glass.
What you’ll need:
- A glass cloche (a dome-shaped glass cover with a base)
- Black cardstock paper
- A pencil
- Scissors
- A small twig or branch from outside
- A hot glue gun (ask a grown-up for help!)
Step-by-Step Guide:
- Draw Your Moths: On the black paper, draw a few simple moth shapes. Think of a small body in the middle with two sets of wings, a bigger pair on top and a smaller pair on the bottom.
- Cut Them Out: Carefully cut out your moth shapes. You can make three or four in different sizes.
- Prepare Your Branch: Make sure your twig is clean and dry. Place it on the base of your cloche to see how it fits.
- Attach the Moths: Ask a grown-up to put a very small dot of hot glue on the back of a paper moth. Quickly and carefully, press the moth onto the twig. It will look like it has just landed there.
- Arrange Your Scene: Glue a few more moths onto the branch in different spots. You can even fold their wings up a little to make them look more realistic. Once the glue is cool, place the glass dome over your creation.
27. The Pharaoh’s Final Feast

Travel back in time to ancient Egypt with a theme fit for a pharaoh’s tomb. This unique decor uses a sandy, neutral color palette with accents of gold and blue. The table is set with plates featuring the Eye of Horus, and small skeletons are seated as ancient dinner guests. Little pyramid figures and a scarab beetle add to the archeological atmosphere.
A vase wrapped in linen strips looks like a freshly discovered mummy, while a golden sarcophagus of King Tut stands guard over the stove. Utensil holders are decorated with hieroglyphics, completing the ancient story. This is a creative and educational theme that brings a fascinating piece of history to your Halloween celebration.
DIY Instructions: Mummy-Wrapped Jar
Let’s make a jar or vase that looks like an ancient mummy!
What you’ll need:
- A glass jar, vase, or bottle
- Strips of cheesecloth or white fabric (you can rip up an old t-shirt)
- A cool, wet tea bag
- Craft glue
- A pair of googly eyes (optional)
Step-by-Step Guide:
- Age Your Bandages: To make the mummy wrap look old, stain the fabric strips by dabbing them with a cool, wet tea bag. Let the strips dry completely.
- Start Wrapping: Put a dot of glue near the bottom of your jar. Press the end of one fabric strip into the glue.
- Wrap it Up: Begin wrapping the strip around and around the jar. Overlap the edges a little bit as you go. You can wrap it neatly or make it messy for a more spooky look.
- Secure and Continue: When you get to the end of a strip, secure it with another dot of glue. Then start a new strip where the last one left off. Keep going until the whole jar is covered.
- Add Eyes (Optional): Leave a little gap in the wrapping near the top and glue on a pair of googly eyes so your mummy can peek out. Let all the glue dry.
28. Swamp Creature’s Kitchen

Venture deep into the bayou with a creepy, crawly swamp creature theme. This decor creates the feeling of a murky, moss-covered hideaway. Spanish moss hangs from the light fixtures and shelves, instantly transforming the kitchen into a spooky swamp. Slimy green snakes and frogs are perched everywhere, and a large alligator lurks on the counter.
A cauldron on the stove bubbles with a mysterious green potion. Even the jars are filled with eerie green liquids and props, like a jar of preserved eyeballs. This is a wonderfully textured and immersive theme that uses lots of creepy creatures to bring the eerie feeling of the swamp to life.
DIY Instructions: Jar of Eyeballs
Let’s make a gross-looking jar of eyeballs to display on a shelf!
What you’ll need:
- A clear glass jar with a lid
- Ping pong balls
- Red and black permanent markers
- Water
- A few drops of green or yellow food coloring (optional)
Step-by-Step Guide:
- Draw the Eyes: Take a ping pong ball. Use the black permanent marker to draw a solid black circle in the middle. This is the pupil.
- Add the Veins: Use the red permanent marker to draw thin, squiggly lines radiating out from the pupil. These are the spooky blood vessels. Don’t make them perfect!
- Make a Batch: Repeat these steps on all of your ping pong balls until you have enough to fill your jar.
- Fill the Jar: Place all your finished eyeballs into the glass jar.
- Add “Preservative”: Fill the jar with water. If you want the water to look extra swampy and gross, add one or two drops of green or yellow food coloring and stir it gently. Screw the lid on tight, and you have a terrifying decoration for your swamp kitchen.
29. The Experimental Eatery

Cook up some scientific chaos in a mad scientist’s laboratory. This theme turns your kitchen into a fun and fascinating science lab. A chalkboard is covered in complex chemical formulas, while beakers and flasks filled with colorful liquids bubble away by the sink. Dry ice in a container creates a cool, smoky effect that pours over the counter.
The food itself becomes part of the experiment. Gummy worms and brains are served in petri dishes, and drinks are served in test tubes. This is a highly interactive and imaginative theme that makes cooking feel like a wild scientific discovery.
DIY Instructions: Colorful Lab Beakers
Let’s make some simple, colorful beakers to decorate your lab.
What you’ll need:
- A few clear glass cups or small vases
- Water
- Different colors of food coloring (like green, blue, and red)
Step-by-Step Guide:
- Fill Your “Beakers”: Fill each glass cup with water. You can fill them to different levels to make them look more interesting.
- Add the Color: Take your first cup of water. Add one or two drops of a single color of food coloring. Watch as the color swirls and mixes into the water.
- Mix Your Potions: Repeat this step with your other glasses, using a different color for each one. You can even try mixing colors. What happens if you add one drop of blue and one drop of yellow?
- Arrange Your Lab: Carefully place your colorful beakers on the counter. You can group them together to make it look like you’re in the middle of a very important experiment. Be careful not to spill your “chemicals”!
30. Enchanted Forest Feast

Host a magical midnight feast in an enchanted forest. This theme brings the whimsical and slightly spooky side of nature to your dining table. A bed of green moss creates a lush, forest-floor table runner. Black, barren branches rise from vases, making it feel like you’re dining under a moonlit canopy.
Adorable woodland creatures like owls and mushrooms are reimagined as candle holders, mugs, and salt and pepper shakers. A crescent moon-shaped serving board is filled with snacks for the forest feast. Hanging paper bats fly overhead, adding a classic Halloween touch to this magical woodland scene.
DIY Instructions: Hanging Paper Bats
Let’s make some simple paper bats to hang from the ceiling!
What you’ll need:
- Black construction paper
- A pencil
- Scissors
- A hole punch
- Clear fishing line or black thread
Step-by-Step Guide:
- Fold and Draw: Fold a piece of black paper in half. On the folded edge, use your pencil to draw half of a bat shape. It should look like one wing and half of a body.
- Cut it Out: While the paper is still folded, carefully cut along the line you drew.
- Reveal Your Bat: Unfold the paper, and you’ll have a perfectly symmetrical bat!
- Make a Colony: Use your first bat as a template to trace and cut out more bats. You can make them in different sizes for a more dynamic look.
- Get Ready to Hang: Use your hole punch to make a small hole in the center of each bat’s body. Cut different lengths of fishing line or thread. Tie one end of a piece of string through the hole on each bat. You can then use tape to hang the other end from the ceiling.
31. The Ghoulish Gastronome’s Nook

Transform a corner of your kitchen into the study of a scholarly ghoul. This theme mixes intellectual curiosity with a touch of the macabre. A stack of old, leather-bound books creates a sense of history, while a skull peeking out from the center adds a spooky surprise. Vintage anatomical charts and a quill pen in an inkwell complete the academic atmosphere.
Black crows act as wise overseers of the scene, perched on shelves and books. A magnifying glass rests on an open book, as if the owner was just interrupted from their research. This decor is perfect for those who love a dark academia aesthetic, creating a space that is both intelligent and eerie.
DIY Instructions: Aged Apothecary Jars
Let’s make some old-fashioned ingredient jars for your ghoulish pantry.
What you’ll need:
- Plain ceramic or glass canisters
- White paper
- A cool, wet tea bag
- A black pen
- Scissors
- A glue stick or Mod Podge
Step-by-Step Guide:
- Age Your Labels: Take a sheet of white paper and stain it by dabbing it all over with the cool tea bag. This will give it an old, yellowish look. Let the paper dry completely.
- Cut the Labels: Cut the stained paper into label shapes. Rectangles with fancy clipped corners look great.
- Write on the Labels: Use your black pen to write spooky or old-fashioned ingredient names on the labels. You could write “Arsenic,” “Belladonna,” or “Eye of Newt.” Use your fanciest cursive handwriting.
- Attach to Jars: Use a glue stick or a thin layer of Mod Podge to carefully glue the labels onto your canisters.
- Seal Them: If you used Mod Podge, you can paint a thin layer over the top of the label as well. This will seal it and give it a nice, finished look. Let them dry, and your spooky canisters are ready!
32. Minimalist Macabre Setting

Embrace a modern and clean Halloween style with a minimalist approach. This decor uses a simple black and white color palette to create a look that is both stark and sophisticated. A single, beautifully carved white pumpkin with a golden stem sits as a chic centerpiece. The key is using empty space to make each element stand out.
A framed art print of a skull adds a touch of gothic elegance without adding clutter. The table is set with plain white plates, but a salad plate with a simple spiderweb design adds a festive touch. This theme proves that you don’t need a lot of decorations to make a powerful and stylish Halloween statement.
DIY Instructions: Spiderweb Plates
Let’s make some temporary spiderweb designs for your plates!
What you’ll need:
- Plain white plates
- A black dry-erase marker (make sure it’s “dry-erase”!)
- A steady hand
Step-by-Step Guide:
- Start Your Web: Make sure your plate is clean and completely dry. In the center of the plate, draw a small ‘X’ with your dry-erase marker.
- Draw the Spokes: From the center where your ‘X’ crosses, draw several straight lines out to the edge of the plate, like the spokes of a bicycle wheel.
- Connect the Spokes: Starting near the center, draw curved lines connecting one spoke to the next. Continue doing this, moving outwards towards the edge of the plate, to create the web pattern.
- Set the Table: Your spiderweb plate is ready! It’s a great way to decorate for a party.
- Easy Cleanup: The best part? Because you used a dry-erase marker, the design will wipe right off with a paper towel or wash off easily with soap and water after your meal is done. It’s temporary and food-safe once removed.
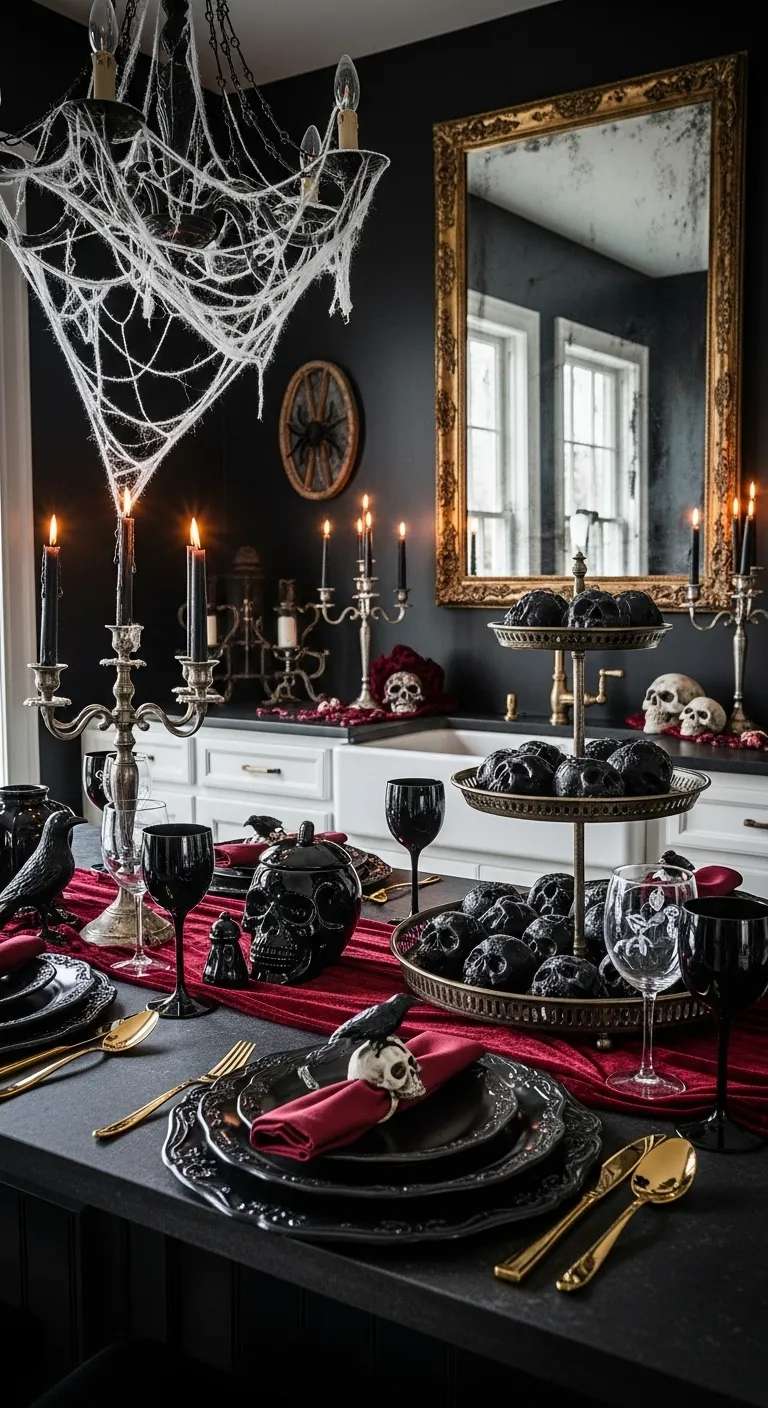
33. Gothic Vampire’s Lair

Host a dinner party worthy of Dracula himself with a dark and dramatic gothic theme. This opulent style uses a rich color palette of deep black and blood red, with accents of antique gold and silver. A grand, gilded mirror reflects the haunting scene, making the room feel larger and more mysterious.
The table is set with ornate black plates and cutlery, while thick cobwebs are draped over the chandelier, as if the room has been untouched for centuries. Silver candelabras with black candles cast a flickering, eerie light over the feast. This is a truly luxurious and immersive theme, creating an unforgettable, elegant horror experience.
DIY Instructions: “Bleeding” Candles
Let’s make some candles that look like they are dripping with blood.
What you’ll need:
- White or black pillar or taper candles
- One red candle
- A lighter or matches (this is a job for a grown-up!)
- A protected surface, like an old plate or newspaper
Step-by-Step Guide:
- Prepare Your Candles: Place your main white or black candles upright on the protected surface.
- Light the Red Candle: Ask a grown-up to carefully light the red candle.
- Create the Drips: The grown-up should tilt the lit red candle over the top of the white or black candle. As the red wax melts, it will drip down the sides.
- Make it Look Real: Move the red candle around the top edge of the other candle to create drips of different lengths and thicknesses. It will look like blood is pouring down the sides.
- Let it Cool: Once you are happy with how it looks, the grown-up can blow out the red candle. Let the red wax drips cool and harden completely. Now you have some perfectly spooky candles for your vampire’s lair.
34. Haunted Doll’s Tea Party

Serve up some serious chills with a haunted doll’s tea party. This theme taps into the unsettling feeling of old, forgotten toys. A vintage doll with cracked porcelain skin sits at the head of the table, an unnerving hostess for this ghostly gathering. The whole scene is cast in dim, shadowy light, making it feel like a room frozen in time.
The table is set with mismatched, old-fashioned tea cups and plates. Other antique toys, like a worn rocking horse and a slightly creepy teddy bear, are scattered around the room as silent guests. This is a truly scary theme for brave souls who want to create a memorable and spine-chilling Halloween atmosphere.
DIY Instructions: Haunted Tea Stains
Let’s make a plain teacup look old and haunted.
What you’ll need:
- A plain white ceramic teacup
- A very strong black tea bag
- A small amount of hot water
- A paper towel
Step-by-Step Guide:
- Brew the “Stain”: Put the tea bag in the bottom of your teacup. Pour just enough hot water over it to get it wet and release the dark tea color. Let it sit for about 10 minutes to get really strong.
- Create the Drips: Carefully take the wet tea bag out. Hold it above the outside of the cup and give it a little squeeze so the dark tea drips down the sides.
- Make it Look Old: Use the wet tea bag to dab and smudge the tea stain around the rim and on the saucer. You want it to look like it’s been sitting in a dusty attic for a hundred years.
- Let it Set: Let the tea stains air dry completely on the cup and saucer. Don’t wipe them off! The stains will set and make the teacup look genuinely old and used.
- Display Your Work: Place your haunted teacup on the table, ready for a ghostly guest.
35. The Anarchy Cafe

Crank up the music and break the rules with a punk rock Halloween theme. This edgy and energetic style is all about rebellion and a do-it-yourself attitude. A banner made of ripped fabric and spray-painted letters screams “HALLOWEEN” in a chaotic font. Bright neon pink and green paint is splattered everywhere, contrasting with the stark black and white.
Chains are draped over cabinets, and a utensil holder is covered in silver studs. Ripped denim with band patches adds to the gritty, concert-venue vibe. This is a loud, bold, and fun theme for anyone who wants a Halloween that is less about traditional spooky and more about hardcore attitude.
DIY Instructions: No-Sew Punk Banner
Let’s make a tattered and torn banner for your anarchy cafe.
What you’ll need:
- An old black t-shirt or black fabric
- White craft paint
- A stencil brush or a sponge
- Letter stencils (or you can make your own)
- Scissors
- String or twine
Step-by-Step Guide:
- Cut Your Flags: Lay the black fabric flat. Cut it into several rectangles or squares. Don’t worry about making them perfect; jagged edges look better for this style.
- Stencil the Letters: Place a letter stencil on your first piece of fabric. Dip your stencil brush or sponge into a little bit of white paint and dab it over the stencil. Use a pouncing, up-and-down motion. This will create a messy, spray-painted look.
- Spell Your Word: Repeat this for each letter of your spooky word, like “BOO” or “FEAR,” using one piece of fabric for each letter. Let the paint dry.
- Tatter the Edges: Use your scissors to make small snips along the bottom of each fabric flag. Then use your fingers to rip and fray the fabric to make it look worn out.
- String it Up: Cut a small hole in the top two corners of each fabric piece. Thread your string through the holes to create your awesome, rebellious banner.
36. Graveyard Grub Station

Turn your kitchen counter into a spooky cemetery with a graveyard theme. This clever setup uses humor to create a fun and festive food station. A miniature wrought iron gate and fence create the boundary for your culinary cemetery. Utensil holders are disguised as old urns, with skeleton hands playfully poking out.
The stars of the show are the little tombstones with funny inscriptions like “R.I.P. Dinner” and “Here Lies Last Night’s Casserole.” Black crows stand guard over the scene, while lanterns cast a candlelit glow. This is a lighthearted and creative way to display your Halloween snacks and utensils.
DIY Instructions: Mini Food Tombstones
Let’s make some little tombstones to label your party food!
What you’ll need:
- A piece of gray or black craft foam (or cardboard painted gray)
- A white or silver paint pen or marker
- Scissors
- A pencil
Step-by-Step Guide:
- Draw the Shape: On your piece of craft foam, use a pencil to draw a classic tombstone shape. It should be a rectangle with a curved top. Make them small enough to place on a buffet table or next to a plate.
- Cut Them Out: Carefully cut out your tombstone shapes with scissors.
- Write a Funny Epitaph: Use your white or silver paint pen to write “R.I.P.” at the top of the tombstone. Below that, you can write the name of a food dish or a funny saying. For example, for a bowl of chili, you could write “Here Lies Chili.”
- Add Details: You can add a little cross at the top or a crack down the side to make it look older.
- Let it Dry: Let the paint pen dry completely. Once they are dry, you can lean them against your serving dishes to create your very own delicious graveyard.
Decorating your kitchen for Halloween is a chance to get creative and have some fun. As we’ve seen, the possibilities are endless. You can go for something elegant and gothic, bright and cheerful, or truly terrifying. The most important thing is to choose a theme that you enjoy.
Don’t be afraid to mix and match ideas or to use the DIY projects as a starting point for your own unique creations. A few simple touches can completely change the feel of the room and make everyday moments a little more magical.
So this year, let the spooky spirit flow into the heart of your home. Let your kitchen be a place where potions are brewed, monster mashes are hosted, and happy Halloween memories are made.
Key Takeaways
- Embrace a Theme: Choosing a specific theme, like vampires, ghosts, or a mad scientist’s lab, helps create a cohesive and immersive look.
- DIY is Your Friend: Simple, budget-friendly DIY projects can add a personal and unique touch to your decor that you can’t buy in a store.
- Details Matter: Small touches like custom napkin rings, spooky ingredient labels, or themed coasters can have a big impact on your overall design.
- Don’t Forget the Fun: Halloween decor can be chic and sophisticated, but it can also be playful, colorful, and humorous. Choose a style that makes you happy.