As the days grow shorter and a chill settles in the air, our homes become our sanctuaries. This is the season to create a warm, inviting atmosphere that feels both cozy and alive, even when the world outside is quiet and still.

While fresh flowers are lovely, there is a unique, lasting beauty to dried florals and greenery. Their muted tones, interesting textures, and sculptural shapes bring a touch of nature indoors that endures throughout the winter months. They offer a sustainable and wonderfully creative way to decorate.
From dramatic wall hangings to simple, fragrant sachets, there are countless ways to incorporate these natural elements into your home. This guide will walk you through 35 creative ideas, complete with simple, step-by-step instructions to help you bring each vision to life. Let’s explore the timeless charm of dried botanicals.
1. Winter Woodland Mantel Display

This arrangement brings the quiet beauty of a snowy forest indoors. Crisp white birch logs stand tall among a bed of frosted evergreen branches, creating a lovely winter scene. Large, snow-dusted pinecones and soft cotton puffs add wonderful texture and a touch of rustic charm.
Silvery eucalyptus leaves weave through the display, catching the light. The gentle glow from candles in mercury glass holders completes the serene look. It’s a design that feels both natural and elegant, transforming a simple mantel into a stunning focal point for the season.
DIY Instructions
What You’ll Need:
- A few frosted evergreen branches or a small garland
- 3 short birch logs (different heights look nice)
- Some large pinecones
- Stems of dried cotton
- Dried silver dollar eucalyptus
- Small white dried flowers (like statice)
- A few flameless candles and pretty holders
- A hot glue gun (optional, ask a grown-up for help!)
Step-by-Step Guide:
- Create Your Forest Floor: Lay your evergreen branches down on the mantelpiece. Spread them out to make a nice, full base for everything else.
- Place Your Trees: Stand the birch logs up in the middle of the greenery. It’s good to put the tallest one in the back and the shorter ones in front of it.
- Add the Pinecones: Next, find good spots for your big pinecones. Tuck them in between the green branches so they look like they fell there naturally.
- Bring in the Cotton Snow: Gently poke the cotton stems into the arrangement. Place them near the logs and around the pinecones to look like little puffs of snow.
- Add More Greenery: Now, add the eucalyptus stems. Their round, silvery leaves will give your display a different shape and a soft, frosty color.
- A Dusting of Flowers: Fill in any small gaps with your little white flowers. This makes the whole display look fuller and more delicate.
- Light It Up: Finally, place your candle holders and flameless candles safely among the decorations. Turn them on to give your winter scene a warm, cozy glow.
2. Modern Harvest Hoop Wreath

This simple hoop wreath offers a fresh take on winter decorating. A sleek golden ring provides the foundation, beautifully contrasting with an arrangement of natural textures. Soft bunny tail grasses and stalks of wheat create a gentle, feathery look on one side.
Silvery lunaria pods add a pearlescent shimmer, while a sprig of green cedar brings a touch of classic winter foliage. The design is asymmetrical, giving it a contemporary and artistic feel. A simple two-toned ribbon at the top completes this elegant piece, ready to hang on any door or wall.
DIY Instructions
What You’ll Need:
- A metal hoop (gold or brass looks nice)
- Floral wire
- A small bundle of dried wheat stalks
- A few stems of bunny tail grass
- Some dried lunaria pods (also called money plant)
- One small branch of cedar or other evergreen
- A ribbon for hanging
Step-by-Step Guide:
- Start Your Bundle: Take a few pieces of wheat and grass and hold them together. This will be the bottom layer of your design.
- Add More Texture: Add the cedar branch and the lunaria pods on top of the grasses. Arrange them so you can see all the different shapes.
- Wire It Together: Wrap your floral wire tightly around the stems of your little bundle to hold everything in place. Don’t cut the wire yet!
- Attach to the Hoop: Place your bundle against the metal hoop where you want it to be. Use the same long piece of floral wire to wrap the bundle securely onto the hoop. Keep wrapping until it feels strong, then cut and twist the wire to finish.
- Create a Mirror Image: Make a second, smaller bundle of grasses and wheat. Attach it above your first bundle, facing the opposite direction to create a balanced look.
- Add the Finishing Touch: Tie your ribbon in a bow or a simple knot at the top of the hoop. Now it’s ready to hang up!
3. Dramatic Driftwood Wall Hanging

This is not just a decoration; it’s a piece of art for your wall. A weathered piece of driftwood serves as the base for an explosion of dried botanicals. Fluffy pampas grass fans out, creating a soft, cloud-like background.
Deep burgundy amaranthus trails downwards, adding a rich splash of color and dramatic length. Spiky blue thistles and delicate poppy seed pods are tucked in, providing interesting shapes and textures. This large, flowing arrangement makes a stunning statement over a couch or bed, bringing a touch of wild, natural beauty indoors.
DIY Instructions
What You’ll Need:
- A cool piece of driftwood
- Twine or strong string
- Floral wire
- Pampas grass stems
- Dried blue thistles
- Hanging amaranthus (the long, trailing kind)
- Dried poppy seed pods or similar round shapes
Step-by-Step Guide:
- Prepare Your Hanger: Tie a piece of twine to both ends of your driftwood so you can hang it on the wall.
- Create the Base: Lay the driftwood down. Start attaching the pampas grass stems to the center of the wood using floral wire. Have them fan out like a sunrise.
- Add the Main Flowers: Next, add your blue thistles. Wire them in front of the pampas grass, focusing them in the middle of the arrangement.
- Add the Drama: Now, attach the long stems of the hanging amaranthus. Let them hang down naturally. You can add a few different lengths to make it more interesting.
- Fill in the Gaps: Use the poppy seed pods and any leftover smaller pieces to fill in any empty spots. This will make your wall hanging look full and complete.
- Hang It Up: Carefully lift your creation and hang it on a strong nail on the wall. Adjust any pieces that may have moved.
4. Gilded Winter Tablescape

This table setting is filled with warmth and luxury. A rich, dark green velvet runner creates a soft base for an elegant centerpiece. Deep red roses and moody hellebore flowers are mixed with sprays of gilded golden ferns. The metallic shine from the ferns catches the candlelight beautifully.
Tall, slim taper candles in matching green stand in ornate brass holders, adding height and a warm glow. The entire scene feels special and inviting, turning a simple dinner into a memorable occasion. It’s a wonderful way to combine the richness of winter colors with a bit of sparkle.
DIY Instructions
What You’ll Need:
- A table runner (velvet is a nice choice)
- A block of floral foam and a shallow dish for it
- Fresh flowers like dark red roses
- Dried ferns that you’ve spray-painted gold
- A few tall taper candles and holders
- Scissors
Step-by-Step Guide:
- Soak Your Foam: Put the floral foam block in water and let it sink all by itself. This will fill it up with water for your fresh flowers. Once it’s full, place it in the shallow dish in the middle of your table runner.
- Add the Fresh Flowers: Trim the stems of your roses and other fresh flowers. Gently push the stems into the foam block. Start with the biggest flowers and spread them out.
- Bring in the Gold: Now, take your golden ferns. Place them around the flowers. Some can stick out to the sides to make the arrangement look wider.
- Fill It Out: Continue adding flowers and ferns into the foam until it is completely hidden and your centerpiece looks full and beautiful.
- Place the Candles: Set your candle holders on the table runner, on either side of your floral centerpiece. Place the candles inside them. Ask a grown-up to light them when it’s time for dinner.
5. Rustic Farmhouse Pitcher Bouquet

This charming bouquet captures the feeling of a cozy country winter. An old-fashioned, slightly chipped white pitcher serves as a lovely vase. It is filled with an assortment of dried textures and muted colors that feel calm and gentle.
Large dried hydrangeas in soft greens, blues, and creams form the heart of the arrangement. Fluffy white cotton stems add a touch of softness, while thin stalks of dried oats reach upwards. A few sprigs of eucalyptus provide a hint of silvery green, completing this beautiful and timeless display.
DIY Instructions
What You’ll Need:
- A pitcher or jug
- A few large dried hydrangea heads
- Stems of dried cotton
- A bundle of dried oats or wheat
- Some dried eucalyptus stems
Step-by-Step Guide:
- Start with the Biggest Blooms: Place the big hydrangea heads into the pitcher first. They are your main flowers, so let them fill up most of the space. Use one, two, or three depending on the size of your pitcher.
- Add Height: Next, add the tall stems of dried oats. Place them towards the back of the arrangement so they stand up above the hydrangeas.
- Bring in the Greenery: Add the eucalyptus stems around the sides. Let them stick out a bit to give the bouquet a more natural, less perfect shape.
- Add Softness: Finally, poke the cotton stems into the gaps between the hydrangeas. Their bright white puffs will add a lovely texture.
- Adjust and Admire: Step back and look at your bouquet. You can gently move stems around until you think it looks just right.
6. Minimalist Bud Vase Collection

This display shows that sometimes, less is more. Instead of one large bouquet, a group of small bud vases creates a clean and modern look. Each vase holds just one or two carefully chosen dried stems, allowing the unique shape of each plant to be appreciated.
Yellow craspedia balls add a pop of color, while a bleached white fern provides delicate texture. A tall allium head, papery lunaria pods, and sculptural poppy pods each have their own vase. Grouped together on a marble tray, this collection of different shapes and colors feels thoughtful and stylish.
DIY Instructions
What You’ll Need:
- A collection of small vases (3 to 5 is a good number)
- A tray to put them on
- A few different types of single dried stems (like the ones mentioned above, or any you like!)
- Scissors
Step-by-Step Guide:
- Gather Your Vases: Find a few small bottles or vases. It’s fun if they are different shapes and sizes. Clean them and make sure they are dry.
- Choose Your Stems: Look at your dried stems and decide which one would look best in each vase. Think about their height and shape.
- Trim to Fit: Hold a stem up next to a vase. You want the stem to be taller than the vase. Cut the bottom of the stem so it’s the right height.
- Arrange One by One: Place one or two stems into each vase. Don’t make it crowded. The idea is to see the beauty of each single stem.
- Group Them Together: Place your finished bud vases on the tray. You can arrange them in a line or a little cluster. This makes them look like one complete decoration.
7. Scented Holiday Door Swag

This festive swag is a treat for the eyes and the nose. A lush bundle of fresh cedar branches hangs downwards, creating a beautiful teardrop shape. The deep green is dotted with the bright, cheerful colors of dried orange slices, which look like little stained-glass windows.
Cinnamon sticks, tied together with twine, add a warm, spicy fragrance and rustic texture. Pinecones and clusters of blue and red berries are tucked throughout the greenery. A rich, red velvet bow at the top provides a classic finishing touch to this wonderfully fragrant and welcoming decoration.
DIY Instructions
What You’ll Need:
- Several branches of fresh cedar or pine
- Floral wire
- A hot glue gun (with a grown-up’s help)
- A few dried orange slices
- 3-4 cinnamon sticks and some twine
- Small pinecones
- A wide, wired ribbon for the bow
Step-by-Step Guide:
- Make Your Bundle: Lay your cedar branches on a table, with the longest one at the bottom and shorter ones on top. The stems should all be at the same end.
- Secure the Branches: Use your floral wire to wrap tightly around the stems several times to hold all the branches together in a bundle. Create a little loop with the wire on the back for hanging.
- Prepare Your Spices: Tie two cinnamon sticks together with a piece of twine, making a small “X” shape.
- Decorate the Swag: Now for the fun part! Ask a grown-up to help you use the hot glue gun. Add a dab of glue to the back of your orange slices, pinecones, and cinnamon bundles and press them onto the cedar branches. Spread them out nicely.
- Add the Final Touch: Make a big, beautiful bow with your ribbon. Use a piece of floral wire to attach the bow to the top of your swag, hiding all the wrapped stems. Hang it on a door or wall.
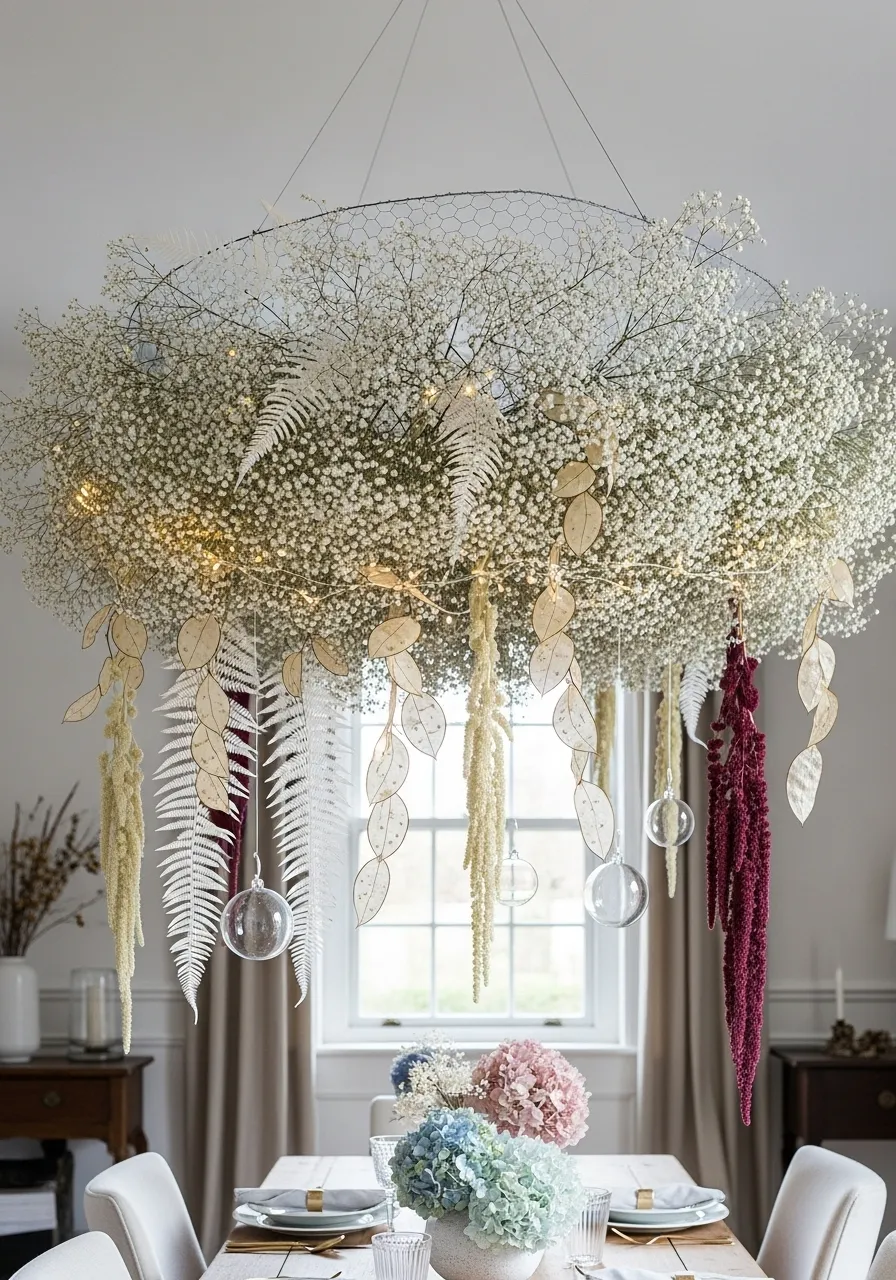
8. Floating Floral Cloud Chandelier

This hanging installation creates a truly magical atmosphere. A large, round frame is hidden by a fluffy cloud of delicate baby’s breath, making it seem like it’s floating in mid-air. It’s a breathtaking centerpiece hanging over a dining table.
Dangling from the cloud are different beautiful elements. Wispy, preserved ferns, long trails of amaranthus, and shimmering lunaria pods hang at various lengths. Tiny, warm fairy lights are woven throughout the baby’s breath, casting a soft, dreamy glow. This decoration turns any room into an enchanted wonderland.
DIY Instructions
What You’ll Need:
- Chicken wire and wire cutters (ask a grown-up for help!) OR a large, round wire wreath frame
- Lots of dried baby’s breath
- Clear fishing line
- A few interesting dried things to hang (ferns, amaranthus, etc.)
- A strand of battery-powered fairy lights
- Strong string or wire for hanging the whole thing
Step-by-Step Guide:
- Create Your Frame: With a grown-up’s help, shape the chicken wire into a large, shallow bowl or dome shape. If you’re using a wreath frame, you can skip this step.
- Build Your Cloud: Start poking the stems of the baby’s breath into the holes in the chicken wire or wreath frame. Keep adding more and more until the entire frame is covered and looks like a big, fluffy cloud.
- Add the Dangling Pieces: Cut different lengths of clear fishing line. Tie one end to the bottom of a fern or other hanging decoration. Tie the other end to the wire frame, so the decoration hangs down below the cloud. Do this with several different pieces.
- Weave in the Lights: Gently wrap the fairy light string in and around the baby’s breath. Tuck the small battery pack inside the cloud so it’s hidden.
- Hang Your Chandelier: Tie three or four long, strong pieces of string to the top of your wire frame. Have a grown-up help you hang it securely from a hook in the ceiling.
9. Styled Bookshelf with Dried Botanicals

This image shows how dried florals can elevate everyday spaces like a bookshelf. A collection of modern vases in matte black and stone finishes holds simple, yet striking, arrangements. The spiky, globe-like shape of sea holly, also known as thistle, adds a sculptural element and a beautiful dusty blue color.
Tall, slender poppy seed pods provide height and a different kind of texture. A small bunch of dried grasses in a simple pot adds softness. Set against a dark background with stacks of books, these arrangements create a sophisticated and moody winter scene, full of texture and interest.
DIY Instructions
What You’ll Need:
- A few interesting vases that you like
- Dried blue thistles (sea holly)
- Dried poppy seed pods
- A small bundle of dried grass
- Your bookshelf!
Step-by-Step Guide:
- Clear a Space: Choose one or two shelves on your bookshelf that you want to decorate. You might need to move a few books to make room.
- Create Your First Arrangement: Take one of your vases. Cut the stems of the blue thistles so they are a good height for the vase and place them inside.
- Make a Second One: In another vase, do the same thing with the poppy seed pods. You can make this arrangement taller or shorter than the first one.
- Add the Grasses: In a third, smaller pot or vase, place your bundle of dried grasses.
- Style the Shelf: Now, place your new dried flower arrangements back on the shelf. Don’t put them all in a row. Try putting one next to a stack of books, and another on top of some books lying flat. Move things around until you create a look that you enjoy.
10. Enchanted Frost Wreath

This wreath looks like it was just brought in from a magical, snowy forest. A base of silvery-green eucalyptus and other foliage is heavily flocked, giving it a thick layer of freshly fallen snow. This frosty look makes the whole wreath shimmer.
Bright pops of color come from clusters of glossy red berries and smaller, matte white berries scattered throughout the design. A few small pinecones add a touch of rustic texture. Woven subtly through the branches are tiny LED lights, which cast a cool, ethereal glow and make the wreath truly enchanting.
DIY Instructions
What You’ll Need:
- A grapevine wreath base
- A few branches of faux eucalyptus or other greenery
- A can of snow spray (use this outside with a grown-up!)
- Bunches of faux red and white berries
- A few small pinecones
- A hot glue gun (with a grown-up’s help)
- A string of battery-powered micro LED lights
Step-by-Step Guide:
- Build Your Base: Use the hot glue gun to attach the greenery branches to the grapevine wreath. Cover the front and sides of the wreath.
- Make It Snowy: Take the wreath outside and place it on some newspaper. Ask a grown-up to help you spray it with the snow spray. Let it dry completely.
- Add the Berries: Once it’s dry, bring it back inside. Use the hot glue gun to add your bunches of red and white berries. Spread them out all around the wreath.
- Place the Pinecones: Glue the small pinecones into some of the gaps between the berry clusters.
- Light It Up: Carefully wrap the string of LED lights around and through the wreath. Tuck the wire in so you can’t see it. Find a spot on the back of the wreath to attach the battery pack with some glue or wire.
11. Earthy Terracotta and Grasses Centerpiece

This collection of terracotta vases creates a warm and inviting centerpiece. The earthy, matte texture of the vases provides a lovely base for an assortment of dried grasses. Each vase holds a different type, allowing the unique textures of pampas, wheat, and bunny tails to stand out.
The arrangement feels cohesive because of the matching vases, but the varying heights of the grasses make it visually interesting. Placed on a simple table runner, this display brings a sense of calm, natural beauty to the room. It’s a wonderful way to celebrate the simple elegance of dried botanicals.
DIY Instructions
What You’ll Need:
- A few terracotta or clay vases in different shapes and sizes
- A bundle of dried pampas grass
- A bundle of dried wheat
- A bundle of dried bunny tail grass
- A table runner
Step-by-Step Guide:
- Set the Stage: Lay your table runner down on your table. This will be the foundation for your centerpiece.
- Arrange Your Vases: Place your empty vases on the runner. Group them together in the center of the table. Don’t put them in a straight line; a little cluster looks more natural.
- Fill the Vases: Now, start adding the grasses. Put just one type of grass in each vase. For example, fill one vase with wheat, another with pampas, and a third with bunny tails.
- Trim for Height: You can trim the stems of the grasses to make them different heights. This will make your arrangement more interesting to look at.
- Final Touches: Make sure each vase has a nice, full bunch of grass. You can adjust the vases or the grasses until you like how it looks.
12. Botanical Gallery Wall

Turn your walls into a beautiful nature journal with a gallery of pressed botanicals. This collection features a variety of leaves and flowers, each carefully preserved behind glass. The mix of different frames—simple black, elegant gold, and even an ornate oval—makes the display feel personal and collected over time.
Each frame tells a small story, showcasing the delicate details of a fern, a pansy, or a simple leaf. Arranging them together creates a stunning feature wall that is both artistic and educational. It’s a timeless way to bring the outdoors in and appreciate the quiet beauty of plants.
DIY Instructions
What You’ll Need:
- A collection of picture frames in different sizes and styles
- Heavy white or cream-colored paper
- Flowers and leaves that you’ve pressed
- A glue stick
- Scissors
Step-by-Step Guide:
- Press Your Plants: Find some nice leaves and flowers. Place them between two pieces of paper inside a big, heavy book. Leave them for a week or two until they are completely flat and dry.
- Prepare Your Backgrounds: Cut your heavy paper to fit inside each of your picture frames.
- Create Your Art: Gently take your pressed plants out of the book. Arrange one or a few on a piece of paper. When you like how it looks, use a tiny bit of glue from the glue stick to hold it in place.
- Frame Your Work: Carefully place your paper with the pressed plant into a frame and close the back. Do this for all of your plants and frames.
- Plan Your Layout: Before you put nails in the wall, lay all your frames out on the floor. Move them around until you find an arrangement you like. Then, ask a grown-up to help you hang them on the wall.
13. Winter Spice Potpourri Bowl

This beautiful wooden bowl is filled with all the wonderful scents of winter. It’s a handmade potpourri that is as lovely to look at as it is to smell. Dried orange and apple slices provide a touch of rustic color, while whole cinnamon sticks and star anise add a warm, spicy fragrance.
Small pinecones, bay leaves, and little jingle bells are scattered throughout, adding different textures and a hint of festive cheer. A simple white candle sits in the center, making it a welcoming and cozy centerpiece for a coffee table or entryway.
DIY Instructions
What You’ll Need:
- A wide, shallow bowl (wood looks nice)
- Dried orange and apple slices
- Small pinecones
- Cinnamon sticks
- Star anise pods
- A few bay leaves
- A flameless pillar candle
Step-by-Step Guide:
- Start with a Base: Fill the bottom of your bowl with any smaller potpourri items you have, like dried flower petals or wood chips.
- Add the Big Pieces: Arrange the larger items next. Place your dried orange and apple slices and the pinecones around the bowl. Don’t put them all in one spot; spread them out.
- Place Your Candle: Gently nestle your flameless candle into the very center of the bowl.
- Fill in with Spices: Now, fill in the gaps with your cinnamon sticks and star anise. You can tuck them in between the fruit slices and pinecones.
- Add the Finishing Touches: Place a few bay leaves on top for a touch of green. Your beautiful, fragrant potpourri bowl is ready!
14. Boho Pampas Grass Tree

For a modern and soft alternative to a traditional pine, this pampas grass tree is a showstopper. Built in a classic stone urn, the tree has a beautiful, feathery texture that feels both glamorous and natural. The fluffy plumes of grass create a full, cloud-like shape.
The tree is decorated simply with a few ornaments in shades of pink and silver, which complement the warm, neutral tones of the grass. This unique tree brings a touch of bohemian elegance to winter decor, creating a soft and dreamy focal point in any room.
DIY Instructions
What You’ll Need:
- A large, heavy pot or urn
- A large cone made of dry floral foam
- Many stems of dried pampas grass
- A few lightweight Christmas ornaments
- Scissors or garden shears
Step-by-Step Guide:
- Create a Strong Base: Place the floral foam cone securely inside your pot or urn. You might need to add some stones or sand to the bottom of the pot to keep it from tipping over.
- Start at the Bottom: Trim the stems of your pampas grass. Begin at the bottom of the foam cone and poke the stems in. Angle them slightly downwards and outwards so they look like tree branches.
- Work Your Way Up: Continue adding pampas grass stems in rows, working your way up the cone. Overlap the rows so that you can’t see the foam underneath.
- Cover the Top: When you get to the top, poke a few stems straight into the peak of the cone to finish the shape.
- Decorate Gently: Hang a few very light ornaments on the plumes of grass. Heavier ornaments might fall off. Your soft and fluffy tree is complete!
15. Minimalist Winter Branch Display

This arrangement celebrates the simple, structural beauty of winter. A tall, textured ceramic vase holds a large bundle of bare branches, reaching upwards like a tree in winter. The twisting, delicate twigs create a beautiful and complex silhouette against the wall.
The decoration is very simple. A few small, geometric glass ornaments hang from the branches, catching the light without adding clutter. This minimalist approach creates a calm and sophisticated display that feels both natural and artistic, making a strong statement with very few elements.
DIY Instructions
What You’ll Need:
- A large, heavy vase that won’t tip over easily
- A collection of long, interesting branches from your yard
- A few very lightweight ornaments
Step-by-Step Guide:
- Go on a Branch Hunt: Look in your backyard or a park for fallen branches that have a nice shape. Look for ones with lots of little twigs.
- Clean Your Branches: Gently wipe any dirt off your branches with a dry cloth. You can trim off any little pieces you don’t like.
- Arrange in the Vase: Place your branches in the heavy vase one by one. Arrange them so they spread out and create a full, tree-like shape.
- Add a Little Sparkle: Hang just a few of your lightest ornaments on some of the twigs. Don’t add too many! The idea is to keep it looking simple and natural.
- Find the Right Spot: Place your vase in a corner or next to a fireplace where it can be seen and enjoyed.
16. Fragrant Hanging Herb Bundles

This simple decoration adds rustic charm and a wonderful scent to a kitchen. Small bundles of various herbs are tied with twine and hung from a simple branch. The different colors and textures of rosemary, sage, lavender, thyme, and bay leaves create a beautiful display.
This method is a traditional way to dry herbs for cooking, but it also serves as a lovely, natural decoration. Hung in a kitchen or dining area, these bundles release a gentle, earthy fragrance into the air. It’s a decoration that is both beautiful and practical.
DIY Instructions
What You’ll Need:
- A few types of fresh herbs (rosemary, thyme, and sage work well)
- Natural twine or string
- A sturdy stick or branch
- Scissors
Step-by-Step Guide:
- Make Your Bundles: Take a few sprigs of one type of herb and hold them together. This is your first bundle.
- Tie Them Up: Cut a long piece of twine. Wrap it tightly around the stems of your herb bundle several times, then tie a strong knot. Leave a long tail of twine for hanging.
- Repeat for All Herbs: Do this for all of your different herbs, creating several small bundles.
- Hang Your Bundles: Take the long tail of twine on one of your bundles and tie it onto your stick. Do this with all your bundles, leaving a little space between each one.
- Display Your Work: Ask a grown-up to help you hang your stick with the herb bundles from hooks on the wall or ceiling.
17. Coastal Driftwood and Lunaria Garland

This delicate garland brings a light and airy feel to winter decor. Small, smooth pieces of driftwood are connected with twine, creating a natural, coastal-inspired chain. Attached to the garland are small bunches of wispy dried flowers and grasses.
The star of the show are the translucent, silvery lunaria pods, which shimmer like mother-of-pearl. A few delicate ornaments are mixed in, adding another layer of texture. This is a unique and gentle decoration, wonderful for a bathroom or a room with soft, natural light.
DIY Instructions
What You’ll Need:
- A long piece of twine
- Several small, smooth pieces of driftwood
- A hot glue gun (with a grown-up’s help)
- Small bunches of dried baby’s breath, lunaria, or bunny tail grass
- A few small, lightweight ornaments
Step-by-Step Guide:
- Lay Out Your Twine: Place your long piece of twine on a table. This will be the base of your garland.
- Attach the Driftwood: Ask a grown-up to help you use the hot glue gun. Put a line of glue on a piece of driftwood and press the twine into it. Add another piece of driftwood every few inches along the twine.
- Add the Flowers: In the spaces between the driftwood, glue on your small bunches of dried flowers.
- Add the Ornaments: Finally, glue on your lightweight ornaments. You can place them near the flower bunches.
- Let It Dry: Let the glue dry completely before you carefully pick up your garland and hang it across a window or on a wall.
18. Gothic Romance Mirror Swag

This decoration is full of drama and moody elegance. A large, ornate gold mirror is draped with swathes of rich velvet in jewel tones of red, blue, and green. This creates a soft and luxurious frame for the mirror itself.
Woven into the fabric is a garland of dark, dried foliage and deep red roses. Long trails of burgundy amaranthus hang down, adding to the dramatic effect. The whole look is opulent and romantic, like something from a classic fairytale, turning a simple mirror into a stunning work of art.
DIY Instructions
What You’ll Need:
- A large mirror (one with a fancy frame is great)
- A few long pieces of velvet or other soft fabric in different colors
- A pre-made garland of faux dark leaves and flowers, or make your own
- Floral wire
Step-by-Step Guide:
- Drape the Fabric: Take your first piece of fabric and drape it over one of the top corners of the mirror, letting it hang down the side. Do the same on the other side with a different colored fabric.
- Position the Garland: Lay your flower garland across the top of the mirror, over the fabric.
- Secure Everything: Use small pieces of floral wire to gently attach the fabric and the garland to the mirror frame. You can also use temporary, wall-safe hooks behind the mirror to hold things in place.
- Arrange and Fluff: Adjust the fabric so it hangs nicely. Make sure the flowers and leaves of the garland are visible. This decoration looks wonderful with some candles placed on the table in front of it.
19. Spiced Citrus Winter Centerpiece

This centerpiece is a feast for the senses, full of vibrant color and warm scents. A wooden tray holds a collection of natural winter elements. Bright orange clementines provide a fresh, citrusy aroma, while bundles of cinnamon sticks tied with twine add a spicy warmth.
Textured decorative balls made of seeds or beans add an interesting visual element. The display is built around a glass cloche, or dome, which covers a few special items, making them a focal point. It’s a creative and fragrant arrangement that feels both festive and natural.
DIY Instructions
What You’ll Need:
- A round tray or shallow bowl
- A few small oranges or clementines
- Bundles of cinnamon sticks and some twine
- Star anise pods
- A glass cloche or a clean glass jar
- A few interesting objects to put under the cloche (like a pretty pinecone or ornament)
Step-by-Step Guide:
- Set Up Your Tray: Place your tray in the middle of the table. Put the glass cloche in the center.
- Arrange the Items Under the Glass: Lift the cloche and place your special objects on the tray right in the middle. Then, carefully place the cloche back over them.
- Add the Citrus: Arrange the clementines on the tray around the outside of the glass cloche.
- Bundle Your Cinnamon: Take three or four cinnamon sticks and tie them together with a piece of twine. Make two or three of these bundles.
- Fill in the Gaps: Place your cinnamon bundles and the star anise pods in the empty spaces between the clementines. Keep arranging until your tray looks full and beautiful.
20. Winter Whites Dried Bouquet

This stunning bouquet proves that you don’t need color to make a statement. The arrangement is a beautiful study in the textures of white and neutral tones. Fluffy white pampas grass and bleached ferns create a soft and airy background.
Stems of soft cotton, white hydrangeas, and delicate baby’s breath add body and different shapes to the bouquet. The most interesting element is the translucent, paper-like leaves of the lunaria plant, which add a delicate shimmer. It’s a chic and sophisticated arrangement, looking especially striking in a simple white vase.
DIY Instructions
What You’ll Need:
- A white vase
- A variety of dried white and neutral florals (pampas, cotton, bleached fern, etc.)
- Scissors
Step-by-Step Guide:
- Start with a Clean Slate: Make sure your white vase is clean and ready.
- Add the Tallest Stems First: Take your tallest flowers, like the pampas grass, and place them in the vase. These will create the height and shape of your bouquet.
- Add the Main Flowers: Next, add your larger flowers, like the cotton stems and hydrangeas. Place them in the middle of the arrangement.
- Fill with Texture: Use the smaller, more delicate pieces like the bleached ferns and lunaria to fill in the gaps. Place some towards the front and sides so they can be seen.
- Fluff and Arrange: Gently move the stems around until the bouquet looks full and balanced from all sides. You can trim some stems to be shorter if you need to.
21. Enchanted Rose Cloche Display

This display captures a tiny, magical world under glass. A single, perfectly preserved dried rose sits inside a small bird’s nest, creating a scene from a storybook. Wispy bunny tail grasses and baby’s breath surround the rose, adding to the delicate and romantic feel.
The entire scene is protected by a glass cloche, which makes it feel like a precious treasure. A thin wire of fairy lights is woven through the arrangement, casting a soft, warm glow. It’s a beautiful way to highlight a single special bloom and create a point of wonder on a shelf or side table.
DIY Instructions
What You’ll Need:
- A wooden base
- A glass cloche (dome) that fits the base
- A small bird’s nest
- One beautiful dried rose
- A few small dried flowers like baby’s breath and bunny tail grass
- A short, battery-powered strand of fairy lights
- A hot glue gun (with a grown-up’s help)
Step-by-Step Guide:
- Set the Scene: Place the small bird’s nest in the center of the wooden base. You can use a tiny dab of hot glue underneath to keep it from sliding around.
- Add the Star: Gently place your dried rose in the middle of the nest.
- Fill in the Details: Poke the stems of the baby’s breath and bunny tails into the nest, arranging them around the rose.
- Bring in the Magic: Carefully weave the fairy light string in and around the flowers in the nest. Let the small battery pack sit behind the nest.
- Cover Your Treasure: Turn the lights on. Carefully place the glass cloche over the entire arrangement and onto the wooden base.
22. Rustic Harvest Corn Swag

This beautiful swag is a celebration of the harvest season. It has a wonderfully rustic and natural feel, made from materials straight from the field. Two large flowers, crafted from dried corn husks, form the focal points of the decoration.
Colorful ornamental corn cobs, with their deep reds and blues, are tucked into the arrangement. Stalks of golden wheat add another layer of texture and a touch of softness. The entire bundle is tied together with twine and burlap, completing its charming, farmhouse look.
DIY Instructions
What You’ll Need:
- Dried corn husks (you can buy these at a grocery or craft store)
- A hot glue gun (with a grown-up’s help)
- A few cobs of ornamental corn
- A small bundle of dried wheat
- Floral wire or strong twine
Step-by-Step Guide:
- Make the Husk Flowers: To make one flower, take a corn husk for your first petal. Put a dot of hot glue at the bottom and pinch it together. Do this with about 5-6 husks. Then, glue these pinched petals in a circle onto a small piece of cardboard to create your flower. Make two flowers.
- Start Your Bundle: Lay a few long corn husks down on your work surface.
- Add the Wheat and Corn: Place the bundle of wheat on top of the husks. Then, arrange your ornamental corn cobs on top of the wheat.
- Attach Your Flowers: Place the two corn husk flowers you made near the top of the bundle.
- Tie It All Together: Use a long piece of floral wire or twine to wra
p tightly around the entire swag to hold everything together. You can wrap it a few times to make sure it’s secure.
23. Sunlit Citrus and Spice Mobile

This cheerful mobile is designed to catch the winter light. Thin, dried slices of oranges and grapefruits hang like beautiful pieces of stained glass, glowing when the sun shines through them. The bright colors are a wonderful way to brighten up a room.
Hanging between the citrus are fragrant cinnamon sticks, star anise, and sprigs of fresh cedar. The whole mobile is suspended from a simple branch, giving it a natural and handmade feel. It’s a decoration that delights the eyes and fills the air with a fresh, spicy scent.
DIY Instructions
What You’ll Need:
- 1 orange and 1 grapefruit
- A sturdy stick or small branch
- Clear fishing line or thin twine
- A needle with a large eye
- Cinnamon sticks and star anise pods
- A few small sprigs of cedar
Step-by-Step Guide:
- Dry Your Citrus (Grown-up Step): Ask a grown-up to slice the fruit very thinly. Place the slices on a baking sheet and bake them in the oven at a very low temperature (around 200°F or 95°C) for 2-3 hours, flipping them halfway through, until they are dry.
- Prepare Your Hangers: Cut several pieces of your fishing line or twine, all at different lengths.
- String Your Decorations: Use the needle to carefully poke a hole through a citrus slice and thread a piece of string through it, tying a knot to secure it. On other strings, tie on cinnamon sticks, star anise, or little cedar sprigs.
- Create Your Mobile: Tie the other end of each string onto your main branch.
- Balance and Hang: Spread the strings out along the branch. Tie one long piece of twine to both ends of the branch to create a hanger. Now you can hang your beautiful mobile in a window.
24. Sculptural Dried Seed Pod Bouquet

This arrangement is a striking example of modern, minimalist floral design. It focuses on the strong, architectural shapes of dried flowers and seed pods. Large, lacy allium heads and textured poppy pods stand tall on slender stems, creating interesting silhouettes.
A few spiky blue thistles are added for texture and a touch of deep color. The entire bouquet is placed in a simple, matte black vase, which makes the unique shapes of the plants stand out even more. This type of arrangement is all about appreciating the beauty of line and form.
DIY Instructions
What You’ll Need:
- A tall, simple vase (black looks very modern)
- A few dried allium heads (the big, round seed heads)
- Several dried poppy seed pods
- A few stems of dried thistles or sea holly
Step-by-Step Guide:
- Choose Your Vase: Pick a vase that is tall and has a narrow opening. This will help your stems stand up straight.
- Start with the Tallest: Place your tallest stems in the vase first. These will be the foundation of your arrangement’s shape.
- Add the Main Shapes: Next, add the allium heads and the poppy pods. Place them at slightly different heights to make it more interesting to look at.
- Fill in with Texture: Use the spiky thistle stems to fill in any gaps at the bottom and to add a different shape and color.
- Keep It Simple: Don’t overcrowd the vase. The goal is to be able to see and appreciate the shape of each individual stem.
25. Feathered Wheat Wreath

This wreath offers a unique and beautiful twist on a classic harvest design. The base is a full, golden wreath made entirely of dried wheat, giving it a soft, feathery texture. Woven throughout the wheat are long, elegant pheasant and peacock feathers.
The iridescent greens and blues of the peacock feathers provide a stunning contrast to the neutral tones of the wheat. A few dried fern leaves are tucked in, adding another layer of delicate texture. It’s a sophisticated piece that brings a touch of the countryside’s natural elegance indoors.
DIY Instructions
What You’ll Need:
- A wire wreath frame
- Floral wire
- A large bundle of dried wheat
- A variety of long feathers (like pheasant and peacock)
- A few dried or preserved fern leaves
Step-by-Step Guide:
- Make Small Wheat Bundles: Take 5-6 stalks of wheat and wrap floral wire around the stems to create a small bundle. Make many of these.
- Attach Bundles to the Frame: Lay one wheat bundle on the wire frame. Use the wire attached to it to wrap it tightly to the frame. Place the next bundle so it slightly overlaps the first one, hiding the stems.
- Cover the Frame: Continue adding wheat bundles all the way around the frame until it is completely covered and looks full.
- Add the Feathers: Now, gently slide the stems of the long feathers into the wreath, tucking them securely between the wheat stalks. Arrange them so they fan out from the center.
- Add the Ferns: For a final touch, tuck the dried fern leaves in around the edges of the wreath.
26. Winter Woodland Terrarium

This charming terrarium contains a tiny, self-contained winter forest scene. A bed of vibrant green moss creates a lush forest floor inside a beautiful glass jar. A variety of natural treasures are arranged on top of the moss.
Small pinecones, a piece of tree bark, and a few acorns give the scene a realistic, rustic feel. A dried poppy seed pod stands tall like a strange, miniature tree. The finishing touch is a tiny deer figurine, which brings the whole miniature world to life. It’s a wonderful way to create a lasting piece of nature to enjoy indoors.
DIY Instructions
What You’ll Need:
- A clean, clear glass jar or vase with a lid
- A layer of small pebbles for the bottom
- A layer of dried moss
- Small treasures from a walk: tiny pinecones, acorns, interesting bark
- A special dried element, like a poppy pod
- A tiny animal figurine (optional)
Step-by-Step Guide:
- Start with Drainage: Put a thin layer of small pebbles at the bottom of your glass jar. This helps it look like real ground.
- Create the Forest Floor: Place a thick, soft layer of moss on top of the pebbles. Gently press it down.
- Add the Big Features: Arrange your larger items first. Place the piece of bark and the biggest pinecone on the moss.
- Place the Smaller Details: Now, add your smaller treasures. Sprinkle the acorns and smaller pinecones around. Find a good spot to stand up your poppy pod.
- Add a Friend: If you have one, place your tiny deer figurine on the moss to complete your woodland scene.
- Close It Up: Gently place the lid on your terrarium. Keep it out of direct sunlight.
27. Calming Lavender Sachets

These simple pouches are a lovely and practical way to enjoy dried botanicals. Made from natural linen or cotton fabric, each small bag is filled with fragrant dried lavender buds. The sachets are simply tied at the top with a piece of twine or raffia.
These little bags can be tucked into drawers to make clothes smell nice, or hung on a doorknob to release a gentle, calming scent into the room. They make for a charming and thoughtful handmade gift, offering a small touch of rustic beauty and relaxing aromatherapy.
DIY Instructions
What You’ll Need:
- Small fabric bags with drawstrings (from a craft store) OR small squares of fabric
- A bowl of dried lavender buds
- A spoon
- Twine or ribbon
- (If making your own bags: needle and thread or a hot glue gun)
Step-by-Step Guide:
- Make Your Pouch (If Needed): If you have fabric squares, fold one in half. With a grown-up’s help, sew or hot glue the two sides shut, leaving the top open to make a little pouch.
- Fill with Lavender: Hold a bag open and use a spoon to carefully fill it with dried lavender buds. Fill it about two-thirds full so you have room to tie it.
- Tie It Closed: If your bag has a drawstring, pull it tight. If not, pinch the top of the bag together.
- Add the Finishing Touch: Cut a piece of twine or ribbon and tie it tightly in a knot or a bow around the top of the sachet to keep the lavender inside. You can even tuck a small sprig of fresh lavender into the bow.
28. Elegant Hoop Wreath with Hellebore

This wreath is a beautiful example of modern minimalism. A simple, slender gold hoop provides a clean and elegant frame. Attached to one side is a small, carefully arranged bundle of bleached white foliage. The texture is fine and feathery, like a dusting of snow.
The only point of color is a single, dramatic dark flower, a hellebore, nestled at the base of the white foliage. This contrast between the light, the dark, and the metallic hoop creates a striking and sophisticated piece of decor that is both simple and very stylish.
DIY Instructions
What You’ll Need:
- A metal hoop
- A small bunch of dried, bleached foliage (like ferns or ruscus)
- One beautiful faux flower (a dark one provides a nice contrast)
- Thin floral wire or pretty twine
- A ribbon for hanging
Step-by-Step Guide:
- Create Your Bundle: Hold your bunch of white foliage together in your hand. Trim all the stems so they are the same length.
- Add Your Flower: Place the stem of your single flower on top of the white foliage.
- Wrap It Up: Use your floral wire or twine to wrap tightly around all the stems, creating one neat bundle.
- Attach to the Hoop: Place your finished bundle against the metal hoop. Use the same wire or twine to wrap it securely onto the hoop.
- Add a Hanger: Tie a ribbon to the top of the hoop so you can hang your modern wreath on the wall.
29. Muted Hydrangea Garland

This lush garland brings a touch of romantic, cottage-style charm to any space. It is made almost entirely of large, pillowy heads of dried hydrangeas. The flowers have a beautiful, antique color palette of soft blues, dusty mauves, and muted greens.
Woven between the big blooms are small pinecones and sprigs of silvery-green eucalyptus, which add texture and a hint of winter scent. A simple white ribbon is tied at one end, adding to the soft, elegant feel. This garland looks lovely draped over a mantelpiece or trailing down a staircase banister.
DIY Instructions
What You’ll Need:
- A long piece of thick rope or twine to be your base
- Lots of dried hydrangea heads
- Small pinecones
- Thin floral wire
- A few stems of dried eucalyptus
Step-by-Step Guide:
- Prepare Your Flowers: Cut the stems of your hydrangeas, leaving about 2-3 inches to work with.
- Start Attaching: Take your first hydrangea head and place its stem against the rope. Use a piece of floral wire to wrap the stem tightly to the rope.
- Overlap and Continue: Take your next hydrangea head and place it so the bloom covers the stem and wire of the first one. Wire this one onto the rope. Continue this process, adding hydrangeas all the way down the rope.
- Add the Details: Cut small pieces of wire. Wrap a piece of wire around the base of a pinecone and twist it. Use the wire tails to attach the pinecone to the garland, tucking it between the flowers.
- Fill in with Greenery: Tuck the stems of the eucalyptus into the garland to fill any small gaps.
30. Ikebana Inspired Winter Arrangement

This is not a typical bouquet; it is a thoughtful, artistic arrangement inspired by the Japanese art of Ikebana. The design emphasizes space, line, and form. A beautifully twisted, bare branch creates a sculptural silhouette, reaching up from a shallow ceramic bowl.
The focus is on a few carefully chosen elements: a large, dried protea flower and a textured lotus pod. The arrangement is held in place by a kenzan, or flower frog, which is hidden under a bed of soft green moss. This is a calm and contemplative piece that celebrates the unique beauty of each element.
DIY Instructions
What You’ll Need:
- A shallow bowl or dish
- A kenzan (a small, heavy base with metal spikes, found at craft stores)
- A piece of interesting, twisted branch
- One or two large, interesting dried flowers (like a protea or lotus pod)
- A small piece of preserved moss
Step-by-Step Guide:
- Place Your Kenzan: Put the kenzan in the bottom of your shallow bowl, slightly off-center. Add a little water to the bowl if you are using any fresh elements.
- Set Your Main Line: Take your most interesting branch. Carefully and firmly press the bottom of the stem onto the spikes of the kenzan so it stands up on its own. This is your tallest element.
- Add Your Focal Flower: Trim the stem of your main flower. Press it onto the kenzan in front of the branch. This flower should be much shorter than the branch.
- Add Your Third Element: Place your third element, like the lotus pod, even shorter and to the side. The goal is to have three main points at different heights.
- Cover Your Tools: Gently tear your moss into small pieces and place it on top of the kenzan to hide it from view.
31. Autumn Grain Door Sheaf

This abundant bundle, often called a sheaf, brings all the textures of a golden field right to your door. It is a rich collection of various dried grains and grasses, layered to create a full, cascading shape. Deep red sorghum, golden wheat, and feathery grasses are all artfully combined.
The different colors and textures create a look that is both rustic and incredibly detailed. Tied securely with a thick piece of jute twine and finished with a simple plaid ribbon, this decoration is a wonderful way to celebrate the harvest and add a touch of natural beauty to your entryway.
DIY Instructions
What You’ll Need:
- A bundle of long, sturdy straw or grass for the back
- A variety of other dried grains and grasses (sorghum, wheat, millet)
- Strong twine or jute rope
- A decorative ribbon
Step-by-Step Guide:
- Create Your Base: Take your bunch of sturdy straw and lay it on a table. This will be the back of your sheaf and give it its shape.
- Start Layering: Begin laying your other grains and grasses on top of the straw base. Put the longest pieces on first. Add shorter, more colorful pieces like the red sorghum on top of that.
- Build It Up: Continue adding layers, making sure you can see all the different textures. The goal is to create a full, teardrop shape.
- Tie It Tightly: Once you are happy with your arrangement, gather all the stems together at the top. Take your strong twine and wrap it around the stems many times, as tightly as you can. Tie a secure knot at the back.
- Add a Bow: Tie your decorative ribbon over the twine to hide it and add a finishing touch.
32. Luminated Pinecone and Birch Bucket

This arrangement brings a cozy, woodland feel to any room. A rustic galvanized metal bucket, accented with woven seagrass, is filled with natural winter treasures. Inside, short birch logs stand like small trees among a gathering of large, frosted-tip pinecones.
Sprigs of silvery-green eucalyptus are tucked in, softening the edges and adding a touch of color. Woven throughout the display is a delicate string of warm fairy lights, which casts a gentle glow on the natural elements. It’s a simple, charming centerpiece that feels both rustic and magical.
DIY Instructions
What You’ll Need:
- A bucket or pot
- A piece of dry floral foam that fits inside
- A few short birch logs
- A collection of pinecones
- Several stems of dried eucalyptus
- A strand of battery-powered fairy lights
Step-by-Step Guide:
- Set Your Foundation: Place the floral foam securely inside the bucket. This will help hold everything in place.
- Place Your Logs: Firmly press the bottom ends of the birch logs into the foam. Arrange them so they stand up straight, like trees.
- Add the Pinecones: Arrange the pinecones on top of the foam, in between and around the birch logs. Cover the entire top of the foam with them.
- Tuck in the Greenery: Poke the stems of the eucalyptus into the foam in the gaps between the pinecones. Let the leaves drape over the side of the bucket.
- Add the Sparkle: Gently weave your string of fairy lights in and around the logs, pinecones, and eucalyptus. Tuck the battery pack out of sight.
33. Shimmering Lunaria Light Display

This decoration creates an ethereal and magical glow. The star of this display is the lunaria plant, also known as money plant or honesty, with its beautiful, paper-thin, and pearlescent seed pods. A delicate garland of these pods is draped gracefully across a mirror.
Tiny micro fairy lights are intertwined with the garland, making the translucent pods shimmer and shine. Below, simple glass bud vases hold more lunaria stems, continuing the theme. The whole scene is light, airy, and wonderfully enchanting, especially in the evening when the lights are turned on.
DIY Instructions
What You’ll Need:
- A few long stems of dried lunaria
- A long strand of micro fairy lights on a thin wire
- Clear tape
- A few small glass bud vases
Step-by-Step Guide:
- Prepare Your Stems: Gently handle your lunaria stems, as the pods can be delicate. You will use some for the garland and some for the vases.
- Create the Garland: Lay one long lunaria stem on a table. Place your string of fairy lights next to it. Carefully wrap the light wire around the lunaria stem and its branches.
- Hang Your Garland: Use small pieces of clear tape to attach your finished light-up garland to the top of a mirror or a mantelpiece. Let it drape gently in the middle.
- Fill Your Vases: Trim your remaining lunaria stems to a good height for your bud vases.
- Complete the Display: Place the bud vases on the mantel or table in front of your mirror to finish the beautiful, glowing display.
34. Gilded Magnolia Wreath

This wreath is a picture of classic Southern elegance with a glamorous update. A full, lush wreath is made from beautiful magnolia leaves. Some leaves show their glossy, deep green side, while others show their soft, velvety brown underside.
What makes this wreath truly special are the leaves that have been painted a brilliant gold. The metallic finish catches the light beautifully and provides a stunning contrast to the natural texture of the other leaves. It is a sophisticated and timeless piece that adds a touch of luxury to any door or wall.
DIY Instructions
What You’ll Need:
- A wire or grapevine wreath frame
- Floral wire
- Many fresh magnolia leaves
- Gold spray paint (use this outside with a grown-up!)
Step-by-Step Guide:
- Prepare Your Golden Leaves: Take about one-third of your magnolia leaves and lay them on some newspaper outside. With a grown-up’s help, spray paint them gold. Let them dry completely.
- Make Small Leaf Bundles: Take three magnolia leaves (a mix of green, brown-sided, and gold ones). Hold their stems together and wrap a piece of floral wire tightly around them to create a small bundle. Make many of these bundles.
- Attach to the Frame: Lay one bundle on your wreath frame. Use the wire tails to attach it securely.
- Overlap and Cover: Place your next bundle so the leaves cover the stems of the first one. Attach it to the frame. Continue doing this all the way around the wreath until the entire frame is covered and looks full and beautiful.
35. Verdant Artichoke and Pomegranate Centerpiece

This is a truly unique and bountiful centerpiece that looks like it came straight from a lush garden. Instead of traditional flowers, the arrangement is built around whole artichokes, which have a wonderful, sculptural shape. Deep red pomegranates are nestled among them, adding a rich jewel-toned color.
The arrangement is filled out with fragrant sprigs of fresh rosemary, soft, silvery dusty miller, and branches of olive and bay leaves. It is a stunning display of textures and shades of green. Placed on a simple runner, this centerpiece is a conversation starter that feels both rustic and luxurious.
DIY Instructions
What You’ll Need:
- A block of floral foam and a shallow tray for it
- A few whole artichokes
- A couple of small pomegranates
- Wooden skewers
- Lots of fresh greenery (rosemary, olive branches, bay leaves)
- A few pillar candles
Step-by-Step Guide:
- Soak Your Foam: Let your floral foam soak up water in a sink or bucket. Once it’s heavy, place it in its tray in the center of your table.
- Prepare Your Produce: Carefully push a wooden skewer into the bottom of each artichoke and pomegranate. This will give you a “stem” to stick into the foam.
- Add the Main Pieces: Trim the skewers to a good length. Start arranging the artichokes and pomegranates by pushing their skewers firmly into the foam. Create a nice, mounded shape.
- Fill with Greenery: Now, take your sprigs of rosemary and other greens. Trim the ends of the stems and begin poking them into the foam, filling all the gaps between the artichokes.
- Add Candles: Carefully nestle your pillar candles into the arrangement, making sure they are sitting securely. Ask a grown-up to light them.
Decorating with dried florals and greenery is a wonderful way to connect with the quiet beauty of the winter season. These natural elements bring texture, warmth, and lasting charm into our homes. They remind us that there is life and beauty to be found even in the coldest months.
Whether you prefer a grand, dramatic display or a few simple, well-placed stems, we hope these ideas have inspired you. The best part about these projects is that you can adapt them to your own style. So have fun gathering your materials, and enjoy the process of creating something beautiful for your home.
Key Takeaways
- Lasting Beauty: Unlike fresh flowers, dried botanicals last the entire season and beyond, making them a sustainable choice.
- Wonderful Texture: From fluffy pampas grass to spiky thistles, dried elements add a rich variety of textures to your decor.
- Creative Freedom: Dried florals are incredibly versatile. They can be used in wreaths, bouquets, garlands, and even terrariums.
- Simple and Accessible: Many of these projects use simple techniques and readily available materials, making them enjoyable for all skill levels.