That first step onto a cold bathroom floor can send a shiver through your whole body. On a dark winter morning, a chilly bathroom feels more like a place of dread than a place of comfort. The harsh overhead light and the cold surfaces can make getting ready a jarring experience.

But your bathroom does not have to be this way.
You can transform this cold, functional space into a warm and welcoming retreat. It does not require a massive renovation or a lot of money. With a few simple swaps and thoughtful additions, you can create a personal spa that makes you look forward to those quiet moments, even on the coldest of days.
1. Embrace the Warmth of a Heated Towel Rack

Stepping out of a hot shower can feel jarring. The cold air hits your skin instantly. A heated towel rack changes that experience completely. Imagine wrapping yourself in a wonderfully warm towel every single time. It feels like a hug.
This simple addition brings a spa-like quality to your daily routine. Your towels and robe stay dry, fresh, and delightfully cozy. It’s a small change that makes a big difference on chilly winter mornings. Your bathroom begins to feel less like a utility room and more like a personal sanctuary.
DIY Installation: Your Guide to a Toasty Towel Rack
Step 1: Pick Your Spot. First, decide where you want your warm towels to be. It needs to be near an electrical outlet, just like a lamp needs a plug to light up. Make sure it’s a safe distance away from the shower or bathtub where it won’t get splashed with a lot of water.
Step 2: Make Your Marks. Hold the towel rack against the wall where you want it to go. Use a pencil to make a little dot on the wall through each of the screw holes. To make sure it’s not crooked, you can use a tool called a level. It looks like a small ruler with a bubble in the middle. The rack is straight when the bubble is right in the center.
Step 3: Get a Grown-Up for Help. This next part is a job for an adult. They will need to use a drill to make small holes on your pencil marks. After making the holes, they will gently tap the plastic wall anchors (they usually come with the rack) into the holes. These anchors help the screws hold on tight.
Step 4: Attach the Rack. Now, line up the towel rack with the holes in the wall. Place the screws into the holes and use a screwdriver to tighten them. Keep going until the rack feels strong and doesn’t wiggle.
Step 5: Plug In and Enjoy. Plug the cord into the wall outlet. Find the “on” switch and flip it. It will take a few minutes to warm up. Now you can hang your towel or robe and get ready for a much warmer, cozier end to your bath or shower!
2. Step onto a Plush Bath Mat

Cold tile floors are a major source of chill in the bathroom. The shock of stepping onto an icy surface can undo all the comfort of a warm shower. A simple swap to a plush, high-pile bath mat provides instant warmth and comfort for your feet.
The soft texture feels wonderful and adds a visual layer of coziness to the room. It breaks up the hard surfaces and makes the space more inviting. This small touch is a very effective way to make your bathroom feel much warmer underfoot.
DIY Guide: Choosing Your Super Soft Bath Mat
Step 1: Measure Your Space. Use a measuring tape to see how much room you have. You want a mat that fits nicely in front of your shower or sink without getting in the way of the door.
Step 2: Pick Your Material. Look for soft materials. Chenille feels like fuzzy caterpillars and is very soft. Memory foam is squishy and comfortable, like a pillow for your feet. A thick cotton mat is also a great choice.
Step 3: Choose a Color. Find a color that matches your towels, shower curtain, or wall paint. A nice color can make the whole room look better.
Step 4: The Squish Test. If you are in a store, ask if you can touch the mat. Give it a little squish with your fingers to feel how soft and thick it is. Choose the one that feels best to you.
Step 5: Care for Your Mat. To keep your mat fluffy, you need to wash it. Most mats can go in the washing machine. A grown-up can help you read the tag to see how to wash and dry it so it stays soft for a long time.
3. Install a Heated Bidet Seat

The jarring experience of a cold toilet seat on a winter night is something no one enjoys. A heated bidet seat is a transformative upgrade for any bathroom. It provides consistent, gentle warmth that adds a surprising amount of comfort to your daily routine.
Beyond the warmth, it offers enhanced hygiene. This single change elevates the function of your toilet to something much more comfortable and clean. It’s a touch of modern convenience that makes your bathroom feel thoughtfully designed.
DIY Project: Installing Your Warm Bidet Seat
Step 1: Turn Off the Water. Look behind your toilet for a small, oval-shaped handle on the wall. This is the water shut-off valve. Turn it clockwise (to the right) until it stops. Then, flush the toilet to empty the tank.
Step 2: Say Goodbye to the Old Seat. Look for two plastic caps at the back of the toilet bowl. Pop them open. Underneath, you will find two large screws, probably made of plastic. A grown-up can help you unscrew them, and then you can lift the old seat right off.
Step 3: Put the New Seat On. Clean the area, then place the new bidet seat’s mounting plate over the holes. Put the bolts through and tighten them from underneath. Slide the bidet seat onto the plate until it clicks.
Step 4: Connect the Water. An adult should help with this part. They will unscrew the water hose from the bottom of the toilet tank. Then, they will connect the special T-valve that came with your bidet. One part connects back to the tank, and the other connects to a new, smaller hose for your bidet.
Step 5: Plug it In and Power Up. Your bidet seat needs electricity for the heat. Plug the cord into a special bathroom outlet (called a GFCI outlet). Turn the water valve back on (counter-clockwise). Now you can use the remote to turn on the heat!
4. Unroll a Heated Floor Mat

While a plush rug helps, a heated floor mat takes warmth to the next level. This is a simple mat that you plug into the wall to generate gentle, radiant heat. It warms the floor beneath your feet, creating a pocket of comfort right where you need it most.
Place it in front of your vanity or sink for a warm spot to stand while you get ready. The consistent warmth it provides can make the entire room feel less drafty. It’s an easy and effective way to fight back against cold floors.
DIY Setup: Your Cozy Heated Floor Mat
Step 1: Choose the Best Spot. Decide where your feet get the coldest. The best place is usually in front of the sink where you stand to brush your teeth, or maybe right where you step out of the shower.
Step 2: Clean the Floor. Before you put the mat down, wipe the floor with a cloth or mop. You want the floor to be clean and completely dry.
Step 3: Lay it Flat. Carefully unroll the mat and lay it on the floor. Make sure it is completely flat and there are no bumps or wrinkles in it.
Step 4: Plug it In Safely. Plug the cord into a GFCI outlet, which is the kind with the test and reset buttons. Make sure the cord is out of the way so nobody trips on it.
Step 5: Set the Temperature. The mat will have a small controller. Turn it on and choose a temperature. Start with a low setting and see how it feels. You can always make it warmer if you need to.
5. Add a Compact Bathroom Heater

For bathrooms that get especially cold, a small space heater can be a game-changer. It quickly warms up the air in the room, taking the edge off a chilly morning. You can turn it on a few minutes before your shower to make the entire space comfortable.
Safety is the most important factor here. Always choose a heater specifically designed for bathroom use. These models have important safety features to protect against moisture and accidents, ensuring you can warm up your space without any worries.
DIY Safety Guide: Using Your Bathroom Heater
Step 1: Check for Safety Features. When you get a heater, make sure the box says it is safe for bathrooms. A grown-up should look for features like an automatic shut-off, which turns the heater off if it gets knocked over.
Step 2: Find a Safe Place. The heater needs its own space. Place it on the floor, on a hard, flat surface like the tile. It must be at least three feet away from the bathtub, shower, sink, and toilet.
Step 3: Keep it Clear. Never put anything on top of the heater. Also, make sure towels, bath mats, curtains, and clothes are not touching it or even close to it.
Step 4: Warm Up the Room. The best way to use it is to turn it on for 10 or 15 minutes before you get in the shower. This warms up the room. An adult should always turn it off and unplug it before anyone gets into the water.
Step 5: Unplug When Done. When you are finished using it, always unplug the heater from the wall. This is the safest way to store it.
6. Swap in Warm-Glow Light Bulbs

The type of light in your bathroom can trick your brain into feeling warmer or colder. Many bathrooms use bright, white, or blue-toned light bulbs. These can feel harsh and clinical, similar to a doctor’s office.
Switching to light bulbs that cast a warm, yellowish glow can instantly make the room feel more comfortable. The softer light is less jarring and creates a cozy, relaxing atmosphere. It’s a very simple and inexpensive change that has a big impact on the feel of the room.
DIY Swap: Creating Warm Light
Step 1: Turn Off the Power. First, flip the light switch to turn the light off. To be extra safe, a grown-up can go to the house’s breaker box and turn off the power for the whole bathroom.
Step 2: Let the Old Bulb Cool Down. Light bulbs get very hot when they are on. If the light was just on, wait for about five minutes so the bulb can cool down. You don’t want to burn your fingers.
Step 3: Unscrew the Old Bulb. Once it’s cool, gently hold the glass part of the bulb and twist it to the left (counter-clockwise). Keep twisting until it comes out of the socket.
Step 4: Screw in the New Bulb. Take your new warm-glow bulb. Line it up with the socket and gently twist it to the right (clockwise). Stop when it feels snug. You don’t need to twist it super hard.
Step 5: Light It Up! Turn the power back on at the switch (or the breaker box). Flip the switch and look at your new, warm, and cozy light!
7. Use Flameless LED Candles

The soft, flickering light from candles creates an instantly relaxing and warm feeling. However, using real candles with open flames in a bathroom can be unsafe. Flameless LED candles offer the same beautiful ambiance without any of the risk.
You can group them on a shelf or around the tub to create a serene glow. Many come with remote controls or automatic timers, so you can have them turn on each evening. They are a wonderful way to add a touch of warmth and tranquility.
DIY Decor: Your Safe Candlelight Display
Step 1: Gather Your Supplies. You will need a set of flameless candles (different sizes look nice together), a tray or a flat plate, and some decorative things like smooth river stones, pretty sea glass, or even some small pinecones.
Step 2: Arrange the Candles on the Tray. Place your candles on the tray. A good trick is to put the tallest one in the back and the shorter ones in front. Putting them in a group of three or five often looks best.
Step 3: Add Your Decorations. Now, carefully place your stones or other items on the tray around the bottom of the candles. This makes your display look more finished and interesting.
Step 4: Find the Right Spot. Place your finished tray somewhere it looks nice and is away from water. A good spot could be on a shelf, on the counter by the sink, or on the back of the toilet.
Step 5: Turn Them On and Relax. Use the switch on the bottom of each candle to turn it on. If you have a remote, you can turn them all on at once. Now you have a beautiful, warm glow that is completely safe.
8. Add a Himalayan Salt Lamp

A Himalayan salt lamp provides a unique and soothing light. It casts a soft, pinkish-orange glow that is much warmer and gentler than a regular lamp. This creates a peaceful and calming environment, great for unwinding.
The natural, rustic look of the salt crystal also adds a nice decorative element to the bathroom. It brings a touch of nature indoors. The soft light is especially good for relaxing baths or for use as a nightlight.
DIY Setup: Your Calming Salt Lamp
Step 1: Unpack Your Lamp Carefully. Open the box and gently take out the salt lamp. It is made of real salt, so it can be a little heavy and delicate. It should come with a base, a small light bulb, and a cord.
Step 2: Put the Bulb In. Ask a grown-up to help you with this part. The light bulb usually clips into the base. Squeeze the clips, push the bulb holder up into the hole in the bottom of the lamp, and then let the clips go.
Step 3: Find a Dry Spot. Salt lamps can sometimes get a little wet on the outside, especially in a steamy bathroom. It’s best to put your lamp on a small dish or plate to protect your counter. Pick a spot that is far away from the shower or sink.
Step 4: Plug It In. Plug the cord into a wall outlet. Make sure the cord isn’t stretched or in a place where it could be a tripping hazard.
Step 5: Enjoy the Warm Glow. Find the switch on the cord and turn it on. Many salt lamps have a dimmer switch, so you can slide it to make the light very soft or a little brighter.
9. Upgrade to a Backlit Anti-Fog Mirror

A fogged-up mirror is a common annoyance after a warm shower. An anti-fog mirror has a gentle heating element that keeps the glass clear. When this feature is combined with backlighting, it becomes a major bathroom upgrade.
The light from behind the mirror provides a soft, even glow that is easy on the eyes. It eliminates shadows and makes the whole room feel more open and modern. This functional and beautiful piece adds a layer of quiet luxury.
DIY Upgrade: Installing a Glowing Mirror
Step 1: Turn Off the Power (A Job for a Grown-Up). This is the most important step. A grown-up must go to the main electrical panel in your house and flip the circuit breaker that sends power to the bathroom. This makes it safe to work with the wires.
Step 2: Remove the Old Mirror and Light. Your grown-up helper will carefully take down the old mirror. Then, they will unscrew the old light fixture from the wall, disconnecting the wires.
Step 3: Install the Mounting Bracket. The new mirror will come with a metal bracket. Hold it on the wall, use a level to make it straight, and mark the screw holes with a pencil. Then, screw the bracket securely into the wall.
Step 4: Connect the Wires (Grown-Ups Only). This is another job for an adult. They will match the colored wires from the mirror to the wires coming out of the wall (usually black to black, white to white) and connect them using wire nuts.
Step 5: Hang the Mirror and Power On. Carefully lift the mirror and hang it on the mounting bracket until it feels secure. Now, the grown-up can go back to the breaker panel and turn the power back on. Flip the switch and test your amazing new mirror!
10. Invest in Thick, Absorbent Towels

Thin, scratchy towels don’t do a good job of drying you off or keeping you warm. One of the easiest swaps for a cozier bathroom is a set of new, high-quality towels. Look for ones that are thick, plush, and made from 100% cotton.
A truly fluffy towel feels luxurious against the skin and is much more effective at keeping you from feeling cold after your bath. Stacking them on a shelf or rolling them in a basket also adds to the spa-like appearance of your bathroom.
DIY Display: Rolling Your Spa Towels
Step 1: Lay the Towel Flat. Find a large, flat surface like your bed or a clean floor. Spread one of your clean, fluffy towels out completely flat.
Step 2: Fold the Towel Lengthwise. Take the long bottom edge of the towel and fold it up to meet the long top edge. You now have a long, skinny rectangle.
Step 3: Make a Pointy End. Take one of the top corners of your folded rectangle and fold it down diagonally, so the top edge lines up with the side edge. This will make a triangle shape, like a paper airplane.
Step 4: Flip it Over and Roll it Up. Carefully flip the entire towel over. Starting from the straight end (the one without the point), begin to roll the towel up as tightly and neatly as you can.
Step 5: Tuck and Display. When you get to the end of the roll, you will have a little pointy flap left over. Tuck this point into the folds of the roll to keep it from unraveling. Now you have a perfectly rolled towel that looks like it came from a fancy spa!
11. Choose a Fabric Shower Curtain

A cold, sticky plastic shower curtain can make a bathroom feel cheap and chilly. Swapping it for a fabric one is a quick upgrade. Fabric curtains, like those made of cotton or linen, look and feel much warmer.
They also help trap steam from the shower, which keeps the whole room warmer. The texture adds a soft touch to a room full of hard surfaces. It’s an easy way to make your bathroom more inviting.
DIY Swap: Hanging a New Shower Curtain
Step 1: Take the Old Curtain Down. Stand on a sturdy stool if you need to. Unhook each of the old shower curtain rings from the rod and take the old curtain off.
Step 2: Check Your New Curtain. Unfold your new fabric curtain. You will see a row of holes at the top. Count them. Now count the hooks you have. You should have the same number of hooks and holes.
Step 3: Put the Hooks On. Lay your new curtain on a clean, flat surface like your bed. Open up each shower hook and push it through one of the holes at the top of the curtain.
Step 4: Hang it Up. Carefully lift the curtain. One by one, hook each of the rings over the shower rod and snap them closed.
Step 5: Add a Liner. Fabric curtains need a waterproof liner on the inside to keep water in the tub. Hang the liner on the same hooks, but make sure it’s on the side that will be inside the bathtub.
12. Try a Wooden Bath Mat

While a plush rug is soft, a wooden bath mat offers a different kind of warmth. Wood doesn’t get as icy cold as tile does. Stepping onto a slatted wood mat feels natural and clean, much like being in a sauna.
These mats, often made from bamboo or teak, are naturally water-resistant. They add an organic, spa-like element to your bathroom decor. The clean lines look modern and help keep your floor dry.
DIY Guide: Caring for Your Wooden Mat
Step 1: Find a Good Spot. Place your wooden mat right outside your shower or bathtub, just like a regular rug. Make sure it sits flat and doesn’t wobble.
Step 2: Wipe it Down. After you shower, there will be water on the mat. Use a towel to quickly wipe the surface dry. This helps the wood last a long time.
Step 3: Let it Breathe. About once a week, lean the mat up against the wall or the side of the tub. This lets air get underneath so the bottom can dry out completely.
Step 4: Clean it Well. Every month or so, it’s a good idea to clean it. Use a soft brush and some soapy water to gently scrub the top and bottom. Rinse it with clean water.
Step 5: Keep it Looking New. Ask a grown-up to help you with this. A few times a year, they can rub a special oil (like teak oil) on the mat with a cloth. This keeps the wood from drying out and maintains its nice color.
13. Add Textured Wallpaper

Bare, painted walls can sometimes feel cold and flat. Adding wallpaper with a visible texture, like grasscloth or a fabric look, brings instant warmth and depth to a bathroom. The texture absorbs light and sound in a softer way.
It makes the room feel more like a cozy living space and less like a sterile utility room. You don’t have to cover every wall. Just one accent wall can be enough to completely change the feel of the space and make it more inviting.
DIY Project: Your Peel-and-Stick Accent Wall
Step 1: Pick and Clean Your Wall. Choose a wall that doesn’t get splashed with a lot of water. The wall behind the toilet or sink is often a good choice. An adult should help you clean the wall with a sponge and a little bit of soap, then wipe it dry with a clean cloth.
Step 2: Measure and Cut. Measure the height of the wall. Then, unroll your peel-and-stick wallpaper on the floor and use the measuring tape to cut your first piece a little bit longer than the wall.
Step 3: Peel and Stick the Top. Get a grown-up to help you stand on a step stool. Peel about a foot of the paper backing off the top of your wallpaper piece. Line it up at the very top of the wall and press it on.
Step 4: Smooth it Down. Slowly pull more of the backing off with one hand while you use a flat tool (a smoother) to press the wallpaper onto the wall with your other hand. Go from the center out to the sides to push out any air bubbles.
Step 5: Trim the Edges. Once the whole piece is on, a grown-up can use a craft knife to carefully trim the extra wallpaper at the bottom and around any outlets. Repeat these steps for the next pieces, lining up the pattern.
14. Have a Plush Robe Ready

The journey from a warm shower to getting dressed can be a chilly one. Having a thick, comfortable robe ready to go makes all the difference. It’s like a wearable towel that keeps you wrapped in warmth.
Choosing a robe made from an absorbent material like terrycloth or a soft one like flannel enhances the experience. Hanging it on a hook on the back of the door keeps it handy. This simple habit turns a routine into a small moment of comfort.
DIY Task: Installing a Robe Hook
Step 1: Pick the Perfect Height. Close the bathroom door. Stand in front of it and pretend you are reaching for your robe. Have a friend or a grown-up make a small pencil mark on the door where your hand comfortably reaches.
Step 2: Mark the Screw Holes. Hold the base of your new hook up to the door so the center is on your pencil mark. Use your pencil to make a tiny dot inside each of the screw holes.
Step 3: Get a Grown-Up to Help. Ask an adult to use a drill with a very small drill bit to make starter holes on your marks. This makes it much easier to put the screws in.
Step 4: Screw it In. Place the hook back over the holes. Put a screw in one hole and use a screwdriver to tighten it until it’s snug. Do the same for the other screw.
Step 5: Hang Your Robe. Give the hook a little tug to make sure it’s strong. Now you can hang your cozy robe on it, and it will always be ready for you.
15. Use an Essential Oil Diffuser

Warmth isn’t just about what you feel, it’s also about what you smell. An essential oil diffuser fills the air with a fine, warm mist and pleasant scents. It makes the bathroom feel like a high-end spa.
Choosing warm, calming scents like sandalwood, lavender, or chamomile can make the room feel cozier. The soft gurgling sound and the visible puff of steam add to the relaxing atmosphere. It’s a multi-sensory way to create a warm environment.
DIY Guide: Your First Diffusion
Step 1: Find a Safe, Flat Spot. Place your diffuser on the bathroom counter or a shelf. Make sure it’s not right on the edge where it could fall, and keep it away from the sink or tub.
Step 2: Add Water. Most diffusers have a fill line on the inside. Take the top off and pour in some clean, cool water from a cup until it reaches that line.
Step 3: Add a Few Drops of Oil. Choose your favorite essential oil. Open the bottle and carefully let three to five drops fall into the water. You don’t need a lot!
Step 4: Put the Top On and Plug In. Put the cover back on the diffuser securely. Plug the cord into the wall.
Step 5: Press the Button. There will be a button on the front. Press it to turn the diffuser on. Some diffusers also have a button to turn on a soft light. Now you can enjoy the lovely smell and warm mist.
16. Hang Eucalyptus in the Shower

Hanging a bundle of fresh eucalyptus from your showerhead is a simple trick that transforms your shower into a steam room. The hot water and steam release the natural oils in the eucalyptus leaves.
This fills the air with a refreshing and invigorating scent that can help you feel more awake and clear your sinuses. It’s a natural air freshener that adds a beautiful green touch and a spa-like feel to your daily routine.
DIY Project: Creating Your Shower Bundle
Step 1: Get Your Eucalyptus. You can find fresh eucalyptus at a flower shop or some grocery stores. You’ll want a small bunch with lots of leaves.
Step 2: Prepare the Stems. Lay the eucalyptus on a counter. Take a heavy cup or a rolling pin and gently roll it over the leaves a few times. This helps to bruise them a little so they release more of their wonderful-smelling oil.
Step 3: Tie it Together. Gather the stems together at the bottom. Use a piece of twine or a rubber band to tie them together tightly. Wrap it around several times.
Step 4: Hang it Up. Take your bundle and tie it to your showerhead arm, behind the part where the water comes out. You want the steam to hit the leaves, but you don’t want the leaves to be directly in the water stream.
Step 5: Enjoy Your Steam Shower. Turn on the hot water and enjoy the amazing smell. The bundle will stay fresh and fragrant for a few weeks.
17. Light a Warm-Scented Candle

Certain smells can make us feel warm and cozy. Lighting a candle with a comforting scent like cedar, cinnamon, or vanilla can instantly change the mood of a cold bathroom. The soft flicker of the flame also adds a visually warm glow.
The combination of gentle light and a pleasant aroma helps you relax. It signals to your brain that it’s time to unwind. It’s a simple ritual that can make a bath or even just your morning routine feel much more special.
DIY Safety: Enjoying Your Candle
Step 1: Find a Safe Surface. Never put a candle directly on a plastic bathtub edge or a wobbly surface. Place it on a sturdy, heat-resistant holder or dish on the counter, far away from anything that could catch fire.
Step 2: Keep it Clear. Make sure your candle is at least one foot away from towels, the shower curtain, toilet paper, and any spray cans like hairspray.
Step 3: Trim the Wick. Before you light your candle, use scissors to trim the little black wick so it’s only about a quarter-inch long. This helps it burn cleanly and safely.
Step 4: Light it Carefully. A grown-up should always be the one to light and blow out the candle. Use a long match or a lighter.
Step 5: Never Leave it Alone. This is the most important rule. Never, ever leave a burning candle by itself, not even for a minute. When you are ready to leave the bathroom, a grown-up must blow it out completely.
18. Prepare a Luxurious Bath Soak

A hot bath is one of the best ways to warm up on a cold day. You can make it even better by adding special bath salts or soaks. These often contain minerals like Epsom salt, which can help soothe your muscles.
Adding things like dried lavender, rose petals, or chamomile to your bath not only looks pretty but also releases calming scents. The warm water and pleasant smells work together to create a deeply relaxing and warming experience.
DIY Recipe: Make Your Own Calming Bath Salts
Step 1: Gather Your Ingredients. You will need a clean glass jar, one cup of Epsom salts, a few drops of your favorite essential oil (lavender is very relaxing), and maybe a spoonful of dried flowers like lavender buds or chamomile.
Step 2: Pour in the Salt. Carefully pour the Epsom salts into your jar. A funnel can help make this less messy.
Step 3: Add the Scent. Add about five to ten drops of your essential oil to the salt. The more drops you add, the stronger it will smell.
Step 4: Add the Flowers (Optional). If you have dried flowers, add a spoonful of them into the jar with the salt.
Step 5: Shake it Up! Put the lid on the jar tightly. Now, shake the jar for about a minute. This mixes the oil and flowers all through the salt. Your bath soak is ready to use! Just add a few scoops to your next warm bath.
19. Install a Rainfall Shower Head

A standard shower head can feel weak, letting cold air hit your skin between the streams of water. A rainfall shower head is much larger and provides a wide, gentle cascade of water that covers your whole body at once.
This total coverage keeps you enveloped in warm water, minimizing the chance of getting chilly. The experience feels more like standing in a warm summer rain than a regular shower. It is a simple plumbing change that adds a lot of comfort.
DIY Swap: Upgrading Your Shower Head
Step 1: A Grown-Up Needs to Do This. Changing a shower head involves tools and plumbing, so this is a job for an adult.
Step 2: Remove the Old Head. First, they will wrap a soft cloth or a rag around the old shower head where it connects to the pipe. This prevents scratches. Then, using a wrench, they will turn the connection to the left (counter-clockwise) until the old head comes off.
Step 3: Clean the Threads. There might be some old white tape on the pipe threads. They should peel this off and wipe the threads with a cloth.
Step 4: Apply New Tape. Take a roll of new plumber’s tape (also called Teflon tape). Wrap it tightly around the threads on the pipe, going in a clockwise direction. Go around three or four times.
Step 5: Screw on the New Head. Take the new rainfall shower head and screw it onto the taped threads by hand, turning it to the right (clockwise). Once it’s hand-tight, the adult can use the wrench and cloth again to give it one last gentle turn to make sure it’s snug.
20. Bring in a Waterproof Speaker

Music and sound can have a big effect on how we feel. Playing calming music or nature sounds in the bathroom can help you relax, making the whole space feel warmer and more inviting. It turns a quick shower into a mini-escape.
A waterproof Bluetooth speaker is designed to be safely used in a wet environment. You can place it on a shelf or even hang it in the shower. The right soundtrack can distract you from the cold and complete the spa-like atmosphere.
DIY Setup: Your Bathroom Soundtrack
Step 1: Charge Your Speaker. Before you use it for the first time, plug your new speaker into the wall with its charging cable. Let it charge until the little light tells you it’s full.
Step 2: Turn it On and Pair It. Press the power button on the speaker. Then, go to the settings on a phone or tablet and turn on the Bluetooth. Look for the speaker’s name in the list and tap it to connect. You might hear a little beep when it pairs.
Step 3: Find Some Music. Open a music app. You can search for playlists with names like “Spa Music,” “Relaxing Sounds,” or “Peaceful Piano.” You can also play your favorite calm songs.
Step 4: Find a Safe Spot. Even though it’s waterproof, it’s best to put your speaker on a shelf or the corner of the tub where it won’t get a direct blast of water.
Step 5: Press Play and Enjoy. Start your playlist, adjust the volume, and enjoy your shower or bath with your own personal soundtrack.
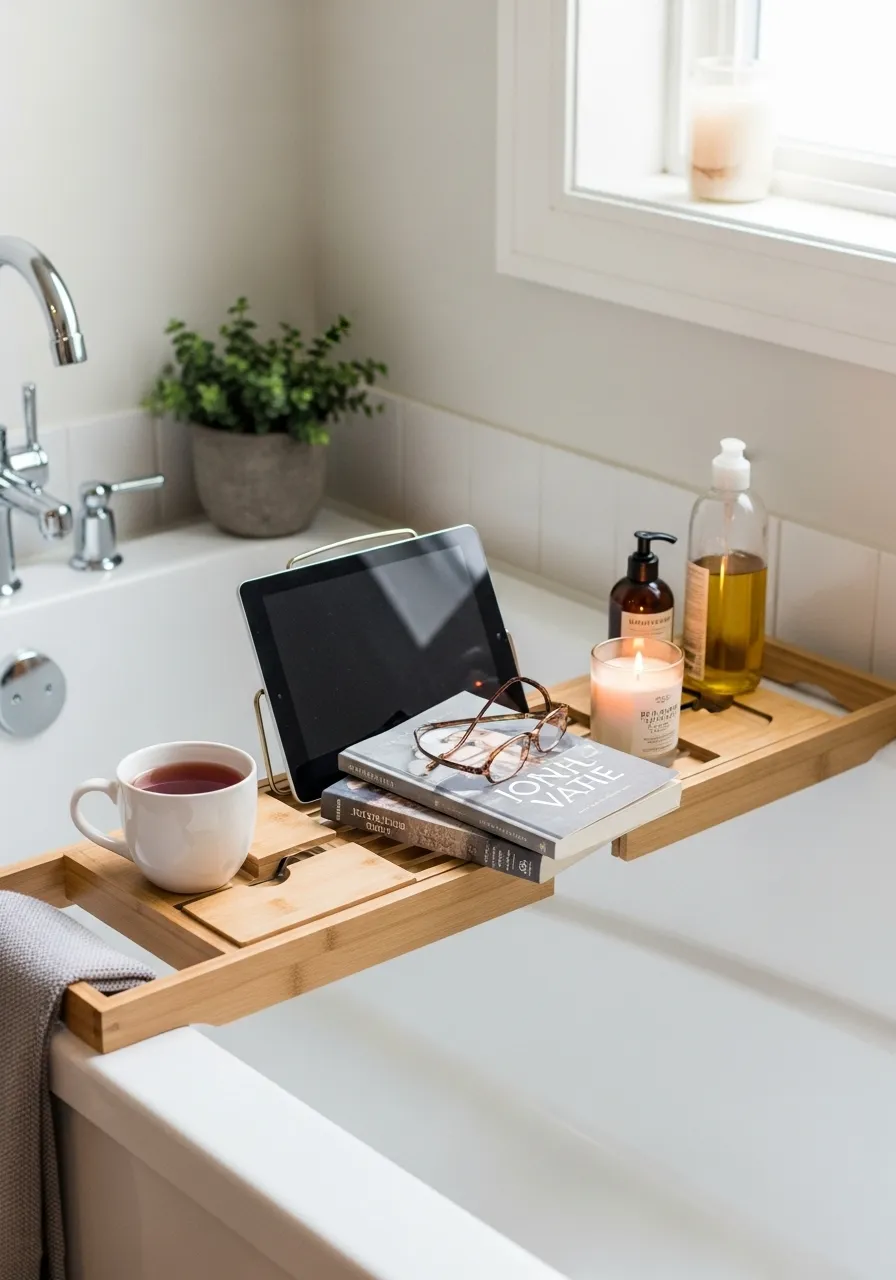
21. Use a Bath Tray for Cozy Comforts

A long, hot bath is a wonderful way to warm up. A bath tray, or caddy, makes it even better by keeping all your favorite things close by and safe from the water. You can have a warm cup of tea, a good book, or even a tablet to watch a show.
This simple wooden plank turns your tub into a command center for relaxation. It encourages you to stay in the warm water longer, soaking away the day’s chill. It’s a small piece of furniture that makes a bath feel like a truly special occasion.
DIY Guide: Setting Up Your Bathtub Caddy
Step 1: Find a Caddy that Fits. Measure the width of your bathtub from edge to edge. Choose a caddy that is adjustable or just a little bit wider than your tub so it can rest securely on the sides.
Step 2: Gather Your Relaxation Tools. Think about what makes you feel cozy. Grab a favorite book, a mug for some tea or hot cocoa, a small snack, and maybe your flameless candle.
Step 3: Arrange Everything Safely. Place the caddy across the tub. Put your book or tablet on the special stand. Place your mug in the round holder designed for it. Keep everything balanced and away from the edges where they could fall.
Step 4: Add a Towel. It’s a good idea to lay a small hand towel on one side of the caddy. This gives you a dry spot to put your hands or rest your snack.
Step 5: Relax and Enjoy. Carefully get into the tub and enjoy having all your comforts within easy reach.
22. Add Life and Warmth with Plants

A bathroom with only tile and porcelain can feel cold and lifeless. Bringing in a few houseplants is an easy way to make the space feel warmer and more welcoming. The color green is calming, and the plants add a touch of nature.
Many plants actually love the warm, steamy environment of a bathroom and will grow very well there. They help to clean the air and can make the room feel like a lush, tropical escape, even in the middle of winter.
DIY Project: Choosing Your Bathroom Plants
Step 1: See How Much Light You Have. Look at your bathroom window. If it gets a lot of bright light, you have more choices. If it’s a small window or there isn’t one, you need a plant that likes low light.
Step 2: Pick the Right Plant. For low light, a snake plant or a pothos plant are great choices because they are very tough. If you have a bright window, an orchid loves the steamy air of a bathroom.
Step 3: Find a Pretty Pot. Choose a pot that has a hole in the bottom for water to drain out. Make sure it’s big enough for your plant to be comfortable.
Step 4: Pot Your Plant. A grown-up can help you gently take the plant out of its plastic container and put it in the new pot. You may need to add a little bit of extra potting soil around the sides.
Step 5: Water it, but Not Too Much. Feel the soil. If it’s dry, it’s time to water it. Pour water in until it starts to come out of the hole in the bottom of the pot. Don’t water it again until the soil feels dry.
23. Swap Plastic for Warm Wood Accessories

Think about the items on your bathroom counter. Many of them, like toothbrush holders and soap dishes, are probably made of cold plastic or ceramic. Swapping these for accessories made of wood can make a surprisingly big difference.
Wood has a natural warmth and texture that feels much cozier. A matching set of wooden accessories can make your counter look organized and stylish. It’s a small change that brings an organic, spa-like feeling to the room.
DIY Swap: Creating a Cohesive Look
Step 1: Choose Your Wood. Bamboo is a great choice for bathrooms because it holds up well in damp places. You can also find accessories made of other woods like acacia or teak. Try to get pieces that are all a similar color.
Step 2: Get a Matching Set. Look for a set that includes a toothbrush holder, a soap dish or a soap dispenser, and maybe a small cup or a trash can.
Step 3: Clean Your Counter. Before you put out your new things, clear everything off your bathroom counter and give it a good wipe down with a cloth.
Step 4: Arrange Your New Accessories. Place your new wooden items on the clean counter. Group them together near the sink so they are easy to use.
Step 5: Care for the Wood. To keep your wooden accessories looking good, wipe them down with a dry cloth every few days to keep them from sitting in water.
24. Organize with Woven Baskets

Clutter can make a room feel chaotic and cold. Using woven baskets for storage is a great way to tidy up and add a layer of visual warmth. The natural texture of materials like seagrass or water hyacinth is much softer than plastic bins.
You can use baskets to hold rolled-up towels, extra toilet paper, or toiletries. They keep things neat and out of sight. Placing a few baskets around the room adds a cozy, rustic touch.
DIY Decor: Styling with Baskets
Step 1: Pick Baskets in Different Sizes. Get a large basket for big things like clean towels, and a few smaller baskets for things like hand towels, soaps, or extra toilet paper rolls.
Step 2: Roll Your Towels. Instead of folding your towels, roll them up tightly like you did for the towel rack. This makes them look neat and allows you to fit more into the basket.
Step 3: Fill Them Up. Place your rolled towels standing up in the large basket. Use the smaller baskets for your other supplies.
Step 4: Find Good Homes for Them. Put the large towel basket on the floor in a corner where it’s out of the way. The smaller baskets can go on a shelf, on the back of the toilet, or on the counter.
Step 5: Keep it Tidy. Try to keep the items in your baskets organized. A tidy basket looks much better than one that is overflowing with clutter.
25. Use a Decorative Towel Ladder

A standard metal towel bar can be cold and boring. A decorative ladder, especially one made of bamboo or wood, is a much warmer and more stylish way to hang your towels. It leans against the wall, adding height and interest to the room.
A ladder provides several rungs for hanging towels, allowing them to air out and dry. It’s a functional piece of decor that brings a relaxed, spa-like feel to the space. It looks much more interesting than a simple hook or bar.
DIY Setup: Your Towel Ladder
Step 1: Assemble the Ladder (If Needed). Some ladders come in a box and you have to put them together. An adult can help you follow the instructions to build it.
Step 2: Find the Right Wall. Choose a blank wall in your bathroom that has enough space. Make sure the ladder won’t be in the way of a door or a drawer.
Step 3: Lean it Securely. Place the bottom of the ladder on the floor, a little bit away from the wall. Then lean the top of the ladder against the wall. Give it a gentle wiggle to make sure it feels sturdy and won’t slip.
Step 4: Drape Your Towels. Hang your towels over the rungs. You can hang a large bath towel on one rung and a hand towel on another. Don’t put too many heavy, wet towels on it at once.
Step 5: Add a Decorative Touch. You can also hang a small basket from one of the rungs to hold a washcloth or a bar of soap.
26. Switch to Amber Glass Dispensers

Mismatched plastic bottles of soap and lotion can make a bathroom counter look cluttered and cheap. A very simple but effective swap is to pour your products into uniform amber glass dispensers.
The warm, dark color of the amber glass instantly makes the counter look more sophisticated and organized. It creates a cohesive, high-end feel, like something you would see in a nice hotel. This small detail adds a touch of warmth and elegance.
DIY Swap: Upgrading Your Soap Dispensers
Step 1: Get Your New Bottles. You can buy empty amber glass bottles with pump tops online or at many stores. Get one for hand soap and maybe another one for hand lotion.
Step 2: Get a Small Funnel. A small kitchen funnel will make the next step much easier and less messy.
Step 3: Fill Them Up. Place the funnel in the top of an empty bottle. Slowly pour your favorite liquid hand soap from its original container into the glass bottle. Fill it almost to the top, but leave a little space.
Step 4: Screw on the Pump. Wipe any drips off the rim of the bottle. Screw the pump top on tightly.
Step 5: Give it a Test. Place your new dispenser by the sink and give it a few pumps to get the soap flowing. Now you have a beautiful and functional upgrade.
27. Install a Natural Woven Window Shade

A bare window can let in a lot of cold air, making your bathroom feel drafty. A simple vinyl blind can also feel cold and clinical. A woven wood or bamboo shade is a great alternative that adds both warmth and texture.
These types of shades provide privacy while still letting a soft, warm light filter through. The natural material makes the room feel cozier and more connected to the outdoors. It’s a functional way to insulate your window and improve the room’s style.
DIY Installation: Your Woven Shade (For a Grown-Up)
Step 1: A Grown-Up Needs to Do This. Hanging a window shade requires tools and precise measurements, so an adult should handle this project.
Step 2: Measure the Window. They will use a measuring tape to measure the width of the window on the inside of the frame, at the top, middle, and bottom. They will use the smallest number to order the right size shade.
Step 3: Mark for the Brackets. They will hold the mounting brackets that came with the shade up in the top corners of the window frame and use a pencil to mark where the screws will go.
Step 4: Install the Brackets. Using a drill, they will screw the brackets into the window frame on their pencil marks.
Step 5: Snap in the Shade. Finally, they will lift the headrail (the top part of the shade) and hook it into the front of the brackets. Then they will push it up and back until it snaps into place. Now you can test it by pulling the cord to lower and raise it.
28. Update Hardware to Warm Metals

The metal finishes in a bathroom can have a big impact on whether it feels warm or cold. Many bathrooms have shiny, cool-toned chrome or silver hardware. A quick and easy update is to swap your cabinet knobs and drawer pulls for a warmer metal.
Finishes like brushed gold, brass, or oil-rubbed bronze have a much warmer feel. This small change can make your vanity look richer and more elegant. It’s like putting on jewelry for your cabinets.
DIY Project: Swapping Cabinet Knobs
Step 1: Get Your Screwdriver. You will probably need a Phillips head screwdriver, the one with the tip that looks like a plus sign.
Step 2: Unscrew the Old Knob. Open the cabinet door or drawer. On the inside, you will see the head of a screw. Hold the knob on the outside with one hand, and use your screwdriver to turn the screw to the left (counter-clockwise) until it comes out.
Step 3: Check the New Hardware. Your new knob or pull should have come with its own screw. Make sure it’s the right length to go through the door or drawer.
Step 4: Screw on the New Knob. Push the new screw through the hole from the inside of the door. With your other hand, hold the new knob over the screw on the outside and turn it to the right (clockwise) until it’s tight.
Step 5: Admire Your Work. Close the door or drawer and see how much better it looks with the new, warm hardware.
29. Hang Warm-Toned Artwork

Bare walls can make a room feel empty and cold. Adding a piece of art is one of the best ways to bring personality and warmth into your bathroom. The key is to choose art that has warm colors or depicts a cozy scene.
Look for pictures with colors like deep reds, oranges, yellows, and warm browns. A picture of a sunny landscape or an abstract piece with warm tones can make the whole room feel more inviting. It turns a plain wall into a point of interest.
DIY Decor: Hanging Your Art
Step 1: Pick Your Art and Frame. Choose a picture or a print that you really like. Put it in a frame. A frame made of warm wood or a gold-colored metal will add to the cozy feeling.
Step 2: Find the Best Spot. Hold the framed art up against the wall to see where it looks best. A good rule is to hang it so the center of the picture is at about eye level.
Step 3: Make a Mark. Once you find the right spot, hold the picture there and use a pencil to make a very light mark on the wall right in the middle of the top of the frame.
Step 4: Ask a Grown-Up for Help. A grown-up can take a picture hanger and a hammer. They will place the nail of the hanger a little bit below your pencil mark and gently tap it into the wall.
Step 5: Hang it Up. Carefully hang the wire or hook on the back of your frame onto the hook on the wall. Use a level to make sure it’s straight.
30. Upgrade Your Toilet Paper Holder

Even something as simple as a toilet paper holder can add or subtract from the warmth of a room. A basic, spring-loaded plastic holder can feel cheap. A much nicer option is a freestanding holder in a warm metal finish.
These holders are sturdy and often have space to store a few extra rolls, which is very convenient. To add even more warmth, you can store your main supply of extra rolls in a small woven basket on the floor nearby.
DIY Upgrade: Your Toilet Paper Station
Step 1: Assemble Your New Holder. Most freestanding holders come in a few pieces. A grown-up can help you follow the simple instructions to screw the base, the pole, and the top part together.
Step 2: Place it Perfectly. Put the assembled holder on the floor next to your toilet. Make sure it’s in a spot that is easy to reach but not in the way.
Step 3: Load it Up. Slide a new roll of toilet paper onto the dispenser arm. Stack a few extra rolls on the storage part of the stand if it has one.
Step 4: Use a Basket for Extras. Take a small woven basket and fill it with the rest of your extra toilet paper rolls. You can stack them on top of each other.
Step 5: Complete the Station. Place the basket on the floor next to the stand or on the back of the toilet if there is room. Now even this functional corner looks warm and organized.
31. Apply a Privacy Film to Your Window

A clear glass window can feel like a black hole at night, making a bathroom seem colder and less private. Applying a frosted or decorative privacy film is an easy fix. This thin sheet sticks to the glass, obscuring the view without blocking the light.
The film adds a layer of insulation, helping to stop cold from seeping through the glass. During the day, it scatters sunlight beautifully, creating a soft, warm glow in the room. It’s a simple solution for more privacy and a cozier feel.
DIY Project: Installing Window Film
Step 1: Clean the Window. This is the most important step. Clean the window glass thoroughly with glass cleaner and a lint-free cloth. Then, spray it with a mix of water and a tiny drop of soap.
Step 2: Measure and Cut the Film. Measure your window pane carefully. Unroll the window film on a flat surface and use a ruler and a craft knife to cut it about one inch bigger on all sides than your measurement.
Step 3: Peel and Spray. The film has a clear backing. Carefully peel this backing off. As you peel, spray the sticky side of the film with plenty of the same soapy water. Also spray the window glass again.
Step 4: Place the Film. Carefully pick up the wet, sticky film and place it on the wet window. The water will let you slide it around to get it into the right position.
Step 5: Squeegee and Trim. Once it’s in place, use a squeegee tool to smooth the film down, pushing the water and air bubbles out to the edges. A grown-up can then use a craft knife to carefully trim the extra film from the edges.
32. Incorporate a Dry Brushing Routine

Sometimes, feeling warm is about what you do, not just what’s around you. Dry brushing is a spa practice that can make you feel warm from the inside out. Before you get in the shower, you use a special brush with stiff bristles to gently brush your dry skin.
This action helps to get your blood circulation going, which can create a warm, tingling sensation. It also exfoliates your skin, making it feel smooth. It’s a quick, invigorating ritual that wakes up your body and helps you feel warmer before you even turn on the water.
DIY Guide: Your First Dry Brush
Step 1: Get the Right Brush. You need a special brush made for dry brushing. Look for one with natural bristles, not plastic. Many have a long handle so you can reach your back.
Step 2: Start at Your Feet. Before you shower, while your skin is still dry, start brushing. Begin at your feet and use long, smooth strokes. Always brush upwards, towards your heart.
Step 3: Work Your Way Up. Brush your legs, then your arms (starting at your hands and moving up). Use a gentle pressure. Your skin might turn a little pink, but it should not hurt.
Step 4: Brush Your Body. Brush your back and your tummy. On your stomach, it can feel nice to brush in a circular, clockwise motion.
Step 5: Hop in the Shower. After a few minutes of brushing, take your shower as you normally would. After your shower, pat your skin dry and put on some lotion.
33. Keep Your Tea Warm with a Mug Warmer

There’s nothing cozier than a hot drink on a cold day. If you enjoy a long soak in the tub, a mug warmer can be a wonderful accessory. It’s a small electric hot plate that you place on your bath caddy to keep your cup of tea or cocoa steaming hot.
You no longer have to rush through your bath before your drink gets cold. This little device allows you to truly slow down and savor the moment. It’s a small touch of technology that supports ultimate relaxation and warmth.
DIY Setup: Your Hot Drink Station
Step 1: Find a Stable Spot. Place your mug warmer on a flat, stable surface, like your bath caddy or a small stool next to the tub. Make sure it’s away from the edge where it could get knocked into the water.
Step 2: Plug It In Safely. The cord should be plugged into an outlet that is far away from the tub. Make sure the cord is not draped where it could be a hazard.
Step 3: Use the Right Mug. A flat-bottomed ceramic mug works best with a mug warmer. A cup with a curved bottom won’t get as much heat.
Step 4: Turn It On. Press the power button. Some warmers have different temperature settings you can choose from.
Step 5: Enjoy Your Warm Drink. Make your favorite hot beverage and place the mug in the center of the warmer. Now you can relax in the tub for as long as you like, and your drink will be waiting for you, wonderfully warm.
34. Add a Soft Seat with an Upholstered Stool

When you’re getting ready in the bathroom, you often end up sitting on a cold, hard toilet lid or a chilly tile floor. Adding a small, upholstered stool or ottoman provides a much warmer and more comfortable place to sit.
The fabric on the stool adds a soft texture to the room, making it feel more like a cozy dressing room. You can use it to sit on while you dry your hair or put on lotion. It’s a functional piece of furniture that brings both comfort and a touch of elegance.
DIY Decor: Choosing Your Bathroom Seat
Step 1: Measure Your Space. Decide where you want to put the stool. Use a measuring tape to see how much space you have so you can choose a stool that fits without being in the way.
Step 2: Pick a Good Fabric. Look for a stool covered in a durable fabric. Materials used for outdoor furniture can be a good choice because they resist moisture. You can also choose fabrics like velvet or tweed for a very cozy look.
Step 3: Consider Storage. Some ottomans have a lid that lifts off so you can store things inside. This is a great place to keep extra towels or toiletries.
Step 4: Find the Right Spot. Place your new stool in a corner, next to the vanity, or in front of a mirror. Make sure it’s not in a place where it will get wet.
Step 5: Use it! Enjoy having a comfortable, warm spot to sit. You can also use it as a place to set out your clothes for the next day.
35. Create a Spa Water Station

Staying hydrated is part of feeling good, but drinking icy cold water can make you feel chilly. Setting up a “spa water” station on your counter encourages you to drink room-temperature water that is much more pleasant.
A beautiful glass beverage dispenser filled with water and slices of fruit or herbs looks very inviting. Adding things like orange slices, cucumber, and mint makes the water taste refreshing and special. It’s a simple touch that elevates your bathroom into a wellness retreat.
DIY Recipe: Your Own Spa Water
Step 1: Get a Pretty Dispenser. Find a glass beverage dispenser with a spigot. Make sure it’s clean.
Step 2: Choose Your Flavors. You can use lots of different things to flavor your water. Good combinations are cucumber and mint, or orange and cinnamon sticks.
Step 3: Wash and Slice Your Ingredients. Wash your fruits and herbs very well. A grown-up can help you carefully slice them.
Step 4: Fill the Dispenser. Place your sliced ingredients in the bottom of the dispenser. Then, fill it up with clean, cool water.
Step 5: Let it Infuse. Let the water sit for at least an hour so the flavors can mix into the water. You can set it up in the morning and enjoy it all day. Place a small glass next to it and enjoy your fancy spa water whenever you like.
36. Install a Dimmer Switch

The right lighting can completely change the feel of a room from cold and harsh to warm and intimate. While warm-toned bulbs help, a dimmer switch gives you total control. It allows you to lower the intensity of the light to create a soft, relaxing glow.
Lowering the lights is great for a calming bath, helping your mind and body to unwind before bed. A bright light can be jarring, while a soft light is soothing. It is a simple electrical upgrade that makes a big difference in the room’s ambiance.
DIY Swap: Installing a Dimmer (For a Grown-Up)
Step 1: This is a Job for a Grown-Up. Working with electricity is serious. An adult must be the one to do this. First, they will go to the home’s main electrical panel and turn off the power to the bathroom.
Step 2: Remove the Old Switch Plate. They will use a screwdriver to remove the two small screws holding the switch plate on the wall.
Step 3: Unscrew and Pull Out the Switch. Next, they will unscrew the two screws holding the light switch itself in the electrical box. Then they can gently pull the switch out from the wall.
Step 4: Disconnect and Reconnect Wires. They will carefully disconnect the wires from the old switch and connect them to the new dimmer switch, following the instructions that came with it.
Step 5: Put it Back Together. They will carefully push the new dimmer switch back into the box, screw it in, and then put on the new switch plate. After turning the power back on, you can test it by sliding or turning the dimmer to see the light change.
37. Use a Scented Reed Diffuser

Sometimes, you want a continuous, gentle scent without lighting a candle or plugging something in. A reed diffuser is a wonderful way to add a constant, subtle fragrance to your bathroom, making it feel warmer and more pleasant.
The reeds soak up scented oil from a bottle and release the fragrance into the air. Choosing warm scents like sandalwood, vanilla, or amber can make the room feel cozy all the time. It’s a low-maintenance way to keep your bathroom smelling like a spa.
DIY Setup: Your Reed Diffuser
Step 1: Unpack Your Diffuser. Your diffuser kit should come with a bottle of scented oil and a bundle of wooden sticks, called reeds.
Step 2: Open the Bottle. Carefully unscrew the cap from the bottle of oil. Sometimes there is a small plastic plug in the top that you will need to pull out.
Step 3: Put the Reeds In. Place the reeds into the bottle so they are standing up like flowers in a vase. Spread them out a little bit.
Step 4: Let Them Soak. The reeds will start to soak up the oil. This can take a few hours.
Step 5: Flip the Reeds. After about an hour, carefully take the reeds out, flip them over so the dry ends are now in the oil, and put them back in the bottle. This helps the scent get started. You can do this once a week to make the smell stronger.
38. Indulge in a Heated Bath Mat

A hot bath is already a great way to warm up, but a heated bath mat takes that comfort to a whole new level. This is a special waterproof mat that you place inside the tub itself. It has a gentle heating element that warms the water around you.
The mat often provides targeted heat to your back, helping to relax sore muscles. It keeps the bath water from cooling down too quickly, so you can enjoy a long, comfortable soak. It is the ultimate upgrade for a luxurious and therapeutic bathing experience.
DIY Use: Your In-Tub Heater
Step 1: Read the Instructions. This is an electric item for the tub, so it’s very important that a grown-up reads all the safety instructions first.
Step 2: Place it in the Tub. Before you add water, place the mat in the empty bathtub. Most mats have suction cups on the bottom. Press down firmly to make sure it is stuck to the bottom of the tub and won’t float around.
Step 3: Position the Controller. The mat will have a cord that leads to a controller. Drape this over the side of the tub so the controller is on the outside, far away from the water.
Step 4: Plug it In. A grown-up should plug the cord into a GFCI outlet, which is the extra safe kind with the test and reset buttons.
Step 5: Fill the Tub and Enjoy. Fill the tub with water. Turn on the mat using the controller. You can usually choose the heat level and sometimes even a gentle bubbling massage. Now you can get in and enjoy an extra-warm bath.
A cold bathroom is a common problem, but it is one with many simple solutions. You do not have to endure chilly floors and drafty air all winter. By making small, intentional changes, you can build layers of warmth and comfort into the space.
From the towels you use to the light you see, every detail matters. Each swap brings you one step closer to transforming a purely functional room into a personal sanctuary. Your bathroom can become a cozy retreat where you begin and end your day feeling relaxed and cared for.
Key Takeaways
- Layer Your Warmth: Combat cold surfaces by using heated elements like towel racks, bidet seats, and floor mats. Plush rugs and wooden accessories also feel much warmer than cold tile and plastic.
- Engage All Senses: Warmth is more than just temperature. Use warm-toned lighting, scented candles, and essential oil diffusers to create a cozy atmosphere. Calming music can also enhance the spa-like feel.
- Incorporate Soft Textures: Swap out cold, hard materials for softer alternatives. A fabric shower curtain, thick cotton towels, a plush robe, and an upholstered stool can instantly make the room feel more comfortable and inviting.
- Focus on Small Details: Simple upgrades like changing cabinet hardware to a warm metal, using amber glass dispensers, and adding houseplants can have a big impact on the overall feel of the room without a large investment.