Living in a tiny home often feels restrictive when you want to celebrate. You might look at your bare walls and feel a sense of boredom. Small spaces do not have to stay dull during the season of love.

Valentine day arrives as the best time to refresh your surroundings. This holiday gives you a reason to add warmth and color to every corner. Your apartment can become a romantic sanctuary without losing any functional floor area.
We gathered thirty five creative ways to brighten your home. These projects focus on vertical space and smart accents for tiny living. You can enjoy a festive atmosphere that looks professional and feels cozy.
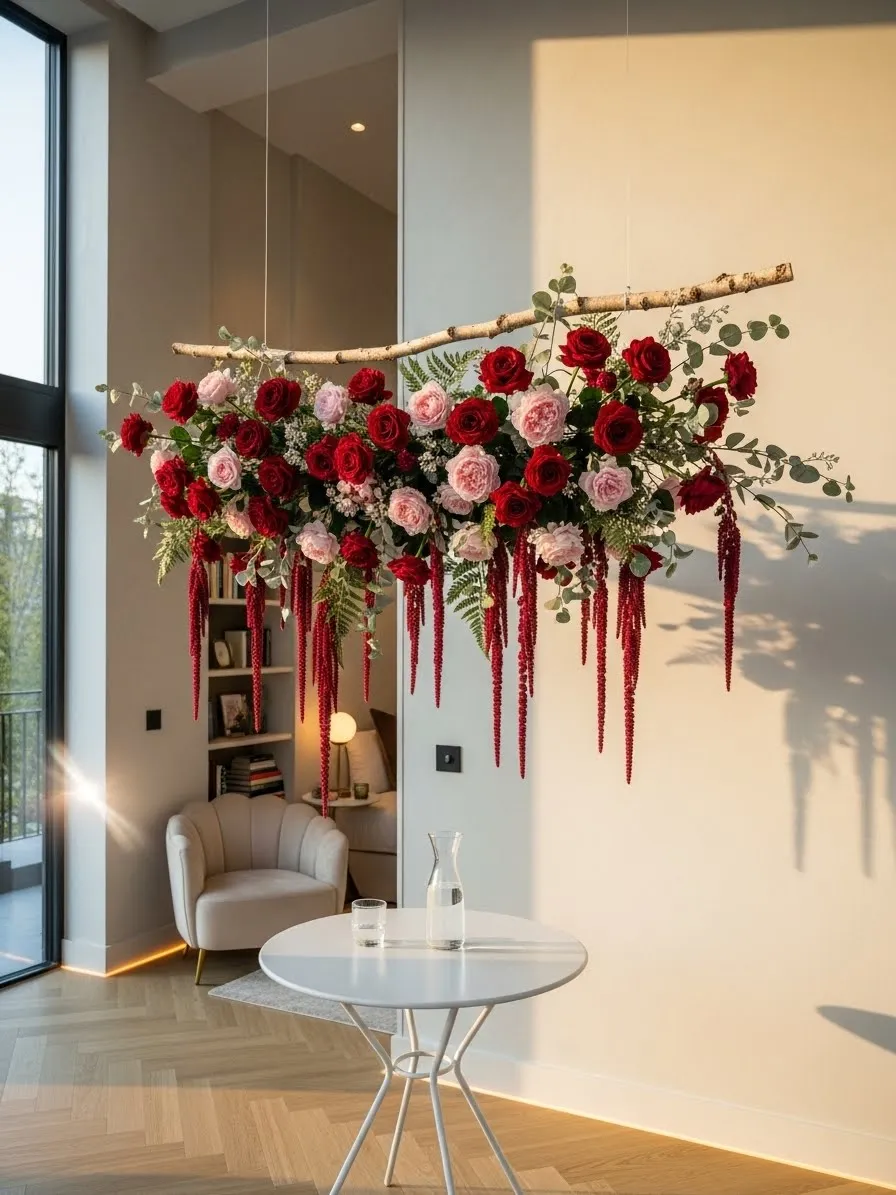
1 Floating Rose Branch

Transform your tiny living area with a stunning hanging garden that stays off the floor. This beautiful birch branch holds a lush arrangement of red and pink roses. Greenery and trailing flowers add texture and life to your small room. You will love how the light hits the vibrant petals during a sunset.
Small apartments often lack floor space for bulky decorations. Hanging this piece from the ceiling draws the eye upward and creates a sense of height. It brings a romantic atmosphere to your home without cluttering your walking paths. Guests will feel amazed by this unique focal point.
Material Required List
- One natural birch branch
- Fresh or faux red roses
- Fresh or faux pink roses
- Eucalyptus stems
- Fern leaves
- Red amaranthus stems
- Clear fishing line
- Green floral wire
Equipment Required List
- Two heavy duty ceiling hooks
- Sharp scissors
- Wire cutters
- Measuring tape
- Step ladder
DIY Instruction Step by Step
- Select a sturdy birch branch that is about three or four feet long.
- Clean the wood with a damp cloth to remove any loose dirt or bark.
- Measure the width of your branch using the measuring tape.
- Mark two spots on your ceiling that match the width of the branch ends.
- Screw the heavy duty hooks into the ceiling at those marked spots.
- Cut two long pieces of clear fishing line to your desired hanging length.
- Tie one end of the fishing line securely to the left side of the branch.
- Attach the other piece of fishing line to the right side of the branch.
- Climb the ladder and loop the fishing line over the ceiling hooks.
- Check that the branch hangs level and adjust the line length if needed.
- Wrap the green floral wire around the eucalyptus and fern stems.
- Secure these green leaves to the branch to create a base layer.
- Use more floral wire to attach the red and pink roses into the greenery.
- Cluster the flowers in the center and spread them toward the ends.
- Hang the red amaranthus from the bottom of the branch so it drapes down.
- Step back to ensure the floral weight is balanced across the wood.
2 Romantic Mirror Messages

Brighten your morning routine with sweet notes written directly on your glass surfaces. This mirror features handwritten poems and hand drawn hearts in a soft pink shade. It turns a functional object into a sentimental piece of art.
Small homes benefit from decor that does not take up extra physical room. Using a mirror allows the light to bounce around while sharing your feelings. You can easily wipe the surface clean when the holiday ends.
Material Required List
- One pink liquid chalk marker
- One white liquid chalk marker
- Glass cleaner
- Microfiber cloth
Equipment Required List
- Stepping stool
- Level tool
DIY Instruction Step by Step
- Clean the entire mirror surface using glass cleaner and a microfiber cloth.
- Ensure the glass is completely dry before you start writing.
- Plan your text on a piece of paper first to check the spacing.
- Shake the pink liquid chalk marker well to prime the ink.
- Write your favorite love quotes or messages in the center of the mirror.
- Switch to the white marker to draw small hearts and arrows around the edges.
- Use the level tool to keep your lines of text straight if needed.
- Allow the ink to dry for ten minutes so it does not smudge.
3 Love Letter Entrance

Welcome guests with a heart made of tiny envelopes on your front door. Each paper pocket holds a sprig of dried lavender or a small note. This design uses flat materials so it fits behind a screen door easily.
Crafting this shape creates a bold statement in a narrow hallway. Kraft paper and white envelopes provide a rustic look. Red heart stickers add a pop of color that catches the eye.
Material Required List
- Twenty small kraft envelopes
- Twenty small white envelopes
- Forty red heart stickers
- Dried lavender sprigs
- Removable adhesive putty
Equipment Required List
- Ruler
- Pencil
DIY Instruction Step by Step
- Wipe your door clean to ensure the adhesive sticks well.
- Use a pencil and ruler to lightly mark a large heart shape on the door.
- Stuff each envelope with a small sprig of dried lavender.
- Seal the center of each envelope flap with a red heart sticker.
- Apply a small piece of adhesive putty to the back of a kraft envelope.
- Press the envelope onto the bottom point of your heart outline.
- Alternate between white and kraft envelopes as you move up the sides.
- Layer the envelopes slightly to create a full and textured appearance.
- Fill in the center of the heart until no door surface shows through.
- Erase any visible pencil marks carefully after you finish.
4 Floating Heart Window
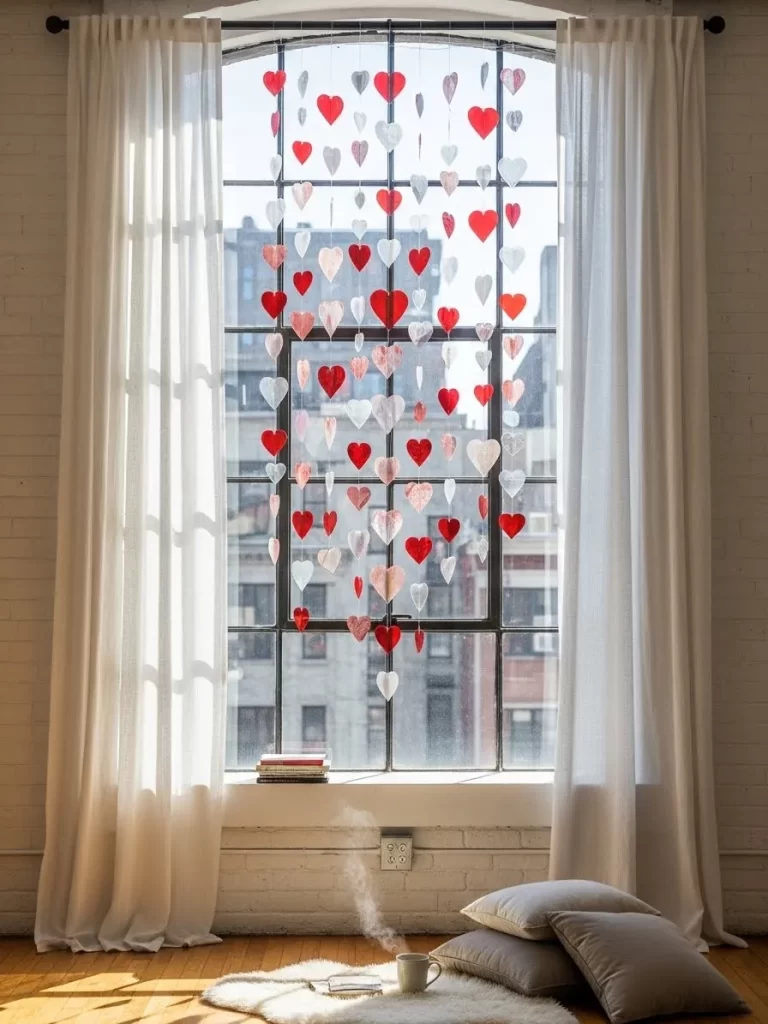
Capture the natural light with a delicate display of hanging hearts in your window. Transparent and solid red shapes dance together on thin strings. This setup creates a dreamy glow inside your tiny apartment during the day.
Window treatments like this provide a festive look without blocking your view. The hearts sway gently when a breeze enters the room. It makes your living space feel airy and full of love.
Material Required List
- Red cardstock
- Translucent red vellum paper
- Pink cardstock
- White thread
- Clear tape
Equipment Required List
- Heart shaped hole punch
- Scissors
- Needle
DIY Instruction Step by Step
- Punch out fifty hearts using the cardstock and vellum paper.
- Group the hearts by color and material on a flat table.
- Cut ten pieces of white thread to match the height of your window.
- Thread a needle with the first piece of string.
- Pierce the top and bottom of a heart to slide it onto the thread.
- Space the hearts three inches apart along the entire string.
- Repeat this process for all ten strings of thread.
- Secure the top of each string to the window frame using clear tape.
- Distribute the strings evenly across the width of the glass.
5 Velvet Bow Cabinets
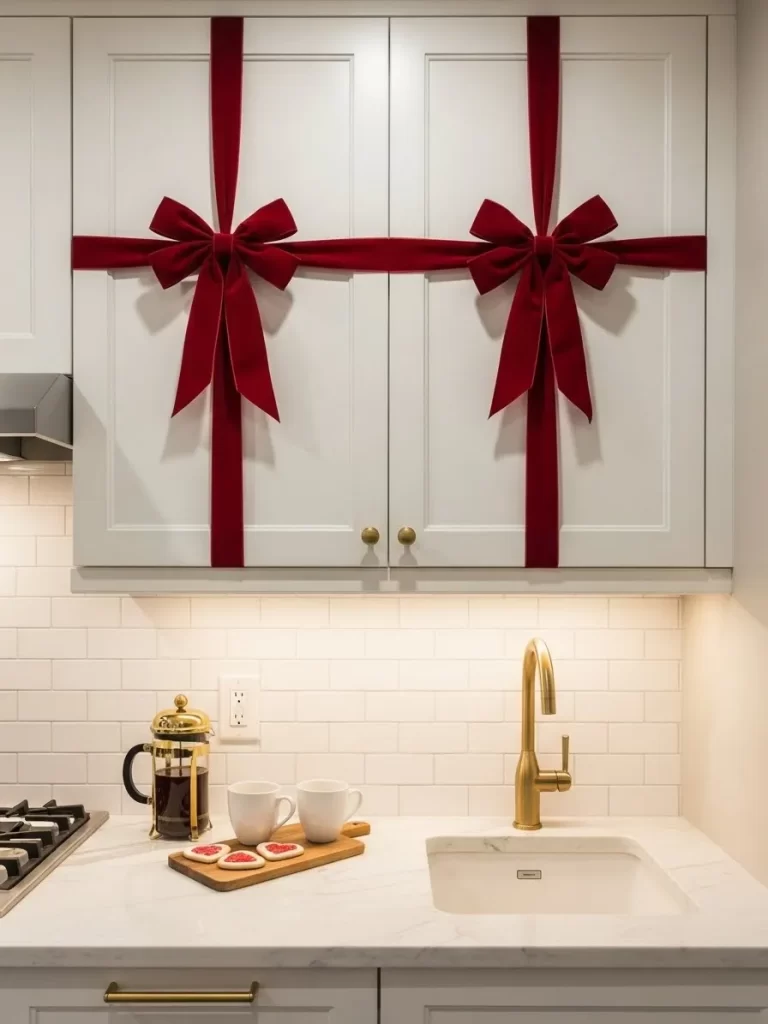
Dress up your kitchen with oversized velvet ribbons tied around your cabinet doors. Deep red fabric adds a touch of luxury to white or wooden cupboards. This simple change makes your cooking area feel warm and ready for a date night.
Tiny kitchens often feel cluttered with too many small items. Large bows provide a clean and organized look that feels intentional. You can still open the doors easily to reach your mugs and plates.
Material Required List
- Ten yards of wide red velvet ribbon
- Double sided fabric tape
- Safety pins
Equipment Required List
- Fabric scissors
- Measuring tape
DIY Instruction Step by Step
- Measure the vertical height of your cabinet door.
- Cut a piece of ribbon that is double the height plus six inches.
- Wrap the ribbon vertically around the door from top to bottom.
- Secure the ends on the inside of the door with double sided tape.
- Cut a second piece of ribbon for the horizontal wrap.
- Tape this piece around the middle of the door so it crosses the first ribbon.
- Tie a large and fluffy bow using a separate piece of ribbon.
- Use a safety pin to attach the bow where the ribbons intersect.
- Trim the ends of the bow at an angle for a professional look.
6 Nostalgic Display Ladder
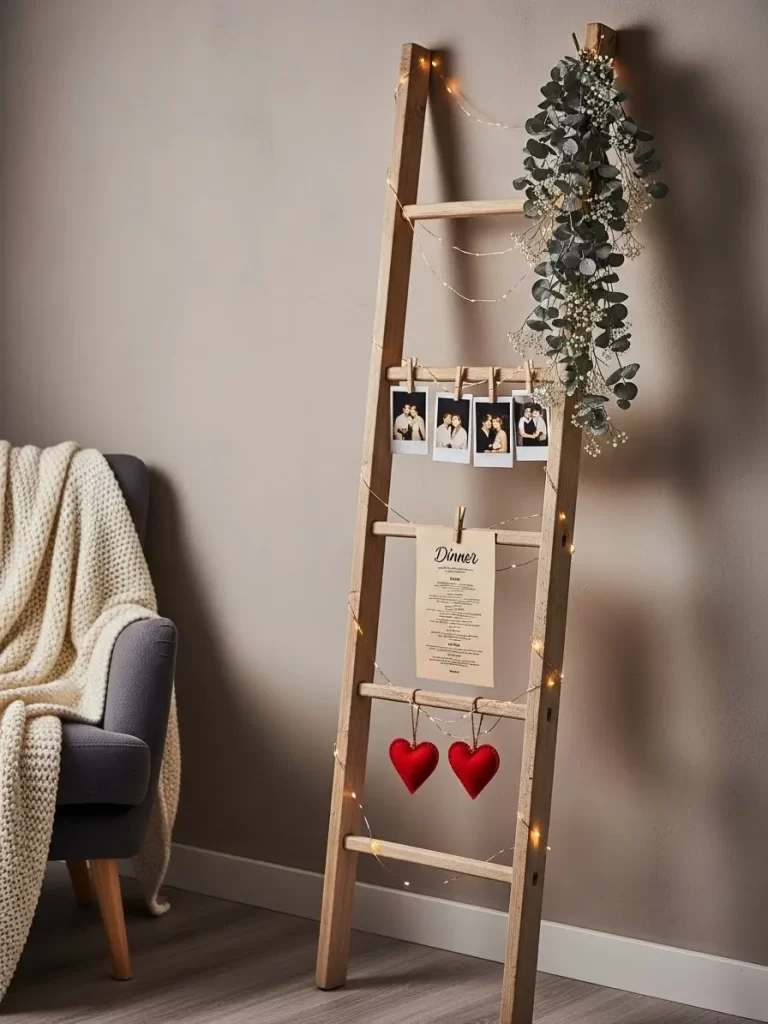
Lean a wooden ladder against your wall to showcase your favorite memories. Twinkling fairy lights wrap around the rungs to illuminate printed photos. It provides a cozy corner for reflection in a small studio.
Adding greenery and felt hearts gives the ladder a soft and organic feel. This vertical storage solution keeps your surfaces clear of frames. You can swap the photos out for different seasons later in the year.
Material Required List
- String of battery operated fairy lights
- Ten printed polaroid photos
- Two red felt hearts
- Eucalyptus garland
- Wooden clothespins
Equipment Required List
- Wooden blanket ladder
- Clear zip ties
DIY Instruction Step by Step
- Position the wooden ladder securely against a flat wall.
- Wrap the fairy lights around the side rails from top to bottom.
- Secure the battery pack to the back of a rung using a zip tie.
- Drape the eucalyptus garland over the top right corner.
- Use small clothespins to clip your photos to the light wire.
- Space the pictures out so they do not overlap each other.
- Hang the red felt hearts from the bottom rung using twine.
- Turn on the lights to check the glow and adjust the photo placement.
7 Heart Mural Wall
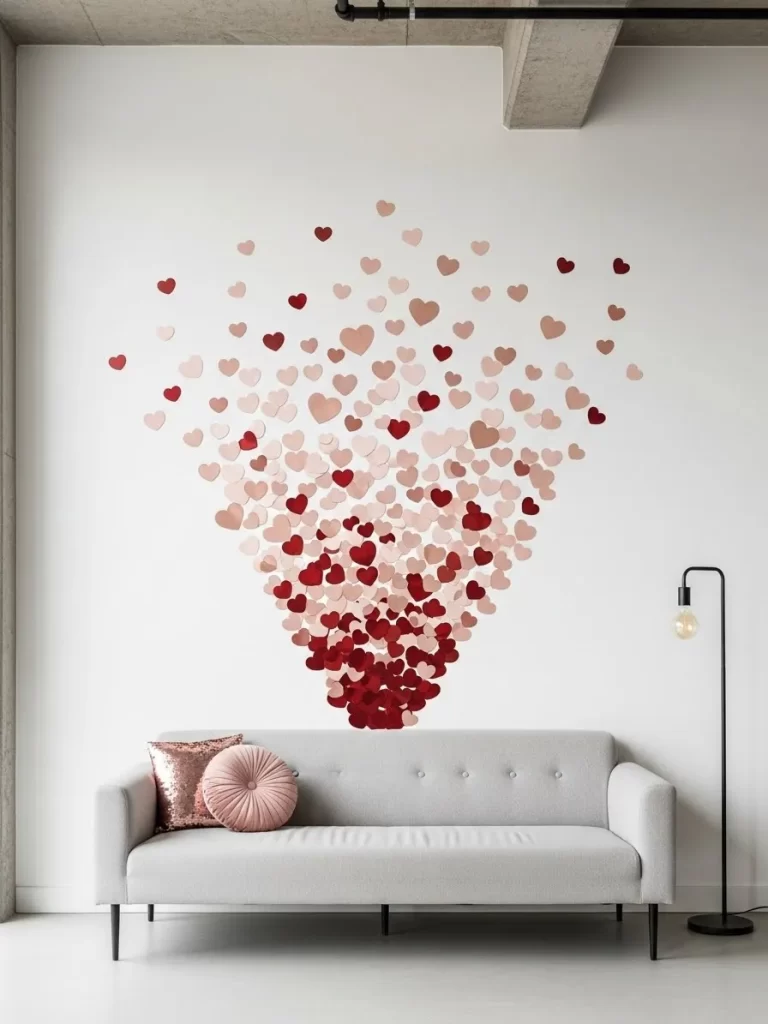
Create a stunning explosion of color above your sofa with paper hearts. The gradient moves from deep red at the bottom to light pink at the top. This artwork covers a large area without the weight of a heavy frame.
Wall decals like these are great for renters who cannot use nails. The scattering effect makes the room feel larger and more energetic. It acts as a beautiful backdrop for your holiday photos.
Material Required List
- Paper hearts in red and pink and peach
- Removable glue dots
Equipment Required List
- Level
- Step ladder
DIY Instruction Step by Step
- Clean the wall surface with a dry cloth to remove dust.
- Start at the bottom center of the area above your couch.
- Apply a glue dot to the back of a dark red heart.
- Press a cluster of red hearts tightly together at the base.
- Move upward and start spacing the hearts further apart.
- Use medium pink hearts as you reach the middle of the design.
- Finish with the lightest peach hearts at the very top.
- Angle the hearts in different directions to suggest movement.
- Step back frequently to ensure the overall shape looks balanced.
8 Valentine Bar Cart
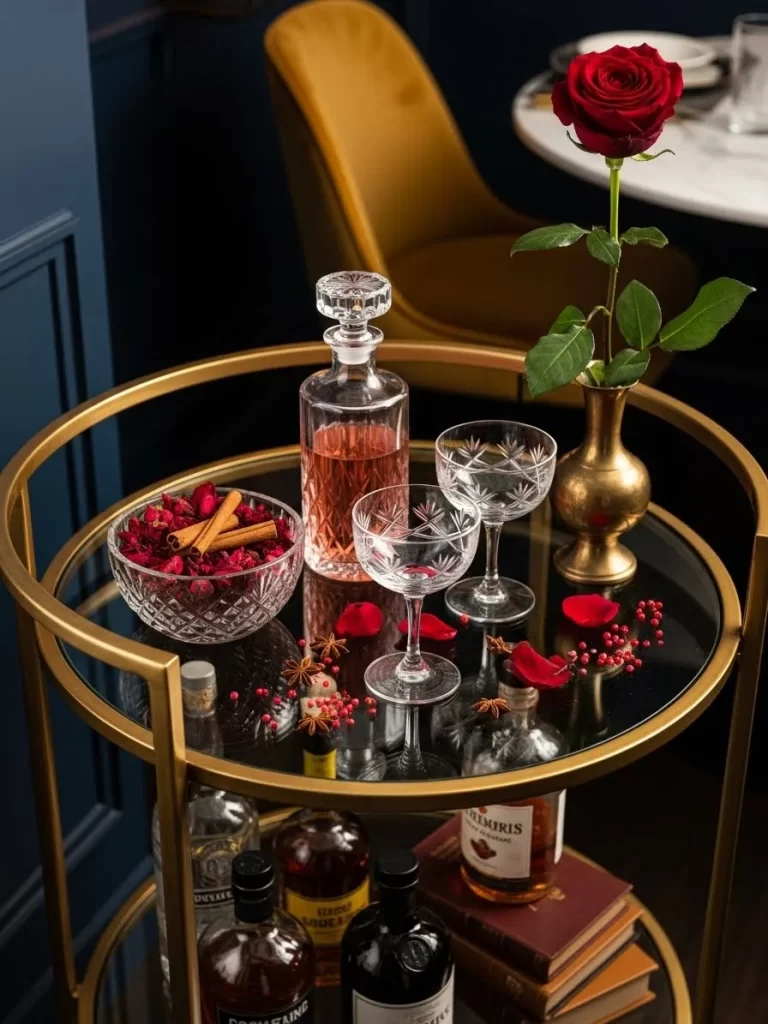
Style a gold cart with sparkling glassware and deep red roses. A single flower in a brass vase creates a sophisticated look for a tiny corner. Dried petals and star anise scattered on the glass add a spicy scent to the air.
Small carts provide a dedicated spot for serving drinks during a celebration. Using glass bottles and clear cups keeps the furniture looking light. It encourages you to slow down and enjoy a toast with your partner.
Material Required List
- Fresh red rose
- Bottle of rose wine
- Dried rose petals
- Whole star anise
- Pink peppercorns
Equipment Required List
- Gold bar cart
- Brass bud vase
- Crystal decanter
- Coupe glasses
DIY Instruction Step by Step
- Polish the glass shelves of your bar cart until they shine.
- Place your crystal decanter in the center of the top shelf.
- Fill the brass vase with water and insert the fresh red rose.
- Position two coupe glasses next to the decanter.
- Scatter dried rose petals across the glass surface.
- Add star anise and pink peppercorns for visual texture and aroma.
- Arrange your favorite spirit bottles on the bottom shelf.
- Keep a small bowl of garnish nearby for easy serving.
9 Paper Glow Lanterns
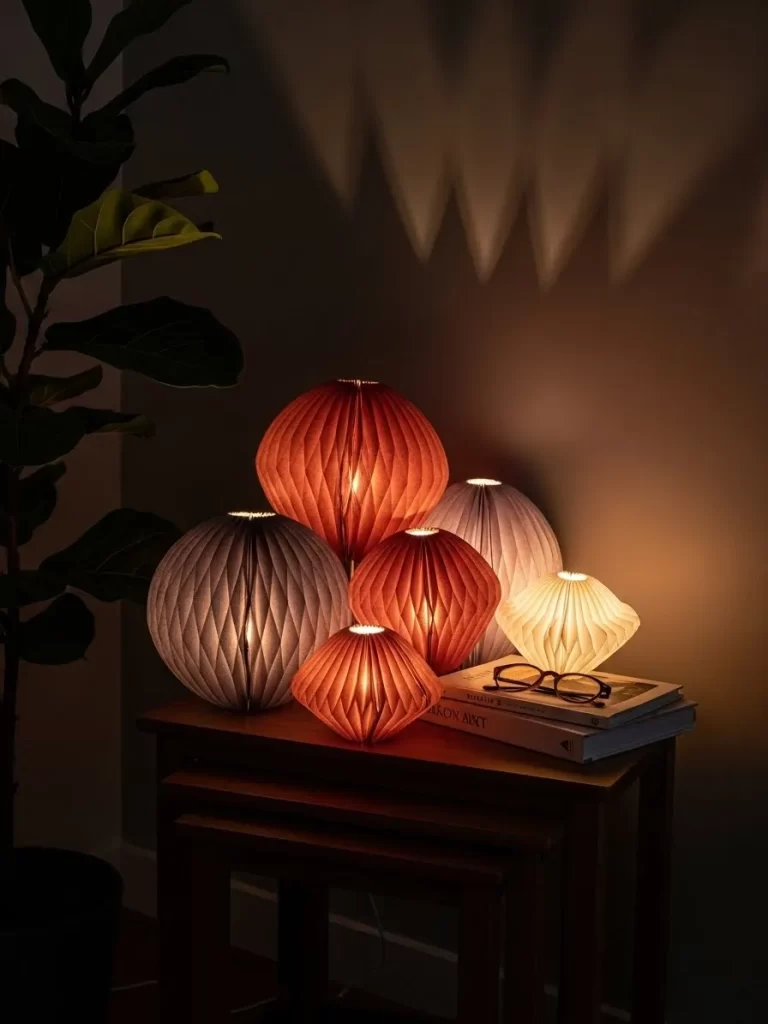
Set a romantic mood with a cluster of pleated paper lamps. These spherical lights cast soft shadows across your walls and ceiling. Various sizes and shades of orange and cream create a warm bonfire effect indoors.
Tiny tables benefit from lighting that doubles as a sculpture. These lamps are lightweight and easy to move around your apartment. They provide a calm environment for reading or relaxing together.
Material Required List
- Three pleated paper globe lanterns
- Three small LED puck lights
- Stacking side tables
Equipment Required List
- Double sided tape
DIY Instruction Step by Step
- Assemble your pleated paper lanterns according to the package.
- Place the puck lights on the top stacking table.
- Set one lantern directly over each puck light.
- Use a small piece of double sided tape to keep the lanterns centered.
- Arrange the lanterns in a cluster with the tallest in the back.
- Place a pair of glasses and a book nearby to complete the scene.
- Turn on the puck lights using their remote or the base switch.
10 Heart Macrame Art
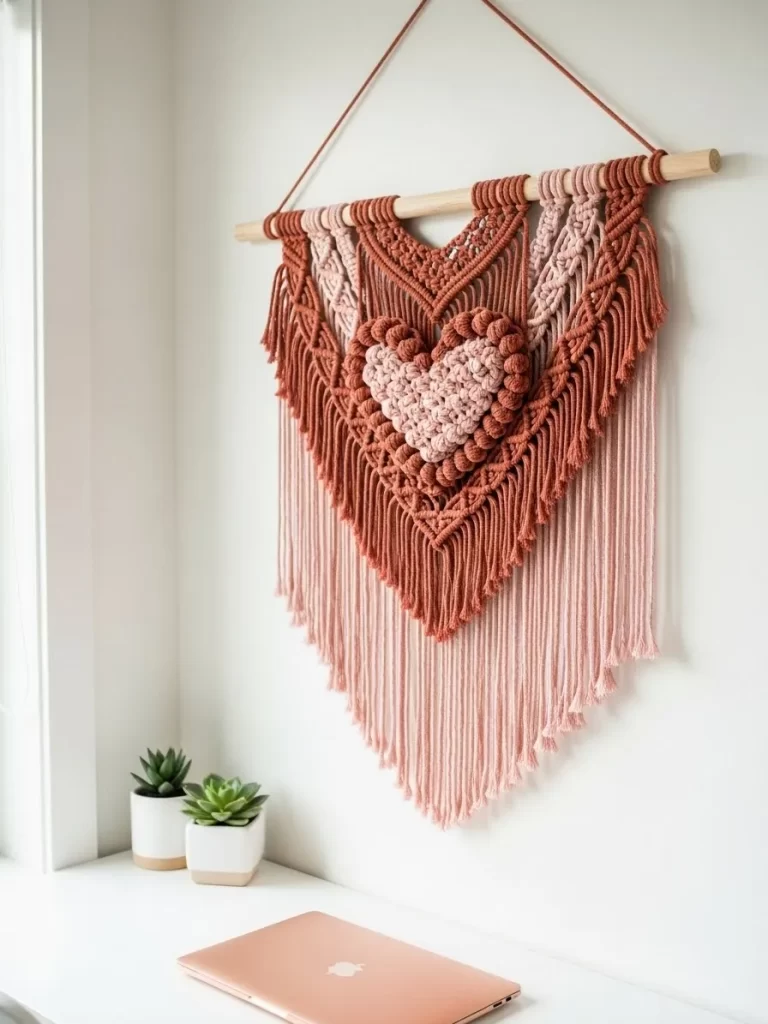
Hang a handmade textile piece to add warmth and texture to your walls. This macrame design features a central heart woven with thick pink yarn. The long fringe at the bottom creates a soft and bohemian vibe.
Fabric art is a smart choice for small spaces because it absorbs sound. It brings a cozy feeling to a minimalist room. You will appreciate the craftsmanship every time you walk by.
Material Required List
- Thick cotton cord in terracotta
- Pink chunky yarn
- Wooden dowel rod
- Hanging string
Equipment Required List
- Scissors
- Measuring tape
- Wall hook
DIY Instruction Step by Step
- Attach the hanging string to both ends of the wooden dowel.
- Cut twenty pieces of terracotta cord to your desired length.
- Loop these cords onto the dowel using a lark head knot.
- Weave the terracotta cords downward to create a v shape.
- Use the pink chunky yarn to create a raised heart in the center.
- Tie knots closely together to form the rounded tops of the heart.
- Let the remaining cords hang loose at the bottom for the fringe.
- Trim the fringe into a sharp point using your scissors.
- Hang the finished piece on a wall hook in your bedroom or office.
11 Candy Land Tiered Tray
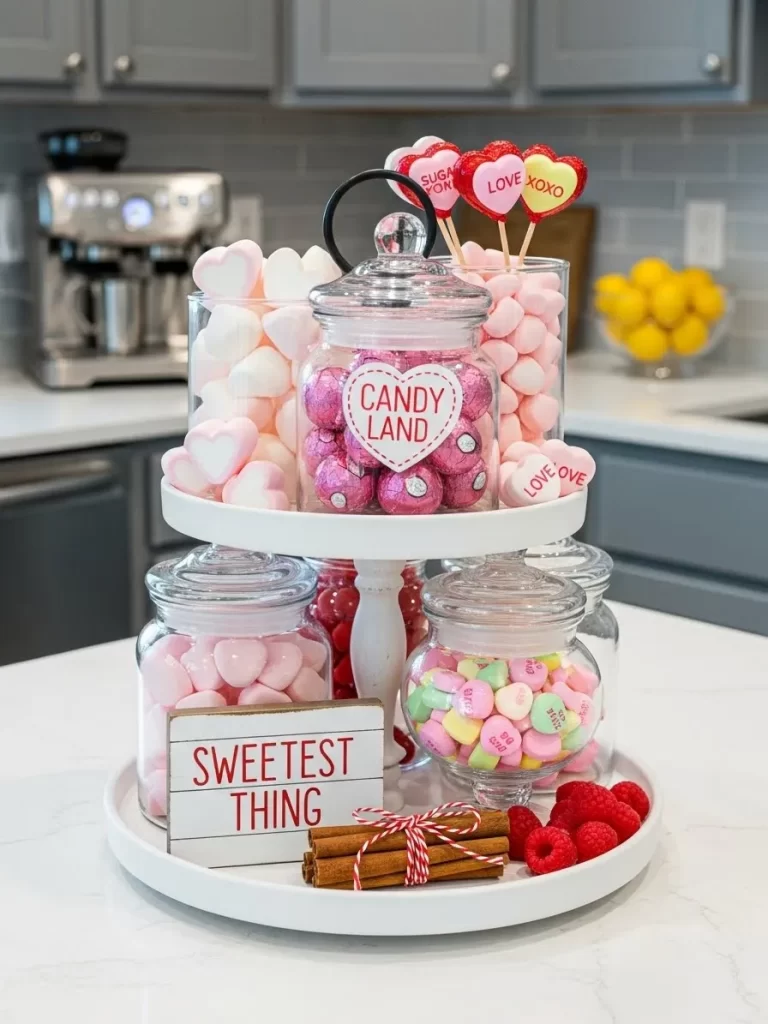
Small kitchens shine with a sweet treat display. This white tiered stand holds jars of pink marshmallows and chocolates. Bright red raspberries and cinnamon sticks add fresh details to the arrangement.
You can place this on your counter or a small table. It serves as both a snack station and a festive decoration. Every guest will enjoy picking their favorite candy from the glass jars.
Material Required List
- White two tiered stand
- Heart shaped marshmallows
- Pink foil wrapped chocolates
- Conversation hearts
- Fresh raspberries
- Cinnamon sticks
- Red and white baker twine
- Small glass jars with lids
Equipment Required List
- Small tongs
- Scissors
DIY Instruction Step by Step
- Clean your tiered stand with a damp cloth to remove dust.
- Place the largest glass jars on the bottom tier of the stand.
- Fill one jar with pink heart shaped marshmallows.
- Pour the foil wrapped chocolates into the second jar.
- Set a round glass bowl on the bottom tier for the conversation hearts.
- Arrange a small pile of fresh raspberries next to the jars.
- Bundle four cinnamon sticks together using the red and white twine.
- Tie a small bow with the twine to secure the sticks.
- Place the cinnamon bundle on the front of the bottom tray.
- Add smaller jars filled with pink candy to the top tier.
- Lean a small decorative wooden sign against the center post.
- Set the small tongs nearby so guests can serve themselves easily.
12 Crimson Balloon Ceiling
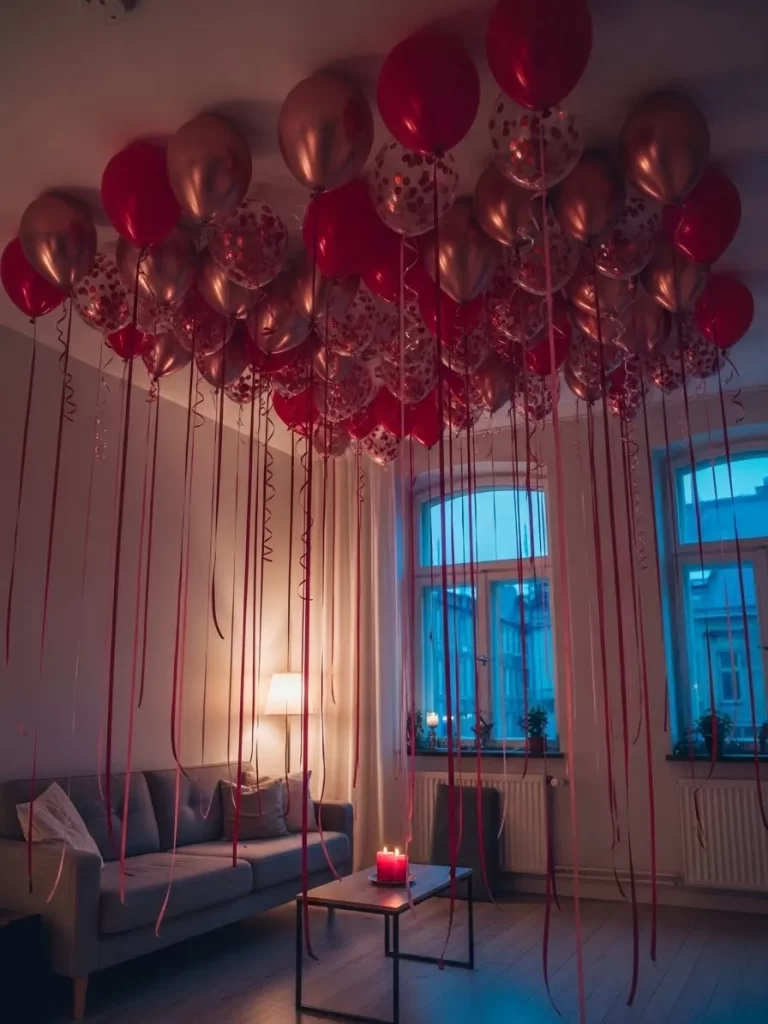
Turn your ceiling into a sea of color using air filled balloons. Dark red and metallic rose gold spheres float above your living area. Long ribbons hang down to create a sense of magic and intimacy in your tiny apartment.
This idea fills the empty upper space of a room without taking up floor area. It works well for a surprise morning or a cozy evening dinner. The varying textures of matte and shiny surfaces catch the light beautifully.
Material Required List
- Twenty dark red balloons
- Twenty metallic rose gold balloons
- Ten clear balloons with red confetti
- Fifty long red ribbons
- Removable adhesive dots
Equipment Required List
- Balloon pump
- Scissors
- Step ladder
DIY Instruction Step by Step
- Use the balloon pump to inflate all fifty balloons to a medium size.
- Knot the end of each balloon tightly to keep the air inside.
- Cut fifty pieces of red ribbon that are five feet long each.
- Tie one ribbon to the knot of every balloon.
- Curl the ends of the ribbons slightly using the edge of your scissors.
- Apply a removable adhesive dot to the very top of a red balloon.
- Climb the step ladder and press the balloon against the ceiling.
- Hold it for five seconds to ensure the glue dot sticks well.
- Continue placing balloons until the entire ceiling over your sofa is covered.
- Mix the different colors and confetti styles for a balanced look.
- Let the ribbons dangle at various heights to create a dreamlike effect.
13 Minimalist Gold Hoop Wreath
Decorate your door with a modern wreath that feels light and airy. A thin gold hoop features a cluster of green eucalyptus and white pampas grass. A deep burgundy velvet ribbon adds a sophisticated finishing touch to the wood.
Small entryways stay looking clean with this simple design. It provides a festive greeting without the bulk of a traditional evergreen wreath. The natural textures bring a bit of the outdoors inside your home.
Material Required List
- One large gold metal hoop
- Dried eucalyptus stems
- White pampas grass sprigs
- Small white flower stems
- Wide burgundy velvet ribbon
- Narrow pink velvet ribbon
- Thin floral wire
Equipment Required List
- Wire cutters
- Scissors
- Over the door hook
DIY Instruction Step by Step
- Lay your gold metal hoop flat on a table or work surface.
- Position a few eucalyptus stems along the left side of the hoop.
- Wrap floral wire around the stems to secure them to the metal.
- Layer the pampas grass over the greenery to add height and softness.
- Secure the grass with more floral wire at the base of the stems.
- Tuck small white flowers into the arrangement to fill any gaps.
- Cut a long piece of burgundy velvet ribbon and a shorter pink piece.
- Tie the burgundy ribbon into a large bow at the bottom of the greenery.
- Layer the pink ribbon over the center of the bow for a two tone look.
- Allow the ends of the ribbons to hang down at different lengths.
- Hang the wreath on your door using the over the door hook.
14 Ombre Bookcase Library
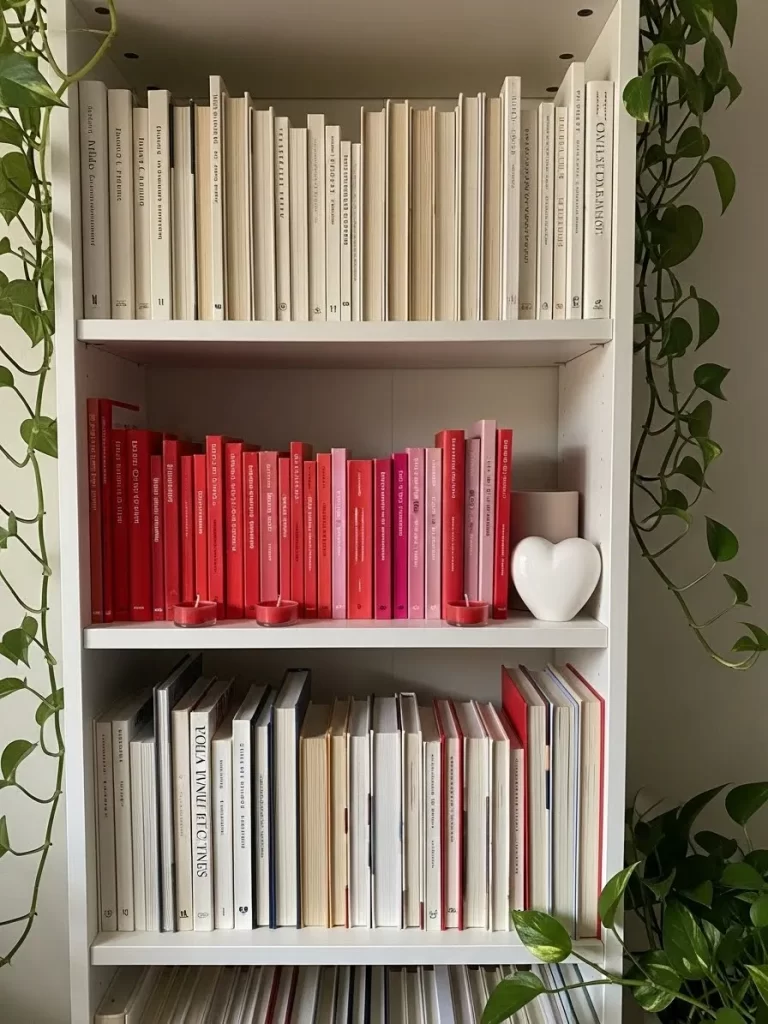
Organize your books by color to create a stunning visual focal point. This shelf displays a transition from deep red to soft pink and creamy white. It turns your existing library into a curated piece of Valentine decor.
Using items you already own makes this a budget friendly option for tiny living. The clean lines and color blocks make the room feel much more organized. A single white heart sculpture adds a subtle holiday theme.
Material Required List
- Your collection of red and pink and white books
- One ceramic heart sculpture
- Three small red tea light candles
- Potted ivy plant
Equipment Required List
- Soft dusting cloth
DIY Instruction Step by Step
- Empty the middle shelves of your bookcase completely.
- Wipe the shelves clean with a soft cloth to remove dust.
- Sort all your books into piles based on the color of their spines.
- Place the darkest red books on the left side of the middle shelf.
- Arrange the medium red and bright pink books next to them.
- Transition into light pink and then white books on the right side.
- Ensure all the book spines are flush with the front of the shelf.
- Place the ceramic heart sculpture on the shelf with the white books.
- Set three small red tea light candles in front of the red books.
- Drape the vines of your ivy plant down the sides of the bookcase.
15 Message in a Bottle Display
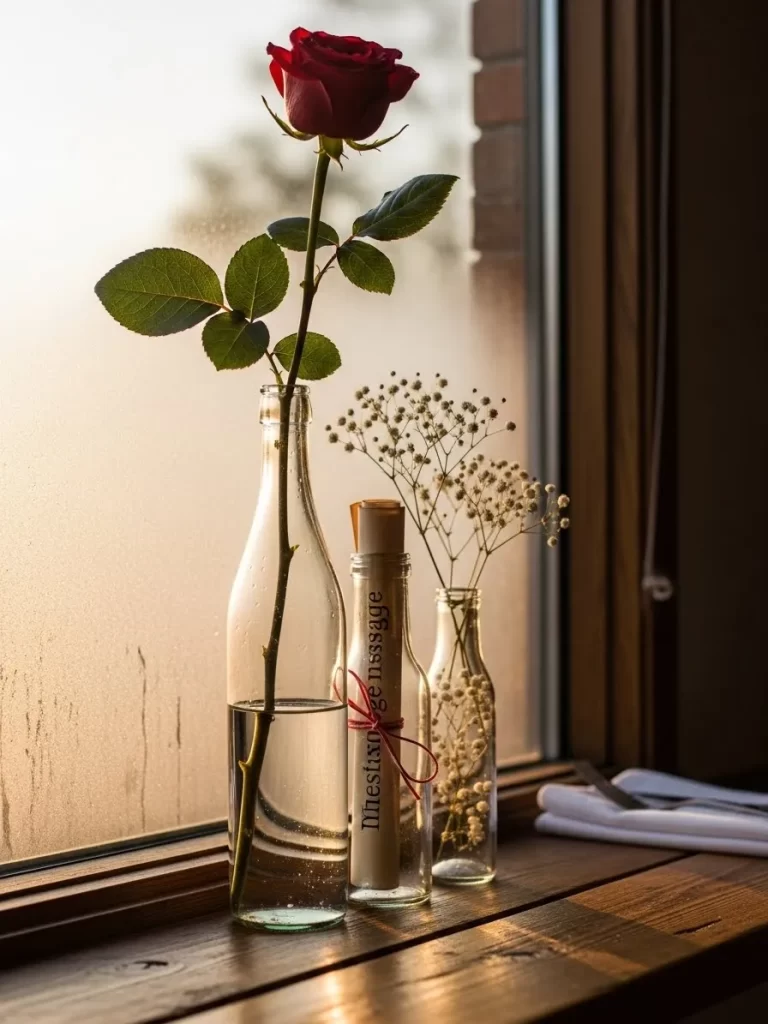
Create a romantic windowsill scene with glass bottles and a hidden note. A single long stem red rose stands tall in a clear carafe of water. A rolled paper scroll tied with twine sits inside a smaller bottle.
This decoration takes up very little space on a ledge or narrow table. The sunlight shines through the glass to highlight the delicate baby breath flowers. It is a thoughtful way to share a private letter with your partner.
Material Required List
- One fresh long stem red rose
- One sprig of dried baby breath
- Small piece of parchment paper
- Red twine
- Water
Equipment Required List
- One tall clear glass bottle
- One medium clear glass bottle
- One small clear glass bottle
DIY Instruction Step by Step
- Wash three glass bottles of different heights and let them dry.
- Fill the tallest bottle halfway with fresh water.
- Trim the stem of the red rose at an angle so it fits the bottle.
- Place the rose inside the tall bottle.
- Write a personal love note on the small piece of parchment paper.
- Roll the paper into a tight scroll.
- Tie a piece of red twine around the scroll to keep it closed.
- Drop the scroll into the medium sized glass bottle.
- Place the baby breath sprig into the smallest glass bottle.
- Arrange the three bottles in a row on your windowsill.
- Position them so the tallest bottle is in the front.
16 Felt Love Window Banner
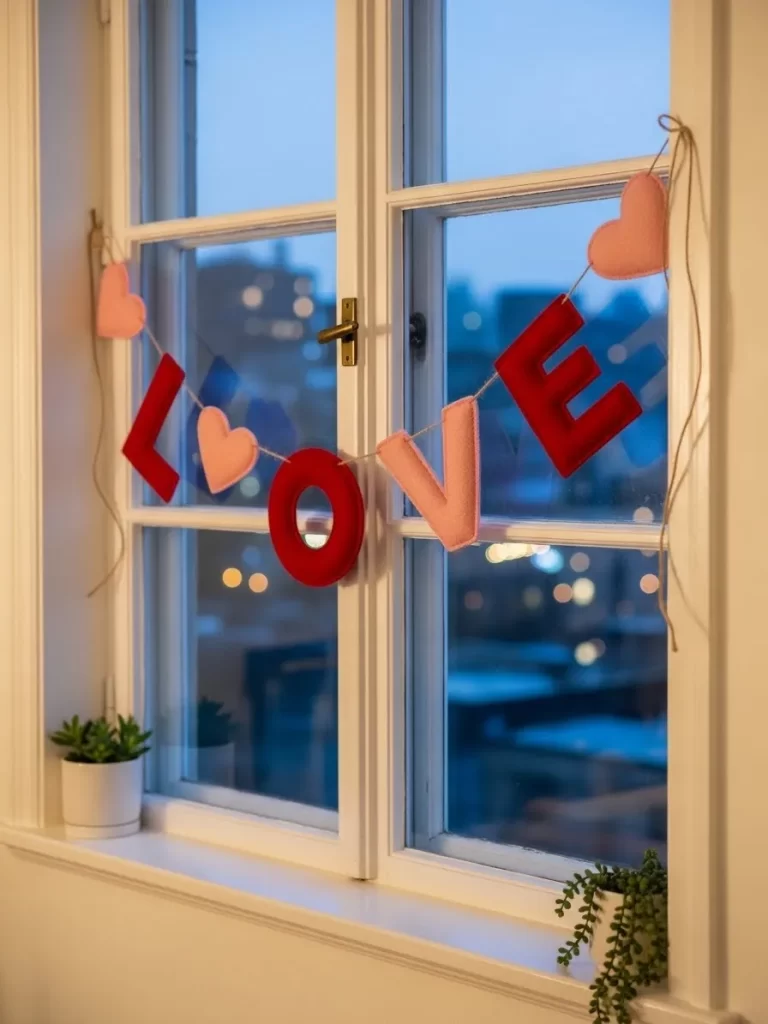
Hang a playful garland across your window to spread a message of love. Large red and pink felt letters spell out a sweet greeting. Small hearts sit between the letters to add extra charm to the view.
Felt is a great material for small spaces because it is light and quiet. You can see the message from both inside and outside your apartment. It creates a cheerful atmosphere without blocking any natural light.
Material Required List
- Red felt sheets
- Pink felt sheets
- Thick twine or jute string
Equipment Required List
- Letter templates
- Heart template
- Fabric scissors
- Hole punch
- Suction cup hooks
DIY Instruction Step by Step
- Trace the letter templates onto the red and pink felt sheets.
- Cut out the letters L and O and V and E using fabric scissors.
- Trace and cut out four small pink hearts from the remaining felt.
- Use the hole punch to make two holes at the top of each letter.
- Punch two holes in the top of each felt heart as well.
- Measure the width of your window and cut a piece of twine to match.
- Thread the twine through the letters and hearts.
- Arrange the sequence so a heart sits between every letter.
- Space the items evenly along the string.
- Attach the suction cup hooks to the top corners of your window glass.
- Tie the ends of the twine to the hooks to hang the banner.
17 Romantic Texture Pillows
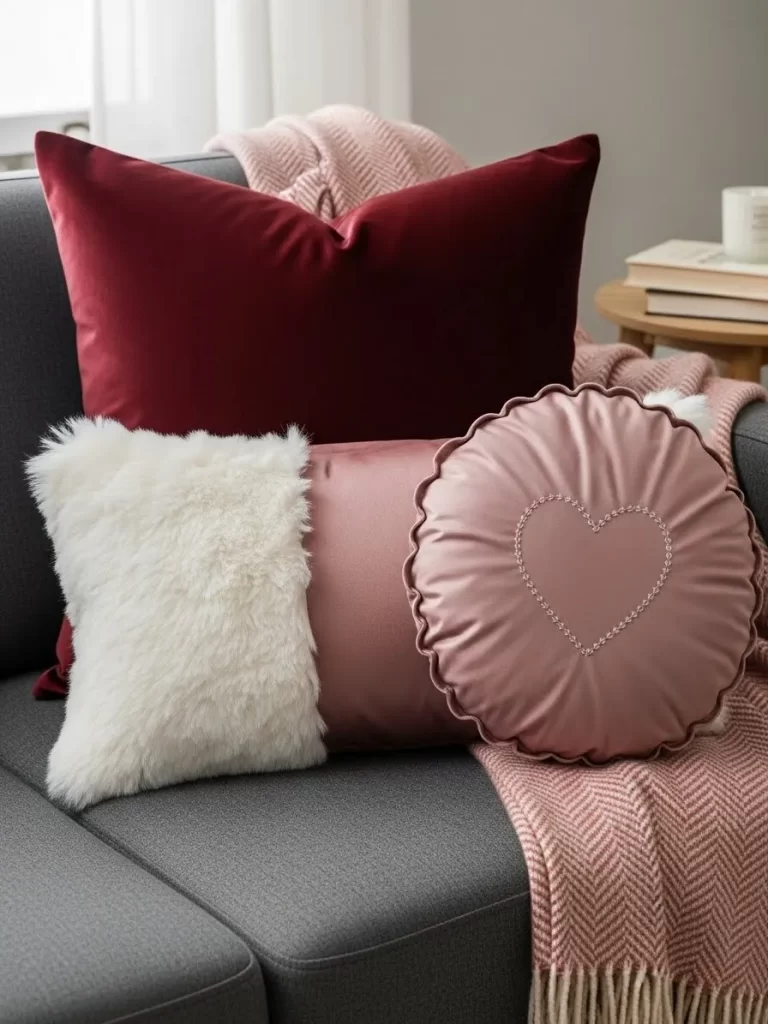
Update your sofa with a collection of pillows in various fabrics and shapes. A deep burgundy velvet cushion provides a rich base for the arrangement. A round pink satin pillow with an embroidered heart adds a soft touch.
Mixing textures like faux fur and satin makes your small living room feel luxurious. These accents are easy to store away when the season changes. You will love how comfortable and inviting your seating area becomes.
Material Required List
- One large square burgundy velvet pillow
- One small square white faux fur pillow
- One medium rectangular pink satin pillow
- One round pink pillow with heart embroidery
- One pink herringbone knit throw blanket
Equipment Required List
- None
DIY Instruction Step by Step
- Clear all existing pillows from one corner of your sofa.
- Drape the pink herringbone blanket over the back and arm of the couch.
- Place the large burgundy velvet pillow against the back cushion.
- Set the white faux fur pillow in front of the burgundy one.
- Position the rectangular pink satin pillow next to the fur pillow.
- Lean the round embroidered heart pillow against the front of the pile.
- Fluff each cushion to ensure they look full and cozy.
- Adjust the blanket so it looks natural and slightly ruffled.
18 Hanging Herb Heart Garden
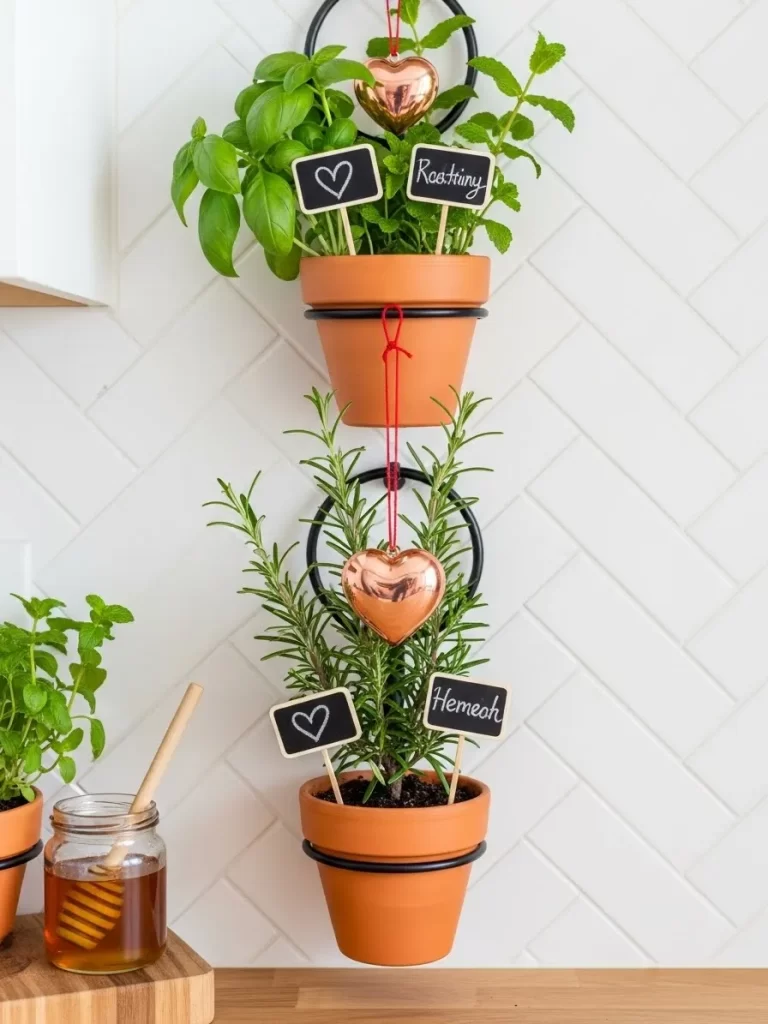
Combine your love for cooking and decor with a vertical herb display. Three terracotta pots hang from black metal rings on a white tiled wall. Small chalkboard tags and copper heart ornaments add a festive flair.
Vertical gardens are a smart solution for kitchens with limited counter space. You can grow fresh basil and rosemary and mint right on your wall. The copper hearts catch the light and add a warm metallic glow.
Material Required List
- Three small terracotta pots
- Fresh basil plant
- Fresh rosemary plant
- Fresh mint plant
- Three black metal wall rings
- Two copper heart ornaments
- Three small chalkboard garden stakes
- Red string
- Potting soil
Equipment Required List
- Power drill
- Wall anchors and screws
- Chalk marker
DIY Instruction Step by Step
- Mark three vertical spots on your wall for the metal rings.
- Drill holes at the marks and insert the wall anchors.
- Screw the black metal rings into the anchors until they are tight.
- Fill the terracotta pots with a layer of potting soil.
- Plant the basil and rosemary and mint into the separate pots.
- Place one pot into each of the metal rings on the wall.
- Use the chalk marker to write the herb names on the stakes.
- Push the stakes into the soil of each plant.
- Tie a copper heart ornament to the rosemary pot using red string.
- Hang the second copper heart from the basil pot.
19 Glowing Neon Heart
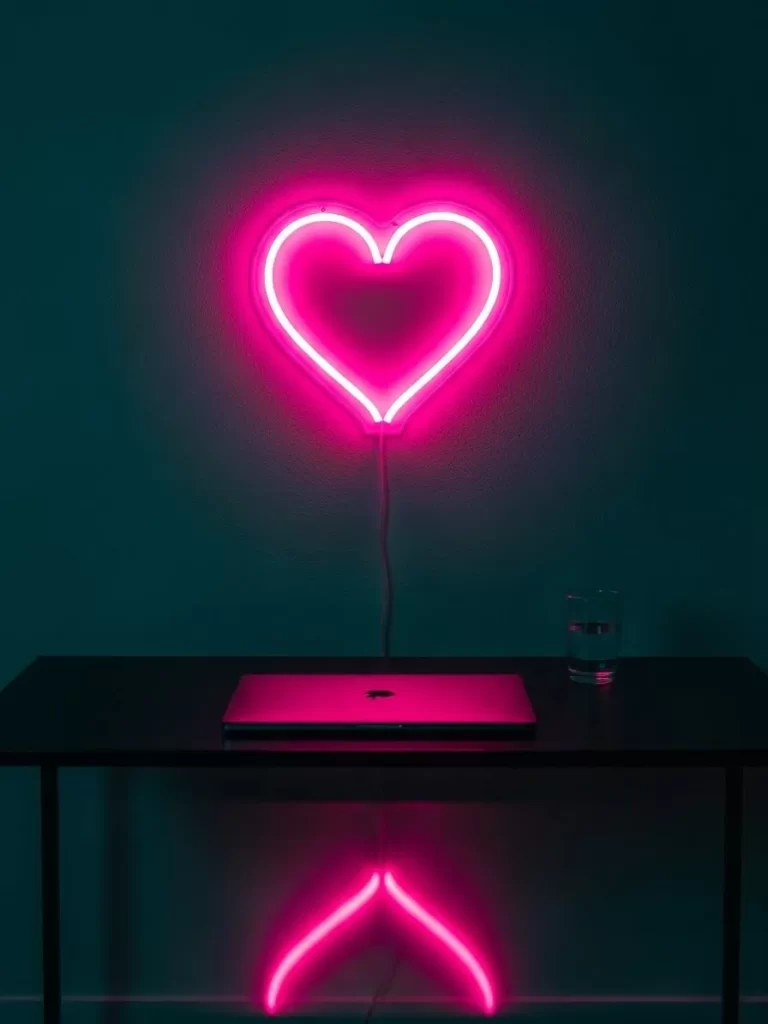
Light up a dark corner with a bright pink neon heart sign. This simple piece of wall art creates a bold and modern vibe in a studio. The reflection of the light on your desk or table adds a cool depth to the room.
Neon lights are slim and take up almost no physical space on your wall. They act as a nightlight and a decoration at the same time. This glow makes your workspace feel more creative and romantic.
Material Required List
- One LED neon heart sign with USB cord
- Clear adhesive wall hooks
Equipment Required List
- Measuring tape
- Level
DIY Instruction Step by Step
- Choose a central spot on the wall above your desk or table.
- Measure the distance from the floor to ensure the light is centered.
- Clean the wall area with a dry cloth to help the adhesive stick.
- Peel the backing off the clear adhesive hook and press it to the wall.
- Wait one hour for the adhesive to set properly.
- Hang the neon heart sign onto the hook.
- Run the power cord straight down the wall for a clean look.
- Plug the USB cord into a power adapter or your computer.
- Turn on the light to enjoy the vibrant pink glow.
20 Marble Table XOXO Accents
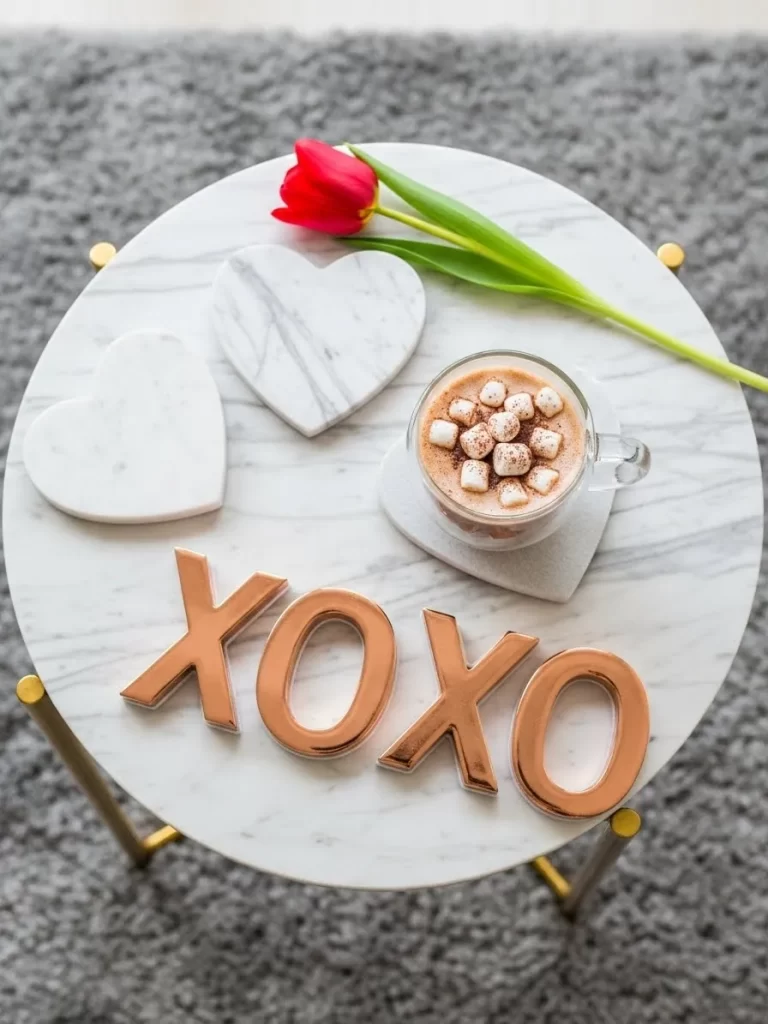
Style your coffee table with elegant marble coasters and metallic letters. Two white marble hearts provide a cool and smooth surface for your drinks. Large copper X and O letters spell out a classic message of affection.
Small tables look best with a few high quality items instead of many tiny ones. A clear glass mug of cocoa with marshmallows adds a cozy feeling to the scene. A single red tulip in the background brings a natural pop of color.
Material Required List
- Two heart shaped white marble coasters
- Two copper X letters
- Two copper O letters
- One fresh red tulip
- Clear glass mug
- Hot cocoa and marshmallows
Equipment Required List
- Small vase
DIY Instruction Step by Step
- Clear the surface of your round marble side table.
- Place the two heart shaped coasters in the center of the table.
- Arrange the copper letters to spell XOXO near the front edge.
- Space the letters evenly so they look balanced.
- Fill a small vase with water and insert the red tulip.
- Set the vase at the back of the table to add height.
- Prepare a hot mug of cocoa and top it with mini marshmallows.
- Place the warm mug onto one of the marble heart coasters.
21 Romantic Line Art Frame
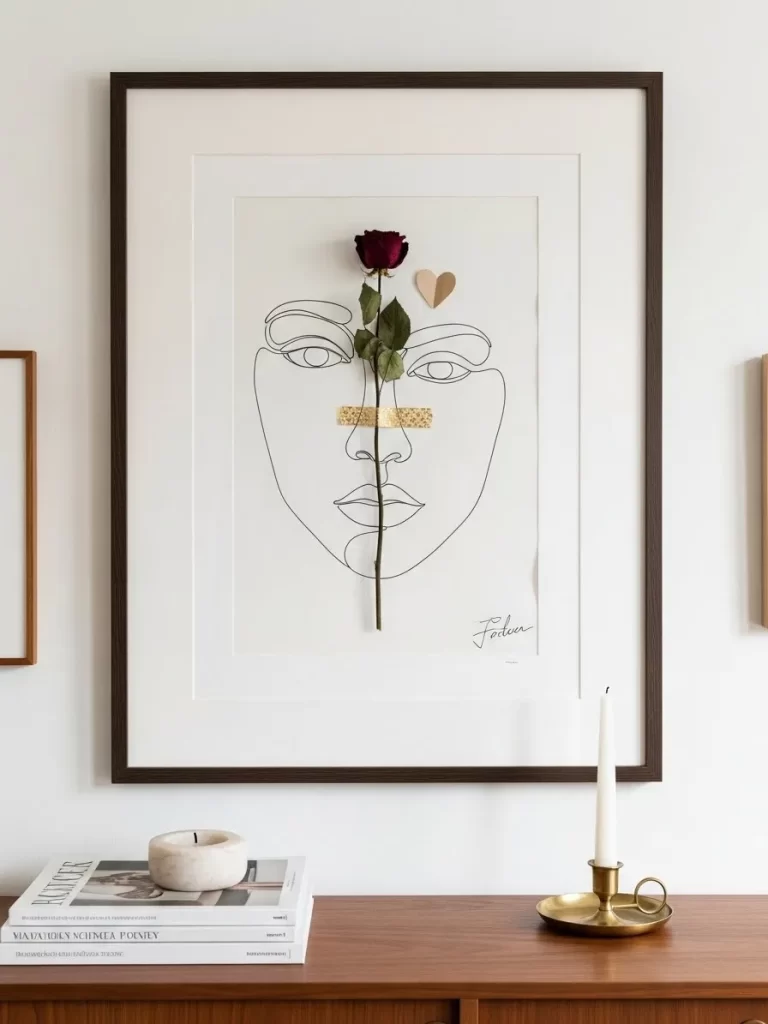
This elegant piece of wall art features a minimalist face drawn with a single black line. A real dried red rose is taped over the nose area to create a three dimensional effect. It adds a touch of high end gallery style to your small bedroom or hallway.
White space in the frame makes the tiny apartment feel less cluttered and more open. You can place this on a dresser or hang it above a side table. The contrast between the simple ink and the rich flower petal looks sophisticated.
Material Required List
- One black and white line art print
- One dried long stem red rose
- Gold decorative washi tape
- One small gold paper heart
- Large wooden picture frame with white matting
Equipment Required List
- Scissors
- Clear adhesive dots
DIY Instruction Step by Step
- Open the back of your picture frame and remove the glass.
- Place your line art print flat on the white matting.
- Position the dried rose vertically so the bloom sits near the top of the face.
- Cut a small piece of gold washi tape using your scissors.
- Press the tape firmly over the middle of the rose stem to hold it in place.
- Use a clear adhesive dot to attach the small gold heart near the eye of the drawing.
- Reassemble the frame carefully without the glass to avoid crushing the flower.
- Place the finished artwork on a shelf or mount it to your wall.
22 Cozy Yarn Tassel Garland
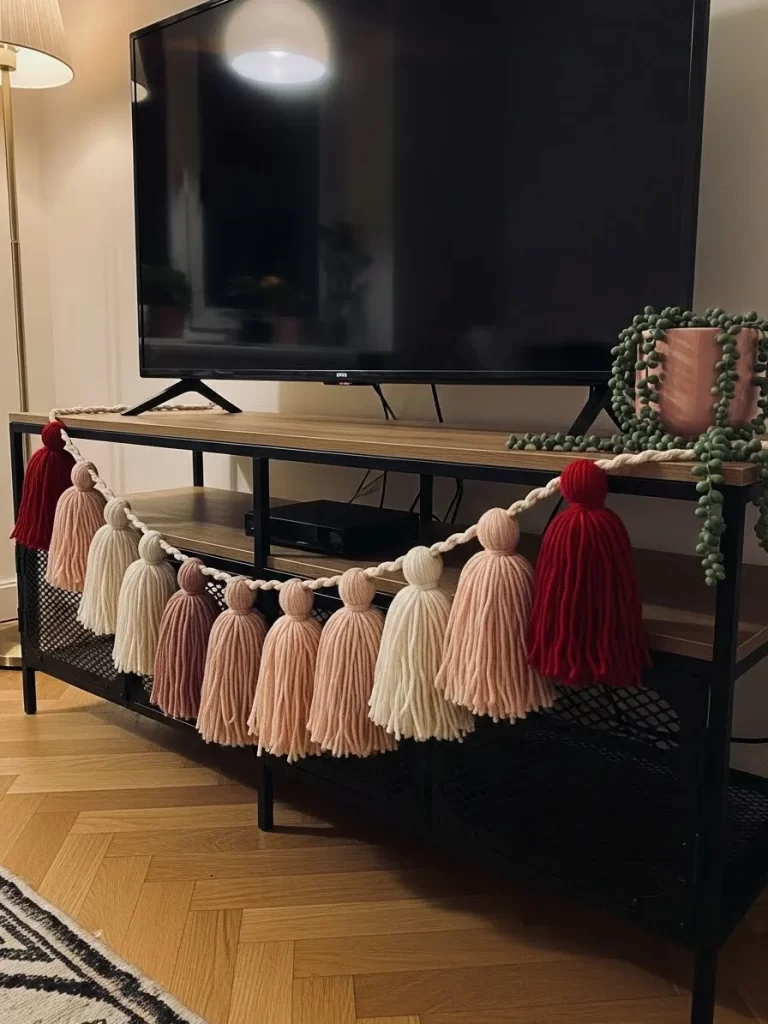
Add a soft and bohemian touch to your television stand with a handmade tassel garland. This decoration uses various shades of cream and pink and deep red yarn. The thick braided cord holds the tassels in a playful row.
Textured items like this bring warmth to a small living room during cold February nights. You can drape it over furniture or hang it along a mantle. It is a simple way to introduce color without using a lot of space.
Material Required List
- Thick white cotton rope
- Red chunky yarn
- Pink medium weight yarn
- Cream wool yarn
- Terracotta cotton yarn
Equipment Required List
- Large piece of cardboard
- Fabric scissors
- Measuring tape
DIY Instruction Step by Step
- Measure the width of your TV stand and cut the white rope to that length plus two feet.
- Wrap the red yarn around your piece of cardboard twenty times.
- Slide a small piece of yarn under the wraps and tie it tightly at the top.
- Cut the bottom of the yarn loops to create the tassel fringe.
- Wrap another string of yarn around the top of the tassel to create a neck.
- Repeat these steps with the pink and cream and terracotta yarns.
- Make at least twelve tassels in various colors for a full look.
- Tie each tassel onto the white rope using a simple knot.
- Space the tassels three inches apart along the center of the rope.
- Drape the garland across the front of your media console.
23 Magnetic Love Letter Fridge
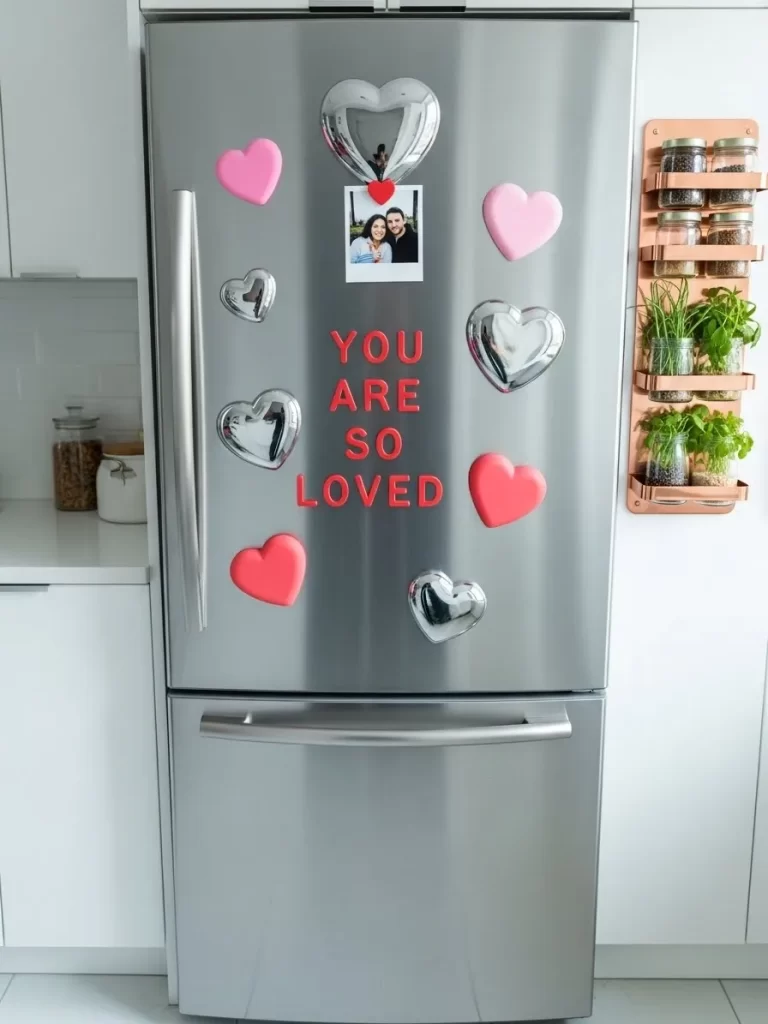
Your kitchen can join the holiday spirit with a simple magnetic display. Shiny silver hearts and soft pink shapes surround a personal photo of you and your partner. Bold red letters spell out a message of appreciation on the steel surface.
Small kitchens often feel cramped when you add bulky counter decor. Using the refrigerator door keeps your surfaces clear and functional. You will smile every time you reach for a snack or a drink.
Material Required List
- Red magnetic alphabet letters
- Three large silver heart magnets
- Three small pink heart magnets
- Three small red heart magnets
- One printed polaroid photo
Equipment Required List
- Microfiber cloth
- Stainless steel cleaner
DIY Instruction Step by Step
- Spray the refrigerator door with cleaner and wipe it with the microfiber cloth.
- Select a favorite photo that features a happy memory.
- Place the photo in the center of the upper fridge door.
- Secure the photo at the top using one of the silver heart magnets.
- Find the letters to spell the phrase YOU ARE SO LOVED in your magnetic set.
- Arrange the words vertically underneath the central photo.
- Use a level or a ruler to make sure the text is straight.
- Scatter the remaining pink and red hearts around the message.
- Cluster a few magnets near the edges to create a frame effect.
24 Eucalyptus Shower Sanctuary

Refresh your morning with a fragrant bundle of greenery and flowers in your bathroom. This design features long eucalyptus branches tied together with two deep red roses. Hanging them from the shower head allows the steam to release natural oils.
Tiny bathrooms often lack room for vases or candles on the vanity. This vertical arrangement stays out of the way while you wash. The scent of eucalyptus creates a spa like environment in your own home.
Material Required List
- Five fresh eucalyptus branches
- Two long stem red roses
- Thick brown jute twine
- One metal S hook
Equipment Required List
- Garden shears
- Measuring tape
DIY Instruction Step by Step
- Gather your eucalyptus branches and align the tops of the leaves.
- Trim the bottom of the stems using your garden shears so they are even.
- Place the two red roses in the center of the greenery bundle.
- Position the roses so the blooms peeking out from the bottom of the leaves.
- Wrap the jute twine tightly around the top of the stems three times.
- Tie a double knot to secure the bundle together.
- Create a small loop with the remaining twine and tie it off.
- Attach the metal S hook to the twine loop.
- Hang the hook over the neck of your shower head behind the water flow.
- Replace the roses every few days to keep the display looking fresh.
25 Heart Shaped Waffle Brunch
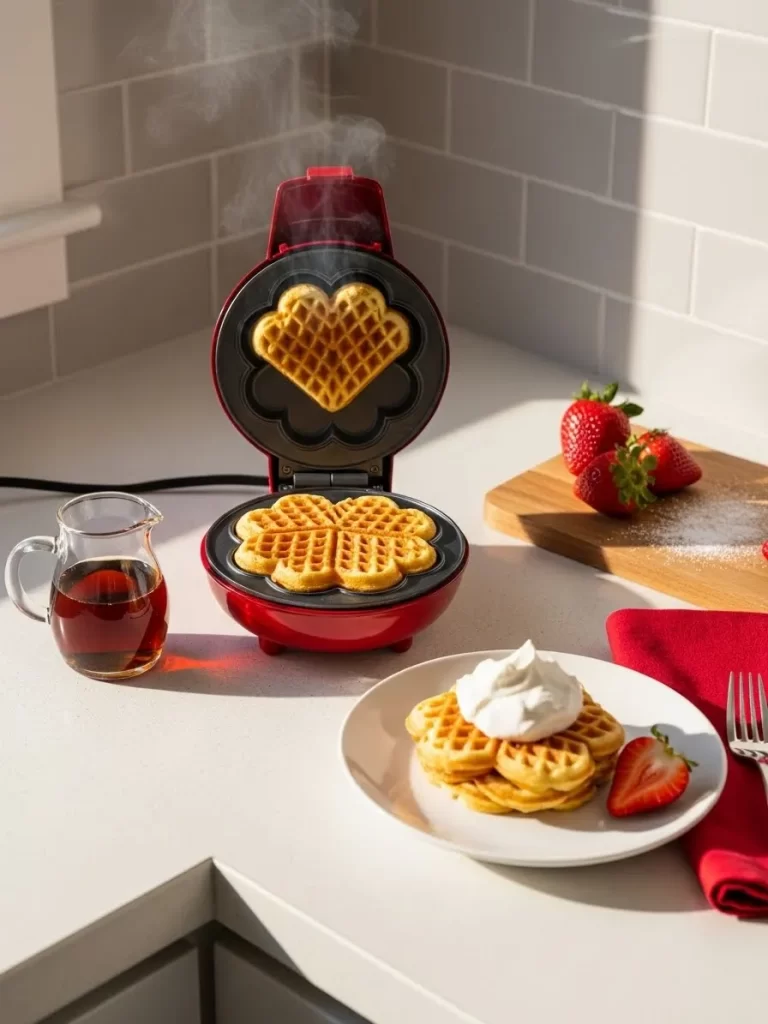
Celebrate Valentine morning with a festive breakfast made in a special red iron. These golden waffles feature a beautiful floral heart pattern that looks like lace. Serving them on a white plate makes the details stand out.
Small appliances are great for adding holiday cheer to a tiny apartment kitchen. You can store the waffle maker away easily when you finish your meal. Adding whipped cream and fresh strawberries makes the dish feel like a treat.
Material Required List
- Waffle batter
- Whipped cream
- Fresh strawberries
- Maple syrup
- Powdered sugar
Equipment Required List
- Heart shaped waffle maker
- Small glass pitcher
- Cutting board
- Knife
DIY Instruction Step by Step
- Plug in your heart shaped waffle maker and let it heat up.
- Prepare your favorite waffle batter in a large mixing bowl.
- Lightly coat the iron plates with cooking spray if needed.
- Pour a small amount of batter into the center of the hot iron.
- Close the lid and wait for the steam to stop rising.
- Remove the waffle carefully once it is golden brown and crisp.
- Stack three waffles on a clean white ceramic plate.
- Slice a fresh strawberry into thin heart shapes using your knife.
- Add a large dollop of whipped cream to the top of the stack.
- Place the strawberry slices into the cream.
- Pour maple syrup into a small glass pitcher for serving.
26 Pink Neon Glow Accents
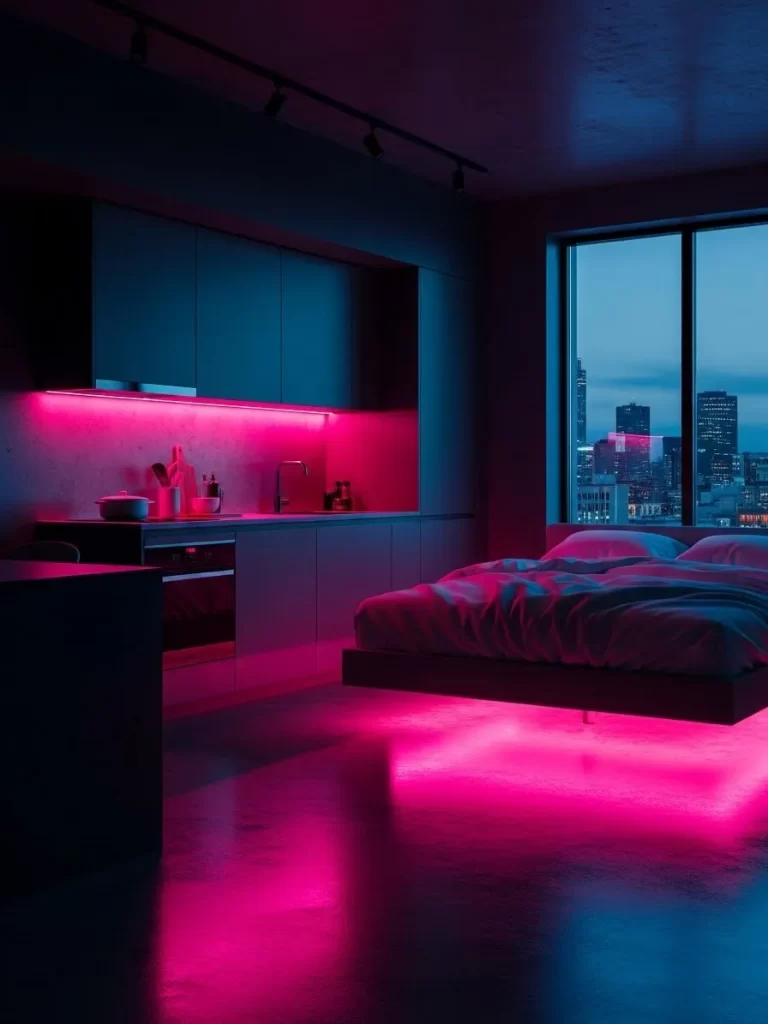
Transform your studio apartment into a modern lounge with vibrant LED strips. This lighting setup places a hot pink glow under the bed and kitchen cabinets. It creates a futuristic look that feels both romantic and energetic.
Underglow lighting makes a small space feel much larger by highlighting the floor area. You can change the atmosphere of the room with the flip of a switch. It is a great way to add color without cluttering your walls.
Material Required List
- Two rolls of pink LED light strips
- Adhesive backing tape
- Power adapter
Equipment Required List
- Measuring tape
- Scissors
- Cleaning alcohol
DIY Instruction Step by Step
- Measure the length of the bottom edge of your bed frame.
- Clean the area where the lights will go with alcohol to remove dust.
- Peel the protective film off the adhesive backing of the LED strip.
- Press the strip firmly along the underside of the bed frame.
- Cut the strip at the designated mark if it is too long.
- Repeat the cleaning and sticking process under your kitchen cabinets.
- Connect the strips to the power adapter and plug it into a wall outlet.
- Hide any extra wires behind furniture for a neat appearance.
- Turn the lights on at night to enjoy the soft pink reflection.
27 Origami Heart Snake Plant
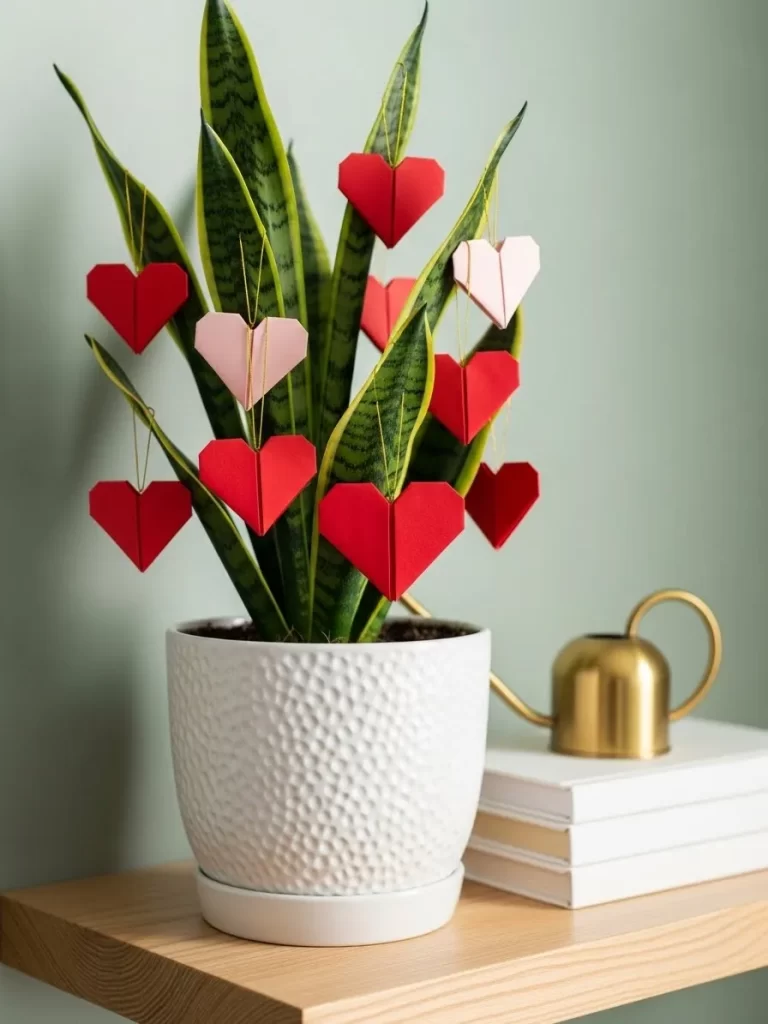
Give your indoor plants a festive makeover with tiny paper ornaments. This snake plant features bright red and soft pink origami hearts hanging from its leaves. The geometric shapes provide a fun contrast to the natural green patterns.
Decorating your existing plants is a smart move for tiny living. It saves you from buying new items that take up extra surface area. These paper hearts are lightweight and will not damage your greenery.
Material Required List
- Red origami paper squares
- Pink origami paper squares
- Thin gold thread
Equipment Required List
- Small needle
- Scissors
DIY Instruction Step by Step
- Fold a square piece of red paper in half to create a triangle.
- Fold the corners upward to meet at the top point.
- Turn the paper over and fold the top flaps down to form heart bumps.
- Tuck the corners in to create a smooth and rounded heart shape.
- Repeat these steps to make ten red and five pink hearts.
- Thread a small needle with a six inch piece of gold string.
- Poke the needle through the top center of a paper heart.
- Tie the ends of the thread together to create a hanging loop.
- Drape the loops over the tall leaves of your snake plant.
- Space the colors out so the red hearts are the main focus.
28 Heart Sphere Shadow Box
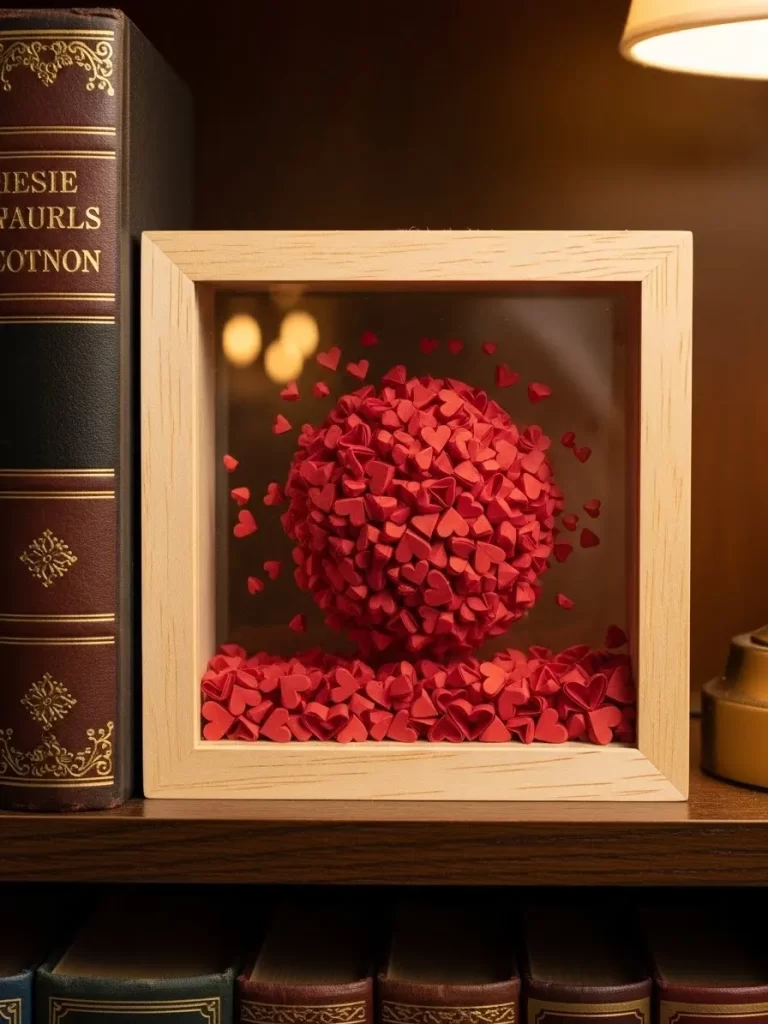
Capture a moment of love with a square wooden frame filled with a sphere of paper hearts. A dense pile of red hearts sits at the bottom while a large orb floats in the center. It looks like a magical heart globe sitting on your shelf.
Shadow boxes are excellent for small homes because they pack a lot of detail into a slim design. You can display it vertically on a bookcase or lean it against a wall. The natural wood finish matches many different interior styles.
Material Required List
- One square wooden shadow box frame
- One hundred tiny red paper hearts
- One small foam ball
- Clear fishing line
Equipment Required List
- Tweezers
- Clear tape
- Scissors
- Glue gun
DIY Instruction Step by Step
- Remove the back panel of your shadow box frame.
- Clean the inside of the glass to ensure it is crystal clear.
- Glue your paper hearts onto the foam ball until it is fully covered.
- Pour eighty remaining paper hearts into the bottom of the frame.
- Cut a short piece of clear fishing line and tie it to the heart ball.
- Tape the other end of the line to the top inner edge of the frame.
- Use tweezers to adjust the center ball so it does not touch the glass.
- Replace the back panel and secure the tabs.
- Shake the frame gently to settle the loose hearts at the bottom.
- Place the box next to your favorite books for a cozy look.
29 Crane and Heart Doorway
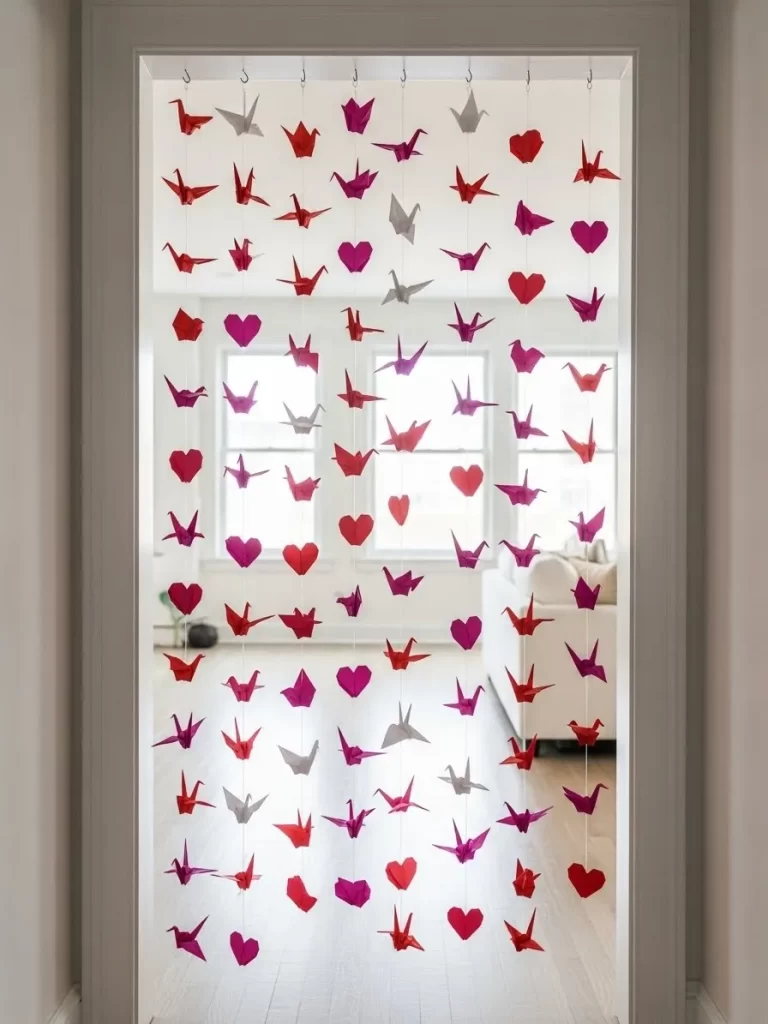
Create a whimsical entrance to your living room with a hanging paper curtain. This display features red and pink origami cranes mixed with paper hearts. The strings hang from small hooks to create a soft barrier between rooms.
Open doorways in small apartments can feel a bit plain. This curtain adds privacy and visual interest without the weight of a heavy door. The paper shapes catch the light and move gently when you walk past.
Material Required List
- Fifty red and pink origami cranes
- Twenty red and pink paper hearts
- White nylon string
- Small white ceiling hooks
Equipment Required List
- Needle
- Ruler
- Step ladder
DIY Instruction Step by Step
- Measure the width of your doorway and mark eight even spots.
- Screw the small white hooks into the top of the door frame.
- Cut eight pieces of nylon string to the height of your doorway.
- Tie the top of each string to a ceiling hook.
- Use a needle to thread a crane onto the bottom of the first string.
- Tie a small knot under the crane to keep it from sliding down.
- Add a heart three inches above the crane.
- Continue adding cranes and hearts in an alternating pattern.
- Repeat this for all eight strings until the curtain is full.
- Trim any extra string at the floor level for a clean finish.
30 Satin Bow Dining Chair
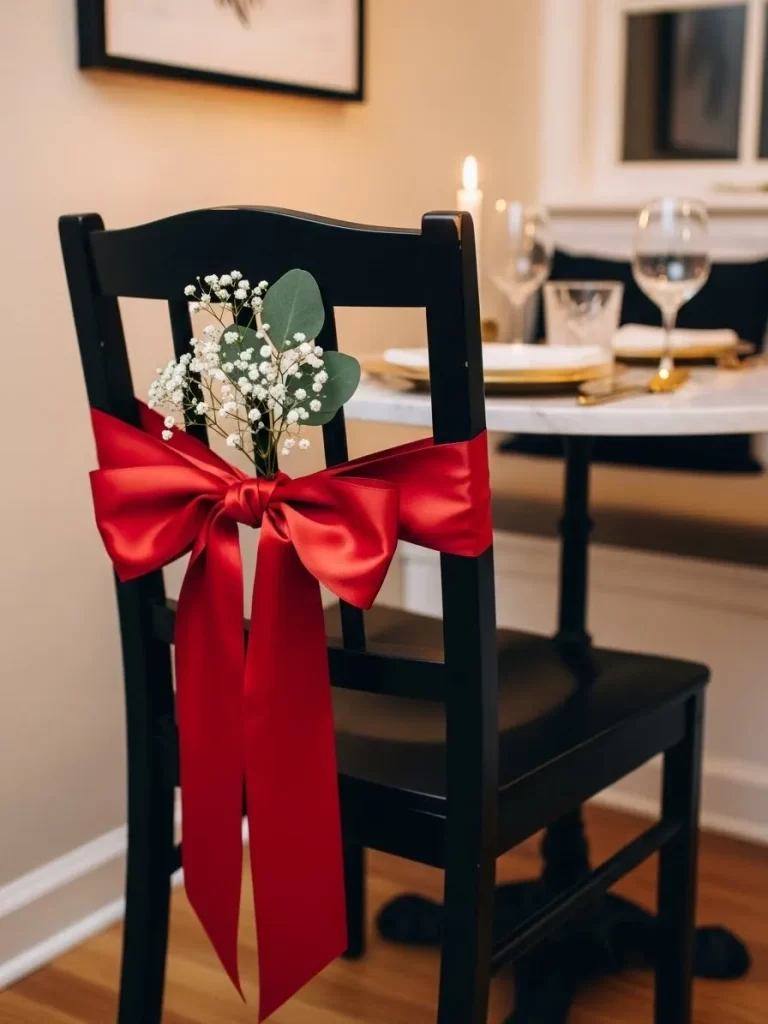
Dress up your dining area with a luxurious red satin ribbon tied around each chair. A small bunch of baby breath and a green leaf are tucked into the knot. It turns a simple seat into a romantic place for a holiday dinner.
Small dining tables look more expensive when you focus on chair details. This idea uses vertical space and does not crowd the table surface. You can choose a ribbon color that matches your existing dishes or napkins.
Material Required List
- Three yards of wide red satin ribbon
- One sprig of fresh baby breath
- One large green eucalyptus leaf
- Thin green floral wire
Equipment Required List
- Fabric scissors
- Measuring tape
DIY Instruction Step by Step
- Wrap the measuring tape around the back of your chair to find the length.
- Cut a piece of red satin ribbon that is three times that length.
- Center the ribbon on the back of the chair slats.
- Pull the ends to the front and tie a large and symmetrical bow.
- Trim the ends of the ribbon so they hang down evenly.
- Cut the baby breath and eucalyptus leaf to a length of four inches.
- Use a small piece of floral wire to bundle the greenery together.
- Slide the stem of the greenery bundle into the center of the ribbon knot.
- Adjust the loops of the bow to hide the wire and the stems.
31 Glowing Heart Cloche
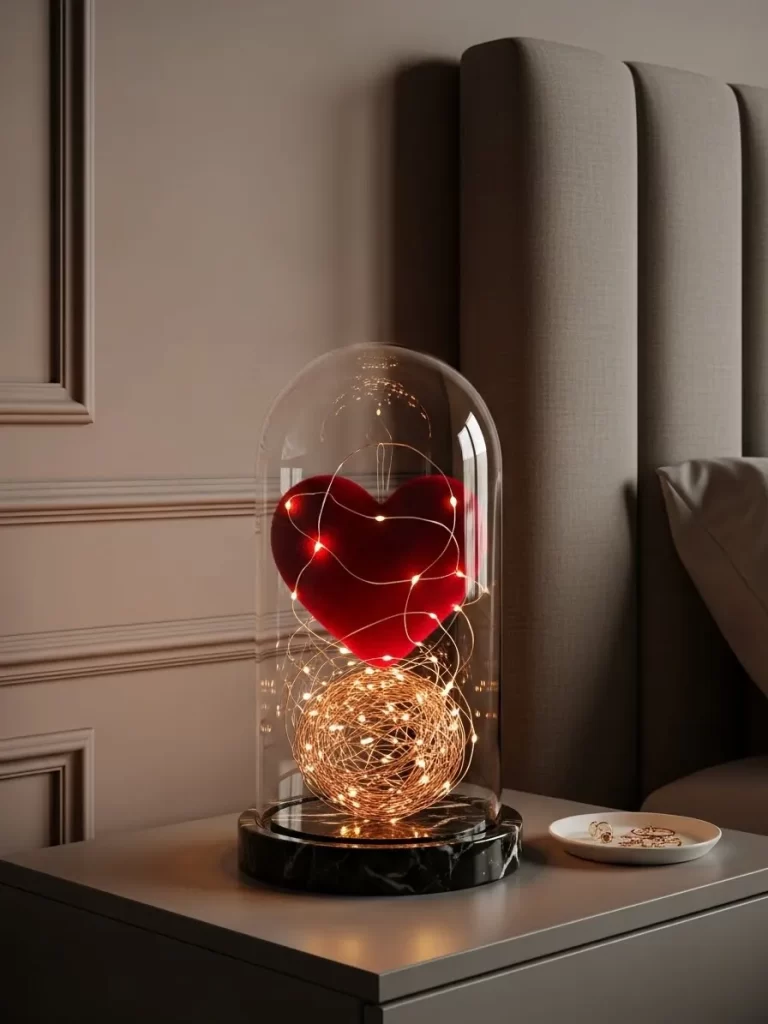
Illuminate your bedside table with a red heart encased in a glass dome. A warm string of copper fairy lights wraps around a soft velvet heart. The black marble base adds a touch of modern elegance to your decor.
Glass cloches protect your decorations from dust while making them look like museum pieces. This light provides a gentle glow that is not too bright for a small bedroom. It creates a peaceful and loving atmosphere before you sleep.
Material Required List
- One red velvet heart ornament
- One string of copper battery fairy lights
- Glass cloche with black marble base
Equipment Required List
- Clear tape
DIY Instruction Step by Step
- Wipe the glass cloche and the marble base until they are clean.
- Unroll the copper fairy lights and check the batteries.
- Coil the lights into a loose ball on top of the marble base.
- Place the red velvet heart in the center of the light coil.
- Wrap a few strands of the wire around the heart to hold it upright.
- Secure the battery pack to the back of the base using clear tape.
- Set the glass dome over the heart and the lights.
- Switch on the lights and hide the battery pack from view.
32 Chiffon Drape Window

Frame your window with a soft pink chiffon fabric that hangs in graceful waves. Small clusters of red roses act as tie backs at the top corners of the frame. This look softens the hard lines of a tiny apartment window.
Sheer fabrics allow natural light to filter through while providing privacy. The draping effect makes the ceiling feel higher and the room feel bigger. You will enjoy the view through this romantic and airy border.
Material Required List
- Five yards of pink chiffon fabric
- Six small artificial red roses
- White satin ribbon
- Tension curtain rod
Equipment Required List
- Measuring tape
- Scissors
DIY Instruction Step by Step
- Adjust your tension rod to fit the width of your window frame.
- Slide the chiffon fabric onto the rod so it is centered.
- Hang the rod at the very top of the window.
- Pull the fabric toward the left and right sides to create a swag in the middle.
- Use a piece of white ribbon to tie the fabric loosely to the rod ends.
- Group three red roses together and wire their stems.
- Pin the rose cluster over the ribbon tie on the left side.
- Repeat this for the right side to create a balanced look.
- Let the long ends of the chiffon hang down to the windowsill.
33 Sweet Heart Soap Dish
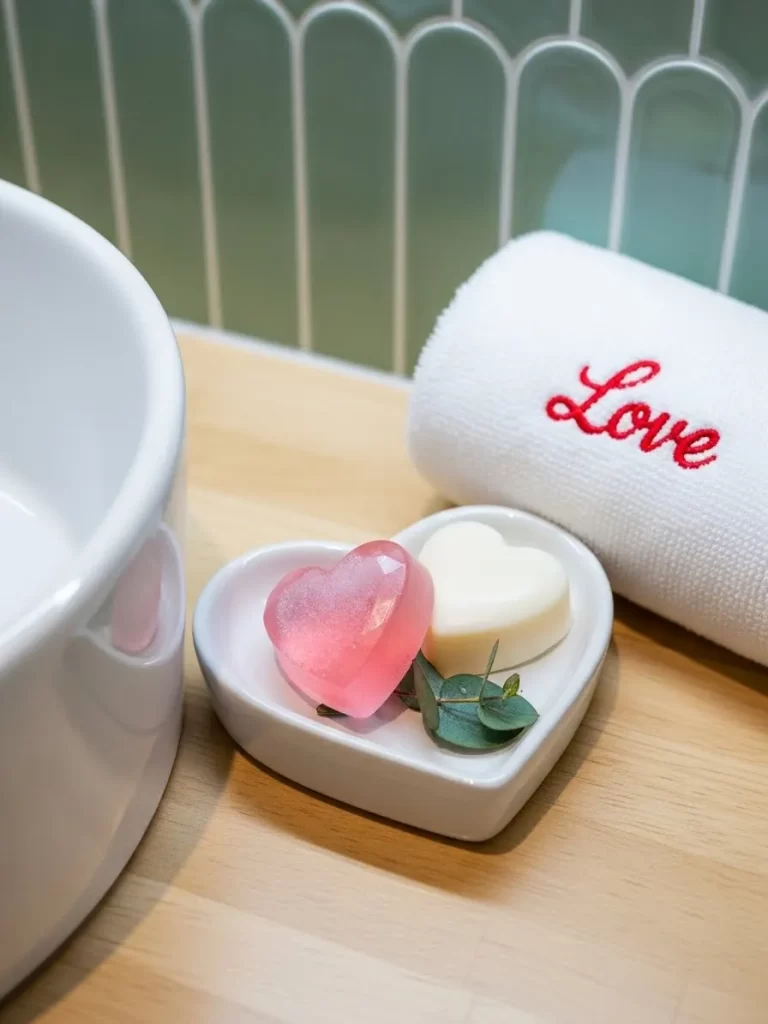
Refresh your bathroom vanity with heart shaped soaps in a ceramic dish. One translucent pink soap and one solid white soap sit together on a green leaf. A rolled white towel with red embroidery completes the spa look.
Small bathroom counters stay tidy with this compact and functional display. It adds a pop of color and a pleasant scent to a tiny space. Your guests will appreciate the thoughtful and festive detail.
Material Required List
- One heart shaped pink glycerin soap
- One heart shaped white cream soap
- One small white ceramic heart dish
- One fresh eucalyptus leaf
- One white hand towel with red stitching
Equipment Required List
- None
DIY Instruction Step by Step
- Wash and dry your ceramic heart dish thoroughly.
- Place the fresh eucalyptus leaf in the center of the dish.
- Set the pink glycerin soap on the left side of the leaf.
- Place the white cream soap on the right side so they touch.
- Roll the hand towel into a neat cylinder with the red stitching showing.
- Position the soap dish and the towel next to your bathroom sink.
- Change the leaf every few days to keep the display looking fresh.
34 Floating Acrylic Love Banner
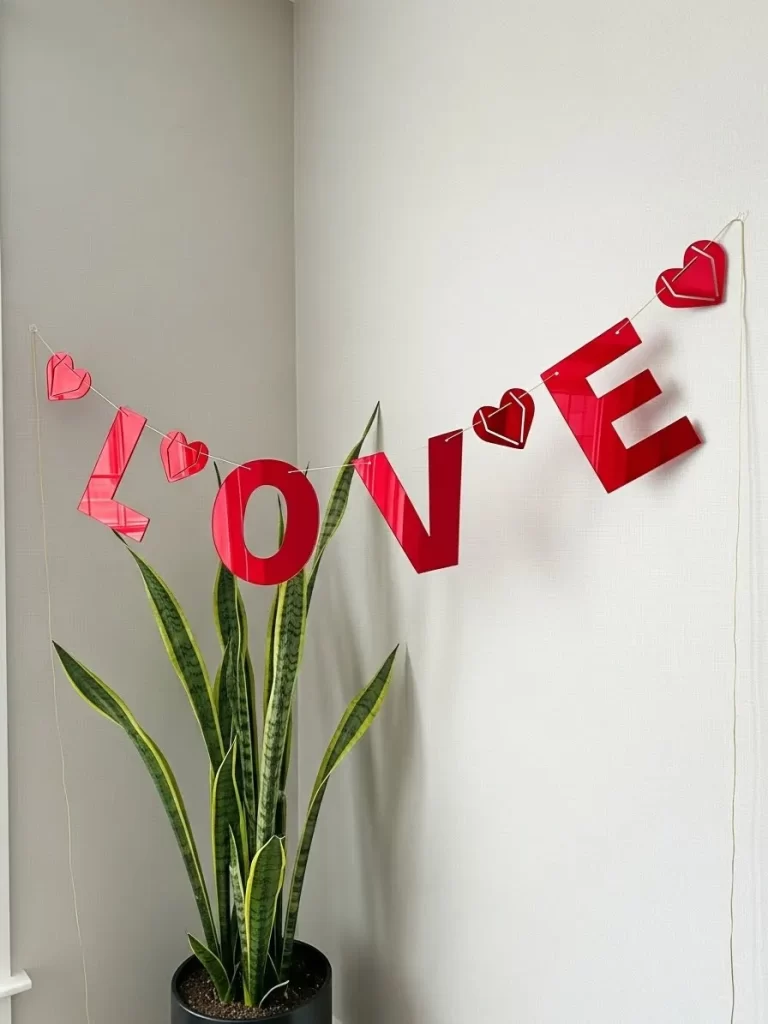
Hang a bold red banner over a tall plant to add a modern holiday touch. The large acrylic letters reflect the light and create sharp shadows on the wall. Tiny red hearts are spaced between the letters for a cute finish.
Acrylic decor is a great choice for small rooms because it is sleek and shiny. This banner uses the height of your plant to save wall space. It brings a pop of high contrast color to a neutral corner.
Material Required List
- Red acrylic letters spelling LOVE
- Four small red acrylic hearts
- Clear nylon thread
- Two small adhesive wall hooks
Equipment Required List
- Scissors
- Step ladder
DIY Instruction Step by Step
- Attach the two adhesive hooks to the walls behind your tall plant.
- Measure a piece of nylon thread that is five feet long.
- Tie one end of the thread to the left wall hook.
- Thread the acrylic letters and hearts onto the line.
- Arrange the sequence to show a heart and then a letter.
- Tie the other end of the thread to the right wall hook.
- Adjust the tension so the banner drapes slightly over the plant leaves.
- Space the letters evenly so the word LOVE is easy to read.
35 Mirror Candle Centerpiece
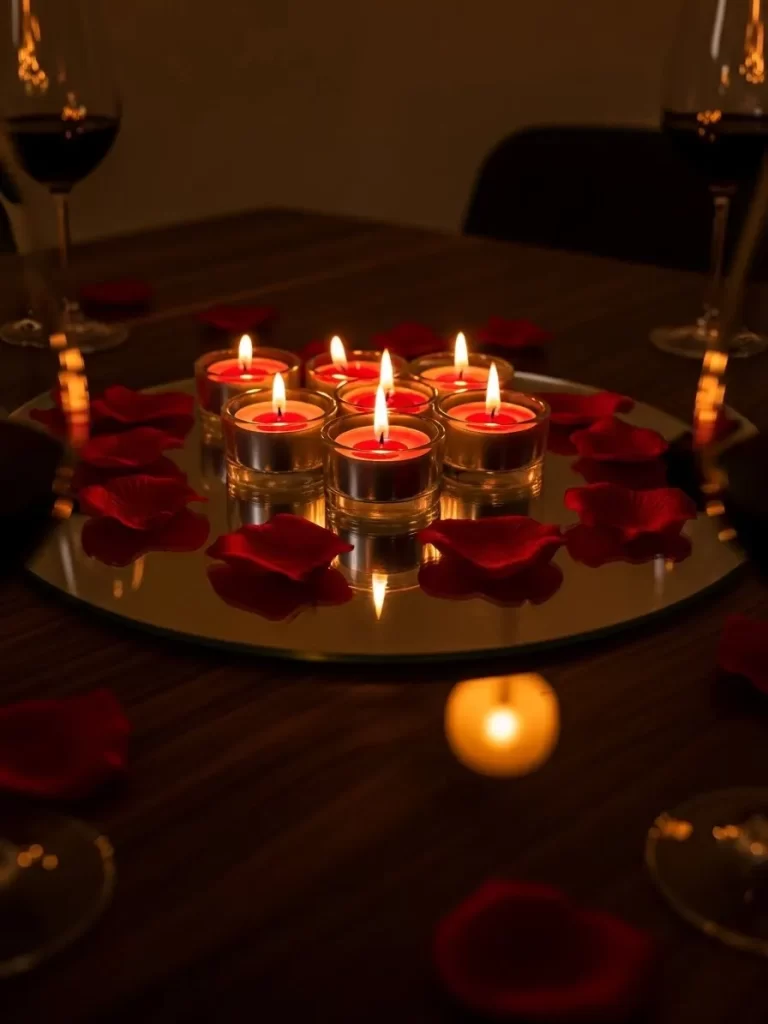
Create a glowing focal point on your dining table with a circular mirror. Seven red tea light candles in glass holders are clustered in the center. Fresh red rose petals are scattered around the glass to add romance.
Using a mirror as a base doubles the light and warmth in a tiny room. This centerpiece is low and will not block your conversation across the table. It is an easy way to set the mood for a special evening.
Material Required List
- One ten inch circular craft mirror
- Seven red tea light candles
- Seven clear glass candle holders
- One bag of fresh red rose petals
Equipment Required List
- Long handle lighter
DIY Instruction Step by Step
- Polish the circular mirror with a cloth to remove any smudges.
- Place the mirror in the center of your wooden dining table.
- Put one red tea light into each of the seven glass holders.
- Arrange the candle holders in a tight circle on the mirror.
- Scatter the rose petals around the edge of the mirror base.
- Drop a few petals on the table surface for a natural look.
- Use the long handle lighter to light each candle just before dinner.
- Enjoy the beautiful reflection of the flames on the mirror surface.
Creating a beautiful home does not require a massive floor plan. You only need a bit of creativity and some simple materials. These ideas show that love can fill even the smallest studio.
Take your time to select the projects that match your personal style. Your effort will turn a drab room into a place of joy. Enjoy the process of making your space feel special this February.
Key Takeaways
- Vertical space helps you decorate without creating physical clutter.
- Lighting changes the mood of a room more than bulky furniture.
- Simple items like paper and yarn create high impact looks for low costs.
- Colors like red and pink bring energy to neutral apartment palettes.
- Functional objects like mirrors and cabinets serve as great decor bases.