
Many homeowners find their dining rooms gathering dust throughout the year. These spaces often become landing zones for mail or laundry instead of family gatherings. Changing the atmosphere starts with a single focal point on the table.

A well chosen centerpiece breathes life back into a cold room. It sets the stage for a memorable evening with your partner. You can transform a boring surface into a romantic sanctuary with just a few materials.
This guide offers forty two unique ways to reclaim your space this February. These designs range from rustic wood to sparkling glass. Every option helps you create a setting that invites you to stay and talk for hours.
1 The Memory Shadow Box
Relevant Name: Vintage Love Story Shadow Box

Creating a centerpiece that tells your unique love story changes the entire mood of a dining space. This wooden shadow box holds special tokens such as old photos and maps showing where you first met. Small items like a pocket watch add a timeless feel to the arrangement.
Soft candlelight reflects off the glass to highlight deep red rose petals scattered inside the frame. Such a personal display invites meaningful conversation during dinner. It makes every meal feel like a beautiful celebration of your journey together.
Material Required List
- Wooden shadow box with a glass top
- White velvet or silk fabric for the base
- Vintage paper map of a special location
- Two small printed photographs
- Fresh or silk red rose petals
- Small antique items like a pocket watch or locket
Equipment Required List
- Sharp scissors
- Double sided tape
- Small glue dots
- Red ink pen
DIY Instructions
- Begin by removing the back panel from your wooden shadow box.
- Use your scissors to cut the white fabric so it matches the size of the back panel exactly.
- Apply glue dots to the corners of the panel and press the fabric down until it is flat and smooth.
- Take your vintage map and use the red pen to draw a small heart over a city that means something to you both.
- Stick the map onto the fabric using double sided tape in the upper right section.
- Place your two photos near the bottom edge so they overlap slightly.
- Arrange the pocket watch and any other heavy vintage items on the left side to balance the look.
- Toss a handful of rose petals over the empty spaces to add a pop of color.
- Put the glass and frame back together carefully and secure the clips on the back.
- Position the finished box in the center of your table and surround it with small candles.
2 The Golden Harvest
Relevant Name: Gilded Fruit and Moody Dahlia Display

Rich textures meet metallic shine in this opulent table display. Dark burgundy dahlias provide a moody backdrop for gold leaf pears and deep purple grapes. This setup feels luxurious yet organic. It encourages guests to linger over their drinks.
A velvet runner in forest green anchors the scene. This adds a soft layer of elegance to the dark wooden surface. These deep jewel tones create a sophisticated atmosphere. Such a choice moves beyond traditional pinks and bright reds.
Material Required List
- Forest green velvet runner
- Fresh pears
- Gold leaf sheets
- Burgundy dahlias in small tubes
- Large bunch of purple grapes
- Whole walnuts in shells
Equipment Required List
- Soft bristle paintbrush
- Gold leaf adhesive or sizing
- Low pedestal metal bowl
- Floral shears
DIY Instructions
- Clean the skins of your pears with a dry cloth to remove any dust.
- Apply a thin layer of gold leaf adhesive to the bottom half of each fruit using your brush.
- Wait for the glue to feel tacky before pressing the gold leaf sheets onto the surface.
- Brush away the extra gold flakes gently so the fruit looks naturally dipped.
- Lay your green velvet runner down the middle of the dining table.
- Place the metal pedestal bowl in the center of the runner.
- Arrange the gilded pears inside the bowl with the grape bunch draping over the edge.
- Trim the stems of your dahlias and place them into small water tubes.
- Tuck the flowers into the gaps between the fruit so they stand upright.
- Scatter walnuts and a few loose dahlias along the velvet runner to finish the look.
3 The Scholar’s Secret Garden
Relevant Name: Botanical Curiosity Glass Cloches

Science and romance blend beautifully in these glass bell jars. Tiny dried flowers and moss mounds sit atop smooth river stones. These miniature worlds create a sense of wonder for your table.
Vintage botanical prints and magnifying glasses spread across the surface add an air of discovery. This intellectual approach to decor sparks unique talking points between partners. Every small detail invites a closer look at the natural beauty preserved under the glass.
Material Required List
- Three glass cloches with wooden bases
- Assorted preserved moss
- Small dried yellow flowers
- Large smooth river stones
- Vintage botanical sketches or paper
- Quail eggs or decorative speckled stones
Equipment Required List
- Long tweezers
- Clear craft glue
- Paper scissors
DIY Instructions
- Place a large river stone in the center of each wooden base.
- Apply a small amount of glue to the bottom of the moss pieces.
- Press the moss onto the top and sides of the stones until they are covered.
- Use your tweezers to poke the stems of dried flowers into the moss.
- Put the glass cloches over the moss mounds to seal them.
- Set the largest cloche in the middle of the table.
- Position the two smaller jars on either side of the main one.
- Lay the vintage botanical papers flat on the table underneath the jars.
- Group the speckled eggs or extra moss around the bases.
- Rest a magnifying glass nearby to complete the scholarly aesthetic.
4 The Midnight Bloom Trio
Relevant Name: Minimalist Glass Anemone Arrangement
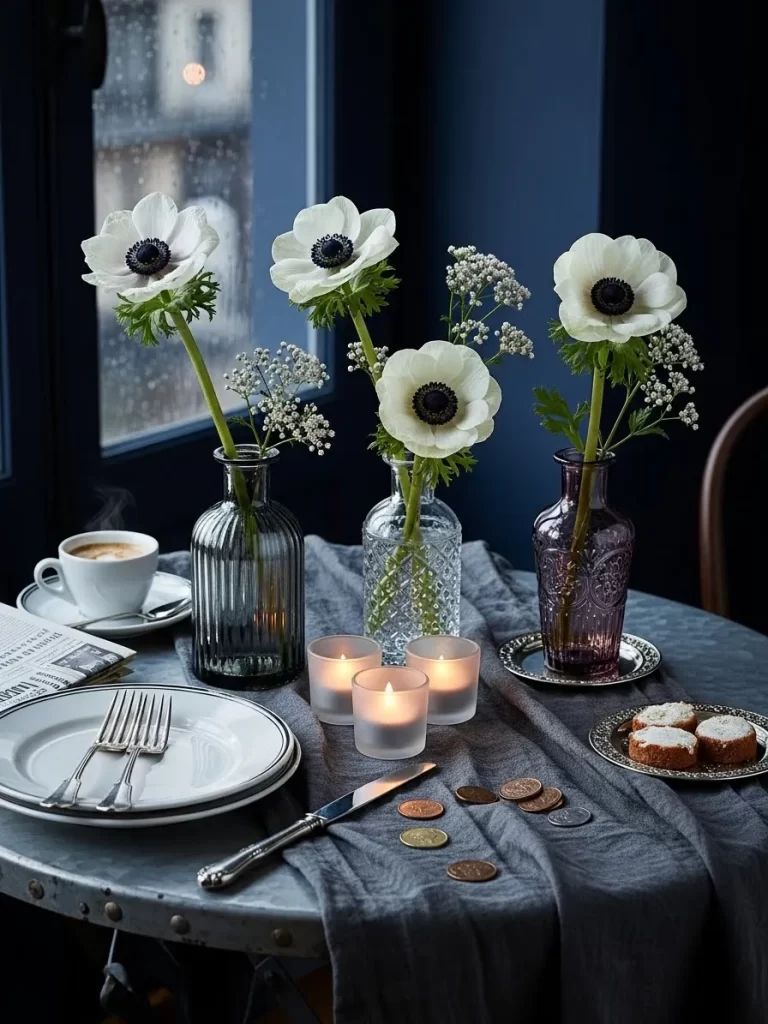
Simplicity often carries the most emotional weight during a quiet dinner. Three distinct glass bottles in grey, clear, and purple hues hold striking white anemones. These flowers stand tall with their dark centers.
The delicate petals contrast against a moody blue wall and charcoal linen cloth. Small frosted votives cast a gentle glow across the table. This illuminates the space without overwhelming the diners. This clean look suits a modern apartment or a cozy breakfast nook for two.
Material Required List
- Three glass bottles of varying heights and colors
- Five fresh white anemones
- Small bunch of white baby breath
- Three frosted glass votive candles
- Charcoal grey linen tablecloth
Equipment Required List
- Sharp floral shears
- Water pitcher
DIY Instructions
- Cover your dining table with the charcoal grey linen cloth.
- Fill your three glass bottles halfway with fresh water.
- Trim the stems of your anemones at an angle so they sit at different heights.
- Place two anemones in the tallest bottle and one in each of the others.
- Add a few sprigs of baby breath to the bottles to fill out the empty spaces.
- Align the bottles in the center of the table with the tallest one in the middle.
- Place the three frosted votives in a small cluster in front of the bottles.
- Light the candles just before your meal starts to create a soft glow.
- Ensure the flower petals are not touching the candle flames.
- Wipe away any water drops on the glass for a crisp finish.
5 The Balanced Serenity Stack
Relevant Name: Zen Stone and Moss Cairn
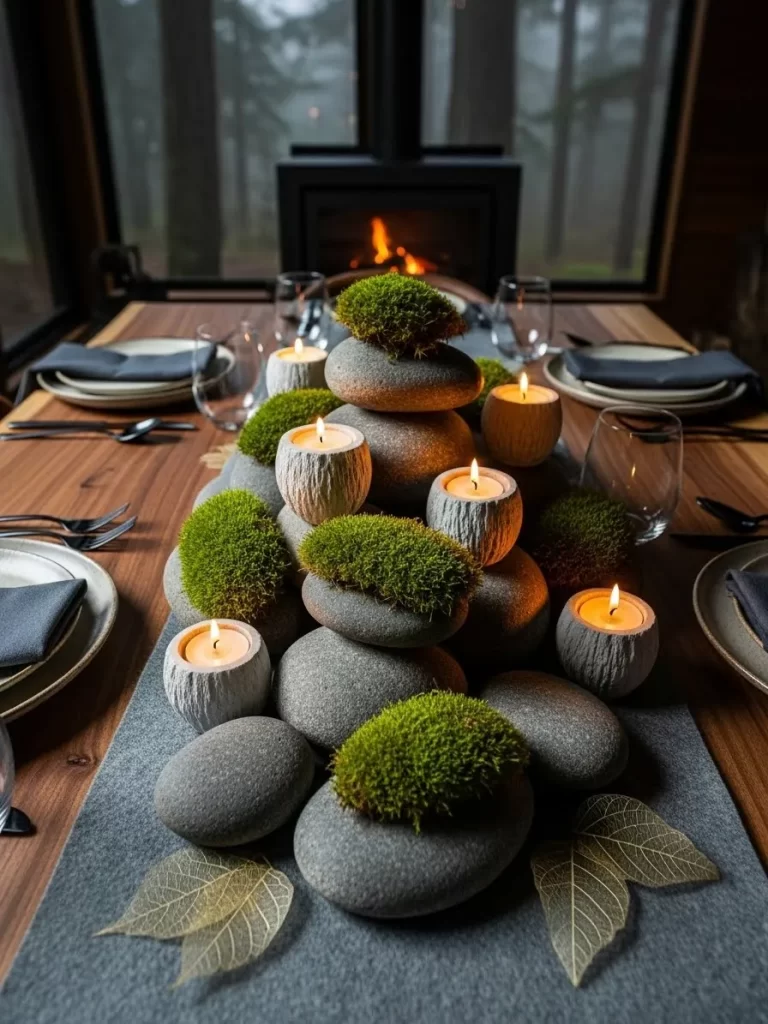
Bringing the outdoors inside creates a grounding environment for a romantic meal. Smooth grey river stones are stacked carefully to mimic natural cairns. Lush green moss cushions the hard surfaces of the rocks.
Recessed tea lights provide a flickering warmth that reflects off the stones. This arrangement feels peaceful and steady. It serves as a reminder to slow down and enjoy the quiet presence of your loved one.
Material Required List
- Fifteen flat river stones in various sizes
- Preserved green moss clumps
- Six tea light candles in stone holders
- Dark grey felt or fabric runner
- Skeleton leaves for decoration
Equipment Required List
- Hot glue gun
- Glue sticks
DIY Instructions
- Lay the dark grey felt runner across the center of your wooden table.
- Select your largest, flattest stones to act as the base of the stack.
- Build a pyramid shape by stacking the stones from largest to smallest.
- Use a small dot of hot glue between stones if they feel unstable.
- Stuff pieces of preserved moss into the crevices between the rocks.
- Arrange the stone tea light holders around the base of the rock pile.
- Place one tea light on a flat stone near the top of the stack.
- Tuck extra moss around the bottom of the entire arrangement.
- Scatter a few golden skeleton leaves on the runner for a delicate touch.
- Light the candles to see how the shadows play off the mossy textures.
6 The Celestial Paper Flight
Relevant Name: Origami Crane Hanging Cloud
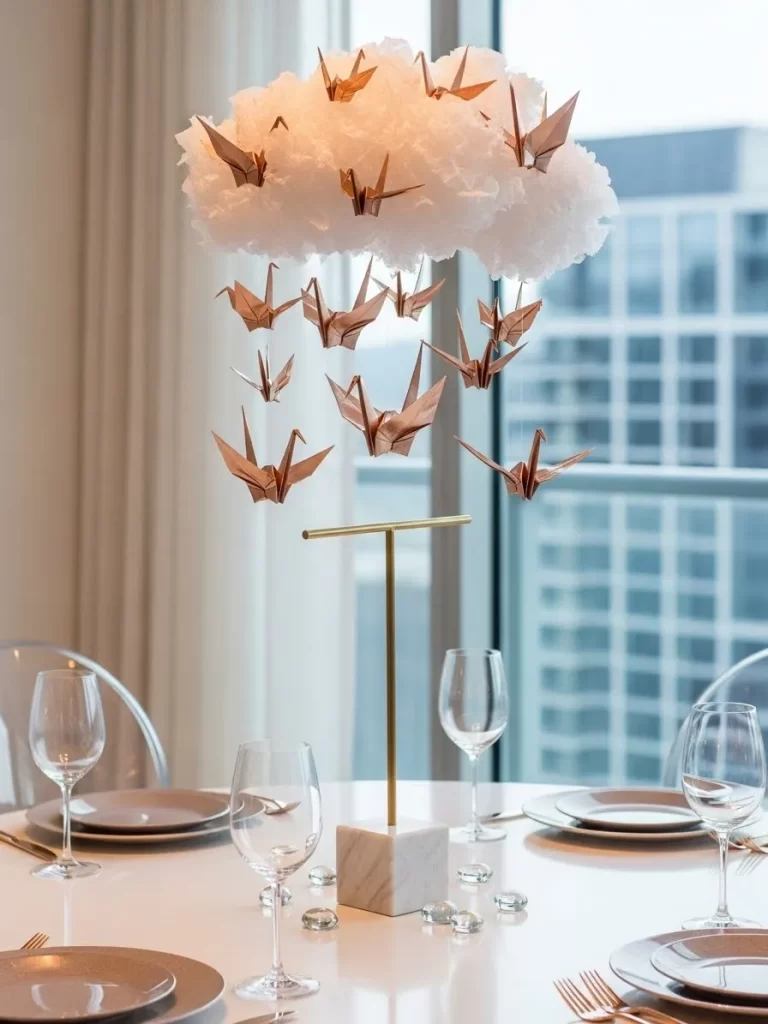
Whimsy takes flight with this suspended paper sculpture. A fluffy white cloud hovers above the table surface. Rose gold origami cranes dangle from invisible threads.
This vertical display keeps the table surface clear for food. It draws the eye upward and adds a sense of light. Symbolic of peace and longevity, the cranes add a layer of deep meaning to your celebration. Sunlight or lamps make the metallic paper shimmer beautifully.
Material Required List
- White polyester fiberfill or cotton batting
- Rose gold metallic craft paper
- Clear fishing line
- Marble base with a gold T bar stand
- Glass pebbles
Equipment Required List
- Needle
- Scissors
- Paper folding tool
DIY Instructions
- Fold twelve paper cranes using the rose gold metallic paper.
- Cut lengths of fishing line ranging from six to twelve inches long.
- Thread the line through the center of each crane and tie a knot.
- Shape the fiberfill into a large, fluffy cloud form.
- Attach the cloud to the top of the gold T bar stand using small bits of wire or glue.
- Tie the other ends of the fishing lines to the T bar so the cranes hang at different levels.
- Adjust the cranes so they look like they are flying out from under the cloud.
- Place the marble base in the center of your dining table.
- Spread glass pebbles around the base to hide the stand feet.
- Position your dinner plates around this tall centerpiece for an airy feel.
7 The Regency Romance Candelabra
Relevant Name: Pearl Draped Brass Candelabra
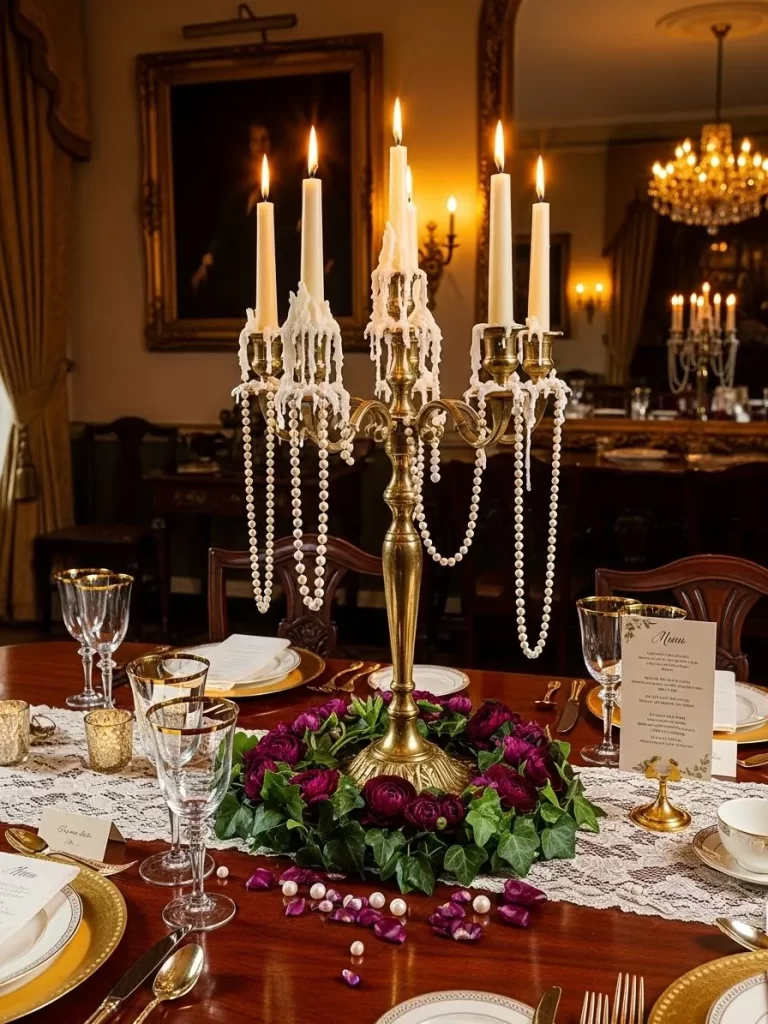
Old world glamour shines through in this brass candle arrangement. Long white tapers drip wax naturally. This gives the piece a lived in and authentic vintage feel.
Strands of faux pearls drape from the arms like jewelry. They catch the light as the evening progresses. A lush wreath of dark purple ranunculus and ivy sits at the base. This grounds the height with vibrant life and deep color.
Material Required List
- Five arm brass candelabra
- Five tall white taper candles
- Three long strands of faux pearls
- Purple ranunculus flowers
- Fresh ivy vines
- White lace table runner
Equipment Required List
- Lighter or matches
- Floral wire
DIY Instructions
- Place the white lace runner down the length of your dining table.
- Set the brass candelabra firmly in the center of the runner.
- Insert the white taper candles into the holders.
- Drape the pearl strands over the arms of the candelabra so they loop gracefully.
- Create a circular wreath at the base using the fresh ivy vines.
- Secure the ivy ends with small pieces of floral wire.
- Cut the stems of the purple ranunculus very short.
- Nest the flower heads into the ivy wreath until it looks full.
- Light the candles ten minutes before dinner to allow some wax to drip.
- Scatter a few loose petals and pearls on the lace to finish the scene.
8 The Modern Noir Floral Row
Relevant Name: Linear Calla Lily Glass Row
Sleek lines and deep colors define this contemporary approach to romantic decor. Deep purple calla lilies stand individually in tall glass cylinders. This linear placement stretches across the length of a long table.
Every guest has a clear view of the beauty from their seat. Small black votive holders break up the transparency of the glass. It is a bold choice for those who appreciate architectural shapes and a sophisticated palette.
Material Required List
- Five tall slender glass cylinder vases
- Five dark purple calla lilies
- Four small black ceramic votive holders
- White tea light candles
- Grey modern table mats
Equipment Required List
- Water pitcher
- Scissors
DIY Instructions
- Arrange the grey table mats along the center of the table in a row.
- Place the five glass cylinders in a perfectly straight line on top of the mats.
- Pour two inches of clean water into each glass vase.
- Trim the ends of the calla lily stems so they are the same length.
- Put one lily into each vase so the flower head peeks over the rim.
- Position the black votive holders in the spaces between the glass vases.
- Drop a white tea light into each black holder.
- Align everything carefully to maintain the sharp linear look.
- Light the candles to create a contrast between the dark flowers and bright flames.
- Check that the water remains clear for a polished appearance.
9 The Seaside Sunset Basin
Relevant Name: Coastal Sand and Floating Candle Tray

Transport your dinner to the coast with a centerpiece inspired by the beach. Fine white sand fills a large glass tray. It serves as a soft bed for conch shells and starfish.
A smaller glass bowl sits nestled in the sand. This bowl holds water and floating white candles. Pink rose petals drift on the water surface. This evokes the feeling of a warm summer night by the ocean.
Material Required List
- Large circular glass tray
- Small clear glass bowl
- Two pounds of fine white sand
- Three large conch shells
- Two dried starfish
- Four floating white candles
- Fresh pink rose petals
- Small piece of driftwood
Equipment Required List
- Matches
- Small cup for pouring sand
DIY Instructions
- Place the large glass tray in the middle of your table.
- Pour the white sand into the tray until it is one inch deep.
- Use your hand to smooth the sand out to the edges.
- Press the small glass bowl into the sand in the center of the tray.
- Fill the small bowl with water almost to the top.
- Arrange the conch shells and driftwood on the sand around the bowl.
- Place the starfish leaning against the shells for a natural look.
- Set the floating candles into the water bowl.
- Sprinkle a few pink rose petals onto the water around the candles.
- Light the candles to see the light reflect off the sand and water.
10 The Satin Streamer Bouquet
Relevant Name: Pastel Tulip and Ribbon Cascade
Soft pink tulips offer a classic nod to spring and new beginnings. Long ribbons in shades of burgundy and dusty rose tie around the vase. These fabric trails flow down onto the table.
The ribbons act like a built in runner. They connect the centerpiece to the place settings. Movement from the ribbons adds a playful touch to the dining room. It creates a gentle atmosphere for a lighthearted Valentine meal.
Material Required List
- Ten fresh pink tulips
- Tall clear glass vase
- Three yards of burgundy satin ribbon
- Three yards of dusty rose satin ribbon
- Three yards of cream silk ribbon
- White gauze table runner
Equipment Required List
- Fabric scissors
- Floral shears
DIY Instructions
- Lay the white gauze runner across the table for a textured base.
- Fill the glass vase halfway with cool water.
- Trim the tulip stems and remove any leaves that would sit below the water line.
- Arrange the tulips in the vase so they lean out naturally.
- Cut your three different ribbons into equal lengths of about two yards each.
- Hold all the ribbons together and wrap them once around the neck of the vase.
- Tie a simple knot at the front of the vase.
- Pull the ribbon ends out so they drape across the table toward the chairs.
- Trim the ends of the ribbons at an angle to prevent fraying.
- Position the vase in the center of the table and adjust the ribbon flow.
11 The Candyland Love Jar
Relevant Name: Sweetheart Marshmallow and Candy Buffet
Bright colors and sugary treats bring a playful energy to your Valentine table. This large glass jar overflows with red hearts and pink marshmallows to create a joyful focal point. Using candy as decor makes the setting feel lighthearted and fun for guests of all ages.
A red and white checkered runner sits beneath the display to add a classic picnic feel. Small milk bottles with striped straws wait nearby for a sweet drink. This setup works wonderfully for a casual brunch or a family celebration filled with laughter.
Material Required List
- Large glass apothecary jar with a lid
- One bag of red heart shaped candies
- One bag of white marshmallows
- One bag of pink marshmallows
- Red and white checkered table runner
- Red heart paper cutout on a stick
Equipment Required List
- Long spoon for layering
- Scissors
DIY Instructions
- Spread the red and white checkered runner down the center of your table.
- Clean your glass apothecary jar so it is clear and free of fingerprints.
- Pour the pink and white marshmallows into the bottom third of the jar.
- Use your spoon to level the top of the marshmallow layer.
- Add a thick layer of red heart candies on top of the marshmallows.
- Finish with another layer of pink marshmallows until the jar is almost full.
- Place the lid securely on top of the jar.
- Slide the red heart stick into the candy so it stands tall at the back.
- Scatter extra red candies around the base of the jar on the runner.
- Set your plates and milk bottles around the centerpiece to complete the look.
12 The Minimalist Heart Branch
Relevant Name: Sculptural Winter Love Branch
Minimalist design often speaks louder than crowded arrangements. A single white branch stands tall in a smoked glass vase to provide a striking silhouette. This sculptural piece brings a touch of modern art to your dining area.
A bright red paper heart hangs from a thin thread to add a pop of color. It sways gently with the movement of the room. This simple gesture reminds us that love only needs a small spark to shine brightly in a quiet space.
Material Required List
- Large multi branched twig
- White matte spray paint
- Smoked glass cylinder vase
- Red cardstock paper
- Black sewing thread
- Black felt circular base
Equipment Required List
- Hot glue gun
- Scissors
DIY Instructions
- Take your twig outside and spray it with white matte paint until it is fully covered.
- Allow the branch to dry completely for at least two hours.
- Cut a medium heart shape out of your red cardstock paper.
- Fold the heart down the middle to give it a three dimensional look.
- Attach a loop of black thread to the top of the heart with a tiny drop of glue.
- Place the black felt base in the center of your table.
- Set the smoked glass vase on the felt and place the branch inside.
- Hang the red heart from one of the lower branches so it dangles freely.
- Adjust the branch so it looks balanced and does not tip the vase.
- Keep the surrounding area clear to emphasize the simple lines of the branch.
13 The Copper Heart Air Plant
Relevant Name: Industrial Wire Heart and Orchid Frame
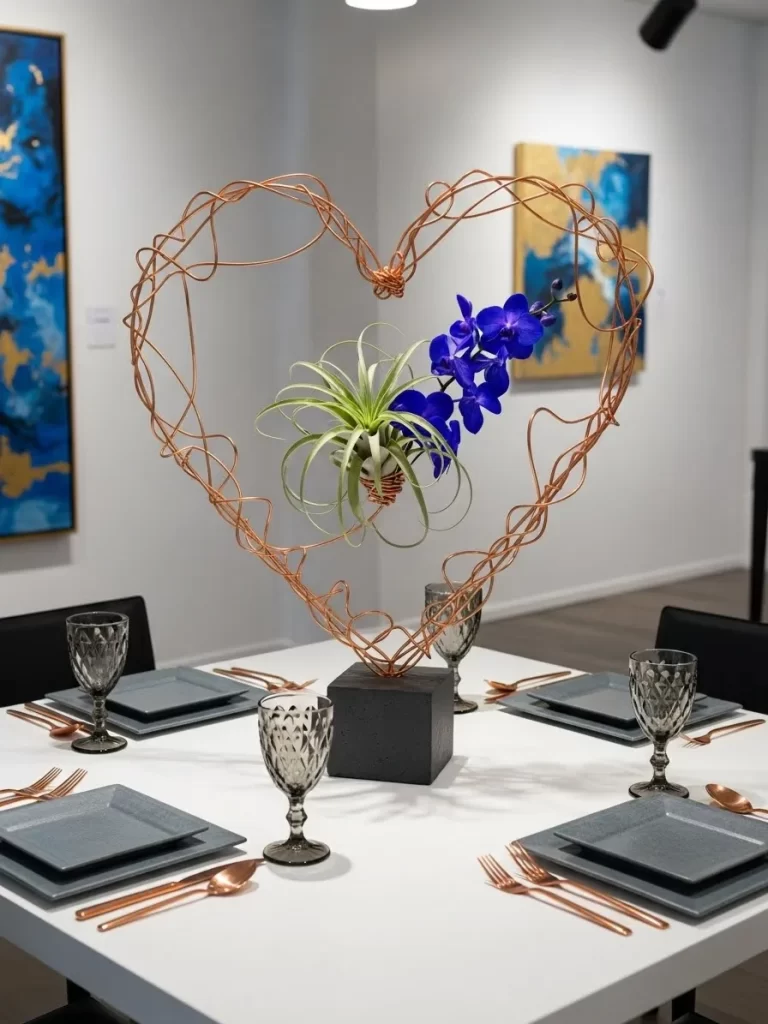
Industrial charm meets natural life in this artistic wire sculpture. A large heart shape made from tangled copper wire stands as a bold centerpiece. This unique structure holds a vibrant air plant and deep blue orchids.
The metallic glow of the copper contrasts with the white table surface. Such a modern piece works well in a gallery style home. It shows that romance can be both edgy and organic at the same time.
Material Required List
- Thick copper jewelry wire
- One large tillandsia air plant
- One stem of blue dendrobium orchids
- Black wooden block base
- Thin copper binding wire
Equipment Required List
- Wire cutters
- Needle nose pliers
- Drill with a small bit
DIY Instructions
- Bend your thick copper wire into a large heart shape roughly twelve inches wide.
- Wrap the wire around itself several times to create a messy and thick texture.
- Secure the ends of the heart together at the bottom point.
- Drill a small hole into the center of your black wooden block.
- Insert the bottom point of the wire heart into the hole and use glue if needed.
- Take your air plant and nestle it into the center of the wire heart.
- Use the thin binding wire to hold the air plant loosely in place.
- Tuck the stem of blue orchids behind the air plant so the flowers peek through.
- Place the finished sculpture in the middle of a white table.
- Mist the air plant with water once a week to keep it looking fresh.
14 The Floating Rose Bowl
Relevant Name: Serene Grey Basin of Floating Roses
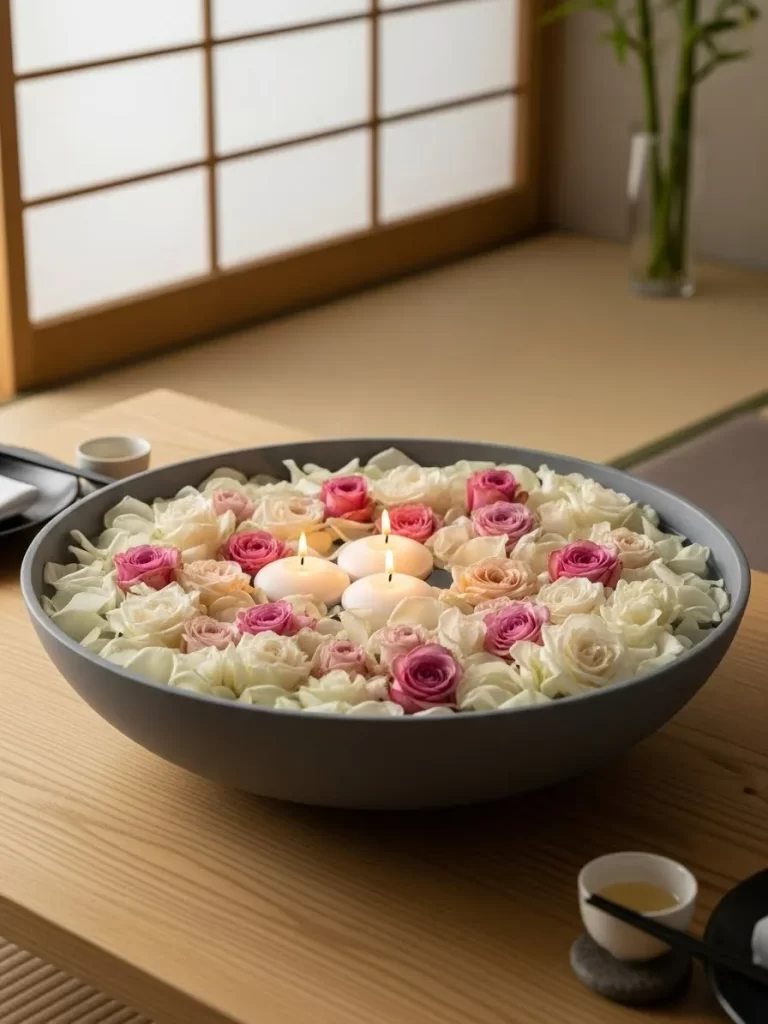
Softness and water create a peaceful atmosphere for a long dinner conversation. A large grey ceramic bowl is filled with water and covered in white rose petals. Floating candles sit in the center to provide a gentle flickering light.
Pops of pink roses break up the white surface to add depth. This centerpiece stays low to the table. This allows guests to see each other easily without any obstructions. It is a classic choice for a calm and romantic evening.
Material Required List
- Large wide grey ceramic bowl
- Two dozen white roses
- One dozen pink roses
- Three white floating disc candles
- Fresh water
Equipment Required List
- Floral shears
- Small pitcher
DIY Instructions
- Place your large grey bowl in the exact center of the dining table.
- Fill the bowl three quarters full with room temperature water.
- Pluck the petals off most of the white roses.
- Scatter the white petals across the surface of the water until it is hidden.
- Cut the heads off the pink roses and a few white ones leaving no stem.
- Arrange the full flower heads in a circular pattern around the edge of the bowl.
- Place the three floating candles in a triangle shape in the middle.
- Ensure the petals do not cover the wicks of the candles.
- Light the candles just before your partner arrives.
- Add a few drops of rose oil to the water for a subtle scent.
15 The Tea Party Macaron Tier
Relevant Name: Sweet Treat Tiered Moss Stand
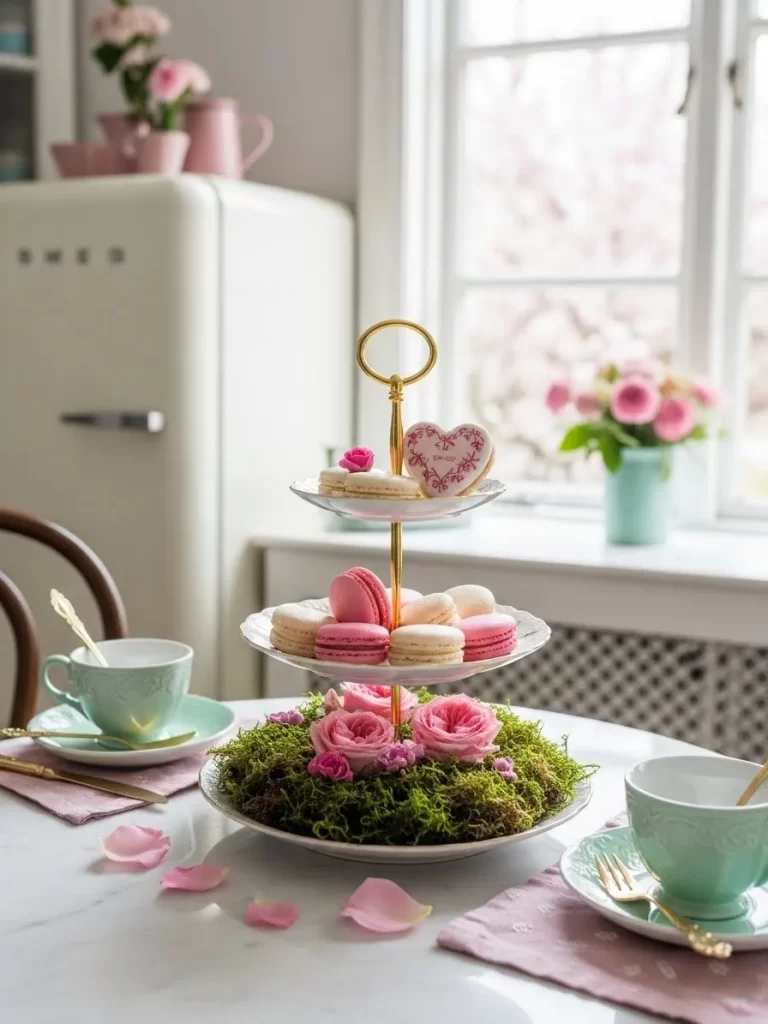
Gourmet flavors and garden textures combine in this delightful dessert display. A three tiered white stand holds an assortment of pink and cream macarons. The bottom level is covered in lush green moss and fresh roses.
This arrangement serves as both a centerpiece and a final course for your meal. It brings a sense of playful luxury to the table. The height of the stand adds a vertical element that catches the eye immediately.
Material Required List
- Three tier white porcelain dessert stand
- One dozen pink macarons
- One dozen vanilla macarons
- Preserved sheet moss
- Six small pink rose heads
- Heart shaped iced sugar cookies
Equipment Required List
- Scissors
- Tweezers
DIY Instructions
- Assemble your three tier stand according to the package directions.
- Cut the sheet moss to fit the entire bottom plate of the stand.
- Place the moss down and tuck the edges under so it looks like a natural mound.
- Nest three pink roses into the moss on the bottom level.
- Arrange the pink and cream macarons in a circle on the middle tier.
- Stack a few macarons on the top tier along with one or two roses.
- Lean a heart shaped cookie against the top handle for extra detail.
- Place the stand in the center of your table near your tea cups.
- Scatter a few loose rose petals on the table surface around the base.
- Offer the macarons to your guest as a sweet ending to the meal.
16 The Illuminated Tulip Tower
Relevant Name: Mirror Base Glowing Tulip Vases

Light reflects and multiplies in this high gloss floral arrangement. Five glass cylinders of different heights sit on a circular mirror. Each vase holds a single white ruffled tulip submerged in clear water.
Submersible tea lights at the bottom of the vases create a magical glow from within. This setup looks stunning in a room with dimmed lights. The ruffles of the tulips look like delicate lace under the water surface.
Material Required List
- Five glass cylinder vases in varying heights
- Five white ruffled tulips
- Five submersible LED tea lights
- Large circular mirror base
- Clear glass pebbles
Equipment Required List
- Water pitcher
- Scissors
DIY Instructions
- Place the circular mirror base in the center of your dining table.
- Turn on your submersible LED lights and drop one into the bottom of each vase.
- Pour an inch of clear glass pebbles over the lights to hide them.
- Fill each cylinder almost to the top with clean water.
- Trim your tulip stems so the flower heads will be fully underwater.
- Slide one tulip into each vase and use the pebbles to hold the stem base.
- Arrange the vases on the mirror with the tallest one in the center.
- Wipe away any water splashes from the mirror surface.
- Group the shorter vases around the central tower for a balanced look.
- Check that the LEDs are bright enough to illuminate the flower petals.
17 The Frosted Winter Berry Wreath
Relevant Name: Snowy Berry and Evergreen Candle Ring
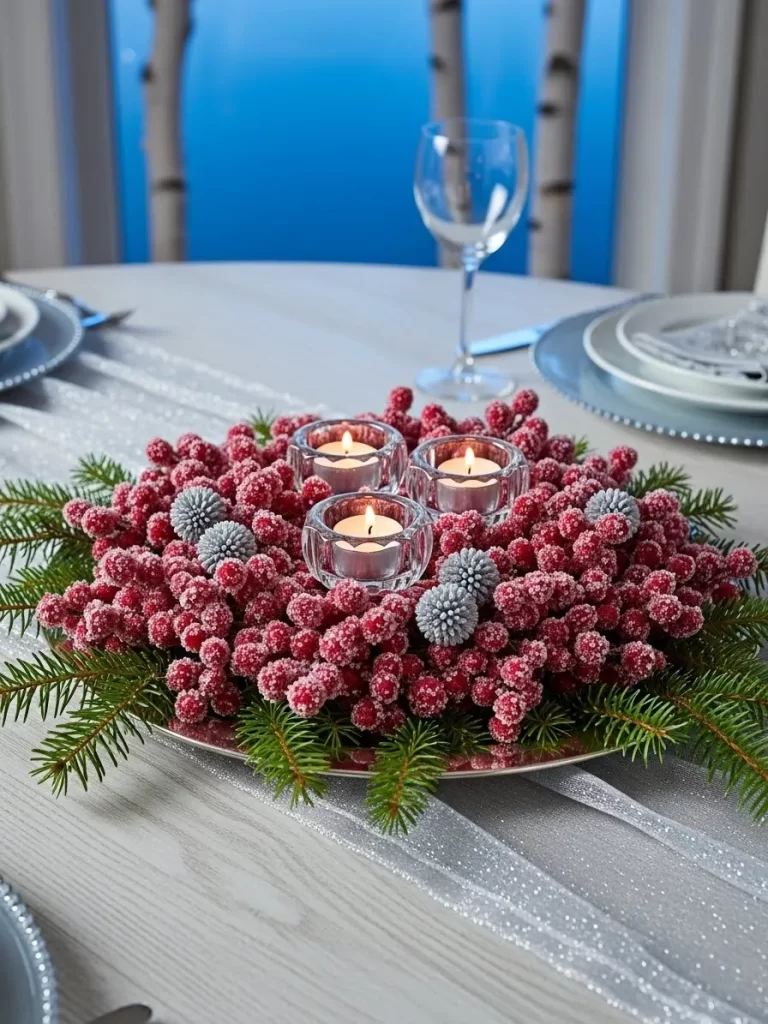
Cool tones and winter textures bring a crisp feel to your Valentine dinner. A thick wreath of frosted red berries sits on a silver charger plate. Three clear glass votives nestle in the center of the berries.
Sprigs of fresh evergreen poke out from the bottom to add a natural green contrast. The frosted coating on the berries looks like a light dusting of snow. This arrangement is great for a cozy meal by the fireplace on a cold February night.
Material Required List
- Large frosted red berry wreath
- Silver metal charger plate
- Three clear glass tea light holders
- White tea light candles
- Fresh pine or fir branches
- Silver glitter runner
Equipment Required List
- Floral wire
- Lighter
DIY Instructions
- Lay the silver glitter runner across your table.
- Place the silver charger plate in the middle of the runner.
- Set the frosted berry wreath directly onto the silver plate.
- Tuck small sprigs of fresh evergreen under the edges of the wreath.
- Position the three glass votive holders in a tight cluster in the center hole.
- Drop a white tea light into each glass holder.
- Adjust the berries so they are not touching the glass if it gets hot.
- Add a few silver pinecones around the base for extra texture.
- Light the candles to see the light sparkle off the frosted berries.
- Keep the wreath away from any moisture to preserve the frosting.
18 The Copper Mule Rose Row
Relevant Name: Spicy Cinnamon and Copper Rose Display
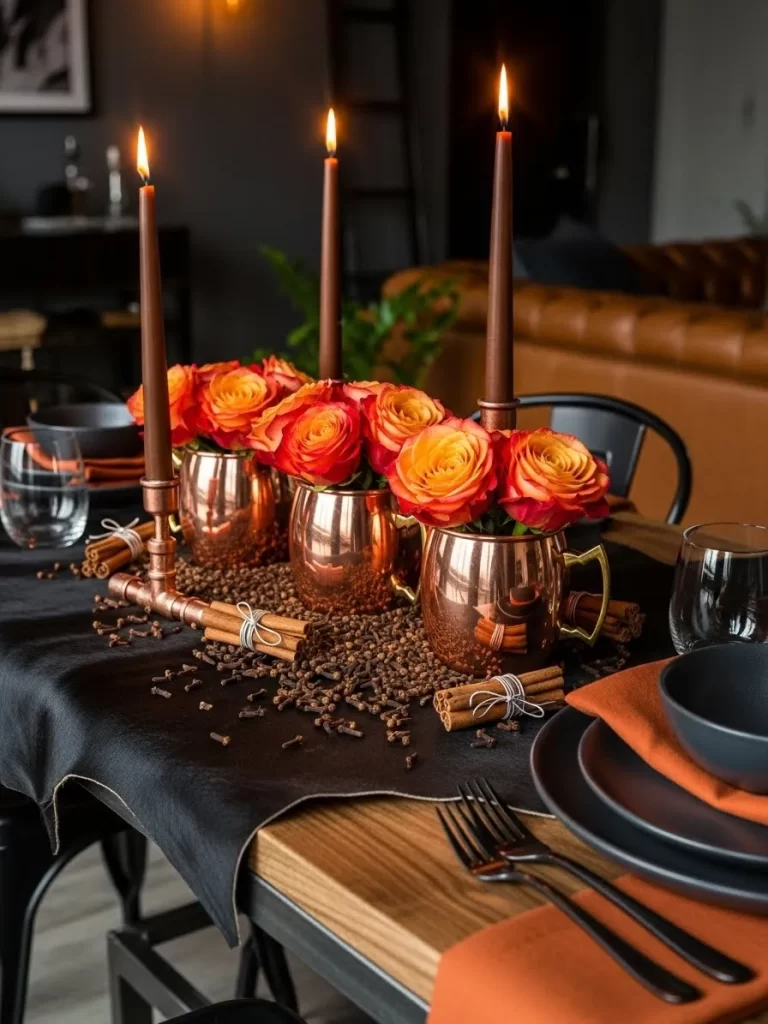
Warm metals and spicy scents create a sensory experience for your table. Three copper mugs act as unique vases for clusters of orange and pink roses. They sit on a bed of whole cloves and cinnamon sticks.
This centerpiece fills the room with a wonderful aroma of spice and flowers. The dark black tablecloth makes the copper shine even brighter. It is a masculine yet romantic look that feels sturdy and grounded.
Material Required List
- Three copper Moscow Mule mugs
- One dozen sunset orange roses
- Two cups of whole cloves
- Twelve large cinnamon sticks
- Black linen tablecloth
- White twine
Equipment Required List
- Floral shears
- Small bowl
DIY Instructions
- Cover your table with the black linen cloth for a high contrast base.
- Fill each copper mug with water and trim the roses to fit snugly inside.
- Place the three mugs in a row in the center of the table.
- Pour the whole cloves directly onto the tablecloth around the mugs.
- Spread the cloves into a rectangular shape that connects all three vases.
- Tie small bundles of cinnamon sticks together using the white twine.
- Rest the cinnamon bundles on top of the cloves between the mugs.
- Tuck a few extra rose heads into the clove bed for more color.
- Polish the copper mugs with a dry cloth so they reflect the candlelight.
- Ensure the clove scent is not too strong by spreading them thinly.
19 The Red Mercury Mirror
Relevant Name: Reflection of Love Mercury Votive Path
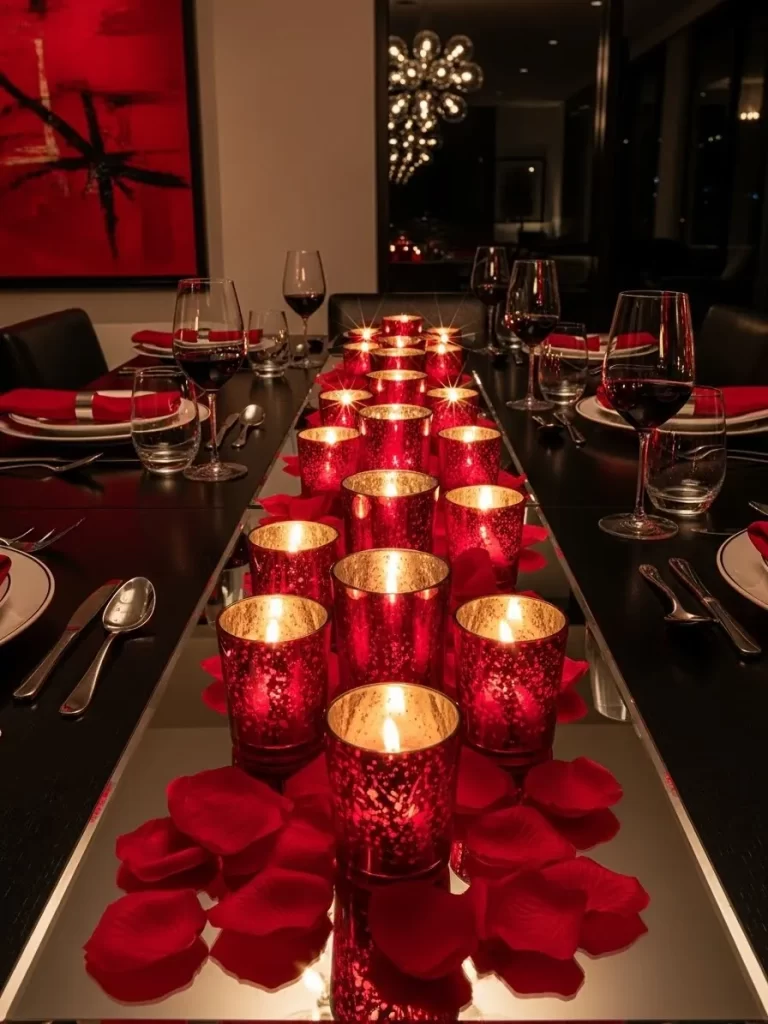
Dozens of small lights create a path of fire and shadow down your table. A long rectangular mirror serves as the base for various red mercury glass votives. These textured glass holders scatter the light in a beautiful pattern.
Red rose petals fill the spaces between the glass for a soft and classic touch. This long arrangement is great for rectangular tables where you want impact at every seat. The height stays low so you can focus entirely on your partner across the table.
Material Required List
- Long rectangular mirror runner
- Twelve red mercury glass votive holders
- Twelve white tea light candles
- Two cups of fresh red rose petals
- Red fabric napkins
Equipment Required List
- Long reach lighter
- Glass cleaner
DIY Instructions
- Clean your long mirror runner until it is streak free and shiny.
- Place the mirror down the center of your rectangular dining table.
- Arrange the red mercury glass holders in a zigzag pattern along the mirror.
- Put one tea light candle into each glass holder.
- Scatter the red rose petals generously over the mirror around the votives.
- Let some petals trail off the ends of the mirror onto the tablecloth.
- Fold your red napkins into simple rectangles and place them at each setting.
- Light all the candles just as you sit down for dinner.
- Watch how the red glass glows as the room gets darker.
- Keep a few extra candles nearby to replace any that burn out quickly.
20 The Romantic Poet Stack
Relevant Name: Literary Love Letter Book Stack
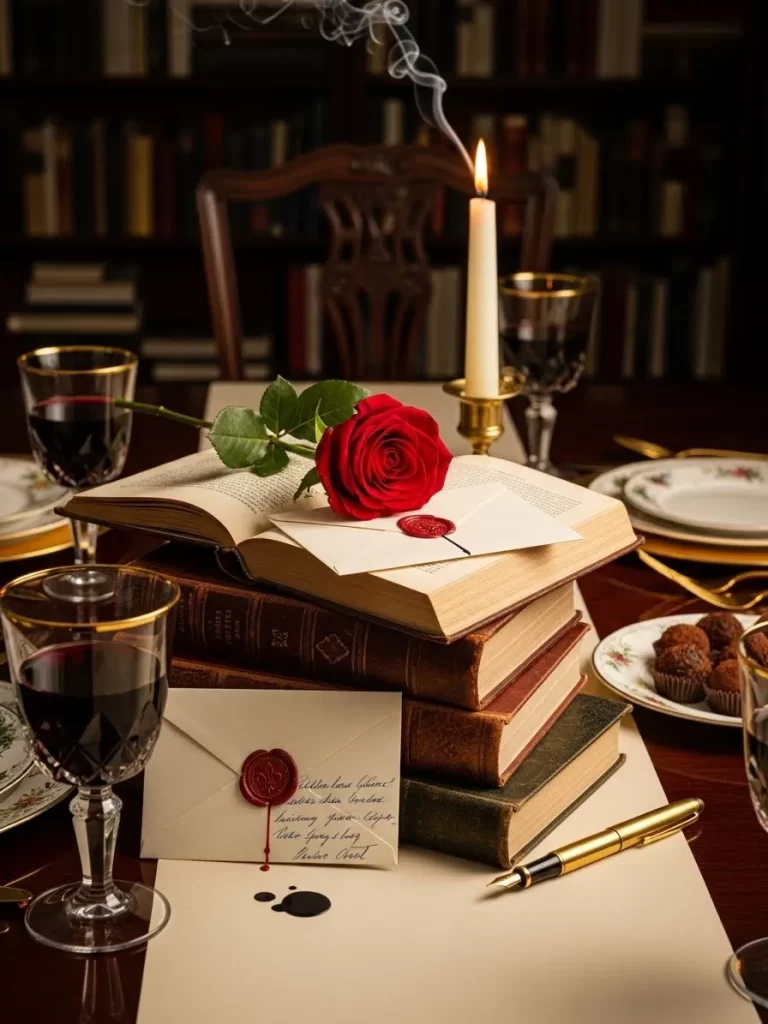
Classic literature and handwritten notes create a timeless atmosphere for your meal. A stack of vintage books serves as a pedestal for a single red rose. This arrangement feels intimate and thoughtful.
Wax sealed envelopes rest nearby to suggest a hidden message between lovers. A golden fountain pen adds a touch of historical charm to the scene. It is a beautiful way to celebrate a love that is written in the stars.
Material Required List
- Three vintage hardback books in brown or green
- One long stem red rose
- Two cream envelopes
- Red sealing wax and a stamp
- Golden fountain pen
- Small brass candle holder
Equipment Required List
- Matches
- Scissors
DIY Instructions
- Stack your three vintage books in the center of the table from largest to smallest.
- Angle the middle book slightly to create a more casual and artistic look.
- Place a cream envelope on top of the books and another on the table.
- Melt your red wax and press your stamp onto the back of the envelopes.
- Lay the golden fountain pen next to the envelopes as if someone just finished writing.
- Trim the stem of your red rose and rest it across the top book.
- Place the small brass candle holder next to the stack with a tall taper.
- Ensure the rose petals are away from the candle flame.
- Add a few small chocolates on a plate nearby to share during the meal.
- Blow out the candle before the wax drips onto your vintage books.
21 Royal Velvet Calla Display
Relevant Name: Midnight Purple Calla and Velvet Arrangement
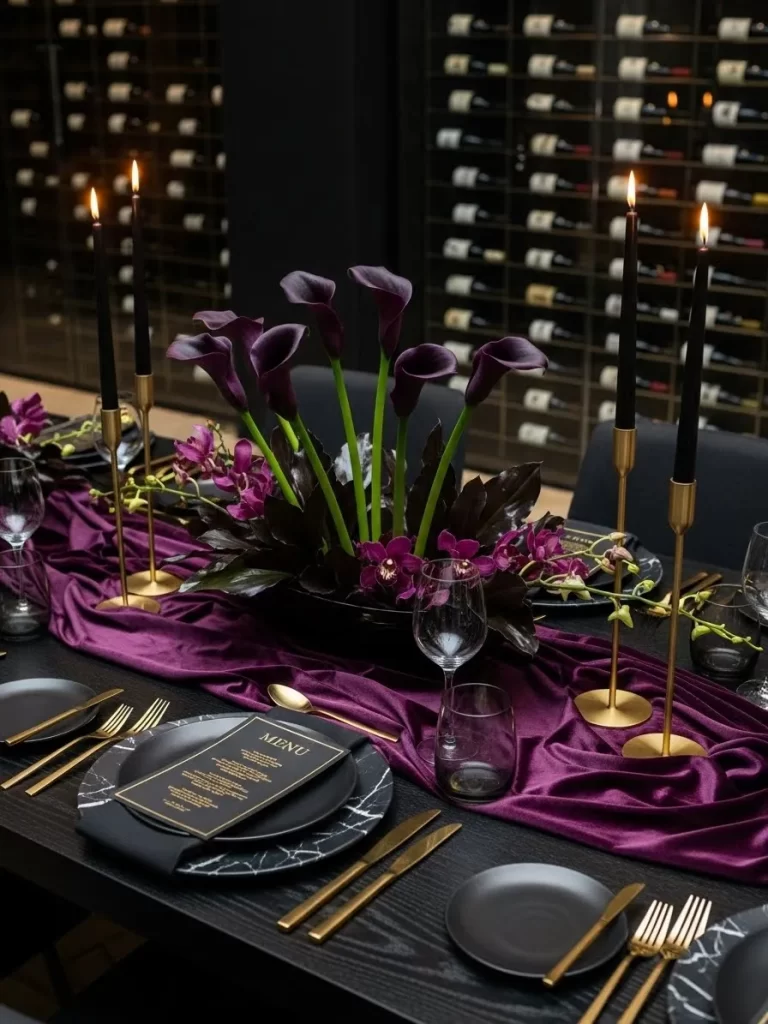
Deep purple tones create a sophisticated look for a winter evening. Dark calla lilies rise from a central bowl to command attention in the room. This arrangement pairs beautifully with a velvet runner.
Gold candle holders add just enough light to see the rich colors. Black marble plates complete the moody aesthetic. It is a bold departure from traditional bright reds. This setup encourages a slow and thoughtful dinner conversation.
Material Required List
- Low black ceramic floral bowl
- Twelve deep purple calla lilies
- Plum purple velvet table runner
- Four tall gold taper candle holders
- Black taper candles
- Floral foam block
Equipment Required List
- Floral shears
- Water pitcher
DIY Instructions
- Place the plum velvet runner down the center of your dining table.
- Soak your floral foam block in water until it is fully saturated.
- Trim the foam to fit tightly inside the black ceramic bowl.
- Cut the calla lily stems at different lengths to create a fan shape.
- Push the stems into the foam starting from the center and working outward.
- Ensure the flowers lean gracefully rather than standing straight up.
- Set the bowl in the middle of the velvet runner.
- Position the gold candle holders in pairs on both sides of the bowl.
- Insert the black taper candles and check that they are straight.
- Pour a little extra water into the bowl to keep the foam moist.
22 The Winter Knit Nest
Relevant Name: Chunky Knit Pinecone and Candle Runner

Comfort and warmth define this rustic centerpiece. A chunky cream knit runner acts as a soft base for a row of white pillar candles. Dried pinecones and delicate white baby breath fill the spaces between the lights.
Small silver stars scattered on the table add a touch of magic. This setup feels like a warm hug on a cold night. It works wonderfully in a home with lots of natural wood textures.
Material Required List
- Chunky cream knit table runner
- Four white pillar candles in varying heights
- Ten large dried pinecones
- One bunch of dried baby breath
- Small silver glitter star cutouts
- Glass candle plates
Equipment Required List
- Lighter
- Scissors
DIY Instructions
- Lay the chunky knit runner across the length of your wooden table.
- Place the four glass candle plates in a row down the center of the runner.
- Set one white pillar candle on each plate.
- Arrange the large pinecones around the bases of the candles in clusters.
- Snip small sprigs of baby breath and tuck them between the pinecones.
- Spread the silver stars across the runner and the table surface.
- Ensure the dry baby breath and pinecones are not touching the candle wicks.
- Light the candles to create a warm and cozy glow.
- Check that the candles are stable on the knit surface.
- Adjust the pinecones to hide the glass plates from view.
23 The Gatsby Gala Tray
Relevant Name: Champagne and Ostrich Feather Display
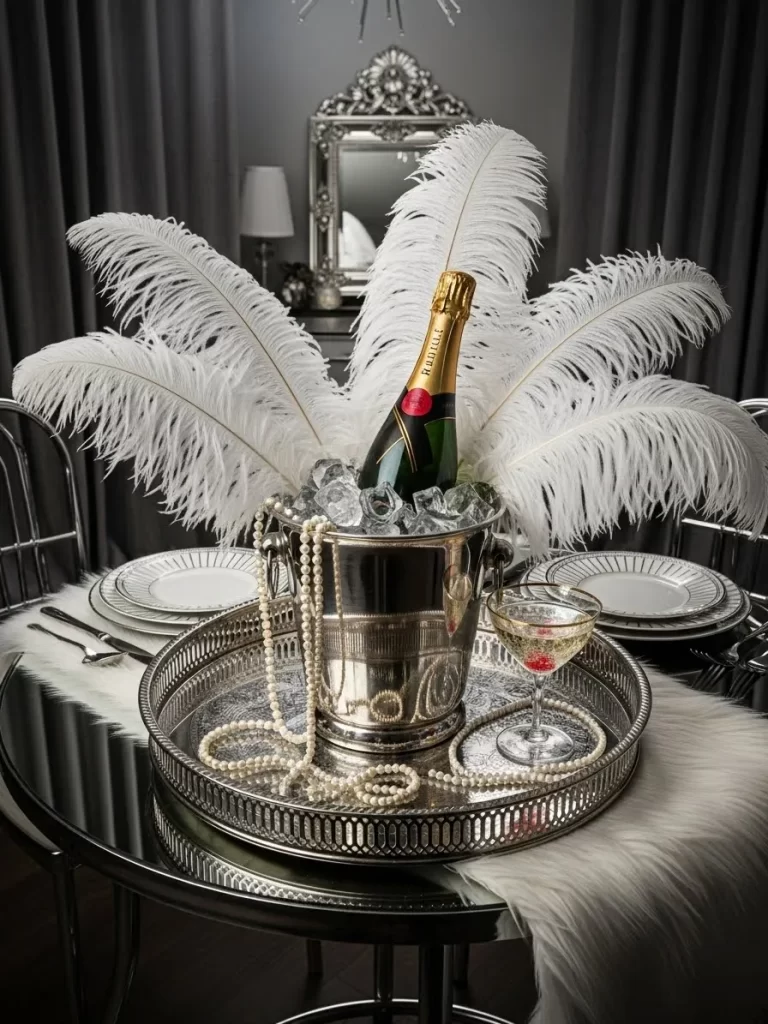
Celebrate your love with a touch of roaring twenties glamour. A silver galleried tray holds a bottle of chilled champagne nestled in ice. Large white ostrich feathers fan out from behind the bottle like a plume.
Strands of faux pearls drape over the edge of the tray to add elegance. This centerpiece is for those who want a dramatic and festive atmosphere. It brings a high end party feel to a private dinner for two.
Material Required List
- Large silver galleried serving tray
- Silver champagne bucket
- Bottle of champagne
- Six large white ostrich feathers
- Two strands of faux pearls
- Bag of clear ice cubes or glass ice rocks
Equipment Required List
- Microfiber polishing cloth
- Small bowl for feather support
DIY Instructions
- Polish the silver tray and champagne bucket until they shine.
- Place the tray in the center of your dining table.
- Set the champagne bucket on one side of the tray.
- Fill the bucket with ice and nestle the champagne bottle inside.
- Place a small heavy bowl behind the bucket on the tray.
- Insert the stems of the ostrich feathers into the bowl so they fan out wide.
- Adjust the feathers so they frame the champagne bottle.
- Drape the pearl strands over the tray edge and around the bucket base.
- Place two crystal champagne flutes on the tray next to the bucket.
- Ensure the tray is level so the ice does not melt and slide.
24 The Rustic Rose Lantern
Relevant Name: Weathered Wood and Eucalyptus Lantern Wreath
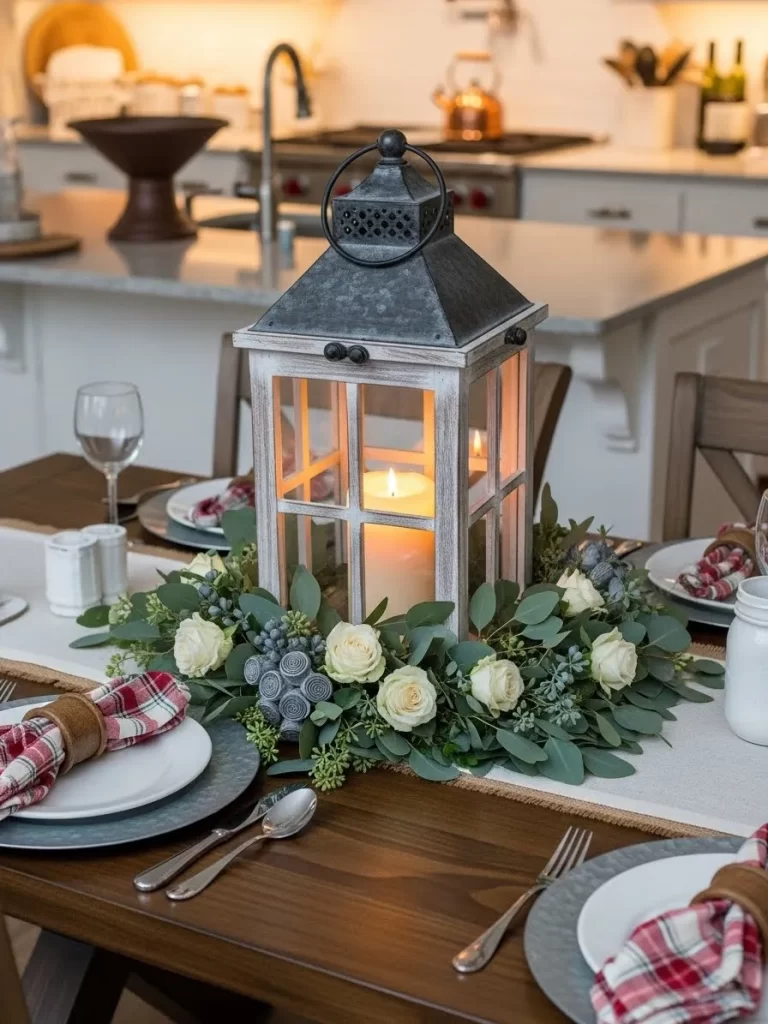
Vintage charm meets garden freshness in this grounded centerpiece. A large weathered wood lantern sits in the middle of a lush eucalyptus wreath. Creamy white roses are tucked into the greenery to provide a soft contrast.
A single large candle inside the lantern provides a safe and steady light. This look is earthy and romantic. It suits a farmhouse style home or an outdoor patio dinner under the stars.
Material Required List
- Large white weathered wood lantern
- One large cream pillar candle
- Fresh eucalyptus garland
- Eight fresh white roses
- Small sprigs of blue berries or thistle
- Burlap table runner
Equipment Required List
- Floral wire
- Sharp scissors
DIY Instructions
- Lay the burlap runner across your dining table.
- Set the wooden lantern in the center of the runner.
- Place the pillar candle inside the lantern and close the door.
- Wrap the eucalyptus garland around the base of the lantern to form a circle.
- Use small bits of floral wire to secure the ends of the garland together.
- Cut the rose stems to about two inches long.
- Push the rose stems into the eucalyptus wreath at equal intervals.
- Add the blue berries or thistle sprigs to fill in any thin spots.
- Fluff the leaves so the wreath looks full and natural.
- Light the candle to see the greenery glow from the center.
25 The Floating Rose Canopy
Relevant Name: Suspended Glass Rose Bubbles
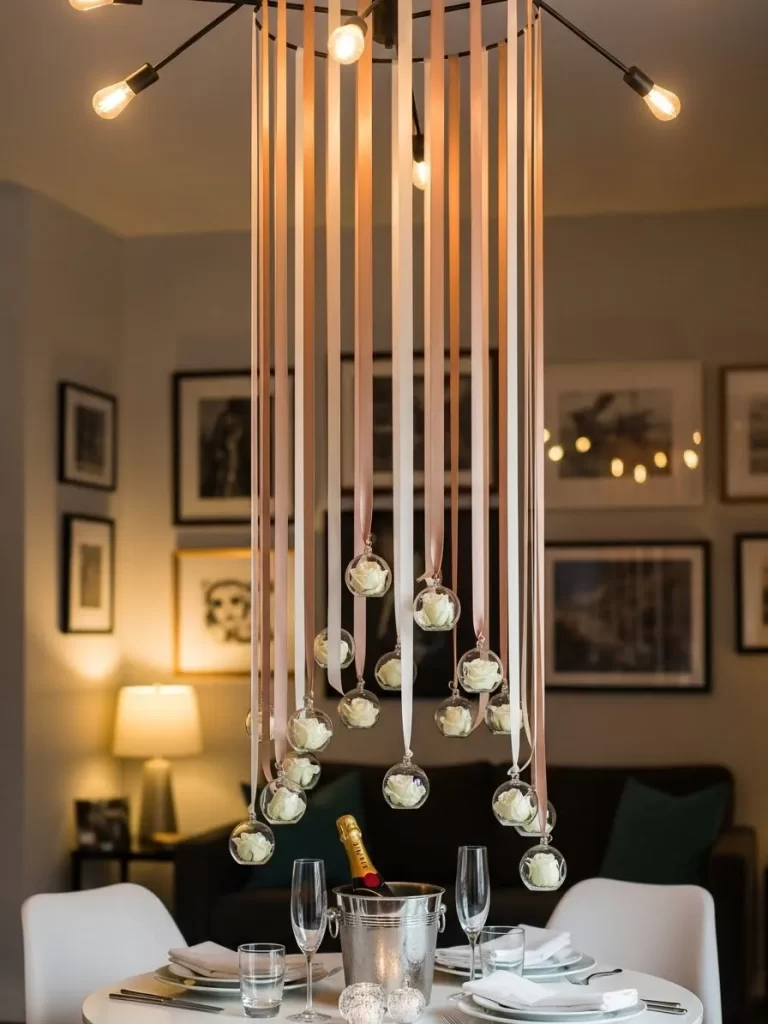
Look upward to find a magical garden hanging above your dinner plates. Clear glass globes dangle from a light fixture on long satin ribbons. Each globe holds a single white rose head that seems to float in mid air.
This vertical arrangement keeps the table completely clear for your meal. It creates a dreamlike environment that feels separate from the rest of the world. The varying heights of the ribbons add movement and depth to the room.
Material Required List
- Twelve small clear glass hanging globes
- Twelve fresh white rose heads
- Roll of cream satin ribbon
- Roll of dusty rose satin ribbon
- Clear fishing line for extra security
Equipment Required List
- Step ladder
- Scissors
- Measuring tape
DIY Instructions
- Measure the distance from your ceiling light fixture to about two feet above the table.
- Cut the satin ribbons into lengths ranging from three to five feet.
- Tie one end of a ribbon to the loop on top of each glass globe.
- Attach the other ends of the ribbons to the arms of your chandelier or light base.
- Vary the heights so some globes hang lower than others.
- Carefully place one white rose head inside each glass globe.
- Ensure the roses are facing outward so you can see them from your seat.
- Add a tiny bit of water to each globe if you want the roses to last longer.
- Check that the globes are not swinging too close to each other.
- Use clear fishing line if the ribbons feel too slippery for a secure knot.
26 The Crimson Floral Heart
Relevant Name: Red Carnation Heart Wreath and Glass Votive

Bold color and iconic shapes make this a classic choice for Valentine’s Day. A thick heart shaped wreath made of red carnations sits flat on the table. A tall glass cylinder with a cream candle stands in the center of the heart.
Clear glass pebbles scattered around the base catch and reflect the light. This centerpiece is a literal symbol of love. The dense texture of the flowers creates a very rich and solid look for the table.
Material Required List
- Heart shaped floral foam wreath form
- Three dozen red carnations
- Tall clear glass cylinder vase
- Cream pillar candle
- Large glass pebbles
- Red chiffon table runner
Equipment Required List
- Floral shears
- Water bucket
DIY Instructions
- Soak the heart shaped floral foam in a bucket of water until heavy.
- Place the red chiffon runner on your table and set the wet foam on top.
- Trim all the carnation stems to about one inch in length.
- Push the flower stems into the foam until the entire heart is covered.
- Make sure no green foam is showing through the red petals.
- Place the glass cylinder in the open center of the heart.
- Put the pillar candle inside the cylinder.
- Scatter the clear glass pebbles around the base of the cylinder on the table.
- Mist the flowers with water to keep them looking fresh.
- Light the candle and enjoy the vibrant red glow.
27 The Artist’s Rainbow Path
Relevant Name: Painted Glass Bottle and Dripping Wax Row
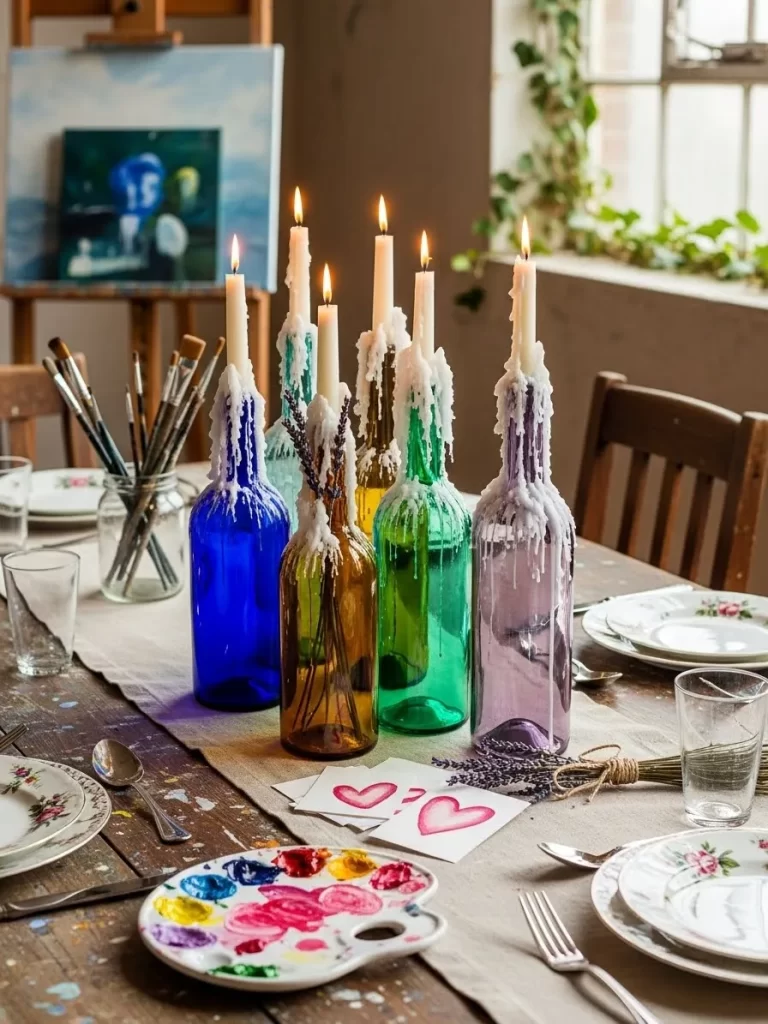
Celebrate your creative spirit with a centerpiece that looks like a work of art. A row of glass bottles in vibrant blue, green, and amber sits on a neutral runner. Tall white candles in the bottles have been allowed to drip wax down the sides.
Small watercolor hearts rest on the table to complete the studio look. This setup is colorful and unconventional. It shows that romance can be found in the messy and beautiful process of creating together.
Material Required List
- Five glass bottles in different colors and shapes
- Five tall white taper candles
- Small pieces of watercolor paper
- Red and pink watercolor paint
- Linen table runner
Equipment Required List
- Paintbrush
- Matches
- Glass cleaner
DIY Instructions
- Lay the linen runner down the center of your table.
- Clean the outside of your colored bottles so the glass is bright.
- Set the bottles in a slightly uneven row along the runner.
- Secure a white taper candle into the neck of each bottle.
- Light the candles a few hours before dinner and let them burn in a draft free spot.
- Watch as the wax drips and hardens on the glass to create a textured look.
- Paint small heart shapes onto the watercolor paper while the wax drips.
- Cut out the hearts once they are dry.
- Place the hearts randomly around the base of the bottles.
- Relight the candles just before dinner for a fresh flame.
28 The Provencal Lavender Row
Relevant Name: White Enamel Pitchers and Dried Lavender
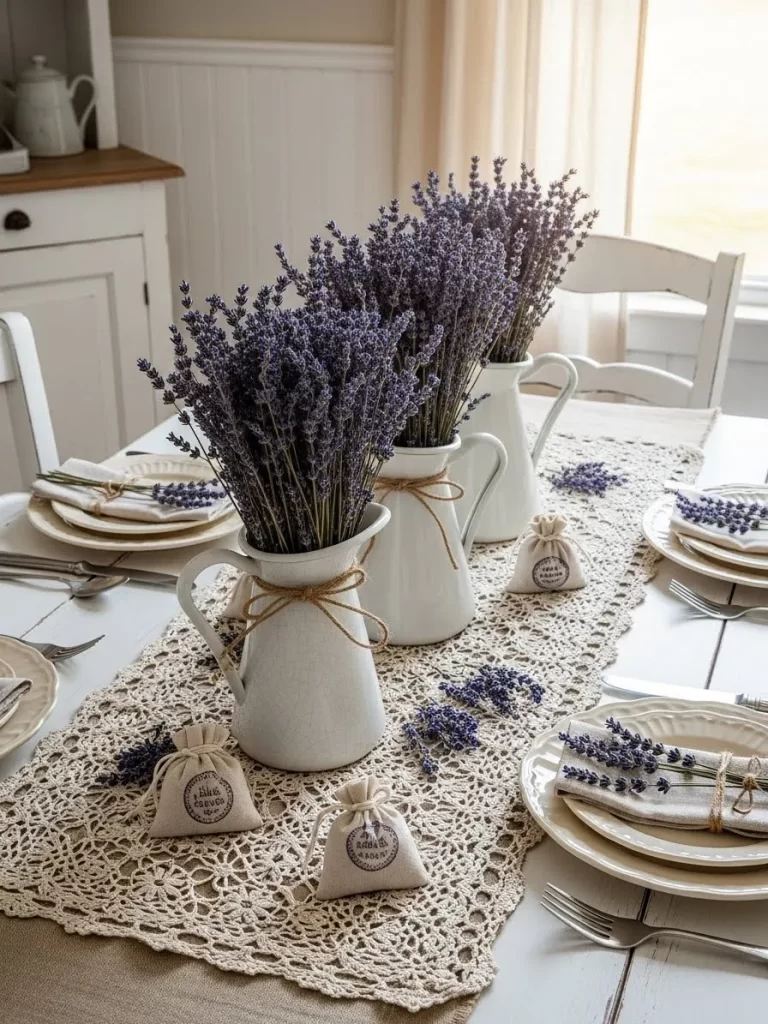
Bring the scent of the French countryside to your romantic meal. Three white enamel pitchers hold large bundles of fragrant dried lavender. A lace runner with a floral pattern adds a delicate vintage touch.
Small lavender sachets at each place setting act as sweet favors for your guest. This centerpiece is simple and elegant. The muted purple and white color palette feels very clean and relaxing for a quiet evening.
Material Required List
- Three white enamel water pitchers
- Three large bundles of dried lavender
- Crochet or lace table runner
- Small linen drawstring bags
- Twine
Equipment Required List
- Scissors
- Measuring tape
DIY Instructions
- Spread the lace runner across your dining table.
- Place the three white pitchers in a row in the center of the table.
- Split your lavender bundles so they fit comfortably in each pitcher.
- Fluff the lavender heads so they look full and stand upright.
- Fill the small linen bags with loose lavender buds to make sachets.
- Tie the bags shut with a simple twine bow.
- Place one sachet on each dinner plate.
- Add a few loose sprigs of lavender on the runner between the pitchers.
- Ensure the pitchers are spaced evenly apart.
- Enjoy the natural scent as it fills the room during your meal.
29 The Hollywood White Plume
Relevant Name: Tall Glass Vase and Ostrich Feather Tree
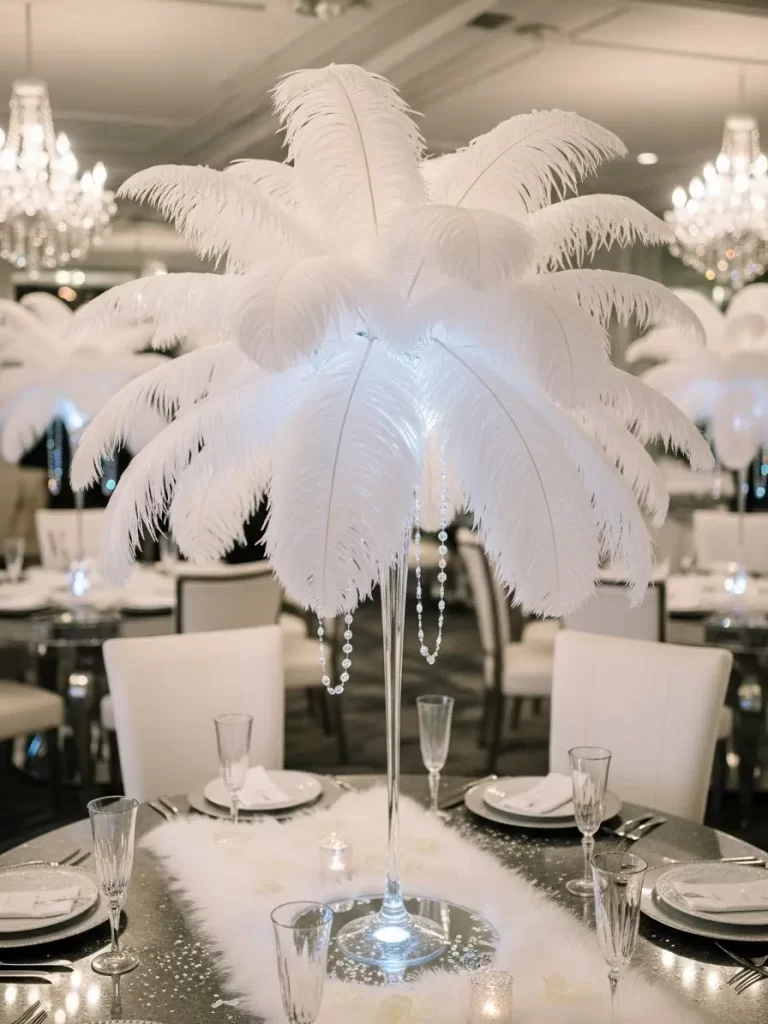
Channel the glamour of a movie star with this tall and dramatic display. A very slender glass vase holds a massive arrangement of white ostrich plumes. The feathers cascade downward like a fountain of light.
A faux fur runner adds another layer of soft texture to the table. Small crystal votives provide a subtle sparkle at the base. This centerpiece is all about height and luxury. It makes a grand statement in a dining room with high ceilings.
Material Required List
- Twenty four inch tall slender glass vase
- Twenty large white ostrich feathers
- White faux fur table runner
- Four small crystal tea light holders
- White tea light candles
- Floral foam cone
Equipment Required List
- Microfiber cloth
- Step stool
DIY Instructions
- Lay the white faux fur runner across your table and brush it smooth.
- Polish the tall glass vase and set it in the center of the runner.
- Place the floral foam cone firmly into the mouth of the vase.
- Start at the bottom of the cone and push the ostrich feather stems in.
- Work your way up the cone in circles until the entire foam is hidden.
- Ensure the top feathers stand taller and the bottom ones drape low.
- Adjust the feathers so the arrangement looks symmetrical from all sides.
- Place the crystal tea light holders in a circle around the vase base.
- Drop a tea light into each holder and light them.
- Step back and check that the feathers are not drooping too far onto the table.
30 The Zen Orchid Basin
Relevant Name: Black Stone Basin with Floating Orchid and Bamboo
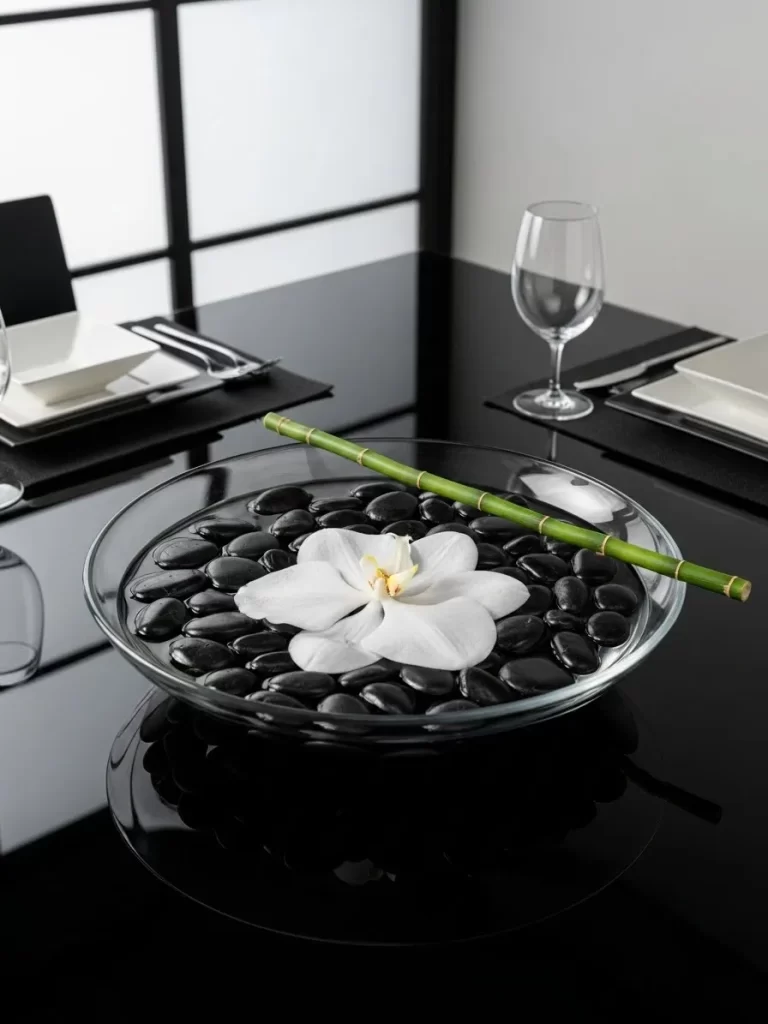
Find peace and balance in this minimalist water display. A wide black stone basin holds shallow water and a bed of smooth black river rocks. A single large white orchid flower floats on the surface.
A green bamboo stalk rests across the rim of the bowl to add a linear element. This centerpiece is perfect for a modern home that values calm and simplicity. The sound of water and the clean lines create a very meditative dining experience.
Material Required List
- Wide shallow black stone or ceramic basin
- Two bags of smooth black river rocks
- One fresh white cattleya orchid head
- One twelve inch green bamboo stalk
- Fresh distilled water
Equipment Required List
- Small pitcher
- Soft cloth
DIY Instructions
- Clean your black basin and the river rocks to remove any dust.
- Fill the bottom of the basin with a single layer of the black rocks.
- Pour distilled water into the basin until the rocks are just covered.
- Place the green bamboo stalk across the top edge of the basin.
- Carefully set the white orchid head onto the water surface so it floats.
- Position the orchid near the center but slightly to one side for balance.
- Set the basin in the middle of your table.
- Use the soft cloth to wipe any water spots from the outside of the bowl.
- Keep the table clear of other decor to emphasize the minimalist look.
- Replace the water and the orchid every two days to keep the display fresh.
31 The Terracotta Pampas Duo
Relevant Name: Rustic Clay Vases with Pampas Grass and Ranunculus
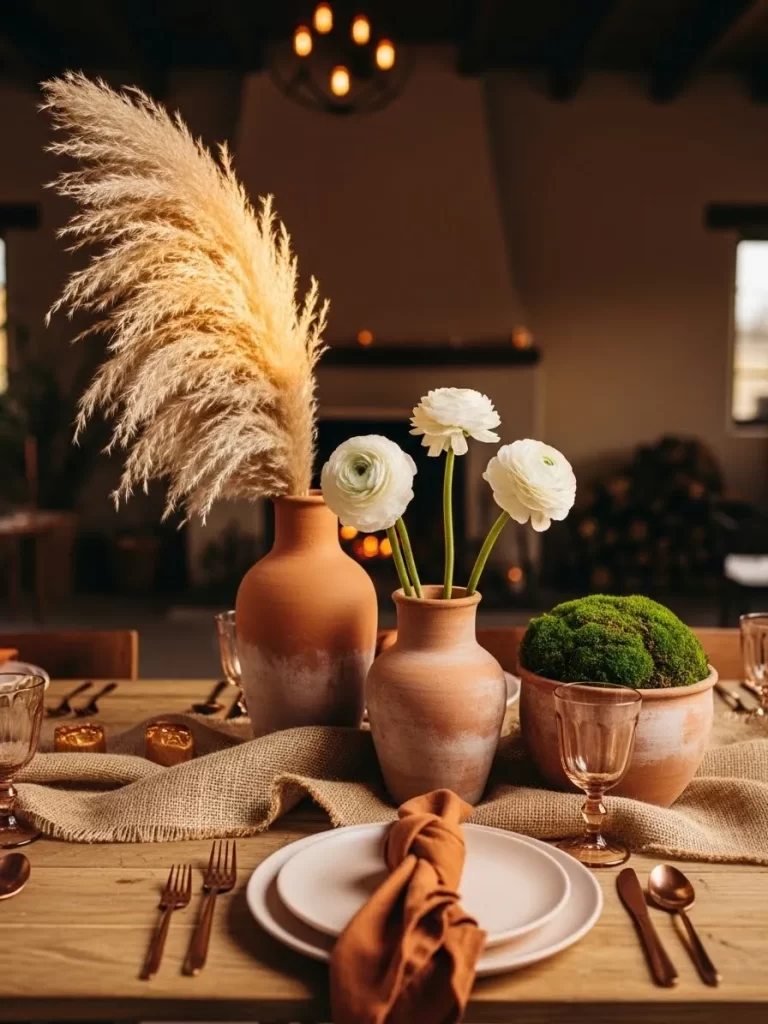
Earthy textures bring a warm and natural feel to your Valentine dining room. Two terracotta vases in different sizes hold fluffy pampas grass and white ranunculus flowers. This combination creates a beautiful contrast between wild and refined elements.
A burlap runner draped casually on the table adds to the rustic charm of the display. Moss mounds in smaller pots provide a pop of vibrant green at the base. It is a wonderful choice for a relaxed and organic meal at home.
Material Required List
- Two terracotta vases in different heights
- Three stems of dried pampas grass
- Six fresh white ranunculus flowers
- Small clay pots with preserved moss
- Burlap table runner
Equipment Required List
- Floral shears
- Water pitcher
DIY Instructions
- Lay the burlap runner across your wooden dining table in soft folds.
- Fill the two terracotta vases halfway with fresh water for the flowers.
- Place the pampas grass stems into the taller vase so they fan out.
- Trim the ranunculus stems so they sit comfortably in the shorter vase.
- Arrange the two vases in the center of the table close to each other.
- Set the small moss pots around the bases of the vases for extra texture.
- Ensure the pampas grass is not leaning too far over the dinner plates.
- Tuck a few loose flower petals onto the burlap runner for a soft look.
- Adjust the heights of the flowers so they do not block your view.
- Check that the pampas grass is secure and not shedding onto the table.
32 The Moroccan Lantern Path
Relevant Name: Intricate Brass Lanterns and Dried Dates
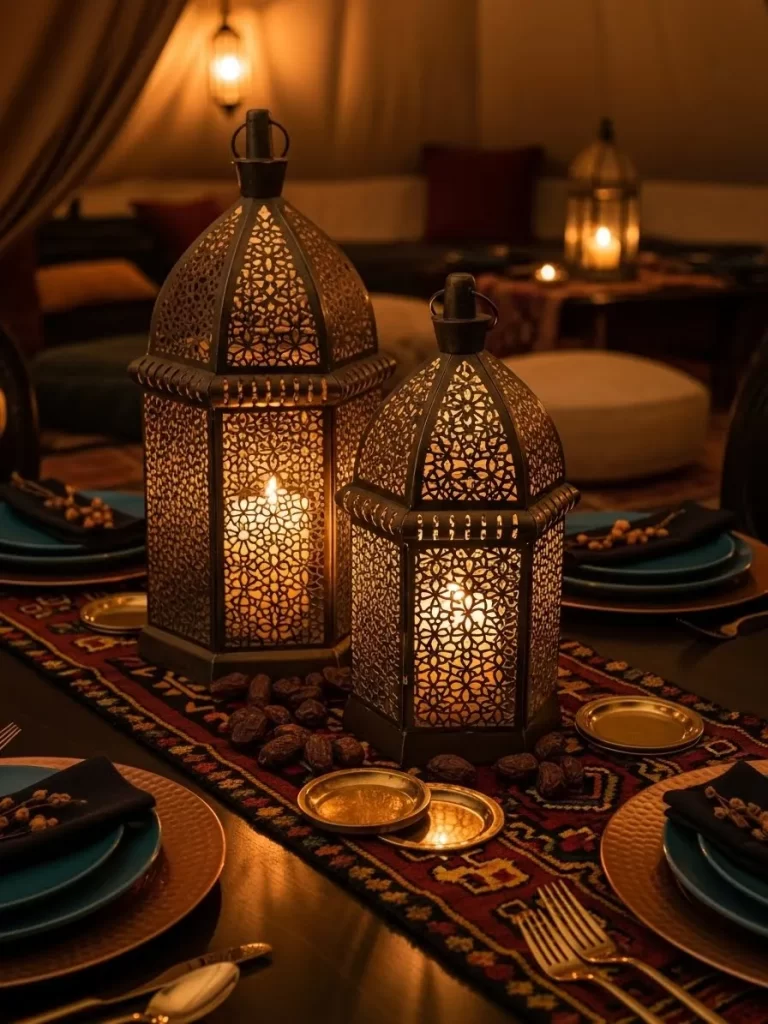
Transport your dinner to a faraway land with these glowing Moroccan lanterns. Two tall brass lanterns with intricate cutouts cast beautiful patterns across the table. Dried dates on small gold plates add a touch of authentic charm.
A patterned runner in deep reds and blues anchors the exotic scene for your meal. These lanterns provide a soft and flickering light that feels very romantic. It is a unique way to celebrate your love with a touch of global style.
Material Required List
- Two large Moroccan style brass lanterns
- Two white pillar candles for the lanterns
- Patterned textile table runner
- Small gold plates with dried dates
- Sprigs of dried berries
Equipment Required List
- Long reach lighter
- Soft cloth for polishing
DIY Instructions
- Lay the patterned textile runner down the length of your dining table.
- Polish the brass lanterns until they have a warm and bright glow.
- Place the two lanterns in the center of the runner at different heights.
- Set the pillar candles inside the lanterns and ensure they are stable.
- Arrange the small gold plates with dates around the lantern bases.
- Scatter the dried berry sprigs along the runner for a natural touch.
- Light the candles just as the sun begins to set for the best effect.
- Watch how the cutout patterns dance across the walls and the table.
- Keep the dates as a sweet snack to enjoy before or after the meal.
- Ensure the lantern tops are not too hot before touching them later.
33 The Geometric Berry Terrariums
Relevant Name: Black Metal Terrariums with Air Plants and Berries

Architectural shapes meet vibrant colors in this modern centerpiece for your table. Three geometric glass terrariums with black metal frames hold air plants and red berries. This setup looks sharp on a black marble or dark wood surface.
White pebbles at the base of each terrarium provide a clean and high contrast look. This arrangement is very low maintenance and can last long after Valentine’s Day. It shows a sophisticated and clean approach to romantic home decor.
Material Required List
- Three geometric glass terrariums in different sizes
- Three tillandsia air plants
- One bunch of fresh red berries
- Two bags of small white river pebbles
- Black marble table runner
Equipment Required List
- Tweezers for placement
- Small spray bottle
DIY Instructions
- Place the black marble runner down the center of your dining table.
- Fill the bottom of each terrarium with a thick layer of white pebbles.
- Use your tweezers to nestle an air plant into the largest terrarium.
- Add small clusters of red berries around the base of the air plant.
- Fill the smaller terrariums with berries and pebbles for a pop of color.
- Arrange the three glass shapes in a row on the marble runner.
- Position the largest terrarium in the center for a balanced display.
- Mist the air plants lightly with water before placing them on the table.
- Ensure the glass is clean and free of fingerprints for a polished look.
- Group the terrariums closely together to create a strong focal point.
34 The Mediterranean Harvest Bowl
Relevant Name: Olive Wood Bowl with Pomegranates and Figs
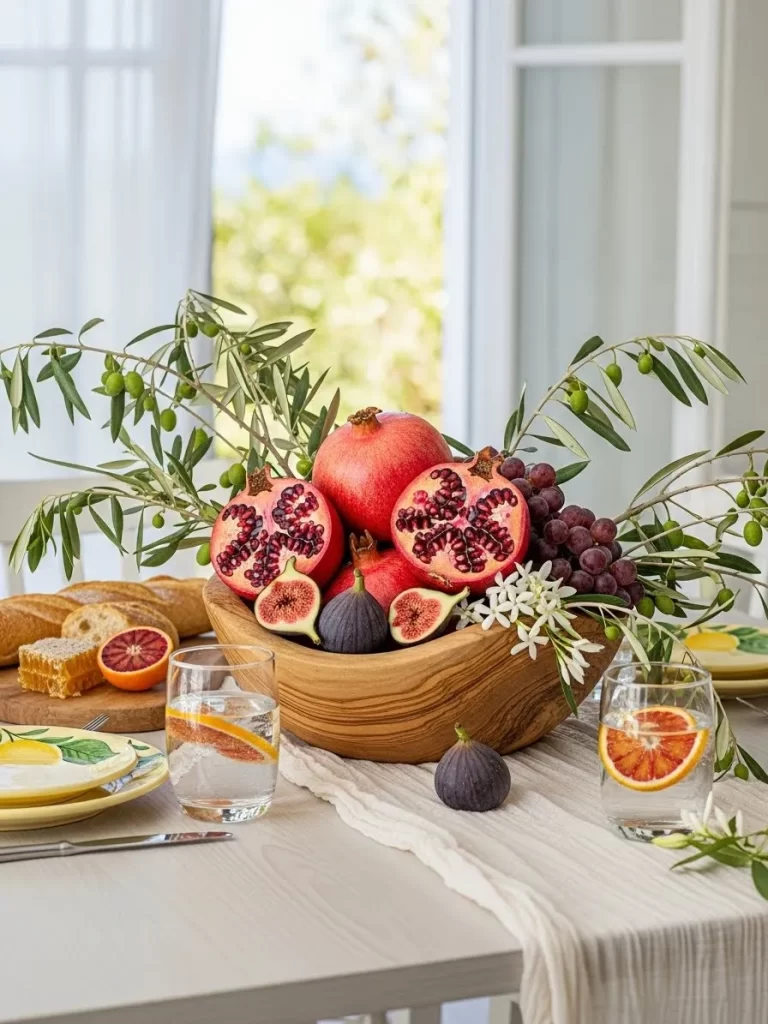
A bountiful display of fresh fruit brings a lush feel to your romantic Valentine table. An olive wood bowl overflows with ripe pomegranates, purple figs, and red grapes. Fresh olive branches with green fruit fan out from the center.
Slices of blood orange in glasses of water add a bright and citrusy touch to the scene. This centerpiece feels healthy, vibrant, and full of life for a special meal. It is a wonderful way to celebrate with the flavors of the sun.
Material Required List
- Large carved olive wood bowl
- Three fresh pomegranates
- Six fresh purple figs
- One large bunch of red grapes
- Fresh olive branches with olives
- Blood orange slices
Equipment Required List
- Sharp fruit knife
- Water glasses
DIY Instructions
- Place the large olive wood bowl in the center of your table.
- Line the bottom of the bowl with the fresh red grapes.
- Cut one pomegranate in half to show the vibrant seeds inside.
- Arrange the whole and halved pomegranates on top of the grapes.
- Nest the fresh figs into the gaps between the larger fruits.
- Tuck the olive branches into the sides so they drape over the edge.
- Place blood orange slices into your water glasses for a coordinated look.
- Set a few extra figs and orange slices on the table surface nearby.
- Ensure the fruit is clean and ready for guests to enjoy after dinner.
- Keep the arrangement low so it does not interfere with conversation.
35 The Woodland Crystal Trough
Relevant Name: Carved Wooden Trough with Ferns and Rose Quartz

Bring the healing energy of crystals to your romantic dinner with this earthy display. A long carved wooden trough is filled with lush green ferns and succulents. Large chunks of pink rose quartz provide a soft and loving glow.
Moss mounds cover the base of the trough for a deep forest floor aesthetic. This centerpiece is grounding and beautiful for a home that loves natural elements. The pink crystals are a subtle nod to the holiday of love.
Material Required List
- Long carved wooden trough or planter
- Two small potted ferns
- Three small succulent plants
- Three large pieces of raw rose quartz
- Preserved sheet moss
- Linen table runner
Equipment Required List
- Small garden trowel
- Water mister
DIY Instructions
- Lay the linen runner down the center of your dining table.
- Place the wooden trough in the exact middle of the runner.
- Set the potted ferns at each end of the trough for height.
- Place the succulents in the center section of the wooden planter.
- Fill the remaining space with sheet moss until the pots are hidden.
- Nest the rose quartz crystals into the moss so they peek out.
- Use the mister to dampen the moss and plants for a fresh look.
- Scatter a few loose pink rose petals on the runner around the trough.
- Adjust the plants so they look natural and not too crowded.
- Position your wine glasses nearby to catch the reflection of the crystals.
36 The Eucalyptus and Baby Breath Garland
Relevant Name: Lush Greenery Garland with Taper Candles

A long and flowing garland of eucalyptus creates a garden feel across your entire table. Tiny white baby breath flowers are woven throughout the leaves like a dusting of snow. This classic look is timeless and elegant for any romantic occasion.
Tall white taper candles rise from the greenery to provide a warm and steady light. Dark red wine glasses add a pop of deep color to the neutral palette. It is a sophisticated way to fill a long table with life and warmth.
Material Required List
- Six foot fresh eucalyptus garland
- Two bunches of white baby breath
- Six tall white taper candles
- Six silver taper candle holders
- Red wine glasses
Equipment Required List
- Floral wire
- Scissors
DIY Instructions
- Lay the eucalyptus garland down the center of your rectangular table.
- Drape the ends over the table edges for a dramatic and full look.
- Snip small sprigs of baby breath and tuck them into the eucalyptus.
- Use small bits of floral wire to secure the flowers if they feel loose.
- Place the silver candle holders in a row within the greenery.
- Space the candles evenly so the light reaches every guest at the table.
- Push the taper candles into the holders and ensure they are straight.
- Fluff the greenery around the base of the candles to hide the metal.
- Set your red wine glasses at each place setting to complete the scene.
- Light the candles and enjoy the natural scent of the fresh eucalyptus.
37 The Garden Party Path
Relevant Name: Pink Carnation Runner with Potted Moss

Celebrate your love with a path of flowers that looks like a spring garden in bloom. Pink and red carnations are woven together to create a living runner down the table. Small terracotta pots with moss mounds add a rustic and earthy touch.
A delicate lace runner underneath provides a soft and vintage base for the flowers. This centerpiece is vibrant, joyful, and full of seasonal energy for your meal. It makes the dining room feel bright and welcoming for a special guest.
Material Required List
- Three dozen pink and red carnations
- Six small terracotta pots with moss
- Lace table runner
- Fresh ivy vines
- Gold rimmed wine glasses
Equipment Required List
- Floral shears
- Water tubes for individual flowers
DIY Instructions
- Spread the lace runner down the center of your wooden table.
- Lay the fresh ivy vines on top of the lace to create a green base.
- Cut the carnation stems and place each one into a small water tube.
- Tuck the flowers into the ivy vines to form a thick floral path.
- Alternate the pink and red colors for a more dynamic and interesting look.
- Place the moss pots at equal intervals along the floral runner.
- Ensure the water tubes are completely hidden by the leaves and petals.
- Set the gold rimmed wine glasses at each place setting for a touch of shine.
- Scatter a few loose petals on the lace for a soft and romantic finish.
- Mist the flowers with water to keep them bright and fresh during dinner.
38 The Burlap Rose Garden
Relevant Name: Potted Miniature Rose Bushes with Burlap Wraps

Bring a touch of a country garden to your table with these miniature rose bushes. Each small plant is wrapped in rustic burlap and tied with a simple white rope bow. This setup feels very personal and can be given as a gift after dinner.
The roses sit on a bed of dried brown moss to add a natural and grounded texture. It is a wonderful choice for a farmhouse style home or a casual Valentine meal. These living plants will continue to grow long after the holiday is over.
Material Required List
- Four miniature red rose bushes in pots
- Four square pieces of burlap fabric
- Two yards of white cotton rope
- One bag of dried brown moss
- Green and white checkered runner
Equipment Required List
- Fabric scissors
- Small shovel
DIY Instructions
- Lay the checkered runner across your table for a casual and fun base.
- Center each rose bush on a square of burlap fabric.
- Pull the corners of the burlap up to cover the plastic pots.
- Tie a length of white rope around the burlap and finish with a bow.
- Arrange the four wrapped roses in a tight group in the center of the table.
- Spread the dried brown moss around the base of the pots to hide the edges.
- Place a few fresh eucalyptus leaves on the moss for a touch of green.
- Water the roses lightly before placing them on the table for dinner.
- Ensure the rope bows are all facing the same direction for a neat look.
- Invite your guest to take one of the plants home as a sweet memory.
39 The Taper Trio Path
Relevant Name: Minimalist Taper Candles in Pink and Magenta
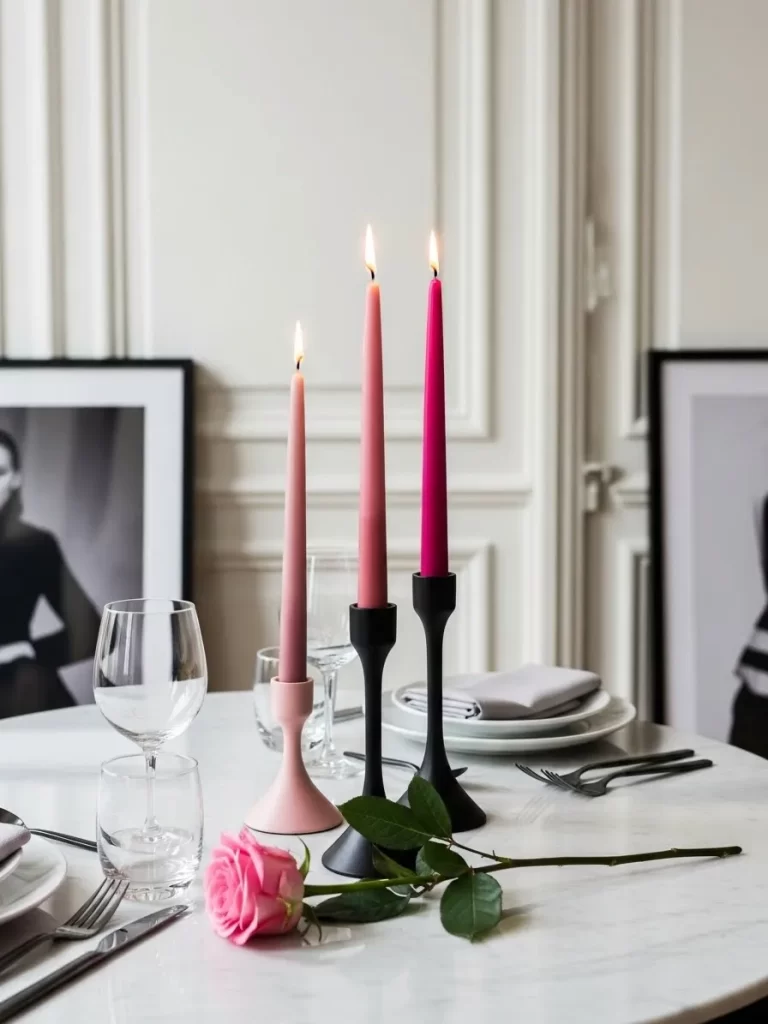
Modern elegance defines this simple and striking candle arrangement for your table. Three tall taper candles in shades of light pink and deep magenta sit in black holders. A single pink rose rests on the white marble surface to add a soft touch.
This minimalist look is excellent for a sophisticated apartment dinner for two. The high contrast between the black holders and the bright candles creates a bold focal point. It proves that a few well chosen items can create a very romantic mood.
Material Required List
- Three tall taper candles (pink and magenta)
- Three matte black candle holders in different heights
- One long stem pink rose
- White marble table surface or runner
- Grey linen napkins
Equipment Required List
- Long reach lighter
- Microfiber cloth
DIY Instructions
- Clean your white marble surface until it is streak free and shiny.
- Place the three black candle holders in a cluster near the center.
- Insert the pink and magenta taper candles into the holders securely.
- Arrange them so the tallest candle is in the middle for a balanced look.
- Lay the single pink rose across the marble in front of the candles.
- Fold your grey linen napkins and place them at each dinner setting.
- Ensure the rose petals are away from where the wax might drip later.
- Light the candles ten minutes before your guest arrives for a warm glow.
- Check that the candles are standing perfectly straight in their holders.
- Keep the surrounding area clear of other items to maintain the clean look.
40 The Midnight Heart Light
Relevant Name: Black Twig Arrangement with Fairy Lights and Lace
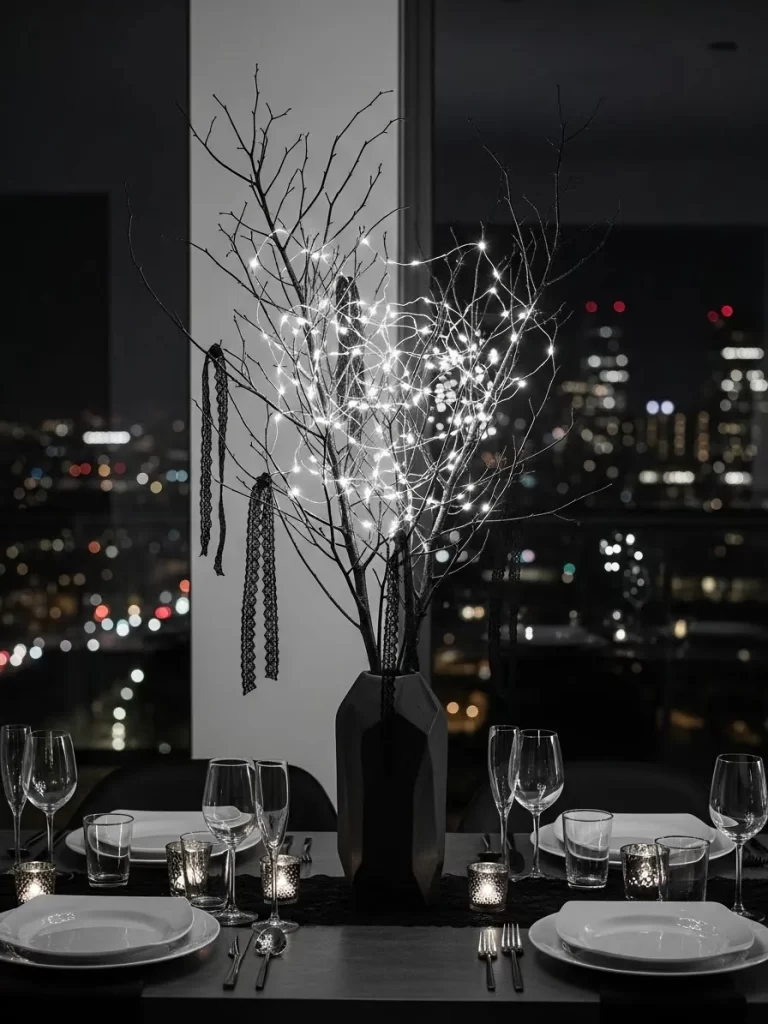
Dramatic and magical, this centerpiece uses light and shadow to create a romantic mood. A tall black vase holds various dark twigs wrapped in sparkling white fairy lights. Black lace ribbons hang from the branches like delicate webs in the evening.
The lights form a soft heart shape in the center of the arrangement when viewed from the front. This setup looks stunning against a city skyline at night for a high end dinner. It is a bold and modern choice for those who love dark and moody decor.
Material Required List
- Tall matte black geometric vase
- One bundle of black painted twigs
- Two strands of battery operated white fairy lights
- Two yards of black lace ribbon
- Black fabric table runner
Equipment Required List
- Scissors
- Thin black wire
DIY Instructions
- Lay the black fabric runner across your dining table.
- Set the black vase in the center and fill it with the painted twigs.
- Wrap the fairy lights around the twigs from the bottom to the top.
- Use thin wire to hold the lights in place and form a central heart shape.
- Cut the black lace ribbon into several long and thin strips.
- Tie the lace ribbons onto the higher branches so they hang down freely.
- Hide the battery packs for the lights inside the mouth of the vase.
- Position the twigs so the arrangement is full and reaches toward the ceiling.
- Turn the lights on and adjust the branches until the heart shape is clear.
- Place white plates and crystal glasses nearby to catch the sparkling light.
41 Hydrangea Clock Wreath
Relevant Name: Vintage Gold Clock and Hydrangea Display

Time stands still when you are with the one you love in this vintage centerpiece. An ornate gold table clock serves as the centerpiece of a lush hydrangea wreath. Blue and white flower heads are woven together to create a soft and cloud like base.
Small gold gears scattered on the blue runner add a touch of steampunk charm to the table. This arrangement is wonderful for a home that loves antiques and historical details. It makes your romantic meal feel like a special moment frozen in time.
Material Required List
- Ornate gold vintage table clock
- Four large blue hydrangea heads
- Four large white hydrangea heads
- Light blue fabric table runner
- Small decorative gold clock gears
Equipment Required List
- Floral shears
- Water tubes for flowers
DIY Instructions
- Lay the light blue runner across the center of your wooden table.
- Place the gold table clock in the exact middle of the runner.
- Trim the hydrangea stems and place each one into a small water tube.
- Arrange the flower heads in a circle around the base of the clock.
- Mix the blue and white flowers for a soft and textured look on the table.
- Ensure the flowers are tucked closely together to hide the water tubes.
- Scatter the small gold gears onto the runner around the hydrangea wreath.
- Place a few white linen napkins at each setting to coordinate with the flowers.
- Set the clock to a time that is special to both of you for a personal touch.
- Polish the gold clock with a soft cloth so it reflects the room light.
42 The Chalkboard Heart Runner
Relevant Name: Interactive Chalkboard Runner with Love Notes
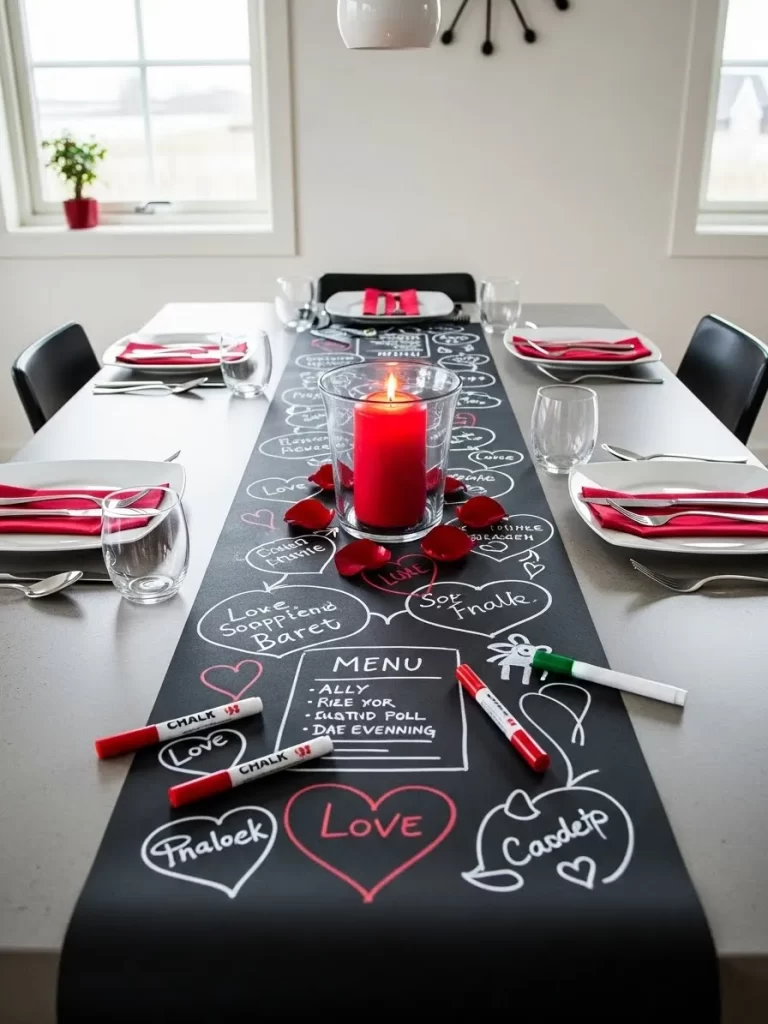
Share your feelings directly on the table with this fun and interactive centerpiece idea. A long black chalkboard runner is covered in hand drawn hearts and sweet love notes. A large red pillar candle in a glass jar provides a warm and central light.
Red rose petals scattered on the black surface add a classic and romantic touch to the meal. This setup is wonderful for a couple that loves to laugh and play together during dinner. It is a unique way to create a meal that is truly personal and memorable.
Material Required List
- Roll of black chalkboard paper or fabric
- One large red pillar candle
- Large clear glass candle jar
- Handful of fresh red rose petals
- Liquid chalk markers in white, red, and green
Equipment Required List
- Scissors
- Soft eraser
DIY Instructions
- Cut the chalkboard runner to the length of your dining table and lay it down.
- Use the white chalk marker to draw a large menu in the center of the table.
- Draw various heart shapes and write sweet messages all over the black surface.
- Use the red and green markers to add color to your drawings and notes.
- Place the red pillar candle inside the glass jar for a safe and steady flame.
- Set the candle jar in the middle of your chalkboard runner.
- Scatter the red rose petals around the base of the candle jar for color.
- Place the chalk markers on the table so your guest can add their own notes.
- Set your white plates and red napkins around the interactive display.
- Enjoy reading the messages and adding new ones throughout your romantic meal.
Key Takeaways
Personal touches matter. Adding a photo or a handwritten note makes the table feel intimate.
Lighting sets the mood. Candlelight and fairy lights soften the room and hide imperfections.
Nature adds life. Fresh flowers and greenery provide scent and texture to the display.
Simplicity works well. You do not need a crowded table to make a big statement.
Bringing romance back to the table does not require a professional designer. You have the power to create a high end look with simple items found at home or local shops. These forty two ideas provide a starting point for your creative journey.
Focus on what makes your relationship special while you build these pieces. Your effort counts more than the price tag of the materials. Enjoy the process of making your home feel warm and inviting once again.