Valentine Day often brings a wave of bright pinks and reds into our homes. Many people want a more subdued look that feels elegant and modern. You can celebrate love without cluttering your space with plastic hearts.

This guide offers 37 ways to embrace a neutral palette for the holiday. We focus on textures like linen and stone to create warmth. Your home will look refreshed and stylish while honoring the spirit of romance.
Muted tones allow your existing furniture to shine. Earthy materials bring a sense of peace to your living areas. You will find that these ideas stay relevant long after the holiday ends.
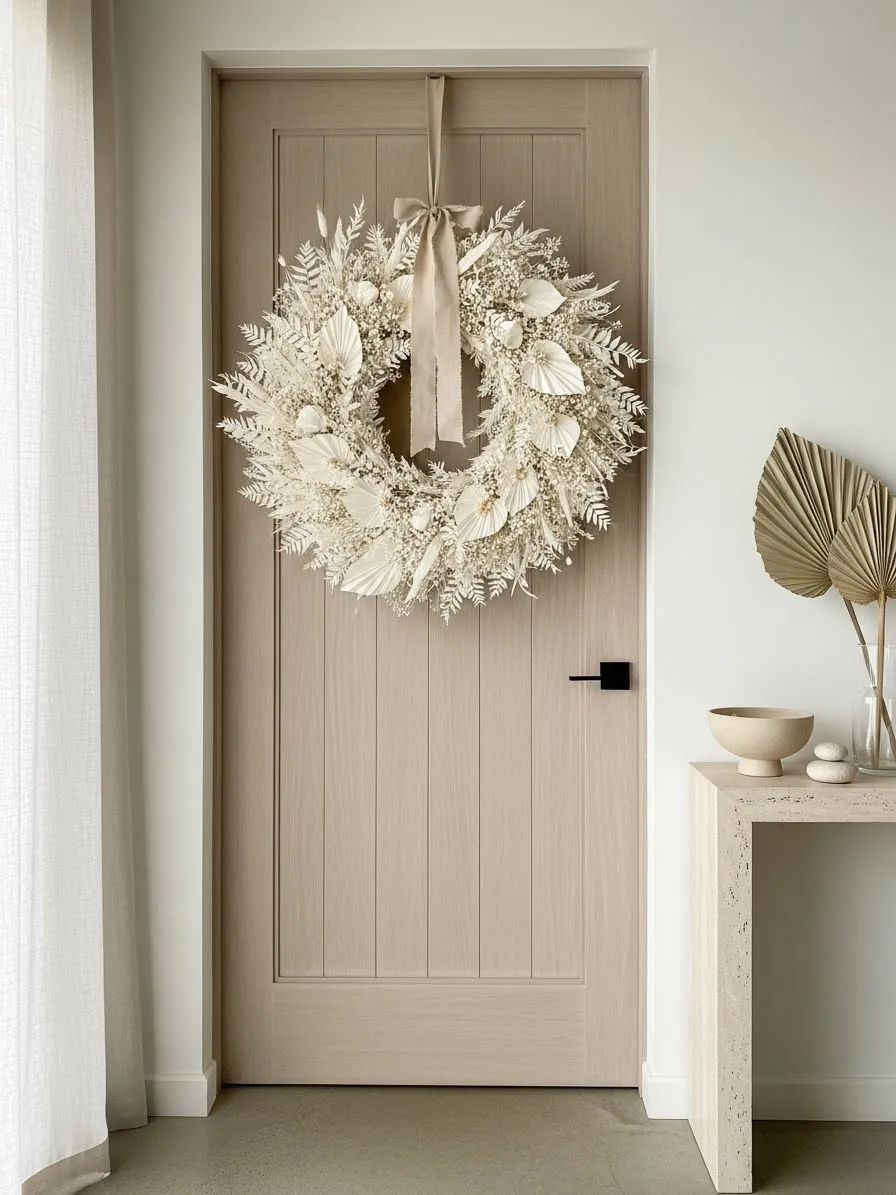
1 Creamy Dried Floral Wreath
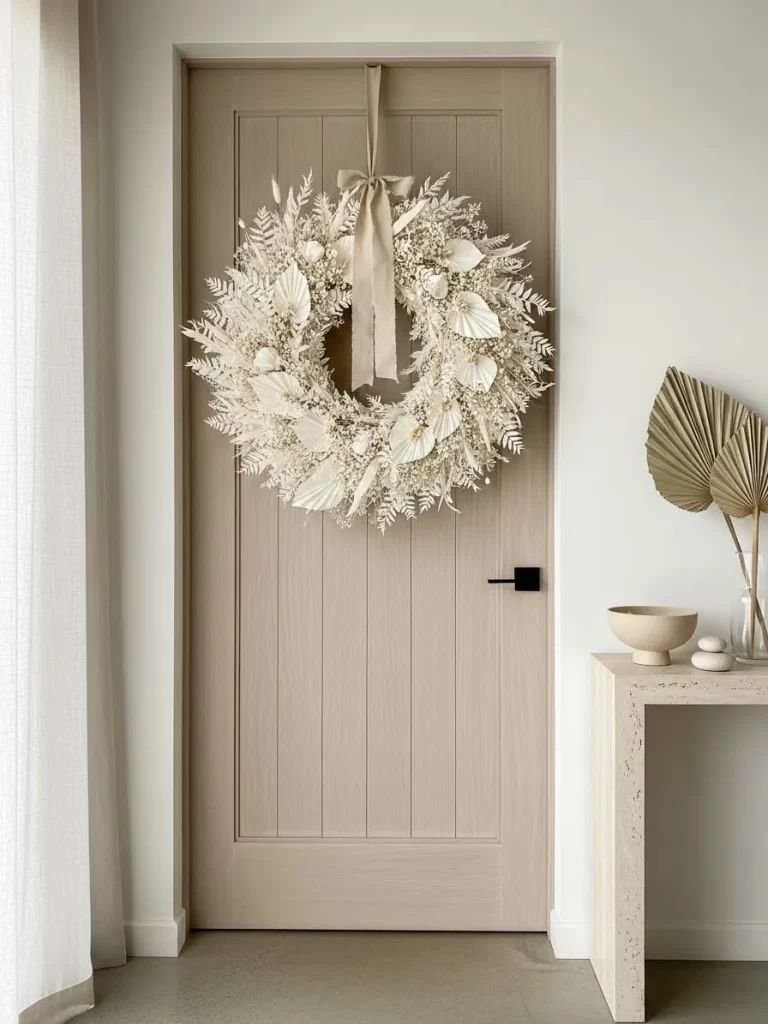
Welcome your guests with a monochromatic wreath that trades bold red colors for subtle textures. This piece uses dried palm leaves and baby breath to create an airy feel. Creamy tones offer a sophisticated look for a modern home.
Taupe ribbons hang from the center to add movement. You will find that this arrangement stays fresh for many months. Every visitor will appreciate the natural beauty of the dried foliage.
Materials Required
- Grapevine wreath base
- Dried palm suns
- Preserved baby breath
- Dried white ferns
- Wide velvet ribbon
Equipment Required
- Hot glue gun
- Floral wire
- Scissors
DIY Instructions
- Prepare your workspace and plug in the hot glue gun to warm up.
- Trim the stems of the dried palm leaves so they are three inches long.
- Push the palm stems into the grapevine base to form a circle.
- Wrap a small piece of floral wire around each leaf to hold it tight.
- Cut the baby breath into small bunches about the size of a hand.
- Put a drop of hot glue on the end of a bunch and tuck it into a gap.
- Add the white ferns around the outer edge for more texture.
- Fill any empty spots with the remaining floral pieces until it looks full.
- Loop the velvet ribbon through the middle of the wreath.
- Tie a knot at the top of the ribbon for easy hanging on a door.
2 Chunky Knit Heart Pillow
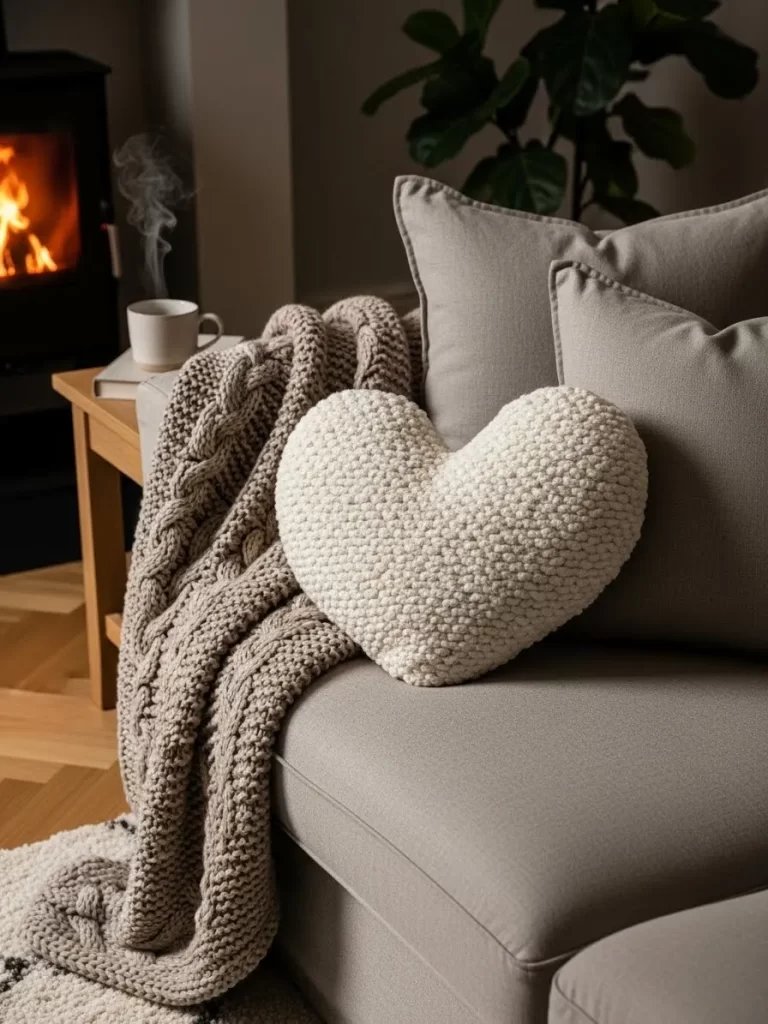
Soften your seating area with a cozy heart cushion made from thick yarn. This accessory adds a touch of romance without using bright colors. Creamy white tones blend well into any modern living space.
Natural light hits the loops of the yarn to create beautiful shadows. You can place this on a grey chair to add instant charm. It serves as a subtle nod to the holiday while remaining useful all year.
Materials Required
- Thick chenille yarn in cream
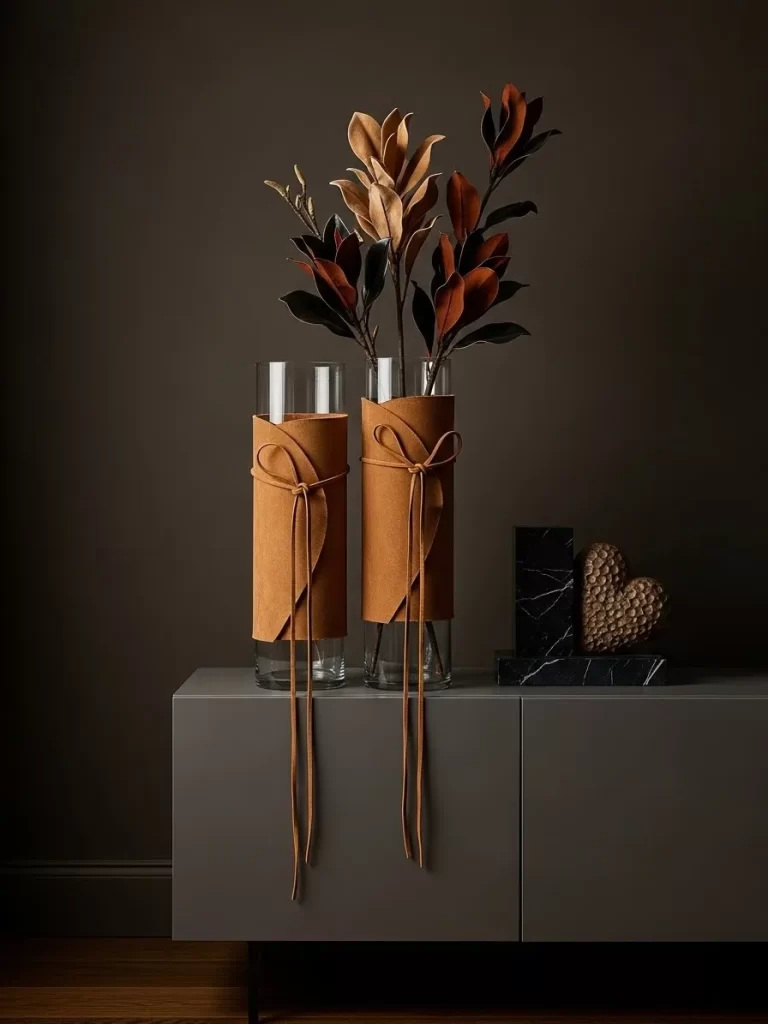
- Polyester fiber fill stuffing
- White sewing thread
Equipment Required
- Large crochet hook
- Sharp scissors
- Sewing needle
DIY Instructions
- Start by making a slip knot and placing it on your crochet hook.
- Crochet two separate circles that will form the top parts of the heart.
- Join these two circles together with a single stitch across the middle.
- Work in a circular motion around both circles to build the heart body.
- Decrease your stitches slowly as you work toward the bottom point.
- Stop when you have a small opening left at the very end.
- Push the fiber fill through the hole until the pillow feels firm.
- Use your hook to finish the last few stitches and close the point.
- Cut the yarn and leave a long tail to weave into the fabric.
- Thread your needle and secure any gaps between the two top circles.
3 Stone XO Sculptural Accents
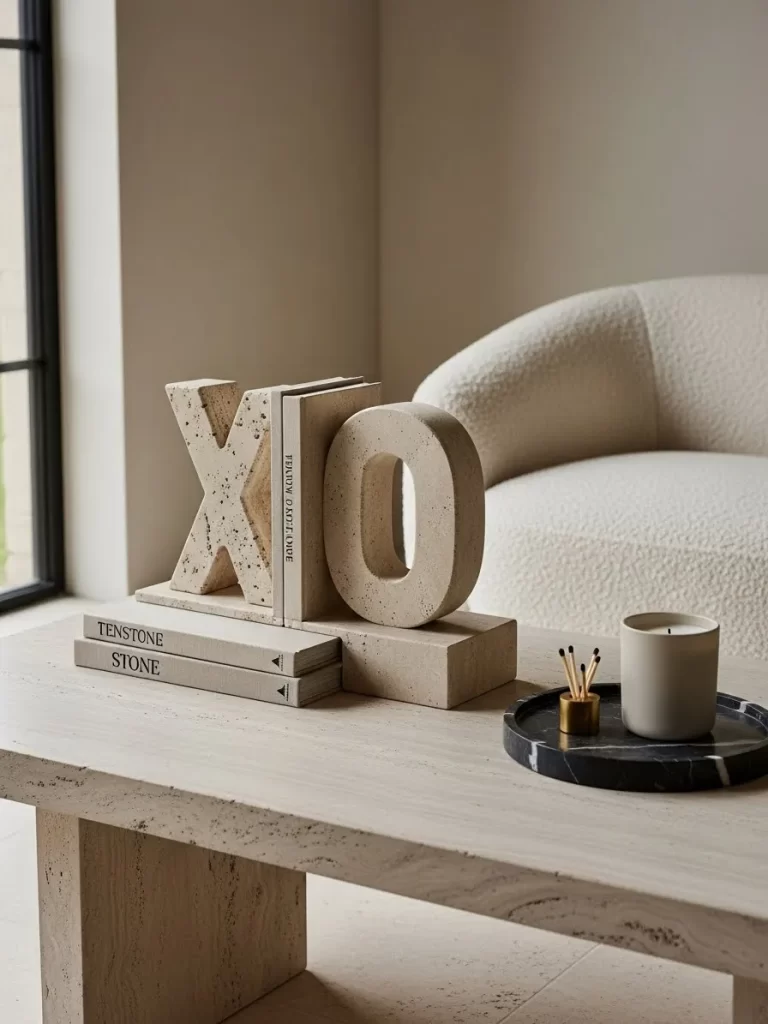
Elevate your coffee table styling with heavy stone letters that signify hugs and kisses. These travertine pieces look like architectural relics found in a museum. Beige tones and porous textures provide a high end organic vibe to your home.
Stacking these on top of neutral books creates a focal point. You will love how the solid weight of the stone feels in your hands. This choice proves that romance can be subtle and sturdy.
Materials Required
- Large papier mache letters X and O
- Stone textured spray paint in sand color
- Fine grit sandpaper
- Clear matte sealer spray
Equipment Required
- Masking tape
- Drop cloth
DIY Instructions
- Wipe your paper letters with a dry cloth to remove any dust.
- Rub the sandpaper gently over the edges to make them smooth.
- Lay a drop cloth on the ground in an area with good air flow.
- Place the letters on the cloth and shake your paint for one minute.
- Apply a light coat of paint using a sweeping motion from side to side.
- Wait twenty minutes for the first layer to dry completely.
- Spray the back and the sides to ensure every surface is covered.
- Let the letters sit for four hours so the texture can harden.
- Spray a thin layer of matte sealer to protect the finish from chips.
- Set the letters on your table once they no longer feel sticky.
4 Minimalist Ribbon Hoop Wreath
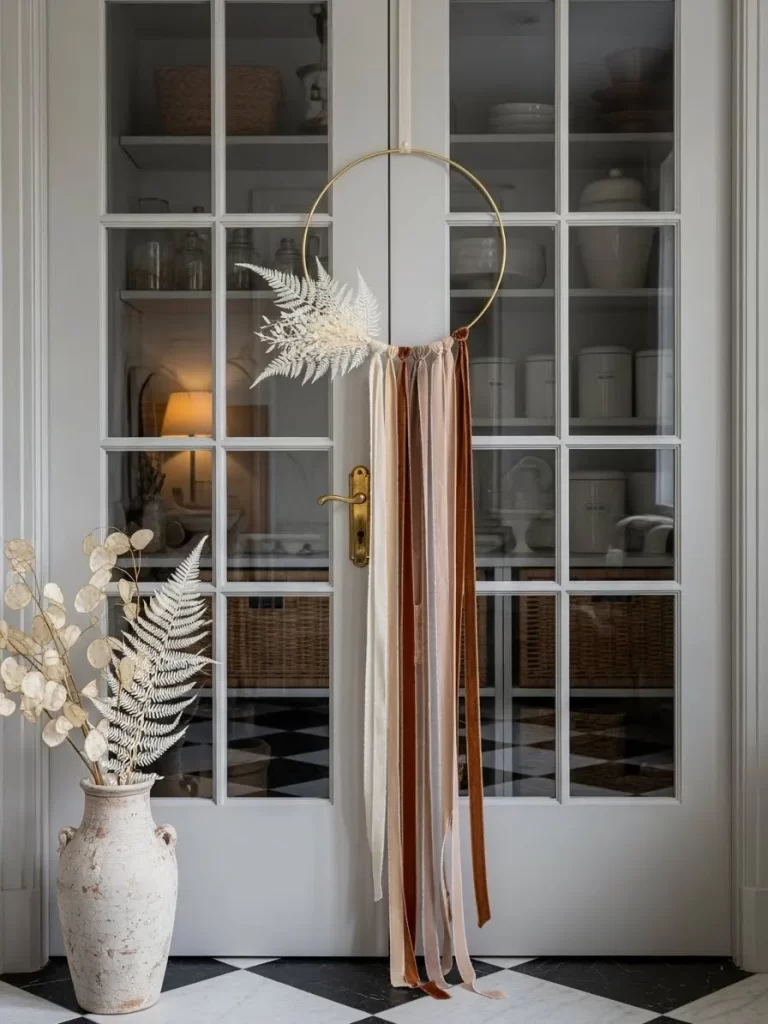
Decorate your interior glass doors with a slender gold hoop and flowing ribbons. Long strands of velvet and silk in tan shades reach toward the floor. Delicate dried ferns attached to the side add a touch of nature to the frame.
Air moves the ribbons gently as you walk by the door. This design feels light and keeps your hallway looking spacious. It is a wonderful way to bring vertical interest to a plain entrance.
Materials Required
- Gold metal floral hoop
- Assorted velvet ribbons in beige and brown
- Dried white ferns
- Thin gold floral wire
Equipment Required
- Sharp scissors
- Hot glue gun
DIY Instructions
- Measure and cut five strands of ribbon that are four feet long.
- Fold a ribbon strand in half and place the loop behind the hoop.
- Pull the loose ends of the ribbon through the loop to tighten it.
- Repeat this process with all ribbons until they hang from the center.
- Take a cluster of dried ferns and place them on the side of the hoop.
- Wrap floral wire tightly around the fern stems and the metal ring.
- Trim any wire ends so they do not scratch your door.
- Apply a small dot of hot glue to the back of the ferns for security.
- Cut the bottom of the ribbons at an angle to prevent fraying.
- Tie a thin string to the top of the hoop for hanging.
5 Sophisticated Neutral Table Setting
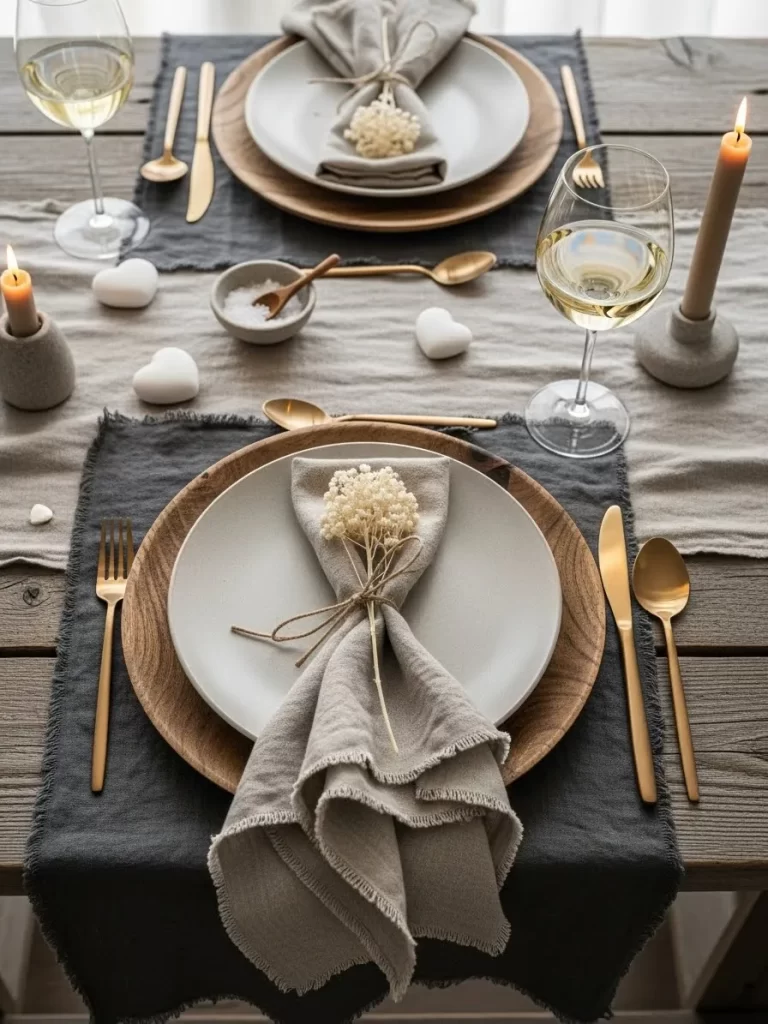
Host a romantic dinner with a table scape that focuses on linen and wood. Charcoal placemats provide a deep base for light grey plates and chargers. Small white heart stones scattered on the runner add a quiet romantic element.
Tying napkins with simple twine and dried flowers makes guests feel special. Gold cutlery adds a hint of luxury without being loud. Your dinner will feel calm and curated in this serene environment.
Materials Required
- Grey linen napkins
- Dried baby breath sprigs
- Natural jute twine
- Smooth white river stones
- White paint pen
Equipment Required
- Iron
- Scissors
DIY Instructions
- Use your iron to remove all wrinkles from the linen napkins.
- Fold each napkin into a long rectangle shape for the plate.
- Cut a piece of jute twine about twelve inches long.
- Place a small bunch of baby breath in the center of the napkin.
- Wrap the twine around the napkin and the flowers twice.
- Tie a simple bow with the twine and trim the extra string.
- Take your white stones and draw a heart on each with the pen.
- Let the ink dry for five minutes so it does not smudge.
- Set your plates and cutlery on the table first.
- Lay the napkins on the plates and scatter the stones around.
6 Golden Taper Candle Display
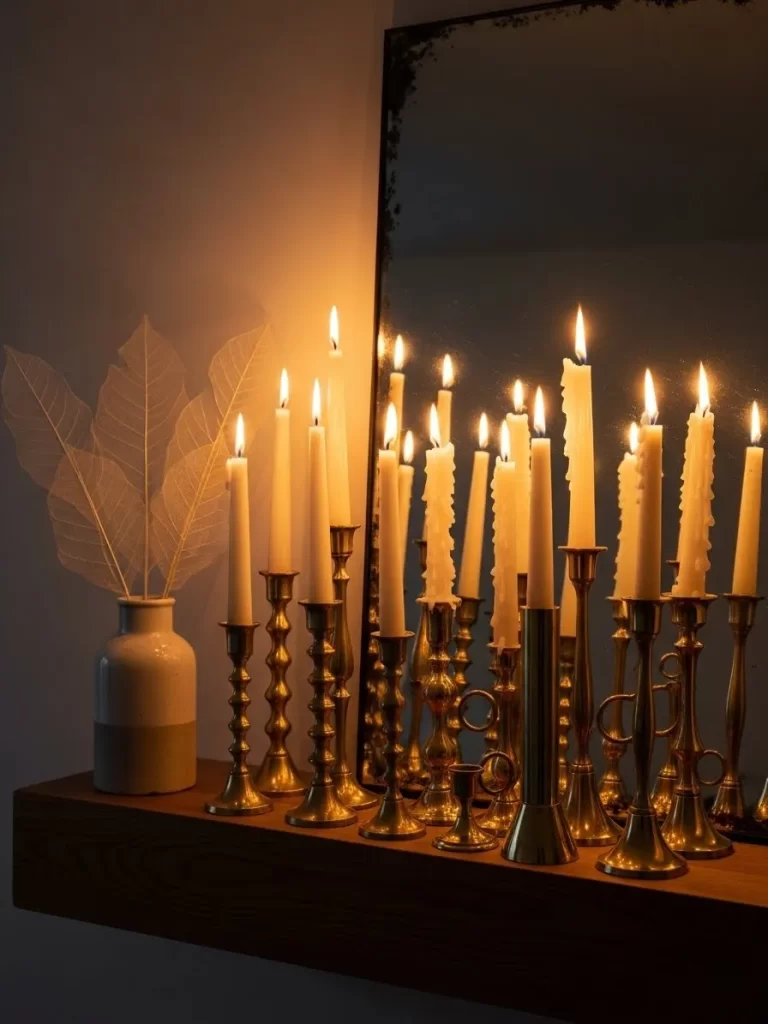
Create a glowing atmosphere with a large collection of brass candlesticks. Placing these in front of a mirror doubles the warmth in the room. Unscented cream candles look elegant as they slowly melt and create unique drips.
Evening light reflects off the polished gold surfaces to brighten a mantel. This setup works well for a cozy night at home. You can mix different vintage styles to give the display a collected look.
Materials Required
- Collection of brass candle holders
- Cream colored taper candles
- Museum wax or sticky tac
Equipment Required
- Lighter
- Microfiber cloth
DIY Instructions
- Rub the brass candle holders with a cloth to make them shine.
- Arrange the holders in a group with the tallest pieces in the back.
- Place a small amount of museum wax on the bottom of a candle.
- Press the candle into the holder and hold it for five seconds.
- Check that the candle is standing straight before letting go.
- Repeat this step for every candlestick in your display.
- Ensure there is space between each flame for safety.
- Place the entire display in front of a mirror for more light.
- Trim the wicks of the candles to a short length before lighting.
- Light the candles starting from the back to avoid heat.
7 Textured 3D Heart Canvas
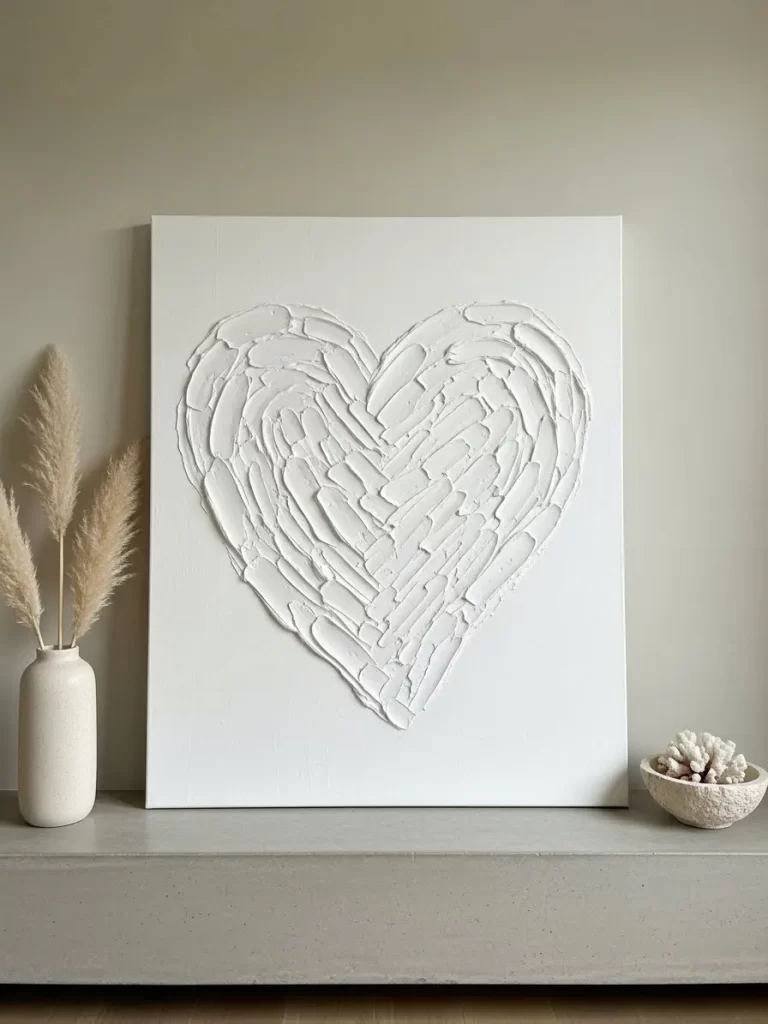
Apply thick plaster to a canvas to create a stunning piece of wall art. This project uses heavy brush strokes to form a large heart shape. Pure white tones allow the texture to be the star of the show.
Shadows move across the ridges of the plaster throughout the day. It looks great leaning on a mantel or hanging in a bedroom. This art piece adds a statement while staying within a neutral palette.
Materials Required
- Large primed white canvas
- Ready mixed joint compound or plaster
- White acrylic paint
Equipment Required
- Putty knife
- Large flat paint brush
DIY Instructions
- Lay the canvas on a flat table protected by old newspapers.
- Open the joint compound and stir it until it is smooth.
- Scoop a large glob of compound and place it on the canvas.
- Spread the material outward to form the shape of a heart.
- Use the putty knife to make short strokes that overlap.
- Keep the edges of the heart messy to give it a 3D effect.
- Let the plaster dry for twenty four hours in a dry room.
- Paint over the heart with white acrylic paint once it is hard.
- Use a dabbing motion to get paint into all the deep cracks.
- Allow the paint to dry before displaying your new art.
8 Wooden Bead Heart Garland
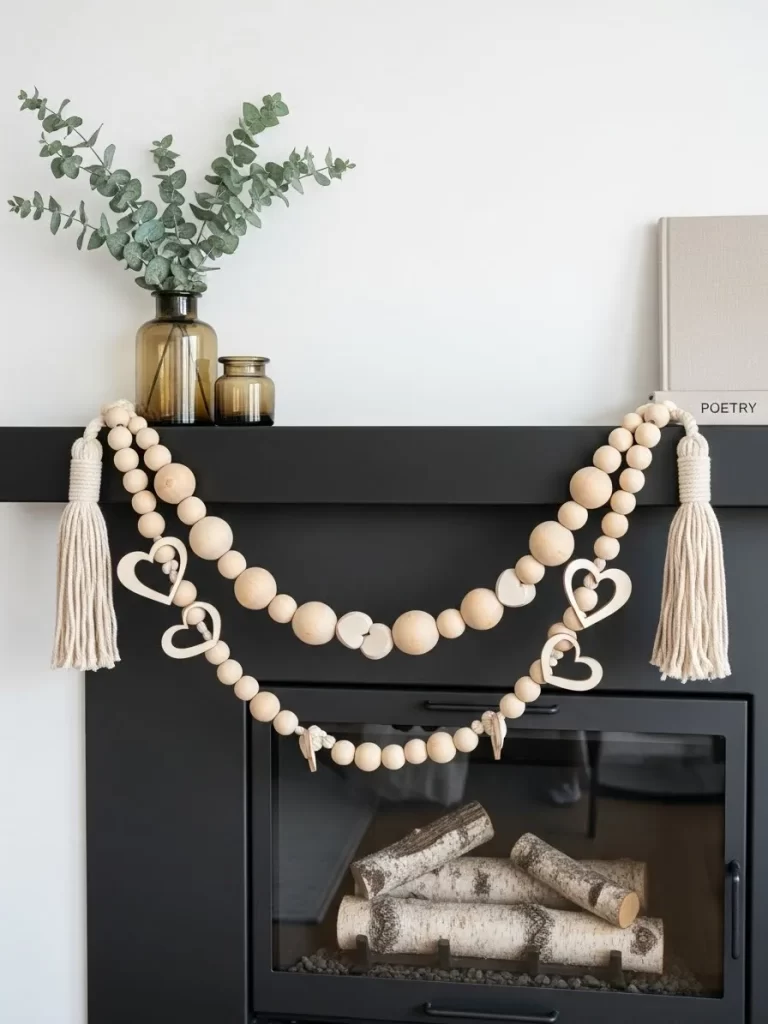
Drape a handmade wooden garland over your fireplace for a rustic touch. This piece features natural beads and delicate wooden hearts. Thick cotton tassels on each end provide a finished and professional look.
Beige wood tones look striking against a dark mantel. This decoration is durable and easy to store for future years. It adds a playful but refined energy to your hearth.
Materials Required
- Natural unfinished wooden beads
- Thin wooden heart cutouts
- Thick white cotton cord
Equipment Required
- Large eye plastic needle
- Sharp scissors
DIY Instructions
- Cut a piece of cotton cord that is six feet long.
- Tie a large knot at one end of the cord.
- Thread the other end of the cord through your needle.
- Slide ten small wooden beads onto the string first.
- Add one large bead followed by a wooden heart cutout.
- Continue this pattern until you reach the end of the cord.
- Make two tassels by wrapping cord around your hand twenty times.
- Tie the top of the loops together and cut the bottom.
- Attach one tassel to each end of the garland with a knot.
- Trim any loose strings and hang the garland on your mantel.
9 Golden Floral Coffee Table Tray
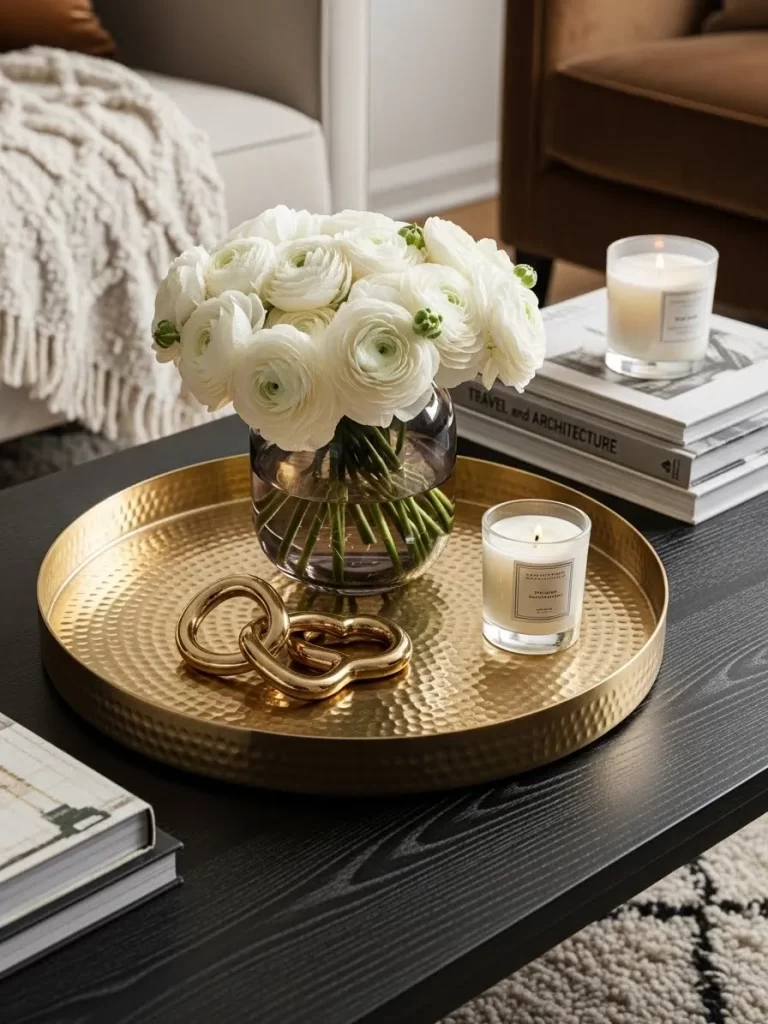
Center your coffee table with a round gold tray that holds fresh flowers. White blooms provide a lush and romantic look when gathered in a vase. Small golden chain links add a modern sculptural element to the tray.
Scented candles help set a relaxing mood in the room. This vignette looks organized and intentional thanks to the tray base. You will enjoy how the gold surfaces catch the sunlight.
Materials Required
- Round hammered gold tray
- Fresh white flowers
- Clear glass cylinder vase
- Small white candles in jars
Equipment Required
- Flower shears
- Fresh water
DIY Instructions
- Wash your glass vase with soap to ensure it is clean.
- Fill the vase halfway with room temperature water.
- Hold a flower stem against the vase to measure the height.
- Cut the stems at an angle so they can drink more water.
- Place the flowers in the vase to create a full dome shape.
- Set the gold tray in the middle of your coffee table.
- Put the vase of flowers on one side of the tray.
- Add two small candles to the other side to balance the look.
- Place a decorative gold chain in the front of the tray.
- Change the water every two days to keep the flowers fresh.
10 Woven Rattan Heart Gallery
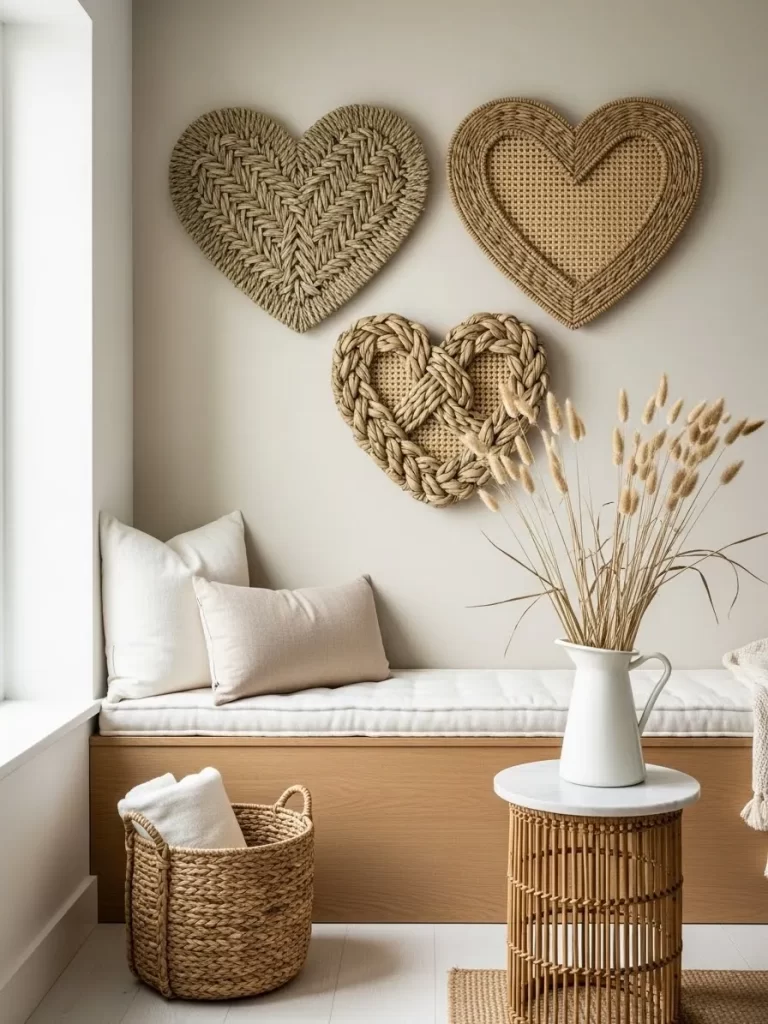
Hang a series of woven hearts on your wall for a cozy gallery. These pieces use different patterns to show the beauty of natural fibers. Rattan and seagrass materials bring warmth to a plain white wall.
Placing these above a bench creates a welcoming feel. The various sizes keep the arrangement interesting to the eye. This style is excellent for those who love an earthy look.
Materials Required
- Thick gauge craft wire
- Flat rattan strips or natural twine
- Thin floral wire
Equipment Required
- Wire cutters
- Pliers
- Hot glue gun
DIY Instructions
- Cut a piece of thick wire and bend it into a heart shape.
- Twist the two ends of the wire together at the bottom.
- Tie the end of a rattan strip to the top of the heart.
- Wrap the rattan around the wire until the frame is covered.
- Use hot glue to secure the end of the strip to the back.
- Create a pattern by pulling strips from one side to the other.
- Loop the strips over and under each other to make a mesh.
- Glue the edges of the strips to the inside of the frame.
- Trim any bits of rattan that are sticking out with scissors.
- Use a small nail to hang the finished hearts in a cluster.
11 Dusty Mauve Tulle Wreath

Soft ruffles of fabric create a striking focal point for your interior doors. This wreath uses layers of fine mesh to build deep volume and texture. Muted rose tones provide a sophisticated alternative to traditional bright holiday colors.
Layering the tulle creates a cloud like effect that feels light and romantic. You can hang this piece in a bedroom or a dressing area for a feminine touch. The long fabric tail adds a dramatic vertical element to your wall decor.
Materials Required
- Wire wreath frame
- Three rolls of dusty mauve tulle
- Thin floral wire
- Clear hanging hook
Equipment Required
- Sharp scissors
- Measuring ruler
DIY Instructions
- Cut the tulle fabric into hundreds of strips that measure six inches long.
- Take one strip and tie a simple double knot around the outer ring of the wire frame.
- Slide the knot to the edge so it stays tight against the metal.
- Continue tying strips until the entire outer ring is completely covered.
- Move to the middle ring and repeat the tying process until it feels very full.
- Fill the inner ring with the remaining strips of fabric.
- Pack the strips closely together to ensure the metal frame is hidden.
- Cut a very long piece of tulle to serve as the decorative tail.
- Tie the tail to the bottom center of the wreath and let it hang straight.
- Fluff the fabric with your hands to give the wreath a round and airy shape.
12 Porcelain Heart Trinket Dishes
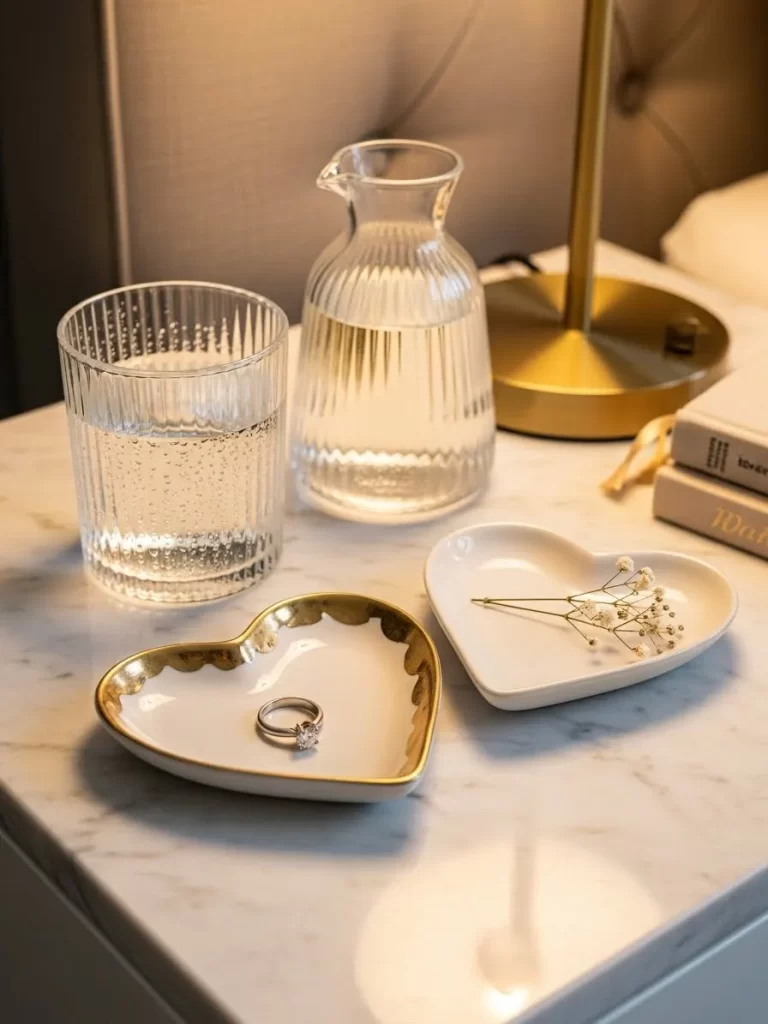
Small accents often make the biggest impact in a well curated room. These white ceramic bowls feature a beautiful heart shape and metallic gold edges. They look superb on a marble nightstand or a wooden dresser.
Keeping your rings and earrings safe becomes an elegant habit with these dishes. The smooth white surface reflects light to brighten up your vanity area. You will enjoy the heavy and high quality feel of the porcelain material.
Materials Required
- White polymer clay
- Gold leaf paint
- Clear glossy sealer
- Fine grit sandpaper
Equipment Required
- Rolling pin
- Heart shaped cookie cutter
- Small paintbrush
- Baking sheet
DIY Instructions
- Roll out the white clay on a flat surface until it is one quarter inch thick.
- Use your heart shaped cutter to create two identical clay pieces.
- Place each heart inside a small kitchen bowl to give it a curved shape.
- Bake the clay hearts in your oven according to the package directions.
- Allow the clay to cool completely before you remove them from the bowls.
- Rub the edges of the dishes with sandpaper to make them perfectly smooth.
- Wipe away any dust with a clean and dry cloth.
- Paint a thin gold line around the rim of one dish with your brush.
- Apply a layer of clear sealer to protect the paint and the clay surface.
- Let the sealer dry for two hours before you place any jewelry inside.
13 Floating Paper Heart Mobile
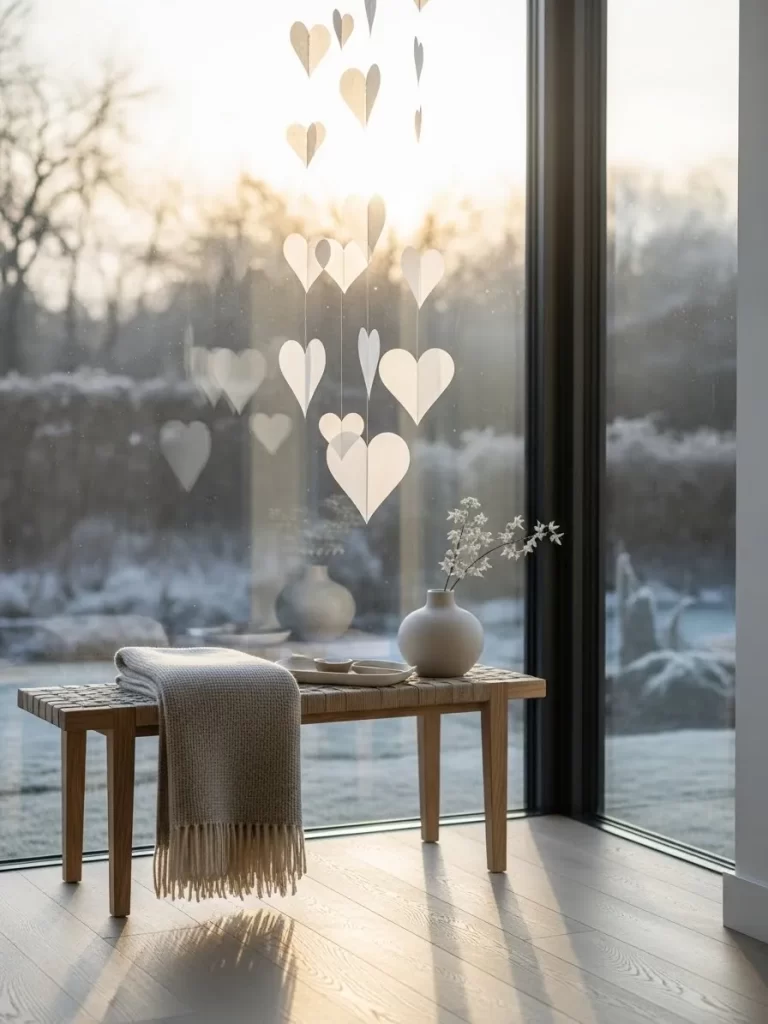
Transform a simple window into a display of light and motion. This mobile uses white paper hearts that spin gently in the breeze. Clean white tones keep the look modern and fresh for any room.
Vertical lines of thread help make your ceilings appear much taller. This project is a budget friendly way to add magic to your living space. You will find the quiet movement of the hearts very relaxing to watch.
Materials Required
- Heavy white cardstock
- White sewing thread
- Small wooden dowel
- Clear tape
Equipment Required
- Heart paper punch
- Sewing machine or glue stick
- Scissors
DIY Instructions
- Punch out forty heart shapes from your heavy white cardstock.
- Group the hearts into pairs of two for each hanging strand.
- Apply a thin layer of glue to the center of one heart.
- Lay a long piece of thread over the glue line.
- Press the matching heart on top to secure the thread in the middle.
- Space the hearts four inches apart along the entire length of the thread.
- Repeat this process until you have five separate strands of paper hearts.
- Fold the paper flaps outward to give each heart a three dimensional look.
- Tie the top of each thread strand to your wooden dowel.
- Use clear tape to secure the dowel to the top of your window frame.
14 Mossy Heart Garden Pots
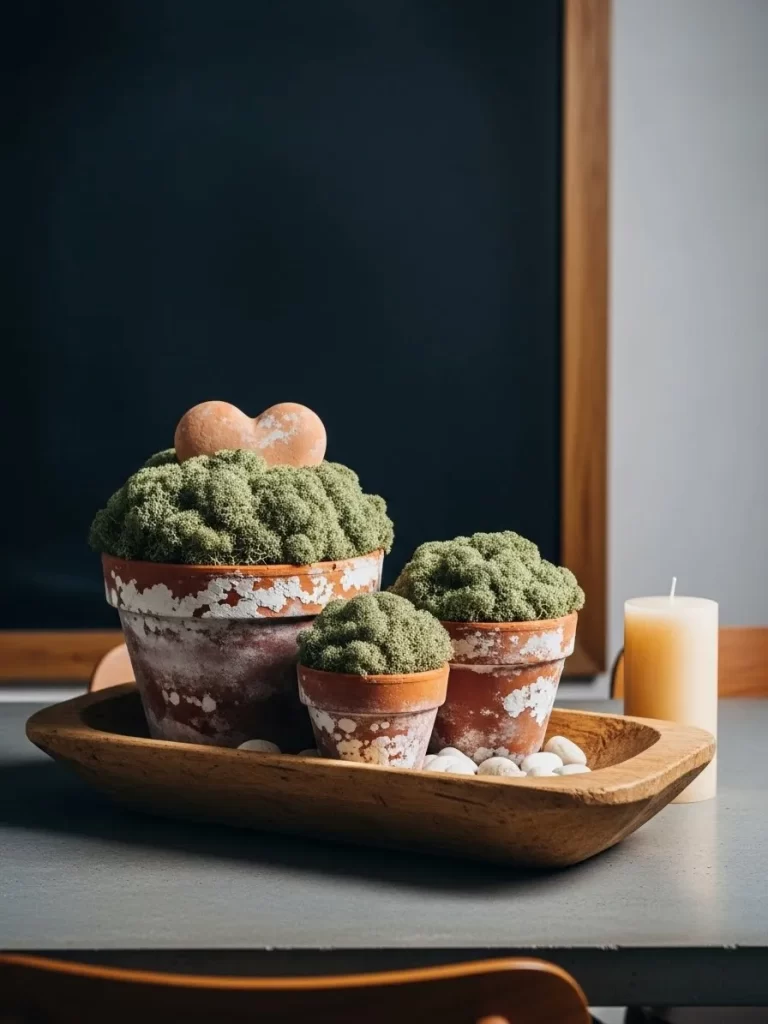
Bring the beauty of nature indoors with these earth toned containers. Distressed terracotta pots provide a rustic base for lush green moss. A small stone heart on top adds a quiet romantic detail to the display.
Mounds of reindeer moss create a soft and organic texture on your table. This arrangement looks excellent on a dining runner or a wooden shelf. You will love how the green color pops against a neutral background.
Materials Required
- Three terracotta pots in different sizes
- Preserved reindeer moss
- Small heart shaped stone
- White chalk paint
- Foam blocks
Equipment Required
- Paintbrush
- Hot glue gun
- Sandpaper
DIY Instructions
- Brush white chalk paint onto the outside of your terracotta pots.
- Wipe some of the paint away with a cloth to create a streaky look.
- Use sandpaper to scuff the edges for a vintage feel.
- Fill the inside of the pots with foam blocks to create a base.
- Apply a generous amount of hot glue to the top of the foam.
- Press large clusters of moss onto the glue until the foam is hidden.
- Cover the edges of the pots with extra moss for a natural look.
- Place the heart stone on top of the moss in the tallest pot.
- Arrange the pots in a cluster on your table or a tray.
- Use a dry brush to clear away any loose bits of moss.
15 Leather Love Letter Journal
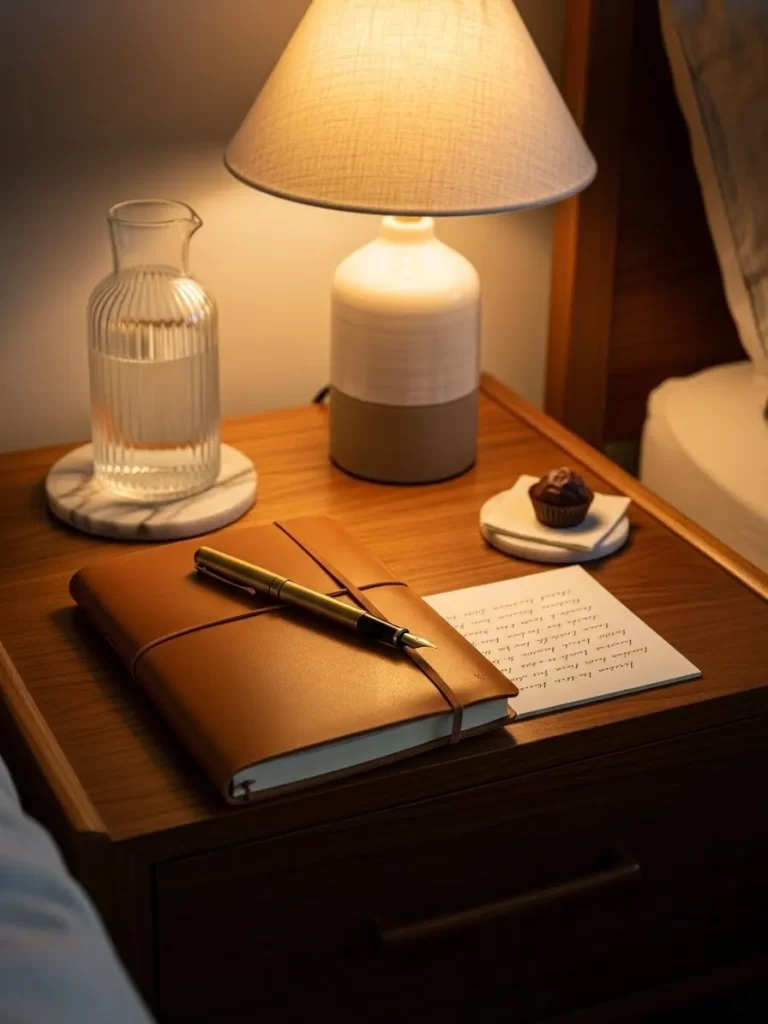
Capture your favorite memories in a classic hand bound book. A tan leather cover with a matching strap looks timeless on a nightstand. This journal provides a private space for your most meaningful thoughts.
Gold fountain pens add a touch of class to your writing desk. This item serves as a beautiful keepsake for your relationship. You will appreciate the smell and feel of the high quality leather.
Materials Required
- Leather journal cover
- High quality paper inserts
- Leather cord
- Small marble coaster
Equipment Required
- Leather hole punch
- Sharp scissors
- Gold fountain pen
DIY Instructions
- Cut a piece of leather to fit around your stack of paper.
- Punch two holes in the center fold of the leather cover.
- Thread a leather cord through the holes and around the paper pages.
- Tie a tight knot on the inside to keep the paper secure.
- Wrap the remaining cord around the outside of the book twice.
- Set the journal on your nightstand or a wooden desk.
- Place a marble coaster next to the book for your drink.
- Put a small chocolate or treat on a napkin for a sweet touch.
- Set your gold pen on top of the leather cover.
- Open the first page and write a short note to a loved one.
16 Monogrammed Linen Pillows
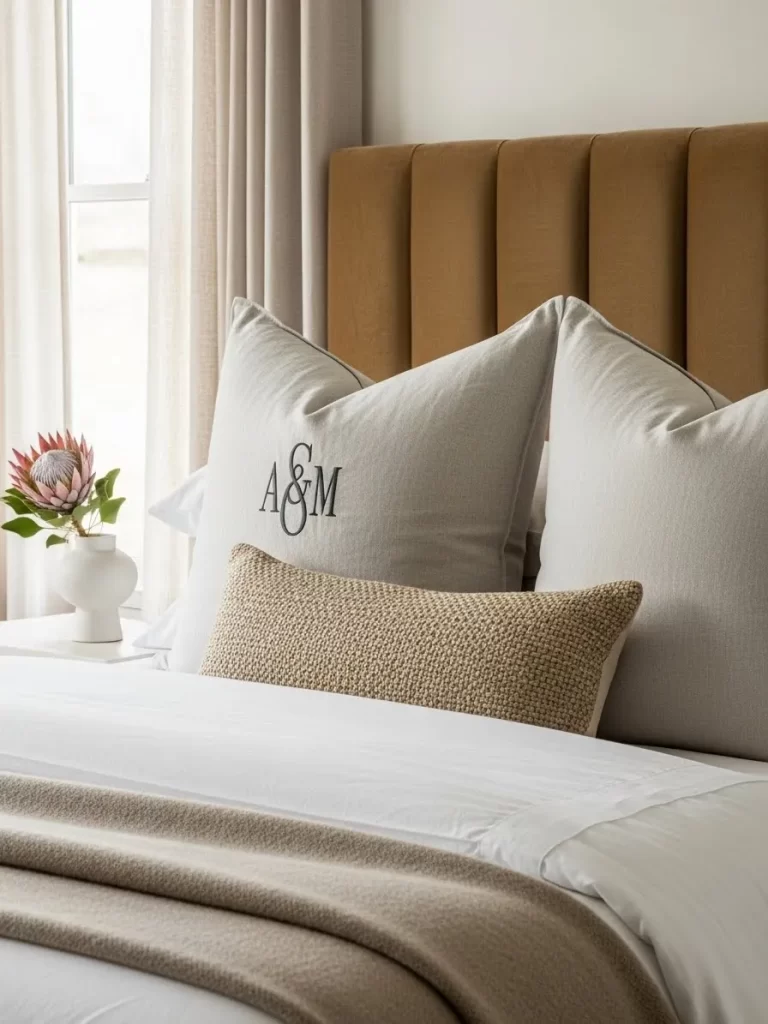
Personalize your bedroom with these custom embroidered cushions. Large initials in dark thread provide a high end look for your bed. Muted linen fabrics keep the space feeling calm and sophisticated.
Layering a long textured bolster in front adds visual interest. This combination makes your bedding feel like a luxury hotel room. You will enjoy the soft touch of the natural linen material.
Materials Required
- Two linen pillowcases in light beige
- Dark embroidery thread
- Long textured bolster pillow
- White bed linens
Equipment Required
- Embroidery hoop
- Sewing needle
- Iron
DIY Instructions
- Use your iron to remove any wrinkles from the pillowcases.
- Draw your initials in the center of the fabric with a pencil.
- Place the linen fabric inside the embroidery hoop to keep it tight.
- Thread your needle and follow the pencil lines with thick stitches.
- Create a satin stitch for a smooth and professional letter finish.
- Remove the hoop and iron the back of the embroidery.
- Put your pillow inserts into the finished monogrammed cases.
- Lean the large pillows against your headboard at the back.
- Place the long bolster pillow in the center at the front.
- Smooth out the duvet cover to complete the bed styling.
17 Smoky Glass Candle Vessels
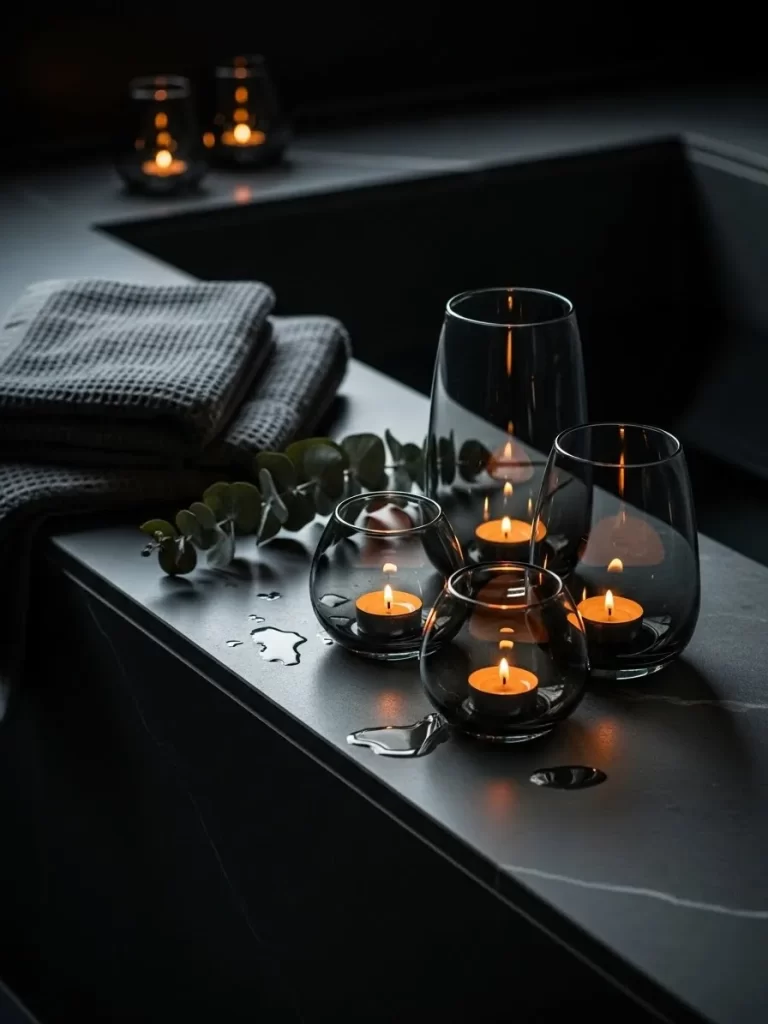
Set a moody and relaxing atmosphere with dark tinted glass. These vessels feature a smoky grey color that looks very modern. The warm orange flames look striking against the dark background.
Placing these on a black stone surface creates a sleek and clean look. This setup is a great choice for a spa like bathroom. You will love the peaceful glow of the fire in the glass.
Materials Required
- Smoky grey glass vases in various sizes
- White tea light candles
- Fresh eucalyptus branch
- Grey waffle knit towels
Equipment Required
- Long neck lighter
- Microfiber cloth
DIY Instructions
- Clean each glass vase with a cloth to remove any fingerprints.
- Place a tea light candle at the bottom of every vessel.
- Arrange the vases in a group on a dark counter or shelf.
- Lay a branch of eucalyptus next to the base of the glass.
- Stack your grey towels neatly nearby to complete the look.
- Ensure the eucalyptus leaves are far away from the candle heat.
- Fill the taller vases with water if you prefer floating candles.
- Use a long lighter to reach the wicks at the bottom.
- Turn off the overhead lights to enjoy the soft smoky glow.
- Replace the candles once they burn down to keep the display fresh.
18 Eucalyptus Heart Wall Hoop

Natural greenery brings life to your bedroom walls. This large gold hoop is bent into a heart shape for a romantic touch. Thick eucalyptus leaves cover one side to create an organic balance.
Muted green tones look fresh against a plain white wall. This decoration provides a wonderful scent to your entire room. You will enjoy the mix of metallic shine and natural foliage.
Materials Required
- Thick gold craft wire
- Fresh eucalyptus branches
- Green floral wire
- Small wall nail
Equipment Required
- Wire cutters
- Pliers
DIY Instructions
- Bend the thick gold wire into a large heart shape by hand.
- Use your pliers to twist the ends together at the bottom point.
- Cut your eucalyptus branches into twelve inch long pieces.
- Lay the first branch against the left side of the gold heart.
- Wrap green floral wire around the branch and the gold frame.
- Place the next branch so it overlaps the first one slightly.
- Continue adding leaves until the left side is completely full.
- Leave the right side of the gold frame bare for contrast.
- Trim any leaves that are sticking out too far with your cutters.
- Hang the finished hoop on a small nail above your bed.
19 Chunky White Knit Heart Throw
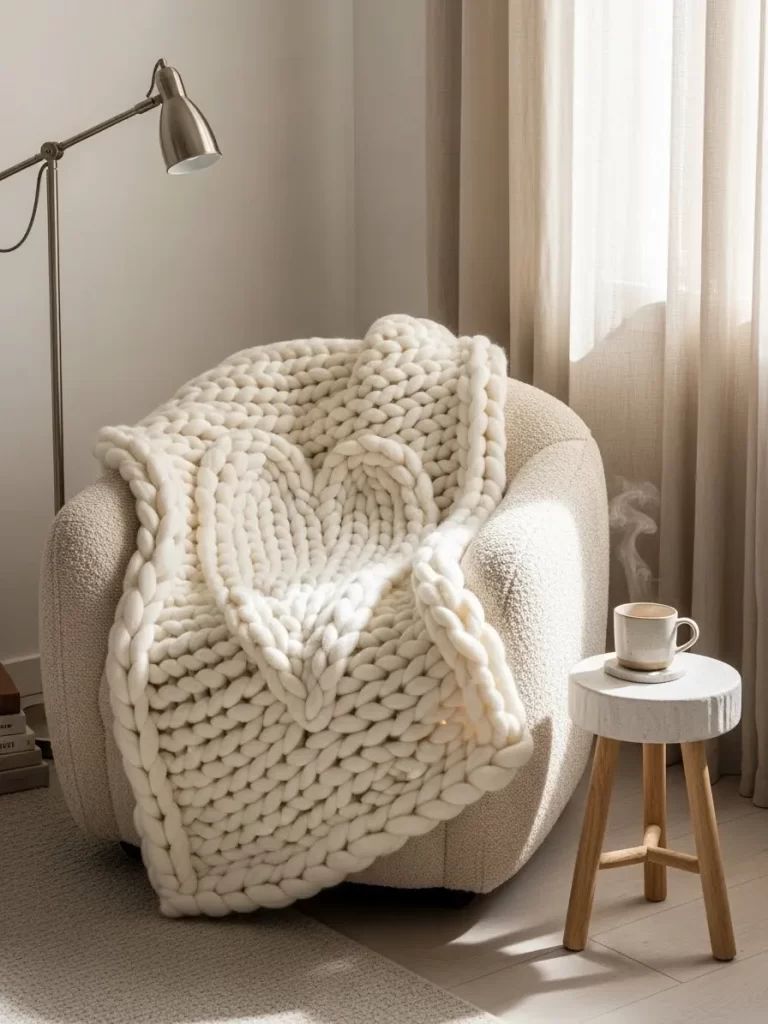
Snuggle up with a giant blanket that features a woven heart design. This piece uses extremely thick wool to create a bold texture. The cream color makes it a versatile item for your living room.
Woven heart patterns add a subtle romantic element to the chair. This blanket looks superb draped over a white boucle seat. You will love the heavy and cozy feel of the thick wool.
Materials Required
- Five pounds of giant wool roving in cream
- Large white boucle armchair
- Small wooden side table
Equipment Required
- Your arms for knitting or giant needles
- Sharp scissors
DIY Instructions
- Lay out your wool roving on a clean and flat floor.
- Create a base row by making twenty large loops by hand.
- Pull the wool through each loop to start the second row.
- Switch your stitch pattern in the center to form the heart.
- Use a purl stitch for the heart area to make it stand out.
- Continue knitting row by row until the blanket is large enough.
- Cast off the final row by pulling the remaining wool through.
- Tuck all loose ends back into the thick stitches of the blanket.
- Drape the finished throw over the back of your armchair.
- Position the blanket so the woven heart is visible in the center.
20 Floating Petal and Candle Bowl
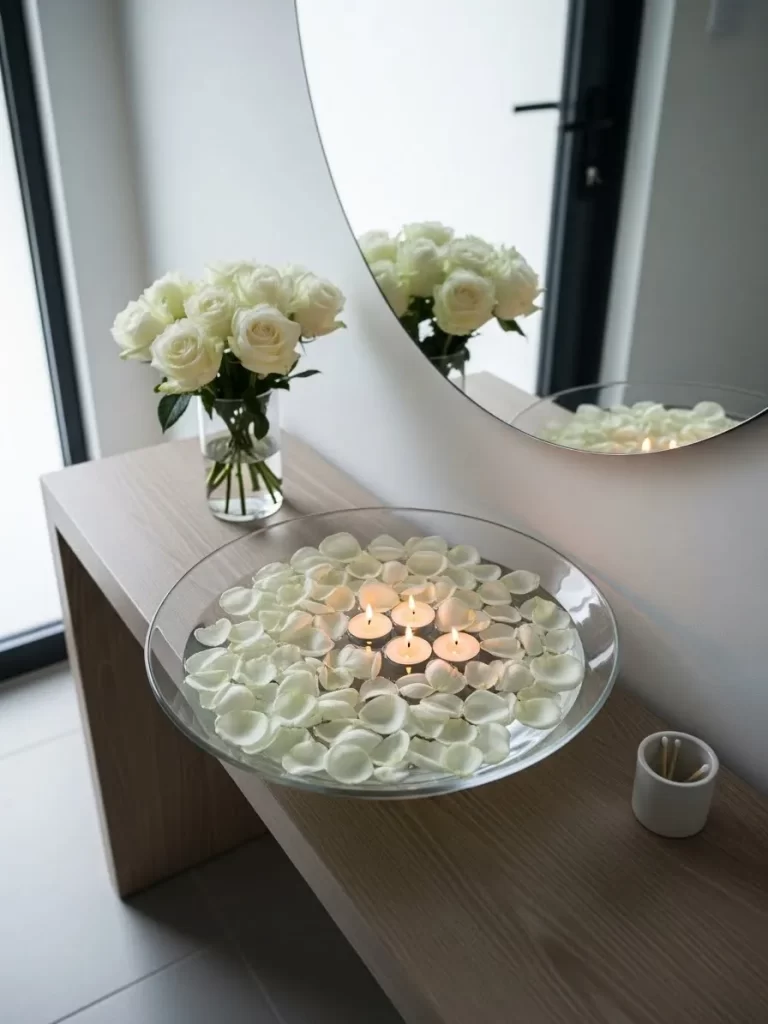
Create a stunning centerpiece with a clear glass bowl and water. White rose petals float on the surface in a thick and lush layer. Small candles in the center provide a beautiful flickering light.
Reflection in the water makes the entire room feel much brighter. This project is easy to assemble but looks very expensive. You can place it on an entryway table to welcome your guests.
Materials Required
- Large clear glass bowl
- Two dozen fresh white roses
- Five white floating candles
- Fresh water
Equipment Required
- Scissors
- Large pitcher
DIY Instructions
- Wash your glass bowl until the surface is perfectly clear.
- Fill the bowl with room temperature water using a pitcher.
- Pull the petals off the roses with a gentle motion.
- Drop the petals onto the water one by one in a circle.
- Continue adding petals until the surface is mostly covered.
- Leave a small opening in the very center of the bowl.
- Place the floating candles carefully into the center gap.
- Make sure the candles have room to move and glow.
- Use a long match to light the candles without getting wet.
- Set the bowl in a prominent spot on your table or shelf.
21 Draped Ribbon Mirror Decor
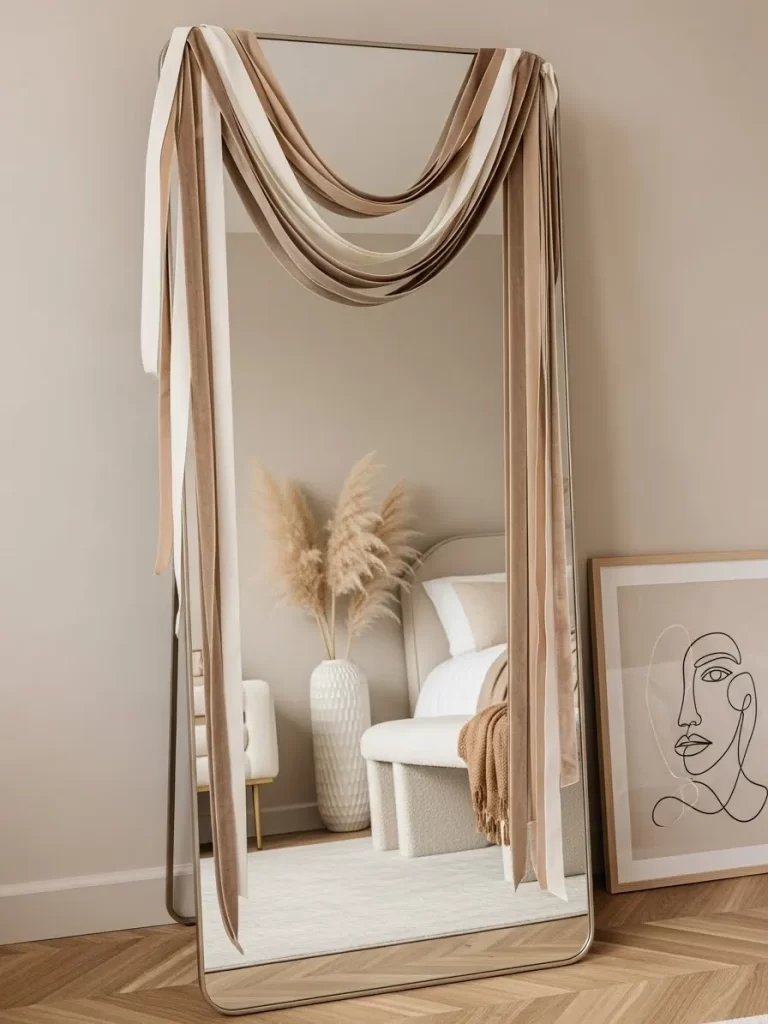
Soft fabric adds a touch of romance to a large floor mirror. Long strands of tan and cream ribbon hang from the top corners. This design frames your reflection with beautiful and soft layers.
Movement of the ribbons adds a sense of life to your room. It is a simple way to dress up a plain piece of furniture. You will enjoy how the fabric catches the afternoon light.
Materials Required
- Wide velvet ribbons in tan and cream
- Silk fabric strips
- Clear adhesive hooks
- Arch floor mirror
Equipment Required
- Sharp scissors
- Fabric steamer
DIY Instructions
- Cut several long pieces of ribbon in various neutral colors.
- Make sure the strands are long enough to reach the floor.
- Use a steamer to remove all wrinkles from the fabric strips.
- Place two clear hooks on the top corners of your mirror.
- Drape the longest ribbons over the hooks in a curved shape.
- Let the ends of the ribbons hang down the sides of the frame.
- Layer the silk and velvet pieces to create visual depth.
- Adjust the lengths so the arrangement looks soft and natural.
- Secure the top of the ribbons with a small piece of tape.
- Step back to ensure the fabric drapes evenly on both sides.
22 Geometric Black Heart Candle
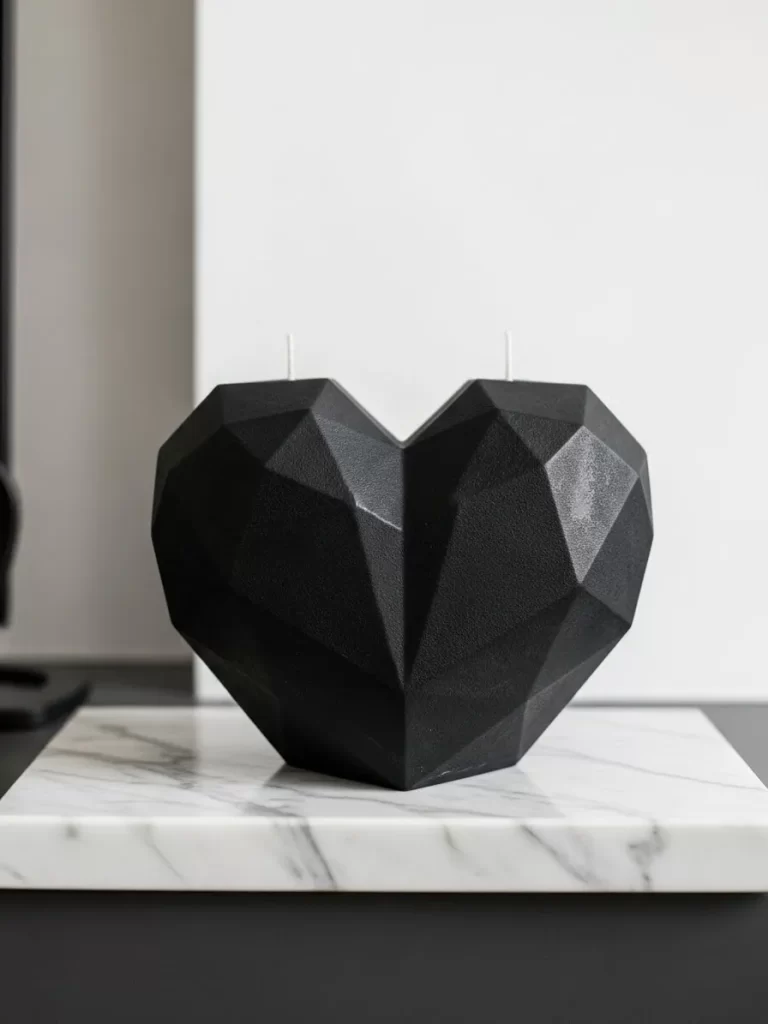
Add a modern edge to your decor with a dark heart candle. The faceted surface reflects light in a very unique and bold way. It looks like a piece of carved stone on your white shelf.
Black colors provide a strong contrast to light walls and furniture. This is a great choice for a minimalist or industrial home. It feels high end and artistic without being traditional.
Materials Required
- Soy wax flakes
- Black candle dye
- Cotton candle wick
- Marble display tray
Equipment Required
- Geometric heart silicone mold
- Melting pot
- Thermometer
DIY Instructions
- Melt the soy wax in a pot using low heat.
- Stir in the black dye until the color is very deep.
- Place the cotton wick in the center of the silicone mold.
- Use a small stick to hold the wick in an upright position.
- Pour the hot wax slowly into the geometric heart mold.
- Let the candle sit for six hours to harden completely.
- Pull the sides of the mold away gently to release the wax.
- Trim the wick to one quarter inch before you light it.
- Place the finished candle in the center of a marble tray.
- Set the tray on a shelf or a coffee table for display.
23 Paper Wrapped Tulip Pitcher
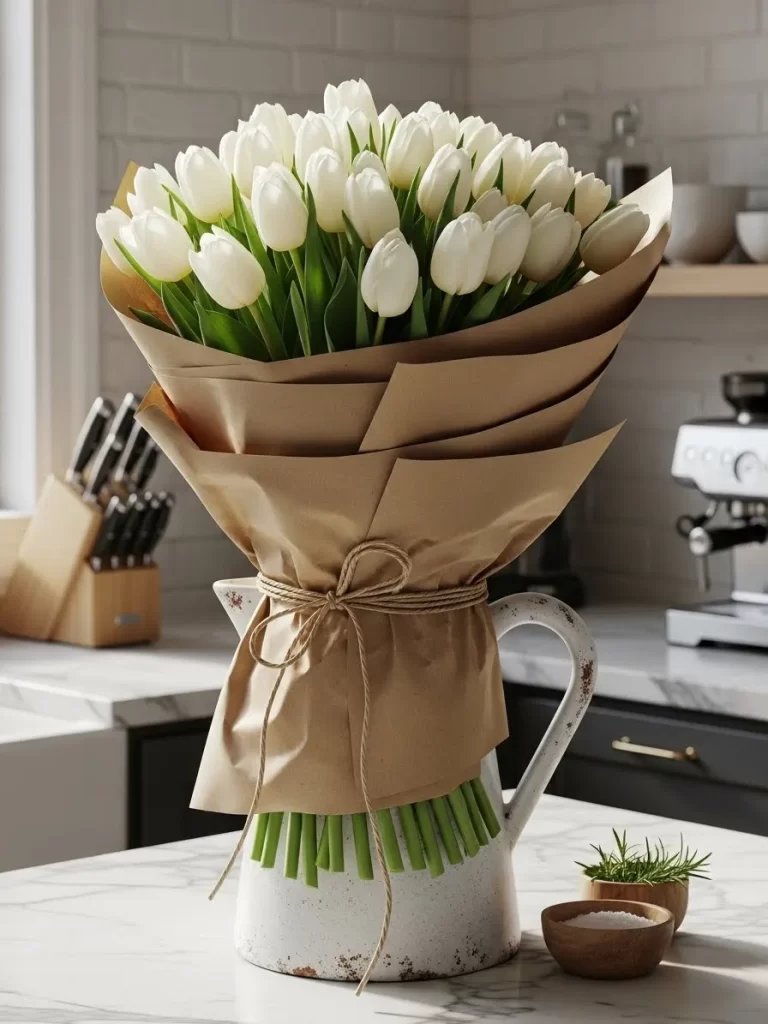
Fresh tulips look charming when wrapped in simple brown paper. This rustic look is fitting for a clean kitchen counter. A white ceramic pitcher provides a bright base for the white blooms.
Twine tied in a simple bow adds a final touch of detail. This arrangement feels natural and very effortless for any home. It is a great way to bring the feeling of spring inside.
Materials Required
- Fresh white tulips
- Brown craft paper
- Natural jute twine
- White ceramic pitcher
Equipment Required
- Flower shears
- Fresh water
DIY Instructions
- Fill your ceramic pitcher halfway with cold and fresh water.
- Trim the tulip stems at an angle with your sharp shears.
- Place the tulips in the pitcher to form a large bunch.
- Cut a large square of brown craft paper from the roll.
- Wrap the paper around the middle of the ceramic pitcher.
- Fold the edges of the paper to make the top look neat.
- Cut a piece of jute twine that is two feet long.
- Wrap the twine around the paper layer twice.
- Tie a simple bow in the front of the pitcher.
- Change the water every day to keep your tulips looking fresh.
24 Oversized Twig and Bud Wreath

Make a massive statement with a giant wreath made of branches. Small white buds are scattered throughout the twigs for texture. This piece fills a large wall with organic and wild beauty.
Messy shapes look modern and very artistic in a minimalist room. It works well above a grey sofa or a large bed frame. This decoration brings the feeling of a forest into your house.
Materials Required
- Large bundle of thin birch twigs
- Small white berry picks
- Thick circular wire frame
- Brown floral tape
Equipment Required
- Wire cutters
- Pliers
DIY Instructions
- Start with a large circular wire frame as your base.
- Group a small bundle of twigs together in your hand.
- Lay the twigs on the frame and wrap them with floral tape.
- Overlap the next bundle to hide the tape from the first one.
- Continue around the entire circle until the frame is covered.
- Add more twigs in random directions to create a wild look.
- Tuck the white berry picks into the gaps between the wood.
- Use small pieces of wire to secure any heavy branches.
- Trim the twigs that are sticking out too far for a better shape.
- Hang the wreath on a sturdy nail in the middle of your wall.
25 Heart Etched Champagne Coupes

Celebrate with a pair of elegant and vintage glass coupes. A small etched heart on the base adds a secret and romantic detail. These glasses look sophisticated when served on a silver tray.
Bubbles in the drink make the etched heart shape sparkle. This is a subtle way to mark a special occasion at home. You will love using these for every anniversary or celebration.
Materials Required
- Pair of glass champagne coupes
- Glass etching cream
- Heart shaped stencil
- Silver serving tray
Equipment Required
- Small paintbrush
- Rubber gloves
- Microfiber cloth
DIY Instructions
- Wash the glasses with soap to remove any oils or prints.
- Place a heart stencil on the bottom of each glass base.
- Put on your rubber gloves to protect your hands from the cream.
- Apply a thick layer of etching cream over the stencil area.
- Let the cream sit on the glass for exactly ten minutes.
- Rinse the cream off with warm water in the kitchen sink.
- Peel away the stencil to reveal the frosted heart shape.
- Dry the glass carefully with a soft microfiber cloth.
- Repeat the entire process for the second glass in the set.
- Place the finished coupes on a silver tray for your guests.
26 Coffee and Croissant Morning Tray
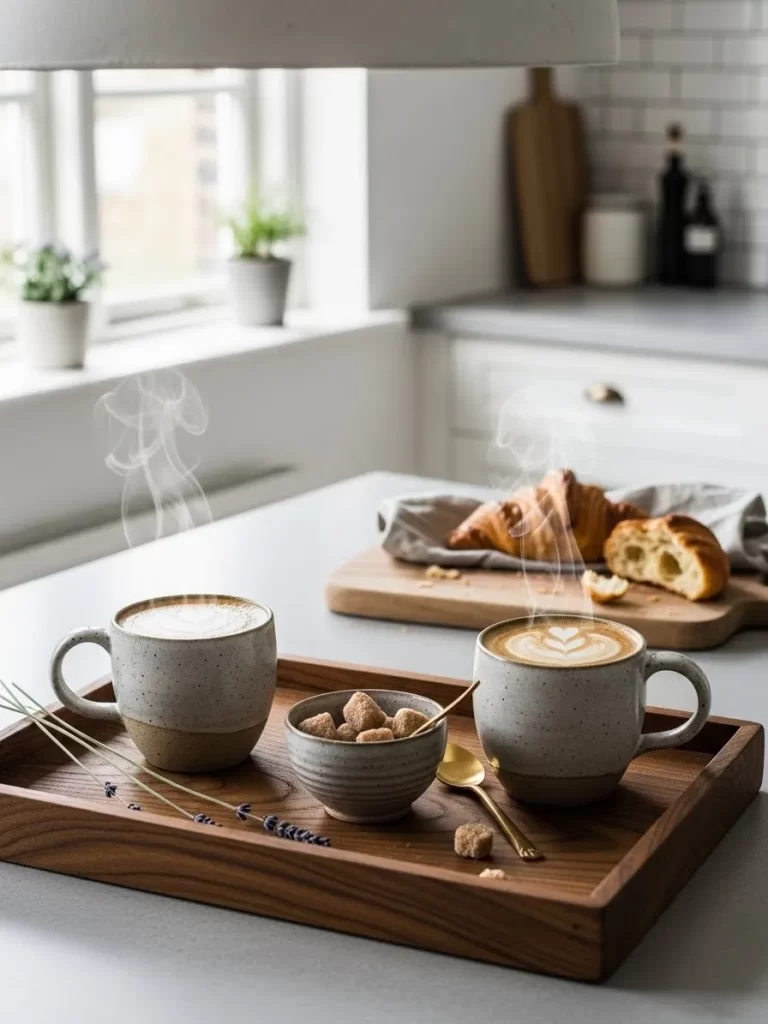
Start your day with a romantic breakfast served in bed. Two speckled ceramic mugs are filled with hot and fresh coffee. A wooden tray holds everything you need for a quiet morning.
Fresh croissants on a wooden board look very inviting and warm. A small sprig of lavender adds a pleasant scent to the setup. This is a wonderful way to show love through a simple meal.
Materials Required
- Two speckled ceramic mugs
- Wooden serving tray
- Fresh croissants
- Dried lavender sprigs
- Wooden cutting board
Equipment Required
- Coffee maker
- Small spoons
DIY Instructions
- Brew a fresh pot of coffee in your kitchen maker.
- Place your wooden serving tray on a flat counter top.
- Set two warm croissants on a small wooden cutting board.
- Fill the ceramic mugs with hot coffee for two people.
- Position the mugs on the left side of the serving tray.
- Place the board with croissants on the right side.
- Lay a few sprigs of dried lavender across the front of the tray.
- Set a small bowl of sugar cubes next to the coffee mugs.
- Carry the tray carefully to the bedroom or the living room.
- Enjoy your slow morning meal while the coffee is still hot.
27 Frosted Pinecone Dough Bowl
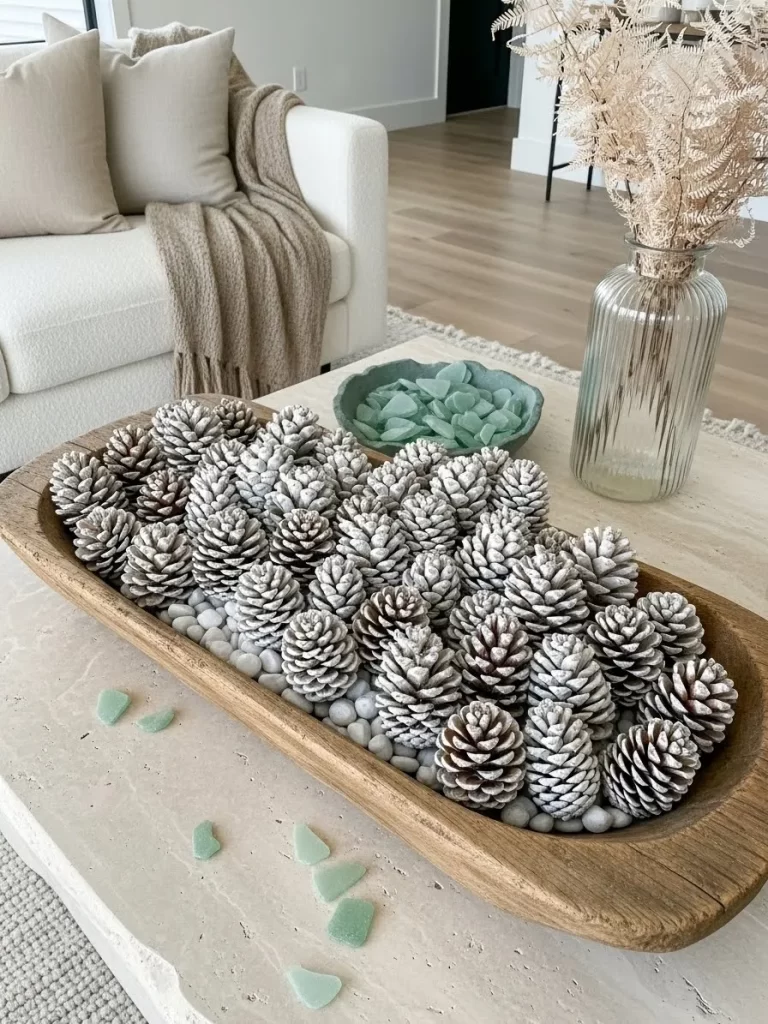
Decorate your coffee table with a long and rustic dough bowl. Many white frosted pinecones are packed inside for a winter look. Small white stones at the bottom provide another layer of texture.
Sea glass pieces in soft green offer a tiny hint of color. This arrangement feels organic and grounded for any space. It looks excellent in a room with lots of natural light.
Materials Required
- Wooden dough bowl
- Frosted white pinecones
- White river stones
- Green sea glass pieces
Equipment Required
- Soft brush for dusting
DIY Instructions
- Wipe the wooden bowl with a dry cloth to remove dust.
- Pour a thick layer of white stones into the bottom of the bowl.
- Place the largest pinecones in the center of the arrangement.
- Add the smaller pinecones around the edges to fill all gaps.
- Make sure the pinecones are standing in an upright position.
- Scatter the green sea glass pieces over the top of the stones.
- Position a few extra glass pieces on the table near the bowl.
- Check the display from all sides to ensure it looks balanced.
- Use a soft brush to clear any loose bits from the pinecones.
- Set the bowl in the center of your coffee table for display.
28 Framed Paper Doily Heart Art
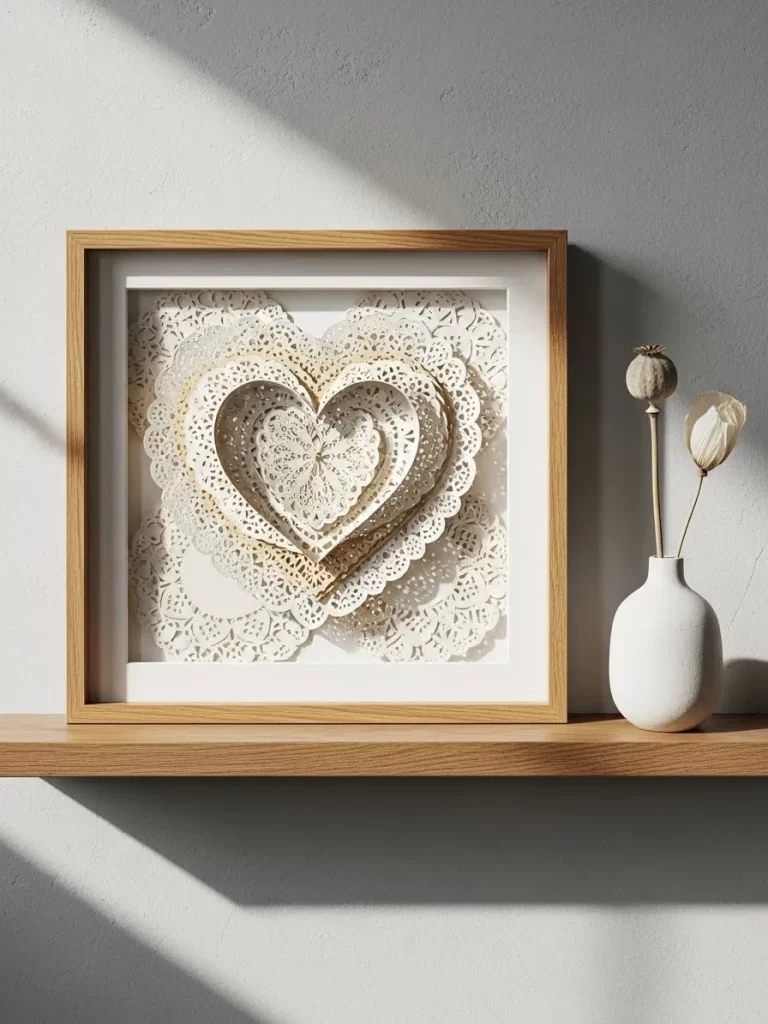
Create a delicate piece of art using simple white paper doilies. Many layers of lace paper form a large and textured heart. The light wood frame keeps the focus on the intricate details.
Shadows behind the paper layers add depth to the art piece. This looks elegant on a white shelf or a wooden mantel. It is an affordable way to make custom decor for your home.
Materials Required
- Square wood picture frame
- Ten white paper doilies
- White cardstock base
- Double sided tape
Equipment Required
- Sharp scissors
DIY Instructions
- Remove the glass and the backing from your picture frame.
- Cut a piece of cardstock to fit the inside of the frame exactly.
- Take five doilies and fold them in half with a gentle crease.
- Layer the doilies on the cardstock to form a large heart shape.
- Use double sided tape to secure the bottom layer of paper first.
- Keep adding doilies until the heart looks very thick and full.
- Trim the outer edges of the doilies to sharpen the heart shape.
- Place the decorated cardstock back into the wooden frame.
- Secure the backing of the frame to hold everything in place.
- Lean the finished art against the wall on a wooden shelf.
29 Dark Wax and Rose Scented Display
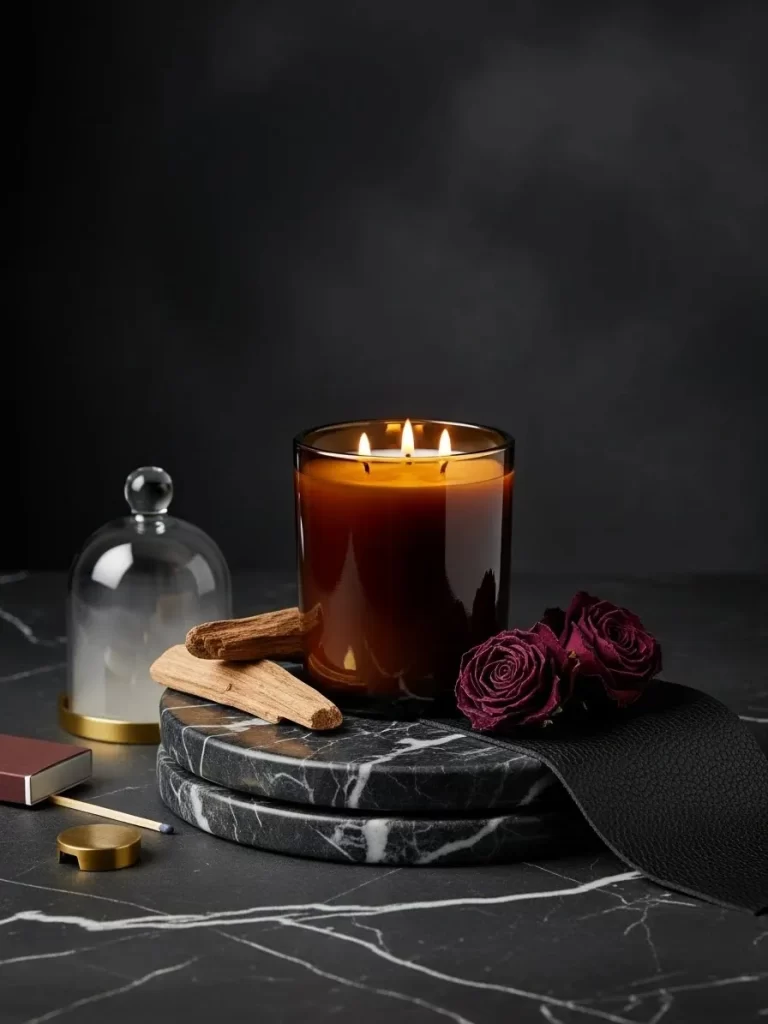
Set a sophisticated mood with a large amber glass candle. Dried roses in a dark red color sit next to the jar. A black marble base provides a luxury foundation for the display.
Warm glow from the candle creates a cozy atmosphere in your room. This display looks high end and very intentional for guests. It is a great choice for a romantic evening dinner party.
Materials Required
- Amber glass scented candle
- Black marble display tray
- Three dried dark red roses
- Scented wood sticks
Equipment Required
- Matches
- Glass cloche
DIY Instructions
- Place the black marble tray on your table or a shelf.
- Set the amber candle in the middle of the tray surface.
- Lay three dried roses carefully next to the glass candle jar.
- Place the scented wood sticks in a small pile on the tray.
- Cover the roses with a glass cloche to keep them protected.
- Make sure the cloche is not touching the candle flame area.
- Light the candle with a match to start the warm glow.
- Watch how the fire reflects in the dark marble surface.
- Keep the display away from any fans or moving air.
- Enjoy the deep floral scent as it fills your entire room.
30 Macrame Fringe Heart Wall Hanging
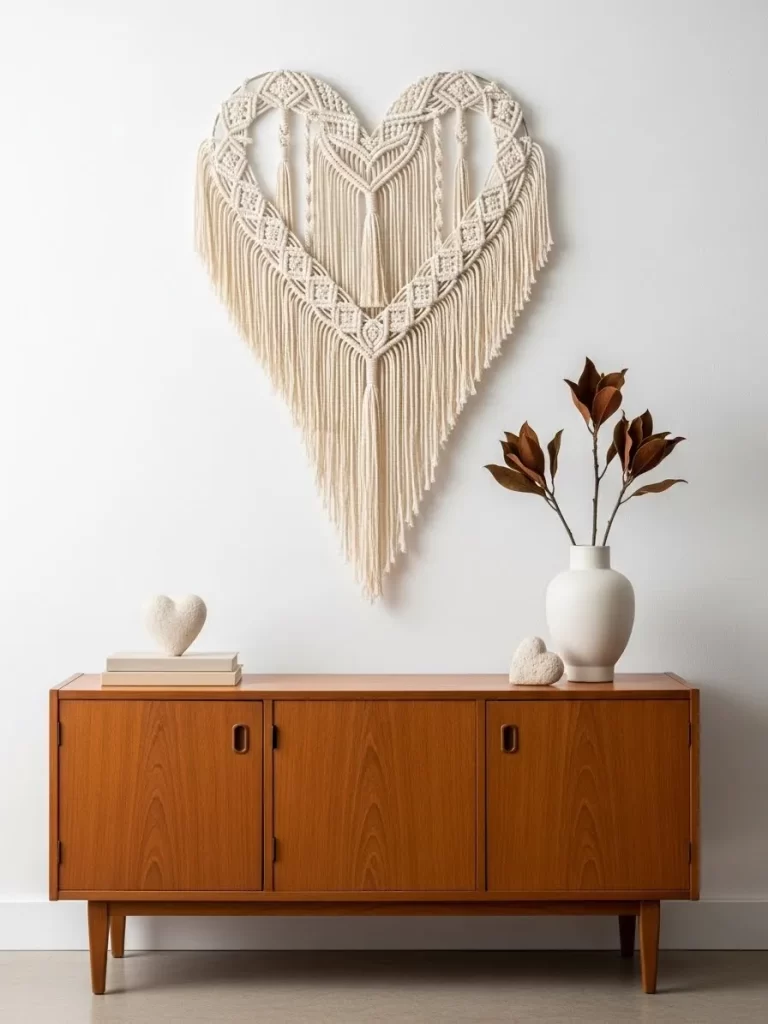
Add a boho touch to your home with a large woven heart. Long cotton fringe hangs down to create a soft and flowing shape. Natural cream cord looks beautiful on a plain white bedroom wall.
Intricate knots show off the hand crafted quality of the piece. This decoration adds a lot of texture to your living space. It is a soft and romantic way to style your empty walls.
Materials Required
- Large metal heart frame
- Cotton macrame cord in cream
- Small wooden beads
Equipment Required
- Sharp scissors
- Measuring tape
- Fine tooth comb
DIY Instructions
- Cut fifty pieces of cord that are each six feet in length.
- Fold one cord in half and loop it over the metal frame.
- Pull the ends through the loop to create a tight knot.
- Repeat this for all cords until the top of the heart is full.
- Tie square knots in rows to create a woven pattern at the top.
- Add a few wooden beads to the center strings for more detail.
- Let the rest of the cord hang down in a long fringe.
- Cut the bottom of the fringe into a sharp V shape with scissors.
- Use a fine comb to brush out the cord ends into soft fluff.
- Hang the finished macrame piece on a small wall nail.
31 Arch Mirror with Pampas Grass
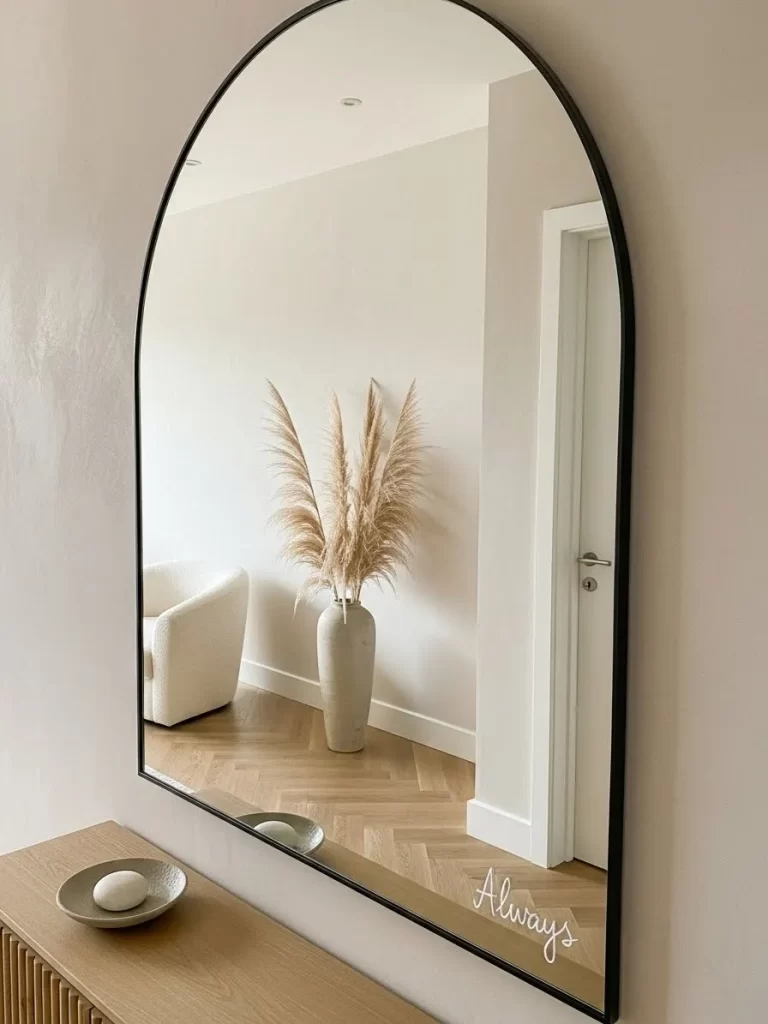
Enlarge your space with a tall black arch floor mirror. Placing a large vase of pampas grass nearby adds soft texture. This combination looks modern and very clean in an entryway.
Reflection of the grass makes the room feel much more open. You will love the airy and light vibe of the dried plumes. The word always written on the glass adds a sweet touch.
Materials Required
- Large arch floor mirror
- Tall ceramic vase in light beige
- Five stems of dried pampas grass
- White glass paint pen
Equipment Required
- Microfiber cloth
- Level for the mirror
DIY Instructions
- Clean your floor mirror with a cloth until it is spotless.
- Position the mirror against a wall in your entryway or bedroom.
- Use the white paint pen to write a word in the corner.
- Let the ink dry for ten minutes before you touch the glass.
- Set the tall ceramic vase on the floor next to the mirror.
- Place the five pampas grass stems into the vase one by one.
- Spread the plumes out to create a full and airy look.
- Fluff the grass gently to remove any loose seeds or dust.
- Adjust the vase so it does not block your reflection in the mirror.
- Step back to ensure the entire arrangement looks balanced.
32 Suede Wrapped Floral Vases
Dress up your glass vases with soft tan suede covers. These wraps feature a delicate bow for a romantic and modern look. They provide a unique texture to your coffee table display.
Dark brown leaves inside the vases offer a moody contrast. This decoration works well on a grey or black console table. You will love the high end and custom feel of these pieces.
Materials Required
- Two tall glass cylinder vases
- Pieces of tan suede fabric
- Thin suede cord
- Dried magnolia leaves
Equipment Required
- Sharp scissors
- Fabric glue
DIY Instructions
- Measure the height and width of your glass vases carefully.
- Cut two pieces of suede fabric to fit around the middle.
- Wrap the fabric around the glass and secure it with glue.
- Let the glue dry for thirty minutes before you continue.
- Cut two long pieces of suede cord for the decorative bows.
- Wrap the cord around the suede fabric twice on each vase.
- Tie a simple bow in the front with long hanging ends.
- Place the dried magnolia leaves into the glass vases.
- Arrange the vases on a shelf or a dark console table.
- Dust the suede fabric with a soft cloth to keep it clean.
33 Pressed Leaf Gallery Wall
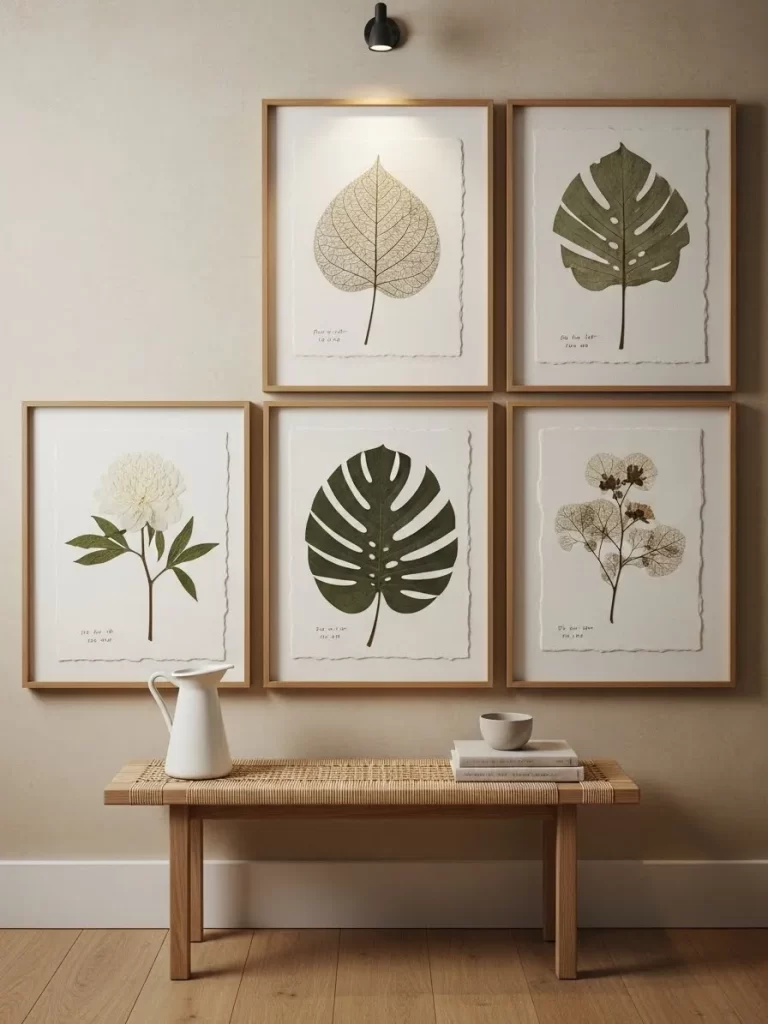
Create a botanical display with a set of framed leaves. These pieces feature different shapes and sizes of greenery. White cardstock backgrounds keep the look clean and very modern.
Light wood frames add an organic feel to your hallway wall. This gallery is a great way to bring the outdoors inside. You will find the natural patterns of the leaves very calming.
Materials Required
- Six light wood picture frames
- Assorted large green leaves
- Heavy white cardstock
- Acid free glue
Equipment Required
- Large heavy books
- Paper towels
DIY Instructions
- Collect several different green leaves from your garden or shop.
- Place the leaves between two paper towels inside a heavy book.
- Leave the leaves to press for at least one full week.
- Cut your cardstock to fit the inside of each picture frame.
- Apply a tiny drop of glue to the back of a pressed leaf.
- Press the leaf onto the center of the white cardstock base.
- Let the glue dry completely before you put it in the frame.
- Place the decorated cardstock behind the glass of the frame.
- Repeat this process for all six leaves in your collection.
- Hang the frames in a neat grid on your hallway wall.
34 Faux Fur Throw with Knitted Poufs
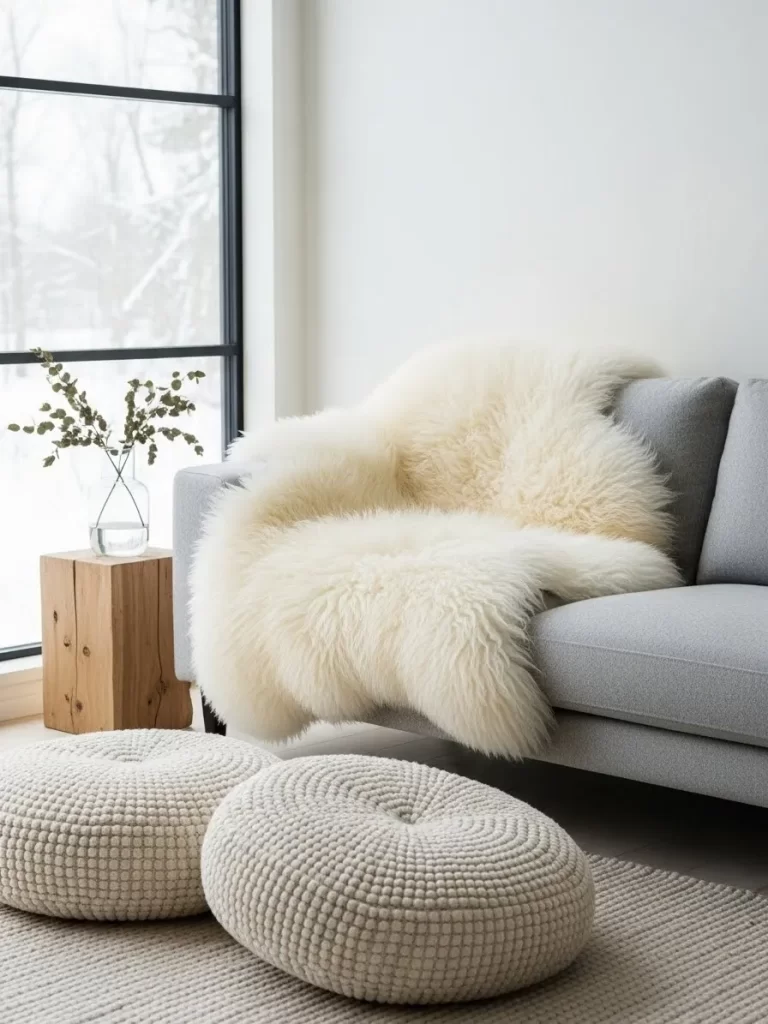
Add a layer of luxury to your grey sofa with a white fur rug. This soft texture makes your living room feel very cozy. Two round knitted poufs provide extra seating on the floor.
Muted grey and cream tones keep the space looking sophisticated. You will love the warm and fluffy feel of the faux fur. This setup is fitting for a relaxing evening at home.
Materials Required
- Large white faux fur throw
- Two cream knitted floor poufs
- Grey fabric sofa
- Clear glass vase with greenery
Equipment Required
- Hand vacuum for cleaning
DIY Instructions
- Clear the area on your floor next to the grey sofa.
- Lay the white faux fur throw over the corner of the seat.
- Let the fur drape naturally down toward the floor rug.
- Place the two knitted poufs on the rug in front of the sofa.
- Stack the poufs or place them side by side for guests.
- Set a wooden side table next to the sofa for your drinks.
- Put a small vase of greenery on the table for a pop of color.
- Fluff the fur with your hands to make it look full and soft.
- Smooth out the knitted surface of the poufs to keep them neat.
- Enjoy your cozy new seating area on a cold holiday night.
35 Birch Branch Hearth Heart
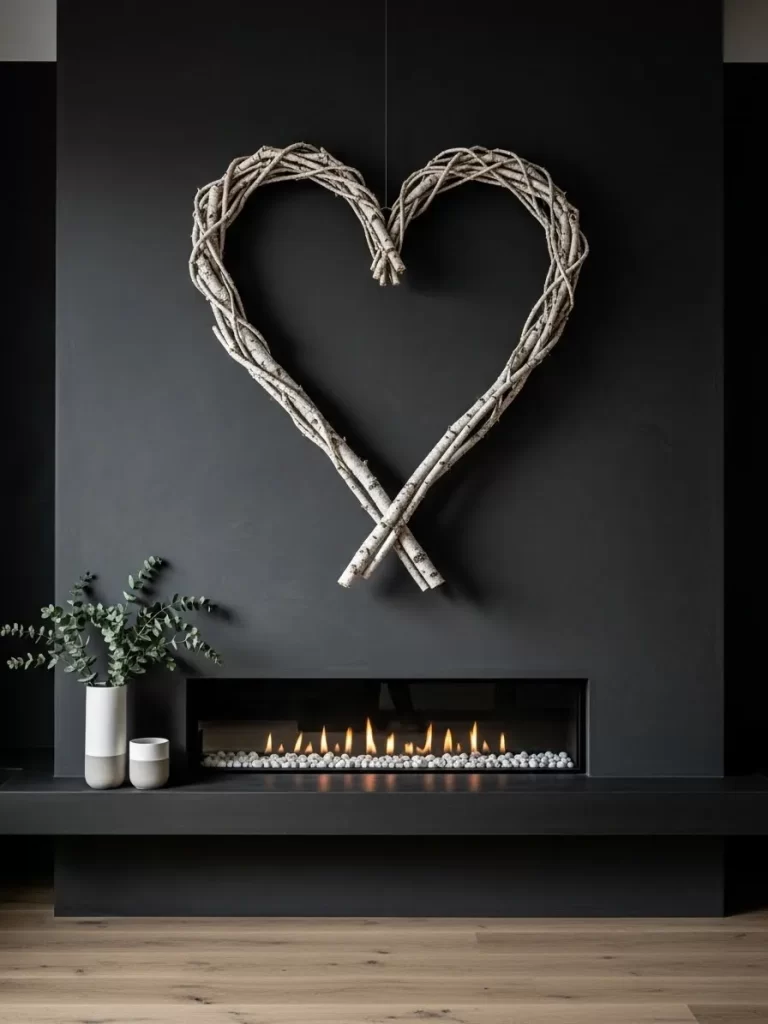
Decorate a black fireplace with a large heart made of branches. This piece uses light colored birch wood for a rustic look. The simple shape stands out against the dark wall surface.
A small vase of eucalyptus on the hearth adds a fresh scent. This decoration brings a touch of romance to your fireplace area. You will enjoy the organic and handmade feel of the wood.
Materials Required
- Six long birch branches
- Thin silver floral wire
- Small white ceramic vase
- Fresh eucalyptus leaves
Equipment Required
- Wire cutters
- Small wall hook
DIY Instructions
- Select two long birch branches of the same size and shape.
- Bend the branches gently to create a curve at the top.
- Twist the branches together at the bottom to form a point.
- Secure the bottom point with several wraps of floral wire.
- Connect the two top curves with more wire in the center.
- Add smaller twigs to the frame to make the heart look thicker.
- Trim any sharp ends with your wire cutters for safety.
- Hang the heart on a hook above your modern fireplace.
- Set a small vase of eucalyptus on the hearth below the heart.
- Check that the heart is hanging straight against the black wall.
36 Ribbon Chandelier Centerpiece
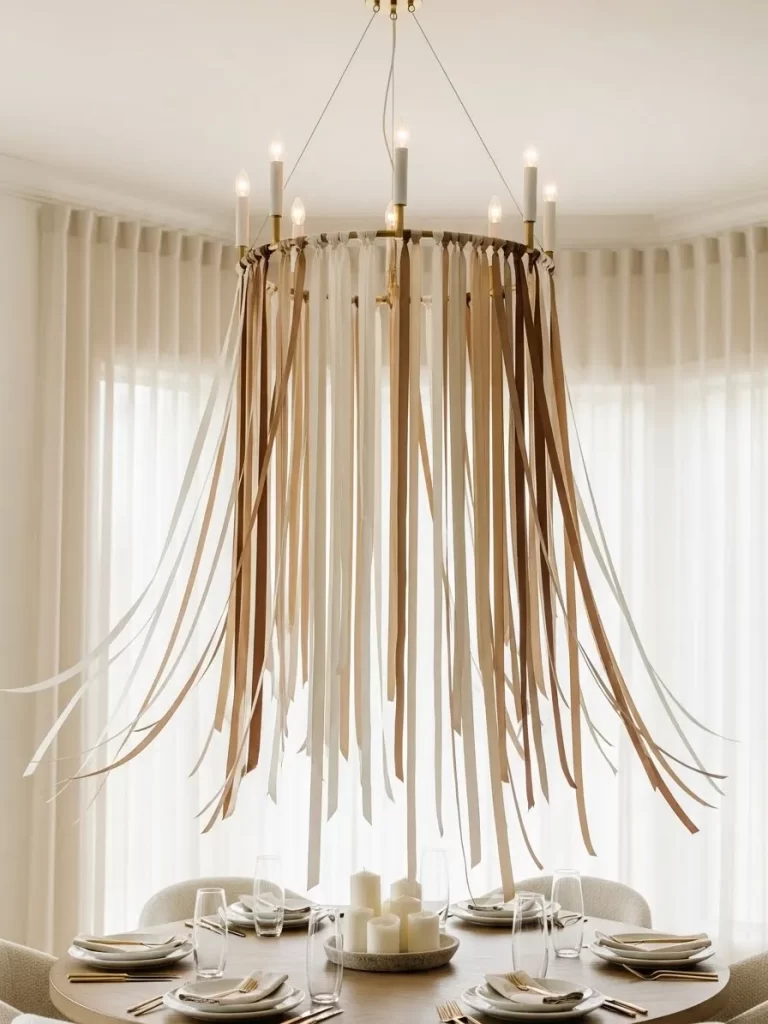
Transform your dining room with a unique hanging decoration. Long ribbons in shades of tan and cream hang from a light fixture. This design creates a soft and flowing canopy over your table.
Movement of the ribbons adds a playful energy to your meal. It is a simple way to dress up your existing chandelier. You will love how the light filters through the thin fabric.
Materials Required
- Existing hoop chandelier
- Five rolls of satin ribbon in neutral tones
- Small white candles
- White linen tablecloth
Equipment Required
- Sharp scissors
- Step ladder
DIY Instructions
- Measure the distance from your light fixture to the table top.
- Cut fifty strands of ribbon that match this measurement.
- Use a step ladder to reach the outer ring of the chandelier.
- Tie each ribbon strand to the metal ring with a simple knot.
- Alternate the different colors of ribbon as you work around.
- Make sure the knots are tight so the ribbons do not fall.
- Space the ribbons evenly to create a full circular curtain.
- Trim the bottom of the ribbons so they do not touch the food.
- Set your dining table with white linens and cream candles.
- Turn on the light to see the beautiful shadows on the table.
37 Marble Heart on Book Stack
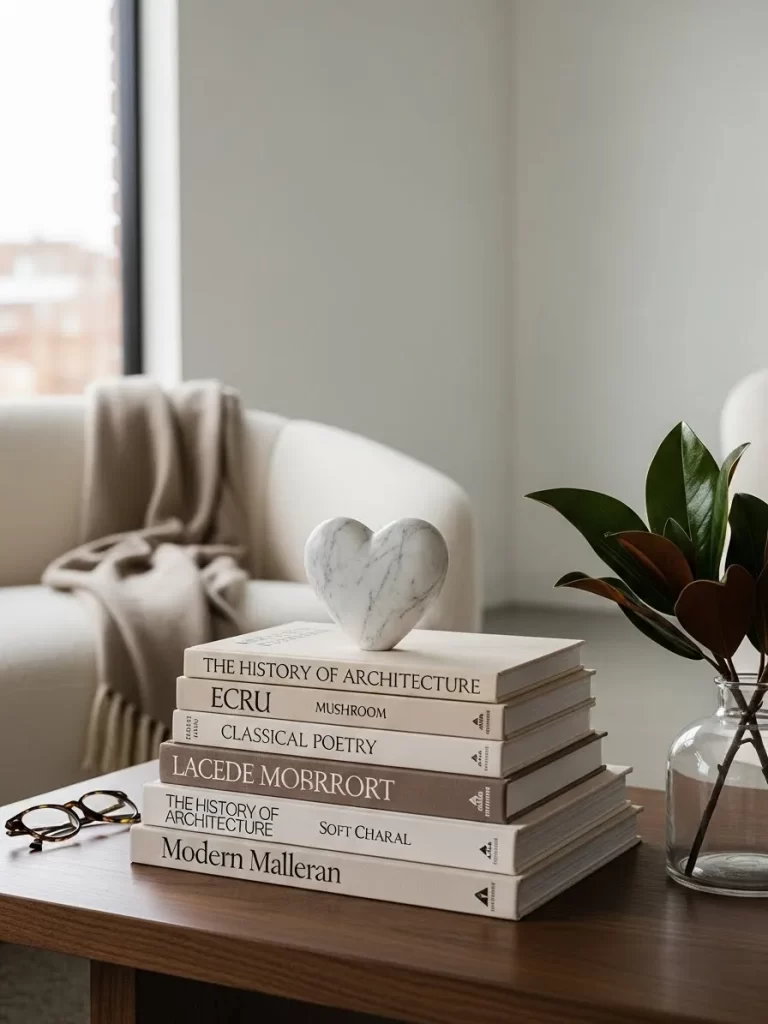
Elevate your coffee table with a heavy marble heart sculpture. This piece sits on top of a stack of neutral colored books. It serves as a subtle and high end nod to the holiday.
Muted tones of beige and brown books look very sophisticated. A small glass vase with green leaves adds life to the display. You will enjoy the solid and cool feel of the marble stone.
Materials Required
- Large marble heart sculpture
- Five neutral colored hardcover books
- Small clear glass vase
- Fresh magnolia leaves
Equipment Required
- Microfiber cloth for polishing
DIY Instructions
- Select five books with beige or brown covers for your base.
- Remove the paper jackets to reveal the clean hard covers.
- Stack the books from largest to smallest on your table.
- Make sure the spines of the books are facing toward the room.
- Place the marble heart sculpture on top of the smallest book.
- Angle the heart so it faces the front of your coffee table.
- Fill the small glass vase with water and magnolia leaves.
- Set the vase next to the book stack to balance the look.
- Polish the marble heart with a cloth to make it shine.
- Step back to ensure the entire display looks neat and clean.
Key Takeaways
- Focus on organic textures like wood and stone to add depth.
- Use creamy whites and soft beiges to keep the mood calm.
- Incorporate dried flowers for a lasting and sophisticated touch.
- Layer different fabrics to create a cozy and inviting environment.
- Keep the romantic nods subtle to maintain a high end look.
Romance does not require loud colors or flashy displays to be felt. Choosing a neutral theme allows you to focus on the quality of your decor. These 37 ideas provide a roadmap to a more refined celebration of love.
You can mix and match these projects to fit your personal style. Each piece adds a layer of sophistication to your home environment. We hope you enjoy creating a space that feels both romantic and curated.
Your home should reflect your unique taste throughout every season. Transforming your space with these subtle accents will make the day feel special. Embrace the beauty of simplicity this year.