Is clutter starting to take over your home? It happens to everyone. Piles of mail on the counter, toys on the floor, and tangled cables can make a space feel chaotic and stressful.

Finding a place for everything is the key to a tidy home, but storage solutions can feel boring or bulky. This is where baskets and bins come in. They are the unsung heroes of home organization.
Not only do they hide messes, but they also add texture, color, and style to any room. They are decorative pieces that happen to be incredibly useful.
In this guide, we will explore 40 smart and stylish ways you can use baskets and bins to bring calm and order to every corner of your home, from the entryway to the garage. Get ready to be inspired!
1. Woven Entryway Organizer

An entryway table is often the first place things get dropped. Keys, mail, and sunglasses can create a messy pile. A small, divided organizer brings instant order to this high-traffic area.
This Woven Tray with Dividers is a stylish way to sort your daily essentials. The natural texture of the basket adds warmth to the space, while the sections keep items from getting jumbled. It creates a designated spot for everything, so you can grab what you need on your way out the door without a frantic search.
Item Name: Woven Tray with Dividers
DIY Cardboard Entryway Tray
You can make a simple and stylish organizer for your entryway table.
What You’ll Need:
- A shallow cardboard box lid (like from a shoebox)
- Extra cardboard for dividers
- A ruler and a pencil
- Scissors
- Glue
- Optional: Paint, decorative paper, or twine to decorate
Instructions:
Step 1: Prepare Your Box Lid
- This will be the main tray. Make sure it’s clean and sturdy.
- If you want, you can paint it or cover it with nice paper to make it look pretty.
Step 2: Measure for Dividers
- Use your ruler to measure the inside length and width of the box lid.
- Decide how you want to divide your tray. Maybe one long section for mail and two small ones for keys and sunglasses.
Step 3: Create the Dividers
- Cut pieces of cardboard to the sizes you measured.
- To make them connect, cut a small slit in the middle of each piece where they will cross. One slit should go from the top down to the middle, and the other should go from the bottom up to the middle.
Step 4: Assemble Your Tray
- Slide the divider pieces together where you cut the slits. They should fit like puzzle pieces.
- Place your divider grid inside the box lid. Use a little bit of glue on the bottom and sides to hold it in place.
Step 5: Decorate (Optional)
- You can wrap twine around the outside of the box lid for a woven look.
Now you have a custom organizer to keep your entryway table neat!
2. The Fireside Reading Basket

A cozy spot by the fireplace is a great place for relaxing. You might want a warm blanket and a few magazines nearby. A large, sturdy basket is a great way to keep these items handy and tidy.
These Two-Tone Rope and Canvas Baskets are both functional and fashionable. The strong leather handles make them easy to move. You can use one for firewood and the other for your favorite throws and books. They add a touch of rustic charm to the room while keeping your hearthside essentials organized.
Item Name: Two-Tone Rope and Canvas Baskets
DIY Fabric-Covered Bin
Give a plain plastic bin a cozy, high-end look.
What You’ll Need:
- A simple plastic bin or bucket
- A piece of fabric that is large enough to wrap around the bin (like felt, canvas, or an old sweater)
- A hot glue gun (ask a grown-up to help you!)
- Scissors
- An old belt you don’t need anymore
Instructions:
Step 1: Measure Your Fabric
- Stand your bin on the fabric. Wrap the fabric up and around the sides of the bin to make sure it’s tall enough to cover it.
- Trim the fabric so it’s a little taller than the bin and long enough to wrap all the way around with a little overlap.
Step 2: Glue the Fabric
- Ask a grown-up to help with the hot glue gun.
- Put a line of glue down the side of the bin and press the edge of the fabric onto it.
- Wrap the fabric tightly around the bin, adding more glue as you go.
- When you get back to the start, fold the raw edge of the fabric under for a clean seam, and glue it down.
Step 3: Finish the Edges
- Fold the extra fabric at the top and bottom over the rims and glue it to the inside of the bin.
Step 4: Add Handles
- Cut two pieces from the old belt, each about 6 inches long.
- Glue the ends of each piece to the sides of the basket to create two sturdy handles.
Your new, stylish basket is ready to hold blankets or books!
3. The Organized Pantry Basket

A pantry can quickly become a chaotic mess of bags and boxes. It’s hard to see what you have, which can lead to buying duplicates or letting food expire. Baskets are a simple way to group items and bring order to your shelves.
These Geometric Pantry Baskets are a clean and modern choice. The open design lets you see what’s inside. You can dedicate one basket for snacks, another for baking supplies, and another for pasta. They make it easy to pull out exactly what you need without causing an avalanche of other items.
Item Name: Geometric Pantry Baskets
DIY Cereal Box Organizers
You can turn empty cereal boxes into useful pantry storage.
What You’ll Need:
- Several empty cereal boxes
- Scissors
- A ruler and a pencil
- Optional: Wrapping paper or paint to decorate
Instructions:
Step 1: Prepare Your Boxes
- Make sure your cereal boxes are empty and clean.
Step 2: Mark Your Cut
- Decide how tall you want your basket to be.
- On one of the wide sides of a box, draw a diagonal line from one of the top corners down to a point about halfway down the side.
- Do the same on the other wide side.
- Draw a straight line across the narrow sides to connect your diagonal lines.
Step 3: Cut the Box
- Carefully cut along the lines you drew. This will create an open-top bin that’s lower in the front, making it easy to see inside.
Step 4: Decorate!
- Now for the fun part. You can paint your new bins a single color for a clean look.
- Or, you can cover them in nice contact paper or wrapping paper.
Line your new, decorated bins up on your pantry shelf. They are great for holding small things like spice packets, granola bars, or bags of grains.
4. The Bedside Tech Organizer

A nightstand can easily get cluttered with charging cables, phones, and other small items. A special organizer can tame the cable monster and keep your essentials neat. This helps create a more peaceful and relaxing bedroom environment.
This Bedside Charging Caddy is a smart solution for your tech. It has a spot to hold your phone and a compartment for cables and other small items like lip balm or glasses. The lid even doubles as a coaster for a glass of water. It keeps everything you need for the night in one tidy spot.
Item Name: Bedside Charging Caddy
DIY Nightstand Catch-All
Make a simple divided box for your bedside table.
What You’ll Need:
- A small, sturdy box, like a shoebox or a gift box
- Pieces of cardboard for dividers
- A pencil and ruler
- Scissors
- A hot glue gun (ask a grown-up for help)
- Optional: Paint or decorative paper
Instructions:
Step 1: Prepare Your Box
- If you want, you can paint your box or cover it with nice paper to match your room.
Step 2: Create a Hole for Cords
- On the back of the box, carefully cut a small hole or slot. This is where your charging cable can pass through.
Step 3: Make Dividers
- Measure the inside of your box. Cut pieces of cardboard to create sections inside. You could make a small square for your phone and a longer section for other items.
Step 4: Assemble the Caddy
- Ask a grown-up to help you glue the cardboard dividers into place inside the box.
Step 5: Organize Your Stuff
- Feed your phone’s charging cord through the hole in the back.
- Now you have a special spot for your phone to charge and for all the little things that usually clutter up your nightstand.
5. The Streamlined Laundry Hamper

Laundry is enough of a chore without having to sort whites from colors on the floor. A divided hamper makes the job a little bit easier. It also helps contain the pile of dirty clothes in a stylish way.
This Woven Hamper with Liner is both beautiful and practical. The wicker design adds a natural, spa-like feel to a bathroom or laundry room. The fabric liner, with separate sections for “Wash” and “Dry,” can be lifted out to easily carry clothes to the machine. The open bottom shelf is a great spot for storing folded towels.
Item Name: Woven Hamper with Liner
DIY Divided Laundry Basket
You can easily turn a regular laundry basket into a sorter.
What You’ll Need:
- A tall, sturdy laundry basket (a round pop-up hamper works well)
- A large piece of cardboard
- A pencil
- A box cutter or strong scissors (a grown-up’s job!)
- Optional: Stencils and a marker
Instructions:
Step 1: Measure Your Basket
- Measure the height and the diameter (the distance across the middle) of your laundry basket.
Step 2: Create the Divider
- On your large piece of cardboard, draw a rectangle. It should be the same height as your basket and the same width as the diameter.
- Ask a grown-up to carefully cut out the rectangle.
Step 3: Add Labels (Optional)
- Near the top of one side of the cardboard divider, use a stencil to write “LIGHTS.”
- On the other side, write “DARKS.”
Step 4: Install the Divider
- Bend the cardboard slightly and slide it down into the middle of your laundry basket. It should fit snugly and stand up straight, dividing the basket into two sections.
Now you can toss your dirty clothes into the correct side as you go, making laundry day much faster.
6. The Playful Toy Storage Bin

Toys have a way of taking over a room. Having large, accessible bins makes cleanup time much easier for kids. Bins that are also fun and decorative are a bonus for any playroom or bedroom.
These Soft-Sided Toy Baskets are a charming way to tackle toy clutter. The rope handles are easy for little hands to grab. The playful designs, like the lion’s face, make organizing feel like a game. Because they are soft, you don’t have to worry about bumps or scrapes.
Item Name: Soft-Sided Toy Baskets
DIY Animal Face Storage Box
Turn a plain canvas bin into a cute animal friend.
What You’ll Need:
- A simple canvas or fabric storage bin
- Sheets of felt in different colors (like yellow, brown, white, and black for a lion)
- Scissors
- Fabric glue
- A pencil
Instructions:
Step 1: Choose Your Animal
- Decide what animal you want to make. A lion, a bear, or a panda are all fun choices.
Step 2: Cut Out the Face Shapes
- For a lion, draw and cut out two large, yellow half-circles for the main face.
- Cut out two smaller circles for the snout.
- Cut out two small, brown half-circles for the inside of the ears.
- Cut out a small triangle for the nose and two small circles for the eyes from black felt.
- Cut several long, thin strips of brown felt for the mane.
Step 3: Glue on the Face
- Glue the two large half-circles onto the front of the bin to create the lion’s head shape.
- Glue the snout circles on top.
- Add the nose and eyes.
- Glue the brown inner-ear pieces onto the top corners.
Step 4: Add the Mane
- Glue the brown felt strips all around the edge of the lion’s head to create a fluffy mane.
Let the glue dry, and now you have a cute animal bin that makes cleaning up toys much more fun!
7. The Sleek Desktop Organizer

A tidy desk can help you focus. Papers, pens, and other office supplies can create clutter that is distracting. Using trays and bins is an easy way to give everything a home.
These Stackable Document Trays are a stylish and efficient way to manage paperwork. You can have a tray for incoming mail, one for bills to pay, and another for finished work. The simple, clean lines and handsome colors bring a professional look to your home office.
Item Name: Stackable Document Trays
DIY Cereal Box File Folders
You can make your own desktop organizers from empty food boxes.
What You’ll Need:
- Several empty cereal boxes or other similar-sized cardboard boxes
- Scissors
- A ruler and a pencil
- Glue
- Decorative paper or paint
Instructions:
Step 1: Cut Your Box
- Take one cereal box. On one of the wide sides, draw a diagonal line from a top corner down to about one-third of the way up the other side.
- Cut along this line and straight across the narrow sides to create a file holder shape.
Step 2: Make More
- Use your first cut box as a template to cut several more boxes to the exact same size and shape.
Step 3: Decorate Them
- Paint your new file holders or cover them with decorative paper. Making them all the same color gives a very clean, organized look.
Step 4: Glue Them Together
- Once they are dry, run a line of glue on the side of one file holder and press another one against it.
- Continue this until you have a sturdy, multi-pocket desktop organizer for all your important papers.
8. The See-Through Closet Box

Closet shelves can be hard to keep tidy. Stacks of sweaters can topple over, and it’s hard to see what you have. Using storage boxes creates neat, contained sections.
These Fabric Closet Bins with Windows are a great organizing tool. The fabric sides give them a soft look, but they are sturdy enough to stack. The clear window in the front is the best part—you can see exactly what’s inside without having to pull the box down and open it up.
Item Name: Fabric Closet Bins with Windows
DIY T-Shirt Window Box
You can add a “window” to any simple storage box.
What You’ll Need:
- A simple cardboard shoebox with a lid
- A clear plastic T-shirt bag or a sturdy freezer bag
- A box cutter or craft knife (a job for a grown-up!)
- A pencil and a ruler
- Glue or strong tape
Instructions:
Step 1: Mark Your Window
- Take the shoebox. On one of the short ends, use your pencil and ruler to draw a rectangle. This will be your window. Leave at least a one-inch border around the edges.
Step 2: Cut the Window
- Ask a grown-up to carefully cut out the rectangle you drew.
Step 3: Prepare the “Glass”
- Cut a flat piece from your clear plastic bag. It should be a little bigger than the window you cut.
Step 4: Install the “Glass”
- Working from the inside of the box, put a thin line of glue or strips of strong tape around the edges of the window cutout.
- Press your plastic piece firmly against the glue or tape.
Let it dry, and now your box has a window! Fill it with socks or other small items, and you’ll always be able to see what’s inside at a glance.
9. The Rolling Underbed Drawer

The space under the bed is prime storage real estate. It’s a great place to store items you don’t need every day, like out-of-season clothing or extra bedding. Bins on wheels make it easy to access these items without straining your back.
These Underbed Bins with Wheels are a smart and convenient solution. The wheels make them effortless to slide in and out. The lids protect your belongings from dust. Using a mix of different styles, like fabric and wicker, can add a bit of visual interest to this practical storage spot.
Item Name: Underbed Bins with Wheels
DIY Under-the-Bed Storage Box
You can make your own rolling bin from a shallow drawer.
What You’ll Need:
- An old, shallow drawer you’re not using anymore
- Four small caster wheels
- A screwdriver
- Optional: A piece of thin plywood for a lid
Instructions:
Step 1: Prepare Your Drawer
- Make sure your drawer is clean and empty. You can give it a fresh coat of paint if you like.
Step 2: Attach the Wheels
- This is a job for a grown-up.
- Flip the drawer upside down.
- Use the screwdriver to attach one caster wheel to each of the four corners on the bottom of the drawer.
Step 3: Create a Lid (Optional)
- If you want to protect your items from dust, you can make a simple lid.
- Measure the top of the drawer.
- Have a piece of thin plywood cut to size at a hardware store.
- You can paint it to match your drawer. Then, just lay it on top.
Fill your new rolling bin with books, shoes, or extra blankets, and slide it easily under your bed.
10. The Tidy Coffee Table Tray

A coffee table can quickly become a dumping ground for remote controls, coasters, and magazines. A simple tray is an elegant solution. It corrals all the small items into one contained, organized space.
This Woven Tray with Remote Holder is a perfect coffee table accessory. The tray itself is great for holding a candle and a book. The clever wooden insert has compartments for keeping remotes and coasters upright and tidy. It instantly makes your living room feel more put-together.
Item Name: Woven Tray with Remote Holder
DIY Divided Tray
You can add custom dividers to any tray you already own.
What You’ll Need:
- A shallow tray
- A thin piece of balsa wood or stiff cardboard
- A ruler and a pencil
- A craft knife or strong scissors (ask a grown-up for help)
- Wood glue or a hot glue gun
Instructions:
Step 1: Plan Your Dividers
- Place your remote controls and other items in the tray to see how you want to divide the space.
Step 2: Measure and Cut
- Measure the inside of your tray.
- Draw the shapes for your dividers on the balsa wood or cardboard.
- Ask a grown-up to carefully cut out the pieces.
Step 3: Assemble the Dividers
- If you have pieces that cross, cut slits in them so they can fit together.
- Use a little bit of glue to join your divider pieces into one grid.
Step 4: Install the Dividers
- Put a thin line of glue on the bottom of your assembled divider grid.
- Carefully place it inside your tray and press it down.
Let the glue dry, and your tray is now a custom organizer for your coffee table.
11. The Fresh Herb Garden Caddy

Fresh herbs can brighten up any meal. Plastic nursery pots, however, are not always the most attractive kitchen decor. A simple basket can transform a practical plant into a charming countertop feature.
These Labeled Woven Planter Baskets give a rustic, organized look to your indoor garden. The small chalkboard labels make it easy to tell your basil from your mint. This setup keeps your herbs handy for cooking and adds a touch of green, lively decor to your kitchen space.
Item Name: Labeled Woven Planter Baskets
DIY Rope-Wrapped Herb Pot
You can give any plain pot a stylish, rustic makeover.
What You’ll Need:
- A plain plastic pot that your herb plant fits in
- A ball of jute rope or thick twine
- A hot glue gun (ask a grown-up to help you!)
- Scissors
- Optional: A small piece of cardboard and black paint for a label
Instructions:
Step 1: Get Ready to Wrap
- Make sure your plastic pot is clean and dry.
- Ask a grown-up to plug in the hot glue gun so it can warm up.
Step 2: Start at the Bottom
- Put a small dot of hot glue on the bottom edge of the pot.
- Press the end of your rope into the glue to hold it.
- Begin wrapping the rope tightly around the pot, adding a little line of glue every inch or so to keep it in place.
Step 3: Keep Going Up
- Continue wrapping the rope in neat rows, pushing them close together so no plastic shows.
- Keep going until you reach the very top rim of the pot.
Step 4: Finish It Off
- When you get to the top, cut the rope.
- Tuck the end neatly and use a final dot of glue to secure it.
Step 5: Add a Label (Optional)
- Cut a small rectangle from the cardboard. Paint it with black paint.
- Once it’s dry, you can write the herb’s name on it with chalk and glue it to the front of your new pot.
Now your herbs have a beautiful new home on your counter!
12. Craft Room Rainbow Nesting Bowls

A craft room is full of small things. Buttons, beads, and thread can easily get lost. Finding a way to store them that is both organized and cheerful can make your creative space better.
These Rainbow Crocheted Nesting Bowls are a wonderful solution. They add a pop of vibrant color to any shelf. You can use the different sizes for different supplies. When not in use, they nest inside each other to save space. They are a happy and practical way to keep your craft supplies in order.
Item Name: Rainbow Crocheted Nesting Bowls
DIY No-Sew Coil Bowls
You can make colorful nesting bowls without any crochet hooks.
What You’ll Need:
- Thick, colorful yarn in several different colors
- A hot glue gun (get a grown-up’s help)
- Scissors
- A bowl from your kitchen to use as a mold
Instructions:
Step 1: Start Your Coil
- Take the end of your first color of yarn.
- Tightly coil the end into a tiny, flat circle, like a snail shell. Use a dot of hot glue to hold it together. This will be the center of your bowl’s bottom.
Step 2: Build the Base
- Continue coiling the yarn around the center, adding a thin line of glue as you go.
- Keep the coil flat until it’s the size you want the bottom of your bowl to be.
Step 3: Form the Sides
- Once the base is big enough, start gluing the next row of yarn on top of the edge of the previous row, instead of beside it. This will make the sides start to build up.
- You can place your coil inside the kitchen bowl you’re using as a mold to help you get a nice shape.
Step 4: Add New Colors
- When you want to change colors, just cut the first yarn and glue the end down.
- Then, start the new color right where the old one left off, securing it with glue.
Step 5: Finish the Bowl
- Keep coiling and gluing until your bowl is as tall as you want it.
- Cut the yarn and glue the end securely on the inside rim.
- Repeat the process to make bowls in different sizes and colors so they can nest together!
13. The Pampered Pet Corner

Our furry friends come with a lot of stuff. Toys, treats, leashes, and food can create clutter near their space. A dedicated basket for your pet’s things keeps everything neat and accessible.
This Two-Tone Rope Basket for Pet Supplies is a great way to organize. The low opening at the front lets your dog or cat easily grab their favorite toys. The main basket is tall enough to hold bags of food or treats. It turns a messy corner into a tidy and functional spot for your beloved pet.
Item Name: Two-Tone Rope Basket for Pet Supplies
DIY Pet Toy Box
Customize a simple box so your pet can get their own toys.
What You’ll Need:
- A sturdy cardboard box
- A box cutter or sharp scissors (this is a job for a grown-up!)
- A pencil
- A round object to trace, like a bowl
- Optional: Paint or fabric to decorate
Instructions:
Step 1: Choose Your Box
- Find a cardboard box that is a good size for your pet’s toys. It shouldn’t be too tall, so they can reach inside.
Step 2: Draw the Opening
- On one of the longer sides of the box, place your bowl upside down near the bottom edge.
- Use your pencil to trace the top half of the bowl, creating a U-shape.
Step 3: Cut the Opening
- Ask a grown-up to carefully cut along the U-shape line you drew. This will create a scoop or dip in the front of the box.
Step 4: Decorate Your Box (Optional)
- Now is the fun part! You can paint the box your pet’s favorite color.
- Or, you could glue some fun fabric around the outside. Let it dry completely.
Step 5: Personalize It
- You can write your pet’s name on the front with a marker or paint. You could even glue a small toy or a bone-shaped cutout to the front.
Fill the box with toys, and show your pet their new, special toy box!
14. The Balcony Garden Organizer

Living in a place with a small balcony means you have to be smart with your space. You might want a garden, but there is no room for big pots. A hanging planter is a clever way to grow plants without using any floor space.
This Vertical Pocket Wall Planter lets you create a garden on any wall or railing. Each pocket can hold a different plant, like lettuce, strawberries, or flowers. It turns a plain, empty surface into a beautiful and living wall of green. It’s a great way to enjoy gardening in a small home.
Item Name: Vertical Pocket Wall Planter
DIY Hanging Shoe Organizer Garden
You can easily turn a shoe holder into a vertical garden.
What You’ll Need:
- A canvas or fabric hanging shoe organizer (one with pockets)
- Scissors
- Potting soil
- Small plants or seeds (herbs, lettuce, and strawberries work well)
- A small gardening trowel or a large spoon
Instructions:
Step 1: Prepare Your Pockets
- If the fabric pockets don’t have a small hole for water to drain, ask a grown-up to help you carefully poke a tiny hole in the bottom of each pocket with scissors.
Step 2: Hang Your Planter
- Find a sunny spot on a wall or balcony railing to hang your shoe organizer. Make sure it’s hanging securely.
Step 3: Fill with Soil
- Use your trowel or spoon to fill each pocket about two-thirds full with potting soil.
Step 4: Add Your Plants
- Gently take your small plants out of their original containers and place one in each pocket.
- Add a little more soil around the plant to make it snug.
- If you are using seeds, follow the instructions on the seed packet to plant them in the soil.
Step 5: Water Your Garden
- Give each pocket a little bit of water.
- Water your plants regularly and watch your vertical garden grow!
15. The Entertainment Center Tidy

An entertainment center can easily get cluttered with video games, controllers, and cables. This mess can be distracting. Using baskets is a simple way to hide the clutter while keeping everything you need close by.
These Wire and Woven Media Baskets are a handsome solution. The mix of black metal and natural fiber looks great in any living room. They are strong enough to hold games and electronics. They slide easily onto shelves, turning a messy area into a clean and organized media hub.
Item Name: Wire and Woven Media Baskets
DIY Two-Texture Storage Box
Give a plain box a cool, mixed-material look.
What You’ll Need:
- A shoebox or a plain wooden or plastic bin
- A ball of jute twine or seagrass rope
- A hot glue gun (ask a grown-up to help)
- Scissors
- Optional: Black paint
Instructions:
Step 1: Prepare Your Box
- If you are using a cardboard shoebox, you might want to paint it black first for a nice, solid background. Let it dry. If you’re using a bin that’s already a dark color, you can skip this.
Step 2: Start Wrapping
- Decide how high you want the woven part to go (usually about halfway up the box).
- Ask a grown-up to help you use the hot glue gun. Start at a bottom corner and glue the end of your twine down.
Step 3: Weave the Twine
- Instead of just wrapping, you can try weaving. Go over and under the corner posts if your bin has them. If not, just wrap the twine around.
- Add a line of glue every few inches and press the twine into it. Keep the rows straight and tight.
Step 4: Finish the Woven Part
- Continue wrapping until you reach your desired height.
- Cut the twine and use a dot of glue to secure the end on the inside or in a back corner.
Step 5: Add a Handle (Optional)
- You can cut a small piece of an old leather belt and glue it to the front to make a simple handle.
Your stylish new basket is ready to hide away controllers and games!
16. The Muddy Boot Station

Rainy and snowy days mean muddy, wet shoes. Leaving them on the floor can create a puddle and a mess. A boot tray gives you a specific place to put dirty footwear, protecting your floors.
These Metal and Rubber Boot Trays are a durable and practical choice for an entryway. The raised edges keep water and dirt contained. You can fill them with pebbles for better drainage or leave them plain for easy cleaning. They are a simple tool that makes a big difference in keeping your home clean.
Item Name: Metal and Rubber Boot Trays
DIY Cookie Sheet Boot Tray
You can make a simple, effective boot tray from a kitchen item.
What You’ll Need:
- An old baking sheet or cookie sheet with raised edges
- A can of spray paint (any color you like, but black or grey looks nice)
- A bag of small, smooth river rocks or pebbles from a craft or garden store
- Old newspaper
Instructions:
Step 1: Paint Your Tray
- Find a spot outside or in a well-ventilated area, like an open garage.
- Lay down old newspaper to protect the ground.
- Place the cookie sheet on the newspaper.
- Ask a grown-up to help you spray paint the cookie sheet. Cover the top, bottom, and sides. Let it dry completely. You might need a second coat.
Step 2: Add the Rocks
- Once the tray is totally dry, bring it inside.
- Rinse the river rocks in a colander to get any dust off them, and let them dry.
- Pour the dry rocks into the painted tray, spreading them out to make an even layer.
Step 3: Place It by the Door
- Put your new boot tray near the door you use most often.
Now when you come inside with wet or muddy shoes, you can place them on the rocks. The water will drip down between the stones, allowing your shoes to dry faster and keeping your floors clean!
17. The Mobile Library Cart

If you love to read, you might have books piling up on your nightstand or next to your favorite chair. A book bin is a great way to keep your current reading list organized and portable.
This Rolling Wooden Book Cart makes it easy to move your books from room to room. The simple, clean design looks good anywhere. It’s low enough to sit beside a bed or sofa. The wheels mean you can roll it out of the way when you need to clean. It’s a smart and stylish solution for any book lover.
Item Name: Rolling Wooden Book Cart
DIY Rolling Magazine Holder
Create a simple rolling book bin from two magazine files.
What You’ll Need:
- Two sturdy magazine file holders (cardboard or plastic)
- Strong glue, like wood glue or E6000 (ask a grown-up to help)
- A small, flat piece of wood or very stiff cardboard that is the same size as the two file holders sitting side-by-side
- Four small caster wheels
- A screwdriver
Instructions:
Step 1: Glue the Files Together
- Take your two magazine file holders and stand them up.
- Put a line of strong glue on one of the long, flat sides of one holder.
- Press the other holder against it, so they are stuck together as one unit. Let the glue dry for a few hours.
Step 2: Create the Base
- Take your flat piece of wood or stiff cardboard. This will be the bottom of your cart.
- Put a generous amount of glue on the bottom edges of your joined magazine files.
- Press them firmly onto the wood base. Let this dry completely.
Step 3: Attach the Wheels
- This is a job for a grown-up.
- Flip your new cart upside down.
- Screw one caster wheel into each of the four corners of the wooden base.
Step 4: Fill It Up
- Flip it back over, and your rolling book bin is complete!
- You can fill it with your favorite books, magazines, and notebooks.
18. The Clear Vanity Organizer Set

A bathroom counter can quickly become cluttered with makeup, brushes, and skincare bottles. It can be hard to find what you need in the morning rush. Clear organizers are the solution.
This Acrylic and Bamboo Vanity Set brings order to the countertop. Because the containers are clear, you can see everything at a glance. The different shapes and sizes are good for holding everything from cotton swabs to makeup palettes. It turns your daily routine into a calm, organized experience.
Item Name: Acrylic and Bamboo Vanity Set
DIY Jar and Lid Organizers
You can create a beautiful and useful vanity set by reusing glass jars.
What You’ll Need:
- A few empty glass jars of different sizes (like jam jars or baby food jars), cleaned with labels removed
- A few small wooden drawer knobs
- A can of spray paint in a color you like (gold or white looks nice)
- Super glue (have a grown-up help you with this)
- A small, flat tray or dish
Instructions:
Step 1: Paint the Lids and Knobs
- In a well-ventilated area (like outside), lay the jar lids and wooden knobs on some newspaper.
- Ask a grown-up to help you spray paint them. Let them dry completely, then flip them over and paint the other side.
Step 2: Glue the Knobs
- Once the paint is totally dry, it’s time to add the handles.
- Ask a grown-up to put a small dot of super glue on the bottom of one knob.
- Press it firmly onto the center of one of the painted lids.
- Repeat for all the lids and knobs. Let the glue set for at least an hour.
Step 3: Arrange Your Set
- Screw the new, fancy lids onto your glass jars.
- You can use the jars to hold cotton balls, Q-tips, and makeup sponges.
- Use another jar without a lid to hold your makeup brushes.
- Arrange all your new containers on the small tray to keep them together.
Your bathroom counter now has a custom, stylish organizing set!
19. The Woven Wall Art Display

Baskets are not just for holding things. They can also be beautiful decorations. If you have a large, empty wall, a collection of flat, decorative baskets can create a unique and eye-catching piece of art.
This gallery of Colorful Woven Wall Baskets adds texture, color, and a global feel to the room. Mixing different sizes, patterns, and colors makes the display interesting. It’s an easy way to fill a space with a display that feels personal and creative.
Item Name: Colorful Woven Wall Baskets
DIY Paper Plate Wall Baskets
You can create the look of woven wall art using simple paper plates.
What You’ll Need:
- Several sturdy paper plates in different sizes
- Colorful permanent markers or craft paint
- A pencil
- A ruler
- A hole punch
- Some yarn for tassels (optional)
Instructions:
Step 1: Plan Your Designs
- Look at pictures of real woven baskets for inspiration. You can draw patterns like sunbursts, spirals, zig-zags, or geometric shapes.
- Lightly sketch your design on a paper plate with a pencil.
Step 2: Color Your Plates
- Use your colorful markers or paint to fill in your designs. Be creative and use lots of different colors.
- To make it look more like weaving, you can draw lots of little lines or dots.
- Let the paint or marker dry completely.
Step 3: Create a Collection
- Decorate several plates with different patterns and color combinations. Using different sizes will make your display look more interesting.
Step 4: Add Tassels (Optional)
- To make a simple tassel, wrap yarn around your fingers several times.
- Slide it off, and tie another piece of yarn tightly around the top of the loop.
- Cut the bottom loops to create the tassel fringe.
- Punch a hole in the edge of one of your plates and tie the tassel on.
Step 5: Hang Your Art
- Use a small piece of double-sided tape or a pushpin to hang your finished plates on the wall. Arrange them in a group that you find pleasing.
20. The Frost-Free Freezer Organizer

A freezer can become a frozen wasteland of forgotten food. Items get pushed to the back and are hard to find. Bins can bring order to the cold, helping you see what you have and use it before it goes to waste.
These simple Freezer Organizer Bins make it easy to group foods together. You can have one bin for vegetables, one for meats, and one for frozen fruits. You just slide out the bin you need. The labels on the front mean you never have to guess. It’s a simple system that saves time and reduces food waste.
Item Name: Freezer Organizer Bins
DIY Freezer Box Dividers
You can organize your freezer drawers using simple cardboard dividers.
What You’ll Need:
- A clean, empty cardboard box (from shipping or from a grocery store)
- A ruler
- A pencil
- A box cutter or strong scissors (a grown-up’s job!)
- Optional: Packing tape
Instructions:
Step 1: Measure Your Drawer
- Take out the drawer from your freezer that you want to organize.
- Use your ruler to measure the inside length, width, and height of the drawer.
Step 2: Cut Your Divider Pieces
- On your big piece of cardboard, draw rectangles that are the same height and length as your drawer. These will be your long dividers.
- Draw some smaller rectangles that are the same height and width as your drawer. These will be your short dividers.
- Ask a grown-up to carefully cut out all the pieces.
Step 3: Cut the Slits
- Take one long divider. From the top edge, cut a slit down to the halfway point.
- Take one short divider. From the bottom edge, cut a slit up to the halfway point.
- This will allow the two pieces to slot together like a puzzle piece.
Step 4: Assemble Your Grid
- Slide the short divider’s slit into the long divider’s slit. They should form a “+” shape.
- You can create more slits and add more pieces to make a grid with many small compartments.
- You can add a little packing tape where the pieces join to make them stronger.
Step 5: Organize Your Freezer
- Place your new divider grid inside the freezer drawer.
- Now you have separate sections for your bags of peas, corn, and other frozen foods!
21. The Stylish Bar Cart Caddy

A bar cart is a fun piece of furniture, but it can look cluttered with loose tools, napkins, and fruit. A caddy brings everything together in one neat package. It makes your setup look more professional and keeps you organized when mixing drinks.
This Woven Cane Bar Caddy is both elegant and useful. The dividers create separate spots for straws, openers, and garnishes. The handles make it easy to lift off the cart when you need to wipe the surface. It’s a small detail that adds a lot of style and function.
Item Name: Woven Cane Bar Caddy
DIY Chic Bar Organizer
You can make a stylish organizer for your cart from a simple basket.
What You’ll Need:
- A plain, low-sided basket (oval or rectangular)
- Gold spray paint
- Painter’s tape
- Sturdy cardboard
- A ruler and pencil
- Scissors or a craft knife (ask a grown-up for help)
Instructions:
Step 1: Add a Touch of Gold
- In a well-ventilated area, use painter’s tape to cover the woven part of the basket, leaving only the metal rim and handles exposed.
- Ask a grown-up to help you spray paint the exposed metal parts gold. Let it dry completely before removing the tape.
Step 2: Measure for Dividers
- Measure the inside length and width of your basket.
- On your cardboard, draw out pieces that will fit snugly inside to act as dividers. You can make a long one for the middle and a shorter one to cross it.
Step 3: Cut and Decorate Dividers
- Ask a grown-up to carefully cut out the cardboard pieces.
- You can paint these dividers gold as well, or cover them in nice decorative paper. Let them dry.
Step 4: Assemble Your Caddy
- If you made two dividers that cross, cut a slit halfway through the middle of each one so they can slot together.
- Place your finished dividers inside the basket.
Now you have a custom, high-end looking caddy for all your bar cart accessories!
22. The Pop-Up Utility Tote

Sometimes you need a basket you can take with you. For trips to the market, laundry day in a dorm, or carrying supplies for a picnic, a portable tote is very useful. A collapsible one is even better because it saves space when you’re not using it.
This Collapsible Spiral Tote is lightweight and versatile. The wireframe allows it to pop up to full size in an instant. The shoulder strap makes it easy to carry, and the side pockets are great for small items. When you’re done, it flattens down for easy storage in a car or closet.
Item Name: Collapsible Spiral Tote
DIY Simple Shopping Tote
You can make a simple, strong tote bag for your errands.
What You’ll Need:
- An old pillowcase
- Scissors
- A ruler and a marker
- Optional: A sewing machine (ask a grown-up for help) or fabric glue
Instructions:
Step 1: Prepare the Pillowcase
- Lay your pillowcase flat. This will be the body of your bag.
Step 2: Mark the Handles
- At the open end of the pillowcase, measure in about 4 inches from each side and make a mark.
- Draw two lines straight down about 5 inches from your marks.
- Now, draw a curved line connecting the bottom of your two lines. It should look like a “U” shape.
Step 3: Cut Out the Handles
- Ask a grown-up to help you cut along the lines you drew, cutting through both layers of the pillowcase.
- Then, cut a slit down the middle of the top folded edge, between the two handles. This will separate them.
Step 4: Secure the Edges
- To make your bag stronger, ask a grown-up to help you sew along all the raw edges you just cut.
- If you don’t have a sewing machine, you can carefully fold the edges over and use a strong line of fabric glue to hold them down. Let it dry.
Now you have a handy, washable tote bag made from a pillowcase!
23. The Two-Tone Planter Basket

Houseplants add life and color to a room, but the plastic pots they come in are often plain. A beautiful basket is an easy way to hide the plastic and turn your plant into a stylish piece of decor.
These Two-Tone Seagrass Baskets bring a natural, bohemian feel to your space. The painted bottom half adds a modern touch of color that can match your room’s decor. Using baskets of different sizes for your plants creates a pleasing and layered look on a shelf or tabletop.
Item Name: Two-Tone Seagrass Baskets
DIY Painted Basket Planter
Give any woven basket a new look with a little bit of paint.
What You’ll Need:
- A plain woven basket that is a little bigger than your plant’s pot
- Acrylic craft paint in your favorite color
- Painter’s tape
- A paintbrush
- A plastic saucer or a piece of a plastic bag
Instructions:
Step 1: Tape Your Line
- Decide where you want your paint to stop. For a two-tone look, a line around the middle of the basket looks great.
- Wrap a piece of painter’s tape all the way around the basket to create a clean, straight line.
Step 2: Paint the Bottom
- Paint the entire bottom half of the basket, right up to the edge of the tape.
- You might need to dab the paintbrush to get the paint into all the little woven crevices.
- Let the first coat dry, and then add a second coat if you need to.
Step 3: The Big Reveal
- Once the paint is completely dry, carefully peel off the painter’s tape. You should have a crisp, clean line.
Step 4: Protect From Water
- To protect the basket from water drips, place a plastic saucer or a piece of a plastic bag in the bottom of the basket.
- Now, you can place your potted plant inside.
Your plant has a beautiful, custom new home!
24. The Deck and Patio Storage Box

Outdoor spaces need storage too. Cushions, gardening tools, and pool toys can clutter a beautiful deck or patio. A waterproof storage box keeps these items protected from the weather and neatly out of sight.
This Deck Storage Box Bench is a smart, multi-purpose solution. It offers a large amount of storage space for all your outdoor essentials. The sturdy lid also doubles as extra seating for guests. It’s a practical piece of furniture that helps you keep your outdoor living area tidy and ready for relaxing.
Item Name: Deck Storage Box Bench
DIY Simple Outdoor Crate
You can build a simple wooden crate for your porch or patio.
What You’ll Need:
- An old wooden pallet (you can often find these for free) or several pieces of scrap wood
- A saw, hammer, and nails (a job for a grown-up!)
- A tape measure
- Sandpaper
Instructions:
Step 1: Get Your Wood
- This entire project should be done with a grown-up.
- Carefully take apart the wooden pallet to get several flat wood planks.
- Decide how big you want your crate to be. A square shape is easiest.
Step 2: Build the Sides
- Cut four pieces of wood to the same length. These will be the corner posts.
- Cut several more planks to the desired length of your crate’s sides.
- Nail the side planks to the corner posts to create two opposite walls of your crate.
Step 3: Connect the Walls
- Now, nail more planks across the other two sides to connect your two walls and form a box shape. Leave small gaps between the planks for a rustic look.
Step 4: Add the Bottom
- Cut a few more planks to fit the bottom of the crate.
- Nail them into place.
Step 5: Smooth It Out
- Use sandpaper to smooth down any rough edges or splinters to make your crate safe to handle.
Your new rustic crate is great for holding things like small gardening tools, shoes, or sports balls.
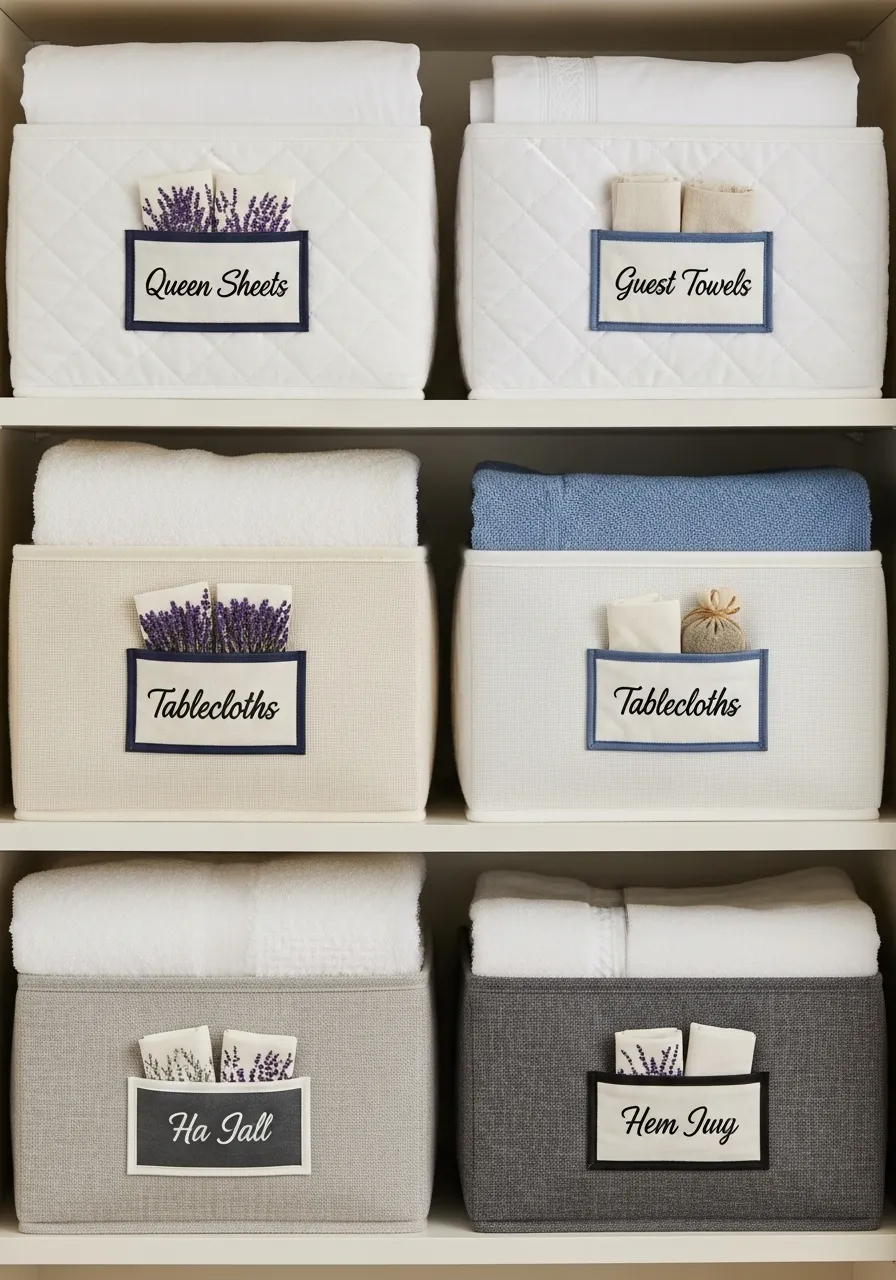
25. The Labeled Linen Closet Bin

A linen closet can easily become a jumble of towels, sheets, and tablecloths. It’s hard to find what you’re looking for when everything is in messy piles. Fabric bins are a great way to create a neat and tidy system.
These Labeled Fabric Storage Bins make your closet look incredibly organized. By dedicating a bin for each type of linen, you can find exactly what you need right away. The labels are easy to read, and the pretty sprig of lavender adds a lovely, calming scent.
Item Name: Labeled Fabric Storage Bins
DIY Easy-Change Bin Labels
Create beautiful, reusable labels for any basket or bin.
What You’ll Need:
- A plain fabric bin or basket
- A small, empty picture frame or a plastic ID badge holder
- A safety pin or a hot glue gun (ask a grown-up for help)
- A piece of stiff paper or cardstock
- A nice pen or marker
Instructions:
Step 1: Prepare Your Label Holder
- If you are using a small picture frame, take out the glass and the back stand. You only need the frame itself.
- If you are using a plastic ID badge holder, it’s already ready to go.
Step 2: Attach the Holder
- Ask a grown-up to help you glue the frame or badge holder to the front of your bin.
- If you want to be able to remove it later, you can use a large safety pin on the inside of the bin to pin the holder in place.
Step 3: Create the Label
- Measure the opening of your frame or holder.
- Cut a piece of cardstock to fit inside.
- Neatly write what the bin is for, such as “Guest Towels” or “Queen Sheets.” You can even draw a little picture.
Step 4: Put It All Together
- Slide your new label into the holder on the front of the bin.
The best part is, if you ever change what’s in the bin, you can just slide the paper out and make a new label!
26. The Heavy-Duty Garage Tote

A garage or basement is often used for long-term storage. Holiday decorations, sports equipment, and old keepsakes all need a safe place to be stored. Strong, stackable bins are a must-have for this job.
These Heavy-Duty Storage Totes are built to last. The strong plastic protects your belongings from dust, moisture, and pests. The bright, colorful lids make it easy to create a color-coded system. You could use yellow for holiday items and blue for camping gear, for example. This makes finding things much faster.
Item Name: Heavy-Duty Storage Totes
DIY Color-Coded Storage Bins
Make your plain storage bins easier to identify with a splash of color.
What You’ll Need:
- Plain plastic storage bins with lids
- Cans of spray paint in a few different, bright colors
- Painter’s tape
- Stencils with letters or numbers (optional)
- Old newspaper or a drop cloth
Instructions:
Step 1: Get Ready to Paint
- Find a space outside or in a very well-ventilated area.
- Lay down your newspaper to protect the ground.
- Make sure your bin lids are clean and dry.
Step 2: Tape Off the Bins
- You can choose to paint the whole lid, or just a part of it.
- If you only want to paint a stripe or a corner, use painter’s tape to mask off the areas you want to keep clean.
Step 3: Paint the Lids
- This is a job for a grown-up.
- Shake the spray paint can well.
- Spray a light, even coat of paint onto the lid. Let it dry for a little while, then add a second coat.
- Use a different color for each category of items you want to store.
Step 4: Add Labels (Optional)
- Once the paint is completely dry, you can add more detail.
- You can use a letter stencil and a black permanent marker to write what’s inside, like “XMAS” or “TOOLS.”
Let everything dry completely, and now your storage is not only organized, but also easy to identify from a distance!
27. The Document and Art Storage Box

Important papers, certificates, and your kids’ beautiful artwork need a safe place. Sticking them in a drawer can lead to them getting bent or torn. A proper storage box keeps them flat and protected.
This Archival Storage Box with file folders is a great way to organize these precious items. The box is sturdy and has a secure latch. Inside, the accordion-style folders let you separate items by year, by child, or by category. It’s a clean and simple system for preserving your important documents and memories.
Item Name: Archival Storage Box
DIY Memory Box
Turn a simple box into a special place for your papers and art.
What You’ll Need:
- A cardboard box with a lid that is large enough to hold your papers flat (a shirt box or a copy paper box works well)
- Several large manila file folders
- Decorative paper or paint
- Glue
- Scissors
- A marker
Instructions:
Step 1: Decorate Your Box
- Make your box special by decorating it. You can paint it your favorite color or cover it with beautiful wrapping paper or scrapbook paper.
- Decorate the lid, too. Let it dry completely.
Step 2: Label Your Folders
- Take your manila file folders. On the tab of each one, write a category.
- You could have folders for “School Awards,” “Report Cards,” “Vacation Drawings,” or “Birthday Cards.”
Step 3: Fill Your Folders
- Go through your papers and artwork and sort them into the correct folders.
Step 4: Put It All Together
- Place your neatly filled folders inside your decorated box.
- Put the lid on top.
Now you have a beautiful and organized memory box. Store it on a shelf or under your bed where it will be safe.
28. The Portable Nursery Caddy

When you have a baby, you need a lot of supplies, and you need them fast. Diapers, wipes, creams, and clothes need to be within arm’s reach. A portable caddy lets you keep everything organized and easy to grab.
This Nursery Diaper Caddy is a parent’s best friend. The dividers create specific spots for each item. The side pockets are handy for smaller things like nail clippers. The sturdy handle lets you carry it from the changing table to the living room, so you’re always prepared, wherever you and the baby are.
Item Name: Nursery Diaper Caddy
DIY Shoebox Diaper Station
You can make a simple, helpful diaper caddy from a shoebox.
What You’ll Need:
- A sturdy shoebox (a boot box is a great size)
- Extra cardboard for dividers
- A ruler and pencil
- Scissors
- Glue
- A thick piece of rope for a handle
- Optional: Fabric or wrapping paper to decorate
Instructions:
Step 1: Decorate Your Box
- If you want, cover your shoebox with cute fabric or wrapping paper. Glue it on smoothly. This makes your caddy look nice in the nursery.
Step 2: Make Dividers
- Measure the inside of your box. Cut pieces of cardboard to create sections inside. A long divider down the middle and a short one across it works well.
- You can cover these dividers with paper or fabric, too.
- Glue them into place inside the box.
Step 3: Add a Handle
- Ask a grown-up to help you carefully poke a hole in the middle of each of the two short sides of the box.
- Cut a piece of rope that is long enough to make a handle.
- Push one end of the rope through one hole and tie a big knot on the inside.
- Push the other end through the other hole and tie another big knot. Make sure the knots are big enough so they won’t pull back through the holes.
Fill your new caddy with diapers, wipes, and other baby supplies!
29. The Vintage-Inspired Storage Trunk

Sometimes, you need to store things out in the open. Plain plastic bins can ruin the look of a room. Decorative boxes that look like old travel trunks add a touch of adventure and style while hiding your clutter.
This set of Nesting Map Storage Trunks is a beautiful way to organize. You can use them to store photos, craft supplies, or old letters. They look wonderful stacked on a shelf or on the floor in a study. They are both a storage solution and a conversation piece.
Item Name: Nesting Map Storage Trunks
DIY Treasure Box Transformation
Turn a plain shoebox into a box that looks like a treasure chest or old suitcase.
What You’ll Need:
- A shoebox with a lid
- An old map, or paper bags from the grocery store
- White glue and a little water
- A paintbrush
- Brown paint
- A black marker
- Optional: Old belt buckles or drawer pulls for decoration
Instructions:
Step 1: Cover Your Box
- Tear your map or paper bag into small pieces.
- Mix a little bit of water with your white glue to make it thinner and easy to paint on.
- Use your paintbrush to apply the glue mixture to a section of the box, then stick the paper pieces on, overlapping them. Cover the whole box and lid. Let it dry completely.
Step 2: Add “Leather” Straps
- Use your brown paint to paint two stripes or “straps” going all the way around the box.
Step 3: Add Details
- Use your black marker to draw little dots or “stitches” along the edges of your brown straps.
- You can also draw a keyhole on the front.
Step 4: Add Hardware (Optional)
- Ask a grown-up to help you glue an old buckle to the front of the box to look like a latch.
- You could also glue a small drawer pull on top to be a handle.
Your new treasure box is ready to be filled with your most important keepsakes.
30. The Stair Step Basket

Stairs can become a magnet for clutter. Things that need to go upstairs get left on the bottom step, and things that need to come down get left on the top. A stair basket is a simple but brilliant invention to solve this problem.
This Wire and Fabric Stair Basket provides a single place to put everything that needs to change floors. Throughout the day, family members can drop items in. Then, the next person heading that way can grab the basket and take everything at once. It’s an easy system that helps keep the stairs clear and your home tidier.
Item Name: Wire and Fabric Stair Basket
DIY “Upstairs/Downstairs” Box
You can set up a simple system to keep your stairs clear.
What You’ll Need:
- A sturdy, medium-sized box or a simple basket
- A piece of paper or a cardboard tag
- A marker
- String or a hole punch
Instructions:
Step 1: Choose Your Basket
- Find a box or basket that is a good size to hold several items but is not so big that it gets in the way.
- Place it on the floor next to the bottom of your staircase.
Step 2: Make a Label
- On your piece of paper or cardboard tag, write “UPSTAIRS” in big, clear letters.
- If you want, you can decorate the label.
Step 3: Attach the Label
- Punch a hole in your tag and use a piece of string to tie it to the handle of your basket.
- If you’re using a box without a handle, you can just tape the label to the front.
Step 4: Start Using the System
- Tell your family that any time they find something downstairs that belongs upstairs (like a toy, a book, or a piece of clothing), they should put it in the basket.
- The next person who goes upstairs is in charge of grabbing the basket, emptying it, and bringing it back down.
- You can make a second basket for the top of the stairs labeled “DOWNSTAIRS” too!
31. The Hidden Recycling Station

Recycling is important, but the bins can be bulky and unsightly in a kitchen. A dedicated station that hides the bins keeps your space looking clean and uncluttered. It makes sorting and recycling an easy and seamless part of your daily routine.
This Tipping Door Recycling Cabinet is a brilliant solution. The slim design fits nicely against a wall, and the wooden top provides extra counter space. Inside, separate bins for paper, plastic, and glass make sorting simple. It tucks the mess away, leaving your kitchen neat and organized.
Item Name: Tipping Door Recycling Cabinet
DIY Labeled Recycling Bags
Set up a simple and clear recycling system with reusable bags.
What You’ll Need:
- Three tall, sturdy reusable shopping bags (canvas totes work great)
- Stencils with letters
- A black permanent marker or black fabric paint
- A piece of cardboard to put inside the bag
Instructions:
Step 1: Get Your Bags Ready
- Make sure your reusable bags are clean and flat.
- Place a piece of cardboard inside the first bag. This will stop the marker or paint from bleeding through to the other side.
Step 2: Stencil the Labels
- Place your letter stencils on the front of the bag to spell out “PAPER.”
- Carefully color in the stencils with your permanent marker or fabric paint. Hold the stencil steady so the letters come out nice and sharp.
Step 3: Let It Dry
- If you used fabric paint, let the bag lie flat for a few hours to dry completely before you remove the cardboard.
Step 4: Repeat for Other Bags
- Do the same thing for the other two bags, creating labels for “PLASTIC” and “GLASS.”
Now you have a set of clearly labeled bags. You can hang them on hooks in your pantry or line them up in the garage to make recycling super easy for everyone in the family.
32. The Cozy Countertop Canister Set

Kitchen counters can feel cold and sterile. Adding soft textures is a great way to make the space feel more warm and inviting. Canisters for flour, sugar, and other staples are necessary, so why not make them beautiful?
This set of Labeled Rope Canisters brings a lovely, soft texture to the countertop. The simple black labels are easy to read, and the cork lids keep your ingredients fresh. They are a practical way to store your baking essentials while also serving as a charming piece of decor.
Item Name: Labeled Rope Canisters
DIY Twine-Wrapped Canisters
You can give old jars or canisters a cozy new look with some twine.
What You’ll Need:
- An old canister or glass jar, cleaned and with the label removed
- A ball of cotton twine or rope
- A hot glue gun (get a grown-up’s help)
- Scissors
- A stencil with letters and a black marker for the label
Instructions:
Step 1: Start Wrapping
- Ask a grown-up to help you with the hot glue gun.
- Put a dot of glue near the bottom of your canister. Press the end of the twine into it.
- Start wrapping the twine tightly around the canister, keeping the rows very close together so there are no gaps.
Step 2: Glue as You Go
- Add a thin line of hot glue every few inches as you wrap. This will keep the twine from slipping.
- Continue all the way to the top of the canister.
Step 3: Finish the Top
- When you reach the top, cut the twine.
- Tuck the end in neatly and use one last dot of glue to hold it in place.
Step 4: Add a Label
- To make a label, you can stick a letter stencil on the front of the canister and color it in with a black marker. Spell out “FLOUR” or “SUGAR.”
Repeat with a few more canisters to create a beautiful, matching set for your kitchen.
33. The Gift Wrap Command Center

Storing wrapping paper can be a pain. The rolls get crushed, and the tape and ribbons get lost. An organizer keeps all your gift-wrapping supplies in one place, so you’re always ready for a celebration.
This Gift Wrap Storage Bag is a fantastic way to stay organized. The main compartment has dividers to protect your rolls of paper. The clear lid is full of pockets for tape, scissors, tags, and bows. Everything has its place, making the process of wrapping a present smooth and enjoyable.
Item Name: Gift Wrap Storage Bag
DIY Wrapping Paper Holder
You can make a simple holder for your wrapping paper rolls from a cardboard box.
What You’ll Need:
- A tall, sturdy cardboard box (like one for a floor lamp or golf clubs)
- A box cutter (a job for a grown-up!)
- Optional: Wrapping paper and glue to decorate
Instructions:
Step 1: Get Your Box
- Find a box that is tall enough for your wrapping paper rolls to stand up in.
- If the box has flaps on top, you can either tuck them in or ask a grown-up to cut them off.
Step 2: Decorate It (Optional)
- To make your holder look nice, you can cover the outside of the box with some of your favorite wrapping paper. Just use glue to stick it on.
Step 3: Create Dividers (Optional)
- If you have a lot of rolls, you can make simple dividers.
- Measure the inside of your box and cut large pieces of cardboard to fit.
- Cut slits in the dividers so they can slide together to form a grid inside the box.
Step 4: Fill It Up
- Stand your rolls of wrapping paper up inside the box.
Now all your paper is in one place, standing neatly in a corner of a closet, ready for the next birthday or holiday.
34. The Modern Magazine Sling

A stack of magazines on a coffee table or floor can look messy. A magazine rack provides a designated home for them, keeping your living space tidy. A rack with a modern design can also act as a stylish piece of furniture.
This Felt and Metal Side Table is a clever, two-in-one piece. The soft felt sling is a gentle place to hold your magazines and books. The flat metal top serves as a small side table, a great spot for a cup of coffee or a tablet. It’s a minimalist and highly functional addition to any modern room.
Item Name: Felt and Metal Side Table
DIY Felt Magazine Holder
You can make a simple, stylish felt holder for your magazines.
What You’ll Need:
- A large, thick piece of felt (at least 24 inches long and 12 inches wide)
- Two wooden dowels, about 12-15 inches long
- A hot glue gun (ask a grown-up to help)
- A ruler and a pencil
- Scissors
- Some string or ribbon
Instructions:
Step 1: Prepare the Felt
- Lay your large piece of felt flat. This will be the main body of your magazine sling.
Step 2: Create the Dowel Pockets
- On one of the shorter ends of the felt, fold over about 2 inches of the material to create a loop or pocket.
- Ask a grown-up to help you run a line of hot glue along the edge to seal the pocket.
- Slide one of your wooden dowels inside this pocket.
Step 3: Repeat on the Other Side
- Do the exact same thing on the other short end of the felt. Fold it over, glue it, and slide the second dowel inside.
Step 4: Add a Hanger
- Cut a piece of string or ribbon.
- Tie the ends of the string to the ends of the top wooden dowel.
- Do the same for the bottom dowel.
You can hang your new felt sling from a hook on the wall. The weight of the magazines in the middle will pull the dowels together, creating the V-shape.
35. The Tiered Plant Ladder

If you love plants but are running out of windowsill space, it’s time to think vertically. A plant stand allows you to display multiple plants in a small footprint. It turns your collection of pots into a stunning “plant wall.”
This Tiered Bamboo Plant Stand is a beautiful way to showcase your greenery. The ladder design allows each plant to get sunlight. The different levels create an interesting and dynamic display. It’s a great piece for a sunny corner, bringing a lot of life and natural beauty into your home.
Item Name: Tiered Bamboo Plant Stand
DIY Crate Plant Stand
You can build a simple, rustic plant stand using wooden crates.
What You’ll Need:
- Three or four wooden crates (you can find these at a craft store)
- Strong glue, like wood glue (ask a grown-up to help)
- Optional: Paint or wood stain
Instructions:
Step 1: Plan Your Design
- Arrange your crates on the floor to see how you want to stack them. You can create a pyramid shape or a staggered ladder.
- Place the biggest crate on the bottom for a sturdy base.
Step 2: Decorate Your Crates (Optional)
- If you want to, you can paint or stain your crates before you glue them together. This is much easier than trying to paint them once they are assembled. Let them dry completely.
Step 3: Start Gluing
- This part is for a grown-up.
- Take the two crates that will be on the bottom level. Put a thick line of wood glue on the side of one crate where it will touch the other.
- Press them together firmly.
Step 4: Build Upwards
- Put glue on the top surface of your bottom crates.
- Carefully place the next level of crates on top, pressing them down.
- Continue until your stand is built.
Let the glue dry for a full day to make sure it’s very strong. Then, you can start arranging your beautiful plants on their new stand!
36. The Entryway Health Hub

Coming home often means bringing germs in with you. Creating a sanitizing station right by the door is a smart way to keep your family healthy. It provides a reminder and a convenient place to clean up as soon as you walk inside.
This Entryway Sanitizing Station is a simple and effective organizer. It has hooks for keys and masks, a spot for hand sanitizer, and a bin for clean masks. Everything you need to transition from the outside world to your clean home is in one place. It helps build good habits for the whole family.
Item Name: Entryway Sanitizing Station
DIY Doorway Drop Spot
Create a simple station for your entryway essentials.
What You’ll Need:
- A small wooden cutting board or a nice flat piece of wood
- Two or three small screw-in hooks
- A small, lightweight plastic cup or bin
- Strong double-sided tape or hot glue (ask a grown-up for help)
- A picture hanger for the back
Instructions:
Step 1: Prepare Your Board
- Make sure your cutting board or piece of wood is clean. This will be the back of your organizer.
Step 2: Attach the Hooks
- Decide where you want your hooks to go along the bottom edge of the board.
- Ask a grown-up to help you screw the hooks into the wood. These are great for keys and masks.
Step 3: Add the Cup
- Use strong double-sided tape or have a grown-up help with hot glue to attach your plastic cup to the front of the board. This can hold clean masks or a small bottle of sanitizer.
Step 4: Add a Hanger
- On the back of the board, attach a picture hanger so you can hang your new station on the wall.
Hang your new organizer by the door, and now everyone has a spot to drop their keys and grab a mask on their way out.
37. The Over-the-Door Ironing Station

An ironing board and iron are bulky and awkward to store. They can take up valuable closet or floor space. An over-the-door organizer is a clever solution that uses unused space to keep these items out of the way.
This Over-the-Door Iron and Ironing Board Holder is a space-saving hero for the laundry room. It hooks over any standard door with no tools required. There’s a special heat-resistant basket for the iron to cool down safely, and strong hooks to hold the ironing board. It keeps everything together and off the floor.
Item Name: Over-the-Door Iron and Ironing Board Holder
DIY Wall Hooks for Your Ironing Board
You can easily hang your ironing board on a wall or behind a door.
What You’ll Need:
- Two large, strong wall hooks (make sure they are rated to hold at least 10 pounds each)
- A drill and screws (a job for a grown-up!)
- A pencil
- A tape measure or ruler
- A level
Instructions:
Step 1: Find a Good Spot
- Decide where you want to hang your ironing board. Behind a door or on a wall in the laundry room are good spots.
Step 2: Position the Board
- Hold your ironing board up against the wall where you want it to hang.
- Use your pencil to make a small mark on the wall just under the “feet” of the T-shaped end of the board. This is where your hooks will go.
Step 3: Mark for the Hooks
- Take the board down.
- Use your level to make sure your two pencil marks are straight.
- Hold your hooks up to the marks to see where the screws will need to go. Mark these spots.
Step 4: Install the Hooks
- This is a job for a grown-up.
- Use the drill to install the hooks securely into the wall. If you’re not drilling into a wall stud, you might need to use wall anchors to make sure the hooks are strong enough.
Once the hooks are installed, you can hang your ironing board by its feet, keeping it safely and neatly off the floor.
38. The Cord Chaos Concealer

A tangle of cables and a clunky power strip can make any room look messy. This “cable clutter” is common behind TVs and under desks. A cable management box is a simple and sleek way to hide the mess.
These Bamboo Lid Cable Management Boxes are a stylish solution. You simply place your entire power strip inside the box, plug everything in, and put on the lid. The cords feed out through the neat slots on the side. The tangled mess disappears, leaving only a clean-looking box.
Item Name: Bamboo Lid Cable Management Box
DIY Shoebox Cable Tamer
You can hide your messy cords using a decorated shoebox.
What You’ll Need:
- A sturdy shoebox with a lid
- A box cutter or craft knife (this is a job for a grown-up!)
- A pencil
- Optional: Wrapping paper or paint to decorate the box
Instructions:
Step 1: Decorate Your Box (Optional)
- To help your box blend in with your decor, you can paint it a solid color or cover it with nice wrapping paper. Do this before you cut any holes.
Step 2: Mark the Cord Holes
- On one of the short sides of the box, draw a large rectangle near the bottom. This is for the main power strip cord.
- On one of the long sides, draw several smaller squares or circles. These are for all the different device cords to come out of.
Step 3: Cut the Holes
- Ask a grown-up to use the box cutter to carefully cut out the holes you drew.
Step 4: Put It All Together
- Place your power strip inside the box.
- Feed the main power strip cord out through the big hole and plug it into the wall.
- Plug all your devices (like your TV and lamp) into the power strip.
- Feed their cords out through the smaller holes on the side.
- Put the lid on the box.
All the messy plugs and extra cables are now hidden, and your space looks much tidier!
39. The Over-the-Toilet Tray

The top of the toilet tank is often unused space. It can be a handy spot for a few bathroom essentials, but items can easily fall off. A tray is a great way to use this space for storage while keeping things secure and looking nice.
This Wire and Woven Toilet Caddy is perfectly sized for the top of a toilet. The feet keep it stable, and the raised sides prevent things from falling. It’s a great place to hold a spare roll of toilet paper, a nice smelling reed diffuser, and a container of cotton balls. It adds style and function to the bathroom.
Item Name: Wire and Woven Toilet Caddy
DIY Decorative Bathroom Tray
You can make a beautiful tray for your bathroom from a picture frame.
What You’ll Need:
- An old picture frame, 8×10 size or larger
- A piece of scrapbook paper with a pretty pattern
- Four wooden beads or small wooden blocks for feet
- A hot glue gun or super glue (ask a grown-up for help)
- Scissors
Instructions:
Step 1: Prepare the Frame
- Take the back off the picture frame and remove any paper that’s inside.
- Clean the glass of the frame really well.
Step 2: Add a Decorative Base
- Cut your piece of pretty scrapbook paper to the same size as the frame’s glass.
- Place the paper inside the frame, with the pretty side facing the glass.
- Put the backing back on the frame securely.
Step 3: Add the Feet
- This part is for a grown-up.
- Turn your frame upside down.
- Use a strong glue, like hot glue or super glue, to attach one wooden bead to each of the four corners on the back of the frame. These will be the feet.
Step 4: Let It Dry
- Let the glue dry completely for a few hours before you flip it over.
You now have a beautiful, custom tray. You can place it on top of your toilet tank to hold a candle, a small plant, or other bathroom necessities.
40. The Porch Package Protector

Getting packages delivered is convenient, but leaving them on the porch can be risky. They can get wet from rain or be tempting for thieves. A package delivery box provides a safe and dry place for your deliveries to be left.
This Stylish Porch Package Box keeps your deliveries secure. The lid can be left unlocked for the delivery person, who can then lock it after placing the package inside. The classic design looks like a handsome piece of outdoor furniture, adding to your home’s curb appeal while protecting your purchases.
Item Name: Stylish Porch Package Box
DIY Front Porch Delivery Bin
You can create a welcoming and useful spot for your packages.
What You’ll Need:
- A large plastic storage bin with a lid (a dark color often looks best)
- Stencils with letters
- White or light-colored outdoor or acrylic paint
- A small paintbrush or a stencil brush
Instructions:
Step 1: Clean Your Bin
- Make sure the outside of your plastic storage bin is clean and dry. This will help the paint stick.
Step 2: Stencil Your Message
- Decide on a good spot for your label, either on the front of the bin or on the lid.
- Place your letter stencils on the bin to spell out the word “PACKAGES.”
- You can hold them in place with a little bit of painter’s tape.
Step 3: Paint the Letters
- Dip your stencil brush in a little bit of paint. Dab off any extra paint so the brush is almost dry.
- Gently dab the paint over the stencils. Dabbing instead of brushing helps prevent the paint from smearing under the stencil.
- Carefully lift the stencils off.
Step 4: Let It Dry
- Let the paint dry completely. You might need to add a second coat to make the letters nice and bright.
Place your new package bin on your porch near the door. Delivery drivers will appreciate the clear instructions, and your packages will have a designated spot.
As we’ve seen, the humble basket is one of the most versatile tools in your organizing arsenal. From sorting laundry to displaying houseplants, there is a stylish solution for every type of clutter.
Getting your home in order doesn’t require a massive overhaul or a huge budget. It can start with a single, well-placed bin or a simple weekend DIY project that turns a plain box into a beautiful storage piece.
By turning your storage into part of your decor, you create a home that is not only tidier and more functional but also more beautiful and calming.
So, pick an idea that inspires you, grab a basket, and start your journey to a more organized and stylish home today.
Key Takeaways
- Storage as Decor: Think of baskets and bins as decorative accents. Use them to add natural textures like wicker and rope, or a pop of color to brighten up a room.
- Contain and Categorize: The fastest way to tidy a space is to group similar items together. Use bins to create dedicated zones for pet supplies, pantry snacks, or bathroom essentials.
- Labels Are Your Friend: A clear labeling system turns a set of storage boxes into a functional library of your belongings. You’ll find what you need faster and be more likely to keep the system going.
- Think Vertically: Don’t forget about wall space and unused corners. Hanging pockets, tiered stands, and over-the-door caddies are excellent for maximizing storage in small areas.
- Embrace DIY: You don’t always need to buy new. As shown in every example, a simple box, some paint, or a bit of glue can be transformed into a custom storage solution that perfectly fits your style and budget.