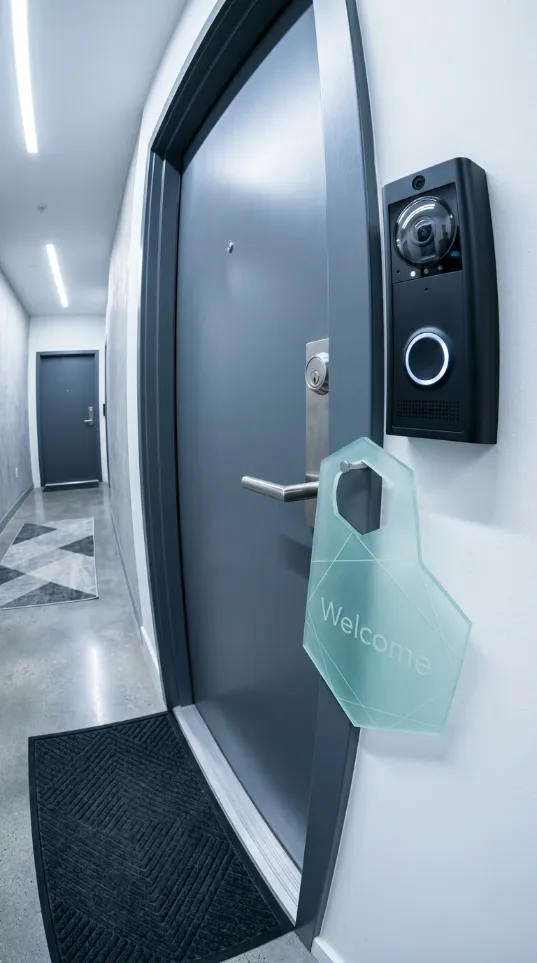
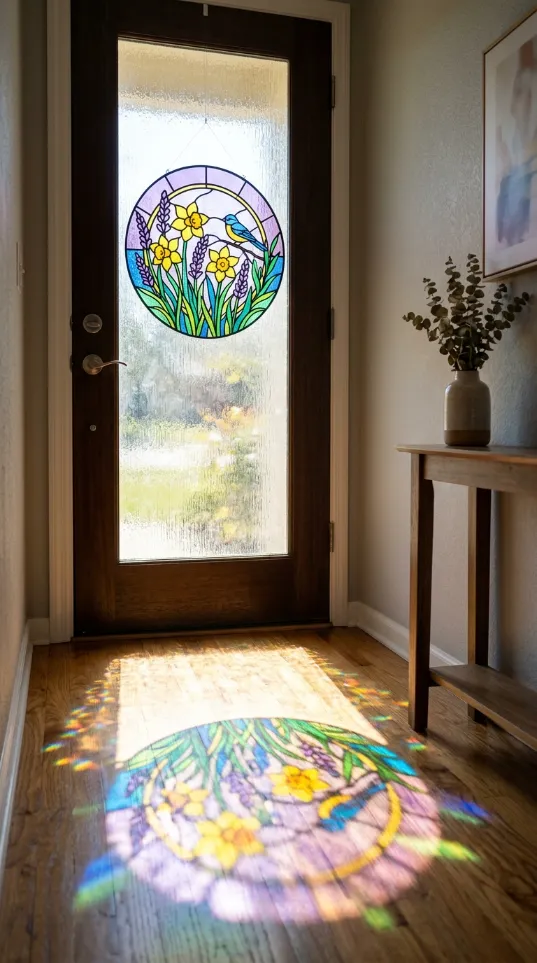
Spring brings a fresh energy to every living space. Most apartment dwellers struggle with small entrances. Traditional wreaths often take up too much room.

Lightweight door hangers offer a better solution for tight hallways. You can enjoy beautiful blooms without blocking your walkway. Every guest will appreciate the sleek and modern look.
1 Minimalist Wooden Bloom Sign
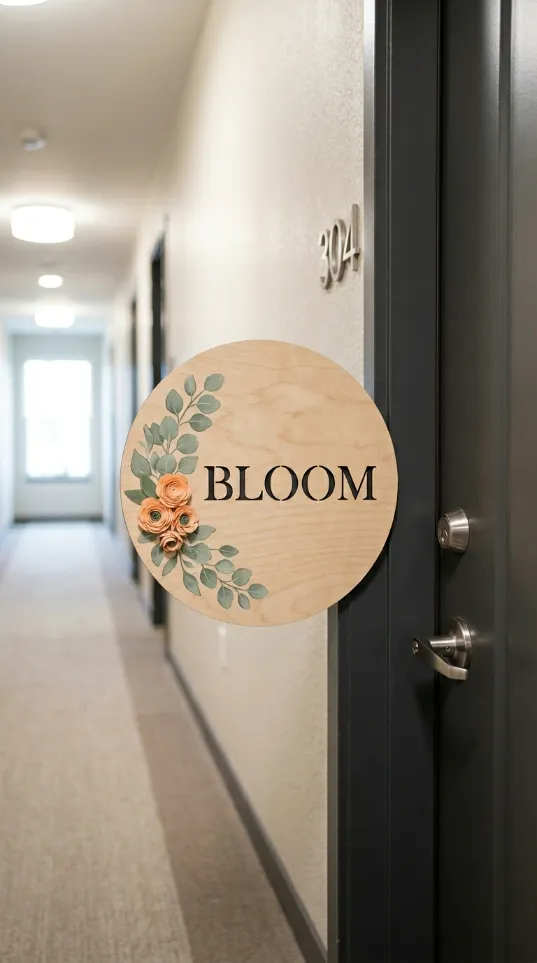
Apartment living often means dealing with narrow hallways and limited porch space. Bulky wreaths frequently get caught in doorframes or block the view through peepholes. This circular wooden sign offers a slim alternative that fits snugly against any flat surface.
Natural wood grain provides a warm, organic backdrop for the bold lettering. Handcrafted floral accents add a pop of color without overwhelming the entrance. Choosing a flat design ensures your decor remains intact even in high traffic areas.
Seasonal transitions become easier when you use lightweight hangers. They store flat in a drawer rather than taking up precious closet space. Upgrade your entry with this modern take on traditional spring greenery.
Material required list
- One circular wood plaque
- Black acrylic paint
- Small orange faux flowers
- Green leaf sprigs
- Strong wood adhesive
Equipment required list
- Medium grit sandpaper
- Small pointed paintbrush
- Sharp scissors
- Measuring ruler
DIY instruction step by step
- Start by rubbing the sandpaper over the wood surface to make it smooth.
- Use your ruler to find the middle of the circle so the text stays centered.
- Paint the letters carefully using the small brush and black paint.
- Cut the stems off your faux flowers and leaves so they lay flat against the wood.
- Place the greenery and flowers on the left side to test the look before gluing.
- Apply a small dot of glue to the back of each floral piece.
- Press the pieces firmly onto the wood and let them dry for an hour.
- Secure a small hook or adhesive strip to the back for hanging.
2 Blue Watering Can Tulips
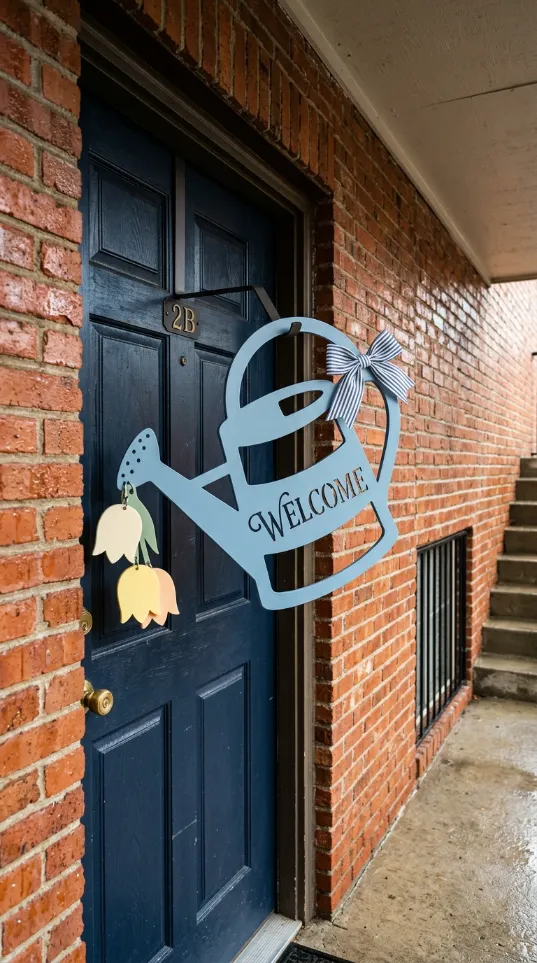
Traditional wreaths often feel too heavy for a modern apartment entrance. Lively blue watering can shapes bring a playful spirit to your front door without the weight. Bright yellow tulips dangle from the spout to create a charming focal point. Using a thin profile ensures the door opens and closes with ease. Most apartment corridors stay quiet, but this piece adds a welcoming splash of color to the hallway.
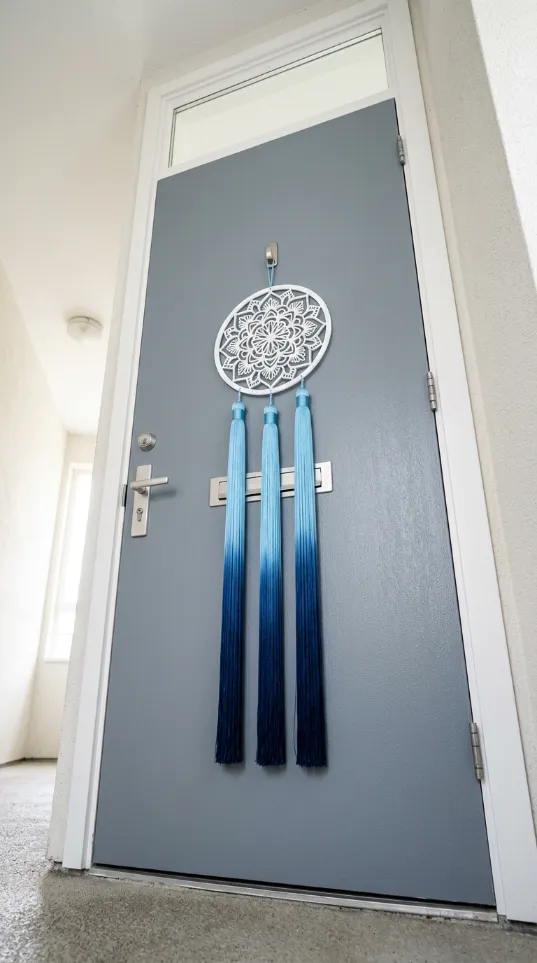
Decorating a small porch requires smart choices that do not block the walkway. This hanger sits flat against the door to prevent snagging on clothing or bags. You get the beauty of spring flowers without the mess of real soil or water.
Material required list
- One wooden watering can cutout
- Light blue acrylic paint
- Three small yellow faux tulips
- Striped navy and white ribbon
- Industrial strength glue
Equipment required list
- Flat paint brush
- Sharp fabric scissors
- Pencil for marking
- Ruler
DIY instruction step by step
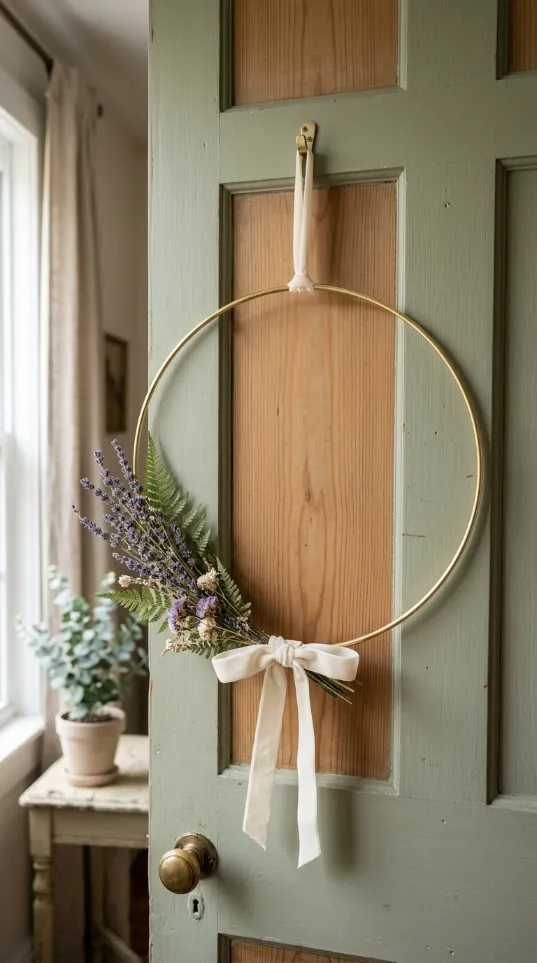
- Clean the surface of your wooden cutout with a dry cloth to remove any dust.
- Apply a thin layer of light blue paint to the front and sides of the wood.
- Wait for the first coat to dry before adding a second layer for better color.
- Tie the striped ribbon into a large bow with two loops.
- Glue the bow to the handle of the watering can and hold it for thirty seconds.
- Arrange the yellow tulips so they appear to be falling from the spout.
- Stick each flower stem to the back of the spout using a generous amount of glue.
- Attach a small loop of string to the top handle to hang it on your door hook.
3 Hello Spring Daisy Round
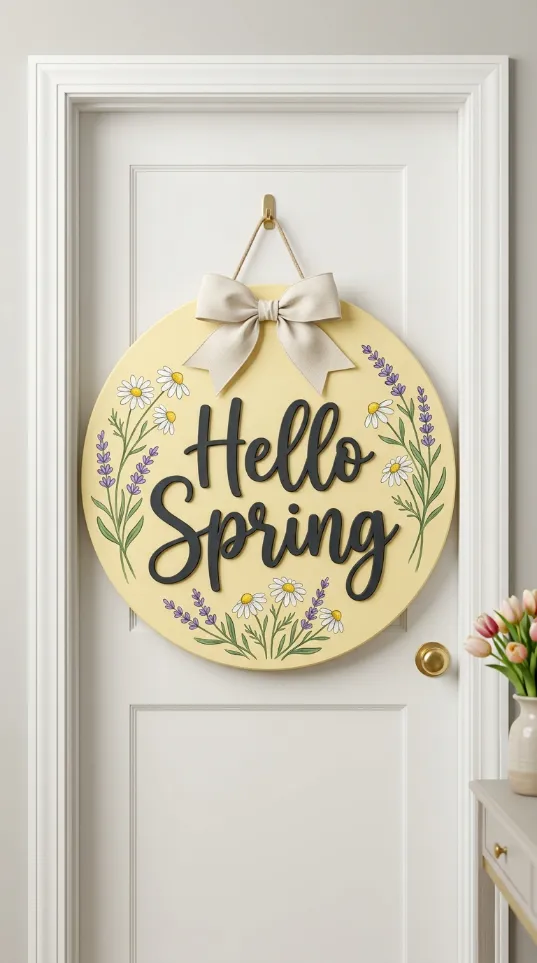
Sunny yellow backgrounds make any entrance feel more inviting during the early months of the year. This circular sign features delicate hand painted lavender and daisies. A large cream colored bow sits at the top to give it a soft texture. Choosing a flat wooden base prevents the decor from bumping against the wall. Neighbors will appreciate the cheerful message as they walk past your unit.
Spring themes look best when they incorporate multiple types of greenery. This design balances the bold text with soft floral illustrations on both sides. It provides a clean and organized look that fits any apartment style.
Material required list
- One circular wooden board
- Pale yellow paint
- Black vinyl or paint for lettering
- Cream colored burlap ribbon
- Twine for hanging
Equipment required list
- Large sponge brush
- Fine detail paintbrush
- Glue gun with glue sticks
- Stencil for the words
DIY instruction step by step
- Cover the entire wooden circle with the pale yellow paint using your sponge brush.
- Let the paint dry completely until the surface is no longer tacky.
- Place your stencil in the center of the board to line up the words.
- Fill in the letters carefully with black paint or apply your vinyl stickers.
- Paint small white circles for daisy petals around the edges of the board.
- Add tiny purple strokes to represent lavender sprigs next to the daisies.
- Fold your burlap ribbon into a bow and glue it at the very top center.
- Thread the twine through the pre drilled holes or glue it to the back for hanging.
4 Sage Green Flower Pot Hanger
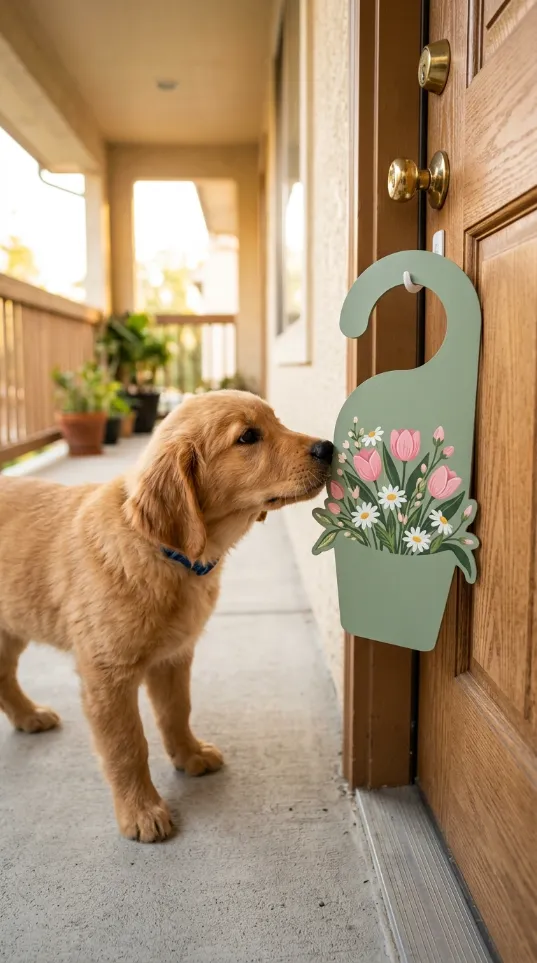
Small spaces benefit from vertical decor that stays out of the way. This sage green pot shape holds a bouquet of pink and white flowers. Its slim silhouette works well on doors with prominent handles or smart locks. Choosing muted tones creates a sophisticated look for a professional living environment. Your pet might even stop to sniff the realistic floral details.
Hanging this piece takes only a second and requires no heavy hardware. It offers a fresh alternative to bulky evergreen wreaths that feel out of place in April. The soft green color matches well with natural wood door finishes.
Material required list
- Flower pot shaped wood cutout
- Sage green matte paint
- Silk pink tulips and white daisies
- Green floral tape
- Small plastic hook
Equipment required list
- Paint tray
- Wire cutters
- Hot glue gun
- Sanding block
DIY instruction step by step
- Smooth out any rough edges on the wood cutout using the sanding block.
- Paint the pot shape with the sage green color and let it dry.
- Use wire cutters to trim the silk flower stems to about three inches long.
- Bundle the tulips and daisies together to create a full bouquet look.
- Wrap the stems tightly with floral tape to keep them in a single bunch.
- Glue the flower bunch to the top center of the wooden pot.
- Press the flowers down until the glue cools and becomes hard.
- Mount the plastic hook on your door to display your new spring creation.
5 Geometric Frosted Welcome Tag
Modern apartments often feature sleek hardware and smart technology. This frosted acrylic hanger complements high tech doorbells and minimalist hallways. Sharp geometric lines provide a contemporary edge to the classic welcome message. Light passes through the translucent material to create a soft glow. Opting for a durable plastic ensures the piece lasts through many seasons of use.
Hallway lighting can be dim, but the white lettering on this sign remains easy to read. It offers a professional appearance for city dwellers who prefer clean aesthetics. You can easily wipe it clean with a damp cloth to keep it looking new.
Material required list
- One sheet of frosted acrylic
- White adhesive vinyl letters
- Thin silver wire
- Clear adhesive dots
Equipment required list
- Utility knife
- Metal ruler
- Cutting mat
- Glass cleaner
DIY instruction step by step
- Cut the frosted acrylic into a long rectangular tag shape using the utility knife.
- Use the metal ruler to guide your blade for perfectly straight edges.
- Clean the surface of the acrylic with glass cleaner to remove fingerprints.
- Peel the back off the vinyl letters and center them on the bottom half.
- Smooth the letters down with your finger to remove any air bubbles.
- Poke a small hole in the top of the tag using a heated needle or drill.
- Loop the silver wire through the hole and twist the ends together.
- Hang the tag over your door handle or on a small adhesive hook.
6 Black Wire Tulip Trio
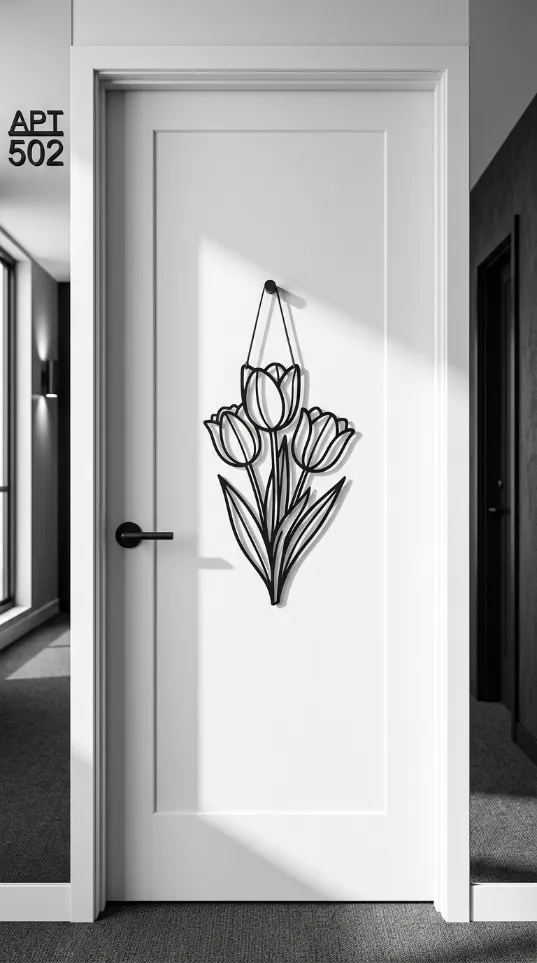
Minimalist homes require decor that makes a statement through simplicity. This black metal silhouette shows three elegant tulips in full bloom. It offers a transparent look that lets the color of your door shine through. Heavy wreaths can leave marks on fresh paint, but this lightweight wire frame hangs gently. Every guest will notice the clean lines of this artistic floral display.
Metal decor stands up well to the humidity and temperature changes in apartment corridors. This piece provides a sophisticated touch without looking like a traditional craft project. It works especially well on white or light colored doors.
Material required list
- Thick black craft wire
- Thin floral wire
- Black spray paint
- Transparent hanging thread
Equipment required list
- Needle nose pliers
- Wire template or drawing
- Protective gloves
- Cardboard box for painting
DIY instruction step by step
- Draw a simple outline of three tulips on a large piece of paper.
- Bend the thick black wire to follow the lines of your drawing using pliers.
- Connect different wire pieces by wrapping them with the thinner floral wire.
- Squeeze the joints tightly so the structure remains stiff and holds its shape.
- Place the finished tulip frame inside a cardboard box to catch overspray.
- Coat the entire piece with black spray paint to hide the silver wire joints.
- Allow the paint to dry for at least four hours in a well ventilated area.
- Tie the transparent thread to the top of the wire and loop it over your door.
7 Cherry Blossom Birdhouse Plaque
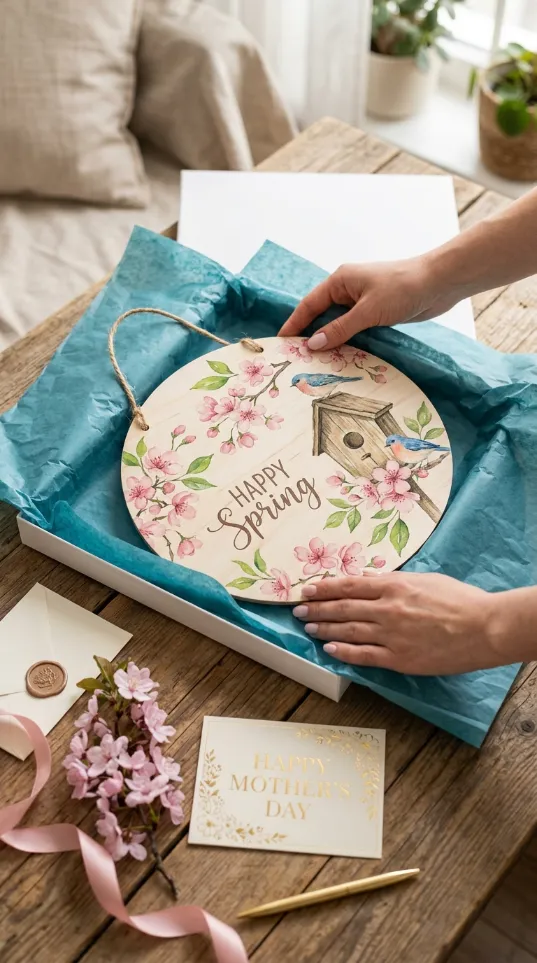
Giving your porch a fresh look does not need to be complicated. This round plaque depicts a serene scene with bluebirds and pink blossoms. Detailed illustrations bring a touch of nature to an urban setting. Storage becomes a breeze since the flat shape fits into a slim gift box. You can swap these signs out quickly as the seasons change.
Wood grain adds a warm feel to the cold metal doors found in many buildings. This item works as a beautiful gift for new neighbors or a treat for yourself. The classic art style never goes out of fashion.
Material required list
- Circular birch wood slice
- Decoupage paper with birdhouse design
- Mod Podge or clear sealant
- Natural jute twine
Equipment required list
- Foam applicator brush
- Soft cloth
- Small drill
- Scissors
DIY instruction step by step
- Sand the wood slice until it is very smooth on both sides.
- Cut the birdhouse design out of the decoupage paper to fit the wood circle.
- Apply a thin layer of Mod Podge to the wood using the foam brush.
- Place the paper carefully onto the wet glue and smooth it with a cloth.
- Brush another layer of sealant over the top of the paper to protect it.
- Let the plaque dry overnight to ensure the glue sets firmly.
- Drill two small holes near the top edge about two inches apart.
- Feed the jute twine through the holes and tie knots to create a hanger.
8 Layered Wooden Sunflower Peony
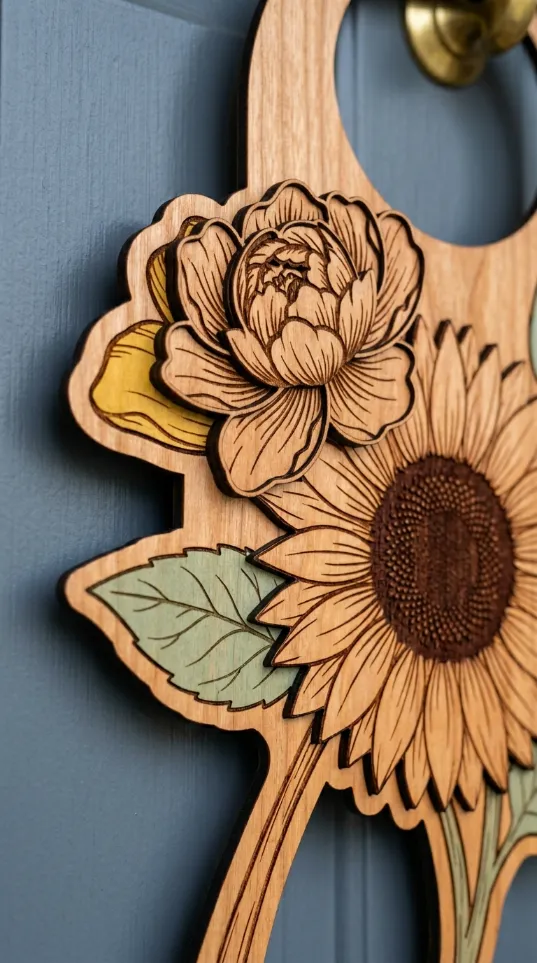
Texture adds depth to flat door hangers without adding unnecessary bulk. This piece uses multiple layers of wood to create a 3D floral effect. A large sunflower sits at the base while a delicate peony rests on top. Natural wood tones mixed with soft yellows and greens feel grounded. Guests will want to touch the intricate carvings as they enter your home.
Crafting with layers allows you to play with shadows and light on your doorstep. This hanger stays close to the door surface despite its detailed appearance. It offers a high end look that outshines cheap plastic wreaths.
Material required list
- Three thin sheets of balsa wood
- Wood stains in yellow, brown, and green
- Strong wood glue
- Clear satin finish spray
Equipment required list
- Precision craft knife
- Small paintbrushes
- Pencil
- Clamps
DIY instruction step by step
- Sketch the shapes of flower petals and leaves onto the balsa wood sheets.
- Cut out each individual piece carefully using the precision craft knife.
- Stain the petal pieces yellow and the center pieces brown.
- Paint the leaf cutouts with a light green wood stain.
- Stack the layers together to see how the flowers will look.
- Apply small drops of glue between the layers and press them together.
- Use clamps to hold the wood pieces in place while the glue dries.
- Spray the entire piece with a satin finish to give it a soft glow.
9 Digital Guest Assistant Hanger
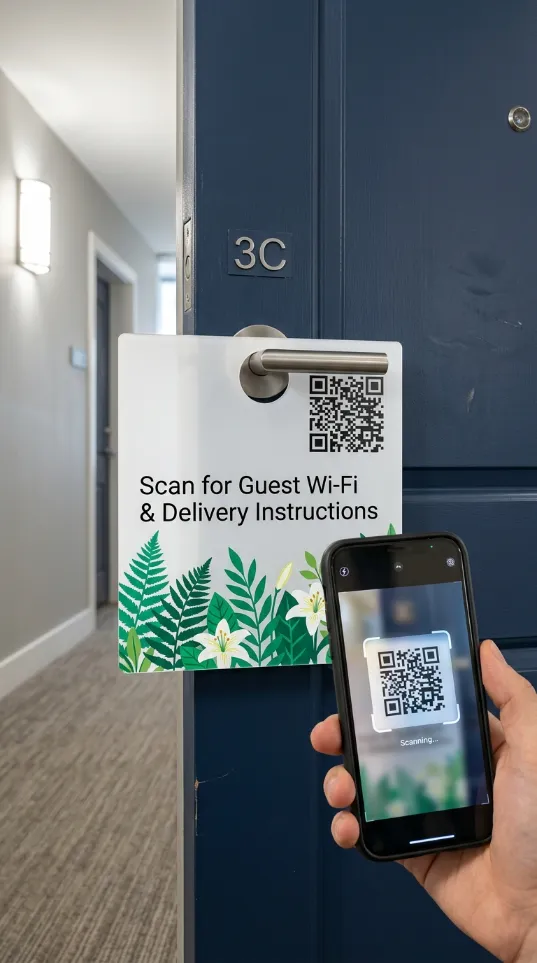
Function meets style with this innovative apartment accessory. A large QR code allows visitors and delivery drivers to access important info instantly. Green leafy patterns keep the technical look from feeling too cold. Smart homeowners use these to share Wi Fi passwords or drop off instructions. Staying organized helps reduce stress for everyone arriving at your door.
This hanger solves the problem of missed packages or confused guests. It hangs directly on the handle for immediate visibility. You can update the information easily by printing a new code whenever needed.
Material required list
- White plastic or cardstock base
- Printed QR code
- Green leaf stickers
- Clear packing tape or lamination sheet
Equipment required list
- Computer and printer
- Scissors
- Hole punch
- Measuring tape
DIY instruction step by step
- Generate a QR code online that links to your guest information page.
- Print the code onto a square piece of white paper.
- Cut your plastic or cardstock base into a large rectangle.
- Use a hole punch to create a wide opening at the top for the door handle.
- Glue the QR code into the center of the rectangular base.
- Arrange the leaf stickers around the edges to decorate the sign.
- Cover the front and back with clear packing tape to make it waterproof.
- Slide the opening over your door handle so guests can scan it easily.
10 Magnetic Interchangeable Rewreath
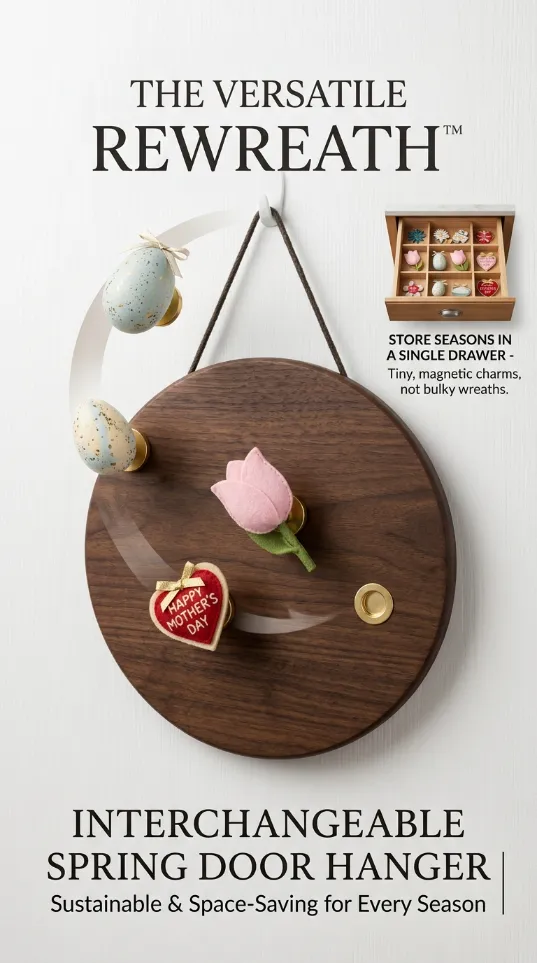
Sustainability matters when you live in a compact home. This dark walnut base allows you to change charms for every occasion. Small magnetic eggs and felt flowers snap into place with a satisfying click. You no longer need a separate box for every single holiday decoration. Saving space becomes easy when one board does the work of many different wreaths.
Interchangeable parts mean you can update your look in seconds. The high quality wood grain provides a luxury feel to your apartment entrance. This system is the ultimate solution for people who love to decorate but hate clutter.
Material required list
- Dark walnut wood circle
- Small round neodymium magnets
- Felt in various colors
- Heavy duty hanging cord
Equipment required list
- Power drill with a small bit
- Hot glue gun
- Fabric scissors
- Measuring tape
DIY instruction step by step
- Mark four or five spots on the wood circle where you want ornaments to go.
- Drill shallow holes into the wood at those marked spots.
- Glue a magnet into each hole so it sits flush with the surface.
- Cut spring shapes like eggs or tulips out of the colored felt.
- Glue a matching magnet to the back of each felt shape.
- Make sure the magnets are facing the right way so they stick to the board.
- Attach the hanging cord to the back of the wood circle with glue.
- Snap your felt spring charms onto the board and change them whenever you like.
11 Elegant Brushed Gold Tassel Plate
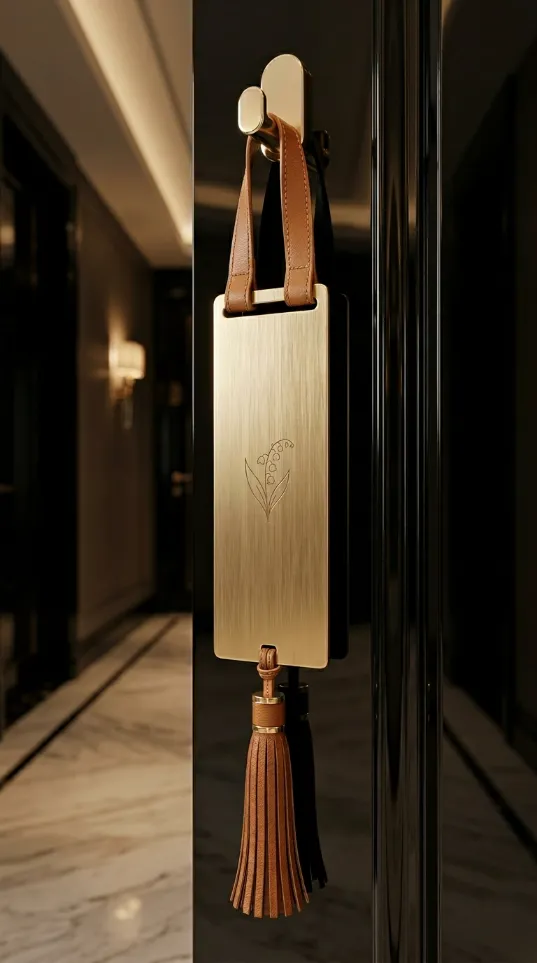
Metal accents bring a touch of luxury to a standard apartment door. This slim gold plate sits flush against the surface and does not rattle when you close the door. A sophisticated lily engraving provides a subtle nod to the spring season. Leather straps hold the piece securely on a metal hook. Using a vertical design keeps the entrance looking clean and expensive.
This item works well for residents who want a high end feel without the clutter of a messy wreath. Light reflects off the brushed surface to brighten up a dim hallway. It remains a durable choice that will stay beautiful for many years.
Material required list
- One rectangular brushed gold aluminum plate
- Leather strips for hanging
- Small metal tassel
- Self adhesive engraving film
Equipment required list
- Metal punch tool
- Fine tip permanent marker
- Heavy duty scissors
- Ruler
DIY instruction step by step
- Clean the gold plate with a soft cloth to remove any oil or dust.
- Use the ruler to mark two spots at the top for the leather straps.
- Punch two small holes through the metal using the punch tool.
- Draw a simple lily design on the center of the plate with the marker.
- Feed the leather strips through the holes and tie them in a secure knot.
- Attach the metal tassel to the bottom edge by punching one more hole.
- Thread the tassel loop through the bottom hole and close the ring.
- Wipe away any remaining marker lines once you are happy with the look.
12 Silent Protector Felt Backed Hanger
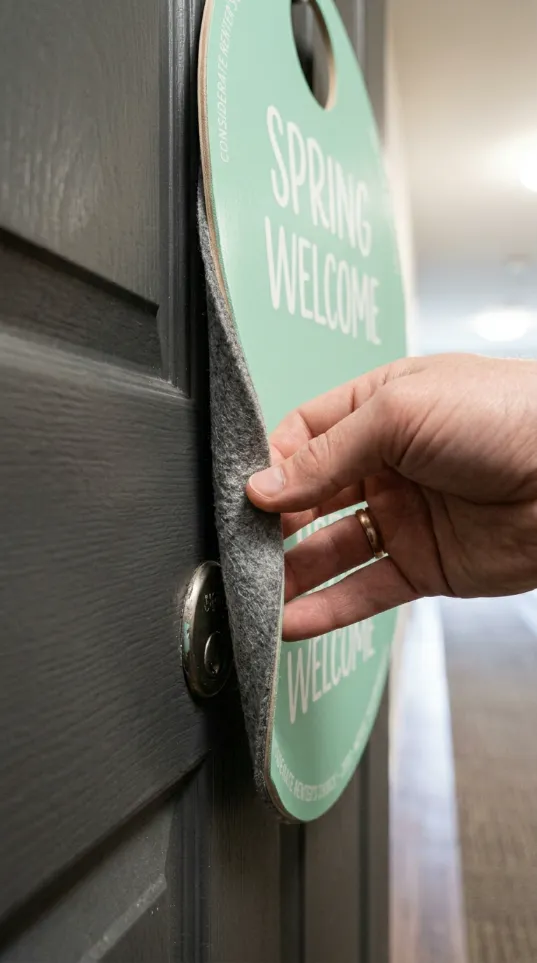
Modern apartment doors often have delicate finishes that scratch easily. This mint green sign features a soft felt backing to protect your paint. It stays completely silent even when the wind blows through the corridor. The rounded shape mimics a classic wreath without the bulk that blocks your door handle. Using lightweight materials makes it safe for renters who cannot use nails or screws.
Peeling back the edge reveals the thick gray felt that cushions every movement. This thoughtful detail shows you care about your living space and your neighbors. It offers a professional look that fits any contemporary interior design.
Material required list
- One stiff plastic round base
- Large sheet of thick gray felt
- Mint green adhesive vinyl
- Strong spray adhesive
Equipment required list
- Box cutter
- Large circular object for tracing
- Rolling pin or flat weight
- Soft microfiber cloth
DIY instruction step by step
- Trace a large circle onto your plastic base and cut it out.
- Apply the mint green vinyl to the front of the plastic circle.
- Smooth out any bubbles by rubbing the surface with the microfiber cloth.
- Trace the same circle onto the gray felt sheet.
- Cut the felt circle out and ensure it matches the size of your base.
- Spray a thin layer of adhesive onto the back of the plastic base.
- Press the felt firmly onto the glue and use a rolling pin to flatten it.
- Let the glue dry for two hours before hanging the sign on your door.
13 Reclaimed Wood Eucalyptus Arch
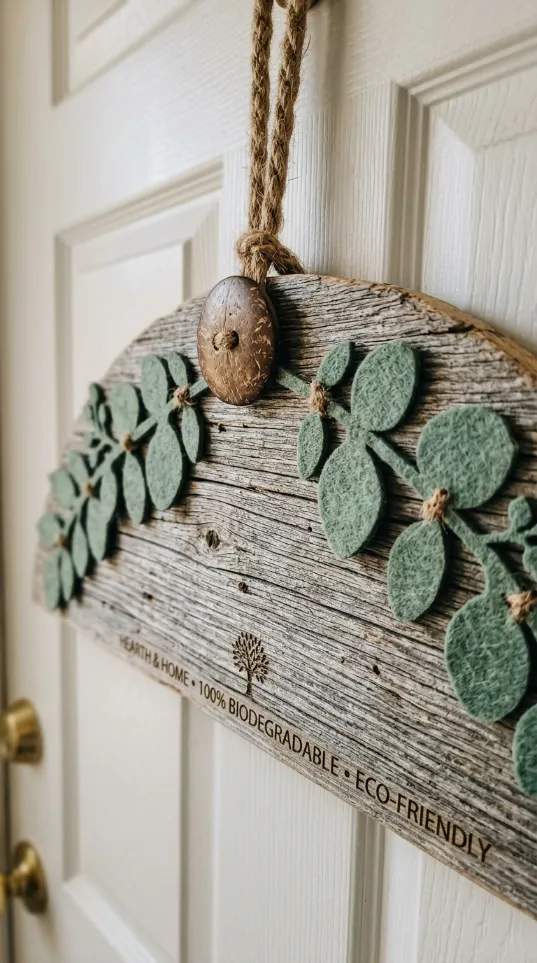
Eco friendly decor adds a rustic charm to a busy city building. This semi circular plaque uses weathered wood salvaged from old fences or pallets. Soft green felt leaves are sewn directly onto the wood for a unique texture. A large coconut button sits at the top to secure the thick rope hanger. Choosing natural materials creates a calming atmosphere for everyone who visits.
Each piece of reclaimed wood has its own history and character. This hanger stands out because it combines rough textures with soft fabric details. It provides a grounded feeling in a world of plastic and metal.
Material required list
- One piece of reclaimed wood cut into an arch
- Green craft felt
- One large coconut or wooden button
- Thick natural jute rope
Equipment required list
- Hand saw
- Hammer and small tacks
- Needle and green thread
- Power drill
DIY instruction step by step
- Use the hand saw to cut your reclaimed wood into a half moon shape.
- Sand the edges so there are no splinters that might catch on clothes.
- Cut several leaf shapes out of the green craft felt.
- Sew a line down the middle of each leaf to create a realistic vein.
- Drill two holes near the top of the wood for the rope hanger.
- Arrange the felt leaves along the top curve of the arch and tack them down.
- Glue the large button over the center of the leaves for a finished look.
- Thread the rope through the holes and tie a thick knot to hold it.
14 Rose Gold Moon Peephole Frame

Function and fashion combine in this clever crescent moon design. The open center allows you to use your peephole without removing any decorations. Frosted rose gold acrylic gives off a warm glow under hallway lights. Delicate white flowers are printed along the bottom curve for a touch of spring. This hanger solves the problem of blocked visibility that many bulky wreaths cause.
Staying safe in an apartment is important, and this sign keeps your view clear. It clings to the door surface and does not swing when people walk by. This modern shape adds a celestial vibe to your entryway.
Material required list
- One sheet of rose gold acrylic
- White paint pen
- Clear adhesive mounting strips
- Soft cotton cloth
Equipment required list
- Jigsaw with a fine tooth blade
- Compass for drawing circles
- Sandpaper for plastic
- Masking tape
DIY instruction step by step
- Draw two overlapping circles on the acrylic to create a crescent moon.
- Ensure the inner curve is wide enough to fit around your door peephole.
- Place masking tape over the lines to prevent the acrylic from cracking.
- Cut out the moon shape carefully using the jigsaw.
- Sand the cut edges until they are perfectly smooth and clear.
- Use the white paint pen to draw small flowers and leaves on the bottom.
- Wipe the front of the moon with a cotton cloth to make it shine.
- Apply the clear mounting strips to the back and press it around your peephole.
15 Intricate Laser Cut Swallow Round
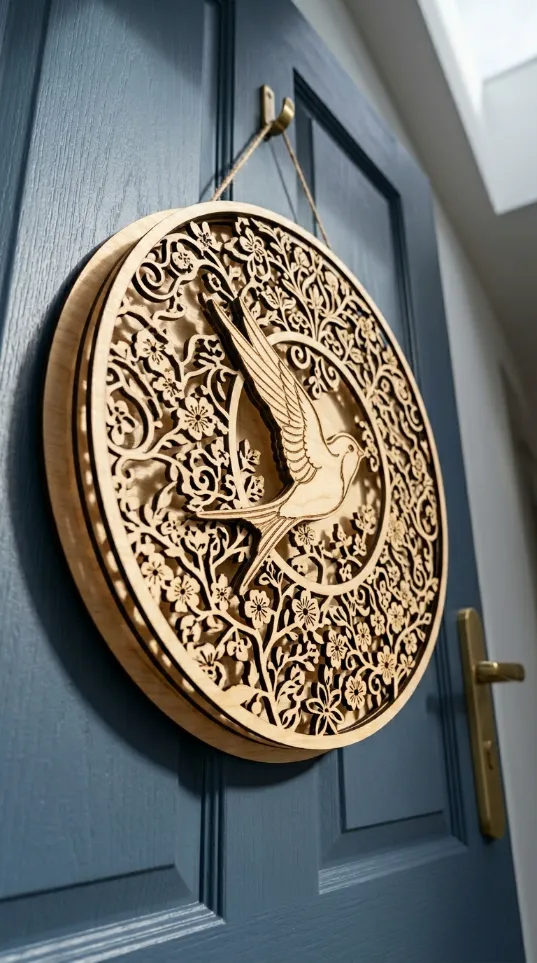
Layered wood art brings a gallery feel to your apartment corridor. This circular piece features a swallow flying through a dense field of cherry blossoms. The laser cut details create a sense of movement and depth that a flat sign cannot match. Natural light highlights the different levels of wood to show off the craftsmanship. Choosing a high detail item makes a lasting impression on your guests.
Bird themes represent the start of spring and new beginnings. This hanger is thin enough to fit between a screen door and the main door. It offers a sophisticated way to celebrate the season without using bright colors.
Material required list
- Three thin birch plywood circles
- Wood glue
- Light oak wood stain
- Thin hemp twine
Equipment required list
- Laser cutter or professional cutting service
- Small sponge for staining
- Paper towels
- Heavy book for pressing
DIY instruction step by step
- Design three layers including a solid back, a floral middle, and a bird front.
- Cut each layer out of the thin plywood using a laser machine.
- Apply a light oak stain to the back layer and let it dry.
- Put small dots of wood glue on the back of the floral middle layer.
- Place the middle layer on the base and align the edges perfectly.
- Glue the bird layer onto the center of the floral design.
- Place a heavy book on top of the stack for one hour to ensure a flat bond.
- Tie a loop of hemp twine through the top cutouts to hang the art.
16 Vertical Spring Bloom Scroll

Narrow doors look better with long, vertical decorations that draw the eye upward. This canvas scroll features a vibrant illustration of tulips, daffodils, and hyacinths. Wood dowels at the top and bottom keep the fabric hanging straight and flat. A soft mint green tassel dangles from the bottom for extra flair. Using a scroll allows you to have a large floral display that takes up zero floor space.
Fabric decor is easy to clean and even easier to store during the winter. You can roll it up into a small tube that fits in any closet corner. This hanger provides a soft, classic look that feels like a garden in the city.
Material required list
- One strip of white canvas fabric
- Two wooden dowels
- Fabric markers or acrylic paint
- One large mint green tassel
Equipment required list
- Sewing machine or fabric glue
- Iron
- Measuring tape
- Pencil
DIY instruction step by step
- Cut the canvas to a width of eight inches and a length of twenty four inches.
- Fold the side edges over and iron them flat before sewing a straight line.
- Create a pocket at the top and bottom by folding the ends over the dowels.
- Sew across the pockets to secure the dowels inside the fabric.
- Sketch your spring flower design onto the canvas using a light pencil.
- Fill in the colors with markers or paint and let them dry completely.
- Attach a string to the top dowel for hanging on your door hook.
- Tie the mint green tassel to the center of the bottom dowel.
17 Driftwood Sunburst Heart Hanger
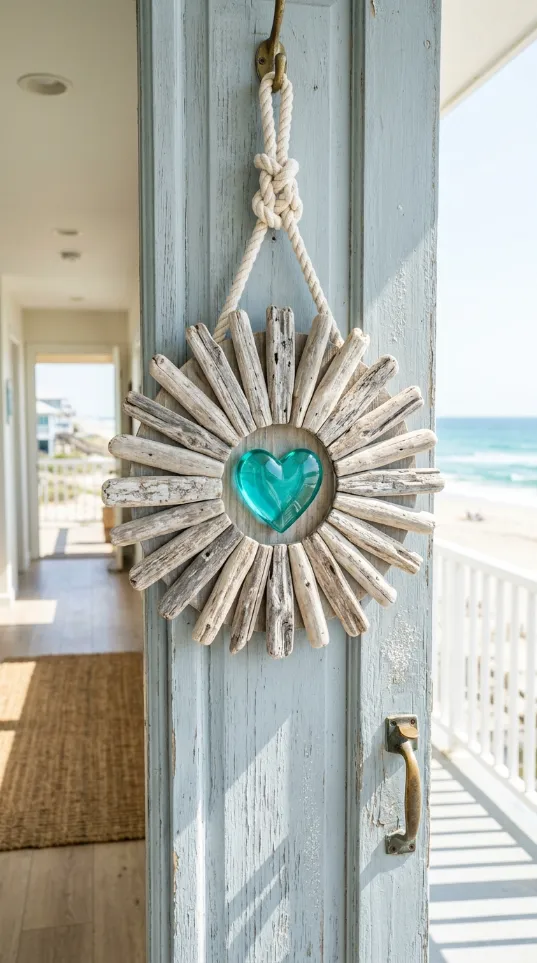
Coastal styles bring a relaxed beach vibe to an urban apartment. This sunburst design uses real pieces of weathered driftwood arranged in a circle. A bright teal glass heart sits in the center to catch and reflect the light. Thick white rope provides a sturdy way to hang this heavy but slim piece. Using found objects from nature makes your door feel more personal and unique.
Driftwood stands up to all kinds of weather and stays beautiful for years. This hanger is much more durable than a dried flower wreath that might crumble. It adds a touch of summer warmth to the early spring months.
Material required list
- One small wooden disc for the base
- Twenty small pieces of driftwood
- One teal glass heart ornament
- Thick white cotton rope
Equipment required list
- High temperature glue gun
- Handsaw for trimming wood
- Level
- Wire brush
DIY instruction step by step
- Clean each piece of driftwood with a wire brush to remove sand and dirt.
- Trim the driftwood pieces so they are all roughly the same length.
- Glue the driftwood sticks to the wooden disc in a radial sunburst pattern.
- Ensure the pieces are packed tightly so the base is not visible.
- Place the teal glass heart in the center of the sunburst.
- Apply a large amount of hot glue to the back of the heart and press it down.
- Turn the piece over and glue the white rope to the back of the disc.
- Check with a level to make sure the heart stays straight when hanging.
18 Community Hallway Floral Display
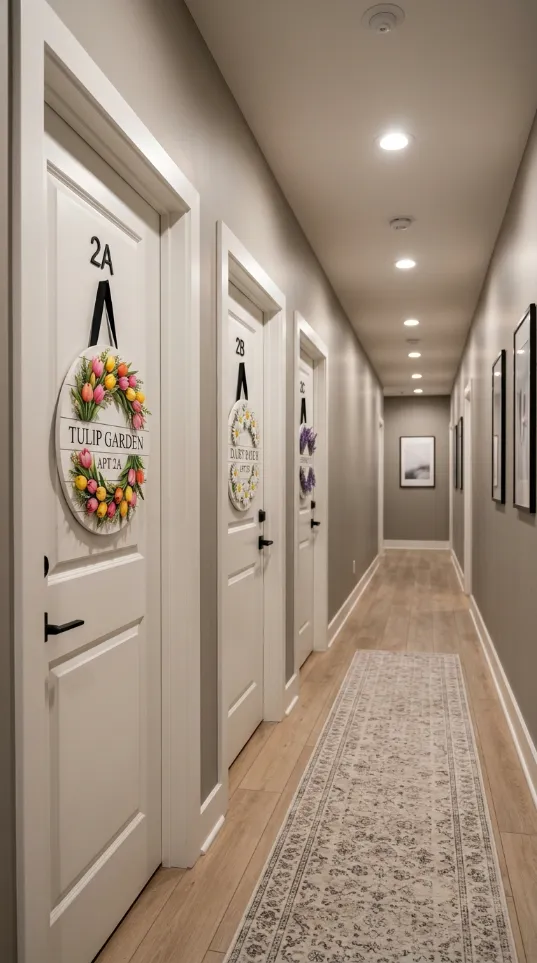
Living in a building with many neighbors means your door is part of a larger community. This view shows how different spring hangers create a cheerful atmosphere for the entire floor. One door features a tulip wreath while the next shows a lavender bunch. Choosing a hanger that coordinates with your neighbors makes the hallway feel unified. These slim decorations allow residents to pass each other without bumping into bulky items.
Small touches of greenery improve the mood of everyone walking to their units. You can see how the flat designs keep the walking path clear and safe. It turns a boring corridor into a vibrant indoor garden.
Material required list
- Variety of wooden and metal hangers
- Over the door hooks
- Small silk flower bunches
- Command strips
Equipment required list
- Step stool
- Cleaning spray
- Microfiber cloth
- Pliers
DIY instruction step by step
- Talk to your neighbors to see if they want to decorate their doors together.
- Clean the outside of every door with spray and a cloth to remove marks.
- Install over the door hooks on each unit at the same height.
- Choose a different spring theme for each door to keep the look interesting.
- Secure any loose parts on the hangers with pliers or extra glue.
- Use Command strips on the bottom of the hangers to stop them from swinging.
- Step back to the end of the hallway to check the overall alignment.
- Add a small rug in front of each door to complete the porch look.
19 Navy Magnolia Home Circle

Dark colors provide a striking contrast against light colored apartment doors. This navy blue wooden circle features the words Welcome to our Home in elegant script. A large white magnolia blossom with green leaves sits right in the center. Using a leather strap gives the piece a modern and high quality finish. This hanger looks professional and welcoming for guests arriving for dinner.
Magnolias represent dignity and perseverance, which fits well for city life. The deep blue paint stays looking clean even in high traffic areas. It offers a classic look that works for both spring and summer months.
Material required list
- One large wooden circle
- Navy blue outdoor paint
- One large faux magnolia flower
- Brown leather hanging strap
Equipment required list
- Paint roller
- Drill with a large bit
- Hot glue gun
- Stencil for the text
DIY instruction step by step
- Roll two coats of navy blue paint onto the wooden circle and let it dry.
- Use a stencil to paint the welcome message in a light gold or white color.
- Drill a hole near the top of the circle for the leather strap to pass through.
- Remove the stem from the faux magnolia so the flower sits flat.
- Glue the magnolia blossom into the center of the word Home.
- Press the flower firmly until the glue sets and the petals stay in place.
- Feed the leather strap through the hole and secure it with a knot.
- Hang the sign on your door and adjust the strap for the best height.
20 Glowing Neon Lily Hanger
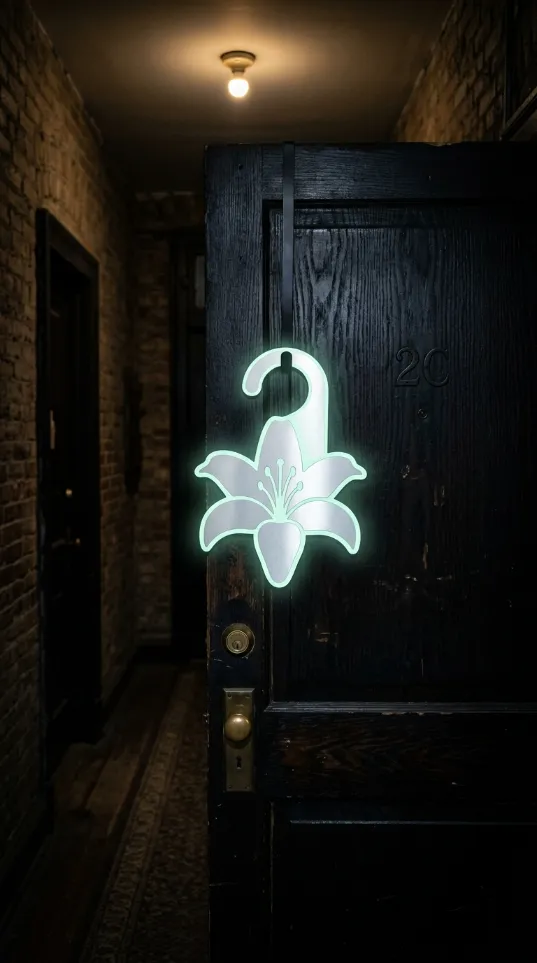
Light up a dark hallway with a modern illuminated door hanger. This acrylic lily shape features a soft green neon glow along the edges. It helps guests find your unit easily during the evening hours. The mirror finish on the petals reflects the hallway lights even when the neon is off. Choosing an electric or battery powered sign adds a futuristic touch to your entrance.
Nighttime safety is better when your doorway is well lit and easy to see. This piece is lightweight and hangs from a simple hook like any other sign. It provides a unique look that none of your neighbors will have.
Material required list
- One sheet of silver mirrored acrylic
- Flexible neon LED strip green
- Small battery pack
- Clear plastic adhesive hooks
Equipment required list
- Acrylic cutting tool
- Soldering iron optional
- Super glue
- Ruler
DIY instruction step by step
- Draw a large lily shape on the back of the mirrored acrylic sheet.
- Cut the shape out carefully and sand the edges until they are smooth.
- Glue the flexible neon LED strip along the outer edge of the lily.
- Hide the battery pack on the back of the acrylic using a strong adhesive.
- Connect the wires from the LED strip to the battery pack.
- Test the light to make sure the green glow is even all around the flower.
- Attach a clear plastic hook to the back for hanging on your door.
- Switch the light on in the evening to welcome your guests home.
21 Golden Hexagon Mirror Hanger
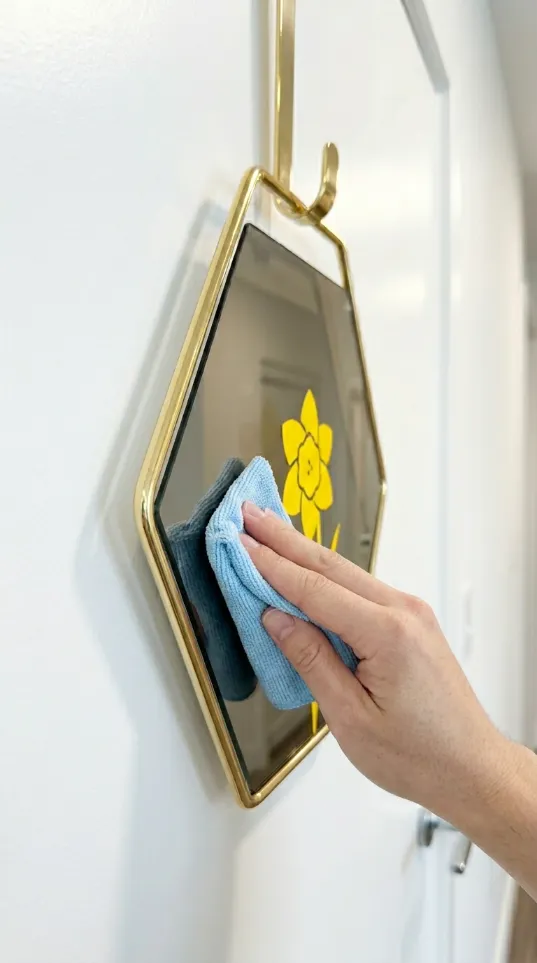
Narrow entryways often feel cramped and dark. Adding a mirrored surface bounces light into the shadows of your apartment hall. This geometric gold frame features a vibrant yellow daffodil centered on the glass. Cleaning the surface regularly ensures the colors stay sharp for every visitor. Guests will appreciate the touch of vanity and nature combined in one piece.
Light reflects beautifully off the polished metal edges during the afternoon. Using a mirror as a door hanger creates an illusion of more space in a small corridor. It provides a functional yet artistic welcome for your home.
Material required list
- One hexagon gold framed mirror
- Yellow vinyl flower decal
- Metal door hook
- Glass cleaning spray
Equipment required list
- Microfiber cloth
- Measuring tape
- Level
DIY instruction step by step
- Wipe the mirror surface with the cloth to remove all fingerprints.
- Use the measuring tape to find the exact center of the glass.
- Peel the backing off the yellow floral sticker very slowly.
- Align the sticker in the center and press it down firmly.
- Smooth out any small air bubbles with the edge of a credit card.
- Place the metal hook over the top edge of your front door.
- Hang the hexagon mirror on the hook and check that it sits straight.
22 Double Layer Spring Flip
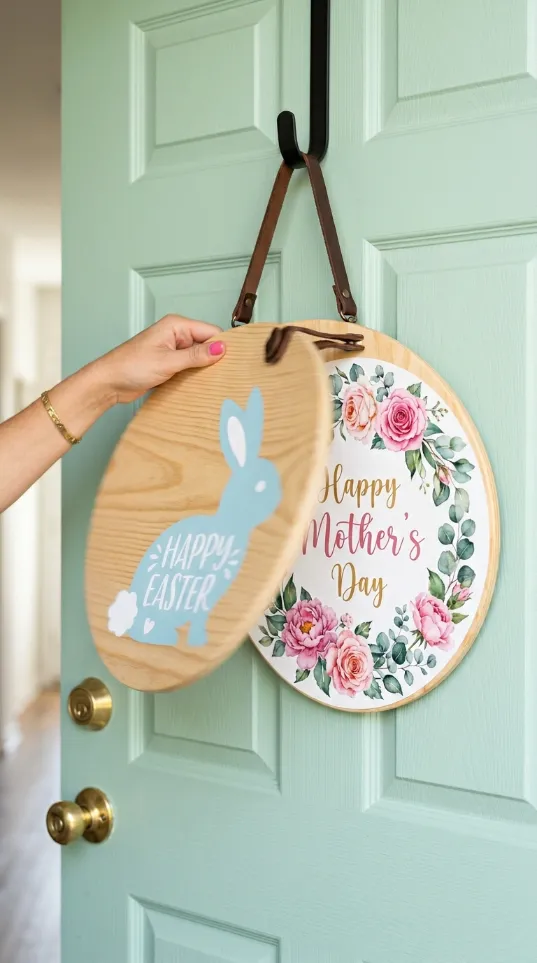
Switching seasonal decor becomes simple when you use a layered wood system. This design allows you to flip between an Easter bunny and a Mother Day floral theme. Leather straps hold the front wooden disc securely against the decorated base. You save money by using a single hanger for multiple spring holidays. Neighbors will admire your ability to stay updated with very little effort.
The natural wood grain of the top layer adds a rustic feel to the porch. Beneath the bunny cutout lies a colorful bouquet of painted peonies. It offers a surprise element that keeps your entry looking fresh.
Material required list
- Two circular wooden boards
- Decorative floral scrapbook paper
- Blue paint for the bunny
- Two leather connection straps
- Wood glue
Equipment required list
- Power drill
- Scissors
- Foam paintbrush
DIY instruction step by step
- Cut your floral paper to match the exact size of the bottom board.
- Apply a thin layer of glue to the board and press the paper down.
- Paint a large blue bunny in the center of the second wooden circle.
- Drill two small holes at the top of both wooden pieces.
- Thread the leather straps through the holes to join the two circles.
- Knot the straps tightly so the top board can flip upward easily.
- Install a sturdy hook on your door to support the weight of both boards.
23 Farmhouse Burlap Stay Sign
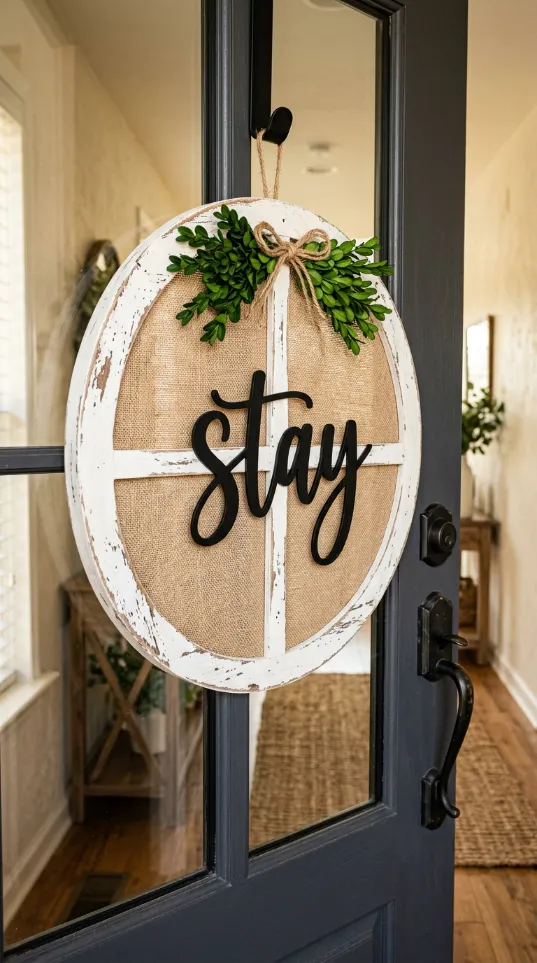
Rural charm works surprisingly well in a modern apartment setting. This oval white frame encloses a rustic burlap center with bold black text. Greenery and a small twine bow add a soft organic touch to the top. Thick glass doors look great with this high contrast piece hanging front and center. Guests feel a sense of calm and welcome before they even knock on the wood.
White distressed paint gives the frame a vintage look that feels cozy. The word stay reminds visitors to slow down and enjoy their visit. This piece is lightweight and safe for all types of door finishes.
Material required list
- Distressed white oval frame
- Burlap fabric sheet
- Black wooden letters spelling stay
- Faux boxwood sprigs
- Natural twine
Equipment required list
- Hot glue gun
- Heavy duty scissors
- Staple gun
DIY instruction step by step
- Trim the burlap sheet so it is one inch larger than the frame opening.
- Stretch the fabric across the back of the frame and staple it down.
- Arrange the black letters in the center of the burlap to check spacing.
- Glue each letter onto the fabric using small dots of hot glue.
- Make a simple bow with the twine and trim the excess string.
- Fasten the boxwood sprigs and the bow to the top of the oval.
- Glue a loop of twine to the top back of the frame for hanging.
24 Stained Glass Spring Suncatcher
Vibrant colors transform a plain glass door into a work of art. This circular suncatcher shows a bluebird perched among bright yellow daffodils. Sunlight pours through the translucent panels to cast a rainbow on your floor. Renters love this option because it leaves no permanent marks on the property. Your entrance will look like a custom gallery piece throughout the sunny months.
Each section of the glass features a unique texture that catches the light. The lead outlines provide a professional and finished appearance. It brings the beauty of a garden inside your apartment.
Material required list
- Clear acrylic or glass circle
- Glass paint in blue yellow and green
- Black lead lining tape
- One strong suction cup hook
Equipment required list
- Printed design template
- Soft cloth
- Toothpick for small details
DIY instruction step by step
- Tape your printed bird design to the back of the clear circle.
- Trace all the black lines on the front using the lead lining tape.
- Fill in the bird and flower shapes with the colored glass paint.
- Use a toothpick to push the paint into the very corners of each section.
- Allow the piece to dry in a flat position for at least twenty four hours.
- Clean the spot on your glass door where the suction cup will go.
- Press the suction cup firmly and hang your new suncatcher.
25 Macrame Tulip Wall Hanging
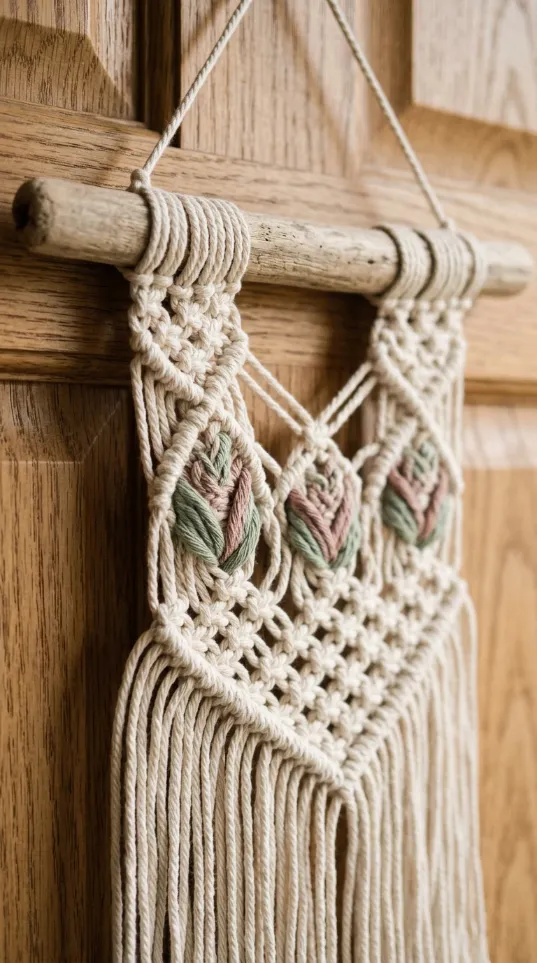
Textured fibers provide a cozy and bohemian feel to any porch area. This macrame piece features intricate knots that form the shapes of tulips. Natural cotton rope hangs from a smooth driftwood branch for a rustic appearance. Pink and green yarns are woven in to give the flowers a realistic look. Soft tassels at the bottom sway gently whenever the door moves.
Boho styles fit well with neutral apartment decor and indoor plants. This hanger is soft and will not make noise when you enter or exit. It adds a handcrafted touch that feels more personal than a store bought wreath.
Material required list
- One thick cotton macrame cord
- Small smooth wooden branch
- Pink and green craft yarn
- Strong hanging twine
Equipment required list
- Sharp fabric scissors
- Small comb for the fringe
- Measuring ruler
DIY instruction step by step
- Tie twenty lengths of cotton cord to your wooden branch using lark head knots.
- Create several rows of square knots to form the background mesh.
- Weave the green yarn through the knots to create the flower stems.
- Build the tulip heads by wrapping pink yarn in a circular pattern.
- Leave the bottom ten inches of cord hanging loose to form the tassels.
- Brush the ends of the cords with a comb to make them look soft.
- Tie a loop of twine to both ends of the branch for hanging.
26 Modern Yellow Hello Arc
Bold shapes make a strong statement on minimalist apartment doors. This semi circular yellow sign hangs by the handle for a unique look. Black script lettering provides a friendly greeting to every neighbor who passes. Using a flat design prevents the sign from getting stuck in the door frame. Bright colors help your unit stand out in a long hallway of identical doors.
Simplicity is the key to this modern and effective decoration. The curved shape follows the line of your door hardware for a clean aesthetic. It is a durable choice that handles daily use without wear.
Material required list
- Half moon wooden cutout
- Bright yellow outdoor paint
- Black vinyl hello sticker
- Clear weatherproofing spray
Equipment required list
- Small foam paint roller
- Sanding block
- Pencil
DIY instruction step by step
- Sand all the edges of the wooden arc until they feel very smooth.
- Apply two even coats of yellow paint with the foam roller.
- Let the paint dry completely between each layer for a better finish.
- Position the black sticker on the right side of the wooden curve.
- Press the sticker down firmly and rub it to remove any bubbles.
- Spray a thin layer of clear coat over the entire sign for protection.
- Slide the circular opening over your door handle to display the sign.
27 Monogram Hummingbird Block
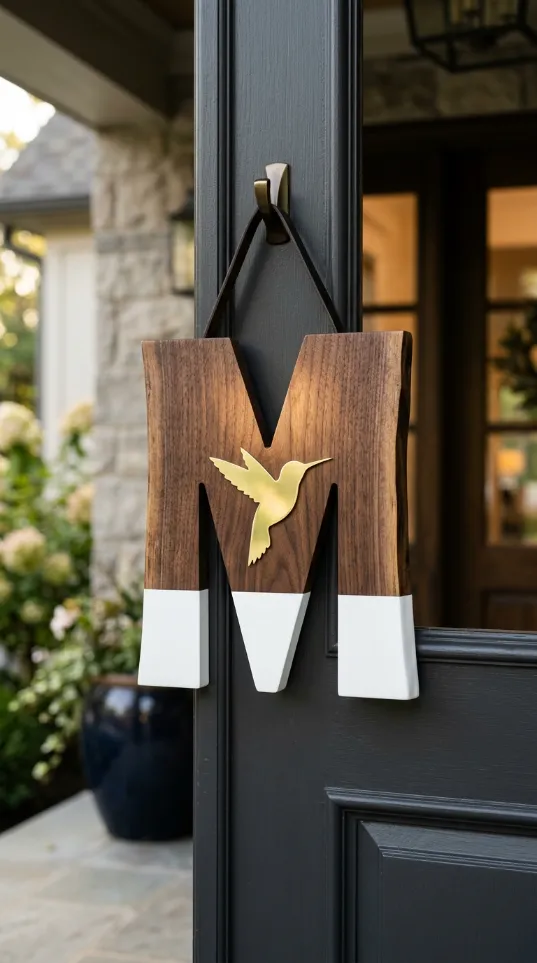
Personalized decor adds a sense of ownership to a rental space. This large wooden letter features a gold hummingbird silhouette in the center. The bottom section is painted white to create a modern dipped appearance. Natural walnut grain provides a rich and sophisticated background for the metal bird. It offers a clean look that fits better than a messy floral wreath.
Custom monograms help guests identify your apartment quickly and easily. The gold bird adds a touch of shimmer that catches the hallway lights. This piece is timeless and works well for any season.
Material required list
- Large wooden letter cutout
- Gold metal bird charm
- White matte acrylic paint
- One leather hanging cord
Equipment required list
- Painter tape
- Super glue
- Small paintbrush
DIY instruction step by step
- Wrap a strip of painter tape across the bottom third of the letter.
- Paint the section below the tape with two coats of white paint.
- Remove the tape carefully while the paint is still slightly wet.
- Glue the gold hummingbird to the upper portion of the wooden letter.
- Hold the bird in place for sixty seconds until the glue is dry.
- Drill a small hole at the very top center of the wood.
- Feed the leather cord through the hole and tie a secure knot.
28 Boho Mandala Ombre Tassels
Intricate patterns draw the eye and invite guests to linger at your door. This white mandala frame features three long tassels with a blue ombre effect. The geometric design looks light and airy against dark colored apartment doors. Using soft threads prevents any scratching on your expensive hardware or paint. Every movement of the door causes the tassels to dance and flow beautifully.
Blue tones remind visitors of clear spring skies and fresh water. This hanger covers a large area of the door without adding any bulk. It is a sophisticated way to add movement to your porch.
Material required list
- One circular mandala wood frame
- White spray paint
- Three skeins of blue and white embroidery thread
- Three small silver metal rings
Equipment required list
- Sharp scissors
- Cardboard for making tassels
- Glue gun
DIY instruction step by step
- Spray the wood frame with white paint in a well ventilated area.
- Wrap thread around a piece of cardboard fifty times to make a tassel.
- Tie the top of the thread loop and cut the bottom to release the tassel.
- Dip the lower half of each tassel in blue dye for an ombre look.
- Attach each dry tassel to a silver ring using a small knot.
- Fasten the silver rings to the bottom edge of the white mandala.
- Use a clear hook to hang the mandala on the center of your door.
29 Hand Painted Chick Wood Slice
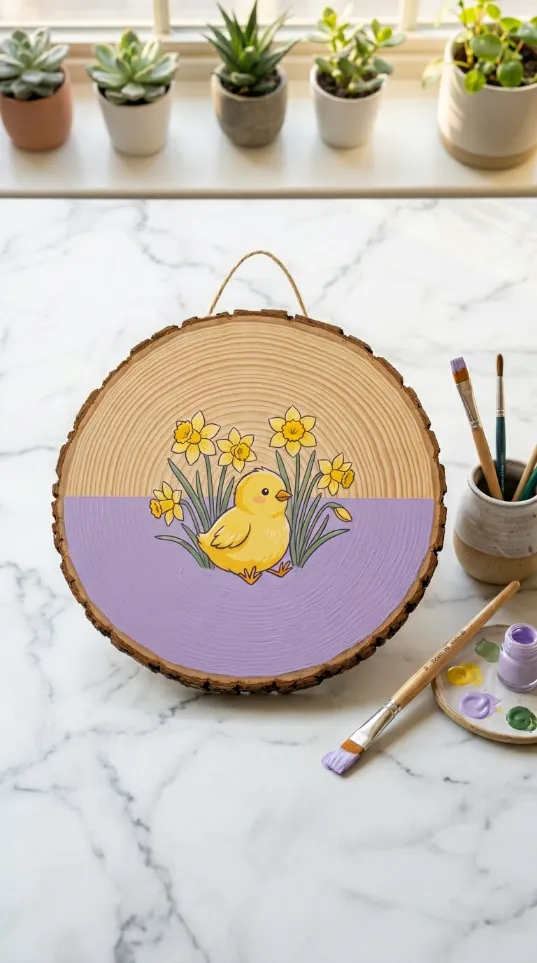
Handmade art brings a personal and warm touch to an urban entryway. This thick wood slice features a cute yellow chick surrounded by spring daffodils. A purple background at the bottom adds a lovely pop of seasonal color. Natural bark edges give the piece a rugged and organic feel. You can customize the drawing to match your favorite spring animals or flowers.
Painting on wood is a relaxing activity that results in a unique decoration. This hanger is heavy enough to stay still even when the door opens quickly. It brings a bit of the countryside to your city home.
Material required list
- One round wood slice with intact bark
- Acrylic paints in yellow green and purple
- Clear satin varnish
- Thick jute twine
Equipment required list
- Selection of fine tip paintbrushes
- Lead pencil
- Soft eraser
DIY instruction step by step
- Sketch a small chick and three daffodils on the wood with a pencil.
- Paint the bottom section with purple paint to create a horizon line.
- Fill in the chick with bright yellow and add a small orange beak.
- Paint the flowers with yellow and the leaves with a soft green.
- Outline all the shapes with a very thin black brush for detail.
- Apply the clear varnish over the entire surface once the paint is dry.
- Tie the jute twine around the top of the wood slice to hang it.
30 Transparent Peony Acrylic Vase
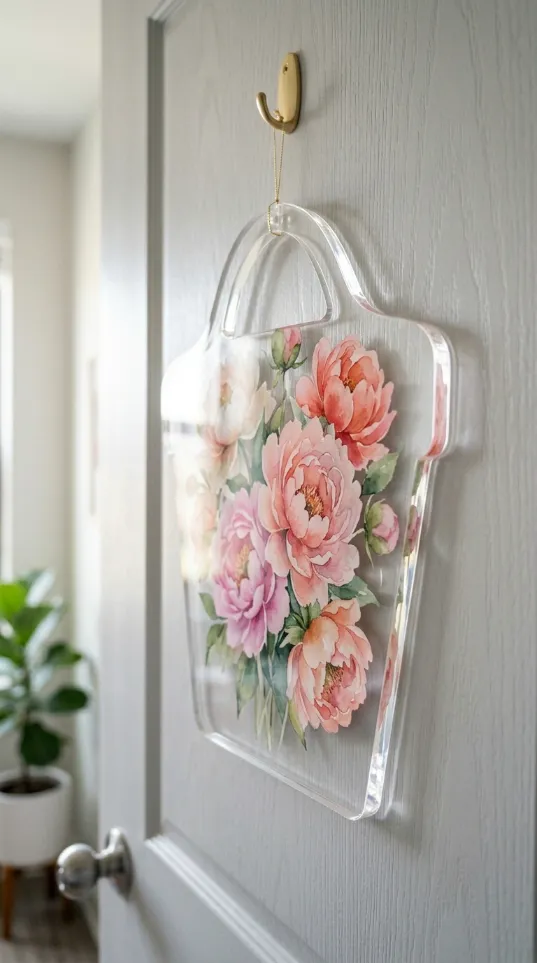
Seeing the inner beauty of your decor is possible with clear materials. This acrylic hanger is shaped like a watering can and filled with pink peonies. The transparent background makes the flowers appear as if they are floating in mid air. It provides a crisp and clean look that never feels cluttered or heavy. This modern piece works well in buildings with bright and open hallways.
Acrylic is easy to clean and remains looking new for many years. The soft pink petals offer a romantic and gentle welcome for your guests. It is the ultimate choice for a high end apartment aesthetic.
Material required list
- One clear acrylic watering can cutout
- Five silk pink peony flower heads
- Strong transparent craft glue
- Clear nylon hanging thread
Equipment required list
- Microfiber cleaning cloth
- Pencil for marking
- Ruler
DIY instruction step by step
- Clean the acrylic cutout with the cloth to remove any smudges.
- Lay the silk peonies on the front to find the best arrangement.
- Apply small dots of transparent glue to the back of each flower.
- Press the flowers onto the acrylic and let them sit for one hour.
- Ensure the glue is completely clear and hidden behind the petals.
- Thread the nylon string through the pre drilled hole in the handle.
- Hang the vase on your door hook for a floating floral effect.
31 Hexagon Neon Bloom Frame
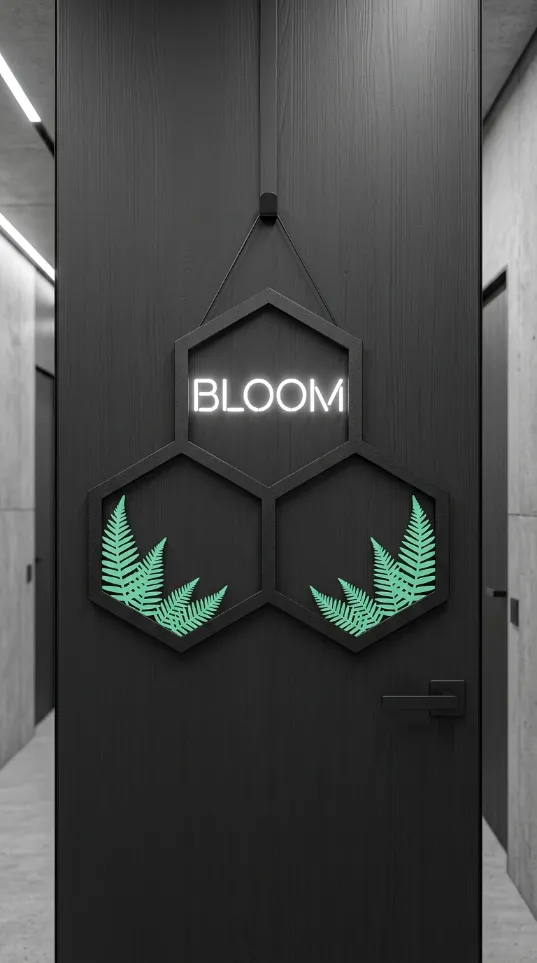
City life often feels gray and industrial. This black hexagon hanger brings a flash of light to your front door. Bright green ferns rest at the bottom of the geometric shapes. Choosing a neon sign ensures your home is easy to find in a long hallway. Light illuminates the text to create a modern and welcoming vibe.
Contemporary apartments look best with sleek and sharp decor. This triple hexagon frame features a bright neon message for late night arrivals. Green fern leaves add a soft organic touch to the dark metal structure. Selecting a geometric shape breaks the boredom of standard circular wreaths. Your entrance will glow with a sophisticated and fresh energy.
Material required list
- Black wooden hexagon frames
- Neon LED strips
- Faux fern leaves
- Strong adhesive glue
- Small battery pack
Equipment required list
- Scissors
- Ruler
- Pencil
- Wire cutters
DIY instruction step by step
- Clean the frames with a cloth to remove any dust or dirt.
- Arrange the three hexagons in a triangle shape on a flat surface.
- Glue the sides of the hexagons together and let them dry for an hour.
- Stick the neon LED strip inside the top hexagon to spell out your message.
- Tuck the battery pack behind the frame so it stays out of sight.
- Place the faux fern leaves in the bottom corners of the lower hexagons.
- Attach each leaf with a small dot of glue to keep them secure.
- Loop a thin cord through the top frame to hang the piece on your door.
32 Vintage Seed Packet Tin
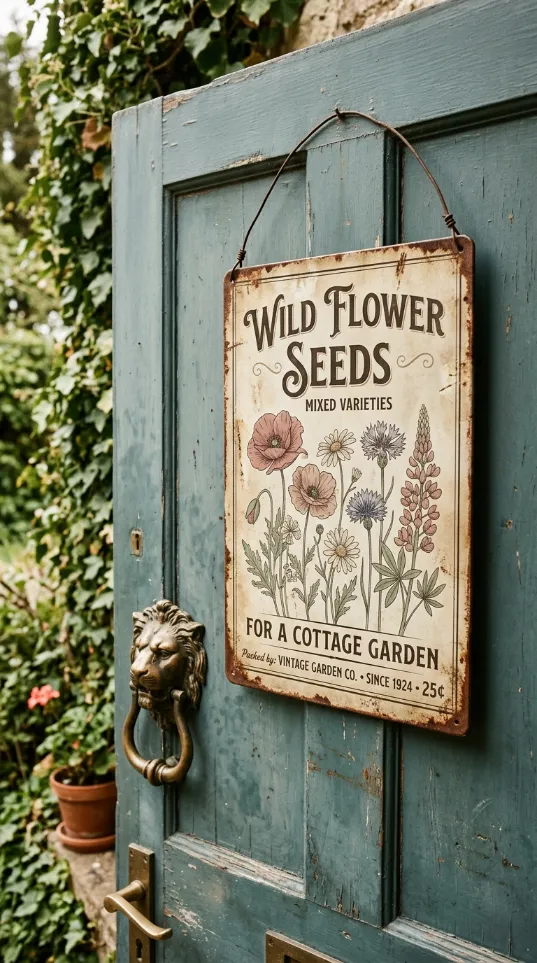
Nostalgia adds a cozy feeling to a modern living space. This metal sign mimics a classic wildflower seed packet from years ago. Muted pink and purple flowers decorate the rusted edges for an authentic look. Selecting a thin metal plate prevents the door from becoming too heavy. Every visitor will enjoy the rustic charm of this garden theme.
Decorating with metal ensures your sign lasts for many spring seasons. This item features a weathered finish that matches well with wooden doors. You can enjoy the look of a garden without the need for a green thumb.
Material required list
- Rectangular tin plate
- Vintage floral decals
- Copper hanging wire
- Brown acrylic paint for aging
Equipment required list
- Sandpaper
- Small sponge
- Pliers
- Drill with a metal bit
DIY instruction step by step
- Scuff the edges of the tin plate with sandpaper to create a worn look.
- Dab brown paint onto the corners with a sponge to mimic rust.
- Wipe away any excess paint before it dries to keep it subtle.
- Apply your floral decals to the center of the plate and press firmly.
- Drill two small holes at the top corners of the sign.
- Thread the copper wire through the holes using your pliers.
- Twist the wire ends together to make a sturdy hanging loop.
- Hang the sign on a decorative nail or hook to finish the look.
33 Peach Spring Donut Wreath
Soft colors make an entrance feel warm and inviting. This 3D peach colored ring offers a bold yet minimalist style. White lettering pops against the smooth surface to celebrate the new season. A light green bow sits at the bottom to provide a gentle contrast. Choosing a rounded shape keeps the decor looking soft and approachable.
Modern apartments benefit from simple shapes that do not feel cluttered. This wreath stays flush against the door to allow for easy movement. Every guest will feel a sense of calm when they see this cheerful greeting.
Material required list
- Foam wreath base
- Peach spray paint
- White vinyl letters
- Light green wooden bow
Equipment required list
- Glue gun
- Measuring tape
- Soft cloth
DIY instruction step by step
- Spray the foam base with peach paint and let it dry completely.
- Wipe the surface with a cloth to ensure it is clean for the letters.
- Use the measuring tape to find the top center of the ring.
- Place the white letters onto the curve of the wreath carefully.
- Apply hot glue to the back of the green wooden bow.
- Press the bow onto the bottom center of the peach ring.
- Let the glue cool for several minutes until it is very hard.
- Hang the wreath using a clear hook for a floating appearance.
34 Orange Metal Tulip Silhouette
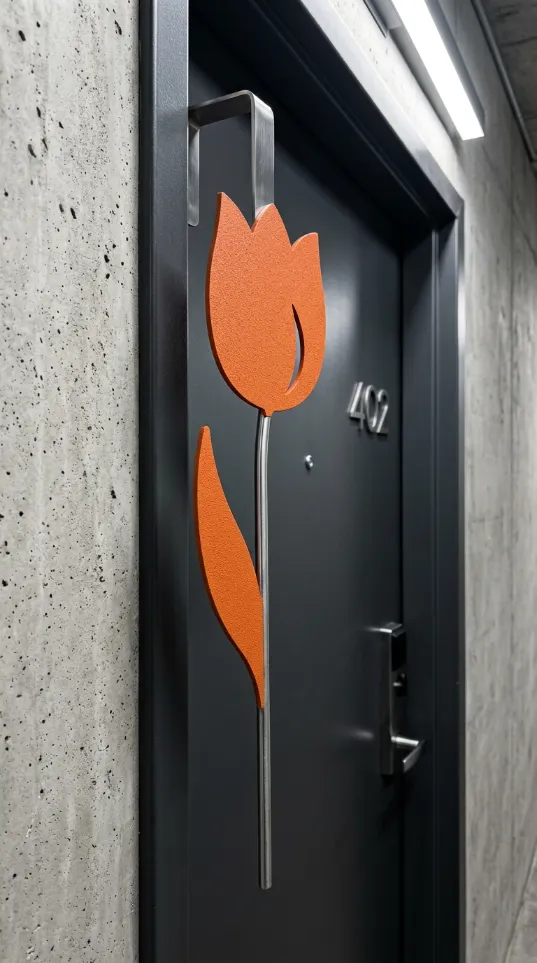
Sleek metal designs offer a durable alternative to traditional floral decor. This vibrant orange tulip stands tall against any dark door surface. Using a slim profile means the hanger will never interfere with your door handle. Bright colors ensure your apartment is easy to spot from a distance. Every line of this piece is clean and modern.
This silhouette provides a minimalist way to show your love for nature. It resists moisture and temperature changes in the hallway or porch. You get a bold pop of color that remains elegant and understated.
Material required list
- Thin aluminum sheet
- Orange powder coat or metal paint
- Silver metal rod for the stem
- Strong metal epoxy
Equipment required list
- Metal snips
- Protective gloves
- Sanding block for metal
- Clamps
DIY instruction step by step
- Draw a tulip flower head shape on the aluminum sheet.
- Cut the shape out carefully using your metal snips while wearing gloves.
- Sand the edges of the metal until they are smooth and safe to touch.
- Paint the flower head with a bright orange color and let it dry.
- Clean the silver metal rod to remove any grease or oil.
- Apply epoxy to the top of the rod and the back of the flower.
- Clamp the pieces together and wait for the glue to set firmly.
- Slide the top of the stem over a door hook to display your work.
35 Felt Flower Bloom Medallion
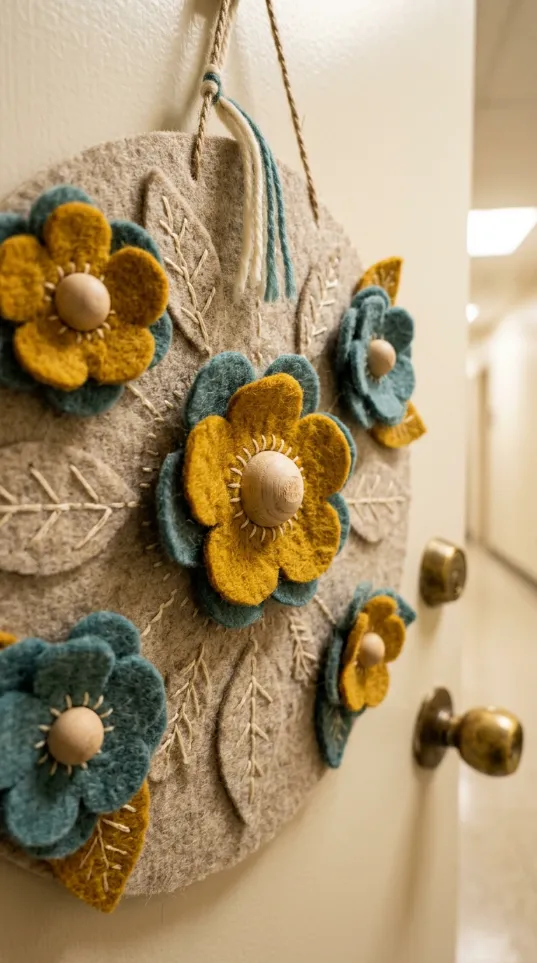
Textured fabrics bring a sense of warmth and comfort to your home entry. This circular felt sign features large yellow and blue flowers with wooden centers. Hand stitched leaf details add a layer of craftsmanship to the design. Choosing a soft material ensures the door never gets scratched or marked. Every visitor will feel the cozy farmhouse vibe of this piece.
Soft decor is quiet and stays still when the door opens. This medallion uses muted tones that blend well with any interior hallway. You can enjoy a handcrafted look that feels unique and personal.
Material required list
- Large thick felt circle
- Blue and yellow felt sheets
- Wooden beads for flower centers
- Embroidery thread
Equipment required list
- Sharp fabric scissors
- Needle
- Glue gun
- Pencil
DIY instruction step by step
- Draw five large petal shapes on the yellow and blue felt.
- Cut out the petals and arrange them in a circle on the large base.
- Sew the petals down using simple stitches with the embroidery thread.
- Glue a large wooden bead to the center of each felt flower.
- Cut small leaf shapes out of green felt and place them around the flowers.
- Stitch the leaves onto the base using a contrasting color of thread.
- Create a small loop of thread at the top of the large felt circle.
- Hang the finished medallion on your door using a small adhesive hook.
36 Hello Sunshine Acrylic Disc

Bright yellow accessories can change the entire mood of a hallway. This translucent acrylic sign glows when light passes through the surface. White lettering and a sun graphic provide a cheerful greeting for every guest. Choosing a thin disc allows you to have a large floral display that takes up zero floor space. Every detail of this piece feels light and airy.
Acrylic is a sturdy material that is very easy to keep clean. This sign arrives in a slim box that fits through most standard mail slots. You can refresh your door in seconds with this modern and happy decoration.
Material required list
- Yellow translucent acrylic circle
- White adhesive vinyl
- White satin ribbon
- Small wooden ring
Equipment required list
- Glass cleaner
- Microfiber cloth
- Scissors
DIY instruction step by step
- Wipe the acrylic disc with glass cleaner to remove any smudges.
- Peel the backing off your vinyl greeting and sun graphic.
- Place the vinyl in the center of the disc and press it down.
- Rub the letters firmly with a cloth to remove any air bubbles.
- Thread the white ribbon through the hole at the top of the disc.
- Tie the ends of the ribbon around the small wooden ring.
- Trim any extra ribbon to keep the hanger looking neat and clean.
- Loop the wooden ring over your door hook to enjoy the sunshine.
37 Lemon Orchard Welcome Sign
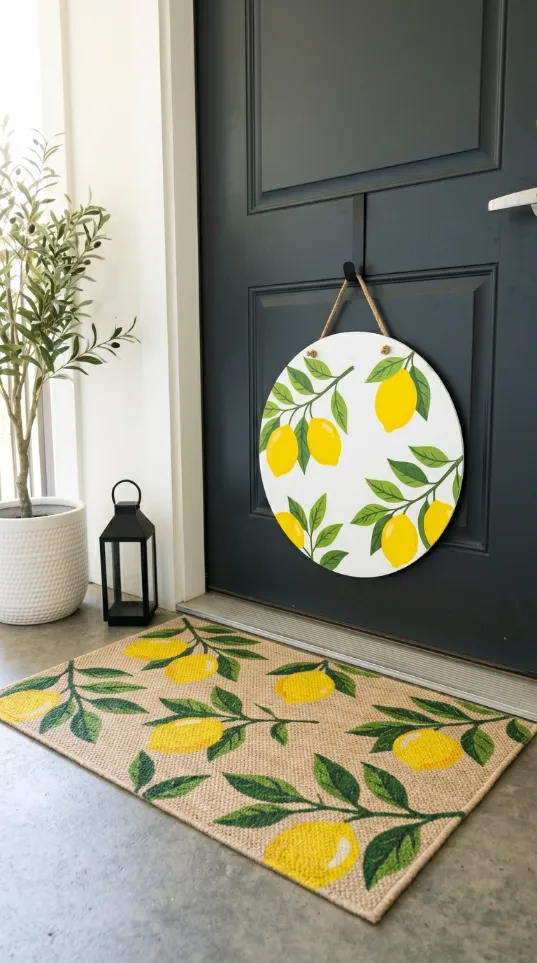
Citrus themes offer a zesty and fresh look for the spring months. This circular white sign features a vibrant pattern of lemons and green leaves. Matching doormats can tie the entire entrance together for a professional look. Using a flat board ensures the sign stays in place even in breezy corridors. Every neighbor will appreciate the bright and clean aesthetic of your porch.
Lemons bring a sense of energy and cleanliness to your apartment door. This design uses a neutral background to make the yellow fruit stand out. You get a coordinated look that feels thought out and welcoming.
Material required list
- Circular white wooden board
- Lemon pattern stencil or stickers
- Yellow and green acrylic paint
- Natural jute twine
Equipment required list
- Foam brush
- Sandpaper
- Drill
- Pencil
DIY instruction step by step
- Sand the edges of the white board to make them smooth.
- Drill two small holes at the top of the board for the twine.
- Place your lemon stencil on the board and hold it steady.
- Dab yellow paint onto the lemon shapes using a foam brush.
- Paint the leaves with a bright green color once the yellow is dry.
- Remove the stencil carefully and let the paint set for one hour.
- Feed the jute twine through the holes and tie a secure knot.
- Hang the sign on your door to create a fresh orchard vibe.
38 Dragonfly Shadow Silhouette
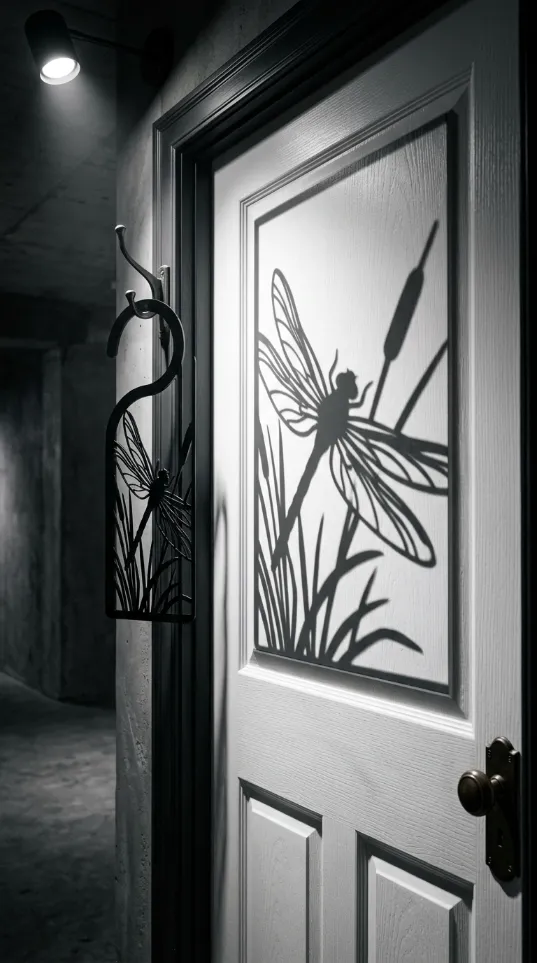
Black silhouettes create a dramatic and artistic effect on light colored doors. This dragonfly hanger features intricate wing details and tall reeds. Light from the hallway casts a beautiful shadow against the wood surface. Choosing a metal or heavy plastic design ensures the piece lasts for years. Every guest will stop to admire the delicate lines of this nature scene.
Dragonflies represent change and joy which is a great message for spring. This hanger remains flat and out of the way for busy apartment hallways. You get a sophisticated look that feels like a piece of custom art.
Material required list
- Sheet of black rigid plastic or metal
- Waterproof black paint
- Thin wire for hanging
- Clear protective spray
Equipment required list
- Utility knife or metal shears
- Cutting mat
- Ruler
- Pencil
DIY instruction step by step
- Draw the outline of a dragonfly and some reeds on your material.
- Cut the shape out slowly to keep the wing details sharp.
- Smooth any rough edges using a small file or sandpaper.
- Paint the entire piece with matte black paint and let it dry.
- Apply a clear spray coat to protect the finish from scratches.
- Poke a small hole in the top section of the reed design.
- Thread the thin wire through the hole and make a loop.
- Hang the silhouette on your door to watch the shadows move.
39 Secure Welcome Lattice Sign
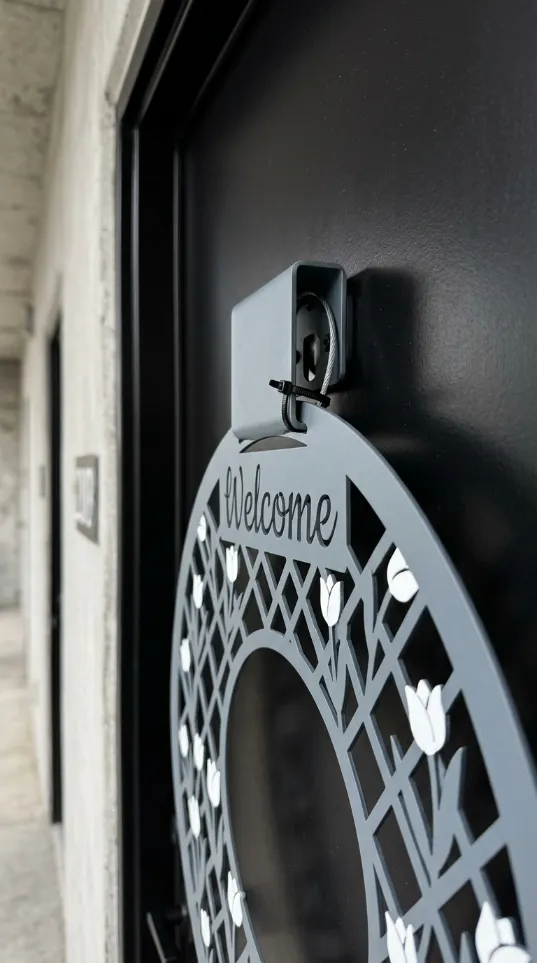
Safety and style can go hand in hand for city dwellers. This circular gray sign features a lattice pattern and a secure mounting system. A cable lock ensures the decoration stays on your door in busy public hallways. White tulip graphics add a soft touch to the industrial strength of the piece. Every resident will appreciate the balance of beauty and security.
Many apartments have rules about loose items in the corridor. This hanger stays attached and organized without becoming a trip hazard. You get peace of mind knowing your decor is safe and stylish.
Material required list
- Gray plastic lattice circle
- White vinyl tulip stickers
- Small steel cable lock
- Heavy duty door hook
Equipment required list
- Cleaning cloth
- Pliers
- Ruler
DIY instruction step by step
- Clean the surface of the gray lattice with a damp cloth.
- Place the white tulip stickers in a circular pattern around the edge.
- Center the word Welcome at the top of the sign and press it down.
- Feed the steel cable through the lattice openings at the top.
- Wrap the cable around your door hook or a secure handle.
- Lock the cable using the provided key or combination code.
- Ensure the sign is hanging straight and the cable is hidden.
- Test the security by gently tugging on the sign to make sure it holds.
40 Frosted Glass Office Hanger
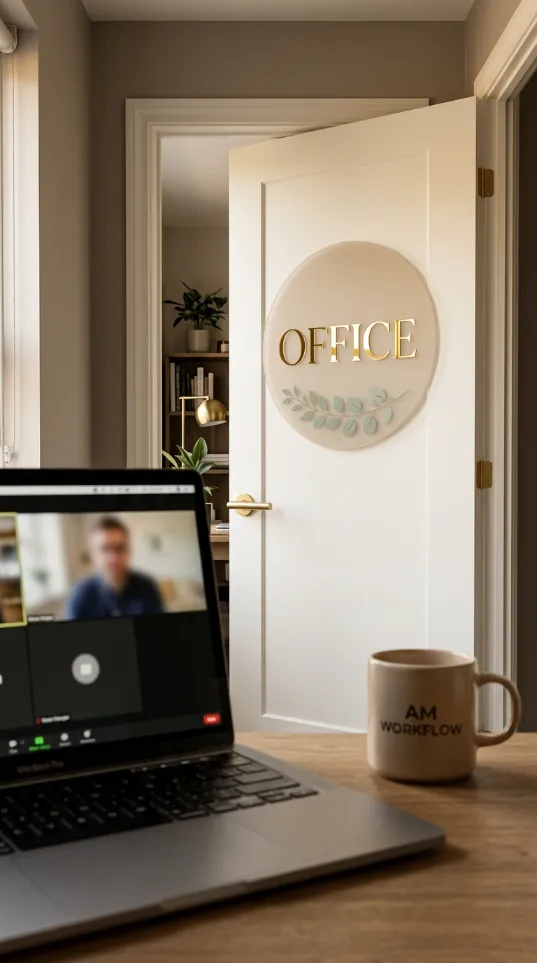
Working from home requires clear boundaries within your apartment space. This frosted acrylic sign helps family and roommates know when you are busy. Gold lettering provides a professional and high end appearance for your indoor office. Green leaf sprigs add a touch of life to the minimalist design. Choosing a flat sign allows the door to close fully without any noise.
Clear signs work well with any color of interior door. This piece helps you stay focused during important video calls and meetings. You can enjoy a quiet and organized work environment with this simple addition.
Material required list
- Rectangular frosted acrylic sheet
- Gold adhesive letters
- Faux eucalyptus sprig
- Clear mounting squares
Equipment required list
- Level
- Ruler
- Soft cloth
DIY instruction step by step
- Wipe the frosted acrylic with a cloth to remove any dust.
- Use a ruler to find the exact center of the acrylic sheet.
- Place the gold letters to spell out the word Office in the middle.
- Check the alignment with a level to make sure the text is straight.
- Glue the eucalyptus sprig to the bottom of the sign for decoration.
- Let the glue dry completely before moving the sign.
- Apply clear mounting squares to the four corners of the back.
- Press the sign firmly onto your office door at eye level.
41 Gold Hoop Lavender Wreath
Gold hoops offer a sleek look for modern apartments. Traditional wreaths take up too much room in narrow hallways. This design uses a thin metal ring to save space. Dried lavender and green ferns add a natural scent to your entry. Soft velvet ribbons tie the whole look together.
You can hang this piece on a small command hook easily. Every guest will notice the elegant simplicity of this floral loop. It provides a fresh atmosphere without cluttering the porch.
Material required list
- One gold metal hoop
- Dried lavender bunches
- Faux fern leaves
- Cream velvet ribbon
- Thin floral wire
Equipment required list
- Wire cutters
- Fabric scissors
- Glue gun
DIY instruction step by step
- Clean the gold hoop with a soft cloth to remove dust.
- Place your fern leaves on the bottom left side of the ring.
- Wrap thin floral wire around the stems to hold them in place.
- Lay the lavender over the ferns and secure them with more wire.
- Cut a long piece of velvet ribbon to make a large bow.
- Glue the bow over the wire joints to hide them from view.
- Tie a small loop of ribbon at the top of the hoop.
- Hang the finished wreath on a hook at eye level.
42 Blue Willow Scalloped Plate
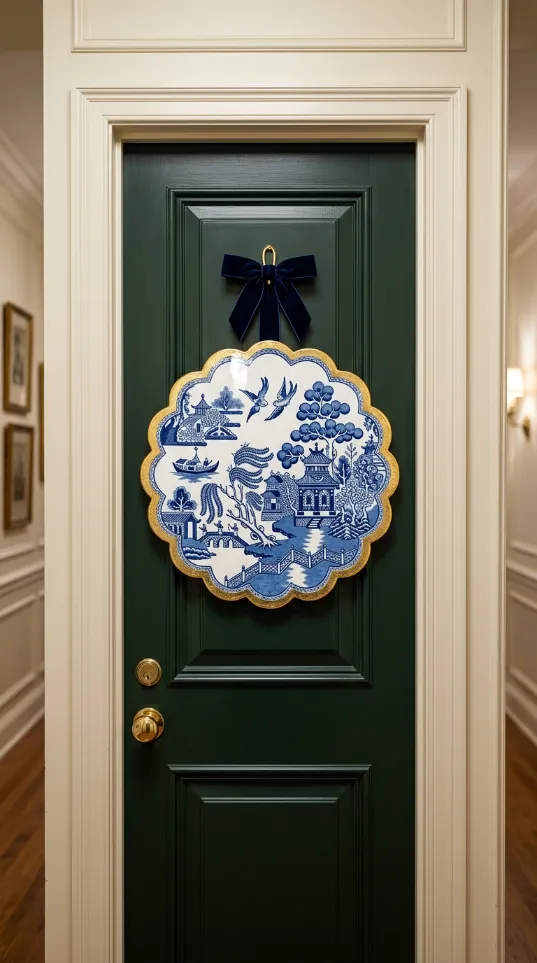
Classic porcelain patterns bring a timeless feel to your front door. This scalloped plate hanger features iconic blue and white landscapes. A deep navy velvet bow adds a touch of luxury to the top. Thin profiles allow your door to open wide without hitting the wall.
Glossy finishes reflect the overhead hallway lighting beautifully. Renters enjoy using lightweight items that do not require heavy nails. Your entrance will feel like a boutique hotel with this sophisticated choice.
Material required list
- One scalloped melamine or ceramic plate
- Blue willow pattern decal
- Navy velvet ribbon
- Gold adhesive trim
- Heavy duty adhesive disc
Equipment required list
- Measuring tape
- Scissors
- Glue gun
DIY instruction step by step
- Choose a plate that is lightweight to ensure it stays on the door.
- Apply the blue willow decal to the center of the plate carefully.
- Stick the gold adhesive trim around the scalloped edges for a glow.
- Flip the plate over and find the exact top center point.
- Press the adhesive disc firmly onto the back of the plate.
- Tie a double loop bow with the navy velvet ribbon.
- Glue the bow to the top edge of the plate facing forward.
- Attach the hanging loop to your door hook for a regal look.
43 Augmented Reality Infinite Spring Hanger
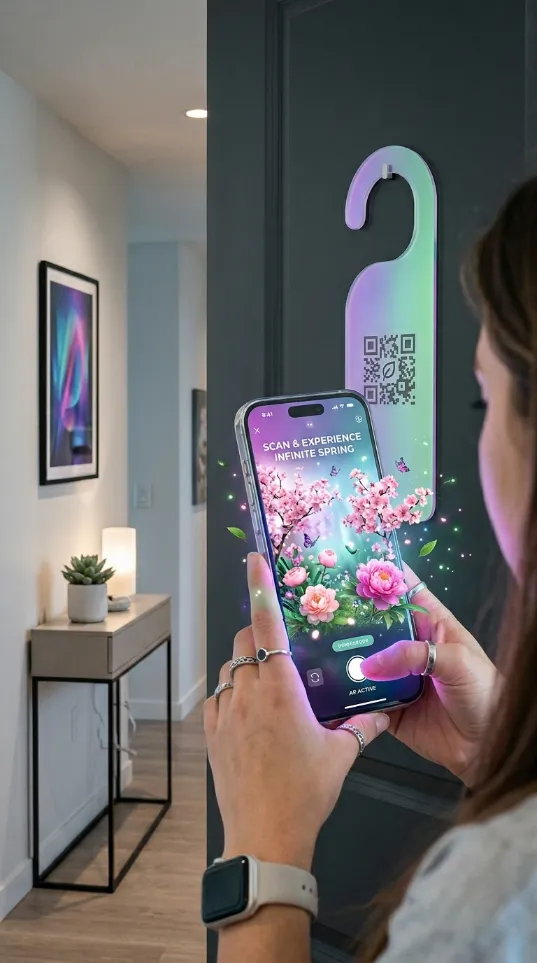
Technology meets decor with this interactive iridescent hanger. Visitors scan the QR code to see 3D flowers on their phones. Shimmering holographic material changes color as you walk past. Digital spring blossoms float in the air through your camera lens.
This piece is great for tech lovers who want a futuristic porch. Slim acrylic designs fit into any mailbox for easy delivery. Surprise your friends with a hidden floral world at your doorstep.
Material required list
- One iridescent acrylic door hanger
- High resolution QR code sticker
- Clear protective lamination
- Small adhesive hook
Equipment required list
- Computer to generate AR links
- Printer
- Microfiber cloth
DIY instruction step by step
- Generate a QR code that links to an AR floral filter online.
- Print the code onto a small piece of white adhesive paper.
- Clean the iridescent acrylic with a cloth to remove smudges.
- Stick the QR code in the middle of the lower hanger section.
- Cover the code with clear lamination to keep it waterproof.
- Smooth the surface with your thumb to remove any air bubbles.
- Slide the hook through the top opening of the hanger.
- Invite your neighbors to scan the code for a digital surprise.
44 Pressed Wildflower Paper Oval
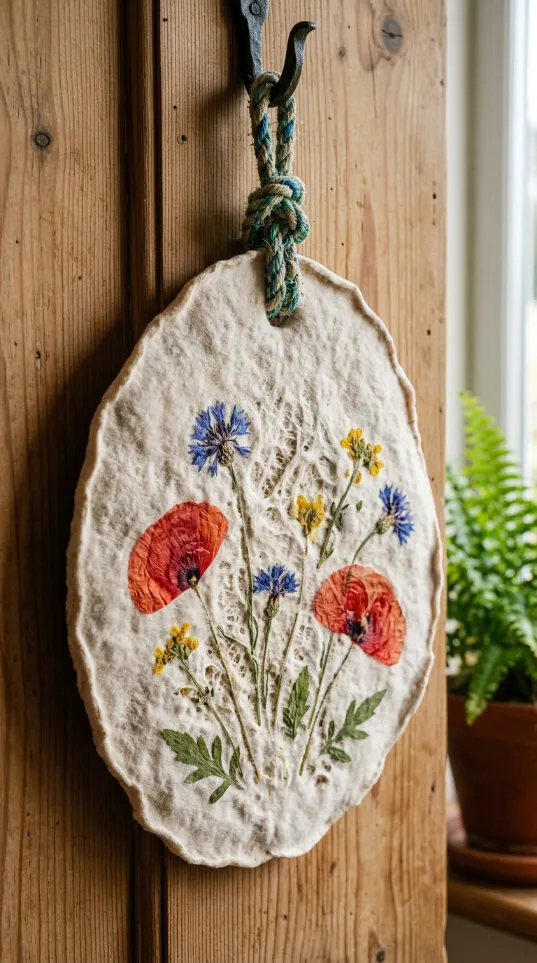
Handmade textures make your apartment feel warm and lived in. This oval hanger uses real pressed poppies and blue cornflowers. Rough paper edges provide a charming rustic look for urban dwellers. Thick blue rope adds a sturdy and nautical touch to the design.
Natural materials are eco friendly and easy to recycle later. Every bloom is unique because they come directly from a meadow. Displaying your love for nature has never looked so artistic.
Material required list
- One handmade paper oval base
- Real pressed poppies and cornflowers
- Clear matte sealant
- Blue and tan braided rope
- Liquid craft glue
Equipment required list
- Soft paintbrush
- Tweezers
- Small hole punch
DIY instruction step by step
- Lay the paper oval on a flat surface to begin your design.
- Use tweezers to place the pressed flowers in a vertical bunch.
- Apply a tiny dot of glue to the back of each petal carefully.
- Press the flowers down gently so they do not break.
- Brush a thin layer of sealant over the flowers to protect them.
- Punch a small hole at the top center of the paper oval.
- Feed the braided rope through the hole and tie a large knot.
- Hang the paper plaque on a rustic nail or wooden hook.
Key Takeaways
Space saving designs keep hallways clear. Flat profiles prevent damage to door frames.
Customization allows for personal artistic expression. Lightweight items stay secure on adhesive hooks.
Choosing the right decor makes your apartment feel like home. Door hangers provide style without the unnecessary bulk.
Simple materials allow you to create something unique. Your front door serves as the first impression for visitors. Make this spring special with a handcrafted sign.