The best Halloween scares are the ones you never see coming. Your guests might expect a skeleton on the porch or a ghost in the living room. But the bathroom is a space they visit alone, with their guard down. This makes it a wonderful canvas for a truly memorable fright.

Transforming this small, private room creates an immersive and shocking surprise. You do not need a huge budget or a lot of time. Our list offers 37 unique themes, from subtle and spooky to a full horror movie scene. Each idea comes with a simple DIY project to help you bring the nightmare to life.
1. Whimsical Nightmare Washroom

This bathroom brings a beloved spooky movie to life. The black and white stripes on the shower curtain and bathmats are instantly recognizable. This creates a fun, cartoonish feel that is still a little bit strange. Spooky, twisted tree decals on the wall add to the fantasy landscape.
The room is full of character. A creepy-cute doll sits on the toilet, and a strange sandworm rests on the lid. A special light projects wavy green patterns on the ceiling, making the whole room feel magical and eerie. This theme is great for those who like their scares with a bit of fun.
DIY Spooky Wall Decals
What you will need:
- Black contact paper (the kind you use to line shelves)
- A pencil
- Scissors
- A picture of a spooky tree for inspiration
Instructions:
Step 1: Draw Your Design Turn the contact paper over so you are looking at the paper backing. Use your pencil to draw some spooky, swirly tree shapes. Don’t worry about making them look real; the stranger, the better! You can also draw some bare branches.
Step 2: Cut it Out Carefully use your scissors to cut out the tree shapes you drew.
Step 3: Peel and Stick Slowly peel the paper backing off your contact paper shape. The other side will be sticky.
Step 4: Decorate Your Wall Gently press your sticky tree decal onto the bathroom wall. You can smooth it out with your hand. Create a whole spooky forest on your wall! Because it’s contact paper, it should peel off easily after Halloween.
2. Industrial Horror Chamber

This bathroom looks like a scene from a terrifying horror movie. The walls are designed to look like rusty, riveted metal plates, creating a cold and scary trap. The room feels dark and dangerous. Bloody handprints and splatters are smeared on the walls and the shower curtain.
The details make this theme truly frightening. A television on the floor is tuned to static, which is a classic horror movie signal that something is wrong. Low, misty smoke rolls across the floor, adding to the mystery and fear. This is a setup for the bravest of Halloween fans.
DIY Bloody Handprints
What you will need:
- Red craft paint
- A paper plate
- Your own hand
- A clear shower curtain liner or old white sheet
Instructions:
Step 1: Get Your “Blood” Ready Pour a small puddle of the red craft paint onto your paper plate.
Step 2: Make Your Hand Bloody Press your hand flat into the red paint. Make sure your palm and all your fingers are covered in the paint.
Step 3: Leave Your Mark Press your paint-covered hand firmly onto your shower curtain liner or old sheet. Lift your hand straight up to avoid smearing it too much. You can also drag your fingers down a little to make it look extra scary.
Step 4: Add Some Splatters To make it look even more gruesome, dip your fingertips in the paint and flick them at the curtain. This will create small “blood” splatters. Let everything dry completely before you hang it up.
3. Witch’s Apothecary Nook

This bathroom has been turned into a witch’s personal pantry. The theme is all about magic and potions. The shower curtain is decorated with illustrations of mushrooms and herbs, like a page from an old spellbook. The room feels earthy and mysterious.
The shelves are the main attraction. They are filled with dark amber-colored glass jars and bottles, each with a handmade label for things like “Poison” or “Witch’s Brew.” Bundles of dried herbs hang from the ceiling, ready to be used in a magical potion. This is a beautiful and subtly spooky theme.
DIY Potion Ingredient Jars
What you will need:
- A few clean, empty glass jars with lids
- Some plain paper or tan-colored cardstock
- A pen or marker
- Scissors
- A glue stick or tape
- Something to put in your jars (like dried beans, rice, or even water with food coloring)
Instructions:
Step 1: Create Your Labels Use your scissors to cut the paper into small rectangles for your labels. With your pen, write spooky ingredient names on them. You can write “Frog’s Breath,” “Eye of Newt,” or “Spider Eggs.” Use fancy, swirly handwriting. To make them look old, you can carefully tear the edges of the labels.
Step 2: Fill Your Jars Fill each jar with a different “ingredient.” Dried lentils can be “Bat Droppings,” and little white beans can be “Dragon’s Teeth.”
Step 3: Label Your Potions Use your glue stick to attach one spooky label to the front of each jar. Now your shelf will look just like a real witch’s collection of potion ingredients.
4. The Psycho Shower Scene

This bathroom is a tribute to one of the most famous scary movies ever. The design is simple, clean, and very unsettling. The all-white shower curtain and white towels look completely normal at first glance. It is the unexpected splash of “blood” that provides the shock.
The theme is subtle, which makes it even creepier. A bathmat with the “Bates Motel” logo is the biggest clue. This minimalist approach proves you do not need a lot of decorations to create a truly scary experience for your guests. It’s all about creating that one moment of surprise.
DIY Blood Splatter Bath Mat
What you will need:
- A plain white bath mat
- Red fabric paint
- A small paintbrush
- A paper plate
Instructions:
Step 1: Prepare Your Paint Squeeze some of the red fabric paint onto your paper plate. Add a tiny bit of water and mix it in. This will make the paint a little thinner and easier to splatter.
Step 2: Load Your Brush Dip your paintbrush into the thinned red paint. Don’t wipe the extra paint off the brush; you want it to be nice and drippy.
Step 3: Make a Splash! Hold your paint-filled brush over the bath mat. Use your other hand to tap firmly on the handle of the brush. This will cause the paint to fly off and create a cool splatter effect on the mat.
Step 4: Let it Dry Let the paint dry completely before you put the bath mat on the floor. The fabric paint will make sure the “bloodstain” doesn’t wash out.
5. Mad Scientist’s Laboratory

This bathroom has been turned into a crazy experiment. The room looks like a scientist’s lab where things have gone very wrong. The shower curtain is a blueprint of the human body, and an anatomy poster hangs on the wall. This gives the room a creepy, medical feel.
The counter and shelves are covered with science equipment like beakers and test tubes filled with colorful liquids. A plasma ball gives off a spooky, electric glow. Fake spiders are trapped in jars or crawling out of the beakers. This is a fun and colorful theme that is both smart and spooky.
DIY Bubbling Test Tubes
What you will need:
- A few clear test tubes or small glass vases
- Water
- Different colors of food coloring
- An Alka-Seltzer tablet
Instructions:
Step 1: Fill Your Test Tubes Fill each of your test tubes about three-quarters full with water.
Step 2: Add Some Color Add a different color of food coloring to each test tube. You can make one red, one green, and one blue. Swirl them around to mix the color in.
Step 3: The Secret Ingredient This is the fun part! Break an Alka-Seltzer tablet into a few small pieces.
Step 4: Make it Bubble! Just before your guests arrive, drop a small piece of the Alka-Seltzer tablet into each test tube. The water will immediately start bubbling and fizzing, just like a real science experiment! The bubbles will last for a few minutes.
6. Gothic Vampire’s Lair

This bathroom is dark, elegant, and dangerous. It looks like the private sanctuary of a vampire. Deep, blood-red velvet curtains and black damask-print towels create a rich and luxurious feel. The dark, textured walls and black marble countertop add to the gothic atmosphere.
The room is lit by the dramatic glow of many red and black candles. They are placed in ornate candelabras and on spooky wall sconces. The mirror is large and framed in antique silver, completing the look of a vampire’s castle. This theme is for those who find beauty in the darkness.
DIY Dripping Blood Candles
What you will need:
- A few plain white or black pillar candles
- A red candle
- A lighter or matches
Instructions:
Step 1: Get an Adult’s Help This DIY project involves a flame, so you must have a grown-up do this part for you.
Step 2: Prepare Your Candles Place your plain white or black candles on a piece of newspaper to protect your table.
Step 3: Light the Red Candle Ask the adult to light the red candle.
Step 4: Make it Drip! Now, the adult should carefully tilt the lit red candle over one of the plain candles. As the red wax melts, it will drip down the sides of the white or black candle. Let it drip all the way around the top. The red wax looks just like dripping blood! Do this for all of your candles.
7. Phantom’s Masquerade Vanity

This bathroom is full of mystery and dark romance. The theme is inspired by a beautiful but haunting masquerade ball. Elegant and mysterious Venetian masks with feathers and jewels are the main decoration, hanging on the walls as art. The room feels like a secret dressing room.
The mood is set with candlelight. A large, golden candelabra provides a soft, flickering glow. Red rose petals are scattered across the dark countertop, adding a touch of romance and tragedy. This theme is very theatrical and creates a feeling of sophisticated horror.
DIY Feathered Masquerade Mask
What you will need:
- A plain plastic mask from a craft store
- A hot glue gun
- A few craft feathers (black and red are good choices)
- Craft paint in colors like red, gold, or black (optional)
- Glitter or stick-on jewels (optional)
Instructions:
Step 1: Paint Your Mask (Optional) If you want your mask to be a different color, you can paint it first. Let it dry completely. You can even paint fancy swirls or patterns on it.
Step 2: Get Help with the Glue Gun Ask a grown-up to help you with the hot glue gun. Let it warm up.
Step 3: Add the Feathers Decide where you want your feathers to go. Usually, they look nice coming off the side or top of the mask. Put a small dot of hot glue on the end of a feather and press it onto the back of the mask. Hold it for a few seconds until the glue sets. Do this with a few more feathers to create a beautiful fan shape.
Step 4: Add Some Sparkle (Optional) You can add a line of glitter glue around the eye holes or stick on some plastic jewels to make your mask even more glamorous.
8. Catacomb Skull Crypt

This bathroom takes you deep underground into a bone-filled crypt. The theme is all about skulls, and there are hundreds of them. The shower curtain is covered in a pattern of skulls stacked on shelves. The walls look like they are made of stone, and they are also lined with shelves of skulls.
The dedication to the theme is incredible. A skull is even used as a toilet paper holder. The floor is made of stone, and a single candle provides a spooky, flickering light. This is an immersive and scary design that will make anyone feel like they have stumbled into a forbidden place.
DIY Skull Wall Shelves
What you will need:
- A few small, flat wooden plaques or small pieces of wood
- Black or gray craft paint
- A paintbrush
- A few lightweight plastic skulls
- Strong craft glue or a hot glue gun
Instructions:
Step 1: Paint Your Shelves Paint your wooden plaques with the black or gray paint. This will make them look like old stone shelves. Let them dry.
Step 2: Attach the Skulls Ask a grown-up to help with the glue. Put a good amount of strong glue on the bottom of one of your plastic skulls. Press it firmly onto the center of one of your painted wooden plaques. Let it dry completely.
Step 3: Create a Stack (Optional) You can even glue two or three skulls on top of each other to create a small stack on one of your shelves.
Step 4: Mount to the Wall Most wooden plaques from craft stores will have a small hook on the back for hanging. If not, you can use removable picture-hanging strips. Hang your new skull shelves on the wall to create your own mini-catacomb.
9. Zombie Apocalypse Safe House

This bathroom is not a place for relaxing. It is a fortified safe room during a zombie outbreak. The door has been boarded up to keep the undead out. The walls are covered in warning signs, bloody handprints, and blood splatters. Yellow and black quarantine tape is wrapped around the room.
The whole room tells a story. A first-aid kit on the wall suggests that people have been injured. A single, bare bulb in a cage provides the only light, creating a grim and desperate atmosphere. This theme is for those who love a good zombie story and want to feel like they are living in one.
DIY Quarantine Warning Tape
What you will need:
- A roll of yellow crepe paper streamer
- A roll of black electrical tape
- A black permanent marker
- Scissors
Instructions:
Step 1: Create the Stripes Unroll a long piece of your yellow streamer and lay it flat on a table. Carefully place a long strip of the black electrical tape along the top edge of the streamer. Place another strip of black tape along the bottom edge.
Step 2: Add Your Warning In the yellow space between the two black stripes, use your black permanent marker to write a warning. You can write “QUARANTINE,” “ZOMBIE OUTBREAK,” or “KEEP OUT” over and over again down the length of the streamer.
Step 3: Make it Look Worn To make your tape look like it has been through an apocalypse, you can gently crinkle it up in your hands and then smooth it back out. You can even tear the edges a little bit.
Step 4: Secure the Area Use regular tape to stick your new quarantine tape across the bathroom door, mirror, or toilet.
10. The Haunted Seance Room

This bathroom invites the spirits to come and visit. The whole room is set up for a spooky seance to contact the other side. The room is dark and filled with the soft glow of candles. Sheer, gauzy fabric is draped over the windows and furniture, making everything look soft and ghostly.
The details are what make this theme so spooky. A Ouija board bathmat invites you to play a dangerous game. Ghost decals on the mirror look like spirits are trapped inside the glass. A sign on the shelf with the words “GET OUT” is a clear warning that you are not alone.
DIY Mirror Ghosts
What you will need:
- A sheet of white window cling material
- A black dry-erase marker (not permanent!)
- A pencil
- A picture of a simple cartoon ghost for inspiration
- Scissors
Instructions:
Step 1: Draw Your Ghost Place your sheet of window cling on a table. Use your pencil to lightly draw a simple ghost shape. A classic bedsheet ghost with two eyes is easy to draw.
Step 2: Outline Your Ghost Use the black dry-erase marker to trace over the pencil lines of your ghost shape. Don’t worry about making the lines perfect; a little shakiness looks spooky.
Step 3: Cut it Out Carefully use your scissors to cut out the ghost shape.
Step 4: Stick it to the Mirror Peel the paper backing off your window cling and press your ghost onto your bathroom mirror. It will look like a ghost is floating inside the glass! The best part is that after Halloween, it peels right off, and you can use a paper towel to wipe away any leftover dry-erase marker smudges.
11. Padded Cell Commode

This bathroom creates the chilling atmosphere of an old, abandoned asylum. The shower curtain looks like the padded walls of a cell, which is instantly unsettling. The room is stark and clinical, with white tiles and harsh lighting that feels uncomfortable and tense.
Scrawled notes and a patient’s “treatment” chart are taped to the wall, hinting at a dark story. A whiteboard with the desperate plea “LET ME OUT” adds a layer of live-in horror. This theme is a psychological thriller that will surely give your guests a genuine fright.
DIY Frantic “Let Me Out” Whiteboard
What you will need:
- A small, cheap whiteboard
- A black dry-erase marker
- A ruler (optional)
Instructions:
Step 1: Write the Big Letters Take your black dry-erase marker and write the words “LET ME” on the top line of the whiteboard. Make the letters big and a little shaky, like someone wrote them in a hurry.
Step 2: Write the Last Word On the line below, write the word “OUT” even bigger. Make these letters look extra messy and desperate. You can press down hard with the marker to make the lines thick and dark.
Step 3: Add Some Smudges To make it look like someone was frantically writing, use your finger or a paper towel to gently smudge some of the letters. Don’t wipe them away, just blur them a little bit.
Step 4: Display Your Warning Place the whiteboard on your bathroom counter, leaning against the wall. It will look like a message left behind by a trapped spirit or patient.
12. Headless Horseman’s Hollow

Bring the legend of Sleepy Hollow into your home. This bathroom has a rustic, spooky feel, like a cabin deep in the haunted woods. A dramatic shower curtain shows the Headless Horseman himself, riding under a giant full moon. It sets a wonderfully scary scene.
The decor uses natural elements to enhance the theme. Bare, twisted branches reach out from corners, and glowing lanterns cast an eerie orange light. Carved jack-o’-lanterns sit on the counter, their grins lighting up the room. It’s a classic Halloween look that is both beautiful and frightening.
DIY Spooky Bare Branch Decor
What you will need:
- A few bare branches from your yard or a park
- A vase or a small bucket
- Sand, small rocks, or dirt
- Black or brown spray paint (optional)
Instructions:
Step 1: Find Your Branches Go on a nature walk and look for some cool, twisty branches on the ground. The ones with lots of little twigs coming off them look the spookiest. Make sure they are dry.
Step 2: Paint them Dark (Optional) If you want your branches to look extra creepy, you can lay them on some newspaper outside and spray paint them black or dark brown. Ask a grown-up for help with this part. Let them dry completely.
Step 3: Plant Your Spooky Tree Fill your vase or bucket about halfway with sand, rocks, or dirt. This will hold your branches in place.
Step 4: Arrange the Branches Stick the bottom ends of the branches into the sand or rocks. Arrange them so they stand up straight and spread out like a creepy tree. You can place this in a corner of your bathroom for an instant haunted forest feel.
13. Sunken City of Cthulhu

Transform your bathroom into the lost city of a sea monster. This room feels like it is deep at the bottom of the ocean. A terrifying shower curtain shows the giant tentacles of a kraken or Cthulhu reaching up from the dark water. The walls are painted a deep, murky blue-green.
The details make this theme special. The mirror is framed with barnacles, and seaweed appears to grow down the walls. A statue of the monster itself sits by the sink, which is covered in a slimy-looking substance. This is a creative and scary theme for fans of sea legends.
DIY Barnacle Encrusted Mirror
What you will need:
- Macaroni pasta in shell shapes of all sizes
- A hot glue gun with glue sticks
- Gray or beige craft paint
- A small paintbrush
Instructions:
Step 1: Get Help with the Glue Gun Ask a grown-up for help with the hot glue gun, as the tip gets very hot. Let it warm up before you start.
Step 2: Create a Barnacle Cluster Decide where on the frame of your mirror you want the barnacles. A corner is a good place to start. Glue the largest pasta shells onto the mirror frame first, placing them close together.
Step 3: Add Smaller Shells Fill in the gaps around the big shells with smaller macaroni shells. Glue them on top of each other and in tight groups. This makes it look like they have been growing there for a long time.
Step 4: Paint Your Barnacles Once the glue is dry, use your paintbrush to dab gray or beige paint all over the pasta shells. Make sure to get paint down in the cracks. Let it dry, and your mirror will look like it was pulled from a shipwreck!
14. Abandoned Dollhouse Bathroom

Nothing is quite as creepy as old dolls. This bathroom looks like a dusty, forgotten nursery in a haunted house. The room is filled with antique-looking dolls with blank stares and cracked faces. They sit on the toilet, the counter, and even on the floor, watching your every move.
The decor is old and decaying. The lace shower curtain is yellowed and torn, and the mirror is shattered. Even the light is dim and yellow, making everything look ancient and spooky. This theme is simple to create but delivers a powerful, chilling scare.
DIY Cracked Mirror Effect
What you will need:
- A roll of black string or yarn
- A small bottle of clear school glue
- Scissors
Instructions:
Step 1: Plan Your Cracks Look at your mirror and imagine where you want the cracks to be. A good idea is to have a few lines coming out from one central spot, like a spiderweb.
Step 2: Cut Your String Cut a few pieces of your black string. Make them different lengths. These will be the lines of your cracks.
Step 3: Glue the First Crack Draw a thin line of glue on the mirror where you want your first crack to be. Gently press one of your pieces of string into the glue. Pat it down so it sticks well.
Step 4: Add More Cracks Keep adding more lines of glue and string, starting from the same central point. This will create a shattered look. The black string against the mirror looks just like a real crack from far away. The glue will dry clear, so you will only see the string.
15. Ghostly Pirate’s Quarters

Ahoy, matey! Welcome to a ghost ship. This bathroom is decorated like the spooky cabin of a pirate captain. A shower curtain with an old treasure map sets the adventurous mood. Skeletons are part of the crew, with one tangled in fishing nets hanging from the ceiling.
The details are what sell the theme. A mirror is framed with thick rope, and an old lantern provides a spooky glow. A small treasure chest even sits on top of the toilet. This fun theme combines adventure with scares and is great for all ages.
DIY Treasure Chest Toilet Topper
What you will need:
- An old shoebox with a lid
- Brown paint
- A paintbrush
- Gold or yellow craft paper
- Scissors
- Glue
- A black marker
Instructions:
Step 1: Paint Your Box Take the shoebox and its lid and paint them all over with brown paint. This will make it look like it’s made of old wood. Let it dry completely.
Step 2: Add Details Use your black marker to draw lines on the box to look like wooden planks. You can also draw a keyhole on the front of the box.
Step 3: Make the Gold Trim Cut two long, thin strips from your gold paper. Glue one strip around the edge of the box lid, and the other around the bottom part of the box. This makes it look like a real treasure chest.
Step 4: Fill with Treasure (optional) You can fill your chest with extra rolls of toilet paper or small Halloween treats. Place it on top of your toilet tank for a fun and useful pirate decoration.
16. Mummy’s Tomb Washroom

Enter the ancient curse of the mummy’s tomb. This bathroom feels like an archaeological discovery. The shower curtain is covered in Egyptian hieroglyphics, telling an ancient story. A life-sized pharaoh’s sarcophagus stands guard in the corner, wrapped in old bandages.
The entire room follows the theme. Canisters on the counter are wrapped to look like mummies, and fake scarab beetles are scattered about. Even the soap dispenser and toilet paper rolls are wrapped in gauze. This is a unique and detailed theme that will transport your guests to ancient Egypt.
DIY Mummy-Wrapped Canisters
What you will need:
- An empty jar or canister (like from coffee or sugar)
- A roll of white gauze or cheesecloth
- Craft glue
- A pair of googly eyes
- Scissors
Instructions:
Step 1: Start Wrapping Put a small dot of glue near the bottom of your canister. Press the end of the gauze onto the glue to hold it in place.
Step 2: Wrap it All Up Begin wrapping the gauze around and around the canister. Overlap the layers and wrap in different directions to make it look messy, just like a real mummy. Don’t worry about it being neat!
Step 3: Secure the End When your whole canister is covered, cut the gauze. Tuck the end under another piece of gauze, or use another small dot of glue to hold it down.
Step 4: Give it Eyes Glue two googly eyes onto the canister near the top. Place them so they are peeking out from between the gauze wraps. Now you have a cute and creepy mummy to hold your bathroom supplies.
17. The Grim Reaper’s Respite

Even death needs a place to rest. This bathroom is simple, stark, and very spooky. The color scheme is just black and white, which creates a dramatic and somber mood. The main decoration is the Grim Reaper’s black, hooded robe hanging on the door, with his scythe leaning nearby.
The theme of time running out is everywhere. A large clock hangs on the wall, and shelves are filled with hourglasses, their sand slowly trickling down. It is a minimalist but powerful design that reminds every visitor that their time is limited.
DIY Scythe Prop
What you will need:
- A long cardboard tube (from wrapping paper)
- A large piece of cardboard (from a box)
- A pencil
- Scissors or a box cutter
- Black paint or black duct tape
- Silver or gray paint
Instructions:
Step 1: Make the Handle Take the long cardboard tube. This will be the handle, or “snath,” of the scythe. You can either paint it black or wrap it completely in black duct tape to make it strong.
Step 2: Draw the Blade On the large piece of cardboard, use a pencil to draw a big, curved blade shape. It should look like a giant crescent moon. Ask a grown-up to help you cut it out with scissors or a box cutter.
Step 3: Paint the Blade Paint your cardboard blade with the silver or gray paint. This will make it look like it’s made of metal. Let it dry completely.
Step 4: Attach the Blade Ask a grown-up to help you cut a small slit near the top of your cardboard tube handle. Carefully slide the bottom, straight edge of the blade into the slit. Use more black duct tape to securely wrap around the spot where the blade and handle meet. Now you have a scythe to lean against the wall!
18. Haunted Library Lavatory

This bathroom is for the ghosts of scholars past. The room is styled like a dark, old-fashioned study or library. The shower curtain looks like a giant bookshelf filled with ancient books. The dark green walls and wood furniture create a cozy yet creepy atmosphere.
The spooky details make this theme work. Skulls are used as bookends, sitting on top of stacks of old books. Some books even appear to be floating in mid-air. A green banker’s lamp on the counter casts an eerie light on the scene, making it feel like a true haunted library.
DIY Floating Books Decor
What you will need:
- A small, lightweight hardcover book you don’t need anymore
- A small L-shaped metal bracket (from a hardware store)
- A hot glue gun or very strong craft glue
- Screws to attach the bracket to the wall
Instructions:
Step 1: Prepare the Book Open the book to the very back. Take the back cover and the last few pages and separate them from the rest of the book block.
Step 2: Glue the Bracket Ask a grown-up to help with the glue. Put a lot of strong glue on one side of the L-bracket. Slide that side of the bracket between the back cover and those last few pages you separated.
Step 3: Close and Secure Press the back cover and the pages firmly onto the glued bracket. You can even glue the cover shut over the bracket. Put something heavy on the book and let the glue dry for a full day.
Step 4: Mount to the Wall Ask a grown-up to help you screw the other side of the L-bracket into the wall. The book will now stick straight out from the wall, looking like it’s floating all by itself!
19. 8-Bit Monster Level

This bathroom is a throwback to classic arcade games. The shower curtain features pixelated monsters, ghosts, and vampires from an old video game. The theme is fun, colorful, and a little bit spooky. The bath mat declares “GAME OVER” in a bold, red, pixelated font.
The walls are decorated with colorful ghost characters that look like they are floating up towards the ceiling. Even the health bar above the sink adds to the video game feel. This is a very creative and playful way to decorate for Halloween, especially for gamers.
DIY Pixel Ghost Wall Art
What you will need:
- Sheets of craft foam or construction paper in different colors (red, blue, green, orange)
- A ruler
- A pencil
- Scissors
- Removable wall putty or double-sided tape
Instructions:
Step 1: Draw a Grid On the back of your colored paper, use a ruler and pencil to draw a grid of small squares. Make each square the same size, like one inch by one inch.
Step 2: Create the Ghost Shape Following the lines of the grid, draw the outline of a simple ghost. Think of the ghosts from Pac-Man. They have a round top and a zig-zag bottom. The grid will make your drawing look blocky and pixelated.
Step 3: Cut it Out Carefully use your scissors to cut out the ghost shape you drew. Because you followed the grid, the edges will be perfectly square and pixelated.
Step 4: Stick them to the Wall Put a small piece of wall-safe putty on the back of your pixel ghost. Press it onto the wall. Make a few ghosts in different colors and stick them on the wall as if they are floating around the room.
20. The Plague Doctor’s Office

Step back in time to a dark and mysterious era. This bathroom is set up like the laboratory of a medieval plague doctor. The most striking piece is the famous beaked mask, which sits on a stand on the counter, ready for the doctor’s next patient.
The room is decorated with old medical drawings of the human body and botanical charts of herbs. Shelves are lined with glass jars full of dried herbs and strange specimens, as if the doctor is working on a cure. This is a sophisticated and creepy theme that is both historical and horrifying.
DIY Specimen Jars with Herbs
What you will need:
- A clean glass jar with a lid
- A few sprigs of fresh or fake herbs (rosemary works well)
- Water
- Black ribbon (optional)
Instructions:
Step 1: Prepare Your Jar Make sure your glass jar is completely clean on the inside and outside so you can see through it clearly.
Step 2: Add Your Specimen Take a sprig of your herb and place it inside the jar. You can have it standing up or lying on its side.
Step 3: Fill with Water Carefully fill the jar with water, all the way to the top. The water will magnify the herb a little, making it look more like a scientific specimen.
Step 4: Seal and Display Screw the lid on tightly. If you want to be extra fancy, you can tie a black ribbon around the herb inside the jar before you add the water. Place your new specimen jar on a shelf for a creepy, scientific look.
21. Classic Monster Movie Mash

Travel back to the golden age of horror. This bathroom pays tribute to the original movie monsters. Framed posters of Dracula, Frankenstein, The Wolf Man, and The Mummy turn the walls into a gallery of ghouls. The black-and-white theme feels like an old Hollywood film.
A fun film strip border runs along the walls, tying the whole scene together. Stretchy cobwebs are draped over the posters and mirror, making the room look old and abandoned. A Frankenstein’s monster head on the counter is a fantastic final touch for this cinematic scare.
DIY Film Strip Border
What you will need:
- A roll of black craft paper or poster board
- A ruler
- A pencil
- White paint pen or white chalk marker
- Scissors
Instructions:
Step 1: Cut Your Strips First, cut your black paper into long strips. A good width for each strip is about 3 or 4 inches. You can make them as long as you want, or tape shorter pieces together later.
Step 2: Draw the Border Lines Use your ruler and the white paint pen to draw a straight line near the top edge of the black strip. Then draw another straight line near the bottom edge. This makes it look like the edges of a film reel.
Step 3: Add the Squares In the space between the two lines you drew, draw small white squares. These are the little sprocket holes that a real film strip has. Draw them in a line all the way down the strip.
Step 4: Put it on the Wall Use wall-safe tape to stick your new film strip border along the top of your bathroom walls. It will look like you are inside a movie theater!
22. Day of the Dead Fiesta

Celebrate with a bathroom full of vibrant color and life. This theme is inspired by Dia de los Muertos, the Day of the Dead. It is less about being scary and more about being a beautiful, happy tribute. A shower curtain decorated with large, artistic sugar skulls is the main feature.
The room is full of bright colors. Cheerful paper banners, called papel picado, are strung across the ceiling. Garlands of orange marigold flowers are draped around the window. Even the accessories, like the toothbrush holder, are shaped like decorated skulls. This is a joyful and artistic way to decorate.
DIY Papel Picado Banner
What you will need:
- Several sheets of colored tissue paper (like pink, yellow, blue)
- A pair of scissors
- A long piece of string
- A glue stick
Instructions:
Step 1: Fold Your Paper Take one sheet of tissue paper and fold it in half. Then fold it in half again, and one more time, until you have a small rectangle.
Step 2: Cut Out Shapes While the paper is still folded, use your scissors to cut small shapes along the folded edges. You can cut out little triangles, half-circles, or diamond shapes. There is no wrong way to do it!
Step 3: The Big Reveal Carefully unfold your tissue paper. You will see a beautiful, lacy pattern with holes in it. It looks very fancy, but it was very easy to do! Do this with a few different colors of paper.
Step 4: String Them Up Take your long piece of string. Lay it on a table. One by one, put a line of glue along the top edge of each decorated paper and fold it over the string. Leave a little space between each color. Now you have a festive banner to hang!
23. Creepy Cemetery Rest Stop

Your bathroom becomes the final resting place for guests. This design turns the entire space into a spooky graveyard. The shower curtain is the main attraction, showing a misty cemetery behind giant iron gates. It feels like you are about to step into a haunted place.
The theme continues throughout the room. Foam tombstones are placed around the toilet and bathtub. A creepy skeleton hand reaches up from the toilet tank, perhaps offering some toilet paper. This is a classic, spooky theme that fully commits to creating a chilling atmosphere.
DIY Foam Tombstones
What you will need:
- A sheet of gray or black foam board from a craft store
- A pencil
- A craft knife or box cutter
- A black marker
Instructions:
Step 1: Draw Your Tombstone Shape On the foam board, use a pencil to draw the outline of a tombstone. You can make the top rounded or give it a cross shape. Make a few different shapes and sizes.
Step 2: Cut it Out This is a job for a grown-up. Ask them to carefully cut out the tombstone shapes you drew using the craft knife.
Step 3: Write an Epitaph Use your black marker to write something funny or spooky on your tombstone. You can write “R.I.P.” or make up a funny name. You can also use the marker to draw some cracks on it to make it look old.
Step 4: Set the Scene Lean your new tombstones against the wall around your bathroom. You can place some fake moss, which you can get at a craft store, around the bottom to make them look like they are really in a graveyard.
24. The Grudge’s Guest Bathroom

This design proves that less can be more terrifying. The bathroom has a clean, minimalist look inspired by Japanese horror movies. The main scare comes from the shower curtain, which shows the dark silhouette of a ghostly figure with long, stringy black hair. The sense of dread is immediate.
The real terror is waiting for you by the tub. A wig of long, black hair is draped over the side of the bathtub, making it look like the ghost is climbing out. It is a simple trick that is extremely effective and will make anyone’s heart stop for a second.
DIY Creepy Hair Decoration
What you will need:
- A cheap, long black wig
- A small hand towel
- A safety pin
Instructions:
Step 1: Position the Wig Take your long black wig. You want to make it look like just the hair of a person is visible. Don’t show the part that goes on your head.
Step 2: Drape it Realistically Drape the wig over the side of your bathtub. Let the hair hang down, with some of it in the tub and some of it on the floor. It should look like a person is hiding in the tub and their hair is hanging out.
Step 3: Secure it (Optional) If you want to make sure the wig doesn’t fall, you can use a small safety pin. Pin the inside netting of the wig to a hand towel that is also hanging over the side of the tub.
Step 4: Wait for the Scream That’s it! This simple trick is one of the most effective. Just leave it there and wait for the first unsuspecting guest to walk into the bathroom.
25. The Werewolf’s Transformation

This bathroom tells the story of a terrifying change. A giant, glowing full moon on the shower curtain sets a chilling scene. Bright red, bloody claw marks tear across the moon, showing that something wild and violent has happened here.
The evidence is scattered around the room. A plaid flannel shirt is ripped to shreds and draped over the counter. A furry rug on the floor looks like a piece of a monster’s coat. A light projector on the ceiling even creates a starry, night-sky effect. This theme makes guests feel like they just missed the werewolf.
DIY Tattered Flannel Shirt
What you will need:
- An old plaid flannel shirt you don’t need anymore
- A pair of scissors
- Your hands!
Instructions:
Step 1: Make the First Cut Take your scissors and make a small snip in the bottom of the shirt. Make another snip on one of the sleeves, and maybe one near the collar. You only need to make a small starting cut.
Step 2: Rip it Up! Put the scissors down. Now, put your fingers into the small cuts you made and pull hard! The fabric will rip in a straight line, which looks much more realistic than a scissor cut. Rip the shirt in a few different places.
Step 3: Make it Look Old To make the shirt look extra worn out, you can rub some dirt on it from outside. You can also stretch the collar and cuffs with your hands to make them look loose.
Step 4: Place the Evidence Drape your newly destroyed shirt somewhere in the bathroom, like over the sink or on the floor. It will look like the clothes of someone who just turned into a werewolf.
26. Haunted Forest Sanctuary

Turn your bathroom into an enchanted and eerie forest at twilight. This beautiful design uses nature to create a spooky feeling. A shower curtain with tall, dark trees makes you feel like you are on the edge of the woods. Real birch tree trunks stand in the corners, bringing the outdoors in.
The details are magical. Black crow decorations are perched on the walls and towel racks. Moss is spread across the counter and floor, and a light projector makes it look like you are standing under the stars. This theme is both wonderfully spooky and strangely peaceful.
DIY Wall Crows
What you will need:
- Black construction paper or craft foam
- A pencil
- Scissors
- A picture of a crow’s silhouette (you can find one online)
- Removable wall putty
Instructions:
Step 1: Find and Trace Your Crow Find a simple picture of a crow’s shape (its silhouette) online and print it out, or just look at it on a screen. Place your black paper over it and trace the shape. You can also just try to draw the shape yourself. Draw a few, with some flying and some sitting.
Step 2: Cut Them Out Carefully use your scissors to cut out the crow shapes you traced or drew.
Step 3: Make Them Fly Take your crow cutouts. For the flying ones, you can gently bend the wings up a little bit. This will make them look like they are really flying when you put them on the wall.
Step 4: Stick Them to the Wall Put a small ball of wall putty on the back of each crow. Press them onto your bathroom wall. You can make a group of them look like they are flying across the room or have a few sitting on top of your mirror.
27. Little Greenhouse of Horrors

This bathroom is overgrown with hungry plants. The theme is inspired by a “Little Shop of Horrors” and is filled with creepy, carnivorous plants. The shower curtain is covered in giant, toothy Venus flytraps. The rest of the room is packed with fake plants, vines, and moss.
Every shelf is filled with hungry-looking flytraps and pitcher plants. Green lights and hanging vines make it feel like a jungle. A small sign with the classic line “FEED ME!” sits amongst the plants, adding a fun and spooky touch. This is a great theme for plant lovers who also love to be scared.
DIY “Feed Me!” Sign
What you will need:
- A small piece of cardboard or a piece of wood
- A small wooden stick or dowel
- A black marker
- A hot glue gun or strong tape
Instructions:
Step 1: Write Your Message Take your piece of cardboard and your black marker. Write the words “FEED ME!” in big, messy letters. Make it look like a hungry plant wrote it itself.
Step 2: Make the Sign Post This is a job for a grown-up. Use the hot glue gun to put a line of glue on the back of your cardboard sign. Press the wooden stick onto the glue. If you don’t have a glue gun, you can use strong tape instead.
Step 3: Let it Dry If you used glue, let the sign sit for a few minutes until the glue is hard and dry.
Step 4: Plant Your Sign Take your finished sign and stick it into one of the potted plants in your bathroom. It will look like the plant is asking for its dinner!
28. Creepy Clown Funhouse

For many, this is the scariest bathroom of all. It is decorated like a nightmarish carnival funhouse. The theme uses bold stripes and unsettling patterns. A red and white striped shower curtain reminds you of a circus tent. The floor has a dizzying black and white checkerboard pattern.
The truly frightening parts are the clowns. Scary clown figures sit on the counter, and terrifying clown masks hang on the wall. The mirror is the best part, as it has a design that looks like a long, endless funhouse hallway. This theme is sure to give anyone with a fear of clowns a major scare.
DIY Scary Clown Soap Dispenser
What you will need:
- A plain, simple soap dispenser (a white one is good)
- Red and black permanent markers
- A picture of a scary clown mouth for inspiration
Instructions:
Step 1: Clean Your Dispenser Make sure your soap dispenser is clean and completely dry. The markers will work better on a clean surface.
Step 2: Draw the Creepy Smile Use your red permanent marker to draw a big, wide smile on the front of the soap dispenser. Make the corners of the smile sharp and pointing upwards. Then, color it in.
Step 3: Add the Details Use the black permanent marker to draw a thin line around the outside of the red smile. You can also draw some small lines for teeth inside the smile.
Step 4: Add a Nose To finish it off, use the red marker to draw a simple red circle above the mouth for the clown’s nose. Now, every time you get some soap, a scary clown will be grinning at you.
29. Cursed Voodoo Getaway

This bathroom feels like a dangerous trip to a cursed jungle island. The decor is inspired by tribal art and voodoo legends. Scary, hand-carved-looking tiki masks hang on the walls, watching you with hollow eyes. Crossed spears and a tribal shield add to the feeling of danger.
Natural materials complete the theme. The shower curtain and some of the wall decorations are made to look like bamboo. A tiki torch with a flickering fake flame adds some spooky lighting. This is a unique theme that is both adventurous and unsettling.
DIY Tiki Torch Light
What you will need:
- An empty paper towel roll
- Brown construction paper
- Orange and yellow tissue paper
- A small, battery-powered tea light candle
- Glue and scissors
Instructions:
Step 1: Make the Torch Handle Take your brown construction paper and glue it around the empty paper towel roll. This will be the “bamboo” handle of your torch.
Step 2: Prepare the “Flames” Cut your orange and yellow tissue paper into squares, about 6 inches by 6 inches. Lay a few squares on top of each other, mixing the colors. Pinch them together in the middle.
Step 3: Add the Flames to the Torch Put some glue around the inside of the top of your paper towel roll. Gently push the pinched part of your tissue paper “flames” into the top of the roll. The rest of the paper should stick up and look like fire.
Step 4: Make it Glow Turn on your small, battery-powered tea light. Carefully drop it down into the paper towel roll so it sits at the bottom. The light will shine up through the tissue paper, making your tiki torch glow like it’s really on fire!
30. Spider Infestation Station

This bathroom is a nightmare for anyone afraid of spiders. The entire room is taken over by creepy crawlies. The shower curtain and even the toilet seat are covered in a spiderweb design. This sets the stage for the main event: the webs.
Fake, stretchy spiderweb material is stretched across every corner of the room. It covers the mirror, the lights, the sink, and the ceiling. Plastic spiders of all shapes and sizes are caught in the webs, with some even crawling on the walls. This is an easy but very effective way to make a room feel truly terrifying.
DIY Spider Egg Sac
What you will need:
- A white balloon
- White, stretchy spiderweb material
- A handful of small plastic spiders
- A glue stick
- A piece of string
Instructions:
Step 1: Inflate Your Balloon Blow up the white balloon, but not too big. About the size of a grapefruit is good. Tie it closed. This will be the shape of your egg sac.
Step 2: Add the First Layer Use your glue stick to rub glue all over one side of the balloon. Take a piece of the stretchy spiderweb material and stretch it over the glued part of the balloon.
Step 3: Add the Baby Spiders Rub some more glue on top of the web material. Press a few of the small plastic spiders onto the glue. They will look like they are trapped inside the egg sac.
Step 4: Add More Layers and Hang Cover the spiders with more glue and another layer of the web material. Keep doing this until the balloon is completely covered and looks like a spooky, lumpy ball. Tie a piece of string to the knot of the balloon and hang your creepy spider egg sac from the ceiling.
31. Evil Queen’s Poisonous Powder Room

This bathroom is fit for a fairy tale villain. The theme is inspired by an evil queen, with elegant and deadly touches. A large, ornate gold mirror is the centerpiece. The dark, textured wallpaper and purple lighting create a feeling of royal wickedness.
The counter is cluttered with colorful potions in fancy glass bottles. Shiny red “poison” apples are placed around the room, tempting any unsuspecting guest. A black crow perches near the mirror, watching everything. This is a glamorous and sinister theme for those who love a good villain.
DIY Poison Apples
What you will need:
- A few fake apples from a craft store
- Shiny red craft paint
- A paintbrush
- Black or purple glitter (optional)
- Glue (if using glitter)
Instructions:
Step 1: Paint Your Apple Make sure your fake apple is clean and dry. Use your paintbrush to cover the entire apple with the shiny red paint. You might need to do two coats to make it look extra bright and juicy.
Step 2: Let it Dry Place the apple on a piece of newspaper and let the paint dry completely. This might take an hour or two.
Step 3: Add a Poisonous Sparkle (Optional) If you want your apple to look magical and poisonous, you can add glitter. Paint a thin layer of clear glue over the top half of the apple. While the glue is wet, sprinkle black or purple glitter all over it.
Step 4: Display Your Deadly Fruit Once your apple is dry, place it on the bathroom counter. It looks just like the poison apple from a fairy tale, but this one is just for decoration!
32. Alien Abduction Zone

This bathroom is out of this world. The entire room glows with an eerie green and blue light, making it feel like you have stepped inside a UFO. The shower curtain tells a story, showing a spaceship beaming up a person and a very surprised cow.
The room is decorated with glowing objects. Strange alien creatures float inside jars on the counter. A glowing handprint on the wall looks like a message from a visitor. Green LED lights tucked under the mirror and cabinets make the whole room feel like a science fiction movie set.
DIY Alien in a Jar
What you will need:
- A clean glass jar with a lid
- A small, plastic alien or octopus toy
- Water
- Green or blue food coloring
- Glow-in-the-dark paint (optional)
Instructions:
Step 1: Paint Your Alien (Optional) If you want your alien to glow on its own, use a small brush to paint it with glow-in-the-dark paint. Let it dry completely before you put it in the jar.
Step 2: Prepare Your Jar Fill your clean glass jar almost to the top with water.
Step 3: Add Some Color Add one or two drops of green or blue food coloring to the water and stir it around. You want the water to be colored, but still easy to see through.
Step 4: Put the Alien in its New Home Drop your plastic alien toy into the colored water. Screw the lid on tightly. Now you have your very own alien specimen in a jar to display on your bathroom counter!
33. Voodoo Bayou Bathroom

Step into the mysterious swamps of the bayou. This bathroom is decorated like a voodoo priestess’s secret workshop. The room is filled with strange ingredients in glass jars, like bones and herbs. The shelves are draped with Spanish moss, making it feel like a southern swamp.
The room is lit by the soft, flickering glow of many candles, creating spooky shadows. A small, handmade voodoo doll hangs from the towel rack, a clear warning to all who enter. This is a creepy and atmospheric theme that feels authentically magical and dangerous.
DIY Voodoo Doll
What you will need:
- Two small twigs or sticks
- Brown or beige yarn or twine
- Scissors
- Two small black buttons or beads (for eyes)
- A hot glue gun or craft glue
Instructions:
Step 1: Make the Body Place your two sticks together to make a cross shape, like a lowercase “t”. This will be the body and arms of your doll. Use your yarn to wrap it around the spot where the two sticks meet. Wrap it tightly until the sticks are held together strongly.
Step 2: Wrap the Body and Head Start wrapping the yarn all around the doll’s body and arms. Go up and around the head, then down and around the body. Keep wrapping until the sticks are completely covered. When you are done, cut the yarn and tuck the end in so it doesn’t unravel.
Step 3: Give it Eyes This is a job for a grown-up. Use the hot glue gun to put two small dots of glue on the head part of your doll. Press the two black buttons into the glue to make the eyes.
Step 4: Finish Your Doll You can add a small red yarn heart if you want. Your little voodoo doll is now ready to be placed somewhere in the bathroom for a spooky surprise.
34. The Overlook Hotel Experience

Come and play with us in this terrifyingly familiar bathroom. This design is a tribute to the classic horror movie, “The Shining.” At first, it looks like a nice hotel bathroom, but the scary details quickly appear. The word “REDRUM” is written backwards in red on the mirror.
Other clues are scattered around the room. A sign with the famous line “All work and no play makes Jack a dull boy” sits by the tub. The key to the forbidden Room 237 is also there. An old typewriter on the floor completes this clever and scary theme for movie fans.
DIY “REDRUM” Mirror Cling
What you will need:
- A sheet of clear window cling material
- A red permanent marker
- A piece of paper and a pencil
- Scissors
Instructions:
Step 1: Write it Backwards On your piece of paper, practice writing the word “MURDER” normally. Now, try to write it backwards, just like in the movie: “REDRUM”. Write it in big, shaky capital letters. This is your template.
Step 2: Trace Your Word Place the sheet of clear window cling over your “REDRUM” template. Use your red permanent marker to trace the letters onto the cling material.
Step 3: Cut it Out You can either cut out the entire rectangle of your cling, or you can use your scissors to carefully cut around the letters.
Step 4: Stick it to the Mirror Make sure your mirror is clean. Peel the backing off your window cling and press it onto the mirror. When someone looks in the mirror, the reflection will read “MURDER”! When Halloween is over, it peels right off.
35. Phantom of the Opera’s Boudoir

This bathroom is a dark and romantic stage set. The room is decorated in the dramatic style of “The Phantom of the Opera.” Heavy, red velvet curtains with gold tassels hang everywhere, making the room feel like a private theater box.
The lighting is dim, coming only from candles in elegant candelabras and wall sconces. The Phantom’s iconic white mask is a key decoration, placed on the curtain. A single red rose and sheets of music are left by the sink, hinting that the Phantom was just here.
DIY Phantom’s Mask
What you will need:
- A plain white plastic mask from a craft store
- A pair of scissors
- A pencil
- Fine-grit sandpaper (optional)
Instructions:
Step 1: Draw Your Shape The Phantom’s mask only covers one side of his face. Take your plain white mask and use a pencil to draw a line down the middle. Decide which side you want to keep.
Step 2: Cut the Mask This part is for a grown-up. Use a strong pair of scissors to carefully cut the mask in half along the line you drew. You will now have a half-mask.
Step 3: Smooth the Edges (Optional) If the edge you cut is a little sharp or messy, ask a grown-up to help you gently sand it down with a piece of fine-grit sandpaper until it is smooth.
Step 4: Display Your Masterpiece Your Phantom mask is complete! You can place it on a shelf, hang it on the wall, or drape it over your shower curtain for a touch of musical mystery.
36. Gateway to Hell Bathroom

This bathroom is dangerously hot. The entire room is designed to look like a portal to the underworld. A dark and fiery decal in the shower makes it look like the bathtub is literally on fire. The room is bathed in a deep, demonic red light.
Chains are draped across the ceiling, adding to the feeling of being trapped. A black bath mat on the floor looks like a summoning circle, and the same symbol is even on the toilet seat. This is an intense and scary theme that is not for the faint of heart.
DIY Hanging Chains
What you will need:
- A few rolls of black or gray plastic chain (from a Halloween or hardware store)
- Scissors
- Small, clear, removable wall hooks
Instructions:
Step 1: Plan Your Chain Placement Decide where you want your chains to hang. A great look is to have them swoop from one corner of the ceiling to another, or to have them drape down over the mirror.
Step 2: Place Your Hooks Follow the instructions on the package to stick the removable hooks to your ceiling or walls where you want the chains to start and end.
Step 3: Cut Your Chains Use your scissors to cut the plastic chain to the right length. It’s better to cut it a little longer than you think you need. You want the chain to hang down and have a nice curve, not be pulled tight.
Step 4: Hang Them Up Hook the first link of one end of your chain onto one of the wall hooks. Then, hook the other end onto another hook. You can hang many chains, and even have them cross over each other for a more trapped, dungeon-like feel.
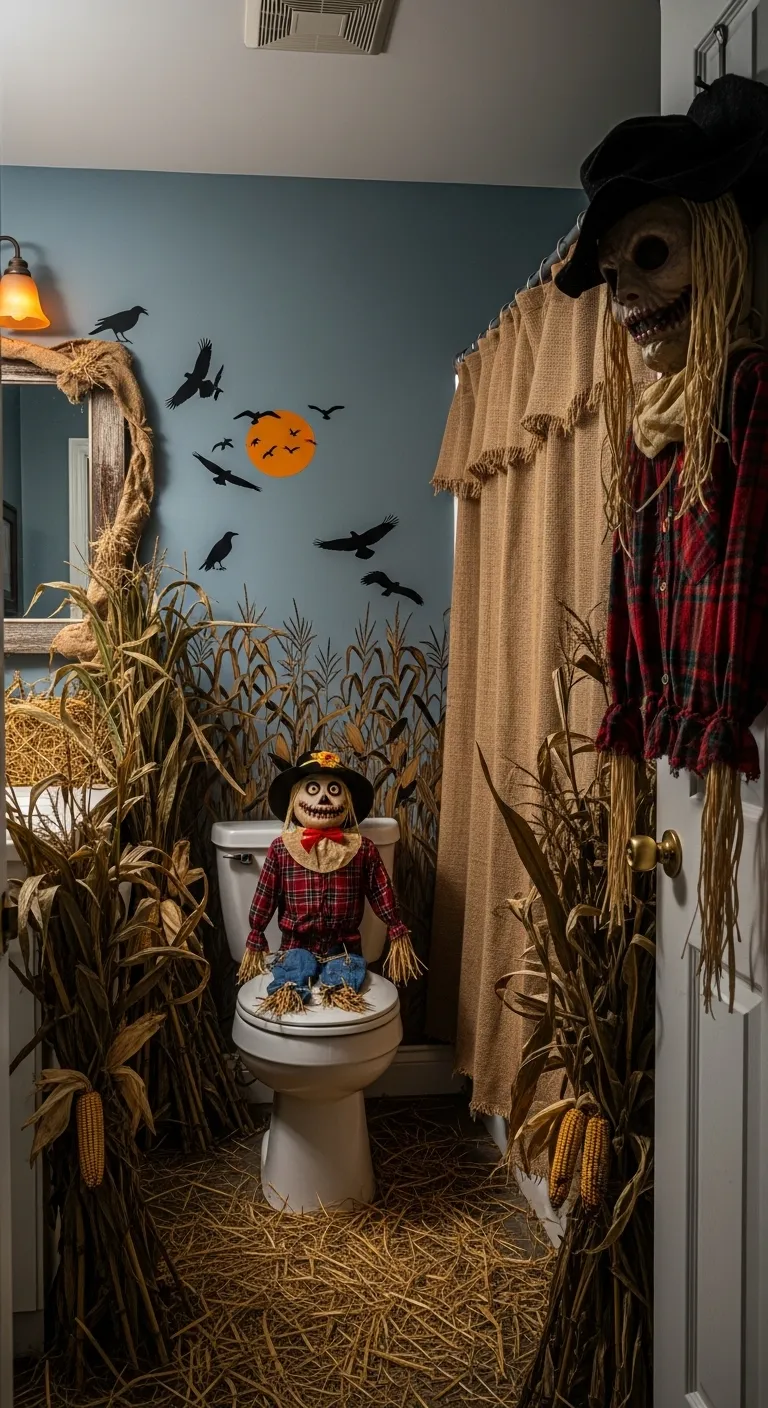
37. Haunted Scarecrow Patch

This bathroom brings the terror of a haunted cornfield indoors. The entire room is filled with the sights and sounds of a creepy harvest. Dried corn stalks are bundled in the corners, and loose hay is scattered all over the floor.
Scarecrows are the main attraction. A large, menacing scarecrow with a burlap sack head and a stitched-on grin guards the door. A smaller, friendlier-looking one sits on the toilet. Black crow decals fly across the wall, completing the spooky farm scene. This theme will make anyone feel like they are not alone.
DIY Mini Scarecrow Decoration
What you will need:
- An empty toilet paper roll
- A small square of burlap fabric
- A rubber band or a piece of twine
- A small square of flannel fabric (or any patterned fabric)
- Two small black buttons
- A black and red marker
- A hot glue gun or craft glue
Instructions:
Step 1: Make the Body Take the flannel fabric square and drape it over the top of the toilet paper roll. This is the scarecrow’s shirt. You can use a little bit of glue to hold it in place.
Step 2: Make the Head Place the burlap square over the top opening of the roll. Push the middle of it down into the roll a little bit. Secure the burlap to the roll by wrapping a rubber band or a piece of twine tightly around it, creating a “neck.”
Step 3: Give it a Face Ask a grown-up to help with the hot glue. Glue the two black buttons onto the burlap head for eyes. Use the black marker to draw a stitched-on mouth, and the red marker to draw a triangle for a nose.
Step 4: Display Your Scarecrow Your mini scarecrow is all done! You can sit it on the bathroom counter or on top of the toilet tank.
Decorating for Halloween should be fun and creative. As you have seen, the bathroom offers a unique opportunity to do something truly special. It is a small space that can deliver a big impact, leaving a lasting impression on anyone who dares to open the door.
Whether you choose a single creepy prop or transform the entire room, the goal is to create a moment of spooky delight. These ideas are a starting point for your own imagination. So go ahead, pick a theme, and make your washroom the most haunted room in the house this year.
Key Takeaways
- Surprise is Key: The bathroom is an unexpected location for decorations, making any spooky theme more effective.
- Themes for Everyone: You can choose a style that is subtly eerie, playfully spooky, or genuinely terrifying.
- DIY Makes it Special: Simple, homemade props often have the most charm and can be created on a small budget.
- Lighting Matters: Using candles, colored lights, or dimmers is a fast way to create a creepy atmosphere in any space.