Have you ever walked into your master bathroom and felt a sudden slump? An outdated design can completely ruin the feeling of a personal sanctuary. Tired tiles, yellowing fixtures, or cabinets from another decade signal it is time for a substantial change.

February offers the chance to stop dreaming and start doing. This quiet winter month is the best time to plan significant home renovations. Getting your design finalized now means you can book contractors and order materials before the spring rush begins.
We have compiled 42 stunning renovation ideas to transform your master bath entirely. These concepts range from simple DIY fixes to major structural overhauls. Prepare to explore modern floating vanities, spa inspired showers, and bold color schemes. Discover the style that will make your space feel current and luxurious again.
1. Sleek Natural Wood Floating Vanity

A floating vanity brings instant modernization to a master bath. The natural wood grain introduces warmth against cool grey tiles. This contrast creates a balanced atmosphere. You gain visual floor space by lifting the cabinets off the ground. The room feels more spacious and open. Flat panel drawers offer hidden storage to hide clutter. Keeping the counter clean becomes much easier.
The integrated wall niche above the tub complements the vanity design. It provides a spot for soaps and decor. Updating your cabinetry is a smart move for a February renovation. This style remains trendy and functional for a long time. Simple hardware completes the minimalist look. Your bathroom will feel like a private spa retreat.
Material Required
- Oak veneer plywood sheets or pre fabricated cabinet box
- Heavy duty wall mounting brackets
- Quartz countertop slab
- Undermount ceramic sinks
- Matte finish cabinet pulls
- Wood stain and polyurethane sealer
- Wall screws and lag bolts
- Plumbing piping and P traps
- Silicone caulk
- Construction adhesive
Equipment Required
- Stud finder
- Power drill and impact driver
- Laser level or long spirit level
- Circular saw
- Tape measure
- Clamps
- Sander and sandpaper
- Caulk gun
- Plumbing wrench
DIY Instructions Step by Step
Step 1 Locate Wall Studs
Clear the wall area completely. Use your stud finder to locate the wooden studs behind the drywall. Mark the center of each stud with a pencil. This step is critical because the vanity must be anchored to the frame to hold the weight.
Step 2 Install the Mounting Cleat
Cut a piece of lumber to fit the length of your vanity. Place this wood piece on the wall at your desired height. Ensure it is perfectly level using your spirit level. Screw this cleat into the marked studs using heavy lag bolts. This ledge will support the back weight of the cabinet.
Step 3 Prepare the Cabinet Box
Remove all drawers and doors to make the cabinet lighter. Lift the cabinet box and rest the back edge on the mounted cleat. Have a helper hold it in place. Check the level again from front to back and side to side.
Step 4 Secure the Vanity
Drive heavy screws through the back rail of the cabinet directly into the wall studs. Use multiple screws for each stud to ensure security. Verify the cabinet does not shift or wiggle when pressure is applied.
Step 5 Install Countertop and Plumbing
Apply a bead of construction adhesive to the top rim of the cabinet. Carefully lower the quartz countertop into place. Install the faucets and drain lines according to the manufacturer instructions. Connect the water supply lines and tighten them with your wrench.
Step 6 Final Touches
Slide the drawers back into their tracks. Attach the cabinet pulls to the drawer fronts. Apply a thin line of silicone caulk where the countertop meets the wall to prevent water damage. Allow everything to dry for 24 hours before use.
2. Organic Wood Slab Vanity & Pebble Floor

A thick wood countertop serves as the stunning focal point in this bathroom. The natural wood grain introduces warmth against cool grey tiles. This contrast creates a balanced atmosphere. You gain visual floor space by lifting the cabinets off the ground. Walking on the pebble floor feels therapeutic on bare feet. It connects the indoors with nature instantly.
Brass fixtures warm up the neutral color palette effectively. This design turns a daily routine into a calming ritual. You can replicate this look by prioritizing natural materials. Keep the colors neutral while making the textures rich. The open shelf below adds functional storage without bulk. It keeps the area feeling airy and light.
Material Required
- Thick solid wood slab (oak or teak recommended)
- Heavy duty steel floating brackets
- Clear matte polyurethane sealer
- White ceramic undermount or vessel sink
- Wall mount faucet rough in valve
- Drain assembly, P trap, and supply lines
- Sandpaper (various grits)
- Wood screws and heavy duty wall anchors
Equipment Required
- Orbital sander
- Power drill with drill bits
- Stud finder
- Spirit level
- Jigsaw (for sink cutout)
- Paintbrush or foam roller
- Tape measure
- Pencil
DIY Instructions Step by Step
Step 1 Prepare the Wood Slab
Sand your wood slab thoroughly until it feels smooth to the touch. Start with coarse grit paper and move to fine grit. Wipe away all the dust with a tack cloth. Apply at least four coats of waterproof polyurethane sealer. Allow each coat to dry completely before applying the next one. This protects the wood from water damage and humidity.
Step 2 Locate and Mark Wall Studs
Use a stud finder to locate the sturdy wooden beams behind your drywall. Mark these locations clearly with a pencil. You need strong structural support for a heavy wood slab. Determine the height you want for your vanity. Draw a level line across the wall at that height.
Step 3 Install the Brackets
Hold your heavy duty brackets against the wall at the marked stud locations. Ensure they are perfectly vertical using a spirit level. Drill pilot holes into the studs to prevent the wood from splitting. Drive heavy lag bolts through the bracket holes into the studs. Check that the brackets are solid and level with each other.
Step 4 Cut the Sink Hole
Measure your sink template carefully on the wood slab. Use a drill to make a starter hole inside your marked line. Insert your jigsaw blade into this hole. Cut along the line steadily to create the opening for the sink. Test the fit to ensure the sink sits flush.
Step 5 Mount the Countertop
Lift the heavy wood slab onto the installed brackets. You might need a helper for this step. Secure the slab to the brackets from underneath using wood screws. Make sure the screws are short enough so they do not poke through the top surface.
Step 6 Install Plumbing
Place the sink into the cutout you created. Apply a bead of silicone around the rim to seal it. Connect the drain assembly and the P trap underneath. Install your wall mount faucet according to the manufacturer guide. Turn on the water to test for any leaks.
3. Industrial Grid Shower Enclosure

Industrial design gets a soft update with leather accents. The black grid shower screen defines the wet area clearly. It frames the shower like a piece of art. Concrete grey tones provide a cool backdrop. Bright towels add necessary warmth and contrast. Leather pull tabs on the vanity are a unique touch. They replace traditional metal hardware for a softer feel. This renovation style suits a modern urban aesthetic. It feels strong yet inviting.
Material Required
- Fixed glass shower panel with black grid frame
- U channel mounting rail (usually included with kit)
- Clear silicone sealant
- Wall anchors and stainless steel screws
- Leather strips (for vanity pulls)
- Brass binding bolts (Chicago screws)
- Masking tape
- Plastic shims
Equipment Required
- Hammer drill (for tile or concrete)
- Masonry drill bits
- Caulk gun
- Level
- Rubber mallet
- Screwdriver
- Tape measure
- Utility knife
DIY Instructions Step by Step
Step 1 Measure and Mark
Determine exactly where the glass panel will sit on your floor or curb. Use a level to draw a plumb line up the wall. This ensures your glass will stand straight up and not lean. Mark the screw holes for the U channel or mounting brackets on the wall and floor.
Step 2 Drill Mounting Holes
Cover your drill marks with masking tape to prevent the tile from cracking. Use a masonry bit to drill slowly into the tile. Tap your wall anchors gently into the holes with a rubber mallet. Remove the masking tape once the anchors are flush with the wall.
Step 3 Install the Channel
Apply a thin bead of silicone to the back of the metal U channel. Press it firmly against the wall and floor lines you marked. Screw the channel into the anchors using a screwdriver. Verify the channel is tight and secure against the tile.
Step 4 Insert the Glass Panel
Apply a small amount of silicone inside the channel track. Lift the glass panel carefully. Insert it into the wall channel first and then lower it into the floor channel. Place small plastic shims under the glass if needed to make it level.
Step 5 Seal the Edges
Run a continuous bead of clear silicone along both sides of the glass where it meets the metal frame and the tile. Smooth the silicone with a wet finger or a caulking tool for a clean finish. This prevents water from leaking out of the shower area.
Step 6 Create Leather Pulls
Cut your leather strips into equal lengths for the vanity handles. Fold a strip in half to create a loop. Punch a hole through both ends of the folded leather. Insert a brass binding bolt through the vanity drawer hole and the leather loop. Tighten the screw from the inside of the drawer. Repeat for all drawers.
4. Geometric Pattern & Organized Wood Vanity

A bold floor pattern transforms a plain bathroom into a statement space. The black and white geometric tiles add energy and movement. They contrast beautifully with the calm light wood vanity. This combination keeps the room from feeling too sterile or cold. The white subway tiles on the wall provide a quiet backdrop. This lets the floor remain the star of the show.
Organization is key in this renovation concept. The vanity features deep drawers with custom dividers. Every item has a specific home. This reduces countertop clutter significantly. The unique octagonal mirror adds a modern geometric touch. Integrated lighting around the mirror frame eliminates harsh shadows. This space blends classic and modern vibes well.
Material Required
- Patterned ceramic or porcelain floor tiles
- Thinset mortar suitable for bathrooms
- Sanded or unsanded grout (dark grey recommended)
- Tile spacers (1/8 inch or 1/16 inch)
- Waterproof underlayment membrane
- Silicone caulk
- Wood vanity with drawer dividers
Equipment Required
- Manual tile cutter or wet saw
- Notched trowel
- Rubber grout float
- Large sponge and bucket
- Rubber mallet
- Spirit level
- Knee pads
- Tape measure and chalk line
DIY Instructions Step by Step
Step 1 Prepare the Subfloor
Ensure your floor is completely clean and level. Install a waterproof underlayment membrane over the subfloor. Apply a thin layer of mortar to secure the membrane. Smooth out any air bubbles with a flat trowel. This step prevents cracks and water damage later.
Step 2 Plan the Layout
Find the center point of the room. Snap a chalk line to mark your starting point. Dry lay a row of tiles to check how the pattern fits at the edges. Adjust your starting line if you end up with tiny slivers of tile at the walls.
Step 3 Apply the Mortar
Mix your thinset mortar according to the bag instructions. Spread it onto a small section of the floor using the notched side of your trowel. Hold the trowel at a 45 degree angle to create consistent ridges.
Step 4 Lay the Tiles
Press the first tile firmly into the mortar. Twist it slightly to ensure good adhesion. Place tile spacers at the corners to keep gaps even. Continue laying full tiles to complete the main floor area. Check frequently with a level to ensure no tile is sticking up higher than the others.
Step 5 Cut and Install Edges
Measure the remaining gaps at the walls. Mark your tiles and cut them using a tile cutter or wet saw. Spread mortar on the back of these cut pieces (back buttering) before placing them. This ensures they stick well in tight spots. Allow the floor to cure for 24 hours.
Step 6 Grout the Floor
Remove the spacers. Mix your grout to a peanut butter consistency. Spread it over the tiles using a rubber float. Push the grout diagonally into the joints to fill them completely. Wipe away excess grout with a damp sponge. Rinse your sponge often to avoid haze. Let it dry and buff with a clean cloth.
5. Modern Concrete Vessel & Marble Contrast

Concrete sinks add an industrial edge to a modern vanity. The grey stone texture contrasts sharply with the white countertop. Black faucets creates a bold silhouette against the wall. Lighted mirrors offer shadow free reflection. The monochrome palette feels sophisticated and timeless. Large drawers provide ample storage for toiletries. This renovation updates a bathroom instantly. It looks expensive but uses simple materials. The geometric floor tiles add a playful pattern underfoot.
Material Required
- Concrete vessel sinks (square or rectangle)
- Pop up drains (non overflow style)
- High rise vessel faucets (matte black)
- Clear silicone sealant
- Plumbers putty
- Water supply lines (braided stainless steel)
- Painter tape
Equipment Required
- Power drill with hole saw bit (if counter is not pre drilled)
- Adjustable wrench
- Caulk gun
- Channel lock pliers
- Pencil
- Bucket and rag
DIY Instructions Step by Step
Step 1 Position the Sinks
Place your new vessel sinks on the countertop. Move them until you find the spot that looks best and aligns with the plumbing below. Measure from the back wall to ensure they are even. Mark the drain hole location on the counter with a pencil.
Step 2 Drill Counter Holes
If your countertop does not have holes, you must drill them. Use a diamond hole saw bit suitable for your counter material. Drill slowly and use water to keep the bit cool. Clean away all dust and debris once the holes are cut.
Step 3 Install the Faucets
Install the tall vessel faucets into their designated holes. Tighten the mounting nuts from underneath the cabinet. Connect the hot and cold water supply lines to the shut off valves. Hand tighten them and then give a quarter turn with a wrench.
Step 4 Prepare the Drains
Apply a ring of plumbers putty around the top flange of the drain assembly. Insert the drain through the hole in the bottom of the sink. From underneath, slide on the rubber gasket and the tightening nut. Screw it on but do not fully tighten yet.
Step 5 Mount the Sinks
Apply a bead of clear silicone to the bottom edge of the concrete sink. Carefully lower the sink over the hole in the countertop. Press down firmly to create a seal. Immediately wipe away any silicone that squeezes out.
Step 6 Final Connections
Connect the drain tailpiece to the P trap under the sink. Tighten all nuts on the drain assembly. Turn on the water supply valves. Run the water and check for leaks at the faucet base and the drain connections. Tighten slightly if you see any drips.
6. Living Wall Green Spa Sanctuary

Biophilic design brings the calming power of nature into your bathroom. The large moss wall art is the hero of this space. It adds soft texture and vibrant green color without maintenance. Vertical green subway tiles in the shower echo this natural theme. They make the ceiling feel higher than it is. The room feels fresh and oxygenated.
A skylight floods the white space with natural sunshine. This keeps the plants and the mood bright. The built in bench offers a spot to relax or store extra towels. Wood tones on the bench seat warm up the grey floor tiles. This design balances hard surfaces with organic softness. You can relax here after a long day.
Material Required
- Plywood sheet (for backing)
- Wood trim molding (for frame)
- Preserved moss (various shades and textures like mood moss or sheet moss)
- Faux fern or air plant accents
- Hot glue sticks (bulk pack)
- Wood stain or paint
- Heavy duty picture hangers
Equipment Required
- Hot glue gun
- Circular saw or hand saw
- Hammer and finish nails
- Staple gun
- Paintbrush
- Stud finder
- Level
DIY Instructions Step by Step
Step 1 Build the Frame
Cut your plywood sheet to the desired size for your art piece. Cut the wood trim to fit around the edges of the plywood. Attach the trim using wood glue and finish nails. Sand the frame edges to remove splinters. Stain or paint the frame and let it dry completely.
Step 2 Plan the Design
Lay out your preserved moss on a table before gluing. Mix different shades of green to create depth. Group round mood moss clumps together for hills. Use flat sheet moss for the background. Place faux ferns or air plants in clusters to mimic natural growth patterns.
Step 3 Glue the Moss
Work in small sections. Apply a generous amount of hot glue to the plywood backing. Press the moss firmly into the glue. Hold it for a few seconds until it sets. Pack the moss tightly together so no plywood shows through. Be careful with the hot glue gun to avoid burns.
Step 4 Add Detail
Once the base layer is done, add your accent plants. Glue them into the crevices between the moss clumps. This creates a 3D effect. Check the edges of the frame to ensure the moss looks neat and contained.
Step 5 Install Hanging Hardware
Flip the frame over carefully. Install heavy duty D ring hangers or a French cleat system on the back. This art piece will be heavier than it looks. Measure the distance between hangers.
Step 6 Mount on Wall
Use a stud finder to locate a secure spot on the bathroom wall. If studs are not available, use heavy duty drywall anchors. Insert your screws and hang the moss wall. Use a level to ensure it hangs straight. The preserved moss needs humidity but no direct water, so the bathroom environment suits it well.
7. Timeless Oak Tower & Marble Shower

Vertical storage is a game changer for shared bathrooms. This tall oak cabinet utilizes vertical space efficiently. You get ample room for towels without sacrificing floor area. The natural wood grain warms up the cool marble surfaces nearby. Brass fixtures add a touch of vintage luxury to the room.
This layout proves that traditional materials never go out of style. The open shelves allow for decorative display. Closed drawers hide the daily clutter away. It balances practical needs with high end aesthetics. Your morning routine becomes smoother with everything within reach. This renovation choice adds significant value to your home.
Material Required
- Pre built tall linen cabinet or plywood for custom build
- Marble tiles for shower walls
- Brass shower fixtures (rain head and handheld)
- Thinset mortar and white grout
- Wood shims
- Cabinet screws (3 inch)
- Wood trim for filler strips
- Clear silicone caulk
Equipment Required
- Power drill and driver bits
- Tile saw (wet saw)
- Notched trowel
- Rubber grout float
- Spirit level (4 foot)
- Stud finder
- Clamps
- Tape measure
DIY Instructions Step by Step
Step 1 Plan the Cabinet Placement
Measure the available floor space next to your vanity. Ensure the tall cabinet will not block the entry door or shower door. Mark the footprint on the floor with tape. Use a stud finder to locate studs in the wall behind the cabinet location.
Step 2 Level the Base
Place the cabinet box in the marked spot. Floors are rarely perfectly flat. Use your spirit level to check if the cabinet stands straight. Insert wood shims under the corners until the bubble on the level is centered. Snap off the excess parts of the shims.
Step 3 Secure to Wall
Drill pilot holes through the back mounting rail of the cabinet. Drive long cabinet screws through these holes directly into the wall studs. This prevents the tall tower from tipping over. Verify it is solid by giving it a gentle shake.
Step 4 Install Filler Strips
If there is a gap between the cabinet and the wall, you need a filler strip. Cut a piece of wood trim to match the gap width. Scribble the wall contour onto the wood if the wall is uneven. Glue or nail this strip in place for a custom built look.
Step 5 Tile the Shower
Apply mortar to the shower walls using a notched trowel. Press your marble tiles into the mortar. Use spacers to keep lines straight. Once the mortar cures, apply white grout to the joints. Sponge off the excess and let it haze over before buffing.
Step 6 Install Fixtures
Wrap plumber tape around the threads of the shower pipe. Screw on the brass shower arm and head. Tighten them carefully with a wrench. Protect the finish with a cloth while tightening. Caulk around the escutcheon plate to seal the hole.
8. Emerald Art Deco Powder Room

Bold wallpaper makes a small space feel grand. This green fan pattern brings Art Deco glamour to 2025. The matching green vanity creates a seamless monochrome look. Gold mirrors and sconces pop against the dark background. It feels like stepping into a luxury hotel.
The black and white floor tiles ground the vibrant colors. A window seat offers a cozy touch in an unexpected place. This design is not for the faint of heart. It rewards those who embrace color fully. You can transform a boring bathroom into a jewel box with this approach. Every guest will leave with a lasting impression.
Material Required
- Patterned wallpaper rolls (buy 15 percent extra)
- Wallpaper paste (if not pre pasted)
- Green semi gloss paint for vanity
- Gold finish mirrors
- Wall sconces
- Sandpaper and tack cloth
- Painter tape
- Primer suitable for wallpaper
Equipment Required
- Wallpaper smoothing tool
- Utility knife with fresh blades
- Paint roller and brushes
- Scissors
- Stepladder
- Plumb bob or laser level
- Sponge and water bucket
- Screwdriver
DIY Instructions Step by Step
Step 1 Prep the Walls
Fill any holes or cracks in the drywall with spackle. Sand the walls smooth once dry. Apply a coat of wallpaper primer. This helps the paper stick better and makes removal easier later. Remove all outlet covers and switch plates.
Step 2 Establish a Plumb Line
Wallpaper patterns must be straight. Use a laser level or a plumb bob to draw a vertical line on the wall. Start your first strip aligned with this line rather than the corner of the room. Corners are often not straight.
Step 3 Apply the First Strip
Apply paste to the back of the paper or the wall depending on the product type. Book the paper by folding it on itself for a few minutes to activate the glue. Hang the first strip at the top of the wall. Smooth it down with your tool to remove air bubbles.
Step 4 Match the Pattern
Hold the second strip up to the wall next to the first one. Slide it up or down until the fan pattern aligns exactly. This is crucial for a professional look. Press the seam together gently. Use a seam roller to ensure edges do not lift. Trim the excess paper at the ceiling and baseboard with a sharp knife.
Step 5 Paint the Vanity
Remove the vanity doors and drawers. Sand the surfaces lightly to remove the glossy finish. Wipe away dust. Apply a high quality primer. Paint two coats of emerald green semi gloss paint. Let it cure fully before reattaching the hardware.
Step 6 Mount Mirrors and Lights
Locate the electrical boxes for your sconces. Connect the wires matching black to black and white to white. Screw the fixtures into the box. Hang your gold mirrors centered between the lights. Ensure they are at a comfortable height for viewing.
9. Mediterranean Arches & Terrazzo

Bring the vacation vibes home with this sunny design. The terrazzo tiling adds playful speckles of color everywhere. An arched shower entrance softens the architectural lines. It mimics the look of Greek or Italian villas. Bright blue and yellow paint blocks create a cheerful mood.
The concrete vanity adds a rustic and handmade feel. Woven baskets provide texture and easy storage. This style celebrates imperfection and warmth. It feels organic and lived in rather than sterile. You will feel energized every time you step inside. It is a breath of fresh air for a master bath.
Material Required
- Drywall sheets (flexible type for arch)
- Wood framing studs (2×4)
- Arch corner bead
- Joint compound
- Terrazzo style floor tiles
- Plaster finish paint
- Concrete mix (for vanity top)
- Melamine board (for concrete mold)
Equipment Required
- Jigsaw
- Drywall screw gun
- Trowel and hawk
- Sanding block
- Tile cutter
- Mixing paddle and drill
- Bucket
- Tin snips
DIY Instructions Step by Step
Step 1 Frame the Arch
Build a standard rectangular door frame using 2×4 lumber. Cut two pieces of plywood into the shape of your arch curve. Screw these plywood arches into the top corners of the frame. Install short blocking pieces between the plywood curves to support the drywall.
Step 2 Install Drywall
Cut drywall to fit the flat face of the wall. For the curved underside of the arch, use a strip of flexible drywall or score the back of regular drywall so it bends. Screw it carefully into the framing. Do not force it too hard or it will snap.
Step 3 Mud and Tape
Apply the arch corner bead to the curved edges. This plastic or metal strip creates a crisp line. Staple or spray glue it in place. Apply joint compound over the bead and the screw holes. smooth it out with a trowel. You will need multiple thin coats. Sand until perfectly smooth.
Step 4 Pour Concrete Top
Build a mold using smooth melamine board to the size of your vanity top. Insert a foam knockout where the sink drain will go. Mix your concrete and pour it into the mold. Vibrate the mold with a hammer to release air bubbles. Let it cure for at least 48 hours before demolding.
Step 5 Install Terrazzo Tile
Lay your terrazzo tiles on the floor and shower walls. Use a white thinset mortar to prevent color bleed. Grout with a light color to blend with the tile background. Seal the tiles well as terrazzo can be porous.
Step 6 Apply Plaster Finish
Roll or trowel a plaster texture paint onto the walls. This gives that authentic Mediterranean stucco look. Paint color blocks in blue or yellow as desired. The texture hides minor wall imperfections well.
10. Moody Floral & Fluted Wood Maximalism

Maximalism creates a cozy and enveloped feeling here. The dark floral wallpaper sets a dramatic and romantic tone. Teal wainscoting anchors the busy pattern visually. The fluted wood vanity adds modern texture to the mix. It catches the light beautifully with its ridges.
A bright pink rug breaks up the darkness with fun color. Crystal chandeliers add necessary sparkle and height. This space feels personal and curated over time. It shows that you can mix eras and styles successfully. You will love the richness and depth of this design. It turns a bathroom into a true sanctuary.
Material Required
- Half round wood trim molding (lots of linear feet)
- Construction adhesive
- Pin nails
- Existing flat vanity or plywood box
- Wood stain (walnut or oak)
- Wainscoting panels or beadboard
- Dark teal paint
- Floral wallpaper
Equipment Required
- Miter saw
- Pin nailer or brad nailer
- Caulk gun
- Paint sprayer or brush
- Laser level
- Measuring tape
- Sandpaper
DIY Instructions Step by Step
Step 1 Prepare the Vanity
Clean the surface of your vanity doors and drawers. Scuff sand them so the glue holds better. If the doors have raised panels, you might need to flip them over or replace them with flat plywood for the fluting.
Step 2 Cut the Fluting
Measure the height of your drawer fronts and doors exactly. Set up a stop block on your miter saw to cut many pieces of half round trim to the exact same length. You will need dozens of pieces. Sand the cut ends lightly.
Step 3 Attach the Trim
Apply a zigzag of construction adhesive to the back of a trim piece. Press it onto the vanity door starting at the far left edge. Secure it with a few pin nails. Place the next piece tightly against the first. Repeat until the entire face is covered.
Step 4 Stain and Seal
Once the glue is dry, sand the entire surface to ensure the wood is even. Apply your wood stain with a rag, getting into all the grooves. Wipe off excess. Finish with a matte polyurethane sealer to protect it from water splashes.
Step 5 Install Wainscoting
Measure up from the floor to about chair rail height (usually 36 inches). Cut your beadboard or wainscoting panels to fit. Glue and nail them to the lower wall. Top it with a cap molding. Paint this lower section in a deep teal color.
Step 6 Hang Wallpaper
Apply the dark floral wallpaper on the upper half of the walls. Cut around the vanity mirror or sconces carefully. The dark pattern hides seams well, making it a forgiving project for beginners. Add your pink rug and accessories last.
11. Rustic Farmhouse Barn Door Suite

This bathroom captures the essence of modern farmhouse style. The white shiplap walls brighten the room immediately. They provide a crisp texture that drywall lacks. The sliding barn door mechanism on the shower is the standout feature. It saves space and adds industrial character with its black hardware.
Wood elements in the vanity and mirror frames warm up the white palette. The trough style sink is both practical and nostalgic. Industrial cage lights complete the look effectively. This design feels cozy yet clean. It is a great choice for updating a guest bath. The classic colors ensure it stays stylish for years.
Material Required
- Pre primed shiplap boards (MDF or wood)
- Construction adhesive
- Barn door glass shower kit
- Black matte shower faucet
- Industrial vanity light fixture
- Reclaimed wood mirror
- White silicone caulk
- Finish nails
Equipment Required
- Miter saw
- Brad nailer (air or electric)
- Stud finder
- Level (4 foot)
- Drill and masonry bits
- Caulk gun
- Jigsaw
- Measuring tape
DIY Instructions Step by Step
Step 1 Install Shiplap
Locate your wall studs and mark them. Cut your shiplap boards to length. Apply adhesive to the back of the first board. Nail it to the studs starting from the bottom of the wall. Use the tongue and groove system to stack the next board on top. Check the level every few rows.
Step 2 Prepare Shower Opening
Ensure your shower curb and walls are tiled and waterproofed. Measure the opening width exactly at the top, middle, and bottom. The barn door rail needs solid backing. If your walls are finished, you may need heavy duty anchors.
Step 3 Mount the Top Rail
Position the metal rail track above the shower entry. Use a laser level to ensure it is absolutely straight. Mark the mounting holes. Drill into the tile or wall studs. Secure the rail with the provided bolts. This track holds the heavy glass door.
Step 4 Hang the Glass Door
Attach the roller wheels to the top of the glass panel. Carefully lift the glass and set the wheels onto the track. Install the stopper blocks on the rail ends. These prevent the door from sliding off the track.
Step 5 Install the Guide
Place the floor guide at the bottom of the shower entry. This small piece keeps the glass from swinging in and out. Screw it into the threshold or curb. Slide the door back and forth to test for smooth movement.
12. Shimmering Ocean Mosaic Retreat

Immerse yourself in color with this bold tile design. The small blue mosaic tiles cover the walls and ceiling completely. They reflect light like water in a pool. This creates a soothing and aquatic atmosphere. The white vanity cuts through the blue to offer visual relief.
A large lighted mirror adds modern functionality. It provides even illumination for grooming. The glass shower partition keeps the room feeling open. You do not feel closed in despite the intense color. This renovation turns a plain bathroom into a high end spa. It is a brave choice that pays off in style.
Material Required
- Glass mosaic tile sheets (blue mix)
- White thinset mortar (polymer modified)
- Non sanded grout (white or light grey)
- Tile spacers (1/16 inch)
- Waterproofing membrane
- LED backlit mirror
- Glass shower panel
- Silicone sealant
Equipment Required
- Notched trowel (V notch for mosaics)
- Rubber grout float
- Tile nippers or wet saw
- Laser level
- Grout sponge
- Drill
- Bucket and mixer
DIY Instructions Step by Step
Step 1 Waterproofing
Apply a liquid waterproofing membrane to all wet area walls. Apply two coats for safety. Let it dry completely. This is critical for mosaic tiles as they have many grout lines.
Step 2 Apply Thinset
Mix your white thinset. Do not use grey mortar as it shadows through glass tile. Spread it with a V notch trowel. Flatten the ridges slightly to get full coverage on the small tiles.
Step 3 Install Mosaic Sheets
Press the tile sheets into the mortar. Use a flat board or grout float to beat them in gently. This ensures the surface is flat. Align the gaps between sheets so you cannot see the seams. Cut individual tiles with nippers to fit around outlets.
Step 4 Grout the Walls
Wait 24 hours for the tile to set. Mix non sanded grout to a smooth paste. Spread it diagonally across the tiles. Push it deep into the many joints. Wipe away the excess with a damp sponge. Repeat the wiping process until the glass sparkles.
Step 5 Mount the Mirror
Hold the mounting bracket for your LED mirror against the wall. Mark the screw holes. Drill through the tile using a diamond bit. Insert anchors and screw the bracket in place. Connect the wiring if it is hardwired or plug it in. Hang the mirror on the bracket.
13. Sleek Grey & Tech Vanity

This bathroom prioritizes efficiency and modern lines. The large format grey tiles make the room look expansive. They require fewer grout lines which makes cleaning simple. The double vanity offers plenty of personal space for two people. Clean white countertops contrast sharply with the grey cabinets.
The tall lighted mirrors are the focal point here. They provide excellent task lighting without casting shadows. Brushed nickel faucets add a soft metallic touch. This design is timeless and functional. It suits a busy couple who need a streamlined morning routine.
Material Required
- Large format porcelain tiles (12×24 inch)
- Double vanity cabinet (grey finish)
- Quartz countertop with dual sinks
- Two LED vertical mirrors
- Widespread faucets (brushed nickel)
- Tile leveling clips and wedges
- Plumbing p traps and supply lines
Equipment Required
- Large tile cutter
- Level (long)
- Drill
- Adjustable wrench
- Notched trowel (1/2 inch)
- Suction cup handle (for lifting tile)
- Chalk line
DIY Instructions Step by Step
Step 1 Plan Tile Layout
Find the center of the wall. Plan your tile rows so you do not have tiny slivers at the corners. Snap a chalk line to guide your first row. This ensures the pattern stays straight up the wall.
Step 2 Install Large Tiles
Spread mortar on the wall and back butter the tile. Place the tile and insert leveling clips under the edges. Place the next tile and slide the wedges into the clips. Tighten the wedges to force the tiles to be perfectly flat with each other.
Step 3 Install the Vanity
Locate the wall studs. Place the vanity cabinet in position. Check that it is level. Shim the bottom if necessary. Screw the cabinet back into the studs. This heavy unit needs strong anchoring.
Step 4 Connect Plumbing
Install the faucets onto the countertop before placing it. Apply silicone to the cabinet top. Lower the heavy counter into place. Connect the drain pipes and water lines underneath. Turn on the water to test for leaks.
Step 5 Hang Mirrors
Measure the distance between the two sinks. Center your mirrors over each basin. Mark the hanging points. Use heavy duty drywall anchors or toggle bolts. Hang the mirrors and connect the power source.
14. Accessible Sage Green Oasis

Safety meets style in this thoughtful renovation. The barrier free shower allows for easy entry without tripping. A built in bench provides a secure place to sit. Grab bars are installed but look like stylish towel rails. The sage green wall color promotes relaxation and calm.
The wood vanity adds warmth to the medical grade functionality. Contrasting tile borders add visual interest to the shower walls. This bathroom allows for aging in place with dignity. It does not look clinical or cold. It feels like a safe and welcoming retreat.
Material Required
- Curbless shower pan kit
- Slip resistant floor mosaic
- Grab bars (ADA compliant)
- Fold down shower seat
- Sage green paint (mildew resistant)
- Handheld shower head with slide bar
- Subway tile and glass accent tile
Equipment Required
- Reciprocating saw (for drain adjustment)
- Drill with masonry bits
- Stud finder
- Trowel
- Paint roller and tray
- Level
- Screwdriver
DIY Instructions Step by Step
Step 1 Install Blocking
Before tiling, open the wall to install wood blocking. Screw 2×6 lumber between the studs where you plan to mount grab bars and the seat. This provides solid support that drywall anchors cannot offer.
Step 2 Set the Pan
Install the curbless shower pan level with your subfloor. This might require recessing the floor joists. Connect the drain. Waterproof the entire floor area and up the walls.
Step 3 Tile and Grout
Lay your slip resistant mosaic floor. Tile the walls with subway tile. Add the decorative glass border at eye level. Grout everything and seal it well.
Step 4 Install Safety Accessories
Locate your wood blocking marks. Drill through the finished tile. Mount the grab bars and the folding seat securely. Use stainless steel screws to prevent rust.
Step 5 Paint the Walls
Apply painters tape to the tile edges and ceiling. Roll on two coats of sage green paint. Remove the tape while the paint is still slightly wet for a crisp line.
15. Vibrant Blue & Yellow Energy

Color brings this windowless bathroom to life. The sky blue walls make the small space feel airy. Bright yellow accessories add a pop of sunshine. The grey double vanity grounds the colorful room. Lighted mirrors add depth and brightness.
This design shows that family bathrooms can be fun. The layout is practical with plenty of counter space. The colors are energetic and happy. It is a great way to wake up in the morning. Changing paint and towels is an easy way to get this look.
Material Required
- Semi gloss paint (Sky Blue)
- Double vanity with quartz top
- Two LED backlit mirrors
- Brushed nickel faucets
- Yellow decor items (towels, soap dispenser)
- Baseboard molding (PVC recommended)
- Vanity lights
Equipment Required
- Paint roller and edger
- Drill
- Screwdriver
- Caulk gun
- Level
- Stud finder
- Utility knife
DIY Instructions Step by Step
Step 1 Painting
Remove all hardware and switch plates. Clean the walls with TSP substitute. Apply a high quality primer. Paint the walls with two coats of semi gloss blue. This finish withstands humidity better than flat paint.
Step 2 Vanity Installation
Position the vanity cabinet. Ensure the plumbing pipes align with the back openings. Secure the cabinet to the wall studs. Apply silicone to the top edge. Place the countertop on the cabinet.
Step 3 Electrical Upgrades
Turn off the power at the breaker. Remove old light fixtures. Install the new backlit mirrors. Connect the wires matching colors (white to white, black to black, ground to green). Secure the mirrors to the wall brackets.
Step 4 Install Baseboards
Measure the wall lengths. Cut PVC baseboard to fit. PVC is better than wood for bathrooms as it does not rot. Glue it to the wall with construction adhesive and a few brad nails. Caulk the top edge for a clean finish.
Step 5 Accessorize
Install towel rings and robe hooks. Add your yellow towels and accessories. The high contrast between blue and yellow creates the vibrant look.
16. The Laundry Bath Combo

Maximize utility by combining laundry and bath functions. This layout places a stacked washer and dryer in a custom alcove. White cabinetry hides supplies and keeps the look cohesive. The pull out storage rack is a genius addition for detergents.
Sage green walls keep the room feeling fresh, not like a utility closet. The countertop extends over the cabinets for folding space. This concept is brilliant for smaller homes or apartments. It turns a chore area into a pleasant part of the home.
Material Required
- Stacked washer and dryer unit
- Stock kitchen cabinets (white)
- Pull out wire organizer
- Laminate or stone countertop
- Green wall paint
- Plumbing hookups for laundry
- Dryer vent kit
Equipment Required
- Appliance dolly
- Drill
- Circular saw (for counter cut)
- Level
- Hole saw (for venting)
- Wrench
- Stud finder
DIY Instructions Step by Step
Step 1 Frame the Alcove
Build a partition wall if one does not exist to separate the laundry appliances. Ensure you have the correct electrical outlet (240V) and venting access for the dryer.
Step 2 Install Cabinets
Install the base cabinets next to the appliance alcove. Level them and screw them together. Anchor them securely to the wall studs. Leave the correct opening width for the fridge.
Step 3 Countertop Installation
Cut the countertop to span across the base cabinets. Secure it from underneath with screws. Cut a hole for the sink. Install the sink and faucet.
Step 4 Position Appliances
Connect the water hoses and vent hose to the washer and dryer. Plug them in. Carefully slide the stacked unit into the alcove. Ensure the vent hose does not get crushed behind the machine.
Step 5 Final Paint
Paint the walls in the soft green shade. This separates the zone visually from the white cabinetry. Install a tension rod or drying rack if space permits.
17. Dark Industrial Shower Tower

This shower design makes a bold, masculine statement. The large dark grey tiles create a moody and dramatic backdrop. A black shower tower panel replaces standard fixtures. It offers body jets and a rainfall head in one unit. The green accent wall adds an organic touch.
The dark wood floating vanity adds warmth to the charcoal tones. This look is modern and sophisticated. It requires good lighting to keep it from feeling too cave like. The result is a high end, hotel style experience.
Material Required
- Large format charcoal porcelain tiles
- Black shower tower panel
- Green accent tiles or paint
- Dark wood floating vanity
- Black matte drain cover
- Thinset mortar (grey)
- Grout (charcoal)
Equipment Required
- Tile cutter (large capacity)
- Drill with diamond bit
- Level
- Notched trowel
- Wrenches
- Grout float
- Spacer clips
DIY Instructions Step by Step
Step 1 Tile Installation
Install the dark tiles in a vertical stack or brick pattern. Use grey thinset. Use leveling clips to ensure the large tiles remain flat and lip free. Grout with a matching charcoal color for a seamless look.
Step 2 Install Shower Tower
Locate the water supply nipples on the wall. Shower towers usually require standard hot and cold outlets. Attach the flexible hoses from the back of the tower to your wall pipes. Drill mounting brackets into the tile using a diamond drill bit.
Step 3 Mount the Panel
Hang the shower tower onto the brackets. Check that it is plumb. Turn on the water to test all the jets and the rainfall head. Ensure there are no leaks behind the panel. Seal the edges with silicone.
Step 4 Vanity Mounting
Mark the height for your floating vanity. Reinforce the wall if necessary. Drive lag bolts through the vanity back into the studs. Ensure it is perfectly level. Install the sink and faucet.
Step 5 Lighting
Install bright recessed lighting in the ceiling. Dark bathrooms need extra lumens. Aim a light specifically at the shower area to highlight the dark tile texture.
18. The Ultimate Linen Tower

Conquer clutter with a dedicated vertical storage system. This tall cabinet maximizes the space between the studs or in a corner. The mix of open shelving and drawers is practical. Open shelves hold towels for guests. Drawers hide toiletries and small items.
The grey finish is neutral and calming. Gold hardware adds a touch of elegance. The pull out drawers are built with dividers. This keeps makeup and tools organized. This renovation focuses on functionality first. It is a life saver for shared bathrooms.
Material Required
- Tall cabinet unit (custom or semi custom)
- Drawer organizers/dividers
- Gold cabinet pulls
- Cabinet screws
- Shims
- Trim molding
- Touch up paint
Equipment Required
- Drill
- Clamps
- Level (4 foot)
- Miter saw (for trim)
- Screwdriver
- Stud finder
- Tape measure
DIY Instructions Step by Step
Step 1 Assemble the Cabinet
If your unit is flat pack, assemble it according to instructions. Use wood glue in the joints for extra strength. If it is pre assembled, remove the drawers to make it lighter to move.
Step 2 Position and Level
Place the tower in its designated spot. Use a long level to check vertical alignment. The floor is likely uneven. Tap shims under the low corners until the bubble is centered.
Step 3 Anchor to Wall
Find the studs behind the cabinet. Pre drill holes in the cabinet’s back rail. Drive 3 inch cabinet screws into the studs. This is crucial for safety as tall cabinets can tip.
Step 4 Install Drawers
Slide the drawer rails into place. Insert the drawers. Test their motion. If they stick, adjust the rails slightly. Install the custom dividers inside the drawers.
Step 5 Hardware and Trim
Drill holes for the gold handles. Screw them on tightly. Measure and cut trim molding to cover any gaps between the cabinet and the ceiling or wall. Nail the trim in place.
19. Pink Stone & Vertical Texture

Soft colors meet modern texture in this chic design. The pink stone countertop is the star attraction. It adds a feminine and playful touch. The white vanity features vertical fluting which is very trendy. The wall tiles are also stacked vertically to emphasize height.
A large circular mirror softens the linear patterns. The bidet toilet adds a layer of modern luxury and hygiene. Gold sconces flank the mirror for balanced light. This room feels fresh, young, and curated. It proves that pink can be sophisticated.
Material Required
- Pink quartz or terrazzo countertop
- White vanity with fluted detail
- Vertical subway tiles (white)
- Round LED mirror
- Gold wall sconces
- Smart bidet toilet seat
- Gold towel warmer
Equipment Required
- Tile saw
- Drill
- Notched trowel
- Level
- Wrench
- Screwdriver
- Grout float
DIY Instructions Step by Step
Step 1 Vertical Tiling
Plan your tile layout. Instead of the usual brick pattern, stack the tiles directly on top of each other. This creates modern lines. Use spacers to keep the vertical lines straight. Grout with white or light grey.
Step 2 Vanity and Top
Install the white vanity base securely. Apply adhesive to the top rim. Lower the pink stone countertop carefully. It is heavy and brittle, so handle with care. Backsplash installation comes next if you have a matching piece.
Step 3 Electrical Fixtures
Install the electrical boxes for the sconces on either side of the mirror location. Connect the gold sconces. Mount the round mirror in the center. Ensure the lights are level with each other.
Step 4 Bidet Install
Turn off the water to the toilet. Remove the old seat. Install the mounting plate for the bidet seat. Connect the T valve to the water supply line. Connect the bidet hose. Snap the seat onto the plate. Plug it in if it is electric.
Step 5 Final Details
Install the gold towel warmer or rack. The gold finish ties in with the lighting. Test all water connections and lights.
20. Bold Blue Subway with Yellow Stripe

Traditional style gets a colorful update here. The deep blue subway tiles create a rich wainscoting effect. A bold yellow stripe tile adds a surprising sporty accent. The dark wood vanity grounds the colorful walls with classic elegance.
The mosaic floor tiles add pattern without overwhelming the eye. Dark oil rubbed bronze fixtures match the traditional vibe. This bathroom has personality and history. It feels established rather than brand new. It is a great way to respect an older home’s character while adding fun.
Material Required
- Blue subway tiles (glossy)
- Yellow pencil or border tiles
- Mosaic floor tile sheets
- Dark wood vanity with granite top
- Oil rubbed bronze faucet and light
- Tile adhesive and grout
- Chair rail tile molding
Equipment Required
- Manual tile cutter
- Notched trowel
- Level
- Tape measure
- Grout float
- Sponge
- Bucket
DIY Instructions Step by Step
Step 1 Floor Installation
Ensure the subfloor is clean. Spread mortar and lay the mosaic sheets. Be careful to match the pattern between sheets. Let it cure and then grout. Cover the floor with cardboard to protect it while working on walls.
Step 2 Wall Layout
Determine the height of your wainscoting. The yellow stripe should be at a pleasing height, usually around chest level. Mark level lines around the room for the blue tile, the yellow stripe, and the top molding.
Step 3 Tiling Walls
Start from the bottom and work up. Tile the blue subway section first. Stop at the line for the yellow stripe. Install the yellow tiles. Continue with blue above or finish with a bullnose cap depending on your design.
Step 4 Vanity Placement
Once the grout is dry, bring in the vanity. If the tile is thick, the vanity might sit slightly away from the wall. You can scribe the back legs or caulk the gap. Connect the sink plumbing.
Step 5 Fixtures
Install the dark bronze faucet and the matching light fixture. The dark metal looks distinct against the blue tile. Hang the mirror. Clean all surfaces thoroughly to remove grout haze.
21. Terracotta Arches & Copper Warmth

This bathroom captures the essence of a desert sanctuary. The warm terracotta tiles envelope the shower space completely. They create a cozy and earthen atmosphere. The white plaster arch frames the shower entry beautifully. It softens the hard lines typically found in bathrooms.
A hammered copper vessel sink sits on a simple floating shelf. This adds a rustic yet luxurious focal point. Built in niches offer practical storage without breaking the visual flow. The color palette is soothing and grounded. You feel an immediate sense of calm here. This design proves that warm tones are making a huge comeback. It feels timeless and organic.
Material Required
- Terracotta square tiles (4×4 or 6×6 inch)
- Flexible drywall (for the arch)
- Corner bead (arch style)
- Joint compound
- Copper vessel sink
- Wall mount faucet (oil rubbed bronze)
- Floating wood shelf or slab
- Reddish brown grout
Equipment Required
- Tile cutter
- Notched trowel
- Drywall knife and pan
- Drill with hole saw
- Sanding sponge
- Level
- Sponge and bucket
DIY Instructions Step by Step
Step 1 Frame the Arch
Construct a standard rectangular door frame with wood studs. Cut plywood into a curved arch shape. Screw these plywood pieces into the top corners of the frame. Install blocking between the plywood curves to support the drywall.
Step 2 Install Flexible Drywall
Use flexible drywall sheets for the curved underside of the arch. Score the back of regular drywall if you cannot find flexible sheets. Screw it gently into the wood framing. Cover the flat walls with standard cement board for tiling.
Step 3 Mud the Arch
Apply the plastic arch corner bead to the curved edges. This gives you a crisp and smooth line. Apply several thin coats of joint compound. Sand between coats until the curve is seamless. Paint the outer wall with a white textured paint.
Step 4 Tile the Shower
Apply mortar to the shower walls. Press the terracotta tiles into place. Use spacers to ensure even gaps. These tiles often have irregular edges so trust your eye. Grout with a color that matches the tile to create a monolithic look.
Step 5 Mount the Sink
Locate the studs for your floating shelf. Install heavy duty shelf brackets. Slide the wood shelf onto the brackets. Drill a hole for the drain. Place the copper sink on top and connect the drain assembly.
22. Coastal Blue Wainscoting & Shiplap

Classic coastal style gets a modern refresh here. The lower walls feature a deep blue subway tile wainscoting. This protects the walls from splashes effectively. White shiplap covers the upper walls for added texture. The contrast between the dark tile and bright wood is striking.
A large grey double vanity provides ample storage for a family. The open shelf at the bottom keeps towels handy. Industrial style sconces add a bit of edge to the room. The large window allows natural light to highlight the different textures. It is a clean and breezy look. This renovation feels crisp and orderly.
Material Required
- Blue subway tiles
- White shiplap boards (MDF or PVC)
- Grey double vanity cabinet
- Chrome or nickel widespread faucets
- Tile edge trim (bullnose or metal profile)
- White silicone caulk
- Construction adhesive
- Grout (white or light grey)
Equipment Required
- Tile cutter
- Level (4 foot)
- Brad nail gun
- Stud finder
- Caulk gun
- Drill
- Measuring tape
DIY Instructions Step by Step
Step 1 Establish Level Lines
Determine the height of your wainscoting. Mark a level line around the entire room. This line marks where the tile stops and the shiplap begins.
Step 2 Install the Tile
Apply thinset mortar to the lower wall section. Install the blue subway tiles in a brick pattern. Use spacers for uniform lines. Finish the top edge with a bullnose tile or a metal Schluter strip for a clean look. Grout the tiles once dry.
Step 3 Install Shiplap
Locate the wall studs. Cut your shiplap boards to fit the upper wall width. Start directly on top of the tile edge. Nail the boards into the studs through the tongue of the plank. Stack them up to the ceiling.
Step 4 Install the Vanity
Place your vanity cabinet in position. Check for level and shim if needed. Screw the cabinet back into the studs. Install the countertop and sinks. Connect the plumbing lines.
Step 5 Add Trim and Caulk
Install crown molding at the ceiling if desired. Run a bead of white caulk where the shiplap meets the tile trim. This seals the gap and makes the transition look professional. Paint the shiplap a crisp white.
23. Geometric Black & White Drama

Black walls create a bold backdrop for this modern bathroom. The dark paint makes the white vanity and trim pop. A large octagonal mirror serves as the artistic centerpiece. Its unique shape draws the eye immediately. The floor features white hexagon tiles with black accents.
This pattern plays with classic vintage designs but feels new. The room feels sophisticated and high contrast. Bright artwork adds a necessary splash of color. This design is confident and sharp. It works well in powder rooms or master baths alike. You do not need expensive materials to achieve this high end look.
Material Required
- Matte black wall paint
- White semi gloss paint (trim)
- Hexagon mosaic floor tile (white with black dots)
- Large octagonal mirror
- White floating or freestanding vanity
- Chrome faucet and hardware
- Tile mortar and grout (grey)
Equipment Required
- Paint roller and sash brush
- Tile nippers
- Notched trowel
- Grout float
- Drill and wall anchors
- Level
- Painter tape
DIY Instructions Step by Step
Step 1 Floor Tiling
Prepare your subfloor. Spread mortar and lay the hexagon mosaic sheets. Pay close attention to the pattern alignment between sheets. The black dots must follow the sequence. Grout with a light grey to define the hex shapes.
Step 2 Paint the Walls
Clean and prime the walls. Use painter tape to mask off the ceiling and baseboards. Apply two coats of matte black paint. Matte finish hides wall imperfections better than glossy paint. Peel the tape off while the paint is still tacky.
Step 3 Mount the Vanity
Assemble and position your white vanity. Secure it to the wall studs. A white vanity against a black wall creates a sharp floating effect. Install the sink and chrome faucet.
Step 4 Hang the Mirror
This mirror is the main feature so center it perfectly over the sink. Measure the back hanging brackets. Mark the wall and install heavy duty anchors. Hang the mirror and clean it with glass cleaner.
Step 5 Style the Room
Add colorful art or bright yellow towels to break up the monochrome palette. Install bright vanity lights above the mirror to ensure the room is not too dark.
24. Earthy Cork & Green Split Wall

Nature inspired textures make this bathroom feel grounded. The walls feature a unique split design. One side boasts a textured cork or brown organic material. The other side is painted a calming sage green. Dark slate tiles cover the lower wainscoting and the tub surround.
This combination of dark stone and warm earth tones is cozy. The wood vanity matches the window trim perfectly. It creates a seamless look. A large soaking tub invites relaxation. This design suits a home with a rustic or craftsman aesthetic. It feels solid and permanent.
Material Required
- Cork wall tiles or textured wallpaper
- Sage green paint
- Dark slate or porcelain tiles (12×24 inch)
- Wood stain (to match vanity)
- Dark wood vanity cabinet
- Oil rubbed bronze faucet
- Tile adhesive and dark grout
Equipment Required
- Tile cutter (wet saw recommended for slate)
- Paint roller
- Utility knife
- Level
- Trowel
- Wallpaper smoothing tool (if using paper)
- Drill
DIY Instructions Step by Step
Step 1 Tile the Wainscoting
Measure up from the floor to your desired height. Install the dark slate tiles horizontally. Use a dark mortar. Tile the front of the bathtub apron as well for a built in look. Grout with charcoal color.
Step 2 Apply Cork or Texture
On the designated accent wall, apply the cork tiles or textured wallpaper. If using cork, use contact cement or heavy duty construction adhesive. Roll it smooth to remove air pockets.
Step 3 Paint
Paint the remaining wall sections in sage green. Cut in carefully around the wood window trim. Do not get paint on the wood surfaces.
Step 4 Install Vanity
Place the dark wood vanity against the tiled lower wall. You might need to notch the back of the vanity legs to fit over the baseboard tile. Secure it to the wall.
Step 5 Final Details
Install the bronze faucet and towel bars. These dark fixtures complement the slate tile. Treat the cork wall with a sealer if it is near a water source to prevent swelling.
25. Fluted Wood Architectural Vanity

Vertical lines dominate this ultra modern space. The vanity features a stunning fluted wood face. This texture continues up the wall in a dedicated panel. It draws the eye upward and makes the ceiling feel higher. Clean white vessel sinks sit atop a thin white counter.
Minimalist black faucets extend from the wall. This keeps the countertop clear and uncluttered. Vertical tube lights integrate seamlessly into the mirror design. The look is architectural and precise. It creates a serene and spa like environment. This renovation requires precision but the visual payoff is huge.
Material Required
- Half round wood molding or tambour panels
- Plywood for backing
- White quartz or solid surface countertop
- Round white vessel sinks
- Wall mount black faucets
- Vertical LED tube lights
- Wood stain (light oak)
Equipment Required
- Table saw or circular saw
- Pin nailer
- Router (optional for edges)
- Drill with hole saw
- Level
- Clamps
- Sandpaper
DIY Instructions Step by Step
Step 1 Build the Vanity Box
Construct a simple floating cabinet box using plywood. It does not need fancy fronts yet. Mount it securely to the wall studs.
Step 2 Create Fluted Panels
Cut your half round molding strips to the exact height of the vanity drawer fronts. Glue and pin nail them onto the plywood drawer faces. Do the same for the tall wall panel section next to the mirror.
Step 3 Stain and Seal
Sand all the wood surfaces to ensure they are smooth. Apply a light oak stain. Follow with three coats of matte polyurethane. This is crucial for bathroom cabinetry to resist water.
Step 4 Install Counter and Sinks
Install the white countertop. Drill holes for the vessel sink drains. Glue the sinks in place with silicone.
Step 5 Install Wall Faucets
This step requires rough in plumbing work before the drywall is finished. Install the faucet valves inside the wall. Once the backsplash is done, attach the black trim kits and spouts.
Step 6 Lighting
Mount the vertical LED lights on the mirror or directly on the wall. Align them with the center of the sinks for the best face lighting.
26. Industrial Concrete & Glass Block

Industrial materials take center stage in this renovation. The walls are finished in a smooth grey concrete look. A glass block window adds retro charm and privacy. It lets light in without exposing the room. The walk in shower features a sleek linear drain.
A concrete sink integrates seamlessly into the floating shelf. This monolithic look is very current. Stainless steel fixtures add a sharp metallic contrast. The design is raw yet refined. It is easy to clean and highly durable. This style works best in modern urban homes.
Material Required
- Glass blocks
- Glass block mortar and spacers
- Concrete overlay mix (for walls)
- Waterproofing membrane
- Linear shower drain
- Concrete sink or trough
- Stainless steel shower fixtures
Equipment Required
- Trowel (flat and notched)
- Sponge float
- Bucket and mixing drill
- Level
- Caulk gun
- Tile cutter (for floor)
DIY Instructions Step by Step
Step 1 Install Glass Blocks
Prepare the window opening. Mix the glass block mortar. Lay the first row of blocks with spacers between them. Check for level and plumb constantly. Reinforce every few rows with wire mesh designed for glass blocks. clean the joints with a jointer tool.
Step 2 Prepare Shower Floor
Install the pre sloped shower pan. Cut the hole for the linear drain. Connect the drain to the plumbing. Waterproof the entire floor and walls with a liquid membrane.
Step 3 Concrete Wall Finish
You do not need to pour solid concrete walls. Use a concrete overlay product designed for wet areas. Trowel it onto the cement board walls. Smooth it out for a polished look or leave it rough for texture. Seal it with a high quality concrete sealer.
Step 4 Install Concrete Sink
Mount the heavy concrete sink on strong wall brackets. Ensure the brackets are hit studs. Connect the chrome trap and faucet.
Step 5 Finish Floor
Lay a simple large format grey tile on the shower floor to match the walls. The linear drain makes tiling easier as you do not need complex cuts around a center drain.
27. Moroccan Blue & Carved Wood

Exotic details make this bathroom unforgettable. The walls are covered in deep blue Zellige style tiles. Their uneven surface catches the light in mesmerizing ways. The wooden vanity features intricate carved door panels. This adds a global and handcrafted feel.
A marble countertop brings a touch of classic elegance. Gold fixtures pop against the dark blue background. A carved wood mirror frame complements the vanity. This space feels like a jewelry box. It is rich, moody, and full of character. It is a bold departure from the standard white bathroom.
Material Required
- Blue Zellige tiles (4×4 inch)
- Carved wood vanity cabinet
- Marble vanity top
- Gold wall mount faucet
- Gold mirror and sconces
- Tile adhesive and grout (white or light grey)
- Silicone sealant
Equipment Required
- Tile cutter
- Notched trowel
- Drill
- Level
- Screwdriver
- Grout sponge and bucket
DIY Instructions Step by Step
Step 1 Prep Walls
Ensure walls are clean and flat. Zellige tiles are irregular, so a flat substrate is important. Mark your starting line at the vanity height.
Step 2 Install Tiles
Spread adhesive on the wall. Press the tiles into place. Zellige tiles are often installed with very tight grout lines or no spacers. distinct imperfection is part of the look. Cover the entire wall for maximum impact.
Step 3 Grout
Use a contrasting grout like white to highlight the tile edges. Spread grout over the tiles and wipe off vigorously. The irregular surface traps grout, so cleaning takes extra effort.
Step 4 Install Vanity
Place your carved wood vanity. If it is a furniture piece repurposed as a vanity, you may need to cut holes in the back for plumbing. Secure it to the wall.
Step 5 Install Marble Top
Glue the marble top to the vanity cabinet. Install the gold faucet. The wall mount faucet rough in must be done prior to tiling.
Step 6 Decorate
Hang the carved mirror and the gold lanterns. These accessories complete the Moroccan theme.
28. Mirrored Glamour & Crystal

Luxury is the defining trait of this design. Mirrored panels cover the walls to expand the space visually. They reflect the light from the sparkling crystal chandeliers. The black vanity provides a grounding contrast to the bright mirrors.
A white marble countertop adds to the opulent feel. This bathroom feels like a dressing room in a mansion. It is perfect for those who love high drama. The extensive use of mirrors makes a small room feel double the size. It is a high maintenance look but undeniably stunning.
Material Required
- Large mirror panels (custom cut)
- Mirror mastic (adhesive)
- Black high gloss vanity
- Marble countertop
- Crystal chandeliers or sconces
- Chrome faucets
- J channel (for mirror support)
Equipment Required
- Suction cups (for handling glass)
- Caulk gun
- Drill
- Level
- Screwdriver
- Measuring tape
DIY Instructions Step by Step
Step 1 Prepare the Vanity
Install the black vanity cabinet first. It serves as the base for your measurements. Ensure it is level and secured to the studs. Install the marble top.
Step 2 Measure for Mirrors
Measure the wall space above the vanity precisely. You will likely need to order custom cut mirrors to fit around outlets or lights. Ask for polished edges.
Step 3 Install Lighting
Install the electrical boxes for your crystal fixtures. Do this before the mirrors go up. The mirror installer will need to know where the holes are.
Step 4 Install Mirrors
Install a metal J channel along the top of the backsplash. This supports the weight of the mirror. Apply mirror mastic to the back of the glass. Lift the mirror into the channel and press it against the wall. Use painter tape to hold it flat while the glue cures.
Step 5 Final Assembly
Install the crystal sconces over the mirrors. Be very careful not to crack the glass when tightening screws. Install the chrome faucet. Keep glass cleaner handy at all times.
29. Travertine Warmth & Wood Tower

Traditional comfort defines this spacious bathroom. Beige travertine tiles cover the floor and shower. The natural stone variation adds subtle beauty. A tall wood tower cabinet provides vertical storage. It sits on the counter to keep daily items accessible.
Oil rubbed bronze fixtures add a vintage touch. A built in bench in the shower offers safety and comfort. This design is ageless and inviting. It creates a warm and neutral backdrop for daily life. It appeals to those who prefer classic aesthetics over trends.
Material Required
- Travertine tiles (various sizes)
- Stone sealer
- Wood vanity and matching tower cabinet
- Travertine or granite countertop
- Oil rubbed bronze shower kit
- Thinset mortar (white)
- Grout (beige)
Equipment Required
- Wet saw (essential for stone)
- Drill
- Level
- Notched trowel
- Grout float
- Sponge
- Knee pads
DIY Instructions Step by Step
Step 1 Shower Bench
Frame the shower bench using concrete blocks or wood covered in cement board. Waterproof it thoroughly. This must be solid before tiling.
Step 2 Install Stone Tile
Lay the travertine tiles. Because stone is porous, you must use white thinset to prevent discoloration. Mix tiles from different boxes to blend the color variations. Seal the stone before grouting to prevent grout haze from sticking.
Step 3 Grout and Seal Again
Grout with a matching beige color. Clean carefully. Once dry, apply a second coat of heavy duty stone sealer. This protects the stone from soap scum and water.
Step 4 Install Cabinets
Install the main vanity cabinet. Place the countertop on top. Then, install the tall tower cabinet on top of the counter. Screw it into the wall studs and into the ceiling if it reaches that high.
Step 5 Fixtures
Install the bronze shower head and handheld unit. The dark metal looks distinct against the light stone. Install the sink faucet to match.
30. Sustainable Bamboo & Green Glass

Eco friendly design meets modern style here. The vanity is made from sustainable bamboo plywood. Its linear grain is distinctive and beautiful. The countertop is a thick slab of recycled green glass. It has a translucent quality that looks like frozen water.
A mosaic backsplash in varying shades of green ties the look together. The vessel sink sits atop the glass surface. This bathroom feels fresh and connected to nature. It is a great conversation starter. The materials are durable and kind to the planet.
Material Required
- Bamboo vanity cabinet
- Recycled glass countertop (custom order)
- Green glass mosaic tile sheets
- Vessel sink
- Tall vessel faucet
- Silicone sealant (clear)
- Tile adhesive and unsanded grout
Equipment Required
- Drill
- Tile cutter for glass
- Notched trowel
- Grout float
- Level
- Caulk gun
DIY Instructions Step by Step
Step 1 Install Vanity
Place the bamboo cabinet in its spot. Bamboo is very stable but check for level. Anchor it to the wall studs. Bamboo is hard, so pre drill holes before driving screws to avoid splitting.
Step 2 Install Glass Top
Glass countertops are heavy and fragile. Apply small dabs of clear silicone to the cabinet corners. Lower the glass top gently. Do not overtighten the drain assembly or you could crack the top.
Step 3 Mosaic Backsplash
Spread white mastic on the wall. Press the glass mosaic sheets into the adhesive. Glass tile is transparent so smooth out the ridges in the glue. Let it cure for 24 hours.
Step 4 Grout
Use unsanded grout to avoid scratching the glass tiles. White grout usually looks best to keep the colors bright. Sponge off the excess.
Step 5 Plumbing
Install the vessel sink and the tall faucet. Ensure the faucet spout reaches the center of the bowl. Turn on the water and check for leaks. The green glass will glow under the bathroom lights.
31. Fireplace & Chandelier Sanctuary

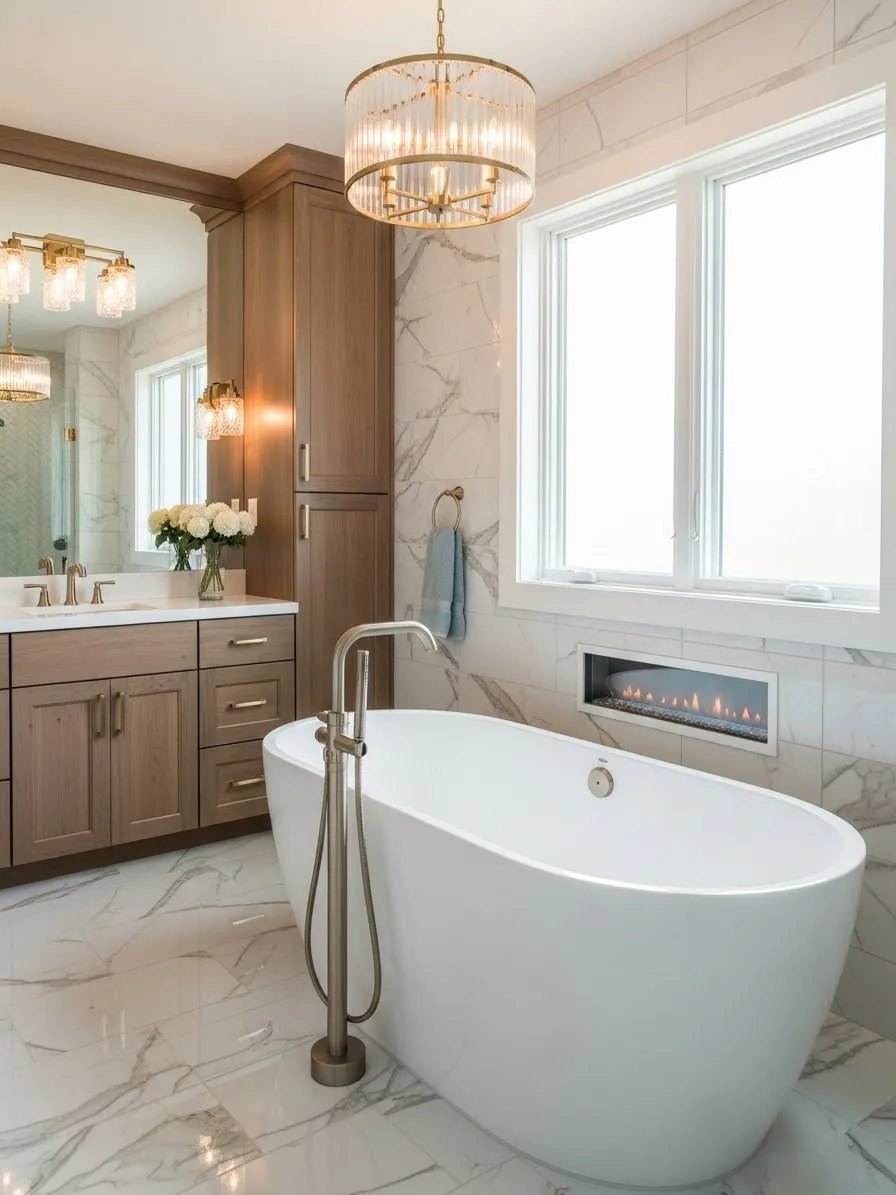
Luxury reaches a new level with this stunning layout. A built in gas fireplace sits beside the soaking tub. It adds warmth and a mesmerizing glow for evening baths. The large window allows natural light to flood the room. A crystal chandelier overhead creates a focal point of elegance.
Marble floors and walls keep the space feeling bright and expansive. The wood vanity adds a necessary natural touch to ground the design. This bathroom is designed for lingering and relaxation. It transforms your home into a five star retreat. You can enjoy the flickering fire while soaking away the day.
Material Required
- Linear gas fireplace unit (ventless or vented)
- Freestanding soaking tub
- Crystal chandelier
- Marble floor and wall tiles
- Heat resistant backer board
- Gas line piping
- Wood vanity cabinet
- Floor mounted tub filler
Equipment Required
- Reciprocating saw
- Drill with masonry bits
- Pipe wrench
- Tile saw
- Level
- Trowel
- Voltage detector
DIY Instructions Step by Step
Step 1 Frame the Fireplace
Build a frame into the wall using steel studs to support the fireplace unit. Ensure you follow all clearance codes for combustible materials. Install heat resistant backer board around the opening instead of standard drywall.
Step 2 Install Gas Line
Hire a professional to run the gas line to the fireplace location. This is a safety critical step. Once the line is capped and tested, you can proceed with the surround.
Step 3 Tile the Surround
Apply mortar to the backer board. Install your marble tiles around the fireplace opening. Use a high heat mortar if required by the manufacturer. Grout the joints once the tiles are set.
Step 4 Install the Tub
Rough in the plumbing for your freestanding tub and floor filler. Position the tub near the fireplace but at a safe distance. Connect the drain and water lines. secure the tub to the floor with silicone.
Step 5 Hang Lighting
Install a reinforced electrical box in the ceiling for the heavy chandelier. Connect the wiring and hang the fixture. Ensure it is rated for damp locations if it is close to the tub.
32. Layered Mirrors & Glass Brightness

This design uses mirrors to double the visual space. A massive wall to wall mirror sits behind the vanity. Sconces are mounted directly onto the glass for a floating effect. This technique bounces light into every corner. The white cabinetry keeps the room feeling crisp and clean.
A clear glass shower enclosure allows the eye to travel all the way to the back wall. White subway tiles in the shower maintain the bright theme. Chrome fixtures add a sparkle that matches the glass elements. This is a brilliant solution for bathrooms that feel small or cramped.
Material Required
- Large custom cut mirror panel
- Glass drill bits
- Sconce light fixtures
- White vanity cabinet
- Glass shower enclosure
- Chrome faucets
- Mirror mastic adhesive
- J channel support track
Equipment Required
- Glass cutter (or order custom)
- Drill
- Caulk gun
- Suction cups (for glass handling)
- Level
- Screwdriver
- Measuring tape
DIY Instructions Step by Step
Step 1 Prepare the Wall
Ensure the vanity wall is perfectly flat. Install the electrical boxes for your sconces. The boxes must protrude enough to flush with the mirror surface or use special mirror mounting kits.
Step 2 Install J Channel
Screw a metal J channel along the top of the backsplash. This will support the weight of the heavy mirror glass. Ensure it is level.
Step 3 Mount the Mirror
Apply mirror mastic to the back of the glass. With a helper and suction cups, lift the mirror into the channel. Press it firmly against the wall. You may need to have holes pre drilled by the glass fabricator for the lights.
Step 4 Install Sconces
Carefully pull the electrical wires through the holes in the glass. Connect your sconce fixtures. Tighten the mounting nuts gently to avoid cracking the mirror.
Step 5 Install Shower Glass
Install the U channel for the stationary glass panel on the shower curb. Insert the glass and seal it with clear silicone. Attach the hinged door and handle.
33. Slate Hydrotherapy Spa

Turn your shower into a wellness zone with this dark and moody design. Large slate tiles cover the walls and floor for a monochromatic look. The dark color is soothing and hides soap scum well. A stainless steel shower tower panel is the star feature. It includes body jets, a rain head, and a handheld wand.
A built in bench offers a spot to sit and enjoy the hydrotherapy. Recessed niches keep shampoo bottles organized and off the floor. This renovation feels masculine and modern. It brings the experience of a high end gym sauna into your home.
Material Required
- Dark slate or porcelain tiles (12×24 inch)
- Shower tower panel with jets
- Waterproofing membrane (liquid or sheet)
- Linear drain kit
- Teak or stone bench top
- Charcoal grout
- Thin set mortar
Equipment Required
- Tile cutter (wet saw)
- Drill with diamond bits
- Notched trowel
- Grout float
- Level
- Sponge
- Caulk gun
DIY Instructions Step by Step
Step 1 Waterproofing
Apply a comprehensive waterproofing system to the shower walls and floor. This is crucial for a steam or jet shower. Ensure all corners and seams are sealed tight.
Step 2 Tile Installation
Install the dark tiles using a polymer modified mortar. Work from the bottom up. For the niches, cut tiles carefully to frame the opening. Use a dark grout to create a seamless surface.
Step 3 Install the Bench
Frame the bench seat using concrete blocks or treated lumber. Cover it with cement board and waterproof it. Tile the vertical face. Install a solid stone or teak slab for the seat.
Step 4 Mount the Tower
Locate the water supply nipples on the wall. Shower towers usually require standard hot and cold outlets. Attach the flexible hoses from the back of the tower to your wall pipes. Drill mounting brackets into the tile using a diamond bit. Hang the panel and connect the hoses.
Step 5 Seal and Test
Apply silicone caulk around the edges of the shower panel. Turn on the water and test all functions. Check for leaks behind the panel before final sealing.
34. Pocket Door Space Saver

Maximize every inch of floor space with a sliding pocket door. This eliminates the swing radius of a traditional door. It makes the bathroom feel instantly larger. The light wood vanity adds warmth to the neutral grey walls. White subway tiles protect the splash zone effectively.
This layout is smart for smaller ensuites or guest baths. The clean lines of the shaker cabinets are timeless. A simple large mirror reflects the window light. This renovation focuses on flow and functionality. It solves the common problem of doors hitting the vanity.
Material Required
- Pocket door frame kit
- Solid core door slab
- Drywall sheets
- Light wood vanity cabinet
- Subway tiles
- Door hardware (flush pull)
- Joint compound and tape
Equipment Required
- Reciprocating saw (demolition)
- Drill
- Level
- Drywall knife
- Tile cutter
- Stud finder
- Hammer
DIY Instructions Step by Step
Step 1 Open the Wall
Remove the drywall on one side of the wall where the door will slide. Remove the existing studs to create a header opening. This is a structural change, so check for load bearing beams.
Step 2 Install the Frame
Install the pocket door track and split studs provided in the kit. Ensure the track is perfectly level or the door will slide on its own. Hang the door on the track rollers.
Step 3 Close the Wall
Install new drywall over the split studs. Be careful to use short screws so you do not penetrate the door cavity. Mud, tape, and sand the wall smooth. Paint the wall.
Step 4 Install Vanity
Position your vanity cabinet. Secure it to the studs. Since you have a pocket door, ensure the vanity screws do not go into the door pocket area.
Step 5 Tile Backsplash
Apply adhesive to the wall behind the vanity. Install subway tiles in a brick pattern. Grout with a contrasting grey to match the floor.
35. Hotel Style Coffee Bar

Bring the convenience of a luxury hotel suite to your master bath. This custom cabinetry includes a beverage fridge and a coffee station. Wake up and enjoy your morning brew without leaving the room. The rich walnut wood tones add warmth and sophistication.
Storage towers flank the sink to hold towels and supplies. A dedicated drawer organizes mugs and spoons. The marble countertop provides a durable surface for coffee preparation. This unique feature adds incredible lifestyle value. It creates a true morning routine hub.
Material Required
- Custom or semi custom cabinetry (walnut finish)
- Under counter beverage fridge
- Marble countertop slab
- Electrical outlet (GFCI)
- Cabinet pulls (brass)
- Coffee machine
- Plumbing fixtures
Equipment Required
- Drill
- Jigsaw (for counter vents if needed)
- Level
- Screwdriver
- Appliance dolly
- Hole saw
DIY Instructions Step by Step
Step 1 Electrical Prep
Install a dedicated electrical outlet inside the cabinet or on the backsplash for the coffee maker. Install another outlet for the fridge in the base cabinet area.
Step 2 Install Cabinets
Set the base cabinets and the tall storage towers. Level them and screw them together. Anchor them securely to the wall studs. Leave the correct opening width for the fridge.
Step 3 Countertop Installation
Place the marble countertop. You may need a grommet hole for the coffee maker cord to pass through to the outlet below. Install the sink and faucet.
Step 4 Fridge Installation
Slide the beverage fridge into the opening. Ensure there is enough clearance for ventilation as per the manual. Plug it in and adjust the feet so it sits flush.
Step 5 Final Organization
Install drawer organizers for your coffee pods and spoons. Stock the fridge with water and creamer. Set up your coffee machine on the counter.
36. Skylight Attic Retreat

Transform an awkward attic space into a bright bathroom oasis. The skylight is the game changer here. It floods the room with natural light from above. The sloping ceiling adds architectural interest rather than feeling cramped. White walls and tiles maximize the airy feeling.
A light wood vanity floats above the floor to maintain visual space. The layout tucks the tub under the lowest part of the ceiling. This uses the height efficiently. It is a cozy and private space. The view of the sky makes it feel open to the outdoors.
Material Required
- Skylight window unit (flashing kit included)
- Roofing shingles and tar
- Drywall and insulation
- Floating wood vanity
- White ceramic tiles
- Bathtub
- Waterproof paint
Equipment Required
- Reciprocating saw
- Ladder
- Drill
- Drywall lift or helper
- Trowel
- Caulk gun
- Safety harness (for roof work)
DIY Instructions Step by Step
Step 1 Cut Roof Opening
Mark the skylight location from inside. Drive nails through the roof to mark the corners. Go on the roof and cut the shingles and decking. Frame the opening with headers.
Step 2 Install Skylight
Mount the skylight curb and the unit itself. Interweave the flashing steps with the shingles to prevent leaks. This step requires precision to ensure it is watertight.
Step 3 Finish Interior Shaft
Frame the light shaft connecting the roof hole to the ceiling. Insulate the space. Hang drywall and finish the corners. Paint the shaft white to reflect light.
Step 4 Install Tub and Vanity
Place the tub under the slope where standing height is lower. Install the floating vanity on the taller wall. Ensure the wall is reinforced to hold the vanity weight.
Step 5 Tile and Paint
Tile the tub surround with white ceramic tiles. Paint the walls in a satin finish to bounce the light around the room.
37. Botanical Green & Gold

Make a bold statement with vintage inspired floral wallpaper. The dense green pattern creates a lush garden feel. Gold mirrors and fixtures pop beautifully against the busy background. This mix of pattern and metallic shine is very trendy.
The white vanity and subway tile wainscoting balance the intense walls. They provide a calm visual break. This design works well in powder rooms or master baths. It feels curated, artistic, and full of life. It turns a boring white box into a jewel.
Material Required
- Floral wallpaper (green dominant)
- Wallpaper paste
- Gold framed mirrors (rounded corners)
- Gold widespread faucets
- White vanity with stone top
- Subway tiles for wainscoting
- Gold towel bars
Equipment Required
- Wallpaper smoothing tool
- Utility knife
- Level
- Drill
- Tile cutter
- Sponge
- Paste brush
DIY Instructions Step by Step
Step 1 Install Wainscoting
Install white subway tiles on the lower half of the wall. Use a chair rail tile to cap the top edge. Grout and clean the tiles. This protects the wall from water damage.
Step 2 Wallpaper the Upper Wall
Prime the drywall above the tile. Apply paste to your floral wallpaper. Hang the first strip using a laser level for straightness. Match the pattern carefully on subsequent strips. Trim the edges at the ceiling and tile line.
Step 3 Install Vanity
Place the white vanity against the tiled section. You might need to silicone the gap if the tile creates a standoff. Connect the plumbing.
Step 4 Mount Gold Fixtures
Install the gold faucets onto the sink. Measure and drill holes for the gold mirrors through the wallpaper. Use anchors if no studs are present.
Step 5 Final Styling
Add gold towel bars and accessories. The gold finish ties in with the lighting. Test all water connections and lights.
38. Granite & LED Modern Mix

Update a standard bathroom with modern technology and durable materials. The speckled granite countertop is forgiving and hard wearing. It hides water spots and makeup dust well. The LED backlit mirror provides shadow free lighting for grooming.
White shaker cabinets keep the look classic and bright. Grey floor tiles tie in with the granite flecks. This renovation balances practical family needs with modern style. The lighted mirror acts as a nightlight and a design feature. It is a functional upgrade that looks great.
Material Required
- Grey and white granite countertop
- LED backlit mirror (hardwired)
- White vanity cabinet
- Black matte faucets
- Grey porcelain floor tiles
- Backsplash tiles (optional)
- Electrical wire and box
Equipment Required
- Drill
- Voltage tester
- Tile cutter
- Level
- Caulk gun
- Screwdriver
- Wrench
DIY Instructions Step by Step
Step 1 Rough In Electrical
Determine the location of the LED mirror. Run a romex wire from a switch or outlet to the center of where the mirror will hang. Install a recessed electrical box.
Step 2 Install Floor and Vanity
Lay the grey porcelain floor tiles. Once grouted and dry, install the white vanity cabinet. Secure it to the wall.
Step 3 Countertop Install
Apply silicone to the top of the cabinet. Lower the heavy granite slab into place. Install the black faucet. Add a 4 inch granite backsplash or tile the wall.
Step 4 Connect the Mirror
Hold the mirror base plate against the wall. Connect the house wires to the mirror driver (black to black, white to white). Mount the mirror onto the brackets.
Step 5 Final Test
Turn on the power. Test the mirror’s touch controls for dimming and color temperature. The light should illuminate the granite surface beautifully.
39. Curved Rod Refresh

You do not need a full demolition to update a bathroom. This concept focuses on clean basics. A simple white tub is enhanced by a curved shower curtain rod. This small change adds elbow room in the shower. It feels spacious and upscale.
Fresh white tile surround and a new vanity breathe life into the room. A recessed niche in the shower wall adds storage without bulk. This is a budget friendly renovation. It focuses on clean lines and functionality. It is perfect for a rental property or a quick refresh.
Material Required
- Standard alcove bathtub
- Curved shower curtain rod
- White ceramic wall tiles
- Prefabricated niche insert (or frame your own)
- White vanity
- Chrome shower fixture
- Tub surround adhesive
Equipment Required
- Drill
- Level
- Tile cutter
- Caulk gun
- Trowel
- Screw gun
- Utility knife
DIY Instructions Step by Step
Step 1 Tub Installation
Remove the old tub. clear the alcove. Install the new tub and level it. Connect the drain and overflow. Secure the tub flange to the studs.
Step 2 Install Niche and Tile
Cut a hole between studs for the niche. Install a waterproof niche box. Apply cement board to the walls. Tile the surround, cutting tiles to fit around the niche. Grout with white for a seamless look.
Step 3 Install Curved Rod
Measure the height for your curtain rod. Mark the holes for the mounting brackets. The curved rod mounts differently than a straight one, so follow the template. Drill into the tile or drywall and secure the brackets.
Step 4 Vanity Swap
Remove the old vanity and sink. Install the new white vanity. Connect the supply lines and P trap.
Step 5 Finish Details
Caulk all corners and the tub edge. Hang a fresh white shower curtain. The curved rod instantly makes the shower feel bigger.
40. Floating Oak Minimalist

Minimalism creates a calm and clutter free environment. This floating oak vanity keeps the floor visible. This trick makes the room feel larger. The warm wood grain prevents the space from feeling sterile. A large round mirror softens the straight lines.
Matte black fixtures provide a modern contrast. The white subway tile is installed in a grid pattern for a contemporary twist. This design is simple but effective. It relies on quality materials and clean geometry. It is easy to clean and maintain.
Material Required
- Floating oak vanity cabinet
- Heavy duty wall anchors or blocking
- Round black framed mirror
- Matte black wall mount or deck mount faucet
- White square tiles
- Grey grout
- Silicon caulk
Equipment Required
- Drill
- Stud finder
- Level (long)
- Tile cutter
- Spacer clips
- Screwdriver
- Wrench
DIY Instructions Step by Step
Step 1 Blocking the Wall
Open the wall behind the vanity location. Install 2×6 wood blocking between the studs. This provides a solid surface to anchor the floating vanity. Close and patch the drywall.
Step 2 Tile the Wall
Install the white tiles in a stacked grid pattern rather than a brick lay. This looks more modern. Use grey grout to define the grid.
Step 3 Mount the Vanity
Mark the desired height on the wall. Hold the vanity up (you need a helper). Drive lag screws through the back rail into the wood blocking you installed. Check for level.
Step 4 Install Plumbing
Install the sink and the black faucet. Since the vanity floats, the P trap might be visible. Use a decorative bottle trap in black or chrome for a cleaner look.
Step 5 Hang Mirror and Lights
Center the round mirror over the sink. Install a simple bar light above it. The black accents tie the whole look together.
41. Symmetric Dual Shower Suite

This shower is built for two people to use comfortably. The symmetrical layout features dual shower heads mounted on opposite walls. Matte black fixtures stand out sharply against the clean white subway tiles. Two matching niches add depth with a hexagonal tile backing. Black trim frames these niches to match the faucets.
This design eliminates the morning fight for warm water. The white backdrop keeps the space feeling large and open. It is a high contrast look that feels custom and expensive. The grid pattern of the tiles adds order and rhythm to the room. It is a timeless choice that remains fresh.
Material Required
- White subway tiles (3×6 inch)
- Black shower faucet kits (quantity 2)
- Hexagon mosaic tile sheets (for niches)
- Black niche trim (Schluter style)
- White grout
- Black or charcoal grout (for niches)
- Thinset mortar
- Waterproofing membrane
Equipment Required
- Laser level
- Tile cutter
- Notched trowel
- Drill with diamond bits
- Grout float
- Spacers
- Sponge and bucket
DIY Instructions Step by Step
Step 1 Rough In Plumbing
Open the walls to run plumbing for two separate shower valves and heads. Ensure the pipes are spaced evenly from the center line of the shower. This symmetry is the key visual element. Pressure test the lines for leaks before closing the wall.
Step 2 Construct Niches
Frame out two identical boxes between the studs for the niches. Install a preformed waterproof niche box or build one with cement board. Ensure they are exactly level with each other.
Step 3 Waterproof and Tile
Apply liquid waterproofing to the walls and niche interiors. Apply white thinset and install the subway tiles. Work from the center line outward. Use spacers to keep lines straight.
Step 4 Tile the Niches
Install the black trim around the niche edges. Cut the hexagon mosaic sheets to fit inside the boxes. Use a dark mortar or the dark grout to make the pattern pop.
Step 5 Grout and Finish
Grout the main walls with white grout for a seamless look. Grout the niches with dark grout to accent the hexagons. Install the black shower trims and heads once the grout cures.
42. Soft Glow Wood Minimalist

Lighting defines this modern vanity area efficiently. The large mirror features a built in LED border that provides even illumination. It casts a soft glow forward to eliminate harsh shadows on your face. The wood floating vanity adds organic warmth to the stark white walls. Its clean lines keep the floor area visually open.
A matte black faucet provides a single point of contrast on the white counter. This space feels calm and uncluttered. It is a brilliant example of how less is more in design. The rounded corners of the mirror soften the rectangular shapes of the cabinetry. This renovation focuses on mood and simplicity.
Material Required
- Floating wood vanity cabinet
- Rectangular LED backlit mirror (rounded corners)
- Matte black single hole faucet
- White solid surface or quartz countertop
- Heavy duty toggle bolts or wall anchors
- Silicone sealant
- Electrical wire and box
Equipment Required
- Power drill
- Stud finder
- Level (long)
- Screwdriver
- Caulk gun
- Wire strippers
- Voltage tester
DIY Instructions Step by Step
Step 1 Prepare Electrical
Decide where the mirror will hang. Run an electrical line to a recessed box behind the mirror location. This allows you to hide the cords for a hardwired connection.
Step 2 Install Vanity Support
Locate the wall studs using a finder. Since the vanity floats, it needs strong support. You may need to open the wall to add wood blocking if the studs do not align with the cabinet brackets.
Step 3 Mount the Cabinet
Lift the vanity cabinet into place with a helper. Check for level across the top and front. Drive lag screws through the mounting rail into the studs or blocking. Ensure it is rigid and does not tip.
Step 4 Install Counter and Faucet
Install the black faucet onto the countertop before placing it on the cabinet. Apply a bead of silicone to the top edge of the wood cabinet. Lower the counter into place and let it set.
Step 5 Hang the Mirror
Connect the mirror wires to the house supply (black to black, white to white). Mount the mirror bracket to the wall. Hang the mirror and test the light function. The soft light will highlight the wood grain beautifully.
Updating your master bathroom is a huge undertaking, but the payoff is substantial. We have traveled through 42 unique renovation ideas, from the warmth of terracotta arches to the symmetry of dual shower systems. No matter your budget or design preference, inspiration certainly abounds.
The time to move past that outdated look is now. February is your window to plan the logistics, secure your materials, and hire reliable professionals. Starting your planning process today ensures your dream space is ready for spring enjoyment.
Take the ideas that resonate most with your style. Mix and match concepts to create a truly bespoke sanctuary. Use this guide to make your master bathroom feel new, luxurious, and completely suited to your needs.
???? Key Takeaways
- Texture is Essential: Mix smooth marble with rough fluted wood or pebbles for immediate depth and visual interest.
- Maximizing Space: Floating vanities and pocket doors are highly effective in making rooms look and feel significantly larger.
- Lighting Matters: Integrated LED mirrors provide superior, shadow free illumination for grooming and ambiance.
- Bold Accents: Introducing color via unique tiles, patterned wallpaper, or statement fixtures brings immediate personality.
- Storage Solutions: Utilizing vertical linen towers and clever drawer organizers conquers clutter successfully in shared spaces.