Is your living room couch looking a little tired? Maybe it’s stained, faded, or you’re just bored with the style. A new sofa can be a huge expense, but that doesn’t mean you’re stuck with a look you don’t love. A fresh new feel for your living room is closer than you think.

You can completely transform your main seating area with a bit of creativity and some simple projects. Many updates don’t require a lot of money or special skills. They just require a new way of looking at the furniture you already own.
This guide is filled with simple, affordable ideas to help you refresh your seating. From no-sew fabric tricks to clever functional additions, you’ll find plenty of inspiration. Get ready to fall in love with your living room all over again, without breaking your budget.
1. The Bohemian Paisley Throw

Instantly change the entire mood of your sofa with a vibrant, patterned throw. Draping a large, colorful piece of fabric like this paisley quilt over your existing couch is the quickest way to hide stains or dated upholstery. It brings an immediate infusion of energy and personality.
The rich colors and intricate design create a focal point in the room. This approach is wonderfully non-committal; you can swap it out with the seasons or whenever you crave a new look. It’s an effortless trick that delivers a dramatic and cozy transformation, making an old sofa feel exciting again.
DIY Instructions: How to Drape a Throw Blanket
What you need:
- A large decorative blanket, quilt, or piece of fabric
- A few safety pins (optional)
Step-by-step guide:
- Center the Blanket: Stand in front of your sofa and hold the blanket up by its top two corners. Find the middle of the blanket and line it up with the middle of your sofa’s backrest.
- Drape it Over: Let the blanket fall over the back and onto the seat cushions. Make sure it hangs down evenly on both sides.
- Tuck it In: Use your hands to push and tuck the blanket down into the cracks between the seat cushions and the arms/back of the sofa. This helps it stay in place and gives it a more fitted look.
- Smooth it Out: Smooth out any major wrinkles on the seat and back with your hands. Don’t worry about making it look too neat; a few gentle folds look natural and cozy.
- Secure if Needed: If your blanket is slippery, you can use a few large safety pins in hidden spots (like deep in the cushion cracks or on the back of the sofa) to keep it from sliding around.
2. No-Sew Cushion Covers

Give your seat cushions a facelift without a single stitch. This clever no-sew method uses fabric and safety pins to create a crisp, custom-looking cover. It’s an excellent way to introduce a new pattern or color to your living room.
This technique is forgiving and completely reversible, making it great for renters or anyone who likes to change their decor often. By pulling the fabric taut and securing it neatly, you can achieve a surprisingly professional result. It’s a budget-friendly project that makes a huge visual impact.
DIY Instructions: How to Make a No-Sew Cushion Cover
What you need:
- A piece of fabric large enough to wrap around your cushion
- Lots of large, sturdy safety pins
- Scissors
Step-by-step guide:
- Lay Out Your Fabric: Place your fabric on a clean floor with the pretty side facing down.
- Center Your Cushion: Put your sofa cushion in the middle of the fabric.
- Wrap it Like a Present: Take the fabric from the front and back of the cushion and pull it tightly to the middle of the cushion’s underside. Overlap the two pieces of fabric.
- Start Pinning: Use safety pins to fasten the two overlapping pieces of fabric together. Start in the middle and work your way out towards the edges.
- Fold the Ends: Now for the sides. You will have extra fabric sticking out. Fold the ends neatly, just like you are wrapping a birthday present. Create crisp, triangular folds.
- Pin the Sides: Pull the folded fabric flaps tightly towards the center of the cushion’s bottom and secure them with more safety pins. Make sure all your pins are on the bottom where no one will see or sit on them.
3. Gilded Gold-Leaf Accents

Add a touch of unexpected glamour to your sofa with a hint of gold. Applying gold leaf or metallic paint to the feet or a corner of the frame is a subtle but striking detail. It catches the light and makes the entire piece feel more luxurious and special.
This is a simple project that looks incredibly high-end. The warm metallic finish contrasts beautifully with both wood and fabric, adding a sophisticated, modern touch. It’s the kind of small detail that elevates the whole piece of furniture, proving that you don’t need a big change to make a big impression.
DIY Instructions: How to Add Gold Accents
What you need:
- Gold metallic craft paint
- A small, flat paintbrush
- Painter’s tape
- A paper plate
Step-by-step guide:
- Clean the Area: Wipe the sofa legs or the part of the frame you want to paint with a clean, damp cloth to remove any dust. Let it dry.
- Tape Off Your Lines: This is the secret to a professional look! Use painter’s tape to create a crisp, straight line where you want the gold paint to stop. Press the edge of the tape down firmly.
- Get Your Paint Ready: Squeeze a small amount of gold paint onto a paper plate.
- Paint Carefully: Dip your brush in the paint and apply a thin, even coat to the area below the tape. Paint away from the tape edge to help prevent paint from getting underneath it.
- Let it Dry and Recoat: Let the first coat of paint dry completely. Then, apply a second coat to make the gold color really solid and shiny.
- The Big Reveal: While the second coat of paint is still a little bit wet, carefully and slowly peel off the painter’s tape. This gives you the sharpest line. Let it all dry before you touch it.
4. The Pillow Collector’s Mix

Turn your sofa into a plush, inviting haven by piling on the pillows. A generous collection of cushions in various sizes, shapes, and textures is one of the easiest ways to refresh your seating. It’s a chance to play with color and pattern on a small, affordable scale.
The key to this look is variety. Mix different materials like chunky knits, smooth velvets, classic weaves, and even faux fur. Stick to a loose color palette to keep it from looking chaotic. This layered effect not only looks stylish but also adds a serious amount of comfort, making your sofa the best seat in the house.
DIY Instructions: How to Mix and Match Pillows
What you need:
- 5-7 pillows in different sizes, shapes, and textures
- A sofa
Step-by-step guide:
- Choose a Color Family: Pick two or three main colors that you want to work with (for example, blue, white, and brown). This will help your pillow collection look coordinated instead of messy.
- Start with the Biggest: Take your two largest pillows and place them in the far corners of the sofa, against the arms. These are your anchor pillows.
- Layer Inward: Place your medium-sized pillows in front of the large ones. This is a good place to use pillows with more interesting patterns or textures.
- Add a Fun Shape: If you have a pillow that isn’t a square (like the round knot or the long lumbar pillow), place it in the very front, slightly off-center.
- Mix Up the Textures: Don’t put two similar pillows right next to each other. Place a fuzzy pillow next to a smooth one, or a knitted pillow next to a plain cotton one. This contrast is what makes it look interesting.
- The Karate Chop: For a final designer touch, you can give the top of your softest pillows a gentle “karate chop” to create a little dimple.
5. The Armrest Caddy Tray

Add both style and function to your sofa with a handsome armrest caddy. This clever accessory provides a stable surface for a cup of coffee or a book, right where you need it. It’s a brilliant solution for sofas that don’t have an end table nearby.
The combination of warm wood and rugged leather straps adds a touch of rustic sophistication. This piece is not just practical; it’s a decorative element in its own right. It’s a unique and thoughtful detail that makes your seating more user-friendly and adds a custom, handcrafted feel to your living room.
DIY Instructions: How to Make an Armrest Tray
What you need:
- Three pieces of wood (one for the top, two for the sides). The top piece should be as wide as your sofa armrest.
- Wood glue
- An old leather belt
- A screwdriver and some short screws
Step-by-step guide:
- Build the Wooden Frame: Take your top piece of wood and one of the side pieces. Put a line of wood glue along the top edge of the side piece. Press it firmly against the underside of the top piece to make an “L” shape. Repeat with the other side piece. Let the glue dry.
- Measure Your Belt: Drape the old belt over the wooden tray and the arm of your sofa. Figure out how long the pieces need to be to wrap around and buckle.
- Cut the Belt: Cut the belt into two pieces. You will want one piece with the buckle and one piece with the holes.
- Attach the Belt to One Side: Place one side of your wooden tray on the inside of the sofa arm. Use your screwdriver and two small screws to attach the ends of your two belt pieces to the bottom of that side of the tray.
- Drape and Buckle: Drape the wooden tray over the armrest. Bring the belt straps up and over the outside of the tray and buckle them together. Pull the belt tight so the tray is held firmly in place.
6. The Over-Arm C-Table

A C-table is a smart and versatile addition to any seating area. Its unique shape allows the base to slide under the sofa, bringing the tabletop right over your lap. It’s the perfect perch for a laptop, a snack, or a magazine.
This type of table is a fantastic space-saver, offering the convenience of a coffee table without taking up a lot of floor space. Many models, like this one, also include extra storage like a basket for magazines. It’s a modern, practical piece that makes your favorite seat even more comfortable and functional.
DIY Instructions: How to Choose and Style a C-Table
What you need:
- A C-table
- A measuring tape
Step-by-step guide:
- Measure First: Before you buy a C-table, you need to measure two things. First, measure the height from the floor to the top of your sofa’s seat cushion. Second, measure the height from the floor to the top of your sofa’s armrest.
- Find the Right Fit: Look for a C-table that is taller than your seat cushion, so it can slide over it. If you want it to go over your armrest, it needs to be taller than that. Make sure the bottom part of the table is low enough to slide under your sofa.
- Slide it into Place: Simply slide the bottom of the C-table under the front of your sofa. You should be able to pull it towards you so it sits comfortably over your lap while you’re sitting down.
- Keep it Simple: The top of a C-table is a work surface, so you don’t want to clutter it up. It’s the perfect spot for the book you’re currently reading and a cup of tea.
- Use the Storage: If your table has a basket or shelf, use it! It’s a great place to keep magazines or your tablet, keeping them off the floor but still within easy reach.
7. The Statement Button Swap

Give a classic tufted sofa a playful and modern twist by swapping out the standard buttons. Replacing the original fabric-covered buttons with ones in bold, contrasting colors is a simple yet impactful update. This small change adds a pop of personality to a traditional piece.
You can buy button-covering kits at any craft store, allowing you to use any fabric you like. Or, you can find pre-made buttons in various materials like velvet, leather, or metal. This is a delightful way to customize your furniture and add a dash of unexpected color that ties into your room’s overall decor.
DIY Instructions: How to Change Sofa Buttons
What you need:
- New buttons (either pre-made or a kit to make your own)
- A long upholstery needle
- Strong upholstery thread
- A small pair of scissors or a seam ripper
Step-by-step guide:
- Remove the Old Button: Carefully use your small scissors or seam ripper to snip the threads that are holding the old button in place. Be careful not to cut the sofa fabric. Pull the old button out.
- Thread Your Needle: Cut a very long piece of your strong upholstery thread and thread it through your long needle. Don’t tie a knot yet.
- Go Through the Back: Push your needle from the back of the sofa (or underneath the cushion) all the way through to the front where the button should be. It can be tricky to find the right spot!
- Thread the New Button: Once the needle is sticking out the front, slide your new button onto the thread.
- Go Back Again: Push the needle back through the sofa fabric, just a tiny bit next to where it came out. Guide it back to the starting point on the back of the sofa.
- Pull and Tie: You should now have two long threads on the back of the sofa. Pull them very, very tight. This is what creates the “tuft” and pulls the button deep into the cushion. While pulling tight, have a friend help you tie a strong, secure knot.
8. Armrest Cover with Fringe

Protect the part of your sofa that gets the most wear and tear. A custom armrest cover is a practical and stylish solution for covering up worn spots or preventing future damage. It’s an easy sewing project that can be customized to fit any sofa arm.
Adding a decorative trim, like the tassel fringe on this cover, turns a functional piece into a charming detail. You can choose a fabric that matches your sofa or go for a contrasting pattern to add more visual interest. Securing it with velcro strips makes it easy to remove for cleaning.
DIY Instructions: How to Make an Armrest Cover
What you need:
- A piece of fabric
- A sewing machine or needle and thread
- Decorative fringe or trim
- Stick-on velcro strips
- A measuring tape
Step-by-step guide:
- Measure Your Sofa Arm: Use your measuring tape to measure the length and width of your sofa’s armrest. Drape the tape measure over it from the seat cushion on the inside to about halfway down the outside. This is your length. The width is the measurement from the front to the back of the armrest.
- Cut Your Fabric: Cut your fabric to the measurements you just took, adding one extra inch on all four sides for sewing.
- Hem the Edges: Fold over the edges of your fabric by about half an inch and sew them down to create a neat hem. This will stop the fabric from fraying.
- Add the Fringe: Sew your decorative fringe along one of the shorter edges of your fabric cover. This will be the edge that hangs on the outside of the sofa arm.
- Attach the Velcro: Take your stick-on velcro strips. Stick one part of the velcro (the fuzzy side) to the underside of your armrest cover, along the edge that will be tucked into the seat cushion. Stick the other part of the velcro (the scratchy side) to the side of the sofa base, hidden down by the seat cushion.
- Put it On: Drape your new cover over the armrest. Tuck the velcro edge down into the side of the seat cushion and press it firmly so the two velcro strips stick together.
9. Re-stuff Sagging Cushions

Bring your sofa back to life by tackling those sad, sagging cushions. Over time, the foam and stuffing inside your cushions can get compressed. You can easily restore their plumpness and comfort by adding new batting or foam.
Simply unzip the cushion cover and wrap the existing foam insert with a few layers of fresh polyester batting. This will fill out the cover, smooth out wrinkles, and provide renewed support. It’s a simple, invisible fix that makes a world of difference in how your sofa looks and feels.
DIY Instructions: How to Plump Up Your Cushions
What you need:
- A roll of polyester batting (you can find this at a craft or fabric store)
- Scissors
- A sagging sofa cushion
Step-by-step guide:
- Unzip the Cover: Find the zipper on your sofa cushion and open it up. Carefully take the fabric cover off. You will probably find a foam block inside, which might already be wrapped in some old, flat batting.
- Wrap It Up: Take your new roll of batting. Lay the foam block on top of it.
- First Layer: Wrap the batting around the foam block, just like you’re wrapping a present. You want one continuous piece of batting that covers the top, bottom, and front of the cushion. Cut the batting from the roll.
- Add More Layers: For a really plump cushion, repeat this step. Add a second or even a third layer of batting, wrapping it tightly around the foam block each time.
- Squeeze it Back In: This can be the tricky part! You now have to get the newly plumped-up insert back into its fabric cover. It helps to fold the insert in half like a taco, slide it into the cover, and then let it expand inside.
- Zip and Fluff: Carefully zip the cover closed. You might need to push the stuffing in as you go. Once it’s zipped, give the cushion a few good punches and squishes to even out the new stuffing.
10. The Concealed Drop-Down Tray

Upgrade your sofa with a feature that’s all about convenience. Some sofas come with a hidden drop-down tray in the middle cushion, but you can create a similar effect. This is a fantastic feature for movie nights, providing a hard surface for drinks and snacks.
By adding a sturdy, flat tray that can be wedged between or behind the back cushions, you create an instant table. Look for slim console trays or bed trays that can be easily stored when not in use. It’s a clever way to add functionality to your seating without any permanent changes.
DIY Instructions: How to Create a Hidden Tray
What you need:
- A sturdy, slim tray (like a laptop bed tray with folding legs or a long serving tray)
- A sofa with multiple back cushions
Step-by-step guide:
- Find the Right Tray: The trick is to find a tray that is thin but strong. A simple black tray with a built-in cup holder is a great choice.
- Find Your Spot: Look at the back of your sofa. The best place for your hidden tray is usually between two back cushions, or between a back cushion and the arm of the sofa.
- Wedge it In: Take your tray and slide it down vertically into the gap you’ve chosen. Push it down far enough so that only the very top is sticking out, or so it’s completely hidden.
- Pull it Out for Use: When you’re ready to use it, simply pull the tray up and out.
- Position it Securely: Lay the tray flat on top of your seat cushion. If you are using a bed tray, unfold the legs and position it over your lap. If it’s a flat tray, it’s best to place it on a firm, unoccupied cushion.
- Store it Away: When you’re finished, simply slide it back into its hiding spot behind the cushions.
11. The Luxurious Faux Fur Drape

Introduce a touch of glamour and incredible softness to your seating. Casually draping a faux sheepskin or fur throw over a chair instantly makes it look more expensive and feel much cozier. The rich texture invites you to sit down and relax.
This is a simple way to add a layer of warmth and sophistication. It works beautifully on armchairs, accent chairs, or even on one end of a larger sofa. The unstructured, natural way the throw falls adds a relaxed yet elegant feel to the room. It’s an effortless update with a big payoff in comfort and style.
DIY Instructions: How to Style a Faux Fur Throw
What you need:
- A faux fur or sheepskin throw
- An armchair or sofa
Step-by-step guide:
- Give it a Shake: Before you place your throw, hold it by one end and give it a good shake. This will fluff up all the fibers and make it look its best.
- The Asymmetrical Drape: Hold the throw in the middle so it hangs down on both sides. Don’t aim for perfection. Place the center of the throw over one back corner of the chair.
- Let It Fall Naturally: Let the fabric cascade down over the back and onto the seat of the chair. Allow it to look a little messy and undone. One side might hang lower than the other, and that’s okay!
- Tuck and Puddle: Gently tuck a small part of the throw into the side of the seat cushion to hold it in place. Let the end of the throw “puddle” or gather on the floor a little bit for a very relaxed and stylish look.
- Adjust for Comfort: Sit in the chair! If the throw is in your way, just adjust it slightly. The goal is for it to look great but also be comfortable.
12. Decorative Blanket Stitching

It’s the small, handcrafted details that often make the biggest impression. Adding a contrasting blanket stitch along the seams of your couch or cushions introduces a touch of bespoke charm. This simple stitching technique highlights the lines of your furniture.
Using a thick, colorful yarn or thread, this detail adds a subtle pop of color and a cozy, handmade feel. It’s a wonderful way to mend a small tear or simply to give a plain slipcover a unique, custom-designed look. This project is slow and mindful, resulting in a beautiful, personal touch.
DIY Instructions: How to Add a Blanket Stitch
What you need:
- A large-eye needle (like a yarn needle)
- Thick yarn or embroidery floss in a color you like
- Scissors
Step-by-step guide:
- Thread Your Needle: Cut a long piece of your yarn, maybe twice as long as your arm. Thread it through the needle, but don’t tie a knot yet.
- The First Stitch: Push your needle from the inside of the fabric seam to the outside, leaving a small “tail” of yarn on the inside. You can hold this tail with your thumb.
- Create the “L” Shape: Pull the needle out and move it a little bit to the right (about as far as a fingernail is wide). Push the needle through from the top layer of fabric to the bottom, going straight down.
- Loop It: Before you pull the stitch completely tight, you’ll see a loop of yarn. Guide your needle through that loop from back to front.
- Pull it Snug: Now, gently pull the yarn tight. You’ll see you’ve made a little “L” shape stitch that hugs the edge of the fabric.
- Repeat: Continue making these stitches all along the edge of the seam. Try to keep your stitches the same size and the same distance apart for a neat look. When you’re done, tie a knot on the inside of the fabric.
13. Layered Textural Throws

Why settle for one blanket when you can have a few? Layering multiple throws on your sofa creates a deep, inviting look that is full of texture and warmth. This approach adds visual weight and a “sink-right-in” feeling to your living room.
The key is to combine different materials. Mix a chunky knit with a smooth weave, or a tasseled throw with a nubby one. Fold one neatly and drape another more casually. This technique is not just for looks; it’s also practical, ensuring there’s always a cozy blanket ready for anyone who needs one.
DIY Instructions: How to Layer Blankets
What you need:
- Two or three blankets with different textures and complementary colors
- A tray and a candle (optional)
Step-by-step guide:
- Choose Your Base: Start with your largest or thinnest blanket. Fold it neatly in half or in thirds lengthwise. Lay it smoothly across the seat cushions of your sofa.
- Add the Second Layer: Take your second blanket, which should be the most textured or “chunky” one. Fold it more loosely and place it on top of the first one, but maybe a little off-center.
- The Casual Drape: If you have a third throw, you can drape this one more casually over the back or arm of the sofa.
- Mix Up the Folds: Don’t fold every blanket the same way. One can be perfectly folded, while another is more gathered or draped. This contrast is what makes it look interesting.
- Add an Accessory: Place a simple tray on top of your blanket pile. You can put a candle, a small plant, or a couple of books on it. This makes it look like a deliberate and stylish part of your decor.
14. Hand-Stenciled Patterns

Unleash your inner artist by adding a custom pattern to a plain piece of furniture. Using a simple stencil and a fabric marker, you can transform a boring ottoman or cushion into a one-of-a-kind piece with a global or bohemian vibe.
This project gives you complete control over the design. You can create your own stencil or buy one online. It’s a satisfying way to put your personal stamp on your decor. The slightly imperfect nature of hand-stenciling adds to its charm, making it clear that this is a piece with a story.
DIY Instructions: How to Stencil Fabric
What you need:
- A plain fabric ottoman or cushion
- A stencil with a pattern you like
- A permanent fabric marker
- A ruler and a pencil (optional)
Step-by-step guide:
- Plan Your Design: Before you start, decide where you want the pattern to go. You can do the whole thing, or just the top. If you want straight lines, you can use a ruler and a pencil to make very light guide marks.
- Place Your Stencil: Take your stencil and place it firmly on the fabric where you want to start your pattern.
- Trace the Pattern: Hold the stencil down with one hand so it doesn’t move. With your other hand, use the fabric marker to carefully color inside the cut-out shapes of the stencil.
- Lift and Repeat: Carefully lift the stencil straight up. You should see your pattern on the fabric. Now, move the stencil to the next spot and repeat the process.
- Connect the Dots: Line up the stencil with the part you just colored to continue the pattern seamlessly. Keep going until you have covered the entire area you planned.
- Let it Dry: Let the marker ink dry completely according to the instructions on the marker. Some may require you to apply heat with an iron (through a cloth) to make it permanent.
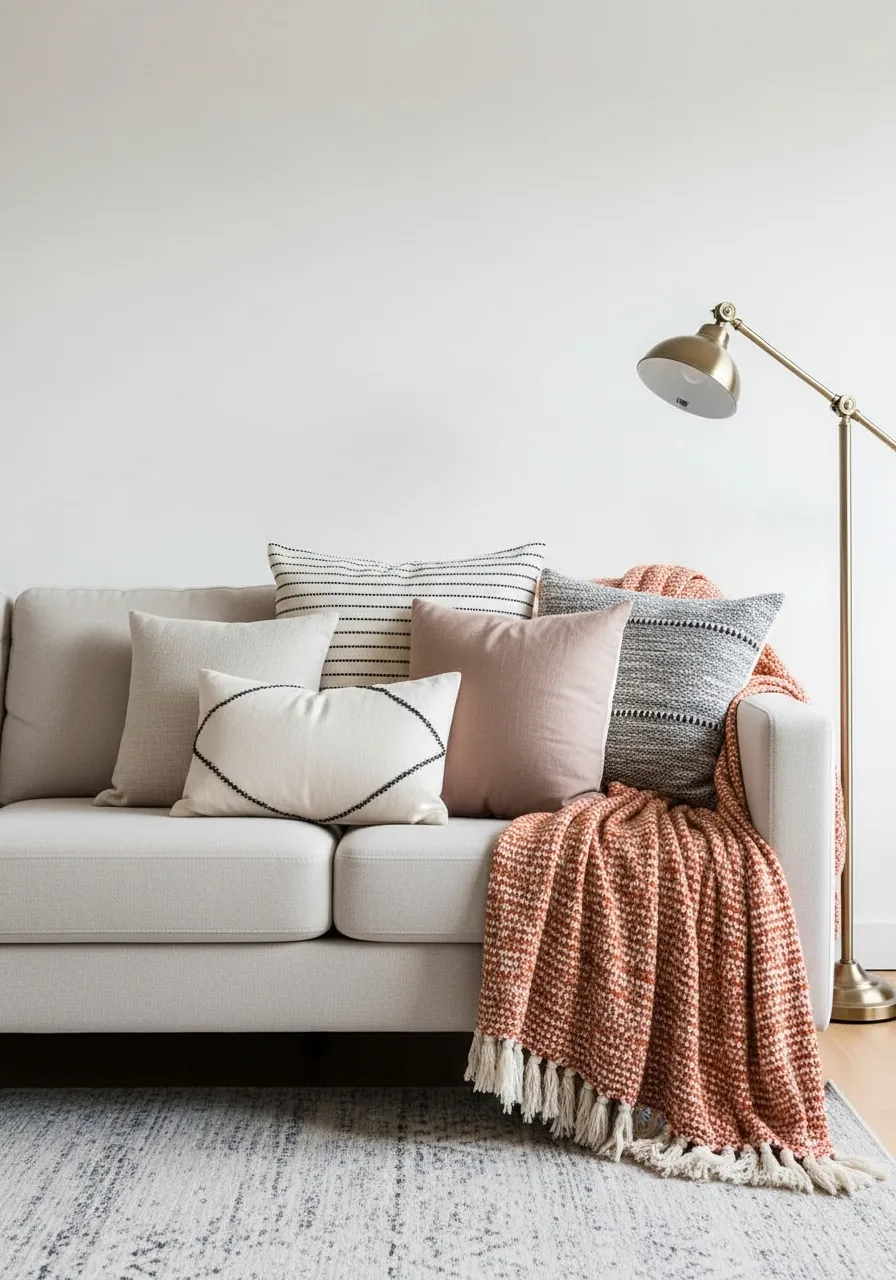
15. The Curated Throw & Pillow Set

Create a cohesive and polished look by carefully choosing a small collection of pillows and a throw that work together. This isn’t about matching everything perfectly, but about creating a harmonious color story and a mix of interesting textures.
Start with a color palette of two or three shades. In this image, soft pink, cream, and charcoal create a calm mood. Then, play with patterns—a thin stripe, a geometric design, a solid color. A textured throw in one of the main colors ties everything together beautifully. This thoughtful combination makes any sofa look instantly styled by a professional.
DIY Instructions: How to Coordinate Pillows and a Throw
What you need:
- A throw blanket
- 3 to 5 pillows in different sizes and shapes
Step-by-step guide:
- Pick Your Color Story: Choose two or three colors that you want to be the stars of the show. One should be a neutral color (like the cream sofa), and the others can be accent colors (like the pink and charcoal).
- Start with the Throw: Casually drape your throw blanket over one corner of the sofa. Don’t fold it perfectly; let it hang over the arm and back for a relaxed feel.
- Place Your Largest Pillows: Put your two largest pillows in the corners of the sofa. These can be a solid color or have a simple pattern.
- Layer in the Mediums: Place your medium-sized pillows in front of the large ones. This is a great place to use your main accent color or a more interesting pattern.
- Add the Centerpiece: Place your most interesting or smallest pillow in the front. This could be a lumbar pillow (the long, skinny kind) or one with a unique texture.
- Step Back and Check: Look at your arrangement from across the room. Does it feel balanced? The goal is for the colors and patterns to be spread out nicely, not all clumped on one side.
16. The Ottoman Cushion Refresh

Is your ottoman looking a bit sad and flat? You can bring it back to life by adding new foam and padding. This project not only improves the look of your ottoman but also makes it much more comfortable to put your feet up on.
By adding a thick layer of high-density foam and wrapping it in soft batting, you can create a plush, supportive surface. It’s like giving your ottoman a brand-new cushion. A staple gun makes securing the new fabric a straightforward task, resulting in a professional-looking finish.
DIY Instructions: How to Re-stuff Your Ottoman
What you need:
- A piece of high-density foam, cut to the size of your ottoman top
- A roll of soft batting
- A staple gun and staples
- Scissors
- Fabric to cover (if you’re changing it)
Step-by-step guide:
- Remove the Old Top: Turn your ottoman upside down. If the top is screwed on, unscrew it. If the fabric is stapled on, carefully use a flathead screwdriver to pry up the old staples and remove the old fabric and foam.
- Place the New Foam: Put your new piece of foam on the wooden top of the ottoman. Make sure it’s centered.
- Wrap it in Batting: Roll out your batting and lay it over the foam. You want enough batting to wrap around the foam and the edges of the wooden top. It’s like putting a fluffy blanket over the foam.
- Staple the Batting: Pull the batting snug and use your staple gun to attach it to the underside of the wooden top. Put one staple in the center of each of the four sides first. Then, work your way around, adding more staples and keeping the batting tight.
- Add the Fabric: Lay your new fabric down, pattern-side facing the floor. Place the padded ottoman top onto the fabric, foam-side down.
- Staple the Fabric: Just like you did with the batting, pull the fabric tight and staple it to the underside of the top. Start with one staple on each side, then fill in the gaps. Fold the corners neatly, like wrapping a present, before you staple them down.
- Reattach the Top: Screw the newly cushioned top back onto the base of your ottoman.
17. Contrasting Edge Piping

Highlight the beautiful shape of your sofa by adding or replacing the piping along its seams. Also known as welting, this corded trim defines the silhouette of the furniture, making it look sharper and more tailored.
Using a contrasting color, like the white against the navy blue in the photo, creates a bold, graphic look. It’s a detail that adds a touch of classic, high-end style. While it can be a bit more involved, it’s a powerful way to customize a piece of furniture and make it truly stand out.
DIY Instructions: How to Add New Piping
What you need:
- Pre-made piping in your chosen color (you can buy this at a fabric store)
- A hot glue gun with fabric glue sticks
- Scissors
Step-by-step guide:
- Measure Your Seams: Use a flexible measuring tape to measure all the seams on your sofa where you want to add the piping. Add a little extra to your total measurement just in case.
- Heat Up Your Glue Gun: Plug in your hot glue gun and let it get hot. Make sure you are using glue sticks that are meant for fabric.
- Start in a Hidden Spot: It’s always good to start in a place that’s not easily seen, like the back corner of the sofa.
- Apply a Line of Glue: Squeeze a thin, straight line of hot glue directly onto the existing seam of your sofa. Only do a short section at a time, about 6 inches long, so the glue doesn’t dry.
- Press the Piping in Place: Take your piping and carefully press the flat “tail” part of it onto the line of hot glue. Hold it for a few seconds until it sticks. The rounded, corded part should stand out.
- Continue Around the Sofa: Keep working in small sections, applying a line of glue and pressing the piping into place. When you get to a corner, you may need to snip the flat tail of the piping so it can bend smoothly.
- Finish Neatly: When you get back to where you started, cut the piping so the two ends meet perfectly. Add a final dot of glue to secure the end.
18. Elegant Scarf & Brooch Draping

Repurpose a beautiful silk scarf as an elegant chair accessory. This no-sew, no-glue technique is a sophisticated and temporary way to add a splash of color and pattern to a dining chair or accent chair, especially for a special occasion.
Simply drape the scarf over the back of the chair and gather it with a sparkling brooch or a decorative buckle. The soft fabric adds a touch of luxury, while the brooch acts as a piece of jewelry for your furniture. It’s a quick, creative, and completely reversible way to dress up your seating.
DIY Instructions: How to Drape a Scarf on a Chair
What you need:
- A large, decorative scarf (silk or a similar soft fabric works well)
- A brooch, a large earring, or a decorative buckle
Step-by-step guide:
- Fold Your Scarf: Take your scarf and fold it into a triangle by bringing two opposite corners together.
- Drape It Over: Find the center of the longest folded edge. Place this center point at the top middle of your chair’s backrest. Let the two long ends and the pointed corner hang down the back.
- Gather the Fabric: Use both of your hands to gather the scarf together in the middle of the chair back. Pinch it so it creates nice, soft folds.
- Add the Bling: While holding the gathered fabric with one hand, take your brooch or buckle with the other.
- Secure It: If you’re using a brooch, simply pin it through all the layers of the gathered fabric. If you’re using a buckle, thread the fabric through it and adjust until it holds securely.
- Fluff and Arrange: Gently pull on the ends of the scarf to make sure they hang nicely. You can spread the fabric out a little above and below the brooch to create a fuller look.
19. Bold Painted Fabric Stripes

Make a strong statement by painting stripes directly onto your chair or sofa. This is a daring and transformative project that can turn a plain piece of furniture into a true centerpiece. It’s an affordable way to get a custom, high-end designer look.
Using fabric paint and painter’s tape, you can create crisp, clean lines. This nautical-inspired red and navy design adds a classic, preppy feel. You can even add a stenciled initial for a personalized monogram. This is a fantastic option for a slipcover that you can remove for easy painting.
DIY Instructions: How to Paint Stripes on Fabric
What you need:
- A chair or sofa with light-colored fabric (or a slipcover)
- Fabric paint in your chosen colors
- High-quality painter’s tape
- A small paint roller or foam brush
- A measuring tape
- A pencil
Step-by-step guide:
- Plan Your Stripes: Decide how wide you want your stripes to be and how far apart they should be. Use your measuring tape and a pencil to make small, light marks at the top and bottom of the cushion to guide you.
- Tape Off Your Lines: This is the most important step! Use your painter’s tape to create the edges of your stripes. Press the tape down very firmly, especially on the edges, to prevent the paint from bleeding underneath.
- Start Painting: Pour some fabric paint into a tray. Use your small roller or foam brush to apply a thin, even coat of paint between the tape lines. Don’t load up your roller with too much paint.
- Apply a Second Coat: Let the first coat dry completely. Then, apply a second coat to make the color solid and vibrant.
- Remove the Tape: This is the magic moment! While the second coat of paint is still a little bit wet, carefully and slowly peel off the painter’s tape. Pulling it off now helps create a really sharp line.
- Let it Cure: Let the paint dry and cure for as long as the paint bottle recommends. This might be a few days. Curing is what makes the paint permanent and soft.
20. Chic Leather Tab Handles

Elevate a simple storage ottoman or bench with the addition of stylish leather handles. This small detail adds a touch of rustic or modern charm, depending on the hardware you choose. It’s both a decorative and a functional upgrade.
These handles make it easier to lift the lid of a storage piece or to pull a bench out from under a console table. It’s a simple project that requires only a few materials but delivers a high-end, custom look. The warm texture of the leather contrasts beautifully with the fabric.
DIY Instructions: How to Make Leather Handles
What you need:
- A strip of leather (you can buy small pieces at a craft store or use an old belt)
- Screws with matching decorative screw posts (sometimes called Chicago screws)
- A ruler and a utility knife or sharp scissors
- A drill or an awl to make holes
Step-by-step guide:
- Cut Your Leather: Decide how long you want your handles to be. A good length is usually around 6-7 inches. Use your ruler and knife to cut the leather strip to the right length. You can cut the ends straight or give them a rounded shape.
- Mark Your Holes: On your leather strip, mark a spot for a hole about half an inch from each end. Make sure they are centered.
- Make the Holes: Use your drill with a small drill bit or a sharp awl to carefully make a hole through the leather at the spots you marked.
- Position the Handle: Decide where you want the handle to go on your ottoman. Hold the leather strip in place and use a pencil to mark through the holes onto the ottoman. This shows you where to make the screw holes.
- Make Pilot Holes: Use your drill or awl to make small starter holes in the ottoman at the spots you marked with the pencil.
- Attach the Handle: Take one of your screw posts (it has two parts, a screw and a post). Push the post part through the hole in the ottoman from the inside out. On the outside, line up one end of your leather handle with the post, and then screw the top part of the screw in to secure it. Repeat for the other side of the handle.
21. The Modern Color-Block Drape

Create a bold, graphic statement by draping multiple throws over the back of your sofa. This technique uses clean lines and solid blocks of color to give your seating a modern and intentional look. It’s a departure from a single, casually tossed blanket.
The crisp folds and defined sections of color can change the entire personality of your couch, making it feel more like a piece of contemporary art. This method works well to introduce a new color scheme into your room. It is a simple, no-commitment way to experiment with a strong, minimalist aesthetic.
DIY Instructions: How to Create a Color-Blocked Look
What you need:
- 2-4 solid-colored, thin blankets (fleece or cotton work well)
Step-by-step guide:
- Choose Your Colors: Pick a few blankets in colors that look nice together. You can use different shades of the same color or contrasting colors for a bolder look.
- Fold Them Neatly: Take your first blanket and fold it lengthwise until it is a long, neat rectangle. The width should be about one foot wide.
- Drape the First One: Place your first folded blanket over the back of the sofa, letting it hang down evenly on the back and front.
- Add the Next One: Take your second folded blanket and lay it right next to the first one. Make sure the edge of the second blanket just barely touches the edge of the first one. There should be no gap.
- Keep Going: Continue this process with your other blankets, laying each one neatly next to the last, until you have covered the back of your sofa with colorful stripes.
- Smooth It Out: Use your hands to smooth down the front and back of the blankets so they hang straight and look very tidy.
22. The Rustic Crate Side Table

Add a touch of farmhouse charm to your living room with a simple wooden crate. When turned on its side, a rustic crate becomes a functional and stylish side table. This is a wonderfully affordable and creative way to add surface area and storage next to your seating.
The open slats are great for stashing books, magazines, or a small folded blanket. Adding wheels to the bottom makes it easy to move around wherever you need it. This upcycled piece brings a warm, unpretentious, and practical element to your space, proving that you don’t need to spend a lot to get a lot of character.
DIY Instructions: How to Make a Rolling Crate Table
What you need:
- A wooden crate
- Four small caster wheels (the kind that spin all around)
- A screwdriver and the small screws that come with the wheels
- Sandpaper (optional)
Step-by-step guide:
- Find a Crate: You can find wooden crates at craft stores, home improvement stores, or even some grocery stores.
- Clean and Sand: Make sure your crate is clean. If there are any rough or splintery spots, use a piece of sandpaper to smooth them down.
- Flip it Over: Turn the crate upside down so the bottom is facing up.
- Position the Wheels: Place one caster wheel on each of the four corners of the bottom of the crate. Don’t put them too close to the edge.
- Screw Them In: Use your screwdriver to attach each wheel to the crate with the small screws that were included. Make sure they are screwed in tightly so they don’t wobble.
- Flip and Roll: Turn your crate right-side up. It’s now a rolling side table! Place it next to your chair or sofa and fill it with your favorite things.
23. Iron-On Pillow Borders

Give plain pillows a sharp, tailored look without ever touching a sewing machine. Using fusible bonding tape and a hot iron, you can add clean, crisp borders to your cushion covers. This is a simple and quick way to introduce a pop of color or a touch of detail.
This technique allows you to customize any plain pillow with fabric strips or ribbon, creating a high-end, designer feel. The heat from the iron activates the adhesive, creating a strong bond that looks just like a sewn seam. It’s an accessible project for anyone who wants a polished look with minimal effort.
DIY Instructions: How to Add Iron-On Trim
What you need:
- Plain pillow covers
- Fabric cut into strips, or wide ribbon
- Fusible bonding web/tape (like HeatnBond or Stitch Witchery)
- An iron
- Scissors
Step-by-step guide:
- Prep Your Pillow: Take the cover off your pillow and lay it flat on an ironing board. Iron the cover so it’s smooth and wrinkle-free.
- Cut Your Materials: Cut your fabric strips or ribbon to the lengths you need to create a border. Also, cut your fusible tape to the same lengths.
- Make a Sandwich: Place your first fabric strip where you want it on the pillow cover. Now, carefully lift the strip and place the fusible tape underneath it. The tape should be hidden between the pillow cover and the fabric strip.
- Time to Iron: Turn your iron to the setting recommended on the fusible tape package (usually no steam). Press the hot iron down firmly on top of your fabric strip for about 10-15 seconds.
- Lift and Check: Lift the iron. The heat has melted the tape, gluing the strip to the pillow cover.
- Continue All Around: Repeat this process for all the sides of your border. Let it cool down completely before you put the cover back on your pillow.
24. The “Ditch the Sofa” Chair Circle

Who says a living room has to have a sofa? Break from tradition by creating a cozy and conversational seating area using only armchairs. Arranging four chairs in a circle is a refreshing alternative that can make a room feel more open and intimate.
This layout is fantastic for encouraging conversation, as everyone is facing each other. It’s a versatile setup that can work in small or large spaces. Mixing and matching chair styles or colors can add an eclectic, curated feel. A central rug and a small coffee table anchor the space, making it feel complete and welcoming.
DIY Instructions: How to Create a Chair Circle
What you need:
- Four matching or complementary armchairs
- A round area rug
- A small round coffee table or ottoman
Step-by-step guide:
- Start with the Rug: Place your round area rug in the center of the space where you want your seating area to be. The rug will be the foundation of your circle.
- Place the First Two Chairs: Place your first two chairs directly across from each other, with their front legs just on the edge of the rug.
- Add the Other Two: Now, place the other two chairs in the remaining spaces, so you have four chairs making a square or a circle shape. Again, they should be facing inward and be at the edge of the rug.
- Center the Table: Place your small coffee table or ottoman in the very middle of the circle. There should be enough room for people to walk between the table and the chairs.
- Adjust for Conversation: Sit in each chair. Can you comfortably talk to the person across from you? Is the table easy to reach? Adjust the chairs, pulling them slightly closer or pushing them farther apart, until it feels just right. Add pillows and throws to make it cozy!
25. The Layered Ottoman Tray

Transform your soft ottoman into a functional coffee table by adding a stylish tray. This simple addition provides a stable, flat surface for drinks, books, or decorative items, making your ottoman much more versatile.
To take it a step further, add another layer of texture by placing a decorative placemat or a small woven runner underneath the tray. This protects the fabric of the ottoman and adds visual interest. This technique of layering materials creates a curated and thoughtful look, turning a simple footrest into a beautiful and practical centerpiece for your seating area.
DIY Instructions: How to Style an Ottoman Tray
What you need:
- A large, sturdy tray
- A decorative placemat, small runner, or piece of fabric
- A few decorative items (like a vase, a candle, and a mug)
Step-by-step guide:
- Start with a Clean Slate: Clear everything off your ottoman.
- Add the First Layer: Lay your decorative placemat or runner in the center of the ottoman. This will be the base for your display.
- Place the Tray: Center your tray on top of the placemat. Choose a tray made from a different material than the placemat for a nice contrast (like a woven tray on a cloth placemat).
- The “Rule of Three”: A simple decorating trick is to group items in threes. Place your three chosen items on the tray. For example, a small vase with some greenery, a stack of two books, and a pretty candle.
- Vary the Heights: Make sure your three items are different heights. One tall (the vase), one medium (the candle), and one short (the books). This makes the arrangement more pleasing to the eye.
- Leave Some Space: Don’t fill the entire tray. Leave some empty space so you still have room to put down a cup of coffee or the remote control.
26. Bohemian Floor Cushion Seating

Create a relaxed, low-key lounge area with a collection of large floor cushions. This is a superb way to add extra, flexible seating to your living room without bringing in more bulky furniture. It fosters a casual and communal atmosphere.
A stack of bohemian-style pillows with rich textures, patterns, and tassels instantly adds a layer of worldly charm and comfort. They are easy to move around, perfect for game nights, movie marathons, or just creating a cozy reading nook. When not in use, they can be stacked in a corner, serving as a beautiful decorative element.
DIY Instructions: How to Set Up a Floor Cushion Corner
What you need:
- 3-5 large floor cushions in various patterns and textures
- A low tray or basket (optional)
Step-by-step guide:
- Choose Your Corner: Find a cozy spot in your living room for your new seating area, perhaps near a window or next to your main sofa.
- Start with the Biggest: Place your largest floor cushion on the bottom. If you have a plain one, this is a good one to use as the base.
- Stack Them Up: Stack two or three more cushions on top. Don’t worry about making the stack perfectly neat; a slight tilt makes it look more inviting.
- Spread Them Out: Place one or two more cushions on the floor next to your stack. This makes it clear that this is an area for sitting.
- Mix and Match: The key to the bohemian look is to mix different patterns, colors, and textures. Have a bumpy one next to a smooth one, and a striped one next to a floral one.
- Add a Surface: You can place a low brass tray or a shallow basket nearby to hold a drink or a book, acting as a mini coffee table for your floor lounge.
27. A Statement Fabric Reupholstery

For a truly dramatic transformation, consider reupholstering a piece of furniture in a bold, statement-making fabric. This project can turn a tired, outdated chair into the absolute star of your living room. A vibrant, large-scale pattern brings energy and personality to your space.
While reupholstering can be a more involved DIY, tackling a simple piece like a dining chair seat or a small accent chair is a great way to start. It allows you to choose a fabric that perfectly reflects your personal style. The result is a completely unique piece of furniture that looks custom-made for your home.
DIY Instructions: How to Reupholster a Simple Chair Seat
What you need:
- A chair with a removable, screw-on seat
- A screwdriver
- New fabric (a piece larger than the seat)
- A staple gun and staples
- Scissors
Step-by-step guide:
- Remove the Seat: Turn your chair upside down. You will likely see four screws holding the seat cushion onto the chair frame. Use your screwdriver to remove these screws and take the seat off.
- Cut Your Fabric: Lay your new fabric on the floor, with the pretty side facing down. Place the chair seat on top of it, also facing down. Cut the fabric around the seat, leaving about 3-4 inches of extra fabric on all sides.
- Start Stapling: Pull one side of the fabric up and over the edge of the seat base. Hold it tight and put one staple in the middle using your staple gun.
- Pull and Staple Opposite: Go to the direct opposite side of the seat. Pull the fabric very tight, and put one staple in the middle of that side. Now do the same for the other two opposing sides.
- Fill in the Gaps: Continue adding staples all the way around, always pulling the fabric tight before you staple. Leave the corners for last.
- Fold the Corners: Neatly fold the fabric at the corners, just like you’re wrapping a present. Pull the corner fabric tight and put a few extra staples in to hold it securely.
- Screw It Back On: Place the newly covered seat back onto the chair frame and screw it back into place from underneath.
28. The Functional Sofa Console Table

Make the most of the often-wasted space behind your sofa by adding a slim console table. This piece of furniture is a game-changer for both style and function. It provides a surface for lamps, which adds lovely ambient lighting to your room.
A sofa console is also the perfect place to display decorative objects, family photos, or plants. Even better, it acts as a convenient charging station. You can place a power strip on the table or on a lower shelf to easily plug in phones, tablets, and laptops, keeping messy cords hidden from view.
DIY Instructions: How to Set Up a Sofa Console
What you need:
- A slim console table that is slightly lower than the back of your sofa
- Lamps, plants, and other decor
- A power strip and cable ties or clips
Step-by-step guide:
- Choose the Right Table: Find a long, narrow table. Measure the height of your sofa’s backrest and choose a table that is the same height or just a little bit shorter.
- Position the Table: Push your sofa away from the wall. Center the console table behind the sofa, then push the sofa back towards it, leaving just enough space for cords.
- Place Your Tallest Items: Start by placing your tallest items, like one or two lamps, on the ends of the table. This creates a sense of balance.
- Fill in the Middle: In the space between the lamps, add some medium-sized and smaller items. A stack of books, a decorative bowl, or a couple of small plants work well.
- Manage Your Cords: Plug your lamps into a power strip. Run the cords down the back of the table. Use cable ties or adhesive clips to attach the cords to the table legs to keep them neat and hidden.
- Create a Charging Zone: Leave one end of the power strip accessible for charging your devices. You can place a small tray on the table to hold your phone while it charges.
29. Playful Tassel Embellishments

Add a dose of fun and personality to a plain ottoman or pillow with colorful, handmade tassels. This simple embellishment is an easy and affordable way to infuse your seating with a touch of bohemian flair. It’s a craft project that can be done in an afternoon.
You can make your own tassels out of yarn in any color you like, allowing you to perfectly match your existing decor or introduce a new accent color. Attaching them along the bottom edge or to the corners of a piece gives it a playful, custom-decorated look.
DIY Instructions: How to Make and Add Tassels
What you need:
- Yarn in your favorite colors
- A piece of stiff cardboard (about 4 inches tall)
- Sharp scissors
- A needle and thread or a hot glue gun
Step-by-step guide:
- Wrap the Yarn: Hold the end of the yarn against the cardboard. Wrap the yarn around and around the cardboard. The more you wrap, the fluffier your tassel will be (about 30-40 times is good).
- Tie the Top: Cut a separate, small piece of yarn. Slide it under all the wrapped yarn at the top of the cardboard and tie a tight double knot. This holds everything together.
- Cut the Bottom: Slide the bundle of yarn off the cardboard. Use your scissors to cut through all the loops at the bottom. You now have a tassel!
- Create the “Neck”: Cut another small piece of yarn. Tie it tightly around the tassel about an inch from the top knot. This creates the little “head” of the tassel. Wrap the ends of this tie around the neck a few times and then tie another knot to secure it.
- Trim It: Your tassel might have some uneven ends. Use your scissors to give it a little haircut so the bottom is nice and straight.
- Attach It: To attach your new tassel, you can either use a needle and thread to sew the top loop onto your pillow or ottoman, or you can use a small dot of hot glue for a no-sew option.
30. The Sofa-Back Bench and Table

This clever setup is a masterclass in space-saving design. Placing a long, upholstered bench under a slim console table behind your sofa provides a huge amount of function. It offers extra seating that can be pulled out when guests arrive.
When tucked away, the bench is completely hidden, maintaining a clean and uncluttered look. The console table itself provides a valuable surface for lighting and decor. This combination is a fantastic solution for open-plan living spaces, as it helps to visually separate the seating area from the rest of the room while adding tons of utility.
DIY Instructions: How to Create a Bench and Table Combo
What you need:
- A slim console table
- An upholstered bench
- A measuring tape
Step-by-step guide:
- Measure Everything First: This is the most important step! First, measure the height from the floor to the underside of the console table’s top. Second, measure the length between the table’s legs.
- Find the Perfect Bench: Take your measurements to the store or look online for an upholstered bench. You need to find a bench that is shorter than the height of your table’s underside, and narrower than the length between the table legs. This ensures the bench will slide underneath easily.
- Think About Style: Try to find a bench and a table that look good together. They can be made of the same material for a matched look, or different materials (like a wood table and a fabric bench) for a more interesting contrast.
- Position the Table: Place the console table behind your sofa.
- Tuck the Bench: Simply slide the bench into the space under the table.
- Style the Top: Now that your seating is in place, style the top of the console table with books, a lamp, or a plant. The extra seating is now hidden in plain sight, ready for when you need it.
31. The Free-Spirited Tie-Dye Throw

Cover your sofa in a wave of vibrant, free-form color. A large tie-dye throw is a bold and artistic way to completely change the look of your seating. It’s a statement piece that brings a relaxed, bohemian energy to any room.
This is more than just a blanket; it’s a piece of art that you can create yourself. The unique patterns and bleeding colors ensure that no two throws are exactly alike. Whether you choose bright rainbow hues or deep indigo shades, this draped cover is a fun and expressive way to hide worn upholstery or simply to celebrate color.
DIY Instructions: How to Tie-Dye a Couch Throw
What you need:
- A large white or light-colored cotton blanket or flat sheet
- A tie-dye kit (with dye powders, squeeze bottles, rubber bands, and gloves)
- A large plastic tub or a space outside you can get messy
- A wire rack (like a cookie cooling rack)
- A plastic bag or plastic wrap
Step-by-step guide:
- Prep Your Blanket: Wash and dry your new blanket or sheet first. Leave it slightly damp for dyeing.
- Time to Tie: Lay your damp blanket on a flat surface. For the big circle pattern (a “mandala”), pinch the fabric in the very center and start twisting it. Keep twisting until the whole blanket looks like a flat cinnamon roll. Use 3-4 big rubber bands to hold your fabric pizza together.
- Mix Your Dyes: Put on your gloves. Follow the instructions in your kit to mix the dye powders with warm water in the squeeze bottles.
- Add the Color: Place your bundled blanket on the wire rack inside the plastic tub. Squeeze the dye onto the different sections created by the rubber bands. Flip the bundle over and dye the other side too.
- Let It Sit: Carefully place your dye-covered bundle into a plastic bag or wrap it in plastic wrap. Let it sit for at least 6-8 hours, or even a full day for the brightest colors.
- Rinse and Wash: Take the bundle to a sink. While still wearing your gloves, rinse it under cool water until the water runs clear. Carefully cut the rubber bands off and unfold your creation. Wash the blanket by itself in your washing machine and dry it.
32. The Floating Macrame Shelf

Sometimes the best update is one that floats beside your chair. A macrame hanging shelf is a beautiful and space-saving alternative to a traditional side table. It adds a touch of handmade, bohemian charm while providing a perfect perch for a small plant or a cup of tea.
This clever accessory keeps your essentials within reach without cluttering the floor. It’s an especially good solution for small living rooms or tight corners where a normal table wouldn’t fit. The intricate knots of the macrame hanger add a layer of soft texture to the room, making your favorite seating spot even more special.
DIY Instructions: How to Make a Simple Hanging Shelf
What you need:
- Macrame cord (about 4mm thick)
- A small round wooden plate or disc
- A wooden or metal ring for hanging
- Scissors
Step-by-step guide:
- Cut Your Cords: Cut four very long pieces of macrame cord. A good starting length is about 10 feet for each cord.
- Attach to the Ring: Take all four cords and fold them exactly in half. Push the folded loop through your ring. Then, pull the loose ends of the cords through that loop to create a knot. You should now have eight cords hanging down.
- Make Your First Knots: Separate your eight cords into four groups of two. About a foot down from the ring, tie a simple knot in each group of two. Make sure all four knots are at the same level.
- Create a Net: Now, you’re going to make a new set of knots. Take one cord from one group and one cord from the group next to it. Tie them together in a knot about 4-5 inches below your first set of knots. Do this all the way around. You are creating a diamond pattern that will form a basket.
- The Final Knot: Gather all eight cords together underneath where your wooden disc will sit. Tie one big, strong knot with all the cords to create a base for your shelf to rest on.
- Add the Shelf and Trim: Place your wooden disc inside the net you created. It should sit securely on top of the big final knot. Trim the tassel of cords at the bottom so it looks neat. Now you can hang it up!
33. The Sophisticated Monochrome Stack

Create a look of quiet luxury by layering pillows and throws in a single color. A monochrome palette, like the various shades of grey shown here, is a powerful way to make your seating look chic, cohesive, and incredibly calming.
The secret to making this work is texture. While the color is the same, the feeling of each piece is different. Combine a chunky knit throw with smooth velvet pillows, a nubby woven cushion, and maybe even a touch of faux fur. This mix of textures creates depth and visual interest, preventing the single color from looking flat and proving that simple can be stunning.
DIY Instructions: How to Style a Monochrome Look
What you need:
- 3-5 pillows in the same color, but with different textures
- 1-2 throw blankets in the same color family, also with different textures
Step-by-step guide:
- Find Your Textures: Go on a treasure hunt in your home or at a store. Gather all the pillows and blankets you can find in your chosen color. Look for different materials: one knitted, one smooth, one fluffy, one with a pattern woven in.
- Start with a Base Throw: Take your largest or smoothest throw and drape it over one arm of the sofa. Let it hang casually.
- Build Your Pillow Stack: On the opposite side of the sofa, start stacking your pillows. Put the largest one in the back, against the arm of the sofa.
- Layer Forward: Place your other pillows in front of the first one, working from largest to smallest.
- Focus on Contrast: The most important step! Make sure you place different textures right next to each other. For example, put your smooth velvet pillow in front of your bumpy, knitted one. This is what makes the single color look so interesting.
- The Final Touch: Take your second throw, maybe a fluffier one, and loosely fold it. Place it on the seat cushions in front of your pillow stack.
34. The Wicker Chair Makeover

Give an old, dated wicker or rattan chair a fresh and modern new life with a can of spray paint. This is one of the most effective ways to transform woven furniture, instantly updating its color and hiding any imperfections. A coat of black paint, for example, can make a tired piece look chic and contemporary.
The real fun comes with the cushion. After painting the frame, you can add a brand-new seat cushion in a bold, vibrant fabric. This pop of color and pattern against the newly painted frame creates a stunning contrast. It’s a weekend project that results in what looks like a brand-new piece of custom furniture.
DIY Instructions: How to Paint a Wicker Chair
What you need:
- An old wicker chair
- A stiff brush and soapy water
- Spray paint primer
- Spray paint in your chosen color
- A new cushion that fits the chair
Step-by-step guide:
- Clean, Clean, Clean: Take your chair outside. Use a stiff brush and some soapy water to scrub all the dust and dirt out of the wicker. Rinse it well with a hose and let it dry completely in the sun. This might take a full day.
- Set Up Your Paint Station: Find a spot outside or in a well-ventilated garage. Put down a large drop cloth or old newspapers to protect the ground.
- Prime It First: Shake your can of spray paint primer very well. Hold the can about a foot away from the chair and spray in long, sweeping motions. Cover the entire chair with a light coat of primer. Let it dry.
- Time for Color: Now, shake your can of colored spray paint. Just like with the primer, spray the chair with light, even coats. It’s better to do two or three thin coats than one thick, drippy one. Make sure you spray from all angles to get into all the woven parts.
- Let it Cure: Let the chair dry completely. This could take 24 hours.
- Add Your Cushion: Once the paint is fully dry and no longer sticky, bring your chair inside and add your new, colorful cushion.
35. The Dedicated Cozy Corner

Sometimes refreshing your living room seating means creating a brand new spot to sit. Carve out a dedicated cozy corner for reading and relaxing. This approach adds a new functional zone to your room that is all about personal comfort.
Combine a comfortable chair, like a classic wicker piece, with layers of soft cushions and pillows. The key is to add great lighting—a floor lamp for overall light and a smaller task lamp for reading. A small shelf or table keeps books and a warm drink close at hand. This intentional little nook becomes a welcome retreat from the main sofa.
DIY Instructions: How to Create a Reading Nook
What you need:
- An empty corner of your living room
- A comfortable armchair
- A small bookcase or side table
- A floor lamp and/or a small table lamp
- Pillows and a throw blanket
Step-by-step guide:
- Pick Your Spot: Find a quiet, low-traffic corner in your living room. A spot near a window is a great choice for natural light during the day.
- Bring in the Chair: Place your comfortable armchair in the corner. You can angle it slightly towards the rest of the room so it feels connected but still separate.
- Add a Surface: Place your small bookcase or side table right next to the chair, within easy arm’s reach. This is where you’ll put your book, your drink, and a lamp.
- Let There Be Light: Good lighting is very important. Place a floor lamp behind the chair or a small table lamp on your side table. Having a light source dedicated to your nook makes it feel like its own special space.
- Make it Cozy: Add a comfortable cushion to the seat of the chair and a pillow for your back. Drape a soft throw blanket over the arm of the chair.
- Personalize It: Stack a few of your favorite books on the shelf and maybe add a small plant. This little corner is now your personal escape.
A tired couch doesn’t have to mean a complete replacement. As you’ve seen, there are countless ways to breathe new life into your existing seating. A small change can make a significant impact on the entire feel of your living room.
From a simple pile of new pillows to a weekend painting project, you have the power to update your space. These ideas are here to spark your imagination and show you what’s possible.
So choose a project that excites you and get started. A more comfortable, stylish, and personal living room is just one small DIY away. Your sofa has plenty of life left in it; it’s just waiting for a fresh start.
Key Takeaways
Refreshing your living room seating is an achievable goal. You don’t need a big budget to make a big change. Here are the main points to remember:
- Cover It Up: The fastest way to get a new look is with textiles. A simple slipcover, a strategically draped throw, or a no-sew cushion wrap can instantly hide old fabric and introduce new colors and patterns.
- Accessorize with Comfort: Never underestimate the power of pillows and blankets. Layering different textures and sizes is a low-cost way to add style and make your seating much more inviting.
- Focus on the Details: Small, thoughtful updates can make a piece feel custom. Swapping buttons, adding decorative stitching, or painting the legs are small projects with a high-end result.
- Add Functionality: Enhance how you use your seating. Adding a C-table, an ottoman tray, or a console table behind the sofa makes your space more practical and stylish at the same time.