The spooky season is just around the corner, and you might find yourself with a sudden urge to decorate. There is no need to panic if you have waited until the last minute. You can transform your home into a haunted haven in a single afternoon.

These creative ideas are proof that you do not need to spend a lot of time or money to get into the Halloween spirit. From clever crafts to simple spooky accents, these projects are designed for quick and easy fun. You will find inspiration to decorate every corner of your home, both inside and out.
Each project is designed to be simple and uses common materials you may already have on hand. Get ready to unleash your creativity and make this Halloween unforgettable. Let’s make your home the most festive on the block.
1. Spooky Vinyl Record Wall Art

Transform old vinyl records into chilling Halloween decorations quickly. You can use white paint markers to draw classic spooky faces on the black surfaces. Ghosts, skulls, and grinning devils come to life with just a few simple strokes.
Consider hanging the decorated records on a plain wall using adhesive strips. To enhance the eerie atmosphere, scatter a few black paper bats around the vinyl creations. This upcycled art adds a retro yet spooky touch to your Halloween decor.
This project is not only budget-friendly but also a fun activity for all ages. It allows for creativity and personalization in your Halloween setup. Display these unique pieces together for a striking gallery wall effect.
2. Spiderweb Donut Treats

Create an eerie and edible treat with these clever spider donuts. Begin with plain or chocolate-glazed donuts and add chocolate frosting for a rich base. Mini pretzel twists and sticks become the spooky spider legs.
Place the pretzels around the donut’s center to form the legs, creating a creepy-crawly look. Use white icing to draw delicate spiderweb designs on some of the donuts. Small candy eyes give each spider a whimsical personality.
These decorative desserts are a fantastic addition to any Halloween party or gathering. The combination of sweet and salty flavors is sure to please your guests. They are simple to assemble and look just as good as they taste.
3. Haunted Window Silhouettes

Turn your windows into a spooky scene with these easy-to-create silhouettes. Using black cardstock, you can cut out classic Halloween shapes like flying witches, bats, and ghosts. A haunted house silhouette adds a dramatic centerpiece to the display.
You can easily attach these shapes to the window panes with a bit of tape or adhesive putty. The shadows cast by the indoor lights at night create a truly chilling effect for anyone passing by. A ghost dangling from the top frame adds a touch of whimsical eeriness.
This craft is an excellent way to decorate your home’s exterior without a lot of effort. The window becomes a canvas for a spooky story. It transforms a simple window into an eye-catching and festive feature.
4. Playful Black Cat Pumpkins

Transform your pumpkins into charming black cats without the mess of carving. A coat of black spray paint creates the sleek feline body. This method avoids the hassle of traditional pumpkin carving.
To make the face, use paper or felt to create pointed ears and a small pink nose. White paint or a marker can form the whiskers and a simple mouth. Oval cutouts of yellow paper or felt serve as the cat’s expressive eyes.
A black pipe cleaner or piece of twine can be attached for a cute tail. These friendly felines are a sweet and simple addition to your porch or doorstep. They offer a unique and welcoming alternative to classic carved jack-o-lanterns.
5. Eerie Skull Candle Holder

Create a sophisticated centerpiece with a skull-themed candle holder. A large ceramic or plastic skull forms the base, with its hollow top holding a glass votive or pillar candle. The flickering flame adds a warm yet spooky glow to your table.
Surround the candle’s base with small, playful spiders and scattered confetti. The tiny spiders add a creepy-crawly element to the decor. Position a few smaller skulls and plastic bones on the tray around the main piece.
This arrangement works well on a dining table or entryway console. It combines a spooky theme with an elegant display. The contrast of the macabre skulls with the warm candlelight is both dramatic and inviting.
6. Playful Mirror Decals

Give your mirrors a spooky message with some creative decals. Large black letters spelling out “BOO” and “EEK” are placed directly onto the mirror’s surface. These bold words immediately set a playful Halloween mood.
Black bat and spiderweb cutouts can be scattered around the words to complete the look. The mirror reflects the room, creating an interesting layered effect with the decorations. A ghost or spider cutout with white accents can also be added for contrast.
This simple decoration is non-damaging and can be applied to any mirror or window. It’s a great way to add some festive spirit to smaller spaces like a hallway or bathroom. The entire setup can be created and removed in a flash.
7. Friendly Ghost Cookies

Bake a batch of these spirited ghost cookies for a delightful Halloween treat. Using a ghost-shaped cookie cutter, you can create the base for these friendly apparitions. A simple sugar cookie recipe provides a sturdy and tasty foundation.
Once the cookies are cooled, a generous layer of white royal icing gives them their ghostly form. This smooth, glossy coating makes each ghost appear to be floating. A piping bag with black icing creates wide, expressive eyes and a screaming mouth.
These charming cookies are a wonderful activity for an afternoon of baking. They are a festive and delicious addition to any dessert table. Everyone will enjoy decorating these playful treats.
8. Skeletal Place Setting

Dress up your Halloween table with these playful skeletal place settings. Begin with black and orange napkins to create a festive and bold color scheme. A black lace napkin on top adds a touch of elegance to the base.
A small plastic skeleton is positioned on each setting, with its limbs wrapped around the utensils. A simple twine bow ties the skeleton and silverware together, making a neat bundle. Mini pumpkins are also added to the plate for an autumnal touch.
This creative arrangement is a great way to welcome guests to your Halloween dinner party. It combines spooky and stylish elements for a memorable tablescape. The little skeletons are a fun surprise for everyone.
9. Glowing Potion Jars

Create a mysterious and luminous display with these glowing potion jars. Begin by placing glow sticks of different colors into a clear liquid inside a mason jar. The bright, neon colors give off an enchanting light.
To make the jars even more eerie, add floating eyeballs or small plastic spiders. The creepy items bobbing in the glow-in-the-dark liquid create a spellbinding effect. Use these jars to light up a dark corner or as a centerpiece for a Halloween event.
This project is a simple way to add some magic to your Halloween decorations. The colorful glow from the jars casts an otherworldly light on the entire space. It is a fantastic alternative to candles and is safe for kids.
10. Mummy Mason Jar Luminaries

Give old mason jars a spooky new life by transforming them into mummy luminaries. Wrap the jars with strips of white fabric or gauze, leaving some of the glass exposed. The wrapping creates a bandage-like texture, giving the jars a classic mummy look.
Large googly eyes are glued onto the front, peeking out from behind the bandages. The wide, staring eyes add a touch of playful creepiness to the craft. Place a battery-operated tea light inside each jar to make it glow.
The flickering light from within casts a soft, warm glow through the gauze. These are great for lining a walkway or for creating a spooky centerpiece. You can also make a black lace version for a more gothic look.
11. Poisoned Candy Apples

Craft these striking poisoned candy apples for a dramatic and spooky display. The deep red apples are coated with a black “poison” drip. A glossy black candy coating is drizzled from the top, creating a menacing, dripping effect.
For a touch of sparkle, sprinkle black edible glitter over the still-wet coating. This adds a subtle yet enchanting shimmer. A simple knife placed on the platter with the apples enhances the eerie theme.
This is a clever and visually impressive twist on the classic candy apple. They are a great centerpiece for a Halloween party or a spooky dessert buffet. These apples look enchanting and slightly sinister at the same time.
12. Floating Ghost Lanterns

Create a whimsical and spooky atmosphere with these floating ghost lanterns. Inflate white balloons and drape a layer of white tulle or sheer fabric over each one. The fabric gives the balloons a ghostly, ethereal appearance.
Wrap a string of fairy lights around the balloons, letting the ends of the lights hang down. The soft glow from the lights makes the ghosts appear to hover in the dark. Attach a long string to each balloon and hang them from a tree branch.
These lanterns are a fantastic way to decorate your outdoor space for Halloween. They add a magical touch to your yard and are especially enchanting at night. This simple project is a fun and creative way to greet trick-or-treaters.
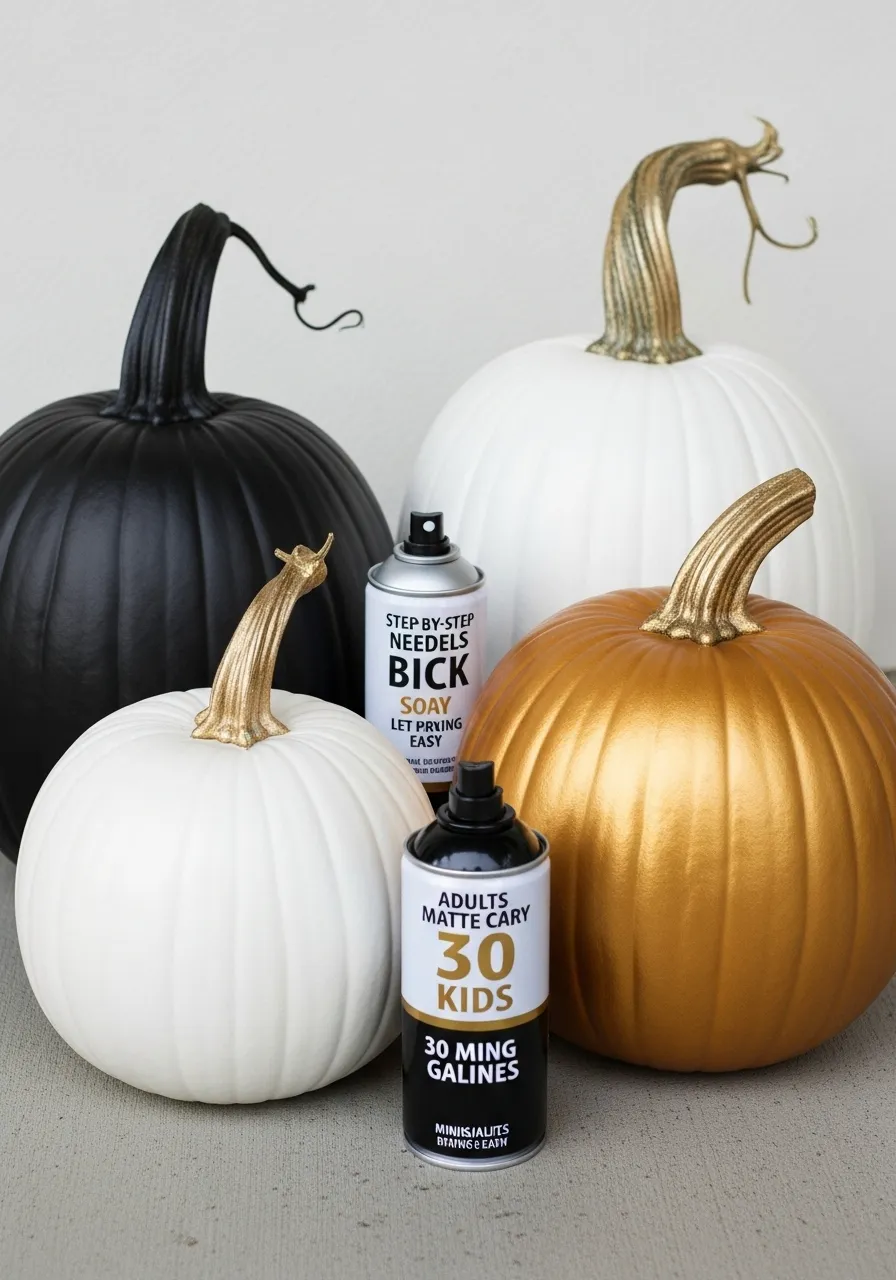
13. Chic Painted Pumpkins

Give your pumpkins a sophisticated, modern makeover with some spray paint. A coat of matte black or brilliant white paint completely transforms the traditional orange gourd. The pumpkins instantly become chic decorations that fit with a contemporary style.
You can use gold or metallic spray paint on the stems for a striking contrast. The golden stems add a touch of elegance and glamour to the pumpkins. This project requires no carving, meaning your pumpkins will last much longer.
These stylish pumpkins work well indoors or on a porch. They are an easy way to elevate your fall decor with minimal effort. This is a quick and simple way to create an elegant Halloween display.
14. Bat-Infested Lantern

Give a simple lantern a spooky makeover by adding some paper bats. Cut small bat shapes from black paper or cardstock. A variety of sizes adds more visual interest to the arrangement.
Attach the bats to the glass panes of the lantern using a small piece of tape or adhesive. Arrange them as if they are swarming around the light inside. When the candle is lit, the bats cast eerie shadows, enhancing the spooky effect.
This project is a great way to use a pre-existing piece of decor and make it festive. It is also an easy and fun activity to do with family. The finished lantern becomes an enchanting centerpiece for your Halloween decorations.
15. Potion Bottle Collection

Transform empty bottles into a spooky apothecary collection for a mystical display. Use a variety of bottle shapes and sizes, from small glass jars to large wine bottles. Vintage-style labels with spooky names like “Spider Poison” and “Witch’s Brew” are printed and glued on.
To give each bottle a unique look, add different items inside. A bottle can be filled with purple glitter, while another holds small seeds. A skeleton key or a plastic spider tied to the neck of a bottle adds a charming detail.
This collection is a great way to create a themed vignette on a shelf or table. The different textures and colors of the bottles and their contents make the display interesting. This craft is a simple and creative way to add a touch of magic to your home.
16. Frankenstein Bottle Friends

Transform empty glass bottles into a set of classic monster decorations. First, paint the bottles with bright green and black acrylic paint. The green body and black hair immediately bring Frankenstein’s monster to mind.
Use a white paint pen to create the wide, expressive eyes and the stitched mouth. To make the neck bolts, glue two small nuts or screws to the side of the bottle’s neck. A few simple black lines painted on the face add to the stitched-together look.
This project is a fun way to create a family of monster bottles in different sizes. They look charming and funny when displayed together on a windowsill. These Frankenstein friends are a simple and artistic way to decorate for the holiday.
17. Swarming Bat Wall Decor

Create a dramatic and spooky effect by making a swarm of bats on your wall. Cut out various bat shapes and sizes from black paper or cardstock. The different sizes and angles of the bats create a dynamic sense of motion.
Use small pieces of tape or adhesive putty to arrange the bats, making them appear to fly out from a doorway or corner. The bats look like they are in mid-flight. This setup gives the illusion of a full-on bat migration in your home.
This project is a fantastic way to fill a large wall space with a simple and impactful decoration. It’s also an easy and fun craft to do with children. The bats can be moved around to create different flight patterns as well.
18. Spooky Cheese Board

Create a festive and savory Halloween snack with a ghostly cheese board. Use a ghost-shaped cookie cutter to cut slices of white or pale yellow cheese. The cheese ghosts are then arranged on a platter, ready to be enjoyed.
Small holes are cut in the cheese with a straw to create the eyes and mouth. The variety of expressions on each ghost gives them a charming personality. The ghosts are arranged among rows of crackers, berries, and slices of fig.
This is a fun and easy way to serve a themed appetizer at your Halloween gathering. It is also a very quick project to assemble for a party. The spooky ghosts add a playful and whimsical touch to the cheese board.
19. Spider Tassel Garland

Create a sophisticated and spooky garland with black and silver yarn tassels. Begin by making a number of tassels from black yarn and some from glittery silver yarn. The combination of textures and colors gives the garland an elegant feel.
Thread the tassels onto a string or thin wire, alternating the colors to create a pattern. Small plastic spiders are then tied onto the string between each tassel. The spiders look as if they are crawling along a web.
This garland is a chic and subtle way to add a Halloween touch to a wall or mantel. It is a fantastic alternative to more traditional, brightly colored decorations. The result is a fun and stylish piece that works for any space.
20. Monstrous Door Decals

Give your front door a massive, friendly monster face with some fun decals. A large vinyl or paper cutout of a monster’s face is applied directly to the door. Big, googly eyes, sharp fangs, and a wide, goofy grin make the monster look welcoming rather than scary.
The monster’s face is framed with horn-like shapes and a message welcoming guests. To complete the scene, a small flying witch and a few bats are placed around the face. The entire decal set can be easily applied and removed from the door.
This project is a simple and bold way to greet guests and trick-or-treaters. It is an excellent way to decorate your door without a lot of effort. This monster door is a playful and friendly Halloween greeting.
21. Floating Witch Hat Lights

Create a magical and enchanting display with these floating witch hats. A simple string of battery-operated fairy lights is tucked inside each black witch’s hat. The wire of the fairy lights is then used to hang the hats from a ceiling or a tree branch.
The small battery packs are discreetly taped to the wires so they are hidden. This gives the illusion that the hats are truly hovering in mid-air. The warm glow from the lights creates a cozy and mystical ambiance.
These hats are a fantastic way to decorate a porch or an indoor space for a spooky party. The simple design makes them easy to put together in an afternoon. They add a whimsical and eerie touch to any space.
22. Spooky Cutout Garland

Create a fun and festive garland using simple paper cutouts. You can print or draw shapes like ghosts, skulls, and bats onto cardstock. For a vintage look, some of the ghosts can be cut from old book pages.
Punch a small hole in the top of each cutout and string them onto a length of twine. A few plastic spiders can be added along the twine for a creepy-crawly touch. Hang the garland across a mantel, a doorway, or a window.
This project is a very easy and quick way to add a Halloween vibe to any room. It is also an excellent activity for a rainy afternoon. The combination of different shapes and textures makes the garland unique.
23. Indoor Haunted Plants

Give your indoor plants a spooky Halloween makeover with fake spiderwebs and critters. Stretch fake spider webbing over the leaves and branches of your houseplants. The webbing immediately creates a creepy, neglected feel.
Scatter a few large and small plastic spiders and bats throughout the plants. The spiders look like they are crawling through their newly spun webs. This is a very quick and simple way to bring a Halloween feel to an ordinary room.
This project uses items you can find at any party supply or craft store. It transforms your everyday greenery into a haunted jungle. It’s an effortless way to decorate for the season without a big commitment.
24. Googly-Eyed Ghost Wreath

Create a charming and spooky wreath with a playful twist. A foam wreath form is covered with a generous amount of cotton balls, giving it a fluffy, cloud-like base. Small, white felt ghosts are then attached to the wreath.
Each ghost has a different set of googly eyes, from wide-eyed to crossed-eyed, giving them distinct personalities. A few of the ghosts have tiny orange or black bows, adding a pop of color and charm. The entire wreath looks like a cluster of friendly spirits.
This is a fun and simple project that brings a whimsical touch to your door or wall. The wreath is a lighthearted decoration for the Halloween season. It is a fantastic way to welcome guests with a smile.
25. Ghostly Bruschetta Bites

Create a cute and spooky appetizer with this twist on a classic bruschetta. Start with toasted baguette slices topped with chopped tomatoes and fresh basil. Slices of fresh mozzarella are cut into ghost shapes using a small cookie cutter.
The mozzarella ghosts are then placed on top of the tomato and basil mixture. A food-safe pen or small drops of balsamic glaze create the eyes and mouth on each ghost. This gives each ghost a unique, spooky expression.
This dish is a quick and simple way to serve a themed snack at your Halloween party. It is a fantastic combination of fresh flavors and playful design. Your guests will love these delicious little ghost bites.
26. Melting Wax Candles

Create a spooky and gothic candle display with this simple craft. Start with black cylindrical objects of varying heights, like PVC pipe or painted cardboard tubes. A generous amount of hot glue is applied to the top of each cylinder, creating a dripping wax effect.
The hot glue is painted with bright orange and black colors to look like melted wax. Battery-operated tea lights are placed on top to give a safe, flickering light. A touch of fake spider webbing connects the candles, adding a final eerie detail.
These are a wonderful alternative to real candles for a Halloween display. The dripping wax effect is both dramatic and visually interesting. They are a fun way to create a moody and spooky centerpiece for a table or mantel.
27. Pumpkin and Skeleton Centerpiece

Create a charming and festive centerpiece with a mix of gourds and spooky figures. A large wooden tray provides the base for a variety of small pumpkins and gourds. You can use a mix of colors and shapes to create visual interest.
A small plastic skeleton is positioned in the middle, casually lounging among the pumpkins. A black candle holder and a textured vase with bare branches add to the autumnal feel. A small votive candle in a dark glass holder casts a warm glow.
This centerpiece is a great way to combine natural elements with a Halloween theme. The mix of textures and shapes makes it a unique and eye-catching display. It is a simple yet elegant way to decorate a dining table.
28. Caution Tape Mummy Man

Build a life-sized Halloween figure using recycled materials and caution tape. The body is formed from plastic bottles and bags, wrapped together to create a human shape. The clear plastic milk jugs form the legs and arms, while black trash bags make the torso.
The figure is then wrapped with yellow caution tape, creating a “mummy” effect. A head is made from a plastic bottle and wrapped in a tan material. This spooky character is great for placing in your yard or on your porch.
This craft is a creative and eco-friendly way to decorate for the holiday. It’s also a fun project to make with family. This mummy man is sure to be an attention-grabbing addition to your lawn.
29. Spooky Fingerprint Art

Create a unique and personalized art piece with this fun fingerprint project. Start with a black canvas and a little bit of white acrylic paint. Gently press your thumb and fingers into the paint and then onto the canvas to create ghost shapes.
The fingerprints leave a fun textured pattern on the painted ghosts. Use a fine-tipped black marker to draw small eyes and an open mouth on each ghost. The different sizes of the fingerprints create a family of ghosts on the canvas.
This is a wonderful activity to do with children and makes a special keepsake. It is a quick and simple way to create a spooky piece of art for your wall. The canvas becomes a personalized and charming decoration.
30. Spiderweb Candle Arrangement

Create a sophisticated and eerie centerpiece with a few simple elements. Use black pillar or taper candles in a variety of heights, placing them in clear glass holders. Some of the candles are wrapped with white yarn or twine, adding a touch of texture.
White string is then woven between the candles to create a delicate spiderweb design. Small plastic spiders are attached to the web and placed on the tabletop. The spiders look like they are crawling all over the display.
This project is a great way to use black and white for a chic Halloween look. It is an easy way to give your table a spooky yet elegant feel. The final result is a stylish and striking arrangement.
31. Haunted Mirror Scene

Create a dramatic and spooky mantel display with a haunted mirror scene. A large mirror serves as the backdrop for a detailed black silhouette cutout. This cutout depicts a haunted house, creepy trees, and a graveyard scene.
The black silhouettes are placed directly on the mirror, creating a reflective and layered effect. Orange lights or small LED candles are placed behind the windows of the haunted house to make them glow. Pumpkins, gourds, and other candles are arranged on the mantel to complete the scene.
This project is a sophisticated way to add a haunted touch to your home. It creates an enchanting and eerie focal point for a living room. The reflection of the room in the mirror adds a unique depth to the decor.
32. Jack-O-Lantern Wine Bottle

Give an empty wine bottle a festive makeover by turning it into a jack-o-lantern. First, paint the entire bottle with bright orange acrylic or spray paint. Once the paint is dry, use black paint or a permanent marker to draw on a classic jack-o-lantern face.
For a fun detail, wrap the neck of the bottle with twine or raffia. A small bow is tied at the top to complete the look. You can also add a cork to the top to resemble the pumpkin’s stem.
This is a very simple and creative way to upcycle an old bottle. This charming pumpkin bottle is a great addition to a kitchen counter or as part of a centerpiece. It’s a quick project that adds a cheerful and festive touch to any space.
33. Creepy Jar of Critters

Create a gruesome yet captivating display with a jar full of spooky items. Fill a clear glass jar with water and add a few drops of food coloring to tint the liquid a murky green. Drop in a variety of plastic spiders, eyeballs, and other small Halloween toys.
For a fun detail, add glitter to the water to make it shimmer. A piece of black burlap or netting tied around the lid gives it a rustic, spooky look. A smaller jar can be filled with a single eyeball and spider for a separate display.
This is a fun and simple craft that looks like a mad scientist’s experiment. It’s an easy way to create a creepy and mesmerizing piece of decor. These jars are a great addition to a haunted house display or a festive shelf.
34. Ethereal Ghost Mirror

Create a spooky and mystical mirror with ghost silhouettes. Using a mirror as your base, you can attach transparent or frosted ghost decals to the surface. The decals give the ghosts a semi-transparent, ethereal appearance.
A large, expressive ghost is placed in the center, appearing to float in the reflection. Smaller ghosts and a tiny skull are also added, scattered around the main figure. A little ghost with a “Boo!” message adds a playful touch.
This decoration is a great way to transform an ordinary mirror into a piece of ghostly art. The ghosts seem to hover on the surface, creating a haunting yet beautiful effect. It is a simple project that makes a big visual impact in a room.
35. Eyeball Branch Bouquet

Give your floral arrangement a spooky twist with this easy-to-create eyeball bouquet. Begin by collecting a few bare tree branches from your yard or a park. A variety of sizes and shapes of googly eyes are then glued onto the branches.
Use a mix of different types of eyes, from classic googly eyes to fake bloodshot ones. The eyes are placed on the branches, making them look like a creepy-crawly collection of orbs. A large clear glass vase holds the branches and is filled with even more eyeballs.
This eerie and whimsical display is a simple yet impactful way to decorate a console or tabletop. It is a fantastic alternative to traditional floral arrangements. This project is a fun and creative way to add a bit of horror to your home.
36. Rustic Pumpkin Table Runner

Create a beautiful and rustic centerpiece with a collection of pumpkins and gourds. Lay a burlap or linen table runner down the center of your table to provide a textured base. Arrange pumpkins and gourds of different shapes, sizes, and colors along the runner.
Use twine to tie bows around a few of the gourds for a charming, rustic touch. You can also scatter fall leaves and berry sprigs between the pumpkins. A tiny jack-o-lantern wearing a witch’s hat adds a playful Halloween element.
This centerpiece is a great way to blend natural elements with a festive theme. It is also an effortless way to create a seasonal tablescape. This simple arrangement is a warm and welcoming addition to any dining room.
37. Cotton Ball Ghost Garland

Create a fluffy and fun ghost garland using simple craft supplies. Start by forming the ghost bodies using a small cotton ball for the head and a larger one for the body. You can use glue to secure the head and body together.
Cover the ghost forms with a piece of white fabric or gauze and tie it at the neck. Glue on some googly eyes and use a black marker to draw an open mouth. A thin string is threaded through the tops of the ghosts to hang them in a line.
This garland is a quick and simple way to add a bit of spooky fun to a room. The ghosts look like they are floating in the air. It’s a great activity to do with kids for a festive decoration.
38. Wooden Ghost Family

Create a charming ghost family from scrap wood for a rustic and simple decoration. Cut pieces of wood into various heights and sand them to create a distressed look. A coat of white paint is applied, leaving some of the raw wood showing through.
A black permanent marker is used to draw simple, expressive ghost faces on each wooden block. A variety of expressions from shocked to surprised gives each ghost a unique personality. The different heights of the blocks create a fun and playful group.
This project is an easy way to use leftover materials to create a festive decoration. The ghost family looks fantastic on a mantel, shelf, or tabletop. They are a great, rustic alternative to classic Halloween figures.
39. Halloween Monster Bottle Trio

Create a festive collection of monster bottles for a fun Halloween decoration. Empty wine bottles are painted with different colors to resemble a mummy, Frankenstein’s monster, and a jack-o-lantern. Each bottle has its own unique personality and style.
The mummy is wrapped in white bandages with googly eyes peeking out. Frankenstein’s monster is painted green and purple with a stitched mouth and nuts for bolts. The jack-o-lantern is painted orange and has a classic jack-o-lantern face with a twine-wrapped neck.
This set of bottles is a charming and creative way to decorate a shelf or mantel. They are a great upcycling project that is fun to create. This trio makes a delightful and spooky statement piece.
40. Spooky Ghost Balloons

Create a ghostly and fun entrance with a cluster of floating ghost balloons. Inflate several white balloons with helium so they can float. Using a black permanent marker, you can draw different spooky or funny faces on each one.
Give the ghosts a range of expressions, from a classic shocked look to a toothy grin. Tie a long piece of twine or clear fishing line to each balloon. You can then hang them from the ceiling at different heights to give the illusion of a floating ghost swarm.
This decoration is an excellent way to greet guests at your door. The balloons are a simple and effective way to create a festive atmosphere. This project is a quick and whimsical way to decorate for a party.
Transforming your home for Halloween does not have to be a major undertaking. With these creative and easy projects, you can add a festive touch to any room in just a few hours. These decorations prove that even the smallest details can make a big impact.
From friendly ghost balloons to rustic pumpkin centerpieces, each idea offers a unique way to celebrate the season. You have everything you need to create a memorable and spooky space. Now your home is ready to welcome the holiday in style.
We hope these ideas have inspired you to get crafting and enjoy the magic of a handmade Halloween. Your home is now a testament to your creativity and holiday spirit. Happy decorating!
Key Takeaways
- Quick & Easy: You can create stunning Halloween decorations in a single afternoon using simple materials. Many of these projects use items you already have.
- Creative & Unique: Go beyond the typical store-bought decorations. These ideas allow you to personalize your spooky decor and make it your own.
- Something for Everyone: With a variety of crafts, there’s a project for every skill level and style. You can find inspiration for any room in your home, from the entryway to the dining table.
- Upcycle & Reuse: Many of these projects encourage using recycled materials like old bottles and records. This is a budget-friendly and creative approach to holiday decorating.