Walking into a room with bare walls often feels cold and empty. Large art pieces usually solve this problem by adding a bold focal point to the space. Many homeowners avoid these items because of the high price tags found in galleries. You do not need a massive bank account to enjoy beautiful wall decor.

Creative solutions allow you to fill your space with personality without spending too much money. This guide provides affordable ways to transform your home using simple materials. You can make your living areas feel curated and sophisticated starting today. Exploring these options helps you see the potential in everyday objects.
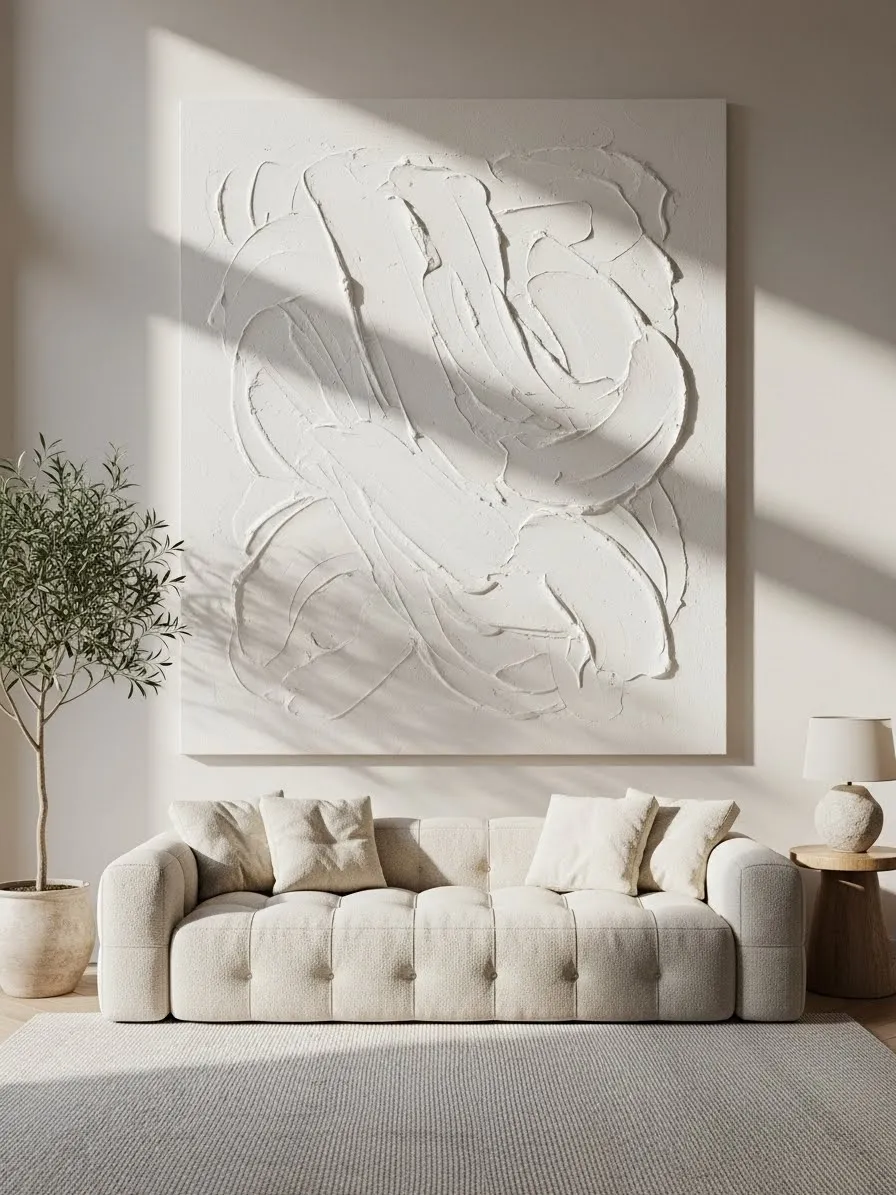
1 Large Textured Plaster Canvas Art
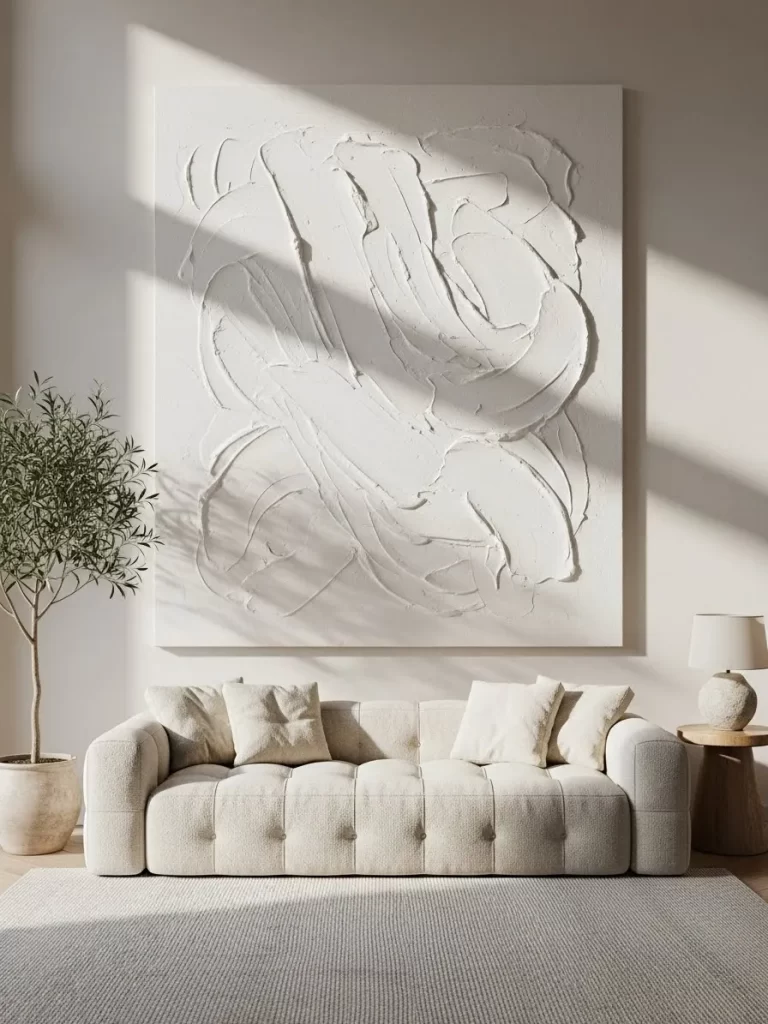
Empty walls often make a room feel unfinished. Adding a massive textured canvas brings immediate character to your space. This monochromatic style relies on thick strokes to create movement through light and shadow. It fills a large void without overwhelming the room with loud colors.
Creating your own art saves money while providing a high end look. You do not need professional painting skills to master this technique. Using simple supplies allows you to customize the size to fit your wall exactly. This project results in a sophisticated focal point that looks like it belongs in a modern gallery.
Material Required List
- Large blank canvas
- Large bucket of pre mixed joint compound
- White acrylic wall paint
Equipment Required List
- Wide putty knife
- Plastic drop cloth
- Large paint brush
DIY Instruction Step by Step
- Clear a large floor area and spread the plastic drop cloth to protect your flooring from spills.
- Place your blank canvas flat on the covered floor area so you can work on it horizontally.
- Open the bucket of joint compound and use your putty knife to scoop a large amount onto the center of the canvas.
- Spread the compound across the entire surface using sweeping circular motions to create thick ridges and valleys.
- Keep the patterns irregular and messy to ensure the final piece looks artistic and organic rather than manufactured.
- Let the canvas sit undisturbed for at least twenty four hours until the compound is completely hard and dry to the touch.
- Apply a coat of white paint over the dried plaster if you want a uniform matte finish across the whole piece.
- Find a stud in your wall and hang the heavy art piece securely using sturdy wall anchors to support the weight of the plaster.
2 Abstract Splatter Canvas Drop Cloth
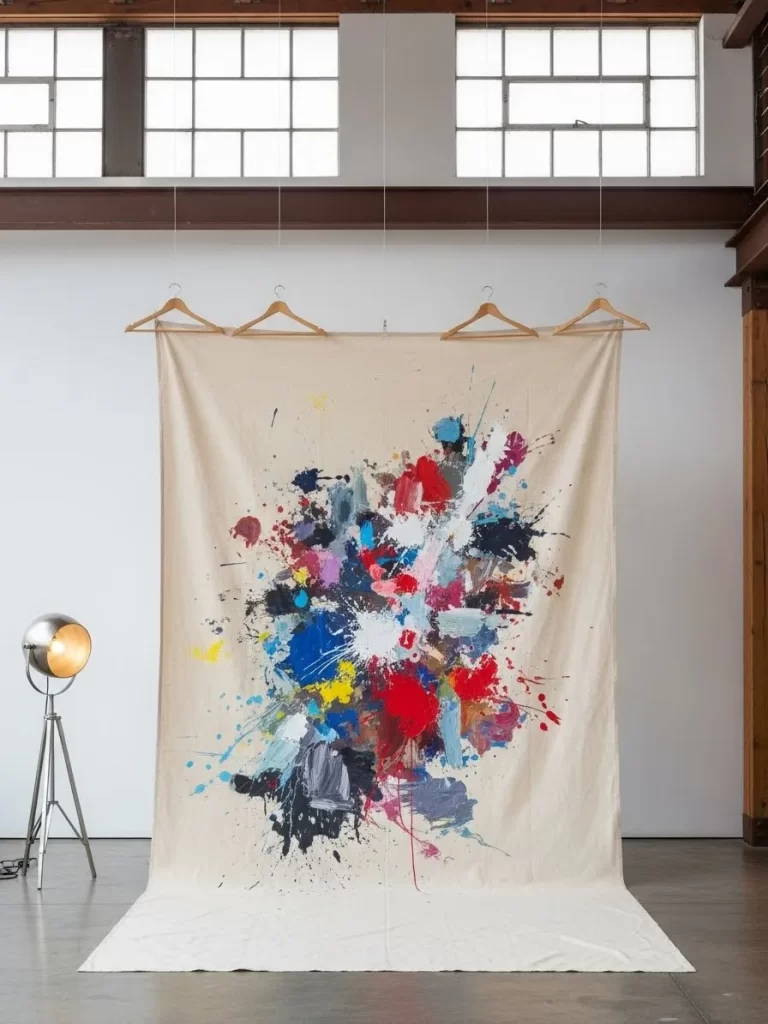
Many people think large art must cost a fortune. You can create a massive focal point using a basic painter drop cloth. This method allows you to use bold colors and energetic movements. It fills a huge wall without the need for a heavy frame.
Hanging the fabric with simple wooden hangers gives your room a relaxed vibe. This style works well in modern studios or industrial spaces. You pick the colors to match your chairs or rugs. Guests will notice this unique piece as soon as they walk in.
Material Required List
- Large canvas drop cloth
- Acrylic paint in three colors
- Clean water
Equipment Required List
- Four wooden clothes hangers
- Large plastic floor covering
- Small mixing cups
DIY Instruction Step by Step
- Lay the plastic covering on a flat floor in your garage or a big room.
- Spread the canvas drop cloth over the plastic and pull it tight.
- Mix each paint color in a cup with a bit of water to make it thin.
- Stand over the canvas and flick the paint using quick wrist motions.
- Add layers of color until you are happy with the look of the splashes.
- Let the paint dry for a full day before you try to move it.
- Clip the top edge of the fabric into the four wooden hangers.
- Space the hangers evenly and mount them on your wall with small nails.
3 Large Scale Botanical Fabric Frame
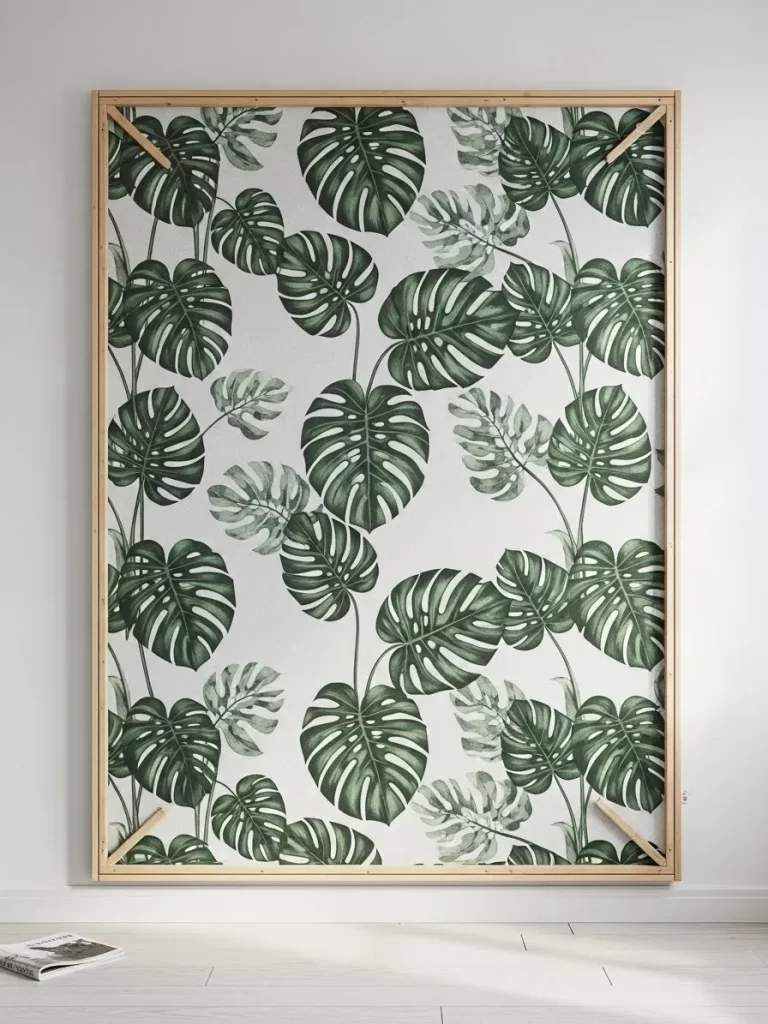
Nature themes bring a peaceful feeling to any home. You can make a giant botanical piece using a length of printed fabric. Tropical patterns like these green leaves look expensive and lush. This choice covers a large area for much less than a standard painting.
Building a light wooden border makes the fabric look like gallery art. It keeps the cloth tight and looking professional. The light wood tone looks great next to the green leaves. It is a smart way to add life to a plain white wall.
Material Required List
- Three yards of leaf print fabric
- Four long strips of pine wood trim
- Wood glue
Equipment Required List
- Staple gun
- Measuring tape
- Small hand saw
DIY Instruction Step by Step
- Measure the wall area where you want the art to go.
- Cut the pine wood trim into four pieces to make a large rectangle.
- Put wood glue on the corners and join them to form the frame.
- Lay your fabric face down on a clean and flat floor.
- Place the wooden frame on top of the fabric and center the print.
- Pull the fabric over the back of the wood and use the staple gun.
- Start in the middle of each side and move toward the corners.
- Trim the extra fabric from the back and hang the frame on a hook.
4 Horizontal Textured Plaster Niche
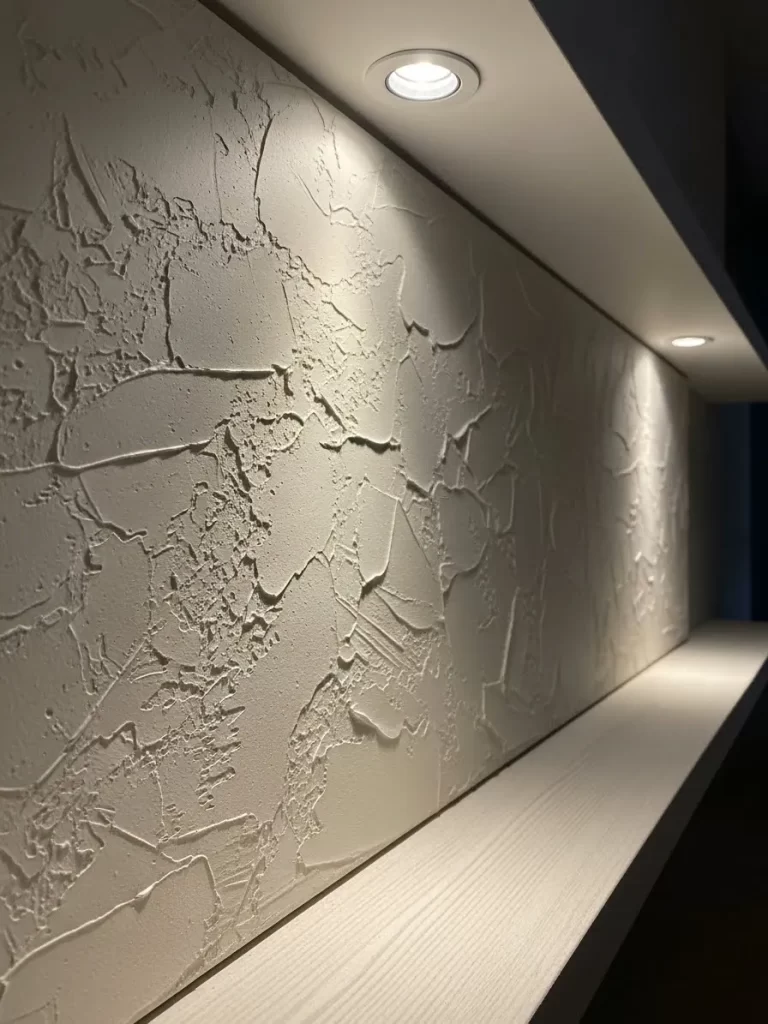
Textured walls add depth that simple paint cannot match. You can create a long art piece directly inside a wall niche. This monochromatic look uses shadows to show off the patterns. It feels like a permanent part of your house.
Adding small lights at the top makes every ridge stand out. This setup looks dramatic when the sun goes down. It is a clever way to decorate a long hallway or a main wall. The final result looks clean and very high end.
Material Required List
- Bucket of pre mixed joint compound
- White primer paint
Equipment Required List
- Large notched trowel
- Blue painter tape
- Small step ladder
DIY Instruction Step by Step
- Use the painter tape to mark a long rectangle on your wall.
- Put a thick layer of joint compound inside the tape using the trowel.
- Drag the notched trowel across the wet plaster to make wavy lines.
- Build up the thickness in some spots to create bigger shadows.
- Let the plaster dry for two days until it is hard and bright.
- Sand any sharp edges lightly so they are safe to touch.
- Apply a coat of primer and then your final wall paint.
- Place small lights above the art to show off the texture at night.
5 Diamond Pattern Woven Basket Gallery
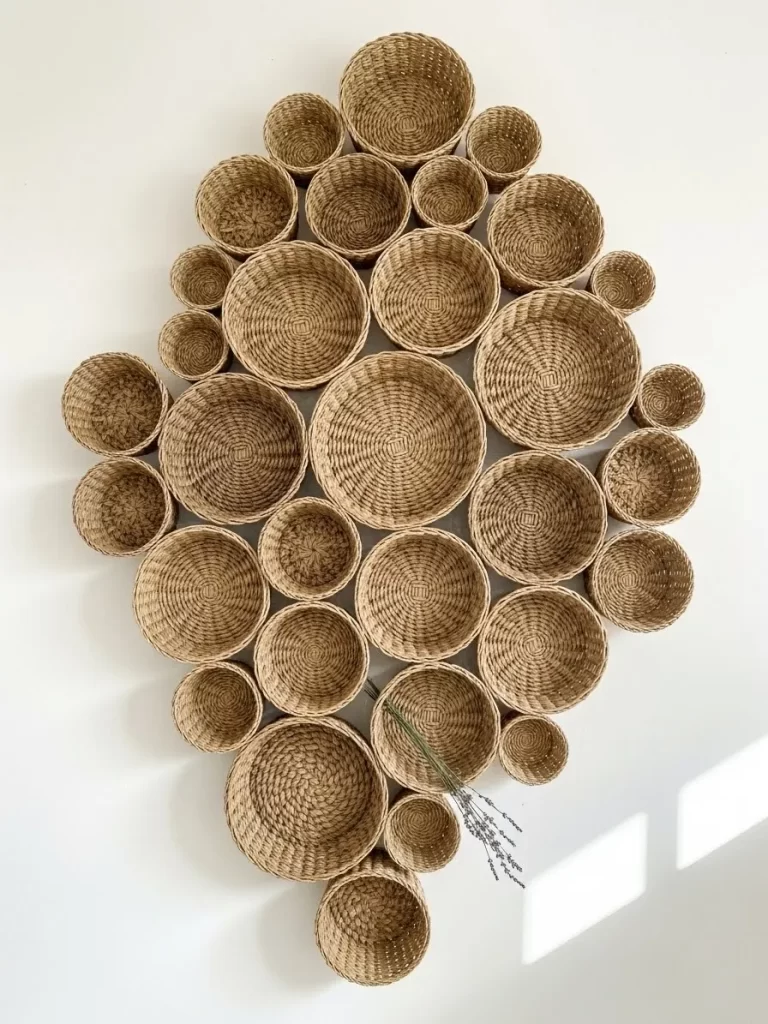
Natural materials bring warmth and texture to a room. You can group many baskets together to form a large geometric shape. This diamond layout creates a sense of order on your wall. It is a wonderful alternative to framed photos.
Using different sizes of baskets adds interest through repetition. The brown tones work well with almost any color scheme. This display is light and easy to put up by yourself. It fills a big wall without feeling too dark or heavy.
Material Required List
- Twenty woven baskets in various sizes
- Strong clear fishing line
Equipment Required List
- Small hammer
- Box of finishing nails
- Bubble level
DIY Instruction Step by Step
- Collect several shallow baskets from local shops or thrift stores.
- Lay all the baskets on the floor in a diamond shape first.
- Put the biggest baskets in the middle and smaller ones on the edges.
- Take a picture of the floor layout to help you remember the spots.
- Find the top point of your diamond on the wall and tap a nail.
- Hang the first basket by its weave or a loop of fishing line.
- Add the rest of the baskets one by one using your photo guide.
- Use a level to make sure the whole diamond stays straight.
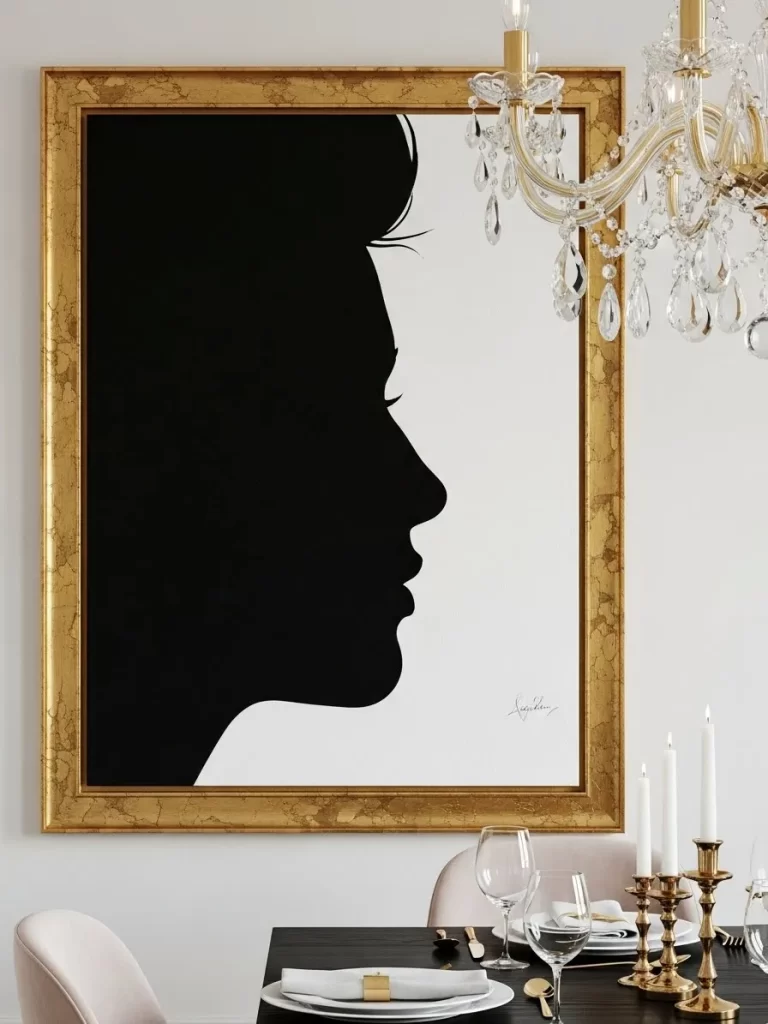
6 Minimalist Wire Face Contour Art
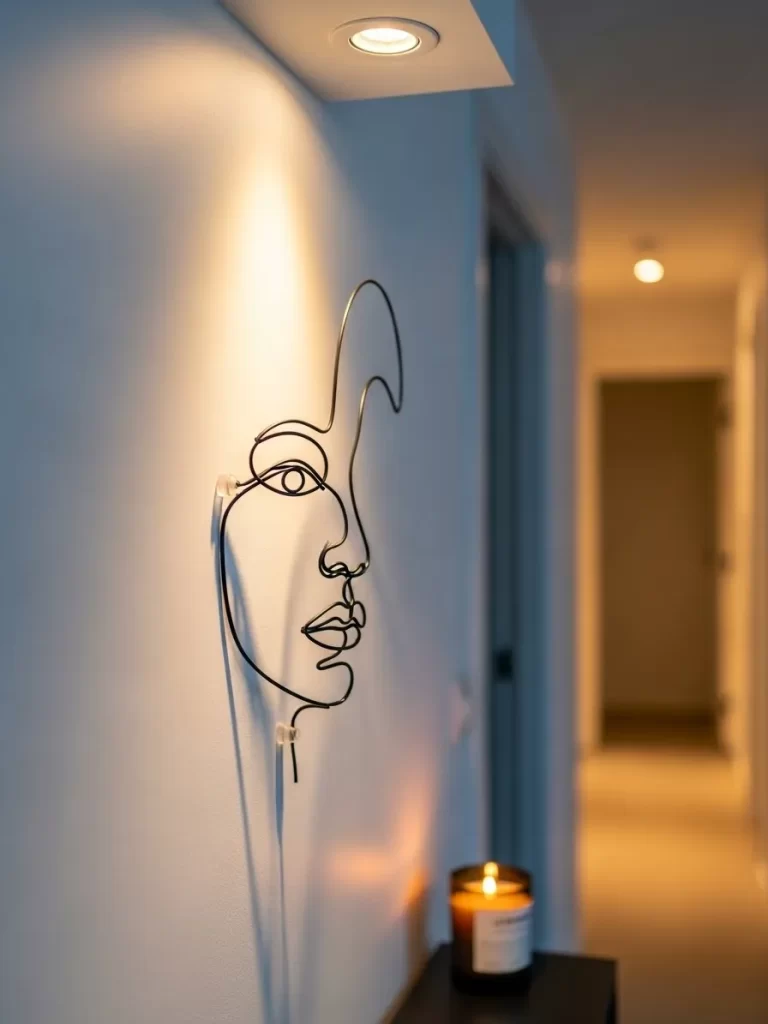
Modern line art is a top choice for clean and simple homes. You can create a large face shape using thick black wire. This style uses the wall itself as a canvas. It creates a cool three dimensional effect that changes as you walk by.
The shadows from the wire add another layer of art to the surface. This project costs very little because wire is cheap to buy. It looks custom made and very expensive. It is a subtle way to fill a long hallway or a small entry.
Material Required List
- Thick gauge black aluminum wire
- Small clear wall clips
Equipment Required List
- Wire cutting tool
- Needle nose pliers
- Large sheet of paper
DIY Instruction Step by Step
- Draw a simple face profile on the large paper with one long line.
- Take the wire and bend it to follow the lines of your drawing.
- Use the pliers to make sharp turns for the nose and the lips.
- Try to keep the wire flat so it sits close to the wall.
- Cut off the extra wire once the face shape is done.
- Hold the wire art against the wall and mark the clip spots.
- Stick the clear clips to the wall using the adhesive provided.
- Snap the wire into the clips to finish your art display.
7 Reclaimed Wood Herringbone Panel
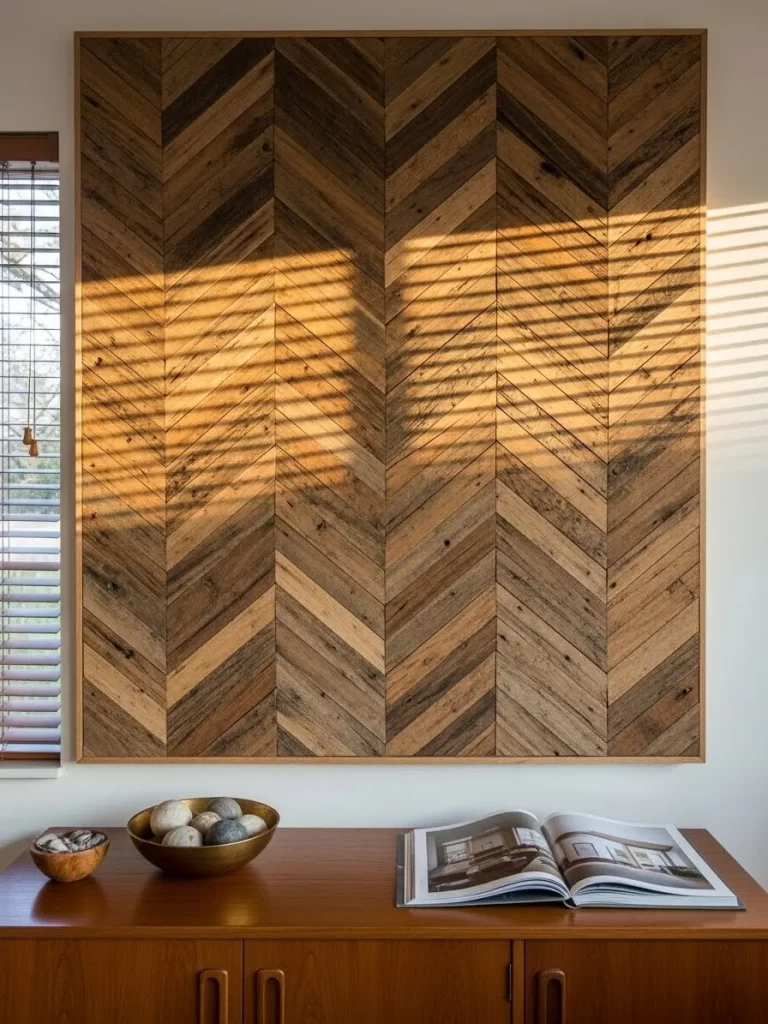
Wood adds a cozy and rustic feeling to a modern space. You can build a large panel using thin strips of old timber. The herringbone pattern looks professional and shows great craftsmanship. It acts as a massive piece of furniture for your wall.
Staining the wood in different colors creates a beautiful look. This project is a great way to use wood scraps from other tasks. The natural grain of the wood is the best feature. It provides a sturdy and timeless look for your living room.
Material Required List
- Thin wood lath strips
- Large plywood board for backing
- Wood stain in light and dark tones
Equipment Required List
- Miter saw
- Strong wood glue
- Brad nailer
DIY Instruction Step by Step
- Cut your plywood backing board to the size you want for the art.
- Stain your wood strips and let them dry before you start.
- Draw a line down the middle of the plywood to guide you.
- Cut the ends of the wood strips at forty five degree angles.
- Put glue on the back of a strip and line it up with the center mark.
- Nail it down and fit the next piece to make the V shape.
- Cover the whole board with the wood strips in this pattern.
- Trim the edges and add a thin frame around the outside.
8 Oversized Black and White Scroll Art
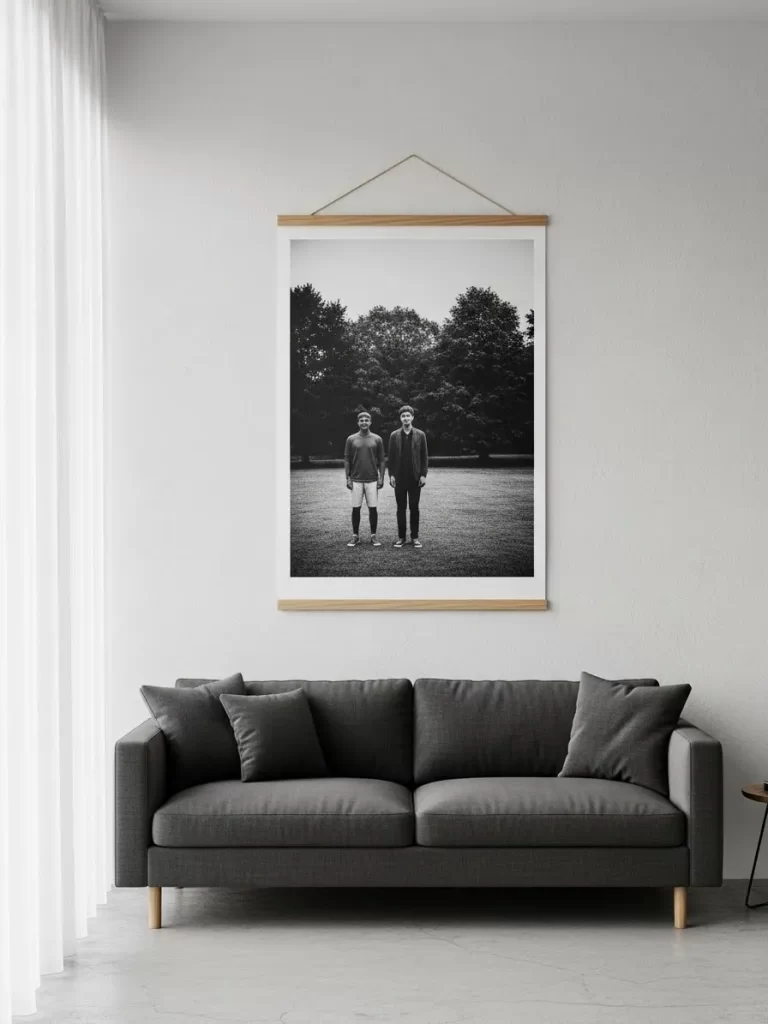
Large photos create a personal and warm connection in a room. You can print a favorite memory in black and white on a huge scale. Using wooden slats at the top and bottom creates a classic scroll look. This method is much cheaper than buying a giant frame.
The black and white colors keep the big image from feeling too busy. It fits perfectly above a sofa or a large bed. This art is very easy to roll up and move if you change houses. It offers a clean and sophisticated way to show off your photos.
Material Required List
- Large paper print of a photo
- Four flat wooden trim pieces
- Strong twine or brown rope
Equipment Required List
- Double sided tape
- Pair of scissors
- Power drill
DIY Instruction Step by Step
- Order a large print from a local shop for a low price.
- Cut four wooden pieces to be slightly wider than your paper.
- Tape the top edge of the paper between two wooden pieces.
- Do the same for the bottom edge to keep the paper flat.
- Drill a small hole through the ends of the top wooden slats.
- Pull the twine through the holes and tie a strong knot.
- Make sure the knots are tight so the wood does not fall.
- Hang the scroll from a single nail and let it pull straight.
9 Glowing Neon Wave Wall Art
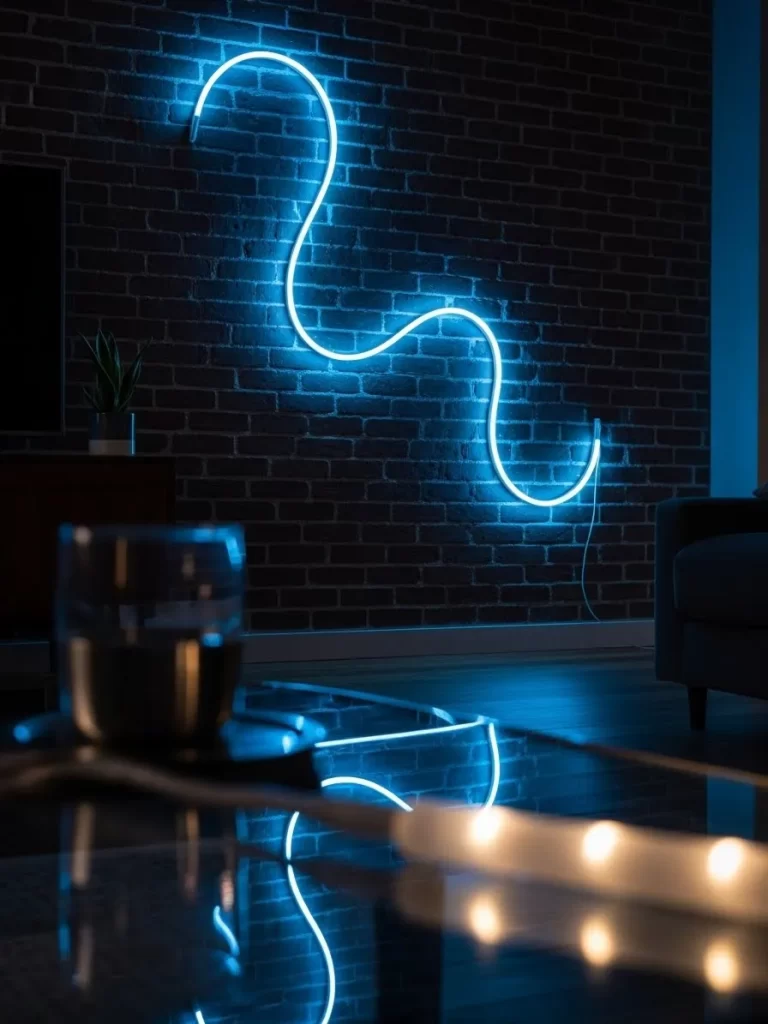
Light can be used as art to change how a room feels. You can install a flexible neon rope in a large wavy pattern. This creates a modern and fun vibe in a dark room. The blue glow adds a cool and futuristic touch to a brick wall.
This type of art is useful because it provides soft light. It is a great choice for a movie room or an office. You can change the shape whenever you want a new style. It makes a bold statement with very little work.
Material Required List
- Flexible LED neon rope light
- Plastic mounting clips
Equipment Required List
- Small screwdriver
- Pencil
- Long extension cord
DIY Instruction Step by Step
- Plug in the neon rope to check that it works correctly.
- Use a pencil to draw a large wavy line on your wall.
- Put your first clip at the start of the line and screw it in.
- Snap the start of the neon rope into that first clip.
- Follow the pencil line and add a clip every few inches.
- Keep snapping the rope into the clips until you reach the end.
- Hide the power cord behind a desk or use a cord cover.
- Turn off the room lights to see the bright blue glow.
10 Textile Headboard Art Installation
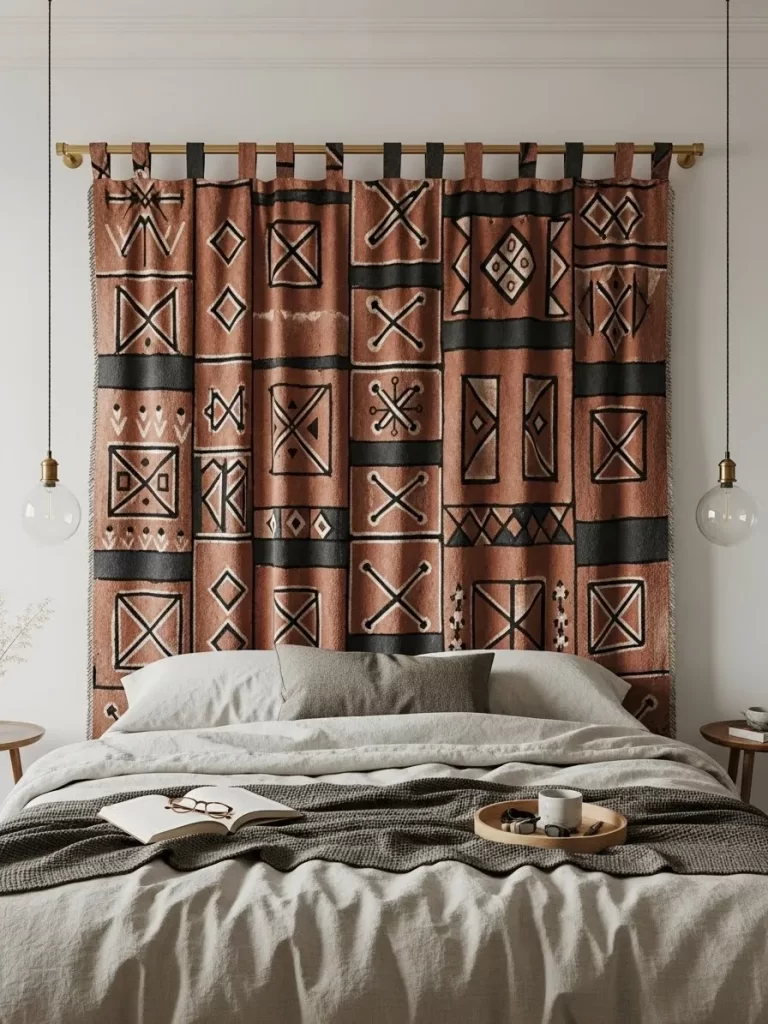
Fabric pieces can work as both art and a soft headboard. You can hang a large patterned rug from a strong metal rod. This fills the whole wall behind a bed with color and style. It is a quick way to make a bedroom feel more comfortable.
The geometric patterns give the room a center point for the furniture. This art is soft and helps keep the room quiet. You can swap the fabric easily if you want a new look. It creates a high end style with very simple hardware.
Material Required List
- Large heavy textile or rug
- Brass curtain rod and wall brackets
- Fabric clips
Equipment Required List
- Power drill
- Wall anchors
- Level
DIY Instruction Step by Step
- Measure your bed and buy a rod that is a bit wider.
- Mark the spots for the rod brackets high on the wall.
- Use the drill to put in anchors and screw the brackets on.
- Attach the fabric clips to the top edge of your rug.
- Slide the rod through the clips so the rug hangs down.
- Lift the rod and place it onto the wall brackets.
- Use a level to make sure the rod is straight.
- Pull the fabric smooth so it looks neat against the wall.
11 Vintage Hardware Shadow Box
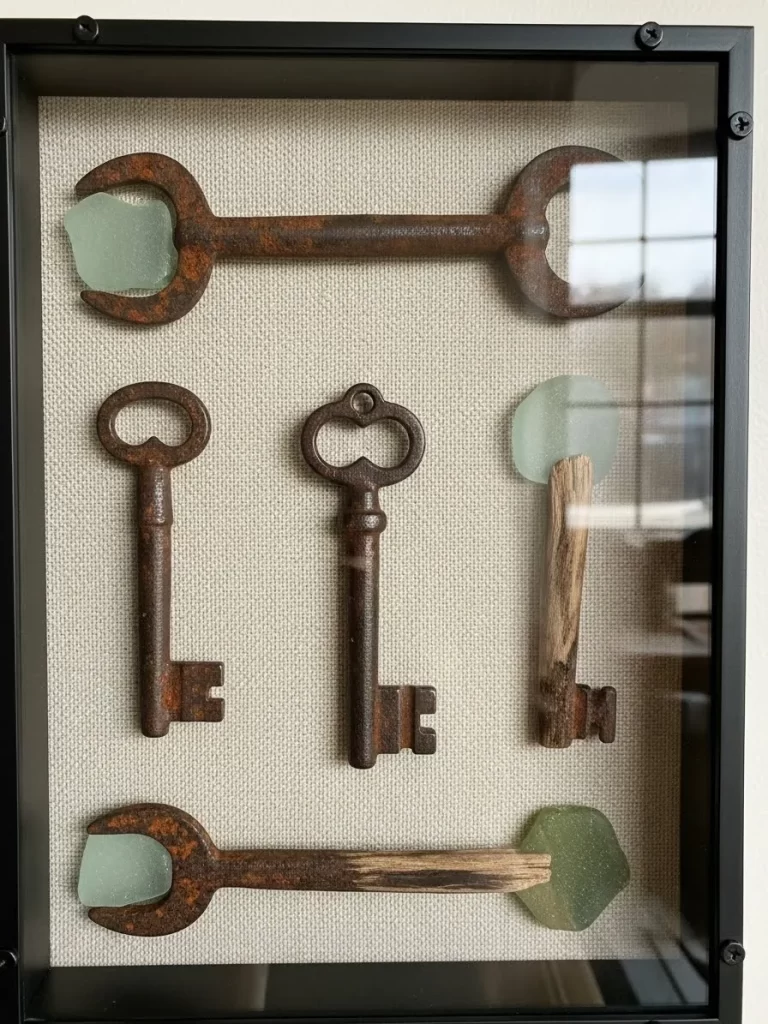
Old tools and keys tell a story about the past. You can put these heavy items inside a shadow box to make industrial art. The light fabric background lets the rusty metal stand out. This display turns ordinary scrap into a beautiful collection.
Using glass keeps your items safe from dust and looks polished. This style works well in a study or a rustic room. It makes guests want to look closer and ask about the history. You can find these old items at local garage sales.
Material Required List
- Assorted old keys and tools
- Shadow box frame with glass
- Scrap piece of linen fabric
Equipment Required List
- Hot glue gun
- Scissors
- Screwdriver
DIY Instruction Step by Step
- Open the back of the shadow box and take out the board.
- Cut your linen fabric to fit the size of the board.
- Glue the fabric to the board and wrap it around the edges.
- Lay your tools on the fabric to find a good layout.
- Put plenty of glue on the back of each metal tool.
- Press them onto the fabric and wait for the glue to dry.
- Clean the glass so there are no marks on the inside.
- Put the board back in the frame and close the clips.
12 Floating Indigo Dyed Fabric
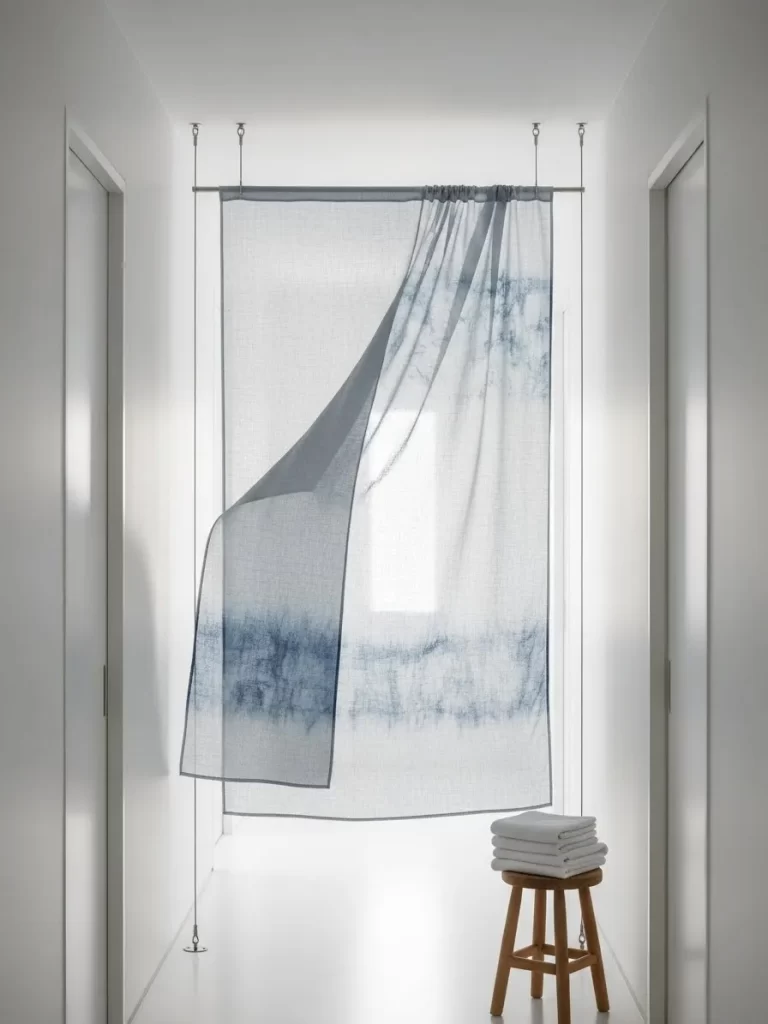
Big walls can feel cold without some soft movement. A thin piece of blue linen adds a sense of flow to a hallway. The indigo patterns look like water or a cloudy sky. This art moves with the air and creates a very calm space.
Hanging the cloth from steel cables keeps the look modern. It avoids the heavy look of a big frame. This project is cheap and uses basic skills to finish. It is a great way to add color without a big commitment.
Material Required List
- Two yards of thin white linen
- Indigo fabric dye
- Steel cable hanging kit
Equipment Required List
- Large plastic bucket
- Rubber gloves
- Sewing machine
DIY Instruction Step by Step
- Mix the blue dye in a bucket following the box directions.
- Dip parts of the cloth into the dye for a few minutes.
- Rinse the cloth in cold water until the water is clear.
- Sew a small hem on the top and bottom of the cloth.
- Put the cable brackets high up on your hallway walls.
- Slide the steel cable through the top hem of the cloth.
- Pull the cable tight between the two wall brackets.
- Use a steamer to get rid of any wrinkles in the linen.
13 Bold Blue Architectural Blueprint
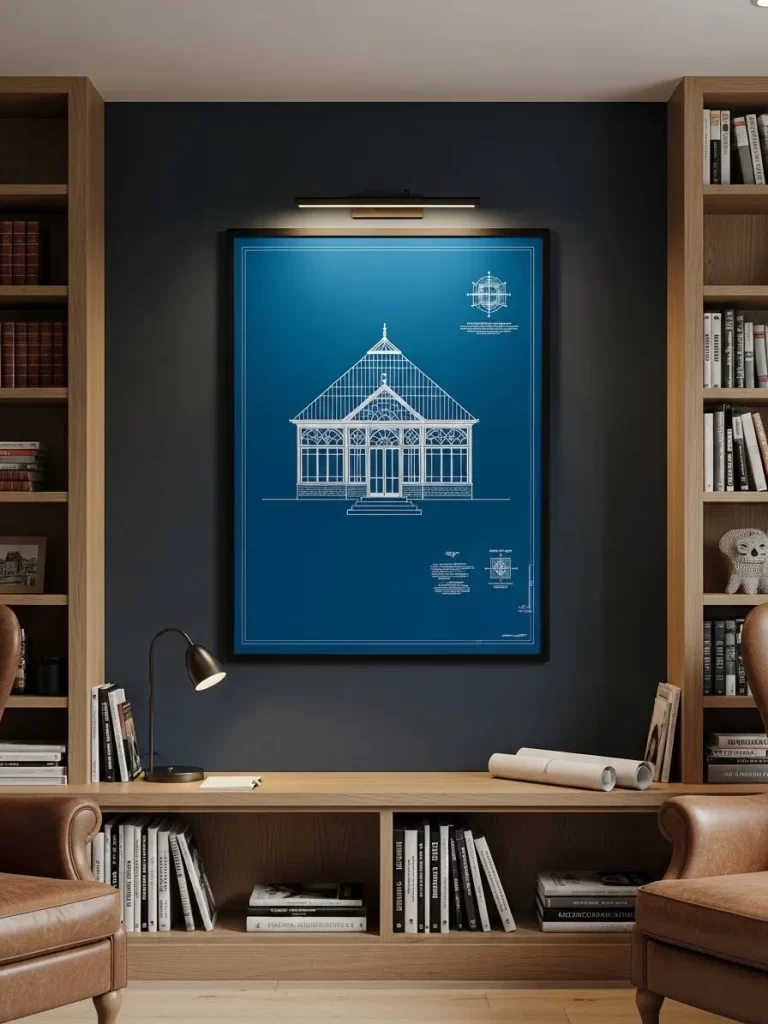
Blueprints offer a smart and classic look for a home office. You can print a large drawing on a deep blue background. The white lines look sharp and catch the eye easily. It fills a dark wall with many fine details and style.
Framing the print in a thin black border keeps the focus on the art. Adding a small light above it makes the piece look like it is in a museum. This choice is great for people who love old buildings. It provides a formal and tidy look to any room.
Material Required List
- Large architectural print
- Thin black frame
- Battery picture light
Equipment Required List
- Measuring tape
- Level
- Wall anchors
DIY Instruction Step by Step
- Find a clear digital file of an old building or garden.
- Send it to a print shop for a large blue print.
- Put the print in your black frame and close the back.
- Mark the middle of your wall at eye level.
- Install a wall anchor to hold the weight of the frame.
- Hang the frame and check it with your level.
- Put the picture light on the wall above the frame.
- Turn the light on to show off the white drawing lines.
14 Framed Natural Monstera Leaf

Using real plants in your decor adds immediate life to a room. You can save a single large leaf by putting it behind glass. The bright green color looks great on a clean white wall. It creates a modern tropical look that is simple and beautiful.
A light wood frame matches the organic feel of the leaf. This art is very cheap if you have plants at home. It acts as a natural center point for an entry table. The simple look of one leaf makes a very big statement.
Material Required List
- Large fresh monstera leaf
- Wooden picture frame with glass
- Three heavy books
Equipment Required List
- Paper towels
- Double sided tape
- Glass cleaner
DIY Instruction Step by Step
- Cut a big healthy leaf from a plant or buy one.
- Put the leaf between paper towels to soak up moisture.
- Place the leaf in a heavy book for two weeks to flatten.
- Take the dry leaf out carefully when it is ready.
- Put a small piece of tape on the back of the leaf.
- Press the leaf onto the center of the frame board.
- Clean the glass well before you put it in the frame.
- Close the frame and hang it in a sunny spot.
15 High Fashion Magazine Collage
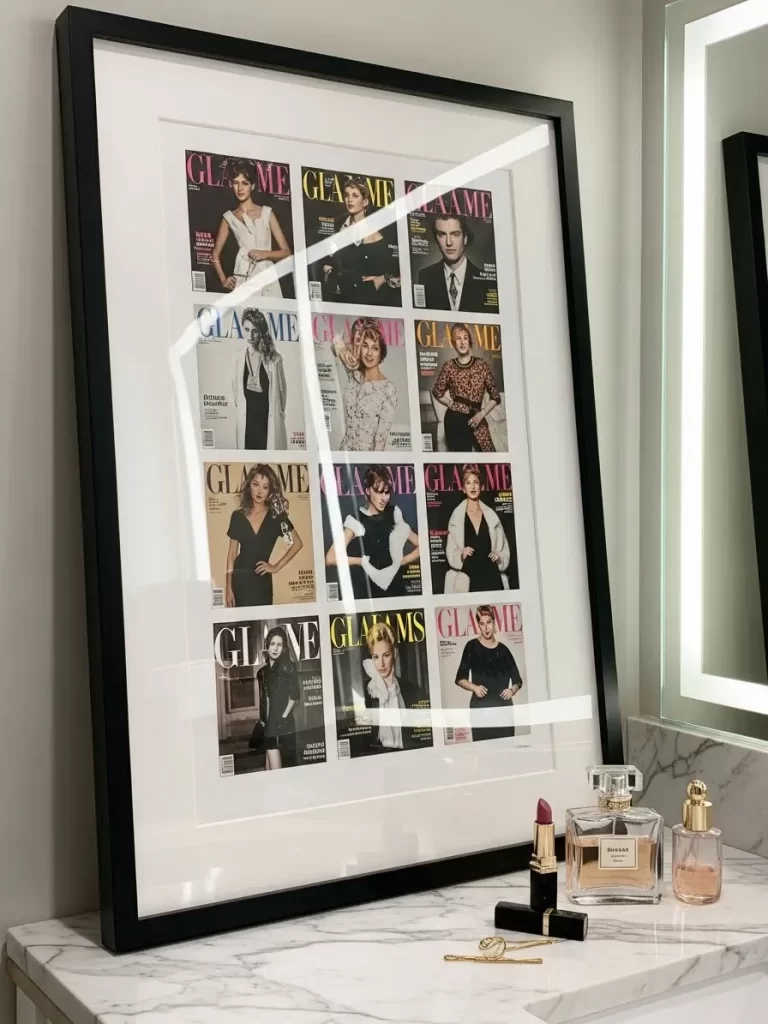
Magazine covers are art that many people just throw away. You can collect your favorites and group them in one big frame. This creates a glamorous look for a dressing room. The grid layout keeps the different pictures looking tidy and chic.
Using a white border around the images gives a gallery look. It is a fun way to show off your style and interests. This project is very budget friendly because you use old magazines. It adds a touch of luxury to a small corner.
Material Required List
- Twelve magazine covers
- Large black picture frame
- White mat board
Equipment Required List
- Scissors
- Glue stick
- Ruler
DIY Instruction Step by Step
- Carefully pull the covers off your favorite magazines.
- Trim the edges with scissors so they are all straight.
- Lay the mat board on a table and arrange the covers.
- Use a ruler to keep the space between them the same.
- Glue the back of each cover and press it to the board.
- Repeat this until your grid is full and looks straight.
- Put the board in the large frame and lock the back.
- Lean the frame on a counter or hang it on the wall.
16 Industrial Corrugated Metal Backing
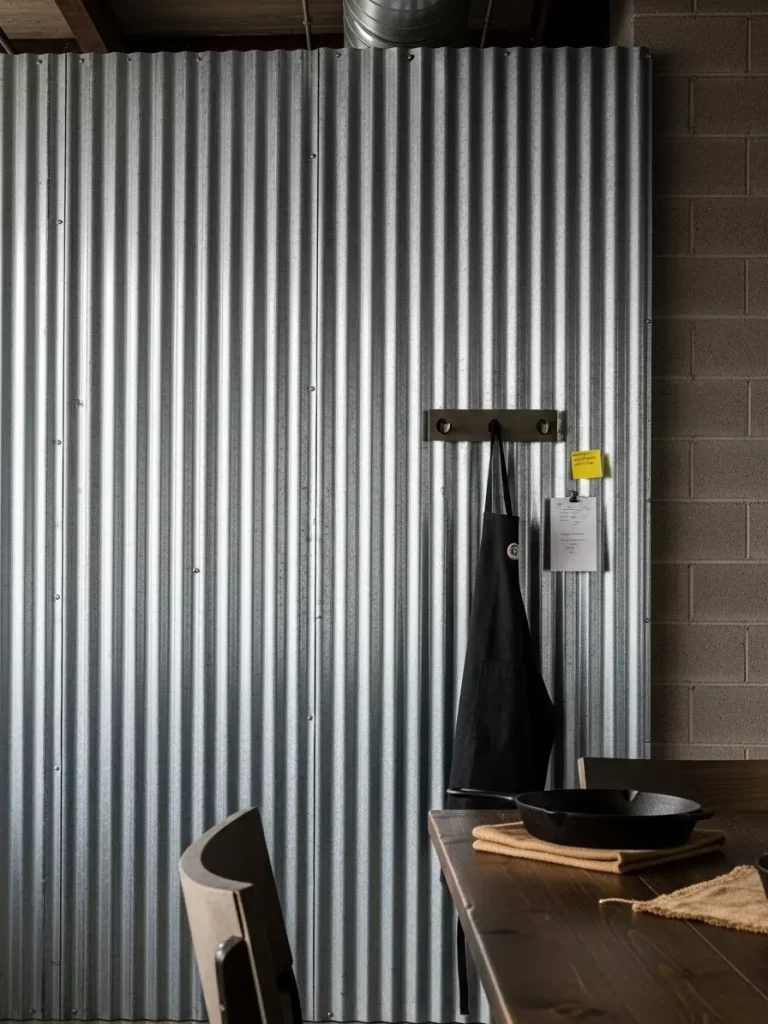
Raw materials can be a bold choice for a kitchen wall. A large sheet of metal adds an industrial feel to a dining area. The vertical lines make the ceiling feel higher. It is a strong and unique choice instead of wallpaper or paint.
You can use the metal surface to hang your cooking tools. This makes the art both useful and pretty to look at. The silver color reflects light and helps brighten a room. It provides a sturdy look for a modern farmhouse style.
Material Required List
- Sheet of corrugated metal
- Magnetic hooks
- Metal screws
Equipment Required List
- Power drill
- Metal cutting snips
- Work gloves
DIY Instruction Step by Step
- Measure your wall and buy a metal sheet that fits.
- Put on gloves to protect your hands from sharp edges.
- Hold the metal against the wall with help from a friend.
- Drill holes through the metal and into the wall studs.
- Screw the sheet to the wall using screws and washers.
- Place magnetic hooks on the metal wherever you like.
- Hang your favorite black apron or pans on the hooks.
- Wipe the metal with a cloth to remove any dust.
17 Clear Acrylic Fabric Hanger
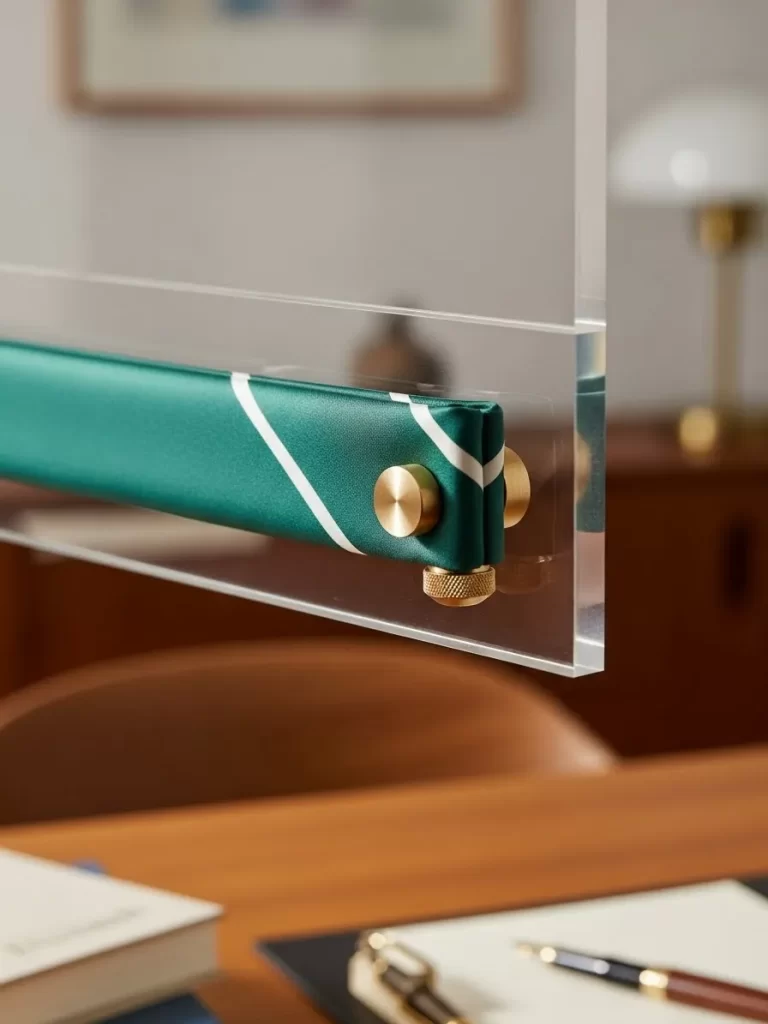
Small details change how art looks in a modern room. You can use a clear bar with brass parts to hang a piece of fabric. This style feels light and airy compared to a big frame. It allows the color of the cloth to be the main focus.
The green satin fabric here provides a rich and soft texture. This method is great for showing off expensive scarves. It protects the fabric from being folded in a drawer. The result is a clean and very sophisticated wall accent.
Material Required List
- Clear acrylic rod
- Two brass wall brackets
- Strip of green satin fabric
Equipment Required List
- Power drill
- Level
- Screwdriver
DIY Instruction Step by Step
- Buy an acrylic rod that is wider than your fabric.
- Mark the wall where the two brackets will go.
- Use a level to make sure the marks are even.
- Drill holes and screw the brackets into the wall.
- Fold the top of your fabric over the clear rod.
- Slide the rod into the brackets so it stays put.
- Adjust the fabric so it hangs straight and looks smooth.
- Tighten the small screws on the brackets to hold the rod.
18 Metallic Gold Plaster Accent
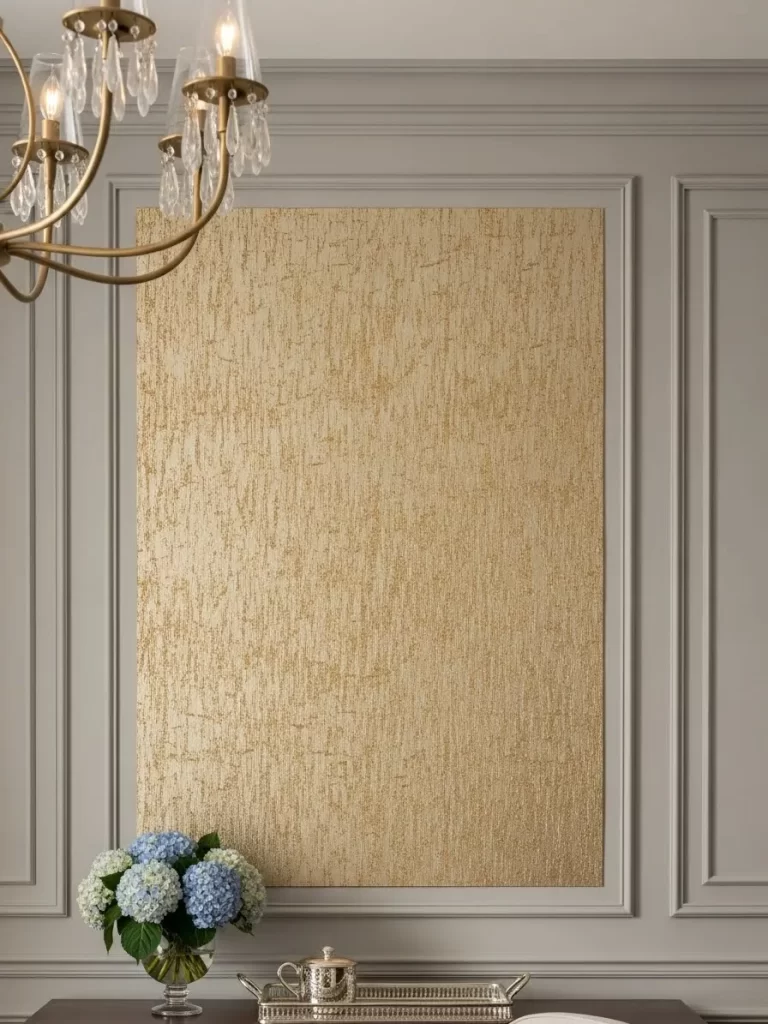
Gold adds a touch of luxury and warmth to a formal room. You can apply a gold texture inside a wall frame for a grand effect. The vertical lines create a sense of movement and high style. This art glows when the light from a chandelier hits it.
Using plaster allows you to make a custom look that feels expensive. The gray walls provide a quiet background for the shiny gold. This is a great way to fill a large wall panel. It makes the whole room feel more finished and high end.
Material Required List
- Pot of joint compound
- Metallic gold paint
- Wall molding kit
Equipment Required List
- Wide trowel
- Paint roller
- Painter tape
DIY Instruction Step by Step
- Put up the wall molding to make a large rectangle.
- Use tape to protect the molding from the plaster.
- Apply a thin layer of plaster inside the frame.
- Pull the trowel down to make vertical lines in the wet mud.
- Let the plaster dry until it is hard and light.
- Paint the area with a base coat of tan paint.
- Roll the gold paint over the texture for a bright shine.
- Take off the tape and enjoy your new gold wall art.
19 Triple Sunset Shoreline Triptych
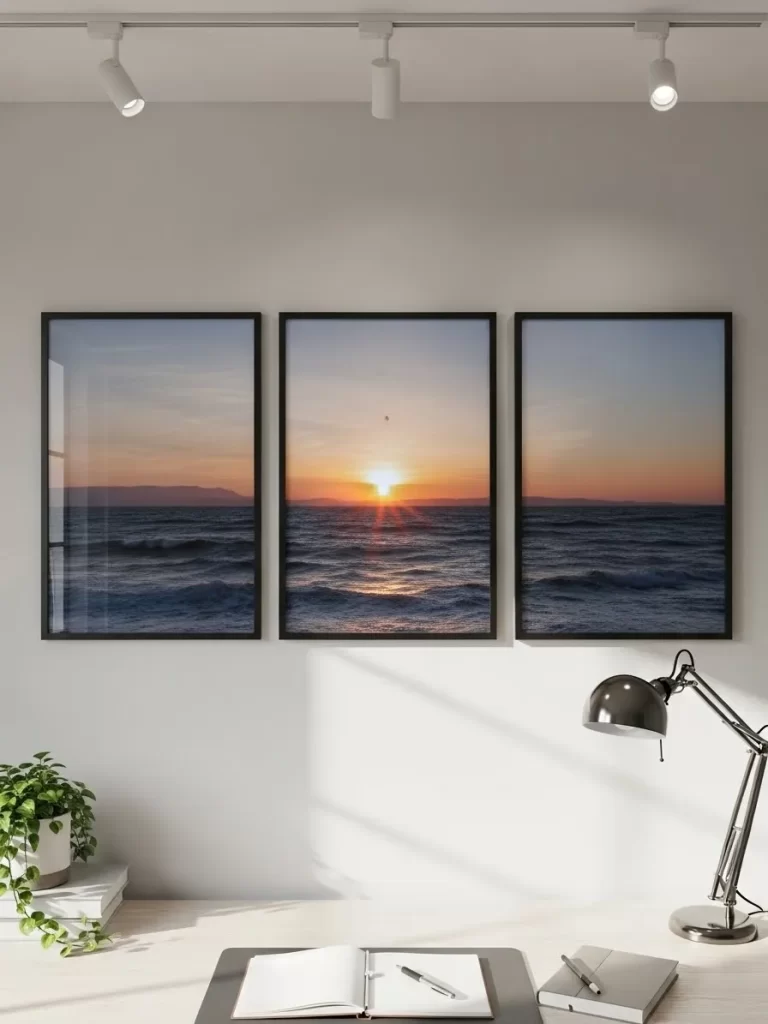
One photo split into three parts creates a sense of scale. This triptych shows a beautiful sunset over the dark ocean. Spreading the image across three frames makes it feel like a window. It brings a peaceful view into your office or bedroom.
The black frames keep the look sharp and very modern. This setup fills a wide wall better than one small frame. You can use your own beach photos to make it more personal. It is a great way to remember a favorite trip.
Material Required List
- One panoramic sunset photo
- Three black picture frames
- Three white mat boards
Equipment Required List
- Photo app for cropping
- Ruler
- Level
DIY Instruction Step by Step
- Take a wide photo and crop it into three equal squares.
- Print the three parts at a shop on matte paper.
- Put each print into one of the three black frames.
- Find the center of your wall for the middle frame.
- Hang the middle frame first at your eye level.
- Measure two inches to the left and hang the next one.
- Measure two inches to the right and hang the last one.
- Use a level to make sure all three are perfectly lined up.
20 Botanical Grid Gallery Wall
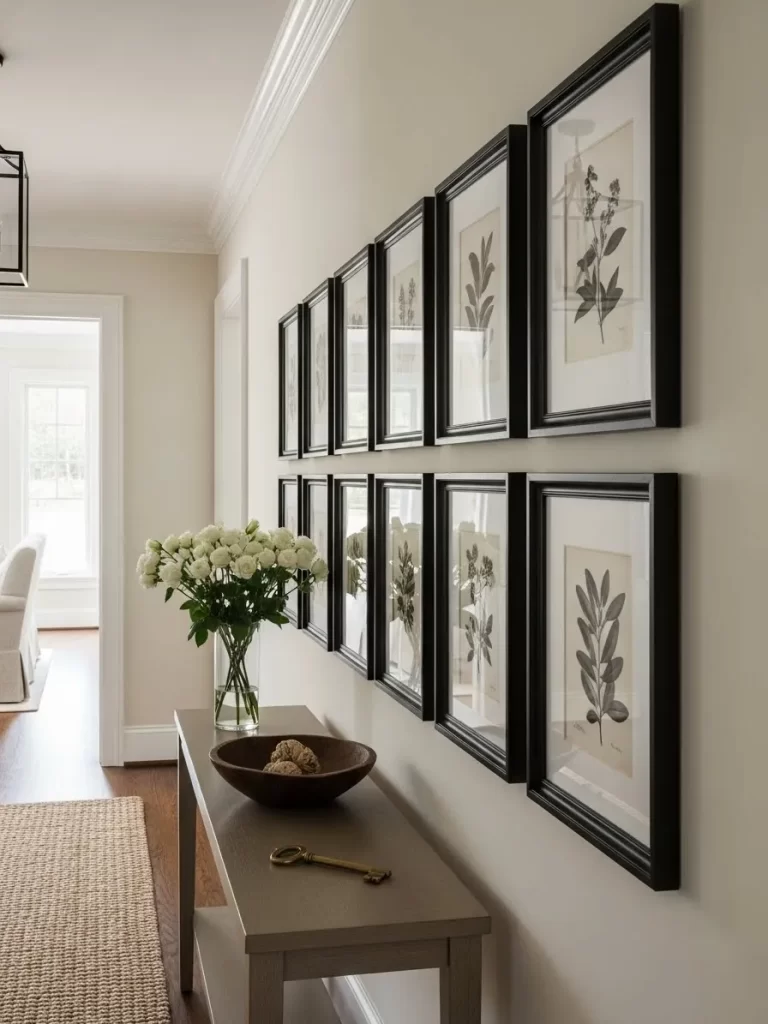
A long hallway is a great spot for a large art display. You can hang a long grid of leaf prints to create rhythm. This style feels very tidy and organized in a home. The black frames look strong against the light colored walls.
Using the same frame for every picture creates a gallery look. This approach makes a small space feel much longer and bigger. You can pick different leaves for variety while keeping the style the same. It is a timeless way to decorate a hallway.
Material Required List
- Twelve botanical leaf prints
- Twelve black frames with mats
- Wall hanging kit
Equipment Required List
- Measuring tape
- Painter tape
- Level
DIY Instruction Step by Step
- Get twelve prints that have the same colors and theme.
- Put each print into a frame and center it well.
- Use tape to mark a long line on the wall as a guide.
- Decide how much space you want between the frames.
- Start from the middle of the wall and work outward.
- Hang the top row of six frames and make sure they are level.
- Hang the bottom row of six directly under the first ones.
- Check the lines one last time to make sure they are straight.
21 Giant Wooden Floor Mirror
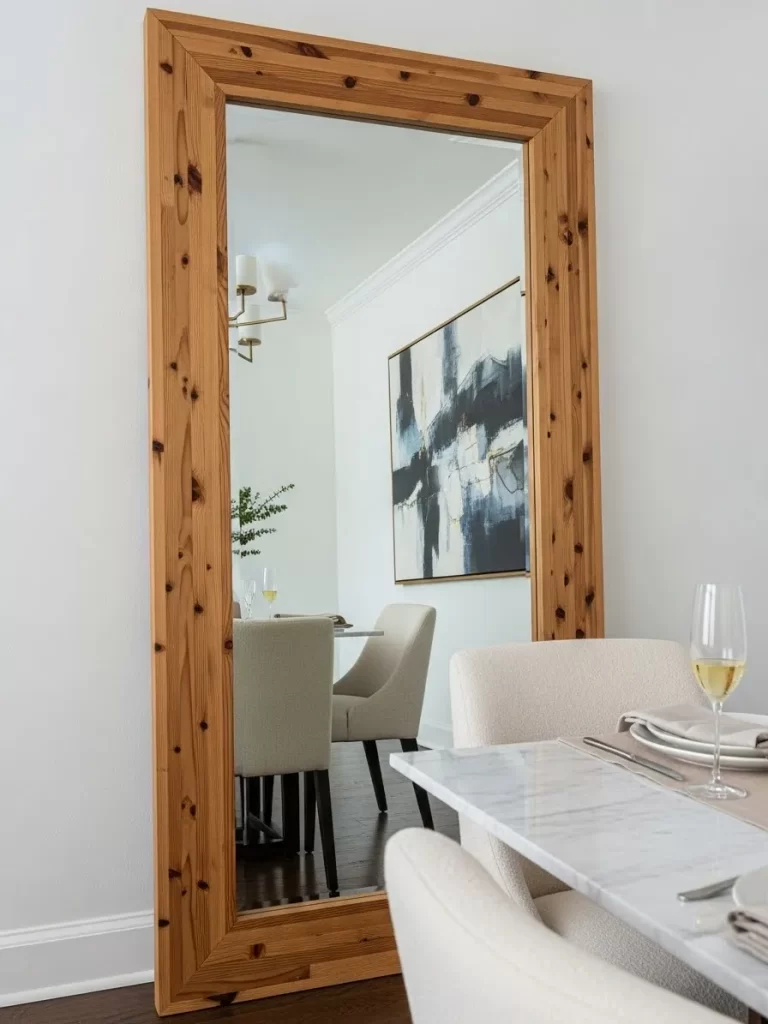
Large mirrors act as functional art by making a room feel twice as big. You can build a massive frame for a basic mirror to give it presence. The thick wood adds a natural and warm element to a dining space. It reflects light and art from the opposite wall.
Leaning the mirror against the wall creates a casual and modern look. This avoids the need for heavy mounting hardware on your drywall. The knots in the pine wood provide a rustic and honest character. It is a centerpiece that serves a purpose every single day.
Material Required List
- Large frameless sheet mirror
- Four thick pine wood boards
- Heavy duty mirror adhesive
Equipment Required List
- Power sander
- Measuring tape
- Level
DIY Instruction Step by Step
- Measure your mirror and cut the pine boards to fit around the edges.
- Sand the wood boards until they are very smooth to the touch.
- Lay the mirror face down on a soft rug to prevent scratches.
- Apply the mirror adhesive to the back of each wood board.
- Press the boards onto the edges of the mirror to form a frame.
- Let the glue dry for a full day before you try to move it.
- Flip the mirror over and clean the glass with a soft cloth.
- Lean the mirror against the wall and check that it is stable.
22 Blue and Gold Drip Abstract Canvas
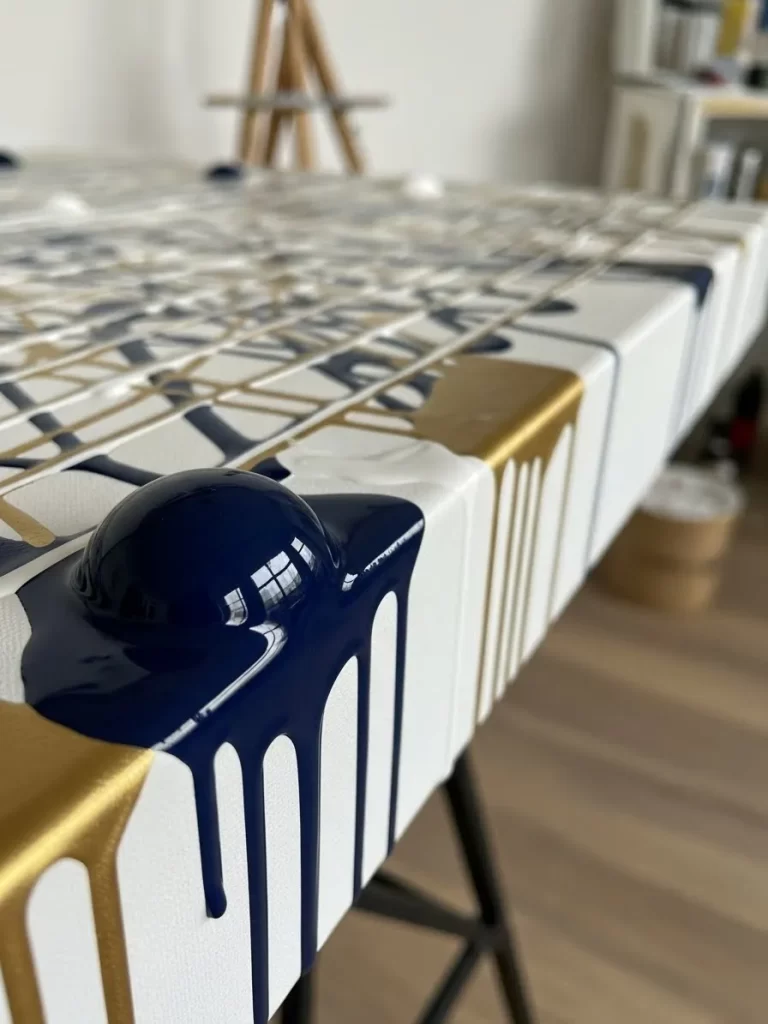
Abstract art allows you to play with color without needing to draw. You can create a large canvas using deep blue and gold paints. The thick drips add a sense of luxury and modern style. This piece looks like it came from a high end art gallery.
Working on the floor allows the paint to flow in natural ways. You can control the density of the drips to suit your taste. The white background keeps the colors looking bright and very clean. It is a bold way to add a pop of color to a neutral room.
Material Required List
- Large white stretched canvas
- Navy blue and metallic gold acrylic paint
- Pouring medium
Equipment Required List
- Plastic drop cloth
- Small cups for pouring
- Two wooden sawhorses
DIY Instruction Step by Step
- Set up your sawhorses and cover the floor with the plastic cloth.
- Place the canvas on top of the sawhorses so it sits flat.
- Mix the paint with the pouring medium in separate small cups.
- Tip the canvas slightly and pour the blue paint along the top edge.
- Let the paint run down the side of the canvas to create drips.
- Repeat the process with the gold paint for a shimmering effect.
- Allow the canvas to sit for two days until the paint is hard.
- Hang the canvas in your living room to show off the texture.
23 Carved Wood Room Divider Art
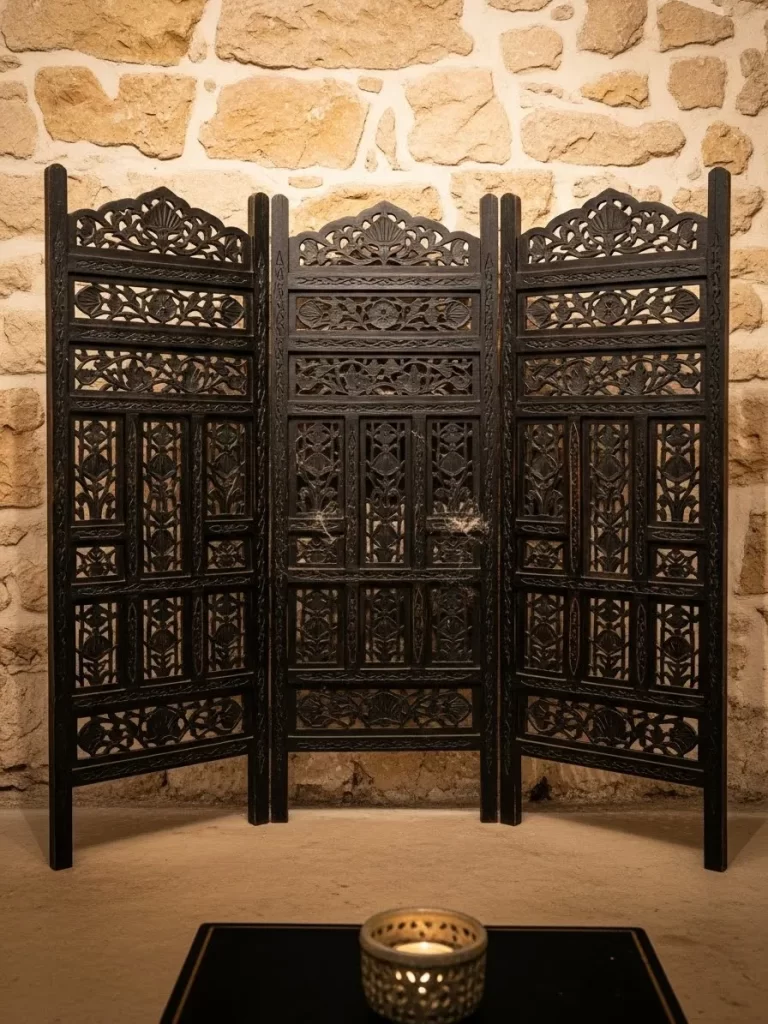
Room dividers can be used as massive pieces of wall art. You can place a dark carved wood screen against a stone wall for contrast. The intricate patterns create beautiful shadows when the lights are low. It adds a sense of history and world travel to your home.
This approach covers a huge amount of wall space very quickly. You do not need to hang anything or drill any holes. The black wood stands out perfectly against light colored masonry. It is a smart way to add architecture to a plain room.
Material Required List
- Three panel carved wood room divider
- Small rubber feet for the bottom
Equipment Required List
- Level
- Damp cloth for dusting
DIY Instruction Step by Step
- Dust the entire wood screen to make sure it looks clean.
- Attach rubber feet to the bottom to protect your floors.
- Stand the divider against your chosen wall in the room.
- Fold the side panels slightly inward to help it stand up straight.
- Use a level to ensure the top of the screen is even.
- Move it an inch away from the wall to create deeper shadows.
- Place a candle or small lamp in front of it for a glow.
- Enjoy the texture this piece adds to your living space.
24 Macrame Mirror with Ombre Fringe

Boho style brings a relaxed and handmade feel to a bedroom. You can update a simple round mirror with a macrame arch. The blue ombre fringe adds a modern twist to traditional weaving. This piece acts as both a mirror and a soft wall hanging.
The gradient of blue colors looks like the ocean or the sky. Using a wooden rod gives the piece a sturdy and organic base. This art is soft to the eye and adds a lot of personality. It is a great DIY project for a rainy afternoon.
Material Required List
- Round mirror
- Cotton macrame cord
- Blue fabric dye
Equipment Required List
- Wooden dowel
- Scissors
- Large bowl for dyeing
DIY Instruction Step by Step
- Cut many lengths of cotton cord to be the same size.
- Loop the cords onto the wooden dowel using a basic knot.
- Dip the bottom ends of the cord into the blue dye.
- Lift them out slowly to create a light to dark blue effect.
- Let the cord dry completely before you touch the mirror.
- Attach the mirror to the center of the wooden dowel.
- Comb through the fringe to make it look soft and neat.
- Hang the dowel on your wall using a simple hook or nail.
25 Vinyl Record Album Cover Wall
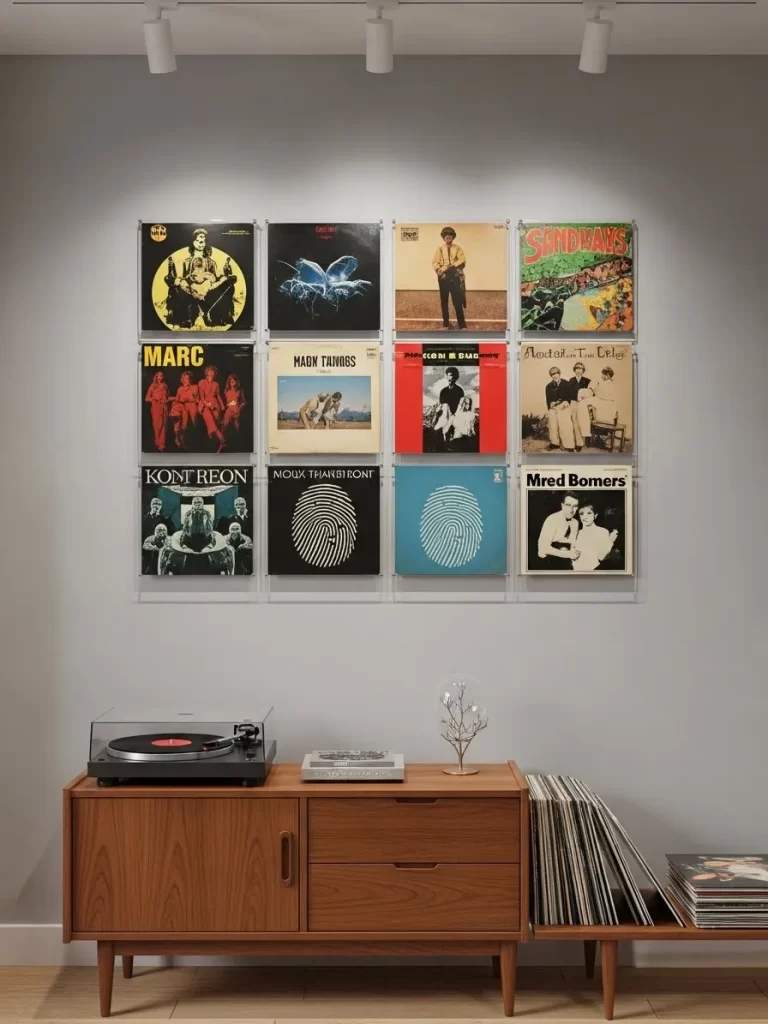
Music lovers can turn their record collection into a large art grid. You can display twelve of your favorite album covers in a tidy layout. This adds a lot of color and a personal story to your room. The square shapes look very organized and modern when grouped together.
Using clear clips allows you to change the albums whenever you want. You can listen to the music and then put the art back on the wall. This is a very cheap way to fill a large space in a den. It celebrates your favorite artists and looks very cool.
Material Required List
- Twelve vinyl record albums
- Twenty four clear wall clips
Equipment Required List
- Measuring tape
- Pencil
- Level
DIY Instruction Step by Step
- Pick twelve albums that have colorful and interesting covers.
- Mark a grid on your wall using a pencil and a ruler.
- Space the marks so the albums will have an inch between them.
- Stick the clear clips to the wall at the top and bottom marks.
- Slide your first album into the clips and check the level.
- Continue adding the albums until your grid is complete.
- Make sure all the covers are facing the right way up.
- Step back and enjoy your personal wall of music history.
26 Vintage Window Fern Pressed Art
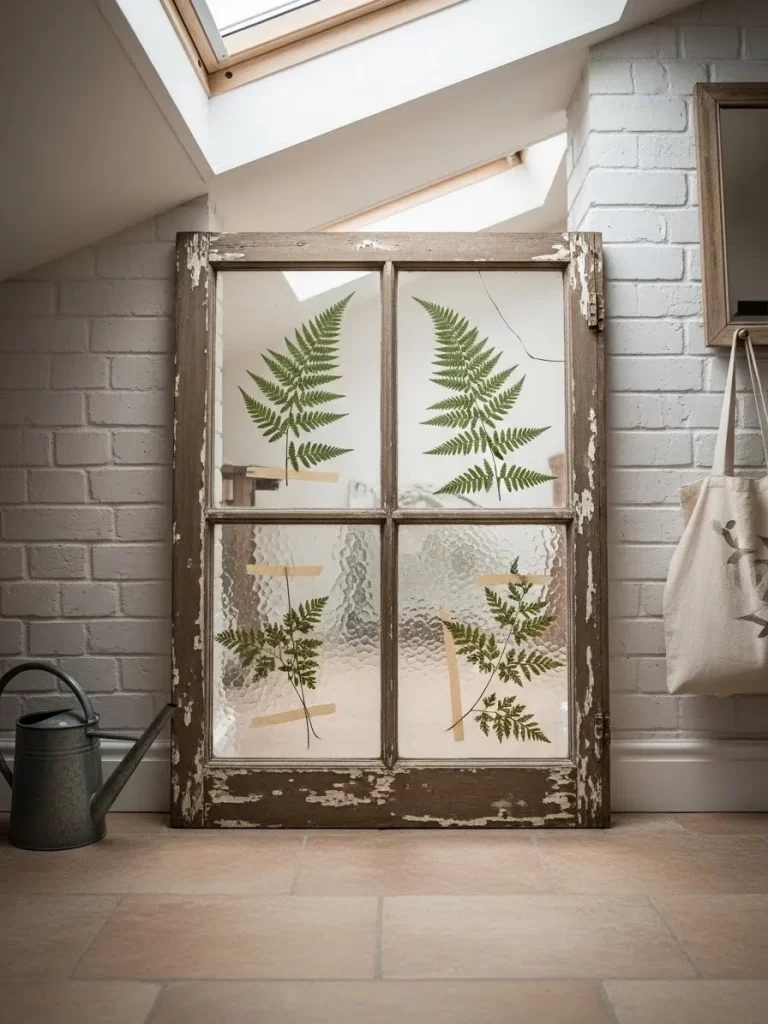
Old windows can be saved and turned into beautiful garden art. You can press real ferns against the glass for a natural look. The weathered wood frame adds a lot of rustic charm to your home. It feels like looking out into a forest even when you are inside.
Using tape to hold the leaves gives the art a casual and airy feel. This piece looks great leaning against a brick wall or on a porch. It is a wonderful way to bring the outdoors in for very little money. The textures of the glass and the leaves work perfectly together.
Material Required List
- Old four pane wooden window
- Four large dried fern leaves
- Clear tape
Equipment Required List
- Glass cleaner
- Soft cloth
- Sandpaper
DIY Instruction Step by Step
- Clean the old window frame and sand away any loose paint.
- Wash both sides of the glass until they are perfectly clear.
- Dry your fern leaves inside a heavy book for one week.
- Place a fern leaf in the center of each glass pane.
- Use a small piece of clear tape to hold the leaf in place.
- Ensure the leaves are flat against the glass for a clean look.
- Lean the window against a wall near a bright window.
- Watch how the sunlight shines through the green leaves.
27 Washi Tape Mountain Mural
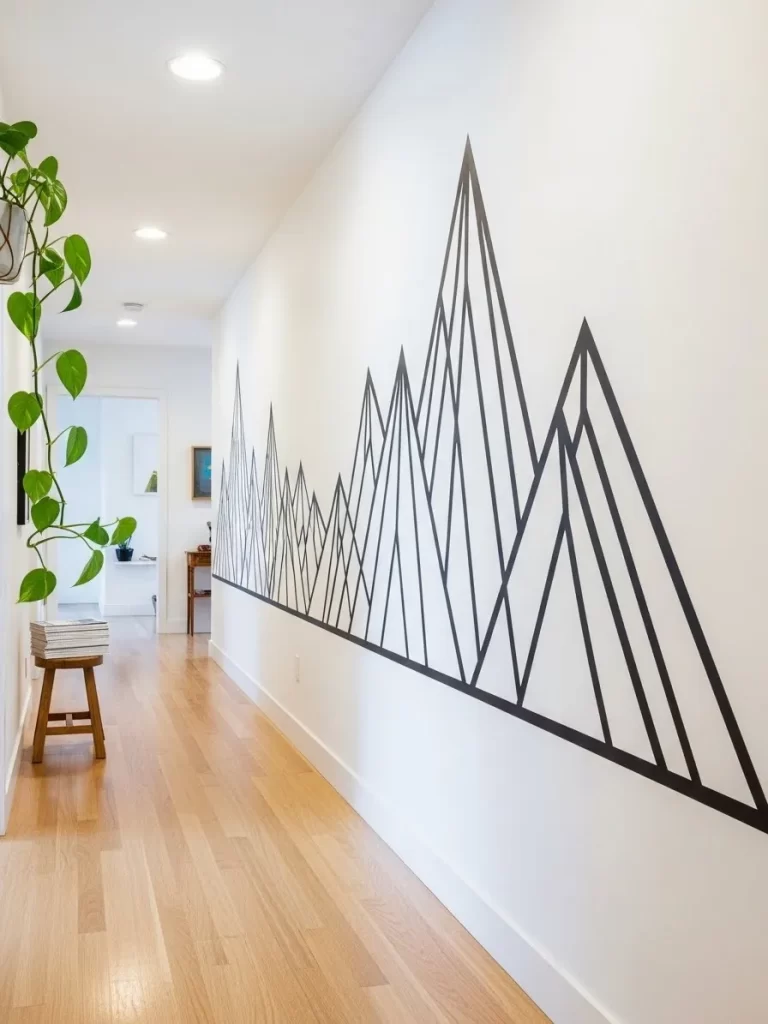
You can create a massive mural without using any messy paint. Washi tape allows you to draw geometric mountains directly on your wall. This style looks very modern and sharp in a long hallway. It is easy to remove if you live in a rental home.
The black lines create a strong contrast against a white wall. You can make the mountains as tall or wide as you like to fit the space. This project is very fun and takes only an hour to complete. It adds a huge amount of style for the price of a few tape rolls.
Material Required List
- Three rolls of black washi tape
Equipment Required List
- Scissors
- Step ladder
- Measuring tape
DIY Instruction Step by Step
- Clean the wall surface to make sure the tape sticks well.
- Start at one end of the hallway and stick the tape to the baseboard.
- Pull the tape up at an angle to create the side of a mountain.
- Press the tape down firmly as you move along the wall.
- Cut the tape and start a new line to form the peak.
- Add smaller triangles inside the big ones for more detail.
- Keep the lines straight to make the art look professional.
- Step back often to make sure the whole mountain range looks balanced.
28 Vintage Kitchen Label Gallery Wall

Small frames can be grouped together to act as one large art piece. You can use vintage food labels to decorate a kitchen wall. This adds a sense of history and color to your cooking space. The grid layout keeps the many small items looking very neat.
The white mats make the old paper look like expensive gallery art. This style works well above a marble counter or a sink. It is a great way to use a collection of small things you love. The result is a charming and very personal kitchen accent.
Material Required List
- Twelve vintage food labels or postcards
- Twelve small black frames with white mats
Equipment Required List
- Hammer
- Box of small nails
- Ruler
DIY Instruction Step by Step
- Find twelve old labels with pretty colors and designs.
- Put each label into a frame and make sure it is straight.
- Measure the width of the wall area you want to cover.
- Mark a grid on the wall with three rows and four columns.
- Space the frames two inches apart for a clean look.
- Hammer a nail into each mark on your wall grid.
- Hang the frames and use a ruler to check the gaps.
- Adjust any frames that look crooked until the grid is perfect.
29 Minimalist Typography Quote Poster
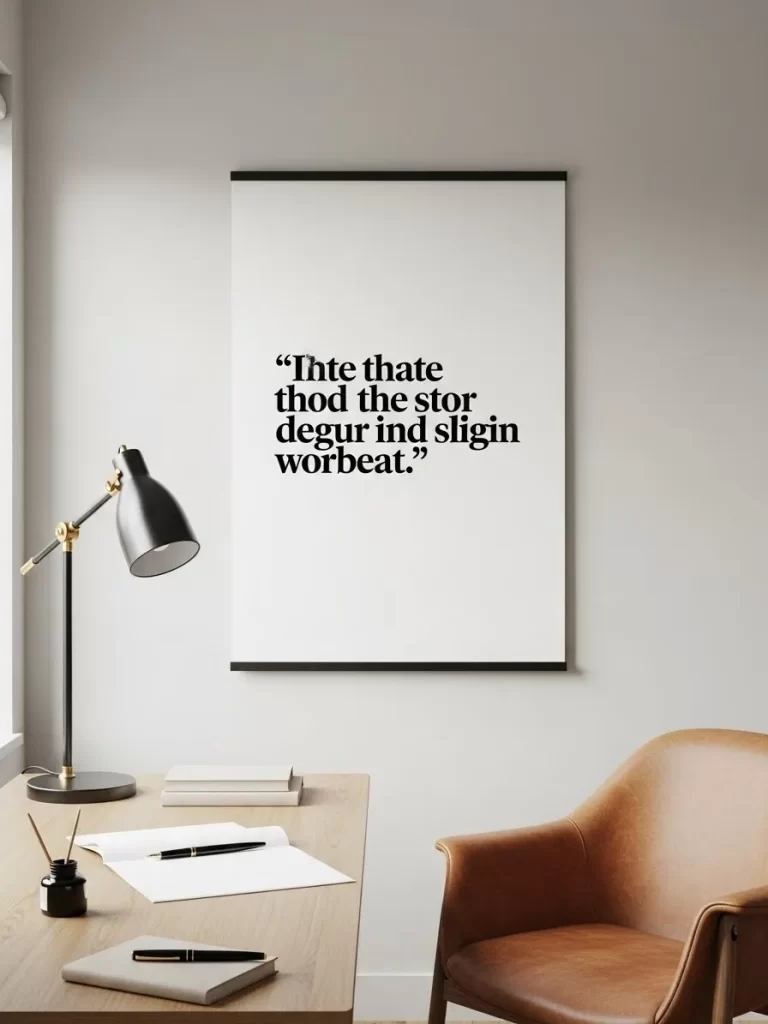
Words can be just as powerful as pictures when used as art. You can print a favorite quote in a bold black font on white paper. This creates a modern and intellectual vibe for a home office. It fills the wall with meaning and a clean aesthetic.
Using thin black rails at the top and bottom keeps the look simple. This avoids the bulk of a traditional heavy frame. The large white space makes the room feel open and very quiet. It is a great daily reminder of your goals or thoughts.
Material Required List
- Large paper print with a quote
- Two black magnetic poster hangers
Equipment Required List
- Level
- Pencil
- One small nail
DIY Instruction Step by Step
- Choose a quote that means something special to you.
- Print it in a large size on thick matte paper.
- Snap the top hanger over the top edge of the paper.
- Snap the bottom hanger over the bottom edge to weigh it down.
- Mark a spot on your wall at the correct height for the art.
- Tap a nail into the wall at your pencil mark.
- Hang the top rail on the nail and let the paper unroll.
- Use a level to make sure the quote is sitting straight.
30 Large Kitchen Chalkboard Mural
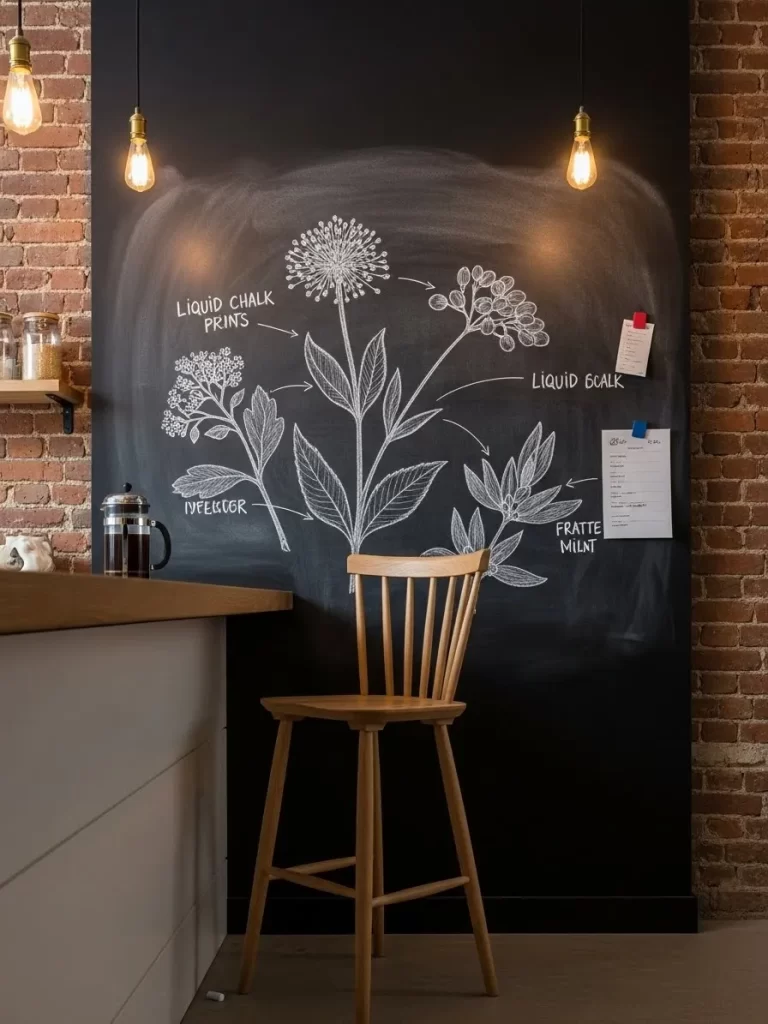
A giant chalkboard is a great way to combine art and function. You can draw large botanical sketches to decorate your kitchen. This adds a rustic and cozy feel to a brick or wood room. It is a space that you can change whenever you feel creative.
Using liquid chalk allows you to draw very fine and white lines. You can write your grocery list next to the art for a handy reminder. This mural fills a large wall and makes the kitchen feel like a cafe. It is a fun and interactive part of your home.
Material Required List
- Large sheet of black chalkboard wood
- White liquid chalk markers
Equipment Required List
- Screws and a drill
- Level
- Damp cloth
DIY Instruction Step by Step
- Mount the black chalkboard sheet to your kitchen wall with screws.
- Make sure it is level and secure before you start drawing.
- Look at a picture of a flower to help you with the sketch.
- Use the liquid chalk marker to draw large leaves and stems.
- Add small details and labels to make it look like a science drawing.
- Leave some empty space on the side for your daily notes.
- Wipe away any mistakes with a damp cloth while the chalk is wet.
- Let the chalk dry for a few minutes until it is bright white.
31 Vibrant Fluid Resin Wall Panel
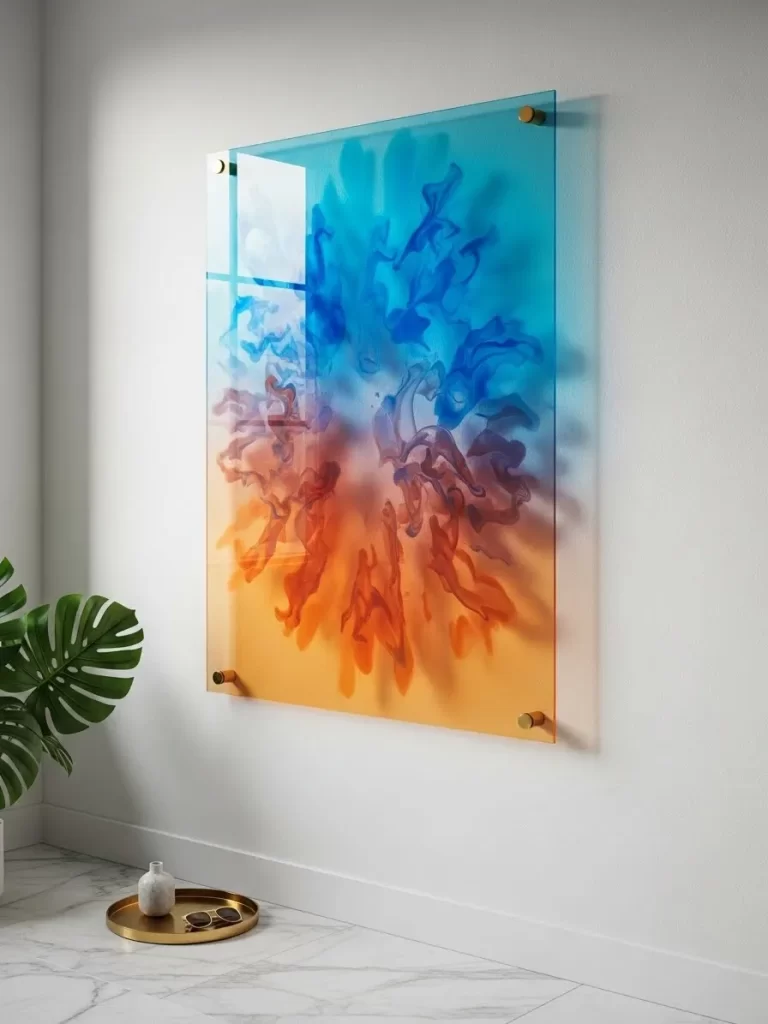
Bright colors can change the energy of a dull room instantly. This large panel uses swirling blue and orange tones to create a liquid look. It sits slightly away from the wall to give a sense of depth and weight. Light passes through the clear edges and makes the colors glow during the day.
You can make this using clear acrylic sheets and liquid pigments. It provides a high end feel for a low price. The organic shapes look like shifting clouds or deep water. This piece works well in a modern entryway or a bright bathroom where you want a splash of life.
Material Required List
- Large clear acrylic sheet
- Blue and orange alcohol inks
- Clear resin kit
Equipment Required List
- Heat gun
- Level
- Plastic cups for mixing
DIY Instruction Step by Step
- Place your acrylic sheet on a flat table covered with a plastic cloth.
- Mix a small amount of clear resin according to the bottle directions.
- Pour the clear resin over the sheet until it covers the entire surface.
- Drop several dots of blue and orange ink into the wet resin.
- Use the heat gun on a low setting to blow the ink around in wavy patterns.
- Keep moving the heat gun so the colors blend but do not turn brown.
- Let the panel sit for twenty four hours until the resin is hard and shiny.
- Mount the panel to your wall using stand off bolts to keep it away from the surface.
32 Vintage World Map Wall Scroll
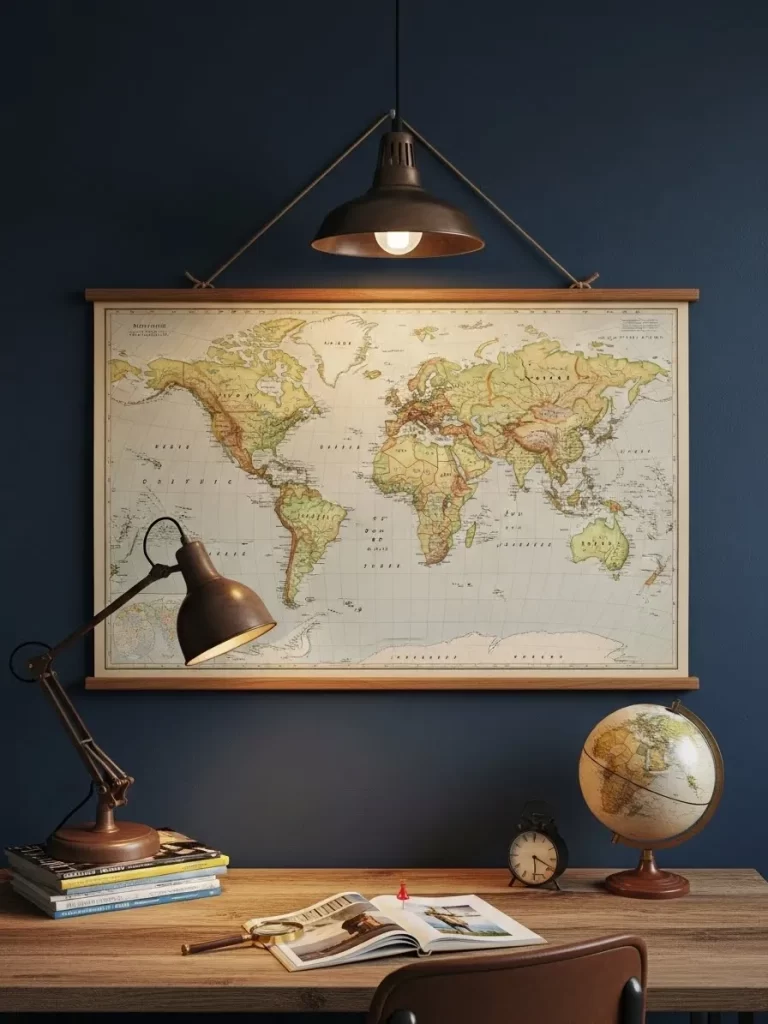
Old maps bring a sense of adventure into a quiet home study. This large paper map hangs from wooden rails to cover a dark wall effectively. The warm tan colors look great under a soft desk lamp or near a window. It offers a classic look that never goes out of style.
Making your own scroll is faster than finding a huge frame. You simply glue the paper to light wood strips at the top and bottom. This method allows you to display large prints without heavy glass or high costs. It creates a focal point that encourages people to stop and look closer at the details.
Material Required List
- Extra large vintage style world map print
- Two thin wooden dowels
- Strong twine
Equipment Required List
- Wood glue
- Measuring tape
- Heavy books
DIY Instruction Step by Step
- Lay your map print face down on a clean and flat floor.
- Measure the width of the map and cut your wooden dowels to match that size.
- Apply a thin line of wood glue along the top edge of the paper.
- Press one wooden dowel onto the glue and hold it for a minute.
- Repeat this process for the bottom edge of the map to help it hang straight.
- Place heavy books on top of the dowels and let the glue dry for three hours.
- Tie the ends of your twine to the top dowel to create a hanging loop.
- Place a single nail in your wall and hang the map at eye level.
33 Large Terra Cotta Sun Mural
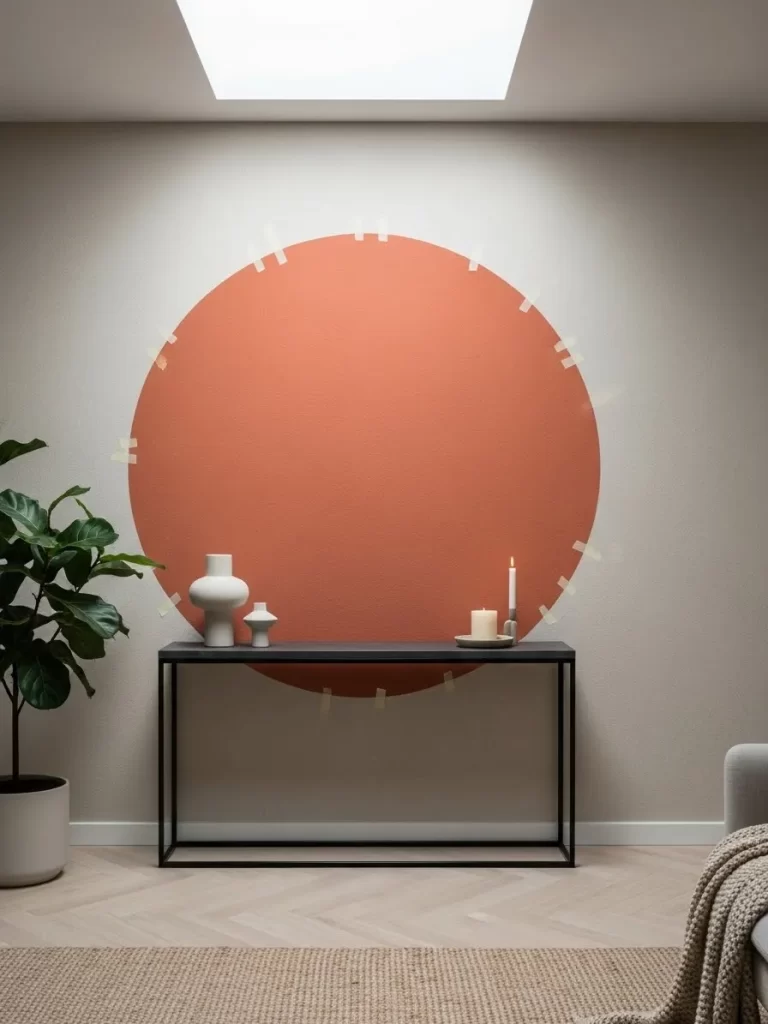
Painting a large shape directly on your wall is a bold and smart move. This giant rust colored circle acts as a warm backdrop for a console table. It uses a matte finish to keep the look soft and natural. Simple geometry makes the room feel modern and very intentional.
You only need a small can of paint and some painter tape to do this. It is one of the cheapest ways to fill a massive space without buying art. This design draws the eye toward your furniture and small decor items. It works best on a neutral wall to make the terra cotta color stand out.
Material Required List
- Small can of terra cotta matte wall paint
- One long piece of string
Equipment Required List
- Pencil
- Small paint roller
- Angled paint brush
DIY Instruction Step by Step
- Clear the wall area and find the center point for your circle.
- Tape one end of the string to the center point with a piece of tape.
- Tie the other end of the string to a pencil at the desired radius length.
- Hold the string tight and move the pencil in a circle to draw the outline.
- Use your angled brush to carefully paint the outer edge of the circle.
- Fill in the center of the circle using the small paint roller for a smooth finish.
- Apply a second coat of paint once the first layer is dry to the touch.
- Remove the center tape and touch up that small spot with your brush.
34 Antique Music Sheet Wall Grid
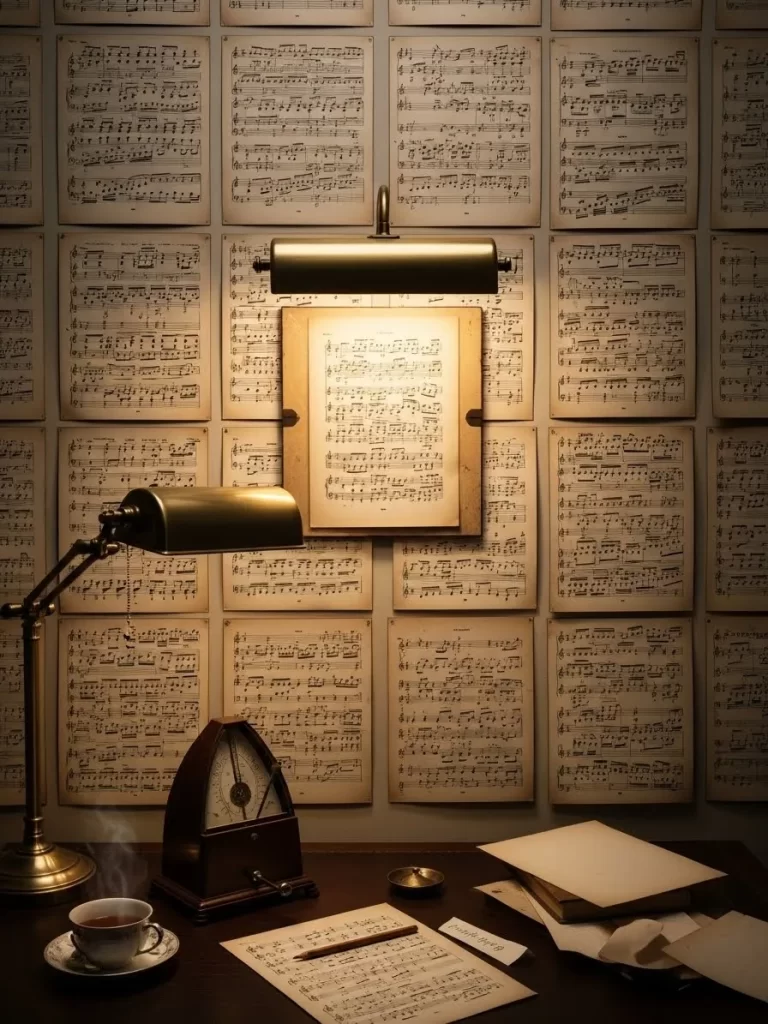
Old paper has a beautiful texture that tells a story of the past. You can group dozens of vintage music sheets to create a large paper wall. This layout looks organized and very artistic in a home office. The warm yellow tones of the paper add a cozy feeling to a workspace.
Using light adhesive allows you to arrange the sheets easily without damage. You do not need expensive frames for this creative project. It is a wonderful way to recycle old books or musical scores. The repetition of the notes creates a unique pattern that looks sophisticated from a distance.
Material Required List
- Fifty vintage music sheets
- Acid free adhesive putty
Equipment Required List
- Level
- Ruler
- Step ladder
DIY Instruction Step by Step
- Sort your music sheets and pick the ones with the most interesting patterns.
- Measure the wall area to see how many sheets will fit in a grid.
- Use a level and a pencil to draw a faint straight line for the top row.
- Put a small piece of adhesive putty on the four corners of the first sheet.
- Press the sheet onto the wall while following your pencil line.
- Place the next sheet exactly one inch to the right of the first one.
- Continue this pattern until you have a full row across the wall.
- Start the next row one inch below the first row and repeat the steps.
35 Framed Vintage American Flag

Flags carry a lot of history and texture in their thick fabric. Hanging a large vintage flag behind glass creates a patriotic focal point. The deep red and blue tones look great against a dark navy or gray wall. This piece adds a lot of character to a living room or a den.
Finding a large acrylic frame protects the delicate fabric from dust and light. It makes the flag look like a valuable piece of museum art. You can find old flags at thrift stores for very little money. This display feels sturdy and provides a high end look for your home.
Material Required List
- Vintage cotton American flag
- Large acrylic shadow box frame
- Large piece of white foam board
Equipment Required List
- Straight pins
- Measuring tape
- Windex
DIY Instruction Step by Step
- Iron your flag on a low heat setting to remove any deep folds.
- Lay the white foam board on a flat table and center the flag on top.
- Use straight pins to secure the corners of the flag to the foam board.
- Pull the fabric slightly tight so there are no wrinkles in the middle.
- Clean the inside of the acrylic frame to remove any smudges.
- Place the foam board with the flag into the frame carefully.
- Secure the back of the frame using the clips provided with the kit.
- Mount the heavy frame to a wall stud using a sturdy hook.
36 Minimalist Black and Gold Silhouette
A simple profile can speak volumes in a quiet and modern room. This large art piece features a bold black silhouette inside a golden frame. The contrast between the dark shape and white background is very striking. It brings a sense of elegance and fashion to your dining area.
You can create this look by using a projector and simple black paint. It is a smart way to fill a large frame on a small budget. The gold leaf on the frame adds a touch of shimmer under the lights. This art style feels timeless and fits well in an upscale home.
Material Required List
- Large white canvas
- Black acrylic paint
- Gold leaf kit for the frame
Equipment Required List
- Image projector
- Small detail brush
- Pencil
DIY Instruction Step by Step
- Find a profile photo of a person and upload it to your projector.
- Shine the image onto your blank white canvas in a dark room.
- Use a pencil to trace the outline of the face onto the canvas.
- Turn off the projector and use your detail brush to paint the outline black.
- Fill in the entire shape with black paint until it is solid and dark.
- Apply the gold leaf to the edges of your frame following the glue steps.
- Let the paint and the gold leaf dry for at least six hours.
- Place the canvas into the gold frame and hang it in your dining room.
37 Small Patterned Gold Foil Art Grid
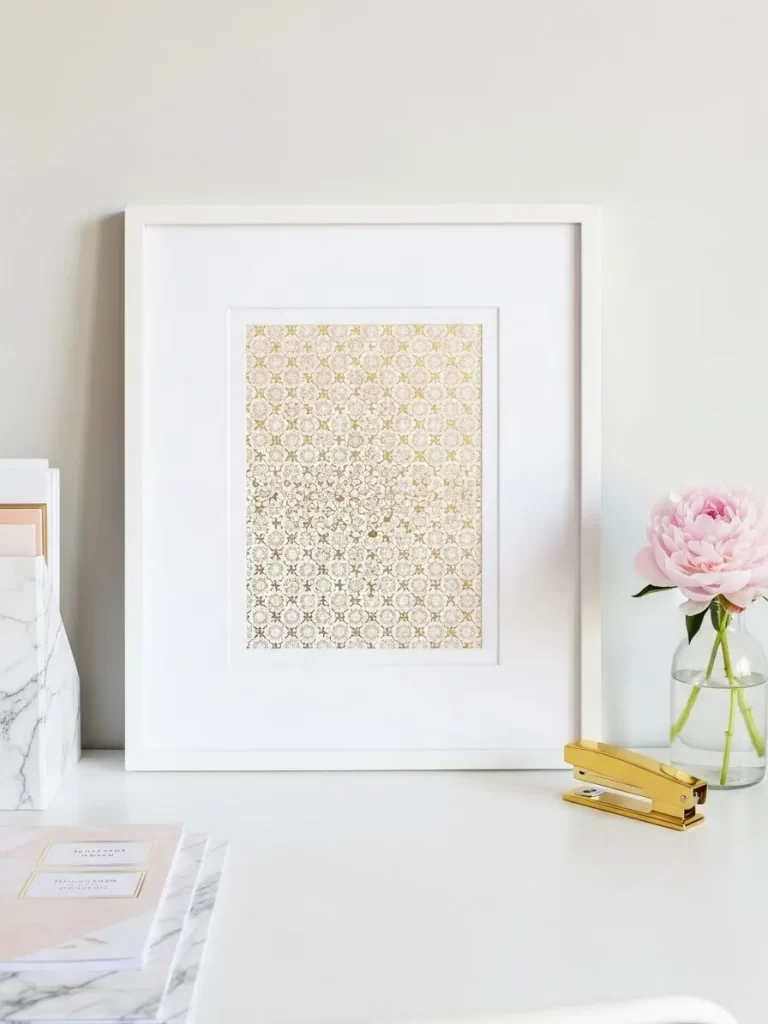
Tiny details look impressive when you group them together in a grid. This large white frame holds a collection of small patterned gold prints. The shimmering foil catches the light and adds a subtle glow to your desk. It looks very tidy and professional for a home office.
Using a mat with multiple cutouts keeps the small pieces organized and straight. You can use leftover wrapping paper or foil scraps for this project. It is a great way to use a big frame you already own. This art provides a delicate and pretty touch to a modern room.
Material Required List
- Large white picture frame
- Twelve small squares of gold foil paper
- White mat board with twelve cutouts
Equipment Required List
- Double sided tape
- Ruler
- Scissors
DIY Instruction Step by Step
- Cut your gold foil paper into twelve squares that match the mat openings.
- Lay the white mat board face down on a clean and flat table.
- Place your first gold square over the first opening in the mat.
- Secure the square to the back of the mat using double sided tape.
- Repeat this for all twelve openings until the grid is full.
- Check the front of the mat to make sure all patterns are straight.
- Place the mat board inside the white frame and close the back.
- Display the finished piece on a wall that gets plenty of natural light.
Transforming your home with large art does not require a professional designer. You have seen how everyday items like fabric or old windows become stunning features. Budget decor relies on your willingness to experiment with new textures and colors. These projects turn blank surfaces into conversational pieces for your guests.
Starting a project today brings new life to your quiet corners and empty halls. These thirty seven ideas prove that style is accessible to everyone regardless of their budget. Your walls will tell a story that is unique to your own personal taste. Enjoy the process of creating a home that reflects your creativity.
Key Takeaways
- Large art pieces bring immediate character to any room in the house.
- Creative DIY methods save money while providing professional and high end results.
- Using mixed textures like plaster or wood adds depth to monochromatic designs.
- Organization and grid layouts keep small items looking curated and tidy on big walls.
- Proper lighting enhances the shadows and details of your handmade wall art.