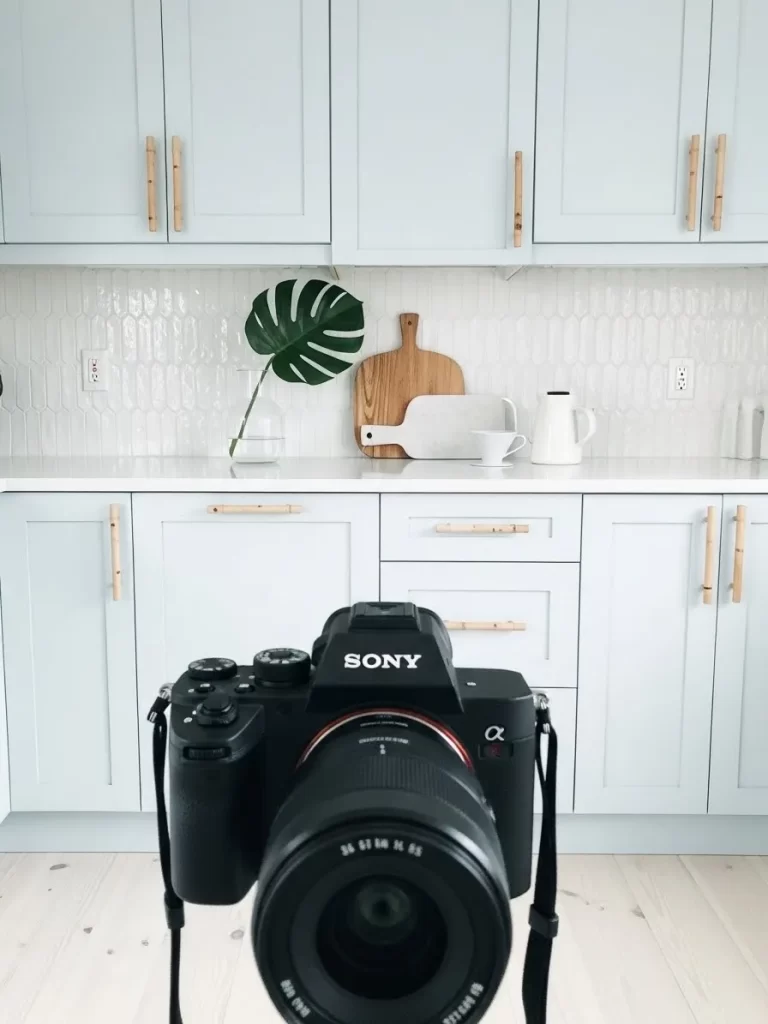
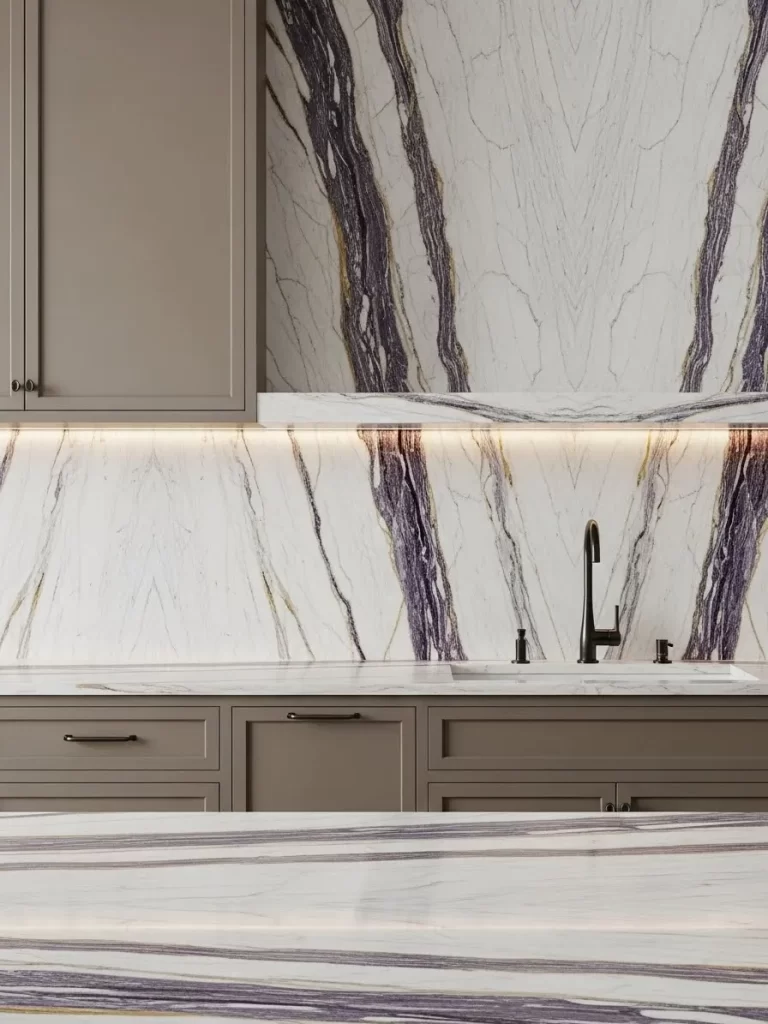
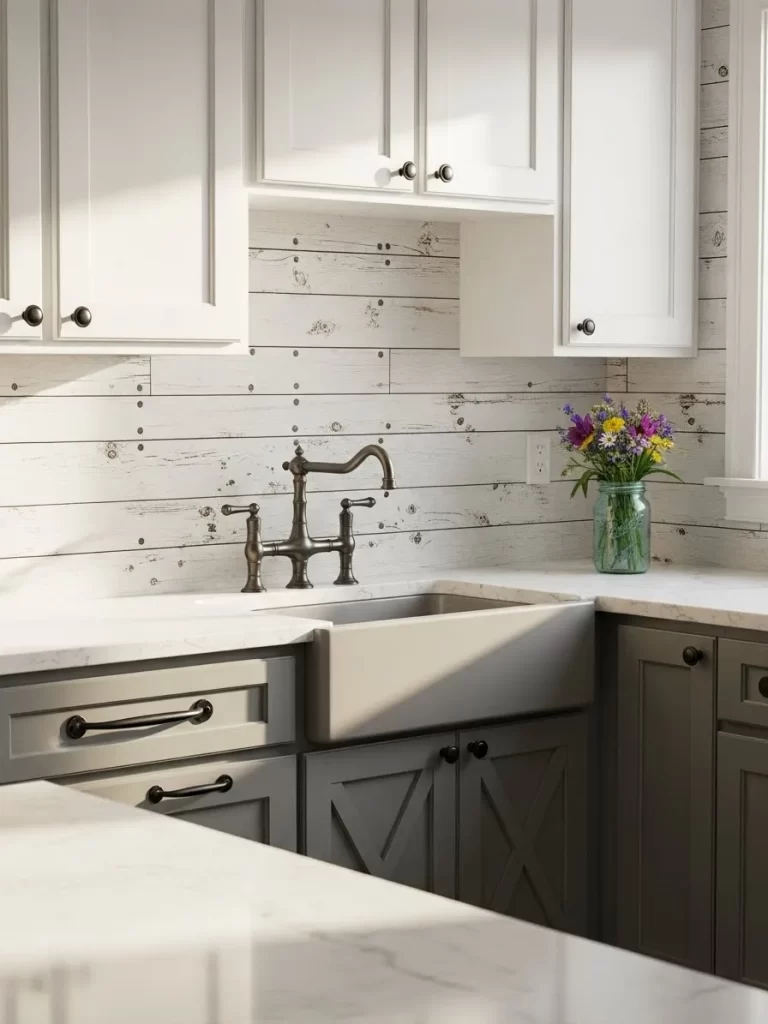
Walking into a dull kitchen feels uninspiring every single morning. Most homeowners face a common struggle with outdated surfaces and plain colors. You deserve a space that reflects your unique personality and style.

Backsplashes and cabinets represent the largest visual areas in your cooking zone. Small changes to these surfaces create a massive impact on the overall mood. Modern textures and bold shades can breathe new life into your home immediately.
This guide explores forty creative ways to refresh your kitchen without a total renovation. Every project includes clear lists and simple instructions for any skill level. Start your journey toward a more beautiful and exciting home today.
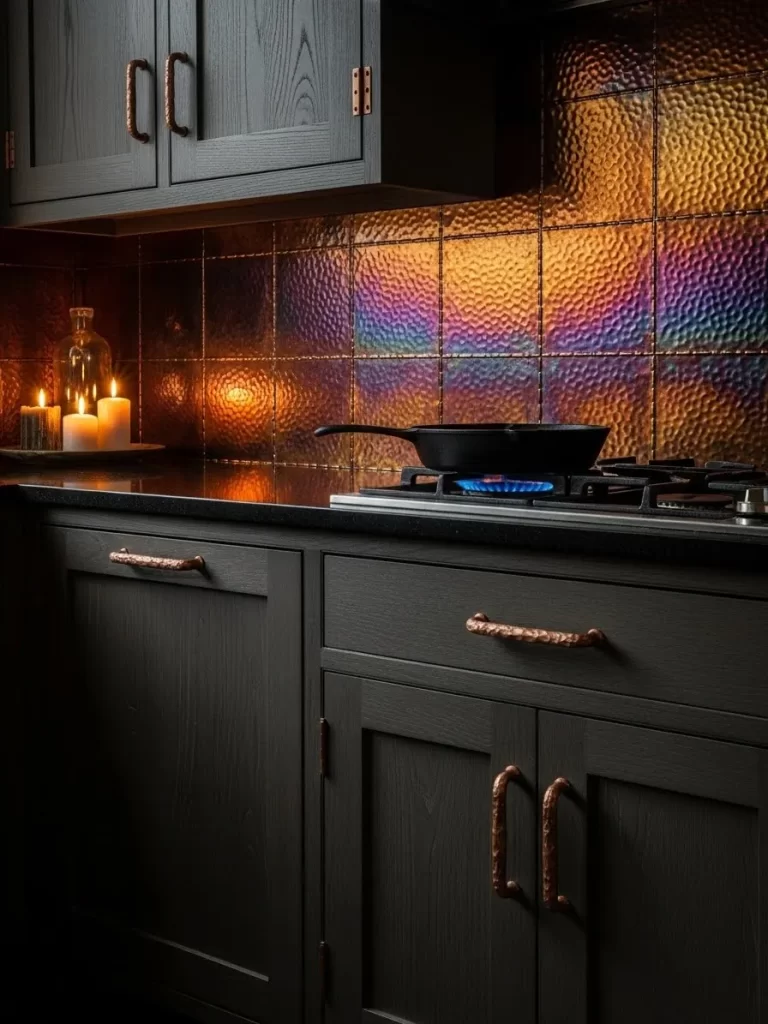
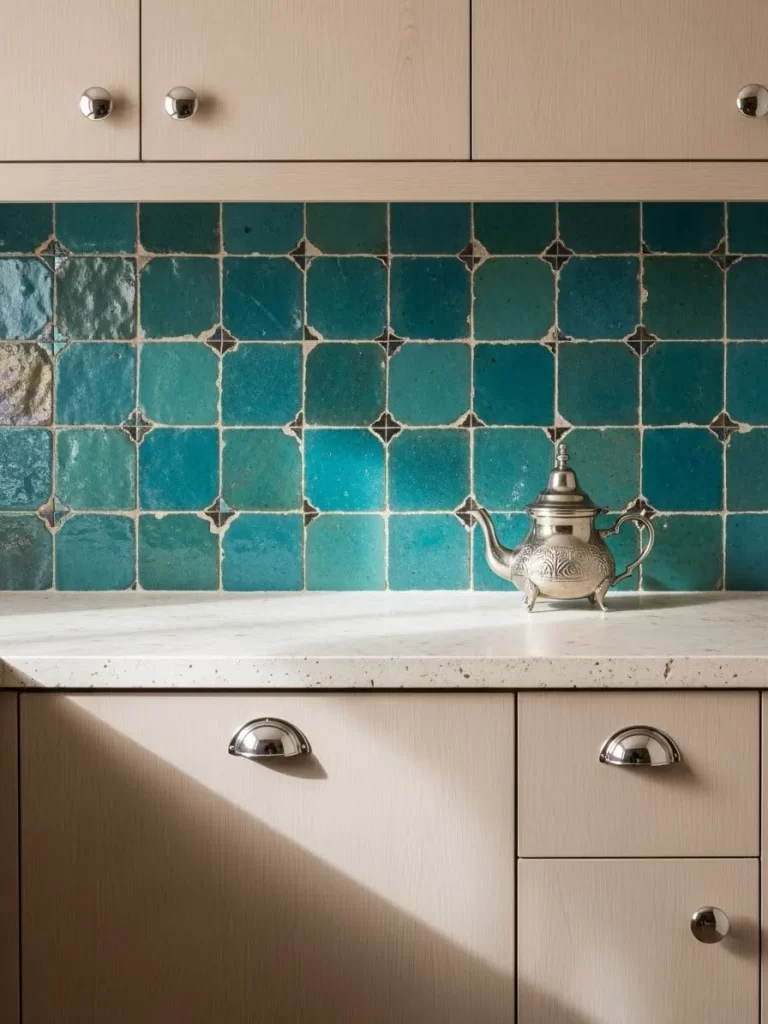
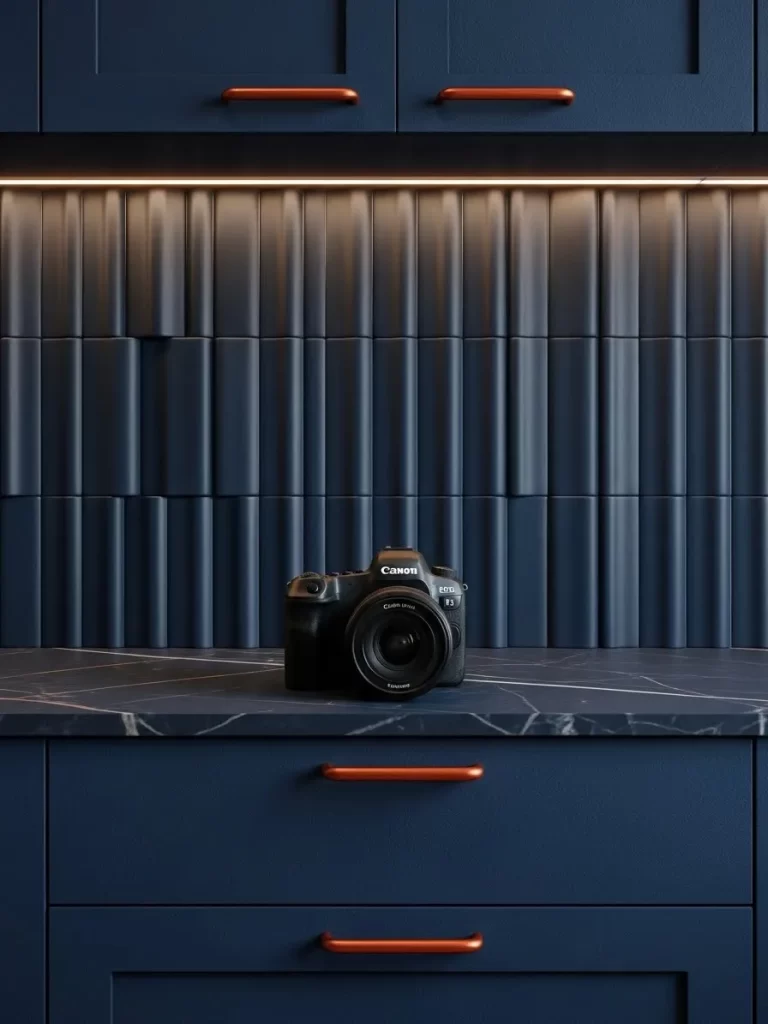
1 Embossed Stone Backsplash and Midnight Blue Cabinets
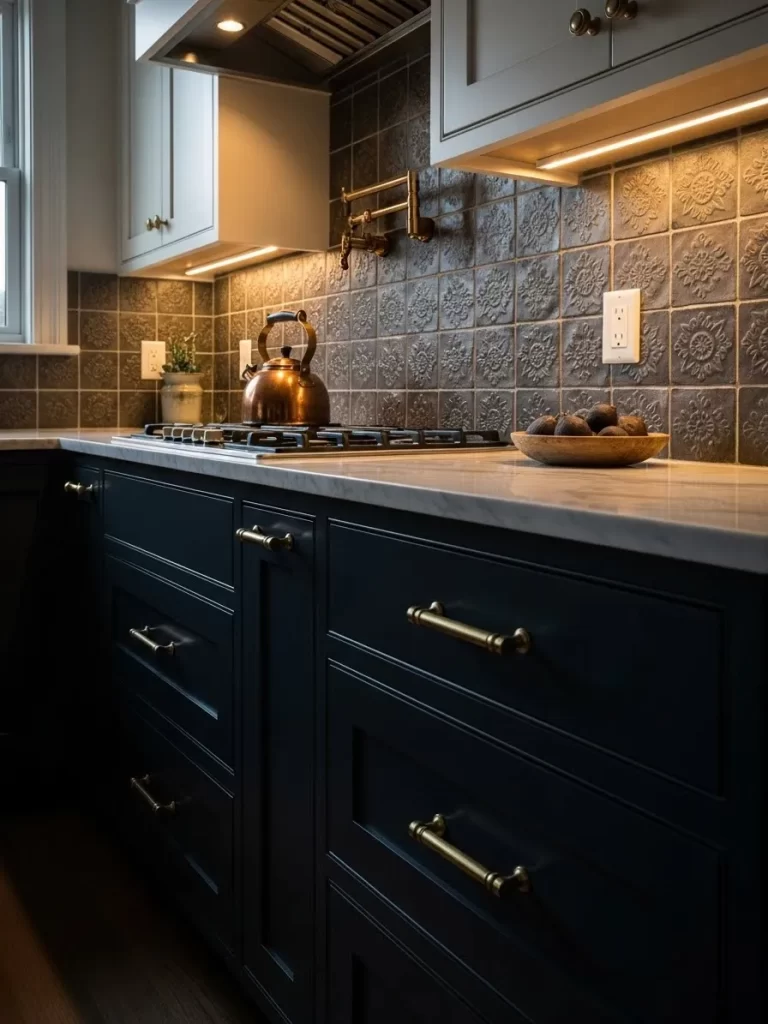
Your kitchen design gains immediate character when you combine deep tones with rich textures. This specific look features dark blue cabinetry paired with gray embossed tiles. These tiles showcase intricate floral patterns that catch the light from under-cabinet fixtures.
Natural marble countertops provide a bright contrast against the moody lower cabinets. Brass hardware adds a warm glow to the space. You can transform a dull cooking area into a sophisticated retreat by focusing on these tactile details.
Choosing a patterned backsplash creates a focal point that feels expensive and custom. It breaks up the flat surfaces of your walls. The bronze kettle and wooden accents help ground the design in a cozy, farmhouse aesthetic.
Materials Required
Embossed ceramic or stone tiles Pre-mixed tile grout Tile adhesive or thin-set mortar Painter’s tape Plastic spacers Warm white LED light strips Midnight blue cabinet paint
Equipment Required
Wet tile saw or manual tile snapper Notched trowel Rubber grout float Large sponge and bucket Level tool Measuring tape Screwdriver for cabinet hardware
DIY Instructions Step by Step
- Clear all items from your countertops and remove electrical outlet covers to create a clean workspace.
- Measure the height and width of your wall to calculate how many tiles you need to buy.
- Apply a thin layer of adhesive to a small section of the wall using your notched trowel.
- Press the first embossed tile firmly into the mortar starting from the bottom center of the wall.
- Place plastic spacers between each tile to ensure the gaps for grout stay consistent and straight.
- Cut edge tiles using a wet saw to fit snugly against the cabinets and corners of the kitchen.
- Let the adhesive dry for twenty four hours before you begin the grouting process.
- Spread grout over the tiles with a rubber float at a forty five degree angle to fill every crevice.
- Wipe away the excess grout with a damp sponge after it sits for twenty minutes.
- Install your new brass handles onto the cabinet doors once the backsplash is completely dry and clean.
2 Warm Vertical Oak and Sandstone Stack
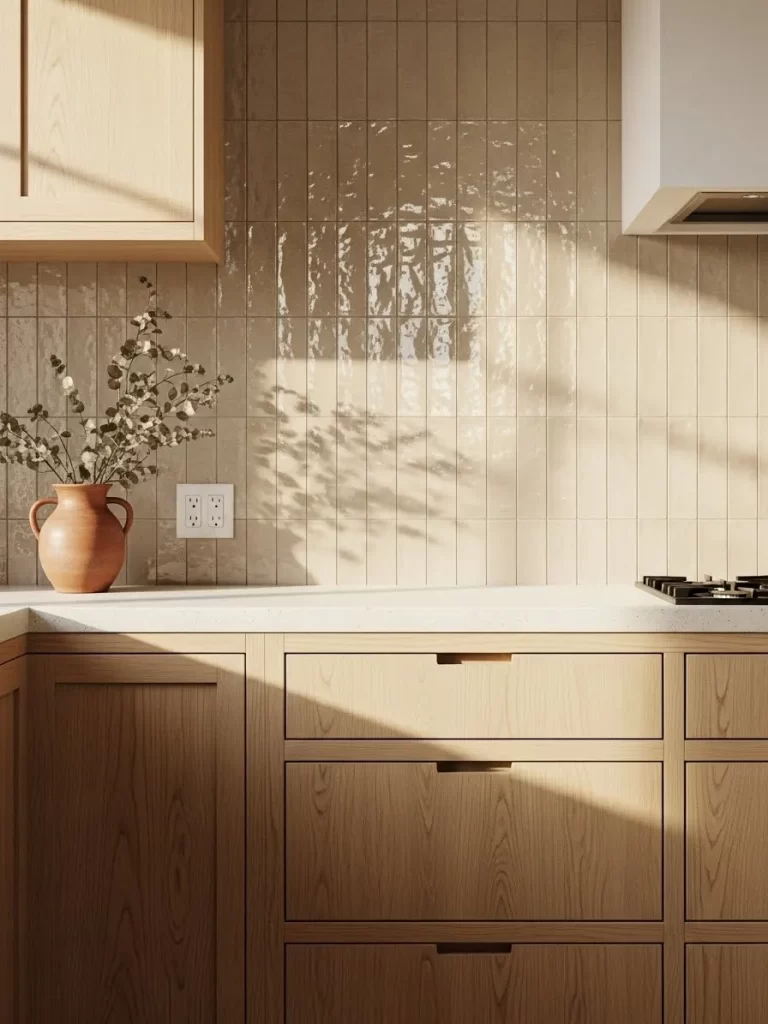
Natural textures bring a serene atmosphere to your cooking space. This design uses vertical oak cabinetry paired with elongated sandstone tiles. The soft beige tones reflect sunlight to create an airy feeling in the room.
Slim, recessed handles on the drawers maintain a sleek and modern appearance. A simple clay vase with dried branches adds a rustic touch to the counter. You can achieve this high end look by focusing on monochromatic earthy shades.
Vertical tile patterns make short walls appear much taller than they are. This clever trick adds a sense of grandeur to small kitchens. The matte finish on the wood ensures the space feels grounded and organic.
Materials Required
Vertical grain oak cabinet veneers Sandstone or matte ceramic subway tiles Light beige sanded grout High bond tile mastic Natural wood sealant Low profile drawer pulls
Equipment Required
Laser level Fine tooth saw for wood trim Small notched trowel Grout sponge Measuring tape Pencil for marking
DIY Instructions Step by Step
- Clean the wall surface thoroughly to remove any grease or old paint before starting.
- Mark a vertical center line on the wall using your laser level to keep tiles straight.
- Apply adhesive to the wall in small sections to prevent it from drying too fast.
- Set the tiles vertically starting from the bottom, pressing firmly to bond them to the wall.
- Insert small spacers between tiles to maintain thin, even lines for the grout.
- Measure and cut tiles for the top edge using a tile saw for a professional finish.
- Mix the beige grout until it reaches a thick, peanut butter consistency.
- Press the grout into the vertical gaps using a float held at an angle.
- Wipe the tile faces clean with a damp sponge after the grout begins to set.
- Apply a protective sealant to the oak cabinets to guard against moisture and heat.
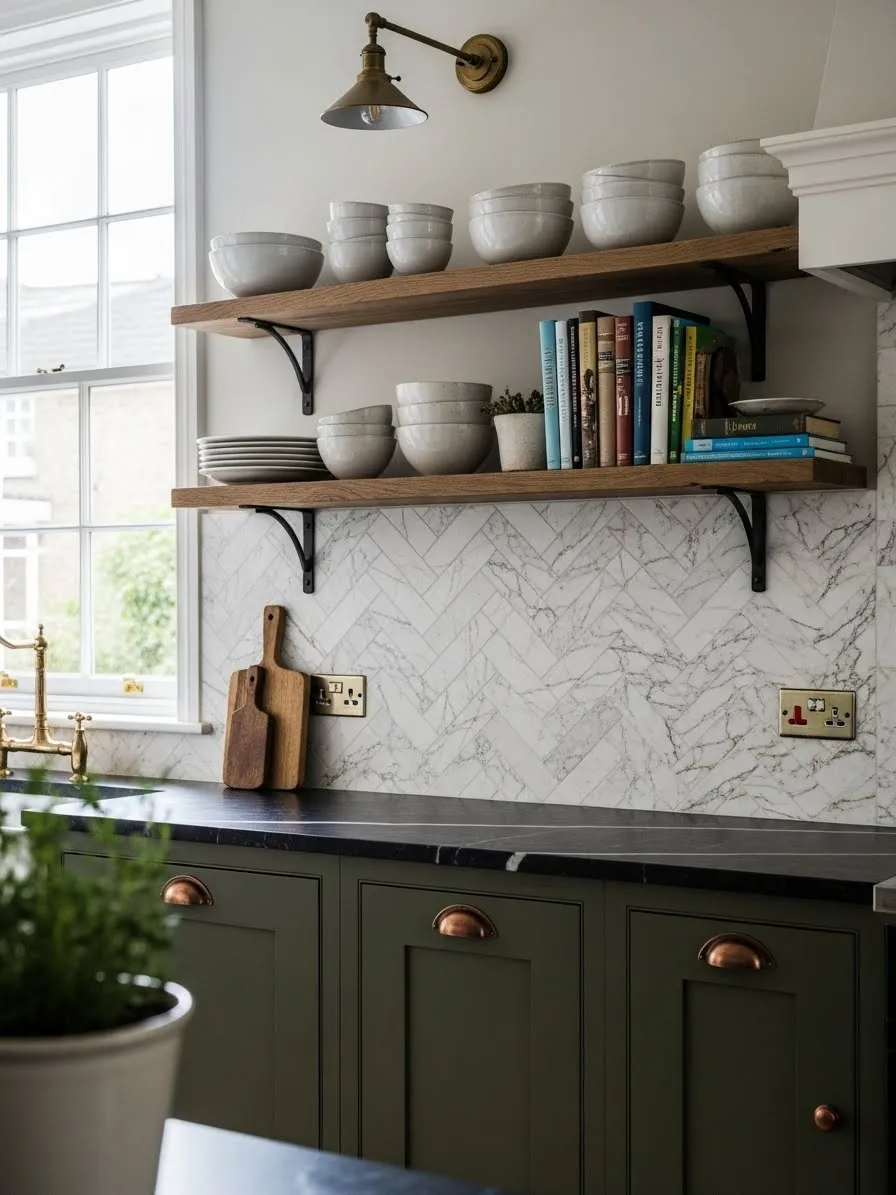
3 Modern Sage Green and Herringbone Marble

Combining classic patterns with trendy colors breathes new life into a tired kitchen. These sage green cabinets feature copper cup handles that pop against the muted paint. A white marble backsplash in a herringbone layout provides a timeless backdrop.
Open wooden shelving replaces heavy upper cabinets to create an inviting display area. You can show off your favorite cookbooks and ceramic bowls to add personality. The black metal brackets provide a subtle industrial edge to the soft color palette.
Herringbone patterns add movement and energy to the walls. This layout draws the eye upward and makes the ceiling feel higher. Mixing metal finishes like brass and copper creates a curated, lived in feel.
Materials Required
Sage green cabinet paint Marble tile strips White non sanded grout Copper cup handles Reclaimed wood planks Black heavy duty shelf brackets
Equipment Required
Power drill Paint roller and tray Tile nippers or wet saw Spirit level Screwdriver Sandpaper
DIY Instructions Step by Step
- Remove all old hardware and sand the cabinet surfaces to help the new paint stick.
- Apply two thin coats of sage green paint, letting each coat dry fully between applications.
- Draw a horizontal line where your first row of tiles will sit to ensure a level base.
- Arrange your marble strips in a V shape pattern on the wall using adhesive.
- Work in small sections to keep the herringbone angles consistent across the entire backsplash.
- Fill the gaps with white grout once the adhesive has hardened overnight.
- Clean the tiles with a microfiber cloth to remove any hazy grout residue.
- Locate the wall studs using a stud finder before you mount the shelf brackets.
- Secure the wooden planks to the brackets using short wood screws for stability.
- Screw the new copper handles onto your dry cabinet doors to complete the transformation.
4 Ultra Minimalist Matte Charcoal Suite
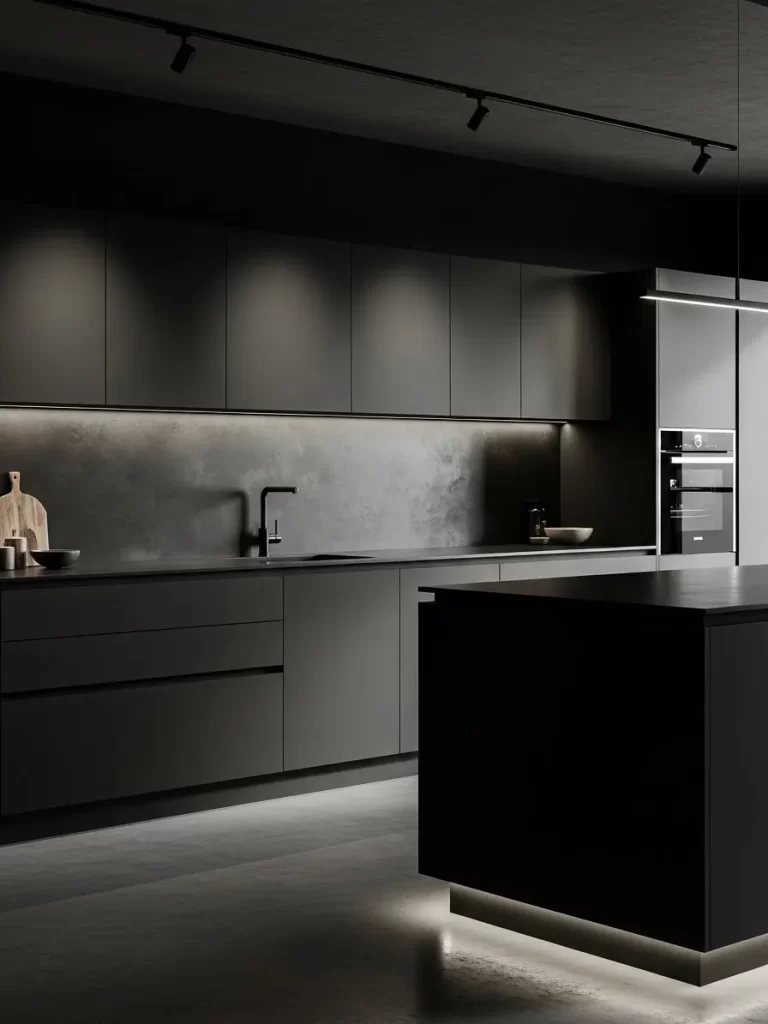
Monochromatic designs offer a bold and sophisticated look for modern homes. This kitchen features matte charcoal cabinets and matching dark countertops. The seamless backsplash mimics a concrete texture to add depth without clutter.
Strategic under cabinet lighting creates a soft glow that highlights the workspace. Every handle is hidden to maintain the clean lines of the cabinetry. This style is excellent for open concept living where the kitchen needs to blend into the decor.
Dark surfaces hide minor stains and offer a moody, professional atmosphere. The black faucet blends into the background for a truly minimalist aesthetic. You can use varied light sources to prevent the dark colors from feeling too heavy.
Materials Required
Matte charcoal laminate or paint Concrete finish backsplash panels Dark gray silicone sealant Integrated LED light strips Matte black kitchen faucet Construction adhesive
Equipment Required
Circular saw for cutting panels Caulking gun Wire strippers for lighting Clamps Soft lint free cloths Measuring tape
DIY Instructions Step by Step
- Measure your wall area and cut the concrete look panels to the exact size needed.
- Apply heavy duty construction adhesive to the back of the panels in a zigzag motion.
- Press the panels onto the wall and hold them in place with clamps or temporary supports.
- Seal the joint between the countertop and the panel with dark gray silicone for a waterproof finish.
- Peel the backing off your LED light strips and stick them to the underside of the cabinets.
- Connect the lights to a power source and hide the wires behind the cabinet lips.
- Clean the cabinet faces with a damp cloth to remove any fingerprints or dust.
- Swap your old faucet for a matte black model by following the manufacturer instructions.
- Ensure all lines are straight and the lighting is even across the entire counter length.
- Organize your countertop with only a few wood accents to maintain the minimalist vibe.
5 Coastal White and Scalloped Texture
Light and airy kitchens benefit from subtle textures that mimic the ocean. These pale blue cabinets are paired with white scalloped tiles that look like fish scales. The glossy finish on the tiles reflects light beautifully throughout the day.
Light wood handles provide a soft, organic touch to the cabinetry. A simple green leaf in a glass vase keeps the styling fresh and natural. This design is great for making small kitchens feel much larger and more cheerful.
The scalloped tile pattern adds a playful yet elegant element to the room. It breaks away from traditional rectangular shapes for a unique look. You can use white grout to keep the focus on the interesting shape of the tiles.
Materials Required
Pale blue cabinet paint White scalloped ceramic tiles White waterproof grout Light wood cylindrical handles Tile mortar Painter’s tape
Equipment Required
Tile spacers for irregular shapes Rubber float Bucket for mixing Paint brushes Screwdriver Level
DIY Instructions Step by Step
- Prep your cabinets by cleaning them with a degreaser and lightly sanding the surface.
- Paint the cabinets with a soft blue hue and allow them to dry for two days.
- Apply tile mortar to the wall starting from the lowest point of the backsplash.
- Lay the scalloped tiles so the points face upward for a classic scale look.
- Use small spacers to keep the curved edges aligned as you move across the wall.
- Cut the top row of tiles to create a flat edge where they meet the upper cabinets.
- Apply white grout over the entire surface once the tiles are firmly set.
- Use a damp sponge to carefully clean the curves of each tile.
- Mark the center of your cabinet doors to prepare for the new wood handles.
- Drill small holes and screw the wood handles into place for a finished coastal look.
6 Vibrant Terrazzo and Sunny Yellow Accents

Infuse your home with energy by using bright colors and mid century patterns. This kitchen features bold yellow lower cabinets and clean white uppers. The terrazzo backsplash brings all the colors together with its multi colored stone chips.
Round wooden knobs add a retro feel to the flat panel doors. A mint colored toaster and fresh oranges provide extra pops of color on the white counter. This design is a fantastic way to express a fun and creative personality.
Terrazzo is a durable material that hides splashes and crumbs very well. The mix of teal, orange, and gray fragments makes the wall look like a piece of art. Using white upper cabinets prevents the yellow from overwhelming the space.
Materials Required
Bright yellow cabinet paint White semi gloss cabinet paint Terrazzo tile sheets Round wooden cabinet knobs White sanded grout High bond adhesive
Equipment Required
Foam paint rollers Power drill Measuring tape Level Rubber grout float Large sponge
DIY Instructions Step by Step
- Clean all cabinet surfaces with a degreaser to ensure the paint bonds well.
- Apply the bright yellow paint to the lower cabinets using a foam roller for a smooth finish.
- Coat the upper cabinets in white paint to keep the top half of the kitchen feeling light.
- Measure the area between the counter and cabinets to plan your tile layout.
- Spread a layer of adhesive onto the wall with a trowel.
- Press the terrazzo tile sheets into the adhesive, starting from one corner and working across.
- Wait for the adhesive to dry before spreading white grout into the gaps.
- Wipe away the extra grout with a damp sponge before it hardens.
- Drill small pilot holes into the cabinet doors for the new wooden knobs.
- Screw the knobs in tightly and place your colorful appliances on the counter.
7 Rustic Hexagon and Raw Edge Wood
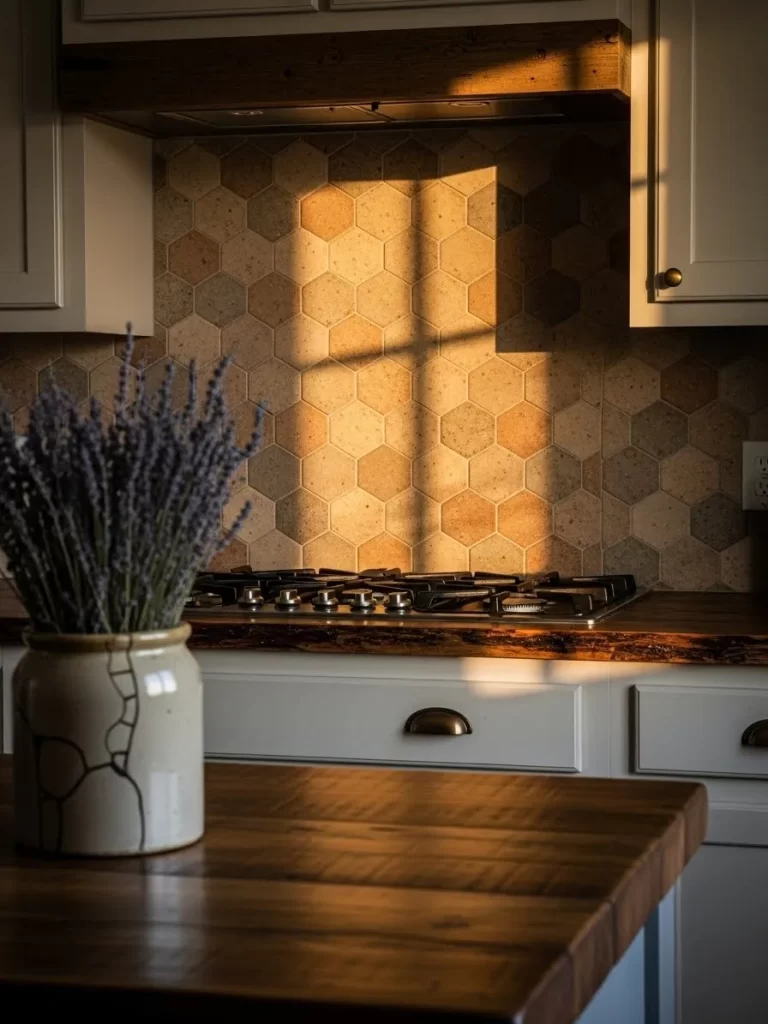
Warm lighting and natural materials create a cozy, hearth like feeling in the kitchen. This design features a mix of earth toned hexagon tiles that range from sand to terracotta. A thick, raw edge wood countertop adds a rugged and organic element.
Sunlight hitting the tiles highlights the different textures and shades of the stone. White lower cabinets with bronze bin pulls provide a clean base for the rustic top. A simple jar of dried lavender brings a soft scent and color to the room.
Hexagon tiles offer a geometric interest that feels more modern than standard bricks. The varying colors in the backsplash help hide cooking splatters effectively. Choosing a thick wood slab for the counter makes the kitchen feel sturdy and traditional.
Materials Required
Earth tone hexagon tiles Tan or brown grout Raw edge wood slab Bronze bin pulls Wood mineral oil Construction adhesive
Equipment Required
Notched trowel Grout float Circular saw Sanding block Level Measuring tape
DIY Instructions Step by Step
- Measure your base cabinets and cut the wood slab to fit with a slight overhang.
- Sand the raw edge of the wood until it is smooth but still retains its natural shape.
- Apply several coats of mineral oil to protect the wood from water and food.
- Mount the wood countertop to the cabinets using heavy duty screws from underneath.
- Spread adhesive on the wall and arrange the hexagon tiles in a random color pattern.
- Use spacers to keep the honeycomb shape consistent as you build the wall.
- Fill the joints with a warm tan grout to complement the earthy tile colors.
- Wipe away excess grout and let the wall dry for at least one day.
- Attach the bronze bin pulls to the center of your drawer fronts.
- Install a warm toned light under the cabinets to enhance the glow of the wood and tile.
8 High Gloss Black and Emerald Glass
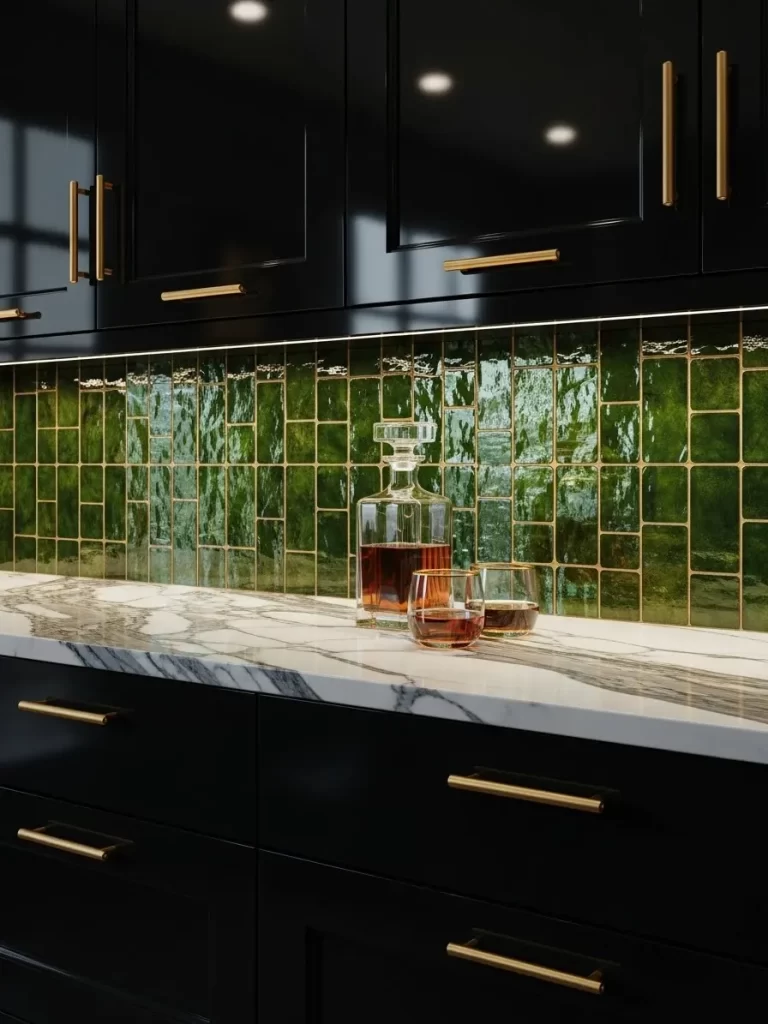
Luxury meets drama in this striking combination of dark surfaces and jewel tones. The high gloss black cabinets reflect everything, making the room feel deep and expensive. A vibrant emerald green glass backsplash adds a splash of sophisticated color.
Long brass handles provide a brilliant contrast against the dark cabinet faces. The marble countertop features heavy gray veining that ties the black and green together. This look is excellent for homeowners who want a high fashion, glamorous kitchen.
Glass tiles are very easy to clean and maintain a permanent shine. The vertical orientation of the green tiles adds a modern twist to the design. Under cabinet lighting is essential here to make the glass and brass really sparkle.
Materials Required
High gloss black cabinet paint Emerald green glass subway tiles Non sanded white grout Long brass bar handles Marble look laminate or stone Glass tile adhesive
Equipment Required
Glass tile cutter Screwdriver Paint brushes Measuring tape Rubber float Soft cloth
DIY Instructions Step by Step
- Remove cabinet doors and paint them with high gloss black paint in a dust free room.
- Apply the glass tile adhesive to the wall in a thin, even layer.
- Place the green glass tiles vertically, starting from the countertop and working up.
- Use a glass tile cutter to make precise cuts for any corners or outlets.
- Let the tiles sit for twenty four hours before you begin the grouting process.
- Spread non sanded grout over the glass tiles gently to avoid any scratches.
- Clean the tile surface with a soft, damp cloth to remove the grout haze.
- Reattach the dry cabinet doors and mark the spots for the new handles.
- Drill the holes and screw the long brass bars onto the doors.
- Polish the glass and brass with a dry cloth for a sparkling finish.
9 Elegant Pearl and Gold Trimmed Shaker

Traditional style gets a royal update with shimmering materials and metallic accents. These light gray shaker cabinets feature delicate gold paint detailing in the recessed panels. The backsplash consists of iridescent mother of pearl bricks that glow.
Clear acrylic handles with gold bases keep the look light and airy. A bouquet of white peonies in a glass vase enhances the feminine and soft aesthetic. This design works beautifully in kitchens with large windows and plenty of natural light.
Mother of pearl tiles offer a luxury finish that changes color as you move through the room. The gold trim on the cabinets adds a custom, hand crafted feel to the space. You can use a white marble counter to keep the palette bright and cohesive.
Materials Required
Light gray cabinet paint Gold metallic paint Mother of pearl mosaic tiles Clear acrylic handles with gold trim White non sanded grout Mosaic tile adhesive
Equipment Required
Fine detail paint brush Small notched trowel Grout float Measuring tape Screwdriver Spirit level
DIY Instructions Step by Step
- Paint the cabinets a soft gray and let them dry for at least forty eight hours.
- Use a fine detail brush to carefully paint a thin gold line around the inner cabinet panels.
- Spread a thin layer of adhesive on the backsplash area for the mosaic sheets.
- Press the mother of pearl tiles into the adhesive, aligning the patterns carefully.
- Apply white non sanded grout over the tiles after the adhesive is dry.
- Wipe the tiles with a damp sponge to bring out their natural iridescence.
- Measure the distance between the holes on your new acrylic handles.
- Drill holes into the cabinet doors and screw the gold hardware into place.
- Seal the bottom edge of the tiles where they meet the counter with clear silicone.
- Buff the tiles with a dry cloth to ensure they shine under your kitchen lights.
10 Industrial Brick and Riveted Steel
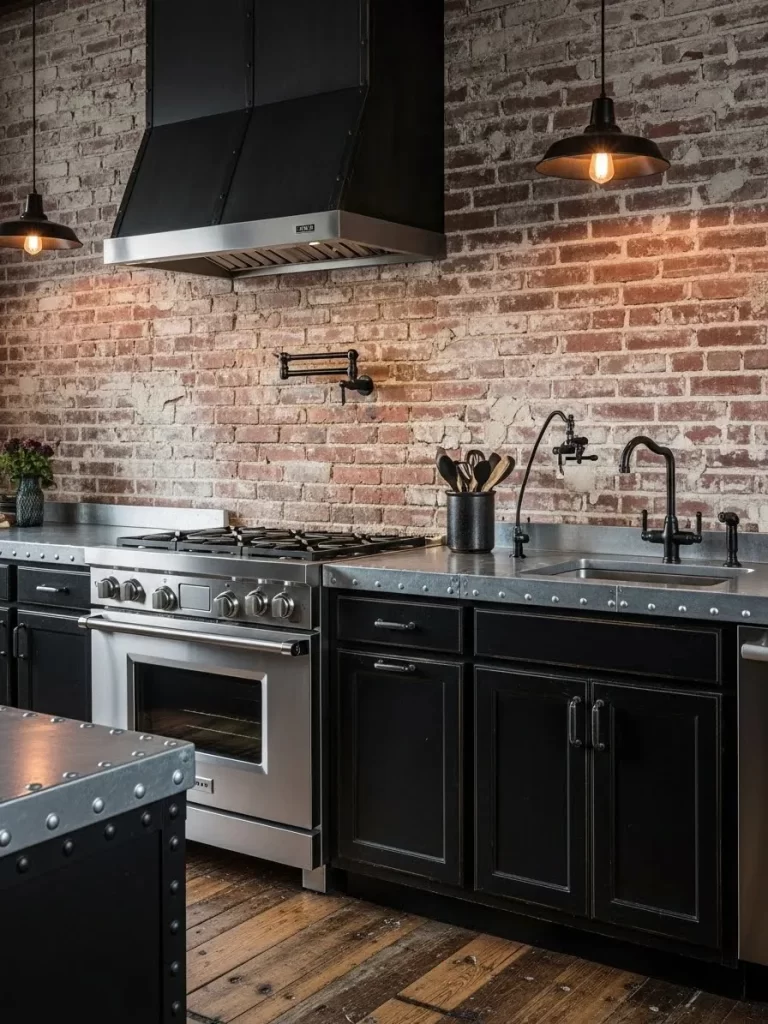
Urban loft style combines raw architectural elements with heavy duty metal finishes. This kitchen features an entire wall of exposed red brick as the primary backsplash. Dark black cabinets are topped with stainless steel counters that have visible rivet details.
Industrial pendant lights with Edison bulbs cast a warm, amber glow over the cooking area. A black wall mounted pot filler adds professional functionality to the stove space. This design is perfect for those who love a rugged, masculine, and historical aesthetic.
Exposed brick adds incredible texture and a sense of history to a modern home. The steel countertops are nearly indestructible and provide a hygienic surface for food prep. You can use reclaimed wood flooring to balance the cold metal and hard brick.
Materials Required
Thin brick veneers Gray brick mortar Stainless steel countertop sheets Decorative metal rivets Matte black cabinet paint Matte black pot filler
Equipment Required
Masonry trowel Grout bag Power drill Measuring tape Level Metal shears
DIY Instructions Step by Step
- Clean the wall and apply a layer of mortar if you are installing brick veneers.
- Press the bricks into the mortar, leaving wide gaps to mimic traditional masonry.
- Fill the gaps using a grout bag for a clean and authentic look.
- Seal the brick with a matte clear coat to prevent dust and grease absorption.
- Paint your cabinets matte black and let them cure for several days.
- Measure and cut the stainless steel sheets to fit over your existing countertops.
- Glue the steel down and drill small holes along the edges for the rivets.
- Tap the decorative rivets into the holes for a custom industrial look.
- Mount the black pot filler faucet into the brick wall above the stove.
- Hang the industrial pendant lights at a height that clears your head but illuminates the counter.
11 Coastal Rattan and Textured Sandstone
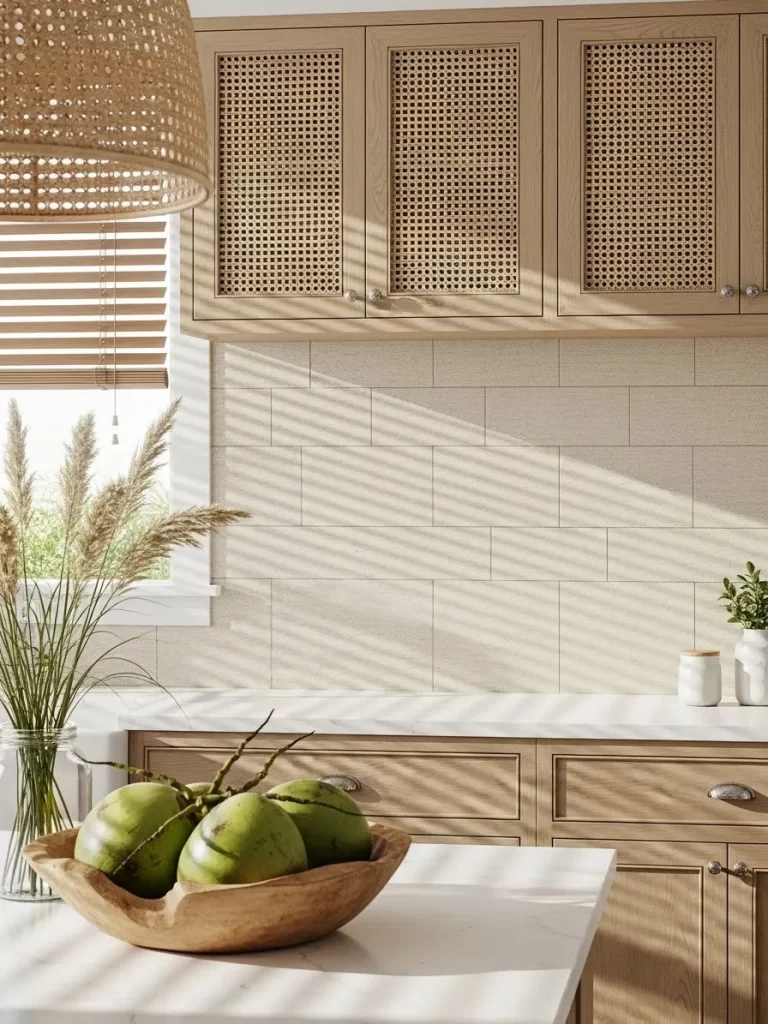
Bring a relaxed vacation feel to your home with woven textures and soft neutral colors. These cabinets feature unique rattan mesh inserts that allow for airflow and visual interest. The backsplash uses large sandstone tiles with a subtle fabric like texture.
Large woven pendant lights hang above the island to anchor the coastal theme. A wooden bowl of green coconuts adds a tropical touch to the marble counter. This kitchen feels like a breezy beach house no matter where you live.
Rattan is a lightweight and sustainable material that adds warmth to a white kitchen. The sandstone tiles offer a soft matte finish that prevents glare from bright windows. Keeping the color palette strictly neutral creates a very calming environment.
Materials Required
Shaker cabinet frames Rattan webbing rolls Sandstone finish tiles Beige waterproof grout Silver cup handles Industrial staples
Equipment Required
Staple gun Utility knife Level Tile spacers Grout float Power drill
DIY Instructions Step by Step
- Remove the center panels from your shaker cabinet doors using a saw or router.
- Soak the rattan webbing in water for thirty minutes to make it flexible.
- Stretch the wet rattan over the back of the door frame and staple it tightly.
- Trim the excess webbing with a utility knife once the staples are secure.
- Apply tile adhesive to the wall and set the sandstone tiles in a horizontal grid.
- Use large spacers to keep the grout lines wide and rustic.
- Fill the lines with beige grout once the tiles are stuck firmly to the wall.
- Clean the surface of the tiles with a damp sponge to remove any residue.
- Attach the silver cup handles to the lower cabinets for a classic coastal touch.
- Install the rattan pendant light over your counter to tie the textures together.
12 Minimalist Walnut and Grid Tile
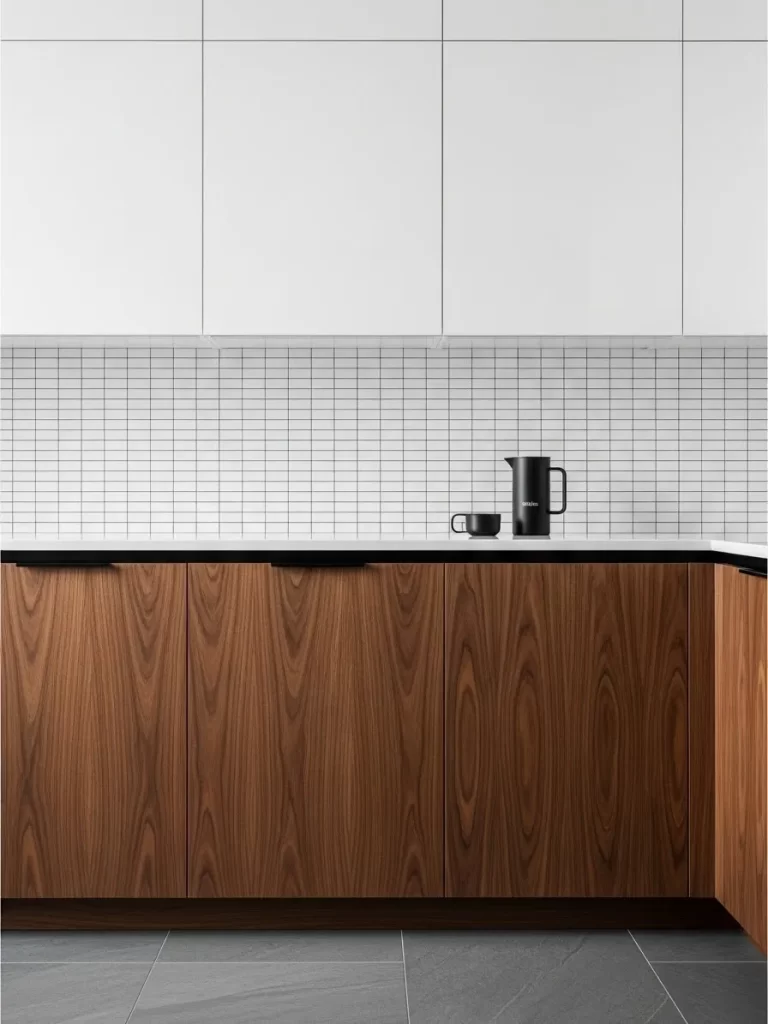
Modern simplicity shines when you pair rich wood grains with clean geometric patterns. These lower cabinets are made of warm walnut wood with a prominent vertical grain. The backsplash features a tiny white grid pattern that looks sharp and organized.
White upper cabinets blend into the ceiling to make the kitchen feel more spacious. A matte black pitcher and mug provide a small but effective contrast on the white counter. This design is perfect for those who appreciate order and natural beauty.
Walnut wood adds an instant feeling of luxury and warmth to any room. The grid tile pattern is a classic choice that never goes out of style. Using dark grout with white tiles makes the grid stand out much more.
Materials Required
Walnut wood veneer or cabinets Small square white tiles Black or dark gray grout Matte black drawer pulls White semi gloss paint for uppers Tile adhesive
Equipment Required
Notched trowel Grout float Level Measuring tape Paint roller Screwdriver
DIY Instructions Step by Step
- Install the walnut lower cabinets and ensure they are perfectly level across the floor.
- Paint the upper cabinets with white semi gloss paint for a seamless look.
- Apply adhesive to the backsplash area in a smooth, thin layer.
- Set the square tiles in a perfect grid, checking with a level every few rows.
- Let the adhesive dry completely before you begin applying the dark grout.
- Press the dark grout into the lines with a float to highlight the grid pattern.
- Wipe the tile faces clean until the white squares are bright and sharp.
- Attach the matte black pulls to the very top of the walnut drawers.
- Seal the corners of the backsplash with white silicone for a clean finish.
- Place a single black accent piece on the counter to complete the minimalist look.
13 Moody Sage and Raw Slate Wall

Darker greens and natural stone create a sophisticated kitchen that feels connected to nature. These sage green cabinets are paired with large format slate panels that have a heavy texture. Leather strap handles add a unique and tactile detail to the drawers.
The slate backsplash features natural ridges that catch the light and create shadows. A wooden bowl with mossy stones reinforces the forest inspired theme. This look is great for creating a quiet and focused cooking environment.
Slate is a very durable material that can withstand high heat behind a stove. The sage green color is a timeless neutral that feels more interesting than gray. Leather handles will age beautifully over time and develop a soft patina.
Materials Required
Sage green cabinet paint Natural slate backsplash panels Brown leather cabinet straps Black stone countertops Stone sealant Heavy duty construction adhesive
Equipment Required
Level Power drill Caulking gun Measuring tape Soft brush for sealant Screwdriver
DIY Instructions Step by Step
- Paint your cabinets a deep sage green and allow them to dry for three days.
- Measure the wall and cut the slate panels to fit the space exactly.
- Apply construction adhesive to the back of the slate panels in large dots.
- Press the slate onto the wall and hold it for a minute to ensure a good bond.
- Seal the slate with a stone protector to keep it from staining.
- Measure the distance for your leather straps on the cabinet doors.
- Drill holes and secure the leather straps using the provided metal bolts.
- Install the black stone countertop to match the dark tones of the slate.
- Seal the gap between the counter and the slate with black silicone.
- Decorate with natural wood cutting boards to add warmth to the dark palette.
14 Grand Navy and Fluted Gold

Create a high end look by combining deep navy blue with shimmering gold fluting. This design features tall navy cabinets with gold trim and a dramatic marble backsplash. A section of the wall is covered in vertical gold slats that act as a focal point.
A crystal chandelier adds a final touch of luxury above the marble island. Brass hardware and wall sconces provide extra warmth against the cool blue cabinetry. This kitchen is designed for those who want to make a bold statement.
The navy blue color provides a regal backdrop for the metallic gold accents. Fluted panels add texture and a sense of movement to the walls. Using marble with heavy veining makes the space feel like a high end hotel.
Materials Required
Navy blue cabinet paint Gold fluted wall panels White marble tiles or slabs Brass cabinet handles Gold metallic trim High bond adhesive
Equipment Required
Level Power drill Measuring tape Miter saw for trim Caulking gun Screwdriver
DIY Instructions Step by Step
- Paint all cabinetry a rich navy blue and install gold metallic trim on the panels.
- Measure the center section of the backsplash for the gold fluted panels.
- Glue the fluted panels to the wall using a high bond adhesive and check the level.
- Install marble tiles on the remaining backsplash areas, surrounding the gold section.
- Use brass sconces on either side of the gold fluting to highlight the texture.
- Apply white grout to the marble tiles and wipe them clean with a cloth.
- Attach the long brass handles to the tall navy cabinet doors.
- Seal all edges with clear silicone to prevent water damage behind the sink.
- Hang a crystal chandelier or bright pendant light to reflect off the gold.
- Buff the marble and gold surfaces until they shine under the lights.
15 Glossy White and Wave Texture
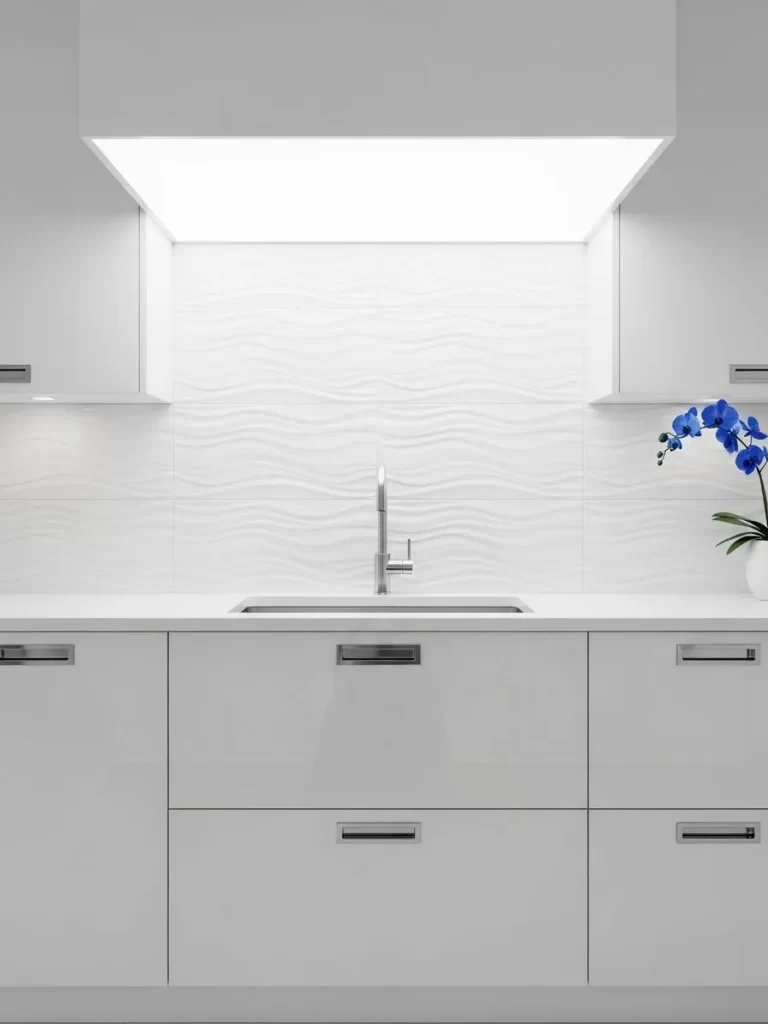
A monochromatic white kitchen feels fresh and modern when you play with different textures. These high gloss white cabinets have a reflective finish that brightens the entire room. The backsplash features 3D wave tiles that create a sense of flowing water.
Integrated handles keep the cabinet faces smooth and uninterrupted. A single blue orchid provides a striking pop of color against the white background. This design is excellent for narrow kitchens that need to feel more open.
Wave tiles add depth to a white wall without needing any extra colors. The glossy finish on the cabinets is very easy to wipe clean after cooking. Using cool white lighting enhances the crisp and clean feeling of the space.
Materials Required
High gloss white cabinet doors 3D wave ceramic tiles Pure white waterproof grout White silicone sealant Tile adhesive Microfiber cleaning cloths
Equipment Required
Notched trowel Grout float Level Measuring tape Sponge Bucket
DIY Instructions Step by Step
- Install the high gloss white cabinets and ensure the doors are aligned.
- Spread a layer of tile adhesive on the wall using a notched trowel.
- Press the wave tiles into the adhesive, making sure the pattern flows.
- Use a level to ensure the rows stay straight as you move up the wall.
- Let the adhesive dry for a full day before you start the grouting.
- Fill the gaps with pure white grout, following the curves of the waves.
- Wipe the tiles down with a damp sponge to remove excess grout from ridges.
- Use a dry microfiber cloth to polish the glossy tiles once the grout is dry.
- Apply white silicone along the joint where the tiles meet the white countertop.
- Add a colorful plant like a blue orchid to give the room a focal point.
16 Classic Black and Glass Gallery
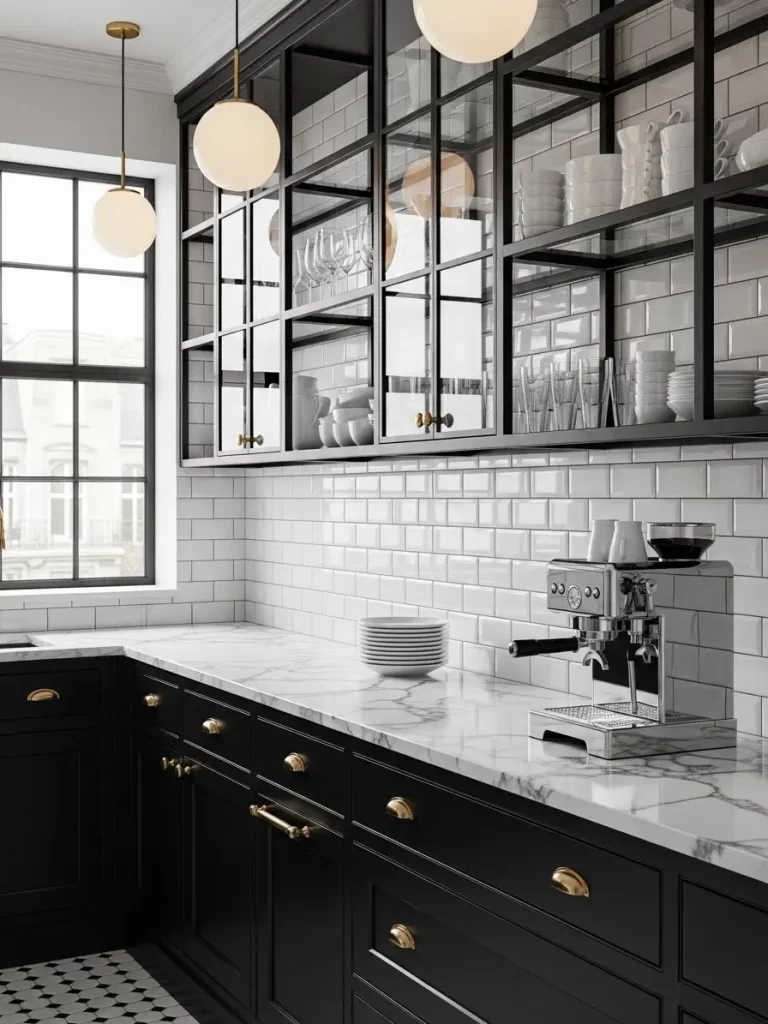
Combine the elegance of black cabinetry with the openness of glass front displays. These lower cabinets are matte black with brass hardware for a timeless look. The upper cabinets feature black frames and glass doors to show off white dishware.
A white marble countertop and matching subway tile backsplash keep the room from feeling too dark. Sphere pendant lights hang from the ceiling to provide soft and even illumination. This design is great for collectors who want to display their favorite ceramics.
Glass cabinets make a kitchen feel larger by allowing the eye to see through. The black and white palette is a sophisticated choice that works in any home style. Using brass accents adds a touch of warmth to the monochromatic design.
Materials Required
Matte black cabinet paint Glass insert cabinet doors White marble subway tiles Brass knobs and pulls White sanded grout Tile adhesive
Equipment Required
Paint roller Power drill Level Measuring tape Grout float Screwdriver
DIY Instructions Step by Step
- Paint your lower cabinets matte black and the upper frames to match.
- Install glass panels into the upper doors and secure them with clear clips.
- Apply adhesive to the wall and set the marble subway tiles in a brick pattern.
- Use small spacers to keep the grout lines thin and professional.
- Fill the lines with white grout once the tiles are stuck firmly.
- Clean the marble surface with a damp cloth to remove any grout haze.
- Attach the brass knobs to the upper doors and the pulls to the lower drawers.
- Install sphere pendant lights over the main counter for a modern look.
- Organize your white dishes inside the glass cabinets for a curated display.
- Seal the backsplash edges with clear silicone to protect the marble.
17 Burnt Orange and Hammered Copper
Create a warm and inviting kitchen using rich metallic tones and deep earthy colors. This design features dark wood cabinets with hammered copper handles. The backsplash is made of iridescent copper tiles that reflect the orange glow of candlelight.
A cast iron skillet on the stove adds to the rustic and hardworking feel of the space. The dark countertops provide a steady base for the shimmering wall above. This look is perfect for cozy evening meals and a warm home atmosphere.
Hammered copper tiles offer a unique texture that feels handcrafted and artistic. The burnt orange highlights in the tiles change depending on the light. Using dark cabinetry allows the copper to be the true star of the room.
Materials Required
Dark wood or black cabinet paint Hammered copper backsplash tiles Copper drawer handles Dark stone countertop Copper colored grout High heat adhesive
Equipment Required
Notched trowel Rubber float Measuring tape Level Screwdriver Soft cloth
DIY Instructions Step by Step
- Prep your cabinets by staining them a dark wood tone or painting black.
- Spread a thin layer of adhesive on the wall behind the stove area.
- Press the copper tiles into the adhesive, ensuring the texture is visible.
- Use a level to keep the rows of copper tiles perfectly straight.
- Apply a copper colored grout to create a seamless metallic look.
- Wipe the tiles with a soft cloth to prevent scratching the copper finish.
- Mark the holes for your new hammered copper handles on the drawers.
- Drill the holes and screw the handles in tightly.
- Apply a protective sealant to the copper tiles to prevent tarnishing.
- Place a few candles on the counter to see how light dances off the copper.
18 Spanish Revival and Golden Oak
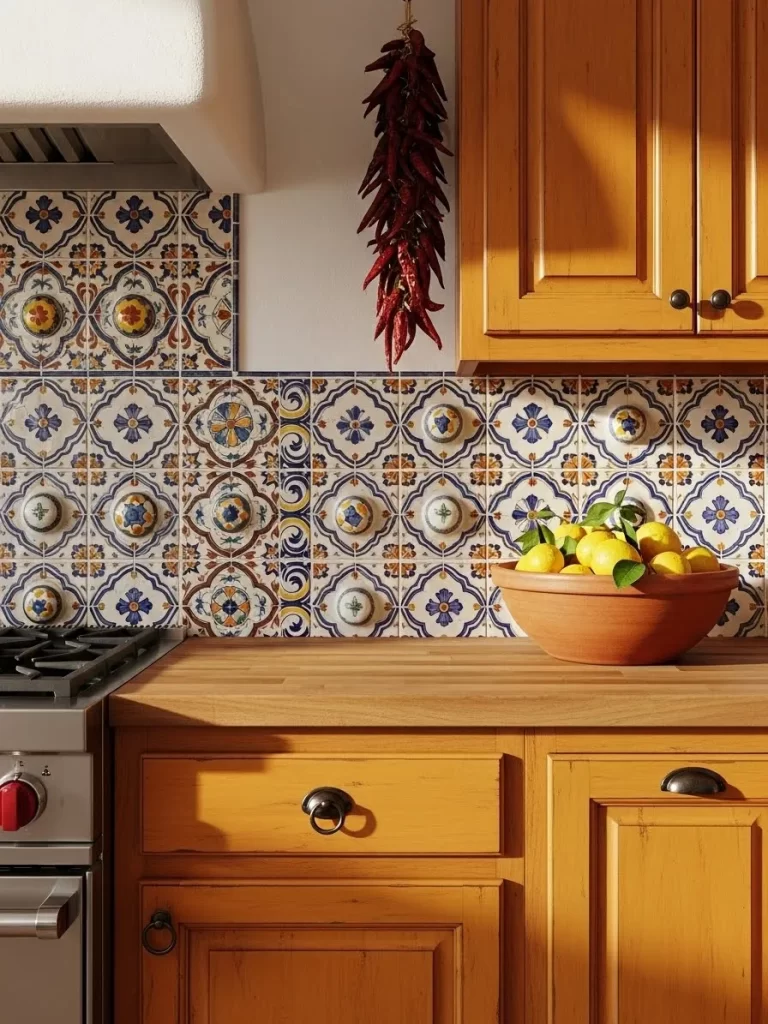
Bring the charm of the Mediterranean into your home with patterned tiles and warm wood. These cabinets are made of golden oak with traditional raised panels and bronze hardware. The backsplash features colorful hand painted tiles with blue and yellow patterns.
A bunch of dried red peppers and a bowl of lemons add a fresh and organic feel. The butcher block countertop provides a durable and warm surface for cooking. This design is excellent for families who love a sunny and welcoming kitchen.
Hand painted tiles add a layer of history and storytelling to your walls. The golden oak cabinetry provides a timeless and sturdy foundation for the room. This style feels very lived in and comfortable for everyday use.
Materials Required
Golden oak cabinets Hand painted ceramic tiles Butcher block countertop Bronze circular handles White or cream grout Wood wax or oil
Equipment Required
Tile saw Grout float Measuring tape Level Sanding block Power drill
DIY Instructions Step by Step
- Sand your oak cabinets and apply a fresh coat of golden oak stain.
- Install the butcher block countertop and seal it with food safe oil.
- Plan your tile pattern on the counter before gluing them to the wall.
- Apply adhesive and press the patterned tiles into place from the center.
- Use tile spacers to keep the busy pattern aligned across the backsplash.
- Fill the gaps with a cream colored grout to match the base of the tiles.
- Wipe the tiles clean with a sponge to show off the vibrant colors.
- Attach the bronze circular handles to the center of the cabinet drawers.
- Hang a bunch of dried peppers or herbs from a hook for an authentic touch.
- Wax the cabinets once a year to keep the golden oak looking rich.
19 Modern Rose and Gray Concrete
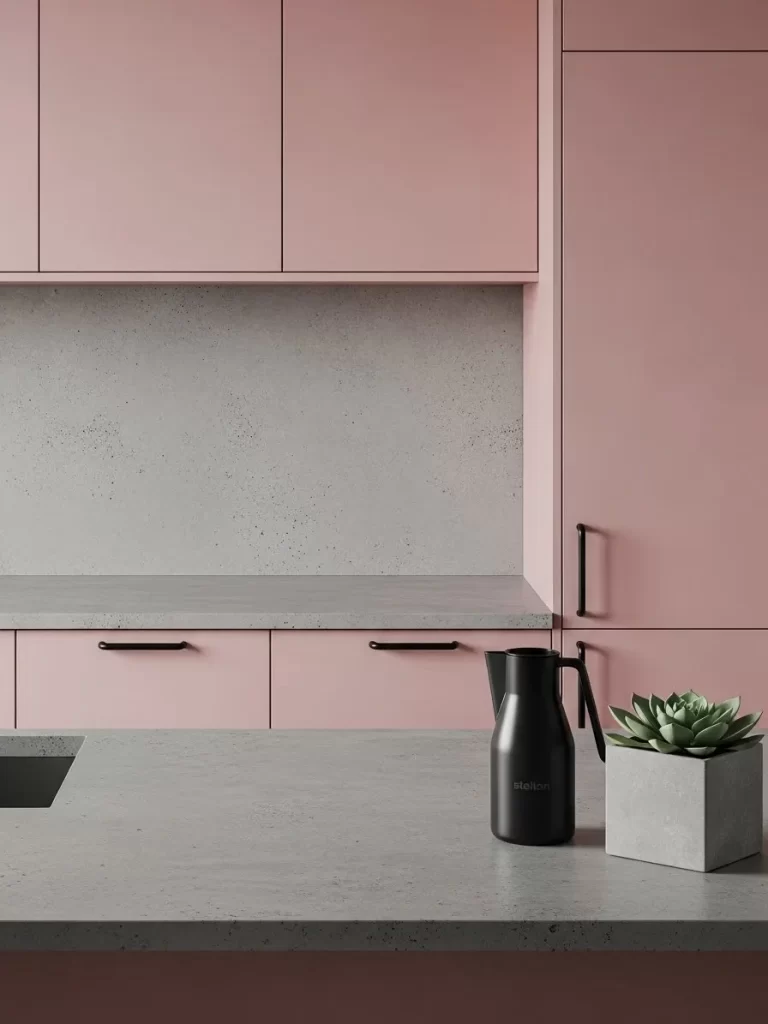
Soft colors meet hard textures in this surprisingly balanced and trendy design. These cabinets are painted a soft dusty rose that feels sophisticated rather than sugary. The backsplash and countertops are made of smooth gray concrete for an industrial edge.
Matte black hardware and a matching pitcher provide a sharp contrast to the pink. A small succulent in a concrete pot ties the whole look together. This kitchen is a great choice for those who want a unique and fashion forward space.
Dusty rose is a modern neutral that pairs beautifully with cool grays. Concrete surfaces are incredibly durable and offer a unique matte texture. Keeping the lines simple allows the color and material to be the main focus.
Materials Required
Dusty rose cabinet paint Concrete backsplash panels Matte black long handles Gray concrete countertop Concrete sealant Construction adhesive
Equipment Required
Foam rollers Level Power drill Measuring tape Sandpaper Caulking gun
DIY Instructions Step by Step
- Sand your cabinets smooth and apply two coats of dusty rose paint.
- Measure the wall for your concrete panels and cut them to size.
- Apply adhesive to the back and press them firmly onto the wall.
- Seal the concrete panels with a matte protector to prevent oil stains.
- Install the concrete countertop and ensure it is level.
- Measure and drill holes for the long matte black handles.
- Screw the handles in and check that they are straight.
- Seal the joint between pink cabinets and gray wall with gray silicone.
- Add black accents like a modern pitcher to balance the soft pink color.
- Wipe the concrete surfaces with a damp cloth to keep them sharp.
20 Classic Cherry and Stacked Stone
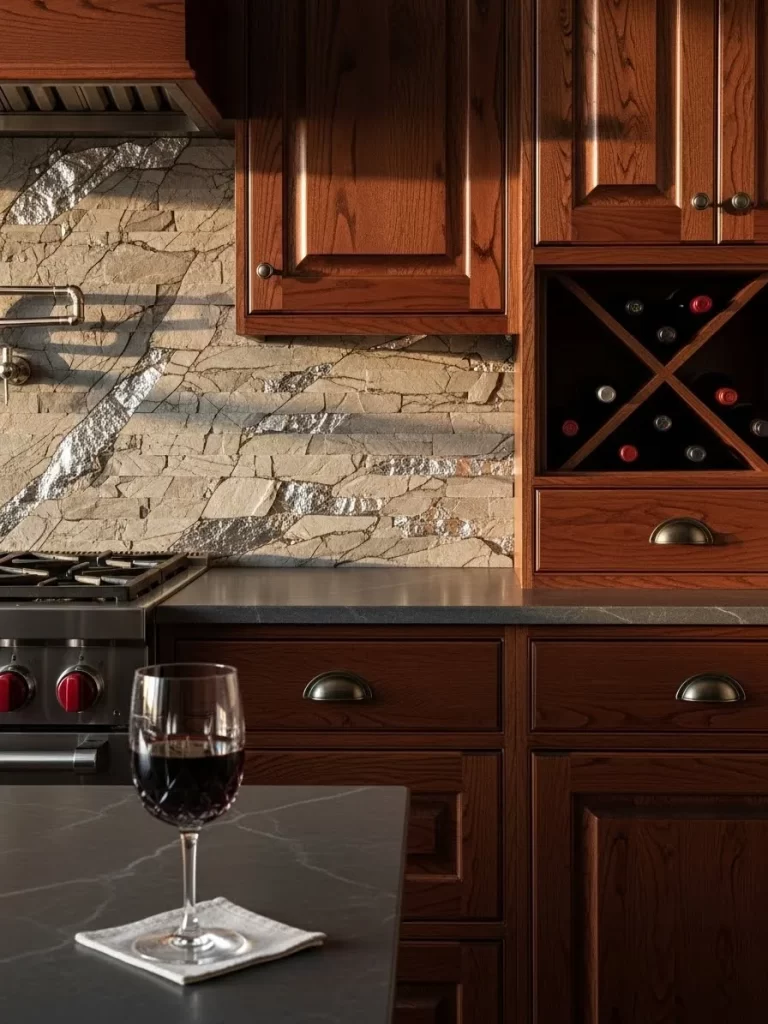
Traditional elegance meets rustic texture in this warm and inviting kitchen design. These cabinets are made of rich cherry wood with deep red undertones and bronze pulls. The backsplash features real stacked stone in varying shades of tan and gray.
A wine rack is built into the cabinetry to keep your favorite bottles organized and displayed. The dark granite countertop provides a polished contrast to the rough stone wall. This look is perfect for creating a cozy and luxurious kitchen for entertaining.
Stacked stone adds incredible 3D texture and a sense of permanence to the room. Cherry wood is a classic choice that feels expensive and high quality. The warm lighting enhances the natural shadows in the stone backsplash.
Materials Required
Cherry wood cabinets Natural stacked stone veneers Bronze cup handles Dark granite or quartz countertop Stone sealer Heavy duty mortar
Equipment Required
Masonry trowel Tile saw with diamond blade Level Measuring tape Screwdriver Power drill
DIY Instructions Step by Step
- Clean the wall and apply a layer of heavy duty mortar with a trowel.
- Press the stacked stone pieces into the mortar from the bottom row.
- Stagger the joints between stones to create a natural appearance.
- Use a tile saw with a diamond blade to cut stone for corners.
- Let the stone wall dry for forty eight hours before applying sealer.
- Install the cherry wood cabinets and attach bronze handles to drawers.
- Set the dark granite countertop on top and secure it.
- Seal the gap between the stone and the counter with dark gray silicone.
- Use under cabinet lights to highlight the beautiful texture of the stone.
- Organize your wine bottles in the built in rack for a finished look.
21 Futuro Ice and Cyan Glow

Ultra modern minimalism focuses on hidden lighting and clinical white surfaces. This kitchen features handle-less high gloss white cabinets that blend into the floor and ceiling. A full glass backsplash is backlit with cyan LED strips for a futuristic atmosphere.
The large central island serves as both a prep space and a dining area. Integrated ovens are flush with the cabinetry to maintain the perfectly flat wall surface. This design is for homeowners who want their home to look like a high tech laboratory.
Backlit glass panels provide an even, shadow free light across the workspace. The cyan color can be changed with a remote to match your mood. Minimalist kitchens are easy to maintain because there are no cracks or handles to collect dust.
Materials Required
High gloss white cabinet panels Tempered frosted glass backsplash RGB LED light strips White quartz countertop Glass mounting clips White silicone sealant
Equipment Required
Level Measuring tape Drill with glass bits Wire strippers for LEDs Caulking gun Suction cups for glass
DIY Instructions Step by Step
- Install the handle-less white cabinets using a push to open mechanism.
- Mount the LED light strips to the wall in a grid pattern where the glass will go.
- Test the lighting to ensure there are no dark spots behind the backsplash area.
- Place small rubber spacers on the wall to keep the glass from touching the LEDs.
- Lift the tempered glass into place using suction cups and secure with clips.
- Connect the LED strips to a power source and hide the controller in a cabinet.
- Seal the top and bottom edges of the glass with white silicone.
- Install the white quartz countertop to create a seamless white environment.
- Buff the glossy cabinet panels to remove any fingerprints.
- Adjust the light color to cyan to achieve the signature futuristic glow.
22 Retro Teal and Checkerboard Tile
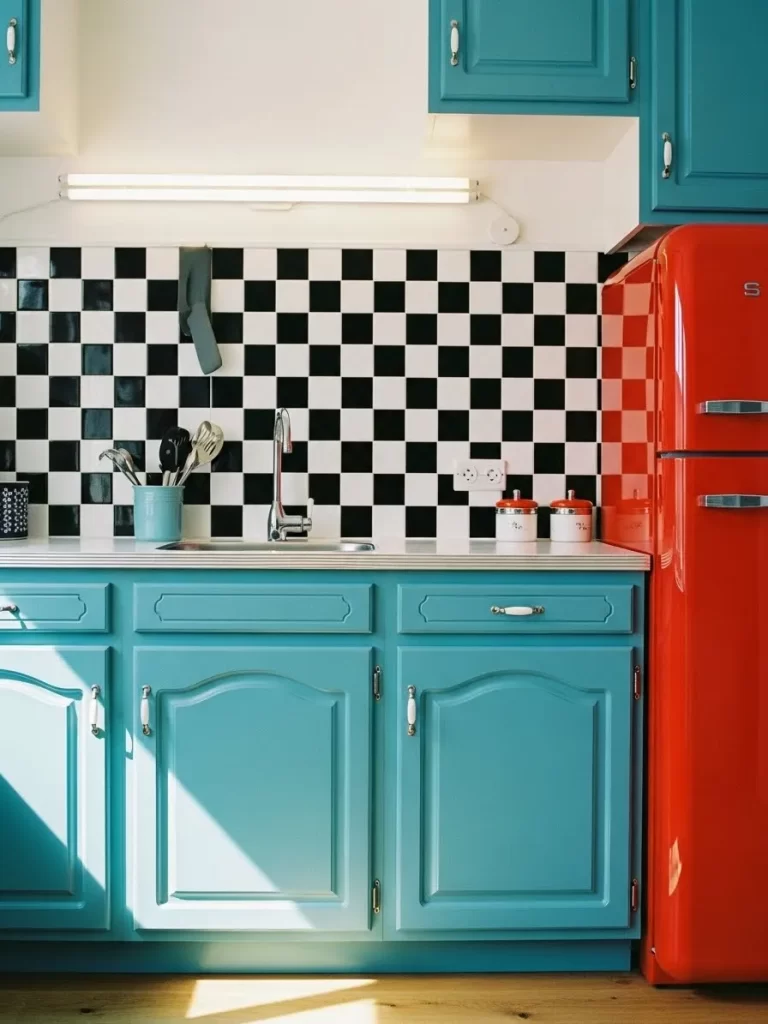
Fun and nostalgic vibes take over this 1950s inspired kitchen. The cabinets are painted a bright teal blue with delicate curved detailing on the panels. A classic black and white checkerboard tile backsplash provides a bold graphic element.
A vintage style red refrigerator adds a primary color pop that defines the space. White porcelain knobs and a simple strip light keep the retro theme consistent. This design is fantastic for those who want a kitchen full of character and history.
Checkerboard patterns are a timeless way to add energy to a small wall. Teal and red is a daring color combination that feels cheerful and energetic. Using vintage style appliances saves you from searching for actual antiques.
Materials Required
Teal blue cabinet paint Square black and white tiles White porcelain knobs Retro red refrigerator White waterproof grout Tile adhesive
Equipment Required
Paint brush and roller Level Grout float Measuring tape Screwdriver Sponge
DIY Instructions Step by Step
- Remove all old hardware and paint the wood with two coats of teal.
- Mark a horizontal line across the backsplash to start your tile grid.
- Apply adhesive and alternate black and white tiles in a staggered pattern.
- Check frequently with a level to ensure the checkerboard stays straight.
- Fill the gaps with white grout after the tiles have set for a day.
- Wipe the tile faces clean with a damp sponge to reveal the sharp contrast.
- Drill new holes for the white porcelain knobs on each cabinet door.
- Screw the knobs in and check that they are tight.
- Move your red retro refrigerator into place as the main focal point.
- Install a simple fluorescent style strip light under the upper cabinets.
23 Botanical Green and Fern Etched Glass
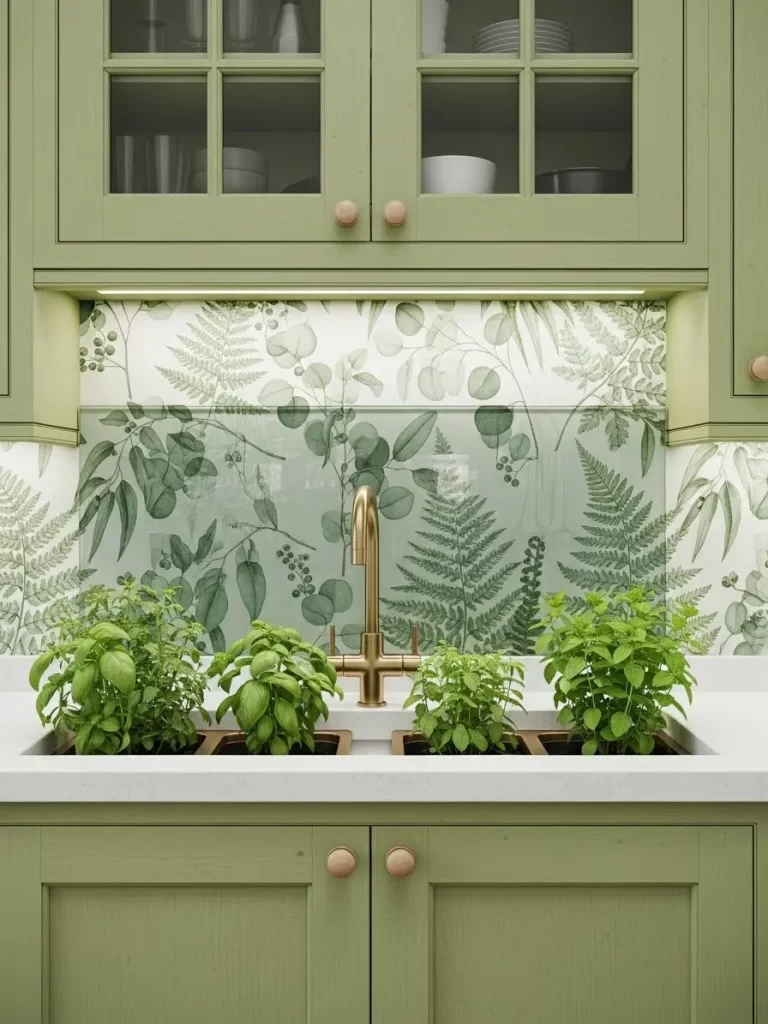
Bring the garden indoors with soft green tones and intricate plant motifs. These light sage cabinets feature natural wood knobs and glass front upper doors. The backsplash is a custom glass panel etched with detailed fern and eucalyptus leaves.
Three built in sinks hold fresh basil and mint plants right in the countertop. The gold faucet adds a touch of warmth to the cool green and white palette. This kitchen is a sanctuary for plant lovers and home cooks who use fresh herbs.
Etched glass backsplashes are incredibly easy to wipe down and never stain. The botanical patterns add a soft, organic feel without being too busy. Keeping real plants in the sink area improves air quality and provides fresh ingredients.
Materials Required
Light sage cabinet paint Custom etched glass backsplash Natural wood round knobs Gold kitchen faucet Herb garden sink inserts Glass adhesive
Equipment Required
Level Power drill Measuring tape Caulking gun Screwdriver Soft cleaning cloth
DIY Instructions Step by Step
- Paint your cabinets a light sage green and install the natural wood knobs.
- Measure the sink area and install the special triple sink for herbs.
- Apply glass adhesive to the wall behind the main counter.
- Carefully press the etched glass panel onto the wall and hold it secure.
- Seal the bottom edge where glass meets counter with clear silicone.
- Install the gold faucet in the center of the herb sink area.
- Fill the sink inserts with potting soil and your favorite kitchen herbs.
- Clean the etched glass with a soft cloth to remove any installation marks.
- Ensure the under cabinet lighting is aimed directly at the fern patterns.
- Add white dishware to the upper glass cabinets to keep the look light.
24 Golden Vein Marble and Midnight Matte
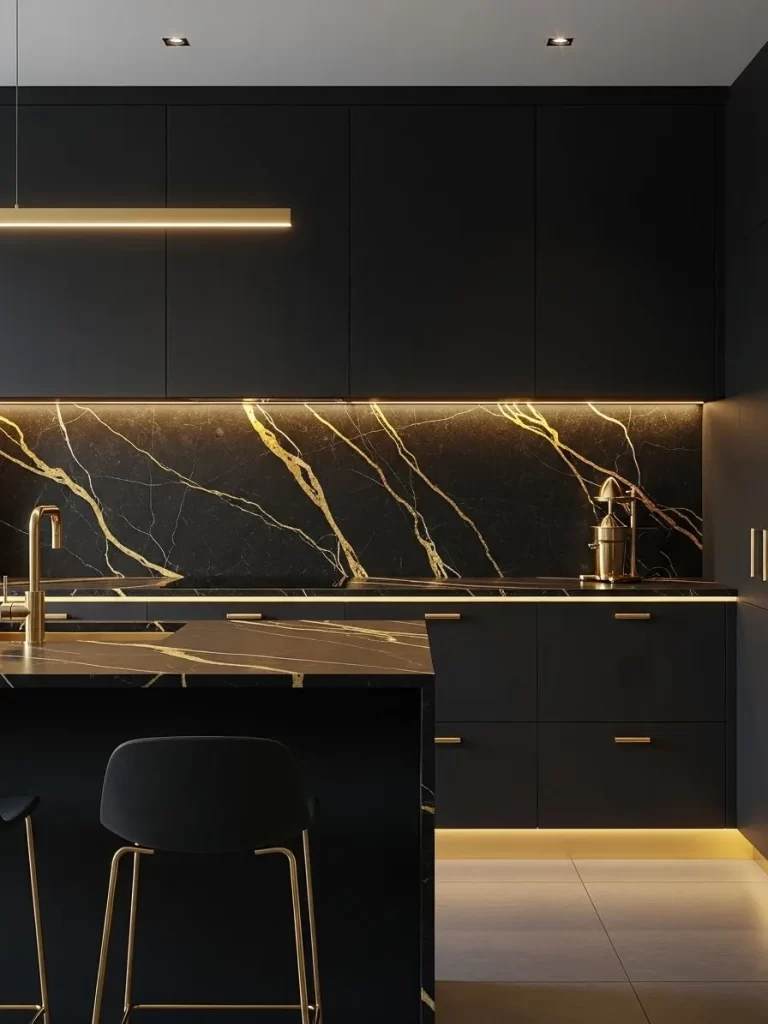
Elegance reaches its peak when you pair deep black surfaces with dramatic gold marble. This kitchen features midnight black matte cabinets with very thin gold handles. The backsplash and countertops are a single slab of black marble with thick gold veins.
A warm glow from under cabinet LEDs highlights the golden lightning strikes in the stone. The gold and black bar stools match the kitchen architecture perfectly. This look is designed for high end entertaining and a moody, expensive feel.
Using a single material for both counter and wall creates a seamless and powerful visual. Matte black surfaces are sophisticated because they don’t reflect glare like gloss. The gold veins in the marble provide enough light to keep the kitchen from feeling too dark.
Materials Required
Midnight matte black cabinet wrap or paint Black and gold vein marble slabs Thin gold bar handles Integrated warm LED strips Gold and black bar stools Heavy duty stone adhesive
Equipment Required
Level Power drill Measuring tape Caulking gun Screwdriver Microfiber cloth
DIY Instructions Step by Step
- Apply the matte black finish to your cabinets for a smooth, non reflective surface.
- Install the stone slabs on the countertop first to act as a base for the wall.
- Apply heavy duty adhesive to the wall in a thick zigzag pattern.
- Carefully lift the marble backsplash slab and press it onto the wall.
- Ensure the veins in the wall slab line up with the veins on the counter.
- Seal the joint between the two slabs with black silicone for a hidden seam.
- Stick the warm LED strips under the upper cabinets to light the gold veins.
- Measure and drill holes for the thin gold handles on the drawers.
- Screw the handles in and check that they are perfectly horizontal.
- Wipe down the marble with a stone safe cleaner to make the gold pop.
25 Sunny Countryside and Beadboard Yellow
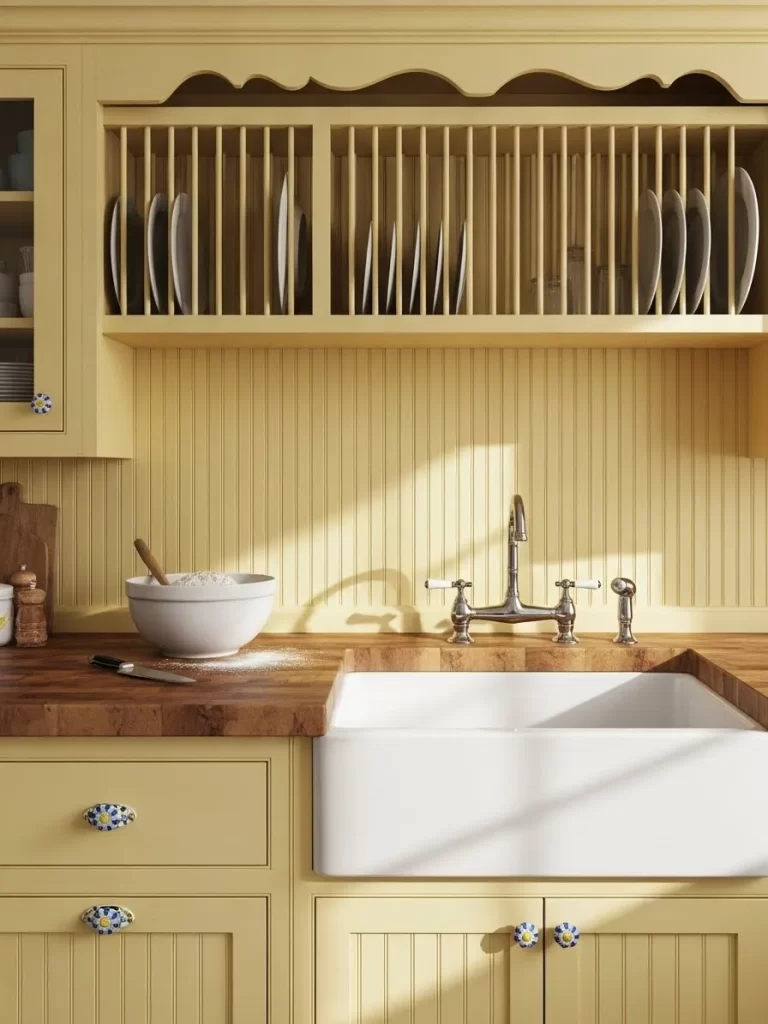
Cozy farmhouse style gets a bright update with cheerful colors and traditional wood details. These pale yellow cabinets feature a built in plate rack and decorative scalloped trim. The backsplash is made of classic vertical beadboard painted to match the cabinetry.
A butcher block countertop and a large white farmhouse sink anchor the rustic theme. Patterned ceramic knobs with blue flowers add a dainty and handcrafted touch. This design is perfect for a sunny breakfast nook and a busy family home.
Beadboard is an affordable material that adds instant texture and a historical feel. The yellow color makes the kitchen feel bright even on a cloudy day. Plate racks are a functional way to display your favorite dishes while keeping them handy.
Materials Required
Pale yellow cabinet paint Vertical beadboard panels Butcher block countertop White farmhouse sink Blue and white floral knobs Wood glue and finish nails
Equipment Required
Paint roller and brush Hammer or nail gun Level Measuring tape Jigsaw for sink cutouts Sandpaper
DIY Instructions Step by Step
- Paint your cabinets a soft pale yellow and let them dry fully.
- Measure the backsplash area and cut the beadboard panels to size.
- Glue the beadboard to the wall and secure it with small finish nails.
- Paint the beadboard the same yellow as the cabinets for a unified look.
- Cut the opening for the farmhouse sink in your butcher block counter.
- Install the sink and the counter, sealing all edges with clear silicone.
- Attach the scalloped wood trim to the top of the upper cabinets.
- Drill holes and install the floral ceramic knobs on the doors.
- Seal the butcher block with wood oil to protect it from water.
- Arrange your best plates in the built in rack for a final country touch.
26 Dark Onyx and Liquid Gold

Drama and luxury collide in this high contrast design featuring glowing metallic textures. These cabinets are finished in a deep onyx black that disappears into the shadows. The backsplash is a textured gold panel that looks like molten metal under the lights.
A matte black faucet and matching sink keep the focus on the shimmering wall. The gold reflects off the black countertops to create a warm and inviting workspace. This kitchen is ideal for someone who wants a bold, artistic focal point.
Textured metal panels are durable and hide splashes better than flat glass. The “liquid gold” effect is achieved through strategic lighting and an irregular surface. Black cabinets allow the gold to glow without any other visual distractions.
Materials Required
Onyx black matte cabinet paint Textured gold metallic backsplash panels Dark black granite countertop Matte black kitchen faucet Warm white LED strips Construction adhesive
Equipment Required
Level Measuring tape Caulking gun Paint roller Screwdriver Soft cloth
DIY Instructions Step by Step
- Paint the cabinets a deep onyx black and ensure a smooth, matte finish.
- Measure the wall and cut the gold metallic panels to fit perfectly.
- Apply adhesive to the wall and press the gold panels into place.
- Ensure the textured patterns on the panels align for a continuous look.
- Seal the bottom edge with a thin bead of black silicone.
- Install the black granite countertop and the matte black faucet.
- Hide the LED light strips under the front edge of the upper cabinets.
- Angle the lights so they hit the textured gold at a sharp angle for shadows.
- Clean the gold panels with a soft cloth to remove any installation dust.
- Step back and check that the gold glow is even across the whole backsplash.
27 Denim Blue and Weathered Wood Grain

Relaxed and comfortable, this design brings the feeling of your favorite pair of jeans to the kitchen. These cabinets are made of weathered gray oak with visible wood grain and blue leather handles. The backsplash consists of glossy blue subway tiles that look like dark denim.
A white stone countertop provides a crisp and clean break between the blue and gray. A bowl of smooth river stones and a piece of white coral add a peaceful natural element. This kitchen is perfect for a calm home where comfort is the priority.
Blue subway tiles are a modern classic that feels fresh and unexpected. Leather handles add a warm, human touch to the cool wood and tile surfaces. Weathered oak hides scratches and wear, making it a great choice for a busy house.
Materials Required
Weathered gray oak cabinet doors Glossy blue subway tiles Blue leather cabinet pulls White quartz countertop Light gray sanded grout Tile adhesive
Equipment Required
Level Power drill Measuring tape Grout float Tile spacers Screwdriver
DIY Instructions Step by Step
- Install the weathered oak cabinets and ensure the wood grain is horizontal.
- Mark a level line on the wall and apply a layer of tile adhesive.
- Set the blue subway tiles in a traditional brick pattern across the wall.
- Use small spacers to keep the lines even as you move upward.
- Fill the gaps with light gray grout after the adhesive has set for a day.
- Wipe the blue tiles clean with a damp sponge until they shine.
- Measure and drill holes for the blue leather handles on the drawers.
- Screw the leather pulls in and make sure they are comfortable to grip.
- Seal the edge between the white counter and blue tiles with clear silicone.
- Decorate with natural stones and coral to complete the relaxed coastal look.
28 Moroccan Turquoise and Natural Cream
Exotic patterns and vibrant colors turn a simple kitchen into a Mediterranean escape. These cream colored cabinets feature silver cup handles and a matte finish. The backsplash is a stunning grid of handmade turquoise tiles with small star shaped accents.
A silver Moroccan tea pot on the counter reinforces the global travel theme. The white speckled countertop keeps the space feeling bright and airy. This design is excellent for homeowners who want to add a splash of color to a neutral room.
Handmade tiles have slight variations in color that make the wall look more interesting. The turquoise shade is refreshing and pairs beautifully with warm cream tones. Using small geometric accents between the tiles adds a custom, artisan feel.
Materials Required
Cream matte cabinet paint Turquoise handmade ceramic tiles Small star shaped accent tiles Silver cup handles White waterproof grout Tile adhesive
Equipment Required
Level Grout float Measuring tape Tile saw Screwdriver Large sponge
DIY Instructions Step by Step
- Paint your cabinets a soft cream color and let them dry completely.
- Lay out your turquoise tiles on the counter to plan the star accents.
- Apply adhesive to the wall and press the tiles into a square grid.
- Place the small star accents at the corners of every fourth tile.
- Ensure the grid stays perfectly level as you work across the backsplash.
- Apply white grout to all the gaps after the tiles are stuck firmly.
- Carefully clean around the handmade edges with a damp sponge.
- Wipe the tiles with a dry cloth to make the turquoise color pop.
- Attach the silver cup handles to the centers of the cabinet drawers.
- Place a Moroccan tea pot or colorful ceramics on the counter to finish.
29 Purple Marble and Muted Taupe
Sophistication and unique luxury define this kitchen with its rare stone textures. These cabinets are a muted taupe color with very simple black handles and a matte finish. The backsplash and countertops are white marble with bold, deep purple and gold veins.
Integrated lighting under the cabinets makes the purple veins look like lightning across the wall. The taupe color provides a calm and neutral base for the dramatic stone. This look is for those who want a kitchen that feels like a piece of fine art.
Rare marbles like this become the immediate conversation piece of any home. The taupe cabinets prevent the purple from feeling too overwhelming or dark. Using large slabs instead of tiles ensures the dramatic veins are never interrupted.
Materials Required
Taupe matte cabinet paint Purple vein marble slabs Simple black drawer pulls Warm white LED strips Stone sealant Heavy duty construction adhesive
Equipment Required
Level Power drill Measuring tape Caulking gun Screwdriver Microfiber cloth
DIY Instructions Step by Step
- Paint your cabinets a soft taupe and install the simple black handles.
- Measure your wall and countertop area for the custom stone slabs.
- Apply construction adhesive to the back of the marble backsplash slab.
- Carefully lift the slab and press it onto the wall, checking for level.
- Ensure the veins in the wall slab align with those on the countertop.
- Seal the marble with a high quality protector to prevent any staining.
- Install the LED light strips under the cabinets to highlight the purple veins.
- Use taupe colored silicone to seal the joint between the stone and cabinets.
- Buff the marble surface until it is smooth and the colors are vivid.
- Keep the counters clear of clutter to let the stone pattern be the star.
30 Weathered Shiplap and Dark Charcoal
Rustic charm meets modern drama in this textured and hardworking kitchen design. These lower cabinets are a deep charcoal gray with traditional bronze knobs. The backsplash is made of horizontal shiplap boards with a weathered white finish.
A large farmhouse sink and a vintage style bronze faucet add to the historical feel. A jar of fresh wildflowers brings a soft and natural touch to the gray and white room. This design is perfect for creating a cozy, lived in atmosphere with a modern edge.
Shiplap adds horizontal lines that make a small kitchen feel much wider. The weathered finish on the wood hides imperfections and adds instant character. Using dark cabinets on the bottom grounds the space and makes the white walls pop.
Materials Required
Dark charcoal cabinet paint Weathered white shiplap boards Bronze circular knobs White farmhouse sink Bronze bridge style faucet Finish nails and wood glue
Equipment Required
Paint roller and brush Hammer or nail gun Level Measuring tape Jigsaw Sandpaper
DIY Instructions Step by Step
- Paint the lower cabinets a deep charcoal gray and install the bronze knobs.
- Measure your wall and cut the shiplap boards to fit horizontally.
- Apply a bead of wood glue to the back of each board before nailing.
- Start from the bottom and stack the boards, checking level at every step.
- Use a jigsaw to cut the shiplap around electrical outlets and the sink.
- Lightly sand the edges of the boards for a soft, weathered appearance.
- Install the white farmhouse sink and the bronze bridge faucet.
- Seal the joint between the sink and the shiplap with clear silicone.
- Paint the shiplap a bright white but leave some grain showing for texture.
- Place a jar of wildflowers on the counter to complete the cozy rustic look.
31 Vintage Pressed Tin and Deep Plum

Ornate metalwork adds a layer of historic charm to your kitchen walls. This look features pressed tin tiles with a blackened antique finish. They create a strong geometric contrast against the smooth, deep plum cabinetry.
Rich purple tones make the space feel grounded and high-end. Beaded molding on the cabinet doors adds a custom touch to the woodwork. You can brighten the dark palette by choosing polished chrome handles that sparkle under cabinet lights.
Metallic surfaces reflect ambient light to prevent the dark colors from feeling heavy. This combination works well for creating a cozy and intimate cooking environment. The result is a kitchen that feels both traditional and daring.
Materials Required
Pressed tin backsplash tiles Deep plum cabinet paint Black antique metal glaze Industrial adhesive Chrome cup handles Gray sanded grout
Equipment Required
Metal snips or heavy scissors Rubber mallet Caulking gun Level tool Small foam roller Measuring tape
DIY Instructions Step by Step
- Clean the wall surface thoroughly to ensure the metal adhesive bonds properly.
- Paint your cabinets with the deep plum shade and let them dry for two days.
- Measure the height of your backsplash to determine how many tin panels you must cut.
- Apply a zigzag pattern of industrial adhesive to the back of the first metal tile.
- Press the tile firmly against the wall starting from the bottom corner.
- Use a rubber mallet to gently tap the edges so they sit flat against the surface.
- Cut any edge pieces using metal snips to fit around your electrical outlets.
- Apply a dark glaze over the tin to highlight the intricate floral patterns.
- Screw the polished chrome handles into the pre-drilled holes on your cabinet doors.
- Seal the joint between the metal tiles and the counter with a thin bead of silicone.
32 Japanese Zen Slats and Midnight Oak
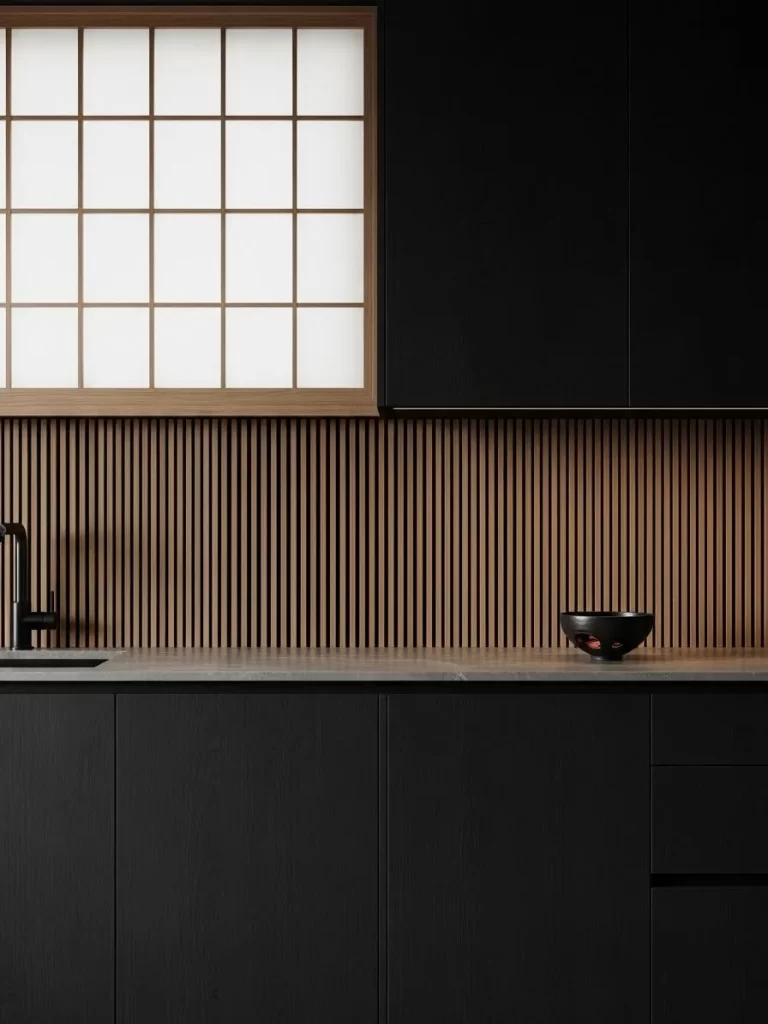
Minimalist lines create a peaceful and orderly atmosphere for modern homes. This design features vertical wooden slats set against a dark charcoal wall. The black cabinetry provides a seamless look that hides modern appliances.
A Shoji-style window screen allows soft, diffused light to wash over the textures. The smooth stone countertop adds a cool element to the warm wood tones. You can achieve this balance by sticking to a strict palette of black and natural oak.
Vertical slats make the kitchen ceiling appear higher than it is. This trick adds a sense of vertical space to small apartments. The lack of visible handles keeps the design clean and focused on the raw materials.
Materials Required
Midnight oak cabinet wrap or paint Oak wood lath strips Matte black wall paint Dark gray stone slab or laminate Wood glue Clear matte wood sealer
Equipment Required
Miter saw for wood strips Laser level Power drill Paint tray and roller Measuring tape Fine sandpaper
DIY Instructions Step by Step
- Paint the backsplash wall in a matte black color to create a dark background.
- Sand your oak lath strips to remove any splinters or rough edges.
- Apply a clear matte sealer to the wood to protect it from kitchen grease.
- Mark vertical lines on the wall using your laser level to keep everything straight.
- Apply a thin line of wood glue to the back of each oak strip.
- Press the strips onto the wall with equal spacing between them.
- Use a small spacer block to ensure the gaps remain consistent across the wall.
- Install the midnight oak cabinets and ensure they align with the slat pattern.
- Wipe down the stone countertop to remove any dust from the wood cutting.
- Place a single black ceramic bowl on the counter to complete the Zen aesthetic.
33 Sunset Ombre Glass Bricks
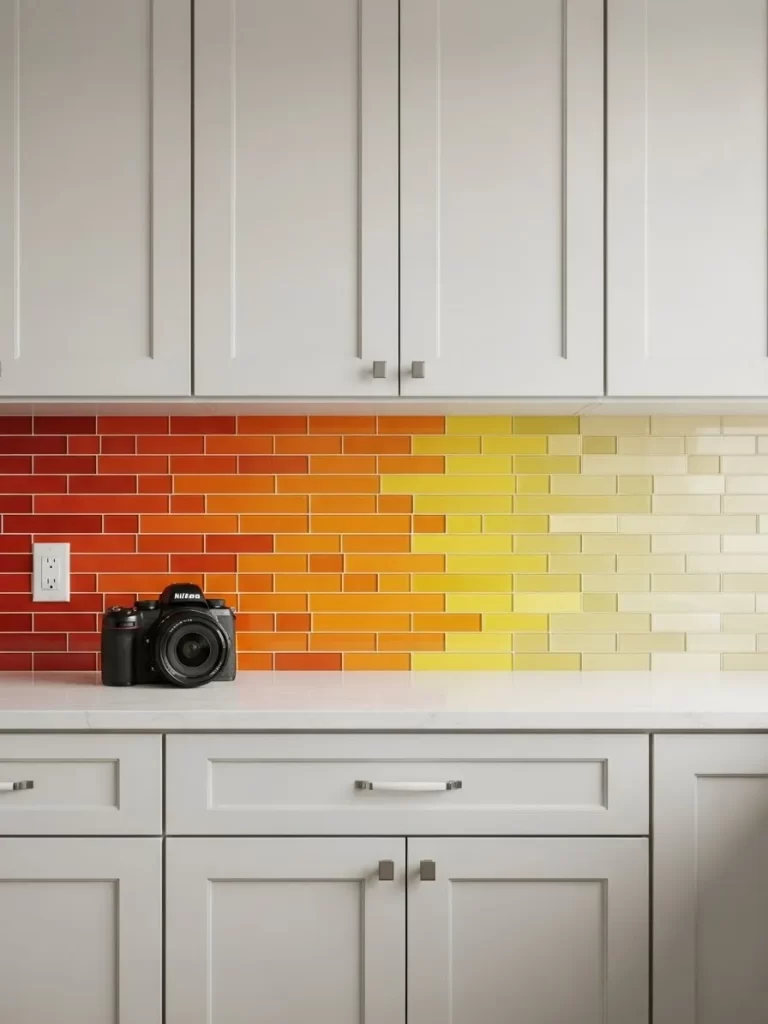
Bright colors can turn a standard kitchen into a vibrant work of art. This backsplash features a horizontal gradient of glass tiles moving from deep red to pale cream. The white cabinetry keeps the focus entirely on the colorful wall.
Glossy glass reflects light to make the room feel energetic and open. A black professional camera on the counter highlights the sharp lines of the grid. You can customize the colors to match the specific light levels in your room.
The ombre effect adds a sense of movement to the long horizontal wall. It creates a focal point that changes as you walk through the space. Using white grout keeps the transitions between colors looking crisp and professional.
Materials Required
Red, orange, yellow, and cream glass subway tiles White non-sanded grout High-bond glass tile adhesive White semi-gloss cabinet paint White silicone sealant Plastic tile spacers
Equipment Required
Glass tile nippers Rubber grout float Large bucket and sponge Level tool Microfiber cloth Measuring tape
DIY Instructions Step by Step
- Arrange your tiles on the floor first to create a smooth color transition.
- Paint your cabinets white to provide a neutral base for the bright colors.
- Spread adhesive on a small section of the wall using a notched trowel.
- Place the red tiles on the far left and gradually move toward the lighter shades.
- Insert plastic spacers between every tile to keep your grout lines perfect.
- Use glass nippers to trim the tiles that sit against the cabinet edges.
- Allow the adhesive to cure for twenty-four hours before you apply the grout.
- Spread white grout over the glass tiles using a rubber float at an angle.
- Clean the tiles with a damp sponge after the grout has sat for ten minutes.
- Polish the glass surface with a dry microfiber cloth to remove any hazy residue.
34 Aged Mirror Panels and Sage Mist
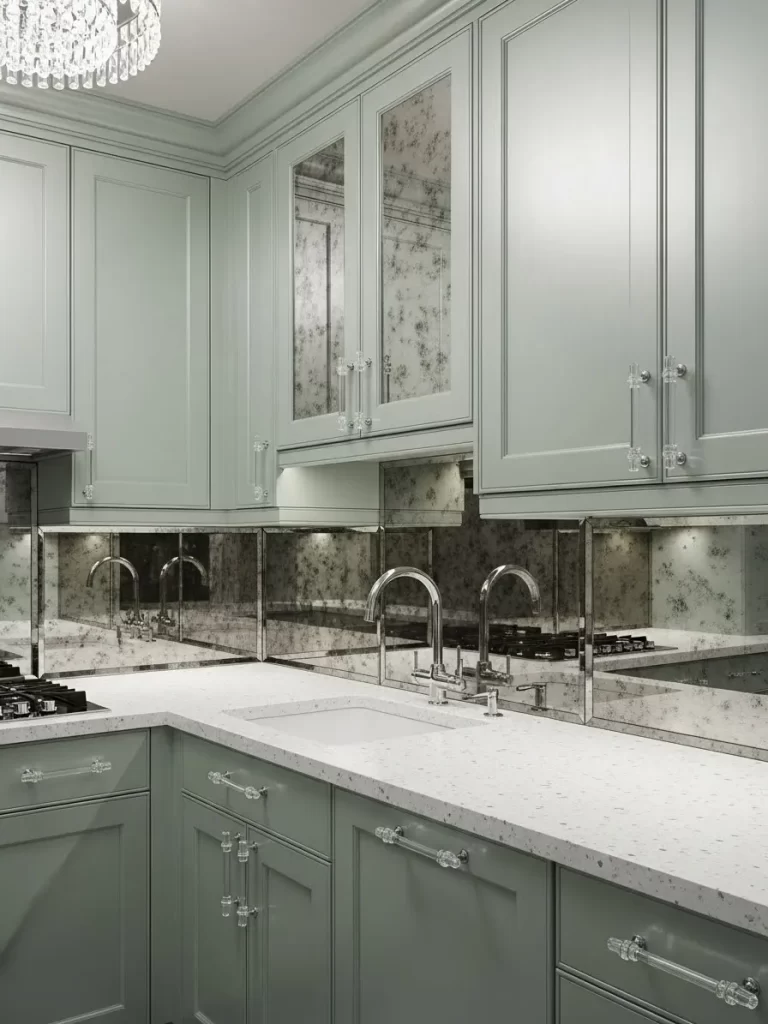
Soft tones and reflective surfaces make a kitchen feel spacious and high-fashion. This look features sage green cabinets paired with antiqued mirror panels. The speckled mirror texture hides fingerprints and adds a vintage touch.
Crystal-clear handles with silver bases complement the reflective backsplash. A large chandelier reflects in the glass to create a bright and luxurious environment. You can use these panels to make a dark corner feel much lighter.
Mirror panels are excellent for narrow kitchens because they double the visual depth. The sage mist color provides a calming contrast to the busy mirror pattern. This combination feels like a boutique hotel or a high-end dressing room.
Materials Required
Sage green cabinet paint Antiqued or distressed mirror panels Crystal and silver cabinet pulls Mirror adhesive (acid-free) Silver metallic trim White stone-look countertop
Equipment Required
Glass suction cups for handling Caulking gun Power drill Level tool Measuring tape Soft glass-cleaning cloth
DIY Instructions Step by Step
- Paint your cabinetry with the sage mist shade and allow it to dry fully.
- Clean the wall surface and the back of the mirror panels with alcohol.
- Apply dots of acid-free mirror adhesive to the back of each panel.
- Carefully lift the mirror onto the wall using suction cups for a better grip.
- Hold the panel in place for a few minutes to ensure the bond is strong.
- Install silver metallic trim around the edges to hide the glass seams.
- Mark the spots for your crystal handles on the dry cabinet doors.
- Drill small holes and secure the silver hardware into place.
- Wipe the mirrors with a soft cloth and a gentle glass cleaner.
- Check that the light from your chandelier is reflecting evenly across the wall.
35 Terracotta Basketweave and Natural Pine
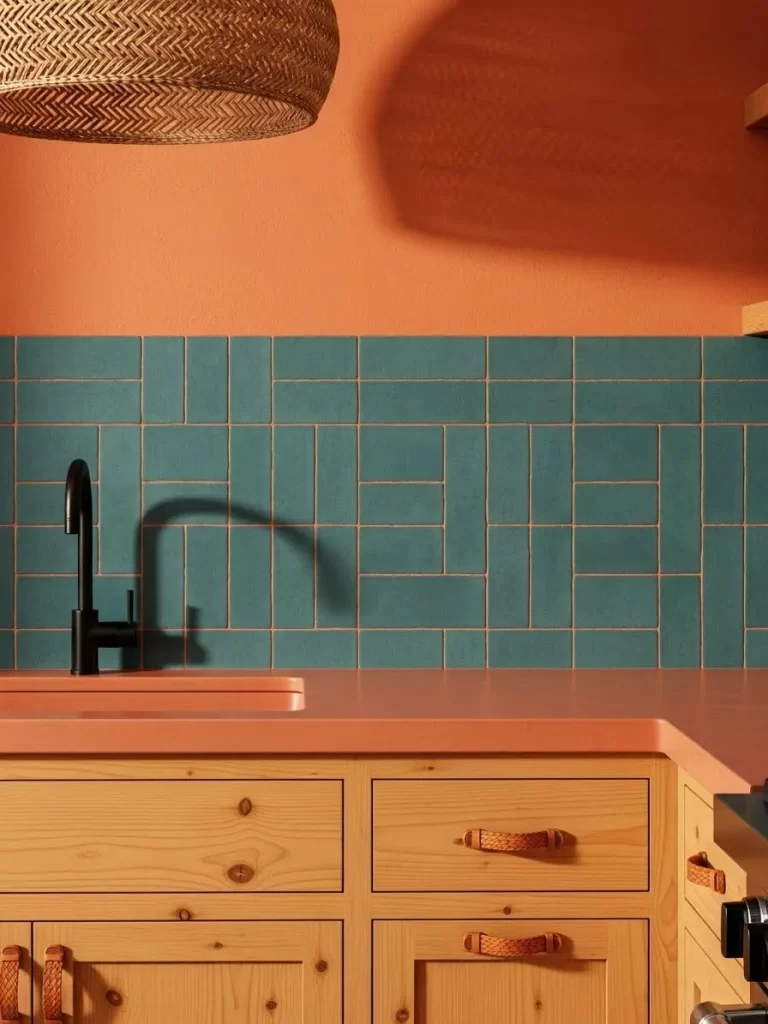
Earthy textures bring a Mediterranean warmth to your daily cooking routine. This design features teal tiles set in a unique basketweave pattern with orange grout. The natural pine cabinets provide a soft, light-colored frame for the bold backsplash.
Woven leather handles add a tactile detail that feels handmade and organic. A large wicker light fixture casts soft shadows across the orange walls. You can achieve this cozy look by mixing cool blue tiles with warm terracotta tones.
The basketweave pattern adds a complex geometric interest to a simple flat wall. It breaks up the space without needing expensive materials. Using natural wood keeps the room feeling light and approachable for families.
Materials Required
Teal matte subway tiles Terracotta or orange-toned grout Natural pine cabinet doors Woven leather handles High-bond tile mortar Wood mineral oil
Equipment Required
Notched trowel Grout float Measuring tape Spirit level Power drill Large sponge
DIY Instructions Step by Step
- Sand the pine cabinets and apply a light coat of mineral oil for protection.
- Mark the center of your wall to start the basketweave tile pattern.
- Apply adhesive to the wall and place two tiles vertically.
- Place the next two tiles horizontally to create the woven appearance.
- Continue this alternating pattern across the entire backsplash area.
- Use small spacers to keep the gaps for the orange grout consistent.
- Mix the terracotta grout and press it into the lines with a rubber float.
- Clean the teal tiles with a damp sponge to reveal the bright orange lines.
- Install the woven leather handles onto the pine drawers using brass screws.
- Seal the wood and tile joints with a clear silicone for water protection.
36 Polka Dot Mosaic and Jet Black
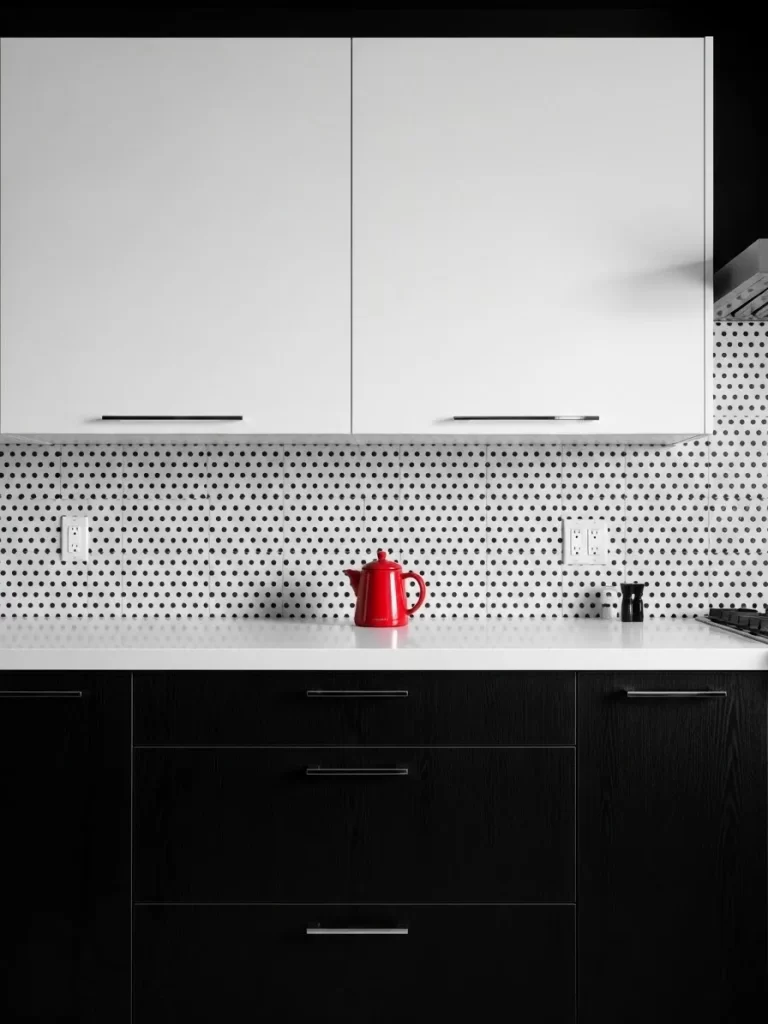
Graphic patterns and sharp contrasts create a modern kitchen with a playful edge. This look features a white backsplash with a tiny black polka dot mosaic pattern. The jet-black lower cabinets anchor the room and give it a professional feel.
A bright red kettle provides a single pop of color that draws the eye. White upper cabinets blend into the ceiling to keep the room feeling tall. You can use this style to make a small kitchen feel sharp and high-contrast.
Mosaic tiles are great for small spaces because they add detail without overwhelming the room. The black and white palette is a safe choice that never goes out of style. The resulting design looks like a page from a high-end interior magazine.
Materials Required
White and black penny or square mosaic tiles Jet-black matte cabinet paint White semi-gloss paint for uppers Pure white grout Matte black drawer pulls Tile adhesive
Equipment Required
Small notched trowel Grout float Paint roller and tray Level tool Measuring tape Utility knife for tile mesh
DIY Instructions Step by Step
- Paint the lower cabinets in jet black and the upper cabinets in white.
- Clean the wall area and mark a level line for your first row of mosaics.
- Spread a thin layer of adhesive on the wall using your notched trowel.
- Press the mosaic sheets onto the wall, aligning the polka dot patterns carefully.
- Use a utility knife to cut the mesh backing for a perfect fit around outlets.
- Allow the adhesive to dry before spreading white grout over the entire surface.
- Use a rubber float to work the grout into all the tiny round gaps.
- Wipe the tiles with a damp sponge until the black dots are clean and sharp.
- Install matte black handles on both the upper and lower cabinet doors.
- Place a bright red accessory on the counter to provide a focal point.
37 Fluted Navy and Copper Accents
Deep textures and warm metals create a kitchen that feels incredibly expensive. This design features navy blue cabinets with horizontal fluted panels on the backsplash. Slim copper handles provide a brilliant warm glow against the cool blue surfaces.
A black marble countertop with white veining adds a layer of natural elegance. A professional camera on the counter shows off the depth of the 3D wall texture. You can use under-cabinet lighting to create shadows that highlight the fluted lines.
Horizontal lines make a narrow kitchen feel much longer than it actually is. The navy color provides a sophisticated alternative to standard gray or black. Copper accents bring a trendy and industrial feel to the traditional blue.
Materials Required
Navy blue cabinet paint Navy fluted or ribbed wall panels Slim copper drawer pulls Black marble-look laminate or stone Construction adhesive Integrated LED light strips
Equipment Required
Power drill Level tool Miter saw for panels Caulking gun Measuring tape Soft cloth
DIY Instructions Step by Step
- Paint your cabinet doors a rich navy blue and let them cure fully.
- Measure your backsplash height and cut the fluted panels to match.
- Apply construction adhesive to the back of the navy fluted panels.
- Press the panels onto the wall and check the horizontal level carefully.
- Install LED light strips under the cabinets to shine down the fluted ridges.
- Mount the copper handles onto the cabinet doors using a power drill.
- Seal the gap between the fluted wall and the black counter with blue silicone.
- Wipe the panels with a soft cloth to remove any fingerprints or dust.
- Ensure the copper hardware is polished and bright for maximum contrast.
- Check the lighting at night to see the dramatic shadow patterns on the wall.
38 Abstract Splatter and Electric Blue
Bold art and industrial materials create a kitchen full of creative energy. This design features a glass backsplash with a vibrant red, yellow, and blue paint splatter. The electric blue cabinetry provides a high-energy base for this colorful theme.
Stainless steel countertops and metal shelving add a professional chef’s kitchen vibe. Magnetic knife strips and hanging utensils keep your workspace organized and clear. You can achieve this look by turning a simple glass sheet into a custom art piece.
The splatter pattern makes every kitchen unique and acts as a massive conversation piece. Stainless steel is nearly indestructible and very easy to sanitize after cooking. This design works perfectly for active households that love modern art.
Materials Required
Electric blue cabinet paint Clear tempered glass sheet Acrylic paints (red, yellow, blue) Stainless steel countertop sheets Magnetic knife strip Metal hanging rail
Equipment Required
Paint brushes or spray bottles Heavy-duty glass adhesive Power drill Level tool Measuring tape Metal shears
DIY Instructions Step by Step
- Splatter acrylic paint onto the back of a clear glass sheet and let it dry.
- Paint your cabinets a bright electric blue to match the splatter art.
- Apply clear heavy-duty adhesive to the wall where the glass will sit.
- Press the glass sheet onto the wall so the paint side faces the wall.
- Install the stainless steel countertop sheets over your existing counters.
- Mount the magnetic knife strip onto the glass using industrial mounting tape.
- Screw the metal hanging rail into the wall studs above the backsplash.
- Hang your kitchen tools and knives to create a professional look.
- Seal the bottom of the glass backsplash with clear silicone.
- Clean the stainless steel with a specialized cleaner to make it shine.
39 Terrazzo Stone and Woven Greige
Neutral tones can still be interesting when you focus on large-scale patterns. This kitchen features a light terrazzo backsplash with oversized gray and tan stone chips. The greige cabinets have a subtle woven fabric texture on the surface.
A built-in terrazzo sink creates a seamless and modern look for the wet area. The bronze faucet adds a warm metallic touch to the cool stone palette. You can use large format tiles to minimize grout lines and make cleaning easier.
Terrazzo is a durable and classic material that adds a playful organic feel. The woven texture on the cabinets makes the room feel soft and comfortable. This combination is great for creating a high-end, spa-like kitchen environment.
Materials Required
Large format terrazzo tiles Greige textured cabinet wrap or paint Bronze kitchen faucet Terrazzo-look sink Light gray grout Stone sealant
Equipment Required
Large tile saw Notched trowel Grout float Power drill Level tool Measuring tape
DIY Instructions Step by Step
- Apply the woven texture wrap or paint to your cabinets for a soft finish.
- Measure the wall for your large terrazzo tiles and mark your cuts.
- Use a tile saw to cut the terrazzo to fit around the sink and outlets.
- Apply a thick layer of adhesive to the wall and press the tiles into place.
- Ensure the edges meet perfectly to create a seamless stone appearance.
- Fill the thin joints with a matching light gray grout.
- Install the terrazzo sink and the bronze faucet into the countertop.
- Seal the terrazzo surface with a stone protector to prevent water spots.
- Wipe the cabinet faces with a damp cloth to remove any installation dust.
- Check that the large stone patterns align across the entire length of the counter.
40 Bronze Mesh and Dark Walnut
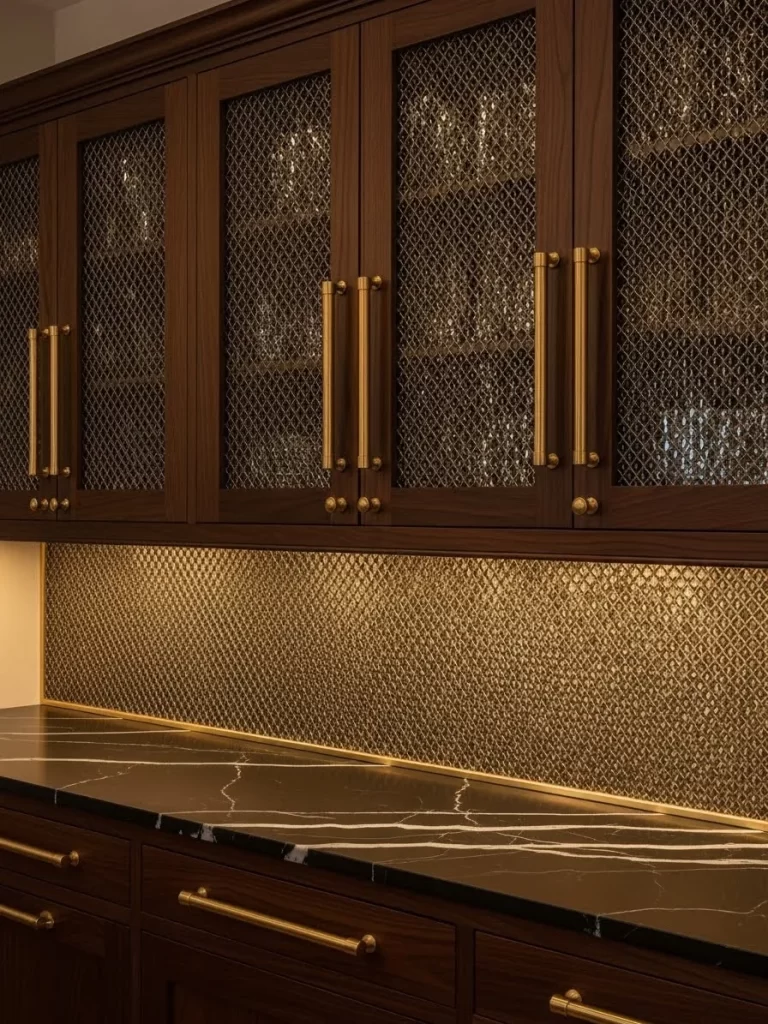
Industrial luxury combines warm wood with sophisticated metallic detailing. This design features dark walnut cabinets with bronze mesh inserts in the upper doors. The backsplash is a matching bronze diamond-mesh panel that glows under warm lights.
Long bronze handles and a black marble counter add to the expensive and moody feel. Warm under-cabinet lighting highlights the shimmer of the metal against the dark wood. This look is excellent for home bars or kitchens designed for evening entertaining.
The mesh inserts allow you to see your glassware while adding a layer of texture. Dark walnut is a timeless wood that brings a sense of weight and quality. Using bronze instead of silver creates a much warmer and more inviting atmosphere.
Materials Required
Dark walnut cabinets Bronze diamond-mesh sheets Bronze long bar handles Black marble countertop Construction adhesive Warm white LED strips
Equipment Required
Metal snips or shears Power drill Staple gun Level tool Measuring tape Screwdriver
DIY Instructions Step by Step
- Remove the center panels from your upper cabinet doors using a saw.
- Cut the bronze mesh sheets to fit the back of the open door frames.
- Staple the mesh into the back of the doors using a heavy-duty staple gun.
- Measure the backsplash area and cut a large bronze mesh panel to size.
- Apply adhesive to the wall and press the mesh panel firmly into place.
- Install the dark walnut lower cabinets and the black marble counter.
- Mount the long bronze handles onto the lower drawers and upper doors.
- Stick the warm LED strips under the upper cabinets to light up the mesh.
- Seal the edge of the mesh backsplash with a thin bronze trim or silicone.
- Polish the wood and metal surfaces for a final, high-end glow.
Key Takeaways
Texture adds depth to flat walls and plain cabinet doors. Bold colors can define the entire mood of your cooking area. Lighting under your cabinets highlights the beauty of new tiles.
Simple DIY steps make these upgrades possible for anyone at home. Planning your layout before applying adhesive prevents common mistakes later. Matching your hardware to your color palette creates a polished look.
Starting a renovation project feels much easier when you have a clear plan. Your kitchen should be a place of joy rather than a boring chore. Each of these forty ideas offers a unique path to a stunning home.
Focusing on quality materials and steady hands ensures a professional result. You have the power to change your environment with just a few tools. Take pride in the work you do to improve your living space.
Creating a custom look does not require a massive budget or years of training. Simple changes often lead to the most satisfying transformations in the end. Enjoy your new kitchen and the vibrant energy it brings to your house.