Is your kitchen feeling a bit lackluster? You might be overlooking one of the most impactful design elements in the entire room. That stretch of wall between your countertops and cabinets is more than just a space to catch splashes.

A kitchen backsplash is a canvas for your personality. It has the power to tie the whole room together, introduce color and texture, or serve as a stunning focal point. A great backsplash can completely transform the mood of your cooking space.
From rustic brick and sleek marble to vibrant patterned tiles and unique 3D designs, the options are truly endless. You do not need a massive budget or a professional contractor to make a significant change.
We have gathered 40 stunning ideas to help you break free from the boring and create a kitchen you truly love. With simple step-by-step DIY instructions for each, you are ready to start your transformation.
1. Embrace Geometric Artistry

Tired of plain kitchen walls? This backsplash offers a dynamic solution. It uses sharp angles and a mix of colors to create a piece of art right behind your sink. The design feels energetic and modern. Strong shapes in black, white, and grey form the base of the pattern.
Splashes of bright yellow and deep blue break up the monochrome look. These surprising pops of color add a playful yet sophisticated touch. This approach turns a functional kitchen area into a focal point. Your cooking space gains a unique personality that stands out.
DIY Instructions: Geometric Peel-and-Stick Tiles
Here is how you can create this look yourself.
What You’ll Need:
- Peel-and-stick geometric tiles in your chosen colors
- A tape measure or ruler
- A pencil
- A level (it looks like a ruler with a bubble in it)
- Scissors or a utility knife (ask a grown-up for help with this!)
- A clean cloth
Step-by-Step Guide:
- Prepare Your Wall: First, make sure the wall is super clean. Wipe it down with a damp cloth to get rid of any dust or grease. A clean wall helps the tiles stick much better. Let it dry completely.
- Plan Your Design: Before you stick anything, lay your tiles on the floor. Arrange them like a puzzle to create the pattern you want. This is your chance to be an artist! Once you love the design, take a picture of it so you remember how it goes.
- Draw a Straight Line: To avoid a crooked backsplash, you need a guide. Use your level and a pencil to draw a faint, straight line on the wall where you want the bottom of your tiles to start.
- Start Sticking: Begin at one end of your backsplash area. Take your first tile, peel off the backing paper, and carefully place it on the wall, using your pencil line as a guide. Press it down firmly with your hands.
- Build Your Pattern: Add the next tile right beside the first one, making sure the edges touch. Follow the pattern you designed on the floor. Continue this until the wall is covered.
- Cut Pieces for Edges: You will likely need smaller tile pieces for the ends of rows or to fit around outlets. This is a job for a grown-up. They can measure the space, mark the back of a tile, and carefully cut it to size with a utility knife.
- Final Press: Once all the tiles are in place, go over the entire backsplash with your hands or a clean cloth one last time. Press firmly to ensure every tile is stuck on well. Now you have an exciting new wall!
2. Add a Touch of Coastal Charm

This backsplash brings the beauty of the sea into your kitchen. The tiles are shaped like fish scales, creating a gentle, flowing pattern on the wall. Their surface catches the light, showing soft hints of blue, green, and pink. It is a subtle way to add color and texture.
The scalloped design feels both playful and elegant. It works well with the natural wood cabinets and clean white countertops. This look creates a calm and inviting atmosphere. Your kitchen becomes a bright and airy space, reminiscent of a day at the beach.
DIY Instructions: Peel-and-Stick Scallop Tiles
You can get this beautiful look with some simple steps.
What You’ll Need:
- Peel-and-stick scallop or fish scale tile sheets
- Tape measure
- Pencil
- A level
- Scissors or a utility knife (get a grown-up’s help)
- A clean rag
Step-by-Step Guide:
- Clean the Wall: Just like a painter needs a clean canvas, you need a clean wall. Use a rag to wipe away any kitchen grease or dust. Wait for it to dry completely.
- Draw a Starting Line: Use your level and pencil to draw a straight line where you want the bottom row of tiles to sit. This keeps everything from looking wonky.
- Plan the Overlap: These tiles often need to overlap to hide the seams. Look at the instructions that came with your tiles to see how they fit together. Practice connecting two sheets on a table first.
- Stick the First Sheet: Peel the backing from your first tile sheet. Line up the bottom edge with your pencil line and press it onto the wall. Smooth it out with your hands to get rid of any air bubbles.
- Continue Tiling: Take your next sheet and overlap it with the first one, just like you practiced. Keep adding sheets one by one until you have covered the whole area.
- Cut for Corners and Outlets: For tricky spots, ask a grown-up for help. They can measure the space, mark the back of a tile sheet, and use a utility knife to cut the right shape.
- Press Everything Down: After all the tiles are on the wall, give them one final press. This ensures they are stuck on tight and will stay there for a long time.
3. Mix Moody Tones with Metallics

This kitchen makes a powerful statement. Dark, textured stone tiles create a dramatic backdrop. They give the wall a rugged and natural feel. The texture adds depth and interest to the cooking area. It is a bold choice that feels solid and timeless.
A sheet of brushed gold-colored metal sits behind the stove. This warm, glowing panel contrasts beautifully with the cool, dark stone. It reflects the light, brightening up the space. This combination of rough stone and smooth metal creates a sophisticated, industrial look with a touch of luxury.
DIY Instructions: Faux Stone and Metal Panel
Creating this dramatic look is easier than it seems.
What You’ll Need:
- Faux stacked stone peel-and-stick panels
- A peel-and-stick metal-finish panel (like stainless steel or faux brass)
- Tape measure
- Pencil
- Level
- Utility knife (for an adult to use)
- A clean cloth
Step-by-Step Guide:
- Wall Prep: Start with a clean, dry wall. Wipe it down to make sure there is no dirt or oil.
- Find the Center: First, you will place the metal panel. Measure the wall behind your stove to find the center. Mark it with a pencil.
- Place the Metal Panel: Peel the backing off your metal-finish panel. Carefully line it up with your center mark and press it firmly onto the wall. Smooth it out to remove bubbles.
- Add the Stone Panels: Now for the stone. Start on one side of the metal panel. Peel the backing off a faux stone panel and press it against the wall, right next to the metal sheet.
- Cover the Rest of the Wall: Continue adding the stone panels, working your way out from the center. These panels are often designed to lock together like puzzle pieces.
- Make Necessary Cuts: When you get to the edge of your cabinets or the end of the wall, you will need to cut a panel. An adult can measure the space and carefully cut the panel to the right size.
- Final Check: Once everything is up, run your hands over all the panels to make sure they are stuck securely. Your kitchen now has a cool new vibe!
4. Elevate Your Space with Height

This kitchen uses a simple trick to feel bigger. The white tiles are stacked on top of each other, pointing up to the ceiling. This vertical pattern draws your eye upward, making the walls seem taller. It is a modern take on the classic subway tile.
The clean white color and light wood cabinets create a calm and open feeling. Even the tile goes all the way up the wall in one section, creating a neat accent. This style is great for smaller kitchens or for anyone who loves a bright, uncluttered look. It is simple, yet very effective.
DIY Instructions: Vertical Peel-and-Stick Tiles
This is a fun project that can make a room feel totally different.
What You’ll Need:
- Peel-and-stick subway tiles
- Tape measure
- Pencil
- A level
- A ruler or straight edge
- Utility knife or strong scissors (for a grown-up to use)
- Clean cloth
Step-by-Step Guide:
- Clean Your Workspace: Get your wall ready by wiping it down with a cloth. Make sure it is completely dry before you start.
- Draw a Plumb Line: This is a special word for a perfectly straight up-and-down line. Use your level to draw a straight vertical line from the counter up. This will be your guide for the first column of tiles.
- Stick the First Tile: Peel the back off your first tile. Line up one of its straight sides with the pencil line you drew. Press it firmly onto the wall.
- Stack Them Up: Place the next tile directly on top of the first one. Make sure their edges are touching and perfectly aligned. Continue stacking tiles until you reach the top.
- Start the Next Column: Begin a new column right next to the first one. Use the tiles in the first column as your guide to keep everything straight.
- Cut Tiles to Fit: When you reach a corner or an outlet, have a grown-up measure the spot and cut a tile to fit. They can use a ruler and a utility knife to get a clean cut.
- Finish the Job: Keep adding columns of tiles until the whole area is covered. Then, give all the tiles a good press to make sure they are on for good.
5. Bring in Some Farmhouse Charm

This kitchen feels cozy and welcoming, thanks to the brick backsplash. The bricks have different shades of red and brown, giving the wall a lot of character. It looks like a wall that has been there for a long time, telling a story.
The warm tones of the brick pair nicely with the wood countertop and dark green cabinets. The farmhouse sink and vintage-style lights complete the rustic look. It is a great way to make a new kitchen feel like it has old-world charm. This style is comfortable and full of texture.
DIY Instructions: Faux Brick Panels
You can get this classic look without any real bricks!
What You’ll Need:
- Faux brick peel-and-stick panels or wallpaper
- Tape measure
- Pencil
- Level
- Utility knife (for an adult)
- A plastic smoother tool (often comes with wallpaper)
- Clean cloth
Step-by-Step Guide:
- A Clean Start: Make sure your wall is clean and smooth. Any bumps on the wall might show through, so a clean surface is important.
- Plan Your First Piece: Start in a corner or at one edge of your counter. Use your level to draw a straight vertical line to guide your first panel.
- Peel and Stick: Carefully peel the top part of the backing from your first faux brick panel. Line it up with your pencil line and press it onto the wall.
- Smooth It Out: As you slowly peel off the rest of the backing, use the smoother tool to press the panel onto the wall. This pushes out any air bubbles and helps it stick well.
- Match the Pattern: When you add the next panel, pay close attention to the brick pattern. You want the “bricks” to line up so it looks like a real wall. Overlap the edges slightly if the instructions say to.
- Custom Cuts: An adult will need to cut the panels to fit around windows, outlets, or cabinets. They can measure the space, mark the back of the panel, and cut it with a utility knife.
- Complete the Wall: Continue adding panels until the backsplash is finished. Step back and admire your new, cozy kitchen wall.
6. Go for a Clean, Seamless Look

This kitchen is all about simplicity. Instead of many small tiles, the backsplash is one large, smooth piece. This is called a slab backsplash. It creates a very clean and modern look because there are no grout lines to distract the eye.
The soft gray color of the slab matches the cabinets, making the whole space feel unified and calm. Under-cabinet lighting highlights the smooth surface, giving it a gentle glow. This style is not only beautiful but also very easy to clean. It is a great choice for a kitchen that feels peaceful and organized.
DIY Instructions: Faux Slab Backsplash
Get this high-end look with a simple project.
What You’ll Need:
- A large roll of peel-and-stick contact paper in a marble or solid color design
- Tape measure
- Pencil
- A long ruler or yardstick
- A plastic smoothing tool
- Utility knife or scissors (for a grown-up)
- A friend to help (this is easier with two people!)
Step-by-Step Guide:
- Squeaky Clean Wall: Your wall must be perfectly clean and dry. Any speck of dust can create a bubble under the contact paper.
- Measure and Cut: Have a grown-up help you measure the backsplash area. Carefully roll out the contact paper and use a pencil and ruler to mark the size you need. Cut it out slowly to get a straight line.
- Apply with a Partner: This is the tricky part. One person should hold the paper at the top of the wall. The other person should peel a few inches of the backing away.
- Start at the Top: Press the sticky top edge of the paper to the wall. Use the smoother tool to press it down firmly.
- Slow and Steady: One person will slowly pull the backing paper down, while the other uses the smoother tool to press the contact paper onto the wall. Go from the center out to the edges to push out air bubbles.
- Cut Around Outlets: When you reach an outlet, an adult can carefully use a utility knife to cut an ‘X’ over the outlet and then trim the flaps around the edges.
- Final Smoothing: Once the whole piece is on, go over it again with the smoother to make sure it’s perfect. Now you have a sleek, modern backsplash!
7. Create a Natural, Cozy Vibe

This kitchen feels warm and inviting, like a sunny afternoon. The backsplash is made of hexagon-shaped tiles in a lovely terracotta color. The six-sided shape is more interesting than a simple square, creating a honeycomb pattern on the wall.
The earthy red-orange color of the tiles adds a natural warmth to the room. It looks beautiful next to the wood cabinets and all the pottery on the shelves. This style is a bit bohemian and very stylish. It makes the kitchen feel like a creative and happy place to be.
DIY Instructions: Peel-and-Stick Hexagon Tiles
This fun shape is easy to install.
What You’ll Need:
- Peel-and-stick hexagon tile sheets
- Tape measure
- Pencil
- Level
- Utility knife (for a grown-up)
- A clean cloth
Step-by-Step Guide:
- Clean the Wall: You know the drill! A clean wall is a happy wall. Wipe it down and let it dry.
- Draw Your Guideline: Use your level and pencil to draw a straight, horizontal line. This will help you keep your first row of tile sheets perfectly straight.
- Plan Your Layout: The hexagon sheets are designed to interlock. Lay a few on the floor to see how they fit together before you stick them to the wall.
- Stick the First Sheet: Peel the backing off your first sheet. Carefully align the straight top or bottom edge with your pencil line and press it onto the wall.
- Interlock the Next Sheet: Take your second sheet and fit it into the first one, like putting puzzle pieces together. Press it down firmly.
- Keep Going: Continue adding sheets until the wall is covered. The hexagon pattern will appear as you go.
- Make the Edge Cuts: At the end of a row or around a cabinet, you’ll have gaps. A grown-up can help here. They will need to cut individual hexagon tiles or parts of tiles from a spare sheet and stick them in the gaps to create a straight edge.
- Final Press: Rub your hands all over the tiles to make sure they are stuck on well. Enjoy your stylish new backsplash!
8. Get a Sleek, Chef-Inspired Look

This kitchen looks like it belongs to a professional chef. The backsplash is made of shiny, stainless steel tiles laid out like subway tiles. The metal surface is sleek and reflects the light, making the space feel bright and clean.
Paired with dark cabinets and a large stove, the steel backsplash creates a modern and serious cooking environment. It is also very practical because metal is durable and easy to wipe clean. This choice is great for someone who loves to cook and wants their kitchen to be both stylish and highly functional.
DIY Instructions: Metal Peel-and-Stick Tiles
You can create this pro look in an afternoon.
What You’ll Need:
- Peel-and-stick stainless steel or metal-finish tiles
- Tape measure
- Pencil
- Level
- Tin snips or a special cutter for metal tiles (a job for a grown-up!)
- A clean, soft cloth
Step-by-Step Guide:
- Prep the Surface: Make sure your wall is clean, dry, and smooth.
- Draw a Level Line: Use your level to draw a straight line for your first row of tiles.
- Stick the First Tile: These tiles have a very strong adhesive. Peel the back off the first tile, line it up carefully with your guide, and press it on. Once it’s on, it’s hard to move, so take your time.
- Create the Pattern: Place the next tile right beside the first. For a subway pattern, you’ll start the second row with a half-tile.
- Cutting Metal Tiles: This is the most important step for an adult. Cutting metal tiles requires special tools and care. They will need to measure the space, mark the tile, and use the correct tool to make a clean cut.
- Work Around Obstacles: For outlets, an adult will need to measure and cut the tile to fit around the opening.
- Final Polish: Once all the tiles are in place, use a soft cloth to wipe away any fingerprints. Your kitchen now has a shiny, professional-grade backsplash.
9. Go Back in Time with Classic Style

This kitchen is fun and full of energy. The white subway tile backsplash is a timeless choice that keeps the space feeling bright and open. The simple, clean lines of the tiles provide a calm background for all the colorful things in the room.
The mint green cabinets and checkered floor give the kitchen a retro, 1950s diner vibe. The white backsplash works as a neutral element, allowing the colors to pop without overwhelming the space. It proves that a simple backsplash can be the foundation for a very playful and personalized kitchen design.
DIY Instructions: Classic Subway Tiles
This is a classic look you can easily do yourself.
What You’ll Need:
- Peel-and-stick subway tile sheets
- Tape measure
- Pencil
- Level
- Utility knife or scissors (for an adult)
- Clean cloth
Step-by-Step Guide:
- A Fresh Start: Begin with a clean, dry wall.
- Find Your Starting Point: It is often best to start in the middle of the wall and work your way out. This makes the design look balanced. Measure to find the center and draw a straight vertical line with your level.
- Draw a Horizontal Line: Also draw a straight horizontal line where the first row of tiles will sit. You will use the spot where the two lines cross as your starting point.
- Apply the First Sheet: Peel the backing from a tile sheet and place its corner right at your starting point. Use your lines to make sure it’s straight. Press it down.
- Create the Brick Pattern: Add the next sheet. For the classic subway look, the tiles should be offset, like bricks in a wall. The sheets are usually designed to help you do this easily.
- Cut End Pieces: Have a grown-up measure and cut tiles to fit at the ends of the rows and around outlets.
- Complete the Wall: Keep adding tile sheets until the entire area is covered. Give it a final wipe-down, and your timeless backsplash is complete.
10. Add a Splash of Color

This backsplash is like a wave of fresh water in the kitchen. It is made of small, rectangular glass tiles in many different shades of blue. The mix of light, medium, and dark blues creates a sense of movement and depth.
The glossy finish of the glass tiles reflects the under-cabinet lighting, making the backsplash sparkle. It is a bold and beautiful way to bring color into a kitchen with white cabinets. This style is cheerful and clean. It adds a lot of personality without being overwhelming.
DIY Instructions: Mosaic Glass Tile Sheets
These tiny tiles look complicated, but they come on easy-to-use sheets.
What You’ll Need:
- Peel-and-stick mosaic tile sheets (with the small tiles already attached to a backing)
- Tape measure
- Pencil
- Level
- Utility knife with a fresh blade (for a grown-up)
- Clean cloth
Step-by-Step Guide:
- Clean Your Wall: Wipe down the wall to remove any grease or dust. Let it dry fully.
- Draw Your Guide: Use a level and pencil to draw a straight line to guide your first row of tile sheets.
- Test the Fit: The sheets are like puzzle pieces. Lay a couple on the counter to see how their edges interlock before you stick them to the wall.
- Stick the First Sheet: Peel the backing off your first sheet. Line it up with your guide and press it firmly onto the wall.
- Connect the Next Sheet: Place the next sheet right beside the first, interlocking the edges so you cannot see a seam. Continue this across the wall.
- Cutting the Sheets: This is the easiest part to customize. A grown-up can easily cut through the mesh backing with a utility knife to go around outlets or fit into small spaces. You can even pop individual tiles off to get a perfect fit.
- Press and Enjoy: Once all the sheets are up, press firmly over the whole surface. Now you have a colorful and sparkling new backsplash that you made yourself!
11. Make a Luxurious Statement with Stone

This kitchen uses a single, stunning piece of marble for its backsplash. The white stone has bold, dark grey lines running through it like rivers. This natural pattern creates a piece of art on the wall. The design is both elegant and powerful.
Using the same marble for the countertop and island creates a seamless, high-end look. The under-cabinet lights shine down, highlighting the beautiful details in the stone’s veining. This approach turns the kitchen into a sophisticated space that feels both modern and timeless. It is a choice that truly stands out.
DIY Instructions: Faux Marble Slab
You can achieve this expensive look with a simple trick.
What You’ll Need:
- A roll of high-quality, peel-and-stick marble contact paper
- Tape measure
- A long ruler or yardstick
- Pencil
- A plastic smoothing tool (like a squeegee)
- Utility knife (a job for a grown-up)
- A friend to help you
Step-by-Step Guide:
- Prepare the Wall: Your wall needs to be very clean and very smooth. Wipe it down to remove any dust or grease. Any little bump will show, so make it perfect.
- Measure and Cut: With a grown-up’s help, measure the height and width of your backsplash area. Roll out your contact paper on the floor and carefully mark your measurements on the back. Use the long ruler to draw straight lines, then cut the paper to size.
- Team Up for Sticking: This is much easier with two people. Have one person hold the top of the paper against the wall. The other person should peel back just the first few inches of the paper backing.
- Start from the Top: Line up the top edge of the paper with the bottom of your cabinets and press it down. Use your smoothing tool to stick that first part firmly.
- Peel and Smooth: Now, one person will slowly pull the paper backing down. As they do, the other person uses the smoothing tool, starting from the middle and pushing outwards, to stick the paper to the wall. This chases away any air bubbles.
- Cut for Outlets: When you get to a power outlet, an adult can carefully cut an “X” shape over it with the utility knife and then trim the little flaps to make a neat opening.
- Final Check: Once the whole piece is on, go over it one more time with the smoother. Now you have a beautiful marble backsplash that looks like the real thing!
12. Play with Light and Texture

This backsplash introduces a unique and sophisticated texture to the kitchen. It uses panels of fluted glass, which has vertical grooves or ridges. These grooves catch the light in an interesting way, creating a beautiful shimmering effect.
Lights placed behind the glass panels make them glow from within. This backlighting turns the backsplash into a feature that is both a light source and a piece of art. The look is modern and very elegant. It adds depth and a sense of luxury to the dark cabinetry.
DIY Instructions: Faux Fluted Glass
Here is a creative way to get this stylish look.
What You’ll Need:
- Sheets of clear acrylic or plexiglass, cut to fit your backsplash area
- A roll of ribbed or fluted window privacy film
- A spray bottle with water and a tiny drop of dish soap
- A plastic squeegee or smoothing tool
- Scissors or a utility knife (for an adult)
- LED light strips (optional, for the glowing effect)
Step-by-Step Guide:
- Prepare Your Panels: First, make sure your acrylic panels are perfectly clean on both sides.
- Apply the Film: Lay an acrylic panel flat on a table. Spray the surface with your soapy water solution. This helps you slide the film around to get it in the right spot.
- Place the Film: An adult can cut a piece of the fluted window film slightly larger than your panel. Peel the backing off the film and lay it on the wet acrylic.
- Squeegee the Bubbles: Use your squeegee to smooth the film down. Start from the center and push all the water and air bubbles out to the edges.
- Trim the Edges: Once the film is smooth, an adult can use a utility knife to carefully trim the extra film from the edges of the panel. Let it dry completely.
- Install the Panels: You can attach your finished panels to the wall using strong double-sided mounting tape or mirror adhesive.
- Add Lights (Optional): To make it glow, stick LED light strips along the top or bottom edge of the wall behind the panels before you attach them. This will give you that beautiful, high-end look.
13. Create a Vibrant, Handmade Feel

This kitchen backsplash is full of life and color. It uses square tiles that look like they were painted by hand. Each tile has a rich, glossy finish, with deep blues, earthy oranges, and bright greens sitting side-by-side.
The slightly uneven colors and textures on the tiles give them a rustic and artistic charm. The pattern is simple, but the mix of colors makes it exciting. This style is great for adding a personal and creative touch to a kitchen with natural wood cabinets. It makes the space feel warm and unique.
DIY Instructions: Colorful Peel-and-Stick Squares
You can create your own colorful masterpiece with this fun project.
What You’ll Need:
- Peel-and-stick square tiles in several different colors
- Tape measure
- Pencil
- Level
- Scissors (for an adult to cut around obstacles)
- A clean cloth
Step-by-Step Guide:
- Clean the Wall: Start by wiping down your wall so the tiles have a clean surface to stick to.
- Plan Your Pattern: Before you stick anything, decide on your color pattern. You can make it random, create stripes, or design a checkerboard. Lay the tiles out on the floor to see what you like best.
- Draw a Guide: Use your level to draw a straight line for the bottom row. This ensures your whole design doesn’t end up crooked.
- Stick the First Tile: Start in a corner. Peel the backing off your first tile, line it up with your guide, and press it firmly onto the wall.
- Build Your Design: Add the next tile right beside the first, making sure the edges touch. Keep adding tiles one by one, following the colorful pattern you designed.
- Make Cuts if Needed: If you need to fit a tile in a small space, an adult can measure it and cut the peel-and-stick tile with a pair of strong scissors or a utility knife.
- Finish Strong: Keep going until the whole area is covered in your beautiful, colorful tiles. Press over the whole backsplash with a cloth to make sure every tile is stuck on well.
14. Embrace Fun with Flecks of Color

This kitchen uses a fun and modern material called terrazzo. The backsplash and countertop are covered in it, creating one seamless, playful surface. Terrazzo is made of small chips of marble, quartz, and glass set in cement, and here it creates a pattern that looks like confetti.
The white base with colorful specks of black, brown, and grey is stylish and energetic. Because the pattern continues from the counter up the wall, it makes the space feel cohesive and clean. This look is great for a minimalist kitchen that needs a touch of personality and fun.
DIY Instructions: Faux Terrazzo Backsplash
Get the fun look of terrazzo without the heavy materials.
What You’ll Need:
- A roll of peel-and-stick terrazzo patterned contact paper or wallpaper
- Tape measure
- Pencil
- A long ruler
- Plastic smoothing tool
- Utility knife (for a grown-up)
Step-by-Step Guide:
- Start with a Clean Slate: Wipe down the wall thoroughly to make sure it is free of any dirt or grease. Let it dry.
- Measure Twice, Cut Once: Ask a grown-up to help you measure the backsplash area. Carefully roll out the terrazzo paper and use a ruler and pencil to mark where to cut. Cut slowly for a straight edge.
- Apply the Paper: It’s easiest to work from top to bottom. Peel a few inches of the backing from the top of the paper. Line it up with the bottom of your cabinets and press it to the wall.
- Smooth It On: Slowly pull the rest of the backing paper down with one hand while using the smoothing tool with your other hand. Work from the middle to the edges to push out all the air bubbles.
- Match the Pattern: If you need a second piece of paper, carefully line up the terrazzo pattern so the seam is hard to see. Overlap the edges just a tiny bit.
- Cut Around Plugs: An adult can use the utility knife to carefully cut out openings for any power outlets.
- Final Press: Go over the entire surface one last time with the smoothing tool to ensure it is stuck on well. Enjoy your new, playful kitchen!
15. Add Drama with Dark, Natural Stone

This backsplash creates a sophisticated and moody atmosphere. It uses dark slate tiles arranged in a herringbone pattern, where the rectangular tiles are angled to form V-shapes. This dynamic pattern adds a lot of visual interest and texture to the wall.
The natural lines and color variations in the dark stone are highlighted by the warm glow of the wall lights. This combination of dark, textured material and focused lighting creates a dramatic and cozy feel. It’s a bold choice that makes a smaller space feel intimate and luxurious.
DIY Instructions: Faux Slate Herringbone
This impressive pattern is easy to create with the right materials.
What You’ll Need:
- Peel-and-stick tiles that look like dark slate or stone
- Tape measure
- Pencil
- A level or ruler
- A miter box and saw, or a utility knife (for an adult to make angled cuts)
- A clean cloth
Step-by-Step Guide:
- Clean Wall, Good Start: Wipe down your wall so it’s clean and ready for tiles.
- Find the Center: The herringbone pattern looks best when it’s centered. Find the middle of your backsplash area and use a level to draw a straight vertical line. This is your main guide.
- The First Tile is Key: Your first tile needs to be placed at a 45-degree angle, with its top corner touching your center line. This sets the pattern for the whole wall.
- Build the ‘V’ Shape: Place the next tile at a 45-degree angle on the other side of the line, so its corner meets the first tile to form the top of a ‘V’. Continue building down from here, creating a zig-zag pattern down the center line.
- Fill in the Sides: Once your center column is done, fill in the sides. Keep the same 45-degree angle for all your tiles.
- Make the Edge Cuts: This is a job for a grown-up. To make the edges straight along the counter and cabinets, they will need to cut the tiles at an angle. They can use a miter box for very straight cuts.
- Press to Finish: When all the tiles are in place, press them all down firmly. Your dramatic new backsplash is complete!
16. Reflect Light with Vintage Style

This kitchen backsplash uses antique mirror tiles to create a feeling of glamour and space. Unlike regular mirrors, these have a distressed, smoky look that adds character and a vintage feel. The mirror reflects the light and the rest of the room, making the kitchen feel larger and brighter.
The tiles are cut with beveled edges and arranged in a geometric pattern, which adds another layer of detail. This is a very luxurious choice that works well with the classic light fixtures and dark cabinets. It turns a simple wall into a stunning and sophisticated feature.
DIY Instructions: Peel-and-Stick Mirror Tiles
You can add this touch of glamour to your own kitchen.
What You’ll Need:
- Peel-and-stick antique mirror tiles
- Tape measure
- Pencil
- Level
- A glass cutter (optional, for a grown-up, only if tiles need to be cut)
- A soft, clean cloth
Step-by-Step Guide:
- A Spotless Surface: Clean your wall so it’s perfectly smooth and dry. Any debris could prevent the tiles from sticking properly.
- Plan Your Layout: Lay your tiles on the floor to plan your design. Start from the center of the wall and work your way out so the design looks balanced.
- Draw Your Guides: Use your level and pencil to draw a straight horizontal line and a straight vertical line through the center of your backsplash area. This will be your starting point.
- Stick the First Tile: Peel the backing off your first mirror tile. Carefully place its corner where your pencil lines cross. Press it firmly onto the wall. Be careful, as they are often very sticky.
- Continue the Pattern: Place the next tiles right up against the edges of the first one. Follow your planned design. Leave the thin, clear protective film on the front of each tile until you are all finished.
- Cutting Tiles (If Needed): Most designs won’t require cuts. But if you need to cut a tile to fit, this is a job for a grown-up using a special glass cutter.
- The Big Reveal: Once all the tiles are on the wall, peel off the protective film from the front of each one. Use a soft cloth to polish them. Your kitchen will now sparkle!
17. Personalize Your Space with Pops of Color

This kitchen backsplash shows how a simple design can be made unique and playful. The main wall is covered in creamy, off-white square tiles with a slightly wavy, handmade texture. This creates a soft and warm background.
To add personality, small square tiles in bright green and deep blue are scattered randomly among the white ones. This creates fun pops of color that catch the eye. The same tiles are used on the countertop area, tying the whole look together. It’s a great way to customize a classic look.
DIY Instructions: Create Your Own Accent Pattern
This is a really fun way to make your backsplash one-of-a-kind.
What You’ll Need:
- A box of peel-and-stick field tiles (your main color, like white or beige)
- A few sheets of peel-and-stick accent tiles in one or two bright colors
- Tape measure
- Pencil
- Level
- Scissors
Step-by-Step Guide:
- Clean Wall, Blank Canvas: Start with a clean, dry wall.
- Plan Your Accents: First, decide where you want your colorful accent tiles to go. You can lay all your white tiles on the floor and swap some out for colored ones until you have a random pattern that you love. Take a picture so you remember it.
- Draw a Guideline: Use your level to draw a straight line for your bottom row of tiles.
- Start Tiling with Your Main Color: Begin in a corner, placing your main colored tiles along the wall. Leave empty spaces where you planned for your accent tiles to go.
- Pop in the Color: Now, take your colorful accent tiles and stick them into the empty spaces you left. Press them down firmly.
- Keep Building: Continue this process, adding rows of your main tile and popping in the colorful ones according to your plan.
- Final Touches: Make sure all the tiles are pressed down securely. You now have a custom backsplash that shows off your creative style!
18. Achieve a Minimalist, Urban Look

This kitchen has a very clean and industrial feel, thanks to its concrete backsplash. The wall behind the stove is covered in a large, smooth panel that looks like poured concrete. It has a soft gray color and subtle texture, creating a calm and minimalist backdrop.
There are no grout lines, which makes the surface look seamless and continuous with the matching countertop. This simple, strong material works well with the flat-panel cabinets and stainless steel appliances. It is a great choice for a modern, uncluttered kitchen with an urban edge.
DIY Instructions: Faux Concrete Panel
Get this cool, industrial look using contact paper.
What You’ll Need:
- A roll of peel-and-stick contact paper with a concrete texture
- Tape measure
- Pencil
- A long ruler or yardstick
- Plastic smoothing tool
- Utility knife (for an adult)
Step-by-Step Guide:
- Get a Clean Surface: The key to making contact paper look good is a perfectly clean and smooth wall. Wipe it down well.
- Measure and Cut: An adult should help you carefully measure the backsplash area. Roll the contact paper out on a clean floor and use the ruler and pencil to mark the measurements on the back. Cut the piece out carefully.
- Apply from the Top: Starting at the top of the backsplash, peel away a few inches of the paper backing. Line up the edge of the contact paper with the wall and press it down.
- Smooth It Down: With one hand, slowly pull the backing paper off. With the other hand, use the smoothing tool to press the contact paper onto the wall. Go from the middle outwards to get rid of any air bubbles.
- Work Slowly: Take your time with this to avoid creases. If you get a big bubble, you can sometimes gently lift the paper and try again.
- Trim Around Outlets: An adult can use the utility knife to cut a neat opening for any power outlets.
- One Final Pass: Go over the whole surface with your smoother to make sure it’s stuck on tight. Your kitchen now has a cool, modern, concrete wall.
19. Step into an Era of Glamour

This backsplash is a work of art that brings the glamour of the 1920s into the kitchen. The design is a stunning Art Deco fan pattern, made from a mix of luxurious materials. White and black marble create the base, while lines of shimmering gold and hints of green add incredible detail and shine.
The pattern is bold and symmetrical, drawing the eye and making a dramatic statement. It even continues from the wall down to the floor, creating a completely immersive design. This is a choice for someone who loves bold patterns and a touch of extravagant, old-world elegance.
DIY Instructions: Art Deco Wall Mural
A wall mural can give you this intricate look in a few simple steps.
What You’ll Need:
- A peel-and-stick wall mural in an Art Deco design
- Tape measure
- Pencil
- Level
- A plastic smoothing tool
- Utility knife (for a grown-up)
- A friend to help
Step-by-Step Guide:
- Clean and Smooth: Your wall must be clean and dry. Murals work best on a very smooth surface.
- Plan the Placement: Murals usually come in a few large panels. Lay them on the floor to see how they fit together. Decide where the center of the design should be on your wall.
- Draw a Guide: Use your level to draw a straight vertical line down the center of your wall. You will use this to line up your first mural panel.
- Hang the First Panel: With a friend’s help, peel the top of the backing off the first panel. Line up its edge with your pencil line and press it to the wall.
- Smooth and Peel: As one person slowly peels the backing down, the other should use the smoothing tool to press the mural onto the wall, working from the center outwards.
- Add the Next Panels: Line up the pattern on the second panel with the first one and apply it in the same way. The key is to match the design perfectly at the seam.
- Trim the Edges: Once all the panels are up, a grown-up can use the utility knife to trim any extra material from the top, bottom, and around any outlets. Your glamorous new backsplash is ready!
20. Bring the Outdoors Inside

This kitchen features a truly unique backsplash: a living wall. A panel behind the stove is filled with different kinds of lush, green moss and ferns. It creates a vibrant, natural texture that brings a sense of life and freshness into the cooking space.
The different shades of green and the soft, bumpy textures of the moss make it a beautiful and calming focal point. Protected by a clear panel, it is a piece of living art that connects the kitchen to nature. This is an unexpected and wonderful way to make a kitchen feel peaceful and alive.
DIY Instructions: Faux Living Wall Panel
You can create this amazing look with preserved moss, so you never have to water it.
What You’ll Need:
- A picture frame with the glass removed, or a shallow wooden box (this will be your frame)
- A piece of foam board or cork board cut to fit inside your frame
- A hot glue gun (with adult supervision)
- Bags of different kinds of preserved moss (sheet moss, reindeer moss, mood moss)
- Optional: a few small faux fern or air plants
Step-by-Step Guide:
- Prepare Your Frame: Place your foam or cork board snugly inside your wooden frame or box. This will be the base you glue everything to.
- Plan Your Design: Open your bags of moss. Lay out the different types and colors on your board without gluing them. Think about creating hills and valleys with different textures. Place your faux ferns where you think they’ll look best.
- Start Gluing: This is a job for a grown-up, or with their close help. Start with your biggest pieces of moss. A grown-up can put a swirl of hot glue on the back of the moss and press it onto the board.
- Fill in the Gaps: Use smaller clumps of the different mosses to fill in all the empty spaces. Cover the entire board so you can’t see the base underneath.
- Add Your Plants: Now, add a dot of glue to the base of your faux ferns or other plants and nestle them into the moss.
- Let It Dry: Let the glue dry completely.
- Hang Your Art: Hang your finished moss panel on the wall like a picture. To protect it from cooking splashes, you can have a piece of clear acrylic or glass cut to size and mount it over the front of your moss art.
21. Add Natural Texture and Warmth

This kitchen backsplash uses thin vertical slats of light-colored wood to create a warm and inviting wall. The repeating lines of the wood paneling draw the eye upward, making the space feel taller. It adds a wonderful natural texture that feels both modern and cozy.
The warm glow from the under-cabinet lighting enhances the grain of the wood. This creates a soft and relaxing atmosphere. Paired with simple gray cabinets, the wood wall becomes a beautiful and calming focal point. It’s a great way to bring a touch of nature indoors.
DIY Instructions: Faux Wood Slat Wall
You can create this trendy look with a simple peel-and-stick solution.
What You’ll Need:
- A roll of peel-and-stick wallpaper that looks like wood slats (or fluted wood)
- Tape measure
- A level
- Pencil
- A plastic smoothing tool
- Utility knife (for a grown-up)
Step-by-Step Guide:
- Prep Your Wall: Make sure the wall is very clean and dry. A smooth surface is best for wallpaper.
- Measure and Cut Your First Piece: Ask a grown-up to help you measure the height of your backsplash. Cut your first strip of wallpaper a little bit longer than you need.
- Draw a Straight Guide: To make sure your first piece is perfectly straight up-and-down, use a level to draw a faint vertical line on the wall where the edge of the paper will go.
- Peel and Stick: Peel the top few inches of the backing off the wallpaper. Line up the edge of the paper with your pencil line and press it onto the wall.
- Smooth It Out: Slowly pull the backing paper down with one hand, and use the other hand to press the wallpaper onto the wall with your smoothing tool. Work from the center to the edges to push out air bubbles.
- Match the Pattern: When you add the next strip, carefully line up the wood slat pattern so it looks like one continuous wall.
- Trim the Edges: Once the wall is covered, a grown-up can use a utility knife to carefully trim the extra wallpaper at the top and bottom. They can also cut out spots for outlets.
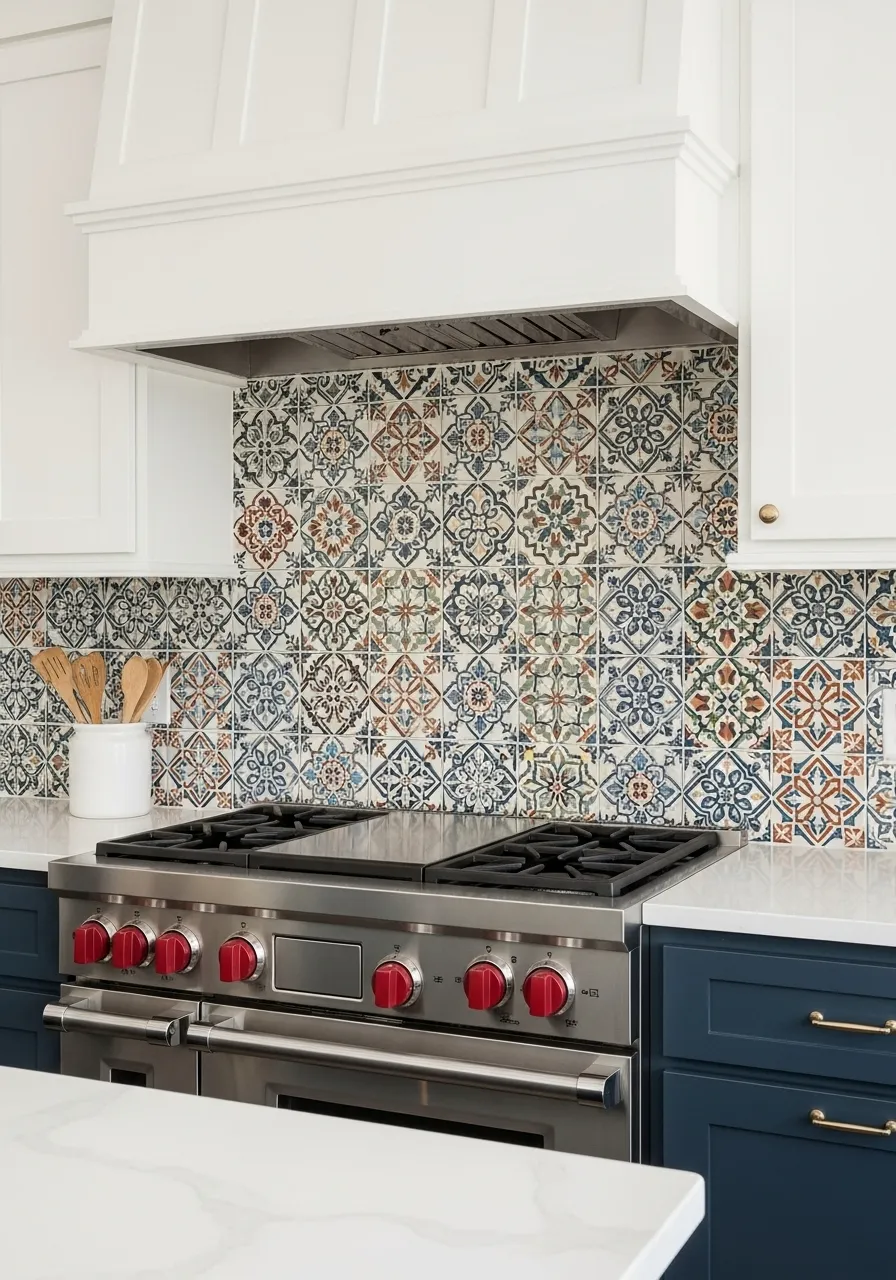
22. Bring Home a Touch of Old-World Charm

This backsplash is full of character and color. It features tiles with intricate, repeating patterns inspired by designs from Spain or Portugal. The mix of earthy colors like blue, terracotta, green, and cream creates a warm and lively look behind the stove.
Each tile seems to tell a story, and together they form a beautiful tapestry. This style adds a ton of personality to the kitchen, making it feel well-traveled and unique. It pairs wonderfully with both the classic white and bold blue cabinets, tying the whole room together.
DIY Instructions: Patterned Peel-and-Stick Tiles
It is easy to get this beautiful, detailed look.
What You’ll Need:
- Peel-and-stick tile sheets with a Mediterranean or Portuguese pattern
- Tape measure
- Pencil
- A level
- Utility knife or strong scissors (for a grown-up)
- A clean cloth
Step-by-Step Guide:
- Clean the Area: Wipe down the wall to get rid of any kitchen dust or grease. Let it dry completely.
- Plan Your Layout: The most important part is making the pattern look continuous. Lay a few sheets on the floor to see how the designs line up. Start your plan from the center of the wall so it looks balanced.
- Draw Your Guides: Use your level to draw a straight horizontal line for the bottom row and a vertical line down the center of the wall.
- Stick the First Sheet: Begin at your center point. Peel the backing off a tile sheet, line it up with your guides, and press it firmly to the wall.
- Match the Pattern Carefully: Take your next sheet and carefully align the pattern with the first one before you press it down. Work slowly to make sure the design flows perfectly from one sheet to the next.
- Make Cuts for Edges: When you reach a cabinet or an outlet, an adult will need to measure and cut a sheet to fit. They can use a utility knife to cut through the sheet.
- Finish the Job: Continue adding sheets until the area is covered. Then press down on all the tiles one last time to make sure they’re secure.
23. Add Modern, Artistic Movement

This backsplash turns a flat wall into a piece of modern art. It is made of 3D tiles that have a raised, wavy surface. When placed together, they create a continuous pattern of flowing waves that add a lot of texture and depth to the kitchen.
The design plays with light and shadow, and the mix of glossy blue and matte white surfaces makes the wave pattern stand out even more. It is a bold and creative choice that gives the minimalist kitchen a dynamic and futuristic feel. This backsplash is definitely a conversation starter.
DIY Instructions: 3D Wall Panels
You can create this amazing 3D effect yourself.
What You’ll Need:
- Lightweight 3D peel-and-stick wall panels in a wave design
- Tape measure
- Pencil
- A level
- Strong scissors or a utility knife (for a grown-up)
- A clean cloth
Step-by-Step Guide:
- Start with a Clean Surface: Wipe down your wall to make sure it’s clean and smooth.
- Plan Your First Row: The panels need to fit together just right to create the wave effect. Start in the middle of your wall for a balanced look. Use your level to draw a straight line to guide your first row.
- Stick the First Panel: Peel the backing off your first 3D panel. Line it up with your guide and press it firmly onto the wall. These panels are often very sticky, so take your time to get it right.
- Connect the Pattern: Take your next panel and fit it right up against the first one. The edges are usually designed to overlap or butt up against each other to hide the seam and continue the pattern.
- Keep Going: Continue adding panels, completing one row at a time. Make sure each one is pressed on firmly.
- Cut Panels to Fit: An adult can cut the panels to fit around outlets or at the end of a row. Because they are lightweight, they can often be cut with strong scissors.
- Check Your Work: Once all the panels are up, step back and enjoy your new, amazing 3D wall!
24. Create a Dramatic, Luminous Feature

This kitchen makes a breathtaking statement with a backlit stone backsplash. The material is a translucent stone like onyx or agate, which has beautiful, flowing bands of color. Lights installed behind the stone make it glow from within, turning the entire wall into a natural work of art.
The warm light shining through the layers of amber, cream, and gray creates a dramatic and luxurious atmosphere. The effect is mesmerizing, especially in the evening. This is a very high-end choice that transforms the kitchen range hood and wall into the undeniable centerpiece of the home.
DIY Instructions: Faux Backlit Agate Wall
You can create a similar glowing effect with a clever trick.
What You’ll Need:
- A piece of clear or frosted acrylic (plexiglass), cut to the size of your backsplash
- A roll of peel-and-stick wallpaper or window film that looks like agate or onyx
- A kit of peel-and-stick LED light strips
- Mounting hardware for the acrylic panel (like stand-off screws)
- A smoothing tool
Step-by-Step Guide:
- Create Your “Stone” Panel: First, you’ll make your fake stone slab. Clean the acrylic panel well. Then, carefully apply the agate-patterned wallpaper to one side of it. Use a smoothing tool to get rid of all the air bubbles. A grown-up can trim the edges with a utility knife.
- Install the Lights: Stick the LED light strips to the wall behind where your panel will go. You can run them along the top, bottom, and sides to get an even glow.
- Mount the Panel: This is a job for a grown-up. They will need to drill small holes in the corners of your acrylic panel and into the wall. Then, they can use stand-off screws to mount the panel. These screws will hold the panel a little bit away from the wall, leaving space for the lights.
- Turn It On: Plug in your LED lights and turn them on. The light will shine through the acrylic and the agate-patterned paper, creating a beautiful glowing effect, just like real backlit stone.
25. Embrace a Clean, Minimalist Look

Sometimes, the most effective backsplash is the simplest one. This wall uses a smooth, uniform coat of matte gray paint. This minimalist approach creates a calm and uncluttered backdrop that allows other kitchen elements, like the rustic wooden shelves and sleek black faucet, to be the stars.
Using a high-quality, scrubbable paint makes the wall durable and easy to clean, which is important in a kitchen. This choice is understated and modern. It proves that you do not always need tiles or patterns to create a stylish and functional kitchen space.
DIY Instructions: A Painted Backsplash
Painting is a quick and easy way to update your kitchen.
What You’ll Need:
- Painter’s tape
- A small can of kitchen and bath paint (it’s extra tough and easy to clean) in your favorite color
- A small paintbrush for edges
- A small paint roller
- A paint tray
- Cleaning spray and a cloth
Step-by-Step Guide:
- Clean the Wall: First, clean the wall really well to get off any grease from cooking. If the wall is greasy, the paint won’t stick. Let it dry completely.
- Tape Off the Edges: Use painter’s tape to make a neat border around your backsplash area. Put tape along the countertop, the bottom of the cabinets, and anywhere else you don’t want to get paint.
- Cut In with a Brush: Pour some paint into your tray. Dip your paintbrush in the paint and carefully paint along the edges of the painter’s tape. This is called “cutting in” and it gives you clean, sharp lines.
- Roll the Middle: Now, use your small roller to fill in the rest of the backsplash. Roll in a “W” shape to get a nice, even coat of paint.
- Add a Second Coat: Let the first coat of paint dry completely. It might take a few hours. Then, add a second coat to make the color look rich and solid.
- Peel the Tape: While the second coat is still a little bit wet, carefully peel off the painter’s tape. If you wait until it’s totally dry, it might peel some of your new paint off with it.
- Let It Cure: Let your new backsplash dry and “cure” for a few days before you scrub it. Now you have a fresh new look!
26. Create a Functional, Utilitarian Wall

This backsplash is for the serious cook who loves to be organized. The entire wall is covered in a dark gray pegboard, a board with a grid of holes. This system turns the backsplash into a completely customizable storage and display area.
Hooks, shelves, and baskets can be moved around to hold everything from pots and pans to spices and utensils. It is an extremely practical and space-saving solution, especially for smaller kitchens. The industrial look is modern and shows that this is a kitchen that is meant to be used.
DIY Instructions: A Pegboard Backsplash
Turn your wall into a super-organizer.
What You’ll Need:
- A sheet of pegboard, cut to the size of your backsplash
- Wooden strips (called furring strips)
- Screws
- A drill (a job for a grown-up)
- A level and a pencil
- A variety of pegboard hooks and organizers
Step-by-Step Guide:
- Plan Your Frame: A pegboard needs to be mounted a little bit away from the wall so the hooks have space to go in. You’ll do this by making a simple wooden frame on the wall first.
- Mount the Frame: A grown-up should cut the wood strips to make a frame that goes around the edges of your backsplash area. They will use a drill and screws to attach this frame to the wall. They should add another strip or two in the middle for extra support.
- Attach the Pegboard: Now, hold the pegboard up against the wooden frame. A grown-up will use the drill and screws to attach the pegboard to the frame.
- Time to Organize: This is the fun part! Take all your pegboard hooks, shelves, and baskets. Start arranging them in the holes to hang up all your kitchen tools.
- Customize Your Layout: You can hang your favorite pans, your cooking spoons, your spice jars, and anything else you want to keep handy. The best part is, you can change it around any time you want!
27. Add Depth and Modern Sophistication

This kitchen uses large panels of smoked mirror for its backsplash. The tinted, darker mirror adds a sense of glamour and drama. It reflects the room and the light, which makes the kitchen feel much bigger and more open, but it does so in a soft, subtle way.
The warm, bronze tint of the mirror complements the dark cabinets and gold hardware beautifully. With no grout lines, the look is incredibly sleek and seamless. This is a sophisticated choice that creates a moody, luxurious atmosphere perfect for a modern home.
DIY Instructions: Faux Smoked Mirror Panels
You can get this sleek, reflective look easily.
What You’ll Need:
- Sheets of acrylic mirror, cut to size
- A roll of smoked or bronze-tinted window film
- A spray bottle with water and a tiny bit of soap
- A squeegee or plastic smoothing tool
- Strong construction adhesive or mirror mastic (a job for a grown-up)
Step-by-Step Guide:
- Tint Your Mirrors: First, you will make your plain acrylic mirrors look like smoked glass. Lay a panel on a clean, flat surface. Spray it with your soapy water solution.
- Apply the Film: Have a grown-up cut a piece of the window film that is a little bigger than your panel. Peel off the backing and lay the sticky side down on the wet acrylic.
- Squeegee It Smooth: Use your squeegee to smooth the film, pushing all the water and air bubbles out to the sides. Let it dry completely. A grown-up can then trim the extra film from the edges with a sharp knife.
- Mount the Panels: The wall needs to be very clean and flat. A grown-up will apply the special mirror adhesive to the back of your finished panels.
- Press them to the Wall: Carefully press the panels onto the wall. They might need to be held in place with painter’s tape or braces while the glue dries. Make sure the seams between panels are as tight as possible.
- Polish and Admire: Once the glue is fully dry, clean the front of your new smoked mirrors. The kitchen will look bigger and more glamorous.
28. Create a Cozy, Rustic Vibe

This kitchen backsplash features classic white shiplap, which are horizontal wooden boards that fit closely together. The clean, repeating lines of the shiplap add a lovely texture to the wall. It creates a look that is bright, clean, and full of farmhouse charm.
The white color keeps the space feeling open and airy, while the texture of the wood adds warmth. The shiplap provides a simple, cozy backdrop for the vintage-style faucet and rustic cutting boards. This is a timeless choice that makes a kitchen feel comfortable and welcoming.
DIY Instructions: Easy Shiplap Wall
This popular look is simple to create with modern materials.
What You’ll Need:
- A roll of peel-and-stick shiplap wallpaper
- Tape measure
- A level
- Pencil
- A smoothing tool
- Utility knife or scissors (for a grown-up)
Step-by-Step Guide:
- Clean the Wall: Start by giving your wall a good wipe-down to make sure it’s clean.
- Start Level: The most important part of shiplap is that the lines are straight. Use your level to draw a perfectly straight horizontal line on the wall where your first strip of wallpaper will go.
- Cut Your First Strip: Measure the width of your wall and have a grown-up cut your first strip of shiplap wallpaper.
- Apply the First Strip: Peel the backing off the paper. Carefully line up the top or bottom edge with your pencil line and press it onto the wall. Use your smoothing tool to get rid of any bubbles.
- Line Up the Next Strip: Cut your next strip. When you place it above or below the first one, make sure to line up the “plank” lines in the pattern perfectly. This makes it look like real wood.
- Continue to the Top: Keep adding strips until you reach the bottom of your cabinets.
- Trim to Fit: A grown-up can use a utility knife to cut the paper to fit around outlets or windows. Now you have a beautiful, cozy farmhouse wall.
29. Embrace Moody, Sophisticated Style

This kitchen features a bold and dramatic backsplash made from a dark stone, like granite or soapstone. The stone has a matte, textured finish with subtle white veins running through it, which look like cracks of lightning against a dark sky.
The backsplash and countertop are made of the same material, creating a powerful, seamless look that wraps around the kitchen. The dark, moody color is very sophisticated and makes the warm copper handles pop. An LED light strip under the cabinets highlights the texture of the stone, adding to the luxurious feel.
DIY Instructions: Faux Black Stone Slab
Get this high-end, dramatic look with contact paper.
What You’ll Need:
- A roll of high-quality, peel-and-stick contact paper that looks like black stone
- Tape measure
- A long ruler
- Pencil
- A plastic smoothing tool
- Utility knife (for an adult)
Step-by-Step Guide:
- A Perfect Surface: To make this look seamless, your wall must be very clean and smooth. Wipe it down to remove any dust or grease.
- Measure and Cut: An adult should help you carefully measure the backsplash area. Roll out your contact paper and use the ruler and pencil to mark the measurements on the back. Cut the paper to size.
- Start at the Top: Peel back the first few inches of the paper backing. Line up the top edge of the contact paper with the bottom of your cabinets and press it to the wall.
- The Peel and Smooth Method: Slowly pull the backing paper down with one hand. At the same time, use your other hand to press the contact paper onto the wall with the smoothing tool. Always smooth from the middle out to the edges.
- Take Your Time: Go slowly to avoid wrinkles and bubbles. If you’re covering a large area, it’s helpful to have a friend help you.
- Cut Openings: When you get to a power outlet, an adult can use the utility knife to cut a neat opening.
- A Flawless Finish: Once the whole piece is on, go over it one more time with the smoother. Your kitchen now has a very cool and sophisticated new look.
30. Add a Fun and Custom Touch

This backsplash shows how to make a kitchen truly your own. It uses small, round penny tiles to create a fun and personal message right on the wall. The main tiles are a beautiful mix of blues and greens, creating a shimmering, water-like background.
White penny tiles are used to spell out a word, making the backsplash a unique piece of art. The small, round shape of the tiles adds a lot of texture and a bit of a retro feel. This is a wonderful idea for adding a playful and meaningful detail to your family’s kitchen.
DIY Instructions: Your Own Penny Tile Mosaic
This is a super fun project where you get to be the artist.
What You’ll Need:
- Sheets of peel-and-stick penny tiles in your main color (like blue)
- A few extra sheets of penny tiles in your letter color (like white)
- Graph paper and a pencil
- Scissors
- A level
- A clean cloth
Step-by-Step Guide:
- Design Your Message: First, plan your design on graph paper. Draw a grid and color in the little circles to spell out your word or make a picture. This will be the map for your real tile design.
- Prepare the Tiles: Pop the individual white penny tiles off their mesh backing. You’ll need these loose tiles to create your letters.
- Start Tiling the Wall: A grown-up can help you start applying the main blue tile sheets to your clean wall. Use a level to keep the first row straight.
- Create Your Letters: When you get to the spot where a letter should be, take one of the blue sheets. Before you stick it to the wall, carefully pop out the blue tiles where the white tiles should go, using your graph paper map as a guide.
- Stick and Fill: Peel the backing off the blue sheet and press it onto the wall. Now, take your loose white tiles and press them one by one into the empty spots you made. The sticky backing from the sheet will hold them in place.
- Complete Your Masterpiece: Keep going until your whole message is spelled out and the wall is covered. You’ve just made a custom piece of art for your kitchen!
31. Embrace a Warm, Weathered Look

This kitchen backsplash makes a bold statement with a large panel of rusted metal. The deep, fiery orange and brown tones create a warm and dramatic focal point behind the stove. The textured, weathered look of the rust adds a lot of character and an industrial, artistic touch to the room.
Paired with sleek black cabinets and a simple gray countertop, the rusted panel really stands out. It brings an element of raw, natural beauty into the modern kitchen. This is a unique choice for anyone who loves a mix of rustic and contemporary styles.
DIY Instructions: Faux Rust Panel
You can create this cool, weathered look without any real rust.
What You’ll Need:
- A metal or MDF panel cut to the size of your backsplash
- Special iron-based paint and a rust activator solution (you can find this at craft or hardware stores)
- Paintbrushes
- A spray bottle
- Sandpaper (optional)
- Clear matte sealer spray
Step-by-Step Guide:
- Prepare Your Panel: If you are using a wood (MDF) panel, you might want to sand it lightly first. Make sure it’s clean and dust-free.
- Apply the Iron Paint: This is a job for a grown-up. They will paint the panel with the special iron paint. This paint has real metal particles in it! They should apply two coats, letting it dry in between.
- Activate the Rust: This is the magic part. While the second coat of paint is still a little damp, a grown-up will spray the rust activator solution all over the panel.
- Watch It Change: Over the next hour, you will see real rust start to form right before your eyes! You can spray more activator in certain spots to create different patterns.
- Stop the Rusting: Once you love the way it looks, you can stop the rusting process by rinsing the panel with water and letting it dry.
- Seal Your Work: To protect your new rust masterpiece and keep it from making a mess, a grown-up will spray it with a few coats of a clear matte sealer.
- Mount It: Once it’s completely dry, an adult can mount the finished panel to the wall with strong construction adhesive.
32. Add a Touch of Understated Glamour

This backsplash brings a soft, shimmering elegance to the kitchen. It is covered in tiny tiles made of mother-of-pearl, which is the iridescent inside layer of a seashell. The tiles catch the light beautifully, reflecting soft shades of white, cream, and pink.
The small, fan-shaped tiles create a delicate, textured pattern that adds a lot of visual interest without being overwhelming. In an all-white kitchen, this backsplash adds a touch of luxury and a subtle glow. It is a beautiful way to create a bright and sophisticated space.
DIY Instructions: Peel-and-Stick Shell Tiles
This glamorous look is surprisingly easy to achieve.
What You’ll Need:
- Peel-and-stick mosaic sheets made of real mother-of-pearl
- Tape measure
- Pencil
- A level
- A pair of heavy-duty scissors or tile nippers (for a grown-up)
- A clean cloth
Step-by-Step Guide:
- A Clean Start: Make sure your wall is clean and completely dry.
- Draw a Guideline: Use your level to draw a straight line where your first row of tile sheets will go. This will keep your whole design straight.
- Stick the First Sheet: Peel the backing off your first sheet of shell tiles. Carefully line it up with your guide and press it firmly onto the wall. These sheets are often very sticky, so get it right the first time!
- Interlock the Sheets: Most mosaic sheets are designed to fit together like puzzle pieces to hide the seams. Fit your next sheet into the first one and press it down.
- Keep Going: Continue adding sheets until the whole backsplash area is covered.
- Make Cuts for Edges: This is a job for an adult. Because the tiles are made of real shell, they can be a bit tricky to cut. An adult may need to use strong scissors to cut the mesh backing, or special tile nippers to carefully snip individual shell pieces to fit around an outlet.
- Final Polish: Once all the tiles are up, gently wipe them down with a soft cloth to bring out their natural shine.
33. Create a Unique, Woven Look

This kitchen backsplash features a beautiful and unusual tile pattern. The white tiles are shaped and laid out to look like a woven basket. This three-dimensional design adds a lot of texture and a sense of handmade craftsmanship to the wall.
The way the light hits the raised pattern creates interesting shadows, making the wall feel dynamic and deep. In a neutral, creamy white, the basketweave pattern is subtle yet very sophisticated. It’s a great way to add a unique textural element to a classic kitchen.
DIY Instructions: 3D Basketweave Tiles
You can get this cool, textured look with special peel-and-stick tiles.
What You’ll Need:
- Peel-and-stick 3D tiles in a basketweave pattern
- Tape measure
- A level and pencil
- A utility knife (for a grown-up)
- A clean cloth
Step-by-Step Guide:
- Wipe Down the Wall: Start with a clean, dry surface.
- Start in the Middle: For a repeating pattern like this, it’s best to start in the center of your backsplash and work your way outwards. This makes the design look even on both sides. Use your level to draw a straight vertical line down the middle of the wall.
- Place Your First Tile: Peel the backing off your first 3D tile. Line up the center of the tile with your pencil line and press it firmly onto the wall.
- Build the Pattern: Add the next tiles on either side of the first one. These tiles are designed to fit together perfectly to create the continuous woven look.
- Complete the Wall: Keep adding tiles, row by row, until the whole backsplash is covered.
- Cut for the Edges: When you get to a corner or an outlet, a grown-up will need to carefully measure and cut a tile to fit. They can use a sharp utility knife for a clean cut.
- Press and Secure: Once all the tiles are in place, go over the entire wall with a cloth, pressing firmly to make sure every piece is stuck on well.
34. Turn Your Wall into an Art Gallery

This kitchen backsplash is for the true art lover. Instead of a single pattern, it uses a collection of different art panels to create a unique and eclectic gallery wall. A large, colorful abstract painting is the main feature, adding a huge splash of energy and color.
Below it, smaller panels with vintage-style botanical drawings and a scenic landscape add a touch of classic charm. This mix-and-match approach is very personal and creative. It turns a functional kitchen wall into a showcase of different art styles, making the space feel vibrant and one-of-a-kind.
DIY Instructions: A Custom Wall Panel Display
Become the curator of your own kitchen gallery.
What You’ll Need:
- Several thin wood (MDF) or canvas panels in different sizes
- Peel-and-stick wallpaper, art prints, or posters of your choice
- Mod Podge or spray adhesive
- A foam brush
- Scissors or a utility knife (for a grown-up)
- Strong construction adhesive to mount the panels
Step-by-Step Guide:
- Choose Your Art: The fun part is picking your pictures! You can choose a mix of modern art, old pictures, and patterns.
- Create Your Panels: For each piece of art, a grown-up will cut a panel of wood or use a canvas that is the right size.
- Apply the Art: If you are using peel-and-stick wallpaper, simply stick it to the panel and trim the edges. If you are using a paper print, a grown-up can apply a thin layer of Mod Podge or spray adhesive to the panel, carefully smooth the print on top, and then seal it with another layer of Mod Podge.
- Arrange Your Gallery: Lay your finished art panels on the floor and arrange them in a way that you like.
- Mount Them to the Wall: This is a job for a grown-up. They will apply a strong construction adhesive to the back of each panel and press them firmly onto your clean kitchen wall, following the layout you designed. Make sure they use a level to keep everything straight.
35. Add Warmth with Ornate Details

This kitchen backsplash has a warm, old-world feel. It is made from metal tiles, likely tin or copper, that have been stamped with beautiful, ornate patterns. Each square tile features a different floral or geometric design, creating a rich and detailed tapestry.
The warm, metallic tones of bronze and copper reflect the light with a soft glow. This adds a sense of history and craftsmanship to the kitchen. Paired with dark green cabinets and copper pots, the look is cozy, elegant, and full of character.
DIY Instructions: Faux Embossed Tin Tiles
You can get this beautiful, vintage look with easy-to-use materials.
What You’ll Need:
- Peel-and-stick faux tin or copper tiles (they are usually made of lightweight plastic)
- Tape measure
- A level and pencil
- A good pair of scissors or tin snips (for a grown-up)
- A clean cloth
Step-by-Step Guide:
- A Clean and Dry Wall: As always, start with a clean surface.
- Find Your Starting Point: It’s a good idea to start in the center of the backsplash to make sure the pattern looks balanced. Find the middle and use a level to draw a straight guideline.
- Stick the First Tile: Peel the backing off your first tile. Line it up with your guide and press it firmly onto the wall.
- Create Your Pattern: Continue adding tiles, placing them edge-to-edge. If your tiles have different patterns, you can mix them up randomly for an eclectic look. Many of these tiles have a small overlap on the edge to help you hide the seams.
- Cut to Fit: When you get to the end of a row, an adult will need to cut a tile. They can measure the space and use strong scissors or tin snips to cut the plastic tile to the right size.
- Finish the Wall: Keep adding tiles until the whole area is covered.
- Final Press: Go over all the tiles with a soft cloth, pressing firmly to make sure they are well attached.
36. Create a Calm and Modern Pattern

This kitchen backsplash uses textured tiles to create a pattern of soft, vertical stripes. The tiles have thin, raised lines, and they are arranged in wide columns of gentle colors like blush pink and seafoam green. The look is calm, clean, and very modern.
The vertical lines help to make the space feel taller, while the subtle texture adds depth and interest to the wall. The soft pastel colors are a nice way to add a bit of personality to the kitchen without being too loud. This is a beautiful choice for a bright and peaceful cooking space.
DIY Instructions: Striped and Textured Wallpaper
This look is easy to get with the right wallpaper.
What You’ll Need:
- A roll of peel-and-stick wallpaper with a ribbed or fluted texture
- You could also use a few rolls of wallpaper in different solid colors to create your own stripes.
- Tape measure
- A level and pencil
- A plastic smoothing tool
- Utility knife (for a grown-up)
Step-by-Step Guide:
- Clean Your Wall: Make sure the wall is clean and smooth.
- Plan Your Stripes: Decide how wide you want your colored stripes to be. Use a tape measure and a level to draw faint vertical lines on the wall to mark out your stripes.
- Cut Your First Strip: A grown-up will cut the first strip of wallpaper to the height of your backsplash.
- Apply the First Stripe: Peel the backing from the top of the paper. Line up the edge of the wallpaper with one of your pencil lines and press it to the wall.
- Smooth It On: Slowly pull the backing off while using your smoothing tool to press the wallpaper onto the wall. This will get rid of any bubbles.
- Add the Next Stripe: Cut a strip of your next color. Carefully line it up right next to the first stripe, making sure there are no gaps. Apply it in the same way.
- Finish the Wall: Continue adding your colored stripes until the whole backsplash is covered. A grown-up can trim the top and bottom and cut out spaces for outlets.
37. Get a Warm, Mediterranean Feel

This kitchen backsplash is made of tumbled stone tiles, which have soft, rounded edges and a slightly rough texture. This gives the wall a rustic and timeless look, as if it belongs in an old country farmhouse in Italy or France.
The light, creamy color of the stone keeps the kitchen feeling bright and warm. A decorative border of tiles is set behind the stove to create a subtle focal point. This style is full of natural texture and pairs beautifully with the dark wood cabinets and ornate range hood.
DIY Instructions: Faux Tumbled Stone
You can get this rustic stone look with peel-and-stick tiles.
What You’ll Need:
- Peel-and-stick mosaic sheets that look like tumbled stone
- Tape measure
- Pencil and a level
- Utility knife (for a grown-up)
- A clean cloth
Step-by-Step Guide:
- A Clean Wall is Key: Wipe down the wall to remove any dirt or grease.
- Draw a Straight Line: Use your level to draw a guideline for your first row of tile sheets. This will keep everything looking straight.
- Stick the First Sheet: Peel the backing from your first sheet. Line it up with your guide and press it firmly onto the wall.
- Connect the Sheets: These mosaic sheets are designed to interlock so you can’t see the seams. Fit the next sheet into the first one and press it down.
- Create a Border (Optional): To create a special design behind the stove, you can use a different style of tile. Just measure the area and fill it in with your decorative tiles first. Then, fill in the rest of the wall around it.
- Cut to Size: A grown-up can use a utility knife to cut through the mesh backing of the sheets to fit them around cabinets or outlets.
- Secure Your Work: Once all the sheets are up, press firmly over the whole backsplash to make sure it’s stuck on well.
38. Add a Pop of Modern Color

This kitchen features a super sleek and modern backsplash. It is a single, large panel of back-painted glass in a beautiful turquoise color. This creates a smooth, glossy surface with absolutely no grout lines, which is very easy to clean.
The bright, bold color adds a fun and vibrant energy to the otherwise all-white kitchen. The reflective surface of the glass also helps to bounce light around the room, making it feel brighter and more spacious. This is a great choice for a clean, contemporary look with a playful personality.
DIY Instructions: A Faux Glass Panel
You can create this look with a colored acrylic panel.
What You’ll Need:
- A sheet of colored acrylic (plexiglass), custom cut to the size of your backsplash
- Strong, clear construction adhesive suitable for plastics (a job for a grown-up)
- A caulking gun
- Painter’s tape
Step-by-Step Guide:
- Get a Custom Panel: The easiest way to do this is to have a hardware store or plastic supplier cut a piece of colored acrylic to your exact measurements. They can even cut out holes for your power outlets.
- Clean Both Surfaces: Make sure your wall and the back of the acrylic panel are perfectly clean and dry.
- Apply the Adhesive: This is a job for a grown-up. They will use a caulking gun to apply the clear construction adhesive to the back of the panel. They should make an “S” shape all over the back and add some around the edges.
- Mount the Panel: Carefully press the acrylic panel onto the wall. Press firmly all over to make sure it makes good contact with the adhesive.
- Tape it in Place: Use a few strips of painter’s tape to hold the panel securely in place while the adhesive dries completely. This could take up to 24 hours.
- The Big Reveal: Once the adhesive is cured, carefully remove the painter’s tape. You now have a super sleek and colorful modern backsplash!
39. Bring Natural, Rugged Texture Indoors

This kitchen makes a powerful connection to the outdoors with a stacked stone backsplash. The wall is covered in rough, uneven pieces of natural stone in various shades of gray, beige, and rust. This creates an incredible amount of texture and a rugged, natural look.
The stone continues from the countertop all the way up the wall, making it a very dramatic feature. The look is rustic yet sophisticated, and it pairs well with the modern white cabinets and sleek wood shelves. This is a great way to add a strong, earthy element to your home.
DIY Instructions: Faux Stacked Stone Panels
This heavy-duty look can be surprisingly lightweight and easy to install.
What You’ll Need:
- Peel-and-stick panels made of lightweight, faux stacked stone
- Tape measure
- A level and pencil
- A handsaw or jigsaw (for a grown-up)
- Construction adhesive (optional, for extra hold)
- A clean cloth
Step-by-Step Guide:
- A Clean, Strong Wall: Wipe down your wall. Make sure it’s in good condition, as the panels can be a bit heavier than wallpaper.
- Start at the Bottom: Begin with your first panel in a bottom corner. Use a level to make sure it is perfectly straight.
- Peel and Stick: Peel the backing from the panel and press it firmly onto the wall. Hold it for a few seconds to make sure it sticks well. For extra security, a grown-up could add a few dabs of construction adhesive to the back.
- Interlock the Panels: These panels are usually designed to fit together like puzzle pieces, with a zig-zag edge. Fit the next panel into the first one to hide the seam.
- Cutting the Panels: This is a job for a grown-up. To fit the panels at the end of a row or around a cabinet, they will need to be cut with a saw.
- Work Your Way Up: Continue adding panels, row by row, until the whole backsplash is covered.
- Check Your Work: Step back and admire your new, rugged stone wall!
40. Add an Artistic, Decorative Touch

This kitchen backsplash features a beautiful and intricate piece of art. A decorative wooden panel, with a detailed pattern cut into it by a laser, is mounted behind the sink. The swirling, lace-like design adds a touch of elegance and craftsmanship to the room.
To protect the wood from splashes, a clear sheet of glass is mounted in front of it. This clever solution allows you to have a delicate piece of art as your backsplash while still being practical and easy to clean. It’s a wonderful way to showcase a unique decorative element.
DIY Instructions: A Decorative Screen Panel
You can create this look with a decorative panel from a hardware store.
What You’ll Need:
- A decorative laser-cut wood or plastic screen panel
- A piece of clear acrylic or glass, cut to the same size as your screen
- Stand-off mounting hardware (it looks like little metal pucks)
- A saw (if the panel needs to be cut, a job for a grown-up)
- A drill (for a grown-up)
- A level and pencil
Step-by-Step Guide:
- Choose Your Panel: You can find these decorative screen panels at most big hardware stores. Choose a pattern you love. A grown-up might need to cut it to the right size for your backsplash.
- Mount the Decorative Panel: The first step is to attach the decorative screen directly to your wall. A grown-up can use a few small dabs of construction adhesive or small screws to fix it in place.
- Mark the Holes for the Glass: Now, hold your clear acrylic panel in front of the screen. Use a pencil to mark on the wall where the corners of the panel are. This is where the stand-off hardware will go.
- Install the Stand-offs: A grown-up will drill holes into the wall and install the back part of the stand-off mounts.
- Mount the Glass: Finally, a grown-up will drill holes in the corners of your acrylic panel. They will hold the panel up to the mounts and screw on the front caps. This will hold the clear panel in place, floating just in front of your decorative screen. It’s protected and looks amazing!
You have now explored 40 different ways to reinvent your kitchen backsplash. From the timeless elegance of natural stone to the playful charm of a personalized mosaic, it is clear that this single feature holds immense design potential.
Your kitchen backsplash should be more than just a functional surface; it should be a reflection of your style. It is the perfect place to take a design risk, introduce a bold pattern, or add a touch of luxurious texture.
Whether you choose a simple weekend paint job or decide to create a custom art panel, you are now equipped with the inspiration and the instructions to get started. It is time to say goodbye to that boring wall and hello to a kitchen that feels uniquely yours.
Key Takeaways
- More Than a Wall Guard: A backsplash is a key decorative feature. It protects your walls from spills and splashes while defining the entire aesthetic of your kitchen.
- A World of Materials: Do not limit yourself to standard tiles. Materials like glass, metal, wood, and even mirrors can create stunning and unexpected results that cater to any style.
- DIY Makes it Accessible: A kitchen refresh does not have to be expensive. With the rise of high-quality peel-and-stick products, creating a beautiful backsplash is an achievable weekend project for any skill level.
- Think Outside the Box: Some of the most memorable backsplashes are the most unconventional. Options like a functional pegboard, a serene painted wall, or a living moss panel can add incredible personality to your space.