The holiday season is a time for connection, warmth, and creating lasting memories. At the heart of these celebrations is often the dinner table. It’s more than just a place to eat; it’s the stage where stories are shared, laughter rings out, and the spirit of the season comes to life.

Setting that stage can sometimes feel like a challenge. You want to create a space that feels special and welcoming, a reflection of your own personal style and the joy of the occasion. A beautifully set table invites your guests in and makes them feel cherished from the moment they sit down.
That’s why we’ve gathered 40 stunning and diverse holiday tablescapes to spark your imagination. Whether your taste is rustic and cozy, modern and minimalist, or glamorous and bold, you’ll find inspiration here. Better yet, each idea comes with simple, step-by-step DIY instructions to help you bring these beautiful looks to life in your own home.
1. Timeless Crimson & Gold Feast

This tablescape brings a classic holiday feeling to your dinner. Rich crimson velvet and shining gold accents create a warm and inviting atmosphere for your guests. The entire scene feels both elegant and comfortable, setting the stage for a special meal.
Lush green garland, full of holly and pine, runs down the center of the table. Bright red berries and golden pinecones peek out from the leaves. Tall red and white candles stand in polished brass holders, casting a gentle, flickering light over the entire setting.
Each place is set with care. Gold charger plates shine beneath crisp white dinnerware. The deep red napkins are held with ornate rings, adding a touch of luxury to this memorable holiday gathering.
DIY Classic Greenery Garland
Here is how you can make the beautiful garland centerpiece for your own table.
What You’ll Need:
- Several long branches of pine or fir (you can find these at a garden store or maybe in your yard!).
- A few smaller branches of holly with red berries.
- A few pinecones.
- Gold spray paint (optional).
- Thin green wire (florist wire works well).
- Scissors.
Step-by-Step Instructions:
- Prepare Your Pinecones: If you want your pinecones to be gold, now is the time to paint them. Ask a grown-up to help you. Go outside or to a place with lots of fresh air and lay down some old newspaper. Place your pinecones on the paper and lightly spray them with the gold paint. Let them dry completely.
- Build the Garland’s Base: Take your longest pine or fir branches and lay them down the center of your table. Overlap them a little bit in the middle to create one long line of green. This will be the foundation of your centerpiece.
- Make it Fuller: Now, use your smaller pieces of pine to fill in any gaps. Tuck them into the base branches to make the garland look thicker and more lush. You can use small pieces of the green wire to attach them if they don’t stay put.
- Add a Pop of Red: Take your holly branches and carefully place them throughout the garland. Poke the stems into the pine branches so they are secure. Make sure the pretty red berries are visible.
- Place Your Golden Pinecones: Arrange your dry, golden pinecones along the garland. You can nestle them between the branches so they look like they grew there.
- Add the Final Touches: Once you are happy with your garland, you can place your candle holders and candles in the center. Make sure they are steady and not wobbly. Now your table has a beautiful, handmade centerpiece!
2. Winter Wonderland Sparkle

Step into a magical, frosted world with this shimmering tablescape. A palette of crisp white and gleaming silver creates a scene of pure winter elegance. It feels like a quiet, snowy evening, full of light and wonder.
A glistening silver runner provides the base for this icy display. Tall, bare branches reach upwards, adorned with twinkling fairy lights that cast a soft glow. Faux snow is scattered generously, creating a fresh-fallen look, while clear glass and silver candle holders add layers of light.
Each setting is a study in sophistication. Silver chargers hold simple white plates, and crystal clear glasses sparkle in the candlelight. This setup transforms your dining room into a peaceful and enchanting winter escape.
DIY Twinkling Frost Branches
You can create this magical centerpiece with just a few simple things.
What You’ll Need:
- A few bare tree branches from your yard.
- White or silver spray paint.
- Spray adhesive or glue.
- White or silver glitter.
- A string of battery-powered fairy lights (the kind with thin wire).
- A vase or pot to hold them.
Step-by-Step Instructions:
- Find Your Branches: Go on a hunt in your backyard or a park for some cool-looking branches that have fallen from a tree. Make sure they are dry.
- Paint the Branches: With a grown-up’s help, take the branches outside and spray paint them white or silver. Make sure to cover all the little nooks and crannies. Let them dry.
- Make Them Sparkle: Lightly spray a branch with the spray adhesive (or use a paintbrush to apply some glue). Before it dries, sprinkle glitter all over it. Do this over a piece of newspaper to catch the extra glitter. Repeat for all your branches.
- Add the Lights: Take your string of fairy lights and carefully wrap it around the branches. Weave the thin wire in and out so the little lights poke out everywhere.
- Set Up Your Centerpiece: Place your finished branches in a vase. You can put some fake snow or white pebbles in the vase to hold them steady. Turn on the lights and watch your table sparkle!
3. Rustic Woodland Gathering

Bring the beauty of the forest indoors with this cozy, nature-inspired tablescape. It uses natural textures like wood, moss, and pine to create a warm and rustic charm. The whole table feels grounded and peaceful, like a festive meal in a snug cabin.
A runner of green moss and fragrant cedar branches forms the heart of the centerpiece. Real deer antlers are nestled among the greenery, alongside chunky pillar candles and scattered pinecones. Slices of real wood serve as placemats or coasters, enhancing the outdoor feel.
The place settings are simple and heartfelt. Gray stoneware plates sit on woven jute placemats. Each napkin is tied with twine and features a personalized wood slice, making every guest feel truly welcome.
DIY Woodland Name Tags
These little name tags are easy to make and add a personal touch to your table.
What You’ll Need:
- Small, thin wood slices (from a craft store).
- A dark marker or pen.
- Twine or string.
- Scissors.
- A small sprig of rosemary or a tiny pinecone for each tag (optional).
Step-by-Step Instructions:
- Get Your Wood Slices: Make sure your wood slices are clean and smooth. If they are rough, you can ask an adult to help you sand them a little bit.
- Write the Names: Using your marker, carefully write the name of each guest on one side of a wood slice. You can practice on a piece of paper first if you want.
- Cut the Twine: Cut a piece of twine for each name tag. About 6 inches long should be good.
- Tie it All Together: Lay the twine on the table. Place a napkin on top of it. Put your little decoration (the rosemary or pinecone) on the napkin. Place the wood slice name tag on top of that.
- Make a Knot: Carefully tie the two ends of the twine together in a bow or a simple knot. Make sure it’s tight enough to hold everything in place. Now you have a beautiful, rustic name tag for each guest!
4. Gilded Harvest Table

This tablescape is a celebration of autumn’s bounty, presented with a touch of glamour. Deep, moody colors are brought to life with brilliant gold and the warm glow of candlelight. It’s a look of abundance and sophistication.
An incredible centerpiece overflowing with fruits and florals runs the length of the table. Rich pomegranates, dark grapes, and ripe figs are mixed with artichokes and small pumpkins. Gold-painted pears and tall, orange taper candles add height and a luxurious shimmer.
The place settings continue the dramatic theme. Gold-rimmed glasses and ornate gold chargers contrast beautifully with matte black plates. Deep burgundy napkins are knotted simply, letting the colors of the harvest shine.
DIY Bountiful Fruit Runner
Create your own stunning and edible-looking centerpiece.
What You’ll Need:
- A table runner in a dark color like orange, red, or brown.
- A mix of real or good-quality fake fruits and vegetables. Good choices are grapes, pomegranates, figs, small pumpkins, and pears.
- A few fall leaves (real or fake).
- Gold spray paint (optional).
Step-by-Step Instructions:
- Add a Touch of Gold (Optional): If you want some sparkle, ask an adult to help you spray paint a few of your pears or pumpkins gold. Let them dry completely.
- Lay the Foundation: Place your fabric runner down the middle of your table.
- Start with the Big Stuff: Begin by placing your largest items, like the small pumpkins, along the center of the runner. Space them out evenly.
- Fill in with Fruit: Now, start filling in the spaces with your other fruits. Let the bunches of grapes spill over the sides a little. Place the pomegranates and figs in small groups.
- Tuck in the Leaves: Poke your fall leaves into any small gaps to add more color and texture.
- Place Your Gilded Fruit: Finally, place your special gold-painted fruits where they will catch the light. Your table now looks like a beautiful harvest painting!
5. Minimalist Holiday Village

This tablescape proves that simple can be stunning. With a clean, Scandinavian-inspired design, it creates a calm and modern holiday atmosphere. The focus is on neutral colors, natural textures, and simple shapes.
A collection of white ceramic houses creates a tiny, peaceful village along a simple linen runner. Bare, sculptural branches in a white vase add height without clutter. Warmth comes from the gentle flicker of beige and white candles in modern, minimalist holders.
The place settings are understated and elegant. Simple white plates are paired with gold and black cutlery. A string of wooden beads and a simple name tag tied with ribbon add a handmade, thoughtful touch to this serene holiday scene.
DIY Air-Dry Clay Village
You can build your own little winter village to decorate your table.
What You’ll Need:
- White air-dry clay.
- A small rolling pin or round bottle.
- A craft knife or a plastic knife (ask an adult for help).
- A little bowl of water.
- Wax paper or a craft mat.
Step-by-Step Instructions:
- Roll Out the Clay: Take a piece of clay and roll it out on your wax paper until it’s about the thickness of a cookie.
- Cut Your House Shape: With the knife (and a grown-up’s help!), cut out a rectangle shape. Then cut a triangle to sit on top for the roof. You can cut them as one piece if you like. Make houses of different sizes!
- Add Windows and Doors: Use the tip of the knife or a toothpick to carefully cut out small squares for windows and a little rectangle for a door.
- Smooth the Edges: Dip your finger in the water and gently smooth any rough edges on your little house.
- Let it Dry: Carefully stand your houses up and let them dry completely. This might take a day or two. Follow the instructions on the clay package.
- Set Up Your Village: Once they are hard and dry, you can arrange your little white houses down the center of your table to create a beautiful, minimalist scene.
6. Jewel-Toned Holiday Glamour

This tablescape is all about rich color and luxurious details. A deep and dramatic setting is created with a palette of sapphire blue, ruby red, and emerald green, all highlighted by brilliant gold. It’s a feast for the eyes, full of energy and opulence.
Vibrant floral arrangements are the stars of the show, bursting with red roses, purple tulips, and bright anemones. Exotic peacock feathers are tucked into the bouquets, adding an unexpected and glamorous touch. The tablecloth is a deep blue velvet, which makes all the colors pop.
Every detail at the place setting shines. Gold chargers and cutlery glitter next to turquoise water goblets. Royal blue napkins are cinched with sparkling, jewel-like rings, completing this dazzling and festive look.
DIY Jeweled Napkin Rings
Add a little bit of sparkle to your own napkins with this fun project.
What You’ll Need:
- Plain napkin rings (or you can use a cardboard paper towel tube).
- A hot glue gun and glue sticks.
- A variety of plastic craft jewels, gems, and beads in different colors and sizes.
- Scissors (if using a cardboard tube).
Step-by-Step Instructions:
- Make Your Rings (If Needed): If you are using a cardboard tube, ask an adult to help you carefully cut it into rings that are about 1 to 2 inches wide.
- Plan Your Design: Lay out your jewels on the table and think about what pattern you want to create on your napkin ring. You could make a flower shape, a stripe, or just a fun mix of colors.
- Get Gluing: Ask a grown-up to help you with the hot glue gun as it gets very hot. Put a small dot of hot glue on the napkin ring and press a jewel onto it. Hold it for a few seconds until it sticks.
- Cover the Ring: Keep adding jewels one by one until your napkin ring is covered in your beautiful design.
- Let it Cool: Set your finished napkin rings aside to let the glue cool down and harden completely. Now you have some glamorous, sparkling rings for your holiday napkins!
7. Coastal Holiday Breeze

Who says the holidays have to be all about snow? This tablescape brings a light, airy, seaside feeling to your celebration. It uses soft colors and natural beach treasures to create a unique and tranquil setting.
A large piece of weathered driftwood acts as the centerpiece, looking as if it just washed ashore. It’s decorated with seashells, starfish, silvery ornaments, and delicate air plants. A runner that looks like a fishing net adds to the coastal theme, while pale blue and white candles provide a soft glow.
The place settings are fresh and simple. Light blue plates sit on white, scalloped chargers. Pale blue napkins are tied with simple twine and a piece of sea glass, finishing this lovely and unconventional holiday table.
DIY Seaside Centerpiece
Bring the beach to your holiday table with this easy-to-make centerpiece.
What You’ll Need:
- A cool piece of driftwood (from a beach or a craft store).
- A collection of seashells, starfish, and sand dollars.
- A few air plants (they look like little sea creatures and don’t need soil!).
- A battery-powered string of fairy lights.
- A hot glue gun (optional, for adult use only).
Step-by-Step Instructions:
- Place Your Driftwood: Lay your piece of driftwood down the center of your table. This is the main part of your centerpiece.
- Arrange Your Shells: Take your seashells and starfish and arrange them on and around the driftwood. Place the bigger shells first, then fill in with the smaller ones. An adult can help you hot glue a few in place if you want them to be secure.
- Add the Plants: Gently tuck your air plants into the little nooks and cracks of the driftwood. They will look like they are growing right out of it.
- Weave in the Lights: Take your string of fairy lights and loosely wrap and weave it through your driftwood and shell arrangement. Hide the battery pack at one end.
- Turn it On: Switch on the lights to give your seaside centerpiece a magical holiday glow.
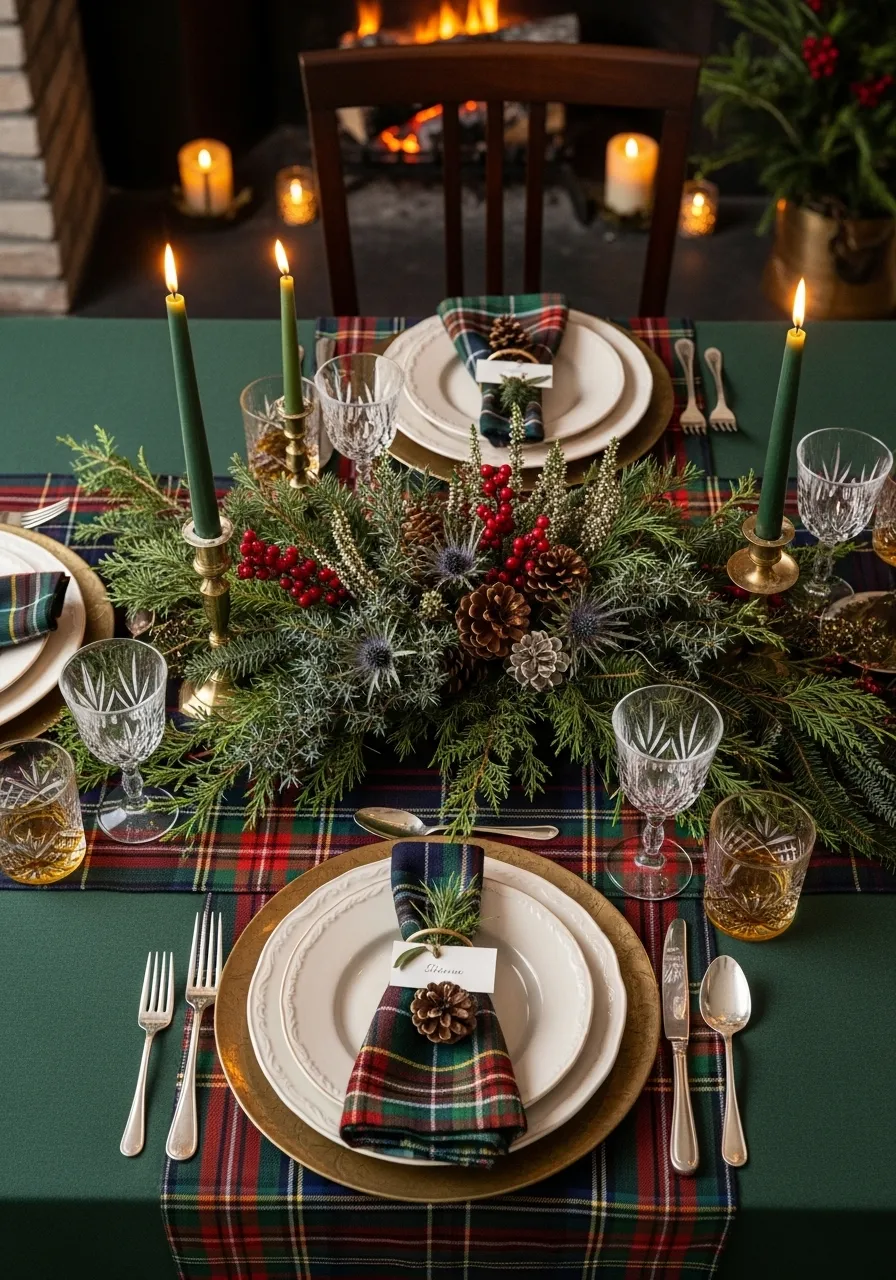
8. Cozy Plaid Holiday

This tablescape is the definition of cozy holiday charm. Classic tartan plaid and deep forest greens create a warm and inviting atmosphere, reminiscent of a festive gathering in the Scottish Highlands. It feels traditional, comfortable, and full of cheer.
A beautiful centerpiece made of fresh pine, cedar, and fir sits at the heart of the table. Bright red berries, pinecones, and hints of blue thistle add color and texture. Brass candlesticks with deep green taper candles complete the classic look.
The entire table is layered over a traditional plaid tablecloth. At each setting, a matching plaid napkin is neatly bundled and tied with twine. This timeless style is wonderful for a classic Christmas dinner.
DIY Plaid Napkin Bundles
This is a very simple way to make your place settings look extra special.
What You’ll Need:
- Cloth napkins with a plaid pattern.
- Twine or thin ribbon.
- Scissors.
- Small name cards.
- A pen.
- A small decoration for each, like a tiny pinecone or a sprig of evergreen.
Step-by-Step Instructions:
- Fold Your Napkin: Lay a napkin flat and fold it into thirds. Then, roll it up neatly into a little bundle.
- Write the Name Tag: Take your pen and write one guest’s name on each of the small cards.
- Cut Your Twine: Cut a piece of twine long enough to wrap around your napkin and be tied in a bow. About 10 inches should be enough.
- Assemble the Bundle: Place the twine on the table. Put the rolled-up napkin on top of the middle of the twine. Place your little pinecone or evergreen sprig on top of the napkin.
- Tie it Up: Place the name card on top of the greenery. Bring the two ends of the twine up and tie them in a neat bow over the name card. Trim the ends of the twine if they are too long. Repeat for all your guests!
9. Whimsical Gingerbread Village

This tablescape is a pure delight, especially for the younger guests. It transforms the dinner table into a magical, edible-looking wonderland. This playful and sweet setup is sure to bring smiles to everyone’s faces.
A village of charming gingerbread houses creates an enchanting centerpiece. Each house glows from within, lighting up a colorful pathway made of gumdrops. The “snow” is made from shredded coconut, and the entire scene is fenced in with candy canes. Little bottle brush trees add to the miniature landscape.
The place settings are just as fun. A red-and-white striped napkin sits atop each plate, holding a cheerful gingerbread man and a name tag. This tablescape is all about fun, imagination, and holiday sweets.
DIY Gumdrop Path
You can make the colorful path that winds through the gingerbread village.
What You’ll Need:
- A bag of colorful gumdrops or similar soft, round candies.
- Shredded coconut for the “snow.”
- A piece of white paper or cardboard cut into a wavy path shape (optional).
Step-by-Step Instructions:
- Make the Snowy Ground: First, sprinkle the shredded coconut all over the center of your table where you want your village to be. This is your snow!
- Lay Your Path (Optional): If you are using a paper path, lay it down on top of the coconut snow. This will give you a guide. If not, you can just imagine the path.
- Place the Border Candies: Take gumdrops of one or two colors and start placing them along the edges of your path. These will be the curb or border. Place them right next to each other.
- Fill in the Path: Now, take all the different colors of gumdrops and fill in the middle of your path. You can make a pattern or just make it a random, colorful mix.
- Build Around It: Once your path is done, you can place your gingerbread houses and candy cane fences alongside it. Your sweet, colorful road is ready!
10. Midnight Glamour Celebration

Ring in the New Year with a tablescape that is all about glamour and excitement. A dramatic black and gold color scheme sets the stage for a dazzling celebration. The entire table sparkles with anticipation for the countdown to midnight.
A tall black vase holding a burst of white and black feathers makes a show-stopping centerpiece. A vintage-style clock is placed right in the middle, ready for the big moment. Tiny disco balls hang from golden branches, reflecting the light from candles and sparklers.
The place settings are pure elegance. Gold chargers pop against the black tablecloth, topped with black plates that have a starry pattern. A sequined gold runner adds an extra layer of sparkle, making this the ultimate setting for a festive and memorable night.
DIY Mini Disco Ball Decor
Add some extra sparkle to your centerpiece with these fun little decorations.
What You’ll Need:
- Some small branches or twigs from the yard.
- Gold spray paint.
- Miniature disco ball ornaments (you can find these at a craft store, especially around the holidays).
- A vase to hold your branches.
Step-by-Step Instructions:
- Paint Your Branches: With a grown-up’s help, take your branches outside and spray paint them gold. Let them dry completely.
- Hang the Disco Balls: The mini disco balls should have little strings on them for hanging. Carefully tie or loop these strings onto the smaller parts of your golden branches. Hang them at different heights to make it look interesting.
- Arrange in a Vase: Place your decorated branches in a vase. You can put some black or gold pebbles in the vase to hold them in place.
- Place on the Table: Put your vase with the sparkling disco ball branches in the middle of your table as part of your centerpiece. They will catch the light and create a fun, party atmosphere.
11. Frosted Winter Orchard

Soft, muted tones give this tablescape a serene and sophisticated winter feel. It’s like a quiet walk through an orchard after the first frost. The look is gentle and romantic, using a palette of dusty blue, soft grey, and pale lilac.
A stunning centerpiece features frosted greenery, like dusty miller, mixed with ripe pears, figs, and clusters of grapes. The frosted effect gives everything a magical, sugary coating. Tall, pale blue taper candles in classic silver holders add a touch of traditional grace.
The place settings are delicate and layered. Silver-beaded charger plates sit beneath simple white dinnerware. Grey linen napkins are tied loosely with a soft velvet ribbon, completing this dreamy and elegant winter scene.
DIY Frosted Fruit & Greenery
You can give regular fruit and leaves a beautiful, sugary, frosted look.
What You’ll Need:
- Some fruit (pears, grapes, figs work well) and sturdy leaves (like magnolia or lemon leaves).
- 1 egg white.
- A small bowl.
- A fork or whisk.
- A small paintbrush.
- White granulated sugar.
- A plate or tray.
Step-by-Step Instructions:
- Prepare the “Glue”: Crack an egg and separate the white part into a small bowl. Use a fork to whisk the egg white for about 30 seconds until it’s a little bit frothy and bubbly.
- Paint Your Fruit: Take your clean, dry paintbrush and dip it into the egg white. Gently paint a very thin layer of egg white all over a piece of fruit or a leaf. Make sure you cover the whole surface.
- Add the “Frost”: Hold the sticky fruit over a plate and sprinkle sugar all over it. Turn it as you go to make sure you cover it completely. The sugar will stick to the egg white.
- Let it Dry: Place your finished frosted fruit and leaves on a piece of wax paper or a drying rack. Let them sit for a few hours until the egg white is completely dry and the sugar is hard.
- Arrange Your Centerpiece: Once everything is dry, you can carefully arrange your frosted creations on the table.
12. Elegant Hanukkah Celebration

This tablescape is a beautiful tribute to the Festival of Lights. It uses a classic and elegant color scheme of deep blue, crisp white, and shining silver to create a setting that is both festive and full of grace.
The centerpiece is a magnificent silver menorah, standing tall and proud with all its candles ready. Bouquets of white hydrangeas and roses add softness, while gold chocolate gelt and wooden dreidels are playfully scattered along the runner, inviting guests to celebrate.
Each place setting is meticulously arranged. Deep blue charger plates provide a bold contrast to the white dinnerware. A simple white napkin is tied with a royal blue ribbon, neatly bundling the silverware and adding a final touch of class.
DIY Simple & Sweet Napkin Bundles
This easy napkin fold makes each place setting look special and organized.
What You’ll Need:
- White cloth napkins.
- Blue ribbon, about half an inch wide.
- Scissors.
- Your knife, fork, and spoon for each setting.
Step-by-Step Instructions:
- Fold the Napkin: Lay your napkin flat. Fold it in half, and then fold it in half again to make a long, skinny rectangle.
- Place the Silverware: Lay your knife, fork, and spoon together in the center of the folded napkin.
- Cut the Ribbon: Cut a piece of blue ribbon that is long enough to wrap around the napkin and be tied in a bow. About 12 inches should be good.
- Wrap it Up: Carefully fold the left and right sides of the napkin over the silverware so they overlap in the middle.
- Tie the Bow: Slide your piece of ribbon underneath the bundle. Bring the ends to the top and tie them in a neat little bow, right in the center. Your bundle is now ready to be placed on the plate!
13. Roaring Twenties Soirée

Travel back in time to an age of glamour and extravagance with this Art Deco-inspired tablescape. A bold black, white, and gold palette sets the stage for a party worthy of the Great Gatsby. The entire scene is full of sharp lines, luxurious textures, and dramatic flair.
Towering black vases with explosive arrangements of white ostrich feathers create unforgettable centerpieces. Strands of pearls cascade down the vases, while elegant white calla lilies add a touch of sleek sophistication. A geometric-patterned runner enhances the Art Deco vibe.
The place settings are pure opulence. Gold cutlery and ornate crystal glasses sparkle against the bold patterns. Black napkins are folded into intricate fans, standing proudly on each plate and completing this stunning, high-society look.
DIY Art Deco Napkin Fan
This special napkin fold looks complicated, but it’s pretty easy to do!
What You’ll Need:
- A square cloth napkin (black, white, or gold works best).
- A napkin ring or a small piece of ribbon.
Step-by-Step Instructions:
- Start Folding: Lay your napkin flat. Begin at one end and fold a small strip, about one inch wide. This is an accordion fold, so flip the napkin over and fold another one-inch strip back the other way.
- Keep Going: Continue flipping and folding the napkin back and forth, like you are making a paper fan, until you have about four inches of napkin left unfolded at the end.
- Fold in Half: Carefully fold your pleated napkin in half, with the accordion folds on the outside.
- Tuck the Corner: Take the corner of the flat, unfolded part and tuck it down and into the pleats. This will create a little stand for your fan.
- Secure and Fluff: You can either slide a napkin ring over the bottom of the fan to hold it together, or you can let it stand on its own. Gently spread out the top pleats to create your beautiful fan.
14. Whimsical Nutcracker Fantasy

Enter a magical world of dancing sugarplums with this playful and colorful tablescape. Inspired by the classic Nutcracker ballet, this setting uses a dreamy palette of pastel pink, teal, and purple, all accented with shimmering gold.
A forest of colorful bottle brush trees creates a whimsical centerpiece down the center of a sparkling pink runner. Gallant nutcracker soldiers of all sizes stand guard among tiny, wrapped presents. Warm fairy lights are woven throughout the scene, making the whole table glow.
The place settings are fit for a ballerina. A light blue napkin is tied with a rich purple ribbon, with a tiny dancer ornament as a special gift for each guest. This enchanting setup is sure to spark joy and imagination.
DIY Bottle Brush Forest
Create your own colorful, miniature forest for the center of your table.
What You’ll Need:
- Several bottle brush trees of different sizes (you can find these at a craft store). They are usually green, but white ones are easiest to color.
- Fabric dye or watered-down craft paint in your favorite pastel colors.
- Small bowls or containers.
- Water.
- Paper towels.
Step-by-Step Instructions:
- Prepare Your Dye: In a small bowl, mix your fabric dye or craft paint with some water. You want it to be colorful but watery, like juice. Make a different color in each bowl.
- Dip the Trees: Take a white or light-colored bottle brush tree and dip it into one of the bowls of color. Swirl it around for a few seconds until the bristles have soaked up the color.
- Let it Dry: Pull the tree out and gently dab the base on a paper towel to get rid of extra drips. Stand the tree up on some newspaper or a protected surface to dry completely.
- Repeat for All Trees: Do the same thing with your other trees and different colors until you have a whole colorful collection.
- Create Your Forest: Once all the trees are dry, you can arrange them down the center of your table. Cluster them together in groups of different sizes and colors to create your magical forest.
15. Heirloom Holiday Elegance

This tablescape is steeped in tradition and personal history. It creates an atmosphere of timeless elegance and warmth, where every detail feels meaningful. Rich velvets, delicate lace, and polished silver come together for a truly memorable family gathering.
A magnificent centerpiece of deep red roses and fresh boxwood sits in a classic silver bowl. Tall silver candelabras cast a warm, flickering light across the table. The foundation is a deep red velvet runner layered over a delicate white lace tablecloth.
What makes this setting truly special are the personal touches. At each place setting, a small, ornate picture frame holds an old family photo, serving as a unique and heartfelt place card. It’s a beautiful way to honor family memories.
DIY Vintage Photo Place Cards
These place cards are a wonderful way to make your guests feel special and start conversations.
What You’ll Need:
- Small, vintage-style photo frames (one for each guest).
- Photos of your guests (you can find these on social media or ask family members for old pictures).
- A printer and photo paper (or you can order small prints online).
- Scissors.
Step-by-Step Instructions:
- Find Your Photos: The fun part! Find a photo of each guest. It could be a baby picture, a funny picture, or just a nice one that you like.
- Size and Print: You will need to make the photos small enough to fit in your little frames. You can do this on a computer before you print them. Print the photos on photo paper for the best quality.
- Cut Them Out: Carefully cut out each printed photo so that it will fit perfectly inside your frame.
- Frame the Photos: Open the back of each frame and place one photo inside. Close it up securely.
- Set the Table: Place one framed photo at each seat. Your guests will be so surprised and happy to find a picture of themselves waiting for them!
16. Modern Nordic Hygge

This tablescape captures the cozy feeling of “hygge” with a modern, minimalist twist. A moody palette of charcoal grey and black is softened by natural textures and an abundance of warm candlelight, creating a sophisticated and deeply comfortable atmosphere.
A soft, grey faux-fur runner adds a layer of plush texture down the center of the table. A simple wooden board holds a collection of pillar candles in various shades of grey and white. Small antlers and geometric accents add a touch of rustic modernism.
The place settings are clean and textural. Matte grey plates sit on dark slate placemats. Cozy, knit napkins are held by a simple leather ring, adding an unexpected and comforting touch to this chic and inviting winter table.
DIY Knit & Leather Napkin Rings
This simple DIY adds a touch of cozy, modern style to your table.
What You’ll Need:
- A strip of leather or faux leather (about 1 inch wide and 6 inches long for each ring).
- A strong glue (like fabric glue or E6000).
- A hole punch.
- A metal stud or rivet that can be pushed together by hand (from a craft store).
- Cloth napkins (a chunky knit or simple linen looks great).
Step-by-Step Instructions:
- Cut Your Leather: For each ring, cut a strip of leather that is about 1 inch wide and 6 inches long.
- Punch the Holes: Punch one hole at each end of the leather strip, about half an inch from the edge.
- Form the Ring: Bring the two ends of the leather strip together to form a circle, overlapping them so the holes line up.
- Add the Stud: Push the bottom half of your metal stud through the two holes from the inside. Then, place the top cap of the stud on the other side and press them firmly together until they snap.
- Dress Your Napkin: Fold or roll your napkin and simply slide it through the finished leather ring. It’s a simple, stylish, and modern look!
17. Tropical Holiday Escape

Trade snowflakes for palm leaves with this vibrant and festive tropical tablescape. This setting is a burst of joyful color and natural textures, proving that a holiday celebration can be warm in every sense of the word.
Large monstera and palm leaves serve as a lush, green runner and placemats. A show-stopping centerpiece of bright tropical flowers, like hibiscus and birds of paradise, brings the island spirit to life. A golden pineapple adds a touch of glam, while bamboo tiki torches provide a warm, flickering glow.
Each place setting is a mini-vacation. Woven wicker chargers hold clean white plates. Bright pink napkins are tied with raffia and a single, beautiful flower. Guests can even sip their drinks from real coconut cups.
DIY Easy Leaf Placemats
These placemats are incredibly simple to make and have a huge impact.
What You’ll Need:
- Large artificial tropical leaves, like monstera or palm leaves (one or two for each guest). You can find these at a craft store.
- Scissors (optional).
- A damp cloth.
Step-by-Step Instructions:
- Clean Your Leaves: Even if they are new, wipe down your artificial leaves with a damp cloth to make sure they are clean and dust-free.
- Arrange the Leaves: This is the easiest part! For each place setting, simply lay a large leaf (or two slightly overlapping leaves) on the table where the plate will go. That’s it!
- Trim if Needed: If any of the leaves are too big or have long stems that get in the way, you can use scissors to carefully trim them to the right size.
- Set the Rest of the Table: Place your charger, plate, and napkin on top of your beautiful new leaf placemat. Your table instantly feels like a tropical paradise!
18. Monochromatic Emerald Dream

This tablescape is a bold and artistic statement, using various shades of a single color to create a deep and immersive atmosphere. By layering different tones and textures of green, the setting becomes dramatic, sophisticated, and surprisingly warm.
The centerpiece is a modern sculpture made of various green and black bottles and vases. Some are matte, some are glossy, and they are all different shapes and sizes. A few sprigs of eucalyptus and round moss balls add natural texture, while tall, olive-green candles provide a soft, moody light.
The monochromatic theme continues through every element. Dark green plates, green glassware, and a soft green linen napkin are all layered on a deep green tablecloth. The result is a cohesive and visually stunning dining experience.
DIY Painted Bottle Centerpiece
Turn old glass bottles into a modern, sculptural centerpiece.
What You’ll Need:
- A collection of empty glass bottles and jars in different shapes and sizes.
- Craft paint or spray paint in 3-4 different shades of the same color (like dark green, olive green, and sage green).
- A paintbrush (if using craft paint).
- Newspaper or a drop cloth.
Step-by-Step Instructions:
- Clean Your Bottles: Make sure your bottles are completely clean and dry. Peel off any labels. Soaking them in warm, soapy water can help.
- Set Up Your Painting Area: Go outside or to a well-ventilated area and lay down lots of newspaper to protect the surface.
- Paint the Bottles: Paint each bottle a solid color. You can either use spray paint for a smooth finish or a paintbrush for a more textured look. Paint some bottles in each of your different shades. Let the first coat dry, and then add a second coat if you need to.
- Let Them Dry Completely: Leave the bottles to dry for several hours until they are no longer tacky or sticky.
- Arrange Your Sculpture: Once they are totally dry, arrange your collection of painted bottles in the center of your table. Cluster them together, putting tall ones in the back and short ones in the front to create a beautiful, modern display.
19. Celestial Starry Night

Capture the magic of a clear winter sky with this enchanting celestial tablescape. A deep navy and black color palette is illuminated by twinkling lights and shimmering metallics, creating a sense of cosmic wonder and mystery.
A silver sequin runner glitters like the Milky Way across a tablecloth printed with golden constellations. The centerpiece features frosty, silver-painted branches wrapped in delicate fairy lights, making them look like shooting stars. Deep blue candles and a golden crescent moon add to the celestial theme.
The place settings are magical. Napkins patterned with stars are held by a beautiful star-shaped ring. Gold cutlery and gold-rimmed glasses add a final touch of sparkle to this dreamy, star-gazing dinner party.
DIY Constellation Napkins
Add a touch of cosmic sparkle to plain napkins with this easy craft.
What You’ll Need:
- Plain, dark-colored cloth napkins (navy or black).
- A fabric marker or fabric paint pen in gold or silver.
- A piece of cardboard to put inside the napkin.
- Pictures of simple constellations to use as a guide (like the Big Dipper or Orion).
Step-by-Step Instructions:
- Prepare Your Napkin: Wash and iron your napkin so it’s smooth. Place the piece of cardboard inside the napkin so the paint doesn’t bleed through to the other side.
- Draw the Stars: Look at your picture of a constellation. Use your fabric paint pen to draw little dots on the napkin where the main stars of the constellation would be.
- Connect the Dots: Gently draw thin lines to connect the star dots, just like you see in a star map.
- Add More Stars: To make it look like a starry sky, add more random dots of different sizes all around your main constellation.
- Let it Dry: Let the fabric paint dry completely according to the instructions on the pen. Some might need you to iron them (with a cloth on top) to set the paint. Now you have your very own star-covered napkin!
20. Vibrant Spice Market Feast

This tablescape is a celebration of warmth, color, and global flavors. Inspired by bustling spice markets, it uses a rich and vibrant palette, intricate patterns, and aromatic elements to create a feast for all the senses.
A beautifully patterned runner in shades of magenta, orange, and turquoise sets a lively foundation. Golden Moroccan-style lanterns with glowing candles form the centerpiece, surrounded by small bowls filled with fragrant star anise and cinnamon sticks. Brightly colored flowers and juicy pomegranate halves add to the feeling of abundance.
The place settings are a joyful mix of color and texture. Bright turquoise napkins pop against terracotta plates and patterned chargers. Each napkin is tied with a simple piece of twine, holding a cinnamon stick and a dried orange slice.
DIY Aromatic Napkin Ties
These simple napkin decorations look beautiful and smell wonderful.
What You’ll Need:
- Dried orange slices (you can buy these at a craft store or make them by baking thin orange slices in the oven at a very low temperature for a few hours).
- Cinnamon sticks.
- Twine or thin ribbon.
- Scissors.
- Cloth napkins in a bright, solid color.
Step-by-Step Instructions:
- Cut Your Twine: Cut a piece of twine that is long enough to wrap around your napkin and be tied in a knot. About 8 inches should be plenty.
- Fold the Napkin: Fold your napkin neatly into a rectangle.
- Thread the Twine: Carefully poke one end of the twine through the center of a dried orange slice. It might be a little fragile, so be gentle. If it’s hard, ask an adult to help you make a small hole with a skewer first.
- Assemble Your Bundle: Lay the folded napkin down. Place the twine on top, with the orange slice in the center. Place a cinnamon stick next to the orange slice.
- Tie it Securely: Wrap the twine around the napkin and tie a simple knot on the back. Your beautiful and fragrant napkin bundle is now ready for the table!
21. Joyful Poinsettia Fiesta

This tablescape is a vibrant explosion of color and celebration. It beautifully blends traditional holiday elements with the lively spirit of a Mexican fiesta. The scene is full of joy, warmth, and brilliant color.
A bold, striped serape runner provides a stunning foundation for layers of festive decor. Bright red poinsettias and cheerful orange marigolds bring natural beauty, while colorful taper candles add height. Above the table, traditional papel picado banners add a touch of authentic, handcrafted charm.
Each place setting is a party in itself. Patterned plates and colorful napkins are topped with a cute sugar skull and a succulent. This setting is a wonderful way to host a holiday gathering that is fun, festive, and full of life.
DIY Papel Picado Banner
You can make this traditional Mexican paper banner to hang over your table.
What You’ll Need:
- Several sheets of colored tissue paper.
- Scissors.
- A long piece of string or ribbon.
- A glue stick.
Step-by-Step Instructions:
- Fold Your Paper: Take one sheet of tissue paper and fold it in half, then in half again, and maybe one more time. The more you fold, the more patterns you will make at once.
- Cut Your Shapes: Just like making paper snowflakes, carefully cut small shapes along the folded edges of the paper. You can cut little triangles, half-circles, or diamonds.
- Unfold and See!: Carefully unfold your tissue paper. You will have a beautiful, lacy pattern! Repeat this with all your different colors of tissue paper.
- String Them Up: Lay your long piece of string on a flat surface. Take one of your finished papers and run a line of glue along the top edge. Fold this glued edge over the string and press it down.
- Finish Your Banner: Add your other colored papers to the string, leaving a little bit of space between each one. Once the glue is dry, your festive banner is ready to hang!
22. Opulent Renaissance Feast

Step into a classic painting with this luxurious and abundant tablescape. With a dark, moody atmosphere, this setting is reminiscent of a grand feast from the Renaissance era. Every detail is rich, dramatic, and overflowing with nature’s bounty.
A magnificent runner of fresh ivy, grapes, figs, pears, and pomegranates spills across a deep red damask tablecloth. The sheer amount of fruit and nuts creates a feeling of incredible opulence. Towering silver candelabras with tall, flickering candles add to the historic and dramatic mood.
The place settings are formal and elegant. Fine china with a delicate floral pattern sits on ornate chargers. Simple cream-colored napkins are tied with a small bunch of berries, completing a look of timeless, artistic grandeur.
DIY Abundant Fruit & Ivy Runner
You can create a beautiful, overflowing centerpiece inspired by classic art.
What You’ll Need:
- Several long strands of real or artificial ivy.
- A large assortment of fruit (real or fake), such as bunches of grapes, pomegranates, figs, and pears.
- Some nuts in their shells, like walnuts or almonds.
- A few single roses or other dark flowers (optional).
Step-by-Step Instructions:
- Create the Base: Lay your strands of ivy down the center of your table. Weave them together and let them twist and turn naturally to form a green base for your runner.
- Add the Largest Fruit: Place your biggest pieces of fruit, like the pomegranates, along the ivy. Don’t put them in a straight line; cluster them in a few spots.
- Drape the Grapes: Let your bunches of grapes spill over the ivy and even hang off the side of the table a little bit. This will make it look very full and abundant.
- Fill in the Gaps: Use your smaller fruits, like figs and pears, to fill in any empty spaces.
- Scatter the Nuts: Sprinkle the nuts throughout the entire runner, letting them fall between the fruits and leaves. If you are using flowers, tuck them in at the very end.
23. French Countryside Charm

This tablescape brings the simple, rustic beauty of the French countryside to your holiday meal. It feels fresh, fragrant, and effortlessly elegant. The focus is on natural textures, soft colors, and the beauty of fresh herbs.
A simple linen tablecloth and woven placemats create a natural base. The centerpieces are unassuming but beautiful: large white pitchers filled with fresh lavender, rosemary, and olive branches. The whole room is likely filled with a wonderful, herbal scent.
The place settings continue the simple theme. White plates are topped with a linen napkin, tied with twine and a single sprig of fresh lavender. This look is relaxed, inviting, and full of natural grace.
DIY Fragrant Lavender Napkin Ties
These simple ties make your napkins look pretty and smell amazing.
What You’ll Need:
- A small bunch of fresh or dried lavender.
- Twine or thin ribbon.
- Scissors.
- Linen or cotton napkins.
Step-by-Step Instructions:
- Prepare Your Lavender: Cut your lavender into small sprigs, each about 3-4 inches long. If you’re using a big bunch, you can get many little sprigs from it.
- Cut Your Twine: Cut a piece of twine for each napkin. It should be long enough to wrap around the napkin and tie a bow, so about 12 inches is a good length.
- Fold Your Napkin: Fold your napkin neatly. You can fold it into a rectangle or roll it up.
- Assemble the Tie: Lay the folded napkin on the table. Place one or two sprigs of lavender on top, in the middle.
- Tie it Up: Take your piece of twine and tie it around the napkin and the lavender. You can tie it in a simple knot or a pretty bow. Your fragrant napkin bundle is now complete!
24. Enchanted Spring Forest

This tablescape feels like a magical, miniature forest floor coming to life. It is wild, natural, and full of the promise of spring, even in the middle of winter. The look is whimsical and organic, as if it were put together by forest fairies.
A chaotic and beautiful centerpiece of moss, tangled twigs, holly branches, and silvery lichen creates the heart of this scene. Tall, slender white candles rise from the arrangement like pale trees. At each place, tiny terracotta pots with sprouting daffodils add a touch of life and color.
The place settings are a charming mix of rustic and refined. Fine china with a floral pattern is topped with a napkin held by a simple ball of moss. It’s a unique and enchanting way to bring the outdoors in.
DIY Moss Ball Napkin Holders
These unique napkin holders are easy to make and look like they came straight from an enchanted forest.
What You’ll Need:
- Styrofoam balls, about 2 inches wide (from a craft store).
- A bag of dried or preserved sheet moss.
- A hot glue gun and glue sticks.
- A small pin or piece of wire for each one (optional).
- A name tag for each guest (optional).
Step-by-Step Instructions:
- Prepare Your Moss: Tear your sheet moss into smaller pieces that are easy to work with.
- Get Gluing: Ask an adult to help you with the hot glue gun. Put a swirl of hot glue on one part of a styrofoam ball.
- Add the Moss: Quickly press a piece of moss onto the hot glue. Be careful with your fingers! Hold it for a few seconds until it sticks.
- Cover the Ball: Keep adding glue and pieces of moss until the entire styrofoam ball is covered and looks like a fuzzy green ball.
- Use it as a Holder: You can simply place the finished moss ball on top of a folded napkin. If you want to add a name tag, you can use a little decorative pin to attach the tag to the moss ball.
25. Bohemian Winter Solstice

This tablescape is warm, eclectic, and full of free-spirited charm. It combines earthy textures, natural elements, and a cozy glow to create a welcoming and soulful gathering space. The atmosphere is relaxed, artistic, and deeply personal.
A patterned runner and macrame placemats create a textural base. The centerpiece is a wooden bowl filled with pinecones, dried orange slices, crystals, and air plants. The entire table is bathed in the warm light of numerous candles in amber jars and a Himalayan salt lamp.
The place settings are unique and personal. A beautiful slice of agate with the guest’s name written in gold serves as a place card. The mix of colorful glassware and rustic pottery completes this beautiful, bohemian scene.
DIY Agate Slice Place Cards
These beautiful, natural place cards are a special gift for your guests to take home.
What You’ll Need:
- Thinly sliced agate stones (you can find these at a craft or crystal shop). Choose ones with a smooth, flat surface.
- A metallic gold or silver permanent marker or paint pen.
- A piece of paper for practicing.
Step-by-Step Instructions:
- Clean Your Stones: Wipe your agate slices with a clean cloth to make sure they are free of dust.
- Practice First: Before you write on the real stone, practice writing your guests’ names on a piece of paper with your metallic marker. This will help you get a feel for the pen.
- Write the Names: Carefully write one guest’s name on each agate slice. Write slowly to make sure the letters are neat and clear. The metallic ink will look beautiful against the stone’s natural patterns.
- Let it Dry: Set the agate slices aside for a few minutes to make sure the ink is completely dry and won’t smudge.
- Set the Table: Place one finished agate place card at each seat, either on the plate or just above it.
26. Dazzling Diwali Celebration

This tablescape is a joyous and radiant celebration of Diwali, the Festival of Lights. It is bursting with vibrant color, fragrant flowers, and the warm glow of many tiny flames. The entire setting feels abundant, festive, and full of life.
A stunning runner made of fresh marigold garlands runs the length of the table. In the center, a large brass tray is filled with little clay lamps called diyas, their flames dancing and reflecting in the metal. Bowls of colorful powders and flower petals add to the sensory feast.
The place settings are a riot of beautiful color. Brightly colored napkins in shades of orange, pink, and green are folded into lotus flowers and placed on gold chargers. Every detail is designed to be joyful and bright.
DIY Simple Clay Diya
You can make your own traditional clay lamps to light up your table.
What You’ll Need:
- Natural air-dry clay.
- A small bowl of water.
- A small, battery-operated tea light for each diya.
Step-by-Step Instructions:
- Roll a Ball: Take a small piece of clay and roll it between your hands to make a smooth ball, about the size of a large gumball.
- Make a Pinch Pot: Gently push your thumb into the center of the ball. Be careful not to push all the way through.
- Shape the Pot: Now, use your thumb and fingers to pinch and turn the clay, slowly making the walls thinner and the bowl wider. Try to make it a nice, round little bowl.
- Create the Spout: On one side of your little bowl, use your thumb and index finger to gently pinch the rim outwards to create a little spout. This is where the flame would traditionally go.
- Let it Dry: Set your finished diya aside to dry completely. This might take a day or two. Once it’s dry, you can place a battery-operated tea light inside to make it glow safely.
27. A Scholarly Holiday

This clever tablescape creates a cozy, intellectual atmosphere, perfect for a winter evening. It feels like a dinner party in a classic, old library. The look is warm, nostalgic, and full of charming, vintage details.
The unique centerpiece is a stack of handsome, leather-bound books. A classic green banker’s lamp sits on top, casting a warm glow. Vintage reading glasses, a magnifying glass, and a brass pinecone add to the scholarly theme, all nestled in a bed of fresh eucalyptus.
The place settings continue the studious look. Tweed and plaid fabrics are used for the napkins and placemats. Each napkin is held with a simple leather strap, personalized with the guest’s name, like a custom bookplate.
DIY Stacked Book Centerpiece
This is one of the easiest centerpieces to create, and it looks so interesting.
What You’ll Need:
- A stack of 5-7 old, hardcover books. Look for books with nice-looking spines in similar colors.
- A small lamp or a pillar candle in a sturdy holder.
- A few sprigs of greenery, like eucalyptus or pine.
- A few fun props, like an old pair of glasses or a magnifying glass.
Step-by-Step Instructions:
- Find Your Books: Look on your bookshelf or at a second-hand store for some nice-looking hardcover books. They don’t have to match perfectly.
- Start Stacking: Place the largest book on the bottom and start stacking the others on top. Don’t stack them perfectly straight! Make them a little bit crooked and offset, so it looks more casual and interesting.
- Add Your Light: Carefully place your small lamp or your candle in its holder on top of the stack of books. Make sure it is very stable and won’t fall over.
- Tuck in the Greenery: Take your sprigs of greenery and tuck them around the base of the books.
- Place Your Props: Arrange your fun props, like the glasses, around the centerpiece to finish the look.
28. Mystical Crystal Gathering

This tablescape is dark, magical, and enchanting. With a palette of deep purples and blacks, it feels like a mystical gathering under a starry sky. The scene is full of natural wonders and a bit of otherworldly sparkle.
A bed of dark green moss forms a runner for the centerpiece. Nestled within it are real, beautiful crystals, including a large amethyst geode that sparkles in the light. Dark, dramatic flowers and silvery fern leaves add to the magical forest feel, all interwoven with twinkling fairy lights.
The place settings are moody and sophisticated. Speckled stoneware plates are topped with soft lavender napkins, held by rings adorned with agate slices. The whole scene is lit by deep purple candles, creating a truly magical ambiance.
DIY Crystal Wire-Wrapped Napkin Rings
You can make these magical napkin rings with just a few supplies.
What You’ll Need:
- A plain, simple napkin ring for each guest.
- Thin, bendable craft wire in gold or silver.
- A small, tumbled crystal for each ring (amethyst or clear quartz would look great).
- Wire cutters (for an adult to use).
Step-by-Step Instructions:
- Cut Your Wire: Ask an adult to cut a long piece of wire for you, about 15-20 inches long.
- Start Wrapping: Hold the end of the wire against the napkin ring and start wrapping the wire around and around the ring. You can make the wraps neat and tidy, or crisscross them for a more rustic look.
- Attach the Crystal: When you get to the spot where you want your crystal, hold the crystal against the ring. Use the wire to wrap around the crystal a few times to hold it in place. Go over and under the crystal to make sure it’s secure, like you’re trapping it in a little wire cage.
- Finish Wrapping: Continue wrapping the wire around the rest of the napkin ring.
- Secure the End: When you run out of wire, just tuck the sharp end underneath the other wires so it won’t poke anyone. Your magical crystal napkin ring is complete!
29. An Irish Holiday Welcome

This tablescape is full of cozy, cheerful charm, inspired by the green hills of Ireland. It feels warm and inviting, like a festive gathering at a countryside pub. The look is a lovely blend of rustic textures and traditional Irish symbols.
The centerpiece is a wreath of fresh moss, holly, and ivy, creating a circle of green. Gold pillar candles and taper candles give off a warm glow. A runner with a Celtic knot pattern adds a touch of authentic Irish style.
Each place setting is a small tribute to the Emerald Isle. A tiny terracotta pot with a living shamrock plant serves as both a decoration and a place card. A bright green napkin is held with a simple gold ring, completing this lucky and festive scene.
DIY Mini Shamrock Place Card
This is a living place card that your guests can take home as a party favor.
What You’ll Need:
- Tiny terracotta pots (one for each guest).
- Potting soil.
- Shamrock plants or seeds (clover from your yard works too!).
- A toothpick or small craft stick for each pot.
- A small paper flag for each name tag.
- A pen.
Step-by-Step Instructions:
- Plant Your Shamrocks: Fill each tiny pot with potting soil. If you have a shamrock plant, gently place a small piece of it in the soil. If you are using seeds, sprinkle a few on top and cover with a tiny bit of soil. Give them a little bit of water.
- Make the Name Tag: Write one guest’s name on each of your little paper flags.
- Attach to the Stick: You can either glue the flag to the top of the toothpick or simply fold it around the stick and glue the ends together.
- Set Your Place Card: Gently poke the finished name tag stick into the soil of one of the pots.
- Place on the Table: Put one finished shamrock pot at each place setting. It’s a beautiful, living piece of decoration!
30. Crystalline Winter Gala

This tablescape is the definition of sleek, modern drama. It creates a futuristic and breathtaking atmosphere, as if you are dining inside a magnificent ice palace. The look is cool, sharp, and full of brilliant, reflected light.
The star of the show is a massive, sculptural centerpiece made of clear, jagged crystals that glows with an internal blue light. The entire tabletop is mirrored, reflecting the centerpiece and the single, elegant calla lilies at each seat. The all-white setting makes the glowing centerpiece even more dramatic.
The place settings are minimalist and chic. Square white plates and crisp white napkins are held by ornate silver rings. The effect is clean, bright, and incredibly sophisticated. This is a tablescape for a truly spectacular event.
DIY “Ice Crystal” Napkin Accent
You can add a touch of icy glamour to your napkins with this simple craft.
What You’ll Need:
- Clear rock candy on a stick (one for each guest).
- Thin silver ribbon.
- Scissors.
- White cloth napkins.
Step-by-Step Instructions:
- Break the Candy (Optional): If the rock candy crystals are very large, you can ask a grown-up to help you carefully break them off the stick and into a few smaller, jagged pieces. If they are a good size, you can leave them on the stick.
- Fold Your Napkin: Fold or roll your white napkin neatly.
- Cut Your Ribbon: Cut a piece of silver ribbon long enough to tie around the napkin in a bow.
- Assemble the Accent: Lay the folded napkin on the table. Place the rock candy crystal (or the stick with the candy on it) on top of the napkin.
- Tie it Up: Take your silver ribbon and tie it around the napkin and the rock candy. Make a pretty, shimmering bow. The sugar crystals will sparkle in the light just like real ice!
31. Ultimate Luxury & Caviar

This tablescape is the height of formal elegance and refined taste. A crisp white and gleaming silver palette creates a backdrop for the ultimate luxury. The atmosphere is exclusive and sophisticated, designed for a very special occasion.
A magnificent crystal chandelier hangs above, its light reflecting off every polished surface. The centerpiece is a grand silver bowl, filled with ice and presenting champagne and tins of fine caviar. Bouquets of pure white roses in silver julep cups add a touch of classic beauty.
The place settings are immaculate. Silver-rimmed plates and polished silverware shine on a white damask tablecloth. Every detail, from the crystal glasses to the elegantly lettered place cards, speaks of understated opulence.
DIY Faux Caviar Spoons
Give your guests a little taste of luxury with this fun and easy craft.
What You’ll Need:
- Small plastic or wooden spoons.
- Silver spray paint.
- Black craft glue or puffy paint.
- A small bowl of tiny black beads or microbeads (from a craft store).
- A piece of newspaper.
Step-by-Step Instructions:
- Paint Your Spoons: With a grown-up’s help, take your spoons outside and spray paint them silver. Let them dry completely on a piece of newspaper.
- Add the “Glue”: Squeeze a small amount of the black glue or black puffy paint into the bowl of one of the silver spoons.
- Create the “Caviar”: Hold the spoon over the bowl of black beads and sprinkle the beads onto the glue. Gently tap the spoon to let the extra beads fall off. The beads will stick to the glue and look just like tiny caviar eggs.
- Let it Dry: Set the spoon aside carefully and let the glue dry completely.
- Set the Table: You can place these decorative spoons on a small plate at each setting as a fun and luxurious-looking detail.
32. Aromatic & Earthy Holiday

This tablescape is a celebration of natural, fragrant elements. It creates a cozy and grounded atmosphere that feels both festive and wholesome. The look is simple, rustic, and appeals to all the senses.
A collection of small potted herbs and a miniature fir tree bring life and a wonderful scent to the center of the table. Golden beeswax candles, known for their subtle honey aroma, cast a warm glow. Bowls of fruit, cinnamon sticks, and dried orange slices complete this earthy, aromatic scene.
The place settings are simple and natural. A linen napkin is tied with twine around a sprig of fresh rosemary. The place card is a single green leaf, with the guest’s name written in elegant script.
DIY Leaf Place Cards
These place cards are beautiful, natural, and incredibly easy to make.
What You’ll Need:
- Large, sturdy, fresh green leaves (magnolia, camellia, or lemon leaves work well).
- A metallic gold or silver paint pen.
- A damp cloth.
Step-by-Step Instructions:
- Choose Your Leaves: Go on a nature walk and find some beautiful, smooth, flat leaves. Make sure you have one for each guest.
- Clean the Leaves: Gently wipe the leaves with a damp cloth to remove any dirt and let them dry.
- Write the Names: Use your metallic paint pen to carefully write one guest’s name on each leaf. The shiny ink will stand out beautifully against the dark green leaf.
- Let Them Dry: Set the leaves aside for a few minutes to make sure the paint is completely dry.
- Place on the Plate: Simply lay one finished leaf place card on each napkin or plate. It’s a lovely, natural touch for your table.
33. Hunter’s Lodge Hearthside

This tablescape is ruggedly handsome and full of cozy, rustic charm. It evokes the feeling of a festive dinner in a grand hunting lodge, with a warm fire crackling in the background. The look is masculine, natural, and deeply comforting.
A centerpiece of fresh pine boughs is the foundation for this rustic display. Real antlers, tall pheasant feathers, and spent brass cartridges are artfully arranged among the greenery. A mix of green and orange taper candles in brass holders adds a warm, woodsy glow.
The place settings use earthy textures and colors. A hammered copper charger sits beneath an olive green plate. A simple napkin is held with a leather strap and a single pheasant feather, while the place card is a simple piece of birch bark.
DIY Feather & Pinecone Napkin Rings
This simple DIY adds a rustic, woodland touch to your napkins.
What You’ll Need:
- A strip of brown ribbon or faux leather, about 1 inch wide.
- A hot glue gun and glue sticks.
- Small pinecones.
- Small, decorative feathers (like pheasant feathers).
- Scissors.
Step-by-Step Instructions:
- Cut Your Ribbon: For each ring, cut a piece of ribbon that is about 6 inches long.
- Form the Ring: With a grown-up’s help, use the hot glue gun to glue the two ends of the ribbon together, forming a circle. This is your napkin ring.
- Add the Pinecone: Put a dot of hot glue on the spot where the ribbon overlaps. Press a small pinecone onto the glue and hold it for a few seconds.
- Tuck in the Feather: Put another small dot of glue next to the pinecone. Gently press the bottom tip of a feather into the glue.
- Let it Cool: Let the glue cool and harden completely. Now you have a handsome, rustic napkin ring ready for your table setting.
34. Santa’s Vintage Toy Shop

This tablescape is a delightful journey back to a classic childhood Christmas. It is playful, nostalgic, and full of charming vintage details. The scene feels like a peek into Santa’s magical workshop.
A festive red and white checkered runner creates a cheerful path for a vintage wooden toy train. The train cars are filled with tiny presents and bottle brush trees. An army of nutcrackers, wooden spinning tops, and other classic toys completes this whimsical centerpiece.
The place settings are sweet and simple. A striped napkin is tied with red and white baker’s twine, holding a beautifully decorated sugar cookie as a special treat for each guest. This table is sure to make everyone feel like a kid again.
DIY Toy Train Centerpiece
You can create your own charming toy parade for the center of your table.
What You’ll Need:
- A simple wooden toy train with a few cars.
- Small bottle brush trees.
- Tiny gift boxes (you can make these by wrapping up sugar cubes or small blocks).
- A few small toy soldiers or nutcrackers.
Step-by-Step Instructions:
- Set the Scene: Lay your table runner down the middle of the table.
- Arrange the Train: Place the engine and connect all the train cars, making a gentle curve down the runner.
- Load the Cargo: Now it’s time to load up the train! Place one or two bottle brush trees in some of the open train cars. Fill the other cars with your tiny wrapped presents.
- Add the Passengers: Stand your little toy soldiers and nutcrackers on the runner, as if they are marching alongside the train or waiting to get on board.
- Complete the Workshop: You can place more trees and toys around the train to make the whole scene look like a busy, magical toy workshop on Christmas Eve.
35. A Golden Candlelight Glow

This tablescape is all about creating a warm, intimate, and deeply romantic atmosphere. It relies almost entirely on the magic of candlelight to create a soft and dreamy environment. The look is simple, cozy, and incredibly inviting.
There is no single centerpiece, but rather a sea of golden light. Dozens of candles of all shapes and sizes are clustered together. Taper candles in vintage holders, pillar candles, and small votives in amber glass jars all combine to cast a magical, flickering glow.
The place settings are simple, allowing the candlelight to be the star. Soft, neutral-colored linens and simple ceramic plates are bathed in the warm light. This minimal approach creates a maximum sense of warmth and intimacy.
DIY Amber Bottle Votives
Turn simple glass bottles into beautiful, warm-toned candle holders.
What You’ll Need:
- A few small, clear glass bottles or jars.
- Transparent glass paint in an amber or orange color.
- A paintbrush.
- Small votive candles or battery-operated tea lights.
Step-by-Step Instructions:
- Clean Your Jars: Make sure your glass jars are clean and completely dry.
- Paint the Inside: Pour a small amount of the transparent glass paint into one of the jars.
- Swirl it Around: Tilt and turn the jar so that the paint coats the entire inside surface. Keep swirling until the inside is completely covered in a thin, even layer of paint.
- Drain the Extra: Turn the jar upside down over a piece of newspaper and let any extra paint drip out.
- Let it Dry: Let the jars dry completely according to the instructions on the paint bottle. The paint will be see-through, giving the glass a beautiful amber color. Once they are dry, you can place a small candle inside and enjoy the warm glow.
36. Magical Fairy Forest

This tablescape invites you into an enchanting, miniature world hidden on the forest floor. It is whimsical, detailed, and full of magical little surprises. The entire scene feels like a secret glimpse into a fairy kingdom.
A lush carpet of real moss covers the center of the table, creating a miniature landscape. Tiny, charming mushrooms, mysterious rocks, and gnarled branches form the terrain. The most magical touch is the tiny fairy houses, with little wooden doors, nestled into the mossy hills.
The place settings are earthy and natural. A large green leaf serves as a placemat, while a feather tied with twine adorns the napkin. Every guest will feel like they have stumbled upon a truly magical place.
DIY Tiny Fairy Doors
These little doors are a magical touch for your forest centerpiece.
What You’ll Need:
- A few flat-sided rocks or small pieces of wood.
- Brown craft paint.
- A small paintbrush.
- A black permanent marker.
- A hot glue gun (for an adult to use).
- A tiny bead or button for a doorknob.
Step-by-Step Instructions:
- Find Your Door Material: Look for rocks or pieces of wood that have one flat side. This will be the front of your door.
- Paint the Door: Paint the flat side of your rock or wood brown. Let it dry completely.
- Draw the Details: Use your black permanent marker to draw the details of the door. Draw a few straight lines to make it look like it’s made of wooden planks. You can also draw a little window or some hinges.
- Add the Doorknob: Ask an adult to help you put a tiny dot of hot glue where the doorknob should go. Press your small bead or button onto the glue.
- Place in Your Forest: Once the glue is cool, you can place your finished fairy doors throughout your mossy centerpiece, leaning them against rocks or the base of a branch to create magical little entrances.
37. A Rainbow of Flowers

This tablescape is a stunning and joyful gradient of vibrant color. It uses a rainbow of flowers and candles to create a beautiful and continuous flow of color from one end of the table to the other. The look is fresh, modern, and full of life.
The centerpiece is a long, unbroken arrangement of flowers that transitions smoothly through the colors of the rainbow. It starts with cool blues and purples, moves through pinks and oranges, and ends with sunny yellows. Matching candles are placed throughout, enhancing the color gradient.
The place settings at each section of the table match the color of the flowers in front of them. A purple napkin sits at the purple end, an orange napkin at the orange end, and so on. This creates a wonderfully cohesive and visually exciting experience.
DIY Rainbow Flower Runner
You can create your own stunning floral gradient down the center of your table.
What You’ll Need:
- Several small vases or glasses that are all the same size.
- Bunches of flowers in a rainbow of colors (e.g., purple hydrangeas, pink roses, orange tulips, yellow daisies).
- Scissors.
- Water.
Step-by-Step Instructions:
- Prepare Your Vases: Fill all your small vases with water.
- Sort Your Flowers: Group all your flowers by color.
- Start Arranging: Start at one end of the table. Cut the stems of your first color of flowers (e.g., purple) so they are the right height for your vases, and fill two or three vases with just those flowers.
- Create the Gradient: Place the next color of flowers (e.g., pink) in the next few vases. Place them right up against the purple vases so they touch.
- Continue Down the Table: Keep adding your different colors, one by one, until you have a long, continuous line of flowers that flows through all the colors of the rainbow.
38. Romantic Dinner for Two

This tablescape is all about creating an intimate and deeply romantic setting. It is designed for a small, special occasion, where the focus is on closeness and warmth. The atmosphere is soft, cozy, and bathed in gentle candlelight.
A soft, chunky knit blanket serves as a tablecloth, instantly creating a feeling of comfort and warmth. The table is covered in dozens of small, mercury glass votives, which create a beautiful, speckled glow. A simple bouquet of soft pink roses is the only centerpiece needed.
The place settings are simple and sweet. A dusty pink linen napkin is tied in a simple knot. Every detail is soft to the touch and easy on the eyes, making it a wonderful setting for a quiet, heartfelt conversation.
DIY Simple Knotted Napkin
This is less of a fold and more of a style, and it’s the easiest way to create a relaxed, elegant look.
What You’ll Need:
- A soft linen or cotton napkin.
Step-by-Step Instructions:
- Straighten the Napkin: Lay your napkin out flat.
- Find the Middle: Pick it up from the very center, letting the four corners hang down.
- Make a Loop: Gently create a loose loop with the fabric in your hand.
- Tie a Knot: Pass the four corners through the loop and gently pull to create a soft, loose knot right in the middle of the napkin.
- Arrange on the Plate: Lay the knotted napkin on the plate, fluffing it a little so it looks effortless and beautiful.
39. A Gothic Romance

This tablescape is dark, dramatic, and full of mysterious beauty. With a palette of black, deep red, and tarnished silver, it creates a gothic and romantic atmosphere, perfect for a unique and moody dinner party.
Massive, ornate silver candelabras with black and red taper candles create a dramatic centerpiece. The floral arrangement is dark and wild, with black roses, deep purple calla lilies, and tangled, bare branches. Peacock feathers and a sculpted black bird add to the mysterious vibe.
The place settings are unapologetically theatrical. Black plates sit on a damask runner over a black tablecloth. Deep burgundy glassware and a single, perfect calla lily on each napkin complete this stunning and unforgettable gothic scene.
DIY Tangled Branch Centerpiece
You can create a dramatic and wild-looking base for your floral arrangement.
What You’ll Need:
- A sturdy, low vase or bowl with a floral frog or foam inside to hold stems.
- Several interesting-looking bare branches or twigs.
- A can of black or dark brown spray paint (optional).
- Your choice of dark, dramatic flowers.
Step-by-Step Instructions:
- Paint Your Branches (Optional): If your branches aren’t dark enough, you can ask a grown-up to help you spray paint them black for a more dramatic look. Let them dry completely.
- Create the Structure: Start by sticking your largest and longest branches into the foam in your vase. Let them stick out at wild angles.
- Build a Tangle: Add your smaller branches, crisscrossing them and weaving them together to create a messy, tangled look, like a thorny thicket.
- Add Your Flowers: Once you are happy with your branch structure, you can begin to add your flowers. Cut the stems to different lengths and place them throughout the branches. Let some be tall and have others be nestled deep inside the tangle.
- Finish the Look: You can tuck other elements, like feathers, into your arrangement to make it even more mysterious.
40. Serene Autumn Zen

This tablescape brings a sense of calm, balance, and natural beauty to the dining experience. Inspired by Japanese Zen gardens, it uses simple, organic elements and a clean design to create a peaceful and contemplative atmosphere.
The centerpiece is a simple meditation on nature. A slab of slate holds a bed of green moss, a few smooth river stones, and a simple pottery vase with a single branch of vibrant autumn maple leaves. Everything is placed with care and intention.
The place settings are minimal and thoughtful. Slate placemats hold rustic, handmade pottery. A bright red napkin adds a single pop of color, while a single, perfect ginkgo leaf serves as a place card, celebrating the simple, profound beauty of nature.
DIY Zen Garden Centerpiece
You can create your own small, peaceful garden for the center of your table.
What You’ll Need:
- A flat, rectangular tray or a piece of slate.
- A bag of preserved sheet moss.
- A few smooth, beautiful stones of different sizes.
- A small, simple vase.
- A single, beautiful branch with colorful leaves.
Step-by-Step Instructions:
- Lay the Foundation: Place your flat tray or piece of slate in the center of your table.
- Create the Moss Bed: Lay a piece of your sheet moss on one part of the tray. It doesn’t need to cover the whole thing.
- Place Your Stones: Arrange your smooth river stones on and around the moss. Think about creating a nice balance. You could place a group of three stones together, for example.
- Position the Vase: Place your small vase on the tray. It can be on the moss, or next to it.
- Add the Branch: Fill the vase with a little bit of water and place your single, beautiful branch inside. The simplicity of the single branch is what makes it so special. Your peaceful centerpiece is now complete.
As we’ve seen through these 40 unique designs, a holiday table can be so much more than just plates and forks. It can be a whimsical gingerbread village, a serene Zen garden, a glamorous Art Deco party, or a cozy woodland escape. There is no single right way to create a beautiful setting.
Ultimately, the most memorable tables are the ones that reflect the personality and warmth of the host. Use these ideas as a starting point, mix and match elements you love, and don’t be afraid to add your own personal touches. Your effort and creativity are what will truly make your guests feel special and your gathering unforgettable.
Key Takeaways
- Start with a Theme: Choosing a theme or color palette first (like “Coastal,” “Rustic,” or “Gothic”) makes it easier to select and coordinate all your other decor elements.
- Layer Your Textures: Combine different materials like rough wood, soft velvet, smooth linen, and shiny metallics to create visual depth and interest.
- Bring Nature Indoors: Fresh greenery, pinecones, fruit, branches, and flowers are simple, inexpensive ways to add life, color, and fragrance to any table.
- Lighting is Key: Never underestimate the power of candles. Their warm, flickering light instantly creates a cozy and magical atmosphere that no overhead light can replicate.
- Personalize Each Setting: Small, thoughtful details like a handwritten name card, a unique napkin fold, or a tiny personal gift make each guest feel individually welcomed and cherished.