
The holiday season often sends us into a flurry of indoor decorating. We spend hours trimming the tree and hanging stockings, making sure the inside of our home feels warm and festive. But in the process, we often forget the very first thing our guests will see.

Your front porch is your home’s first impression. It’s the handshake before the hello, setting the tone for the warmth and cheer that waits inside. An overlooked porch is a missed opportunity to extend your holiday spirit all the way to the curb.
This guide is here to change that. We believe a welcoming entrance is just as important as a beautifully decorated living room. That’s why we’ve gathered 42 distinct and inspiring ideas to help you create a truly memorable holiday porch.
From rustic charm to modern glamour, there is a style here for everyone. And the best part? Each idea comes with simple, step-by-step DIY instructions, so you can bring these beautiful scenes to life yourself. Let’s make your porch the most welcoming one on the block.
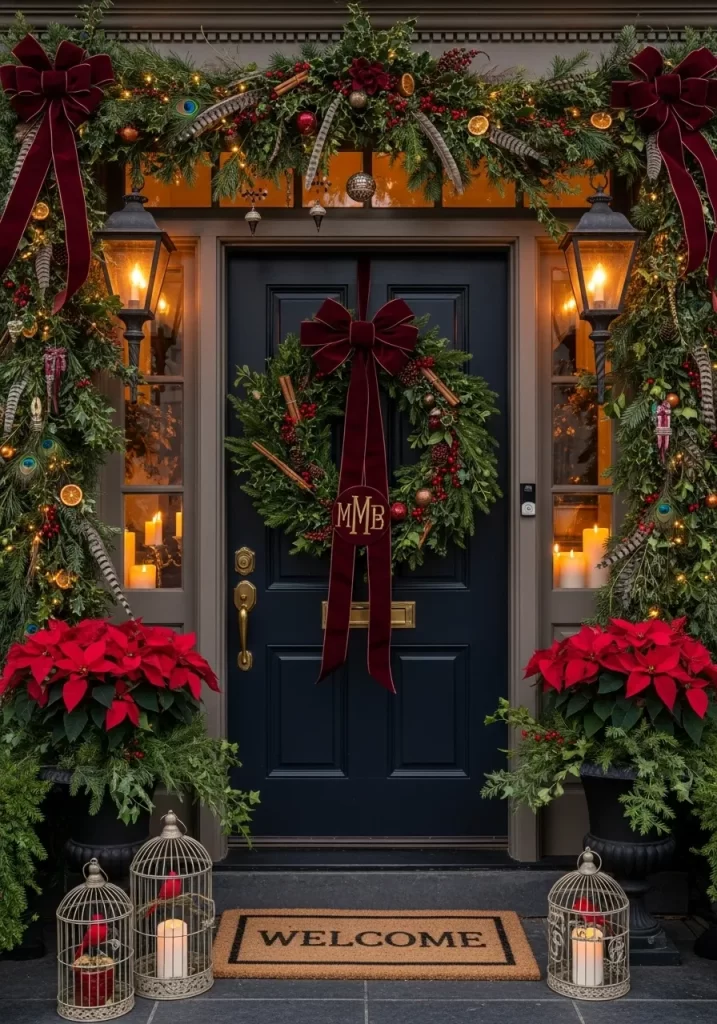
1. Embrace Rustic Charm with Buffalo Plaid

A classic black and red color scheme creates a truly timeless holiday entrance. This design uses lush, green garlands to frame the doorway, providing a rich backdrop for the festive decorations. The warm glow from twinkling lights adds a touch of magic, making the space feel instantly welcoming.
The use of buffalo plaid in the domat and the wreath’s bow introduces a cozy, farmhouse feel. Symmetrical planters, filled with miniature Christmas trees and bright red berries, balance the look. This porch decoration feels like a warm hug, offering a heartfelt greeting to all who arrive.
DIY Instructions: Festive Porch Planter
Let’s make one of the pretty planters you see in the picture! It’s like building a little winter forest in a pot.
What You’ll Need:
- A medium or large planter pot
- Soil or a block of green floral foam
- One small evergreen tree (or several evergreen branches from your yard)
- A few fake red berry stems (you can find these at a craft store)
- 3-4 pinecones
- Gardening gloves (to keep your hands clean)
Step-by-Step Guide:
- Prepare Your Pot: First, put on your gloves. Fill your planter pot about three-quarters full with soil. If you’re using floral foam, just push it down firmly into the bottom of the pot. This will be the base that holds everything up.
- Add the Greenery: Take your small tree and place it right in the center. Make sure it’s standing up straight and tall. If you’re using branches, poke the thick ends deep into the soil or foam. Start with the tallest branches in the middle and add shorter ones around them.
- Bring in the Color: Now for the fun part! Grab your red berry stems. Gently poke them into the soil around the base of your tree or branches. You can put a few in the front and a few in the back.
- Place the Pinecones: Take your pinecones and arrange them on top of the soil. You can have them peeking out from under the green branches. They add a nice, natural touch.
- Find the Perfect Spot: Carefully carry your new planter to your porch. You can make a second one to have a matching set for both sides of your door. Great job!
2. Create a Frosty Winter Welcome

This porch design captures the quiet beauty of a snowy evening. A clean, white and silver palette makes the entrance feel bright and crisp. Birch branches in tall planters add height and a touch of the forest, looking like trees in winter.
Cool-toned fairy lights woven through the branches give off a magical, icy glow. The simple, frosted wreath on the door continues the theme. This look is modern and peaceful, offering a calm and elegant greeting to your guests.
DIY Instructions: Lighted Birch Branch Planter
Let’s create one of those glowing branch displays. It’s like catching little stars in a vase.
What You’ll Need:
- A tall, heavy planter or vase
- Sand, pebbles, or floral foam to fill the base
- A bundle of birch branches (real or fake from a craft store)
- A string of battery-powered fairy lights (with a white or cool blue light)
- Tape
Step-by-Step Guide:
- Make a Strong Base: Fill your tall planter with sand or pebbles. This will hold the branches steady so they don’t tip over. If you use floral foam, push it securely into the bottom.
- Arrange the Branches: Start sticking the birch branches into the base. Put the tallest ones in the back and shorter ones in the front. Move them around until you like how they look.
- Add the Twinkle: Take your string of fairy lights. Find the end of the lights (not the battery pack part). Tape this end to the bottom of one of the branches in the back.
- Weave the Lights: Gently wrap the light string around and through the branches. Go up and down, and from side to side, so the little lights are spread out. Let the battery pack rest at the bottom, hidden behind the branches.
- Light It Up: Turn on your lights! You’ve made a beautiful, frosty decoration for your porch. You can make another one for the other side of your door.
3. Build a Sweet Candy Land Entrance

Step into a world of sugary delight with this playful candy-themed porch. Bright reds, pinks, and greens create a fun and energetic atmosphere that is full of cheer. Giant lollipops and candy canes line the walkway, making visitors feel like they’ve arrived at Santa’s sweet shop.
The garland around the door is dotted with peppermint candies and gingerbread-style ornaments. This whimsical display is full of joy and imagination, promising a fun-filled holiday celebration for everyone who enters.
DIY Instructions: Giant Swirl Lollipop
Let’s make one of the giant lollipops! It’s a super fun decoration that looks good enough to eat (but don’t!).
What You’ll Need:
- A round foam disc (from a craft store)
- White duct tape
- Red or pink duct tape
- A wooden dowel (like a thick stick)
- Clear cellophane wrap or a large clear plastic bag
- A ribbon
Step-by-Step Guide:
- Create the Stripes: Place your foam disc on a table. Take the red or pink duct tape. Tear off a long piece and carefully place it starting from the center of the circle, going to the edge.
- Make a Pinwheel: Add another piece of tape right next to the first one, leaving a small white gap. Keep adding tape strips, curving them as you go to make a swirl, like a real lollipop.
- Add the Stick: Once your swirl is done, take your wooden dowel. Gently and carefully push one end of the dowel into the bottom edge of the foam disc. Push it in about 2-3 inches so it’s secure.
- Wrap It Up: Place your lollipop on the big piece of cellophane. Bunch the cellophane at the bottom around the stick, just like a real lollipop wrapper.
- Tie a Bow: Use your ribbon to tie a bow where the cellophane meets the stick. This will hold the wrapper in place. Now you have a giant candy to decorate your porch!
4. Go for a Simple, Scandinavian Style

This porch decor is all about natural beauty and simplicity. It uses elements from the outdoors to create a calm and inviting space. A fresh olive branch wreath hangs on the door, adding a touch of green without a lot of fuss.
Small pine trees in galvanized buckets and bundled birch logs bring a woodsy feel. A soft sheepskin throw on a simple wooden bench invites guests to sit for a moment. This minimalist approach feels warm and genuine, proving that less can truly be more.
DIY Instructions: Bundled Birch Logs
Let’s make the cute bundle of birch logs. It’s a simple way to bring a piece of the forest to your front door.
What You’ll Need:
- 3-5 birch logs (you can find these at craft stores or garden centers)
- A long piece of twine or natural rope
- Scissors
Step-by-Step Guide:
- Gather Your Logs: Lay your birch logs on the floor or a table. Try to arrange them in a nice bundle. You can have some sticking out a little more than others to make it look more natural.
- Hold Them Tight: Squeeze the logs together in the middle with one hand. They should be snug against each other.
- Start Wrapping: With your other hand, take your twine and wrap it around the middle of the logs several times. Pull the twine tight each time you go around.
- Tie a Knot: After you’ve wrapped it 4 or 5 times, tie a strong knot. You can ask a grown-up for help if the knot is tricky.
- Make It Neat: Use your scissors to snip off any extra twine. You can make a second bundle and place it next to the first one for a lovely porch accent.
5. Design a Dazzling Starry Night

Create a celestial wonderland with this stunning porch decor. A deep blue and shimmering silver color scheme sets a magical, nighttime scene. Large, glowing stars hang from above, looking like they’ve fallen from the sky.
The garland and wreath are woven with twinkling lights and silver ornaments that catch the light beautifully. Frosted branches in the planters add to the icy, elegant feel. This design is sophisticated and full of wonder, welcoming guests to a truly enchanting holiday experience.
DIY Instructions: Sparkling Star Wreath
Let’s make a wreath that looks like it’s covered in little stars and shiny ornaments from the picture.
What You’ll Need:
- A plain evergreen or black wreath base
- Silver and blue Christmas ball ornaments of different sizes
- Small silver star ornaments or glittery star-shaped floral picks
- Hot glue gun (with help from an adult) or floral wire
Step-by-Step Guide:
- Plan Your Design: Lay your wreath flat. Place the ornaments on the wreath without gluing them to decide where you want everything to go. Put bigger ornaments on first, then fill in gaps with smaller ones.
- Attach the Ornaments (Adult Help Here!): Ask an adult to help you use the hot glue gun. Put a dot of hot glue on the back of a large ornament and press it firmly onto the wreath. Hold it for a few seconds. If using wire, wrap it around the ornament’s cap and twist it onto a branch of the wreath.
- Fill It In: Keep adding your silver and blue ornaments around the wreath. Spread them out so the colors are mixed nicely.
- Add the Stars: Now, place your star ornaments in the spaces between the balls. Glue them on or use the floral picks to poke them securely into the wreath.
- Hang and Admire: Once the glue is dry, your sparkling star wreath is ready! Hang it on your door to greet your guests with a touch of starlight.
6. Choose Glamorous Black and Gold

This porch makes a bold and elegant statement. The combination of black and gold creates a look of pure luxury. A magnificent gold leaf wreath is the centerpiece on the glossy black door, immediately catching the eye.
Gold ribbon is woven through the thick garland, which is filled with shiny and matte ornaments. The warm light from the lanterns adds a soft glow to the metallic finishes. This decor is chic and dramatic, offering a sophisticated welcome.
DIY Instructions: Golden Leaf Wreath
Let’s make a beautiful golden wreath like the one on the door. It looks fancy, but it’s fun to create.
What You’ll Need:
- A foam wreath form (like a donut shape)
- Bunches of fake leaves (like magnolia or bay leaves) from a craft store
- Gold spray paint
- Hot glue gun (with adult supervision)
- A wide black ribbon
Step-by-Step Guide:
- Paint the Leaves: In a well-ventilated area (like outside), spread out your fake leaves on some newspaper. Spray them with the gold paint, covering them completely. Let them dry, then flip them over and paint the other side.
- Prepare the Wreath: While the leaves are drying, an adult can plug in the hot glue gun to let it warm up.
- Start Gluing: Once the leaves are dry, take one leaf at a time. Put a line of hot glue on the back of the stem. Press the leaf onto the foam wreath form.
- Overlap and Cover: Take another leaf and glue it so it slightly overlaps the first one. Keep doing this, always pointing the leaves in the same direction, until the entire foam form is covered in beautiful gold leaves.
- Add the Bow: Make a simple bow with your black ribbon. Glue it to the top or bottom of your wreath. Now you have a glamorous wreath to hang on your door!
7. Craft a Coastal Holiday Scene

Bring the feeling of the beach to your holiday decor with this charming coastal theme. Instead of traditional pine, this design uses wreaths made from driftwood, giving it a light and airy look. Starfish and sea-green ornaments are tucked into the branches.
A thick, nautical rope is draped around a frame, adding to the seaside vibe. The “Seas & Greetings” sign is a playful touch. This porch is relaxed and unique, offering a breezy and cheerful welcome to all who visit.
DIY Instructions: Driftwood Starfish Wreath
Let’s make a beach-themed wreath. It’s a great way to remember the seaside during the holidays.
What You’ll Need:
- A grapevine wreath base
- A handful of small driftwood pieces
- Several starfish ornaments (different sizes look great)
- A few sea-green or silver ball ornaments
- Hot glue gun (and an adult to help)
Step-by-Step Guide:
- Get the Glue Gun Ready: Ask an adult to plug in the hot glue gun so it can get warm while you plan your design.
- Arrange the Driftwood: Place your grapevine wreath on a table. Start laying the driftwood pieces on top of it. Point them so they follow the curve of the wreath. Don’t glue them yet, just see where you like them.
- Glue the Wood: With an adult’s help, carefully lift one piece of driftwood at a time. Put a generous amount of hot glue on the back and press it firmly onto the grapevine wreath. Do this until all your wood pieces are attached.
- Add the Stars: Now, decide where your starfish will go. Put a dot of hot glue on the back of a starfish and press it onto the driftwood or the wreath. Spread them out around the wreath.
- Add Some Sparkle: Finally, glue on your sea-green or silver ornaments in any empty spots. Your coastal wreath is complete and ready to hang!
8. Go for a Classic Christmas Look
This entrance is the picture of a traditional holiday. Deep red bows and rich, abundant greenery create a warm and festive welcome. The garland is full of natural elements like cinnamon sticks, dried orange slices, and even pheasant feathers, giving it texture and a wonderful scent.
Pots of vibrant red poinsettias add a classic pop of color. The monogram on the wreath’s ribbon makes it feel personal and special. This timeless design is elegant and full of holiday spirit, wrapping your home in classic charm.
DIY Instructions: Scented Orange Slice Garland
Let’s make a simple garland with dried orange slices, just like the ones tucked into the big garland in the picture. It will make your porch smell amazing!
What You’ll Need:
- 2-3 large oranges
- A knife (for an adult to use)
- An oven
- A baking sheet with parchment paper
- A long piece of twine or ribbon
- A needle with a large eye or a skewer
Step-by-Step Guide:
- Prepare the Oranges (Adult Job): Ask an adult to preheat the oven to 200°F (95°C). Then, they need to carefully slice the oranges into thin, round pieces, about 1/4-inch thick.
- Dry the Slices: Lay the orange slices in a single layer on the baking sheet. Place them in the oven. They will need to bake for about 2-3 hours, flipping them over halfway through, until they are dry. Let them cool completely.
- String Them Together: Ask an adult to help you thread your needle with the twine. Carefully push the needle through the fleshy part of an orange slice, near the rind.
- Create Your Garland: Slide the orange slice down the twine. Leave a little space and then add another slice. You can also add cinnamon sticks or cranberries in between the oranges if you like.
- Hang It Up: Keep adding orange slices until your garland is the length you want. Tie a loop at each end, and it’s ready to hang on your porch!
9. Try a Natural and Earthy Vibe

This porch decor celebrates the simple beauty of nature. A stunning wreath made of succulents and pinecones is the main attraction, offering a unique and modern twist on a holiday classic. The colors are muted and earthy, creating a calm and peaceful feeling.
A simple, handmade garland made of paper ornaments adds a touch of rustic charm. Potted rosemary and mini-trees bring more life and greenery to the space. This design is gentle and understated, showing that holiday decor can be both beautiful and natural.
DIY Instructions: Simple Paper Garland
Let’s make the cute paper garland hanging on the door. It’s an easy and fun craft for a cozy afternoon.
What You’ll Need:
- A few sheets of thick paper or cardstock (white, cream, or light brown looks nice)
- Holiday-themed cookie cutters (like a tree, a star, a circle)
- A pencil
- Scissors
- A hole punch
- A long piece of twine
Step-by-Step Guide:
- Trace Your Shapes: Place a cookie cutter on your paper and trace around it with a pencil. Do this many times to make lots of shapes. Try to make an equal number of each shape.
- Cut Them Out: Carefully cut out all the shapes you traced. Take your time to stay on the lines.
- Punch the Holes: Take one of your paper shapes. Use the hole punch to make a hole near the top of the shape. Do this for every single shape you cut out.
- String Your Garland: Take your long piece of twine. Start threading it through the holes in your paper shapes. You can make a pattern, like tree, star, circle, tree, star, circle.
- Space Them Out: Leave a few inches of space between each shape on the twine. Once all your shapes are on, your garland is ready to hang across your door!
10. Mix Modern and Metallic Finishes

This porch design is sleek, modern, and very chic. It uses a striking color palette of copper, gold, and black. A geometric copper wreath with an air plant is a cool and unexpected touch, showing off a very modern style.
Tall gold planters are filled with lighted branches and a mix of shiny and glittery ornaments in rose gold tones. The large, sparkling stars add a bit of drama. This look is stylish and contemporary, giving your home a sophisticated holiday glow.
DIY Instructions: Ornament Branch Bouquet
Let’s create the beautiful display of branches and ornaments in the tall planter. It’s like making a sparkling bouquet.
What You’ll Need:
- A tall vase or planter
- A bundle of bare branches from your yard
- A string of battery-powered fairy lights
- A box of Christmas ball ornaments in different sizes (copper and rose gold look great)
- Floral foam or sand
Step-by-Step Guide:
- Set Up Your Vase: Fill the bottom of your vase with sand or a block of floral foam. This will keep your branches from falling over.
- Place the Branches: Stick the thick ends of your branches into the foam or sand. Arrange them so they stand up tall and spread out a little at the top.
- Add the Lights: Weave your fairy light string in and around the branches. Start at the bottom and work your way up. Let the battery pack hide at the base.
- Hang the Ornaments: Now for the fun part! Take your ornaments and start hanging them from the branches. Put the larger ones on thicker branches near the bottom and smaller ones on thinner branches near the top.
- Arrange and Display: Step back and look at your bouquet. Move ornaments around if you need to. Once you love how it looks, place it on your porch for a touch of modern sparkle.
11. Decorate with Sweet Pastel Dreams

This porch is a sugary fantasy in soft, dreamy colors. Frosted garlands are adorned with pastel ornaments in shades of lavender, pink, and mint green. Large, shimmers bows add a touch of girly glamour to the entrance.
The wreath on the door is made from colorful bottlebrush trees, creating a whimsical and unique focal point. Tiny fairies seem to dance among the branches. This enchanting display feels like stepping into the Land of Sweets from The Nutcracker.
DIY Instructions: Bottlebrush Tree Wreath
Let’s make that super cute wreath from the door. It’s colorful, fun, and easier than it looks!
What You’ll Need:
- A wire wreath frame
- About 15-20 small bottlebrush trees in different pastel colors
- A hot glue gun (with an adult’s help)
- A few small, sparkly ornaments or pom-poms
Step-by-Step Guide:
- Get Ready to Glue: Ask an adult to plug in the hot glue gun. While it heats up, remove the wooden bases from your bottlebrush trees. They should twist or pull off.
- Plan the Layout: Place your wire wreath frame on the table. Arrange the bottlebrush trees around the frame to see how you want them to look. Mix up the colors!
- Start Gluing (Adults Only!): With help, put a generous line of hot glue on the side of a bottlebrush tree. Press it firmly onto the wireframe. Hold it for a few seconds.
- Cover the Wreath: Keep gluing the trees onto the frame, snuggling them close together. Point them in different directions to make the wreath look full and fluffy.
- Add Some Bling: Once all the trees are attached, glue a few small ornaments or pom-poms in the gaps. Let everything dry, and your sweet pastel wreath is ready to hang!
12. Wrap Your Porch in Plaid

This cozy porch uses classic red plaid to create a feeling of warmth and tradition. A simple evergreen garland is instantly elevated by weaving a wide plaid ribbon through it. Matching bows on the miniature trees tie the whole look together.
Vintage-style ice skates and a rustic wooden sled add a touch of nostalgia, reminding visitors of joyful winter days. The scene is simple and uncluttered, focusing on timeless holiday charm. It’s a friendly and inviting look for any home.
DIY Instructions: Easy Plaid Ribbon Bow
Let’s learn to make the pretty plaid bows you see on the little trees. You can put them anywhere!
What You’ll Need:
- A roll of wide, wired plaid ribbon
- A pipe cleaner or a piece of floral wire
- Scissors
Step-by-Step Guide:
- Make the First Loop: Take the end of your ribbon and make a loop, about 4 inches long. Pinch the bottom of the loop tightly with your thumb and finger.
- Make a Second Loop: Without cutting the ribbon, twist it and make another loop of the same size on the other side. Pinch it at the same spot in the middle.
- Keep Going: Keep making loops, one on the right and one on the left, pinching them all in the middle. Make about three loops on each side.
- Secure the Center: Once you have your loops, ask an adult to help you tightly wrap the pipe cleaner or floral wire around the spot you were pinching. Twist it in the back to hold everything together.
- Fluff and Shape: Now, gently pull and fluff your loops. Because the ribbon has wire, you can shape them to look full and round. Cut the ribbon tails to the length you want, and your bow is done!
13. Welcome Guests with Natural Scents

This porch decor is a feast for the senses, using natural elements that look and smell wonderful. A lush wreath made of fresh rosemary and bay leaves forms the fragrant base. The real stars are the clove-studded oranges, or pomanders, tucked throughout.
Cinnamon sticks and dried orange slices add more texture and spice to the arrangement. The warm copper tones of the planters and bowls complement the orange perfectly. This entrance feels wholesome and inviting, offering an aromatic greeting.
DIY Instructions: Clove-Studded Orange Pomander
Let’s make one of those amazing-smelling oranges! It’s a fun craft that will make your whole porch smell like the holidays.
What You’ll Need:
- A fresh orange
- A jar of whole cloves
- A toothpick or a small nail
Step-by-Step Guide:
- Plan Your Design: You can cover the whole orange in cloves or make a pattern like swirls or straight lines. It can be fun to draw your design on the orange with a pen first (it will get covered up).
- Poke the Holes: Take your toothpick and gently poke a small hole in the orange skin where you want to put a clove. This makes it much easier to push the cloves in.
- Add the Cloves: Take one whole clove and push its pointy stem into the hole you just made. The little “flower” part of the clove will be showing.
- Keep Going: Keep poking holes and adding cloves until you have completed your design. Your hands will start to smell so good!
- Display Your Work: You can place your finished pomander in a bowl on your porch or even tie a ribbon around it to hang it up.
14. Play with Pink and Plaid

This modern farmhouse porch combines classic patterns with a surprising pop of color. The bold black-and-white buffalo check doormat and pillow create a strong graphic base for the design. This makes the bright pink and red berry wreath stand out even more.
Galvanized metal planters and a watering can add a rustic, country touch. The asymmetrical arrangement feels relaxed and contemporary. This look is cheerful and stylish, offering a fresh and modern welcome.
DIY Instructions: Bright Berry Wreath
Let’s make a wreath that’s packed with colorful berries. It’s a beautiful way to add a splash of color to your front door.
What You’ll Need:
- A grapevine wreath base
- Several bunches of fake berry stems (in red and pink)
- A hot glue gun (and an adult’s help) or floral wire
- A pre-made bow or ribbon to make your own
Step-by-Step Guide:
- Prepare Your Berries: Use wire cutters (ask an adult for help) to snip the large berry bunches into smaller, more manageable pieces.
- Start Adding Berries: Take a small piece of a berry stem and poke it into the grapevine wreath. You can weave it in and out of the vines to help it stay.
- Secure with Glue: For extra hold, ask an adult to add a dab of hot glue where the stem meets the wreath. Keep adding berry stems, working your way around the wreath.
- Make It Full: Overlap the stems and fluff out the berries to cover the grapevine base. Mix the pink and red colors as you go. Keep going until the whole wreath is bursting with color.
- Add the Bow: Attach your bow to the bottom of the wreath using its wire or by gluing it on. Your beautiful berry wreath is now complete!
15. Create a Cozy Ski Lodge Vibe

This porch is ready for a cozy day after hitting the slopes. It uses rustic, wintery elements to create the feel of a mountain cabin. A pair of vintage wooden skis immediately sets the scene.
A chunky knit wreath and soft, furry throws on the bench add layers of warmth and texture. A stack of firewood promises a roaring fire inside. This “après-ski” theme is charming and comfortable, inviting guests to come in and warm up.
DIY Instructions: Cozy Chunky Knit Wreath
Let’s make that super soft and cozy-looking wreath. It’s like giving your door a warm scarf.
What You’ll Need:
- A foam wreath form
- One skein of thick, chunky yarn (in a color like gray or cream)
- A hot glue gun (and a grown-up to help)
- Scissors
- A piece of twine for hanging
Step-by-Step Guide:
- Start Wrapping: Ask an adult to put a dab of hot glue on the back of the foam wreath. Press the end of your yarn into the glue to hold it.
- Wrap It Up: Begin wrapping the yarn around and around the wreath form. Keep the strands close together so none of the foam shows through. Just keep wrapping!
- Keep It Neat: As you wrap, push the yarn together so it’s nice and snug. Continue until you’ve covered the entire wreath form.
- Finish It Off: When you get back to the beginning, cut the yarn, leaving a small tail. Ask the adult to put another dab of glue on the back and press the end of the yarn into it to secure it.
- Add a Hanger: Tie a loop with your piece of twine around the top of the wreath. Now it’s ready to hang and make your porch feel extra cozy.
16. March to the Beat of the Nutcracker

This grand entrance is inspired by the classic holiday ballet, The Nutcracker. Life-sized nutcracker soldiers stand guard, creating a dramatic and theatrical welcome. The color scheme of red, blue, and gold is regal and festive.
The wreath on the door is cleverly decorated with miniature golden instruments and drums. A beautiful garland dotted with gold ornaments and red ribbons frames the scene. This porch is full of magic and splendor, welcoming guests to a spectacular holiday celebration.
DIY Instructions: Toy Instrument Wreath
Let’s make a musical wreath inspired by the one in the picture. It’s a playful decoration for any music lover.
What You’ll Need:
- A plain evergreen wreath
- A handful of small, plastic toy instruments (like trumpets, horns, and drums from a party store)
- Gold spray paint
- A hot glue gun (with an adult’s help)
- A big red bow
Step-by-Step Guide:
- Go for the Gold: On some newspaper outside, lay out all your plastic toy instruments. Spray paint them gold on all sides. You might need two coats. Let them dry completely.
- Plan Your Orchestra: Lay your wreath flat. Arrange the golden instruments around the wreath to see where you want them to go before you start gluing.
- Glue the Instruments (Adult Supervision!): Ask an adult to help you. Put a good amount of hot glue on the back of one instrument and press it firmly onto the wreath’s branches.
- Build Your Band: Keep gluing on the instruments, spreading them out evenly around the wreath. You can have them pointing in different directions.
- The Final Touch: Attach your big red bow to the bottom of the wreath. Now your musical masterpiece is ready for its debut on your front door!
17. Weave a Bohemian Holiday Welcome

This porch uses natural textures and a soft color palette to create a peaceful, bohemian holiday vibe. Macrame plant hangers and a woven wall hanging introduce an element of handmade artistry. A simple eucalyptus wreath gets a boho twist with pampas grass and a quartz crystal.
Layered rugs and bamboo lanterns on the floor add warmth and an earthy feel. The overall look is calm, creative, and very personal. It’s a gentle and stylish way to greet guests during the holiday season.
DIY Instructions: Beaded Wooden Garland
Let’s make the simple wooden bead garland you see hanging on the wall. It’s a very calming and easy craft to do.
What You’ll Need:
- A bag of round, wooden beads from a craft store
- A long piece of twine or string
- Scissors
- A piece of tape
Step-by-Step Guide:
- Prepare Your String: Cut a piece of twine to the length you want your garland to be, plus a little extra for tying loops.
- Make a “Needle”: Wrap a small piece of tape very tightly around one end of the twine. This will make it stiff and easy to push through the beads, just like a needle.
- Tie a Stopper: Tie a large knot at the other end of the twine. This knot will stop the beads from sliding right off.
- Start Stringing: Take one wooden bead and slide it onto your twine, all the way down to the knot. Then add another, and another.
- Finish It Up: Keep adding beads until your garland is almost full. Tie another big knot after the last bead to hold them all in place. You can tie the ends together to make a loop for hanging.
18. Go for Timeless Green and Gold

This entrance is the definition of classic elegance. A lush garland made from real pine and a beautiful magnolia leaf wreath create a look that is both simple and luxurious. The deep green of the foliage contrasts beautifully with the warm, glowing lights.
A simple, wide green ribbon hangs the wreath and adorns the planters, adding a touch of understated color. The look is clean, symmetrical, and sophisticated. It’s a timeless design that radiates a quiet and confident holiday spirit.
DIY Instructions: Simple Magnolia Leaf Wreath
Let’s make a beautiful wreath using magnolia leaves. The leaves are shiny on one side and fuzzy brown on the other, which looks really pretty.
What You’ll Need:
- A wire wreath frame
- Lots of fresh magnolia leaves (you might find these in your yard or at a flower shop)
- Floral wire
- Wire cutters
- A wide green ribbon
Step-by-Step Guide:
- Make a Leaf Bundle: Take 3 or 4 magnolia leaves and arrange them in a small fan shape.
- Wrap the Bundle: Use a piece of floral wire to wrap tightly around the stems of your leaf bundle, securing them together. Don’t cut the wire yet.
- Attach to the Frame: Place your leaf bundle on top of the wire wreath frame. Use the same piece of wire to wrap the bundle tightly to the frame. Now you can cut the wire.
- Overlap and Repeat: Make another small bundle of leaves. Place it on the frame so it slightly covers the stems of the first bundle. Attach it with wire.
- Cover the Wreath: Keep making bundles and attaching them, always in the same direction, until the entire front of the frame is covered in beautiful magnolia leaves. Add your green ribbon at the top for hanging.
19. Create an Icy Winter Wonderland

This porch is a frosty, magical scene straight from a snow globe. A monochromatic color scheme of white, silver, and various shades of blue creates a chilly and beautiful winter wonderland. Snowflakes and ornaments seem to float down from the ceiling.
Frosted white branches in the planters look like they’ve been touched by Jack Frost, and they’re filled with sparkling blue and silver ornaments. The “Let it Snow” sign on the door is the finishing touch. This design is a dreamy and immersive holiday experience.
DIY Instructions: Hanging Snowflake Garland
Let’s make some of those beautiful snowflakes that look like they are falling from the sky.
What You’ll Need:
- Glittery snowflake ornaments of different sizes
- Clear fishing line or string
- Tape or small cup hooks
- Scissors
Step-by-Step Guide:
- Cut Your Line: Cut several pieces of fishing line. Make them different lengths. Some can be short and some can be long. This will make the snowflakes look like they are really falling.
- Tie on a Snowflake: Take one piece of fishing line. Tie one end very tightly to the little loop on a snowflake ornament. Make a good, strong knot.
- Add More Snowflakes: You can tie more snowflakes onto the same piece of string, leaving space between them. Or you can just have one snowflake per string. Both look great!
- Hang Them Up: Take the other end of the fishing line and tape it securely to the ceiling of your porch. If you have hooks, you can tie a loop in the line and hang it.
- Create a Snowfall: Keep hanging your snowflake strings, spacing them out, until it looks like a beautiful snow flurry is happening right at your front door!
20. Step into Santa’s Workshop

This charming porch looks like the entrance to Santa’s very own workshop. It’s filled with classic, old-fashioned toys and rustic details. Vintage wooden sleds are decorated with simple green wreaths and plaid ribbons.
A little red wagon and a rocking horse add to the nostalgic, playful feel. The wreath on the door is full of tiny wooden toys, like spinning tops and rocking horses. This theme is heartwarming and full of childhood memories, creating a joyful welcome for all ages.
DIY Instructions: Vintage Toy Wreath
Let’s make a wreath that looks like it came straight from Santa’s bag of toys.
What You’ll Need:
- A plain evergreen or grapevine wreath
- A collection of small, lightweight wooden or vintage-style toys (spinning tops, small cars, toy soldiers)
- A hot glue gun (and a parent to help)
- Some small pinecones or other natural bits
Step-by-Step Guide:
- Heat Up the Glue: Ask a grown-up to plug in the hot glue gun and let it get nice and hot.
- Lay Out Your Toys: Place your wreath on a flat surface. Arrange the little toys on the wreath to get an idea of where everything should go. Put the biggest toys on first.
- Start Gluing (Adults Only!): With help from an adult, put a generous amount of hot glue on the flattest side of a toy. Press it firmly onto the wreath. Hold it in place for about 10 seconds until the glue sets.
- Fill in the Gaps: Keep gluing your toys around the wreath. Once the bigger toys are on, use smaller toys and pinecones to fill in any empty spots.
- Let It Dry: Let the wreath sit for about 30 minutes to make sure all the glue is completely dry and hard. Now it’s ready to hang on your door and welcome everyone to the workshop!
21. Tell a Story with a Literary Theme

This porch is a book lover’s dream, bringing a classic holiday story to life. The decor is inspired by “A Christmas Carol,” using stacks of vintage books and lanterns to create an old-world, scholarly feel. The wreath on the door is crafted from the rolled-up pages of a book.
A flowing banner made of script-covered paper weaves through the garlands, looking like a page from a Charles Dickens novel. This creative theme is full of charm and intelligence, offering a unique and thoughtful welcome to guests.
DIY Instructions: Rolled Page Book Wreath
Let’s make the amazing wreath on the door that looks like it’s made of old book pages.
What You’ll Need:
- An old paperback book you don’t mind cutting up
- A flat cardboard or foam wreath form
- A hot glue gun (and an adult’s help)
- A pencil
- Scissors
Step-by-Step Guide:
- Prepare the Pages: Carefully tear about 100 pages from the old book.
- Roll the Cones: Take one page. Roll it into a cone shape, starting from one corner. Make the pointy end tight and the open end wide. Put a little dot of glue to hold the cone shape. Make lots and lots of these cones.
- Start the Outer Layer (Adults Only!): Ask an adult to help with the hot glue gun. Put a line of glue on the side of one paper cone. Press it onto the outer edge of your wreath form.
- Build Your Layers: Glue more cones right next to each other to make the first row all around the outside of the wreath. For the next row, glue the cones on top of the first row, but stagger them to cover the gaps.
- Fill the Center: Keep gluing on rows of cones, working your way toward the center of the wreath until the whole form is covered in beautiful, rolled pages.
22. Get Cozy with a Sweater Weather Theme

This porch is as cozy as your favorite winter sweater. The design uses knitted textures to create a warm and inviting atmosphere. A wreath made from a Fair Isle patterned sweater is the star of the show, complete with adorable miniature stockings.
Planters are wrapped in matching sweater material, and even the stockings hanging on the sides match the pattern. This theme is wonderfully tactile and charming. It feels like a warm hug, welcoming guests in from the cold.
DIY Instructions: Cozy Sweater Wreath
Let’s make a wreath that looks like it’s wrapped in a cozy sweater.
What You’ll Need:
- An old sweater that you don’t wear anymore (one with a nice pattern is great)
- A foam wreath form (like a donut shape)
- Scissors
- A hot glue gun (and a grown-up to help)
Step-by-Step Guide:
- Cut the Sweater: Lay the old sweater flat. Cut across the body of the sweater, just under the armpits, to make a big tube of fabric. Then, cut this tube into long strips that are about 3-4 inches wide.
- Start Wrapping: Ask an adult to put a dab of hot glue on the back of the foam wreath. Press one end of a fabric strip into the glue to hold it.
- Wrap It Tight: Begin wrapping the fabric strip around and around the wreath form. Overlap the edges a little bit so none of the foam shows.
- Add a New Strip: When you get to the end of a strip, use a little dot of glue on the back to hold it down. Then, start a new strip right where the other one ended.
- Finish and Decorate: Keep wrapping until the whole wreath is covered in the sweater fabric. You can hang little ornaments or stockings from it, just like in the picture!
23. Welcome Winter Birds with a Natural Touch

This porch celebrates the beauty of nature in winter, with a special nod to our feathered friends. A simple grapevine wreath provides a rustic base, while bright red cardinal figures add a stunning pop of color against the dark door.
Birch logs and planters continue the woodsy theme. Tiny birdhouses tucked into the arrangements make the scene even more charming. This design feels peaceful and connected to the outdoors, offering a gentle and lively greeting.
DIY Instructions: Winter Cardinal Wreath
Let’s make the beautiful and simple wreath with the bright red birds.
What You’ll Need:
- A plain grapevine wreath (you can find these at a craft store)
- 4-5 small, fake cardinal birds (also at the craft store)
- A hot glue gun (and an adult’s help)
Step-by-Step Guide:
- Warm Up the Glue: Ask an adult to plug in the hot glue gun so it can get ready.
- Plan Your Bird Placement: Lay the wreath on a table. Place the cardinal birds around the wreath to decide where they will look best. You can have them all facing the same way or looking at each other.
- Glue the Birds (Adults Help!): Most fake birds have little wires on their feet, but glue is stronger. With an adult’s help, put a good amount of hot glue on the feet of one bird.
- Press Them On: Firmly press the bird onto one of the grapevine branches. Hold it for about 15 seconds to make sure it’s stuck on well.
- Finish Your Flock: Keep gluing the other birds around the wreath until you are happy with how it looks. It’s a very simple but beautiful decoration!
24. Host a Bubbly New Year’s Eve Bash

This porch is ready to party! The glamorous gold, silver, and white color scheme is a wonderful choice for a New Year’s Eve celebration. A massive balloon arch filled with metallic and white balloons frames the doorway, creating an instant sense of festivity.
The wreath is made entirely of shiny silver and gold ornaments, adding to the sparkle. Twinkling lights and a “Cheers!” doormat complete the scene. This decor is fun, festive, and full of excitement, ready to ring in the new year with style.
DIY Instructions: Ornament Ball Wreath
Let’s make the super sparkly wreath that’s covered in Christmas balls.
What You’ll Need:
- A wire wreath frame
- Lots of plastic Christmas ball ornaments in different sizes (silver and gold look great)
- A hot glue gun (and an adult to help)
Step-by-Step Guide:
- Prepare the Ornaments: First, take the little metal caps off the top of all the plastic ornaments. You won’t need them.
- Warm Up the Glue Gun: Have an adult plug in the hot glue gun.
- Start with the Big Ones (Adults Only!): With help, put a ring of hot glue around the opening of a large ornament. Press it firmly onto the wire wreath frame. Hold it for a few seconds.
- Build Your Base: Keep gluing the largest ornaments onto the frame, placing them close together to create a full base layer.
- Fill in the Gaps: Now, use the medium and small ornaments to fill in all the gaps. Glue them on top of and in between the larger balls until you can’t see the wire frame anymore. Let it dry completely before hanging.
25. Create an Enchanted Forest Entrance

Step into a magical woodland with this whimsical porch decor. The design uses natural moss, winding branches, and fairy-like details to create an enchanted forest feel. The wreath and garlands are covered in lush green moss, pinecones, and acorns.
The most magical touch is the collection of mushrooms, some with tiny glowing doors, making it look like a fairy village. This theme is imaginative and unique, sparking a sense of wonder for all who approach.
DIY Instructions: Little Mushroom House
Let’s make one of the tiny mushroom houses. It’s like building a home for a fairy.
What You’ll Need:
- A small, unpainted wooden birdhouse
- Red and white craft paint
- A paintbrush
- A small wooden bowl
- A hot glue gun (and a parent to help)
Step-by-Step Guide:
- Make the Mushroom Top: Take the small wooden bowl and turn it upside down. This will be the top of your mushroom. Paint it red. Let it dry.
- Add the Spots: Once the red paint is dry, use the handle of your paintbrush to dip into the white paint. Gently press the handle onto the red bowl to make perfect white polka dots. Let it dry completely.
- Paint the House: While the top is drying, paint the main part of the birdhouse white. This will be the stem of your mushroom.
- Assemble the Mushroom (Adults Help!): Ask an adult to help you with the hot glue gun. Put a ring of hot glue around the top edge of the white birdhouse base.
- Put It Together: Carefully place the red-and-white mushroom top onto the glue. Press down gently. Now you have a tiny mushroom house to place on your porch!
26. Embrace a Modern Black and White Christmas

This porch proves that holiday decor can be minimalist and chic. A striking black and white color palette creates a clean, modern, and sophisticated look. The matte black wreath on the black door makes a subtle but powerful statement.
A simple white ribbon provides a sharp contrast. Ornaments in black, white, and silver add a festive touch without overwhelming the design. This decor is for those who love a clean aesthetic, offering a stylish and contemporary welcome.
DIY Instructions: Modern Black Wreath
Let’s make a cool, all-black wreath. It’s very modern and stylish.
What You’ll Need:
- A basic, inexpensive fake pine wreath
- A can of matte black spray paint
- A long, wide white ribbon
Step-by-Step Guide:
- Prepare for Painting: Take your wreath outside and place it on a large piece of cardboard or some old newspaper. Make sure you are in a spot where it’s okay to use spray paint.
- Paint It Black: Shake the can of spray paint very well. Hold the can about 8-10 inches away from the wreath and start spraying. Use smooth, even strokes to cover all the green pine needles.
- Get All the Angles: You will need to spray from the top, the sides, and even lift it up to get the underneath. Let it dry for about 30 minutes.
- Do a Second Coat: Once it’s dry, check for any green spots you missed. Apply a second coat of paint if needed to make it a solid, matte black. Let it dry completely for a few hours.
- Add the Ribbon: Tie your white ribbon in a simple knot or a small bow at the top or bottom of the wreath. That’s it! Your modern wreath is ready to hang.
27. Go for a Southwestern Holiday Style

This porch brings a warm, desert vibe to the holiday season. Instead of a traditional pine wreath, this design features dried grasses, red chili peppers, and rustic elements. A small cow skull and turquoise stones add an authentic Southwestern touch.
Potted cacti and succulents replace the usual evergreen trees. The warm, earthy tones of the terracotta pots and lanterns create a cozy glow. This unique theme is full of character and warmth, offering a distinctive and inviting welcome.
DIY Instructions: Desert Vibe Holiday Wreath
Let’s make a wreath with a cool, desert-inspired look.
What You’ll Need:
- A grapevine wreath base
- Bunches of fake dried grasses or pampas grass
- A bunch of fake red chili peppers
- A few fake succulent picks or turquoise-colored stones
- Hot glue gun (with adult supervision)
Step-by-Step Guide:
- Warm Up the Glue: Ask an adult to get the hot glue gun ready.
- Add the Grasses: Start by tucking and weaving the stems of the dried grasses into the grapevine wreath. Have them all flow in the same direction, following the curve of the wreath. Use a little bit of hot glue to secure them.
- Add the Chili Peppers: Now, take your bunch of red chili peppers. Use a generous amount of hot glue to attach the top of the bunch to the wreath, on top of the grasses.
- Place Your Accents: Decide where you want your succulents or turquoise stones to go. Put a good amount of glue on the back of them and press them firmly onto the wreath.
- Finishing Touches: Fluff up the grasses and make sure everything is secure. Your Southwestern wreath is now ready to bring some desert heat to your holiday door!
28. Fill Your Porch with Warm Candlelight

This porch is the definition of cozy and inviting. The space is filled with the warm, flickering glow of candlelight from dozens of lanterns and pillar candles. The simple decor allows the light itself to be the main feature.
Soft blankets and pillows on a wooden bench invite guests to sit and stay a while. The warm light reflecting on the red door and wood tones creates an incredibly welcoming atmosphere. This design is all about creating a feeling of warmth, comfort, and togetherness.
DIY Instructions: Faux Candle Lantern
Let’s make one of those beautiful, glowing lanterns. We’ll use a battery-powered candle so it’s safe for everyone.
What You’ll Need:
- A lantern (you can find these at craft or home stores)
- A battery-powered LED candle that fits inside your lantern
- Optional: some fake snow, small pinecones, or pebbles
Step-by-Step Guide:
- Open the Lantern: Open the little door on the side of your lantern.
- Add a Base (Optional): If you want, you can sprinkle a little bit of fake snow or place a few small pinecones or pebbles on the bottom of the lantern. This adds a nice decorative touch.
- Place the Candle: Turn on your battery-powered candle. Carefully place it inside the lantern, right in the middle. Make sure it’s sitting flat and is stable.
- Close It Up: Close the lantern door and make sure it is latched.
- Find the Perfect Spot: You can place your lantern on the steps, next to your door, or on a small table. You can make several in different sizes to create a beautiful, glowing display on your porch.
29. Dazzle with Jewel Tones and Peacock Feathers

This porch is a celebration of bold, vibrant color. The decor uses a rich jewel-toned palette of purple, teal, magenta, and blue. The garland and wreath are packed with shimmering ornaments in these deep, luxurious shades.
Peacock feathers are tucked into the arrangements, adding an exotic and elegant flair. The combination of colors and textures is dramatic and eye-catching. This is a glamorous and opulent way to greet guests, promising a lively and festive celebration inside.
DIY Instructions: Jewel-Toned Ornament Wreath
Let’s make that incredibly colorful wreath. It’s like decorating your door with a beautiful necklace.
What You’ll Need:
- A plain evergreen wreath
- Lots of plastic ornaments in jewel tones (purple, blue, green, magenta)
- A few peacock feathers
- A hot glue gun (and a grown-up’s help)
Step-by-Step Guide:
- Prepare for Gluing: Have an adult plug in the hot glue gun.
- Plan Your Colors: Lay your wreath flat and arrange the ornaments on top of it to see how you want to mix the colors.
- Glue the Ornaments (Adults Help!): With help, start gluing the ornaments onto the wreath’s branches. Start with the larger ornaments to create a base layer.
- Fill It Up: Use the smaller ornaments to fill in all the empty spaces. Don’t be afraid to pack them in close together to make the wreath look really full and rich.
- Add the Feathers: Once all the ornaments are on, take your peacock feathers. Put a little dot of hot glue on the end of the feather’s quill. Gently poke the quill in between the ornaments so the beautiful top of the feather fans out.
30. Throw a Funky, Iridescent Holiday Rave

This porch is ready for a futuristic holiday party. An iridescent tinsel curtain creates a shimmering, color-shifting backdrop that is both playful and mesmerizing. The light reflects off the tinsel, creating a rainbow of colors.
Shiny, chrome-like planters and a simple silver wreath continue the modern, metallic theme. The look is unexpected, fun, and totally unique. This decor is for those who aren’t afraid to be different, offering a vibrant and energetic welcome.
DIY Instructions: Shimmering Tinsel Doorway
Let’s create that amazing, shimmery curtain for your door. It’s a super fun and easy way to make a big impact.
What You’ll Need:
- 2-3 iridescent foil fringe curtains (you can find these at a party supply store)
- A tension rod that fits your doorway, or strong tape
- Scissors
Step-by-Step Guide:
- Measure Your Door: Look at how wide your door frame is. Most party curtains are a standard width, so you might need two to make it look full.
- Use a Tension Rod: The easiest way is to use a tension rod (the kind you use for shower curtains). You can just thread the top of the curtains onto the rod.
- Hang the Curtains: Adjust the tension rod so it fits snugly inside the top of your door frame. If you’re using more than one curtain, bunch them together.
- Or Use Tape: If you don’t have a tension rod, you can use strong packing tape or command strips. Just tape the top edge of the curtains to the top of your door frame. Overlap them a little in the middle.
- Trim the Bottom: The curtains might be too long. Use your scissors to trim the bottom so they just brush the ground. Now you have a magical, shimmering entrance!
31. Offer a Colonial Fruit Welcome

This elegant porch uses fruit to create a beautiful and symbolic display. A wreath made of apples, lemons, and pomegranates offers a colorful and natural decoration. Pineapples, a classic sign of hospitality, stand proudly on either side of the door.
The design is rooted in colonial tradition, where fresh fruit was a way to show guests they were honored and welcome. This look is timeless and meaningful, extending a warm and generous greeting.
DIY Instructions: Fresh Fruit Wreath
Let’s make a stunning wreath using real fruit. It looks and smells amazing!
What You’ll Need:
- A sturdy wire wreath frame
- Floral wire
- Lots of wooden floral picks
- A bag of firm apples, lemons, or other sturdy fruit
- Greenery like ivy or fir branches to fill gaps
Step-by-Step Guide:
- Prepare the Fruit: Gently wash and dry all your fruit. Take a wooden floral pick, which has a sharp point on one end and a wire on the other. Carefully push the sharp point into the bottom of a piece of fruit.
- Attach Fruit to the Wreath: Take your piece of fruit with the pick in it. Place it on the wire wreath frame and use the wire from the pick to wrap tightly around the frame, securing the fruit.
- Build Your Design: Keep adding fruit, one piece at a time. Snuggle them close together to create a full look. You can make a pattern or mix the fruits randomly.
- Fill in the Gaps: Once all your fruit is attached, you might see some empty spots. Tuck small sprigs of greenery into these gaps to hide the wire frame.
- Hang It Up: This wreath can be heavy, so use a strong hook to hang it on your door. It will look beautiful for about a week.
32. Arrange a Botanical Christmas Study

This creative porch looks like a page from a botanist’s notebook. Framed prints of ferns and leaves hang on the wall, setting a scholarly tone. The fresh evergreen wreath is decorated with little tags that have the Latin names of the plants.
Potted herbs and small branches on a desk-like table continue the theme. This design is clever and unique, celebrating the natural world in a very thoughtful way. It’s an educated and earthy welcome for your guests.
DIY Instructions: Labeled Botanical Wreath
Let’s make the clever wreath with the plant name tags. It’s a fun project for any nature lover.
What You’ll Need:
- A simple, fresh evergreen wreath
- Several small pieces of white or cream cardstock paper
- A pen with nice ink
- A hole punch
- Thin twine or string
Step-by-Step Guide:
- Make Your Tags: Cut your cardstock into small rectangular tags, about 1 inch by 3 inches.
- Write the Names: Look up the fancy, scientific names for some common holiday plants (like Pinus strobus for White Pine or Ilex verticillata for Winterberry). Carefully write one name on each tag.
- Punch the Holes: Use your hole punch to make a small hole at one end of each tag.
- Attach to the Wreath: Cut small pieces of twine, about 5 inches long. Thread a piece of twine through the hole in a tag and tie it loosely onto a branch of your wreath.
- Label Your Wreath: Keep adding your tags around the wreath, spacing them out. It will look like a beautiful scientific specimen for your front door.
33. Fold a Peaceful Origami Welcome

This porch offers a message of peace and hope with its minimalist design. The star is a beautiful wreath featuring a cascade of white origami paper cranes. The crane is a symbol of good fortune and longevity in Japanese culture.
The clean white door and simple branch arrangement create a serene and calming atmosphere. This look is delicate, artistic, and full of meaning. It’s a gentle and thoughtful way to welcome visitors to your home.
DIY Instructions: Simple Origami Crane
Let’s learn how to fold a paper crane. You can make many and string them together!
What You’ll Need:
- A square piece of paper (origami paper is best, but any thin paper works)
Step-by-Step Guide:
- Fold in Half: Fold your square paper in half to make a triangle. Unfold it. Then fold it in half the other way to make another triangle. Unfold it.
- Make a Square Base: This is the trickiest part. Bring three corners down to meet the bottom corner. As you do this, the paper will collapse into a smaller square shape, called a square base.
- Create the Neck and Tail: Take the top flaps on one side and fold them to meet the center line. Flip it over and do the same on the other side. Then, unfold these. Now, open the top flap and fold it up along the creases you just made to create a long diamond shape. Flip and repeat on the other side.
- Shape the Body: Fold the skinny sides of the diamond to the center line. Flip it over and do the same on the back.
- Form the Head: Take one of the skinny points and fold it up to be the neck. Take the other skinny point and fold it up to be the tail. Now, take the very tip of the neck and fold it down to make the head. You did it!
34. Create a Moody, Gothic Romance

This dramatic porch uses a dark and romantic theme. Deep, velvety red and black flowers are mixed with wild, dark greenery. An asymmetrical swag sweeps across the top of the door, creating a sense of movement.
Bare, twisting branches add to the gothic feel, looking like something from a beautiful fairytale. The scene is lit by the soft, flickering light of many candles. This design is mysterious and passionate, offering an unforgettable welcome.
DIY Instructions: Dark Floral Lantern Arrangement
Let’s make one of the moody floral arrangements you see inside the lanterns.
What You’ll Need:
- A medium-sized lantern
- A small jar or vase that fits inside the lantern
- A block of wet floral foam
- A few dark-colored fake flowers (like deep red dahlias or black roses)
- Some fake greenery or small twigs
Step-by-Step Guide:
- Prepare the Foam: Cut a piece of the wet floral foam and soak it in water until it’s full. Place the wet foam inside your small jar.
- Place the Vase: Open the lantern door and place the jar with the foam inside.
- Add the Flowers: Trim the stems of your fake flowers so they are not too tall. Start by pushing the stem of your largest flower into the center of the foam.
- Fill it Out: Add the other flowers around the main one. Then, poke the small sprigs of greenery and twigs into the foam to fill in any gaps.
- Arrange and Close: Move the flowers around until you like how they look. Close the lantern door, and you have a beautiful, romantic decoration.
35. Take a Kitschy Retro Road Trip

This porch is a blast from the past! The decor is inspired by a vintage family road trip to Grandma’s house. A bright turquoise door provides a cheerful backdrop for the fun and kitschy decorations.
Shiny tinsel wreaths are decorated with colorful pom-poms, and vintage-style coolers hold thermoses and shiny ornaments. The doormat, shaped like a classic station wagon, completes the theme. This look is playful and full of personality, bringing a smile to every visitor’s face.
DIY Instructions: Pom-Pom Tinsel Wreath
Let’s make one of those shiny, happy wreaths with the bright pom-poms.
What You’ll Need:
- A foam wreath form
- A few strands of fluffy silver tinsel garland
- A bag of large, colorful craft pom-poms
- A hot glue gun (and an adult to help)
Step-by-Step Guide:
- Wrap the Wreath: Ask an adult to put a dot of hot glue on the back of the foam wreath. Press the end of the tinsel garland into the glue.
- Get Fluffy: Start wrapping the tinsel around and around the wreath form until it is completely covered and super fluffy. Secure the other end with another dot of glue on the back.
- Add the Pom-Poms (Adults Help!): Now for the color! With help, put a dot of hot glue on the back of a large pom-pom.
- Press and Stick: Press the pom-pom firmly onto the tinsel. Hold it for a few seconds.
- Decorate All Over: Keep gluing on pom-poms, spreading out the colors all around the wreath. Your fun and funky retro wreath is now ready to hang!
36. Throw a Tropical “Jungle Bells” Party

This porch brings the warmth of the tropics to the holiday season. Instead of pine trees, this entrance is filled with lush, green houseplants like monstera and fiddle leaf figs. The “Welcome to the Jungle” sign sets a fun and playful tone.
Classic red poinsettias are mixed in, adding a traditional holiday color to the sea of green. Ornaments hanging from the tree branches are a subtle festive touch. This “Jungle Bells” theme is fresh and unexpected, offering a vibrant and lively welcome.
DIY Instructions: Tropical Leaf Wreath
Let’s make a festive wreath using tropical leaves instead of pine.
What You’ll Need:
- A wire or grapevine wreath form
- About 15-20 large fake tropical leaves (like monstera or palm leaves)
- A hot glue gun (and an adult’s help) or floral wire
- A pre-made silver bow
Step-by-Step Guide:
- Get the Glue Ready: Ask an adult to plug in the hot glue gun to let it warm up.
- Plan Your Leaves: Lay your wreath form on a table. Arrange the large leaves around it to see how they will best cover the frame.
- Start Attaching: With an adult’s help, put a line of hot glue on the back of a leaf’s stem. Press it firmly onto the wreath form. If using wire, just wrap the wire around the stem and the frame.
- Overlap and Cover: Take another leaf and place it so it slightly covers the stem of the first one. Keep attaching leaves, pointing them all in the same direction, until the whole frame is hidden.
- Add the Bow: Attach your silver bow to the top of the wreath. Now you have a beautiful tropical holiday wreath!
37. Display a Geode and Crystal Wonderland

This porch is a stunning display of natural wonders. The design is built around beautiful, glittering geodes and crystals. A spectacular wreath made of colorful agate slices is the main focal point, with its amazing patterns and gold-trimmed edges.
More agate slices and large crystals are displayed on and around a small table, creating a glamorous, gallery-like feel. This theme is earthy yet very sophisticated, offering a unique and sparkling welcome to guests.
DIY Instructions: Faux Agate Slice Ornament
Let’s make an ornament that looks like one of those beautiful, sliced rocks.
What You’ll Need:
- Clear-drying craft glue
- A small, clear plastic lid (like from a sour cream container)
- Food coloring (in a color you like, such as blue or pink)
- Gold glitter glue or a gold paint pen
- A toothpick and a small cup
Step-by-Step Guide:
- Mix Your Colors: Pour some of the clear glue into your small cup. Add one or two drops of food coloring and stir it with the toothpick until it’s mixed.
- Create the Agate: Pour the colored glue into the plastic lid. You can add a drop of a different color and gently swirl it with the toothpick to make patterns like a real rock.
- Let It Dry: Let the glue dry completely. This might take a whole day or two! It will turn from cloudy to clear.
- Peel It Off: Once it’s totally dry, you can carefully peel your “agate slice” out of the plastic lid.
- Add the Gold Edge: Use your gold glitter glue or paint pen to carefully draw a line all around the outside edge of your slice. Let it dry, then you can hang your beautiful creation.
38. Let Stained Glass Be the Star

This entryway shows that sometimes, less is more. The stunning, colorful stained glass around the door is the real decoration here. The holiday decor is kept simple and elegant so it doesn’t compete with the beautiful windows.
A single, wispy pine wreath with a monogram hangs on the door, adding a personal touch without blocking the view. Two classic black urns with ferns and a pair of candle lanterns complete the scene. This approach is all about complementing the home’s architecture.
DIY Instructions: Simple Monogram Wreath
Let’s make a simple and elegant wreath with your family’s initial on it.
What You’ll Need:
- A simple, thin evergreen wreath
- A wooden letter (the first letter of your last name)
- Black craft paint and a paintbrush
- A hot glue gun (and an adult to help) or fishing line
Step-by-Step Guide:
- Paint Your Letter: Lay your wooden letter on some newspaper and paint it black. You might need two coats. Let it dry completely.
- Attach the Letter: The easiest way to make the letter look like it’s floating is to use clear fishing line. Cut a piece and tie it to the top of the letter. Then, tie the other end to the top of the wreath, so the letter hangs right in the middle.
- Or Glue It: If you prefer, an adult can help you put hot glue on the back of the letter and press it onto the wreath’s branches.
- Keep it Simple: This wreath looks best without a lot of other decorations. It’s simple, personal, and very classy.
39. Wrap Your Porch in Peppermint Stripes

This porch is a sweet treat, decorated from top to bottom in a peppermint candy theme. The boldest feature is the porch columns, which are wrapped in red and white ribbon to look like giant candy canes. This creates a huge visual impact.
A fluffy red-and-white striped wreath hangs on the door, and the planters are filled with ornaments and miniature candy canes. This decor is fun, graphic, and full of festive cheer, creating a sweet and happy welcome.
DIY Instructions: Candy Cane Porch Columns
Let’s make your porch pillars look like giant candy canes!
What You’ll Need:
- Several rolls of very wide white ribbon
- Several rolls of very wide red ribbon
- Strong tape or a staple gun (for an adult to use)
- Scissors
Step-by-Step Guide:
- Start with White: Take the end of your white ribbon. At the very top of your porch column, have an adult secure the end with a staple or a piece of strong tape.
- Wrap the Base: Wrap the white ribbon all the way down the column, overlapping it a little each time so none of the column shows. When you get to the bottom, have an adult cut the ribbon and secure it.
- Add the Red Stripe: Now, take your red ribbon. Secure the end at the top of the column, right where you started the white.
- Create the Spiral: Wrap the red ribbon down the column in a spiral, like the stripe on a real candy cane. Leave a wide gap of white showing between each red stripe.
- Finish It Up: When you get to the bottom, have an adult cut and secure the red ribbon. Your porch now has giant candy canes!
40. Blend Autumn Harvest with Holiday Greenery

This porch is a beautiful example of decor that can bridge the gap between Thanksgiving and Christmas. It combines late autumn harvest elements with early holiday touches. A large wreath made of wheat and pheasant feathers has a rustic, Thanksgiving feel.
Corn stalks frame the door, while small evergreen trees in buckets and mini pumpkins signal the coming Christmas season. The “Grateful Blessed” sign fits both holidays. This design is warm, natural, and a great way to transition between seasons.
DIY Instructions: Harvest Wheat Wreath
Let’s make a beautiful wreath from wheat that’s a great choice for the entire fall and winter season.
What You’ll Need:
- A wire or straw wreath form
- A large bundle of dried wheat stalks
- Floral wire
- Wire cutters
- Optional: a few feathers or small, fake mini pumpkins
Step-by-Step Guide:
- Make a Wheat Bundle: Take a small handful of about 8-10 wheat stalks and arrange them so the tops are even.
- Wrap the Bundle: Use a piece of floral wire to wrap tightly around the stems of your wheat bundle, securing them together. Don’t cut the wire from the spool yet.
- Attach to the Wreath: Place your wheat bundle on the wreath form. Use the wire spool to wrap the bundle tightly to the frame several times.
- Overlap and Repeat: Make another small wheat bundle. Place it on the frame so the wheat tops cover the wrapped stems of the first bundle. Attach it with wire.
- Cover the Whole Wreath: Keep making bundles and attaching them in the same direction until your whole wreath is covered in beautiful, golden wheat. You can tuck in a few feathers or glue on some mini pumpkins for extra decoration.
41. Build a Magical Frosted Ice Palace

This porch has been transformed into a magical ice kingdom. An arch of frosted white branches and glittering icicles creates a grand entrance. Everything is bathed in a cool, white light, giving the impression of a world frozen in time.
The wreath is covered in frosted crystals and sparkling details, with a vintage key in the center suggesting entry to an enchanted place. This look is absolutely breathtaking and full of fairytale wonder, welcoming guests into a dream.
DIY Instructions: Frosted Icicle Wreath
Let’s make a wreath that looks like it’s from a beautiful ice castle.
What You’ll Need:
- A basic grapevine or pine wreath
- A can of white spray paint or fake snow spray
- Silver or iridescent glitter
- A handful of plastic icicle ornaments
- A hot glue gun (and an adult’s help)
- An old key (optional)
Step-by-Step Guide:
- Frost the Wreath: Take your wreath outside and spray it with the white paint or snow spray. Cover it completely. While the paint is still wet, sprinkle it generously with the glitter so it sticks. Let it dry.
- Paint the Key: If you have a key, you can spray paint it silver or white to match the wreath. Let it dry.
- Attach the Icicles (Adults Help!): Have an adult help you with the hot glue gun. Put a dot of hot glue on the top of an icicle ornament and press it onto the wreath.
- Create a Fringe: Glue the icicles around the wreath, especially along the bottom half, so they hang down like real ice.
- Add the Final Touch: Glue your key to the center of the wreath. Your magical, frosty creation is now ready to hang on your door.
42. Design a Rustic Highland Lodge Entrance

This porch has the rugged, cozy feel of a remote cabin or a hunting lodge. A magnificent wreath featuring large antlers is the undeniable centerpiece. The mix of greenery and purple heather adds a touch of the wild Scottish highlands.
A chunky cable-knit blanket and a faux cowhide rug add layers of texture and warmth. The stone walls and simple lanterns complete the rustic, outdoorsy look. This design is strong and welcoming, perfect for a cozy winter retreat.
DIY Instructions: Rustic Antler Wreath
Let’s make the amazing wreath with the antlers. It looks very impressive and brings the outdoors to your door.
What You’ll Need:
- A large grapevine wreath
- Two small, lightweight fake antlers (from a craft store)
- Floral wire
- A few sprigs of fake heather or lavender
- A hot glue gun (with adult supervision)
- A wide plaid ribbon
Step-by-Step Guide:
- Position the Antlers: Place your grapevine wreath on a table. Arrange the two antlers on the wreath to see where they look best. You can have them at the top and bottom, or both at the top like in the picture.
- Wire Them On: This is the most important step. Use several pieces of floral wire to attach the antlers very securely to the thick vines of the wreath. Twist the wire tightly in the back. The antlers should not wiggle at all.
- Add the Flowers: Take your sprigs of heather. Tuck the stems into the grapevine branches around the antlers. You can use a little dab of hot glue (with an adult’s help) to make sure they stay in place.
- Fill it Out: Keep adding greenery and flowers until the wreath looks full and wild.
- Tie the Bow: Make a simple bow with your plaid ribbon and use its wire to attach it to the bottom of the wreath. Your rustic masterpiece is complete!
Your front porch is more than just a path to your door; it’s the cover of your holiday story. By giving it a little attention, you create a warm and festive welcome that makes your guests feel cherished before they even step inside.
Throughout these 42 ideas, we’ve journeyed through enchanting forests, cozy cabins, and sweet candy lands. We’ve seen how simple materials like plaid ribbon, fresh fruit, or even old book pages can be transformed into something truly special.
The most important takeaway is to have fun and make the space your own. Use these concepts as a starting point, mix and match elements you love, and infuse your own personality into your design. Your home’s holiday greeting should be as unique as you are.
Happy decorating!
Key Takeaways
- Define Your Theme. A clear theme—whether it’s rustic, modern, or whimsical—helps create a cohesive and impactful design.
- Embrace DIY. You don’t need a big budget to make a statement. Handmade decorations add a personal touch that is both affordable and heartfelt.
- Layer with Light. Never underestimate the power of a warm glow. Use string lights, lanterns, or battery-operated candles to make your porch feel magical, especially after dark.
- Think Beyond the Door. Decorate the entire porch space. Use planters, columns, seating, and even the walkway to build a complete and immersive scene.