The fireplace mantel is the heart of the home during the holidays. It is where family and friends gather, where stockings hang in hopeful anticipation. A beautifully decorated mantel sets the festive tone for your entire room.

This season, you can create something truly special. You can move beyond the usual arrangement of items. We have gathered 36 distinct holiday mantel decor ideas to spark your imagination and guide your creativity.
From the cozy comfort of a country farmhouse to the glittering glamour of a New Year’s Eve party, there is a style here for everyone. Each idea comes with simple, step-by-step instructions to help you bring your vision to life. Let’s build a magical focal point for your holiday celebrations.
1. The Nutcracker’s Parade

This mantel brings a classic holiday story to life. A collection of colorful nutcrackers stands at attention, creating a festive and orderly display. Their bright uniforms of red, blue, and gold pop against the dark wood of the fireplace. The whole scene feels both playful and grand.
A simple evergreen garland rests below the soldiers, adding a touch of natural texture. Brass trumpets and tiny rocking horses hang from its branches. This display is framed by tall, elegant candlesticks, their flames casting a warm, gentle glow. It’s a look that recalls cherished holiday traditions and timeless tales.
DIY Nutcracker Parade Mantel
Here is how you can make a fun nutcracker parade on your own mantel.
Step 1: Gather Your Soldiers and Supplies
- Find all of your nutcracker figures. It’s more fun if they are different sizes!
- Get a plain green garland. A real or fake one will work.
- You’ll need two tall candlesticks and candles. (Battery-powered candles are a super safe choice).
- Grab two of your favorite stockings.
- Find some ribbon to make a bow.
Step 2: Lay the Greenery Carefully place your green garland across the top of the mantel. Let it swoop down a little in the middle.
Step 3: Arrange the Parade This is the best part! Put your tallest or main nutcracker right in the center. Then, line up the rest of your nutcrackers on both sides. Make them look like they are in a marching line, all facing forward.
Step 4: Add a Warm Glow Place one candlestick on the far-right end of the mantel. Put the other one on the far-left end. If you use real candles, make sure a grown-up is there to help you light them.
Step 5: Hang the Stockings with Care Hang one stocking on the right side of the fireplace and the other on the left.
Step 6: Finish with a Festive Bow Take your ribbon and tie it into a nice bow. Attach it to the front of your garland, right in the center. Your nutcracker parade is now ready for the holidays!
2. Pastel Winter Wonderland

Step into a sweet holiday dream with this pastel-colored mantel. Soft pinks and cool mint greens replace the usual holiday colors, creating a magical, sugary scene. A fluffy, snow-covered garland is draped gracefully, filled with shiny ornaments and delicate bows.
Fuzzy stockings in pink and mint invite cozy moments by the fire. Little bottle brush trees look like candy-colored forests. This decor is whimsical and light, reminding you of snowflakes and sugar plums. It brings a unique and gentle touch to holiday decorating.
DIY Pastel Winter Wonderland Mantel
You can create this sweet and frosty look with a few simple steps.
Step 1: Gather Your Magical Supplies
- Get a flocked garland (the kind that looks like it has snow on it).
- Find ornaments in pastel pink, mint green, and shiny silver.
- Buy some soft ribbon in pink and mint to make bows.
- Look for fuzzy, soft stockings in the same pastel colors.
- Get a few small bottle brush trees in pink and mint.
Step 2: Drape the Snowy Garland Place your flocked garland across the mantel. Let it hang down on one side for a beautiful, swooping look.
Step 3: Add Ornaments and Bows Tuck your pastel ornaments into the branches of the garland. Tie small bows with your ribbon and attach them throughout the greenery.
Step 4: Hang the Fluffy Stockings Hang your soft, fuzzy stockings from the mantel. The different colors will look lovely together.
Step 5: Create a Mini Forest Place your bottle brush trees on the mantel and on the floor next to the fireplace. Group them in little clusters.
Step 6: Add a Gentle Light Put some candles in glass holders on the mantel and hearth. The candlelight will make everything sparkle.
3. Frosted Winter Solstice

This mantel captures the quiet beauty of a frosty winter day. A cool palette of icy blues, shimmering silver, and crisp white creates a serene and elegant look. The scene is filled with different shades of blue, from deep navy to light sky blue, giving it a rich feel.
Sparkling snowflake ornaments and silver branches are tucked into a snowy garland. Everything seems to glitter, like a landscape covered in ice. Blue candles in silver holders add a steady, calm glow. This decor is a sophisticated nod to the chilly, beautiful side of the season.
DIY Frosted Winter Solstice Mantel
It’s easy to bring this cool and calm winter scene into your home.
Step 1: Collect Your Frosty Materials
- You’ll need a white or flocked garland.
- Gather ornaments in many shades of blue and silver. Get different textures: shiny, matte, and glittery.
- Find some large snowflake ornaments.
- Get a few white or silver branches from a craft store.
- Look for blue and white stockings.
- Find blue candles and silver candle holders.
Step 2: Start with the Garland Lay your white or flocked garland across the mantel.
Step 3: Fill with Icy Color Place the blue and silver ornaments all through the garland. Mix the different shades and textures to make it interesting.
Step 4: Add Branches and Snowflakes Tuck the white and silver branches into the garland to add height. Hang the big snowflake ornaments so they stand out.
Step 5: Bring in the Candlelight Place your blue candles in their silver holders and arrange them on the mantel.
Step 6: Hang the Stockings Hang your blue and white stockings to complete the frosty display.
4. Winter Blush

Soft and romantic, this mantel mixes snowy branches with warm shades of pink and berry. The heavily flocked garland looks like it was just brought in from a gentle snowfall. It creates a beautiful, soft base for the pops of color.
Pink ornaments, ribbons, and clusters of frosted berries add warmth and charm. A deep red velvet stocking provides a rich contrast to the lighter pinks. This look is elegant and cozy, blending the chill of winter with the warmth of the holidays.
DIY Winter Blush Mantel
Here is how to create this romantic, snowy look.
Step 1: Gather Your Rosy Supplies
- Find a garland that is heavily flocked (lots of fake snow).
- Get berry picks from a craft store in shades of pink and dark red.
- You’ll need pink ornaments and some light pink ribbon.
- A single, beautiful stocking in dark red or burgundy velvet will be a key piece.
- White decorative trees and pink candles are great extras.
Step 2: Drape the Snowy Garland Lay your flocked garland over the mantel. Let one end hang down much lower than the other for a dramatic effect.
Step 3: Add Berries and Baubles Poke the berry picks deep into the garland. Space them out nicely. Add your pink ornaments among the berries.
Step 4: Tie it with a Ribbon Cut a few pieces of your pink ribbon, tie them into simple bows, and attach them to the garland.
Step 5: Hang the Velvet Stocking On the side where the garland hangs lower, hang your rich, velvet stocking.
Step 6: Add Finishing Touches Place the white decorative trees and pink candles on the mantel to complete your beautiful winter blush scene.
5. Sweet as Honey Holiday

This mantel is warm, cozy, and inspired by nature. A golden glow from beeswax candles creates a welcoming and calm atmosphere. The entire theme centers around honeybees, with honeycomb-shaped ornaments and little bee decorations.
A soft, chunky-knit stocking waits to be filled with treats. A felt ball garland in shades of yellow, cream, and brown adds a touch of handmade charm. This decor feels rustic and heartfelt, a sweet tribute to the simple, good things in life.
DIY Sweet as Honey Mantel
You can create this warm and cozy bee-themed display yourself.
Step 1: Get Your Golden Goodies
- Find beeswax candles in different shapes and sizes. Some shaped like beehives are great!
- Look for bee and honeycomb-themed ornaments.
- Get a chunky knit stocking in a cream or white color.
- You can buy or make a felt ball garland with yellow, white, and brown felt balls.
- A slice of a wood log makes a nice candle holder.
Step 2: Drape the Garland Hang your felt ball garland on the wall just above the mantel area.
Step 3: Hang the Stocking Place your cozy, knit stocking on one side. You can add a little bee ornament to the top of it.
Step 4: Arrange the Candles Group your beeswax candles together on the mantel. Place some on the wood slice to give them different heights.
Step 5: Add the Final Touches Hang a few honeycomb ornaments from the felt garland. A small vase of dried flowers also fits this natural theme nicely.
6. Silver Birch Forest

This mantel design brings the magic of a winter forest indoors. Natural birch logs form the base, giving it a rustic and earthy feel. Everything is then touched with the sparkle of silver, like frost on a cold night.
Glittery silver trees and a shining reindeer figure stand among the logs. Cool blue lights are woven throughout the display, casting an enchanted glow. White stockings and silver pinecones hang below, completing this woodland scene. It’s a wonderful mix of natural and glamorous.
DIY Silver Birch Forest Mantel
Create your own sparkling woodland scene with these easy steps.
Step 1: Find Your Forest Supplies
- The main item is a few clean, dry birch logs.
- Get some silver glittery branches and silver cone-shaped trees.
- Find a silver reindeer or other woodland animal figure.
- A string of blue or cool white fairy lights is a must.
- You’ll need pure white stockings and some silver pinecone ornaments.
Step 2: Lay the Birch Foundation Carefully place the birch logs across the length of your mantel.
Step 3: Weave in the Lights Wrap your fairy lights around and through the birch logs. Make sure the battery pack or plug is hidden.
Step 4: Build Your Forest Place the silver trees and the reindeer figure on and around the logs. Tuck the glittery branches in to fill any empty spaces.
Step 5: Hang Stockings and Pinecones Hang your white stockings from the mantel. Then, hang the silver pinecone ornaments from the birch logs so they dangle down.
Step 6: Add Extra Sparkle You can also add some light-up star figures to make your forest look even more magical.
7. A Glimmering Peacock Christmas

Bold and beautiful, this mantel is a celebration of rich color and sparkle. It uses the jewel tones of a peacock—deep blues, vibrant teals, and shimmering golds—to create a truly stunning display.
A lush evergreen garland is filled with peacock feathers, their iridescent “eyes” catching the light. Ornaments in coordinating colors are tucked among the branches. Sequin stockings in blue and gold add even more glamour. This look is dramatic and luxurious, for a holiday that is anything but ordinary.
DIY Glimmering Peacock Mantel
You can make this glamorous and colorful display for your fireplace.
Step 1: Gather Your Jeweled Treasures
- Start with a basic green garland.
- Buy a pack of long peacock feathers from a craft store.
- Find ornaments in shades of royal blue, teal green, and shiny gold.
- Get sequin stockings, one in blue and one in gold.
- A large, glittery gold ribbon will be for your bow.
- If you can find a peacock figure, it makes a great centerpiece.
Step 2: Deck the Garland Drape the green garland across your mantel.
Step 3: Add Feathers and Ornaments Poke the peacock feathers into the garland, fanning them out. Then, add all of your blue, green, and gold ornaments, spreading the colors evenly.
Step 4: Give it a Centerpiece If you have a peacock figure, place it in the middle or slightly off to one side.
Step 5: Tie a Big Bow Use your gold ribbon to make a large, beautiful bow. Attach it to the garland.
Step 6: Hang the Sequin Stockings Hang your sparkling blue and gold stockings to complete this magnificent look.
8. Gothic Winter’s Night

This mantel creates a moody and romantic holiday scene. It uses a dark color scheme and lots of candlelight to build a mysterious and cozy atmosphere. This is a very different and dramatic take on Christmas decor.
A garland of dark leaves is mixed with dried hydrangea flowers. Deep burgundy velvet stockings hang down, trimmed with delicate lace. The main feature is the collection of tall, silver candlesticks, their many flames reflected in the mirror behind them. This look is for someone who loves a bit of old-world drama.
DIY Gothic Winter’s Night Mantel
Create this moody and beautiful scene with these instructions.
Step 1: Collect Your Moody Materials
- Find a garland with dark leaves, like faux eucalyptus or magnolia.
- Get some dried flowers, like hydrangeas in a dusky pink or purple color.
- Gather as many silver candlesticks as you can find.
- You’ll need white taper candles for the holders.
- Find some stockings made of dark red or burgundy velvet.
- Some frayed, old-looking ribbon will add to the look.
Step 2: Arrange the Greenery Place your dark-leafed garland on the mantel.
Step 3: Add the Dried Flowers Tuck the heads of the dried hydrangeas into the garland.
Step 4: Create a Candlelight Cluster Group all of your silver candlesticks on the mantel. Place the candles inside. Ask a grown-up to help you light them when it’s time.
Step 5: Hang the Velvet Stockings Hang your rich, velvet stockings on one side of the fireplace.
Step 6: Drape the Ribbon Weave your frayed ribbon through the garland in a loose, relaxed way. For an extra touch, you can add old books or a decorative black bird figure.
9. Gingerbread Lane

This mantel is pure holiday cheer and sweetness. It features a whole village of charming gingerbread houses lined up in a row. It is a playful and delightful scene that is fun for the whole family.
A classic pine garland decorated with candy canes hangs below the little village. The stockings are just as sweet, with gingerbread men and candy cane stripes. This decor is all about the fun and tasty traditions of Christmas, creating a display that looks good enough to eat.
DIY Gingerbread Lane Mantel
Building your own sweet gingerbread village is a fun project.
Step 1: Get Your Sweet Supplies
- You’ll need several gingerbread houses. You can buy kits to build and decorate them yourself, or buy them pre-made.
- Get some small bottle brush trees to be the village’s Christmas trees.
- A simple pine garland with pinecones works well.
- Find some candy cane ornaments.
- Look for stockings that match the theme—with gingerbread men or candy stripes.
- Small, battery-powered tea lights are a safe way to light up the houses.
Step 2: Build Your Village Line up all of your decorated gingerbread houses across the top of the mantel.
Step 3: Plant the Trees Place the little bottle brush trees in between the houses to make it look like a real village street.
Step 4: Hang the Garland Drape the pine garland from the mantel so it hangs in front of the fireplace.
Step 5: Decorate with Candy Hang your candy cane ornaments from the garland.
Step 6: Put Up the Stockings Hang your sweet gingerbread-themed stockings.
Step 7: Light Up the Town Turn on the battery-powered tea lights and place one inside each gingerbread house. They will glow warmly from the inside.
10. Scandinavian Winter Village

Clean, simple, and serene, this mantel is inspired by Scandinavian design. It uses a calm color palette of white, gray, and natural green. The look is minimal but very cozy and inviting.
A row of tiny white ceramic houses creates a peaceful winter village. A fresh eucalyptus garland and a wooden bead garland add natural textures. Lots of white candles grouped on the mantel and hearth provide a warm, gentle light, creating a feeling the Danish call “hygge.”
DIY Scandinavian Winter Village Mantel
You can create this calm and beautiful Nordic-inspired mantel.
Step 1: Gather Your Simple Items
- Find a set of small, white ceramic houses.
- Get a real or fake eucalyptus garland.
- A wooden bead garland adds a nice natural touch.
- Collect a lot of white pillar candles in different sizes. Battery-powered ones are great, especially for the group on the floor.
- Simple, gray knit stockings will fit in nicely.
Step 2: Create Your Village Place your little white houses in a neat row along the back of the mantel.
Step 3: Add the Greenery Drape the eucalyptus garland and the wooden bead garland in front of the houses.
Step 4: Hang the Knit Stockings Hang your simple gray stockings off to one side.
Step 5: Bring in the Warmth Arrange a few candles on the mantel itself. Then, create a large, beautiful cluster of white candles on the hearth below the fireplace.
Step 6: Add a Final Simple Touch You can hang a few white star ornaments from the garland to complete this peaceful, cozy scene.
11. Old World Library Christmas

This cozy mantel looks like it belongs in a grand, old library. It is warm, inviting, and full of classic charm. The deep red velvet stockings and rich evergreen garland create a traditional holiday feeling.
A unique garland made from the pages of an old book adds a literary touch. Golden candlelight from brass holders gives the whole scene a soft glow. This decor is for those who love books, history, and a quiet, thoughtful holiday season. It feels both intelligent and festive.
DIY Old World Library Mantel
You can make this cozy, book-lover’s mantel for your own home.
Step 1: Gather Your Bookish Supplies
- You’ll need a simple evergreen garland and some rich, red velvet stockings.
- Find an old book that you don’t mind cutting up.
- You’ll also need string, a stapler, and scissors to make the paper garland.
- Gather some brass candlesticks and white candles.
- A few pretty ornaments will complete the look.
Step 2: Drape the Greenery Lay your evergreen garland across the mantel.
Step 3: Make the Book Page Garland Carefully tear out pages from the old book. Fold each page back and forth like a fan. Once a page is folded, fold it in half and staple the middle part together. Do this with several pages. Then, staple the fan-shaped pages together to create pinwheels. String them together to make a garland.
Step 4: Hang Your Garlands and Stockings Hang your new book page garland in front of the evergreen one. Then, hang your velvet stockings.
Step 5: Add a Warm Glow Place your brass candlesticks and candles on the mantel. Ask a grown-up for help if you’re using real flames.
Step 6: Add the Final Touches Tuck a few simple ornaments into the evergreen garland to add a little sparkle.
12. Spiced Citrus Garland

This mantel is a feast for the senses, filled with the warm, spicy scents of Christmas. A lush evergreen garland is bursting with natural decorations. Dried orange slices, whole oranges, and bundles of cinnamon sticks create a fragrant and colorful display.
The rich colors and textures feel rustic and homemade. Tiny fairy lights woven through the greenery add a gentle sparkle. This decor is all about the traditional aromas of the holiday season, making the whole room feel welcoming and festive.
DIY Spiced Citrus Mantel
Create this beautiful and fragrant mantel that smells as good as it looks.
Step 1: Collect Your Natural Materials
- Start with a full evergreen garland.
- You’ll need some oranges and a sharp knife (get a grown-up to help with this part).
- Buy some whole cinnamon sticks and star anise pods.
- You will also need twine or thin wire.
- A string of warm white fairy lights is essential.
Step 2: Prepare Your Oranges Have a grown-up help you slice some oranges thinly. Place the slices on a baking sheet and bake them in the oven at a very low temperature (around 200°F or 100°C) for 2-3 hours until they are dry. You can also leave some small oranges whole.
Step 3: Decorate the Garland Drape your garland across the mantel. Weave the fairy lights through it.
Step 4: Add the Spices and Fruit Use twine or wire to attach the dried orange slices to the garland. Bundle a few cinnamon sticks together with twine and tie them on. Tuck the whole oranges and star anise pods into the branches.
Step 5: Add Candles Place some beeswax or orange-colored pillar candles around the garland for extra warmth and light.
13. Retro Holiday Road Trip

This mantel is a blast from the past, full of bright colors and playful, retro charm. The style is inspired by the fun designs of the 1950s and 60s. A vintage-style station wagon with a Christmas tree on top is the star of the show.
A shiny silver tinsel garland is decorated with colorful ball ornaments. Bright red stockings add a classic touch. The whole scene is energetic and cheerful, a celebration of a fun, mid-century modern Christmas. It’s a nostalgic and happy display.
DIY Retro Holiday Mantel
You can create this fun and colorful throwback Christmas scene.
Step 1: Find Your Groovy Decorations
- Look for a toy car that looks like an old station wagon.
- Get a very small bottle brush tree to tie to the car’s roof.
- A thick, fluffy silver tinsel garland is a must-have.
- Find ball ornaments in bright colors like red, blue, green, and pink.
- Simple, bright red stockings are needed.
- A starburst clock is a great background piece if you can find one.
Step 2: Park the Car Place your station wagon in the center of the mantel. Tie the little tree to its roof with a piece of string.
Step 3: Hang the Tinsel Drape the shiny silver tinsel garland across the front of the mantel.
Step 4: Add the Ornaments Attach your colorful ball ornaments to the tinsel garland, spreading them out evenly.
Step 5: Hang the Stockings Hang the bright red stockings from the mantel.
Step 6: Add Other Fun Items You can add other retro toys, like reindeer figures or a vintage-style Christmas tree, to complete your fun holiday road trip theme.
14. New Year’s Eve Glam

Get ready to celebrate with this dazzling and glamorous mantel. It’s all about sparkle and shine, with rose gold sequins and shimmering disco balls. This look is festive and fun, a great way to welcome the holidays or the New Year.
A fluffy white feather boa replaces a traditional garland, adding a soft, luxurious touch. Rose gold sequin stockings hang ready for treats. Disco balls of all sizes are scattered around, reflecting light everywhere. This decor is a party waiting to happen.
DIY New Year’s Eve Glam Mantel
You can create this sparkling party-ready mantel with a few fun items.
Step 1: Gather Your Party Supplies
- Instead of a garland, get a long, fluffy white feather boa.
- Find some sparkly sequin stockings in rose gold or silver.
- The most important items are disco balls! Get them in several different sizes.
- A string of round, globe-style lights will add to the party feel.
- Look for some star-shaped ornaments.
Step 2: Drape the Feathers Lay the white feather boa across the top of your mantel.
Step 3: Hang the Lights and Stockings Hang the string of globe lights across the front. Then, hang your sparkly sequin stockings.
Step 4: Bring on the Disco Balls Place the disco balls on the hearth in front of the fireplace. Make a big, fun pile with different sizes. You can put a few small ones on the mantel itself, too.
Step 5: Add Some Stars Hang the star-shaped ornaments from the mantel so they dangle in front of the fireplace. Now you’re ready to celebrate!
15. Peppermint Candy Palace

This mantel is a sugary sweet dream in red, white, and silver. It is inspired by the classic Christmas candy, the peppermint. The look is crisp, clean, and full of festive cheer. It’s like a little piece of a candy maker’s shop.
A garland made of candy cane striped ribbon and shiny silver beads takes center stage. A large glass jar filled with red and white peppermint candies makes a wonderful focal point. Glittering silver cone trees add height and sparkle. This decor is bright, happy, and delicious to look at.
DIY Peppermint Candy Palace Mantel
Here is how you can make this sweet and sparkling candy-themed display.
Step 1: Get Your Sweet Decorations
- Buy a lot of red and white striped peppermint candies.
- Find a large, clear glass jar with a lid.
- Get some silver, glittery cone-shaped trees in different heights.
- You’ll need red and white striped ribbon.
- Find a silver garland or some silver beads.
- White pillar candles are also needed.
Step 2: Make the Candy Centerpiece Fill your big glass jar all the way to the top with the peppermint candies and place it in the center of your mantel.
Step 3: Create a Forest of Trees Arrange your silver cone trees on both sides of the candy jar.
Step 4: Drape the Garland Hang your silver garland and the red and white striped ribbon across the front of the mantel or a mirror behind it.
Step 5: Add a Glow Place your white pillar candles in front of the trees to add a warm light.
Step 6: Finish with a Candy Touch You can even hang a few large candy cane ornaments or a big peppermint swirl ornament in the center of your garland.
16. Midnight Masquerade

This mantel is mysterious, elegant, and very dramatic. It uses a dark and moody color palette of deep blues, rich purples, and black, with hints of gold. The theme is inspired by a glamorous masquerade ball.
A thick, lush garland is filled with dark flowers, feathers, and ornate ribbons. The key features are the beautiful masquerade masks tucked into the greenery. Dark blue velvet stockings and black candles complete the dramatic and sophisticated look. It is a unique and captivating holiday display.
DIY Midnight Masquerade Mantel
Create this mysterious and elegant look for a truly dramatic holiday.
Step 1: Find Your Mysterious Materials
- Start with a very full and leafy evergreen garland.
- Buy some fake flowers in dark blue, deep purple, or black.
- Find some fancy masquerade masks at a party or craft store.
- Get ribbons in luxurious fabrics like velvet and satin, in deep blue and burgundy colors.
- Dark blue velvet stockings are a great choice.
- You’ll need black taper candles and dark-colored holders.
Step 2: Build Up Your Garland Drape the garland over the mantel, letting it hang down heavily on one side.
Step 3: Add Flowers and Masks Tuck your dark flowers deep into the garland. Then, place the masquerade masks so they are peeking out from the leaves and flowers.
Step 4: Weave in the Ribbons Loosely weave your velvet and satin ribbons throughout the entire length of the garland.
Step 5: Add the Candles and Stockings Place your black candles on the mantel. Hang your deep blue velvet stockings.
Step 6: Light It Up You can also add a string of warm white fairy lights deep inside the garland to make the masks and flowers stand out in the dark.
17. Coastal Christmas Calm

Bring the peaceful feeling of the beach to your holiday decor with this coastal-themed mantel. The colors are soft and natural, like sand and seafoam. It is a calm and serene way to celebrate the season.
Instead of a garland, a piece of weathered driftwood is hung with seashell and sand dollar ornaments. A beautiful piece of white coral is the centerpiece. Candles in glass hurricanes filled with sand add a gentle glow. This look is light, airy, and wonderfully relaxing.
DIY Coastal Christmas Calm Mantel
You can create this breezy, beachy holiday look with a few simple steps.
Step 1: Gather Your Beach Treasures
- Find a long, interesting piece of driftwood.
- Collect or buy ornaments shaped like seashells, sand dollars, and starfish.
- A large piece of faux white coral will be your centerpiece.
- You’ll need some glass hurricane vases, white pillar candles, and clean sand.
- A simple, natural-colored linen stocking fits the theme.
Step 2: Set the Foundation Place your driftwood across the mantel or hang it on the wall just above.
Step 3: Hang Your Ornaments Hang your seashell, sand dollar, and starfish ornaments from the driftwood using twine or thin ribbon.
Step 4: Create the Centerpiece Place your beautiful white coral in the center of the mantel.
Step 5: Make Your Sand Candles Pour a layer of sand into the bottom of each glass hurricane vase. Place a white pillar candle on top of the sand in each one. Arrange them on the mantel.
Step 6: Hang the Stocking Hang your simple linen stocking on one end of the driftwood.
18. Art Deco Emerald & Gold

This mantel is all about luxury, glamour, and bold design. It is inspired by the Art Deco style of the 1920s, using a rich color scheme of emerald green and bright, shining gold. The look is sharp, geometric, and very sophisticated.
Large golden palm fronds create a dramatic fan shape on either side of a sunburst mirror. A simple gold garland rests on the mantel. Rich, emerald green velvet stockings with gold tassels hang below. This decor is confident and stylish.
DIY Art Deco Emerald & Gold Mantel
Here’s how to create this glamorous and geometric holiday display.
Step 1: Find Your Deco Decorations
- Look for large, fake palm leaf sprays and paint them a bright, shiny gold.
- Find a garland of fake gold leaves or berries.
- Emerald green velvet stockings are a key element. You can add gold tassels to them.
- A mirror with a geometric or sunburst shape for the background is great.
- Black and gold geometric ornaments can be added.
Step 2: Create the Fan Shape Place your gold palm leaves in vases on either side of the mirror, arranging them so they look like big, beautiful fans.
Step 3: Lay the Garland Place the simple gold garland across the mantel shelf.
Step 4: Add Ornaments Tuck a few of the black and gold geometric ornaments into the gold garland.
Step 5: Hang the Stockings Hang your emerald green velvet stockings. Make sure the gold tassels are showing!
Step 6: Add Some Light A few simple black or gold candle holders with black candles will complete this stylish, high-contrast look.
19. Modern Black & White Farmhouse

This mantel is chic, modern, and clean. It uses a simple black and white color palette for a look that is both festive and stylish. It proves that holiday decor doesn’t have to be red and green to be beautiful.
A garland of fresh eucalyptus and fir hangs gracefully, dropping down on one side. A little village of black and white ceramic houses lines the mantel. Striped and solid black and white ornaments hang from a simple string light. This decor is effortlessly cool.
DIY Modern Black & White Farmhouse Mantel
You can achieve this simple and chic holiday look with these steps.
Step 1: Gather Your Modern Supplies
- You’ll need a garland made of real or fake fir and eucalyptus.
- Find a set of small ceramic houses that you can paint black and white.
- Look for simple ball ornaments in solid black, solid white, and black-and-white stripes.
- You will need simple black and white stockings.
- A thin black candelabra with white candles adds a nice touch.
Step 2: Drape the Greenery Place your evergreen garland on the mantel, letting it hang down longer on one side.
Step 3: Create Your Village Paint your ceramic houses with simple designs in black and white. Line them up along the mantel.
Step 4: Hang the Ornaments String your black and white ornaments on a separate piece of twine or a simple light string and hang it in front of the garland.
Step 5: Hang the Stockings Hang a black stocking and a white stocking.
Step 6: Add Candlelight Place your black candelabra with the tall white candles on the mantel to complete the modern, graphic look.
20. Abstract & Earthy Holiday

This mantel is a work of modern art. It steps away from traditional holiday symbols and uses color, shape, and texture to create a festive feeling. The colors are warm and earthy, with shades of terracotta, rust, mustard, and deep teal.
Instead of a typical garland, there are unique, sculptural pieces in curvy shapes. The candlesticks and vases are also like little sculptures. Even the stockings fit the theme with their rich, solid colors. This decor is for someone who loves art, design, and a one-of-a-kind holiday look.
DIY Abstract & Earthy Mantel
Create your own artistic and modern holiday display.
Step 1: Find Your Artistic Materials
- This look is all about unique shapes. Look for interesting vases, candle holders, and small sculptures in earthy colors.
- Find some modeling clay that air-dries.
- Get stockings in solid, earthy colors like burnt orange and deep teal.
- Look for candles in matching colors.
- A large, abstract painting for the wall behind the mantel is the main feature.
Step 2: Make Your “Garland” Take your air-dry clay and roll it into long, snake-like shapes. Bend and curve them into interesting, abstract loops. Let them dry completely, then you can paint them if you like. Lay these pieces on your mantel.
Step 3: Arrange Your Sculptures Place your collection of unique vases and candle holders on the mantel. Mix up the heights and shapes to make it look interesting.
Step 4: Add Candles Put your colorful candles into the holders.
Step 5: Hang the Stockings Hang your solid-colored stockings.
Step 6: Add a Natural Touch You can place a few branches with round berries (like cotoneaster) in one of the vases to add a final, simple touch of nature.
21. Celestial Night

Look to the stars with this intelligent and mystical holiday mantel. The theme is all about astronomy, with vintage star charts and brass scientific instruments. It creates a scene that is both educational and magical.
Deep blue velvet stockings are embroidered with golden constellations, hanging like a piece of the night sky. A collection of globes, telescopes, and armillary spheres gives the display a historic, scholarly feel. This decor is a tribute to the wonder of the cosmos.
DIY Celestial Night Mantel
You can create this starry and sophisticated look for your own fireplace.
Step 1: Gather Your Stargazing Supplies
- Find some beautiful prints of old star charts or maps. You can print them from the internet.
- Look for brass items like telescopes, globes, or armillary spheres at thrift stores or online.
- You’ll need dark blue velvet stockings. You can use gold fabric paint to draw constellations on them.
- Brass candlesticks with dark blue candles will fit the theme.
- A simple evergreen garland is a good base.
Step 2: Create a Gallery Wall Frame your star chart prints and hang them on the wall behind your mantel. Mix up the sizes and frame styles.
Step 3: Arrange Your Instruments Place your collection of brass instruments and globes across the mantel.
Step 4: Add a Touch of Green Lay a simple garland among the instruments to add a bit of holiday greenery.
Step 5: Hang the Constellation Stockings Hang your beautiful, starry stockings.
Step 6: Light the Night Place your brass candlesticks and blue candles on the mantel to add a warm, flickering light to your celestial scene.
22. Aurora Borealis Glow

This mantel captures the breathtaking magic of the Northern Lights. It uses a special light projector to cast vibrant, moving colors onto the wall. The result is a dynamic and mesmerizing display that feels truly otherworldly.
The decor on the mantel is designed to enhance the light show. Iridescent ornaments, crystal obelisks, and glittery branches catch the colorful lights and sparkle. Deep blue velvet stockings add a touch of richness. This is a high-tech and stunning way to celebrate the holidays.
DIY Aurora Borealis Mantel
You can bring the magic of the Northern Lights into your living room.
Step 1: Get Your Magical Light Show
- The most important item is an aurora borealis or galaxy light projector. You can find these online.
- You will need a simple, lightly flocked garland.
- Find ornaments that are iridescent or multi-colored.
- Look for clear crystal shapes and glittery, icy branches.
- Deep blue or teal velvet stockings work well.
Step 2: Set the Scene Place your projector on the mantel or a nearby table and aim it at the wall above the fireplace. Turn it on to see the beautiful lights.
Step 3: Lay the Garland Drape your garland across the mantel.
Step 4: Add Sparkling Decorations Arrange the crystal obelisks and glittery branches on the mantel. Tuck the iridescent ornaments into the garland. These items will catch the projected light and shimmer.
Step 5: Hang the Stockings Hang your rich velvet stockings.
Step 6: Add Extra Lights Weave a string of multi-colored fairy lights through your garland to add even more color and sparkle to your amazing light display.
23. Woodland Naturalist

This display is a quiet celebration of nature’s beauty in winter. It looks as though someone has just returned from a walk in the woods, gathering interesting treasures. The colors are earthy and muted, with lots of texture.
A large, wild-looking swag made of twigs, dried ferns, and seed pods hangs above the mantel. Below, a simple branch holds a bird’s nest and smooth stones. Everything feels very organic and calm. This decor is for someone who loves the outdoors and finds beauty in simple things.
DIY Woodland Naturalist Mantel
Create this beautiful and earthy display with items foraged from nature.
Step 1: Go on a Nature Walk
- Go to a park or your backyard and collect interesting items. Look for fallen twigs, pinecones, dried leaves, ferns, and seed pods. Make sure you only take things that have already fallen to the ground.
- You’ll need a thicker branch to use as a shelf.
- Find some simple, earth-toned stockings in colors like moss green and beige.
- You can also use botanical prints of ferns or leaves.
Step 2: Make Your Woodland Swag Take your longest twigs and tie them together in the middle with twine to make a base. Then, use more twine or a hot glue gun (with a grown-up’s help) to add the ferns, seed pods, and other items until it looks full and beautiful.
Step 3: Set Up Your Shelf and Art Hang your large swag on the wall. Below it, hang the thicker branch to act as a small shelf. You can frame and hang your botanical prints nearby.
Step 4: Arrange Your Treasures Place a small bird’s nest, some nice stones, or other special finds from your walk on the branch shelf.
Step 5: Hang the Stockings Hang your simple, earthy stockings.
24. Gilded Glamour

This mantel is all about luxurious sparkle. It mixes shimmering silver and glittering gold for a look that is opulent and festive. It’s a very glamorous and celebratory style.
An incredibly full garland is packed with silver and gold ornaments of all sizes and textures. Frosted, glittery leaves add another layer of sparkle. The stockings are the stars of the show, covered in silver and gold sequins. A large, elegant bow with a snowflake pattern completes the look.
DIY Gilded Glamour Mantel
You can create this stunning and sparkly silver and gold display.
Step 1: Gather All That Glitters
- You’ll need a very full garland, or you can use two garlands twisted together.
- Get a lot of ornaments in silver and gold. Find different finishes: matte, shiny, and glittery.
- Look for sparkly leaf or branch picks from a craft store.
- The most important part is sequin stockings in silver and gold.
- You’ll need a wide, wired ribbon in a champagne or gold color to make a big bow.
Step 2: Create a Full Garland Drape your garland across the mantel.
Step 3: Pack it with Ornaments This is where more is more! Fill every bit of your garland with the silver and gold ornaments. Mix the colors and sizes. Poke the sparkly leaf picks in to fill any gaps.
Step 4: Make a Statement Bow Use your wired ribbon to make a large, beautiful bow. Place it right in the center of your garland.
Step 5: Hang the Sequin Stockings Hang your silver and gold sequin stockings, alternating the colors.
Step 6: Add Extra Sparkle on the Hearth Fill a large bowl or platter with more silver and gold ornaments and place it on the hearth for an extra dose of glamour.
25. Enchanted Woodland Friends

This mantel brings a charming and whimsical forest scene to life. It is filled with cute, friendly woodland creatures that are sure to make everyone smile. The look is playful, cozy, and a little bit magical.
Felted animals like squirrels, foxes, and owls are perched along the mantel. A simple garland of pine and red berries provides a home for them. A standout feature is the glowing birch logs, which add a warm, fairy-tale light. This decor is wonderful for a home with children.
DIY Enchanted Woodland Friends Mantel
Create this adorable and magical forest scene for your holiday.
Step 1: Find Your Forest Friends and Supplies
- Look for small, felted woodland animal figures like squirrels, foxes, owls, and deer.
- You’ll need a simple pine garland and some red berry picks.
- The magical touch comes from battery-powered birch logs. You can find these online or in some home stores.
- Look for some cute mushroom ornaments and light-up star ornaments.
- Simple, burlap-style stockings will match the woodland theme.
Step 2: Lay the Garland Drape the pine garland across the mantel. Tuck in the red berry picks.
Step 3: Arrange Your Animal Friends Place your little felted animals along the garland. Make them look like they are playing in the forest.
Step 4: Add the Magical Glow Group the light-up birch logs on one side of the mantel to create a mini forest.
Step 5: Add Whimsical Touches Hang the mushroom and star ornaments from the garland so they dangle down.
Step 6: Hang the Stockings Hang your simple, rustic stockings to complete your enchanted forest.
26. Bohemian Holiday Spirit

This mantel is warm, textured, and free-spirited. It uses natural materials and a rich, earthy color palette to create a cozy, bohemian vibe. It’s a relaxed and stylish way to decorate for the holidays.
A beautiful eucalyptus garland is filled with fluffy pampas grass and dried orange slices. The stockings are the main feature, made from detailed macrame. Warm string lights and a glowing salt lamp add a peaceful, gentle light. This look is all about comfort and personal style.
DIY Bohemian Holiday Spirit Mantel
You can create this warm, textured, and free-spirited look.
Step 1: Gather Your Boho Materials
- You’ll need a eucalyptus garland.
- Find some dried pampas grass and some dried orange slices.
- The key items are macrame stockings. You can buy these or even try to make them.
- A large macrame wall hanging for the background looks great.
- A Himalayan salt lamp and a string of warm globe lights will provide a cozy glow.
- Look for tassels in fun colors like teal and mustard yellow.
Step 2: Start with the Macrame If you have a large macrame wall hanging, hang it on the wall above the fireplace.
Step 3: Drape the Greenery Lay your eucalyptus garland across the mantel.
Step 4: Add Texture and Color Tuck the fluffy pampas grass and the dried orange slices into your garland.
Step 5: Hang the Macrame Stockings Hang your beautiful macrame stockings. You can add the colorful tassels to the stocking loops for a pop of color.
Step 6: Add a Warm Glow Place your salt lamp on the mantel and hang the string of globe lights across the front. An ornate metal lantern on the hearth can also add to the cozy, global feel.
27. Classic Tartan Tidings

This mantel is the definition of a traditional, cozy Christmas. It uses classic tartan plaid, lush greenery, and warm brass accents to create a timeless and inviting holiday scene. It feels familiar and full of cheer.
A beautiful pine wreath and a matching garland are woven with a festive red and green plaid ribbon. Brass reindeer figures and candlesticks add a classic, elegant shine. The stockings, made of the same tartan plaid, complete the coordinated look.
DIY Classic Tartan Tidings Mantel
It’s easy to create this timeless and cozy Christmas look.
Step 1: Get Your Classic Christmas Supplies
- You will need a plain pine wreath and a matching long pine garland.
- The most important item is a wide, wired ribbon in a classic tartan plaid pattern.
- Find a pair of brass reindeer figures.
- You’ll also need some brass candlesticks and red taper candles.
- Look for stockings that are made from the same plaid fabric.
- You can also add natural touches like cinnamon sticks and dried orange slices.
Step 2: Weave the Ribbon Take your plaid ribbon and weave it loosely through the branches of your wreath and your garland. Make a nice bow for the center of the garland.
Step 3: Hang the Wreath and Garland Hang the wreath on the wall above the mantel. Drape the garland across the mantel.
Step 4: Add the Brass Accents Place your brass reindeer in the center of the mantel. Put your brass candlesticks with the red candles on either end.
Step 5: Hang the Plaid Stockings Hang your matching tartan stockings.
Step 6: Add a Scent of Christmas You can tuck little bundles of cinnamon sticks or a few dried orange slices into the garland for a lovely holiday smell.
28. Desert Winter Solace

This unique mantel takes its inspiration from the beautiful colors and textures of the desert. It swaps traditional greenery for succulents and pampas grass, creating a look that is warm, modern, and earthy.
A garland made of pine, dried grasses, and faux succulents creates an interesting mix of textures. The color palette is warm, with copper candle holders and terracotta pots. The simple cream-colored stockings are decorated with tassels, adding a touch of handmade charm.
DIY Desert Winter Solace Mantel
You can create this warm, modern, and unique desert-inspired look.
Step 1: Collect Your Desert-Inspired Items
- You’ll need a pine garland as a base.
- Get some faux succulents of different shapes and sizes.
- Find some dried grasses, like pampas grass or bunny tails.
- Look for candle holders in a warm metal like copper.
- Simple, cream-colored canvas or linen stockings are a good choice.
- You’ll need some terracotta pots and a few real cacti or succulents.
Step 2: Build Your Garland Lay your pine garland across the mantel. Then, use wire or a hot glue gun (with help from a grown-up) to attach the faux succulents and dried grasses.
Step 3: Add Warm Metal Place your copper candle holders and white candles on the mantel.
Step 4: Hang the Stockings Hang your simple, cream-colored stockings. You can add a tassel with a few beads to the loop of each stocking for a special touch.
Step 5: Add Real Plants Arrange your real cacti and succulents in their terracotta pots on the hearth in front of the fireplace. This connects the mantel to the rest of the room.
29. Luxe Emerald & Gold

This mantel is pure elegance and luxury. It uses a rich color scheme of deep emerald green and glamorous gold to create a sophisticated and dramatic holiday statement. The look is formal and very polished.
A thick evergreen garland is filled with huge, metallic gold magnolia leaves. The dark green velvet stockings are personalized with beautiful gold monogram letters. Tall, elegant glass and gold candlesticks add height and a classic sparkle. This decor is all about high-end style.
DIY Luxe Emerald & Gold Mantel
You can create this very elegant and luxurious holiday mantel.
Step 1: Gather Your Elegant Supplies
- Start with a full, high-quality evergreen garland.
- The key feature is large, faux magnolia leaves. You can buy these and spray paint them a brilliant gold.
- Find deep emerald green velvet stockings.
- You can buy wooden or metal letters for your family’s initials and paint them gold to add to the stockings.
- Look for tall, elegant candlesticks made of glass and gold.
- You’ll also need some gold and glittery pinecone ornaments.
Step 2: Drape the Garland Lay your evergreen garland across the mantel.
Step 3: Add the Golden Leaves Tuck your big, gold magnolia leaves into the garland. Make them a main feature. Add the gold pinecones to fill in any gaps.
Step 4: Personalize the Stockings Use a hot glue gun (with help) or ribbon to attach the gold monogram letters to the cuff of each velvet stocking.
Step 5: Hang the Stockings Hang your beautiful, personalized stockings.
Step 6: Add the Candlelight Arrange your tall, elegant candlesticks on the mantel. Their height will add to the drama and sophistication of the display.
30. Winter White Paper Village

This mantel creates a magical, miniature world made entirely of paper. The all-white color scheme makes it look like a tiny village covered in a fresh blanket of snow. The display is delicate, intricate, and absolutely enchanting.
Layers of paper are cut into the shapes of houses, trees, and mountains. The scene is lit from behind with a string of warm fairy lights, which makes the windows of the houses glow. It’s a beautiful piece of art that creates a peaceful and wondrous holiday feeling.
DIY Winter White Paper Village Mantel
You can make your own magical glowing paper village with this fun craft project.
Step 1: Get Your Paper Crafting Supplies
- You will need a lot of sturdy white paper, like cardstock.
- You’ll need a craft knife and a cutting mat (ask a grown-up for help with this).
- A pencil and a ruler are important for drawing your shapes.
- You’ll need clear tape or a glue stick.
- A string of warm white fairy lights is essential for the glow.
- Simple white felt stockings will match perfectly.
Step 2: Find or Draw Your Templates You can find templates for paper houses online to print out, or you can draw your own simple house and mountain shapes. Make sure the houses have windows to cut out.
Step 3: Cut Out Your Village With a grown-up’s help, carefully cut out your house, tree, and mountain shapes using the craft knife. Cut out all the windows. Make many different buildings to create a whole village.
Step 4: Assemble Your Scene Fold and tape or glue your houses together so they can stand up. Arrange them on your mantel in rows. Place the mountain cutouts behind the houses to create depth.
Step 5: Add the Lights Place your string of fairy lights behind all the paper cutouts. When you turn them on, the village will glow from within.
Step 6: Hang the Stockings Hang your simple white stockings below to complete your beautiful, snowy paper world.
31. Earthy & Artisanal

This mantel has a warm, handmade feel that is both rustic and modern. The colors are taken from nature, with terracotta, deep green, and creamy whites. It is a calm and creative space.
The arrangement feels personal, with handmade art pieces and dried flowers in ceramic vases. A simple garland of fresh pine with dried orange slices hangs below, adding a touch of traditional holiday scent. Beeswax candles give off a warm, natural light. This look is all about simple, beautiful objects.
DIY Earthy & Artisanal Mantel
You can create this calm, creative, and natural-looking mantel.
Step 1: Gather Your Artistic Supplies
- Find some ceramic vases in earthy colors like brown, green, and cream.
- Gather some dried flowers or seed pods from your garden or a craft store.
- You’ll need a simple, thin pine garland.
- Get some dried orange slices and cinnamon sticks.
- Find a few beeswax candles.
- A few pieces of framed art with simple, abstract shapes will look great.
Step 2: Arrange Your Vases and Art Hang your framed art on the wall above the mantel. Then, arrange your vases with the dried flowers inside them. Group them in a way that looks balanced and interesting.
Step 3: Add a Warm Glow Place your beeswax candles on the mantel. Their golden color will fit in nicely.
Step 4: Hang the Garland Drape your simple pine garland below the mantel shelf.
Step 5: Add Natural Scents Attach the dried orange slices and cinnamon sticks to your garland. You can also weave in a string of simple, warm globe lights for a bit of sparkle.
32. Après-Ski Chic

This mantel brings the cozy feeling of a mountain ski lodge right into your living room. The look is rustic yet sophisticated, mixing natural wood with soft textures and a clean color palette. It is a stylish and comfortable holiday scene.
A pair of vintage wooden skis creates a bold, graphic statement. Chunky white cable-knit stockings look incredibly cozy and warm. Large lanterns and oversized decorative pinecones complete the modern cabin aesthetic. This decor invites you to curl up with a warm drink after a day on the slopes.
DIY Après-Ski Chic Mantel
Here is how to bring that cozy, stylish ski lodge feeling home.
Step 1: Find Your Lodge-Style Decor
- The main feature is a pair of old wooden skis. You can often find these at thrift stores or flea markets.
- Look for large, chunky cable-knit stockings in white or cream.
- Get some big, decorative pinecones. You can paint them a dark grey or leave them natural.
- Find some modern-looking lanterns in black metal and glass.
- A simple, thin pine garland is all you need for greenery.
Step 2: Display the Skis Hang the wooden skis on the wall above your mantel, crossing them in an “X” shape.
Step 3: Drape the Greenery Lay your simple pine garland across the wooden mantel.
Step 4: Hang the Cozy Stockings Hang your chunky knit stockings. The soft texture looks great against the wood and stone.
Step 5: Add Lanterns and Pinecones Arrange your lanterns on the hearth. Place the oversized pinecones on the mantel itself. You can also add some birch logs next to the fireplace to complete the lodge feel.
33. A Bountiful Holiday Feast

This mantel is overflowing with the rich abundance of a traditional Christmas celebration. It looks like a beautiful still-life painting, full of lush greenery, ripe fruit, and warm candlelight. The style is classic, lavish, and deeply festive.
A very full garland made of different kinds of greenery—pine, ivy, holly—is the base. Tucked within the leaves are real fruits like pomegranates and pears, along with dried hydrangea flowers. Many brass candlesticks create a grand and glittering display of light. This is a truly opulent and timeless look.
DIY Bountiful Holiday Feast Mantel
You can create this lavish and abundant holiday display.
Step 1: Gather Your Bountiful Supplies
- You will need a lot of greenery. Get a thick pine garland, and also some extra branches of ivy and holly with berries.
- Buy some beautiful fruits that will last, like pomegranates, small apples, or pears.
- Get a few heads of dried hydrangeas from a craft or flower store.
- Collect as many brass candlesticks as you can find in different heights.
- You’ll need classic stockings in materials like red velvet or plaid.
Step 2: Create a Super Lush Garland Lay your pine garland on the mantel. Then, weave the extra ivy and holly branches into it to make it look very full and wild.
Step 3: Add the Fruit and Flowers Carefully tuck your fruits and dried hydrangeas into the garland. You can use floral wire to secure them if needed.
Step 4: Create a Forest of Candles Arrange all of your brass candlesticks on the mantel among the greenery. The more you have, the more dramatic it will look.
Step 5: Hang the Stockings Hang your classic, traditional stockings to complete this bountiful feast for the eyes.
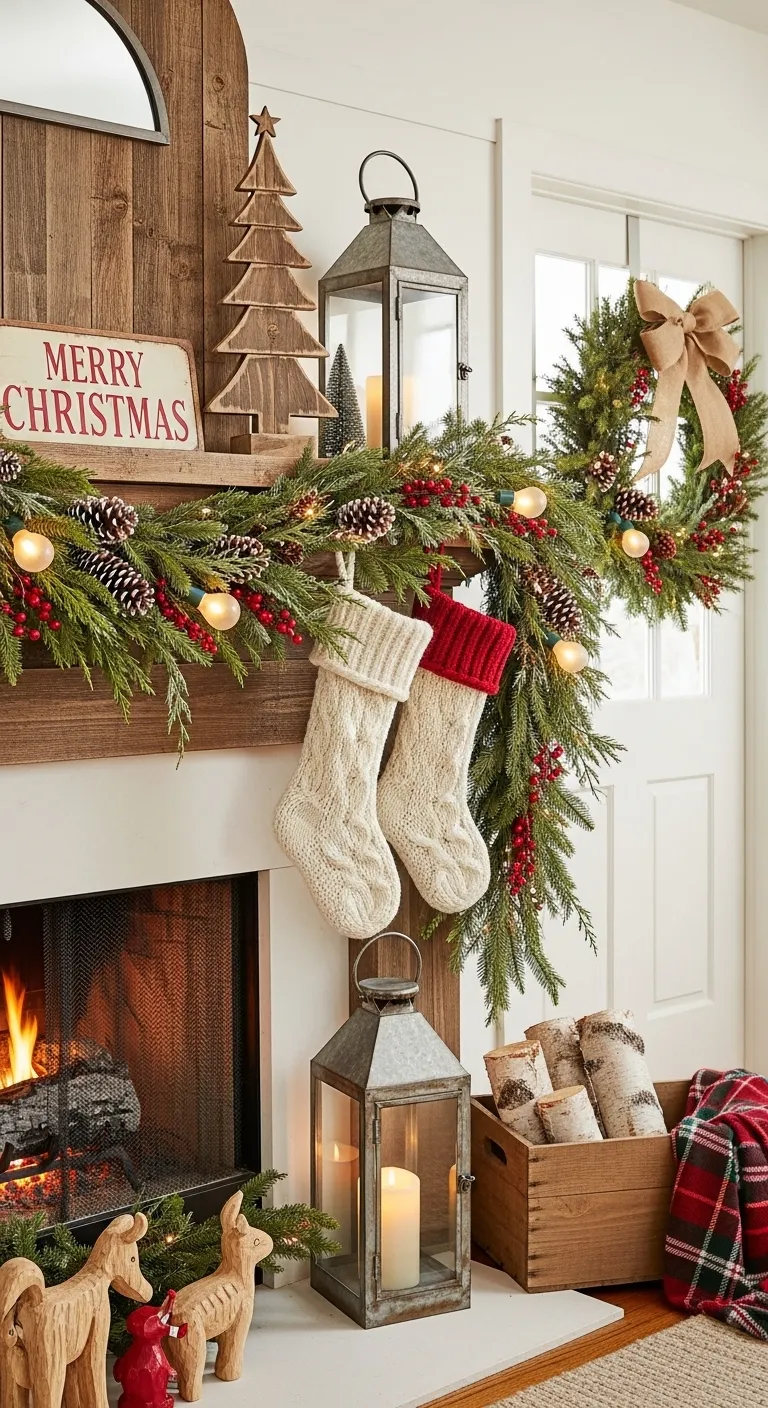
34. Country Farmhouse Christmas

This mantel has all the warmth and charm of a cozy country farmhouse. It uses rustic textures, traditional colors, and simple, heartfelt decorations. The look is welcoming, cheerful, and full of classic Christmas spirit.
A full pine garland is decorated with bright red berries, pinecones, and old-fashioned string lights. A simple wooden sign with a “Merry Christmas” message sets a friendly tone. Chunky knit stockings and a small wreath on the side add to the handmade, rustic feel. This is a comfortable and classic style.
DIY Country Farmhouse Christmas Mantel
You can create this warm and welcoming farmhouse look.
Step 1: Get Your Farmhouse Decorations
- Find a simple wooden sign that says “Merry Christmas” or another holiday greeting.
- You’ll need a full pine garland.
- Get some red berry picks and pinecones.
- A string of lights with large, round bulbs will give it a nice vintage feel.
- Look for chunky knit stockings.
- A small evergreen wreath and some lanterns are great additions.
Step 2: Set the Scene with a Sign Place your wooden Christmas sign on one side of the mantel.
Step 3: Drape and Decorate the Garland Lay your garland across the mantel, letting it hang down on the side. Tuck in your red berries and pinecones. Then, weave in your string of lights.
Step 4: Add a Wreath Hang your small wreath on the wall or a door next to the fireplace to make the whole area feel decorated.
Step 5: Hang the Knit Stockings Hang your cozy, chunky knit stockings.
Step 6: Add Lanterns and Logs Place a lantern on the mantel and another one on the hearth. A wooden crate filled with birch logs also adds to the rustic, farmhouse charm.
35. Winter Blossom Serenity

This mantel is a beautiful example of minimalist holiday decor with a gentle, artistic touch. It is inspired by the quiet beauty of Japanese art, using delicate branches and simple forms. The look is peaceful, elegant, and very serene.
Slender branches with soft pink cherry blossoms are arranged in simple ceramic vases. Two origami cranes, symbols of hope and good fortune, hang as if in flight. The stockings are made of simple, natural linen. This display is a breath of fresh air.
DIY Winter Blossom Serenity Mantel
You can create this peaceful and elegant holiday display.
Step 1: Find Your Delicate Decorations
- Find some bare branches from your yard or a craft store.
- Get some faux cherry blossom stems.
- You’ll need some simple ceramic vases in different shapes.
- Find some beautiful paper to fold into origami cranes.
- Look for stockings made from a simple, natural fabric like linen or cotton.
- A few simple, modern candle holders will complete the look.
Step 2: Arrange the Branches Place your bare branches and your cherry blossom stems together in the vases. Arrange them in a way that looks natural and artistic.
Step 3: Fold Your Cranes Follow instructions online to fold your paper into two beautiful origami cranes.
Step 4: Hang the Cranes and Stockings Hang your linen stockings. Then, hang your origami cranes from clear thread at different heights so they look like they are flying.
Step 5: Add a Single Flame A single, tall white candle in a simple holder adds to the peaceful and minimal feeling of the display.
36. Enchanted Mushroom Grotto

This mantel transforms the fireplace into a magical, enchanted forest floor. It is a whimsical and imaginative display filled with fascinating details. The scene looks like a hidden grotto where fairies and forest creatures might live.
A thick, uneven layer of green moss covers the entire mantel. All sorts of mushrooms, from realistic-looking ones to classic red-and-white toadstools, sprout up from the moss. Tiny, glowing fairy doors and lanterns are tucked into the scene, creating a magical light. It’s a truly unique and captivating display.
DIY Enchanted Mushroom Grotto Mantel
You can build your own magical mushroom world with this fun project.
Step 1: Gather Your Magical Forest Supplies
- You’ll need a lot of sheet moss from a craft store to cover your mantel.
- Find a variety of mushroom figures or ornaments. The more different kinds, the better!
- Look for tiny fairy doors and small lanterns.
- A string of green or warm white fairy lights will help it glow.
- Simple velvet stockings in earthy colors like brown and green will match well.
Step 2: Create Your Mossy Base Carefully lay the sheets of moss all over your mantel. Don’t make it perfectly flat; let it be a little lumpy like a real forest floor.
Step 3: Plant Your Mushroom Forest Arrange all of your different mushroom figures in the moss. Create little groups and clusters.
Step 4: Add the Magic Tuck your little fairy doors into the moss at the back. Weave your fairy lights all through the moss and around the mushrooms. Place your small lanterns in the scene.
Step 5: Hang the Stockings Hang your simple velvet stockings below the mossy grotto.
Step 6: Create a Terrarium For an extra touch, you can create a small mushroom scene inside a glass jar or terrarium and place it on a table nearby. This makes the whole room feel enchanted.
Your holiday mantel is a canvas for your personal style. As you have seen through these 36 ideas, the possibilities for creating a beautiful display are nearly endless. You can craft a classic scene with tartan and brass or a magical mushroom grotto straight from a fairy tale.
The goal is to design a space that brings you joy. Use these concepts as a starting point for your own creativity. Mix and match elements, add your own handmade touches, and build a holiday focal point that tells your family’s story. Happy decorating.
Key Takeaways
- Start with a Theme: A clear theme, whether it’s “Après-Ski Chic” or “Coastal Christmas,” makes it easier to choose cohesive decorations.
- Layer Your Decor: Create visual interest by layering items. Place taller pieces like lanterns or branches in the back and smaller objects in the front.
- Mix Your Textures: Combine different materials. Try pairing soft elements like velvet and chunky knits with rustic wood, shiny metallics, or natural greenery.
- Incorporate Personal Touches: Add items that are meaningful to you, such as family heirlooms, handmade ornaments, or framed photos.
- Embrace Lighting: Never underestimate the power of a warm glow. Candles, fairy lights, or light-up figures bring a magical and cozy atmosphere to any display.