The holiday season brings a special kind of joy to the mailbox. Amid the bills and flyers, little envelopes appear, filled with warm wishes, family photos, and handwritten notes from the people we love. Each card is a small token of connection, a reminder of friendships and family ties that span the miles.

But soon, the collection grows. The first few cards look lovely on the mantelpiece, but by mid-December, you’re faced with a happy problem: a wonderful, cluttered pile of greetings. How do you honor each card without overwhelming your home? The answer is to turn them into decoration themselves.
Forget the crowded refrigerator door. We have gathered 37 simple and stylish ways to transform your holiday mail into a beautiful part of your seasonal decor. From rustic garlands to modern wall art, there is an idea here for every style, every budget, and every space in your home.
1. Earthy Citrus and Pinecone Garland

Transform a simple string into a piece of natural art for your wall. This holiday card display brings the outdoors inside with a charming, rustic feel. The combination of dark pinecones and bright, dried orange slices creates a beautiful contrast. It is a warm and inviting way to showcase the greetings you receive from friends and family.
This garland adds a personal, handmade touch to your seasonal decor. It moves away from shiny, store-bought decorations and embraces a more grounded, simple aesthetic. Each card clipped to the twine becomes part of a larger, festive creation that celebrates both nature and connection.
How to Make Your Garland
What You’ll Need:
- A long piece of twine or sturdy string
- Mini clothespins
- Pinecones of different sizes
- Dried orange slices (you can buy these or make them with a grown-up’s help)
- A hot glue gun
Step-by-Step Instructions:
- Get Your String Ready: Cut a piece of twine as long as you want your garland to be. Leave a little extra on both ends for hanging it up.
- Plan Your Pattern: Lay the twine on a flat surface. Place your pinecones, orange slices, and clothespins along the string to see how you want them to look. Think about making a pattern, like pinecone, orange, clothespin, pinecone…
- Ask for Help: This next step is for a grown-up! The hot glue gun gets VERY hot. Ask your helper to carefully put a small dot of hot glue on the back of a pinecone and press it onto the twine.
- Glue Everything On: Continue having your helper glue on the pinecones and orange slices according to your pattern. Make sure to leave space where you want to hang your cards.
- Hang It Up: Tie small loops at each end of the twine. Use nails or sticky hooks to hang your beautiful new garland on the wall.
- Add Your Cards: Use the mini clothespins you planned for to clip your holiday cards onto the garland. Now you can enjoy your creation!
2. Celestial Dreamcatcher Card Holder

Elevate your holiday cards into a stunning piece of modern art. This display uses a simple golden hoop as its base, creating a look that is both elegant and airy. Thin, delicate chains cascade down, providing the good spot to hang your cherished greetings. The metallic shine gives it a celestial, dreamcatcher-like quality.
This design is a fantastic way to showcase cards without cluttering your surfaces. It hangs on the wall, turning your holiday mail into a floating gallery. The minimalist style ensures that the colorful cards are the main attraction, while the golden hoop adds a touch of festive glamour to your room.
How to Make Your Card Holder
What You’ll Need:
- A large metal hoop (you can find these at a craft store)
- Thin gold chain (from the jewelry section of a craft store)
- Small clips (like mini binder clips or jewelry clips)
- Jewelry pliers or small scissors that can cut the chain
- Gold spray paint (optional)
Step-by-Step Instructions:
- Make it Golden: If your hoop isn’t already gold, ask a grown-up to help you spray paint it in a well-ventilated area (like outside). Let it dry completely.
- Cut Your Chains: Decide how long you want your chains to be. It looks nice if they are all different lengths. Ask a grown-up to help you use the pliers to carefully cut the chain into several pieces.
- Attach the Chains: Take one piece of chain. Loop the top link through the bottom of the hoop and use the pliers to pinch it closed. Do this for all your pieces of chain, spreading them out along the bottom of the hoop.
- Add Your Clips: Open a clip and attach it to the bottom link of one of your chains. Do this for every chain. You can add more than one clip to the longer chains if you like.
- Hang it High: Tie a string to the top of the hoop to hang it on a nail or hook on your wall.
- Display Your Cards: Carefully clip your holiday cards onto the chains. Your beautiful celestial display is now ready to admire!
3. Rustic Farmhouse Windowpane Display

Bring the charm of a country cottage into your home this holiday season. This display uses an old, weathered window frame to create a cozy and rustic backdrop for your cards. The chicken wire adds a touch of farmhouse style, while the simple twine gives you lines to hang your greetings. It feels both nostalgic and festive.
Adding a small wreath and sprigs of greenery softens the look. When you wrap the frame in twinkling fairy lights, the entire display glows with a warm and magical light. It’s a wonderful way to fill a space with cheer and turn your holiday mail into a significant part of your decorations.
How to Make Your Windowpane Display
What You’ll Need:
- An old window frame (without the glass)
- A roll of chicken wire
- A staple gun
- Sturdy twine or string
- Mini clothespins
- A small wreath
- A few sprigs of fake greenery
- Battery-powered fairy lights
Step-by-Step Instructions:
- Get the Frame Ready: Make sure the old window frame is clean. You can leave it looking old and chipped, as that’s part of its charm.
- Add the Wire (Grown-up Job!): This part is for a grown-up. They need to unroll the chicken wire and cut a piece that is a little bigger than the window frame. Then, they will use a staple gun to carefully attach the wire to the back of the frame, pulling it tight.
- String it Up: Weave a long piece of twine through the chicken wire, going from one side of the frame to the other. Create a few horizontal lines like this for you to hang cards on.
- Let it Shine: Gently wrap your fairy lights around the outside of the window frame. Tuck the battery pack behind it so it’s hidden.
- Decorate!: Hang your small wreath in the center of the window. Use the mini clothespins to clip your holiday cards and a few pieces of greenery onto the twine strings.
- Find a Spot: Lean your finished window frame on a mantelpiece or a sturdy shelf. Turn on the lights and enjoy your beautiful farmhouse display.
4. Hanging Ribbon Wall Display

Add a soft touch and a splash of color to your walls with this simple ribbon display. This method is all about clean lines and gentle movement. Long, flowing ribbons hang from a simple wooden dowel, creating vertical lines where you can attach your holiday cards. It is a graceful and uncluttered way to organize your greetings.
You can easily change the look by choosing ribbons that match your holiday decor. Mix different textures and widths for more visual interest. This display is light, airy, and can fit into almost any space, making it a versatile option for showing off the warm wishes you’ve received.
How to Make Your Ribbon Display
What You’ll Need:
- A wooden dowel (you can find this at a craft or hardware store)
- Several rolls of ribbon in different colors and styles
- Scissors
- Small clips (binder clips or clothespins work well)
- A long piece of string or twine for hanging
Step-by-Step Instructions:
- Make a Hanger: Take your long piece of string and tie each end securely to the ends of the wooden dowel. This will be what you use to hang your display on the wall.
- Cut Your Ribbons: Decide how long you want your ribbons to be. It’s fun to make them different lengths! Cut as many pieces of ribbon as you’d like to use.
- Tie the Ribbons: Take one piece of ribbon and fold it in half to make a loop at the top. Place the loop over the dowel, then pull the two loose ends through the loop and pull it snug. This is called a lark’s head knot. Do this with all of your ribbons, sliding them along the dowel to space them out.
- Hang it on the Wall: Put a nail or a strong sticky hook on your wall and hang your dowel from the string hanger.
- Clip on Your Cards: Use your small clips to attach your holiday cards to the hanging ribbons. You can place them at different heights to create a nice, balanced look.
5. Modern Wire Grid Gallery

Create a cool, organized gallery wall for your holiday greetings with this industrial-chic idea. Using simple wire grids, you can build a display that is both functional and stylish. The square shapes and clean lines give it a modern look that makes your colorful cards pop. It’s like a bulletin board, but much more fashionable.
You can arrange the grids in any pattern you like—a large square, a straight line, or a staggered design. Add small sprigs of greenery or tiny ornaments to make it more festive. This is a versatile system that you can keep up all year long to display photos, notes, and other treasures.
How to Make Your Grid Gallery
What You’ll Need:
- Wire wall grids (you can find these online or in home decor stores)
- Nails or wall hooks
- A hammer
- A variety of clips (binder clips, clothespins, etc.)
Step-by-Step Instructions:
- Plan Your Layout: Before you put any holes in the wall, decide how you want to arrange your grids. You can lay them on the floor to see what looks best. Maybe a big square made of four grids, or a long line of three.
- Hang the Grids (A Job for a Grown-up): Ask a grown-up to help you hang the grids on the wall. They will need to use a hammer and nails or strong wall hooks to make sure the grids are secure.
- Get Your Clips Ready: Gather all your different kinds of clips. It’s fun to use a mix of colors and styles.
- Create Your Gallery: Start clipping your holiday cards onto the grids. You can overlap them, hang them straight, or put them at an angle.
- Add Extra Fun: Clip on other small things to make your gallery even more interesting, like a small branch of a pine tree, a little ornament, or a photo. Now your personalized holiday wall is complete!
6. Upcycled Shutter Card Holder

Give an old object a new purpose with this clever and charming card display. A vintage wooden shutter, with its classic slatted design, becomes the foundation for showing off your holiday mail. This project is all about upcycling, turning something that might have been thrown away into a beautiful piece of decor.
The distressed paint and rustic texture of the shutter add character to any room. Cards can be tucked into the slats or hung from wires stretched across the front. Topped with a simple wreath and a burlap bow, this shutter display brings a unique, homespun feel to your holiday decorations.
How to Make Your Shutter Holder
What You’ll Need:
- An old wooden shutter
- Soap and water
- Thin wire or sturdy string
- Small nails and a hammer (or a staple gun)
- A small, simple wreath
- A pre-made bow or ribbon to make your own
Step-by-Step Instructions:
- Clean the Shutter: First, you need to clean the old shutter. Use a cloth with some soap and water to wipe away any dust or dirt. Let it dry completely.
- Add the Hangers (Grown-up Helper Needed!): There are two ways to do this. You can either tuck your cards into the shutter’s slats, or you can add wires. To add wires, ask a grown-up to hammer small nails into the sides of the shutter frame. Then, wrap the wire or string tightly around the nails, stretching it across the front of the shutter.
- Decorate the Top: Use another piece of wire or string to attach your small wreath to the top of the shutter. Then, attach your bow to the top of the wreath.
- Hang the Shutter: Ask a grown-up to help you hang the shutter securely on the wall.
- Display Your Cards: Gently slide your holiday cards behind the wires you added, or tuck them into the slats if you chose that method. Stand back and look at your awesome upcycled creation!
7. Bohemian Branch and Macrame Hanger

Embrace a natural, free-spirited vibe with this artistic card display. It all starts with a beautiful branch found on a walk outside. From this rustic base, a variety of yarns, macrame cords, and strings hang down, creating a tapestry of textures and earthy colors. It’s a truly one-of-a-kind piece.
This display feels personal and handmade. The addition of twinkling fairy lights woven around the branch adds a touch of magic, casting a warm glow on the cards clipped below. It turns your holiday greetings into part of a bohemian wall hanging that is full of warmth and creativity.
How to Make Your Bohemian Hanger
What You’ll Need:
- A sturdy, interesting-looking tree branch
- Different kinds of yarn, string, and macrame cord in your favorite colors
- Scissors
- Mini clothespins
- Battery-powered fairy lights
Step-by-Step Instructions:
- Prepare Your Branch: Find a cool branch from your yard or a park. Make sure it’s dry and clean off any dirt.
- Cut Your Cords: Cut lots of long pieces of your yarn and string. Don’t worry about making them all the same length—different lengths will look more interesting.
- Tie Them On: Attach your pieces of yarn to the branch. A simple way is to fold a piece in half, loop it over the branch, and pull the ends through the loop. Do this with all your pieces, mixing up the colors and textures.
- Add Some Sparkle: Gently wrap your string of fairy lights around the branch, weaving it in between the hanging yarns. Let the battery pack hang down the back where you can hide it.
- Make a Hanger: Tie another piece of sturdy string to both ends of the branch so you can hang it on the wall.
- Clip on the Cards: Use your mini clothespins to attach your holiday cards to the different pieces of hanging yarn. You’ve now made a beautiful, bohemian piece of art!
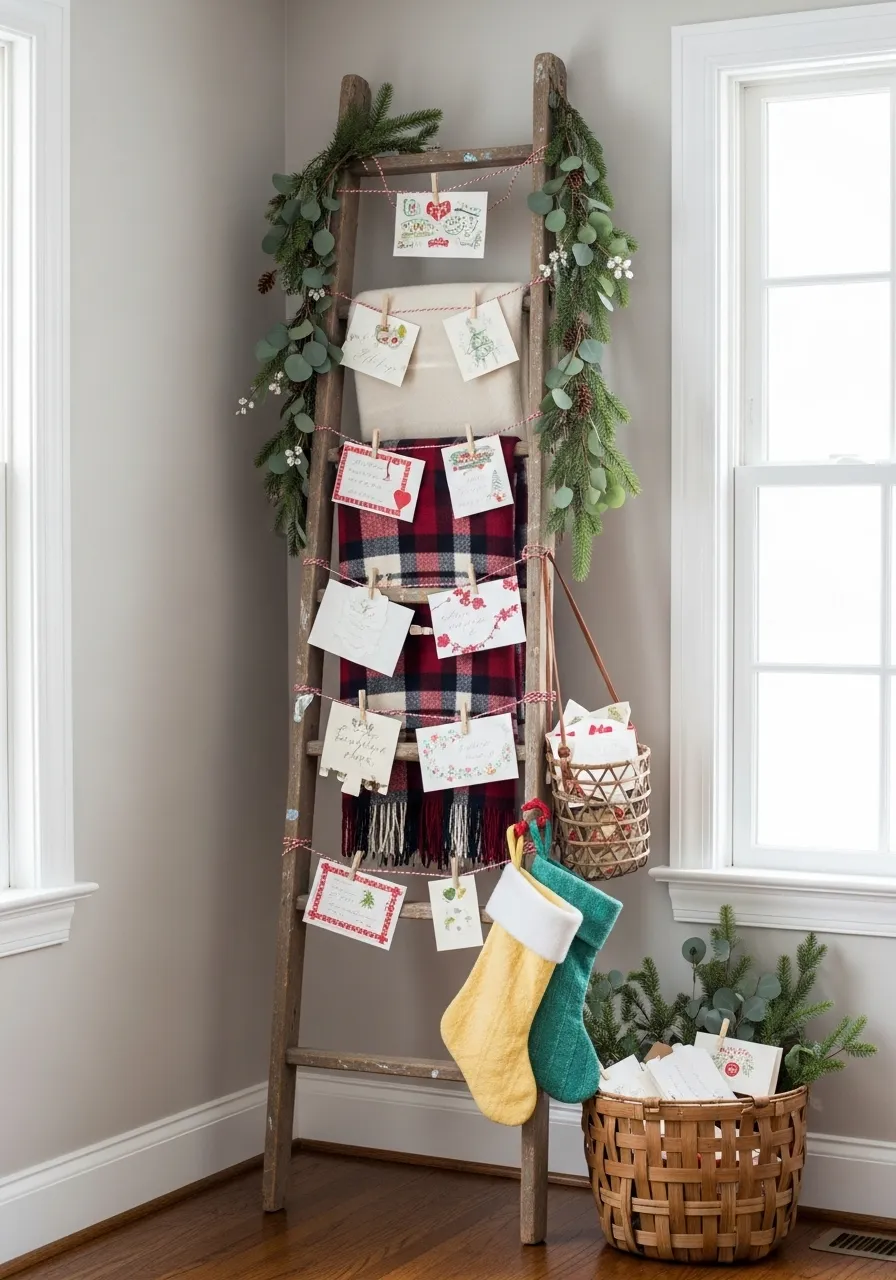
8. Cozy Corner Ladder Display

Use that empty corner in your room to create a tall and eye-catching holiday feature. A simple wooden ladder provides the structure for this cozy and rustic display. It takes up very little floor space but makes a big impact, drawing the eye upward and filling the corner with festive cheer.
Draping the ladder with a soft garland and a warm plaid blanket instantly makes the space feel more inviting. Strings stretched across the rungs are the place to clip your cards, turning them into a central part of the arrangement. Adding a few stockings is a sweet final touch to this charming and layered display.
How to Make Your Ladder Display
What You’ll Need:
- A wooden blanket ladder or an old stepladder
- A long piece of fake garland (like eucalyptus or pine)
- Twine or festive string
- Mini clothespins
- A cozy blanket and a few stockings (optional)
Step-by-Step Instructions:
- Position Your Ladder: Carefully lean your ladder against the wall in a corner where it will be safe and out of the way.
- Drape the Garland: Start at the top of the ladder and loosely wrap your garland around one side, letting it hang down naturally.
- String it Up: Cut a few pieces of twine. Tie one piece from the left side of a ladder rung to the right side, making a straight line. Do this on a few of the rungs, leaving some empty.
- Add Cozy Touches: If you have a blanket, you can fold it and drape it over one of the empty rungs. You can also hang a stocking or two from the side or a rung.
- Hang Your Cards: Use your mini clothespins to clip your holiday cards onto the pieces of twine you just added.
- Step Back and Admire: Look at your festive corner! You’ve turned a simple ladder into a beautiful holiday display.
9. Washi Tape Christmas Tree Card Wall

No room for a tree? No problem! This incredibly clever idea lets you create a Christmas tree right on your wall using only washi tape. It’s a fun, graphic, and modern way to celebrate the season. This display is especially good for apartments, dorm rooms, or any small space.
The best part is that washi tape is gentle on walls, so you can easily remove it after the holidays without leaving a mark. Your holiday cards and paper ornaments become the decorations for your unique tree. It’s a playful, creative, and budget-friendly project that makes a big, colorful statement.
How to Make Your Washi Tape Tree
What You’ll Need:
- Several rolls of washi tape in festive colors and patterns
- Scissors
- A ruler or yardstick (optional, for making straight lines)
Step-by-Step Instructions:
- Choose Your Spot: Find a nice, empty piece of wall where you want to build your tree.
- Make the Trunk: Start at the bottom and use a piece of brown or black washi tape to make a short, straight line for the tree trunk.
- Create the Outline: Use green or another color of tape to make a big triangle shape for the tree outline. You can use a ruler to help you make the lines straight if you want.
- Add the Branches: Use more strips of tape to create zig-zag lines inside your tree outline. These will be your “branches” where you hang your cards.
- Make a Star: Use a sparkly or bright yellow tape to create a star shape at the very top of your tree.
- Decorate Your Tree: Now for the fun part! Use small pieces of tape, rolled up so they are sticky on the outside, to stick your holiday cards onto the washi tape branches. Your cards are the ornaments!
10. Framed with Light Card Display

Turn your holiday greetings into a glowing work of art by putting them in the spotlight. This display uses a large, empty picture frame to create a defined and elegant space for your cards. It instantly makes the collection of cards feel special and important, like a piece in a museum.
Stringing fairy lights across the inside of the frame adds a magical, twinkling effect. The warm light illuminates the cards, making them easy to see and appreciate. Placing smaller frames within the large one adds depth and interest. This is a sophisticated and beautiful way to showcase your holiday mail.
How to Make Your Framed Display
What You’ll Need:
- A large picture frame with the glass and backing removed
- A string of battery-powered fairy lights
- Strong tape (like packing tape or duct tape)
- Mini clothespins
Step-by-Step Instructions:
- Prepare the Frame: Make sure your frame is clean and empty. You just want the outside frame itself.
- Attach the Lights: Turn the frame over so you are looking at the back. Take the end of your string of lights and tape it securely to one corner of the frame’s back.
- Criss-Cross the Lights: Stretch the light string across the opening to the other side and tape it down. Then, go back the other way, creating a zig-zag or criss-cross pattern. Keep going until you have a nice grid of wires. Make sure to tape the string down securely each time you reach the edge.
- Hide the Battery Pack: Tape the battery pack to the back of the frame at the bottom, where it will be hidden from the front.
- Turn it Around: Flip your frame back over so it’s facing the front.
- Hang Your Cards: Use your mini clothespins to clip your holiday cards onto the light strings. Find a place to lean your frame, turn on the lights, and watch your cards glow!
11. Festive Framed Corkboard

A simple corkboard can become the heart of your holiday card display with a few festive touches. By adding a decorative ribbon around the cork, you transform a plain office supply into a custom piece of holiday decor. It’s a classic, organized way to show off all your cards in one central spot.
This method keeps your greetings neat and tidy. You can overlap cards and add little festive pushpins to create a collage of warm wishes. A framed corkboard looks tidy on the wall and can be easily updated as more cards arrive throughout the season.
How to Make Your Corkboard Display
What You’ll Need:
- A corkboard in a simple frame
- A roll of festive ribbon
- A hot glue gun or strong craft glue
- Fun pushpins or thumbtacks
Step-by-Step Instructions:
- Choose Your Ribbon: Pick a ribbon that matches your holiday decorations.
- Glue it On (Grown-up Helper Needed!): Ask a grown-up to help you with this part. They will put a thin line of hot glue on the cork, right next to the inside edge of the frame.
- Press the Ribbon Down: Carefully press your ribbon onto the glue, working your way all around the border of the corkboard. When you get back to the start, cut the ribbon and glue the end down neatly.
- Hang the Board: Ask a grown-up to help you hang the corkboard securely on the wall.
- Pin Your Cards: Use your pushpins to arrange and pin your holiday cards onto the board. You have just created a festive card station!
12. Holiday Card Chandelier Mobile

Let your holiday cards float and dance in the air with a beautiful chandelier mobile. This display hangs from the ceiling, creating a whimsical and eye-catching feature in any room. Colorful ribbons cascade down from a simple hoop, holding cards, bells, and ornaments that gently twirl.
Adding fairy lights to the hoop gives the entire mobile a magical glow, especially in the evening. This is a wonderful way to display cards if you are short on wall space. It becomes a celebratory centerpiece that is full of movement and light.
How to Make Your Chandelier Mobile
What You’ll Need:
- A large embroidery hoop or a craft ring
- Several rolls of ribbon in festive colors
- Small clips
- Little jingle bells or mini ornaments
- Battery-powered fairy lights
- String for hanging
Step-by-Step Instructions:
- Wrap the Hoop: If you want, you can wrap a ribbon around your entire hoop to cover it. Secure the ends with glue or a knot.
- Add the Lights: Carefully wrap your string of fairy lights around the hoop. Let the battery pack hang with the ribbons or tape it to the top.
- Cut the Ribbons: Cut many pieces of ribbon in different lengths. The mobile looks best when some ribbons are short and some are long.
- Tie on the Ribbons: Tie your ribbons all around the hoop. Just a simple knot will work.
- Add Clips and Bells: At the bottom of each ribbon, tie a jingle bell or a tiny ornament. A little higher up on the ribbon, attach a clip for a card.
- Make the Hanger: Cut three or four long, equal pieces of string. Tie them evenly spaced around the hoop. Then, gather the tops of the strings together and tie them in one big knot.
- Hang and Display: Ask a grown-up to help you hang your mobile from a hook in the ceiling. Clip on your cards and enjoy your floating display!
13. The Mini Card-Holding Tree

Why not give your holiday cards their very own Christmas tree? This idea is simple, classic, and full of festive spirit. A small tabletop tree becomes the dedicated spot for showcasing your greetings. It’s a lovely addition to an entryway table, a fireplace mantel, or a desk.
You can decorate the tree with a few small ornaments and lights first, or let the cards be the main decoration. As you receive more cards, the tree becomes fuller and more colorful. It is a miniature version of a beloved tradition, made especially for the warm wishes you receive.
How to Make Your Card Tree
What You’ll Need:
- A small artificial Christmas tree
- Mini clothespins or other small clips
- A tree topper (optional)
Step-by-Step Instructions:
- Set Up Your Tree: Take your mini tree out of its box and fluff up all the branches so it looks nice and full.
- Find a Good Spot: Place your tree on a sturdy table or shelf where it can be seen.
- Add Your Topper: If you have a small star or angel, place it on the top branch.
- Clip on the Cards: This is the easiest part! Just use your mini clothespins to clip your holiday cards directly onto the tree’s branches. You can spread them all around.
- Keep Adding: As more cards arrive in the mail, keep adding them to your special card tree!
14. Staircase Garland Gallery

Turn the journey up and down your stairs into a festive experience. Your staircase railing is a wonderful, long space just waiting to be decorated. By wrapping it in a thick garland, ribbon, and lights, you create a beautiful gallery for your holiday cards.
This display makes a big statement and brings holiday cheer to a central part of your home. The cards are easy to see as you walk by, allowing you to enjoy them every day. Big, beautiful bows at the top and bottom of the railing complete the grand and joyful look.
How to Make Your Staircase Gallery
What You’ll Need:
- A long strand of fake pine garland
- Floral wire or zip ties
- A wide, festive ribbon
- A string of lights
- Mini clothespins
- A few large, pre-made bows
Step-by-Step Instructions:
- Attach the Garland (Grown-up Job!): Ask a grown-up to help you attach the start of the garland to the top of your staircase railing using a zip tie or floral wire. Gently drape the garland down the railing, attaching it every few feet to keep it secure.
- Add the Lights: Weave your string of lights through the garland from top to bottom.
- Wrap the Ribbon: Loosely wrap your wide ribbon around the garland, leaving space between each loop.
- Add the Bows: Use the wires on the back of your big bows to attach one to the top and one to the bottom of the railing.
- Clip on the Cards: Use your mini clothespins to clip cards onto the garland’s branches or the ribbon. Space them out so you can see each one.
15. Shadow Box Holiday Gallery

Treat your most treasured holiday cards like the works of art they are. By placing them in shadow box frames, you can create a sophisticated and personal gallery wall. This method allows you to highlight individual cards, photos, and small keepsakes in a beautiful and protected way.
Using festive scrapbook paper as a background adds color and pattern. You can create a collage of different sized frames for an interesting layout. This is a display you can even leave up after the holidays, swapping the cards for other mementos.
How to Make Your Shadow Box Gallery
What You’ll Need:
- Shadow box frames of various sizes
- Festive scrapbook paper
- Scissors
- A ruler
- Pushpins or glue dots
- Small decorations like dried flowers or mini ornaments (optional)
Step-by-Step Instructions:
- Prepare the Background: Open the back of a shadow box. Take out the backing board. Measure the board and cut a piece of scrapbook paper to the exact same size. Glue the paper onto the board.
- Arrange Your Card: Place your holiday card on the pretty background paper. You can pin it on with a nice pushpin or use a sticky glue dot on the back to hold it in place.
- Add Extras: If you want, you can add a little sprig of dried flowers or a tiny ornament inside the box next to the card.
- Close the Box: Carefully put the backing board back into the frame and close it up.
- Repeat and Hang: Do this for all of your frames with your favorite cards. Then, ask a grown-up to help you hang them on the wall in a nice arrangement.
16. Festive Cabinet Ribbons

Bring some holiday spirit into the heart of your home—the kitchen! This simple idea uses long, beautiful ribbons to turn your cabinet doors into a festive card display. It’s a clean, elegant look that adds a splash of color and cheer without taking up any precious counter space.
This method works on almost any kind of cabinet. The vertical lines of the ribbons draw the eye up, and the cards add a personal touch. Topped with a matching bow, this display is simple to put together but looks thoughtful and put-together.
How to Make Your Cabinet Ribbons
What You’ll Need:
- A roll of wide, festive ribbon (like plaid)
- Scissors
- Strong double-sided tape or removable adhesive hooks
- Mini clothespins
- Pre-made bows (optional)
Step-by-Step Instructions:
- Measure Your Ribbon: Measure a piece of ribbon so it’s long enough to go from the top of your cabinet door to the bottom. Cut it.
- Attach the Ribbon: Open the cabinet door. Use a piece of strong double-sided tape to attach one end of the ribbon to the very top of the door on the inside. Pull the ribbon down the front of the door so it’s straight, then wrap it under the door and tape the other end to the inside.
- Add a Bow: If you have a bow, you can stick it to the ribbon at the top of the cabinet door.
- Clip on Cards: Use your mini clothespins to clip your holiday cards all the way down the ribbon.
- Repeat: Do this for a few of your cabinet doors to create a beautiful, symmetrical look.
17. Minimalist Wire Tree Display

If you love clean lines and modern style, this wire tree is a wonderful choice. This display uses a simple metal outline of a tree to create a graphic and contemporary spot for your holiday cards. The open design is light and airy, ensuring your wall doesn’t feel cluttered.
The focus of this display is truly on the cards themselves. Clipped to the different wire “branches,” they become the ornaments. This type of decoration is great for smaller spaces or for anyone who prefers a more minimalist approach to holiday decorating.
How to Use Your Wire Tree Display
What You’ll Need:
- A wire tree wall hanging
- A nail and a hammer
- Small clips (gold or metal ones look nice)
Step-by-Step Instructions:
- Hang the Tree: This is the easiest part. Ask a grown-up to hammer a nail into the wall where you’d like your tree to go. Then, simply hang the wire tree on the nail.
- Get Your Clips: Gather your small clips.
- Decorate with Cards: Clip your holiday cards onto the different wire sections of the tree. You can arrange them however you think looks best.
- Add Other Shapes: Some wire displays come with matching wire stars or other shapes. You can hang these next to your tree to complete the modern, festive look.
18. Winter Wonderland Card Cloche

Create a tiny, magical snow globe scene for your most special holiday cards. A glass cloche, or bell jar, lets you build a miniature winter wonderland on any tabletop. This display protects your cards from dust while turning them into a beautiful and enchanting centerpiece.
Inside the glass dome, you can add fake snow, a tiny tree, and other small figures to create a story. The holiday cards become the backdrop to your charming little world. It’s a sophisticated and creative way to highlight one or two favorite greetings.
How to Make Your Winter Cloche
What You’ll Need:
- A glass cloche with a base
- A few of your favorite holiday cards
- Fake snow
- A mini bottle brush tree
- A tiny deer or snowman figurine (optional)
Step-by-Step Instructions:
- Create the Snowy Ground: Take the glass dome off the base. Sprinkle a nice layer of fake snow all over the base.
- Plant Your Tree: Gently push the bottom of your mini bottle brush tree into the snow so it stands up.
- Place Your Cards: Stand one or two cards up in the snow behind the tree. You might need to build up a little pile of snow behind them to help them stand.
- Add a Friend: If you have a little figurine, place it in the snow in front of the tree.
- Cover Your World: Carefully and slowly lower the glass cloche back over your scene and onto the base. Now you have a beautiful winter wonderland to admire!
19. Hanging Garden Card Display

For those with a green thumb, why not mix your plants with your holiday cheer? This unique idea uses macrame hangers and small potted plants as the home for your holiday cards. It creates a living, breathing display that is fresh, beautiful, and full of life.
The natural textures of the macrame ropes and the green from the plants provide a lovely, earthy background for the colorful cards. You can hang a single plant holder or group several together at different heights to create a stunning botanical feature by a window.
How to Make Your Hanging Garden Display
What You’ll Need:
- Macrame plant hangers
- Small pots that fit in the hangers
- Small plants or sprigs of greenery (real or fake)
- Potting soil (if using real plants)
- Your holiday cards
Step-by-Step Instructions:
- Pot Your Plants: Place your small plants into the pots. If they are real, make sure to add some soil.
- Place in Hangers: Carefully put each pot into a macrame hanger.
- Hang Them Up: Ask a grown-up to help you hang the plant holders from hooks in the ceiling or a curtain rod. It looks great to hang them at different levels.
- Add Your Cards: Gently tuck a holiday card into each pot, leaning it against the plant. If the card won’t stay up, you can tape it to a small wooden stick (like a coffee stirrer) and stick that into the soil.
20. Layered Mantel Garland

Make your fireplace the heart of your holiday decorations with layers of festive garlands. This look is all about mixing textures and colors to create a display that is fun, joyful, and full of personality. A more traditional ribbon or beaded garland can be paired with a playful, handmade one.
The lower garland is the spot to hang your cards, allowing them to be seen clearly against the fireplace. Using colorful felt shapes, pom-poms, and stars makes the display feel whimsical and child-friendly. It’s a cheerful way to frame the coziest spot in the house.
How to Make Your Layered Garland
What You’ll Need:
- A main garland for the top of the mantel (like a ribbon or beaded one)
- Removable adhesive hooks
- A long piece of string or twine
- Colorful felt balls (pom-poms) and felt shapes (like stars and trees)
- A large needle (optional, for stringing)
- Mini clothespins
Step-by-Step Instructions:
- Hang the First Garland: Ask a grown-up to place a few removable hooks on top of your mantel. Drape your main garland across the hooks.
- Make the Card Garland: Take your long piece of string. You can either tie the felt balls and shapes onto the string, or a grown-up can help you use a needle to thread them on, leaving spaces in between.
- Hang the Second Garland: Place a couple of removable hooks on the front of your mantel, lower down than the first set. Hang your new felt ball garland from these hooks, letting it hang in a nice swoop.
- Clip on the Cards: Use your mini clothespins to clip your holiday cards onto the felt ball garland in the empty spaces you left.
21. Vintage Winter Sled Display

Capture the nostalgic feeling of a snow day with this charming corner display. A vintage wooden sled becomes the perfect rustic backdrop for your holiday greetings. This idea is all about creating a cozy winter scene, bringing together elements of outdoor fun and indoor warmth.
Leaning in a corner, the sled creates a festive vignette without taking up much space. Wrapped in warm lights and strung with cards, it feels both celebratory and personal. Paired with old skis and ice skates, it tells a story of joyful winter memories.
How to Make Your Sled Display
What You’ll Need:
- A vintage-style wooden sled
- Twine or string
- Mini clothespins
- A string of battery-powered lights
- Other winter decorations like old ice skates or pinecones (optional)
Step-by-Step Instructions:
- Find the Right Corner: Choose a cozy corner in your home and carefully lean the sled against the walls.
- Add the Lights: Starting from the top, loosely wrap the string of lights around the sled, letting them drape naturally. Tuck the battery pack behind the sled so it’s hidden.
- String it for Cards: Take a long piece of twine and tie it to one side of the sled. Criss-cross it over to the other side and wrap it around, continuing this pattern down the length of the sled.
- Clip on Your Greetings: Use your mini clothespins to attach your holiday cards to the twine you just added.
- Create a Winter Scene: If you have them, place old ice skates or a basket of pinecones at the base of the sled to complete the look.
22. Holiday Card Couture

For a touch of glamour and surprise, turn your holiday cards into a high-fashion statement. This display uses a wire dress form as a unique sculpture to showcase your greetings. The cards are pinned and clipped to create the illusion of a beautiful gown, making for a truly unforgettable piece of decor.
This is a creative way to bring a bit of artistic flair to your holiday decorations. A satin ribbon acts as a sash, and a touch of tinsel adds sparkle. It’s a fun conversation starter that blends the joy of the season with a love for fashion and design.
How to Make Your Card Couture
What You’ll Need:
- A wire dress form or mannequin
- A wide satin ribbon
- Lots of holiday cards
- Straight pins and mini clothespins
- A piece of festive tinsel or a faux pearl necklace (optional)
Step-by-Step Instructions:
- Set Up Your Form: Place your mannequin where you want it to be displayed.
- Add the Sash: Tie the wide satin ribbon around the “waist” of the dress form. You can make a simple knot or a big bow at the back or side.
- Create the Bodice: Start at the top. Use clothespins or carefully stick straight pins through the corners of your cards to attach them to the top part of the form. Overlap them to create a solid look.
- Design the Skirt: Continue pinning or clipping cards below the sash, working your way down. Let the cards fan out at the bottom to create the shape of a skirt.
- Add Some Bling: Drape a strand of tinsel over the shoulder or a pearl necklace around the neck for a final touch of sparkle.
23. Cascading Door Ribbons

Decorate your doors and welcome guests with a colorful cascade of holiday cards. This simple method uses the height of a door to create a long, flowing display. It’s an excellent way to use a space you might otherwise overlook, bringing cheer to your entryways or any room in the house.
By using ribbons in a variety of festive colors, you can create a vibrant, joyful look. The cards hang neatly in vertical lines, keeping them organized and easy to see. Framed with a simple garland, this display turns a plain door into a beautiful holiday feature.
How to Make Your Door Ribbons
What You’ll Need:
- Several rolls of ribbon in different colors
- Scissors
- Strong tape
- Mini clothespins
- A tension rod or a simple dowel that fits your doorway (optional)
Step-by-Step Instructions:
- Cut Your Ribbons: Cut long pieces of ribbon. Make them long enough to hang down your door as far as you’d like.
- Hang the Ribbons: There are two ways to do this. The easiest way is to use strong tape to attach the end of each ribbon to the very top edge of the door. A second way is to tie the ribbons onto a dowel or tension rod and place that at the top of the door frame.
- Space Them Out: Arrange your ribbons so they are evenly spaced.
- Clip on Your Cards: Use your mini clothespins to attach your holiday cards to the ribbons. You can hang one card per ribbon or several all the way down.
24. Rustic Wall Ladder Hanger

Embrace a simple, natural aesthetic with this minimalist wall hanging. This display is made from a collection of dowels and found branches, creating a ladder-like structure for your cards. It has a clean, Scandinavian-inspired feel that is both modern and rustic.
The beauty of this piece is in its simplicity and the texture of the natural materials. It hangs flat against the wall, making it a great choice for smaller spaces or narrow hallways. The use of simple binder clips adds a slightly industrial touch that contrasts nicely with the wood.
How to Make Your Wall Ladder
What You’ll Need:
- Several thin wooden dowels or straight, clean sticks from outside
- A long piece of sturdy string or leather cord
- Scissors
- Small binder clips
Step-by-Step Instructions:
- Cut Your Cords: Cut two long, equal pieces of your cord. These will be the vertical sides of your ladder.
- Lay it Out: Place the two cords on the floor, parallel to each other.
- Tie on the Rungs: Take your first dowel or stick and place it at the top. Tie one end of the dowel to the left cord and the other end to the right cord. This is your first “rung.”
- Continue Down: Keep tying on your dowels, moving down the cords and leaving a nice amount of space between each one. This creates your ladder.
- Make a Hanger: Tie the top ends of the two long cords together in a knot. This will form a triangle shape that you can use to hang your ladder.
- Hang and Clip: Hang your ladder on a nail. Use the binder clips to attach your cards to the dowel rungs.
25. Festive Tiered Tray Centerpiece

Turn your holiday cards into a beautiful centerpiece for your dining table or kitchen island. A tiered tray, often used for serving snacks or desserts, can be repurposed into a charming display. It keeps all your holiday cheer contained in one stylish and movable spot.
Filled with mini bottle brush trees, shiny ornaments, and rustic pinecones, the tray becomes a miniature holiday world. Your cards can be tucked in among the decorations, standing up for all to see. It’s an easy way to create a festive focal point that feels both abundant and organized.
How to Make Your Tiered Tray
What You’ll Need:
- A two or three-tiered tray
- A variety of small holiday decorations (mini trees, ornaments, pinecones)
- Small card holders or place card holders (optional)
- Your holiday cards
Step-by-Step Instructions:
- Start with the Bottom Tier: Place your largest decorations on the bottom level of the tray. Arrange the mini trees and pinecones, leaving some open spaces.
- Add Your Cards: Stand your holiday cards up in the open spaces. You can lean them against the bigger decorations to help them stay up. If you have small card holders, you can use those too.
- Decorate the Top Tier: Fill the top level with smaller ornaments and a few more cards.
- Add a Finishing Touch: You can weave a string of tiny fairy lights through your display for some extra sparkle. Place your finished centerpiece on a table and enjoy!
26. Floating Ribbon Canopy

Create a breathtaking and immersive display by hanging your cards from the ceiling. This idea is all about creating a joyful, floating canopy of colorful ribbons and warm wishes. It works especially well in a room with high or beamed ceilings and makes a huge festive impact.
As the ribbons gently move with the air, the cards and snowflake ornaments seem to dance. This display fills the vertical space in a room, drawing the eye upward and creating a sense of celebration and wonder. It’s like standing under a gentle shower of holiday happiness.
How to Make Your Floating Canopy
What You’ll Need:
- Several rolls of ribbon in many different colors
- A way to hang them (hooks in the ceiling, or tying them to an exposed beam)
- Scissors
- Mini clothespins
- Lightweight snowflake ornaments (optional)
Step-by-Step Instructions:
- Plan Your Hanging Spot (Grown-up Job!): This is the most important step. A grown-up needs to decide the best and safest way to hang the ribbons. This might mean screwing small hooks into a ceiling beam or finding another secure anchor point.
- Cut the Ribbons: Cut many pieces of ribbon. Make them different lengths so your cards will hang at different heights.
- Tie the Ribbons: Securely tie one end of each ribbon to your hook or beam. Spread them out to cover the area you want to decorate.
- Clip on Cards and Snowflakes: Use your mini clothespins to attach your cards to the hanging ribbons. You can also clip on a few light snowflake ornaments in between the cards for extra wintery fun.
27. Clipboard Wall Gallery

For a look that is organized, modern, and a little bit rustic, try creating a gallery wall of clipboards. This display arranges your holiday cards in a neat grid, turning them into a collection of mini art pieces. The simple, functional look of the clipboards acts as a frame for each card.
This is a very clean and graphic way to showcase your greetings. Adding a small sprig of fresh greenery to each clip brings in a touch of nature and a festive scent. You can easily swap out the cards as new ones arrive, keeping your gallery fresh all season long.
How to Make Your Clipboard Gallery
What You’ll Need:
- Several clipboards (all the same size and style looks great)
- Nails and a hammer
- A ruler and a pencil
- Small sprigs of greenery (like cedar or fir)
Step-by-Step Instructions:
- Plan Your Grid (Grown-up Job!): Ask a grown-up to help you plan where the clipboards will go. They can use a ruler and a pencil to make small marks on the wall to make sure your grid is straight and evenly spaced.
- Hang the Clipboards: Your grown-up helper can then hammer a nail into the wall for each clipboard. Hang the clipboards on the nails.
- Add Your Cards and Greenery: Clip one holiday card onto the center of each clipboard.
- Add a Finishing Touch: Take a small sprig of greenery and tuck it under the metal clip, on top of the card. Now your stylish gallery is complete!
28. Repurposed Hanger Display

Upcycle a simple clothes hanger into a charming and clever card display for your door. This is a wonderfully simple and budget-friendly project that adds a personal touch to a bedroom door or small wall space. It’s all about finding a new use for an everyday object.
Wrapped in ribbon, the hanger is instantly transformed into a festive base. More ribbons hang down, providing the perfect place to clip your cards. Topped with a mini wreath, it becomes a complete and cheerful decoration.
How to Make Your Hanger Display
What You’ll Need:
- A simple wire or plastic clothes hanger
- Festive ribbon
- A hot glue gun or tape
- Scissors
- Several more pieces of ribbon in different colors
- Mini clothespins
- A mini wreath (optional)
Step-by-Step Instructions:
- Wrap the Hanger: Ask a grown-up to help you put a dot of hot glue at one end of the hanger. Press the end of your ribbon onto it. Carefully wrap the ribbon all the way around the hanger until it’s completely covered. Cut the ribbon and glue the other end down.
- Add the Hanging Ribbons: Cut several long pieces of ribbon in different colors. Tie them along the bottom bar of the hanger.
- Add a Wreath: If you have a mini wreath, you can use a small piece of ribbon to tie it to the hook part of the hanger.
- Hang it Up: Place your decorated hanger on a doorknob or a hook on the wall.
- Clip on the Cards: Use your mini clothespins to attach your holiday cards to the hanging ribbons.
29. Upcycled Egg Carton Tree

Get creative and crafty with this eco-friendly holiday project. This whimsical tree is built entirely from old egg cartons, making it a fun and sustainable way to display your cards. It’s a wonderful activity for a chilly afternoon and results in a truly one-of-a-kind decoration.
Painted green and decorated with colorful button “ornaments,” the stacked egg cartons create a fantastic 3D tree. The little cups in the cartons are the right size for tucking in holiday cards. This display is full of handmade charm and playful personality.
How to Make Your Egg Carton Tree
What You’ll Need:
- Several cardboard egg cartons
- Green paint and a paintbrush
- A hot glue gun
- Colorful buttons
- A piece of cardboard for the star
- Scissors
Step-by-Step Instructions:
- Get Help from a Grown-up: This whole project is fun to do together! A grown-up should do all the cutting and gluing. First, they will cut the egg cartons into different sized sections.
- Paint it Green: Paint all the pieces of your egg cartons green. You might need two coats. Let them dry completely.
- Build Your Tree: Start with the biggest piece of egg carton for the base. Your grown-up helper will use the hot glue gun to stack and glue the smaller pieces on top, creating a pyramid or tree shape.
- Decorate with Buttons: Glue colorful buttons all over your tree, just like ornaments.
- Make a Star: Cut a star shape out of a piece of cardboard, paint it yellow or gold, and glue it to the top of your tree.
- Display Your Cards: Carefully tuck your holiday cards into the little egg cups on your finished tree.
30. Glowing Clip-Light Garland

Make your holiday cards glow with this incredibly simple and magical display. A string of lights that comes with built-in clips makes decorating easier than ever. This is a quick way to create a big impact, especially at night when the lights create a warm and cozy atmosphere.
Draped across a window, over a headboard, or along a wall, these lights instantly add festive cheer. You can weave them through a simple pine garland for a more traditional look. The colorful clips add an extra touch of fun to this bright and cheerful display.
How to Use Your Clip-Lights
What You’ll Need:
- A string of photo-clip LED lights
- Batteries for the lights
- A simple garland (optional)
Step-by-Step Instructions:
- Put in the Batteries: Open the battery pack and put the batteries in. Test the lights to make sure they work.
- Drape the Lights: Decide where you want to hang your display. You can drape the string of lights across the top of a window, along a wall, or over the headboard of your bed. Use tape or small hooks to hold it in place.
- Add a Garland: If you are using a garland, you can hang it first and then loosely wrap the light string around it.
- Clip and Glow: This is the best part! One by one, clip your holiday cards onto the lights.
- Turn it On: Switch on your lights and watch your holiday cards glow!
31. Bookshelf Card Showcase

Integrate your holiday greetings right into your home’s existing decor with this simple idea. Your bookshelves are a wonderful place to tuck and display cards, turning your library into a festive gallery. It requires no extra tools or wall space, making it a very easy way to decorate.
Placing cards among your favorite books adds a personal and cozy touch to the room. You can stand them up in the gaps between books or lean them against the front of a row. Weaving a thin strand of fairy lights through the shelves adds a warm, magical glow to your literary display.
How to Set Up Your Bookshelf Showcase
What You’ll Need:
- A bookshelf
- Your holiday cards
- A thin string of battery-powered fairy lights (optional)
Step-by-Step Instructions:
- Find the Gaps: Look at your bookshelves and find little open spots.
- Tuck in the Cards: Gently slide your holiday cards into these spots. You can stand them up on their own or lean them against the books for support.
- Vary the Placement: Place some cards on one shelf and some on another. Put some in front of the books and some between them to make it look interesting.
- Add a Twinkle: If you have fairy lights, carefully weave the string along the back of the shelves, behind the books. Let the little lights poke through and make your display sparkle.
32. Festive Kitchen Hutch Display

Bring holiday cheer into the heart of your home by decorating a kitchen hutch or baker’s rack. This busy spot becomes a central hub for festive greetings, mixed right in with your everyday dishes and treats. It’s a warm and charming way to make your kitchen feel extra cozy for the season.
This display is all about layering. Strings of cards are hung across the shelves, while others stand on mini easels. Tucked between plates, mugs, and jars of cookies, the cards become part of a scene of holiday abundance and hospitality.
How to Decorate Your Kitchen Hutch
What You’ll Need:
- A baker’s rack or kitchen hutch
- Twine or string
- Mini clothespins
- Mini easels (optional)
- Your holiday cards
Step-by-Step Instructions:
- String it Up: Tie a piece of twine from one side of a shelf to the other. Do this for a couple of the shelves.
- Clip on Cards: Use your mini clothespins to hang cards from the twine you just added.
- Use Your Dishes: Stand other cards up by leaning them against a stack of plates or a mug.
- Put Them on Display: If you have mini easels, they are the right size for holding up a special card on their own.
- Fill in the Gaps: Arrange your cards among your other kitchen items until your hutch looks full and festive.
33. Gilded Frame Farmhouse Display

Mix rustic charm with a touch of glamour in this elegant card display. An ornate, gilded picture frame provides a beautiful border, while the chicken wire filling gives it a relaxed, farmhouse feel. It’s a wonderful project that results in a piece of custom wall art for the holidays.
The contrast between the fancy gold frame and the simple wire is what makes this display so interesting. You can weave greenery through the wire for a pop of color and a natural touch. It’s a sophisticated yet approachable way to turn your holiday greetings into a framed masterpiece.
How to Make Your Gilded Frame
What You’ll Need:
- A large, ornate picture frame (with glass and backing removed)
- A roll of chicken wire
- A staple gun
- Wire cutters
- Mini clothespins
- A few sprigs of greenery (optional)
Step-by-Step Instructions:
- Prepare the Frame: Make sure your picture frame is empty and clean.
- Add the Wire (Grown-up Job!): This part needs a grown-up. They will unroll the chicken wire and use wire cutters to cut a piece that’s a little larger than the frame’s opening.
- Staple it Down: Your grown-up helper will then place the wire on the back of the frame and use a staple gun to attach it all the way around, pulling it tight as they go.
- Add Greenery: If you’re using it, weave a few sprigs of greenery through the chicken wire.
- Hang and Clip: Ask a grown-up to hang the frame on the wall. Use your mini clothespins to clip your holiday cards directly onto the chicken wire.
34. Colorful Yarn Tapestry Display

Make a big, bold, and beautiful statement with this stunning yarn wall hanging. This project is a piece of art in itself that also serves as a creative place to display your holiday cards. The beautiful gradient of colors creates a warm and modern backdrop for your greetings.
This display is all about texture and color. The soft, hanging yarn adds a cozy feel to any room, while the sprig of eucalyptus brings in a natural element. This is a versatile piece that you can leave up all year long, changing out the cards for photos after the holidays.
How to Make Your Yarn Tapestry
What You’ll Need:
- A long wooden dowel
- Many rolls of yarn in different colors
- Scissors
- Mini clothespins
- String for hanging
Step-by-Step Instructions:
- Make a Hanger: Tie a long piece of string to both ends of your dowel so you can hang it later.
- Cut Your Yarn: This is the biggest step! Cut lots and lots of long pieces of yarn. To make them all the same length, you can wrap the yarn around a large book and then cut the loops at both ends.
- Tie the Yarn: Take one piece of yarn and fold it in half. Place the looped end over the dowel, then pull the two loose ends through the loop to create a knot. This is called a lark’s head knot.
- Create Your Pattern: Continue tying on your yarn pieces, arranging the colors in a pattern you like—maybe a rainbow or a gradient. Push the knots close together.
- Hang and Trim: Hang your dowel on the wall. Use sharp scissors to trim the bottom of the yarn into a shape, like a point or an angle.
- Clip on Cards: Use your mini clothespins to attach your cards to the strands of yarn.
35. Merry & Bright Mirror Display

Use a large mirror to double your holiday cheer! This incredibly simple and chic idea turns a functional piece of your decor into a festive card display. The reflection makes your room feel brighter and larger, while the cards add a colorful, celebratory border.
This method is quick, easy, and requires no holes in the wall. You can arrange the cards along the top and side of the mirror frame, creating a casual and modern look. Adding a festive message with removable vinyl letters or a window marker is a fun final touch.
How to Make Your Mirror Display
What You’ll Need:
- A large floor or wall mirror
- Gentle tape that won’t damage your cards (like washi tape or painter’s tape)
- Your holiday cards
- Removable vinyl letters or a chalk marker (optional)
Step-by-Step Instructions:
- Clean Your Mirror: Make sure your mirror is clean and free of fingerprints.
- Write a Message: If you want, use your vinyl letters or chalk marker to write a festive message like “Merry & Bright” in the center of the mirror.
- Tape Your Cards: Take your first card and make a small loop with your tape, sticky-side-out. Stick it to the back of the card.
- Create Your Border: Gently press the card onto the mirror’s frame or the very edge of the glass. Continue adding cards, overlapping them slightly, to create a border along one or two sides of the mirror.
36. Cozy Felt Pocket Organizer

Keep your holiday cards beautifully organized with this modern felt wall hanging. The clean lines and soft texture of the felt create a display that is both stylish and functional. Each pocket provides a neat and tidy home for a card, keeping your collection in order.
This display has a calm, minimalist feel that fits well with Scandinavian or modern decor. The simple star garland adds a subtle festive touch. It hangs neatly from a wooden dowel, making it a great space-saving option for any wall.
How to Make Your Felt Organizer
What You’ll Need:
- A large piece of thick craft felt
- A sewing machine or fabric glue
- Scissors and a ruler
- A wooden dowel
- String for hanging
Step-by-Step Instructions:
- Cut the Main Piece (Grown-up Job!): Ask a grown-up to cut a long rectangle from the felt for the main back panel.
- Cut the Pockets: Cut several smaller rectangles of felt for the pockets. Make them slightly wider than the back panel.
- Attach the Pockets: Your grown-up helper can either sew or use strong fabric glue to attach the pockets. They will attach the bottom and the two sides of each pocket to the back panel, leaving the top open.
- Make a Sleeve for the Dowel: At the top of the main panel, fold the felt over to the back and sew or glue it down, leaving a hollow tube for the dowel to slide through.
- Assemble and Hang: Slide the dowel through the sleeve you just made. Tie a piece of string to both ends of the dowel.
- Display Your Cards: Hang your new organizer on the wall and slide your holiday cards into the pockets.
37. Enchanted Branch Chandelier

Bring a piece of the winter forest indoors with this enchanting hanging branch chandelier. This magical display floats from the ceiling, creating a rustic and beautiful mobile for your cards and ornaments. It’s a natural and artistic way to fill an empty corner or hang over a table.
Twinkling fairy lights wrapped around the branches give the display a warm and magical glow. The cards, mixed with delicate snowflakes and glass ornaments, seem to dance in the air as they gently spin. This display is a true showstopper that captures the wonder of the season.
How to Make Your Branch Chandelier
What You’ll Need:
- A few interesting, sturdy branches
- Strong string or twine
- A battery-powered string of fairy lights
- Clear fishing line
- Mini clothespins
- Lightweight ornaments (like paper snowflakes)
- Ceiling hooks
Step-by-Step Instructions:
- Build Your Chandelier (Grown-up Job!): Ask a grown-up to arrange the branches into a shape you like (like a star or just a bundle) and tie them together securely in the middle with twine.
- Add the Lights: Wrap the string of fairy lights all around the branches. Let the battery pack hang near the middle where you can hide it or tape it to a branch.
- Attach the Hangers: Your grown-up helper needs to screw three or four hooks into the ceiling in a circle. They will then tie long pieces of fishing line from the branches up to the hooks to hang the chandelier.
- Add the Card Hangers: Cut many different lengths of fishing line. Tie one end to the branches, spreading them all around.
- Clip and Decorate: Tie a mini clothespin to the bottom of some of the hanging lines. On others, tie your lightweight ornaments.
- Display Your Greetings: Clip your cards onto the clothespins and enjoy your beautiful, floating winter chandelier.
As we’ve seen, displaying your holiday cards doesn’t have to be an afterthought. With a little creativity, your collection of greetings can become a central and meaningful part of your home’s festive atmosphere. It’s a way to celebrate not just the season, but the people who make it special.
Whether you choose a simple string of twine, an elegant gilded frame, or a playful tree made from egg cartons, the goal is the same. You are creating a space to honor the connections that warm our lives throughout the year. So pick an idea, make it your own, and let the love you receive be a beautiful thing to look at every day.
Key Takeaways
- Use What You Have: Everyday objects like ladders, hangers, picture frames, and bookshelves can be transformed into unique card displays with a few simple touches.
- Think Vertically: Many of the most stunning ideas use vertical space. Hanging ribbons from a door, ceiling, or dowel rod draws the eye upward and saves precious surface area.
- Embrace Natural Elements: Simple, found materials like branches, pinecones, and greenery add instant warmth and rustic charm to any display.
- Lights Add Magic: A simple string of battery-powered fairy lights can elevate almost any display, adding a warm and magical glow that makes your cards feel extra special.