It’s that time of year again when ghouls and ghosts emerge, and your home needs a spooky makeover. While cobwebs and pumpkins are a great start, there’s nothing quite as haunting as a shadowy figure staring from a window. Window silhouettes create a frightening, dramatic effect, turning your house into a centerpiece of scary style.

Whether you are a seasoned Halloween decorator or just starting out, this guide is for you. We have collected 36 of the most terrifying, thrilling, and creative window silhouettes to inspire your seasonal decor. You will find ideas from classic monsters to modern terrors, complete with simple, step-by-step instructions.
Get ready to transform your windows and haunt the neighborhood with these spine-chilling designs. The best part? These projects are fun, affordable, and will have your friends and neighbors jumping with fright!
1. The Shadowy Visitor

A tall, ominous figure stands motionless in the window, casting a long, eerie shadow. A wide-brimmed hat conceals its face in darkness. The creature’s gaunt, claw-like hands suggest a sinister presence.
Down at its feet, two smaller, strange beings seem to be conversing, adding to the mysterious and unsettling scene. This silhouette creates a suspenseful and chilling atmosphere, making passersby wonder who or what is lurking inside. It is a striking piece of decor that promises to be a conversation starter for any Halloween display.
DIY Steps to Make The Shadowy Visitor
Want to make this spooky figure all by yourself? It’s a fun project, just like a school art class!
Step 1: Get Your Paper Ready
First, find a large piece of black paper or poster board. You can tape a few smaller pieces together if you need to. Make sure it’s big enough to fill a good part of your window.
Step 2: Draw Your Monster
Next, get a pencil and draw the shape of your shadowy figure. Don’t forget the hat and those long, creepy fingers! You can also draw the two smaller creatures at the bottom. Remember, you’re just drawing the outline, so don’t worry about all the little details.
Step 3: Cut it Out
Now for the fun part! Grab a pair of scissors and carefully cut out the shape you drew. If you need a grown-up’s help with any tricky parts, just ask. You’ll have your silhouette ready in no time.
Step 4: Put it in the Window
Finally, use some clear tape to stick your spooky monster to the inside of your window. Make sure the lights are on inside so your silhouette can be seen by everyone outside!
2. The Playful Peepers

These small silhouettes add a touch of eerie innocence. One figure gives a friendly-yet-spooky wave, while its companion stands silently. The hollow eyes glow with a chilling light from within, creating a ghostly effect.
This simple but effective design makes it look as though curious spirits are peering out from your home, making a connection with trick-or-treaters. It’s a great option for a less scary, more playful Halloween vibe.
DIY Steps to Make The Playful Peepers
Step 1: Draw Your Shapes
Get some black paper and a pencil. Draw two simple shapes of kids or small monsters. Try to make them different from each other.
Step 2: Add the Eyes
Add some big, oval shapes for eyes inside the heads. These will be the parts that glow.
Step 3: Cut it Out
Carefully cut out the shapes you drew. Use your scissors to cut out the eyes, too!
Step 4: Put it in the Window
Tape the silhouettes to the inside of your window. The glow of the lights from inside will make the white eyes stand out to everyone outside.
3. The Candy Corn Phantom

A giant, friendly ghost has taken on the form of a classic Halloween candy. This cheerful phantom, with its white, orange, and yellow stripes, looks surprised with its mouth wide open in a “Boo!” expression. The candy corn shapes around it add to the whimsical theme. This playful silhouette adds a sweet and vibrant pop of color to your window. It’s a fun and lighthearted way to get into the spooky season.
DIY Steps to Make The Candy Corn Phantom
Step 1: Get Your Paper
Use big sheets of paper in white, orange, and yellow.
Step 2: Draw and Cut
Draw the ghost’s body, then cut out the stripes and the arms. Now, tape the stripes onto the ghost’s body to make it look like a candy corn.
Step 3: Make the Face
Draw and cut out some eyes and a big open mouth from black paper.
Step 4: Put it in the Window
Finally, tape everything to your window and watch your candy corn ghost come to life!
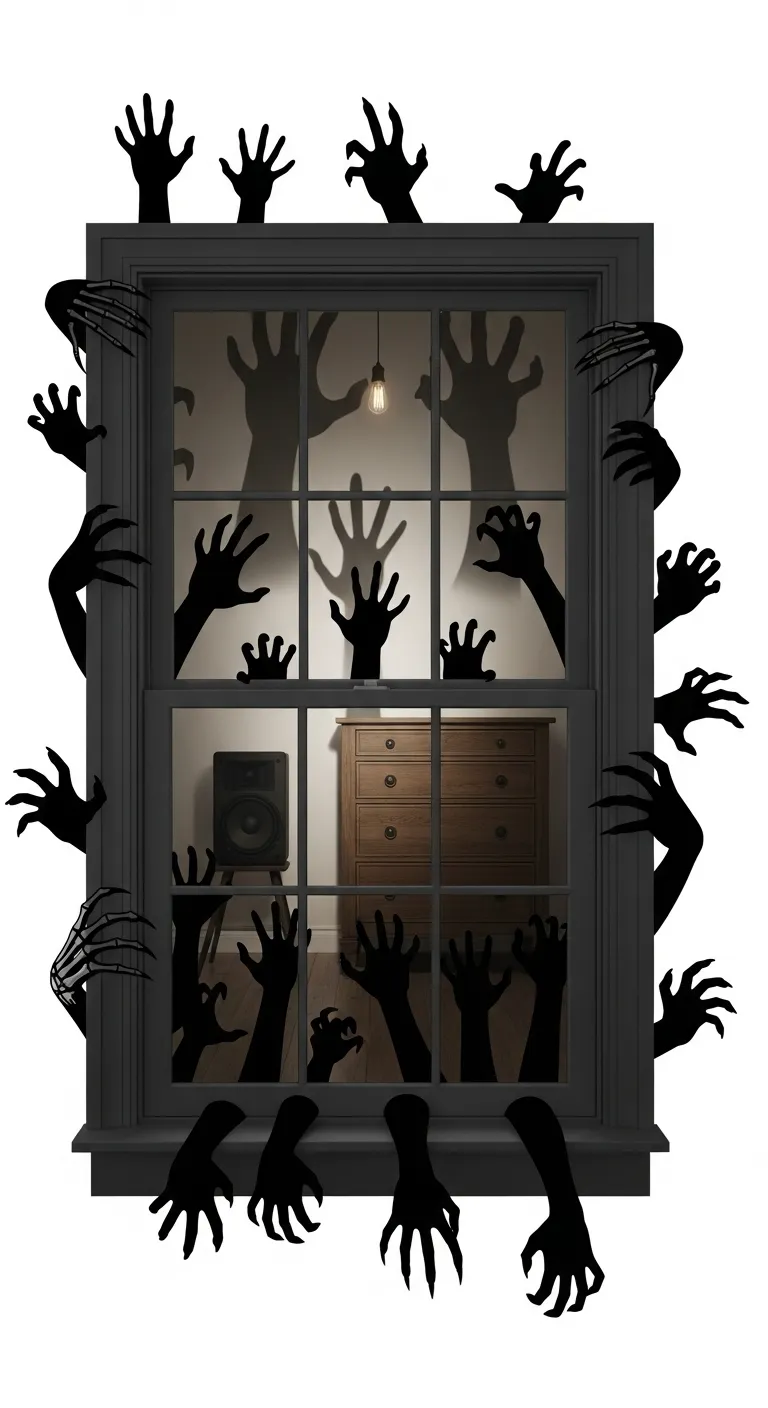
4. The Grasping Horde

A terrifying collection of bony hands reaches out from all sides of the window. The silhouettes, some sharp and skeletal, others appearing fleshy and claw-like, create a scene of pure horror. A few hands can be seen behind the glass, pressing against it from the inside. This silhouette is truly frightening and gives the impression that a horde of undead creatures is trying to break into the house. It’s a highly effective decoration for those who enjoy a more spine-chilling Halloween theme.
DIY Steps to Make The Grasping Horde
Step 1: Draw the Hands
Use a lot of black paper. Draw many different hand shapes. Make some look like monster hands, and others like skeletons.
Step 2: Cut Them Out
Use scissors to carefully cut out all the hand shapes you drew.
Step 3: Put Paper in the Window
Place a large piece of translucent white paper over the window.
Step 4: Attach the Hands
Tape the cut-out hands all over the outside of your window frame. Add a few hands inside the window, too, to make it look like they are coming out of your house!
5. The Stone Guardian

A hulking, muscular creature made of stone seems to be protecting the window from intruders. Its body is covered in a textured, rock-like pattern, with glowing orange eyes and a bright number “13” on its chest. The mossy patches on its body add an ancient, earthy feel to the design. This silhouette provides a sense of powerful and formidable presence. It stands as a silent sentinel, watching over your home and adding a unique, monster-movie-inspired element to your Halloween decor.
DIY Steps to Make The Stone Guardian
Step 1: Sketch the Monster
On a large sheet of black paper, sketch out a big, strong monster.
Step 2: Add Details
Draw lots of bumpy shapes all over its body to make it look like rocks.
Step 3: Cut and Color
Cut out the shape of the monster. Next, cut out its eyes and the number “13” from orange or red paper.
Step 4: Assemble and Display
Tape the red pieces behind the cut-out eyes and number, then tape the whole monster to your window.
6. The Unsettling Clown

This classic, terrifying clown peers into the window with a sinister grin and menacing eyes. Its dark, ruffled hair and stark face paint are illuminated from behind. A single red balloon floats from its hand, creating a chilling contrast against the dark background. This silhouette capitalizes on the fear of clowns, a common Halloween trope. The simple yet powerful image is sure to send a shiver down the spine of anyone who sees it.
DIY Steps to Make The Unsettling Clown
Step 1: Draw Your Clown
On black paper, draw a big clown face with a wide smile and hair sticking out. Draw a hand holding a long string with a circle at the end.
Step 2: Make the Balloon
Using a separate sheet of red paper, cut out a circle for the balloon.
Step 3: Cut it Out
Cut out the clown’s face, hair, and hand from the black paper.
Step 4: Put it in the Window
Tape the black silhouette to your window and tape the red paper balloon on top of it.
7. The Wandering Mummy

This detailed silhouette features a mummy, wrapped in tattered bandages, with its glowing eyes fixed on the viewer. One arm is outstretched as if reaching for help, while the other is raised in a wave. The intricate details of the frayed bandages make the figure look realistic and ancient. This silhouette brings a piece of Egyptian lore to your display. It’s a classic monster design that works well with other spooky decorations to create a timeless Halloween scene.
DIY Steps to Make The Wandering Mummy
Step 1: Draw the Mummy
Get a large sheet of black paper. Draw the outline of a person wrapped in bandages. You can draw some bandages hanging off the arms.
Step 2: Cut Out the Shape
With scissors, cut out the entire shape. Next, cut out the small eye holes.
Step 3: Put it in the Window
Tape your mummy to the window. You can put some sand or dirt on the windowsill for a fun, extra touch!
8. The Fire-Breathing Beasts

Two powerful dragons swoop down from the sky, their wings spread wide. They breathe streams of fiery breath that illuminate the scene. One dragon flies in a dark, stormy sky with lightning, while the other soars through a blazing orange inferno. These impressive silhouettes bring a mythical and dramatic element to your home decor. The intense colors of the fire and sky create a stunning, vibrant display that will grab everyone’s attention.
DIY Steps to Make The Fire-Breathing Beasts
Step 1: Draw Your Dragons
Find a big piece of black paper. Draw two dragons with large wings. Draw their mouths open, getting ready to breathe fire!
Step 2: Cut Out the Shapes
Cut out your dragons.
Step 3: Create the Fire
Get some red, yellow, and orange tissue paper. Cut it into flame shapes.
Step 4: Put it in the Window
Tape the flame shapes behind the dragons’ mouths. Tape the dragons to your window to create your own fiery scene!
9. The Ocean Terror

A monstrous octopus appears to be invading the house, its large tentacles wrapping around the window. The eyes of the beast glow with an eerie green light from inside the window, while its suction-cup-covered arms extend outward. The rest of the home is covered in a messy fishing net, completing the underwater, monstrous theme. This silhouette is a truly unique and creative idea that goes beyond traditional Halloween creatures. It is sure to stand out and frighten your neighborhood.
DIY Steps to Make The Ocean Terror
Step 1: Draw the Octopus
On black paper, draw the big, round head of an octopus. Cut out the head and two big eyes.
Step 2: Make the Tentacles
Next, cut out long, wavy tentacles. Cut circles out of the tentacles to make it look like they have suction cups.
Step 3: Make the Eyes Glow
Use green paper to put behind the eyes so they glow.
Step 4: Put it in the Window
Tape the head and tentacles to your window, making sure the tentacles look like they are reaching out.
10. The Howling Werewolf

This chilling silhouette captures a powerful werewolf caught mid-howl, silhouetted against a bright full moon. Its powerful body and sharp claws are clearly visible, while bats fly around in the moonlit sky. The trees are bare and spooky, adding to the desolate atmosphere. This classic monster design evokes the feeling of a full moon on a dark night. This is a timeless decoration that brings a traditional scare to your window display.
DIY Steps to Make The Howling Werewolf
Step 1: Draw Your Werewolf
On black paper, draw a big werewolf standing on its hind legs with its head tilted back to howl.
Step 2: Cut Out the Shapes
Cut out the werewolf shape, making sure to get those claws right! On a separate piece of black paper, draw some small bats and cut them out.
Step 3: Create the Moon
Using a large, round piece of white paper, create a moon.
Step 4: Assemble and Display
Tape the moon to your window first, then tape the werewolf on top of it. Finish by taping the little bats around your monster.
11. The Gnarled Tree

A sinister, haunted tree takes up the whole window, its gnarled branches reaching out with claw-like fingers. Its hollow face reveals glowing red eyes and a screaming mouth, adding an extra layer of terror. Two dark ravens perch on its branches, an owl sits at its base, and leaves float around it. This is a masterful silhouette, full of intricate details. This piece of decor will transform your window into a chilling portal to a haunted forest.
DIY Steps to Make The Gnarled Tree
Step 1: Get Lots of Black Paper
You’ll need a large piece of black paper for the tree. You can also get more black paper for the ravens and the owl.
Step 2: Draw the Tree and Critters
Draw a big, spooky tree with lots of skinny, twisty branches. Don’t forget the face with big eyes and a screaming mouth! Draw some ravens and an owl on separate sheets of paper.
Step 3: Cut Everything Out
Carefully cut out the tree. You can use a craft knife for the tricky parts. Cut out the ravens and owl too.
Step 4: Put it in the Window
Tape the tree to your window. Then, tape the ravens and owl to the branches and the bottom of the window to make a haunted forest.
12. The Ethereal Ghost

A tattered, spectral ghost floats from the top of the window, its wispy form seeming to blow in the wind. The empty, black holes for eyes and a screaming mouth give it a classic, spooky look. A subtle green glow from within makes it look even more ghostly. Two smaller ghost silhouettes on the windowsill look up at the larger one, creating a fun, family-themed display.
DIY Steps to Make The Ethereal Ghost
Step 1: Get Cheesecloth and Paper
You will need a sheet of white cheesecloth and some black paper.
Step 2: Make Your Ghost
Cut the cheesecloth into a spooky shape. It’s okay if it’s a little messy! Next, cut two small circles for eyes and a bigger oval for a mouth from the black paper.
Step 3: Make Smaller Ghosts
Draw and cut out a couple of smaller, simpler ghosts from the black paper.
Step 4: Put it in the Window
Tape the cheesecloth to the top of the window, and put the eyes and mouth on it. Then, tape the small ghosts to the windowsill for a spooky family.
13. The Jack-o’-Lantern Patch

A lively line of grinning jack-o’-lanterns fills the bottom of the window, each with a different carved face. Bats fly above them, adding to the nighttime Halloween scene. The vibrant orange light from within the pumpkins creates a warm, inviting, but still spooky feel. This display brings a classic pumpkin patch right into your home. It’s a wonderful choice for a family-friendly Halloween decoration.
DIY Steps to Make The Jack-o’-Lantern Patch
Step 1: Draw Your Pumpkins and Bats
On black paper, draw lots of pumpkins. Make some big and some small. Draw different scary and funny faces on each one. Draw some bats on a separate sheet of paper.
Step 2: Cut Out Your Shapes
Carefully cut out all of your pumpkins and bats. Don’t forget to cut out the eyes, noses, and mouths of the pumpkins.
Step 3: Put Paper in the Window
Place a large piece of orange paper over your window to create a glowing background.
Step 4: Put it in the Window
Tape your cut-out pumpkins to the orange paper, right along the bottom of the window. Tape the bats flying above them, too!
14. The Genie of the Lamp

A smoky, mysterious figure rises from a beautiful, ornate genie lamp. Its ghostly form twists and swirls, while its piercing red eyes glow in the twilight. The genie’s muscular, shadowy body seems to be held together by the smoke itself. This unique silhouette is a new take on classic scary decor. It adds a magical and unsettling element to your display, making everyone wonder what wishes have been granted.
DIY Steps to Make The Genie of the Lamp
Step 1: Draw Your Genie
On a large piece of black paper, draw the shape of a genie made of smoke. You can make it look like it is twisting and swirling.
Step 2: Cut Out the Shape
Carefully cut out the genie shape from the paper.
Step 3: Add the Eyes
Cut two little eye holes in the genie’s head. Place a piece of red paper behind the head so the eyes glow red.
Step 4: Put it in the Window
Tape the genie to your window. You can also put a real or fake genie lamp on the windowsill to complete the look.
15. The Mothman

A huge, terrifying moth with glowing red eyes is silhouetted against the window. Its fluffy body and large, patterned wings create a creepy look. A small bat is silhouetted below the monster, making the moth look even bigger and scarier. This unique silhouette is based on a famous spooky legend. It’s a great choice for those who want a truly creative and frightening decoration.
DIY Steps to Make The Mothman
Step 1: Draw the Moth
On a large piece of black paper, draw a big moth shape with giant wings. Draw its fluffy body and antennae.
Step 2: Add Details and Eyes
Draw some shapes inside the wings, then cut those out. Cut out two circles for the eyes.
Step 3: Get Your Glow
Place a sheet of red paper behind the moth’s head so its eyes will glow.
Step 4: Put it in the Window
Tape your moth to the window. You can even cut out a tiny bat and put it below the moth to make it look even bigger!
16. The Crows of the Windowpane

A single large crow perches on a bare, twisted branch, as if watching your house. Three more crows sit on a fence below, creating an unsettling scene. The silhouettes of tiny leaves on the branches add a nice touch. This simple yet effective design is inspired by classic horror stories. It is a subtle and sophisticated way to create a spooky atmosphere without being too over the top.
DIY Steps to Make The Crows of the Windowpane
Step 1: Draw Your Shapes
On black paper, draw a big, bare tree branch with some little branches coming off of it. Draw four crows and a fence on a separate sheet of paper.
Step 2: Cut it Out
Carefully cut out the tree branch, the crows, and the fence.
Step 3: Put it in the Window
Tape the tree branch to the side of your window. Tape the crows to the branch and on the windowsill.
17. The Krampus

This terrifying creature with large horns, sharp fangs, and a long, lolling tongue is sure to frighten anyone who sees it. The silhouette’s furry body and chains create a menacing look, and a menacing child’s doll sits in a basket on its back. This silhouette is inspired by the European legend of Krampus, who punishes misbehaving children during the Christmas season. It’s an unusual decoration that will definitely turn heads.
DIY Steps to Make The Krampus**
Step 1: Draw the Monster
On black paper, draw a monster with horns and a furry body. Make sure its mouth is open with a big tongue hanging out.
Step 2: Cut it Out
Cut out the shape of the monster from the paper. Cut out its eyes and tongue, too.
Step 3: Add Details
Draw some little kids or dolls on another piece of paper and cut them out.
Step 4: Put it in the Window
Tape the Krampus silhouette to your window. Place the little dolls on the windowsill or tape them to the monster.
18. The Grim Reaper

Two grim reapers, a large one and a small one, stand side-by-side in your window, casting their imposing shadows. The larger reaper holds a scythe, its tattered cloak giving it a classic, haunting look. The smaller one carries a pumpkin bucket. This silhouette is a timeless piece of Halloween decor. It’s a powerful image that brings a sense of spooky tradition to your home.
DIY Steps to Make The Grim Reaper
Step 1: Draw Your Reapers
On a large piece of black paper, draw two figures with hoods and long cloaks. One should be big and the other should be small.
Step 2: Add Details
Draw a long, curved blade for a scythe on the big reaper. Draw a pumpkin bucket for the little reaper.
Step 3: Cut it Out
Carefully cut out the two grim reapers and their accessories.
Step 4: Put it in the Window
Tape both of the reapers to your window, so they look like they are standing side-by-side.
19. The Carnivorous Vines

A gothic window frame is surrounded by monstrous, thorny vines and carnivorous plants. The plants have wide, gaping mouths with sharp teeth, and some of the thorny vines have blood dripping from them. The silhouettes are illuminated by an eerie green glow from within the house. This unique design is a great alternative to traditional haunted houses. This decor is a creative way to make your home look like a deadly garden.
DIY Steps to Make The Carnivorous Vines**
Step 1: Draw the Vines
On black paper, draw a fancy window frame. Then, draw thorny vines and creepy plants coming out from it.
Step 2: Cut Out the Shapes
Carefully cut out all the vines, plants, and the window frame.
Step 3: Add the Glow
Tape a sheet of green paper behind your window to make it glow.
Step 4: Put it in the Window
Tape your cut-out silhouettes over the green paper. Make sure to tape the vines all around the window frame to complete the look.
20. The Spider Invasion

A massive spider with a red hourglass on its back is about to crawl into the window, its long, spindly legs stretching across the panes. Many smaller spiders cover the windowpane and the window frame. The entire scene is covered in thick, white webbing. This creepy-crawly display is a favorite for Halloween. It’s sure to send shivers down the spine of anyone who is afraid of spiders.
DIY Steps to Make The Spider Invasion
Step 1: Draw Your Spiders
On a big piece of black paper, draw a huge spider. On a separate sheet of paper, draw lots of smaller spiders.
Step 2: Cut it Out
Cut out the big spider and all the little spiders. Cut out a red hourglass shape to put on the big spider’s back.
Step 3: Create the Web
You can use white yarn or fake spiderwebs to make a web on your window.
Step 4: Put it in the Window
Tape the fake webs to the window frame. Then, tape your big spider to the top of the window, and put all the little spiders all over the web.
21. The Alien Abduction

A classic flying saucer hovers in the night sky, its brilliant beam of light pulling a person and a house upward. An ominous alien figure stands in the ship’s light, while a smaller alien watches from a smaller ship below. The scene is a simple but effective portrayal of an extraterrestrial encounter. It’s a fun and imaginative piece of decor for fans of science fiction horror.
DIY Steps to Make The Alien Abduction
Step 1: Get Black Paper
Use a big sheet of black paper to draw your silhouettes.
Step 2: Draw the Scene
Draw a large flying saucer, a person, a house, and an alien. Draw a smaller flying saucer and alien too. Make sure the big saucer is at the top of the paper, with the person and house below it.
Step 3: Cut it Out
Carefully cut out all of your shapes.
Step 4: Put it in the Window
Tape all of the silhouettes to the window so it looks like the house and person are being pulled up.
22. The Crying Spirit

A ghostly female figure seems to be howling in agony, her long, tangled hair blowing wildly in the wind. Her sharp, claw-like nails are extended, adding to the dramatic and frightening scene. This silhouette is haunting and emotional, creating a chilling sense of dread. The stark contrast of the pale figure against the dark background makes a powerful statement.
DIY Steps to Make The Crying Spirit
Step 1: Get Paper
You’ll need black paper for the outline of the woman and white paper for the wispy hair and dress.
Step 2: Draw and Cut
Draw a woman’s shape with her mouth open and hands extended. Cut this out. Then, cut long, thin strips from the white paper for her hair and dress.
Step 3: Add the Glow
Tape the black figure to your window. Tape the white strips over the dress and hair to make it look like they’re flowing.
Step 4: Make it Move
Place a small fan on the windowsill and point it at the silhouette to make her hair and clothes look like they are blowing in the wind!
23. The Sitting Skeleton

This charming yet spooky silhouette shows a skeleton sitting comfortably in an armchair, seemingly relaxing. One hand is raised in a friendly wave. A plant and a bloody knife sit on the windowsill nearby. The scene is both humorous and frightening. This piece of decor is a great way to welcome guests with a smile and a shiver.
DIY Steps to Make The Sitting Skeleton
Step 1: Draw Your Skeleton
On a large piece of black paper, draw a skeleton sitting in a chair. You can draw a spooky-looking plant and a knife on a separate sheet.
Step 2: Cut it Out
Carefully cut out the skeleton and the chair. Cut out the plant and knife, too.
Step 3: Put it in the Window
Tape the skeleton to your window. Place a real chair behind it to make it look like the skeleton is sitting in a real chair.
24. The Mad Scientist’s Lab

A mad scientist with wild hair and goggles looks crazed while holding a glowing beaker. In front of him, a monster lies on a table while bolts of lightning crackle around it. The silhouette of bubbling beakers and tubes fills the window below. This is a busy and exciting scene. It’s an excellent choice for a window that needs a lot of spooky energy.
DIY Steps to Make The Mad Scientist’s Lab
Step 1: Get Black Paper
Get a lot of black paper for the scientist, the monster, and the lab tools.
Step 2: Draw Your Scene
Draw the scientist and all his tools. Draw the monster on the table and some lightning bolts. Draw some beakers, bottles, and tubes too.
Step 3: Cut and Color
Cut out all of the shapes. Use colored paper to put behind the beakers and lightning to make them glow.
Step 4: Put it in the Window
Tape the whole scene to your window and have fun with all your cool new decorations.
25. The Screen Horror

A terrifying, screaming face is trapped inside a vintage television screen, its hands pressing against the glass as if trying to break through. The wires and lightning bolts from within add to the chaotic energy. This silhouette is a clever take on modern horror themes. It’s a fun and spooky decoration that will definitely stand out.
DIY Steps to Make The Screen Horror
Step 1: Draw a TV
On a piece of black paper, draw an old-fashioned television set with a big screen.
Step 2: Draw the Monster
On another piece of black paper, draw a screaming face and two hands.
Step 3: Cut it Out
Cut out the TV shape and then cut out the screen. Next, cut out the monster’s shape.
Step 4: Put it in the Window
Tape the TV to your window. Tape the screaming monster behind the hole in the screen.
26. The Antlered Demon

A dark, skeletal figure with a deer skull for a head and large antlers peers into the window. Its long, bony fingers rest on the windowpanes as if it is about to break through. Its bony ribs are clearly visible. The whole scene has a chilling and primitive feeling. This is a very creative and terrifying silhouette that is sure to give everyone a fright.
DIY Steps to Make The Antlered Demon
Step 1: Draw Your Monster
On a large piece of black paper, draw a spooky skeleton with a deer head and giant antlers.
Step 2: Cut Out the Shapes
Carefully cut out the entire shape of the monster. Make sure you cut out the thin bones of the ribs and fingers.
Step 3: Put it in the Window
Tape your monster to the window. You can also tape some thin, bare tree branches to your window to create a spooky forest scene.
27. The Rider of Sleepy Hollow

A classic figure from a famous scary story, this is a silhouette of a headless rider on a horse. The rider holds a flaming pumpkin head in his hand. This timeless decoration brings a legendary figure to your window. It’s a thrilling and recognizable piece that will delight fans of spooky folklore.
DIY Steps to Make The Rider of Sleepy Hollow
Step 1: Draw the Rider
On black paper, draw a person on a horse. Make sure the person has no head.
Step 2: Add the Head
Draw a spooky pumpkin with a face on a piece of orange paper.
Step 3: Cut it Out
Carefully cut out the rider on the horse. Next, cut out the pumpkin head and flames.
Step 4: Put it in the Window
Tape the black silhouette to your window. Tape the pumpkin head so it looks like the rider is holding it.
28. The Bat Swarm

A massive cloud of bats flies from a towering church steeple. The sky glows a deep orange, creating an eerie, sunset-like atmosphere. The bats seem to be flying up and away from the steeple, almost like a tornado. This impressive silhouette is a stunning display that will add a sense of drama and scale to your home decor.
DIY Steps to Make The Bat Swarm
Step 1: Get Paper
You will need a lot of black paper for this. You can also get a big sheet of orange paper for your background.
Step 2: Draw the Church and Bats
Draw a tall, spooky church with a steeple on one piece of black paper. On the other pieces, draw lots and lots of bats!
Step 3: Cut Out the Shapes
Carefully cut out the church and all the bats.
Step 4: Put it in the Window
Tape the orange paper to your window first. Next, tape the church to the bottom corner. Then, tape all the bats on the orange paper so they look like they are flying out of the steeple.
29. The Portrait of a Ghost

A mysterious ghost in a formal, old-fashioned outfit is framed in the window by a beautiful, detailed gold frame. The ghost’s glowing red eyes peer out from the dark. Spiders and their webs surround the frame. This unique silhouette makes it look like a spooky portrait has come to life.
DIY Steps to Make The Portrait of a Ghost
Step 1: Draw Your Ghost
On black paper, draw the shape of a person in an old-fashioned outfit.
Step 2: Draw the Frame
On another sheet of black paper, draw a big, beautiful frame with a fancy border.
Step 3: Cut it Out
Cut out the ghost shape. Cut the empty space out of the frame.
Step 4: Put it in the Window
Tape the frame to your window first. Then, tape the ghost behind the frame so it looks like a portrait. You can add some fake spiderwebs too!
30. The Haunted Candelabra

A spooky, antique candelabra holds eight dripping candles with glowing flames. One of the flames has a smiling face on it! A mysterious hand reaches out from the side of the window, reaching for a book with a glowing flame on top. This is a very classic and elegant way to spook up your window. It feels like something out of an old haunted mansion.
DIY Steps to Make The Haunted Candelabra
Step 1: Draw Your Candelabra
On black paper, draw a spooky candelabra. Draw two small candles and a book too.
Step 2: Draw Flames
On yellow and orange paper, draw some flame shapes for the candles and the book.
Step 3: Cut it Out
Cut out the candelabra, candles, and book. Cut out the flames.
Step 4: Put it in the Window
Tape the black silhouettes to your window. Then, tape the flames on top of the candles and the book so they look like they are on fire!
31. The Gothic Guardian

A classic gargoyle rests on a stone base, its muscular body and menacing horns giving it a powerful presence. Its glowing red eyes pierce through the darkness. The creature’s menacing grin and sharp claws give a chilling warning to anyone who approaches your home. This striking silhouette evokes a sense of ancient, gothic horror, making your house look like a haunted castle.
DIY Steps to Make The Gothic Guardian
Step 1: Find Black Paper
Get a big piece of black paper or poster board.
Step 2: Draw the Shapes
Draw a large gargoyle with horns, wings, and claws. You can also draw a stone block for it to sit on. Don’t forget to draw circles for the eyes.
Step 3: Cut it Out
Use scissors to carefully cut out the gargoyle and the stone block.
Step 4: Get Your Glow
Cut out circles from red paper and tape them behind the eye holes to make the eyes glow.
Step 5: Put it in the Window
Tape your gargoyle to the window. You can add some fake ivy around the window to make it look even more ancient.
32. The Emerald-Eyed Cat

A sleek black cat sits regally in an arched window, its tail curling elegantly. A bell hangs from its collar. Its bright green eyes glow with an eerie light, seeming to stare right at you. The simple shape and glowing eyes of this silhouette make it a subtle yet spooky decoration. This piece is a mysterious and classic nod to Halloween tradition.
DIY Steps to Make The Emerald-Eyed Cat
Step 1: Get Black Paper
You’ll need a large piece of black paper for the cat.
Step 2: Draw and Cut
Draw a cat on the paper, making sure to include its tail and whiskers. Cut out the shape. Next, cut out two circles for the eyes.
Step 3: Get Your Glow
Cut out circles from green paper. Tape these green circles behind the eyes you cut out.
Step 4: Put it in the Window
Tape your glowing-eyed cat to the window. You can add some little pumpkins or leaves on the windowsill to complete the look.
33. The Grinning Scarecrow

A classic scarecrow stands tall with a wide, stitched smile and button eyes. Its straw hands and hair stick out from its ragged clothes. A black crow sits on its arm, adding to the rustic horror feel. The silhouette is a spooky take on a friendly autumn character. It’s a fun and creepy addition that captures the spirit of the season.
DIY Steps to Make The Grinning Scarecrow
Step 1: Get Your Paper
Find a large piece of black paper.
Step 2: Draw the Scarecrow
Draw a scarecrow with a stitched face. You can add some patches to its clothes. Draw a crow on its arm.
Step 3: Cut it Out
Cut out the scarecrow and the crow. Don’t forget to cut out the eyes and mouth.
Step 4: Add the Details
You can use yellow paper or string to make the straw hair and hands. Tape the yellow paper behind the hands and head.
Step 5: Put it in the Window
Tape your scarecrow to the window and watch it come to life.
34. The Elegant Vampire

A debonair vampire looks out from the window, his slick hair and high-collared cape making him look quite formal. His face is pale and his eyes glow with a chilling red light. A single drop of blood drips from his lip, adding a subtle touch of terror. This silhouette is a timeless piece of decor that evokes a sense of old-world horror.
DIY Steps to Make The Elegant Vampire
Step 1: Get Black and Red Paper
Find some black paper for the vampire and a small piece of red paper for the details.
Step 2: Draw the Vampire
Draw a person’s upper body in a cape with a high collar. You can draw his hair and eyes.
Step 3: Cut and Color
Cut out the vampire. Cut out two circles for the eyes and a small drop for the blood.
Step 4: Put it in the Window
Tape your vampire to the window. Place the red circles behind the eyes and the red drop on his lip.
35. The Cybernetic Siege

A menacing group of robots has broken through the window, their glowing red eyes and metal bodies staring at you. The glass around them is shattered into many pieces. The robots have different looks, from a classic design to a more modern one. This silhouette is a modern and sci-fi take on scary decor. It’s a great choice for a decoration that is both spooky and futuristic.
DIY Steps to Make The Cybernetic Siege
Step 1: Get Black Paper
Get a lot of black paper for your robots.
Step 2: Draw the Robots
Draw lots of robots. You can make some of them look like their bones are showing and give them different tools.
Step 3: Cut Out the Shapes
Carefully cut out all of the robots. Next, cut out their eyes and other details.
Step 4: Add the Glow
Cut out red circles for the eyes. Tape the red circles behind the eye holes.
Step 5: Put it in the Window
Tape all of your robots to the window and give your friends a scare.
36. The Night Hag’s Ride

A classic silhouette of a witch flying on a broomstick with a cat. The witch’s clothes are ragged and her hair flies behind her in the wind. The backdrop is a full moon and a beautiful orange sky. This is a very classic and charming silhouette. It’s a fun way to bring a familiar piece of Halloween to your home.
DIY Steps to Make The Night Hag’s Ride
Step 1: Get Paper
Find a piece of black paper for the witch and the cat, and a large white or yellow piece for the moon.
Step 2: Draw the Shapes
Draw a witch on a broomstick. Draw a cat on the broomstick too. Draw a big circle for the moon on a separate piece of paper.
Step 3: Cut it Out
Carefully cut out the witch and cat from the black paper. Next, cut out the moon.
Step 4: Put it in the Window
Tape the moon to your window first. Then, tape the witch and cat on top of the moon so it looks like they are flying.
Making your own window silhouettes is a fun and simple way to get into the Halloween spirit. You don’t need any fancy tools or expensive supplies. A little bit of paper and some tape are all you need to create a truly spooky scene.
You can mix and match different designs to tell your own haunted story. Try adding a mad scientist to a gothic window, or a gargoyle to a pumpkin patch. With so many options, you can create a unique display for your home year after year.
These DIY steps are easy enough for anyone to follow, so the whole family can join in on the fun. This is a creative and exciting way to get ready for the season and give your home a terrifying new look.
Happy haunting!