Mirrors have always held a touch of mystery. They show us our reflection, but folklore and horror stories tell us they can also show us something else entirely. They can be windows to other worlds, prisons for spirits, or tools for dark magic.

This Halloween, you can harness that creepy power. Forget the usual decorations. A well-placed, cleverly altered mirror can be the most unsettling thing in your home. It can create a sense of unease that stays with your guests long after they’ve left.
We have gathered 40 unique and terrifying haunted mirror ideas. Each one comes with simple, step-by-step DIY instructions. You do not need to be a professional artist to create these nightmares. All you need is a little creativity and a willingness to get spooky.
1. The Swarm of Souls Mirror

This is not a single mirror but a honeycomb of reflections. Black and mirrored hexagons create a strange, insect-like pattern on the wall. But something is wrong with this hive. Giant, monstrous bees and spiders are trapped on the glass.
Golden, sticky honey drips from the corners of the frames, looking thick and unnatural. Each mirror captures a different creature, turning a modern design into a disturbing collection of trapped souls. Guests will be drawn to the unique shape but repulsed by the creepy crawlies within.
DIY: Create a Hive of Horrors
What You’ll Need:
- Hexagon-shaped mirror tiles (you can find these online or at a craft store).
- A few black hexagon tiles of the same size.
- Printed pictures of large, scary-looking insects (like bees, wasps, and spiders) on clear sticker paper.
- A hot glue gun with gold or yellow glue sticks.
Instructions:
Step 1: Plan Your Hive Before you stick anything to the wall, lay out your hexagon tiles on the floor. Mix the black and mirror tiles to create a cool pattern that looks like a honeycomb.
Step 2: Trap the Bugs Cut out your insect pictures from the clear sticker paper. Carefully peel off the backing and stick one insect onto the center of each mirror tile. The clear sticker will make it look like the bug is right on the glass.
Step 3: Add the Drips Take your hot glue gun with the gold glue. Turn it upside down. Squeeze out a thick line of glue from the top corner of a few tiles, letting it drip down. This will create a realistic, gooey honey drip. Let the glue harden completely.
Step 4: Build Your Wall Carefully stick your finished tiles to the wall, following the pattern you planned. Your creepy, haunted honeycomb is now ready to scare your guests.
2. The Beckoning Message Mirror

In a dark room, a single word glows from within a mirror: “HELP.” The message is written in a scratchy, desperate font. It seems to be emerging from a thick cloud of smoke or fog that is trapped inside the glass.
The smoke appears to be rising from a small humidifier placed in front of the mirror, creating a strange and ghostly illusion. It makes guests wonder who is sending the message, and if they are trapped on the other side.
DIY: Create a Message from the Mist
What You’ll Need:
- A mirror with a simple frame.
- A “HELP” decal or sticker made from frosted or etched-glass vinyl.
- A small, personal humidifier.
Instructions:
Step 1: Clean the Mirror Make sure your mirror is very clean and dry. This will help the sticker adhere properly.
Step 2: Apply the Message Carefully peel the backing off your “HELP” sticker. Position it in the center of the mirror and press down firmly. Use a credit card to smooth out any air bubbles.
Step 3: Set the Scene Place the mirror on a wall or leaning against it in a dimly lit hallway or room.
Step 4: Add the Mist Fill your humidifier with water and place it on the floor or a small table directly in front of the mirror. Turn it on. The mist will rise and swirl in front of the glass, making it look like the glowing message is appearing from within the smoke.
3. The Heartbeat of the Machine Mirror

This mirror is not made of glass, but of gears, gauges, and brass. It looks like a piece of a fantastic, old-world machine, perhaps a time machine or a submarine’s porthole. The steampunk design is intricate and fascinating to look at.
But in the center, a bright red line beats like a heart monitor, pulsing with an unnatural life. Reflected in the glass, you can see someone holding a glowing red heart. The machine is alive, and its heartbeat is a constant, creepy presence in the room.
DIY: Build a Beating Steampunk Portal
What You’ll Need:
- A round mirror.
- Lots of old gears, clock parts, and bottle caps.
- Gold and bronze spray paint.
- A hot glue gun.
- A short strip of red LED lights that have a “pulse” or “fade” setting.
Instructions:
Step 1: Create the Machine Parts Take all your gears, clock parts, and bottle caps. Spray paint them with the gold and bronze colors to make them look like old metal.
Step 2: Build the Frame Use your hot glue gun to attach the painted machine parts all around the edge of the round mirror. Overlap them to create a thick, mechanical-looking frame.
Step 3: Add the Heartbeat Take your red LED light strip. Carefully tape or glue it across the middle of the mirror. Hide the battery pack behind the mirror.
Step 4: Turn It On Set the LED lights to the “pulse” setting. The red light will flash on and off like a steady heartbeat, making your steampunk creation feel alive.
4. The Psychedelic Skull Mirror

This is a trip you won’t want to take. The mirror’s edge is not a solid frame, but a swirling, melting border of iridescent, rainbow colors. It looks like liquid metal or oil on water.
Floating within this psychedelic goo are ghostly, grinning skulls. In the center, your own reflection is warped and twisted by the strange lights. This mirror feels like a doorway to a vibrant, electric, and very haunted dimension.
DIY: Create a Trippy Skull Portal
What You’ll Need:
- A mirror with a simple, flat frame.
- Iridescent, holographic vinyl wrap (the kind used for cars or crafts).
- Printed pictures of skulls on clear sticker paper.
- Scissors.
- A craft knife.
Instructions:
Step 1: Create the Frame Measure the frame of your mirror. Cut a piece of the iridescent vinyl wrap to fit. Carefully apply the vinyl to the frame, smoothing out any bubbles.
Step 2: Make it Melt Use your craft knife to carefully cut a wavy, melting-looking edge into the vinyl on the inside of the frame, so it overlaps the mirror.
Step 3: Add the Skulls Cut out your skull pictures from the clear sticker paper. Stick them onto the iridescent frame, so they look like they are floating in the colors.
Step 4: The Final Trip Hang your mirror in a dark room. The holographic vinyl will catch the light in strange ways, making the colors shift and move as you walk past it.
5. The Ghost’s Warning Mirror

This is a simple scare that is very effective. On the surface of a normal bathroom mirror, a chilling message has been scrawled: “BEHIND YOU” and “GET OUT.” The writing looks like it was scratched into the glass itself.
The corners of the mirror are covered in what looks like a spiderweb of cracks. This mirror turns a private moment into one of pure terror, forcing you to look over your shoulder.
DIY: Write a Scratchy Warning
What You’ll Need:
- A bathroom mirror.
- A white or silver permanent marker.
- A black dry-erase marker.
- A ruler.
Instructions:
Step 1: Write the Message Use your white or silver permanent marker to write your spooky message on the mirror. Make the letters look messy and shaky.
Step 2: Add the Scratches Go back over your letters with the permanent marker. Add lots of small, overlapping lines to make it look like the words were scratched into the glass instead of written.
Step 3: Create the Cracks Use your ruler and the black dry-erase marker to draw straight lines from the corners of the mirror, making it look like cracked glass.
Step 4: Easy Cleanup The best part of this DIY is how easy it is to remove. Simply draw over the permanent marker words with the dry-erase marker, and both will wipe away clean with a paper towel.
6. The Final Reflection Mirror

This mirror offers a grim look into your own future. It is shaped like a coffin, with a dark wood frame and a soft, white satin lining. The lining is torn and old, as if it has been waiting for a long time.
At the bottom, a small brass plaque is engraved with the words, “[GUEST’S NAME]’S FINAL REFLECTION.” This is a highly personal and macabre piece of decor that gives your guests a preview of their own demise.
DIY: Build Your Own Coffin Mirror
What You’ll Need:
- A large piece of sturdy cardboard or foam board.
- A craft knife.
- A sheet of mirror big enough to fit.
- Black or dark brown paint.
- White satin fabric.
- A hot glue gun.
Instructions:
Step 1: Build the Coffin Draw a coffin shape on your cardboard. Have an adult help you cut it out. Also, cut out long strips of cardboard to be the sides of the coffin. Glue the sides onto the base to create a box.
Step 2: Paint it Dark Paint the entire outside of your cardboard coffin with the black or brown paint.
Step 3: Line the Inside Cut your white satin fabric to be a little bigger than the coffin. Use your hot glue gun to glue it to the inside, bunching it up along the sides to create a ruffled look.
Step 4: Add the Mirror Carefully place your mirror inside the coffin, on top of the satin. You can add a little bit of glue to hold it in place. You can get a custom plaque made online or simply print one on gold paper.
7. The Face Stealer’s Portrait

This looks like an ordinary framed mirror in an art gallery. A small sign above it reads, “The Face Stealer.” When you look into the mirror, you see your own reflection, but with a terrifying change.
Your own smile is replaced with a grotesquely wide, creepy grin. In the background, a dark, shadowy figure with a blank face is reflected, as if it has just stolen your smile for itself. This is an elaborate illusion that is deeply unsettling.
DIY: Steal a Smile
What You’ll Need:
- A mirror with a simple black frame.
- A printed picture of a wide, creepy smile on clear sticker paper.
- A life-sized cardboard cutout of a person.
- Black paint.
Instructions:
Step 1: Prepare the Smile Cut out the creepy smile from the clear sticker paper.
Step 2: Apply the Smile Carefully stick the smile onto the mirror at about mouth-level. The clear sticker will make it look like it’s part of the reflection.
Step 3: Create the Face Stealer Paint your cardboard cutout completely black. You can cut a hole where the face should be to make it extra creepy.
Step 4: Set the Scene Hang your mirror on the wall. Place the black cutout behind where your guests will stand to look in the mirror. When they look, they will see their own face with the creepy smile, and the reflection of the dark, faceless figure standing behind them.
8. The Widow’s Mourning Veil

A beautiful, antique standing mirror is draped in a dark shroud. A long, black lace veil covers the glass, as if the mirror itself is in mourning. The lace is torn and old.
Tucked into the veil is a faded, black and white photograph of a stern-looking woman from a hundred years ago. When you peer through the rips in the lace, you see the reflection of a ghostly woman in a black veil standing in the room behind you.
DIY: Create a Grieving Ghost
What You’ll Need:
- A standing mirror.
- A long piece of black lace fabric.
- An old, creepy-looking photograph (you can print one from the internet).
- A white sheet.
- A wig of long, dark hair.
Instructions:
Step 1: Dress the Mirror Drape the black lace fabric over the top of the mirror. Let it hang down like a veil. Make a few small tears in the lace.
Step 2: Add the Widow Use a safety pin to attach the old photograph to the lace.
Step 3: Create the Ghost Drape the white sheet over a tall lamp or a dress form to create a human-like shape. Place the dark wig on top.
Step 4: The Final Scene Position your sheet ghost in the room where it will be visible in the mirror’s reflection. When guests look through the torn veil, they will see the ghostly figure reflected behind them.
9. The Witch’s Scrying Mirror

This is not a mirror for checking your hair. It is a tool for dark magic. The small, black mirror sits on a wooden stand, surrounded by the tools of a witch: smoking sage bundles, animal skulls, and tarot cards.
Instead of your reflection, you see a ghostly, swirling face made of smoke trapped within the glass. The reflection in your phone shows the same eerie face. The air is thick with the smell of incense and magic.
DIY: Conjure a Spirit in a Black Mirror
What You’ll Need:
- A small mirror with a simple frame.
- A can of glossy black spray paint.
- A printed picture of a smoky, ghostly face on clear sticker paper.
- A hot glue gun.
- Other witchy items like fake skulls, candles, and dried herbs.
Instructions:
Step 1: Create the Scrying Mirror In a well-ventilated area, spray paint the glass of your mirror with the glossy black paint. This will create a “black mirror” that has a faint, dark reflection.
Step 2: Trap the Spirit Cut out your smoky face sticker. Carefully apply it to the center of your black mirror.
Step 3: Build the Altar Place your mirror on a stand. Arrange your other witchy items around it to create a spooky altar. Burn some incense (with an adult’s permission) to add to the magical atmosphere.
10. The Carnival’s Last Laugh Mirror

Step right up and see the horror! This mirror looks like it was stolen from a haunted carnival funhouse. The frame is painted with cheerful red and white stripes, but it is old, dirty, and splattered with blood.
The mirror itself is warped, twisting your reflection into a monstrous shape. And reflected in the glass is not your own face, but the terrifying, grinning face of a demonic clown. This mirror is a ticket to a carnival of nightmares.
DIY: Build a Funhouse of Fear
What You’ll Need:
- A tall mirror.
- A sheet of flexible, funhouse-style mirror material.
- A large piece of cardboard or foam board for the frame.
- Red and white paint.
- A large, scary clown mask.
Instructions:
Step 1: Build the Frame Cut your cardboard into the shape of a carnival mirror frame. Paint it with red and white stripes. Use some watered-down brown paint to make it look old and dirty.
Step 2: Warp the Reflection Carefully glue the flexible mirror sheet onto your real mirror. The warped material will distort everything.
Step 3: Add the Clown This is another “live action” scare. Have a friend put on the clown mask and hide. When a guest looks into the mirror, your friend can jump out, and their scary reflection will be twisted by the funhouse mirror.
11. The Weeping Wraith Mirror

A sad, lonely face seems to be trapped inside this foggy mirror. It is a blurry, ghostly image, like a forgotten memory. From its eyes, thick, clear tears run down the glass, making the sorrow feel real and present.
This mirror does not show your reflection clearly. Instead, it shows you someone else’s pain. Guests will lean in to get a better look, only to be met with a silent, eternal cry for help.
DIY: Create a Crying Ghost
What You’ll Need:
- An old mirror with a frame.
- A printed picture of a blurry, spooky face.
- Scissors.
- Clear school glue or a hot glue gun with clear glue sticks.
- Hairspray (the aerosol kind).
Instructions:
Step 1: Prepare the Ghostly Face Cut out the spooky face from your printed picture. You only need the face itself, not the background.
Step 2: Fog the Mirror Lightly spray the inside of the mirror with hairspray. Before it dries, gently wipe most of it away with a paper towel. This will leave a thin, foggy layer on the glass that you can still see through.
Step 3: Trap the Ghost Tape the picture of the face to the back of the mirror glass (if you can remove it from the frame). If you can’t, you can tape it carefully to the front, but it looks spookier from behind the fog.
Step 4: Make it Weep Take your clear glue. Start at the eyes of the ghostly face and squeeze out a thick line of glue going down the glass. Make it wavy and uneven, just like a real tear. Make a few tear tracks.
Step 5: Let it Dry Let the glue dry completely. It will dry clear, leaving a permanent, wet-looking tear running down your haunted mirror.
12. Arachne’s Vanity Mirror

This is no place to get ready for a night out. A beautiful, old-fashioned vanity mirror has been taken over by spiders. Thick, dusty cobwebs cover the entire glass, making it hard to see your own face.
A giant, hairy spider sits in the middle of the web, claiming the mirror as its own. Smaller spiders crawl all over the frame and the table. It is a nightmare for anyone who dislikes creepy crawlies.
DIY: Weave a Spider’s Web
What You’ll Need:
- An old vanity mirror.
- A bag of stretchy spiderweb material.
- A large, plastic toy spider.
- Several small plastic spiders.
- A hot glue gun.
Instructions:
Step 1: Clean Your Mirror Start with a clean mirror. This will help the spiderwebs and glue stick better.
Step 2: Stretch the Web Take a handful of the stretchy spiderweb material. Pull it apart and stretch it over the front of the mirror. Hook the edges on the corners of the frame. The thinner you stretch it, the more real it looks.
Step 3: Place the Queen Take your big toy spider. Use your hot glue gun to put a large dot of glue on its belly and press it firmly into the center of the web. Hold it for a few seconds until the glue sets.
Step 4: Add the Spiderlings Now, take your smaller spiders. Put a tiny dot of hot glue on each one and stick them all over the mirror frame, the web, and the vanity table around the mirror.
13. Astrologer’s Abyssal Chart

This mirror does not show you the stars you know. It is a glowing portal to a strange and distant cosmos. Bright blue, mystical constellations of sea monsters and unknown gods are mapped across its dark surface.
Ancient symbols line the golden frame, hinting at forgotten magic. Looking into it feels like you are peering into another universe, one that is beautiful but also very dangerous.
DIY: Map a Monster Sky
What You’ll Need:
- A round shadow box frame.
- A regular round mirror that fits in the back.
- A sheet of clear plastic or glass that fits in the front.
- A printed picture of a glowing blue zodiac chart on transparency film (you can get this at an office supply store).
- Blue LED fairy lights with a battery pack.
Instructions:
Step 1: Set Up the Box Place the regular mirror in the back of the shadow box, shiny side up.
Step 2: Light the Stars Tape your blue LED fairy lights around the inside edge of the shadow box frame. Let the battery pack hang out the back.
Step 3: Add the Constellations Lay your special printed zodiac chart on top of the lights. The clear film will let the light shine through.
Step 4: Close the Portal Place the clear glass or plastic sheet in the front of the frame to hold everything in.
Step 5: Gaze into the Void Turn on the lights. The blue light will illuminate the monster chart, creating a deep, glowing effect that looks like a window into space.
14. The Doppelgänger Glass

When you look into this mirror, you are not alone. Your own reflection stares back, but there is a faint, ghostly copy of you right beside it. This second image is faded, like a soul that has not quite left.
Is it a trick of the light, or has a spirit attached itself to you? The mirror creates a deeply personal and unsettling feeling. It makes you wonder which reflection is the real you.
DIY: Create Your Own Ghostly Twin
What You’ll Need:
- Any mirror with a simple frame.
- A camera (a phone camera works).
- A computer with a simple photo editing program (like Paint or a free online editor).
- A sheet of clear printable sticker paper.
- A printer.
Instructions:
Step 1: Take Your Picture Stand against a plain wall and have someone take a picture of you from the chest up. Look serious and spooky.
Step 2: Make it a Ghost On a computer, open the picture. Use the editing tools to turn the photo black and white. Then, find the “transparency” or “opacity” setting and lower it to about 50%. This will make your picture see-through, like a ghost.
Step 3: Print Your Ghost Following the instructions for the clear sticker paper, print your semi-transparent image.
Step 4: Stick it to the Mirror Carefully cut out your ghostly image from the sticker sheet. Peel off the backing and stick it smoothly onto the mirror. Now, when you look into the mirror, your ghostly twin will be staring back.
15. Mad Doctor’s Display Cabinet

This is the medicine cabinet of a doctor you never want to meet. Behind the glass door, strange and horrifying objects are on display. Old surgical tools, a giant insect, and a human eyeball are mixed with bones and yellowed gauze.
A small light inside illuminates the grim collection. This piece tells the story of a mad scientist’s twisted experiments. It is a cabinet of curiosities that will make your guests’ skin crawl.
DIY: Assemble a Creepy Collection
What You’ll Need:
- A small cabinet with a glass door, or a shadow box.
- Black paint.
- A collection of creepy items: plastic surgical tools, a large fake bug, a fake eyeball, plastic bones (all from a Halloween store).
- Old, yellowish gauze or cheesecloth.
- A small, battery-operated LED tap light.
Instructions:
Step 1: Prepare the Cabinet If your cabinet isn’t already dark, paint the inside of it black. This will make your creepy items stand out.
Step 2: Add the Light Stick the battery-powered tap light to the ceiling on the inside of the cabinet.
Step 3: Arrange the Gauze Drape and bunch up the old gauze inside the cabinet to create a creepy background for your items.
Step 4: Display Your Horrors Arrange all your spooky props inside the cabinet. Lean the tools against the back, place the eyeball on a shelf, and position the bug where it can be seen clearly.
Step 5: The Final Look Close the glass door and turn on the light. Your mad doctor’s cabinet is now ready for visitors.
16. The Watcher in the Woods Mirror

Something is watching from the darkness. This round mirror is surrounded by a thick, tangled wreath of dark branches and moss, as if it were pulled from a haunted forest floor.
Hidden in the branches are two glowing green eyes, staring out at you. When you look into the mirror, you see another pair of glowing eyes in the reflection, watching from the room behind you. You are being watched from both sides.
DIY: Build a Forest Spirit’s Lair
What You’ll Need:
- A round mirror.
- A grapevine wreath that is slightly larger than the mirror.
- A hot glue gun.
- Extra twigs and moss from a craft store or your yard.
- A short string of green LED fairy lights (with a battery pack).
Instructions:
Step 1: Attach the Mirror to the Wreath Use a lot of hot glue to attach the back of the mirror to the front of the grapevine wreath. Make sure it’s centered.
Step 2: Make it Overgrown Use your hot glue gun to add more twigs and moss to the wreath. Make it look messy and natural, like it grew that way.
Step 3: Add the Eyes Take your string of green LED lights. Poke two of the bulbs through the wreath from the back so they look like eyes peering out from the top. Weave the rest of the wire through the back of the wreath to hide it.
Step 4: Hide the Power Tape the battery pack to the back of the mirror.
Step 5: The Double Scare Hang your mirror on a wall. When you turn on the lights, you’ll see the glowing eyes in the wreath and their reflection in the mirror.
17. Gilded Cage of Thorns Mirror

This mirror was once a beautiful treasure, but now it is cursed. The fancy gold frame is wrapped in sharp, thorny vines. The whole thing is covered in thick cobwebs and crawling with black spiders.
Worst of all, thick, red blood drips from the bottom of the golden frame onto the mantelpiece below. It is a beautiful object that has been twisted into something ugly and dangerous.
DIY: Corrupt a Golden Frame
What You’ll Need:
- A mirror in an ornate frame (a cheap plastic one from a thrift store is great).
- Gold spray paint.
- Fake thorny vines (from a craft store).
- Stretchy spiderweb material and plastic spiders.
- A hot glue gun with red glue sticks (or fake blood).
Instructions:
Step 1: Make it Gold If your frame isn’t already gold, take the mirror out and spray paint the frame. Let it dry completely.
Step 2: Add the Thorns Wrap the thorny vines around the frame, using a dab of hot glue here and there to hold them in place.
Step 3: Add the Webs and Spiders Stretch the cobweb material over the corners of the frame. Add a few plastic spiders, gluing them onto the frame and webs.
Step 4: Make it Bleed Turn your hot glue gun with the red glue stick upside down. Squeeze out long drips of red glue along the bottom edge of the frame. Let them harden. This will create a realistic, bloody drip effect.
18. The Silent Scream Mirror

This stylish mirror looks like it belongs in a fancy old hotel. But it holds a prisoner. Part of the mirror is actually a screen, and on it, a person in black and white is trapped.
With hands pressed against the glass, the trapped mime screams, but you cannot hear them. They are forever stuck inside the mirror, begging to be set free. This high-tech scare is completely unexpected and very creepy.
DIY: Trap a Person in Your Mirror
What You’ll Need:
- An old tablet or a digital picture frame that can play videos.
- A large piece of black foam board.
- A craft knife.
- A silver marker.
- A short video of someone pretending to be trapped.
Instructions:
Step 1: Film Your Prisoner Use your phone to film a short, looping video of a friend. Have them wear black and white makeup and pretend they are trapped in a box, pressing their hands against the screen and screaming silently.
Step 2: Build the Frame Measure your tablet screen. On the foam board, draw a large mirror shape around those measurements. Have an adult help you cut out the mirror shape and the hole for the screen in the middle.
Step 3: Decorate the Frame Use your silver marker to draw fancy Art Deco lines and patterns on the black foam board frame to make it look like a real mirror.
Step 4: Install the Screen Tape your tablet to the back of the foam board frame, so the screen shows through the hole.
Step 5: The Show Begins Lean your mirror against a wall, play the video on a loop, and watch your guests jump when they see the moving person trapped inside.
19. Hourglass of the Damned

This is more than just a decoration; it’s a timer. The frame, covered in ancient Egyptian symbols, holds a terrible secret. Inside, sand constantly falls, slowly burying a small human skull.
This piece is a spooky reminder that time runs out for everyone. The skull disappears and reappears as the sand shifts. It is a quiet, thoughtful, and very grim addition to any desk or shelf.
DIY: Craft a Skull Timer
What You’ll Need:
- A sand art picture frame (the kind you flip over to watch the sand fall).
- A very small and lightweight plastic skull (like a charm or a bead).
- Sand.
- A small screwdriver.
Instructions:
Step 1: Open the Frame Look for a small hole on the side or bottom of the sand art frame. These frames can sometimes be opened or have a plug that can be removed to change the contents. This is the hardest part and might require an adult’s help.
Step 2: Empty the Old Sand If you can open it, carefully pour out the colorful glitter or sand that came inside.
Step 3: Add the Skull Drop your tiny plastic skull inside the empty frame.
Step 4: Add New Sand Carefully pour in new, regular sand until the frame is about three-quarters full.
Step 5: Seal it Back Up Put the plug back in or seal the frame. Now, every time you flip it over, you can watch the sands of time slowly bury the skull.
20. Graveyard Gate Mirror

This mirror looks like it was taken from a haunted cathedral or a crumbling mausoleum. It is shaped like a gothic stone window and covered in cracks. A small tombstone at the bottom gives a clear message: “BEWARE.”
Green ivy vines crawl up the sides, as if nature is trying to reclaim it. Looking into this mirror makes you feel like you are staring through a gate into the world of the dead.
DIY: Build a Tombstone Mirror
What You’ll Need:
- A large sheet of thick foam board (like insulation foam).
- A craft knife or foam cutter.
- A mirror sheet or a mirror cut to an arched shape.
- Gray and black paint.
- Fake ivy vines.
- A hot glue gun.
Instructions:
Step 1: Carve the Tombstone Draw a tall, arched gothic window shape on your foam board. Have an adult help you cut it out. Use the craft knife to carve window details and cracks into the surface of the foam.
Step 2: Paint it Like Stone Paint the entire foam frame with gray paint. Once it’s dry, water down some black paint and brush it all over the frame, then quickly wipe most of it off. The black paint will stay in the cracks and make it look old.
Step 3: Add the Mirror Glue your mirror to the back of the frame so it shows through the window openings.
Step 4: The Final Warning Cut a small tombstone shape from a leftover piece of foam. Paint it gray and write “BEWARE” on it with a black marker. Glue it to the bottom of the mirror frame.
Step 5: Add the Ivy Wrap the fake ivy vines around the frame, using hot glue to hold them in place. Your gateway to the other side is now complete.
21. Winter’s Ghost Mirror

A bitter cold has frozen this mirror in time. The elegant silver frame is draped in sharp, realistic icicles. Frosty patterns creep in from the edges of the glass, obscuring the reflection.
Through a small clear patch, a ghostly figure can be seen lurking in the room. The mirror seems to radiate a chill that has nothing to do with the temperature. It is a beautiful but deeply chilling piece of decor.
DIY: Create a Frozen Fright
What You’ll Need:
- A mirror with an ornate, fancy frame.
- A can of window frost spray.
- Snowflake stencils.
- Fake craft icicles (the clear, plastic kind).
- A hot glue gun.
- (Optional) A large, white sheet.
Instructions:
Step 1: Frost the Glass Place your snowflake stencils on the corners of the mirror. In a well-ventilated area, lightly spray the edges of the mirror with the frost spray. Remove the stencils to reveal a frosty pattern.
Step 2: Add the Icicles Use your hot glue gun to attach the fake icicles along the top edge of the mirror frame. Let them hang down over the glass for a realistic effect.
Step 3: Create the Ghost (Optional) For an extra scare, drape a white sheet over a chair or lamp in the room. When people look into the mirror, they will see the ghostly shape reflected in the clear part of the glass.
22. The Plague Doctor’s Scrying Glass

This vintage hand mirror shows more than just your face. When you pick it up, your reflection is replaced by that of a grim figure from history: the Plague Doctor. The strange, bird-like mask with its long beak stares back with cold, emotionless eyes.
The silver handle is cool to the touch. Holding it feels like you’ve connected with a dark and deadly past. This interactive piece is a simple but powerful way to spook your guests.
DIY: Reflect a Dark Past
What You’ll Need:
- An old-fashioned silver hand mirror.
- A plague doctor mask.
- A friend to help you out.
Instructions:
Step 1: Set the Scene Place the hand mirror on a desk or vanity table in a dimly lit room.
Step 2: Prepare the Scare This is a “live action” scare, which makes it extra fun. Have a friend put on the plague doctor mask and a black shirt or cloak. Have them hide somewhere in the room.
Step 3: The Lure Encourage your guests to explore the room. Someone will eventually pick up the beautiful hand mirror to look at their reflection.
Step 4: The Reveal As soon as someone picks up the mirror, that’s the signal for your friend in the mask to step quietly behind them. When the guest looks in the mirror, they won’t see their own face, but the terrifying plague doctor staring back at them.
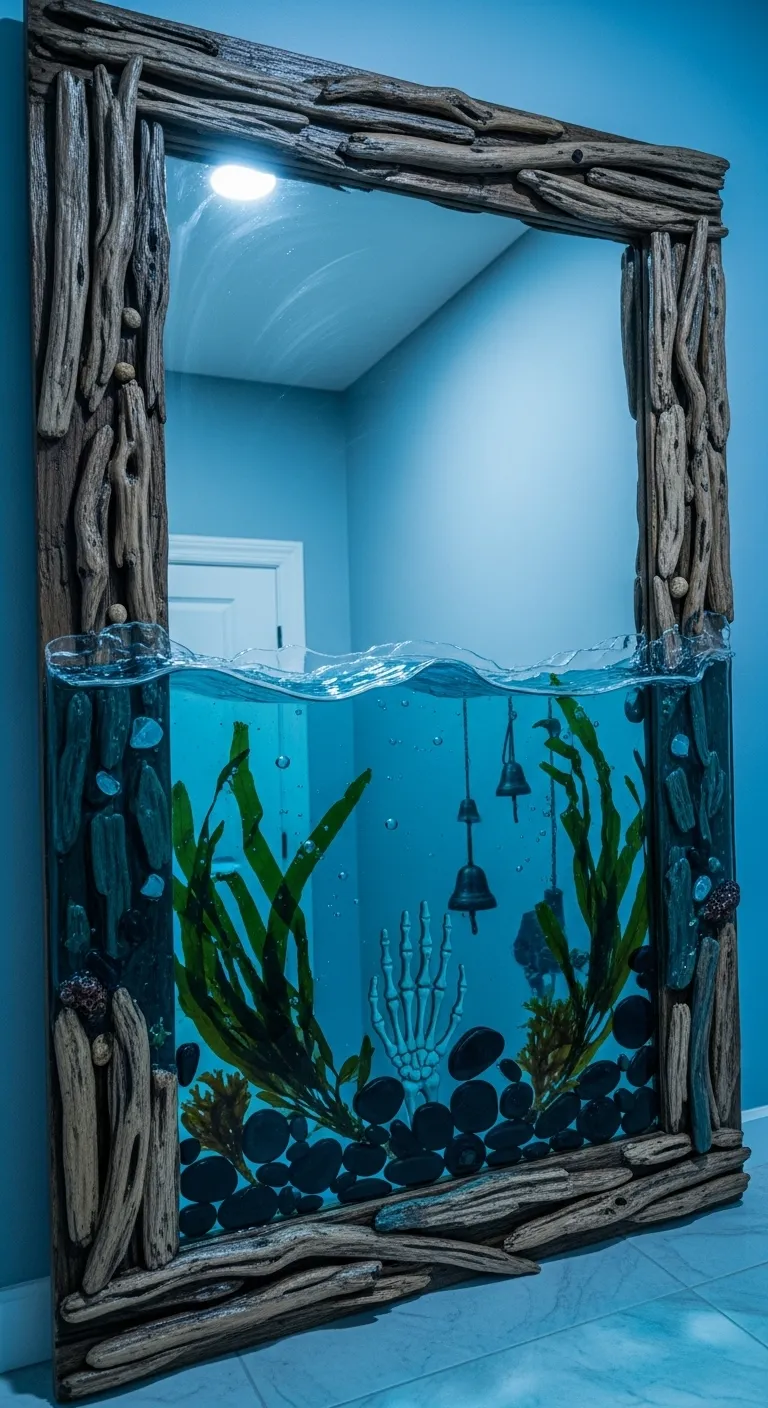
23. Drowned Man’s Looking Glass

This mirror is half in our world, half in a watery grave. The top section reflects the room as normal, but the bottom half is a murky aquarium. Inside, seaweed sways and dark stones cover the floor.
A skeleton hand reaches up from the depths, surrounded by old, silent bells. The water line seems to ripple, as if something just disturbed the surface. It feels like you are looking through a window into a haunted lake.
DIY: Build an Underwater Grave
What You’ll Need:
- A mirror with a deep, wooden frame.
- A small sheet of clear plexiglass.
- Blue-tinted clear epoxy resin.
- Aquarium decorations: plastic seaweed, small black rocks.
- A plastic skeleton hand.
- A hot glue gun.
Instructions:
Step 1: Create the Waterline Have an adult help you cut the plexiglass so it fits snugly inside the mirror frame, about halfway up. Use a strong sealant or hot glue to fix it in place, making sure it’s watertight.
Step 2: Decorate the Seabed Arrange the black rocks, seaweed, and the skeleton hand at the bottom of the mirror, below the plexiglass divider. Glue them down so they don’t float.
Step 3: Pour the Water Mix your blue epoxy resin according to the package directions. Carefully pour the resin into the bottom section of the mirror until it reaches the plexiglass line.
Step 4: Let it Set Let the resin cure completely. This can take a day or two. Once it’s hard, you will have a permanent, spooky underwater scene at the bottom of your mirror.
24. Wall of Captured Souls

This is not one mirror, but many. A collection of old, mismatched hand mirrors hangs on a dark wall. Each one seems to hold a different secret, a different soul.
Most of the mirrors show a normal reflection. But one shows only a single, watching eye. Another reflects a distorted, screaming face. This creepy collection makes guests look at each mirror, wondering what they will find next.
DIY: Collect Some Haunted Reflections
What You’ll Need:
- A collection of different-sized old hand mirrors (from a thrift store).
- A computer and printer.
- A few creepy images (a close-up of an eye, a blurry face, a skull).
- Scissors.
- Glue.
Instructions:
Step 1: Gather Your Mirrors Clean up your thrift store hand mirrors. It’s okay if they look old and worn – that adds to the spooky effect.
Step 2: Print Your Ghosts Find and print your creepy images. Measure the glass part of a few of your mirrors and resize the images on your computer to fit perfectly.
Step 3: Capture the Souls Cut out your printed images. Apply a thin layer of glue to the back and carefully stick them onto the glass of three or four of the mirrors. Smooth them out so there are no bubbles.
Step 4: Arrange Your Wall Hang all the mirrors, including the ones you altered, in a random-looking cluster on a dark-painted wall. Guests will have to look closely to find the haunted ones.
25. Seven Years Bad Luck Mirror

Someone has released a terrible energy. This large, frameless mirror has been shattered by a powerful force. A web of cracks spreads out from a central impact point, breaking your reflection into a hundred tiny pieces.
Shards of broken glass lie on the floor beneath it, a warning of the bad luck to come. It’s a simple, dramatic, and very effective scare that looks dangerously real.
DIY: Fake a Shattered Mirror
What You’ll Need:
- A large, cheap floor mirror.
- A roll of clear static-cling window film (the kind used for privacy).
- A black permanent marker.
- Scissors.
- A few pieces of real mirror for the floor (handle with extreme care and adult supervision).
Instructions:
Step 1: Apply the Film Carefully apply the clear window film to the entire surface of the mirror. Smooth out all the bubbles. This film will protect the mirror from the marker.
Step 2: Draw the Cracks Using your permanent marker, draw a spiderweb of cracks all over the film. Start with one point and draw lines coming out from it. Then add smaller connecting lines.
Step 3: The Aftermath (Use Caution!) This step requires an adult. Wrap a small, old mirror in a thick towel and carefully break it with a hammer. Safely collect a few of the larger broken pieces.
Step 4: Set the Scene Lean your “cracked” mirror against a wall. Carefully place the few real broken shards on the floor at its base. It will look like the mirror just shattered.
26. The Lingering Touch Mirror

Something from the other side is trying to break through. This mirror has a dark, weathered frame and the glass itself is cloudy and black around the edges. It looks like it has been damaged by smoke or fire.
In the center of the glass is a single, black handprint. It is not on the surface; it seems to be coming from inside the mirror itself. The print is a sign of a spirit’s desperate, and permanent, touch.
DIY: Leave a Ghostly Handprint
What You’ll Need:
- A mirror in a simple, dark frame.
- Black spray paint.
- A can of “looking glass” spray paint (which creates a mirror effect).
- A rubber glove.
- Black acrylic craft paint.
Instructions:
Step 1: Age the Mirror In a well-ventilated area, lightly spray the edges of the mirror glass with black spray paint. Immediately blot it with a paper towel to create a smoky, uneven look.
Step 2: Make the Print Put on the rubber glove. Squeeze a small amount of black acrylic paint onto a plate and dip your gloved hand into it.
Step 3: Leave Your Mark Press your paint-covered hand firmly onto the center of the mirror. Lift it straight up to leave a clear handprint. Let the paint dry.
Step 4: Seal the Ghost Once the handprint is dry, spray a very light coat of the “looking glass” paint over the entire mirror, including the handprint. This will make the print look like it’s under the glass, not on top of it.
27. The Endless Red Void

Look into this bathroom mirror and you might not come back. It is a portal to a terrifying dimension. A tunnel of glowing red rings pulls you deeper and deeper into the darkness.
At the very end of the horrifying, endless tunnel stands the small, dark silhouette of a lonely figure. It is waiting for you. This is a high-tech illusion that turns a simple mirror into a gateway to a nightmare.
DIY: Open a Portal to Nowhere
What You’ll Need:
- A round shadow box frame.
- A round regular mirror that fits in the back.
- A round one-way mirror that fits in the front.
- A strip of red LED lights with a battery pack.
- A small cutout of a person’s silhouette from black paper.
Instructions:
Step 1: Set the Scene Open the shadow box. Glue the tiny paper silhouette of the person onto the exact center of the regular mirror.
Step 2: Place the Mirror Put the regular mirror (with the silhouette on it) into the back of the shadow box.
Step 3: Add the Lights Stick your red LED light strip all around the inside edge of the frame.
Step 4: Close the Portal Place the one-way mirror in the front of the shadow box, with the very shiny side facing inside. Close up the frame.
Step 5: Turn It On Hang your mirror and turn on the lights. The red light will bounce back and forth, creating an endless tunnel with the lonely figure waiting at the end.
28. The Doll’s Revenge Mirror

The spirit of a broken toy haunts this mirror. The glass is spiderwebbed with cracks, as if something was thrown at it. A dusty, white handprint is pressed against the surface from the inside.
At the bottom of the frame, the disembodied head of a creepy old doll lies on the floor, its blank eyes staring up at you. It is clear the doll is the one who broke the mirror, and its angry spirit is now trapped inside.
DIY: Unleash a Toy’s Rage
What You’ll Need:
- An old mirror in a wooden frame.
- A sheet of cracked glass window cling or a white paint pen.
- Baby powder.
- An old doll head.
Instructions:
Step 1: Crack the Mirror Apply the cracked glass window cling to the mirror for an instant shattered effect. If you don’t have a cling, use a white paint pen to draw a spiderweb of cracks.
Step 2: Add the Ghostly Handprint Press your hand firmly onto the mirror. Now, lightly sprinkle baby powder over the handprint area. Gently blow away the extra powder. A ghostly, dusty handprint will be left behind.
Step 3: The Culprit Place the old doll head on the floor or table right below the mirror, as if it is looking up at its own destructive work.
29. The Otherworld Fungus Mirror

This mirror is not from our world. It has been infected by a strange, alien lifeform. A bizarre pink and blue growth, like a mix of fungus and coral, has completely overgrown the frame.
The texture is bumpy and full of holes, and strange, root-like tendrils creep across the glass. It is both disgusting and fascinating. It transforms a simple bathroom mirror into a piece of a spaceship or an alien planet.
DIY: Grow an Alien Infection
What You’ll Need:
- An oval mirror.
- Air-dry modeling clay.
- A hot glue gun.
- Pink and blue craft paint.
Instructions:
Step 1: Build the Growth Take your air-dry clay and start sculpting strange shapes directly onto the mirror’s frame. Make bumpy textures, flat mushroom-like pieces, and long, thin roots. Don’t cover the whole frame, leave some space. Let the clay dry completely.
Step 2: Paint the Fungus Paint the frame and all the clay shapes. Use blue for the bumpy parts and pink for the mushroom and root parts. Don’t be afraid to let the colors mix a little.
Step 3: Add Details Use a toothpick or the end of a paintbrush to poke holes into some of the pink fungus parts to make them look extra weird and creepy. Let all the paint dry.
30. The Other Mother’s Mirror

At first glance, this mirror seems to show a reflection of a sweet, charming dollhouse bedroom. The colors are soft and the furniture is tiny and perfect. But there is no dollhouse in the room with you.
This mirror is a window into another, more sinister world, just like in the movie Coraline. The perfect room is a trap. It is a subtle, creepy illusion that will make your guests do a double-take.
DIY: Build a Window to Another World
What You’ll Need:
- A mirror with a cute, scalloped frame.
- A small dollhouse room diorama box (or you can make one from a shoebox).
- A screwdriver.
- A hot glue gun.
Instructions:
Step 1: Remove the Mirror Carefully remove the actual mirror glass from the frame. You will usually find clips or tabs on the back that you can undo with a screwdriver. You will be left with an empty frame.
Step 2: Prepare the Other World Get your dollhouse room ready. Make sure it is fully decorated.
Step 3: Combine the Worlds Use a generous amount of hot glue on the back of the mirror frame. Press the frame firmly onto the open side of the dollhouse room box.
Step 4: The Illusion Hang your new “mirror” on the wall. When people look at it, they won’t see their reflection. They’ll see the secret room, and wonder how it got there.
31. The Tub Ghost’s Invitation

A steamy bathroom mirror holds a chilling message. Written in the condensation are the words “I’M IN THE TUB.” Below it, another creepy instruction appears: “LOOK CLOSER.” The letters drip as if the message was freshly written.
This scare is all about suspense. Guests will feel a sense of dread as they are forced to turn and look at the shower curtain. What they imagine is waiting for them is the most frightening part.
DIY: Leave a Dripping Message
What You’ll Need:
- A bathroom mirror.
- A can of anti-fog spray (the kind for car windows).
- A Q-tip.
- A shower or a humidifier.
Instructions:
Step 1: Clean and Prep the Mirror Start with a completely clean and dry mirror.
Step 2: Write the Secret Message Dip your Q-tip into the anti-fog spray. Use the wet Q-tip to write your spooky message on the mirror. The liquid will be invisible when it dries.
Step 3: Create the Steam Just before your guests arrive, turn on the shower to hot for a few minutes to steam up the bathroom. If you don’t want to waste water, a humidifier will also work.
Step 4: The Reveal The entire mirror will fog up except for the words you wrote with the anti-fog spray. The message will appear clearly, and condensation will drip from the letters, making it look like it was just written by a wet, ghostly hand.
32. The Collector’s Cabinet of Curiosities

This is not a single mirror, but a folding screen of horrors. Each panel displays a different, disturbing collection. One panel is filled with a hundred staring glass eyeballs. Another holds rows of human teeth. The center is covered in beautifully preserved moths.
The bottom panels are mirrors, reflecting the room and anyone brave enough to look. It is a terrifying display of a collector who has gone too far, mixing the beautiful with the grotesque.
DIY: Assemble a Cabinet of Nightmares
What You’ll Need:
- A three-panel folding screen or three large picture frames you can hinge together.
- Black foam board.
- Lots of creepy craft items: plastic eyeballs, fake teeth, fake moths or butterflies.
- Mirrors that fit the bottom panels.
- A hot glue gun.
Instructions:
Step 1: Prepare the Panels Cut the black foam board to fit inside each panel of your screen.
Step 2: Create the Collections On one piece of foam board, use your hot glue gun to stick on the plastic eyeballs in neat rows. On another, glue down the teeth. On a third, arrange and glue the moths.
Step 3: Assemble the Screen Place your decorated foam boards into the top sections of the folding screen. Place the mirrors in the bottom three sections. If using picture frames, hinge them together to create the screen.
33. The Prisoner’s Countdown

This mirror tells a grim story of someone counting their last days. The entire surface is covered with tally marks, scratched into the glass. There are hundreds of them, as if a prisoner has been trapped for a very long time.
At the bottom, a chilling question is scrawled: “WHO IS NEXT.” Small notes on the table below add to the mystery, with messages like “DON’T LET HIM FINISH.” It makes you feel like you’ve stumbled upon an active crime scene.
DIY: Keep the Tally
What You’ll Need:
- A large mirror with a simple frame.
- A white dry-erase marker or a bar of soap.
- A few small pieces of paper and a pen.
Instructions:
Step 1: Make the Marks Using your dry-erase marker or soap, cover most of the mirror with tally marks (four vertical lines with one diagonal line across them). Make them look a little messy and rushed.
Step 2: Ask the Question In a clear space at the bottom, write “WHO IS NEXT.”
Step 3: Add to the Story On the small pieces of paper, write other creepy messages like “HE’S WATCHING” or “IT’S TOO LATE.” Place these on the table in front of the mirror to create a sense of mystery and danger.
34. The Runic Ward Mirror

This is an object of powerful, dark magic. A strange, bloody mask of a demon is trapped behind the glass. The mirror’s surface is covered in glowing red runes and a magic circle, as if trying to contain the evil within.
Thick, red blood drips from the ancient symbols. The whole thing feels dangerous, like a prison for a demon that is about to break free. It’s a terrifying centerpiece for any dark altar.
DIY: Create a Demonic Prison
What You’ll Need:
- A mirror with a thick, dark frame.
- A scary mask.
- Red glass paint or a red permanent marker.
- Fake blood.
Instructions:
Step 1: Trap the Demon Tape or glue the mask to the back of the mirror so it shows through the glass. If you can’t, you can glue it directly to the front.
Step 2: Draw the Magic Circle Using your red glass paint or marker, draw a circle on the mirror right over the mask’s face. Add some lines and star-like points to make it look like a magical seal.
Step 3: Add the Runes Look up some ancient-looking symbols or runes online. Draw them around the magic circle.
Step 4: Make it Bleed Drip fake blood from some of the runes and from the bottom of the mask to make the seal look fresh and violent.
35. Bloody Mary’s Mirror

Someone has summoned a violent spirit. This clean, modern bathroom mirror is stained with the evidence. A single, bloody handprint is pressed against the glass, with blood dripping down from the fingers.
Below the handprint is a wide, bloody smile, a grotesque grin made of nightmares. It is a simple and shocking scare that turns an ordinary bathroom into the scene of a terrifying ritual.
DIY: Leave a Bloody Welcome
What You’ll Need:
- A bathroom mirror.
- A bottle of fake blood or red food coloring mixed with corn syrup.
- A paintbrush.
Instructions:
Step 1: The Handprint Pour some of your fake blood onto a plate. Press your hand into it, then press your hand firmly onto the mirror. Let some of the “blood” drip down before you lift your hand.
Step 2: The Smile Use your paintbrush and the fake blood to paint a large, creepy smile on the mirror below the handprint. Add some drips coming from the corners of the mouth.
Step 3: Clean Up This effect is temporary and can be easily cleaned up with window cleaner. Be careful not to get the fake blood on your towels or sink, as it can stain.
36. The All-Seeing Eye Mirror

You are being watched. This curved security mirror, the kind you see in the corner of a store, has been transformed. In the center of the convex glass is a giant, bloodshot eyeball.
The eye follows you as you move around the room, thanks to the mirror’s distorted reflection. It is a strange and unsettling piece that gives the creepy feeling of constant surveillance by some monstrous creature.
DIY: Make a Watcher
What You’ll Need:
- A round, convex security mirror.
- A large, realistic eye sticker or a printout of an eye.
- Scissors.
- Glue or double-sided tape.
Instructions:
Step 1: Get the Eye Find a high-quality image of a creepy, bloodshot eye online. Print it out on glossy paper.
Step 2: Cut and Stick Carefully cut out the eye. Use glue or double-sided tape to stick it right in the center of the security mirror.
Step 3: Hang it High Hang the mirror in the corner of a room, high up on the wall. The curved shape of the mirror will distort the room’s reflection around the eye, making it look like it is watching everything.
37. The Glitching Demon Mirror

This is a mirror for the modern age of horror. A sleek, high-tech smart mirror shows your reflection perfectly. But then, it begins to glitch. Your face distorts with digital static.
For a split second, your reflection is replaced with a terrifying, monstrous clown face before returning to normal. It is a technological jump scare that will make anyone question if they really saw what they saw.
DIY: Create a Digital Jumpscare
What You’ll Need:
- An old TV or computer monitor that you can stand up vertically.
- A USB stick.
- A short video file that you can create.
Instructions:
Step 1: Create the Video Use a simple video editing app to create a short video. It should be mostly black, but for one second in the middle, have a scary clown face flash on the screen with some static or glitch effects.
Step 2: Set Up the “Mirror” Load the video file onto your USB stick and plug it into the TV. Set the video to play on a loop.
Step 3: The Illusion Stand the TV up against a wall in a dark room. Most of the time, the screen will be black, acting like a dark mirror. Guests will see their faint reflection. But every so often, the clown face will flash, giving them a huge scare.
38. The Seance Portal

This mirror is a tool for contacting the dead. The octagonal frame is covered in glowing magical symbols. Inside the dark glass, you don’t see your reflection, but the shadowy silhouette of a hooded figure.
Smoke seems to swirl inside the mirror, and a ghostly hand is pressed against the glass from the other side. Surrounded by candles and tarot cards, this mirror is clearly a portal that has been successfully opened.
DIY: Open a Gateway to the Other Side
What You’ll Need:
- A picture frame with a glass front (an octagon shape is great).
- Black paint.
- Glow-in-the-dark paint and a fine brush.
- A printed, transparent image of a ghostly figure.
Instructions:
Step 1: Make the Black Mirror Paint the inside of the frame’s backing board with black paint.
Step 2: Add the Ghost Place your transparent ghost picture inside the frame, against the black background.
Step 3: Paint the Runes On the outside of the glass, use your glow-in-the-dark paint to carefully paint magical-looking symbols all around the edge.
Step 4: Charge the Runes and Set the Scene Hold a bright light to the frame to “charge” the glow paint. Then, place your mirror on a table surrounded by candles to complete your seance scene.
39. The Wendigo’s Crown Mirror

This mirror is a tribute to a terrifying forest spirit. It is mounted on a wooden plaque, like a hunter’s trophy. Instead of your own head, the reflection is in the shape of a human silhouette.
The plaque is crowned with the skull and large antlers of a deer. Feathers and other bones complete the pagan, tribal look. It suggests the person in the reflection has been sacrificed to the beast.
DIY: Craft a Hunter’s Trophy
What You’ll Need:
- A wooden plaque.
- A sheet of mirror that you can cut.
- A paper silhouette of a person’s head.
- A small deer skull with antlers (a plastic one is fine).
- Feathers, fake teeth, and other rustic items.
- A hot glue gun.
Instructions:
Step 1: Cut the Mirror Trace the silhouette shape onto the mirror sheet. This step requires an adult with special tools to safely cut the mirror to shape.
Step 2: Mount the Mirror Glue the silhouette-shaped mirror to the center of the wooden plaque.
Step 3: Add the Crown Use a lot of hot glue to attach the deer skull and antlers to the top of the plaque, so they frame the mirror.
Step 4: Decorate the Trophy Glue the feathers, teeth, and other items around the skull to complete the wild, monstrous look.
40. The Empty Abyss Mirror

Sometimes, the scariest thing is what you can’t see. This large, ornate black frame should hold a grand mirror. But the glass is gone, replaced with a sheet of pure, deep blackness. It reflects nothing.
A single, white skeleton hand hangs from the top corner of the frame, as if it is reaching out from the void. It is a simple, elegant, and deeply unsettling piece that plays on the fear of the unknown.
DIY: Gaze into the Void
What You’ll Need:
- A large, fancy mirror frame (from a thrift store).
- Black spray paint.
- A piece of foam board cut to the size of the frame.
- A plastic skeleton arm.
- A hot glue gun.
Instructions:
Step 1: Paint it Black In a well-ventilated area, spray paint the frame, the foam board, and the skeleton arm all black. Let them dry.
Step 2: Create the Void Place the black foam board into the frame where the mirror used to be.
Step 3: The Hand from Nowhere Decide if you want the hand to be black or if you want to paint it white for contrast. Use your hot glue gun to attach the skeleton arm to an upper corner of the frame, so the hand is inside the empty space.
Step 4: Hang Your Void Hang the mirror on the wall. Guests will be drawn to the beautiful frame, only to be creeped out by the unsettling emptiness inside.
Turning an ordinary object into a source of fear is the true art of Halloween decor. Mirrors offer a unique opportunity to play with reflections, expectations, and the imagination of your guests. A haunted mirror doesn’t just sit there; it interacts, it tells a story, and it watches you back.
Whether you choose a simple, spooky message or an elaborate demonic portal, these projects are designed to be fun and achievable. So grab an old mirror, gather your craft supplies, and get ready to create something that will truly creep out your guests. Happy haunting!
Key Takeaways
- Mirrors are versatile tools for horror: They can be used for subtle, atmospheric scares or for shocking jump scares.
- DIY is budget-friendly: You can create high-impact decorations using inexpensive craft supplies and old mirrors.
- Various themes are possible: Ideas range from ghostly apparitions and magical portals to sci-fi glitches and gory crime scenes.
- Instructions are for everyone: The step-by-step guides are simple enough for beginners to follow and create impressive results.