Candlelight changes a room. It makes shadows dance and corners hide secrets. For Halloween, this flickering light is essential. It creates the atmosphere for every ghost story and spooky celebration. But the flame is only half the story. The holder it rests in can be a masterpiece of horror all on its own.

Forget simple, boring stands. This is a journey into the world of dramatic, narrative candle holders. Each piece tells a story. You will find gothic horrors, mythical beasts, and cursed artifacts. Some are elegant, others are gruesome. All of them are unforgettable.
We have gathered 35 incredible ideas to inspire your Halloween decor. Better yet, we show you how to create them yourself. Get ready to transform your home with these unique and spooky projects.
1. The Spectral Candelabra

This candelabra looks like it’s been captured by a ghost. A flowing, translucent spirit drapes itself over the candle holder, its form cascading down to the base in ethereal folds. The ghost’s head is thrown back with an empty, screaming mouth, creating a truly haunting centerpiece.
The shape is both eerie and beautiful. It seems to float in the room. This decoration transforms a simple light source into a dramatic, supernatural event. The way the candlelight flickers through the ghostly form adds to the chilling effect. It is a striking piece for any haunted setting.
DIY Instructions: How to Capture a Ghost
What You’ll Need:
- An old candelabra you don’t mind getting messy.
- A box of cheesecloth.
- A bottle of liquid starch.
- A bowl.
- A small balloon and a bottle or vase to hold it up.
- A hot glue gun.
- Newspaper to protect your workspace.
Step-by-Step Guide:
Step 1: Make the Ghost’s Head Blow up the balloon just a little bit, so it’s the size of a fist. Place it on top of the bottle or vase. This will be the form for your ghost’s head.
Step 2: Get Starchy Put your candelabra on the newspaper. Place the balloon-on-a-bottle right over the center of the candelabra. Pour the liquid starch into a bowl. Dip a large piece of cheesecloth into the starch until it’s completely soaked.
Step 3: Drape Your Ghost Gently squeeze out the extra starch. Drape the wet cheesecloth over the balloon and the arms of the candelabra. Arrange it so it has nice, spooky folds. Let it dry completely. This might take a whole day.
Step 4: The Big Reveal Once the cheesecloth is hard and stiff, carefully pop the balloon. Your ghost will now hold its shape.
Step 5: Final Touches You can use a black marker to draw a screaming face on the ghost. With an adult’s help, use a hot glue gun to make sure the ghost is securely attached to the candelabra.
2. The Demonic Vanity Mirror

This is not a regular mirror. It is a large, imposing candelabra that frames a dark, oval mirror. The stand is a terrifying sculpture of a demonic creature, with a monstrous face, sharp horns, and clawed feet digging into the base.
The branches of the candelabra look like twisted, organic horns, holding candles on either side of the mirror. The entire piece has an antique silver finish, making it look like a cursed object from a haunted mansion. It’s a decoration that doesn’t just light a room, it stares back at you from the darkness.
DIY Instructions: How to Make a Cursed Mirror
What You’ll Need:
- An old, oval-shaped mirror.
- Air-dry clay.
- A small, cheap candelabra or individual candle holders.
- A hot glue gun and strong glue (like E6000, ask an adult for help).
- Silver and black spray paint.
- Cardboard for the base.
Step-by-Step Guide:
Step 1: Build the Base Cut a sturdy base from cardboard. Ask an adult to use strong glue to attach the mirror so it stands up on the base. Let it dry completely.
Step 2: Sculpt Your Demon This is the fun part! Use the air-dry clay to sculpt a scary demon face, horns, and clawed feet around the base of the mirror. Don’t worry about making it look great, the messier the better.
Step 3: Add the Candle Holders If you have a small candelabra, glue it to the top or bottom of the mirror. If you have individual holders, glue them on either side to look like horns. Use the clay to blend them into the mirror frame.
Step 4: Let it Dry Let the clay dry completely. This might take a day or two.
Step 5: Paint it Take it outside and ask an adult to spray paint the entire frame, base, and candle holders silver. Once that’s dry, you can lightly spray some black paint over it to make it look old and tarnished.
3. The Witch’s Cauldron Brew

This candle holder is bubbling with magical trouble. A classic black witch’s cauldron, complete with three legs and mystical moon symbols, forms the base. But instead of a normal potion, a thick, slimy brew is spilling over the sides.
The colorful slime is a mix of green, blue, and purple, and it’s filled with creepy ingredients like tiny bones. From this magical overflow, three spooky, branch-like arms rise up to hold the candles. It’s a fun and colorful piece that perfectly captures the playful side of witchcraft.
DIY Instructions: How to Brew a Magic Cauldron
What You’ll Need:
- A small plastic witch’s cauldron.
- A can of spray foam insulation (this is messy, so an adult MUST help).
- Green, blue, and purple craft paint.
- Small plastic bones (from a craft store).
- Three taper candle holders.
- A hot glue gun.
- Gloves and newspaper.
Step-by-Step Guide:
Step 1: Get Ready to Brew Put on your gloves and lay down lots of newspaper. This step is super messy.
Step 2: Make the Bubbles Ask an adult to help you with the spray foam. They should spray a large amount of foam into the cauldron, letting it expand and bubble over the sides. Before it dries, stick the three candle holders into the top of the foam.
Step 3: Let it Set Let the foam expand and dry completely. This might take a few hours. It will feel hard when it’s ready.
Step 4: Paint Your Potion Once the foam is hard, use your craft paints to make it look like a magical brew. Drip the green, blue, and purple paint all over the foam. Let the colors mix together.
Step 5: Add the Ingredients While the paint is still a little wet, press the tiny plastic bones into the “slime.” You can use a little hot glue to make sure they stick.
4. The Plague Doctor’s Lantern

This candle holder is a dark reminder of a spooky time in history. It’s designed to look like a plague doctor, with the famous long-beaked mask sitting on top of an old-fashioned lantern. The mask has a dark, worn texture, making it look like old leather.
A bundle of dried herbs is tied to the side, just like the real doctors used to protect themselves. The lantern itself has a rustic, caged design, and the whole piece sits on a base that looks like a worn leather pouch. The candle inside casts a soft, eerie glow through the glass.
DIY Instructions: How to Craft a Doctor’s Light
What You’ll Need:
- A simple, battery-operated lantern.
- Air-dry clay.
- A small paper cup.
- Black and brown craft paint.
- A small piece of brown fabric or felt.
- String or twine.
- A hot glue gun.
Step-by-Step Guide:
Step 1: Sculpt the Mask Use the air-dry clay to sculpt the plague doctor mask. The main part is the long, pointy beak. You can shape it around a paper cup to help it hold its form. Don’t forget to add two round eye holes.
Step 2: Let it Dry and Paint Let the clay mask dry completely. Then, paint it with black paint. Once it’s dry, you can use a paper towel to rub a little bit of brown paint on it to make it look like old leather.
Step 3: Make the Pouch Take your piece of brown fabric and wrap it around the base of the lantern, gluing it in place. You can add little straps made from smaller strips of fabric.
Step 4: Assemble Your Doctor With an adult’s help, use the hot glue gun to attach the finished mask to the top of the lantern.
Step 5: Final Touches You can tie a little bundle of dried flowers or herbs (like lavender) to the side of the lantern with some twine for a final, authentic touch.
5. The Pumpkin Patch Golem

From the haunted soil of a pumpkin patch, a mighty creature has risen. This candle holder is a large, powerful golem, a monster made of dark, twisted vines and earth. Its body is muscular and imposing, with a terrifying, jack-o’-lantern-like face.
The golem’s body is embedded with several small, glowing pumpkins that seem to grow right out of its skin. In one hand, held high like a torch, it holds a platform for a single candle. This is a truly impressive centerpiece that brings the scary stories of the harvest season to life.
DIY Instructions: How to Raise a Golem
What You’ll Need:
- A wireframe for the body (you can use a posable art mannequin or bend some thick wire into a human shape).
- Dark brown or black air-dry clay.
- Several small, plastic jack-o’-lanterns (like the kind on a string of lights).
- One small, flat disc or bottle cap for the candle holder.
- A hot glue gun.
- A small, battery-operated LED for inside the head.
Step-by-Step Guide:
Step 1: Build the Body Wrap your wireframe with the air-dry clay. Sculpt it to look like thick, twisting vines and powerful muscles.
Step 2: Add the Pumpkins While the clay is still soft, press the small plastic pumpkins into the golem’s chest and stomach.
Step 3: Sculpt the Head Use more clay to sculpt a scary head. Leave the inside hollow. After it dries, an adult can help you drill small holes for the eyes and mouth. You can place the small LED inside to make it glow.
Step 4: Add the Candle Holder Position one of the golem’s arms so it’s reaching up. Glue the flat disc to its hand to hold the candle. Let all the clay dry for a day or two.
Step 5: Finishing Touches You can paint the golem with some darker colors to add more detail. Place the LED in the head, and your monster is ready.
6. The Vampire’s Chalice

This is a goblet fit for a vampire prince. It is a large, blood-red wine glass, but it has been transformed into a work of gothic art. The stem of the glass is wrapped in thorny, metallic vines that crawl up to the cup.
A detailed, menacing bat with its wings spread wide serves as the centerpiece, clinging to the side of the glass. The entire holder has a pewter, antique finish, with drops of red that look like freshly spilled blood. The candle sits inside the red glass, making the whole chalice glow like it’s filled with a sinister liquid.
DIY Instructions: How to Create a Vampire’s Goblet
What You’ll Need:
- A large, cheap wine glass (red glass is great, but clear works too).
- A plastic toy bat.
- A hot glue gun.
- Silver or pewter-colored spray paint.
- Red craft paint.
Step-by-Step Guide:
Step 1: Prepare Your Chalice Make sure your wine glass is clean and dry.
Step 2: Add the Details This part needs an adult’s help. Use the hot glue gun to create raised designs on the stem and base of the glass. Make them look like thorny vines. Then, glue the plastic bat to the front of the glass.
Step 3: Paint it Take the decorated glass outside and ask an adult to spray paint the entire outside of it with the silver or pewter paint. Be careful not to get paint on the inside of the cup.
Step 4: Add the Blood Let the spray paint dry completely. Then, take your red paint and use a small brush to add “blood” drops on the thorns and on the bat’s fangs.
Step 5: Light It Up Place a tea light or a small votive candle inside the glass. If you used a clear glass, the silver paint will make the inside glow beautifully.
7. The Drowned Maiden’s Light

This candle holder is a sorrowful and beautiful piece. It is a bust of a young woman, sculpted to look like the figurehead of a sunken ship. Her form is cracked and weathered, as if she has spent years at the bottom of the sea.
Seaweed and bits of rope are tangled in her hair and around her arms. Her expression is sad and peaceful as she holds her hands out, offering a single, large candle. The piece is painted to look like water-logged stone, creating a ghostly and romantic decoration for a nautical-themed Halloween.
DIY Instructions: How to Make a Shipwreck Figurehead
What You’ll Need:
- A styrofoam wig head and a styrofoam block for the shoulders.
- Gray craft paint with a stone or texture finish.
- Fake seaweed or green craft moss.
- A piece of thick, rough-looking twine or rope.
- A hot glue gun.
- A pillar candle plate.
- Black and green paint for details.
Step-by-Step Guide:
Step 1: Build Your Maiden Hot glue the wig head to the styrofoam block. If you want to add arms, you can use pieces of a pool noodle or rolled-up cardboard and attach them with glue.
Step 2: Turn Her to Stone Paint the entire bust with the gray, stone-textured paint. Let it dry.
Step 3: Make Her Look Old Water down some black and green paint. Brush this watery paint all over the statue, especially in the cracks. This will make her look old and like she has algae growing on her.
Step 4: Add the Details Use the hot glue gun to add the seaweed and rope. Drape them over her shoulders and in her hair.
Step 5: Add the Light You’ll need an adult for this part. Hot glue the candle plate to the statue’s hands, or directly to the top of the shoulder block if you didn’t make arms. Make sure it’s secure before placing a candle on it.
8. The Dungeon Keeper’s Keys

This candle holder looks like it belongs in the deepest, darkest dungeon of a medieval castle. It is a small chandelier made of huge, antique-style skeleton keys. The keys are dark and heavy, with ornate tops that look like they could unlock a castle gate or a treasure chest.
The keys themselves form the arms of the chandelier, each holding a candle at its end. The whole thing hangs from heavy, rusted chains, adding to the dungeon-like feel. It’s a creative and imposing piece that is perfect for a castle or dungeon-themed party.
DIY Instructions: How to Forge a Key Chandelier
What You’ll Need:
- Several large, plastic skeleton keys (from a Halloween or craft store).
- A metal or wooden ring (an embroidery hoop works well).
- Some plastic chain.
- Taper candle holders.
- Black or dark iron-colored spray paint.
- Strong glue (like E6000, for an adult to use).
Step-by-Step Guide:
Step 1: Paint Everything Take your plastic keys, chain, and the ring outside. Ask an adult to spray paint all the pieces with the black or iron-colored paint. Let them dry.
Step 2: Assemble the Chandelier Lay out your ring. Ask an adult to use the strong glue to attach the large plastic keys so they hang down from the ring. Space them out evenly.
Step 3: Add the Candle Holders This also requires strong glue and an adult’s help. Glue the taper candle holders to the tops of the keys, where you would normally hold them. This part is tricky, so you may need to prop them up while they dry for a full day.
Step 4: Hang it Up Attach three or four pieces of the painted chain to the ring. Bring them together at the top so you can hang your new chandelier. (It’s best to use battery-operated candles for safety if you plan to hang it.)
9. The Belladonna’s Glow

This candle holder is beautiful, but with a hint of danger. It is a sculpture of a deadly nightshade plant, also known as Belladonna. The plant has dark green leaves, thorny stems, and beautiful, poisonous-looking purple flowers. Clusters of dark blackberries hang from the vines.
One of the large, bell-shaped flowers is actually a lamp, glowing from within. At the base, another flower holds a taper candle. The piece is a stunning work of art that captures the dangerous beauty of a witch’s garden.
DIY Instructions: How to Grow a Poisonous Plant
What You’ll Need:
- A base, like a small wooden plaque.
- Green floral wire and floral tape.
- Fake leaves and some small, fake purple flowers.
- Small black beads for the berries.
- A hot glue gun.
- One larger, plastic flower that you can fit a small light into.
- A battery-powered “fairy” light.
- A taper candle holder.
Step-by-Step Guide:
Step 1: Build the Stems Twist several pieces of the floral wire together to create a thick, sturdy stem. Stick one end into the base to make it stand up. You can use glue to secure it.
Step 2: Add Leaves and Thorns Wrap the wire stems with green floral tape. As you wrap, add the fake leaves. You can use tiny, sharp bits of wire or even thorns from a real rose bush (be careful!) and wrap them on with the tape.
Step 3: Add the Flowers and Berries Hot glue the smaller purple flowers and the clusters of black beads onto the stems.
Step 4: Make the Glowing Flower Take your larger plastic flower. Ask an adult to help you carefully place the end of the fairy light string inside. Glue this flower to the top of the main stem.
Step 5: Add the Candle Hot glue the taper candle holder near the base of the plant, nestled among the leaves. Hide the battery pack for the fairy lights behind the base.
10. The Ghost Bird’s Cage

This candle holder is a sad and beautiful little scene. An antique-style, white birdcage with a distressed, weathered finish stands on a pedestal. The door to the cage is open, but the inhabitant isn’t going anywhere.
Inside, a tiny, perfectly preserved bird skeleton sits next to a thick pillar candle. A delicate strand of ivy has grown into the cage, wrapping itself around the candle and the skeleton. The piece tells a quiet, spooky story and creates a feeling of romantic, gothic decay.
DIY Instructions: How to Build a Haunted Birdcage
What You’ll Need:
- A small, decorative birdcage (from a craft store).
- White chalky-finish spray paint.
- A small plastic bird skeleton (from a Halloween store).
- A strand of fake ivy.
- Sandpaper.
- A hot glue gun.
- A battery-operated pillar candle.
Step-by-Step Guide:
Step 1: Age the Cage Take your birdcage outside and ask an adult to help you spray paint it with the white chalk paint. Let it dry completely.
Step 2: Make it Look Old Once it’s dry, take a small piece of sandpaper and gently rub the edges and some of the bars of the cage. This will scrape off a little bit of the paint and make the cage look old and weathered.
Step 3: Add the Inhabitants Place your battery-operated candle inside the cage. With an adult’s help, use a small dot of hot glue to secure the little bird skeleton so it’s sitting next to the candle.
Step 4: Let Nature In Take your strand of fake ivy and weave it through the bars of the cage. Wrap it around the candle and the skeleton to make it look like the cage has been sitting in a forgotten garden for a long time. You can leave the door open or closed.
11. Medusa’s Coil Candelabra

A massive knot of serpents forms this intimidating candelabra. Their scaled bodies twist and coil around each other, creating a thick, textured column that seems to writhe with life. Individual snake heads branch out from the mass to form the arms, each one poised to hold a candle.
At the very peak, a cobra rises above the rest, its hood spread wide as it guards the central flame. The entire piece has a weathered, stone-like appearance, as if it were an ancient artifact from a mythical temple. It’s a bold decoration that brings a touch of dark mythology to a room.
DIY Instructions: How to Tame the Serpent Candelabra
What You’ll Need:
- An old candelabra, the curvier the better.
- Lots of small and medium plastic toy snakes.
- One larger plastic toy cobra.
- A hot glue gun and plenty of extra glue sticks.
- Gray or dark green spray paint that has a “stone texture” finish.
- Newspaper to protect your workspace.
Step-by-Step Guide:
Step 1: Prepare Your Candelabra Make sure your candelabra is clean and dry. Put it on your newspaper so you don’t get glue or paint on the table.
Step 2: Add the Snakes! This part is really fun but uses hot glue, so ask an adult for help. Start gluing the plastic snakes all over the candelabra. Wrap them around the center pole and twist them up the arms. Overlap them to cover all the empty spaces.
Step 3: Crown it with the Cobra Take your biggest snake, the cobra, and glue it right at the top. Position it so it looks like it’s holding the middle candle holder.
Step 4: Turn it to Stone Take your snake-covered candelabra outside or to a spot with good airflow. Ask an adult to help you spray paint the entire thing with the stone texture paint. Make sure to spray from all angles to cover every snake.
Step 5: Let it Dry Let the candelabra dry completely. It might take a few hours. Once it’s dry, you can add your candles and display your creature.
12. The Astrologer’s Orrery Candelabra

This candelabra is a beautiful model of the heavens. It is shaped like an armillary sphere, with golden rings that crisscross and spin around a central point. The design captures the mystery of the cosmos and the ancient practice of astrology, with zodiac symbols hanging from the rings.
Candles are placed around the outside of the sphere, their flames illuminating the intricate metalwork. The dark base is also adorned with mystical symbols, suggesting it belongs on the desk of a powerful sorcerer or a celestial observer. It brings a sense of magic and wonder to any space.
DIY Instructions: How to Build Your Own Celestial Sphere
What You’ll Need:
- Two or three different-sized wooden embroidery hoops.
- A round wooden plaque for the base.
- A small wooden dowel for the center pole.
- Metal candle cups (from a craft store).
- Gold and black spray paint.
- A gold permanent marker or paint pen.
- Strong glue (like E6000, ask an adult for help).
- A hot glue gun.
Step-by-Step Guide:
Step 1: Paint Your Pieces Ask an adult to help you spray paint the wooden base plaque black, and all the embroidery hoops gold. Let them dry.
Step 2: Build the Center Hot glue the wooden dowel so it’s standing straight up in the middle of the black base.
Step 3: Create the Sphere Take your gold hoops and nest them inside each other around the center pole. Angle them in different directions to look like a sphere. Use a few dots of hot glue where the hoops touch to hold them in place.
Step 4: Add the Candle Holders This step needs an adult’s help with the strong glue. Glue the metal candle cups to the outside of the biggest hoop. Space them out evenly.
Step 5: Decorate with Symbols Use your gold paint pen to draw zodiac signs or other magical symbols on the rings and around the edge of the black base. Let all the glue and paint dry for a full day before using.
13. The Lich’s Soul Box

This is no ordinary container. It’s an ornate, ancient-looking chest, heavily decorated with skulls and gothic patterns made of bone-like material. The lid is open, revealing a source of mystical purple light that glows from within.
From this captured energy, a holder for a single taper candle emerges, wreathed in more purple light. Green gems also glow from the box’s exterior, hinting at the powerful magic contained inside. This piece looks like an artifact that holds a powerful spirit, using its essence to light your way.
DIY Instructions: How to Construct a Soul Box
What You’ll Need:
- A small wooden craft box with a lid.
- Small plastic skulls (from a craft store).
- Puffy paint or a hot glue gun to create raised designs.
- Silver and black craft paint.
- Purple and green plastic gems.
- A battery-powered purple LED light or purple fairy lights.
- A taper candle holder.
- A hot glue gun.
Step-by-Step Guide:
Step 1: Decorate the Box Use a hot glue gun (with an adult’s help) or puffy paint to draw swirly, magical designs all over the outside of the box. Then, hot glue the small plastic skulls onto the corners and sides.
Step 2: Paint the Box Paint the entire outside of the box, including your designs and the skulls, with black paint. Let it dry completely.
Step 3: Add the Details Dip your brush in the silver paint and wipe most of it off on a paper towel. Lightly brush the silver over the raised designs and skulls. This “dry brushing” technique will make the details pop.
Step 4: Add the Magic Hot glue the purple and green gems onto the outside of the box. Place the battery-powered purple light inside.
Step 5: Place the Candle Holder Hot glue the taper candle holder to the inside of the box. Position it so it looks like it’s rising out of the magical light.
14. The Scarecrow’s Heartlight

This isn’t your typical garden scarecrow. He stands with a stitched-on, sad expression, his straw hands outstretched as if waiting for a friend. A tiny black crow perches on his shoulder, keeping him company.
But in the center of his patched-up chest, where a heart should be, there is a hollow space. Inside this opening hangs a small, glowing lantern. The warm light provides a strange and poignant feeling, transforming the scarecrow from something scary into something with a gentle, hidden warmth.
DIY Instructions: How to Give a Scarecrow a Heart
What You’ll Need:
- A small tabletop scarecrow decoration.
- A miniature battery-operated lantern (from a craft store’s dollhouse section).
- Scissors or a craft knife (an adult must do this part).
- A hot glue gun.
- A small piece of fabric that matches the scarecrow’s clothes.
Step-by-Step Guide:
Step 1: The Operation This is a job for a grown-up. Ask them to use the scissors or craft knife to carefully cut a hole in the middle of the scarecrow’s chest. The hole should be just big enough for your mini lantern to fit inside.
Step 2: Clean it Up If the edges of the hole are a little messy, you can glue a little border of fabric around the inside rim. This will make it look neat.
Step 3: Install the Lantern Turn on your mini lantern. With an adult’s help, use the hot glue gun to carefully put a few dots of glue on the top of the lantern.
Step 4: Bring it to Life Gently press the lantern up inside the hole you cut. The goal is to make it look like the lantern is hanging inside the scarecrow’s chest. Hold it in place for a minute until the glue sets, and your scarecrow now has a glowing heart.
15. The Pierrot’s Tear Candlestick

This candlestick holder captures the sad beauty of a classic Pierrot clown. The white ceramic face has a gentle, melancholic smile and dark, hollowed-out eyes that give it a spooky feel. A single, dramatic black tear is painted running down from one eye.
The clown wears a ruffled collar at the base, completing the iconic look. The candle holder itself rises from the top of the head. The entire piece is a simple but unsettling work of art. It’s a decoration for those who appreciate a more subtle, psychological kind of horror.
DIY Instructions: How to Make a Crying Clown
What You’ll Need:
- A styrofoam wig head (from a craft store).
- White, black, and red acrylic paint.
- Paintbrushes.
- A paper cupcake liner.
- A taper candle holder.
- Mod Podge or white glue to seal it.
- A hot glue gun.
Step-by-Step Guide:
Step 1: Paint the Face Paint the entire wig head white and let it dry. Using a smaller brush, carefully paint on the clown’s face. Give it thin eyebrows, a red nose, a red smile, and black eye sockets. Then, paint a single black teardrop falling from one of the eyes.
Step 2: Make the Collar Take the paper cupcake liner and stretch it out. Glue it around the neck of the wig head to create the ruffled collar.
Step 3: Give it a Shine To make it look like ceramic, paint a coat of Mod Podge or slightly watered-down white glue over the entire head and collar. It will dry clear and shiny.
Step 4: Add the Candle Holder Ask an adult to use the hot glue gun to attach the taper candle holder to the very top of the head. Let it cool completely before adding a candle.
16. The Cursed Effigy Candle Holder

This piece is both beautiful and deeply unsettling. It begins as a classic-style bust of a woman with elegant, sculpted hair and delicate features. But this beauty is destroyed on one side. Half of her face is obscured by a thick, dripping layer of what looks like melted flesh or wax.
A candle sits on top of her head, with red wax already dripping down, adding to the gruesome effect. Her one visible eye stares out, wide and pleading, with a single tear of blood. It is a truly dramatic and artistic piece of horror decor that tells a terrifying story.
DIY Instructions: How to Create a Meltdown Bust
What You’ll Need:
- A styrofoam wig head.
- White spray paint.
- A hot glue gun and MANY extra glue sticks (this is the main material!).
- Flesh-colored or pink acrylic paint.
- Red, black, and brown paint for the small details.
- Paintbrushes.
- A flat-topped lid or a pillar candle holder.
Step-by-Step Guide:
Step 1: Prepare the Bust Spray paint the wig head white and let it dry. Carefully paint one eye to look realistic. Paint the lips red. Then, add a small red “tear” falling from the painted eye.
Step 2: The Meltdown This part is very important and needs adult supervision. Take the hot glue gun and start dripping hot glue all over the other side of the face. Build up thick layers. Let it drip down the head and neck. The goal is to make it look like the head is melting.
Step 3: Paint the Melted Parts Once all the glue is completely cool and hard, use the flesh-colored paint to cover all the glue drips. You can use a little brown or red paint in the deepest parts of the drips to make it look more realistic and gross.
Step 4: Add the Candle Holder Ask an adult to hot glue the pillar candle holder or flat lid to the top of the head. Now your cursed creation is ready.
17. The Cathedral Guardian Candle Holder

Perched atop a crumbling piece of a gothic cathedral, a fearsome gargoyle keeps watch. With its powerful muscles, sharp claws, and leathery wings, it is the classic image of a monstrous stone protector.
The creature crouches, its form covered in moss and the weathering of age, as if it has been sitting there for centuries. In its outstretched, clawed hands, it carefully holds a candle, offering its light to ward off the darkness. This statue is a powerful tribute to gothic horror and dark medieval fantasy.
DIY Instructions: How to Sculpt a Gargoyle’s Perch
What You’ll Need:
- A plastic gargoyle statue (from a Halloween or garden store).
- A small, square wooden box to be the base.
- Gray craft paint that has a stone texture.
- Green and black paint.
- A small, shallow bowl or a candle plate that fits in the gargoyle’s hands.
- Strong glue (like E6000, for an adult to use).
- Craft moss.
- A hot glue gun.
Step-by-Step Guide:
Step 1: Build the Statue Ask an adult to use the strong glue to attach the gargoyle statue onto the top of the wooden box. Let it dry so it’s very sturdy.
Step 2: Turn it to Stone Paint the entire statue and the box with the gray stone-texture paint. Let it dry completely.
Step 3: Make it Look Old Mix a little bit of black paint with water to make it very thin. Brush this watery black paint all over the statue, then use a paper towel to wipe most of it off. The black will stay in all the cracks and make it look ancient.
Step 4: Add Moss Use a small brush to dab some green paint in some of the crevices to look like growing moss. Then, use a hot glue gun to stick small patches of the craft moss onto the base and the gargoyle’s shoulders.
Step 5: Add the Candle Holder Ask an adult to use the strong glue to attach the shallow bowl or candle plate into the gargoyle’s hands. Let it dry for a full day.
18. The Dragon’s Hatching Light

A magical moment is captured forever in this candle holder. A large, green, scaly dragon egg sits safely in a dark nest made of twisted branches and what looks like animal teeth. The egg has cracked open, not to reveal a baby dragon, but a glowing, fiery core.
A single tea light sits inside, making the whole egg glow from within. A tiny, clawed dragon hand reaches out from the crack, as if the creature is just about to emerge into the world. It is a fantastic piece for any fantasy lover’s collection.
DIY Instructions: How to Hatch Your Own Dragon Egg
What You’ll Need:
- A large plastic Easter egg.
- A hot glue gun.
- Green metallic paint.
- A small plastic bowl for the nest.
- Small twigs and sticks.
- A tiny plastic toy dragon hand.
- Black spray paint.
- Gold or orange paint.
- A battery-operated tea light.
Step-by-Step Guide:
Step 1: Make the Egg Scaly With an adult’s help, use the hot glue gun to draw a scale pattern all over the outside of the plastic egg. Make small, overlapping “U” shapes. Once the glue is cool, paint the egg with green metallic paint.
Step 2: Crack the Egg Ask an adult to carefully use scissors to cut a jagged, cracked opening in the front of the egg.
Step 3: Make it Glow Paint the inside of the egg with gold or orange paint. This will make it look like it’s glowing when you put the light inside.
Step 4: Build the Nest Spray paint the small bowl and the twigs black. Hot glue the twigs all around the outside of the bowl.
Step 5: Assemble Your Dragon Glue the finished egg into the nest. Glue the tiny dragon hand so it looks like it’s coming out of the crack. Place the battery-operated tea light inside the egg, and your dragon is ready to hatch!
19. The Carnivorous Votive Holder

This hungry-looking plant is ready for its next meal, and it’s not a fly. Shaped like a Venus flytrap from another planet, its massive purple head is wide open, showing off rows of sharp, white teeth. The inside of its mouth is a swirl of bright, slimy-looking green.
Instead of an insect, it has captured a tea light, which sits on its tongue and illuminates its fearsome grin. The plant’s body has a cracked, dark texture, and it is supported by tentacle-like roots with bright pink spots. It’s a fun and creepy piece of decor that is full of personality.
DIY Instructions: How to Grow a Man-Eating Plant
What You’ll Need:
- A large styrofoam ball.
- Air-dry clay.
- White craft foam for the teeth.
- Purple, green, and pink acrylic paint.
- Paintbrushes.
- A craft knife (an adult must use this).
- A hot glue gun.
- A battery-operated tea light.
Step-by-Step Guide:
Step 1: Form the Mouth Ask an adult to carefully cut the styrofoam ball in half. Then, have them scoop out a little bit from the inside of each half to create a mouth shape.
Step 2: Sculpt the Plant Cover the outside and inside of the two halves with a layer of air-dry clay. On the bottom half, sculpt some roots or tentacles. Let the clay dry completely, which might take a day or two.
Step 3: Paint Your Monster Paint the outside of the plant purple and the inside of the mouth bright green. You can add pink spots on the roots and draw green veins on the outside to make it look more detailed.
Step 4: Make the Teeth Cut out lots of small, pointy triangles from the white craft foam.
Step 5: Assemble the Plant With an adult’s help, use the hot glue gun to attach the two halves of the mouth together at the back, like a hinge. Then, glue the teeth all around the inside edge of the mouth. Place the tea light on the “tongue,” and it’s ready to bite!
20. The Enchanted Forest Fungi Centerpiece

This centerpiece brings a magical, glowing forest floor right into your home. A cluster of mushrooms of all shapes and sizes grows from a mossy, decaying log. The colors are rich and otherworldly, with some mushrooms in natural, earthy tones and others in vibrant blues and purples.
Several of the largest mushroom caps are designed to hold tea lights, their soft glow making the colors of the other fungi even more beautiful. The effect is a twinkling, magical mushroom grove, a setting fit for the secret gatherings of fairies or elves.
DIY Instructions: How to Grow a Mushroom Grove
What You’ll Need:
- A nice piece of driftwood or a small log.
- Air-dry clay.
- Small wooden bowls, bottle caps, or buttons for the mushroom tops.
- A hot glue gun.
- Craft moss.
- Various colors of acrylic paint (brown, red, blue, purple).
- Battery-operated tea lights.
Step-by-Step Guide:
Step 1: Make Your Mushrooms Take a piece of air-dry clay and roll it into a thick stem. Stick a wooden bowl or bottle cap on top to be the mushroom cap. Make lots of these in different heights and sizes. Let them dry completely.
Step 2: Paint the Fungi Once the clay is dry, paint your mushrooms. You can make some look like classic red-and-white toadstools, some can be plain brown, and some can be magical blues and purples.
Step 3: Plant Your Grove Get your log and decide where you want your mushrooms to grow. With an adult’s help, use the hot glue gun to attach the mushrooms to the log in little groups.
Step 4: Add the Details Hot glue patches of craft moss onto the log and around the base of the mushrooms to make it look like a real forest floor.
Step 5: Light it Up Choose a few of the mushrooms that have the flattest tops. Place a battery-operated tea light on top of each one. You can use a tiny dot of glue to make sure they are secure.
21. The Cthulhu Votive Idol

From the sunken city of R’lyeh, this idol brings cosmic horror to your tabletop. The fearsome form of the great Cthulhu is captured in a dark, greenish stone, its surface covered in cryptic, otherworldly runes. With powerful wings and a face of writhing tentacles, the creature seems ancient and unknowable.
It lifts its hands to offer up a bowl, also covered in strange symbols, ready to hold a votive candle. This is not just a decoration; it feels like a forbidden artifact, a conduit to a dimension of madness. Its presence is a tribute to the thrilling tales of eldritch horror.
DIY Instructions: How to Sculpt Your Own Elder God
What You’ll Need:
- A small, stout action figure or garden gnome for the body base.
- A small plastic octopus toy for the head.
- Plastic wings from a dragon or bat toy.
- Air-dry clay.
- A small, shallow bottle cap for the candle holder.
- Dark green and black craft paint.
- A paintbrush.
- A hot glue gun.
Step-by-Step Guide:
Step 1: Build Your Creature With an adult’s help, use a hot glue gun to attach the octopus toy where the action figure’s head was. Then, glue the wings onto its back.
Step 2: Add the Details Use air-dry clay to cover up the seams and blend all the parts together. Add a layer of clay to make the figure look chubbier and more powerful.
Step 3: Carve the Runes While the clay is still soft, use a toothpick or a dull pencil to gently carve strange symbols and lines all over the creature’s body and on the bottle cap.
Step 4: Let It Dry Let the clay harden completely. This might take a full day or two.
Step 5: Paint Your Idol Paint the entire statue, including the bottle cap, with dark green paint. Once it’s dry, water down some black paint and brush it all over. Quickly wipe the black paint off the high spots with a paper towel. This will make the runes stand out. Finally, hot glue the finished bottle cap into the creature’s hands.
22. The Osseous Candelabrum

This piece is a masterpiece of macabre elegance. A full human spinal column, complete with the hip bones for a sturdy base, rises up in a graceful, serpentine curve. The texture and color of the bones are disturbingly realistic, looking like a specimen from a Victorian surgeon’s collection.
At the top, the spine blossoms into a classic candelabra, with multiple arms branching out to hold taper candles. It is a stunning, anatomical work of art that is both beautiful and unsettling. This candelabrum would be right at home in the laboratory of a mad scientist.
DIY Instructions: How to Assemble an Anatomical Candelabra
What You’ll Need:
- A life-sized plastic spine model (you can find these online).
- The top part of an old candelabra with several arms.
- Bone-colored or ivory spray paint.
- Brown and black craft paint for aging.
- Strong glue (like epoxy or E6000, ask an adult for help).
- A small, heavy base to keep it from tipping (like a wooden plaque).
Step-by-Step Guide:
Step 1: Build the Spine First, assemble your plastic spine model according to its instructions. Ask an adult to use the strong glue to securely attach the hip bones to your heavy base.
Step 2: Attach the Candelabra Once the base is dry, have an adult use more of the strong glue to attach the candelabra top to the very top bone of the spine. You may need to prop it up while it dries for a full day.
Step 3: Paint the Bones Take the whole structure outside and spray paint it with the bone-colored paint. Make sure to get into all the little crevices.
Step 4: Make It Look Old Let the spray paint dry. Then, water down some brown and black paint. Brush this dark, watery paint over all the bones, letting it sink into the cracks. Use a paper towel to wipe off the excess. This will make your spine look old and realistic.
23. The Entomologist’s Nightmare Candelabra

At first glance, this is an elegant, antique candelabra. But a closer look reveals a beautiful infestation. The metal is crawling with a stunning variety of insects, from a large, ethereal luna moth to shimmering, iridescent beetles.
Delicate, wispy spiderwebs are spun between the arms, trapping smaller moths and spiders in their threads. The piece looks as though it was left in a forgotten corner of a naturalist’s study and has become a part of the collection itself. It is a work of art for those who find beauty in the creepy crawlies of the world.
DIY Instructions: How to Curate an Insect Candelabra
What You’ll Need:
- An old, ornate candelabra (thrift stores are great for this).
- A variety of realistic-looking plastic insects, especially moths and beetles.
- Fake spider web material.
- A hot glue gun.
Step-by-Step Guide:
Step 1: Clean Your Candelabra Make sure your candelabra is clean and free of dust. This will help the glue stick better.
Step 2: Place Your Bugs With an adult’s help, use the hot glue gun to start attaching your plastic insects all over the candelabra. Put the biggest, most impressive ones (like the big moth) in a central spot. Arrange the others so they look like they are crawling up the arms and base.
Step 3: Spin the Webs This part is fun! Take the fake spider web material and gently stretch it out. The thinner you can make it, the more realistic it will look. Drape and wrap the webs between the arms of the candelabra and over some of the insects.
Step 4: Ready for Display That’s it! This is a very simple but effective project. Add your candles, and your creepy, crawly centerpiece is ready to be admired.
24. The Swamp-Light Tree Candelabra

This candelabra looks as if it were pulled from the heart of a haunted southern swamp. The base and stem are a gnarled, twisted tree trunk, complete with moss and a small frog hiding at the bottom. The arms of the candelabra are like bare, spooky branches reaching for the sky.
Long, stringy strands of Spanish moss hang from the branches, giving it a weeping, ghostly appearance. Tucked within the branches and moss are tiny, glowing lights, like swamp gas or captive fireflies, adding to the mysterious and magical feel.
DIY Instructions: How to Grow a Haunted Swamp Tree
What You’ll Need:
- An old candelabra.
- Air-dry clay or a hot glue gun to create texture.
- Dark brown and green paint.
- A bag of craft Spanish moss.
- A string of battery-powered “fairy” or “firefly” lights (the kind with thin wire).
- A hot glue gun.
Step-by-Step Guide:
Step 1: Create the Bark Use air-dry clay to wrap the stem and arms of the candelabra. Use a toothpick to scratch lines into it to look like bark. Alternatively, you can use a hot glue gun (with an adult’s help) to make long, drippy lines down the candelabra to create a bark texture.
Step 2: Paint Your Tree Once the clay or glue is dry and hard, paint the entire candelabra with dark brown paint. You can use a little green paint to add mossy patches near the base.
Step 3: Add the Moss Use the hot glue gun to attach bunches of the Spanish moss to the arms of the candelabra, letting it hang down naturally.
Step 4: Add the Magic Lights Carefully wrap the string of fairy lights around the branches of your tree. Tuck the small battery pack near the base, hiding it behind some moss. Add your candles, turn on the lights, and your swamp tree will glow.
25. The Cathedral Spire Candelabra

This candle holder is a magnificent piece of gothic architecture in miniature. It is shaped like the towering spire of a haunted cathedral, complete with detailed stonework, arched windows, and snarling gargoyles that guard the corners.
The most stunning feature is the beautiful stained-glass windows, which glow with rich color from a light within. The candles themselves sit high on the spire, like warning beacons on a vampire’s castle. This piece is a testament to the dark beauty of gothic design, perfect for a truly dramatic Halloween display.
DIY Instructions: How to Build a Gothic Cathedral
What You’ll Need:
- A tall, pre-made wooden birdhouse or craft castle.
- Sheets of gray craft foam.
- Small plastic gargoyles (from a craft store).
- Gray spray paint with a stone texture.
- Vellum paper (it’s see-through, like tracing paper).
- Colored Sharpie markers.
- A string of battery-powered fairy lights.
- A hot glue gun.
- Taper candle holders.
Step-by-Step Guide:
Step 1: Add the Details Cut out window frames, arches, and other stone details from the gray craft foam. With an adult’s help, hot glue these details onto your wooden structure. Glue on the gargoyles.
Step 2: Turn it to Stone Take the structure outside and ask an adult to help you spray paint the entire thing with the stone-texture gray paint.
Step 3: Make the Stained Glass Cut pieces of vellum paper to fit the inside of your windows. Use the colored Sharpies to draw beautiful stained-glass patterns on the paper. Glue these paper windows to the inside of your cathedral.
Step 4: Light it Up Place the string of fairy lights inside the structure. The light will shine through your handmade stained-glass windows.
Step 5: Add the Candles Hot glue the taper candle holders to the top spires of your cathedral.
26. The Sunken Treasure Skele-bra

This candelabra tells the tale of a cursed pirate treasure. A wooden chest, encrusted with coral and barnacles, rests on the sea floor. Skeletons of the doomed crew are tangled in the treasure, their bony arms reaching up out of the chest.
The skeletal hands don’t reach for gold, but instead hold the candles, lighting their watery grave. Gold coins spill from the chest, and sea life like starfish and a loyal parrot have become part of the scene. The entire piece is dripping with faux water and seaweed, as if it were just pulled from Davy Jones’ Locker.
DIY Instructions: How to Raise a Cursed Treasure
What You’ll Need:
- A small wooden craft treasure chest.
- Plastic skeleton parts (a skull and several arms are needed).
- Fake plastic gold coins.
- Small plastic starfish and a small toy parrot.
- Green and blue paint.
- A hot glue gun and extra glue sticks.
- Taper candle holders.
Step-by-Step Guide:
Step 1: Arrange the Skeletons With an adult’s help, use the hot glue gun to attach the skeleton parts to the chest. Position them so it looks like they are climbing out. Make sure the arms are sticking straight up.
Step 2: Add the Treasure and Friends Fill the chest with the plastic gold coins, letting them spill over the side. Glue the starfish and the parrot onto the chest.
Step 3: Make it Look Sunken This is the fun part! Use the hot glue gun to create long, drippy lines all over the chest and skeletons. This will look like slimy seaweed and water. Once the glue is cool, use the green and blue paint to color these drips.
Step 4: Add the Candle Holders Finally, hot glue the taper candle holders into the open palms of the skeleton hands.
27. The Necromancer’s Final Spell

A powerful and forbidden spell is captured in this unique candle holder. An ancient scroll, made of aged parchment and filled with glowing red runes, is held open by two skeletal hands. The edges of the scroll are dark and crumbling, as if it contains a dangerous magic.
The hands seem to be presenting the scroll to the viewer, their bony fingers gripping the edges tightly. In the center, where the magic is most powerful, a platform holds a thick pillar candle. The candlelight illuminates the strange writing, making it feel as though you have stumbled upon a dark ritual in progress.
DIY Instructions: How to Scribe a Magic Scroll
What You’ll Need:
- A sheet of thick tan or beige craft foam.
- Two plastic skeleton hands.
- A red paint pen or permanent marker.
- Black craft paint.
- A sponge.
- Two small wooden dowels.
- A hot glue gun.
- A battery-operated pillar candle.
Step-by-Step Guide:
Step 1: Age the Scroll Take your sheet of craft foam. Use the red paint pen to draw a large, magical-looking symbol in the middle and some squiggly writing all over. Then, dip a sponge in a little bit of black paint and gently dab it all around the edges of the foam to make it look burnt and old.
Step 2: Make it a Scroll With an adult’s help, hot glue the two wooden dowels to the top and bottom edges of the craft foam sheet. Gently roll the ends around the dowels to give it a real scroll shape.
Step 3: Add the Hands Hot glue the plastic skeleton hands to the back of the scroll so that it looks like they are holding it open for you to see.
Step 4: Place the Candle You can either glue a small plate to the front to hold the candle, or you can cut a hole in the foam where the main symbol is and push the base of the battery-operated candle through from the back.
28. The Pharaoh’s Curse Votive

The mysteries of ancient Egypt are unlocked with this candle holder. It is a beautifully detailed sarcophagus of an Egyptian pharaoh, decorated with intricate hieroglyphs and rich colors of gold, blue, and red.
The sarcophagus stands open, but instead of a mummy, it reveals a space for a single candle. The candle’s flame casts a warm, flickering light on the golden interior, creating a sense of reverence and mystery. The lid rests beside it, featuring a carving of the jackal-headed god Anubis, the guardian of the afterlife, forever watching over the tomb’s light.
DIY Instructions: How to Build a Pharaoh’s Tomb
What You’ll Need:
- A tall, narrow craft box with a lid (like one for a wine bottle).
- Craft foam.
- A hot glue gun or puffy paint.
- Gold, blue, and red craft paint.
- Paintbrushes.
- A small plastic toy dog or wolf to be Anubis.
Step-by-Step Guide:
Step 1: Shape the Sarcophagus Use craft foam to build a pharaoh’s head shape on the top of the box’s lid.
Step 2: Add the Details Use a hot glue gun (with an adult’s help) or puffy paint to draw lines, patterns, and Egyptian symbols (like ankhs and eyes) all over the box and the lid. Paint your plastic animal gold and glue it to the lid as a final touch.
Step 3: Paint the Tomb Paint the entire box and lid with gold paint. Let it dry. Then, use small brushes to carefully paint the details you added with the blue and red paint. Paint the inside of the box a dark color.
Step 4: Add the Light Simply place a battery-operated candle inside the open sarcophagus. You can stand the lid up next to it.
29. The Frankenstein Coil Candlestick

It’s alive! This candle holder looks like it came straight from Dr. Frankenstein’s laboratory. The piece is a stunning recreation of a Tesla coil, with a heavy wooden base full of gauges and knobs, and a central column wrapped in shimmering copper wire.
Glass insulators and a “Danger: High Voltage” sign complete the look of a powerful, pseudo-scientific machine. The candle sits in a copper dish at the very top, acting as the “spark” that brings the whole creation to life. It’s an amazing piece for any fan of classic monster movies and mad science.
DIY Instructions: How to Power Up a Science Experiment
What You’ll Need:
- A small wooden box for the base.
- A cardboard tube.
- Copper-colored wire.
- A small copper or plastic bowl.
- A few bottle caps and beads for the knobs.
- Copper spray paint.
- A small piece of paper and a marker for the sign.
- A hot glue gun.
Step-by-Step Guide:
Step 1: Build the Control Panel Hot glue the bottle caps and beads onto the front of the wooden box to create the machine’s knobs and dials.
Step 2: Make the Coil Take your cardboard tube and carefully and tightly wrap the copper wire all the way around it from top to bottom. You can secure the ends with a dot of glue.
Step 3: Assemble the Machine Ask an adult to help you spray paint the small bowl with the copper paint. Once it’s dry, hot glue the cardboard tube coil onto the top of the wooden box. Then, glue the copper bowl on top of the coil.
Step 4: Final Touches Write “DANGER” on your small piece of paper and glue it to the front of the box. Place a pillar candle in the copper bowl on top, and your experiment is a success!
30. The Seance Summoner Candlestick

This candlestick holder is an instrument for contacting the spirit world. A skeletal hand, wearing an ornate, mystical-looking bracelet, rises from the center of the piece. Its bony fingers are wrapped around a metal candle holder, lifting the flame up as if it were a beacon to the other side.
The base that the hand emerges from is a beautiful spirit board, with a dark wood finish and intricate silver details. A matching planchette rests nearby, ready for a message. It’s a sophisticated and spooky piece that captures the eerie atmosphere of a Victorian seance.
DIY Instructions: How to Contact the Spirit World
What You’ll Need:
- A round wooden plaque.
- A plastic skeleton hand.
- A taper candle holder.
- Dark brown or black paint.
- A silver or white paint pen.
- A piece of craft foam or cardboard for the planchette.
- A hot glue gun.
Step-by-Step Guide:
Step 1: Create the Spirit Board Paint the round wooden plaque with the dark paint and let it dry. Use your paint pen to carefully write the alphabet, numbers 0-9, and the words “YES” and “NO” around the edge. You can add other magical symbols in the middle.
Step 2: Prepare the Hand With an adult’s help, use a hot glue gun to attach the taper candle holder securely into the palm of the plastic skeleton hand.
Step 3: Summon the Hand Use a generous amount of hot glue to attach the base of the skeleton hand to the very center of your painted spirit board. Make sure it’s standing up straight and is very sturdy.
Step 4: Make the Planchette Cut out the classic, heart-like planchette shape from your craft foam or cardboard. Paint it to match the board and use your paint pen to draw a circle in the middle. Place it on the board, and you are ready to light a candle and begin your seance!
31. The Arachnid’s Perch Candlestick

A terrifyingly elegant creature, this candlestick holder takes the form of a monstrous spider. Its detailed body, complete with red, menacing eyes, serves as the platform for a single taper candle. The spider’s eight long, spindly legs are bent and sharp, creating an unsettling silhouette as they form the base.
The stem is twisted, as if formed from thick strands of a web. The entire piece has a dark, wrought-iron finish that makes it look like a blacksmith’s nightmare. It is a striking centerpiece that is sure to make your guests’ skin crawl with delightful fright.
DIY Instructions: How to Weave a Spider Candlestick
What You’ll Need:
- Thick and thin craft wire.
- A taper candle holder (a metal one works best).
- Black floral tape.
- A hot glue gun.
- Two small red beads for the eyes.
- Black spray paint.
Step-by-Step Guide:
Step 1: Build the Skeleton Cut eight long, equal pieces of the thick wire for the legs. Cut one shorter, thick piece for the main stem.
Step 2: Form the Spider Bunch the eight leg wires together in the middle. Tightly wrap the thin wire around the center to hold them together and form the spider’s body. Then, bend the eight wires to look like creepy spider legs.
Step 3: Attach the Stem With an adult’s help, use a lot of hot glue to attach the main stem wire underneath the spider’s body. Bend this stem into a twisted shape and flare out the bottom wires to make a sturdy base.
Step 4: Wrap it Up Carefully wrap every part of your wire spider—the body, the legs, and the stem—with black floral tape. This will cover the wire and make it look solid.
Step 5: Add the Final Touches Hot glue the taper candle holder onto the top of the spider’s body. Glue the two red beads on the front to be the eyes. A final coat of black spray paint will give it a nice, uniform finish.
32. The Mystic’s Gaze Candlestick

This candle holder is a powerful occult symbol brought to life. A single, stunningly realistic eye stares out from the center of a golden, triangular frame. The eye is full of color and detail, looking so real that it seems to follow you around the room.
The frame is decorated with intricate, magical patterns, reminiscent of ancient alchemy or secret societies. The candle holder sits at the top of the triangle, positioning the flame like a beacon of mystical energy. It’s a piece that feels charged with knowledge and secret power.
DIY Instructions: How to Craft an All-Seeing Eye
What You’ll Need:
- A triangle-shaped piece of wood or very thick cardboard.
- A large, clear glass stone with a flat back (from a craft store).
- A picture of a realistic eye printed on paper, sized to fit your stone.
- Air-dry clay.
- A taper candle holder.
- Gold or bronze metallic paint.
- Clear glue or Mod Podge.
Step-by-Step Guide:
Step 1: Create the Eye Cut out the printed eye picture. Use the clear glue or Mod Podge to stick the picture to the flat back of the glass stone. The glass will magnify the picture and make it look like a real eye.
Step 2: Build the Frame Place your finished eye in the center of the wooden triangle. Use the air-dry clay to sculpt a frame around it. You can press patterns into the soft clay with a toothpick or the end of a pen.
Step 3: Add the Holder While the clay is still soft, press the base of the taper candle holder into the clay at the top point of the triangle.
Step 4: Let it Dry Let the clay harden completely. This might take a day or two.
Step 5: Paint it Gold Paint the entire clay frame and candle holder with the gold or bronze paint. You can water down some black paint to brush on and wipe off, which will make the patterns stand out more.
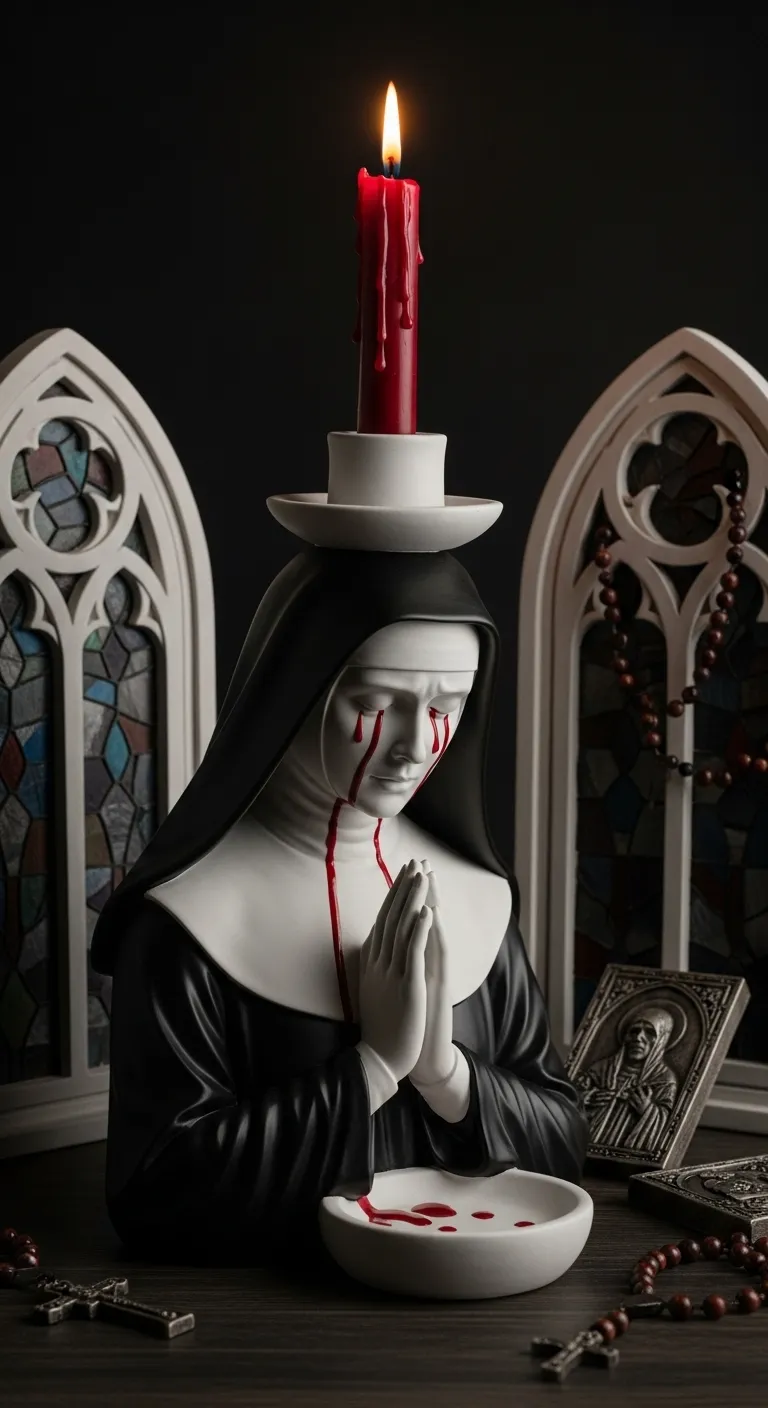
33. The Penitent Nun Candle Holder

A piece of beautiful and tragic horror, this candle holder is a bust of a praying nun. Her face is serene and her hands are clasped in prayer, creating a sense of quiet devotion. Dressed in a traditional black and white habit, she looks like a classic religious statue.
The horror comes from the candle. A red candle is placed on a holder atop her head. When lit, the melting red wax drips down her pale face, creating the horrifying illusion of bloody tears. A small white bowl is placed before her to catch the drips, completing the powerful and unsettling scene.
DIY Instructions: How to Sculpt a Weeping Holy Figure
What You’ll Need:
- A styrofoam wig head.
- Air-dry clay.
- White and black acrylic paint.
- A small, shallow white bowl.
- A flat-topped candle plate.
- A hot glue gun.
- A red candle.
Step-by-Step Guide:
Step 1: Sculpt the Habit Use the air-dry clay to sculpt the nun’s habit (the head covering and collar) directly onto the styrofoam head. You don’t need to sculpt the hands; the pose can be just her head and shoulders.
Step 2: Let the Clay Dry Let your sculpture sit for a day or two until the clay is completely hard.
Step 3: Paint the Figure Paint the face and the inside part of the collar white. Paint the outside of the habit black. Use a very fine brush to paint on closed eyelids and thin eyebrows.
Step 4: Assemble the Scene With an adult’s help, use a hot glue gun to attach the finished bust to a sturdy base. Glue the small white bowl in front of the bust. Then, glue the flat candle plate securely to the top of the nun’s head.
Step 5: Create the Effect Place a red candle on the plate. When you light it, the red wax will create the “bloody tears.”
34. The Horseman’s Jack-o’-Lantern

This candle holder is a fantastic tribute to the terrifying legend of the Headless Horseman. A gnarled, root-covered stand rises from the ground, holding a single, bright candle. But perched just above the flame is the Horseman’s famous projectile: a jack-o’-lantern.
The pumpkin is carved with a truly evil grin, and it glows from within with its own separate light. A weathered strap and rusty chain connect the pumpkin to the base, making it clear this is the head of the infamous rider. It’s a decoration that perfectly captures the spooky spirit of a classic ghost story.
DIY Instructions: How to Build the Headless Horseman’s Light
What You’ll Need:
- A medium-sized craft pumpkin (the kind you can carve).
- A sturdy pillar candle holder.
- Air-dry clay.
- Brown and black paint.
- A small piece of brown craft foam for the strap.
- A short piece of plastic toy chain.
- A hot glue gun.
- A battery-operated tea light.
Step-by-Step Guide:
Step 1: Prepare the Pumpkin Ask an adult to help you carve a scary face into the craft pumpkin. They should also cut a small hole in the bottom so you can put a light inside.
Step 2: Build the Base Take your pillar candle holder. Use the air-dry clay to wrap around the base and stem, sculpting it to look like gnarled tree roots. Let it dry completely.
Step 3: Paint the Base Paint your new root-covered base with brown paint. You can add some black details to make it look more realistic.
Step 4: Assemble the Scene Use a lot of hot glue (with an adult’s help) to attach the finished pumpkin to the base. It should sit just above and slightly behind the spot for the main candle.
Step 5: Add Details Cut a strip of the brown craft foam and glue it around the pumpkin like a strap. Glue the plastic chain on as well. Pop the battery-operated tea light inside the pumpkin to make its face glow.
35. “Nevermore” Wall Sconce

Perfect for a gothic library, this wall sconce brings the moody poetry of Edgar Allan Poe to life. A beautifully detailed, black raven perches atop a stack of old, leather-bound books that seem to float against the wall.
The titles on the book spines are a direct nod to Poe’s famous poem, reading “Lenore” and “Nevermore.” A small, twig-like branch juts out from the books, providing a perch for a single candle holder. This piece is a sophisticated and literary decoration that casts a wonderfully gloomy and romantic light.
DIY Instructions: How to Quote the Raven
What You’ll Need:
- 4-5 small, old hardcover books.
- A realistic plastic raven.
- A small but sturdy tree branch.
- A taper candle holder.
- Dark red, dark green, and black craft paint.
- A gold paint pen.
- Strong glue (like E6000 or wood glue, ask an adult for help).
- Two sturdy picture-hanging hooks.
Step-by-Step Guide:
Step 1: Prepare the Books Ask an adult to help you use the strong glue to glue the books together in a slightly messy stack. This needs to dry for a full day to be very strong.
Step 2: Decorate the Books Paint the spines and covers of the books with the dark, moody colors. Once that’s dry, use your gold paint pen to carefully write “Lenore” and “Nevermore” on the spines.
Step 3: Add the Perches Use more of the strong glue to attach the raven to the top of the book stack. Then, glue the sturdy branch so it sticks out from between two of the books.
Step 4: Attach the Holder and Hangers Glue the taper candle holder to the end of the branch. Again, let this dry completely. Finally, have an adult securely attach the two picture-hanging hooks to the back of the book stack so you can hang your creation safely on the wall.
Light is the soul of Halloween, and these 35 ideas give that light a truly haunted home. We have journeyed through haunted swamps, gothic cathedrals, and mad scientists’ labs. Each candlestick holder offers a unique story, transforming a simple flame into a dramatic centerpiece.
The true magic lies in creation. These projects show that you do not need a massive budget to create a powerful atmosphere. With simple materials and a bit of imagination, you can craft decorations that are personal and deeply unsettling. So choose your favorite, gather your supplies, and bring a new, spooky light into your home this season.
Key Takeaways
- Atmosphere is Everything: The right candlestick holder does more than just hold a candle; it sets a specific mood, from gothic romance to cosmic horror.
- Creativity Over Cost: Many of the most dramatic pieces can be created using inexpensive craft supplies, thrift store finds, and a little bit of DIY effort.
- Tell a Story: The best decorations have a narrative. A melting nun, a cursed treasure chest, or a raven on a book all tell a story that makes your decor more engaging.
- Safety First: Many of these projects are intricate. Using battery-operated LED candles is a safe and effective way to get that spooky flicker without any risk.