Finding the right gift often feels like a heavy chore. Store prices continue to rise every single year. You want to show love without breaking your bank account.

Handcrafted presents offer a unique touch that money simply cannot buy. These projects use simple items to create a luxury feel. Your partner will appreciate the effort you put into their surprise.
This guide helps you navigate the world of handmade luxury. You can create boutique quality items right at your kitchen table. Every project focuses on style and high end aesthetics.
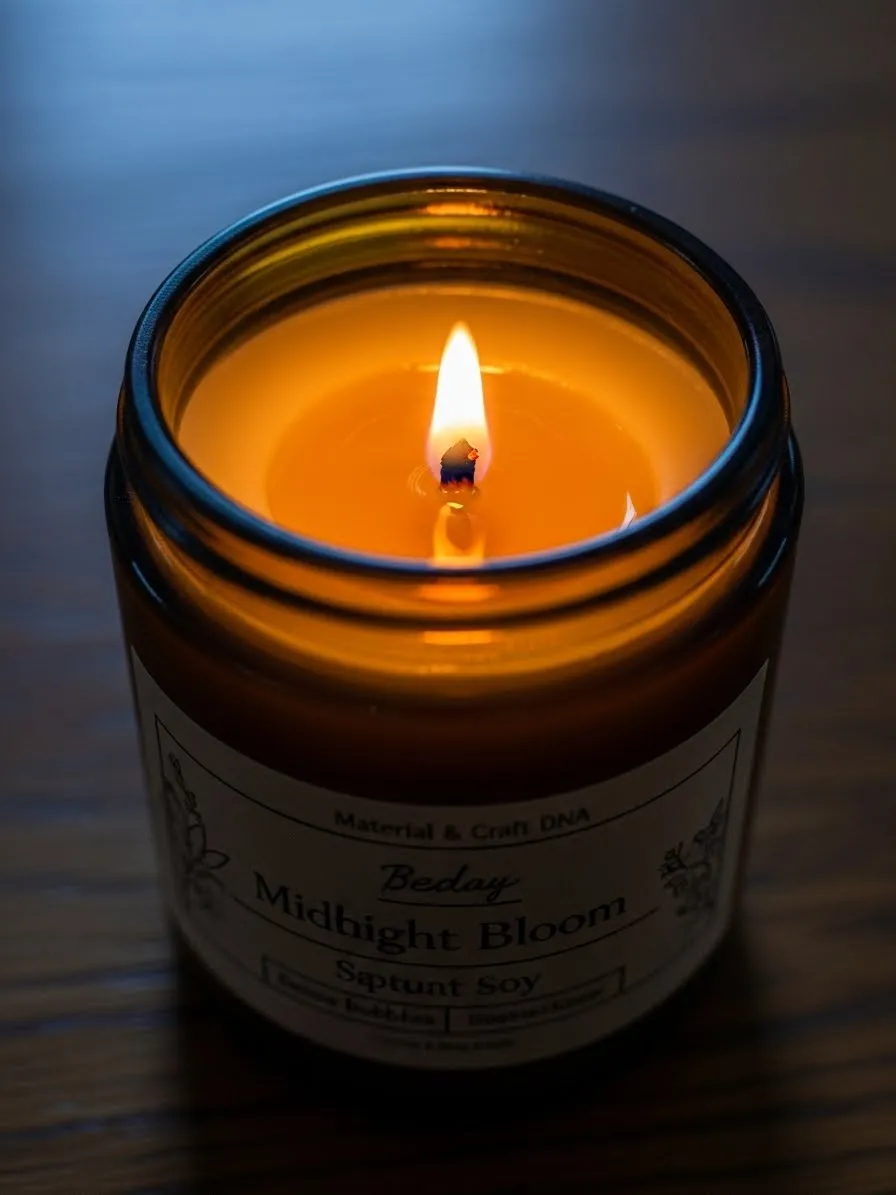
1 Boutique Amber Soy Candle
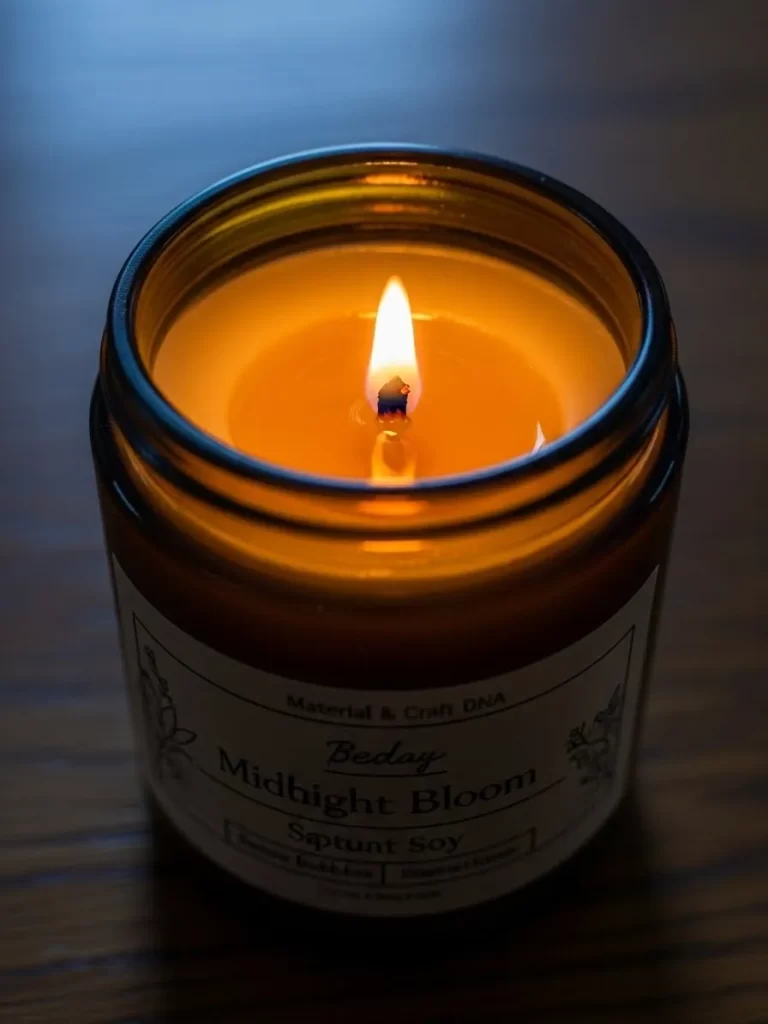
Amber glass jars create a warm atmosphere in any home. The golden light provides a sense of calm during quiet evenings. Natural soy wax ensures the candle stays beautiful for many hours. This material burns cleaner than traditional paraffin options. Adding a lid keeps the fragrance fresh for a much longer time.
Scented oils bring a professional touch to your handmade creation. Choose floral or earthy notes to match the recipient’s taste. Gift giving becomes more meaningful when you craft the item yourself. Custom labels provide that final expensive look found in luxury boutiques. Your loved one will feel truly special receiving a boutique quality item made by your hands.
Material Required List
- Soy wax flakes
- Amber glass jar with a lid
- Pre waxed cotton wick
- Fragrance oil
- Double sided wick sticker
- Paper for the label
Equipment Required List
- Medium sized pot
- Heat safe glass measuring cup
- Digital thermometer
- Long handle spoon
- Wooden clothespin
- Sharp scissors
DIY Instruction Step by Step
- Wash the amber jar with warm soapy water and dry it completely.
- Peel the backing off the wick sticker and stick it to the bottom of the cotton wick.
- Press the wick firmly into the center of the jar floor.
- Fill the pot with two inches of water and bring it to a low simmer.
- Place the heat safe measuring cup inside the pot of water.
- Add the soy wax flakes into the measuring cup to melt.
- Watch the temperature until the wax reaches eighty degrees Celsius.
- Take the cup out of the water carefully using an oven mitt.
- Pour your fragrance oil into the melted wax and stir slowly.
- Wait for the wax to cool down to sixty degrees Celsius.
- Pour the wax slowly into the amber jar while leaving space at the top.
- Clip the clothespin onto the wick and rest it across the jar opening to keep the wick straight.
- Leave the jar on a flat surface for twenty four hours to harden.
- Cut the wick so only one centimeter remains above the wax level.
- Glue your custom paper label onto the front of the jar.
2 Vintage Linen Love Scroll
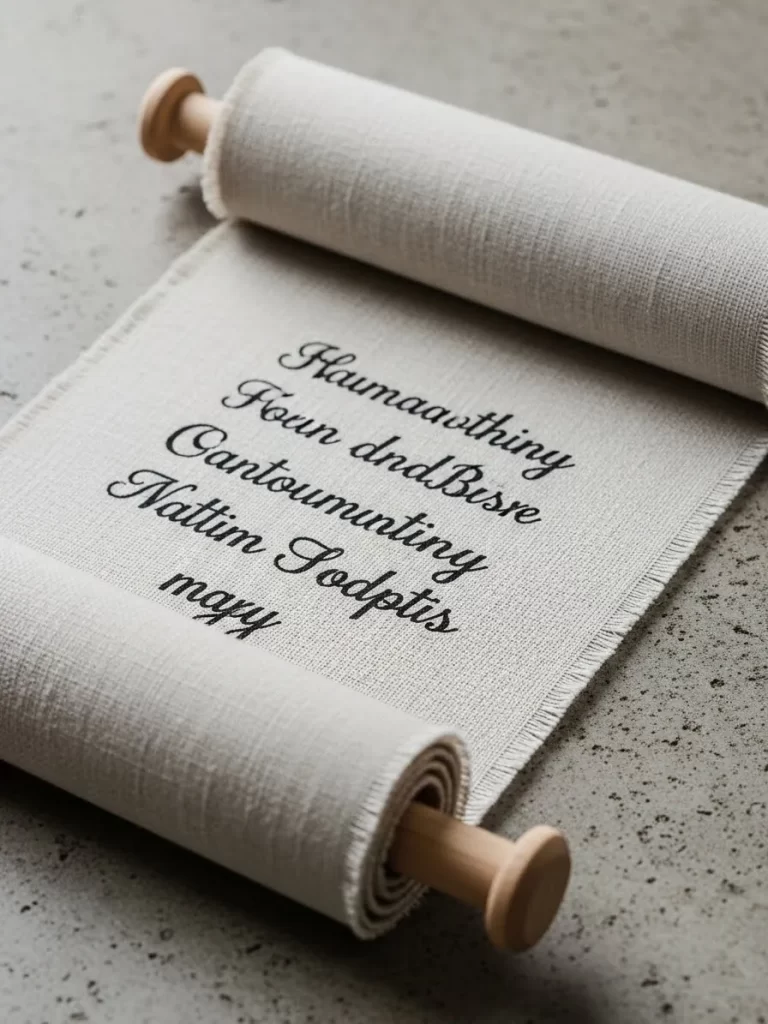
Capture your most precious words on a timeless fabric scroll. This rustic linen piece offers a romantic way to share a meaningful message. Natural textures provide a grounded feel that paper simply cannot match. Your partner can display this unique art in a bedroom or office.
Hand lettering adds a personal signature to the gift. Small imperfections in the handwriting make the gesture feel authentic. Wooden dowels at each end allow for easy hanging or rolling. This simple project creates a lasting memory of your affection. Elegance shines through when you use high quality materials for such a basic concept.
Material Required List
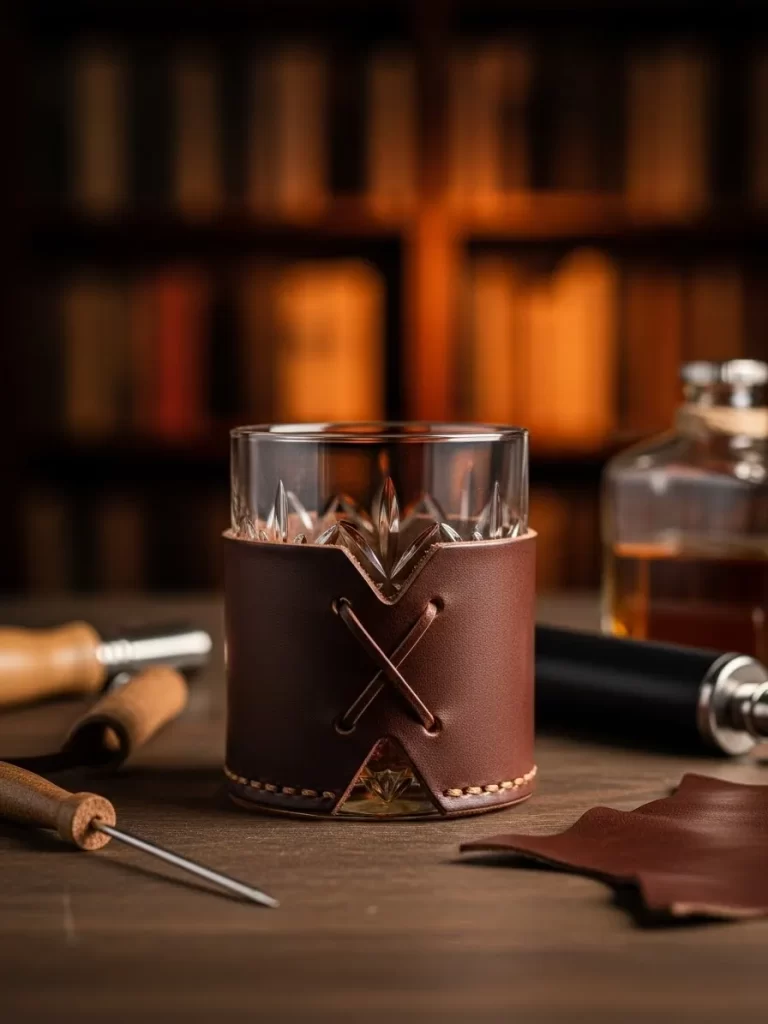
- Light colored linen fabric
- Two wooden dowels
- Permanent fabric marker
- Clear fabric glue
- Twine for hanging
Equipment Required List
- Sharp fabric scissors
- Ruler
- Iron and ironing board
- Flat heavy books
DIY Instruction Step by Step
- Measure a rectangular piece of linen fabric and cut it using your scissors.
- Iron the fabric on a flat board to remove every single wrinkle.
- Use your ruler and a pencil to draw light guide lines for your text.
- Write your message or poem carefully using the permanent fabric marker.
- Let the ink dry for at least thirty minutes to prevent any smudging.
- Apply a thin line of clear glue along the top edge of the fabric.
- Wrap the top edge around a wooden dowel and hold it until it sticks.
- Repeat the gluing process for the bottom edge with the second dowel.
- Place heavy books on the glued edges for an hour to ensure a strong bond.
- Tie a piece of twine to both ends of the top dowel so the scroll can hang.
3 Gilded Marble Hexagon Coasters
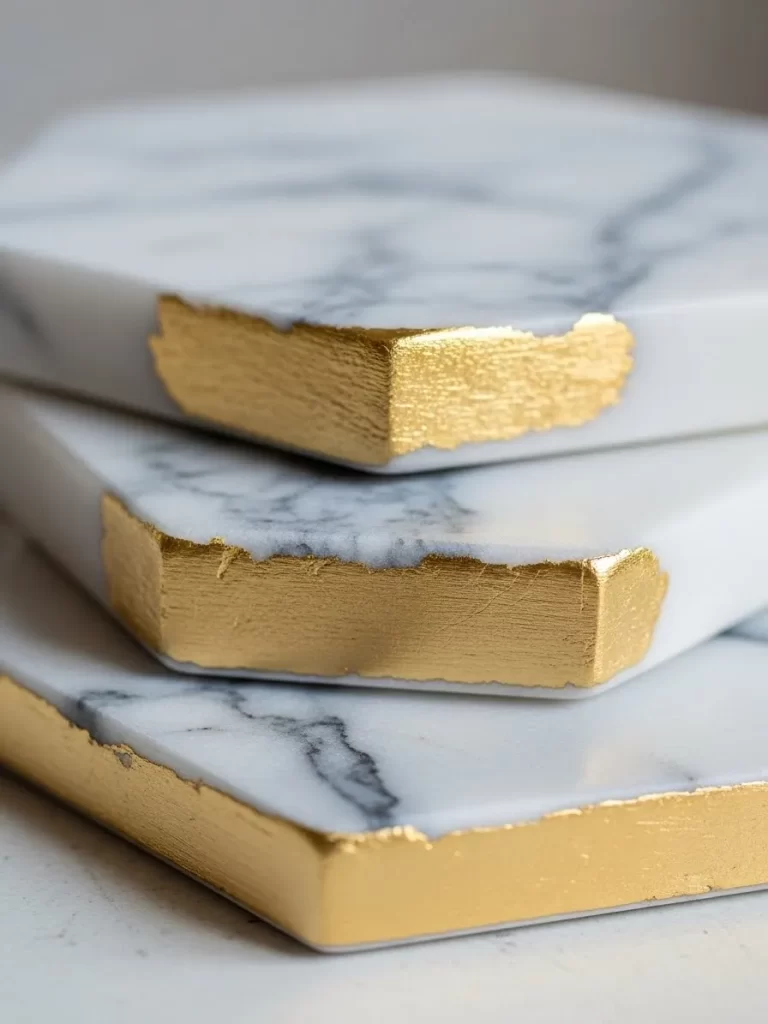
Marble coasters elevate any coffee table with their heavy feel and cool surface. Adding a touch of gold to the edges transforms basic stone into a designer accessory. These hexagons fit together to create beautiful geometric patterns while protecting surfaces from water rings. Guests will notice the shimmering metallic finish during your next gathering.
Natural stone patterns vary between every single piece. This ensures your gift is one of a kind and truly unique. Painting the sides takes very little time but provides a massive visual impact. You can create a full set in just one afternoon. Practical gifts like these remain useful for years while looking incredibly stylish.
Material Required List
- Set of plain marble hexagon tiles
- Metallic gold gilding paint
- Clear stone sealer spray
- Small felt pads for the bottom
Equipment Required List
- Small detail paintbrush
- Painter tape
- Soft lint free cloth
DIY Instruction Step by Step
- Wipe each marble tile with a soft cloth to remove dust or oils.
- Apply painter tape to the top surface of the tile near the edges.
- Dip your small brush into the gold gilding paint.
- Paint the side edges of the marble tile using slow and steady strokes.
- Check that the gold color looks solid and covers the entire side.
- Let the paint dry completely for two hours before removing the tape.
- Peel the painter tape away slowly to reveal a crisp clean line.
- Spray a thin coat of clear sealer over the gold paint to protect it.
- Wait for the sealer to dry according to the bottle instructions.
- Stick four small felt pads to the bottom of each tile to prevent scratching.
4 Botanical Rose Bath Salt Vial
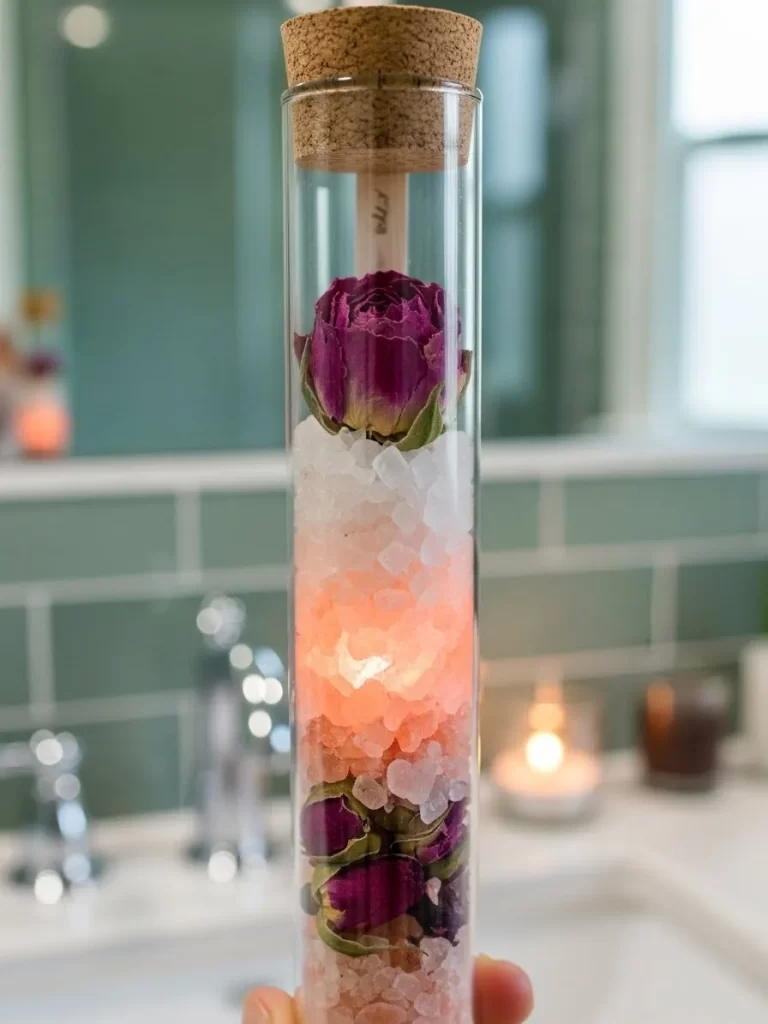
Give the gift of relaxation with a beautiful glass vial filled with soothing minerals. Pink salts mixed with dried rosebuds create a stunning visual gradient in the bottle. This apothecary style container looks beautiful on a bathroom shelf or vanity. The natural scent of roses provides a spa experience right at home.
Epsom salts help to soothe tired muscles after a long day of work. Adding dried flowers makes the bath feel like a luxury hotel amenity. You can easily customize the mixture with different herbs or essential oils. This small gesture shows you care about the well being of your loved one. Glass packaging ensures the salts stay dry and look expensive on display.
Material Required List
- Coarse Himalayan pink salt
- Epsom salt
- Dried miniature rosebuds
- Tall glass vial with a cork top
- Essential rose oil
Equipment Required List
- Small mixing bowl
- Metal spoon
- Small funnel
- Measuring cups
DIY Instruction Step by Step
- Pour one cup of Epsom salt into your mixing bowl.
- Add five drops of essential rose oil to the salt and stir well.
- Place your funnel into the opening of the glass vial.
- Spoon a layer of Himalayan pink salt into the bottom of the vial.
- Add a thin layer of dried rosebuds on top of the pink salt.
- Pour a layer of the scented Epsom salt into the vial next.
- Continue alternating layers until the glass container is almost full.
- Press a few whole rosebuds at the very top for a pretty finish.
- Push the cork stopper firmly into the neck of the vial to seal it.
- Wipe the outside of the glass with a dry cloth to remove any salt dust.
5 Handcrafted Leather Eyewear Wrap
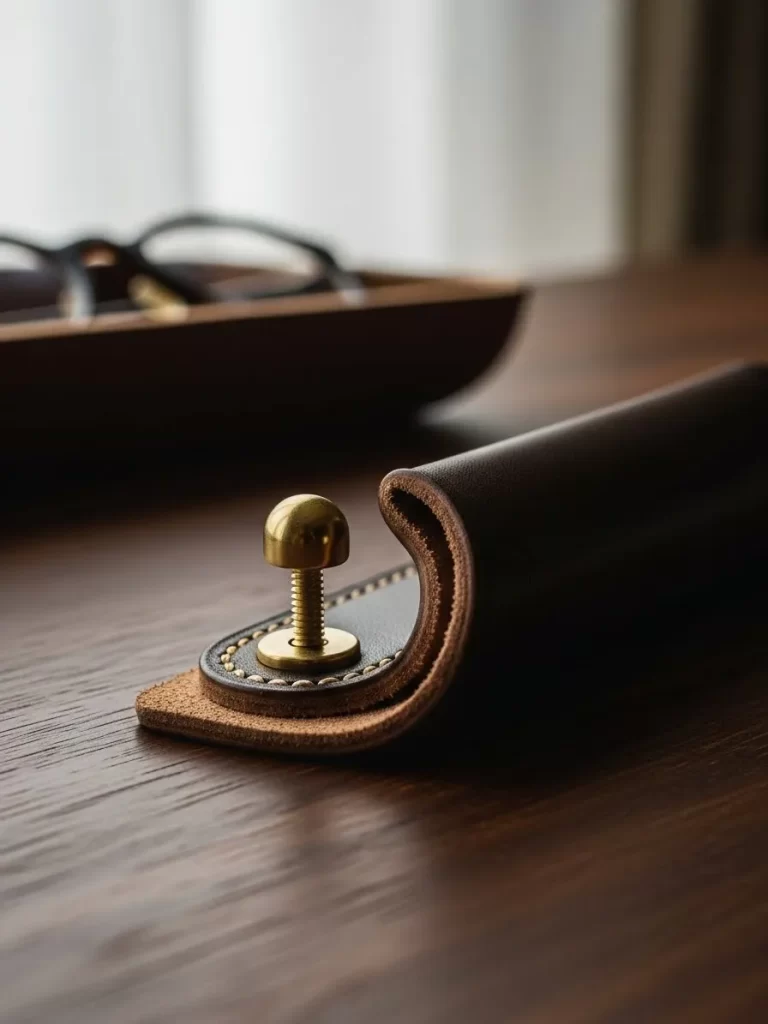
Keep glasses protected and stylish with a minimalist leather sleeve. High quality leather feels soft in the hand and improves with age. This sleek design prevents lenses from scratching while sitting in a bag or on a desk. A simple brass screw post keeps everything secure while looking very sophisticated.
Custom leather goods usually cost a high price in specialty stores. You can achieve the same look with just a few basic tools. This project suits anyone who appreciates functional and modern accessories. Dark brown tones match well with many different styles. Handcrafted items like this stand out because of their durability and classic appearance.
Material Required List
- Scrap of thick vegetable tanned leather
- Brass screw post
- Leather conditioner
Equipment Required List
- Sharp utility knife
- Metal ruler
- Leather hole punch tool
- Cutting mat
DIY Instruction Step by Step
- Place your leather scrap on a cutting mat with the smooth side up.
- Use a metal ruler and utility knife to cut a long rectangle.
- Trim the corners of the rectangle to make them slightly rounded.
- Fold the leather in half to see where the item will sit.
- Mark a spot on both ends of the leather where the holes will go.
- Use the hole punch tool to create a clean hole at each mark.
- Slide the bottom half of the brass screw through the first hole.
- Line up the second hole and push the screw through it.
- Twist the top of the brass screw on tightly to secure the fold.
- Rub a little leather conditioner onto the surface for a polished look.
6 Velvet Green Keepsake Journal
A deep green journal offers a sophisticated place to record thoughts and memories. The rich texture of the cover feels luxurious to the touch every time you open it. Placing a small dried flower inside the pages adds a sentimental element to the gift. This dark color palette creates a moody and expensive aesthetic for any desk.
Writing by hand remains a powerful way to connect with your emotions. This journal serves as a private space for dreams or daily reflections. You can use a fountain pen to enhance the classic feel of the experience. Giving a book like this suggests you value the inner world of your partner. It is a thoughtful choice for writers or those who enjoy organization.
Material Required List
- Hardcover notebook
- Green velvet fabric
- Spray adhesive
- Dried baby breath flowers
- Gold ribbon
Equipment Required List
- Scissors
- Heavy books for pressing
- Ruler
DIY Instruction Step by Step
- Lay the velvet fabric flat on your table with the fuzzy side down.
- Place your notebook on the fabric to see how much material you need.
- Cut the velvet so it is five centimeters larger than the notebook on all sides.
- Apply spray adhesive to the front cover of the notebook outdoors.
- Press the notebook onto the fabric and smooth it with your hands.
- Apply glue to the spine and back cover before folding the fabric over.
- Open the notebook and glue the extra fabric edges to the inside covers.
- Put the journal under heavy books for one hour to keep it flat.
- Glue a small sprig of dried flowers to the inside front page.
- Tie a gold ribbon around the book to keep the pages closed.
7 Artisan Herb Infused Oil Trio
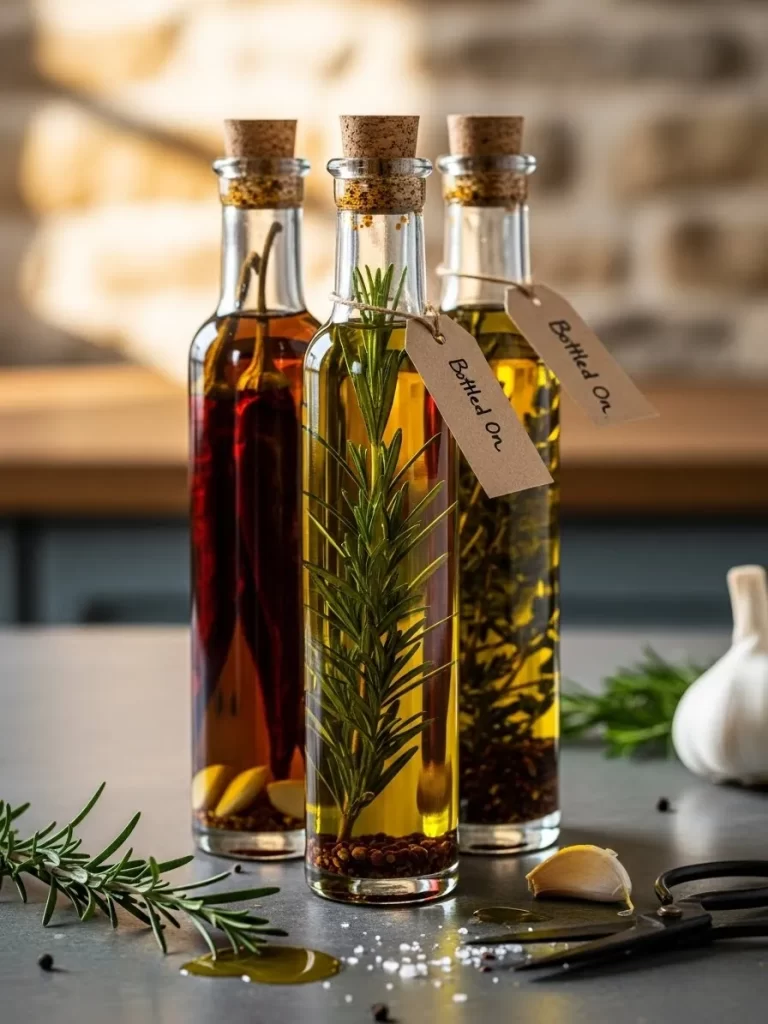
Infused oils bring gourmet flavors to any kitchen with very little effort. Glass bottles filled with rosemary and chili peppers look like high end boutique products. These colorful ingredients provide a beautiful visual display on a kitchen counter. Home cooks will appreciate having these ready to use for dressings or cooking.
Clear bottles allow the natural beauty of the herbs to shine through. Using fresh rosemary and dried spices ensures a bold and tasty result. This gift feels personal because you chose the flavor combinations yourself. It turns a standard cooking ingredient into a decorative and useful item. Your loved one will think of your creativity every time they prepare a meal.
Material Required List
- Extra virgin olive oil
- Fresh rosemary sprigs
- Dried red chili peppers
- Whole garlic cloves
- Three glass bottles with corks
Equipment Required List
- Small funnel
- Paper towels
- Twine
DIY Instruction Step by Step
- Wash the glass bottles with soap and let them dry completely.
- Peel the garlic cloves but do not chop them into pieces.
- Slide one long rosemary sprig into the first glass bottle.
- Put three dried chili peppers into the second bottle for a spicy oil.
- Place the garlic cloves into the third bottle for a savory flavor.
- Set your funnel into the opening of the first bottle.
- Pour the olive oil slowly until the bottle is full to the neck.
- Repeat this for the other two bottles until all are full.
- Press the corks down hard to seal the bottles tightly.
- Tie a piece of twine around each bottle with a hand written flavor tag.
8 Vintage Pressed Fern Floating Frame
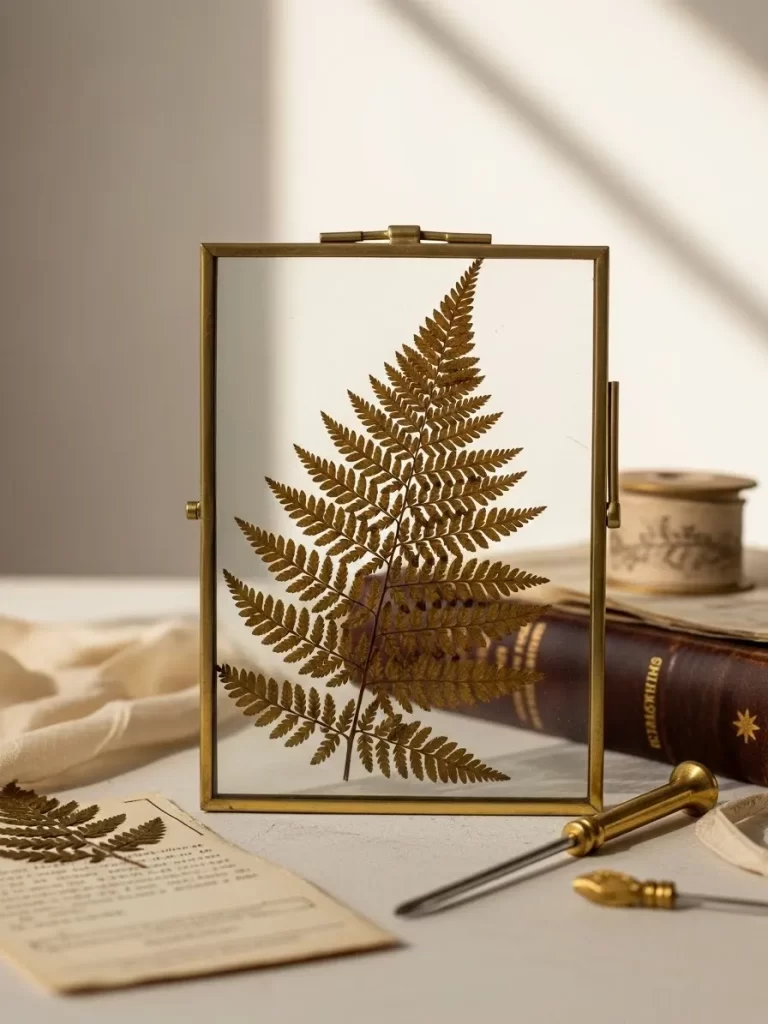
Botanical art brings a touch of the outdoors into a modern home. A single pressed fern leaf looks striking between two panes of glass. The brass frame adds a vintage feel that suits many different decor styles. This minimalist approach focuses on the intricate details of nature.
Floating frames create a transparent border that makes the art look like it is hovering. You can find beautiful leaves in a local park or your own backyard. Pressing the plants preserves their beauty for many years to come. This project is a wonderful way to gift a piece of nature that never wilts. It looks much more expensive than a standard printed photo.
Material Required List
- Fresh fern leaf
- Brass floating frame
- Small piece of clear tape
Equipment Required List
- Two heavy books
- Parchment paper
- Tweezers
DIY Instruction Step by Step
- Place the fresh fern leaf between two sheets of parchment paper.
- Put the paper inside a heavy book and close it flat.
- Stack more books on top and wait one week for the leaf to dry.
- Open the brass frame and clean the glass with a soft cloth.
- Use tweezers to pick up the dried leaf very gently.
- Center the leaf on the bottom pane of glass in the frame.
- Use a tiny piece of clear tape on the back of the leaf to hold it.
- Place the second pane of glass over the leaf very slowly.
- Close the frame latch to lock the glass in place.
- Polish the brass edges with a dry cloth to remove any marks.
9 Luxury Lavender Satin Sleep Pillow
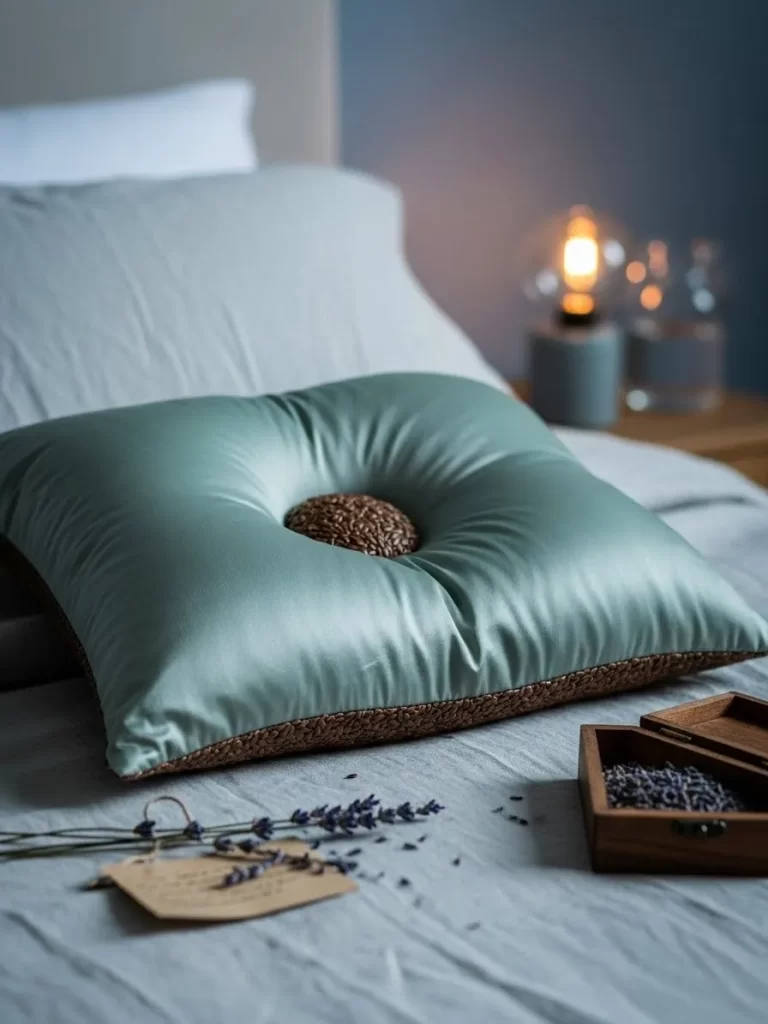
Better sleep is a gift that everyone can truly appreciate. A satin pillow filled with lavender promotes deep relaxation and comfort. The smooth fabric feels cool against the skin and looks elegant on a bed. This small pillow fits perfectly over the eyes to block out unwanted light.
Natural scents like lavender have a calming effect on the nervous system. You can use flaxseeds to give the pillow a comforting weight. This project requires only basic sewing skills but results in a high end product. Your partner will enjoy using this during a nap or before bedtime. It shows a thoughtful concern for their rest and peace of mind.
Material Required List
- Satin fabric
- Dried lavender flowers
- Flaxseeds
- Sewing thread
Equipment Required List
- Sewing needle or machine
- Pins
- Funnel
- Scissors
DIY Instruction Step by Step
- Cut two matching rectangles of satin measuring ten by twenty centimeters.
- Pin the two pieces together so the shiny sides are touching.
- Sew around three of the four edges using a tight stitch.
- Turn the fabric inside out so the shiny side is now on the outside.
- Mix one cup of flaxseeds with half a cup of lavender in a bowl.
- Put the funnel into the open end of your fabric pouch.
- Pour the seed mixture in until the pillow is half full.
- Fold the raw edges of the opening inside the pillow.
- Pin the opening closed so no seeds can leak out.
- Sew the final edge closed using a needle and thread.
10 Gold Flaked Terrazzo Jewelry Tray

Terrazzo patterns offer a playful yet sophisticated look for home accessories. This jewelry tray features colorful chips and shimmering gold flakes for a luxury finish. It provides a safe and stylish place to store rings or earrings overnight. The smooth surface and round shape feel modern and artistic.
Handmade clay items have a charming quality that store bought items lack. You can match the colors to the specific style of your loved one. Sanding the tray creates a professional finish that looks like real stone. This functional piece of art adds a pop of personality to a nightstand. It is a creative way to use simple materials for a high end result.
Material Required List
- White polymer clay
- Colored polymer clay scraps
- Gold leaf flakes
- Clay sealer
Equipment Required List
- Rolling pin
- Round bowl
- Sandpaper
- Baking tray
DIY Instruction Step by Step
- Roll the white clay into a flat circle that is one centimeter thick.
- Chop the colored clay into tiny bits using your fingers or a knife.
- Sprinkle the colored bits and gold flakes over the white clay circle.
- Roll over the clay again to press everything into the white base.
- Use a round bowl to cut a perfect circle out of the clay.
- Turn the edges of the circle up slightly to make a dish shape.
- Place the dish on a baking tray and cook it in the oven.
- Follow the time and temperature written on the clay package.
- Let the dish cool for one hour after taking it out of the oven.
- Rub the edges with sandpaper and brush on a layer of clear sealer.
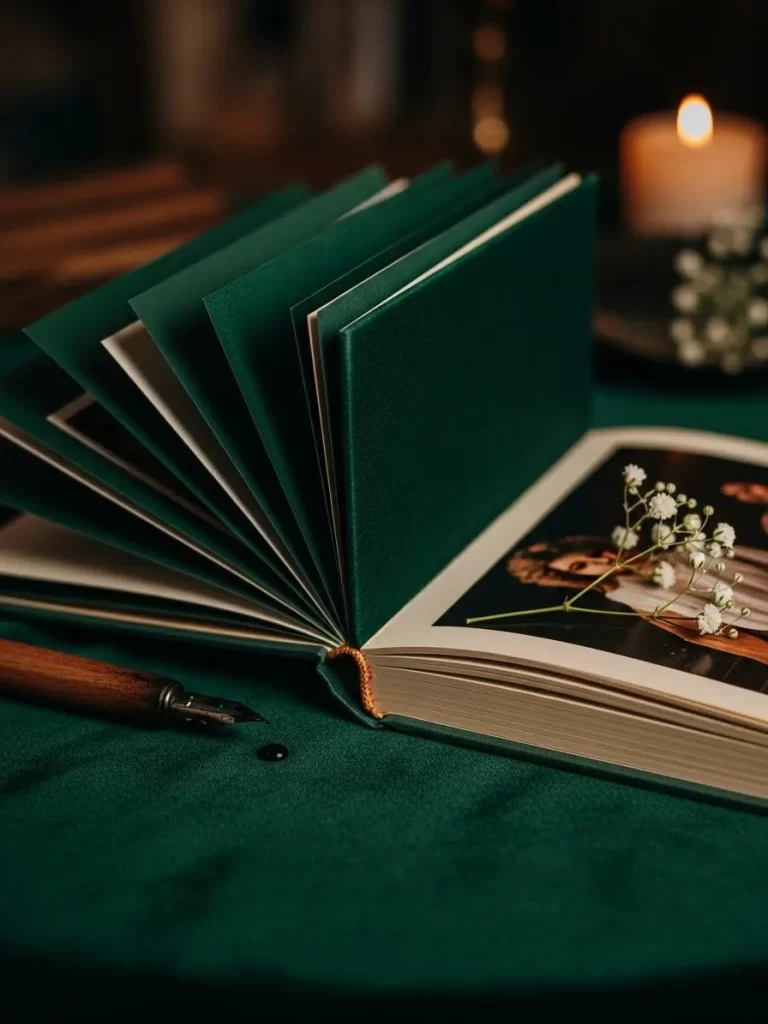
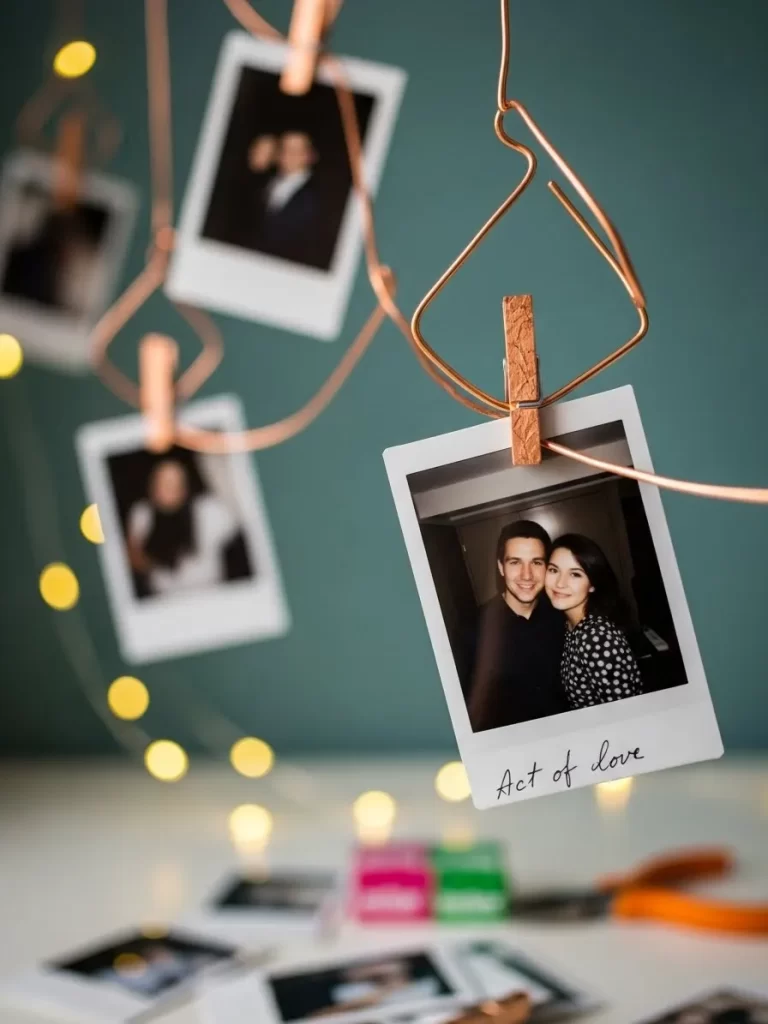
11 Accordion Photo Memory Book

Tell your love story through a series of meaningful images in a black and white book. This accordion style design allows the photos to stand out against a dark background. Your partner can unfold the entire story at once or flip through it like a traditional album. Small notes written in white ink add a personal and nostalgic touch.
Minimalist colors make the project look professional and sophisticated. This gift focuses on the experiences you have shared together over time. It serves as a beautiful piece of decor for a shelf or coffee table. Giving a physical book of photos feels much more special than showing digital images on a screen. Every page reflects a different chapter of your journey as a couple.
Material Required List
- Thick black cardstock paper
- Printed black and white photos
- White gel pen
- Glue stick
Equipment Required List
- Ruler
- Paper cutter or scissors
- Scoring tool
DIY Instruction Step by Step
- Cut your black cardstock into a long strip that is fifteen centimeters tall.
- Mark the paper every ten centimeters using your ruler and a pencil.
- Use a scoring tool to press a line into each mark without cutting the paper.
- Fold the paper back and forth like a fan along the scored lines.
- Choose your favorite photos and trim them to fit the squares.
- Apply glue to the back of the first photo and center it on a page.
- Repeat the gluing process until every square has a photo on it.
- Use the white gel pen to write dates or short memories next to the photos.
- Let the ink dry for ten minutes before closing the book.
- Tie a ribbon around the folded book to keep it neat.
12 Homemade Bourbon Vanilla Essence
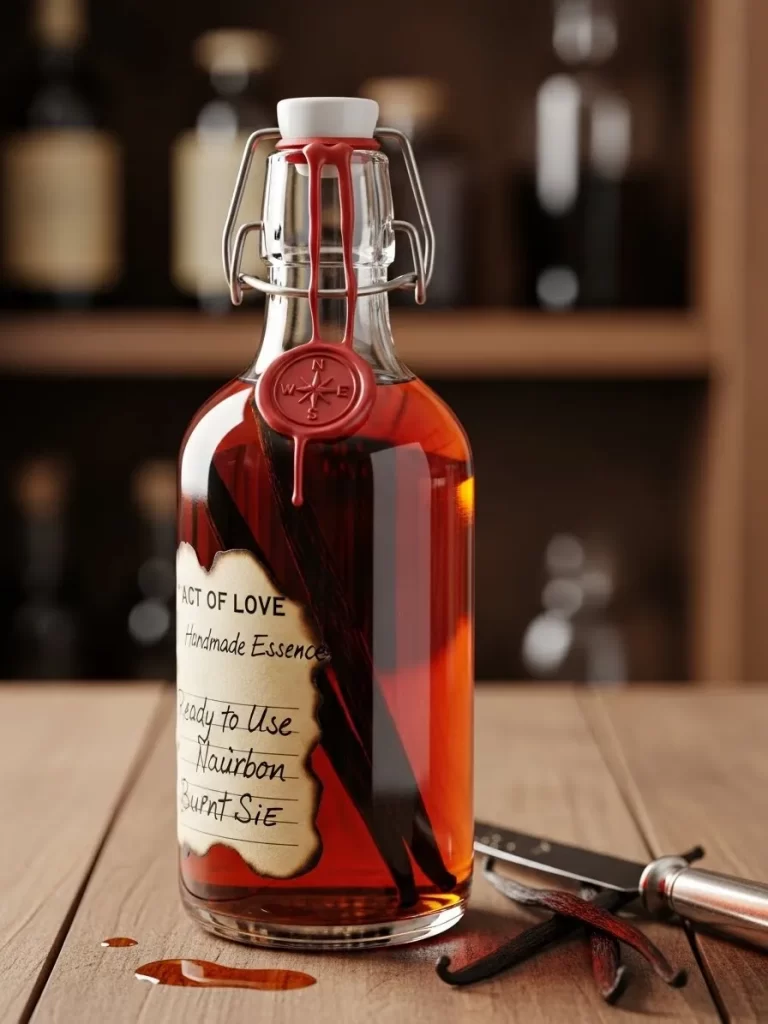
Gourmet cooking starts with high quality ingredients made with patience. This vanilla extract features whole beans inside a beautiful glass bottle. A red wax seal on the top provides an old world feel that looks very expensive. This gift becomes better as it ages over the next few months.
The dark amber color shows the richness of the vanilla flavor inside. Home bakers will love using this for their favorite cakes and cookies. It is a practical gift that lasts for a very long time in the pantry. Personalizing the label makes the bottle look like it came from a specialty food shop. This project shows you value the fine details of culinary art.
Material Required List
- Five whole vanilla beans
- Eight ounces of bourbon
- Glass bottle with a swing top lid
- Red sealing wax
- Paper for a custom label
Equipment Required List
- Sharp knife
- Small pot
- Heat source
DIY Instruction Step by Step
- Slice each vanilla bean down the middle to reveal the tiny seeds inside.
- Place the vanilla beans into the clean glass bottle.
- Pour the bourbon into the bottle until the beans are fully covered.
- Close the swing top lid tightly to prevent any air from entering.
- Melt the sealing wax in a small pot over low heat.
- Dip the top of the bottle into the melted wax and pull it out quickly.
- Let the wax cool for one minute to create a thick protective seal.
- Write the date and flavor on a small piece of paper.
- Glue the label onto the front of the glass bottle.
- Store the bottle in a dark place for at least eight weeks before using.
13 Modern Sculptural Pillar Candles

Update a room with candles that look like modern pieces of art. These U shaped designs offer a unique geometric look that stands out from typical candles. Soft terracotta colors bring a sense of warmth and comfort to any space. They look beautiful even when they are not lit on a shelf.
Concrete bases provide a heavy and industrial contrast to the soft wax. This combination of materials creates a very high end aesthetic. You can use these candles as a focal point on a dining table or mantle. Gifting handmade candles shows you took the time to create something truly special. They offer a stylish way to add light and texture to a home.
Material Required List
- Pillar candle wax
- Candle wicks
- Terracotta wax dye
- Quick dry concrete mix
Equipment Required List
- Silicone U shape candle mold
- Round plastic container for the base
- Wax melting pot
- Thermometer
DIY Instruction Step by Step
- Melt your candle wax in a pot until it becomes a clear liquid.
- Add a few drops of terracotta dye and stir until the color is even.
- Thread the wicks into the bottom of the silicone mold.
- Pour the hot wax into the mold and let it sit for four hours.
- Mix the concrete with a small amount of water in a bowl.
- Pour the concrete into a round plastic container to make the base.
- Let the concrete dry for twenty four hours until it is hard stone.
- Remove the candle from the silicone mold very carefully.
- Take the concrete base out of the plastic container and sand the edges.
- Place the candle onto the concrete base to complete the look.
14 Bespoke Monogrammed Stationery
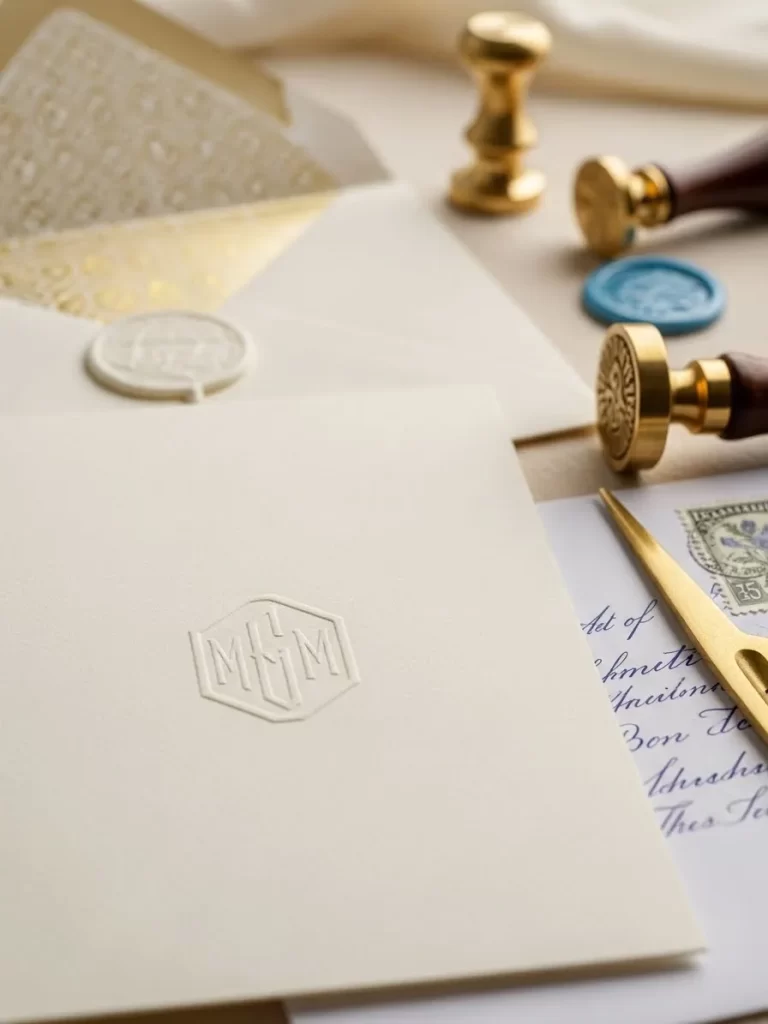
Handwritten letters feel more personal when they arrive on custom paper. This set features a raised monogram that adds a touch of class to every note. Cream colored envelopes and matching cards create a cohesive and professional look. It is a thoughtful gift for anyone who enjoys the art of slow communication.
Gold wax seals provide a final layer of luxury to the presentation. This traditional method of sealing letters makes the recipient feel very important. You can customize the monogram to match the initials of your loved one. High quality paper with a heavy weight feels much better than standard office supplies. This gift encourages a return to the romantic habit of writing letters.
Material Required List
- Heavy cream cardstock
- Matching envelopes
- Gold sealing wax
- Monogram stamp tool
Equipment Required List
- Embossing tool
- Heat gun
- Wax melting spoon
DIY Instruction Step by Step
- Place your cardstock on a flat surface and choose where the monogram goes.
- Use the embossing tool to press the monogram design into the paper.
- Turn the paper over and check that the design is raised and clear.
- Fold your envelopes and place a card inside each one.
- Melt a small piece of gold wax in the melting spoon over a flame.
- Pour a small circle of hot wax onto the back flap of the envelope.
- Press the monogram stamp into the wax and wait ten seconds.
- Lift the stamp slowly to reveal the gold initial design.
- Repeat this process for a full set of ten cards and envelopes.
- Box the set together with a ribbon for a beautiful gift presentation.
15 Soft Wool Travel Tech Pouch
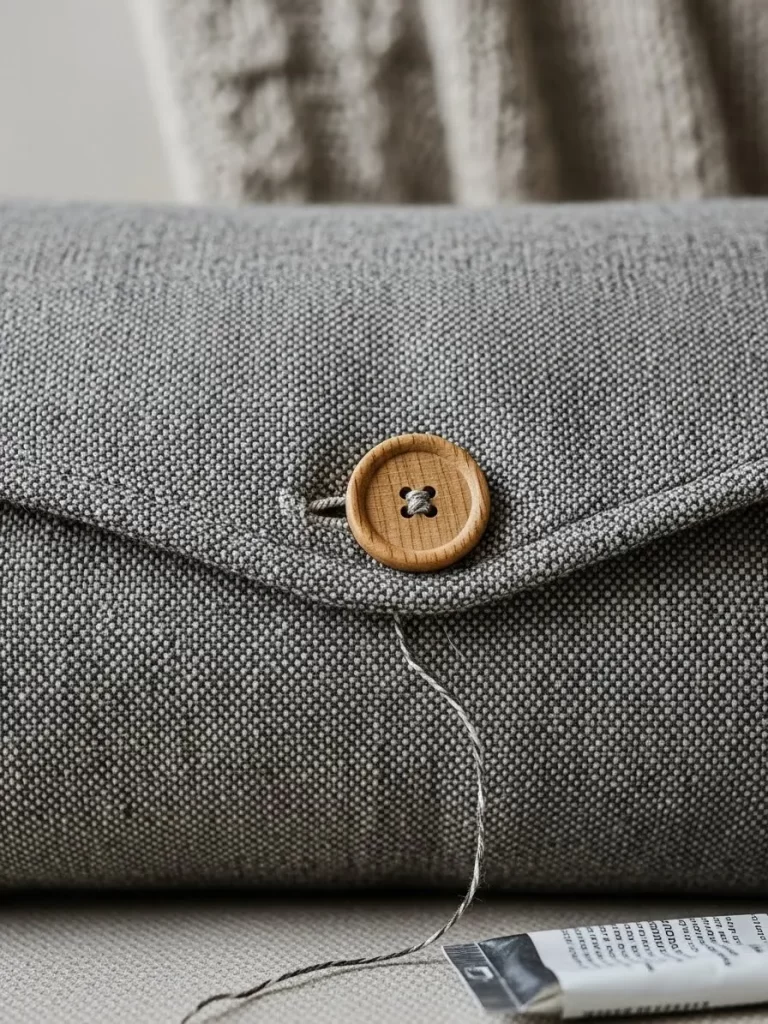
Protect expensive electronics with a handmade pouch made from soft grey wool. This thick fabric provides a natural cushion against bumps and scratches. A simple wooden button keeps the contents secure while adding a rustic touch. The minimalist design fits easily into a backpack or a large handbag.
Grey tones look sophisticated and match with almost any other accessory. This pouch is the right size for a phone or a small tablet device. Using high quality wool ensures the gift feels luxury and lasts for many years. It is a practical choice for someone who is always on the go. Hand stitching shows a level of care that machines cannot replicate.
Material Required List
- Thick grey wool fabric
- Wooden button
- Strong embroidery thread
- Thin twine
Equipment Required List
- Sharp scissors
- Large sewing needle
- Pins
- Ruler
DIY Instruction Step by Step
- Measure your device and add two centimeters to each side for the pattern.
- Cut a long rectangle of wool fabric that is twice the length of your device.
- Fold the bottom half of the fabric up to create a pocket shape.
- Pin the sides together to keep the fabric from moving while you sew.
- Use the needle and thick thread to sew the sides using a blanket stitch.
- Fold the top flap down over the opening to see where the button goes.
- Sew the wooden button onto the center of the front pocket.
- Cut a small slit in the top flap to act as a button hole.
- Check that the button fits through the hole tightly.
- Remove any loose threads with your scissors for a clean finish.
16 Textured Terracotta Sun Vase
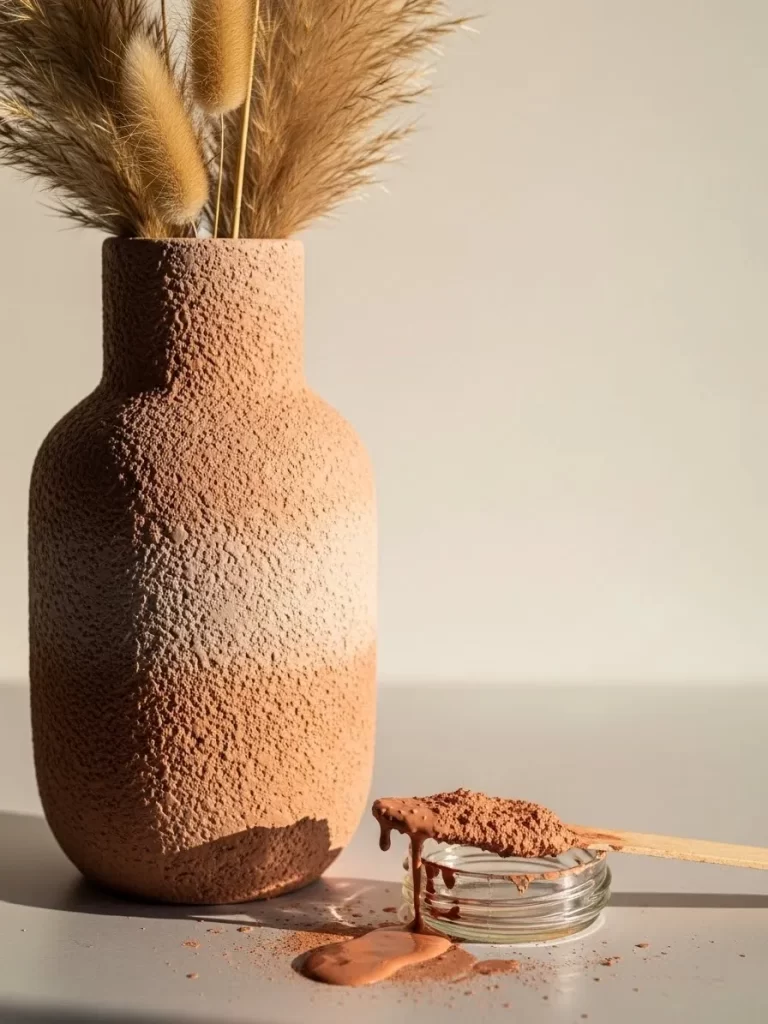
Transform a plain glass bottle into a piece of Mediterranean inspired decor. This textured finish looks like ancient stone or sun baked clay. The warm earthy tones bring a natural feel to a modern living room. It provides a beautiful home for dried grasses or tall botanical stems.
Simple materials like paint and baking soda create this expensive stone effect. You do not need any pottery skills to achieve this professional result. This project is a great way to recycle old glass jars into something beautiful. The rough surface catches the light and adds depth to any shelf display. It is a creative gift for someone who loves interior design.
Material Required List
- Glass bottle or vase
- Terracotta colored acrylic paint
- Baking soda
- Dried pampas grass
Equipment Required List
- Paintbrush
- Mixing bowl
- Small spoon
DIY Instruction Step by Step
- Clean the glass vase with rubbing alcohol to remove any grease.
- Pour half a cup of acrylic paint into your mixing bowl.
- Add two tablespoons of baking soda to the paint and stir well.
- Watch for the paint to become thick and grainy like wet sand.
- Brush a thick layer of the mixture onto the entire outside of the glass.
- Use dabbing motions with the brush to create more texture on the surface.
- Let the first coat dry for two hours before adding a second layer.
- Check that no clear glass is showing through the thick paint.
- Allow the vase to dry overnight until the finish feels hard and stony.
- Place a few stems of dried pampas grass inside to finish the gift.
17 Private Wine Tasting Flight

Create a luxury experience at home with a curated wine tasting set. Three small glass carafes allow your partner to sample different flavors side by side. A wooden serving board keeps the presentation organized and professional. This gift focuses on spending quality time together while learning about new wines.
Small cards with tasting notes help to guide the conversation during the evening. You can choose wines from a specific region or variety to create a theme. This thoughtful gesture shows you care about creating shared memories. It turns a simple drink into an educational and fun activity. The clear glass allows the beautiful colors of the wine to be the star.
Material Required List
- Three small glass carafes
- Wooden serving board
- Three types of wine
- Cardstock for tasting notes
Equipment Required List
- Pen
- Ruler
- Scissors
DIY Instruction Step by Step
- Clean the wooden board and the glass carafes thoroughly.
- Measure and cut three small cards from your cardstock paper.
- Write the name and flavor notes of each wine on the cards.
- Place the wooden board on a flat table in a quiet area.
- Set the three empty carafes onto the board in a straight line.
- Pour a different wine into each carafe until they are half full.
- Place the correct tasting card in front of each glass.
- Light a small candle nearby to create a relaxing atmosphere.
- Arrange a few crackers or pieces of cheese on the side of the board.
- Present the flight to your loved one for a romantic tasting session.
18 Framed Celestial Star Map
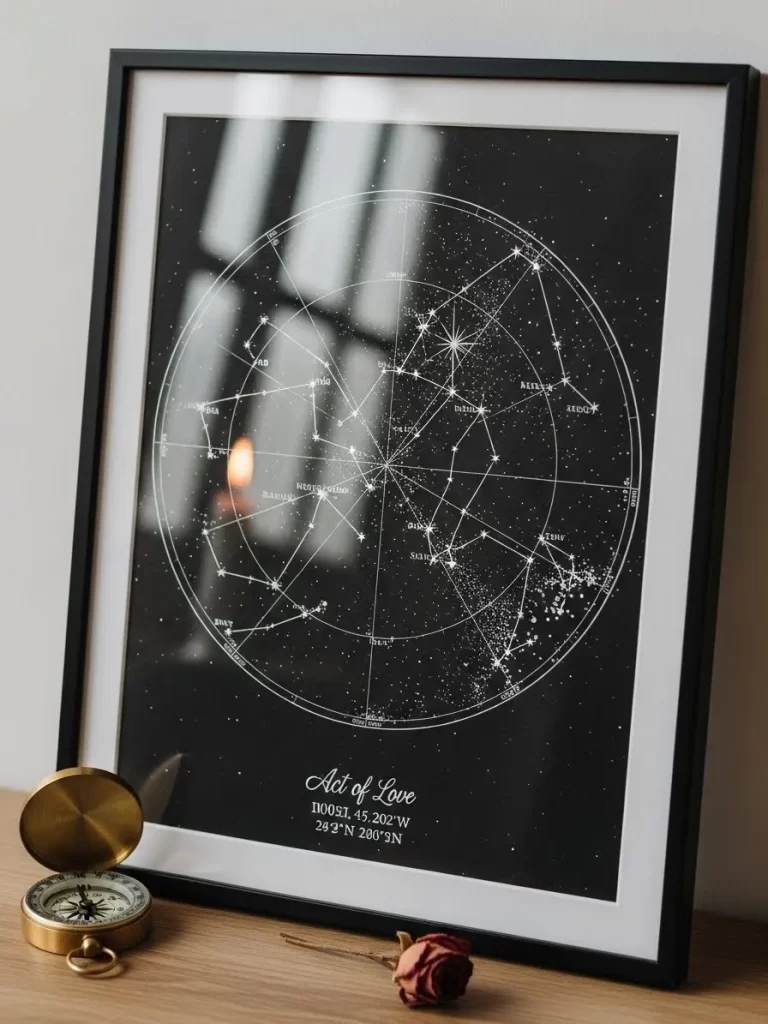
Capture the exact position of the stars from a night that changed your life. This black and white map shows the constellations as they appeared during your first date or wedding. It is a deeply personal gift that celebrates a specific moment in time. The sleek black frame makes it look like a piece of modern gallery art.
White lines and dots against a dark background create a striking visual contrast. This minimalist design suits any home decor style from traditional to modern. You can add the coordinates and date at the bottom for a professional touch. Every time your partner looks at this, they will be reminded of that special night. It is a creative way to turn a memory into a lasting treasure.
Material Required List
- High quality black paper
- White ink pen or paint marker
- Large black picture frame
- Compass for drawing circles
Equipment Required List
- Ruler
- Pencil
- Computer to find star coordinates
DIY Instruction Step by Step
- Use a computer to look up the star map for your specific date and location.
- Use a compass to draw a large circle in the center of the black paper.
- Draw the main constellations inside the circle using your white pen.
- Add many tiny white dots to represent the distant stars in the sky.
- Use a ruler to draw straight lines connecting the stars in each constellation.
- Write the name of the event and the date at the bottom in neat script.
- Include the latitude and longitude coordinates for an authentic look.
- Clean the glass of the picture frame to remove any dust.
- Place your star map inside the frame and secure the back.
- Wipe the frame with a soft cloth before giving it as a gift.
19 Stitched Leather Bound Notebook
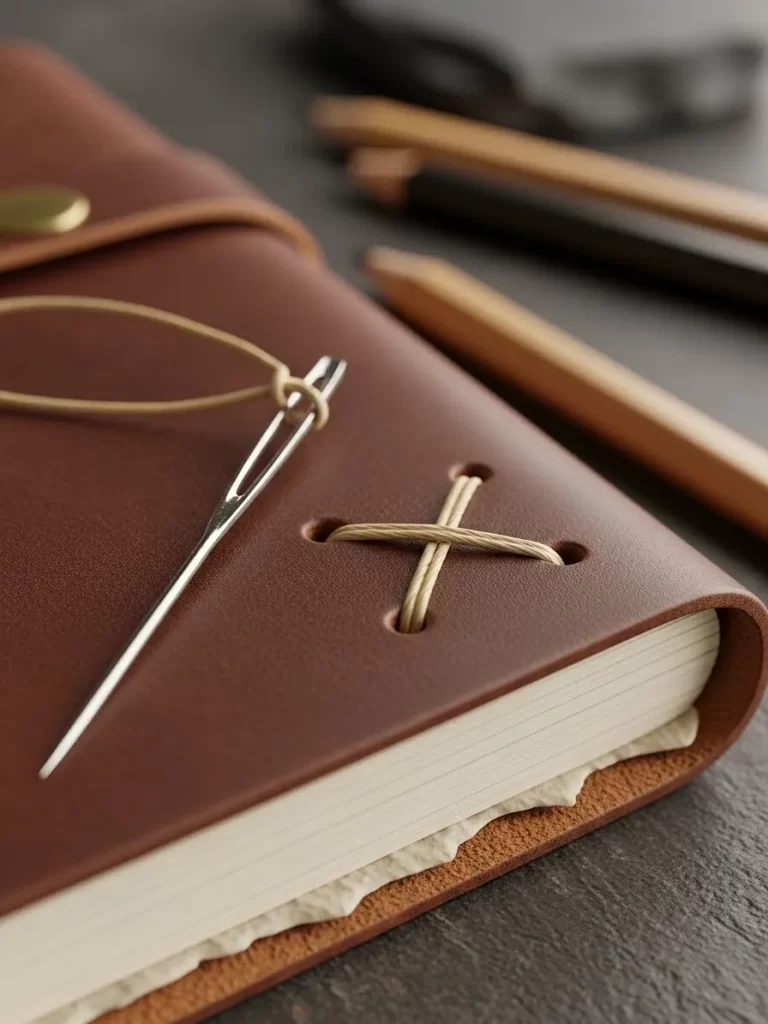
A leather notebook is a classic gift that only gets better with use. The rich brown cover features a hand stitched cross design for a unique look. This sturdy binding ensures the pages stay secure even with daily carrying. It is the right size for a pocket or a small bag for taking notes on the go.
Genuine leather has a natural scent and texture that feels very high end. This journal provides a private place for sketches, lists, or daily thoughts. You can use thick cream paper inside to enhance the vintage aesthetic. Handcrafted details like the stitching show a high level of craftsmanship. It is a durable and stylish gift for someone who loves to stay organized.
Material Required List
- Piece of soft brown leather
- Stack of blank paper
- Thick waxed thread
- Leather glue
Equipment Required List
- Leather hole punch
- Large needle
- Sharp knife
- Ruler
DIY Instruction Step by Step
- Cut your stack of paper to the size you want for your notebook.
- Cut the leather so it is one centimeter larger than the paper on all sides.
- Fold the paper in half and mark four holes along the spine.
- Punch holes through the leather in the same spots as the paper marks.
- Use a sharp needle and waxed thread to sew the paper to the leather.
- Pull the thread tight so the pages do not wiggle or slide.
- Punch four holes in the front cover in the shape of a cross.
- Thread the waxed string through these holes to create the decorative cross.
- Tie a secure knot on the inside of the cover and trim the ends.
- Rub a small amount of leather conditioner onto the cover to make it shine.
20 Fresh Mint Coconut Body Scrub
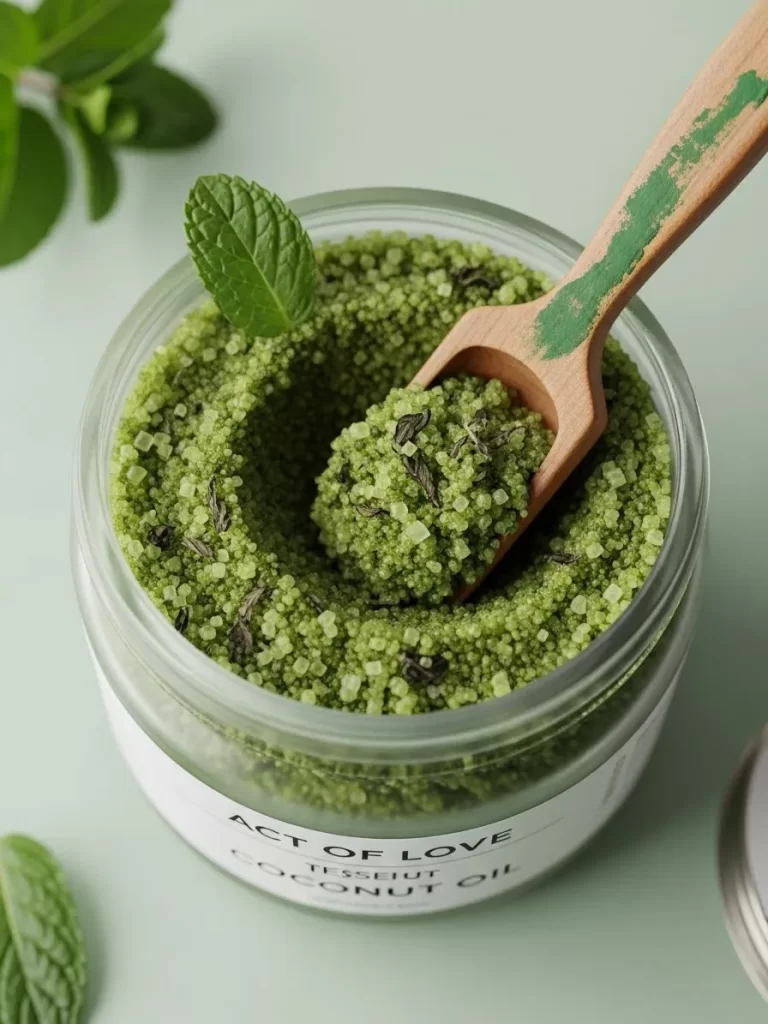
Bring the spa experience home with an invigorating mint and coconut scrub. The bright green color and fresh scent wake up the senses immediately. Natural sugar crystals provide a gentle way to smooth the skin during a shower. This scrub uses simple ingredients that are safe and healthy for the body.
Coconut oil leaves the skin feeling soft and hydrated for the whole day. Adding fresh mint leaves provides a cooling sensation that feels wonderful. You can store this in a glass jar with a wooden spoon for a high end look. This is a thoughtful gift for someone who needs a little extra self care. It looks beautiful on a bathroom counter and smells like a tropical vacation.
Material Required List
- One cup of granulated sugar
- Half a cup of solid coconut oil
- Ten drops of peppermint essential oil
- Fresh mint leaves
- Glass jar with a lid
Equipment Required List
- Mixing bowl
- Wooden spoon
- Blender or food processor
DIY Instruction Step by Step
- Place the fresh mint leaves into a blender with a tablespoon of coconut oil.
- Blend until the leaves are tiny green bits and the oil is green.
- Put the sugar into a large mixing bowl.
- Add the rest of the coconut oil and the green mint oil to the sugar.
- Stir everything together until it looks like wet sand.
- Add the peppermint essential oil and mix it one more time.
- Spoon the mixture into a clean glass jar and press it down.
- Wipe the rim of the jar so the lid fits on perfectly.
- Close the jar tightly to keep the scrub fresh.
- Tie a small wooden spoon to the side of the jar with a piece of twine.
21 Copper Wire Photo Garland
Brighten up a bedroom wall with a shimmering copper wire photo display. The delicate metallic lines create a modern and airy feel in any space. Small rose gold clips hold your favorite memories securely without damaging the prints. This floating gallery style adds a personal touch that looks like high end boutique decor.
Warm fairy lights can be woven through the wire for a magical evening glow. This lightweight project is easy to hang and customize as your photo collection grows. Minimalist designs like this focus on the images rather than bulky frames. It makes a gift for someone who loves to document every special moment. Your loved one will enjoy seeing their favorite faces and places on display every day.
Material Required List
- Thick copper craft wire
- Rose gold mini clothespins
- Printed square photos
- Clear wall hooks
Equipment Required List
- Wire cutters
- Round nose pliers
- Measuring tape
DIY Instruction Step by Step
- Measure the wall space where you want to hang the garland.
- Cut a length of copper wire that is twenty centimeters longer than the wall space.
- Use your pliers to bend each end of the wire into a small loop.
- Straighten the wire with your hands to remove any large kinks.
- Attach the clear hooks to the wall at the desired height.
- Hang the copper wire by slipping the loops over the wall hooks.
- Arrange your photos on a flat surface to decide the order.
- Use a mini clothespin to attach the first photo to the wire.
- Space the remaining photos evenly across the length of the garland.
- Adjust the wire slightly to create a gentle sag for a relaxed look.
22 Gold Leaf Resin Initial Keychain
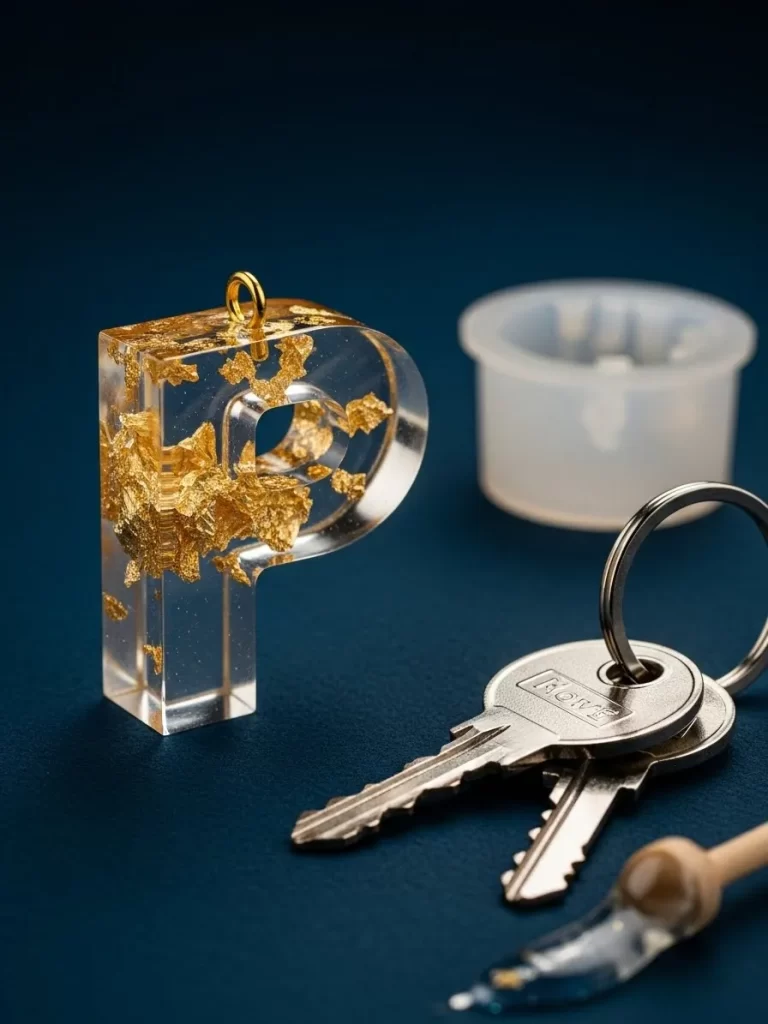
Personalize your keys with a stunning resin letter filled with shimmering gold flakes. The crystal clear finish allows the metallic elements to catch the light beautifully from every angle. This heavy and durable accessory feels like a piece of custom jewelry in your hand. It adds a touch of everyday luxury to a basic set of keys or a handbag.
Using gold leaf creates a random and organic pattern that makes each piece unique. This project allows you to create a high end gift with very few professional tools. The smooth edges and polished surface provide a professional aesthetic. Your friend will appreciate the thought behind a gift that features their own initial. It is a small but powerful way to show you care.
Material Required List
- Two part clear epoxy resin
- Gold leaf flakes
- Small screw eye pin
- Metal keychain ring
Equipment Required List
- Silicone alphabet mold
- Disposable mixing cups
- Wooden stir sticks
- Small hand drill or thick needle
DIY Instruction Step by Step
- Read the resin package to find the correct mixing ratio for the two parts.
- Pour the resin and hardener into a mixing cup very slowly.
- Stir the mixture for three minutes using a wooden stick.
- Add a small pinch of gold leaf flakes into the resin and stir gently.
- Pour the resin mixture into the silicone letter mold of your choice.
- Use a toothpick to move the gold flakes into the corners of the letter.
- Let the resin sit for twenty four hours until it is completely hard.
- Pop the letter out of the silicone mold carefully.
- Drill a tiny hole in the top corner of the letter using a hand drill.
- Twist the screw eye pin into the hole and attach the metal ring.
23 Macrame Bottle Carrying Tote
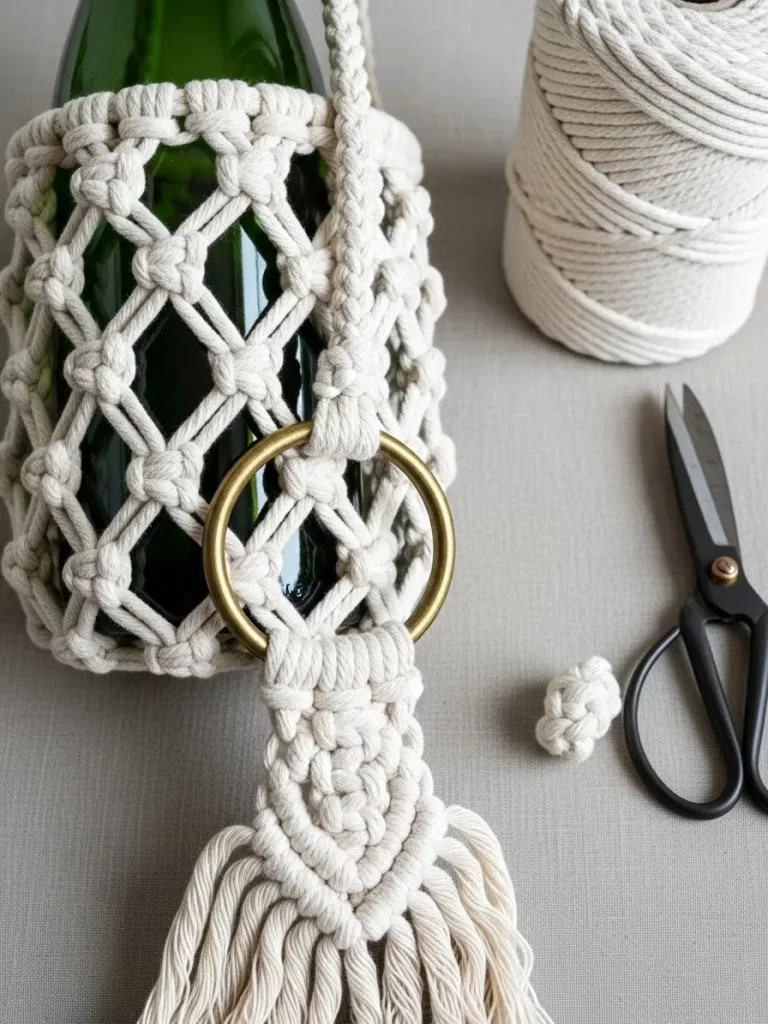
Carry your favorite beverages in style with a handcrafted macrame tote. The intricate knot patterns provide a sturdy and flexible grip for glass bottles. Natural cotton cord gives the bag a bohemian and organic look that is very popular. This functional accessory is great for picnics or casual outdoor gatherings.
Wooden rings at the handle add a professional and finished look to the design. This project is a great introduction to the art of knotting for any beginner. You can customize the length to fit different bottle sizes with ease. Giving a gift like this shows you value both beauty and utility in daily life. It is a sustainable alternative to single use bags that looks much more expensive.
Material Required List
- Three millimeter cotton macrame cord
- One large wooden ring
Equipment Required List
- Sharp scissors
- Measuring tape
- S hook for hanging while you work
DIY Instruction Step by Step
- Cut eight pieces of cotton cord that are each three meters long.
- Fold each cord in half and attach them to the wooden ring using a lark head knot.
- Hang the wooden ring on an S hook at eye level to make knotting easier.
- Group the cords into sets of four for the first row of knots.
- Tie a square knot with each set of four cords about five centimeters below the ring.
- Start the second row by taking two cords from adjacent knots.
- Tie new square knots to create a diamond pattern in the mesh.
- Continue this alternating pattern until the bag is long enough for your bottle.
- Tie all the cords together at the bottom with one large gathering knot.
- Trim the remaining cord ends to create a neat fringe at the base.
24 Midnight Bloom Loose Leaf Tea Tin
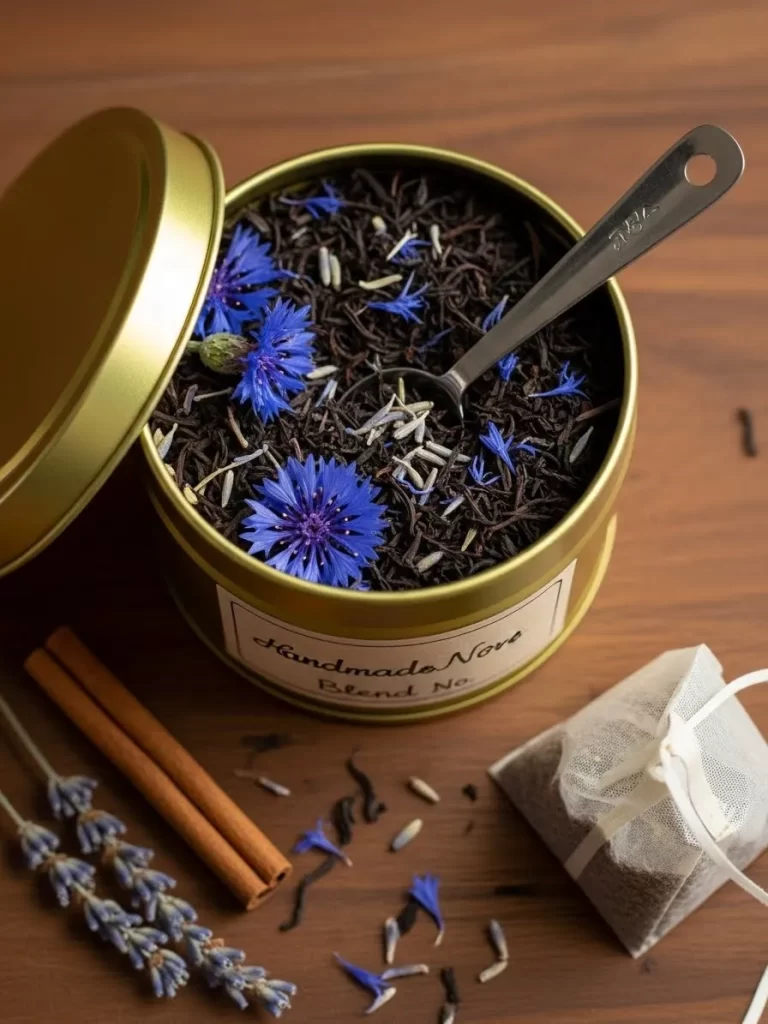
Elevate your morning routine with a custom blend of high quality loose leaf tea. Deep blue cornflowers mixed with dark tea leaves create a visual masterpiece in the jar. The golden tin keeps the tea fresh and protected from sunlight for a long time. This gift offers a sensory experience that starts with the scent and ends with a warm cup.
Handmade tea blends show a deep understanding of the recipient’s personal tastes. You can add dried herbs or spices to create a signature flavor profile. The minimalist label on the front provides a clean and modern look for any kitchen shelf. Gifting tea is a gesture of peace and quiet relaxation. Your loved one will think of your kindness with every soothing sip they take.
Material Required List
- Loose leaf black or green tea
- Dried cornflowers or lavender
- Cinnamon sticks
- Gold metal tea tin
- Paper for a custom label
Equipment Required List
- Large mixing bowl
- Metal spoon
- Measuring cup
DIY Instruction Step by Step
- Pour two cups of your base loose leaf tea into a large mixing bowl.
- Add half a cup of dried cornflowers to the tea for a pop of color.
- Break the cinnamon sticks into small pieces and add them to the mix.
- Stir the ingredients together very gently so you do not crush the leaves.
- Smell the blend to ensure the spices are balanced with the tea.
- Use a measuring cup to pour the mixture into the gold metal tin.
- Tap the tin on the counter to help the tea settle and fill the space.
- Wipe the rim of the tin and press the lid on firmly.
- Write the name of your blend on a small paper label.
- Glue the label onto the front of the tin to complete the gift.
25 Memories Ticket Shadow Box
Save every concert and movie memory in a beautiful wooden shadow box. The dark wood finish provides a sophisticated frame for your collection of paper tickets. A small slot at the top allows you to add new memories without ever opening the frame. This evolving piece of art tells the story of your adventures together over the years.
Placing the box on a shelf creates a great conversation piece for guests. You can see the stack of tickets grow as you share more experiences. This gift is a thoughtful way to celebrate a long term relationship. It turns small scraps of paper into a valuable and organized display. Your partner will love seeing the physical proof of all the fun times you have shared.
Material Required List
- Deep wooden shadow box frame
- Printed background paper
- Small collection of tickets
Equipment Required List
- Power drill with a wide bit
- Sandpaper
- Wood glue
DIY Instruction Step by Step
- Open the back of the shadow box and remove the glass for safety.
- Mark a rectangular spot on the top center of the wooden frame.
- Use a drill to create a series of holes within that marked rectangle.
- Use a small saw or file to connect the holes into a clean ticket slot.
- Sand the edges of the slot until the wood is perfectly smooth.
- Clean the glass and place it back into the front of the frame.
- Glue a piece of decorative paper to the back board of the shadow box.
- Put a few of your existing tickets inside the box to start the collection.
- Secure the back board onto the frame using the metal tabs.
- Place the box on a table or hang it on the wall near the entrance.
26 Whipped Cacao Body Butter

Indulge in a decadent skincare treat that looks and smells like chocolate mousse. This whipped body butter uses natural fats to provide deep moisture to dry skin. The airy texture melts instantly upon contact for a smooth and non greasy finish. It is a luxurious addition to any morning or evening beauty routine.
Glass jars with simple twine ties make this look like an expensive artisan product. You can add vitamin E oil to help the butter stay fresh for many months. This project is much safer and healthier than many store bought lotions. Your friend will enjoy the rich scent and the soft feel of their skin after use. It is a creative way to gift a spa experience in a single jar.
Material Required List
- Raw cacao butter
- Virgin coconut oil
- Sweet almond oil
- Glass jar with a lid
Equipment Required List
- Electric hand mixer
- Large glass bowl
- Small pot for melting
- Rubber spatula
DIY Instruction Step by Step
- Place the cacao butter and coconut oil into a glass bowl.
- Set the bowl over a pot of simmering water to melt the fats.
- Stir the mixture until it is a clear liquid and remove from heat.
- Add the sweet almond oil and stir one more time.
- Put the bowl in the refrigerator for forty five minutes to cool.
- Wait until the oil starts to look solid but is still soft to the touch.
- Use the electric mixer on high speed to whip the mixture.
- Continue whipping for five minutes until it looks like thick white cream.
- Use a spatula to scoop the butter into a clean glass jar.
- Tie a piece of twine around the lid with a hand written instruction tag.
27 Tasseled Wood Bead Garland

Add a touch of Scandinavian style to your home with a wooden bead garland. The natural wood tones provide a clean and organic aesthetic for a mantel or shelf. Thick cotton tassels at each end add a soft texture that balances the hard beads. This versatile piece of decor works well in any room from the nursery to the living area.
Bigger beads create a more dramatic look while smaller ones feel delicate. This project is a relaxing way to spend an afternoon and requires no power tools. You can leave the wood raw or paint a few beads for a custom color pop. It is an affordable way to achieve a high end designer look for your home. Your loved one will appreciate this stylish and modern handmade gift.
Material Required List
- Unfinished wooden beads in various sizes
- Thick cotton twine or cord
- Large embroidery needle
Equipment Required List
- Sharp scissors
- Ruler
- Small piece of cardboard
DIY Instruction Step by Step
- Cut a piece of twine that is one and a half meters long.
- Thread the twine through the large embroidery needle.
- Wrap extra twine around a small piece of cardboard twenty times to make a tassel.
- Slide a short piece of string under the wraps and tie it tightly at the top.
- Cut the bottom of the loops and remove the cardboard.
- Tie the tassel securely to one end of your long garland string.
- Begin sliding the wooden beads onto the string in your favorite pattern.
- Fill the string with beads until only ten centimeters of twine remain.
- Create a second tassel using the same cardboard method.
- Tie the second tassel to the open end of the string to finish the garland.
28 Frosted Glass Midnight Picnic Jar
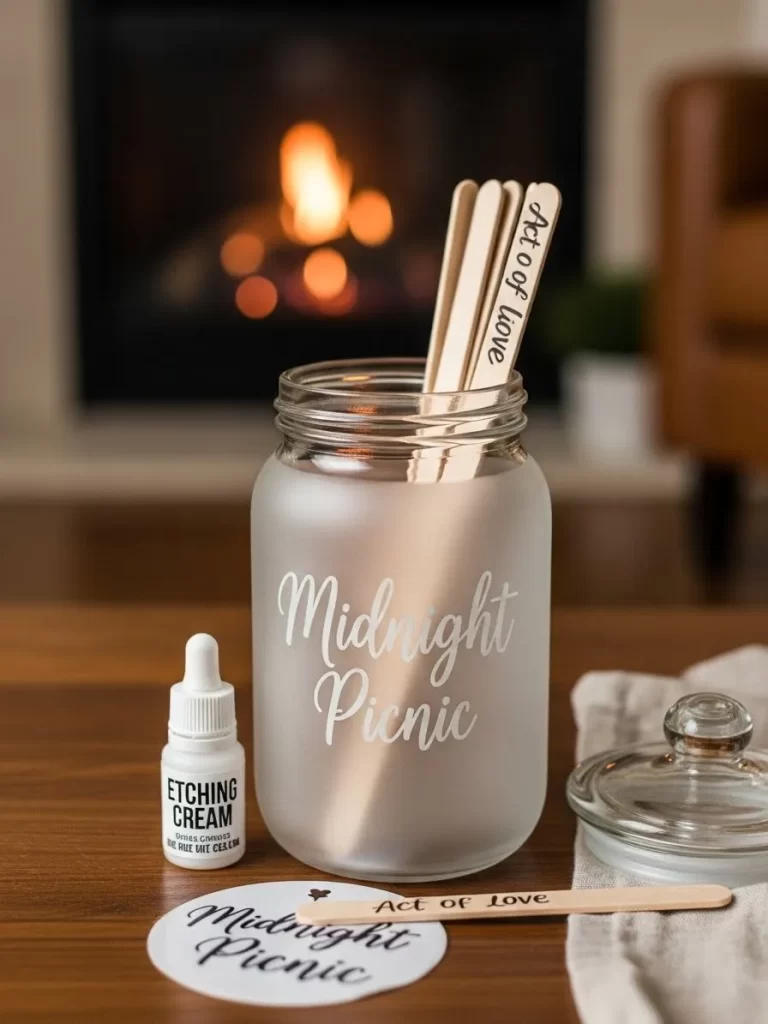
Transform a simple storage jar into a piece of frosted glass art. The matte finish provides a sophisticated and modern look for any kitchen or desk. This jar is the right size for holding treats or small stationery items. The frosted surface allows you to see the contents while still hiding the fine details.
White lettering on the front adds a professional and custom touch to the gift. You can use this method on any glass container you have at home. It is a great way to recycle while creating something that looks brand new. This project is simple enough for anyone to try and yields consistent results. Your partner will enjoy using this stylish jar for their favorite snacks or treasures.
Material Required List
- Large glass jar with a lid
- Glass etching cream
- Vinyl letter stickers
- Small wooden sticks
Equipment Required List
- Rubber gloves
- Paintbrush
- Paper towels
- Sink with running water
DIY Instruction Step by Step
- Wash the glass jar and dry it with a lint free cloth.
- Apply the vinyl stickers to the front of the jar to spell out a name or word.
- Press the edges of the stickers down hard so no cream can leak under.
- Put on your rubber gloves to protect your skin from the cream.
- Use a paintbrush to apply a thick layer of etching cream over the stickers.
- Wait for ten minutes according to the instructions on the cream bottle.
- Rinse the jar under cold running water until all the cream is gone.
- Peel off the vinyl stickers to reveal the clear glass underneath.
- Dry the jar and check that the frosted finish is even across the surface.
- Fill the jar with cookies or candy before giving it as a gift.
29 Sculpted Plaster Canvas Art
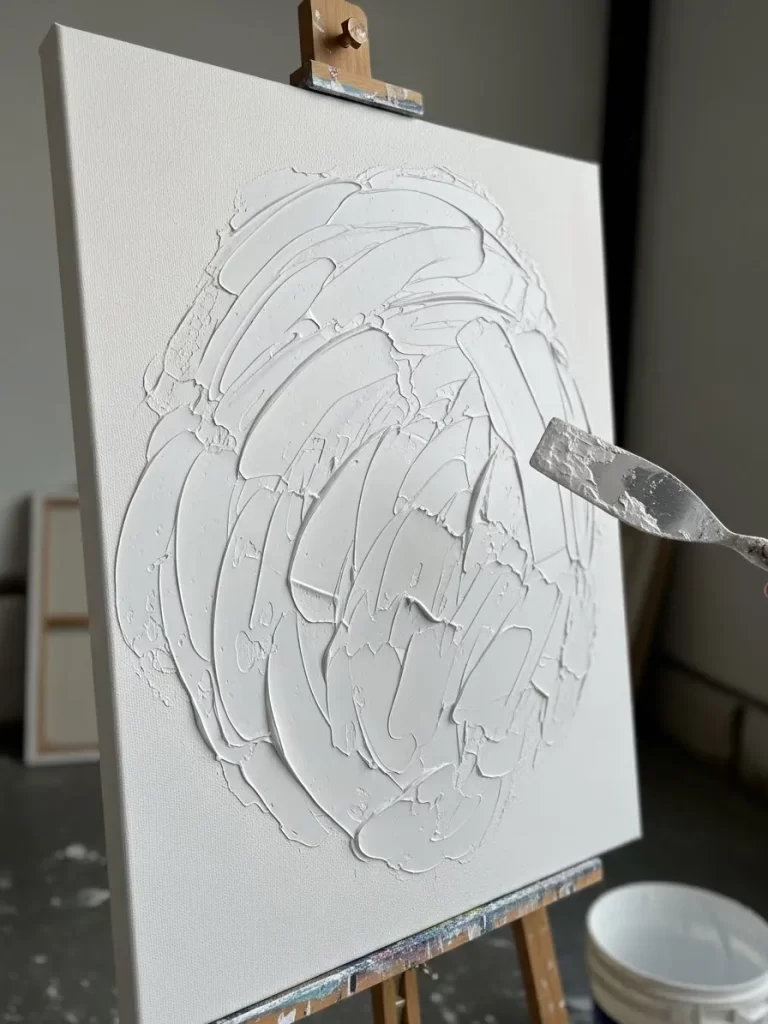
Bring a piece of modern gallery art into your home with a textured canvas. The thick white plaster allows you to create bold and flowing patterns. This minimalist style focuses on light and shadow rather than bright colors. It provides a sophisticated focal point for a bedroom or a quiet reading nook.
Working with plaster is a fun and tactile experience for any artist. You can use common kitchen tools to create different textures on the surface. This project looks much more expensive than the cost of the basic materials. Every piece you create will be a unique and one of a kind original. Your loved one will be impressed by your artistic talent and creativity.
Material Required List
- Large blank stretched canvas
- Pre mixed joint compound or plaster
- White acrylic paint
Equipment Required List
- Putty knife or spatula
- Large paintbrush
- Plastic drop cloth
DIY Instruction Step by Step
- Lay your canvas flat on a plastic drop cloth to protect your floor.
- Scoop a large amount of plaster onto the center of the canvas.
- Use a putty knife to spread the plaster toward the edges in a thick layer.
- Create large swooping motions with the knife to make deep ridges.
- Experiment with different tools like a comb or a fork for more detail.
- Let the plaster dry for at least twenty four hours until it is hard.
- Check for any large cracks and fill them with a tiny bit more plaster if needed.
- Apply a coat of white acrylic paint over the entire surface for a clean look.
- Wait for the paint to dry completely before touching the texture.
- Hang the canvas on a wall where the light can hit the ridges and create shadows.
30 Gilded Quartz Stone Bookends
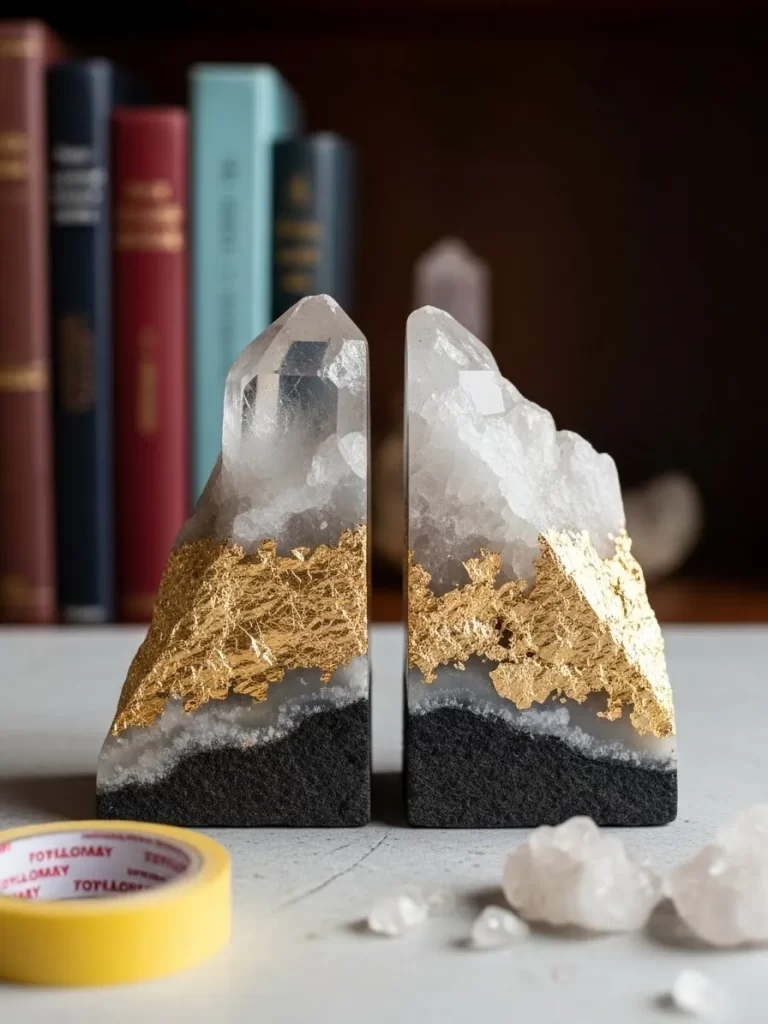
Elevate your library with heavy quartz bookends finished with shimmering gold. These natural stone pieces bring a touch of the earth into a modern home. The gold leaf on the edges provides a luxury contrast to the rough texture of the crystal. These bookends are strong enough to hold even your heaviest hardback books.
Every stone has a different shape and internal pattern for a truly unique look. This project turns basic rocks into high end designer accessories. You can find beautiful stones at local shops or even in nature. Gifting something made of stone symbolizes a strong and lasting relationship. Your friend will enjoy having such a beautiful and functional piece on their bookshelf.
Material Required List
- Two large quartz or heavy stones
- Gold leaf flakes
- Gold gilding glue
- Clear stone sealer
Equipment Required List
- Small paintbrush
- Soft cloth
- Painter tape
DIY Instruction Step by Step
- Scrub the stones with water to remove any dirt or loose bits.
- Let the stones dry completely for a full day.
- Apply painter tape to create a straight line where you want the gold to stop.
- Brush a thin layer of gilding glue onto the bottom section of the stone.
- Wait five minutes until the glue feels sticky to the touch.
- Press the gold leaf flakes onto the glue using a dry paintbrush.
- Rub the gold leaf gently with a soft cloth to smooth the surface.
- Peel off the painter tape to reveal a crisp and clean gold edge.
- Spray a thin coat of clear sealer over the gold to protect the finish.
- Stick felt pads to the bottom of the stones so they do not scratch the shelf.
31 Botanical Hanging Wax Tablets

Fill a small room or closet with the fresh scent of a flower field. These hanging wax tablets feature delicate dried blooms pressed into natural white wax. They act as beautiful air fresheners that look like miniature pieces of art. The purple and orange botanical elements provide a bright pop of color against the neutral background.
Crafting these allows you to preserve the beauty of seasonal flowers for months. You can hang them from a door handle or place them inside a drawer. This project is a wonderful way to use up extra candle supplies in a creative way. The natural twine provides a rustic and organic feel to the presentation. Your partner will appreciate the subtle and natural fragrance in their daily space.
Material Required List
- White soy wax or beeswax
- Dried purple flowers and orange slices
- Essential oil
- Natural jute twine
- Small eyelet grommet
Equipment Required List
- Silicone tag mold
- Wax melting pot
- Tweezers
- Wooden stir stick
DIY Instruction Step by Step
- Melt your wax in a pot until it becomes a clear liquid.
- Add twenty drops of essential oil and stir gently with a stick.
- Pour the hot wax into the silicone tag mold.
- Wait for five minutes until the wax begins to turn opaque.
- Use tweezers to carefully place your dried flowers and orange slices onto the surface.
- Press the botanicals down very lightly so they stick but do not sink.
- Let the wax tablets cool and harden for at least two hours.
- Pop the tablets out of the silicone mold once they feel firm.
- Press a small eyelet grommet into the hole at the top of the tag.
- Thread a piece of twine through the hole and tie it in a secure loop.
32 Monogrammed Luxury Pillowcase
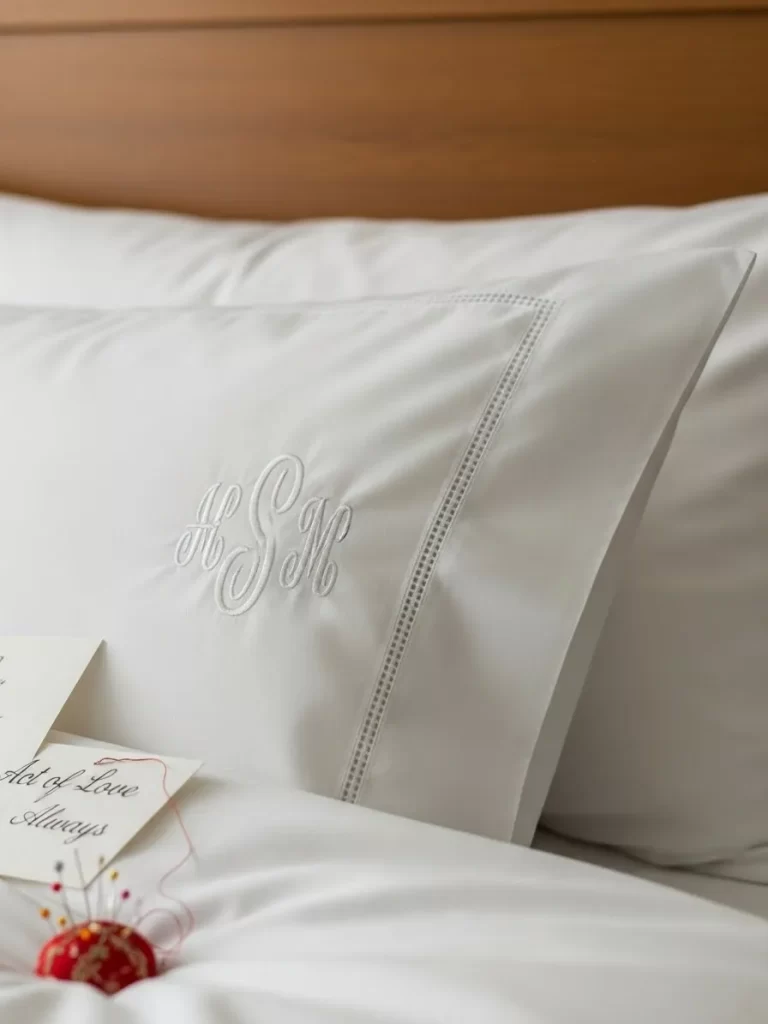
Transform a bedroom into a boutique hotel suite with a personalized pillowcase. This crisp white fabric features a beautiful embroidered monogram in matching thread. The tone on tone design provides a subtle and high end aesthetic for any bed. It is a thoughtful gift that adds a touch of identity and comfort to a home.
Soft cotton fabric ensures a peaceful and cool sleep throughout the night. Hand embroidery shows a level of dedication that is rarely found in mass produced items. You can choose a font style that matches the personality of your loved one. This simple detail elevates the entire look of the room. It is a classic gift that remains stylish for many years to come.
Material Required List
- High thread count white pillowcase
- Embroidery hoop
- White embroidery thread
- Water soluble fabric pen
Equipment Required List
- Embroidery needle
- Sharp scissors
- Iron
DIY Instruction Step by Step
- Wash and iron the pillowcase to ensure a smooth working surface.
- Use the fabric pen to draw the initials in a beautiful cursive style.
- Place the fabric inside the embroidery hoop and tighten the screw.
- Thread your needle with two strands of white embroidery thread.
- Use a satin stitch to fill in the letters for a raised and shiny look.
- Follow the lines carefully to keep the edges of the monogram crisp.
- Tie a small knot on the inside of the pillowcase when you finish.
- Rinse the fabric with cool water to remove the blue pen marks.
- Let the pillowcase air dry and give it a final press with an iron.
- Place the pillowcase on a fresh pillow to present your gift.
33 Rainbow Match Jar with Sentiment
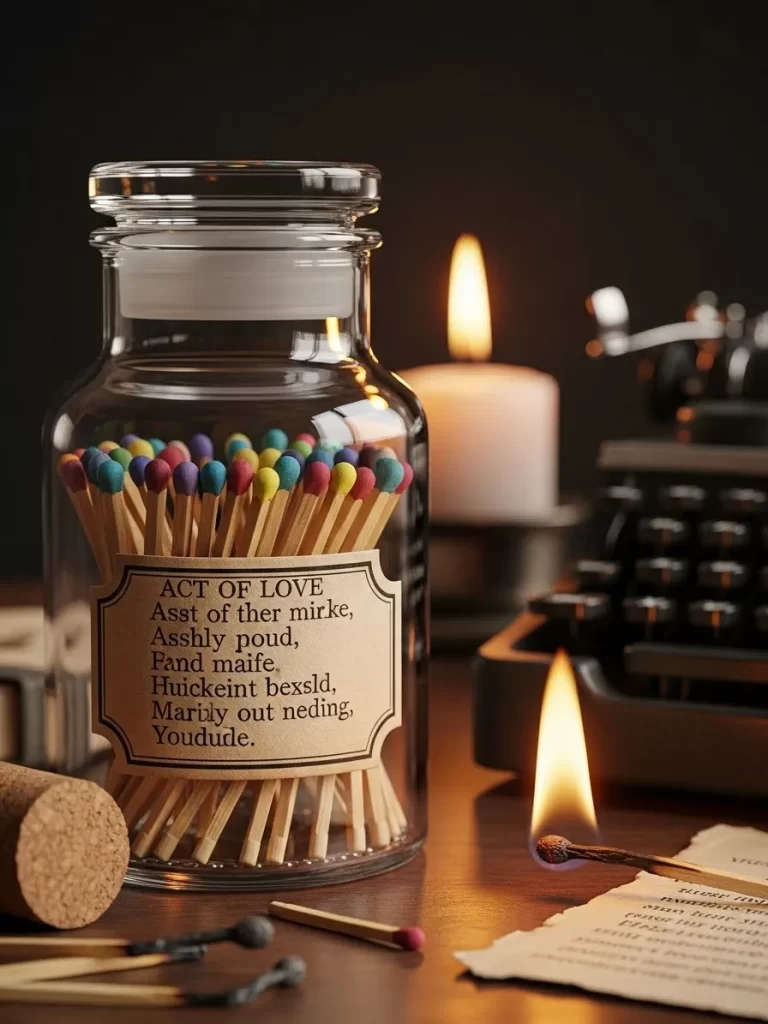
Light up a romantic evening with a colorful and decorative match jar. This apothecary style glass bottle holds a rainbow of matches with vibrant tips. A custom label on the front features a sweet message or poem for your loved one. It is a practical and stylish accessory to keep next to a favorite candle.
Small details like the cork stopper and textured paper label provide an expensive feel. You can customize the match colors to suit the decor of any room. This project is very quick to assemble but offers a high visual impact. It shows that you value the light and warmth your partner brings to your life. The clear glass allows the beautiful colors of the matches to be the star.
Material Required List
- Small glass jar with a cork lid
- Multi colored matches
- Adhesive match striker paper
- Paper for the sentiment label
Equipment Required List
- Scissors
- Glue stick
- Pen
DIY Instruction Step by Step
- Wash the glass jar and ensure the inside is completely dry.
- Sort your colored matches to create a nice mix of tips.
- Place the matches into the jar with the tips facing upward.
- Cut a small circle of match striker paper using your scissors.
- Glue the striker paper to the bottom of the glass jar.
- Write your favorite quote or message on a piece of paper.
- Cut the paper into a neat rectangular shape for the label.
- Apply glue to the back of the label and center it on the jar.
- Press the cork lid firmly into the top of the bottle.
- Test one match on the bottom striker to ensure it works properly.
34 Constellation Gold Foil Mug
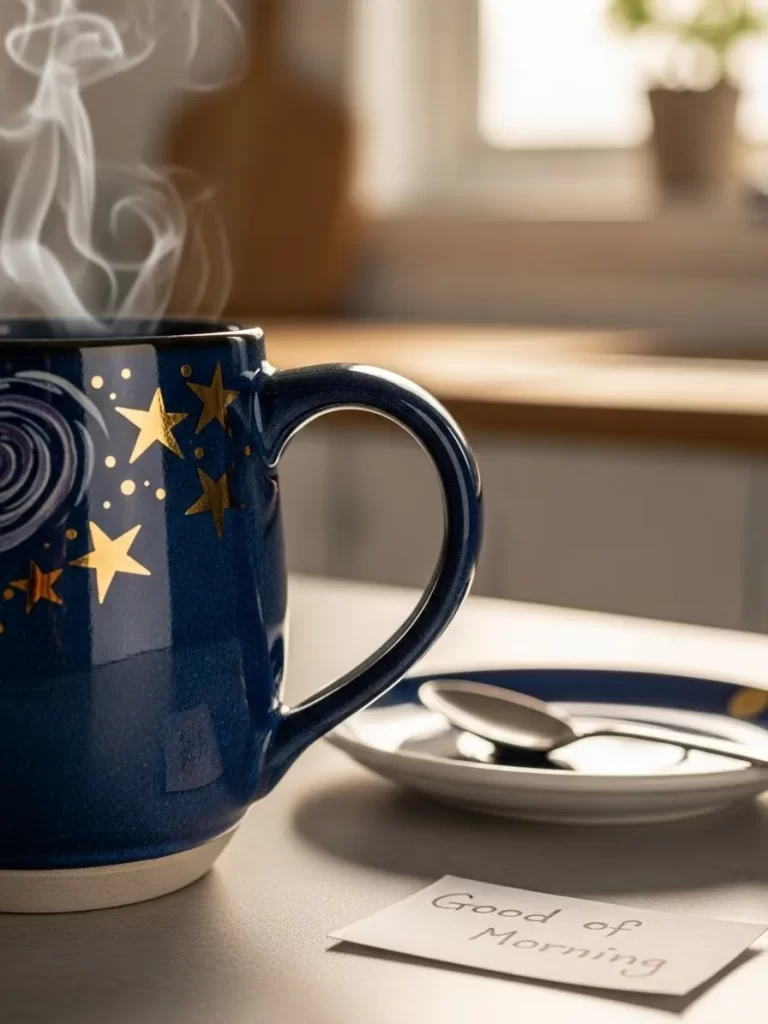
Start every morning with a journey through the stars in a deep blue mug. This ceramic piece features hand painted gold constellations and shimmery stars. The dark glossy finish mimics the night sky during a clear winter evening. It is a wonderful gift for anyone who loves astronomy or quiet coffee moments.
Gold accents provide a luxury feel to an otherwise simple kitchen item. You can choose specific zodiac signs that are meaningful to your partner. This project turns a basic mug into a custom piece of functional art. Hand washing ensures the delicate gold details stay bright for a long time. It is a creative way to bring a touch of the galaxy into the home.
Material Required List
- Dark blue ceramic mug
- Gold porcelain paint marker
- Small star stickers
Equipment Required List
- Rubbing alcohol
- Cotton ball
- Oven for curing
DIY Instruction Step by Step
- Wipe the outside of the mug with rubbing alcohol to remove oils.
- Place small star stickers in the shape of a constellation.
- Use the gold marker to draw small dots over the star stickers.
- Draw thin lines between the dots to connect the constellation.
- Add many tiny gold dots around the main design to look like distant stars.
- Peel off the star stickers to reveal the clean design underneath.
- Let the paint dry for twenty four hours in a cool place.
- Place the mug in a cold oven and set it to one hundred degrees.
- Bake the mug for thirty minutes to set the gold paint.
- Turn off the oven and let the mug cool inside before removing it.
35 Forest Floor Shadow Box
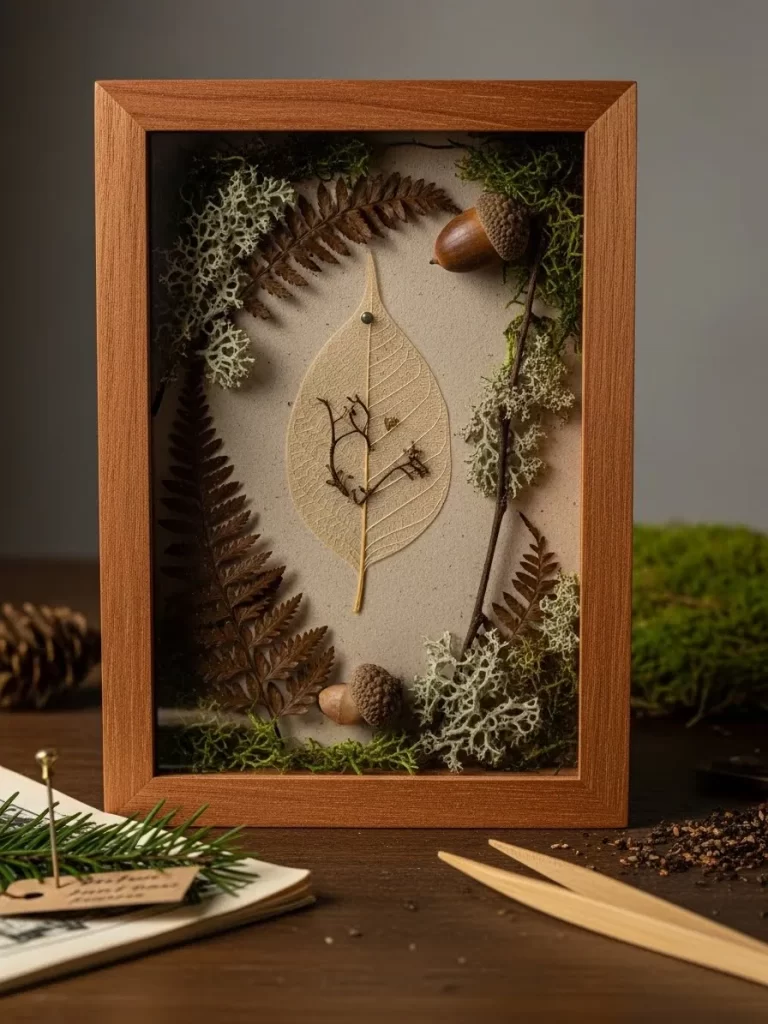
Capture the essence of a quiet woodland walk inside a beautiful shadow box. This arrangement features real moss, acorns, and a delicate skeleton leaf. The natural textures create a sense of peace and connection to the earth. It is a sophisticated piece of wall art that suits a modern or rustic home.
Wood frames provide a warm border for the intricate natural elements inside. This project allows you to preserve small treasures found during your adventures together. Every box is unique because no two leaves or acorns are identical. Gifting a piece of nature shows you value growth and the beauty of the outdoors. It is a creative alternative to traditional framed photographs.
Material Required List
- Wooden shadow box frame
- Dried forest moss
- Whole acorns
- Skeleton leaf
- Neutral colored cardstock
Equipment Required List
- Glue gun
- Tweezers
- Soft brush
DIY Instruction Step by Step
- Open the back of the shadow box and remove the glass.
- Glue a piece of neutral cardstock to the back board for a clean base.
- Place your skeleton leaf in the center using a tiny dot of glue.
- Use tweezers to arrange small patches of moss around the edges.
- Glue the moss down firmly once you are happy with the layout.
- Add two or three acorns in the corners for extra texture and height.
- Use a soft brush to remove any loose bits of moss from the design.
- Clean the inside of the glass to ensure a clear view.
- Put the glass and the back board back into the wooden frame.
- Secure the metal tabs on the back and hang the box on a wall.
36 Matte Black Suede Reed Diffuser

Scent a room with a sophisticated and modern matte black reed diffuser. The sleek dark bottle provides a minimalist aesthetic that looks expensive on a vanity. Black reeds draw the fragrance upward and distribute it slowly into the air. This combination of “Midnight Suede” oils creates a warm and inviting atmosphere.
Personalized labels in white text offer a professional finish to the handmade gift. You can choose different essential oils to create a custom signature scent. This project is a great way to provide long lasting fragrance without a flame. High quality glass bottles can be refilled and reused for many years. It is a thoughtful and stylish gift for someone who values a beautiful home.
Material Required List
- Matte black glass bottle
- Black diffuser reeds
- Reed diffuser base oil
- Fragrance oil
- White adhesive label
Equipment Required List
- Small funnel
- Measuring cup
- Glass stir stick
DIY Instruction Step by Step
- Measure half a cup of diffuser base oil into a glass cup.
- Add thirty drops of your favorite fragrance oil and stir well.
- Place the funnel into the neck of the matte black bottle.
- Pour the oil mixture slowly into the bottle until it is nearly full.
- Apply your custom white label to the front of the black glass.
- Press the label down firmly to remove any air bubbles.
- Insert six black reeds into the bottle through the opening.
- Wait for one hour for the oil to travel up the reeds.
- Flip the reeds over to start the scent diffusion process immediately.
- Place the diffuser on a flat surface away from direct sunlight.
37 Chunky Knit Pom Pom Throw
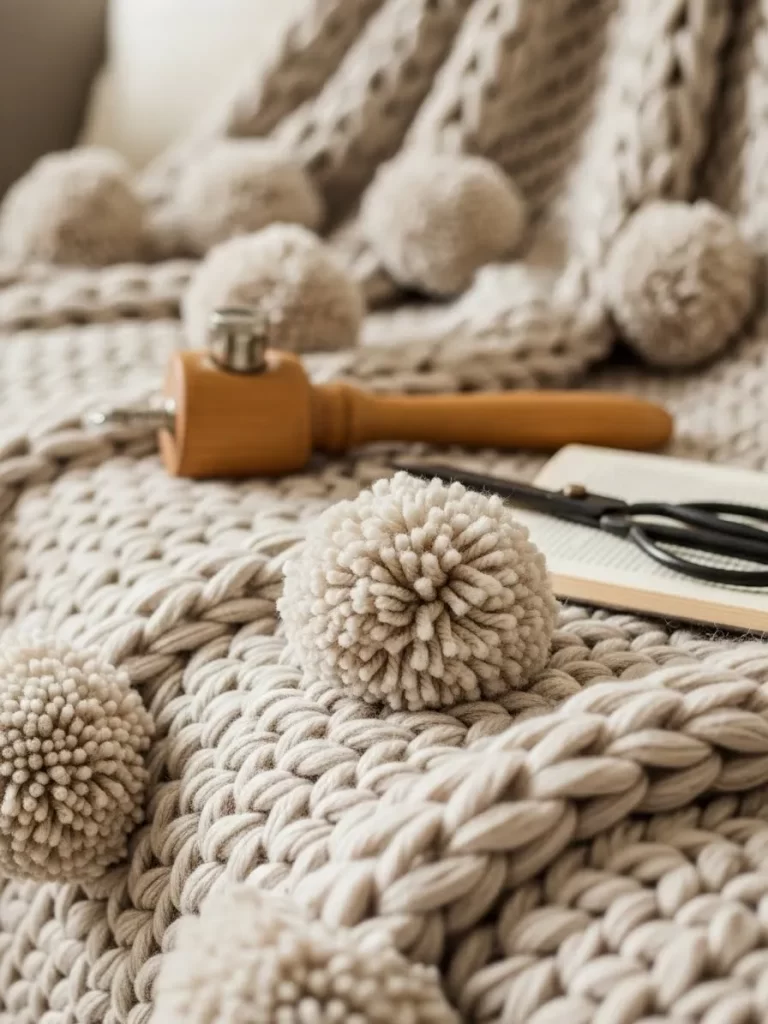
Cozy up on a cold evening with a handmade chunky knit blanket. This thick neutral yarn provides a heavy and comforting weight during relaxation. Large poms on the corners add a playful and stylish detail to the design. It is a luxurious addition to any sofa or bed for extra warmth and texture.
Hand knitting with jumbo yarn is a satisfying project for a beginner. You can complete a full blanket in just a few hours of work. Giving a handmade blanket is a gesture of warmth and protection for your loved one. This piece looks like an expensive designer item found in high end home stores. It is a practical gift that will be used and loved every single winter.
Material Required List
- Four rolls of jumbo chenille yarn
- Matching thin thread
- Large cardboard piece
Equipment Required List
- Sharp scissors
- Large sewing needle
- Your own hands for knitting
DIY Instruction Step by Step
- Start by making a slip knot at the end of your jumbo yarn.
- Use your hands to pull loops through each other to create a chain.
- Reach through each loop in the chain to pull a new loop upward.
- Continue this process row by row until the blanket is the right size.
- Tie off the final row by pulling the yarn end through the last loop.
- Wrap yarn around a large piece of cardboard fifty times to make a pom.
- Tie a string around the center and cut the ends to make a fluffy ball.
- Repeat this to create four large poms for the corners of the blanket.
- Sew one pom to each corner using a needle and matching thread.
- Shake the blanket out to even out the stitches and poms.
38 Gourmet Smoky BBQ Spice Tins
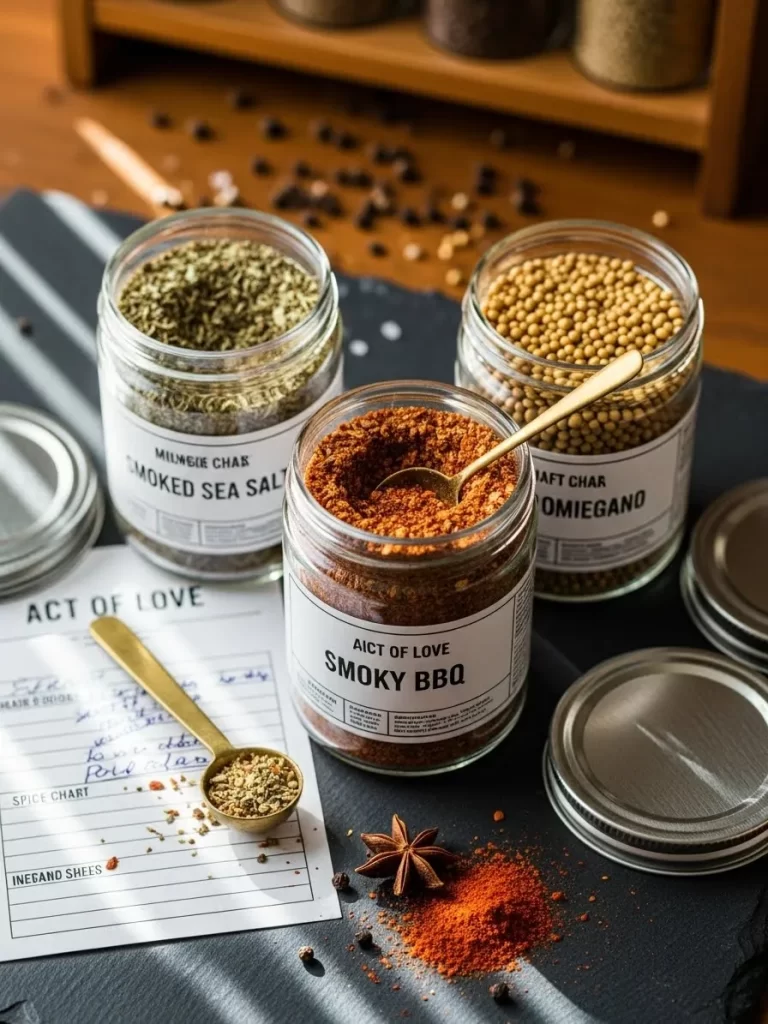
Bring a touch of artisan flavor to the kitchen with custom spice rub tins. These glass jars feature professional labels and high quality ingredients for the grill. Smoky BBQ and smoked sea salt blends provide a gourmet cooking experience. It is a wonderful gift for someone who loves to experiment with new flavors.
Clear glass allows the beautiful colors and textures of the spices to be seen. Wooden spoons tied to the jars provide a convenient way to measure the rubs. You can customize the heat levels to match the taste of your favorite cook. This project turns basic pantry items into a high end culinary gift set. Your partner will enjoy using these during your next weekend dinner at home.
Material Required List
- Glass spice jars with metal lids
- Smoked paprika and sea salt
- Brown sugar and dried garlic
- Small gold metal spoons
- Custom paper labels
Equipment Required List
- Mixing bowl
- Metal spoon
- Funnel
DIY Instruction Step by Step
- Mix your paprika, brown sugar, and garlic in a bowl for the BBQ rub.
- Fill the first jar with the smoky BBQ mixture using a funnel.
- Fill the second jar with coarse smoked sea salt for finishing meals.
- Wipe the jars clean to remove any spice dust from the glass.
- Apply the custom labels to the center of each jar.
- Ensure the labels are straight and the edges are pressed down.
- Screw the metal lids onto the jars tightly to keep the spices fresh.
- Tie a small gold spoon to the side of each jar with a string.
- Place the jars on a small tray for a beautiful gift presentation.
- Include a short recipe card for a special meal you can cook together.
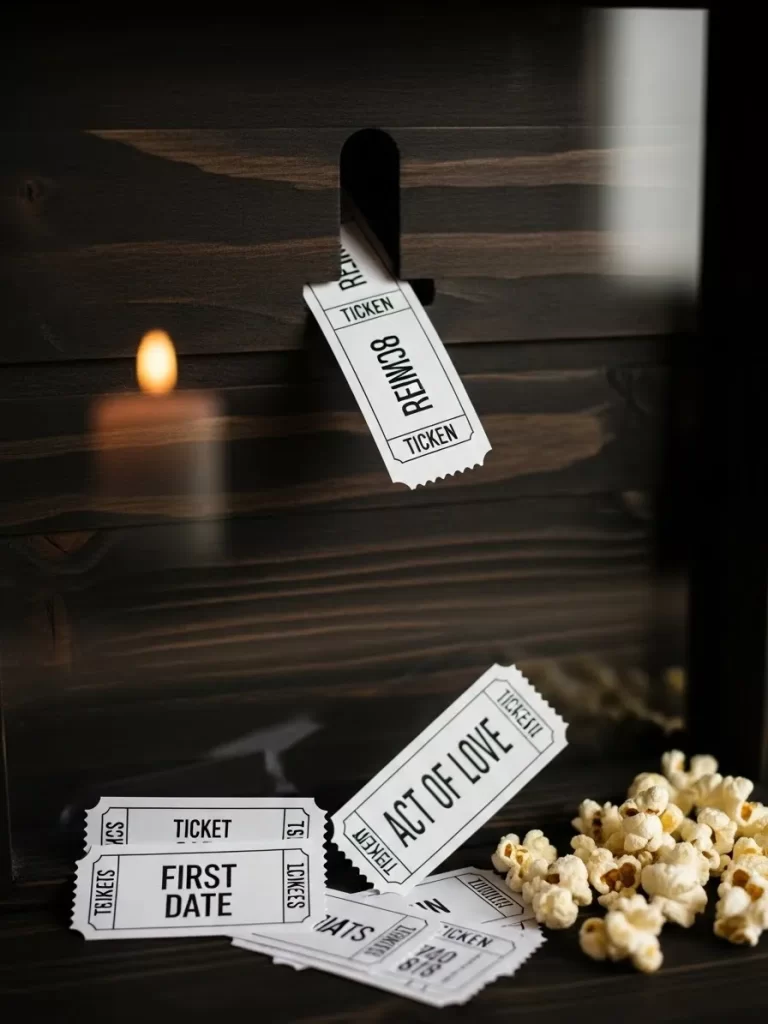
39 The Night We Met Ticket Frame
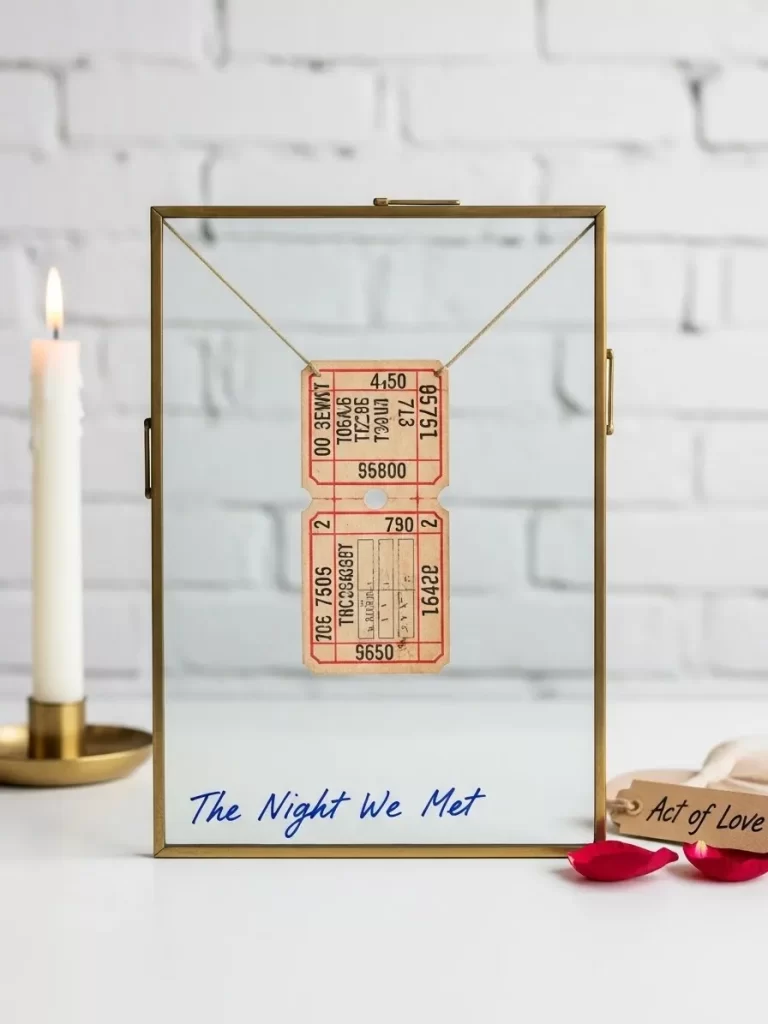
Commemorate your very first date with a beautiful floating ticket frame. A single vintage movie or train ticket sits suspended between two panes of glass. The brass frame adds a touch of classic elegance to this sentimental keepsake. Hand written notes on the glass provide a personal and romantic signature.
Floating frames create a modern look that focuses entirely on the memory inside. This minimalist design suits any shelf or nightstand in your home. Preserving a physical ticket shows you cherish the small moments that started your journey. It is a deeply personal gift that costs very little but means a great deal. Your loved one will feel special seeing this reminder of your shared history.
Material Required List
- Small brass floating frame
- Original ticket from a special event
- Small piece of clear adhesive
Equipment Required List
- Glass cleaner
- Soft cloth
- Tweezers
DIY Instruction Step by Step
- Open the brass frame and remove the two glass panes carefully.
- Clean both sides of the glass with a soft cloth to remove marks.
- Use tweezers to place the ticket in the center of one glass pane.
- Apply a tiny dot of clear adhesive to the back of the ticket to stop it from moving.
- Place the second pane of glass over the ticket slowly.
- Slide the glass back into the brass frame and secure the latch.
- Use a permanent marker to write a short date or name on the glass.
- Wipe the brass edges to remove any fingerprints from your ha
nds.
- Place the frame on a flat surface to check that the ticket is straight.
- Present the frame to your partner as a celebration of your first meeting.
40 Leather Bound Crystal Tumbler
Elevate a simple glass with a handcrafted leather sleeve for a luxury feel. The rich brown leather features a hand stitched cross design for a unique look. This sturdy wrap provides a comfortable grip and keeps drinks at the right temperature. It is a sophisticated addition to any home bar or office desk.
Genuine leather improves with use and develops a beautiful character over time. This project turns a basic tumbler into a custom piece of functional art. You can match the leather color to the style of your favorite room. Handcrafted details like the stitching show a high level of craftsmanship and care. It is a durable and stylish gift for someone who enjoys the finer details.
Material Required List
- Crystal glass tumbler
- Piece of soft brown leather
- Thick waxed thread
- Leather glue
Equipment Required List
- Leather hole punch
- Large needle
- Sharp knife
- Ruler
DIY Instruction Step by Step
- Measure the circumference of your glass and add two centimeters.
- Cut a rectangle of leather using your ruler and a sharp knife.
- Wrap the leather around the glass to check for a tight fit.
- Mark four holes along the vertical edges where the leather meets.
- Use the hole punch tool to create clean holes at each mark.
- Thread your needle with a long piece of thick waxed thread.
- Sew the two edges together using a cross stitch pattern.
- Pull the thread tight as you go to ensure the sleeve stays in place.
- Tie a secure knot on the inside of the leather and trim the ends.
- Slide the leather sleeve onto the glass and adjust it to sit level.
41 Sculpted Ceramic Ring Cone
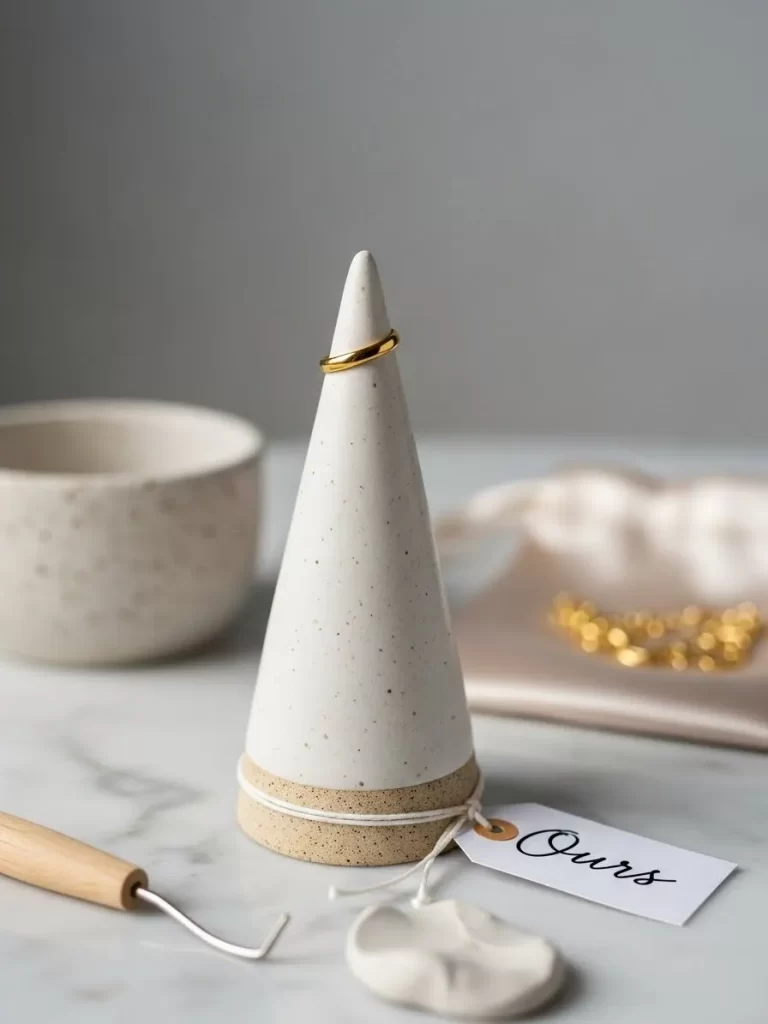
Minimalism meets functionality in this elegant handmade ring holder. Speckled white clay gives the piece an organic feel that fits on any nightstand or dresser. The sharp tip holds multiple rings securely while taking up very little space. A raw stoneware base adds a sophisticated touch of texture to the design.
Handcrafted pottery items bring a sense of art into daily life. You can customize the height of the cone to match your favorite jewelry pieces. This project requires no pottery wheel but yields a professional and expensive look. Gifting a ring cone shows you value the small and precious items of your loved one. It is a creative way to keep accessories organized and beautifully displayed.
Material Required List
- White air dry clay
- Matte white acrylic paint
- Fine grit sandpaper
- Clear clay sealer
Equipment Required List
- Rolling pin
- Paper cone template
- Small bowl of water
- Paintbrush
DIY Instruction Step by Step
- Roll out a lump of air dry clay until it is half a centimeter thick.
- Place your paper cone template onto the clay and cut around it.
- Roll the clay into a cone shape and overlap the edges slightly.
- Dip your finger in water and rub the seam until the clay is smooth.
- Stand the cone upright on a flat surface to dry for twenty four hours.
- Sand the surface and the bottom of the cone until it is perfectly smooth.
- Wipe away the clay dust with a damp paper towel.
- Apply a coat of matte white paint and let it dry completely.
- Use a brush to flick tiny dots of dark paint for a speckled look.
- Apply a final layer of clear sealer to protect the clay from moisture.
42 Infused Lavender Honey Jar
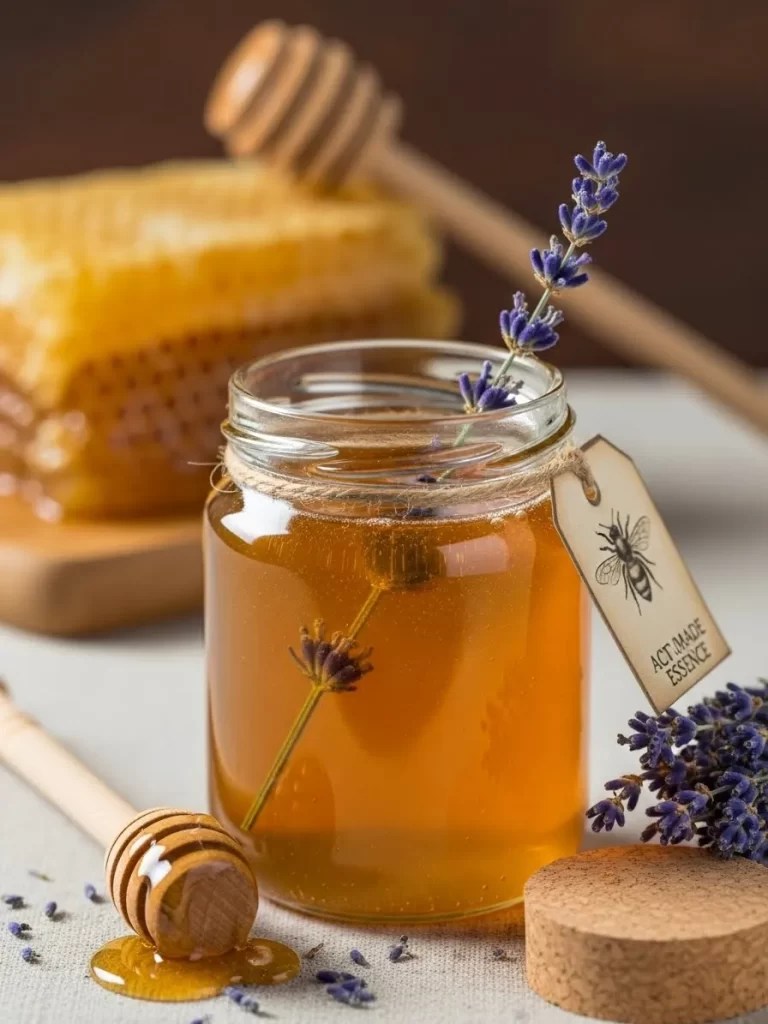
Golden honey becomes a gourmet treat when infused with aromatic herbs from the garden. This clear glass jar displays a beautiful sprig of dried lavender inside the thick liquid. The rich floral scent pairs beautifully with hot tea or fresh morning bread. It looks like a high end boutique find at a fraction of the cost.
Raw honey contains natural sweetness that captures botanical notes very well. Adding a custom bee label provides a professional and expensive finish to the gift. This project is a wonderful way to share the flavors of summer during the cold winter months. It is a practical and delicious choice for anyone who enjoys a luxury pantry. Your loved one will think of your kindness with every sweet spoonful.
Material Required List
- High quality raw honey
- Dried culinary lavender sprigs
- Glass jar with a tight lid
- Twine for decoration
Equipment Required List
- Wooden honey dipper
- Small funnel
- Paper towel
DIY Instruction Step by Step
- Wash the glass jar with hot water and dry it completely.
- Place two long sprigs of dried lavender inside the empty jar.
- Insert the funnel into the neck of the glass jar.
- Pour the honey slowly over the lavender sprigs until the jar is full.
- Use the honey dipper to push the lavender down into the liquid.
- Tap the jar on a soft surface to remove any trapped air bubbles.
- Wipe the rim of the jar so the lid fits on without sticking.
- Screw the lid on tightly to keep the honey fresh.
- Tie a piece of twine around the neck with a small dried lavender bud.
- Let the honey sit for one week to allow the flavor to develop fully.
43 Walnut Magnetic Key Holder
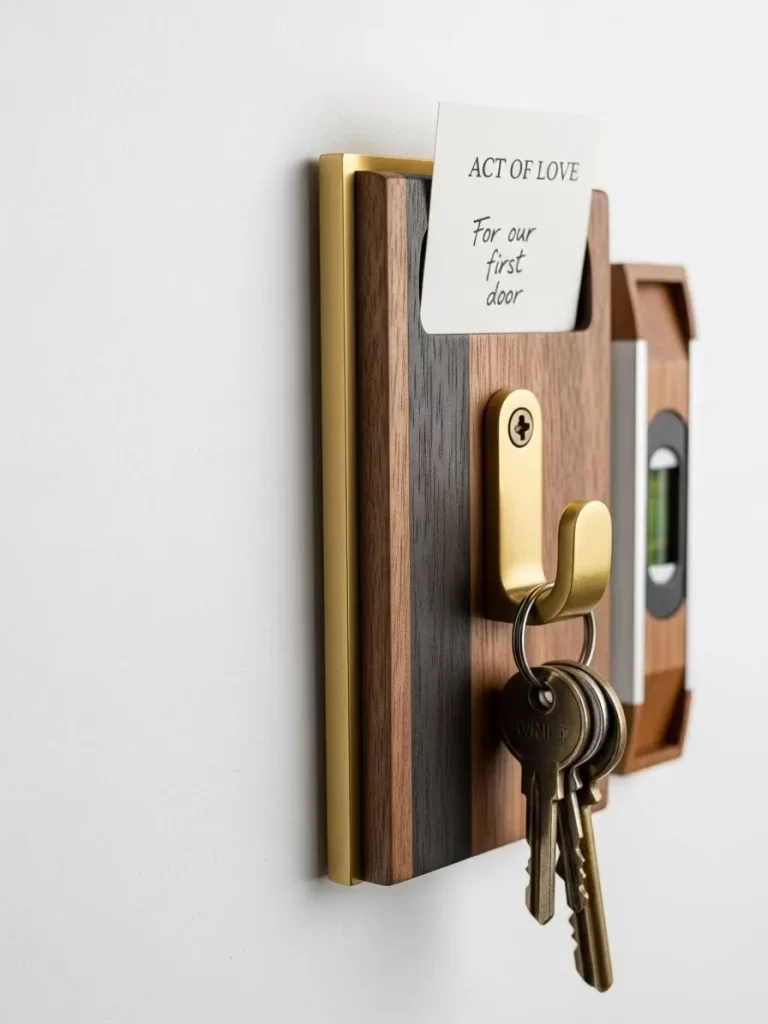
Organized entryways feel much more welcoming with a dedicated spot for daily keys. This solid walnut piece features a hidden magnet that holds key rings like magic. The gold metal hook provides extra storage for a small bag or a light umbrella. A slim slot at the top works as a convenient place for a romantic note.
Solid wood grains bring a touch of luxury and nature into a modern home. This functional piece of decor looks much more expensive than a plastic alternative. You can easily mount it to the wall using strong adhesive or small screws. Gifting a key holder shows you care about the daily comfort and organization of your partner. It is a durable and stylish addition to any hallway or office space.
Material Required List
- Solid walnut wood block
- Neodymium magnets
- Brass wall hook
- Strong wood glue
Equipment Required List
- Power drill with a spade bit
- Screwdriver
- Measuring tape
- Level
DIY Instruction Step by Step
- Cut your walnut block into a rectangle measuring ten by fifteen centimeters.
- Sand the edges of the wood until they are smooth and rounded.
- Mark two spots on the bottom edge for the magnets.
- Drill two shallow holes that match the size of your magnets.
- Apply a drop of wood glue into each hole and press the magnets inside.
- Let the glue dry for one hour before touching the magnets.
- Mark a spot on the front for the brass hook.
- Use a screwdriver to attach the brass hook to the center of the wood.
- Check that the hook is straight using your level.
- Apply a small amount of wood oil to make the walnut grain shine.
44 Hand Marbled Silk Scarf
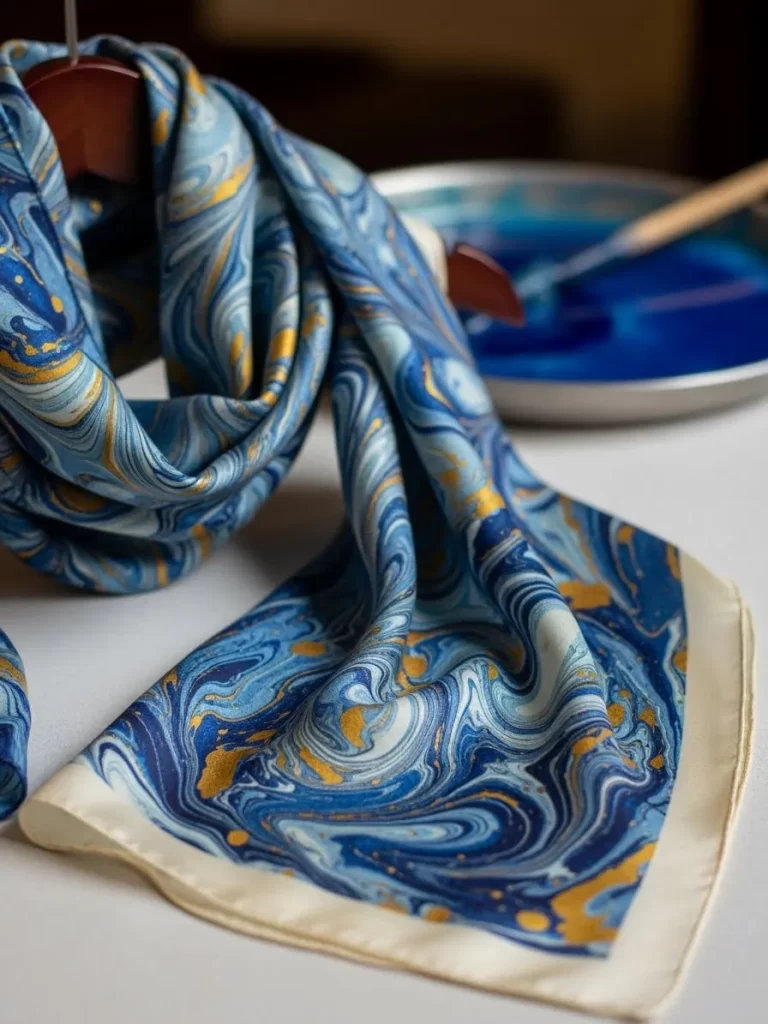
Vibrant blue swirls and golden flecks turn a plain scarf into wearable art. This marbling technique creates one of a kind patterns that flow across the fabric. High quality silk provides a luxurious sheen and a soft feel against the skin. It serves as a bold statement piece for any fashion lover or creative spirit.
Custom fabric patterns usually cost a high price in designer clothing stores. You can achieve the same look at home with just a few specialty materials. Every scarf you create will have its own unique and artistic identity. Giving a piece of wearable art shows you appreciate the personal style of your loved one. It is a stunning gift that combines traditional craft with modern fashion.
Material Required List
- White silk scarf
- Fabric marbling inks in blue and gold
- Alum powder for pre treating
- Liquid carrageenan for the water bath
Equipment Required List
- Large shallow plastic tray
- Droppers for the ink
- Metal skewers or combs
- Iron for heat setting
DIY Instruction Step by Step
- Mix the alum powder with warm water and soak the silk scarf for twenty minutes.
- Hang the scarf to air dry but do not rinse it.
- Fill the shallow tray with water and stir in the liquid carrageenan.
- Let the water bath sit for two hours until it is thick like gel.
- Use the droppers to place dots of blue and gold ink onto the water.
- Drag a skewer through the ink dots to create swirling marble patterns.
- Lay the dry silk scarf flat onto the surface of the water very slowly.
- Lift the scarf up after five seconds to reveal the transferred pattern.
- Rinse the silk in cold water to remove the excess gel.
- Iron the dry scarf on a low setting to lock the colors into the fabric.
45 Gilded Concrete Succulent Planter

Industrial concrete gains a touch of elegance with hand applied gold leaf flakes. This heavy planter provides a stable and stylish home for a vibrant green succulent. The rough grey surface contrasts beautifully with the shimmering metallic edges. It brings a modern and expensive aesthetic to a desk or a sunny windowsill.
Handmade concrete items have a heavy and high quality feel that lasts for years. You can create different shapes and sizes to build a full indoor garden set. Adding a small care tag shows you want the plant to thrive in its new home. This project is a great way to use basic construction materials for a luxury result. Your partner will enjoy watching their green gift grow in such a beautiful container.
Material Required List
- Quick dry concrete mix
- Gold leaf sheets
- Gilding adhesive
- Small succulent plant
- Potting soil
Equipment Required List
- Two plastic containers of different sizes
- Mixing bowl
- Sandpaper
- Small paintbrush
DIY Instruction Step by Step
- Mix the concrete with water until it looks like thick oatmeal.
- Pour the concrete into the larger plastic container until it is half full.
- Press the smaller container into the center to create a hole for the plant.
- Let the concrete harden for twenty four hours in a cool place.
- Remove the concrete pot from the plastic molds very carefully.
- Sand the top rim and sides until the surface is smooth to the touch.
- Brush a thin layer of gilding adhesive onto the top edge of the pot.
- Wait for the glue to feel sticky and press the gold leaf onto it.
- Rub the gold leaf with a dry brush to remove the extra flakes.
- Fill the pot with soil and plant your succulent in the center.
Choosing a handmade gift shows deep care and attention. You now have forty five ways to make this holiday special. Most of these items require very little time to finish.
Start your project early to avoid any last minute stress. A small gesture made by your hands carries a massive amount of meaning. Your loved one will cherish these unique treasures for a long time.
Expensive looks do not require a massive budget. Creativity remains the most valuable tool in your workshop. Enjoy the process of crafting something special for your partner.
Key Takeaways
High quality materials help your gifts look like boutique finds.
Personalization turns a basic item into a sentimental memory.
Clear glass and natural textures always provide an expensive look.
Following simple steps ensures professional results for every beginner.
Small details like custom labels make a huge difference in the final product.