The holiday table is more than just a place to eat. It’s the heart of the home during the festive season, where family and friends gather to share stories and make memories.
But in the rush of holiday preparations, the table’s centerpiece can often be forgotten, leaving the setting feeling incomplete.

What if you could create something truly beautiful without spending a lot of time or money? What if your table could be a conversation starter all on its own?
This guide is here to help. We’ve gathered 36 elegant DIY centerpiece ideas that are simple to create, no matter your skill level. From rustic woodland charm to modern, minimalist glow, you’ll find an inspiring project that will make your holiday feast unforgettable.
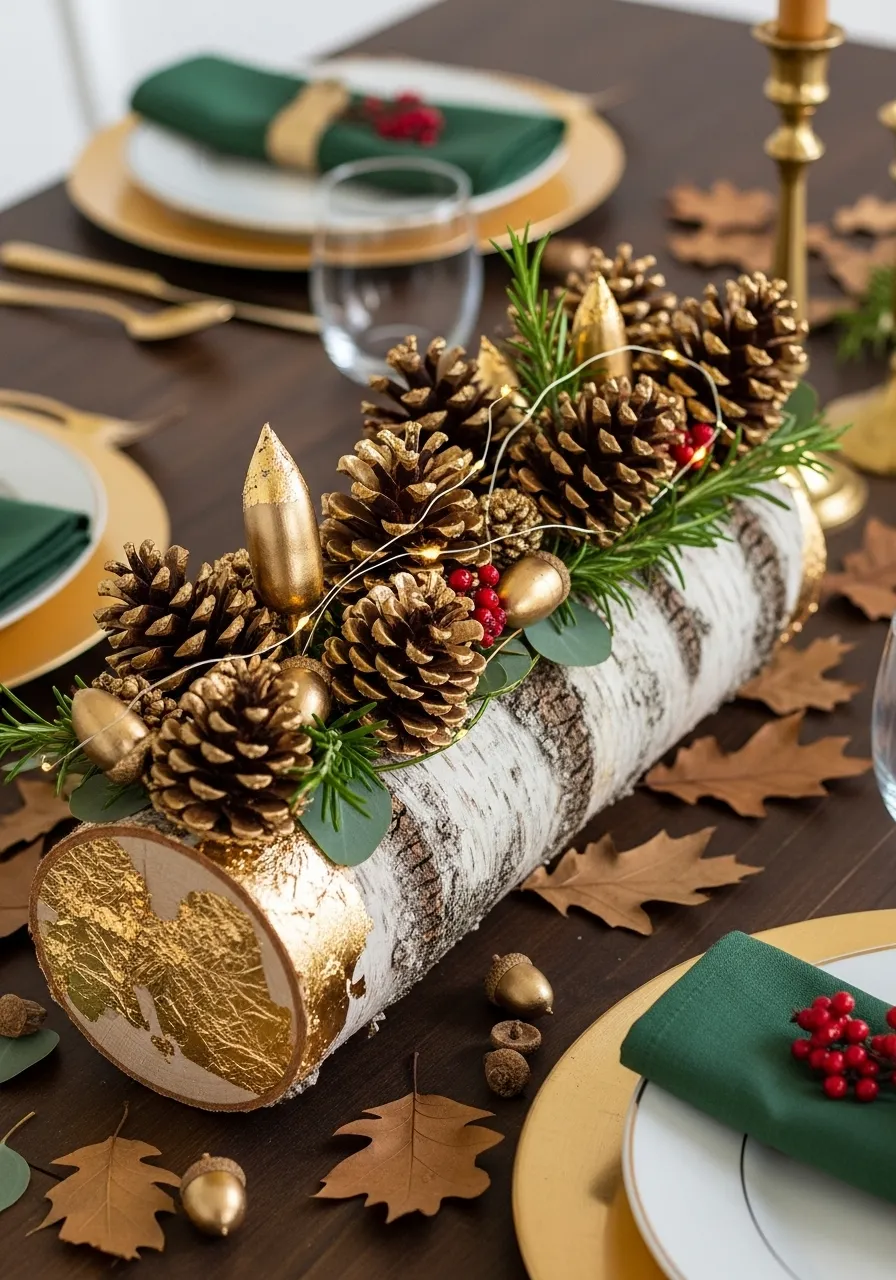
1. Gilded Birch Log Glow
A Touch of Woodland Gold

Bring the outdoors in with this rustic centerpiece. A simple birch log becomes the star of your holiday table. It combines natural elements with a little bit of sparkle. Pinecones, painted with hints of gold, nestle among fresh green sprigs.
Warm fairy lights weave through the arrangement, casting a soft glow. This creates a cozy and inviting atmosphere for your guests. The touch of gold leaf on the end of the log adds a surprising bit of glamour. It’s a beautiful way to celebrate the season.
DIY Instructions: How to Make Your Gilded Birch Log
What You’ll Need:
- A clean, dry birch log (about 1.5 to 2 feet long)
- Pinecones of different sizes
- Gold craft paint
- A small paintbrush
- A hot glue gun and glue sticks (ask a grown-up for help with this!)
- A string of battery-powered fairy lights (the kind with thin wire works great)
- A few small sprigs of fresh greenery (like rosemary or eucalyptus)
- A couple of small sprigs of fake red berries
- Gold leaf sheets and adhesive (optional, for extra sparkle)
Step-by-Step Guide:
- Prepare Your Log: First, make sure your birch log is clean. Wipe off any dirt. Ask a grown-up to help you make sure it sits flat on the table and won’t roll away.
- Paint the Pinecones: Take a few of your pinecones. Using your small paintbrush, gently paint the very tips of the pinecone scales with the gold paint. You don’t need to paint the whole thing, just the edges. Set them aside to dry completely.
- Add the Gold Leaf (Optional): If you want to be extra fancy, ask a grown-up to help you with this part. Paint the special adhesive onto one flat end of the log. Let it sit for a minute until it feels tacky, like a sticker. Carefully press a sheet of gold leaf onto the sticky part. Use a dry, soft paintbrush to gently brush away the extra bits that didn’t stick.
- Arrange the Greenery: Now it’s time to decorate the top of the log. With help from a grown-up, use the hot glue gun to place a few dabs of glue along the top center of the log. Press your greenery sprigs into the glue to create a nice green base.
- Place Your Pinecones: Arrange your dried, gold-tipped pinecones and some plain ones on top of the greenery. Once you like how they look, use the hot glue gun to secure them in place so they don’t fall off.
- Light It Up: Carefully weave your fairy light string in and around the pinecones. Try to hide the wire as much as you can. You can tuck the small battery pack behind some pinecones at one end of the log.
- Finishing Touches: Find any little empty spots and tuck in your red berry sprigs. This adds a nice pop of holiday color.
2. Winter Wonderland Cloche
A Forest Scene Under Glass

Capture a tiny, quiet winter moment. This glass cloche holds a charming woodland scene, bringing a storybook feel to your table. Small bottlebrush trees stand in a field of soft, white snow, creating a peaceful forest.
A small deer figure stands watch, adding life to the miniature world. Silver branches and delicate bead garlands add a touch of frost and sparkle. It’s a simple decoration that draws you in, making you feel the magic of a snowy day. This centerpiece is quiet, elegant, and full of wonder.
DIY Instructions: How to Build Your Winter Wonderland
What You’ll Need:
- A glass cloche or a large, clear glass jar with a lid
- Fake snow or white craft sand
- A few small bottlebrush trees in different sizes
- A small plastic toy deer or other woodland animal
- A few small, thin twigs from your yard
- Silver spray paint
- A small string of silver beads or a tiny garland
- A couple of tiny, shiny ornaments (optional)
Step-by-Step Guide:
- Create a Snowy Base: Take the base of your cloche (or the lid of the jar turned upside down). Pour a nice layer of fake snow onto it. Make it about half an inch deep, like a fresh snowfall.
- Make Frosty Trees: If your trees aren’t already snowy, you can add some “frost.” Just lightly dab a little white paint on the tips of the branches. Let them dry.
- Paint the Branches: Take your twigs and find a grown-up to help you. In a well-ventilated area (like outside), spray paint the twigs silver. Let them dry completely. They will look like icy branches.
- Arrange Your Forest: Now, place your bottlebrush trees into the snow. Push them down a little so they stand up straight. Put the taller ones in the back and shorter ones in the front to make it look more like a real forest.
- Add Your Animal: Place your little deer figure somewhere in the scene. Maybe it’s peeking out from behind a tree.
- Place the Icy Branches: Stick your dried silver branches into the snow around the trees. This will make your forest look more full.
- Add Some Sparkle: Drape the silver bead garland gently over the silver branches. If you have tiny ornaments, you can place one or two in the snow to look like fallen baubles.
- Cover Your Scene: Carefully place the glass cloche dome over your finished scene. Now you have a beautiful winter world to display on your table.
3. Floating Cranberry Candles
A Simple, Vibrant Glow

Sometimes, the most beautiful decorations are the simplest. This idea uses clear glass vases to create a stunning display of color and light. Bright red cranberries and fresh green pine sprigs fill the vases, bringing the classic colors of the holidays to your table.
Floating candles sit on top, their flames dancing above the water. The light shines through the glass, making the red berries and green branches glow. Grouping several vases of different heights together makes the arrangement even more interesting. It’s a clean, fresh, and very cheerful look.
DIY Instructions: How to Make Your Floating Candle Vases
What You’ll Need:
- Several clear glass cylinder vases of different heights
- Fresh cranberries (you can find these at the grocery store)
- Small sprigs of fresh pine or fir (ask a grown-up to help you snip a few from a tree)
- Water
- Floating candles (these are the flat, round ones that float on water)
- A few silver or gold beads (optional)
Step-by-Step Guide:
- Clean Your Vases: Make sure your glass vases are clean and shiny. Any smudges will show up when they are filled with water.
- Add the Greens: Take a sprig of pine and place it inside one of the vases. Make sure it stands up straight along the side of the glass. You only need one or two sprigs per vase.
- Pour in the Cranberries: Gently pour some fresh cranberries into the bottom of the vase. You can fill it about a quarter of the way up. The cranberries will help hold the pine sprigs in place.
- Add Water: Slowly fill the vase with water. Leave about two inches of space at the top. You’ll see the cranberries and pine sprigs float and move around, which looks really nice.
- Float the Candle: Carefully place one floating candle on top of the water in the center of the vase. Don’t light it yet!
- Add a Little Extra (Optional): If you want, you can drop a few shiny silver or gold beads into the bottom of the vase with the cranberries for some extra sparkle.
- Repeat for All Vases: Do the same thing for your other vases. Use different amounts of cranberries or different sized pine sprigs to make each one a little unique.
- Light Them Up: Right before your guests arrive, ask a grown-up to help you light the candles. The flickering light will look beautiful reflecting in the water.
4. Literary Light Stack
A Storybook Holiday Centerpiece

For those who love books, this centerpiece tells a story. A stack of classic, colorful books creates a sturdy and interesting base. The rich colors of the book spines add warmth and character to the table setting. It feels both intelligent and cozy at the same time.
A simple glass hurricane vase with a pillar candle sits on top, its flame providing a gentle light. Fresh holly and eucalyptus are tucked around the base of the candle, held together with a simple velvet ribbon. This decoration is a nod to quiet winter nights spent reading by the fire.
DIY Instructions: How to Create Your Book Stack Centerpiece
What You’ll Need:
- 4-5 hardcover books with nice-looking spines (look for holiday colors like green, red, and blue)
- A wide velvet ribbon
- A tall glass hurricane vase or a wide glass jar
- One white pillar candle that fits inside the vase
- A few sprigs of fresh greenery like holly, eucalyptus, or pine
- A small piece of twine or jute rope
Step-by-Step Guide:
- Choose Your Books: Find some hardcover books around your house. Try to pick ones that look old-fashioned or have pretty colors that match your holiday decorations. Make sure they are books you don’t mind using for decoration for a little while.
- Stack Them Up: Stack the books on top of each other in the center of your table. Start with the biggest book on the bottom and the smallest one on top. You can make them a little crooked for a more relaxed look.
- Tie the Ribbon: Take your velvet ribbon and wrap it around the whole stack of books from top to bottom, like you’re wrapping a present. Tie a simple knot or a bow in the front.
- Prepare the Candle: Place your white pillar candle inside the glass hurricane vase. Make sure it’s standing straight in the middle.
- Add a Rustic Touch: Wrap the piece of twine or jute rope around the top of the glass vase a few times and tie a small knot. This adds a nice, simple detail.
- Arrange the Greenery: Place the glass vase with the candle on top of your book stack. Now, gently tuck your fresh greenery sprigs around the bottom of the vase. You can slide the stems under the jute rope to help hold them in place.
- Final Check: Make sure everything looks balanced. Ask a grown-up to light the candle when it’s time for dinner. This centerpiece will make your table feel warm and full of stories.
5. Harvest Fruit Garland
A Feast for the Eyes

This centerpiece is a celebration of nature’s bounty. It runs down the length of the table, full of rich colors and textures. Fresh pomegranates, pears, and persimmons are nestled among fragrant eucalyptus leaves and olive branches.
Cinnamon sticks and whole walnuts are scattered throughout, adding a warm, spicy scent to the air. The deep reds, bright oranges, and soft greens create a beautiful and delicious-looking display. This runner feels generous and welcoming, inviting everyone to gather around and share a meal. It’s a true taste of the season.
DIY Instructions: How to Assemble Your Fruit and Greenery Runner
What You’ll Need:
- Lots of fresh greenery branches (eucalyptus and olive branches work well)
- A variety of seasonal fruits like pomegranates, pears, persimmons, and small apples
- Whole nuts in their shells (like walnuts or almonds)
- A few cinnamon sticks
- Some star anise pods (they look like little wooden stars)
Step-by-Step Guide:
- Create a Green Foundation: Start by laying your greenery branches down the center of your table. This will be the base of your runner. Overlap the branches a little bit to make it look full. Make sure you leave enough room on the sides for plates and glasses.
- Place the Large Fruits: Next, place your biggest pieces of fruit, like the pomegranates and pears, along the greenery. Don’t put them in a straight line. Stagger them and put some in small groups to make it look natural.
- Add the Smaller Fruits: Now, fill in some of the gaps with your smaller fruits, like the persimmons or small apples. One cool trick is to cut one pomegranate in half so everyone can see the beautiful red seeds inside. Ask a grown-up to help you with the knife.
- Scatter the Nuts and Spices: Take your whole walnuts and cinnamon sticks and scatter them throughout the runner. Tuck them in between the fruits and under the leaves.
- Add the Finishing Touches: Place the pretty star anise pods here and there. They add a lovely shape and smell great too.
- Step Back and Look: Take a look at your runner from all sides to make sure it looks balanced. You can add more greenery or fruit to any spots that look a little empty. Your table now looks like a beautiful painting.
6. Gatsby Glam Tower
A Roaring Twenties Celebration

This centerpiece is all about glamour and celebration. A tiered stand creates a tower of shimmering gold and silver, ready for a grand party. Painted champagne bottles stand tall, looking like trophies. This is a look for a special occasion.
Strings of pearls and silver beads drape elegantly down the sides, catching the light. Shiny ornaments are tucked in, adding more sparkle and shine. White ostrich feathers at the very top give it a final touch of drama and flair. This centerpiece sets the mood for a fun and festive evening.
DIY Instructions: How to Build Your Glamorous Tower
What You’ll Need:
- A two or three-tiered dessert stand (white or silver looks best)
- Several empty glass bottles (like wine or soda bottles), cleaned with labels removed
- Gold and silver spray paint
- Strings of fake pearls and silver beads from a craft store
- A few silver and gold Christmas ball ornaments
- Large white craft feathers
- A hot glue gun (with help from a grown-up)
Step-by-Step Guide:
- Paint Your Bottles: Ask a grown-up to help you with the spray paint. In a well-ventilated area (like outside), spray paint your clean, empty bottles. Make some of them gold and some of them silver. You might need two coats of paint. Let them dry completely.
- Assemble the Base: Place your tiered stand in the center of your table.
- Start Stacking: Arrange your painted bottles on the different tiers of the stand. Place the taller ones on the bottom tier and maybe a special one on the very top. Mix the gold and silver colors.
- Drape the Jewels: Take your strings of pearls and beads and drape them around the bottles. Let them hang down the sides of the stand. It should look like the tower is wearing necklaces.
- Add Ornaments: Place the shiny ball ornaments in any empty spaces on the tiers. You can group a few together in a bowl or an empty glass if you like.
- The Feather Topper: For the most dramatic part, take a few of the large white feathers. You can either stick them into the top of the bottle on the highest tier or use a tiny bit of hot glue (with a grown-up’s help) to attach them to the top.
- Final Touches: Scatter some gold or silver confetti on the table around the base of the tower for extra sparkle. Your centerpiece is now ready for a fabulous party.
7. Cozy Sweater Vases
Warmth and Comfort on Display

Wrap your table in the warmth of a cozy sweater. This simple idea turns everyday jars and bottles into soft, textured decorations. The cable-knit patterns of the sweater sleeves add a feeling of comfort and home, making everyone feel welcome.
Some jars are used as candle holders, their warm light glowing through the knit fabric. Others hold simple sprigs of pine and bright red berries. The mix of soft grey and cream colors is calm and gentle. It’s a creative way to bring the feeling of a warm fireside to your holiday meal.
DIY Instructions: How to Craft Your Sweater Vases
What You’ll Need:
- An old sweater that no one wears anymore (cable-knit or a sweater with a nice texture works best)
- A few clean, empty glass jars and bottles of different shapes and sizes
- Scissors
- A hot glue gun or fabric glue (get a grown-up’s help)
- Candles that fit inside your jars
- A few sprigs of greenery and fake berries
Step-by-Step Guide:
- Choose Your Sweater: Find an old sweater. Make sure it’s okay to cut it up! Sweaters with patterns like cables or ribs look really nice.
- Measure and Cut: Take one of your jars and stand it next to the sleeve of the sweater. You are going to use the sleeve to cover the jar. Cut the sleeve a little bit taller than the jar.
- Slide it On: Carefully slide the piece of sweater sleeve over your jar, like you’re putting a sock on your foot. Wiggle it around until it fits snugly.
- Trim and Glue: If the sweater is too long at the top or bottom, carefully trim it with your scissors. To make sure it stays in place, ask a grown-up to help you put a few dabs of hot glue or fabric glue on the inside at the top and bottom edge of the sweater piece to glue it to the jar.
- Repeat for All Jars: Do the same thing for all your other jars and bottles. You can use different parts of the sweater to get different patterns.
- Decorate!: Now you can decide what to put in your new sweater vases.
- For Candles: Place a candle inside some of the wider jars. The light will make the sweater pattern glow.
- For Greenery: In the taller bottles, put a sprig of pine or a little branch with red berries.
- Arrange Your Display: Group all your finished sweater vases together in the middle of your table. You can add a few pinecones around the base to complete the cozy look.
8. Gingerbread Village Lane
A Sweet and Whimsical Scene

Create a centerpiece that looks good enough to eat. This delightful gingerbread village brings a sense of childhood fun and wonder to your holiday table. Tiny, detailed gingerbread houses line a winding path, each one decorated with sweet icing and colorful candies.
The entire scene is set on a bed of powdered sugar snow, making it look like a real winter village. Small gingerbread trees and tiny flameless candles add to the magic. It’s more than just a decoration; it’s an invitation to dream and a treat for the imagination.
DIY Instructions: How to Build Your Gingerbread Village
What You’ll Need:
- A gingerbread house kit (or several mini ones)
- Icing (usually comes with the kit) and extra candies for decorating
- A long, flat platter to build on
- Lots of powdered sugar for the “snow”
- Small gingerbread man or tree cookies (optional)
- A few small, battery-operated tea light candles
- Small candies like M&Ms or gumdrops to make a path
Step-by-Step Guide:
- Build Your Houses: First, have fun building your gingerbread houses. Follow the instructions on the kit. Use the icing like glue to hold the walls and roof together. Let them dry so they are strong.
- Decorate Each House: Once the houses are built, use more icing and candies to decorate them. Make patterns on the roof, add windows, and put a wreath on the door. Make each house special.
- Create Your Snowy Base: Take your platter. Use a sifter or a spoon to sprinkle a thick, even layer of powdered sugar all over it. This is your snow!
- Arrange the Village: Place your decorated gingerbread houses on the snowy board. Don’t put them in a straight line. Angle them a bit to make it look like a real village street.
- Make a Path: Create a winding path between the houses. You can do this by gently pushing aside the powdered sugar with your finger. Then, place your small candies along the edges of the path to outline it.
- Add Trees and People: If you have small gingerbread trees or gingerbread man cookies, place them around the houses.
- Light Up the Town: Place the battery-operated tea lights in between the houses. Turn them on to make your village glow. (Don’t use real candles!)
- Final Snowfall: For a final touch, lightly sprinkle a little more powdered sugar over the entire scene. Your sweet little village is now complete.
9. Rustic Wine Bottle Candelabra
Simple Elegance with a Vintage Feel

Turn empty bottles into something beautiful. This centerpiece uses old wine bottles as unique and elegant candle holders. The different shapes and shades of green and clear glass create a lovely, mismatched collection. It proves that you don’t need fancy materials to make a statement.
Tall, slender taper candles are placed in the openings, their wax dripping down the sides over time to add to the rustic charm. A sprig of fresh rosemary tied to one bottle adds a touch of green and a wonderful scent. This is a wonderfully simple and sustainable way to add warm candlelight to your table.
DIY Instructions: How to Make Wine Bottle Candle Holders
What You’ll Need:
- 3-5 empty wine bottles, cleaned with the labels soaked off
- Tall taper candles (the kind that are long and skinny)
- A grown-up with a lighter or matches
- A small sprig of fresh rosemary or another herb (optional)
- A small piece of twine (optional)
- A table runner or piece of burlap to put underneath
Step-by-Step Guide:
- Prepare Your Bottles: Make sure your wine bottles are completely clean and dry inside and out. It’s best to soak them in warm, soapy water to help the labels peel off easily.
- Set the Scene: Place your table runner or a piece of burlap fabric down the center of your table. This will protect your table from any wax drips.
- Arrange the Bottles: Group your clean bottles together in the center of the runner. Mix up the different colors and sizes. A group of three or five usually looks best.
- Insert the Candles: Take a taper candle and gently place it into the opening of a bottle. If the candle is a little too wide, ask a grown-up to carefully shave a little wax off the bottom with a knife until it fits snugly. If it’s a little too loose, a grown-up can light the bottom of the candle and let a few drops of wax fall into the bottle opening, then quickly place the candle in to “glue” it in place.
- Do this for all bottles.
- Add a Touch of Green (Optional): If you like, you can tie a small sprig of rosemary to the neck of one of the bottles using a piece of twine.
- Let it Glow: When it’s time for dinner, ask a grown-up to light the candles. As they burn, the wax will drip down the sides of the bottles, creating a beautiful, old-world look.
10. Winter White Tablescape
A Serene and Snowy Dream

Create a calm and magical winter scene with a single color. This centerpiece uses different shades of white to build a peaceful and elegant display. White pumpkins, vases, and flowers all work together to create a look that feels like a fresh snowfall.
Tall, white branches reach up, decorated with tiny snowflakes, adding height and drama. White tulips and roses in a variety of smooth, modern vases bring a soft, natural touch. Candles of different sizes are scattered throughout, their gentle flames making the whole scene glow. This monochromatic look is sophisticated and beautiful.
DIY Instructions: How to Create Your Winter White Scene
What You’ll Need:
- A collection of white objects: small white pumpkins, white vases of different shapes and sizes
- A few interesting tree branches from the yard
- White spray paint
- White or silver glitter (optional)
- Fresh white flowers (like tulips, roses, or baby’s breath)
- White candles (pillar candles and taper candles of different heights)
- White or silver candle holders
Step-by-Step Guide:
- Paint Your Pumpkins and Branches: If your pumpkins aren’t already white, give them a coat of white paint. While you have the paint out, ask a grown-up to help you spray paint your tree branches white. While the paint is still wet, you can sprinkle them with a little glitter for a frosty look. Let everything dry.
- Arrange Your Vases: Group your white vases in the center of the table. Don’t put them in a line; make a nice cluster.
- Add the Flowers: Trim the stems of your fresh white flowers and arrange them in the vases. Put a few flowers in each one.
- Place the Branches: Put your tall, white-painted branches in one of the taller vases in the middle of your arrangement to give it some height.
- Add the Pumpkins: Place your white pumpkins on the table in and around the vases. The different shapes will make it look more interesting.
- Set Out the Candles: Place your white candles throughout the arrangement. Put the pillar candles directly on the table and the taper candles in their holders. Make sure the candles are not too close to the branches or flowers.
- Light the Scene: Ask a grown-up to light the candles before your meal. The whole table will have a soft, dreamy glow.
11. Spiced Orange & Clove Runner
An Aromatic Holiday Welcome

This centerpiece is a feast for the senses, especially your sense of smell. Fragrant oranges, studded with cloves in beautiful patterns, are the stars of this traditional decoration. The warm, spicy scent of clove and citrus will fill the room, instantly making it feel like the holidays.
The oranges are nestled on a bed of fresh pine boughs. Dried orange slices, cinnamon sticks, and star anise are scattered about, adding to the wonderful aroma. It’s a classic, natural, and beautifully fragrant way to decorate your table.
DIY Instructions: How to Make a Spiced Orange Runner
What You’ll Need:
- Several fresh oranges
- A jar of whole cloves
- A toothpick or a small nail
- Fresh pine or fir branches
- A few cinnamon sticks
- Dried orange slices (you can buy these or make them by baking thin slices at a low temperature)
- Twine and tea light candles (optional)
Step-by-Step Guide:
- Create the Pine Base: Lay your pine branches down the center of your table to form a long, green runner.
- Prepare the Oranges: This is the fun part! Take an orange and use the toothpick to poke small holes in the peel. This makes it easier to push the cloves in.
- Stud with Cloves: Push the pointy end of the whole cloves into the holes you made. You can create any pattern you like—swirls, straight lines, or just cover the whole orange.
- Arrange the Pomanders: Place your finished clove-studded oranges (these are called pomanders) along the pine runner.
- Add the Spices: Scatter the dried orange slices and cinnamon sticks in the gaps between the oranges.
- Finishing Touches: If you like, you can wrap a few of the oranges with twine for a rustic look. Place a few tea light candles (in safe holders) among the greenery for a warm glow. Your whole room will smell amazing!
12. Floating Ornament Chandelier
A Touch of Modern Magic

Lift your holiday decor to a new level. This stunning centerpiece hangs above your table, creating a magical, floating display. A simple, natural branch acts as the base for a cascade of beautiful ornaments.
Ornaments of all shapes and sizes hang at different lengths, catching the light as they gently move. Using a mix of shiny, glittery, and matte finishes adds depth and interest. This decoration is modern, airy, and frees up space on your table for all the delicious food.
DIY Instructions: How to Create a Hanging Ornament Display
What You’ll Need:
- A sturdy, interesting-looking tree branch
- A variety of Christmas ornaments
- Clear fishing line or thin ribbon
- Scissors
- Hooks and strong string or wire to hang the branch from the ceiling (get a grown-up for this part!)
Step-by-Step Guide:
- Find Your Branch: Go on a hunt in your backyard or a park for the just-right branch. It should be strong enough to hold the ornaments but not too heavy.
- Hang the Branch: This is a job for a grown-up. They will need to install two hooks in the ceiling above your table. Then, they can use strong string or wire to securely hang the branch horizontally over the table.
- Prepare Your Ornaments: Cut different lengths of fishing line. Tie one end of each piece of fishing line to an ornament. Using fishing line will make the ornaments look like they are floating in mid-air.
- Start Hanging: Tie the other end of the fishing line to the branch. Hang the ornaments one by one.
- Create a Design: Spread the ornaments out along the branch. Use your different lengths of fishing line to hang them at various heights. This will make it look more dynamic and interesting. Put some of the larger ornaments in the middle.
- Check Your Work: Step back and look at your creation from all sides. You can easily move the ornaments around until you love how it looks.
13. Heirloom Silver Bouquet
Classic Elegance in a New Way

Give old treasures a new life with this timeless centerpiece. Polished silver pieces, like a vintage tea set, are used as unique vases for a beautiful floral arrangement. The shiny silver reflects the light and adds a touch of classic elegance to any table.
Creamy white roses, fresh pine sprigs, and snow-dusted pinecones create a simple yet stunning display. Grouping the different silver pieces on a matching tray makes it feel collected and special. This idea is a wonderful way to use family heirlooms in your holiday decorating.
DIY Instructions: How to Arrange a Silver Collection Centerpiece
What You’ll Need:
- A collection of silver-plated items (like a small teapot, creamer, sugar bowl, or mint julep cups)
- A silver tray to put them on
- Fresh flowers (white roses are a great choice)
- Fresh greenery (like pine or fir)
- A few small pinecones, some with fake snow on them
- Water
Step-by-Step Guide:
- Polish Your Silver: Ask a grown-up to help you polish all your silver pieces until they are bright and shiny.
- Arrange on the Tray: Place your silver tray in the center of the table. Arrange the clean teapot, creamer, and other cups on the tray.
- Fill with Water: Carefully fill each silver “vase” about halfway with water.
- Add Greenery: Cut your pine sprigs into smaller pieces. Put a few sprigs in each silver container. This will create a nice green base for your flowers.
- Add the Flowers: Trim the stems of your roses so they are the right height for your containers. Place one or two roses into each silver piece.
- Finishing Touches: Tuck a frosted pinecone or two among the arrangements. You can also place a few sprigs of red berries for a pop of color. Your elegant, classic centerpiece is ready.
14. Enchanted Forest Floor Runner
A Woodland Dream on Your Table

Bring the magic of a deep, mossy forest to your holiday feast. This centerpiece transforms your table into a lush, green woodland floor. It’s full of natural textures and feels like a scene from a fairy tale.
A variety of craft mosses create a soft carpet down the center of the table. Real bark, lichen-covered twigs, and delicate ferns are arranged to look as though they are growing there. Tiny faux mushrooms and small animal figures can be hidden among the moss, waiting to be discovered.
DIY Instructions: How to Build Your Forest Runner
What You’ll Need:
- A roll of brown craft paper to protect your table
- Several types of preserved craft moss (sheet moss, reindeer moss, mood moss)
- A few interesting pieces of tree bark and lichen-covered twigs
- A few small, fake ferns
- Small, fake mushrooms
- A few battery-operated tea light candles in glass holders
- Tiny woodland animal figures (optional)
Step-by-Step Guide:
- Protect Your Table: First, roll out the brown craft paper down the center of your table. This will be the base and will make cleanup much easier.
- Lay the Moss Foundation: Start by placing the flat sheet moss down on the paper to create the main carpet of your forest floor.
- Add Texture: Take clumps of the other types of moss (like the spongy green reindeer moss) and place them on top of the sheet moss to create little hills and valleys.
- Place Logs and Branches: Arrange your pieces of bark and your lichen-covered twigs on top of the moss. Make them look like they fell there naturally.
- Plant the Ferns: Gently tuck the stems of the fake ferns into the moss, so they look like they are growing out of the forest floor.
- Add the Mushrooms: Place your little mushrooms in small groups, maybe near a piece of bark, just like they would grow in the wild.
- Add a Magical Glow: Place your tea light candles (in their glass holders) in safe spots among the moss. The flickering light will look like fireflies.
- Invite Some Friends (Optional): Hide a tiny deer or owl figure in the moss for your guests to find.
15. Countdown Clock Centerpiece
A Celebration of Time

Get ready to ring in the New Year with this fun and festive centerpiece. It’s all about the excitement of the final moments of the year. A collection of clock faces, all set to just before midnight, creates a sense of happy anticipation.
A single flameless candle in the center provides a soft glow, surrounded by sparkly decorations. The black, white, gold, and silver color scheme is classic and celebratory. This is a creative and easy way to set the theme for a New Year’s Eve party.
DIY Instructions: How to Make a New Year’s Clock Display
What You’ll Need:
- A large, round silver platter or tray
- Paper and a printer (or you can buy clock-themed scrapbook paper)
- Scissors
- Cardboard (from an old cereal box)
- A glue stick
- One battery-operated pillar candle
- A small, old alarm clock (optional)
- Black and gold confetti
- A “Happy New Year” sign or cake topper
Step-by-Step Guide:
- Create Your Clocks: Find pictures of clock faces online and print them out in different sizes. Or, cut them out from scrapbook paper.
- Make Them Sturdy: Use a glue stick to glue each paper clock face onto a piece of cardboard. Carefully cut them out again. This will make them strong so they can stand up.
- Arrange the Tray: Place your silver tray on the table. Sprinkle a generous amount of confetti all over it.
- Place Your Candle: Put the battery-operated pillar candle right in the center of the tray.
- Set the Clocks: Arrange your cardboard clock faces all around the central candle. Lean some against the candle and lay some flat. If you have a real alarm clock, you can set it to a few minutes before 12 and place it in the display.
- Add the Sign: Place your “Happy New Year” sign at the back of the arrangement so everyone can see it.
- Final Touches: Make sure everything is arranged nicely. Your centerpiece is now ready for the final countdown!
16. Angelic Feather Wreath
A Soft and Gentle Glow

This centerpiece is as soft and delicate as a fallen feather. It creates a serene and beautiful focal point for your table. A simple wreath is completely covered in white feathers, giving it an ethereal, cloud-like appearance.
The mix of fluffy white feathers and patterned guinea fowl feathers adds lovely texture and detail. In the center, a single candle inside a glass hurricane vase provides a warm, gentle light. This decoration is wonderfully soft, calm, and has a touch of angelic grace.
DIY Instructions: How to Craft a Feather Wreath Centerpiece
What You’ll Need:
- A grapevine wreath form (any size you like)
- White spray paint
- A bag of white craft feathers
- A smaller bag of spotted guinea fowl feathers (optional, for detail)
- A hot glue gun and glue sticks (with help from a grown-up)
- A glass hurricane vase that fits inside the wreath
- One pillar candle
Step-by-Step Guide:
- Paint the Wreath: In a well-ventilated area, spray paint your grapevine wreath white. This is so no dark branches show through the feathers. Let it dry completely.
- Get Your Feathers Ready: Open your bags of feathers so they are easy to grab.
- Start Gluing: This part requires a grown-up’s help with the hot glue gun. Squeeze a small line of hot glue onto the wreath and press the ends of a few white feathers into it.
- Cover the Wreath: Continue gluing feathers onto the wreath in layers. Point them all in the same general direction, slightly overlapping them to cover the wreath form completely. Cover the top and the sides.
- Add the Detail Feathers: Once the wreath is covered in white feathers, you can add the spotted guinea fowl feathers. Put a small dab of glue on the end of a spotted feather and tuck it in among the white ones. Scatter them around to add a pretty pattern.
- Assemble the Centerpiece: Place your finished feather wreath in the middle of your table.
- Add the Candle: Put the pillar candle inside the glass hurricane vase, and then place the vase in the center of the wreath. Ask a grown-up to light the candle.
17. Industrial Copper Pipe Candelabra
A Modern, Metallic Statement

This centerpiece is for those who love a modern, industrial look. It’s made from copper pipes and fittings, the kind you can find at a hardware store. The warm, rosy glow of the copper adds a touch of unexpected elegance to the table.
This clever construction creates a unique candelabra that is both a sculpture and a source of light. Paired with a dark tablecloth and simple greenery, the copper really shines. It’s a bold and creative project that is sure to start a conversation.
DIY Instructions: How to Build a Copper Candelabra
What You’ll Need: (This is a more advanced project for older kids with a grown-up’s help!)
- Copper pipes (usually 1/2 inch works well), cut into various lengths
- An assortment of copper fittings: T-joints, 90-degree elbows, and end caps
- A strong, clear adhesive like epoxy or a pipe cutter for a no-glue fit
- A small block of wood for the base
- Taper candles
Step-by-Step Guide:
- Design Your Candelabra: Before you glue anything, lay out your pipes and fittings on a table. Play with the pieces to design what you want your candelabra to look like. You’ll need upward-facing openings to hold the candles.
- Start Assembling: Once you have a design, a grown-up can help you connect the pieces. You can either use a special tool called a pipe cutter to make the pieces fit together very tightly, or you can use a strong glue like epoxy.
- Build the Structure: Work from the bottom up, connecting your pipes and fittings according to your design. Make sure it is balanced so it won’t tip over. The short pieces of pipe that will hold the candles should be the last ones you add, pointing upwards.
- Create a Base: A grown-up can drill a hole into the small wood block that is the same size as your copper pipe. This will give your candelabra a stable base to stand in.
- Let it Dry: If you used glue, let the whole structure dry completely according to the glue’s instructions.
- Add Candles: Once it’s sturdy, place your taper candles into the upward-facing openings. Your unique, industrial-chic centerpiece is complete.
18. Living Paperwhite Bulb Garden
A Breath of Fresh Spring

Bring life and freshness to your winter table. This simple centerpiece is a living garden in a dish. Paperwhite bulbs, which are easy to grow indoors, sit on a bed of smooth river stones, their green shoots reaching for the light.
As the days go by, your guests can watch the bulbs grow and eventually bloom into fragrant white flowers. It’s a beautiful symbol of hope and new beginnings during the darkest time of the year. The simple glass dish and natural stones give it a clean, modern feel.
DIY Instructions: How to Plant a Paperwhite Centerpiece
What You’ll Need:
- A shallow, clear glass dish or bowl
- A bag of polished river stones or small pebbles
- Several paperwhite flower bulbs
- Water
- A few small pine sprigs (optional)
Step-by-Step Guide:
- Wash Your Stones: Rinse the river stones with water to make sure they are clean.
- Create a Stone Bed: Fill your glass dish with a layer of stones about 2-3 inches deep.
- Place the Bulbs: Take your paperwhite bulbs and place them on top of the stones, pointed-end up. Nestle them in so they are secure. You can place them close together.
- Add Water: Carefully pour water into the dish until the water level just touches the very bottom of the bulbs. It’s very important not to cover the bulbs with water, or they will rot.
- Find a Sunny Spot: Place your dish in a spot that gets some sunlight. For the first week, it’s better if the spot is cool. After you see roots growing, you can move it to a warmer spot.
- Watch it Grow: In a few days, you’ll see roots start to grow down into the stones. Soon after, green shoots will sprout from the top. Keep the water level just touching the bottom of the bulbs.
- Decorate for Dinner: When you’re ready to use it as a centerpiece, you can tuck a few small pine sprigs around the edge of the dish for a festive touch.
19. Rustic Antler & Plaid Glow
A Cozy Cabin Retreat

This centerpiece has a warm, rustic feel, like something you’d find in a cozy mountain lodge. Large, sculptural antlers create a natural holder for a collection of candles. It’s a celebration of the rugged beauty of the wilderness.
The creamy pillar candles are wrapped in simple twine, adding to the rustic texture. Natural pinecones are scattered around, filling in the gaps. The whole arrangement sits on a classic red and green plaid table runner, completing the cozy, cabin-in-the-woods look.
DIY Instructions: How to Create a Rustic Antler Centerpiece
What You’ll Need:
- Two large faux antlers (you can find these at a craft store)
- 3-5 battery-operated pillar candles of different heights
- Twine
- Scissors
- Natural pinecones
- A plaid table runner
- A few long pheasant feathers (optional)
Step-by-Step Guide:
- Lay the Runner: Start by placing your plaid table runner down the center of your table.
- Arrange the Antlers: Place the two antlers on the runner. Arrange them so they face each other, with their curves creating a cradle-like space in the middle.
- Wrap the Candles: Cut a piece of twine and wrap it around the middle of each candle several times. Tie a simple knot or a small bow.
- Place the Candles: Nestle your twine-wrapped candles in the space between the antlers. Put the tallest candle in the middle and the shorter ones on the sides. Make sure they are sitting securely.
- Fill with Pinecones: Take your pinecones and fill in all the empty spaces around the candles and antlers.
- Add Feathers (Optional): For an extra touch, you can tuck a few long, beautiful pheasant feathers in among the pinecones and antlers.
- Turn on the Glow: Switch on your battery-operated candles. Your table now has a warm and woodsy glow.
20. Frosted Fruit Pyramid
A Still-Life Masterpiece

Turn your holiday table into a work of art with this stunning fruit centerpiece. A pyramid of colorful, seasonal fruit creates a lavish and abundant display. It looks like a classical painting come to life.
The secret to its magical appearance is the coating of “frost,” which is simply sugar. This makes the fruit sparkle in the light, as if it were just brought in from a frosty morning orchard. Piled high on an elegant silver cake stand, this centerpiece is both beautiful and delicious.
DIY Instructions: How to Make Sugared Fruit
What You’ll Need:
- An elegant cake stand or pedestal platter
- A variety of beautiful fruits like pears, grapes, pomegranates, and figs
- 1-2 egg whites
- A small bowl
- A pastry brush or a new, clean paintbrush
- Fine granulated sugar
- A baking sheet lined with parchment paper
- A few sprigs of fresh rosemary (optional)
Step-by-Step Guide:
- Wash and Dry Your Fruit: Gently wash and thoroughly dry all of your fruit. It must be completely dry for the sugar to stick.
- Prepare Your Egg Whites: In the small bowl, lightly whisk the egg whites with a fork for just a few seconds until they are a little frothy.
- Paint the Fruit: Using your pastry brush, paint a very thin, even layer of the egg white all over one piece of fruit. Make sure you cover the entire surface.
- Sugar the Fruit: Hold the fruit over the baking sheet and sprinkle it generously with sugar on all sides until it’s completely coated. Gently shake off the excess.
- Let it Dry: Place the sugared fruit on the parchment paper to dry. Do not let the pieces touch. Repeat this process for all your fruit. It will take at least an hour for the sugar coating to dry and harden.
- Build Your Pyramid: Once the fruit is dry, you can start arranging it on your cake stand. Start with the largest pieces on the bottom, like the pomegranates. Then, carefully stack the other fruits on top, building a pyramid shape. Use bunches of grapes to fill in the gaps.
- Add Garnish: Tuck a few sprigs of fresh rosemary into the arrangement for a touch of green. Your sparkling, edible masterpiece is complete.
21. Crystal Energy Runner
A Modern Bohemian Glow

This centerpiece is truly unique, mixing natural elements with a touch of modern magic. Polished agate slices, with their beautiful bands of color, are arranged with raw crystal points. The look is both earthy and glamorous, bringing a mystical energy to your table.
Tiny air plants are tucked between the stones, adding a touch of life and greenery. A string of warm fairy lights is woven through the display, making the crystals glow from within. It’s an unexpected and beautiful way to light up your holiday table.
DIY Instructions: How to Assemble a Crystal and Light Runner
What You’ll Need:
- A long, flat piece of wood or a narrow mirror for the base
- A collection of polished agate slices
- Several quartz or selenite crystal points of different sizes
- A few small air plants (tillandsia)
- A string of battery-powered fairy lights with a thin wire
Step-by-Step Guide:
- Set Down Your Base: Place your wooden board or mirror down the center of your table. This will give you a defined space to work in.
- Arrange the Agate Slices: Lay out your beautiful agate slices along the base. Overlap them slightly and mix up the colors and sizes to create an interesting pattern.
- Place the Crystals: Now, stand your crystal points up in the gaps between the agate slices. Group some of the smaller ones together. The different heights will make it look more dynamic.
- Add the Air Plants: Gently tuck the air plants into nooks and crannies in your arrangement. They don’t need soil, so you can just nestle them between the crystals.
- Weave in the Lights: Carefully weave your string of fairy lights throughout the display. Wrap the wire around the bases of the crystal points to make them light up. Try to hide the battery pack at one end.
- Turn it On: Switch on the lights and watch your centerpiece sparkle. It will create a magical and glowing atmosphere for your dinner.
22. Painted Pumpkin Patch Runner
A Harvest of Modern Color

This centerpiece is a fresh take on autumn decor. A dense gathering of pumpkins and gourds creates a lush runner down the table. The color palette is modern and sophisticated, using soft sages, muted blues, and bold black alongside classic cream.
A touch of glamour is added with gilded gold stems, which catch the light beautifully. A few sprigs of eucalyptus and stalks of wheat are tucked in, adding natural texture. This is a wonderfully full and festive look for a stylish Thanksgiving or fall gathering.
DIY Instructions: How to Create Your Painted Pumpkin Patch
What You’ll Need:
- A lot of small and medium-sized craft pumpkins and gourds
- Craft paint in your chosen colors (like sage green, dusty blue, black, and cream)
- Paintbrushes
- Gold metallic paint
- A few sprigs of faux eucalyptus
- A few dried wheat stalks
Step-by-Step Guide:
- Paint Your Pumpkins: First, paint your pumpkins. Give each one a solid coat of paint in one of your chosen colors. You may need two coats. Let them dry completely.
- Gild the Stems: Once the pumpkins are dry, use a small paintbrush to carefully paint just the stems with your gold metallic paint. This little detail makes them look very special. Let the stems dry.
- Create the Runner: Start arranging your pumpkins down the center of your table. Create a wide, dense runner. Mix up the colors and sizes. Don’t be afraid to stack some of the smaller ones slightly on top of the bigger ones.
- Add Natural Elements: Once your pumpkins are in place, tuck the sprigs of eucalyptus into the gaps between them.
- Finishing Touches: Finally, add the wheat stalks. Poke them into the arrangement so they stand up and add some height and a different texture. Your stylish pumpkin patch is ready.
23. Cozy Lantern Nook
A Rustic Beacon of Light

Create a warm and inviting focal point with a classic lantern. This centerpiece feels like a tiny, cozy scene captured under glass. The rustic metal and wood lantern holds a collection of festive treasures, perfect for a winter evening.
Inside, a large, battery-operated candle provides a safe and steady glow. It’s surrounded by a mix of shiny ornaments, natural pinecones, and bright red berries. A beautiful burlap bow on top adds a final touch of country charm. This is a simple and heartwarming decoration.
DIY Instructions: How to Fill a Holiday Lantern
What You’ll Need:
- A medium to large decorative lantern with glass sides
- One large, battery-operated pillar candle
- A handful of small, colorful Christmas ball ornaments
- A few small pinecones and acorns
- A sprig of faux red berries
- A small piece of glittery, faux greenery or tinsel
- A wide burlap ribbon
Step-by-Step Guide:
- Place Your Candle: Open the door of the lantern and place your battery-operated candle right in the middle. Make sure it is standing straight.
- Add a Sparkly Base: Take your glittery greenery or tinsel and arrange it on the floor of the lantern, all around the base of the candle.
- Fill it Up: Now, start filling the bottom of the lantern with your other items. Gently place the pinecones, acorns, and ornaments around the candle. Mix up the colors and textures.
- Add a Pop of Color: Tuck the sprig of red berries in so that the color is visible from the front.
- Close the Door: Once you like how it looks inside, carefully close the lantern door.
- Tie a Bow: Take your burlap ribbon and tie a big, beautiful bow around the handle or loop at the top of the lantern.
- Set the Scene: Place your finished lantern in the middle of the table. You can arrange some fresh pine branches around the base to complete the look.
24. Velvet Ribbon Candlesticks
A Touch of Jewel-Toned Luxury

Sometimes, the simplest touch can be the most elegant. This idea transforms classic candlesticks into a rich and colorful display. The focus is on the luxurious texture and deep colors of velvet ribbon.
Vintage brass candlesticks of different heights hold colorful taper candles. Long, beautiful velvet ribbons in jewel tones like emerald, ruby, and sapphire are tied around each one, draping gracefully onto the table. It’s a very simple and affordable way to add a lot of drama and sophistication to your tablescape.
DIY Instructions: How to Decorate Candlesticks with Ribbon
What You’ll Need:
- Several traditional-style candlesticks (brass or gold-colored look great)
- Taper candles in a variety of colors that match your ribbons
- Spools of wide velvet ribbon in different jewel-toned colors
Step-by-Step Guide:
- Arrange Your Candlesticks: Group your candlesticks in the center of the table. Using different heights makes the arrangement more interesting.
- Add the Candles: Place a taper candle securely into each candlestick holder.
- Cut Your Ribbon: For each candlestick, cut a long piece of velvet ribbon. It should be long enough to tie a knot or bow and still have long tails that drape onto the table.
- Tie the Ribbons: Take a piece of ribbon and tie it around the candlestick, just below where the candle sits. You can tie a simple, elegant knot or a floppy bow.
- Match Your Colors: You can either match the ribbon color to the candle color (e.g., a red ribbon on the candlestick holding a red candle) or mix them for a more eclectic look.
- Arrange the Tails: Let the long ends of the ribbon fall gracefully onto the table. Your simple yet stunning centerpiece is complete. You can even make a few extra bows to scatter on the table.
25. Dried Botanical Sculpture
A Whisper of Lasting Beauty

This centerpiece is a work of art, created with the delicate and lasting beauty of dried botanicals. It has a wild and natural feel, but the careful arrangement makes it a true sculpture. This is a wonderful option because you can make it once and enjoy it for a long time.
Fluffy pampas grass and wispy stems create height and movement. Interesting shapes from dried flowers, seed pods like silver dollars, and even a pheasant feather add texture and detail. The entire arrangement is set in a simple, solid base, allowing the botanicals to be the star.
DIY Instructions: How to Create a Dried Flower Arrangement
What You’ll Need:
- A block of dry floral foam
- A low, heavy bowl or container to hold the foam
- A selection of dried flowers and grasses (pampas grass, bunny tails, strawflowers, silver dollar eucalyptus)
- A few interesting extras, like a dried palm leaf or a pretty feather
Step-by-Step Guide:
- Prepare Your Base: Place your block of dry floral foam into your bowl. It should fit snugly. If it’s too big, a grown-up can carefully trim it with a knife.
- Create the Shape: Start with your tallest pieces, like the pampas grass. Push the stems firmly into the floral foam to create the height and general shape of your arrangement.
- Add Your Main Flowers: Next, add your bigger, more noticeable flowers, like the strawflowers or dried daisies. Spread them out within the arrangement.
- Fill in with Texture: Now, use your other dried materials to fill in the gaps. Add the soft bunny tails, the round silver dollars, and any other interesting stems you have.
- Add a Focal Point: Place your special item, like the dried palm leaf or the feather, somewhere near the front where it will be noticed.
- Turn and Check: Keep turning your container as you work to make sure your arrangement looks good from all sides. Your beautiful, long-lasting sculpture is finished.
26. Golden Leaf Place Card Garland
A Personal Touch of Autumn

Guide your guests to their seats with this delicate and personal centerpiece. This simple garland combines autumn beauty with a thoughtful touch. It’s a decoration and a place card holder all in one.
Real maple and oak leaves are painted a soft gold, giving them a magical shimmer. They are strung together with rustic twine that winds its way between glowing mercury glass votives. Each leaf is hand-lettered with a guest’s name, making everyone feel special and welcomed.
DIY Instructions: How to Make a Leaf and Twine Garland
What You’ll Need:
- A collection of clean, dry autumn leaves
- Gold spray paint
- A long piece of twine
- A hot glue gun (with help from a grown-up)
- A marker or paint pen in a dark color
- Several small candle holders (mercury glass looks nice) and tea light candles
Step-by-Step Guide:
- Gather Your Leaves: Go outside and find some beautiful, flat leaves that aren’t too crumbly.
- Paint the Leaves: With a grown-up’s help, lay your leaves on some newspaper outside and spray paint them gold. You might want to do both sides. Let them dry completely.
- Write the Names: Once the leaves are dry, carefully write one guest’s name on each leaf with your marker.
- Start Your Garland: Lay your long piece of twine down on a flat surface. Ask a grown-up to help you use the hot glue gun to attach the stem of each leaf to the twine. Space them out every few inches.
- Arrange on the Table: Place your finished leaf garland down the center of your table. Let it curve and wind in a natural way.
- Add the Candles: Place your candle holders along the path of the twine, in between the leaves. Ask a grown-up to light the tea lights just before guests arrive.
27. Tiered Holiday Ice Lantern
A Frosty Tower of Light

This centerpiece is a truly unique and magical creation, perfect for a winter celebration. It’s a beautiful tower made of ice, with festive holiday treasures frozen right inside. It will slowly melt as your dinner progresses, creating an ever-changing display.
Layers of ice are created using plastic containers as molds. Bright red cranberries, fresh orange slices, and green pine sprigs are suspended in the ice, creating beautiful color and texture. A candle sits safely at the very top, its light glowing through the frosty layers.
DIY Instructions: How to Make a Frozen Centerpiece
What You’ll Need: (This project takes a day or two, so plan ahead!)
- Two or three round, plastic food containers that can stack inside each other
- Water
- Festive items: fresh cranberries, thin orange slices, small pine sprigs
- Smooth river stones (optional, for weight and decoration)
- A candle in a glass holder
Step-by-Step Guide:
- Prepare Your Largest Mold: Take your biggest plastic container. Arrange a layer of orange slices, cranberries, and pine sprigs in the bottom.
- Add Water and Freeze: Gently fill the container about halfway with water. Place it in the freezer on a flat surface. Let it freeze completely solid. This takes several hours.
- Create the Next Layer: Take your next smallest container. You will place this inside the largest container, on top of the already frozen layer. To create the ice wall, you can add some stones inside the smaller container to weigh it down. Then, fill the gap between the two containers with more cranberries, orange slices, and water. Freeze again until solid.
- Remove from Molds: Once everything is frozen solid, you may need to run a little warm water on the outside of the plastic containers to help them release the ice form.
- Assemble and Display: Place your finished ice lantern on a plate with a rim to catch the melting water. Place your candle in its glass holder on the top tier. Your spectacular ice sculpture is ready!
28. Wine Cork Wreath and Votive
A Toast to Creativity

Here’s a wonderful way to recycle and create something rustic and full of character. This centerpiece uses wine corks to build charming, textured decorations. It’s a tribute to happy gatherings and shared bottles of wine.
The corks are glued together to form a thick, sturdy wreath and a matching holder for a candle. The variety in the corks, with their different names and wine stains, adds to the story and visual interest. It’s a simple, eco-friendly project that results in a wonderfully unique table decoration.
DIY Instructions: How to Make Cork Decorations
What You’ll Need:
- A lot of used wine corks
- A hot glue gun and plenty of glue sticks (get a grown-up’s help!)
- A flat wreath form made of cardboard or styrofoam
- A small, shallow dish to hold a candle
Step-by-Step Guide:
- Make the Wreath: Take your wreath form. With help from a grown-up, start gluing the corks onto the form. Start by gluing a layer of corks standing up, side-by-side, all around the ring.
- Add a Second Layer: Once the first layer is done, glue a second layer of corks on top of the first. This time, lay them down on their sides. You can be creative and make a pattern. Keep adding corks until the wreath form is completely covered and looks full.
- Make the Candle Holder: To make the matching candle holder, take your shallow dish. Glue a ring of corks standing up all around the outside edge of the dish. Then, glue a second layer on top of the first, just like you did with the wreath.
- Arrange Your Table: Place your cork wreath and your cork candle holder on the table. Put a small candle inside the holder. You can even add some fake grapes and leaves to complete the winery theme.
29. Steampunk Timepiece
A Marvel of Gears and Gold

This centerpiece is for those who love imagination, invention, and all things vintage. It’s a fantastic steampunk-inspired clock, full of intricate gears and golden details. It feels like a time machine has landed on your holiday table.
The large, old-fashioned clock face is the main feature, with a beautiful explosion of exposed gears at the top. The entire piece has a warm, aged-brass finish. Golden votive candles surround it, reflecting the light and adding to the warm, mechanical glow. This is a true statement piece.
DIY Instructions: How to Create a Steampunk Look
What You’ll Need:
- An old, large clock you don’t need anymore (from a thrift store)
- A bag of assorted craft gears (from a craft store or online)
- Gold or brass-colored spray paint
- A hot glue gun (with help from a grown-up)
- A round tray
- Several small, gold-colored candle holders and tea lights
Step-by-Step Guide:
- Prepare Your Clock and Gears: Carefully remove the glass or plastic cover from your old clock. With a grown-up’s help, spray paint the clock and all your craft gears with the metallic paint. Let everything dry.
- Build the Gear Sculpture: This is the creative part! Ask a grown-up to help you use the hot glue gun. Start gluing the gears onto the clock. Create a large, dramatic burst of gears coming out of the top of the clock. Overlap them and build them up in layers.
- Add More Detail: Glue smaller gears onto the main clock body and even onto the tray itself.
- Arrange the Scene: Place your finished steampunk clock in the center of the round tray.
- Add the Candles: Arrange your golden candle holders all around the clock on the tray. Place tea lights inside them.
- Let it Shine: Ask a grown-up to light the candles. The flickering light will make all the golden gears shine, bringing your fantastic time machine to life.
30. Minimalist Ornament Tree
The Beauty of Simple Things

This centerpiece proves that you don’t need a lot to make a big impact. It celebrates the simple, quiet beauty of winter with a minimalist approach. This style is clean, modern, and very peaceful.
A single, bare branch stands in a simple, elegant vase. A handful of carefully chosen ornaments in a limited color palette—like black, white, and green—are hung with care. The empty space is just as important as the ornaments themselves. This is a calm, uncluttered, and effortlessly stylish decoration.
DIY Instructions: How to Make a Minimalist Branch Tree
What You’ll Need:
- One beautiful, bare branch from a tree. Look for one with a nice shape and lots of smaller twigs.
- A sturdy, medium-sized vase with a narrow opening.
- Small pebbles or sand to weigh down the vase.
- A small selection of beautiful ornaments (about 8-12).
- String or ornament hooks.
Step-by-Step Guide:
- Find Your Branch: Go on a nature walk and find the perfect branch. It should be clean and dry.
- Set Up Your Vase: Pour some small pebbles or sand into the bottom of your vase. This will make it heavy so your branch tree won’t tip over.
- “Plant” Your Branch: Push the bottom of your branch firmly into the pebbles in the vase until it stands up straight and feels secure.
- Choose Your Ornaments: Pick out just a few of your favorite ornaments. It looks best if you stick to just two or three colors.
- Hang with Care: Hang your ornaments on the branch. Don’t put one on every single twig. Leave lots of empty space. This is what makes it look minimalist and modern.
- Find the Perfect Spot: Place your simple, beautiful tree on a side table or as a simple centerpiece. It’s a small touch that brings a lot of winter beauty indoors.
31. Tiered Treat Tower
A Sweet Station of Delights

Why should your centerpiece just be for looking? This delightful tiered stand is both a decoration and a dessert bar. The rustic, galvanized metal finish gives it a charming farmhouse feel, perfect for a cozy family get-together.
Each level is loaded with a tempting array of holiday treats. You’ll find mini pumpkin pies, caramel corn, cookies, and mugs ready for hot cocoa. Little pumpkins, pinecones, and candy canes are tucked in, making the whole display festive and fun. It’s a sweet and interactive centerpiece that invites everyone to enjoy.
DIY Instructions: How to Style a Treat Tower
What You’ll Need:
- A two or three-tiered tray
- An assortment of small treats (cookies, mini pies, caramel corn, marshmallows, candy canes)
- A few small mugs
- Small decorative items (mini pumpkins, pinecones)
- Small bowls or ramekins
Step-by-Step Guide:
- Assemble Your Stand: Place your clean, empty tiered tray in the center of your table.
- Start with the Bottom Layer: This is your biggest layer, so place your larger items here. Arrange the mini pies and mugs. Fill the mugs with marshmallows or other small candies.
- Fill the Middle Layer: Use small bowls to hold loose treats like caramel corn or nuts. Arrange cookies and candy canes on this level. Add a mini pumpkin for a pop of color.
- Decorate the Top: The top tier is the smallest. Place a few special cookies or treats here. Add some pinecones and a small sign if you have one.
- Fill in the Gaps: Look at your tower from all sides. If you see any empty spots, tuck in a pinecone, a candy cane, or another small treat. Your delicious centerpiece is now ready for guests to enjoy.
32. Mason Jar Snow Globe Forest
A Village of Winter Wonder

Capture the magic of a snow globe in a collection of charming mason jars. This idea creates a whole village of tiny winter scenes right on your table. It’s a playful and nostalgic decoration that is incredibly easy to make.
Each jar holds a miniature world, with bottlebrush trees dusted in fake snow. Tiny deer and snowman figures bring the scenes to life. The lids are even used to create smaller, open-air scenes. Tied with a simple red and white baker’s twine, this collection is full of homespun charm.
DIY Instructions: How to Make Mason Jar Snow Globes
What You’ll Need:
- Several clean mason jars with lids
- Fake snow
- A collection of small bottlebrush trees
- Tiny holiday figures (like deer, snowmen, or turkeys)
- A hot glue gun (with help from a grown-up)
- Red and white baker’s twine
Step-by-Step Guide:
- Prepare Your Scenes: Decide what you want to put in each jar. A grown-up can help you use a dab of hot glue on the bottom of a tree or a figure and glue it to the inside of the jar lid. This will be the base of your scene.
- Add the Snow: Pour a layer of fake snow into the bottom of the empty jar.
- Put it Together: Carefully take the lid with your glued-on scene and screw it onto the jar. Turn the jar upside down, and you have a snow globe!
- Make Different Kinds: You can also make scenes inside the jar. Just pour in the snow first, then place your trees and figures inside. Tie a bow around the jar’s rim with the baker’s twine.
- Create a Lid Scene: For a super easy version, glue a tree and a tiny figure to the top of a lid.
- Arrange Your Forest: Group all your finished snow globes and lid scenes together on a wooden slice or a platter to create a magical winter village.
33. Pomegranate and Candlelight Runner
A Moody and Dramatic Feast

This centerpiece creates a rich and dramatic mood for an elegant dinner party. The deep red of ripe pomegranates looks stunning against a dark tablecloth. It’s a look that is both classic and bold.
A simple runner of fresh olive branches provides a soft, silvery-green base. The pomegranates are nestled among the leaves, some whole and some cut open to reveal their jewel-like seeds. Tall, dark taper candles in vintage brass candlesticks add height and a warm, flickering light, making the whole scene glow.
DIY Instructions: How to Create a Pomegranate Runner
What You’ll Need:
- A dark-colored tablecloth
- Several branches of fresh olive leaves or eucalyptus
- 5-7 fresh pomegranates
- 3-5 tall, slender taper candles (in a dark color like burgundy or black)
- An equal number of brass candlesticks of varying heights
Step-by-Step Guide:
- Lay the Greenery: Place your olive branches down the center of the table, creating a long, flowing runner.
- Place the Candlesticks: Arrange your brass candlesticks within the greenery. Place the tallest one in the center and the others staggered on either side. Put the candles in the holders.
- Arrange the Pomegranates: Nestle the whole pomegranates among the olive leaves, in between the candlesticks.
- Add the Dramatic Touch: Ask a grown-up to carefully cut one or two of the pomegranates in half or into quarters. Place these cut pieces on the runner with the sparkling seeds facing up.
- Light the Candles: Just before your meal, have a grown-up light the candles. The warm light will reflect beautifully off the pomegranates and create a memorable, elegant atmosphere.
34. Mirrored Light River
A Simple Stream of Sparkle

This centerpiece is modern, minimalist, and incredibly magical. It uses reflection and light to create a big impact with very simple materials. A river of warm, twinkling lights flows down the table, creating a mesmerizing glow.
The base is made of simple, square craft mirrors, laid end-to-end. Heaps of delicate, copper-wire fairy lights are piled on top. The mirrors reflect the tiny lights, making them seem endless and creating a pool of brilliant sparkle. This is a very simple way to add a huge amount of warmth and magic to your table.
DIY Instructions: How to Make a Mirrored Light Runner
What You’ll Need:
- 4-6 square craft mirrors (the kind without frames)
- 2-3 long strings of battery-powered fairy lights (the kind on thin, flexible wire)
- A few clear glass or crystal balls (optional)
Step-by-Step Guide:
- Clean Your Mirrors: Make sure your mirrors are clean and free of fingerprints so they will sparkle their best.
- Create Your Riverbed: Lay the mirrors down the center of your table. You can place them end-to-end to create a long, straight line.
- Unwind the Lights: Turn on your fairy lights. Starting at one end, begin piling and arranging the string of lights on top of the mirrors.
- Create Piles of Light: Don’t lay the lights in a straight line. Create loose, airy piles and tangles of the wire. This will create the most beautiful glow and reflections.
- Add a Focal Point (Optional): If you have clear glass balls, you can place one or two in the middle of your piles of light. The light will shine through them and create interesting reflections.
- Hide the Battery Packs: Tuck the small battery packs just off the edge of the runner at one end. Your simple, sparkling centerpiece is ready to glow.
35. Fragrant Herb Bundle Place Settings
A Welcome of Natural Charm

This simple idea brings a personal and fragrant touch to each place setting. While not a single centerpiece, these bundles work together to create a beautiful, cohesive look for the whole table. Each guest is greeted with a miniature bouquet of fresh herbs.
Bundles of fresh sage, rosemary, and thyme are tied together with natural twine. A cinnamon stick adds a touch of warmth, while a tiny jingle bell provides a hint of festive cheer. A simple craft paper tag with each guest’s name makes it a thoughtful and personal welcome.
DIY Instructions: How to Make Herb Bundle Place Cards
What You’ll Need:
- Fresh herbs (bunches of sage, rosemary, and thyme work well)
- Natural twine
- Scissors
- A cinnamon stick for each bundle
- A small jingle bell for each bundle
- Brown craft paper tags
- A pen
Step-by-Step Guide:
- Write Your Tags: First, write each guest’s name on a paper tag.
- Create a Mini-Bouquet: For each place setting, take a sprig of sage, a sprig of rosemary, and a sprig of thyme. Arrange them in a small, flat bundle.
- Tie it Together: Cut a long piece of twine. Lay your herb bundle on top of a folded napkin. Place a cinnamon stick on top of the herbs.
- Wrap it Up: Wrap the twine around the napkin, herbs, and cinnamon stick several times to secure them.
- Add the Finishing Touches: Before you tie the final knot, thread the twine through your name tag and through the loop on the jingle bell.
- Tie a Bow: Tie a secure knot or a small bow at the front. Trim any extra twine. Repeat this for every place setting.
36. Collected Candlelight Forest
A Grove of Flickering Light

Create a stunning centerpiece by gathering a large collection of candlesticks. This look is all about the beauty of repetition. The forest of tall, slender candles creates a spectacular display of warm, flickering light that will make any meal feel special.
The key is to use a wide variety of candlesticks. Mix and match different styles, heights, and materials—brass, silver, dark metal, even ceramic. Using candles in a few coordinated colors, like navy, cream, and dusty rose, ties the whole eclectic collection together.
DIY Instructions: How to Create a Candlestick Centerpiece
What You’ll Need:
- A lot of candlesticks (at least 10-15). Hunt for them at thrift stores and flea markets!
- A long, simple table runner
- An equal number of tall taper candles in 2-3 complementary colors
Step-by-Step Guide:
- Lay Your Runner: Place a simple table runner down the center of your table. This will define the space for your centerpiece.
- Start Arranging: Begin placing your candlesticks on the runner. Don’t put them in a straight line. Create a dense but random-looking cluster that runs the length of the table.
- Mix it Up: Be sure to mix the different materials, heights, and styles. Put tall ones next to short ones, and shiny brass next to dark metal. This is what makes it look interesting and collected over time.
- Add the Candles: Place your taper candles into the holders. Alternate the colors as you go to create a balanced look. Make sure each candle is secure in its holder.
- Light the Forest: This is the best part. Ask a grown-up to help you carefully light all the candles. The incredible amount of candlelight will create a truly magical and unforgettable atmosphere for your feast.
Your holiday table is a blank canvas, and you have the power to turn it into a masterpiece. A beautiful centerpiece doesn’t have to be complicated or expensive; it just needs a bit of creativity and a personal touch.
We hope this list of 36 ideas has inspired you to make something truly special this year. Choose a project that speaks to you, gather your materials, and enjoy the simple process of creating.
Remember, the most memorable decorations are the ones made with care. They add a warmth and personality to your home that nothing store-bought ever can.
Key Takeaways
- Embrace Nature: Many stunning centerpieces can be created using natural elements like pinecones, branches, fresh fruit, and greenery.
- Repurpose with Purpose: Everyday items such as wine bottles, old books, mason jars, and even sweaters can be transformed into unique decor.
- Light is Magic: Never underestimate the power of candlelight or the soft glow of fairy lights to create a warm and inviting atmosphere.
- DIY is for Everyone: Each project is designed with simple, step-by-step instructions, proving that you don’t have to be an expert crafter to make something beautiful.