As the air gets a little crisper and the nights grow longer, our thoughts turn to the most wonderfully wicked time of the year: Halloween. Decorating your home to capture that spooky spirit is half the fun, but it doesn’t have to mean expensive, store-bought items.

Sometimes, the most impressive decorations come from a little bit of creativity and things you already have around the house. Those empty glass jars, old wine bottles, and forgotten vases sitting in your cupboard are blank canvases just waiting for a spooky transformation.
This guide is packed with 35 unique and imaginative DIY ideas to turn simple glass containers into the stars of your Halloween decor. From creepy-crawly specimen jars and ghostly lanterns to elegant gothic centerpieces, there’s a project here for every style and skill level.
Get ready to unleash your inner artist. Let’s turn that trash into terrifyingly good treasure!
1. Glowing Ghost Lantern

This friendly ghost jar is a simple and charming way to light up a dark Halloween night. Its frosted white surface gives off a soft, ethereal glow, while the classic spooky face provides a touch of gentle fright. A sprinkle of glitter at the base adds a magical, sparkling effect.
This is a wonderful project for all ages. It turns a common mason jar into a cute character. You can make several of these to line a walkway or group them on a porch for a welcoming, haunted display.
DIY Instructions
What You’ll Need:
- A clean, clear glass mason jar
- White frosted glass spray paint
- Glow-in-the-dark or glitter spray paint (in green, blue, or purple)
- Black vinyl sticker paper or black craft paint
- Scissors
- An LED tea light candle
Step-by-Step Guide:
- Clean Your Jar: Start with a clean and completely dry jar. Make sure there’s no sticky stuff from the label.
- Frost it White: With a grown-up’s help, spray the outside of the jar with the white frosted glass paint. Do this in a place with lots of fresh air. Let it dry.
- Add a Glow: Turn the jar upside down. Spray the bottom third of the jar with the glow-in-the-dark or glitter paint. Let it fade up the sides.
- Create the Face: Cut out two oval eyes and a round mouth from the black vinyl paper. If you don’t have vinyl, a grown-up can help you carefully paint the face on with black craft paint.
- Stick on the Face: Peel the back off your vinyl shapes and stick them onto the jar to make the ghost’s face.
- Light it Up: Pop an LED tea light inside, turn it on, and watch your spooky ghost come to life!
2. Witch’s Brew Potion Bottles

Transform ordinary bottles into mysterious containers straight from a witch’s cupboard. These potion bottles are painted a sinister matte black, making them look old and secretive. Aged paper labels with creepy names like “Wolfsbane” and “Dragon’s Blood” hint at the powerful magic held within.
Details like twine, moss, and a dripping wax seal make these props look incredibly realistic. They are a fantastic addition to a mantelpiece or as a centerpiece for a spooky feast. Grouping them together creates the look of a well-stocked sorcerer’s shelf.
DIY Instructions
What You’ll Need:
- Empty glass bottles of different shapes and sizes
- Matte black spray paint
- Paper
- A wet tea bag
- A printer (or you can write the labels by hand)
- Mod Podge or school glue
- Twine
- Craft moss
- A hot glue gun
- Red candle wax or red hot glue sticks for a wax seal effect
Step-by-Step Guide:
- Clean and Paint: Wash and dry your bottles. With a grown-up’s help, spray paint them matte black. Let them dry completely.
- Age Your Labels: Print or write spooky potion names on paper. To make the paper look old, gently dab it all over with a wet tea bag. Let the paper dry. Then, carefully tear the edges instead of cutting them.
- Attach the Labels: Use Mod Podge or glue to stick the aged labels onto your bottles.
- Add Twine and Moss: Wrap twine around the neck and base of the bottles. Use a hot glue gun to add little bits of craft moss.
- Create a Seal: For the top, a grown-up can carefully drip red candle wax over the cork or cap. You can also use red hot glue to create a fake wax drip effect.
3. Gothic Lace Luminary

This luminary combines dark romance with a spooky vibe. A simple glass jar is wrapped in intricate black lace, creating beautiful and mysterious patterns. A black velvet ribbon and a small, antique key charm add to the gothic elegance.
When a candle is lit inside, the flame flickers through the lace, casting intricate shadows. The vase is topped with deep red and black roses, completing the vampire-chic look. It’s a sophisticated piece that adds a touch of class to any haunted mansion.
DIY Instructions
What You’ll Need:
- A clean glass jar
- A piece of black lace fabric, big enough to wrap around the jar
- Spray adhesive or Mod Podge
- Black velvet ribbon
- A small charm (like a key or a spider)
- A hot glue gun or fabric glue
- Scissors
- An LED candle and/or fake flowers
Step-by-Step Guide:
- Clean Your Jar: Make sure your glass jar is clean and dry.
- Measure and Cut the Lace: Wrap the lace around the jar to see how much you need. Cut it so it fits perfectly.
- Attach the Lace: With a grown-up’s help, lightly spray the jar with spray adhesive. Carefully and smoothly wrap the lace around the jar, pressing it onto the glue. Or, you can paint a thin layer of Mod Podge on the jar and press the lace onto that.
- Add the Ribbon: Tie the black velvet ribbon into a bow around the neck of the jar.
- Attach the Charm: Use a small dot of glue or a jump ring to attach your charm to the center of the bow.
- Decorate: Place an LED candle inside for a spooky glow, or use the jar as a vase for dark, beautiful flowers.
4. Haunted House Silhouette Lantern

This jar captures a whole spooky scene. A detailed silhouette of a haunted house, a twisted tree, and a graveyard stands out against a fiery sunset background. Bats fly across the full moon, adding to the classic Halloween atmosphere.
The warm glow from within makes the scene come alive. Crumpled tissue paper creates a beautiful, textured sky effect. This lantern is like a miniature, glowing story you can place on any table or windowsill.
DIY Instructions
What You’ll Need:
- A large, clean glass jar
- Yellow, orange, and red tissue paper
- Black craft paper or vinyl
- A haunted house silhouette template (you can find one online)
- Scissors and a craft knife
- Mod Podge
- A sponge brush
- An LED light string or candle
Step-by-Step Guide:
- Clean the Jar: Start with a clean, dry jar.
- Create the Sunset: Tear the tissue paper into small pieces. Using the sponge brush, apply Mod Podge to a section on the inside of the jar. Stick the tissue paper pieces on, overlapping them. Start with yellow at the bottom, then orange, then red at the top. Cover the whole inside of the jar.
- Cut the Silhouette: Print out a haunted house silhouette. Trace it onto your black paper and carefully cut it out. A grown-up should help with the craft knife for the small details like windows.
- Attach the Scene: Apply Mod Podge to the back of your black silhouette.
- Place it Carefully: Stick the silhouette onto the outside of the jar. Smooth it down to get rid of any bubbles.
- Let it Dry: Let all the Mod Podge dry completely. It will dry clear.
- Light it Up: Put your LED lights inside and watch your haunted house glow against the sunset.
5. Mummy Jar Votive Holder

These little mummies are more cute than scary. An ordinary jar gets wrapped up in rustic burlap or cheesecloth, turning it into an ancient mummy. A pair of googly eyes peeks out from the bandages, giving it a playful and silly personality.
A few splatters of red paint add a hint of spooky fun. These are very easy to make and are great for holding candy, pencils, or an LED candle. Making a whole family of them creates a fun and spooky group.
DIY Instructions
What You’ll Need:
- A clean glass jar
- Strips of cheesecloth, gauze, or burlap
- A hot glue gun or craft glue
- Googly eyes
- Optional: Red craft paint and a small brush
Step-by-Step Guide:
- Clean Your Jar: Wash and dry your jar.
- Start Wrapping: Put a dot of glue at the top of the jar and stick the end of a fabric strip to it.
- Mummify: Begin wrapping the fabric strip around and around the jar. Crisscross the strips and make it a little messy, just like a real mummy.
- Secure the End: When the whole jar is covered, cut the strip and use another dot of glue to hold the end in place.
- Add the Eyes: Find a spot in the bandages and glue on two googly eyes. You might need to pull the fabric apart a little so they can peek through.
- Add Spooky Splatters (Optional): Dip the tip of your brush in a little red paint. Flick the brush near the mummy to create little splatters that look like blood.
- Let it Dry: Let all the glue and paint dry before using your new mummy friend.
6. Spider-Infested Vase

This vase will make your skin crawl. A clear glass vase becomes the home for a huge, creepy spiderweb. Plastic spiders of all sizes crawl all over it, looking terrifyingly real. It’s a simple idea that creates a big scare.
The vase is filled with dead, black branches, making the whole display look like it was taken from a haunted forest. This is a great centerpiece for a Halloween party, especially for guests who are afraid of spiders!
DIY Instructions
What You’ll Need:
- A clear glass vase
- A white or glow-in-the-dark 3D paint pen or hot glue gun
- Plastic spiders in various sizes
- A hot glue gun (if not used for the web)
Step-by-Step Guide:
- Clean the Vase: Start with a very clean, clear vase.
- Draw the Web: Use your 3D paint pen or a hot glue gun to draw a spiderweb on the outside of the vase. Start by drawing lines from the top to the bottom, like the spokes of a wheel.
- Weave the Web: Connect the spoke lines with curved lines that swoop downwards. Go all the way around the vase. Let the web dry completely until it’s hard.
- Infest the Vase: Use a hot glue gun to stick the plastic spiders all over the web.
- Position the Spiders: Place some big ones and some small ones. Make them look like they are crawling up, down, and all around.
- Let it Dry: Let the glue cool and harden. Then you can fill your vase with spooky branches or flowers.
7. Day of the Dead Sugar Skull Jar

This jar is a vibrant and beautiful celebration of the Day of the Dead. Painted to look like a colorful sugar skull, it is covered in intricate and joyful designs. Bright flowers, swirls, and dots in pink, blue, and yellow make this skull look festive and friendly.
Used as a vase for bright orange marigolds, it becomes a stunning centerpiece for a Dia de los Muertos altar or a colorful Halloween display. It’s a wonderful way to celebrate culture and creativity.
DIY Instructions
What You’ll Need:
- A skull-shaped glass jar (or a regular jar you can paint a skull on)
- White spray paint or craft paint
- Craft paints in many bright colors (pink, turquoise, yellow, orange)
- Black paint for details
- Fine-tipped paintbrushes or paint pens
Step-by-Step Guide:
- Prep the Jar: Start with a clean jar. If it’s not already white, give it a good coat of white paint as a base. Let it dry.
- Paint the Eyes: Paint two large circles around the eye sockets in a bright color like turquoise.
- Add Flower Petals: Paint a ring of little petals around the eye circles in another color, like pink or yellow, to make them look like flowers.
- Decorate the Forehead: Paint a pretty design, like a flower or a web, on the forehead of the skull.
- Add Swirls and Dots: Use your fine-tipped brushes to add lots of little details. Paint colorful swirls on the cheeks and chin, and add little dots everywhere to make it look festive.
- Outline and Details: Use your black paint or a black paint pen to outline the shapes, draw the nose cavity, and paint the teeth.
- Let it Dry: Let your beautiful creation dry completely before using it as a vase.
8. Creepy Specimen Jars

These jars look like they belong in a mad scientist’s laboratory. Filled with murky yellow liquid, they hold all sorts of horrifying things. Floating eyeballs, a dismembered doll, slimy worms, and even a cauliflower “brain” make for a truly gruesome display.
Specimen tags with mysterious numbers add to the scientific, experimental feel. These are incredibly effective and easy to make. Line them up on a shelf to create a lab full of failed experiments and horrifying creatures.
DIY Instructions
What You’ll Need:
- Glass jars with lids, in different shapes and sizes
- Water
- Yellow and green food coloring
- Creepy plastic toys: eyeballs, spiders, snakes, dolls, rubber monsters
- Weird food items: cauliflower, radishes, cocktail onions
- Paper tags and a pen
Step-by-Step Guide:
- Clean Your Jars: Wash and dry your jars and lids.
- Choose Your Specimen: Decide what creepy thing you will put in each jar.
- Place the Items: Put your plastic toys or weird food into the jars.
- Make the Liquid: Fill the jars with water. Add one or two drops of yellow food coloring and maybe a tiny drop of green. Stir it up to make the water look like old preservative fluid.
- Seal Them Up: Put the lids on the jars tightly.
- Label Your Experiments: Write a specimen number or a creepy name on a paper tag.
- Attach the Tag: Tie the tag around the neck of the jar with a piece of string.
- Display with Care: Arrange your creepy collection for everyone to see.
9. Pumpkin Patch Candy Jar

This jar is the perfect home for all your favorite Halloween candy. Painted a cheerful orange, it has the classic, smiling face of a friendly jack-o’-lantern. It’s a simple, happy decoration that captures the fun of the season.
The lid is cleverly decorated to look like the top of a pumpkin. A real cinnamon stick for the stem adds a rustic touch and a wonderful, spicy scent. This is a great craft for kids and a festive way to share treats.
DIY Instructions
What You’ll Need:
- A round, squat mason jar with a lid
- Orange craft paint
- Black craft paint or black vinyl
- The metal lid part of the jar
- A piece of burlap or brown paper
- Green felt
- Cinnamon sticks
- Raffia or twine
- A hot glue gun
Step-by-Step Guide:
- Clean and Paint: Wash and dry your jar. Paint the outside of the jar orange. Let it dry.
- Make the Face: Paint a classic jack-o’-lantern face on the jar with black paint. Or, you can cut the shapes from black vinyl and stick them on.
- Decorate the Lid: Trace the metal lid onto the burlap and the green felt. Cut out the circles.
- Assemble the Lid: Glue the burlap circle onto the top of the metal lid. Cut the green felt circle to look like leaves and glue it on top of the burlap.
- Add the Stem: Glue one or two cinnamon sticks into the center of the lid to be the pumpkin’s stem.
- Finishing Touches: Tie a little bow with the raffia and glue it near the stem. Screw the finished lid onto your jar.
10. Bloody Vampire Goblet

This wine glass is fit for a vampire’s feast. Bright red, dripping “blood” cascades down from the rim and pools at the base, looking fresh and gruesome. The dripping effect is created with hot glue, giving it a 3D texture that looks shockingly realistic.
A small bat charm tied to the stem with a black ribbon adds a final, gothic touch. This is a fantastic prop for a Halloween party. You can make a whole set for your guests, but be warned—these are for decoration only!
DIY Instructions
What You’ll Need:
- A clear wine glass
- A hot glue gun
- Red colored hot glue sticks
- A black ribbon
- A small bat charm (or a spider charm)
- A protected work surface (like wax paper)
Step-by-Step Guide:
- Clean the Glass: Start with a clean, dry wine glass.
- Prepare the Glue Gun: With a grown-up’s help, put a red glue stick in the hot glue gun and let it heat up.
- Make the Drips: Carefully squeeze the red hot glue around the rim of the glass. Let it drip down the sides. Make some drips long and some short.
- Make the Puddle: Squeeze a puddle of the red hot glue onto the base of the glass, letting it drip over the sides onto your protected surface.
- Let it Cool: Let the hot glue cool and harden completely.
- Add the Charm: Tie the black ribbon into a bow around the stem of the glass. Make sure to thread the bat charm onto the ribbon before you tie the bow.
- Be Careful: This is a decoration. Do not drink from this glass!
11. Sleek Black Cat Bottles

These minimalist black cat bottles are chic and spooky. Using old wine bottles, this craft creates a modern decoration that hints at Halloween without being over the top. The glowing green eyes seem to stare out from the darkness, watching everything.
This is a very simple DIY that has a big impact. You can create a whole family of these elegant feline figures to line up on a shelf or use as sleek, single-stem vases for dead branches.
DIY Instructions
What You’ll Need:
- Empty glass bottles, cleaned and with labels removed
- Matte black spray paint
- Bright green or yellow craft paint
- A very fine-tipped paintbrush
- White paint pen or fine-tipped white marker
Step-by-Step Guide:
- Prepare the Bottles: Wash and thoroughly dry your glass bottles. Make sure all sticky residue from the labels is gone.
- Paint Them Black: With a grown-up’s help, spray paint the bottles with the matte black paint. Do this in a well-ventilated space and protect your work area. Apply a couple of thin coats for the best coverage. Let them dry completely.
- Paint the Eyes: Use your fine-tipped brush and the bright green paint to create two almond-shaped eyes on the bottle. Fill them in.
- Add the Pupils: Once the green paint is dry, use the same brush to add a thin vertical slit in the center of each eye with black paint. This makes them look like cat eyes.
- Add Whiskers: Use your white paint pen to draw three or four thin lines coming out from the sides of the eyes to create whiskers.
- Let it Dry: Allow all the paint to dry fully before displaying your new cat bottle.
12. Alien Creature in a Jar

Capture an otherworldly creature and display it for all to see. This jar appears to hold a strange, multi-eyed alien octopus, suspended in a mysterious blue liquid. It’s a fantastic and imaginative project for sci-fi lovers.
An LED light at the bottom illuminates the specimen, making the colored rocks and the creature itself glow eerily. Bubbles in the gel give the impression that the creature is alive and breathing. This is a showstopper piece for any Halloween display.
DIY Instructions
What You’ll Need:
- A large, clean glass jar with a lid
- Polymer clay in various colors (green, purple, orange, white, black)
- Water or clear hair gel
- Blue food coloring
- Colored glass beads or fish tank gravel
- A small, waterproof LED light
Step-by-Step Guide:
- Sculpt Your Creature: This is the fun part! Use the polymer clay to create your alien. Make a body, tentacles, and lots of eyes. For the eyes, make small white balls, smaller orange circles, and tiny black dots for pupils. Press them all together and onto the body.
- Bake Your Creation: Follow the instructions on the polymer clay package to bake your creature in the oven. A grown-up should always help with this step. Let it cool down completely.
- Prepare the Jar: Place the waterproof LED light at the bottom of the clean jar. Cover it with the colored glass beads.
- Position the Alien: Gently place your cooled clay alien inside the jar, arranging it on top of the beads.
- Fill the Jar: Slowly fill the jar with either water or clear hair gel. Hair gel will make fewer bubbles and will hold the creature in place better.
- Color the Liquid: Add one or two drops of blue food coloring and gently stir it with a long stick until you get the color you want.
- Seal It: Screw the lid on tightly and turn on the LED light to see your amazing alien specimen glow.
13. The Poisoned Apple Display

This decoration looks like it came straight from a fairytale witch’s cottage. A stark white apple is drenched in a sinister, dripping black glaze, representing the iconic poisoned apple. Displayed under a glass cloche, it becomes a dramatic and ominous centerpiece.
Resting on a bed of moss, the apple looks both beautiful and deadly. It’s a sophisticated and spooky piece that tells a story. The nearby skull with matching black drips ties the whole evil scene together.
DIY Instructions
What You’ll Need:
- A fake apple (from a craft store)
- White matte craft paint or spray paint
- Black glossy craft paint
- A small, real twig for the stem
- Craft moss
- A glass cloche (a bell jar with a base) or a large clear vase turned upside down
- A hot glue gun
Step-by-Step Guide:
- Prepare the Apple: If your fake apple has a plastic stem, pull it out.
- Paint it White: Paint the entire apple with the white matte paint. You may need a few coats to cover the original color. Let it dry completely.
- Add the Poison: Squeeze a generous amount of the black glossy paint onto the top of the apple, right around the hole where the stem was.
- Let it Drip: Tilt the apple and let the black paint slowly drip down the sides. Don’t try to control it too much; let the drips look natural. Set it down on a protected surface to dry. This may take a while.
- Add the Stem: Once the black paint is dry, use a dot of hot glue to secure the real twig into the hole on top for a rustic stem.
- Create the Display: Arrange the craft moss on the base of your cloche. Place the finished poisoned apple in the center of the moss.
- Cover It: Carefully place the glass dome over the apple to complete your fairytale display.
14. Ancient Cracked Bottle

This bottle looks like a relic unearthed from a forgotten tomb. The surface is covered in a network of deep cracks, revealing the dark glass underneath a shattered white coating. It’s a wonderfully textured and aged-looking piece.
This effect is surprisingly easy to achieve and makes a simple bottle look like a priceless, ancient artifact. It would fit perfectly in a mad scientist’s lab, a dusty crypt, or a wizard’s study. The possibilities for this technique are endless.
DIY Instructions
What You’ll Need:
- An empty glass bottle (darker glass like brown or green works well)
- School glue (like Elmer’s)
- A paintbrush
- White or light gray acrylic craft paint
- A hairdryer (optional)
Step-by-Step Guide:
- Clean the Bottle: Start with a clean, dry bottle.
- Apply the Glue: Using your paintbrush, apply a thick, even layer of school glue all over the parts of the bottle you want to look cracked. The thicker the glue, the bigger the cracks will be.
- Wait a Little: Let the glue sit for a few minutes until it’s tacky but not completely dry.
- Paint Over the Glue: While the glue is still tacky, paint your white or gray acrylic paint over it. Try to paint in one direction and don’t brush over the same spot too many times.
- Watch the Magic: As the paint and glue dry, the cracks will start to appear! To speed up the process and get more cracks, you can use a hairdryer on a low setting.
- Let it Cure: Let the bottle dry completely for a full day to make sure the effect is set. You can then add other decorations like a wax seal or an old label.
15. Skeleton Hands Flower Vase

Give your floral arrangements a helping hand from the great beyond. This striking vase features a pair of skeleton hands appearing to clutch a deep red and black vase from the outside. It’s a simple, clever idea that is both creepy and stylish.
The contrast between the white bones and the dark vase makes the hands pop. Filled with black roses and dark red dahlias, it becomes a dramatic and gothic centerpiece, great for a Halloween dinner party or a vampire’s lair.
DIY Instructions
What You’ll Need:
- A tall, cylinder-shaped glass vase (dark red or black looks great)
- Two plastic skeleton hands
- Strong, clear adhesive glue (like E6000 or a high-strength epoxy)
- Dark artificial flowers (black, deep red, purple)
Step-by-Step Guide:
- Clean Your Vase: Make sure the outside of the vase is clean and dry so the glue will stick properly.
- Plan Your Placement: Hold the skeleton hands up to the vase to decide exactly where you want them to go. You want them to look like they are gripping the vase.
- Apply the Glue: With help from a grown-up, carefully apply the strong glue to the parts of the skeleton hands that will touch the vase (the palm and the fingers). Use it in a well-ventilated area.
- Attach the Hands: Firmly press the hands onto the vase in the position you chose.
- Let it Set: You may need to prop the hands up or use painter’s tape to hold them in place while the glue dries. Follow the instructions on the glue package for how long it needs to cure. This could be 24 hours or more.
- Arrange Your Flowers: Once the glue is completely hardened and the hands are secure, arrange your dark, spooky flowers in the vase.
16. Graveyard Terrarium Jar

Build a miniature world of spooky delights inside a large glass jar. This graveyard terrarium is a detailed and charming scene, complete with tiny ghosts, tombstones, and barren trees. It’s like a spooky snow globe without the snow.
The mossy ground, pebble pathway, and tiny skull details make this a fun project to look at. You can add a string of fairy lights to make it glow at night. It’s a creative way to bring a whole haunted landscape into your home.
DIY Instructions
What You’ll Need:
- A large, wide-mouthed glass jar
- Small pebbles or gravel
- Craft moss
- Small twigs from your yard
- A hot glue gun
- Miniature Halloween decorations (tombstones, ghosts, skulls – often found in craft stores or with model train supplies)
- Optional: Tiny LED fairy lights
Step-by-Step Guide:
- Clean Your Jar: Make sure your jar is clean and clear.
- Create the Ground: Cover the bottom of the jar with a layer of craft moss.
- Build a Path: Pour a small line of pebbles down the middle of the moss to create a spooky path.
- Plant the Trees: Use the hot glue gun to put a dot of glue on the bottom of your twigs and stick them into the moss so they stand up like dead trees.
- Set Up the Graveyard: Arrange your miniature tombstones in the moss on either side of the path.
- Add the Ghosts: Place the little ghosts around the scene. You can even use a tiny dot of glue to attach one to a tree branch.
- Add Details: Place a tiny skull or other small spooky items along the path.
- Light it Up (Optional): Carefully tuck the string of fairy lights into the scene, hiding the wire under the moss. Leave the switch part hanging out the top of the jar for easy access.
17. Antique Mercury Glass Vase

This project turns a plain glass vase into an elegant, antique-looking piece. The “mercury glass” effect gives it a mottled, mirrored finish that looks like a treasured and slightly haunted heirloom. It’s a very stylish way to decorate for Halloween.
The finish is created with a special spray paint that gives a unique, speckled look every time. This vase is beautiful on its own or filled with white flowers and cotton stems for a ghostly, sophisticated bouquet.
DIY Instructions
What You’ll Need:
- A clear glass vase
- Krylon Looking Glass spray paint (or a similar mirror-effect spray paint)
- A spray bottle filled with a 50/50 mix of white vinegar and water
- Paper towels
Step-by-Step Guide:
- Clean the Vase: Wash and dry your glass vase. Make sure the inside is especially clean.
- Get Ready to Spray: This project can be a bit messy, so do it outside or in a well-protected, well-ventilated area. A grown-up should help with the spray paint.
- Spray and Spritz: Lightly spritz the inside of the vase with your vinegar and water mixture. You just want little droplets, not a soaked surface.
- First Coat of Paint: Immediately after spritzing, spray a very light coat of the Looking Glass paint inside the vase.
- Dab and Dry: Let the paint sit for about a minute. Then, gently blot the inside with a wadded-up paper towel. This will lift off some of the paint where the water droplets are, creating the mottled effect.
- Repeat: Repeat the process—spritz with water, spray a light coat of paint, wait a minute, and blot. Do this 4-5 times until you are happy with how it looks. The more layers, the more reflective it will be.
- Let it Cure: Let the vase dry completely before using it. This paint is for decorative purposes, so don’t fill the vase with water. It’s best for artificial flowers.
18. Swarm of Bats Lantern

As dusk falls, this lantern comes alive with a swirling colony of bats. The design uses a beautiful gradient of purple, pink, and orange to represent a sunset sky, which makes the black bat silhouettes stand out dramatically.
When you place a candle inside, the light flickers through the swarm, casting spooky shadows on the wall. It’s a simple concept that creates a powerful and dynamic visual. This is a great way to add a pop of color to your spooky decor.
DIY Instructions
What You’ll Need:
- A tall, straight-sided glass candle holder or vase
- Translucent glass paint or alcohol inks in purple, pink, and orange
- Black craft paper or vinyl
- A small bat shape template
- Scissors or a craft knife
- Mod Podge or clear-drying glue
- An LED candle
Step-by-Step Guide:
- Clean the Glass: Start with a very clean and dry glass holder.
- Create the Sunset: Apply the glass paints to the inside of the vase. Start with purple at the top, blend to pink in the middle, and then orange at the bottom. You can use a sponge or brush to dab the colors on and blend them together. Let it dry completely.
- Make the Bats: Find a small bat silhouette online to print and use as a template, or draw your own. Trace the shape onto your black paper many times.
- Cut Out the Swarm: Carefully cut out all the little bats.
- Attach the Bats: Using a small brush, apply a thin layer of Mod Podge to the back of a bat cutout.
- Create the Swarm: Press the bats onto the outside of the glass. Place them randomly, facing different directions, to make them look like they are flying in a swarm. Let the glue dry.
- Light it Up: Place your LED candle inside and watch the bats fly against the sunset.
19. Zombie Outbreak Containment Jars

These jars look like they were salvaged from a post-apocalyptic quarantine zone. Painted to look like rusted metal and covered in biohazard warnings, they are a gritty and realistic-looking prop. The bloody handprint and “Infected” label add to the terrifying story.
Wrapped with barbed wire, these containers are clearly not to be messed with. Use them as utensil holders for a Halloween party or as pencil cups on a desk for a year-round touch of zombie fun.
DIY Instructions
What You’ll Need:
- Large metal or glass jars
- Gray or silver spray paint
- Brown, black, and orange craft paint
- A sponge
- Red craft paint
- Biohazard, quarantine, or danger sticker printouts
- Mod Podge or glue
- Fake barbed wire (found at craft or party stores)
- A hot glue gun
Step-by-Step Guide:
- Paint the Base: With a grown-up’s help, spray paint your jars with the gray paint to look like metal. Let them dry.
- Add the Rust: Put a little brown, black, and orange paint on a plate. Dab your sponge lightly into the paints, then dab it onto the jar, focusing on the top and bottom rims and any seams. This will create a realistic rust effect. Let it dry.
- Apply the Labels: Cut out your warning labels. Apply a layer of Mod Podge to the back and press them onto the jar. Paint a thin layer of Mod Podge over the top to seal them.
- Add the Bloody Handprint: Pour some red paint onto a plate. Press your hand into the paint and then carefully press it onto the jar. Let some of the paint drip down.
- Wrap the Wire: Carefully wrap the fake barbed wire around the rim of the jar. Use a few dots of hot glue to hold it in place.
- Display Your Hazard: Your containment jars are now ready to hold supplies for surviving the zombie apocalypse.
20. Slimy Spider Egg Sac

This is a truly creepy-crawly decoration. A clear jar is covered in a stretched, green, slimy web, and a glowing egg sac sits within, covered in spiders. It’s the stuff of nightmares and an incredibly creative use of a hot glue gun.
An LED light at the base makes the whole thing glow with a sickly green light, highlighting the spiders and the intricate web. This is a unique and disgusting piece that is sure to be a conversation starter at any Halloween gathering.
DIY Instructions
What You’ll Need:
- A round or squat glass jar
- A hot glue gun with plenty of clear or green glitter glue sticks
- A small, round styrofoam ball that fits inside the jar
- Pale green or glow-in-the-dark craft paint
- Plastic spiders of various sizes
- A small green LED light
Step-by-Step Guide:
- Create the Web: This is the trickiest part. Using a hot glue gun (green glue is best, but clear works too), carefully create a web pattern on the outside of the clean jar. Make lots of interconnected, drippy, organic-looking lines. Go all the way around. Let it cool completely.
- Prepare the Egg Sac: Paint the styrofoam ball with the pale green or glow-in-the-dark paint. Let it dry.
- Infest the Sac: Use a hot glue gun to stick the plastic spiders all over the painted styrofoam ball.
- Assemble the Jar: Place the small green LED light at the bottom of the jar.
- Place the Egg Sac: Gently put the spider-covered egg sac into the jar, resting on top of the LED light.
- Turn it On: Switch on the light and watch your horrifying spider nest come to life.
21. Creepy Carnival Vase

Step right up and behold this unsettling vase from a carnival long since abandoned. The bold, contrasting patterns of stripes and harlequin diamonds evoke the strange atmosphere of a circus tent after dark. A special aging effect gives it a distressed, vintage look, as if it holds many strange stories.
This piece is a fantastic way to add a touch of the bizarre to your decor. Fill it with black and white flowers or leave it empty as a standalone statement piece for your spooky sideshow.
DIY Instructions
What You’ll Need:
- A ceramic or glass vase
- White or cream-colored spray paint (for a base coat)
- Red and black acrylic craft paint
- Low-tack painter’s tape
- Paintbrushes
- Optional: Brown craft paint and a sponge for an aged look
Step-by-Step Guide:
- Prime Your Vase: Start with a clean, dry vase. With a grown-up’s help, apply a smooth, even base coat of white or cream spray paint and let it dry completely.
- Tape Off Your Design: Use the painter’s tape to create your patterns. On one side, make vertical stripes. On the other side, create a grid of diamonds by placing tape diagonally in both directions. Press the tape down firmly to prevent paint from bleeding underneath.
- Paint the Patterns: Carefully paint inside your taped-off sections with the red and black paint. You can alternate colors to create your pattern.
- Peel and Reveal: Let the paint dry for a little while, but remove the tape before it’s fully hardened to get clean lines.
- Age Your Vase (Optional): To get the old, dirty look, put a tiny bit of brown paint on a damp sponge. Dab most of it off on a paper towel, then lightly smudge it around the top and bottom rims of the vase.
- Let it Cure: Let all the paint dry completely before using your new carnival vase.
22. Spirit Board Spirit Decanter

This bottle isn’t just for holding liquids; it’s for contacting the other side. Transformed into a spirit board, this flask-shaped bottle becomes a mysterious and interactive piece of decor. The classic alphabet, numbers, and celestial symbols invite questions for the unseen world.
A tiny planchette hanging from the neck completes the look, making it seem ready for a séance at any moment. Use it as a vase for a single white rose to add a touch of gothic romance, or let it stand alone as a cryptic centerpiece.
DIY Instructions
What You’ll Need:
- A flat, flask-shaped bottle
- Matte black spray paint or craft paint
- A white paint pen with a fine tip
- A ruler (optional, for straight lines)
- A small wooden planchette (from a craft store or keychain)
- Black ribbon
Step-by-Step Guide:
- Clean and Paint: Wash and dry your bottle. With a grown-up’s help, paint it with matte black paint. Let it dry completely.
- Draw the Alphabet: Use your white paint pen to carefully write the letters of the alphabet in an arc shape on the bottle.
- Add the Numbers: Below the letters, write the numbers 0 through 9.
- Add the Details: In the top corners, draw crescent moons. In the bottom corners, draw suns. At the very bottom, write “GOODBYE”.
- Let it Dry: Make sure the paint pen is completely dry so it doesn’t smudge.
- Attach the Planchette: Tie the black ribbon into a bow around the neck of the bottle, threading it through the hole in the planchette so it hangs in the front.
- Display Your Portal: Your spirit board is ready to be displayed. Just be careful what you ask it!
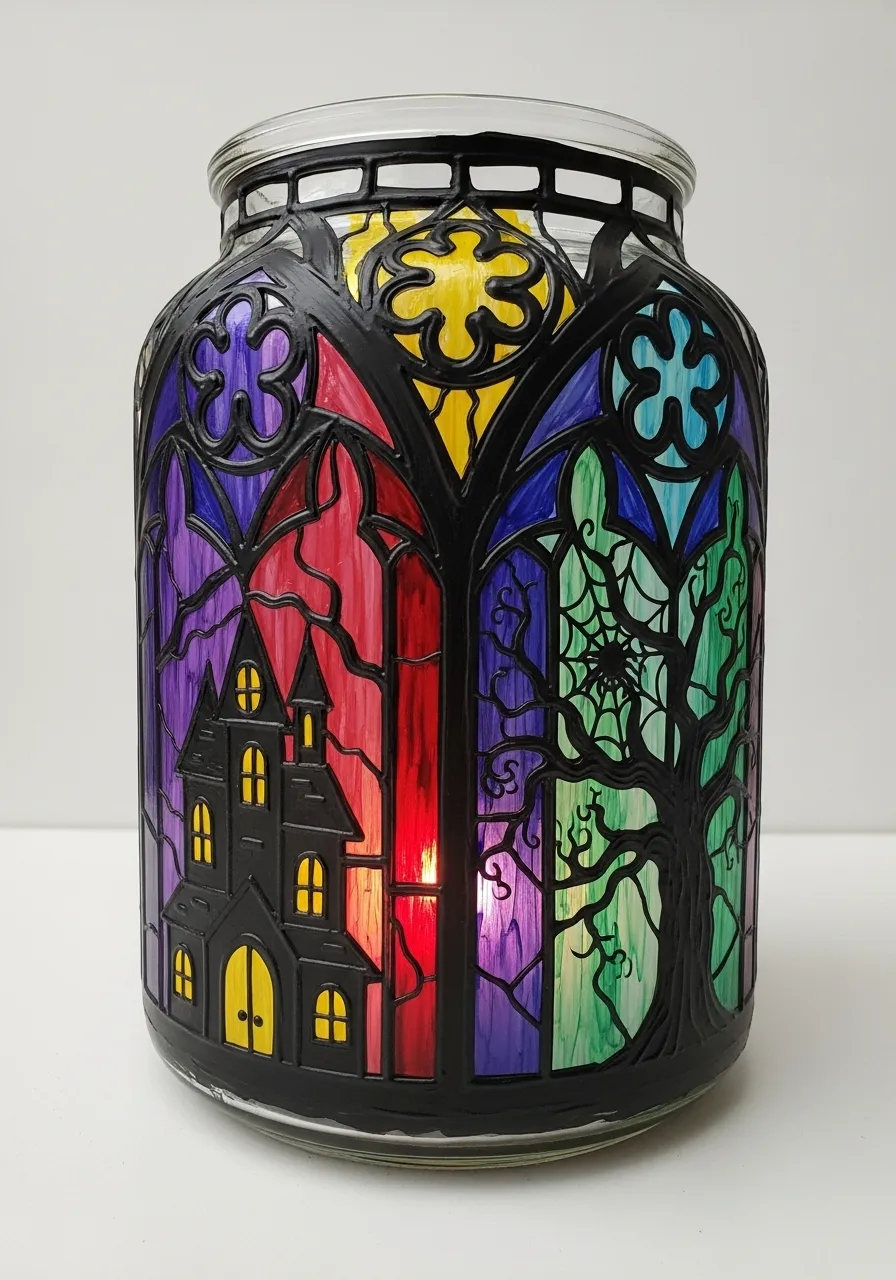
23. Haunted Cathedral Luminary

This jar looks like a magnificent stained-glass window from a haunted gothic cathedral. The intricate black outlines separate panels of deep, rich colors, each telling a piece of a spooky story. One side shows a towering haunted house, while the other reveals a twisted tree with a spiderweb.
When an LED candle is placed inside, the colors glow with a mysterious and beautiful light. It casts a colorful, creepy ambiance over any room, turning a simple jar into a work of art.
DIY Instructions
What You’ll Need:
- A large, clean glass jar
- Black 3D gallery glass paint or “liquid leading”
- Translucent glass paints in various colors (purple, red, green, blue, yellow)
- A small paintbrush
- A design template (optional)
- An LED light
Step-by-Step Guide:
- Clean Your Jar: Start with a perfectly clean and dry jar.
- Draw Your Outlines: Using the black 3D paint, draw the outlines for your design directly onto the outside of the jar. You can draw window frames, a haunted house, a tree, and a spiderweb. Let this outline dry completely until it’s hard. It will look like the lead in a real stained-glass window.
- Color It In: Once the outline is dry, it’s like a coloring book. Squeeze a little bit of a glass paint color into one of the sections.
- Spread the Paint: Use your small paintbrush to spread the paint evenly to fill the entire section, right up to the black lines.
- Fill All Sections: Continue filling in all the different parts of your design with different colors.
- Let it Cure: Let the glass paint dry completely. This might take a full day. The paint will be clear and colorful like real glass.
- Light It Up: Place an LED light inside and watch your haunted window glow.
24. Toxic Slime Specimen Jar

Watch out, this jar is leaking! A terrifying science experiment has gone wrong, and bright green, toxic slime is oozing out of this container. Unlucky flies have been trapped in the gooey mess, making for a truly gross and fun Halloween decoration.
This project uses colored hot glue to create a thick, drippy slime effect that looks wet and sticky even when it’s hard. It’s a fantastic prop for a mad scientist lab or a biohazard-themed display.
DIY Instructions
What You’ll Need:
- A clean glass jar with a lid
- A hot glue gun
- Neon green colored hot glue sticks
- A few plastic flies or other insect toys
Step-by-Step Guide:
- Clean the Jar: Make sure your jar and lid are clean and dry.
- Trap the Bugs: Place the plastic flies inside the jar. You can use a tiny dot of regular hot glue to stick a few to the inside walls of the jar.
- Screw on the Lid: Put the lid on the jar tightly.
- Prepare the Slime: With a grown-up’s help, put a green glue stick into the hot glue gun and let it heat up. Protect your work surface with paper.
- Make it Ooze: Squeeze a large amount of the green hot glue onto the center of the lid. Keep adding more glue, letting it drip over the edges and down the sides of the jar.
- Create Puddles and Drips: Make some drips long and some short. Let it puddle onto your protected work surface at the bottom.
- Let it Cool: Turn off the glue gun and let the “slime” cool down and harden completely. Don’t touch it while it’s hot! Once it’s cool, you can peel it off the paper and display your slimy mess.
25. All-Seeing Eyeball Caddy

This jar is watching you. Covered from top to bottom in a multitude of googly eyes, this simple jar is transformed into a creepy, crawly creature. It is a wonderfully weird and textured piece that is sure to be a conversation starter.
The sheer number of eyes is both funny and unsettling. It’s a very easy craft with a huge visual impact. Use it as a pencil holder on your desk or a utensil caddy for a Halloween party to give your guests the feeling that they’re always being watched.
DIY Instructions
What You’ll Need:
- A clean mason jar
- Black spray paint or craft paint
- A large bag of googly eyes in various sizes
- Strong craft glue or a hot glue gun
Step-by-Step Guide:
- Prep the Jar: Wash and dry your jar. If it’s clear, paint it black. This will help the white parts of the eyes stand out. Let the paint dry completely.
- Start Gluing: Starting at the top or bottom, apply a small dot of glue to the back of a googly eye.
- Stick it On: Press the eye firmly onto the jar.
- Keep Going: Continue gluing eyes onto the jar one by one. Use different sizes and place them very close together.
- Cover Everything: Don’t stop until the entire outside surface of the jar is completely covered in a jumble of eyes.
- Let it Dry: Let the glue dry completely before you use your new, all-seeing jar.
26. Apothecary Poison Bottles

These bottles look like they were taken directly from a dusty old apothecary shelf. The simple, dark glass and vintage-style labels create an authentic and sinister look. They clearly warn of the dangerous contents within, from Strychnine to other unnamed poisons.
This is a classic and easy way to add a touch of gothic horror to your decor. A simple twine bow and an antique key add to the old-world charm. Group several bottles together to create a convincing and creepy display.
DIY Instructions
What You’ll Need:
- Dark-colored glass bottles (green or brown wine bottles are great)
- Vintage poison label printouts (you can find these by searching online)
- Scissors
- Mod Podge or school glue mixed with a bit of water
- A paintbrush or sponge brush
- Twine
- An old-fashioned-looking key (optional)
Step-by-Step Guide:
- Clean Your Bottles: Wash and dry your bottles, removing any original labels.
- Find and Print Labels: Search for “printable vintage poison labels” online. Print out your favorite designs.
- Cut Them Out: Carefully cut out the printed labels.
- Apply the Label: Use your brush to paint a thin layer of Mod Podge onto the back of a label.
- Stick it On: Carefully place the label onto the bottle and smooth it out with your fingers to remove any air bubbles.
- Seal It: Paint another thin layer of Mod Podge over the top of the label. This will seal it and give it a nice finish. It will look white at first but will dry clear.
- Add the Finishing Touches: Once the Mod Podge is dry, tie a piece of twine around the neck of the bottle. If you have one, tie on a small skeleton key before making the bow.
27. Ghost Ship in a Bottle

This isn’t just any ship in a bottle; it’s a legendary ghost ship, trapped for eternity. This incredible diorama captures a miniature haunted vessel sailing on spooky blue waves, surrounded by ethereal fog. A mysterious green light glows from the crow’s nest, hinting at a supernatural crew.
This is an advanced craft that creates a stunning and detailed display piece. The use of cotton balls for clouds and water beads for the ocean is clever and effective. It’s a piece of art that tells a spooky sea story.
DIY Instructions
What You’ll Need:
- A glass bottle with a wide opening (a “ship in a bottle” type)
- Blue water beads or blue hair gel
- A small model ship kit
- Black, gray, and white craft paint
- Cotton balls
- A tiny green LED light or glow-in-the-dark paint
- Long craft tweezers
- Super glue
Step-by-Step Guide:
- Build and Paint the Ship: Assemble your model ship. Paint it to look like a ghost ship—mostly black and gray, with some white paint “dry brushed” on to make it look faded and ancient. Let it dry.
- Add the Ghostly Light: Paint a small dot of green glow-in-the-dark paint on a sail, or if you’re very careful, wire a tiny LED to the mast.
- Create the Ocean: Fill the bottom of the clean bottle with the blue water beads or a layer of blue hair gel.
- Set Sail: This is the tricky part. Use the long tweezers to carefully lower the ghost ship into the bottle and position it on top of the “water.” You may need a tiny dab of super glue to hold it in place.
- Add the Fog: Gently pull apart cotton balls to make them look thin and wispy like clouds or fog.
- Place the Clouds: Use the tweezers to carefully stuff the cotton ball clouds into the bottle around the top of the ship’s masts.
- Seal It Up: Put the cork or lid on your bottle to keep your ghost ship trapped inside forever.
28. Haunted Cemetery Diorama

Create a complete, miniature haunted world inside a single jar. This spooky terrarium features a chilling graveyard scene, with tiny tombstones, ghosts, and even a skeleton rising from its grave. The layered sand and moss create a realistic and textured landscape.
A gnarled, dead tree stands in the center, adding to the creepy atmosphere. A string of fairy lights woven through the scene makes the whole cemetery glow with an eerie, magical light. It’s a detailed and captivating decoration.
DIY Instructions
What You’ll Need:
- A large, wide-mouthed glass jar
- Different colors of craft sand (black, tan) and fine gravel
- Craft moss
- Miniature Halloween decorations: a small fake tree, tombstones, ghosts, a skeleton
- A hot glue gun
- A string of battery-powered LED fairy lights
Step-by-Step Guide:
- Clean Your Jar: Start with a nice, clean jar so you can see your scene clearly.
- Layer the Ground: Carefully pour layers of sand and gravel into the bottom of the jar. You can tilt the jar as you pour to make wavy lines.
- Add the Moss: Place a layer of craft moss on top of the sand to be your graveyard’s grass.
- Plant the Tree: Use a dot of hot glue on the bottom of your miniature tree and stick it into the center of the moss.
- Set Up the Graves: Arrange the tombstones and the skeleton figure in the moss.
- Add the Ghosts: Place the little ghosts around the scene, maybe hiding behind a tombstone.
- Light the Scene: Carefully weave the fairy light string throughout your graveyard. Hide the wire under the moss and wrap it around the tree. Leave the battery pack outside the jar so you can turn it on and off.
29. Cheerful Scarecrow Treat Jar

This friendly scarecrow jar brings the charm of the autumn harvest right into your home. It’s a fun and rustic craft that’s more sweet than spooky. Wrapped in burlap with button eyes and a stitched smile, he’s sure to make everyone smile back.
The details make this project special, from the little patchwork nose to the raffia hair peeking out from under his tiny straw hat. This jar is a wonderful way to store and share your favorite fall candies.
DIY Instructions
What You’ll Need:
- A clean glass jar
- A piece of burlap fabric
- A hot glue gun
- Two black buttons
- Small scraps of colored felt for the nose
- Black embroidery floss or a black permanent marker
- Raffia
- A miniature straw hat (from a craft store)
- Scissors
Step-by-Step Guide:
- Clean the Jar: Make sure your jar is clean and dry.
- Wrap it in Burlap: Cut a piece of burlap that is tall enough to cover the jar and long enough to wrap all the way around. Use the hot glue gun to secure it in place.
- Give Him Eyes: Glue the two black buttons onto the burlap for eyes.
- Add a Nose: Cut a small square from the felt. You can cut tiny squares of another color and glue them on top to make it look like a patch. Glue the nose in place.
- Create a Smile: Use the black marker to draw a simple, curved smile with little stitch marks across it. Or, for a more 3D look, use black embroidery floss and glue it on in the shape of a stitched smile.
- Add the Hair: Glue bunches of raffia around the top rim of the jar to look like straw hair.
- Put on His Hat: Put a generous amount of hot glue on the jar’s lid and press the miniature straw hat firmly on top. You can tie a small raffia bow around the base of the hat for extra decoration.
30. Etched Ghost Glassware

Add a touch of subtle spookiness to your Halloween party with this elegant etched glassware. A friendly, frosted ghost seems to magically appear on the side of this stemless wine glass. It’s a permanent design that won’t wash off, making it a classy and durable decoration.
This technique uses a special cream to gently etch the glass, creating a beautiful and professional-looking result. You can make a whole set of these for your guests to use, or give them as a unique, handmade party favor.
DIY Instructions
What You’ll Need:
- A clean glass cup or wine glass
- Glass etching cream (like Armour Etch)
- A vinyl ghost-shaped sticker or stencil
- A small paintbrush
- Protective gloves and eyewear
Step-by-Step Guide:
- Clean Your Glass: Wash and dry the glass completely. Make sure there are no fingerprints where you plan to put the stencil.
- Apply the Stencil: Carefully peel your vinyl ghost sticker and press it firmly onto the glass. Make sure there are no air bubbles, especially around the edges of the ghost shape.
- Get Your Safety Gear: This part is for a grown-up only. Put on protective gloves and eyewear because the etching cream is a chemical.
- Apply the Cream: Use the paintbrush to apply a thick, even layer of the etching cream over the stencil. Cover the entire ghost shape completely.
- Wait: Let the cream sit for the amount of time recommended in the product’s instructions. It’s usually about 5-10 minutes.
- Rinse It Off: While still wearing gloves, rinse the glass under warm water until all of the cream is washed away.
- Reveal the Ghost: Peel off the vinyl stencil. You will see a permanent, frosted ghost etched into the glass where the stencil was. Wash the glass one more time with soap and water.
31. Celestial Night Sky Lantern

Capture the magic of a clear midnight sky in a jar. This beautiful lantern uses a deep blue glass jar as a canvas for golden constellations, stars, and crescent moons. It’s an enchanting piece that feels both mystical and elegant, perfect for a fortune teller’s caravan or a wizard’s study.
When you place an LED candle inside, the jar glows from within, illuminating the celestial patterns like stars in the night. It’s a simple project that turns a plain jar into a magical piece of decor you can enjoy long after Halloween is over.
DIY Instructions
What You’ll Need:
- A dark blue or purple glass jar
- A gold metallic paint pen with a fine tip
- Optional: Celestial-themed stencils (moons, stars)
- An LED tea light candle
Step-by-Step Guide:
- Clean Your Cosmos: Start with a clean, dry jar. Make sure there are no fingerprints on the outside.
- Plan Your Universe: Decide where you want your biggest designs to go, like the crescent moons. If you’re using stencils, place them firmly on the glass.
- Draw the Moons and Stars: Using your gold paint pen, carefully draw your designs. Trace your stencils or draw freehand. Add lots of little stars and dots to fill in the space.
- Connect the Stars: To make constellations, draw little stars and then connect them with thin, dotted lines. You can make up your own patterns or look up real ones like the Big Dipper.
- Let it Dry: Let the gold paint pen dry completely according to its instructions. Be careful not to smudge your beautiful night sky.
- Add the Glow: Place an LED candle inside your finished jar, turn it on, and watch your constellations shine.
32. Carnivorous Plant Terrarium

This decoration is a hilarious and slightly morbid little scene. Under a glass dome, two skeletons are just relaxing, seemingly unaware that they are lounging next to a hungry Venus flytrap. A tiny sign that reads “FEED ME!” completes this “Little Shop of Horrors” inspired display.
It’s a living piece of decor that is sure to get a laugh from your guests. The layers of sand and moss create a realistic home for the carnivorous plant, making the little skeletons’ predicament even funnier.
DIY Instructions
What You’ll Need:
- A glass cloche (bell jar with a base) or a large jar
- Small pebbles for drainage
- Activated charcoal (from a pet store)
- Layers of sand and soil suitable for carnivorous plants
- A live Venus flytrap plant
- Two miniature plastic skeletons
- A small stick, paper, and a marker for the sign
Step-by-Step Guide:
- Build the Base: On the base of your cloche, create layers. Start with a thin layer of pebbles, then a very thin layer of charcoal, then your sand and soil.
- Plant the Star: Carefully remove the Venus flytrap from its container and plant it in the center of your soil.
- Landscape the Scene: You can add some craft moss around the base of the plant to make it look nice.
- Add the Skeletons: Position your two miniature skeletons so they look like they are lounging in the soil next to the plant.
- Make the Sign: Write “FEED ME!” on a tiny piece of paper and glue it to the top of the small stick.
- Place the Sign: Stick the sign into the soil near the plant.
- Cover and Display: Carefully place the glass dome over the entire scene. Remember, this is a real plant, so it will need some sunlight and distilled water to stay alive!
33. Jack-o’-Lantern Jars & Bottles

You can’t have Halloween without a classic jack-o’-lantern. This craft takes the spirit of pumpkin carving and applies it to everyday glass jars and bottles. Painted a cheerful, bright orange, these containers become the perfect canvas for spooky, silly, or happy pumpkin faces.
This is a very easy and versatile idea. You can make a whole pumpkin patch of different shapes and sizes. Use a round jar for a classic pumpkin and a tall bottle for a fun, stacked totem of jack-o’-lanterns. They make great candy holders or festive vases.
DIY Instructions
What You’ll Need:
- A clean glass jar and/or bottle
- Orange craft paint (acrylic spray paint or brush-on)
- A black permanent marker or black vinyl sticker paper
- Scissors
- A pencil
Step-by-Step Guide:
- Clean Your Glass: Wash and dry your jar and bottle, making sure any labels are removed.
- Paint it Orange: With a grown-up’s help, paint the outside of the glass with the orange paint. Spray paint gives a smooth finish, but brushing works too. You might need two coats. Let it dry completely.
- Design the Face: Decide what kind of face you want. For the bottle, you can draw a stack of three different faces.
- Create the Face: If using a marker, simply draw the triangle eyes, nose, and spooky mouth directly onto the painted glass. If using vinyl, draw the shapes on the back of the vinyl paper, cut them out, peel the backing, and stick them on.
- Let it Dry: If you used a marker, make sure it’s fully dry so it doesn’t smudge.
- Fill with Fun: Your jack-o’-lantern containers are now ready to be filled with candy or used as decorations around your home.
34. Charred Bark Vase

This vase looks like it was pulled from the embers of a forest fire. The bottom half is covered in a thick, rugged texture that looks exactly like burnt and weathered tree bark. The contrast between the sleek, matte black top and the rough, gray bottom creates a powerful and dramatic effect.
It’s a unique piece that feels both rustic and modern. This is a decoration for someone who loves dark, nature-inspired design. Fill it with pale, dry branches or white cotton stems to complete the stark, beautiful look.
DIY Instructions
What You’ll Need:
- A glass or ceramic vase
- Matte black spray paint
- A hot glue gun with many extra glue sticks
- Gray and white acrylic craft paint
- A paintbrush
Step-by-Step Guide:
- Clean and Paint: Start with a clean, dry vase. With a grown-up’s help, give the whole thing an even coat of matte black spray paint. Let it dry.
- Build the Texture: This part uses a lot of glue! Using the hot glue gun, start making long, vertical lines of glue on the bottom half of the vase.
- Create the Bark: Continue adding vertical lines of glue right next to each other. Overlap them and make them bumpy and uneven, just like real tree bark. Create a jagged, uneven edge where the texture stops. Let the glue cool completely.
- Paint the Bark: Once the glue is hard, use your paintbrush to cover all the glue texture with gray paint. Make sure to get into all the little cracks.
- Add Highlights: Before the gray paint dries, dip the tip of your brush in a little white paint. Dab most of it off on a paper towel. Lightly brush over the high points of the bark texture. This is called “dry brushing” and it will make the texture pop.
- Let it Cure: Let all the paint dry completely before displaying your dramatic new vase.
35. Enchanted Mushroom Grotto Vase

This vase is a breathtaking piece of art that looks like it grew in a magical forest. A simple glass jar is completely transformed into a wooden grotto, covered in a stunning array of colorful, intricately detailed mushrooms. Moss and twisting roots complete the enchanting scene.
This is a project for someone who loves fantasy and creating detailed worlds. It’s a true showstopper that combines sculpture and painting to create a one-of-a-kind vase. It’s a decoration that tells a story of fairies, gnomes, and hidden, magical places.
DIY Instructions
What You’ll Need:
- A glass jar or vase
- Air-dry clay or polymer clay
- Clay sculpting tools or a craft knife
- A hot glue gun or strong craft glue
- Acrylic paints in various colors (browns, reds, oranges, yellows, white)
- Paintbrushes of various sizes
- Craft moss
Step-by-Step Guide:
- Form the Base: Cover parts of your clean jar with a thin layer of clay to create a tree-trunk texture. You can leave an opening to see into the “grotto.”
- Sculpt the Mushrooms: This is the most creative part! Use your clay to sculpt mushrooms in all shapes and sizes. For the capped mushrooms, make a stem and a separate cap. Use your tools to carve lines on the underside of the caps.
- Attach the Mushrooms: If using air-dry clay, you can stick the mushrooms on with a bit of water or glue. If using polymer clay, you will bake them separately and glue them on later. Arrange them in clusters, growing up the side of the vase.
- Add Roots: Roll out thin “snakes” of clay and arrange them around the base to look like roots.
- Dry or Bake: Let the air-dry clay dry completely (this may take a day or two). If using polymer clay, have a grown-up help you bake the pieces according to the package directions, then glue them onto the vase.
- Paint Your Masterpiece: Carefully paint the tree trunk, roots, and all your mushrooms. Use different colors and add fine details to make them look realistic.
- Add Moss: Use a hot glue gun to tuck small bits of craft moss in the spaces between the mushrooms to complete the forest look.
And there you have it—35 ways to transform humble glass into hauntingly beautiful works of art. From the simplest glowing ghost to the most intricate enchanted mushroom grotto, these projects show that you don’t need a big budget to make a big impact on your Halloween decor.
Crafting your own decorations adds a personal and creative touch that you just can’t buy in a store. It’s a chance to get your hands a little messy and bring your unique vision of Halloween to life, whether it’s spooky, silly, or sophisticated.
So grab your glue gun, pick out your paints, and choose your favorite project. We hope these ideas have inspired you to look at every empty jar and bottle as an opportunity for some creative magic.
Happy crafting, and happy haunting!
Key Takeaways
- Upcycle with Purpose: Everyday items like mason jars, wine bottles, and old vases are the perfect, budget-friendly starting point for stunning Halloween decorations.
- A Style for Every Spook: This collection covers a wide range of themes, from gruesome and scary (Specimen Jars, Zombie Containers) to cute and charming (Scarecrow Jar, Ghost Lantern) and elegantly gothic (Lace Luminary, Skeleton Hands Vase).
- Simple Supplies, Big Impact: Most of these projects use common and inexpensive craft supplies like acrylic paint, hot glue, clay, and paper, proving you don’t need fancy materials to create something amazing.
- Creativity is King: Each set of instructions is just a starting point. Feel free to change the colors, add different embellishments, and personalize these crafts to perfectly match your own spooky style.