The air grows crisp. The nights get longer. Halloween is creeping up on us, and with it comes the chance to transform your home into a realm of spooky delight. A truly memorable yard is what separates a good Halloween house from a legendary one.

Store-bought decorations have their place. But they can be costly, and everyone on the block might have the same thing. The real magic comes from creating something yourself. It is the personal touches, the clever ideas, and the work of your own hands that create the most impressive scares.
This guide is here to help you unleash your inner mad scientist. We have gathered 39 unique and terrifying DIY prop ideas for your yard. Each one comes with simple, step-by-step instructions designed to make the building process easy and fun. Get ready to make your yard the talk of the neighborhood.
1. Ghoulish Gnomes

Forget the cheerful garden gnomes you know. This menacing crew has been transformed into a terrifying horde of horror movie villains and monsters. Lined up along a garden path, these once-friendly statues now sport bloody beards, glowing evil eyes, and the terrifying masks of classic slashers. One has even become a spooky ghost.
This is a brilliant way to subvert a common garden decoration. It’s a project that allows for a lot of creativity, as you can turn each gnome into a different, recognizable horror icon. They are a great way to add a lot of scary details to your yard that visitors will notice as they get closer.
DIY Instructions: How to Make Ghoulish Gnomes
Giving your garden gnomes a spooky makeover is a fun and easy painting project.
What You’ll Need:
- Several classic garden gnomes (plastic or ceramic)
- Acrylic craft paints (including red, black, white, and glow-in-the-dark green/yellow)
- Paintbrushes of various sizes
- A clear sealant spray (for outdoor protection)
- Small plastic accessories (like tiny knives or masks, optional)
Step-by-Step Guide:
Step 1: Clean Your Gnomes First, make sure your gnomes are clean and dry so the paint will stick properly.
Step 2: Paint the Base Colors Paint over the gnome’s original bright colors with more sinister ones. For example, you can paint a red coat and a black hat for a vampire gnome, or a blue jumpsuit for a slasher gnome.
Step 3: Add the Scary Details This is the fun part. Use a small paintbrush to add the horror details. Paint bloody drips coming from their mouths. For glowing eyes, use the glow-in-the-dark paint. You can even paint a scary mask onto one of their faces. For a ghost gnome, simply paint the entire figure white and add two black ovals for eyes.
Step 4: Seal Your Work Once the paint is completely dry, spray the gnomes with a clear sealant. This will protect them from rain and keep them looking spooky all season.
2. Gargoyle Guarded Pillars

Welcome, foolish mortals. These two imposing pillars look like they were taken straight from a haunted mansion’s gate. Topped with snarling gargoyles with glowing red eyes, these weathered stone columns are the perfect way to create a grand and spooky entrance to your home or yard haunt.
The cracked and aged look of the stone gives them a sense of ancient evil. This is a great prop for setting a creepy tone right from the start. They are tall enough to be intimidating and create a fantastic photo opportunity for your guests.
DIY Instructions: How to Build Gargoyle Pillars
You can build these impressive pillars using cardboard boxes and some clever painting.
What You’ll Need:
- Two tall, rectangular cardboard boxes of the same size
- A can of stone-textured spray paint
- Black and grey craft paint
- A sponge
- Two plastic gargoyles
- Red, battery-powered LED lights
- A hot glue gun or strong construction adhesive
Step-by-Step Guide:
Step 1: Build the Pillar Structure Start by taping your cardboard boxes shut so they are sturdy. If you want to add the smaller, inset gargoyles, you can glue a smaller box onto the front of the main pillar.
Step 2: Give it a Stone Texture In a well-ventilated area, spray the entire surface of your boxes with the stone-textured spray paint. This will give it a rough, rock-like look and feel.
Step 3: Add Age and Detail Once the spray paint is dry, use a sponge to dab on some black and grey paint. This will create the look of weathered, old stone. You can also use a fine brush to paint black cracks onto the pillars.
Step 4: Prepare the Gargoyles For the glowing eyes, carefully drill a small hole in each eye socket of your plastic gargoyles. Push a small red LED light through each hole from the back.
Step 5: Mount the Guardians Use a generous amount of hot glue or construction adhesive to attach your finished gargoyles to the top of the pillars. Place your completed pillars on either side of your walkway to welcome your guests with a scary stare.
3. Skeleton Flamingos

Even the kitschy lawn flamingos are not safe from the zombie apocalypse. This hilarious and creepy prop takes the classic pink flamingo and turns it into a flock of undead birds. Some have been reduced to skeletons, while others are decaying zombies with exposed bones and a hunger for brains.
This is a fantastic and witty idea that is sure to make people laugh and shudder at the same time. The little details, like the one with a skull for a head and a tiny top hat, give the flock a lot of personality. It’s an easy way to fill a large part of your yard with a unique and memorable decoration.
DIY Instructions: How to Make Skeleton Flamingos
You can create your own flock of the undead with some plastic flamingos and paint.
What You’ll Need:
- A flock of plastic pink lawn flamingos
- White and black acrylic paint
- Paintbrushes
- A clear sealant spray
- Optional: A plastic skull that fits over a flamingo head
Step-by-Step Guide:
Step 1: Clean the Flamingos Make sure your plastic flamingos are clean and dry before you start painting.
Step 2: Paint a Bony Base Coat First, paint the entire flamingo white. This will cover up the pink and give you a blank canvas to work with.
Step 3: Add the Skeleton Details Using a picture of a bird skeleton as a guide, use your black paint and a fine-tipped brush to paint bones onto the white flamingo. You can paint a ribcage on the body, bones on the wings, and a skull on the head. Don’t worry about being perfectly accurate; just the suggestion of a skeleton will look great.
Step 4: The Finishing Touches For an extra touch, you can try to find a small plastic skull that can fit over one of the flamingo’s heads to create the leader of the flock.
Step 5: Protect Your Flock Once all the paint is dry, spray your finished flamingos with a clear sealant to protect them from the weather. Then, plant your undead flock all over your front lawn.
4. Spooky Hatching Eggs

Something wicked is hatching in this nest. A cluster of large, cracked eggs sits in a spooky nest of Spanish moss and twigs. But instead of birds, tiny skeletons, ghosts, and spiders are emerging from the broken shells. The flickering candlelight from within the eggs makes it seem like some dark magic is at play.
This is a wonderfully creative and self-contained prop. It tells a complete, creepy story in a small space. It’s a great centerpiece for a porch or a special spot in your yard. The variety of creatures hatching from the eggs keeps it interesting and gives you a lot to look at.
DIY Instructions: How to Hatch Some Horrors
You can make these spooky eggs using large plastic or foam eggs from a craft store.
What You’ll Need:
- Large, paintable craft eggs (plastic or foam)
- Black and white craft paint
- A craft knife
- A bag of small spooky toys (tiny skeletons, ghosts, spiders, snakes)
- A hot glue gun
- Battery-powered LED tea lights
- A grapevine wreath for the nest
- Fake Spanish moss
Step-by-Step Guide:
Step 1: Paint the Eggs First, paint your craft eggs. You can paint some solid black and others white. Let them dry completely.
Step 2: Crack the Eggs Ask a grown-up to help you use the craft knife to carefully cut a jagged, cracked opening in the top of each egg.
Step 3: Add the Creatures This is where you get creative. Use your hot glue gun to attach a tiny skeleton so it looks like it’s climbing out of an egg. In another, you can glue a few tiny ghosts. Fill another with spiders.
Step 4: Make Them Glow Place an LED tea light inside each egg. The flickering light will shine through the cracks and illuminate the spooky creature inside.
Step 5: Build the Nest Place your grapevine wreath on the ground and fill it with the fake Spanish moss. Arrange your finished, glowing eggs inside the nest to create your creepy hatchery.
5. Menacing Monster Mailbox

Getting the mail has never been so dangerous. This hilarious and creative prop turns an ordinary mailbox into a furry, sharp-toothed monster that seems to be eating your letters. With its giant googly eyes, ferocious teeth, and long red tongue, this monster is sure to surprise your mail carrier and any trick-or-treaters.
The details are what make this prop so great. The furry monster arms with skeleton hands, the single flickering light inside its mouth, and the desperate “HELP ME!” note make for a very funny and memorable scene. It’s a fantastic way to add some Halloween spirit to an often-overlooked part of your yard.
DIY Instructions: How to Make a Monster Mailbox
You can give your mailbox a monstrous makeover with some cardboard and craft supplies.
What You’ll Need:
- A large cardboard box that can fit over your mailbox
- Brown craft paint
- Grey fun fur fabric
- Sheets of white and red craft foam
- Two large styrofoam balls for the eyes
- A hot glue gun
- A battery-powered red light
- Two plastic skeleton arms
Step-by-Step Guide:
Step 1: Build the Monster’s Body Cut your cardboard box so that it can slide over your mailbox. Cut out a large, gaping mouth where the mailbox door is, so you can still get your mail. Paint the whole box brown.
Step 2: Add the Fur and Teeth Cut the grey fun fur to create some shaggy hair for the top of the monster’s head and two long arms. Glue these pieces onto the box. Next, cut two strips of white foam into a zig-zag pattern to create the sharp teeth. Glue them along the inside of the mouth opening.
Step 3: Create the Face Paint some scary eyes onto the styrofoam balls and glue them to the top of the box. Cut a long, floppy tongue shape out of the red foam and glue it so it hangs out of the monster’s mouth.
Step 4: The Final Touches You can place a small, flickering red light inside the monster’s mouth for a spooky glow. For the arms, glue the plastic skeleton hands to the end of the fun fur strips. Now your mailbox is ready to take a bite out of Halloween.
6. Creepy Jack-in-the-Box

This is one toy you don’t want to play with. A terrifying, demonic clown bursts from a weathered, ancient-looking box, its evil grin promising nightmares instead of laughter. The rustic, hand-cranked design makes it feel like a cursed antique. A creepy, skeletal hand also emerging from the box adds to the terror, suggesting another monster is trapped inside.
This is a fantastic prop that plays on the common fear of clowns and creepy old toys. The aged look of the wood and the intricate, dark patterns on the box make it look authentic and genuinely unsettling. It’s a great “jump scare” prop that can be hidden in a dark corner to surprise your guests.
DIY Instructions: How to Make a Creepy Jack-in-the-Box
You can build your own cursed toy box using a simple cardboard box.
What You’ll Need:
- A medium-sized cardboard box with flaps on top
- Wood-grain contact paper or brown paint
- A scary clown mask
- A large metal spring or a Slinky
- A small plastic skeleton hand
- A hot glue gun
- Black craft paint for details
Step-by-Step Guide:
Step 1: Create the Antique Box Cover the outside of your cardboard box with the wood-grain contact paper. If you don’t have contact paper, you can paint the box brown and use a sponge with some black paint to create a wood texture.
Step 2: Prepare the Monster Stuff the clown mask with newspaper or plastic bags so it holds its shape. Use your hot glue gun to attach the bottom of the mask to one end of the large spring.
Step 3: Install the Jack Glue the other end of the spring to the inside bottom of the box. When you close the lid, the clown should squish down, and when you open it, he should pop up.
Step 4: Add the Creepy Details You can use black paint to add some spooky drawings or symbols to the outside of the box. To add the second monster, make a small hole in the side of the box and push the plastic skeleton hand through from the inside, securing it with glue.
Step 5: The Grand Reveal Position your finished Jack-in-the-Box with the lid slightly open, so the clown is peeking out, ready to scare anyone who gets too close.
7. Haunted Television Set

Don’t touch that dial. An old, retro television set flickers to life on a dark porch, but the show it’s playing is a horror movie. A ghostly face appears on the screen, her mouth open in a silent scream as the words “HELP ME” flash below. This is a brilliant and unsettling prop that feels like a scene straight out of “The Poltergeist” or “The Ring.”
What makes this so effective is the combination of old technology with modern scares. It’s a very clever way to use a tablet to create a dynamic and scary prop. The static on the screen and the ghostly image are much more frightening than a static picture.
DIY Instructions: How to Make a Haunted TV
You can create this high-tech scare using an old TV and a tablet.
What You’ll Need:
- An old, non-working television (the older and more retro, the better)
- A tablet
- A spooky video clip
- Black cardboard or foam board
- A screwdriver
Step-by-Step Guide:
Step 1: Prepare the TV First, you need to gut the old television. Warning: Old TVs can hold a dangerous electrical charge even when unplugged. Ask a grown-up who knows about electronics to do this part safely. The goal is to remove all the old electronics from the inside, leaving you with a hollow shell and the glass screen in place.
Step 2: Find Your Spooky Video You need a short, spooky video clip to play on a loop. You can search on websites like YouTube for “scary face video loop” or “ghostly static screen.” Find one you like and save it to your tablet.
Step 3: Mount the Tablet Place your tablet inside the hollow TV shell, right behind the glass screen. You will need to build a small shelf or support system out of the black cardboard to hold the tablet in the correct position. Make sure the tablet’s screen is centered.
Step 4: Set the Scene Put your finished haunted TV in a dark corner. Start playing the spooky video on your tablet, making sure it is set to loop continuously. The glow from the tablet will be the only thing visible, creating a very convincing and scary illusion.
8. Floating Ghosts in the Mist

A gathering of spirits has appeared on your lawn. These classic, sheet-style ghosts are more creepy than cute, with their silent, screaming mouths and wispy, wire-frame hands. Lit from below with an eerie blue light and surrounded by a thick fog, they seem to be floating just above the ground, ready to haunt anyone who passes by.
This is a great example of how to make a classic Halloween decoration truly scary. The addition of the fog and the dramatic lighting elevates them from simple decorations to an atmospheric and frightening scene. The disembodied hands reaching up from the ground are a fantastic touch that adds to the terror.
DIY Instructions: How to Make Floating Ghosts
These spooky spirits are easy to make with some styrofoam and fabric.
What You’ll Need:
- Large styrofoam balls for the heads
- White sheets or fabric
- A black permanent marker
- Thin, bendable wire for the hands
- Wooden dowels or garden stakes
- A hot glue gun
- Optional: Blue or green solar-powered spotlights
Step-by-Step Guide:
Step 1: Create the Ghost’s Frame First, push the wooden stake firmly into the bottom of the styrofoam ball. This will be the “spine” of your ghost.
Step 2: Drape the Sheet Drape a white sheet over the styrofoam head. Let it hang down naturally. You can use scissors to cut and shred the bottom of the sheet to make it look old and tattered.
Step 3: Add the Face and Hands Use your black marker to draw two ovals for eyes and a larger, screaming oval for the mouth. To make the hands, bend the wire into a spooky, claw-like shape. You can then poke the wire hands through the sheet on either side of the body.
Step 4: Plant Your Ghosts Push the bottom of the wooden stakes firmly into your lawn. You can make a whole group of them and have them facing different directions.
Step 5: Light the Scene For the full effect, place a blue or green spotlight on the ground in front of each ghost, aimed up at its face. This will make them glow in the dark and look like they are really floating.
9. Swamp Monster from the Black Lagoon

Something ancient and angry is emerging from the murky depths. A horrifying swamp monster, with scaly skin, sharp claws, and glowing red eyes, rises from a small pond in your yard. Surrounded by fog and lit with a sickly green light, this creature looks like it just stepped out of a classic monster movie.
This is a fantastic prop for anyone who wants to create a big, cinematic scare. The “pond” made from a black tarp is a clever way to create a water effect without a real water feature. The monster’s dynamic pose, with its arms reaching out, makes it feel threatening and alive.
DIY Instructions: How to Make a Swamp Monster
You can create your own creature from the black lagoon with a mask and some clever staging.
What You’ll Need:
- A scary monster mask with matching monster hands
- A black plastic tarp
- A small fog machine
- A green, waterproof LED light
- Some rocks and fake plants
- Two wooden stakes
Step-by-Step Guide:
Step 1: Create the “Pond” First, choose a spot in your yard. You can dig a very shallow depression in the ground, or simply lay the black tarp flat on the grass. Bunch up the edges and use rocks to hold them in place, creating a small, pond-like shape.
Step 2: Position the Monster You only need the top half of the monster for this illusion. Attach the monster mask to the top of one of your wooden stakes. Then, attach the two monster hands to their own stakes. Push the three stakes into the ground in the middle of your tarp “pond.” Arrange them so it looks like the head and hands are all part of one creature rising from the water.
Step 3: Add the Spooky Effects Place the green, waterproof LED light in the center of the pond, right in front of the monster’s face. Place the nozzle of your fog machine so that the fog rolls out across the surface of the “water.”
Step 4: The Finishing Touches Arrange more rocks and some fake swampy plants around the edge of your pond to hide the edges of the tarp and make it look more realistic. Your swamp monster is now ready to terrorize the neighborhood.
10. Sewer Dwelling Clown

You’ll float, too. This terrifying prop brings a classic scene from Stephen King’s “IT” to life in your front yard. A creepy clown with a horrifying grin and glowing red eyes peeks out from a sewer grate, holding a single red balloon and offering candy to anyone brave enough to get close.
This is a fantastic prop because it plays on a well-known and truly scary story. The invitation to “COME PLAY WITH ME” is both tempting and terrifying. It’s a great way to create a scary scene that is low to the ground and will surprise people who aren’t looking down.
DIY Instructions: How to Make a Sewer Clown
You can create this iconic horror scene with a mask and a few simple items.
What You’ll Need:
- A scary clown mask
- A round, plastic laundry basket
- A can of silver or grey spray paint
- Black craft paint
- A red balloon and a stick
- A small, battery-powered red light
- Some candy
Step-by-Step Guide:
Step 1: Create the Sewer Grate Take your round plastic laundry basket and turn it upside down. The pattern of the holes already looks a lot like a sewer grate. In a well-ventilated area, spray paint the entire basket with the silver paint. Once it’s dry, you can use a sponge with some black paint to make it look old and dirty.
Step 2: Prepare the Clown For the glowing eyes, you can place the small red light inside the clown mask. Or, you can cut out the mask’s eyes and tape some red cellophane over the holes.
Step 3: Set the Scene In your yard, you will need to hide the clown’s head. You can place the mask in a shallow hole, or build up some mulch or dirt around it so only the top of the head is visible.
Step 4: The Finishing Touches Place your finished sewer grate over the clown’s head. Tie the red balloon to the stick and wedge it under the grate so the balloon is floating above. Finally, scatter some candy around the grate to lure in your unsuspecting victims.
11. Cursed Fairy Ring

Be careful where you step. This circle of mushrooms may look like an enchanted fairy ring, but it holds a dark secret. A handmade sign gives a clear warning: “DO NOT STEP INSIDE THE CIRCLE.” Inside, the skeletal remains of tiny fairies and dragonflies show the grim fate of those who ignore the warning.
This prop is a wonderfully creepy twist on folklore. The colorful lights mixed among the mushrooms create a magical but menacing glow. It’s a clever setup that tells a story and makes your guests think twice before getting too close.
DIY Instructions: How to Create a Cursed Fairy Ring
Building this spooky circle is a great way to add some dark fantasy to your yard.
What You’ll Need:
- A variety of plastic or ceramic garden mushrooms
- Several small, plastic skeletons (like those sold in bags for decoration)
- Small, plastic dragonfly or insect toys
- Craft glue
- A small wooden plank or sturdy piece of cardboard
- A black permanent marker
- A wooden stake
- Colorful, battery-powered string lights
Step-by-Step Guide:
Step 1: Create the Fairy Skeletons If you can find tiny fairy wings at a craft store, glue them to the backs of your small plastic skeletons. If not, the skeletons on their own are still very creepy. You can also glue wings onto the dragonfly toys.
Step 2: Arrange the Circle In a spot on your lawn, arrange the mushrooms in a large circle. Mix the different sizes and shapes to make it look like it grew naturally.
Step 3: Set the Scene Place your fairy skeletons and dragonflies inside the mushroom circle. Pose them in different ways—some lying down, some sitting against a mushroom.
Step 4: Add the Lights Weave the colorful string lights in and around the mushrooms and skeletons. This will make the circle glow with a mysterious light when it gets dark.
Step 5: Make the Warning Sign Use the black marker to write “DO NOT STEP INSIDE THE CIRCLE” on your wooden plank. Glue or nail the plank to the top of the wooden stake. Push the stake into the ground just outside your mushroom ring.
12. Soul Collector Ghoul

This is no ordinary ghost. Hanging from a tree branch, this eerie figure seems to be something much older and more sinister. Its form is made from wire mesh, giving it a see-through, ghostly appearance. A strange, expressionless mask serves as its face, while it holds the head of another, smiling spirit in its hand.
This prop feels like a creature from a dark legend, a collector of lost souls. The tattered fabric and the creepy second head make it a truly unique and unsettling decoration. Lit from below with a colored light, it will cast a terrifying shadow.
DIY Instructions: How to Make a Soul Collector Ghoul
This amazing ghost is built around a simple wire frame.
What You’ll Need:
- A roll of chicken wire
- A plain white mask
- A small styrofoam ball
- White, gauzy fabric like cheesecloth
- A black permanent marker
- Wire cutters and gloves
- A hot glue gun
- Fishing line or strong string
Step-by-Step Guide:
Step 1: Shape the Body Ask a grown-up to help you with this part. Wearing gloves, carefully cut a large piece of chicken wire. Gently bend and shape the wire to create a ghostly, human-like upper body with a head area and two arms.
Step 2: Attach the Face Use the hot glue gun to attach the plain white mask to the head area of your wire frame.
Step 3: Drape the Fabric Drape the cheesecloth over the wire frame. Let it hang down and tear the edges to make it look old and ragged. Use a few dabs of hot glue to keep the fabric in place.
Step 4: Create the Second Head Use the black marker to draw a simple, smiling face on the styrofoam ball. Cut a small piece of cheesecloth, drape it over the ball, and tie it at the “neck” with a piece of string. Use hot glue to attach this smaller head to one of the ghoul’s wire hands.
Step 5: Hang Your Ghoul Tie a long piece of fishing line to the top of the ghoul’s head. Hang it from a sturdy tree branch so it floats in the air. You can aim a green or blue spotlight up at it for an extra spooky effect.
13. Boneyard Break-In

Something spooky is trying to get in. An entire crew of skeletons has assembled a gruesome ladder out of their own bones to climb up to a second-story window. Inside, a mysterious blue phantom with glowing eyes waits for them. This prop tells a fantastic, creepy story that will capture everyone’s imagination.
The detail of using skulls as the ladder’s feet and lashing the bones together with rope makes it look authentic. It’s a dynamic scene that uses the vertical space of your house. This is a great way to create a large-scale decoration that is both scary and a little bit funny.
DIY Instructions: How to Build a Skeleton Ladder
Assembling your own skeleton crew is a fun way to create a big impact.
What You’ll Need:
- At least 4-5 full-size plastic skeletons
- Strong, thick rope or twine
- A hot glue gun or super glue
- A spooky window cling or a blue light and a cutout for the phantom
Step-by-Step Guide:
Step 1: Prepare the Skeletons Most plastic skeletons can be taken apart. Separate the arm and leg bones. You will use these long bones for the sides and rungs of your ladder. Keep the skulls and ribcages for later.
Step 2: Build the Ladder Frame Lay out two long leg bones on the ground to be the sides of your ladder. Place other long bones across them to be the rungs. Plan out how you will tie them together.
Step 3: Lash it Together Use your rope to tightly tie the bones together at each joint. Wrap the rope around several times and tie a strong knot. For extra strength, ask a grown-up to add a dab of hot glue or super glue to the knots.
Step 4: Add the Details You can glue extra skulls onto the ladder for a creepier look. You can also reassemble one of the skeletons and pose it so it looks like it is climbing the ladder you just built.
Step 5: Set Up the Scene Carefully lean your finished ladder against the side of your house, below a window. For the phantom inside, you can stick a spooky window cling on the glass. Or, you can cut a scary shape out of cardboard, tape it to the inside of the window, and shine a blue light behind it.
14. Zombie Beekeeper and his Swarm

The buzz in the air isn’t a friendly one. This terrifying scene features a zombie beekeeper who has been overtaken by his own hive of giant, killer bees. Dressed in a stained and torn beekeeper suit, the undead keeper stands lifelessly among his buzzing minions. Skulls mixed in with the beehives show they’ve had other victims.
This is an incredibly detailed and creative prop that combines horror with the natural world. The giant bees, some dripping with honey and others with tiny skulls, are the stuff of nightmares. It’s a truly unique idea that is sure to have people talking.
DIY Instructions: How to Create a Zombie Beekeeper Scene
You can make a simplified version of this creepy apiary for your own yard.
What You’ll Need:
- A full-body mannequin
- A white disposable painter’s coverall suit
- A beekeeper hat with netting
- A bag of large plastic bees or wasps
- Grey and black face paint
- Brown and red craft paint
- A hot glue gun
- Optional: Round laundry baskets or buckets to make beehives
Step-by-Step Guide:
Step 1: Create the Zombie First, paint the mannequin’s face. Use grey paint as a base, then add black around the eyes and cheekbones to make it look sunken and dead. Let it dry.
Step 2: Dress the Mannequin Put the white coverall suit on the mannequin. Use scissors to cut a few rips and tears in the suit. Splatter some brown paint on it to look like dirt and a little red paint to look like blood. Put the beekeeper hat on its head.
Step 3: Attack of the Bees Use your hot glue gun to attach the giant plastic bees all over the beekeeper’s suit. Put them on the arms, legs, chest, and even on the netting of the hat.
Step 4: Build the Beehives (Optional) If you want to add beehives, you can stack a few round laundry baskets or buckets. You can paint them to look like wood and glue more bees on them.
Step 5: Set the Scene Stand your finished zombie beekeeper in your yard and surround him with your beehives. You can even place a few skulls around to complete the terrifying display.
15. Cannibal Cookout

Dinner is served, but you might want to skip this meal. At first glance, it looks like a friendly neighborhood barbecue, but a closer look reveals the horrifying truth. A smiling mannequin, wearing a “Kiss the Cook” apron, is grilling up skeleton bones, bloody hands, and eyeballs for dinner.
This prop is a masterclass in dark humor. The cheerful setup combined with the gruesome food is what makes it so effective and funny. The chalkboard menu listing “specials” like “lady fingers” and “pickled eyeballs” is a brilliant finishing touch.
DIY Instructions: How to Host a Cannibal Cookout
This shockingly funny scene can be recreated with a mannequin and some spooky props.
What You’ll Need:
- A mannequin
- A button-up shirt, pants, and an apron
- A barbecue grill
- A bag of plastic skeleton parts (ribs, hands, a skull)
- A bag of plastic eyeballs
- Red paint
- A small picnic table or card table
- A red-checkered tablecloth
- A small chalkboard and chalk
Step-by-Step Guide:
Step 1: Dress the Chef First, get your mannequin dressed in the shirt and pants. Put the apron on over the clothes. You can write “Kiss the Cook” on the apron with a fabric marker for that extra funny detail.
Step 2: Prepare the “Food” In a bowl, mix some red paint with a little water to make it look like blood. Drip and splatter it over the plastic skeleton parts and eyeballs. Let them dry.
Step 3: Fire Up the Grill Place the bloody skeleton parts on top of the grill. Put some eyeballs in a pot and place it on the grill’s side burner. You can even place the skull right on the grates.
Step 4: Set the Table Cover your small table with the checkered tablecloth. Set a plate and put some bloody skeleton hands on it, as if it’s a finished meal.
Step 5: Write the Menu On your chalkboard, write a “Menu” with some creepy specials. You could list things like “Spare Ribs,” “Hand Sandwiches,” or “Eyeball Stew.” Prop the menu up near the grill and place your chef behind it, ready to serve his guests.
16. Man-Eating Plant Patch

Don’t wander into this part of the garden. A whole family of hungry, carnivorous plants has sprouted up, and they look ready for a meal. With their giant mouths full of sharp teeth and their glowing red insides, these monsters turn a flowerbed into a feeding ground. The fog and scattered bones at their bases show they haven’t been hungry for long.
This prop is a fantastic and vibrant addition to any Halloween display. The bright colors and cartoonish but creepy design make them stand out, especially at night. They are a fun nod to classic video games and monster movies.
DIY Instructions: How to Grow Your Own Man-Eating Plants
These spooky plants are fun to build using foam craft pumpkins.
What You’ll Need:
- Green and purple craft paint
- Large, hollow foam pumpkins (the kind you can carve)
- Sheets of white craft foam
- A craft knife
- PVC pipes or thick wooden dowels for the stems
- Green craft foam for leaves
- Red, battery-powered lights
- A hot glue gun
- Optional: A fog machine and plastic skulls
Step-by-Step Guide:
Step 1: Create the Plant Head Ask a grown-up to help you use the craft knife to cut a large mouth shape into the side of a foam pumpkin. Don’t cut the piece all the way out; leave it attached at the back like a hinge.
Step 2: Paint Your Plant Paint the outside of the pumpkin green, and the inside of the mouth purple. Let it dry completely.
Step 3: Add the Teeth Cut a long strip of white craft foam. Then, cut a zig-zag pattern along one edge to make a row of sharp teeth. Hot glue the strip of teeth along the inside edge of the plant’s mouth.
Step 4: Build the Stem and Leaves Paint your PVC pipe or dowel green to be the stem. Cut out some leaf shapes from the green craft foam and glue them to the sides of the stem. Firmly push the stem into the bottom of the finished plant head.
Step 5: Plant Your Monster Push the bottom of the stem firmly into the ground. Place a red battery-powered light inside the plant’s mouth to make it glow. Make a few more plants of different sizes to create a whole patch. Add some fog and skulls around the base to complete the look.
17. Alien Crash Site

Something from another world has crash-landed in your yard. This detailed scene shows the wreckage of a flying saucer, half-buried in the ground. Smoke pours out from the damaged hull, and an eerie green light glows from the cockpit. A lone alien survivor stands nearby, perhaps wondering what to do next.
This is an epic prop for any sci-fi fan. The attention to detail, like the broken satellite dishes and old computer parts glued to the ship, makes it look very convincing. The trench in the lawn showing the crash path is a great touch that makes the scene feel real.
DIY Instructions: How to Fake an Alien Crash
You can create your own UFO wreck using some large, common items.
What You’ll Need:
- Two small plastic kiddie pools
- Silver spray paint
- Old electronic parts (keyboards, circuit boards)
- A string of green LED lights
- A small fog machine
- A plastic alien figure
- Strong duct tape or bolts
Step-by-Step Guide:
Step 1: Build the Saucer First, you need to make the classic UFO shape. Place one kiddie pool upside down on top of the other. Use strong duct tape around the rim to hold them together. For a stronger hold, ask a grown-up to help you drill holes and connect them with nuts and bolts.
Step 2: Make it Look Like a Spaceship In a well-ventilated area, spray paint the entire saucer silver. Once it’s dry, you can use hot glue to attach the old electronic parts all over the ship to look like control panels.
Step 3: Add the Damage Ask a grown-up to help you carefully cut some jagged holes in the top of the saucer. You can then line the edges of the holes with more silver duct tape.
Step 4: Light it Up Feed the string of green LED lights into one of the holes so the cockpit area glows. You can also place the fog machine so the nozzle is pointing out of one of the holes, making it look like the ship is smoking.
Step 5: Stage the Crash Place your finished UFO in the yard, tilting it to one side so it looks like it crashed. You can dig a shallow trench in front of it to look like a skid mark. Stand your alien figure nearby, and your alien invasion is ready.
18. Haunted Family Portraits

The spirits of this family never left. In this deeply atmospheric display, old, black-and-white portraits of a mysterious family hang from a tree, swaying gently in the breeze. Floating among the pictures are classic sheet ghosts, their silent forms adding to the chilling scene. The whole area is filled with fog, making it feel like you’ve stepped into another world.
This decoration is all about creating a spooky, old-fashioned mood. It’s not a jump scare, but a slow, creepy feeling that will stick with your visitors. Using fishing line to hang the portraits makes them look like they are floating in mid-air.
DIY Instructions: How to Hang Your Haunted Portraits
This eerie and beautiful display is very simple to put together.
What You’ll Need:
- Several old-looking picture frames of different sizes
- Black-and-white photos
- Clear fishing line
- Small screw-in eyelet hooks
- A tree with a sturdy branch
- Optional: White cheesecloth and a fog machine
Step-by-Step Guide:
Step 1: Find Your Spooky Family You can find creepy, old-fashioned portraits by searching online. Search for “vintage portraits” or “Victorian photos.” Print out several different faces in black and white, and cut them to fit your frames.
Step 2: Frame the Photos Place your printed photos into the picture frames. If your frames aren’t black, you can quickly spray paint them for a more gothic look.
Step 3: Prepare for Hanging Ask a grown-up to help you screw a small eyelet hook into the top center of each picture frame. This is where you will tie the fishing line.
Step 4: Hang the Portraits Cut long pieces of fishing line. Tie one end to an eyelet hook on a frame, and the other end to a tree branch. Hang the portraits at different heights to make the display more interesting. The clear fishing line will be almost invisible at night.
Step 5: Add the Ghosts To add some floating spirits, you can drape pieces of cheesecloth over smaller branches. You can also add a fog machine at the base of the tree to create a thick, spooky mist that will drift through the portraits.
19. Toxic Waste Spill

Danger! This corner of your yard has been contaminated by a terrifying toxic waste spill. Barrels with biohazard and radioactive symbols are overflowing with a bubbling, glowing green slime. An unlucky skeleton, a mutant rat, and other creepy creatures show the deadly effects of the goo.
This is a fantastic prop that glows with an eerie light, making it very effective in the dark. The bright green slime looks seriously spooky under a blacklight. It’s a great way to turn a dark corner into a bright and scary focal point.
DIY Instructions: How to Create a Toxic Spill
You can make your own glowing toxic waste with some simple supplies.
What You’ll Need:
- 2-3 large black buckets or small trash cans
- Orange and black duct tape
- Biohazard and radioactive symbol printouts
- Neon green puffy paint or hot glue and neon green paint
- A black plastic trash bag or tablecloth
- A plastic skeleton and other creepy crawlies (rats, spiders)
- A blacklight
Step-by-Step Guide:
Step 1: Decorate the Barrels Wrap a wide band of orange duct tape around the middle of each black bucket. Print out the biohazard and radioactive symbols, cut them out, and tape them onto the orange band.
Step 2: Make the Slime To make the dripping slime, you can use neon green puffy paint. Squeeze it around the rim of the buckets and let it drip down the sides. Alternatively, you can make drips with a hot glue gun, let them cool, and then paint them with neon green paint.
Step 3: Set Up the Spill Zone Lay the black plastic trash bag on the ground to be your spill area. Arrange the barrels on top of it. You can tilt one of them over.
Step 4: Add the Victims Place your plastic skeleton so it looks like it’s half-melted in the spill. Scatter the mutant rats and other creepy crawlies around the barrels. You can even add some green slime drips to them.
Step 5: Make it Glow The final step is the most important. Place a blacklight so it is shining on your entire display. The neon green paint will glow incredibly brightly, making your toxic spill look dangerously real.
20. Giant Spirit Board

Are you brave enough to play? This massive Ouija board, also known as a spirit board, turns your entire lawn into a game with the other side. The huge board, complete with all the letters, numbers, and classic symbols, is a chilling invitation for ghosts to come and communicate.
The oversized planchette, with the creepy message “RUN RUN RONTBOARY” (a spooky misspelling of “run on board”), adds to the fun. This is a great interactive prop that will make your guests feel like they are part of the haunting. The flickering candles at the corners complete the ritualistic, spooky vibe.
DIY Instructions: How to Make a Giant Spirit Board
This huge prop is surprisingly easy to make with large sheets of wood or cardboard.
What You’ll Need:
- Two or three large sheets of plywood or very sturdy cardboard
- Light brown or tan paint
- Black paint
- Stencils for letters and numbers (or you can draw them)
- A smaller piece of wood for the planchette
- Black duct tape
- Battery-powered LED candles
Step-by-Step Guide:
Step 1: Create the Board Lay your sheets of plywood or cardboard on the ground and tape them together from the back using the black duct tape. This will create one large game board.
Step 2: Paint the Board Paint the entire top surface with the light brown paint to make it look like wood. Let it dry completely.
Step 3: Add the Letters and Numbers This is the most detailed part. Using stencils and black paint, carefully add the letters of the alphabet in an arc at the top. Below them, add the numbers 0 through 9. You’ll also need to add “YES,” “NO,” and “GOODBYE” to the board. Look at a picture of a real Ouija board to get the placement right.
Step 4: Make the Planchette Cut your smaller piece of wood into the classic teardrop planchette shape. Paint it to match the board, and add the same creepy “RUN” message with black paint.
Step 5: Set the Scene Place your finished spirit board in the middle of your lawn. Put the planchette on top of it. Place the battery-powered candles at the corners of the board to give it a spooky glow without any fire hazard.
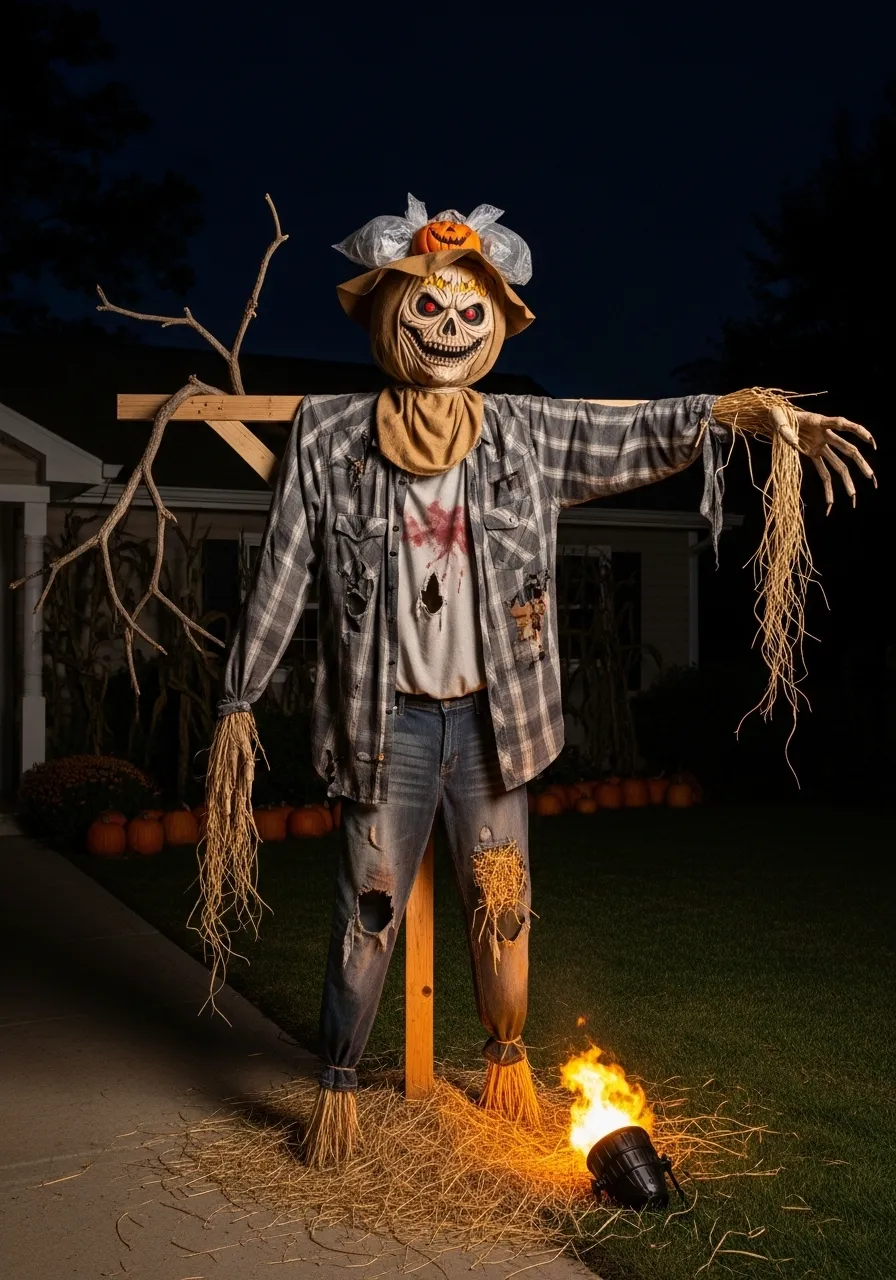
21. Unnerving Scarecrow Army

This is no ordinary farmer’s field. An entire army of scarecrows stands silently in the mist, their stitched smiles looking more menacing than friendly. Dressed in plaid shirts, they all look eerily similar, creating a creepy, uniform legion that seems ready to march at any moment. One scarecrow in the front even holds a wicked-looking scythe.
What makes this display so effective is the sheer number of figures. A single scarecrow can be spooky, but a whole field of them is the stuff of nightmares. The fog rolling across the lawn adds a thick layer of atmosphere, making the scene feel isolated and dangerous.
DIY Instructions: How to Build a Scarecrow Army
Creating your own legion of scarecrows is simple and relies on repetition for its scary effect.
What You’ll Need:
- Several wooden garden stakes or T-posts
- Burlap sacks or fabric for the heads
- Old plaid flannel shirts
- Straw or hay
- A black permanent marker
- Twine or rope
- Safety pins
Step-by-Step Guide:
Step 1: Build the Scarecrow Frame For each scarecrow, you’ll need a “T” shaped frame. You can make this by tying a shorter stick across a taller garden stake with twine. Push the bottom of the tall stake firmly into the ground.
Step 2: Dress Your Scarecrow Put a plaid shirt onto the frame, with the cross-stick going through the arms. Button up the shirt.
Step 3: Stuff the Body Stuff the shirt with plenty of straw or hay to make your scarecrow look full. You can use safety pins to close up the bottom of the shirt and the sleeve cuffs to keep the straw from falling out.
Step 4: Create the Head Stuff a burlap sack with straw until it’s round and firm. Tie it off at the bottom with twine, leaving a little extra burlap at the neck. Use your black marker to draw a simple, stitched face on the sack.
Step 5: Assemble Your Soldier Place the finished head on top of the tall stake, and tie the neck securely to the post. Make as many as you want to build your army. For an extra touch, you can add straw coming out of the sleeves and place some around the base of the post.
22. Lurking Shadow People

You are being watched. From the deep shadows of the porch, several dark, human-like figures stand motionless, their featureless forms blending into the night. Their glowing red eyes are the only thing that gives them away. These “shadow people” are a truly terrifying and subtle prop that preys on our fear of the dark.
This is a great example of “less is more.” The simple, black silhouettes are more frightening than a detailed monster because they let your imagination do the work. The one figure in a fedora hat adds a touch of classic film noir mystery to the creepy gathering.
DIY Instructions: How to Create Shadow People
These spooky figures are easy to make and are very effective in low-light areas.
What You’ll Need:
- Several full-body mannequins or homemade wire frames
- Black, stretchy fabric (like spandex or a zentai suit)
- Small, red LED lights (the kind with a battery pack)
- Thin wire or tape
- Wooden stakes and a stand for each figure
Step-by-Step Guide:
Step 1: Create the Body Form You can use store-bought mannequins for this, or you can make your own. To make your own, ask a grown-up to help you bend and shape strong wire into a simple human outline. Attach this wire frame to a wooden stake with a small base so it can stand up.
Step 2: Cover the Figure Carefully stretch the black fabric over your entire mannequin or wire frame. You want it to be tight and smooth, with no features showing. Secure the fabric at the bottom.
Step 3: Add the Eyes This is the creepiest part. Turn on your small red LED lights. Use thin wire or tape to attach two lights to the head area of your figure, positioned like eyes. The wires can be hidden under the fabric.
Step 4: Position Your Watchers Place your finished shadow people in dark areas of your porch or yard. Tuck them into corners, behind bushes, or just inside a doorway. When night falls, the black figures will disappear, and only their glowing red eyes will be visible.
23. Field of a Thousand Screams

This isn’t your average pumpkin patch. As far as the eye can see, hundreds of pumpkins cover the lawn, each one glowing from within. But instead of funny faces, these pumpkins are carved with intricate, swirling patterns that look like souls trapped inside. Weaving through them are strings of lights, creating a mesmerizing and overwhelming sea of light.
This is a breathtaking and beautiful display that is also deeply unsettling. The sheer number of glowing orbs creates a powerful effect. The few floating ghosts in the background add to the feeling that this is a truly haunted field.
DIY Instructions: How to Create a Glowing Pumpkin Field
You don’t need hundreds of pumpkins to create this effect. A smaller version can be just as magical.
What You’ll Need:
- 10-20 plastic or foam craft pumpkins (carvable kind)
- An electric drill with various sizes of drill bits
- Battery-powered LED lights or string lights
- An extension cord (if using string lights)
Step-by-Step Guide:
Step 1: Plan Your Designs You don’t need to be an expert carver for this. The idea is to create patterns with light. You can draw simple designs on your pumpkins with a pencil: swirls, starbursts, polka dots, or geometric shapes.
Step 2: Drill the Pumpkins Ask a grown-up to help you with the drill. Carefully drill holes along the lines you drew. Use different sizes of drill bits to create more interesting patterns. You can drill lots of tiny holes close together or a few large holes.
Step 3: Light Them Up If you are using individual LED lights, just drop one into each pumpkin. If you are using string lights, you’ll need to cut a larger hole in the bottom or back of each pumpkin. You can then feed the string of lights from one pumpkin to the next.
Step 4: Arrange Your Field Scatter your finished pumpkins across a large section of your lawn. You can also weave extra string lights on the ground between them to fill in the space. When you turn them on at night, your yard will transform into a magical and spooky field of light.
24. Spider’s Lair Vortex

Step into the spider’s parlor. This giant, swirling vortex of light and webs is a stunning and terrifying entryway. A massive spider sits in the center, waiting for its prey. The tunnel-like illusion is created with rings of fabric and strings of lights, drawing you into its mesmerizing depths.
This is a hugely impressive prop that can serve as an archway or a standalone piece. It’s a modern and technological take on the classic spider’s web, using light to create a sense of motion and depth. It’s sure to be a showstopper that people will want to take pictures with.
DIY Instructions: How to Weave a Light-Up Vortex
This amazing prop can be built using hula hoops and string lights.
What You’ll Need:
- 3-4 hula hoops of different sizes
- Black fabric or plastic tablecloths
- Several strings of white or blue LED lights
- Fishing line
- A large plastic spider
- Scissors
Step-by-Step Guide:
Step 1: Create the Rings Wrap each hula hoop completely with black fabric or cut-up plastic tablecloths. This will be the frame of your vortex.
Step 2: Connect the Rings You need to hang the hoops one in front of the other, from largest to smallest, to create the tunnel effect. Cut several long, equal-length pieces of fishing line. Tie the largest hoop to the smallest hoop, with the other hoops spaced evenly in between.
Step 3: Weave the Lights Starting from the back (the smallest hoop), begin wrapping your string lights around the fishing line connectors, moving towards the front. Criss-cross the lights between the hoops as well to create a web-like pattern.
Step 4: Add the Spider Attach your large plastic spider to the center of the smallest hoop at the back, so it looks like it’s at the end of the tunnel.
Step 5: Hang Your Vortex Use more fishing line to hang your finished vortex from a tree, a garage door opening, or a custom-built frame. The black fabric will disappear at night, leaving only the swirling tunnel of light.
25. Haunted House Silhouettes

The horror is coming from inside the house. This clever decoration uses simple black silhouettes to turn your home into a scene from a horror movie. From the street, it looks like giant spiders, bats, rats, and even a creepy person are trapped inside your house, their dark shapes stark against the warmly lit windows.
This is a very effective and budget-friendly way to decorate. It uses the light you already have in your home to create the scare. The giant hands reaching over the garage add a great sense of scale and make it seem like a monster is trying to break in (or out).
DIY Instructions: How to Make Spooky Silhouettes
Creating these scary shadows is as easy as cutting and pasting.
What You’ll Need:
- Large sheets of black poster board or cardboard
- A pencil
- Scissors or a craft knife
- Tape
- A printer (optional)
Step-by-Step Guide:
Step 1: Choose Your Monsters Decide what spooky shapes you want in your windows. You can do giant spiders, a swarm of bats, a shadowy person, or anything you can imagine.
Step 2: Draw Your Shapes You can draw your shapes freehand onto the black poster board. For more complex shapes, you can find silhouette templates online, print them out, and trace them. Make sure to draw them big so they fill the window.
Step 3: Cut Them Out Carefully cut out your shapes using scissors. For tricky inside cuts, ask a grown-up to help you use a craft knife.
Step 4: Install Your Silhouettes Wait until it’s dark outside so you can see the effect. Turn on the lights in the rooms you want to decorate. From inside your house, simply tape your finished silhouettes directly onto the window glass.
Step 5: Check Your Work Go outside and take a look. The black shapes will block the light, creating a perfect, creepy silhouette for everyone on the street to see. You can do this on your garage door, too, by taping the shapes to the outside.
26. Spider Victim Cocoons

A giant spider has been busy in this neighborhood. Hanging upside down from a tree branch, these unfortunate souls are wrapped tightly in thick spider webs, their terrified faces peeking out. These life-sized cocoons are a truly gruesome and startling sight that will make your skin crawl.
The detail of adding smaller spider egg sacs next to the larger victims makes the scene even more horrifying. It suggests a whole family of spiders is about to hatch. This is a prop that works great hanging from a large tree or the eaves of your house.
DIY Instructions: How to Wrap Your Own Spider Victims
These creepy cocoons are fun to make by stuffing old clothes.
What You’ll Need:
- Old clothes (long-sleeved shirt, pants)
- A spooky mask
- Lots of stuffing (newspaper, old towels, plastic bags)
- A large amount of stretchy spider web material
- White yarn or string
- Plastic spiders
- Safety pins
Step-by-Step Guide:
Step 1: Build the Body Lay out the shirt and pants on the floor. Start stuffing them with your chosen material until they look like a full body. Tuck the shirt into the pants and use safety pins to hold them together at the waist.
Step 2: Add the Head Stuff the mask lightly and attach it to the collar of the shirt with more safety pins.
Step 3: Start Wrapping This is the fun part. Start stretching the spider web material all over the body. The more you stretch it, the thinner and more realistic it looks. Keep wrapping until the whole body is covered in a thick layer of webbing.
Step 4: Secure the Cocoon For a more secure wrap, you can wind some white yarn or string around the body over the spider webs. This makes it look like the spider really took its time.
Step 5: Add the Spiders and Hang Stick a few plastic spiders onto the outside of the cocoon. Tie a strong rope around the ankles of your victim and hang them upside down from a tree branch. You can make smaller “egg sacs” by stuffing white balloons and wrapping them in webbing.
27. Haunted Carousel Horse

This is one ride you don’t want to take. A classic carousel horse, once brightly colored and cheerful, is now cracked, stained, and haunted. Its eyes glow with a demonic red light, and a tiny skeleton sits in the saddle, going for an eternal ride. The single, harsh light from above makes the scene feel isolated and incredibly spooky.
This prop is a masterpiece of creepy atmosphere. It takes something associated with childhood joy and turns it into a nightmare. The peeling paint and dark, bloody cracks give it a sense of age and decay, as if it’s been waiting in a haunted carnival for a very long time.
DIY Instructions: How to Create a Haunted Carousel Horse
You can give a modern rocking horse a spooky makeover to create this effect.
What You’ll Need:
- An old plastic rocking horse
- White or light grey spray paint (primer works well)
- Black and red acrylic craft paint
- A fine-tipped paintbrush
- A small plastic skeleton
- A wooden dowel for the pole
- A small wooden plaque for the base
- A hot glue gun or strong epoxy
Step-by-Step Guide:
Step 1: Give the Horse a Ghostly Coat First, clean the rocking horse. Then, in a well-ventilated area, spray paint the entire horse with the white or grey paint. This will cover up the bright colors and give you a spooky base to work with.
Step 2: Add the Cracks and Stains Once the base coat is dry, use your fine-tipped paintbrush and black paint to draw thin, jagged crack lines all over the horse’s body. You can water down some of the black and red paint and let it drip down from the eyes and mouth to look like stains.
Step 3: Assemble the Carousel Paint the wooden dowel a gold or brown color. Ask a grown-up to help you drill a hole through the back of the horse and another in the center of the wooden base. You can then feed the pole through the horse and secure it in the base with hot glue or epoxy.
Step 4: Add the Rider Use glue to secure your small plastic skeleton onto the horse’s saddle. You can position its hands so it looks like it’s holding on.
Step 5: The Final Touches For the glowing eyes, you can paint them with red glow-in-the-dark paint. Or, you could carefully drill out the eyes and place small red LED lights inside the hollow head. Place it in a dark spot with a single light shining down on it for the full creepy effect.
28. The Cursed Well

Some things are better left undisturbed. A ghostly figure with long black hair and skeletal hands rises from the depths of this ancient-looking stone well. A mysterious blue light shines up from the water below, casting an eerie glow on the spirit. This prop is a direct nod to a famous horror movie and is guaranteed to give people the creeps.
The well itself, with its realistic-looking stone and wooden frame, is a great piece of craftsmanship. The combination of the creepy ghost girl and the glowing water creates a powerful and frightening scene. It’s a fantastic centerpiece for a yard display.
DIY Instructions: How to Build a Cursed Well
You can build a lightweight, fake well that looks just as scary.
What You’ll Need:
- A large, round plastic trash can
- Several sheets of textured stone-look wallpaper or foam panels
- Two wooden posts and one crossbeam for the frame
- A female mannequin torso or a styrofoam wig head
- A long black wig
- Two plastic skeleton hands
- Grey, tattered cloth
- A waterproof blue LED light
- A hot glue gun and screws
Step-by-Step Guide:
Step 1: Build the Well Wall Start by wrapping the outside of the round trash can with the stone-look wallpaper or foam panels. This will instantly make it look like it’s made of heavy stone blocks.
Step 2: Construct the Frame Ask a grown-up to help you build a simple wooden frame. Screw the two posts to opposite sides of the trash can, and then screw the crossbeam on top.
Step 3: Create the Ghost Place the long black wig on the mannequin torso or wig head. Drape the grey, tattered cloth over the shoulders. Use hot glue to attach the skeleton hands so they look like they are rising up with the ghost.
Step 4: Assemble the Scene Hang your finished ghost from the center of the crossbeam with fishing line so she is floating just above the well’s opening.
Step 5: Add the Spooky Glow Place the waterproof blue LED light at the bottom of the trash can and turn it on. The light will shine up, illuminating your ghost from below and creating a very scary effect. You can add a little water to the bottom, but the light works just as well in an empty, black can.
29. Sunken Skeleton Crew

From the depths of the ocean, a ghostly pirate crew has washed ashore. This amazing display features the bow of a sunken ship, covered in seaweed and barnacles. A skeleton pirate, tangled in old fishing nets, waves a friendly but creepy hello. The whole scene is bathed in a mysterious blue light that looks like shimmering water.
This is a very creative and theatrical prop that tells a complete story. The sand, the blue fabric for water, and the broken pieces of the ship all work together to create a convincing underwater scene. It’s a great choice for anyone who loves pirates and ghost stories.
DIY Instructions: How to Create a Shipwreck Scene
You can build a small section of a spooky ship for your own yard.
What You’ll Need:
- A few large, flat pieces of cardboard or thin plywood
- Brown and blue-grey paint
- A full-size plastic skeleton
- Old netting (like a fishing net or cargo net)
- Fake seaweed (from a craft or pet store)
- A blue tarp or fabric
- A bag of sand
- A projector with a water effect or a blue spotlight
Step-by-Step Guide:
Step 1: Build the Ship’s Bow Ask a grown-up to help you cut your cardboard or wood into a few planks. Fasten them together at an angle to create the pointed front (the bow) of a ship. It doesn’t need to be perfect; broken and jagged is better.
Step 2: Make it Look Old Paint the ship pieces with the brown and blue-grey paint to make them look like old, weathered wood. Let it dry completely.
Step 3: Set the Seafloor Lay your blue tarp or fabric on the ground where you want your scene. This will be the water. Pour some sand along the “shoreline” and around the base of where your ship will be.
Step 4: Place the Wreckage Stand your finished ship’s bow up in the sand, leaning it to one side as if it’s a wreck.
Step 5: Add the Skeleton and Details Pose your plastic skeleton so it is standing on the wreck. Drape the netting all over the skeleton and the ship. Tuck in pieces of fake seaweed to make it look like it’s been underwater for a long time. To complete the scene, shine your blue light or water-effect projector onto the display.
30. Haunted Tree Spirit

The trees are alive, and they are watching you. This incredible prop turns an ordinary tree in your yard into an ancient, angry spirit. A giant, gnarled face with glowing red eyes seems to emerge from the bark, its branch-like hands ready to grab anyone who gets too close. Lit from below with a green light, the face takes on a sinister, magical quality.
This is a masterful way to use the natural elements of your yard to create a scare. It feels much more organic and frightening than a prop that is just placed on the lawn. It makes it seem like your whole yard is part of the haunting.
DIY Instructions: How to Make a Haunted Tree Face
You can create a spooky tree face using air-dry clay or paper mache.
What You’ll Need:
- A large piece of cardboard for the base
- Aluminum foil
- Masking tape
- Air-dry clay or paper mache strips and paste
- Grey, brown, and black craft paint
- Two red, battery-powered LED lights
- Strong, clear-drying glue or construction adhesive
Step-by-Step Guide:
Step 1: Create the Face Shape On your cardboard base, start building up the shape of your face using crumpled aluminum foil. Create a big brow, a nose, a chin, and cheekbones. Use masking tape to hold the foil pieces in place.
Step 2: Cover the Face Once you are happy with the shape, start covering the entire foil structure with a layer of air-dry clay or paper mache. Use your fingers to sculpt lines and wrinkles that look like tree bark. Let it dry completely, which may take a day or two.
Step 3: Paint the Spirit Paint the entire face with a base coat of grey or brown paint. Then, use a dry brush with a little black paint to go over the high points and bring out the texture. This will make it look more like real bark.
Step 4: Add the Glowing Eyes Ask a grown-up to help you carefully cut out two eye sockets. You can then push the red LED lights through from the back and secure them with tape or glue.
Step 5: Attach it to the Tree Use a strong, outdoor-safe construction adhesive to attach your finished face to the trunk of a tree. For a less permanent option, you can attach strong wires to the back of the cardboard and tie it tightly around the tree. Add a green light at the base of the tree to make your spirit glow.
31. Bubbling Cauldron Spill

A witch’s brew has gone horribly wrong. This fantastic prop shows a huge cauldron that has tipped over, spilling a glowing, bubbling green potion all over the lawn. Floating in the gruesome goo are the ingredients of the spell: bones, eyeballs, spiders, and worms. A half-dissolved skeleton is caught in the toxic tide.
This is a bright and colorful prop that will really stand out at night. The use of expanding foam for the spill gives it a great three-dimensional, bubbly texture. The lights hidden inside the potion and the cauldron make the whole scene glow with a sickly, magical light.
DIY Instructions: How to Brew a Cauldron Spill
This impressive-looking prop is a lot of fun to make and customize.
What You’ll Need:
- A large plastic cauldron
- A large, flat piece of cardboard for the base
- Several cans of spray foam insulation (the kind that expands)
- Neon green spray paint
- A string of green LED lights
- A bag of plastic spooky items (bones, spiders, eyeballs, insects)
- A small plastic skeleton
- A hot glue gun
Step-by-Step Guide:
Step 1: Create the Spill Shape Lay your cardboard on the ground. Prop the cauldron up on its side at one end of the cardboard. Now, spray the foam insulation onto the cardboard, starting from the cauldron’s mouth and creating a large, puddly spill shape. Let the foam expand and dry completely.
Step 2: Paint the Potion Once the foam is hard, spray paint the entire spill with the neon green paint. You may need a few coats to cover it all.
Step 3: Add the Ingredients While the paint is still a little sticky, press your plastic bones, eyeballs, and other creepy items into the foam. You can also use a hot glue gun to attach them more securely once the paint is dry. Place your small skeleton so it looks like it’s caught in the spill.
Step 4: Make it Glow Carefully tuck the string of green LED lights into the spill. Weave it around the bones and push some of the lights deep into the foam to make the whole potion glow from within.
Step 5: Final Touches Place your finished cauldron spill in the yard. You can add a witch’s hat and broom nearby to complete the scene. A small fog machine placed by the cauldron will add to the bubbling, magical effect.
32. Graveyard of the Rising Dead

The dead will not rest in this cemetery. A whole host of skeletons is clawing their way out of the ground, their bony arms reaching for the living. Each gravestone tells a funny or creepy story, like “I TOLD YOU I WAS SICK.” The whole scene is lit with colorful lights, giving the graveyard a ghostly, supernatural glow.
This is a fantastic way to turn your front lawn into a classic Halloween horror scene. The combination of humor on the tombstones and the creepiness of the rising skeletons is a winning formula. Adding fog that hugs the ground makes the whole display feel much more cinematic and spooky.
DIY Instructions: How to Build a Home Graveyard
Creating your own cemetery is easy with foam boards and some plastic skeletons.
What You’ll Need:
- Several large sheets of styrofoam insulation board
- Grey and black craft paint
- A craft knife or styrofoam cutter
- Several plastic skeletons
- Small wooden stakes
- Waterproof glue
- Optional: Different colored solar-powered spotlights
Step-by-Step Guide:
Step 1: Cut the Tombstones Ask a grown-up to help you use the craft knife to cut the styrofoam sheets into tombstone shapes. You can make them rounded at the top, square, or even shaped like crosses.
Step 2: Paint and Personalize Paint your tombstones with the grey paint. You can use a sponge with some black paint to make them look like old, weathered stone. Once dry, use black paint to write funny or spooky epitaphs on them.
Step 3: Prepare the Skeletons You only need the top half of the skeletons for this prop. Most plastic skeletons can be easily taken apart at the waist.
Step 4: “Bury” the Dead In your yard, dig a small pile of dirt or mulch for each grave. Place the top half of a skeleton in the middle of the pile, and arrange its arms so it looks like it’s crawling out.
Step 5: Set the Stones Use waterproof glue to attach a wooden stake to the back of each tombstone. Let the glue dry. Then, push the stakes firmly into the ground behind your rising skeletons. To make your graveyard glow, aim a different colored spotlight at each of the graves.
33. The Weeping Witch

This grieving witch is a truly sorrowful and scary sight. Dressed in black, she holds a bouquet of dead roses, her skeletal hand covering her face as she weeps. But her tears are not water; they are a thick, black ooze that drips from her glowing red eye. The single spotlight shining down on her makes the scene feel lonely and tragic.
This is a very atmospheric and emotional prop. It tells a story and creates a mood of sadness and horror. The “weeping” effect is a fantastic detail that is sure to capture everyone’s attention and give them a good scare.
DIY Instructions: How to Make a Weeping Witch
The creepy weeping effect is created with a hidden water pump.
What You’ll Need:
- A mannequin or a homemade PVC pipe frame
- A scary witch mask with long grey hair
- Black robes or fabric
- A plastic skeleton hand
- A small, submersible water pump (the kind for tabletop fountains)
- Clear vinyl tubing
- Black food coloring
- A bucket
- A bouquet of fake black roses
Step-by-Step Guide:
Step 1: Assemble the Witch First, build your witch’s body. Dress your mannequin or PVC frame in the black robes. Attach the witch mask to the top. Position one of the mannequin’s arms (or a wire arm) so it is holding the bouquet of black roses.
Step 2: Create the Crying Effect Ask a grown-up for help with this. Attach the skeleton hand to the witch’s other arm and position it so it is covering the mask’s face. Now, run the clear vinyl tubing up the back of the witch, under her robes. Feed the end of the tube up to the mask and position it right at the corner of one of the eye holes, hiding it behind the skeleton fingers.
Step 3: Set Up the Pump Place the other end of the tube into a bucket of water. Add a generous amount of black food coloring to the water to make it look like black tears. Place the small water pump into the bucket.
Step 4: Make Her Weep Plug in the pump. It will send the black water up the tube and out of the witch’s eye, where it will drip down her face and robes. Position her in a dark spot under a tree with a single light shining down for a truly spooky and sad scene.
34. Spider Egg Sac Lanterns

A spider infestation has reached a terrifying new level. Hanging from a tree, these glowing green pods look like alien eggs, but a closer look reveals they are swarming with tiny spiders. These are giant egg sacs, and they look ready to hatch at any moment. The intricate web pattern on the outside and the creepy green glow from within make them a unique and skin-crawling decoration.
This is a brilliant twist on traditional paper lanterns. The addition of the spiders and the creepy, veiny texture elevates them into something truly horrifying. Hanging a whole cluster of them together creates a very effective and immersive spider’s nest.
DIY Instructions: How to Make Spider Egg Sacs
You can create these glowing horrors using simple paper lanterns.
What You’ll Need:
- White paper lanterns of various sizes
- A bag of small plastic spiders
- A hot glue gun
- Stretchy spider web material
- Green, battery-powered LED lights or glow sticks
Step-by-Step Guide:
Step 1: Assemble the Lanterns Start by carefully expanding your paper lanterns according to their instructions.
Step 2: Add the Veins and Webs To create the creepy, veiny look, you can gently stretch a thin layer of the spider web material over the outside of the lantern. For a more defined pattern, you can use your hot glue gun to draw thin, web-like lines directly onto the paper.
Step 3: Infest the Sacs Use your hot glue gun to attach the small plastic spiders all over the outside of the lanterns. Don’t be shy; the more spiders, the creepier it looks.
Step 4: Make Them Glow Before you hang them, you need to add the light. Turn on a green LED light or activate a glow stick and place it inside the lantern.
Step 5: Hang Your Horrors Use string or fishing line to hang your finished egg sacs from a tree branch. Hang them at different heights to create a more natural-looking cluster. You can also stretch more spider web material between the branches to connect all the sacs together.
35. Mad Scientist’s Laboratory

It’s alive! This incredible display turns a window of your home into the laboratory of a mad scientist. Inside, a wild-haired mannequin dressed in a lab coat is hard at work on his latest monstrous creation. Beakers bubble with colorful liquids, lightning flashes, and a skeleton assistant watches patiently.
This is a wonderfully detailed and theatrical prop that tells a story. The use of colored lights in the beakers and a lightning effect machine (or a flickering light) creates a dynamic and exciting scene. The monitor outside showing the scene in black and white is a great touch that feels like an old horror movie.
DIY Instructions: How to Create a Mad Scientist Lab
You can stage your own spooky experiment right in your living room window.
What You’ll Need:
- A mannequin
- A white lab coat and a crazy hair wig
- A table
- Various glass jars, beakers, and vases
- Food coloring
- A plastic skeleton
- A string of blue or white Christmas lights
- A blacklight or other colored lights
Step-by-Step Guide:
Step 1: Set Up Your Lab Bench Place a table directly in front of a large window that is visible from the street. This will be your main stage.
Step 2: Dress the Scientist Put the lab coat and wig on your mannequin. Position him behind the table so it looks like he is conducting an experiment.
Step 3: Prepare the Potions Fill your various glass jars and beakers with water. Add a few drops of different colored food coloring to each one to create a variety of spooky potions. You can drop a piece of dry ice into some of them to make them bubble and smoke (ask a grown-up for help with this).
Step 4: Add the Assistant and Effects Position your plastic skeleton next to the scientist. For a cool lightning effect, you can loosely drape the string of Christmas lights behind the scene and set them to a “flicker” or “flash” mode. Place your other colored lights around the lab to create a spooky glow.
Step 5: Final Touches Draw the curtains partly closed on either side of the window to frame your scene like a theater stage. Turn on all the lights, and your laboratory is open for business.
36. High-Tech Tombstone of the Future

This is not your great-grandfather’s gravestone. This futuristic, high-tech tombstone uses digital screens to deliver a chilling, personalized message to anyone who dares to look. It takes a live picture of the viewer and displays it on the screen with the message, “YOU’RE NEXT.” It even predicts a terrifyingly close date of death.
This is a brilliantly modern and interactive prop that is sure to get a huge reaction. It combines classic graveyard horror with the unsettling feeling of being watched by technology. The sleek, black design and glowing blue text make it look like something from a sci-fi horror movie.
DIY Instructions: How to Make a “You’re Next” Tombstone
This interactive scare is possible with a tablet and some clever construction.
What You’ll Need:
- A tablet with a front-facing camera
- A large sheet of black foam board
- A craft knife
- Silver or light blue paint pens
- A simple “mirror” or “camera” app for your tablet
- A small, battery-powered digital photo frame (optional)
- Tape or Velcro strips
Step-by-Step Guide:
Step 1: Build the Tombstone Shape Ask a grown-up to help you cut the black foam board into a classic tombstone shape. You will need to cut a hole in the center of it that is the exact size of your tablet’s screen.
Step 2: Add the Tech Details Use your silver or blue paint pens to draw futuristic lines, symbols, and text on the tombstone. You can write things like “SYSTEM ONLINE” or “SUBJECT DETECTED.”
Step 3: Install the “Camera” Open the mirror or camera app on your tablet. You want the app that simply shows what the front-facing camera sees. Use strong tape or Velcro strips to attach the tablet to the back of the foam board, so the screen is perfectly aligned with the hole you cut.
Step 4: Add the Death Date (Optional) If you have a small digital photo frame, you can create an image with a spooky date on it and set it as the only picture. Then you can cut another hole in your tombstone above the tablet and mount the photo frame in the same way.
Step 5: Set It Up Prop your finished tombstone up in your yard. When someone walks up to read it, they will be startled to see their own face staring back at them from the screen, making for a very memorable and personal scare.
37. Caged Carnival Clown

This circus attraction should have been retired long ago. A terrifying clown with a wicked grin and sharp teeth is locked away in a rusty, old cage. Dressed in a dirty, tattered clown suit, he seems ready to break out at any moment. The chains wrapped around the bars suggest that he is extremely dangerous.
This is a fantastic prop for creating a sense of unease and anticipation. Guests will be both scared of the clown and worried that he might escape. Placing it in a corner with some hay and a single spotlight makes it feel like a forgotten sideshow at a haunted carnival.
DIY Instructions: How to Cage a Clown
You can build a convincing-looking cage using PVC pipes.
What You’ll Need:
- A mannequin
- A scary clown mask and costume
- PVC pipes and corner connectors to build a cube-shaped frame
- Metallic silver and rusty brown spray paint
- Plastic chains
- A small bench or stool
Step-by-Step Guide:
Step 1: Build the Cage Frame First, cut your PVC pipes and use the connectors to build two square shapes for the top and bottom of your cage. Then, add vertical pipes in the corners and along the sides to create the bars.
Step 2: Make it Look Old and Rusty In a well-ventilated area, spray paint the entire cage with the metallic silver paint. Once it’s dry, lightly spray some of the rusty brown paint over it, focusing on the joints and corners. This will make it look like old, rusted metal.
Step 3: Prepare the Clown Dress your mannequin in the clown costume and mask. You can tear the costume a little and rub some dirt on it to make it look worn out.
Step 4: Lock Him Up Place the small bench inside the finished cage. Position your clown mannequin on the bench, with its hands gripping the bars. For an extra scary touch, you can leave the door of the cage slightly ajar.
Step 5: Add the Final Touches Drape the plastic chains over the cage. You can wrap them around the bars or have them hanging from the top. Place your finished prop on a bed of straw and aim a single light at it to create a spooky, theatrical scene.
38. Demonic Scarecrow

This is not your average scarecrow. With a horrifying jack-o’-lantern head, a twisted, stitched grin, and glowing eyes, this creature looks like it was born in a nightmare. Its long, twig-like fingers and tattered clothes give it a monstrous appearance. Standing alone in the field, lit by a single, flickering flame, it is a truly terrifying sight.
This prop takes the classic scarecrow and makes it much more demonic and aggressive. The combination of the pumpkin head and the scarecrow body is a great twist. The firelight from below casts deep, dancing shadows on its face, making it look alive and full of evil intent.
DIY Instructions: How to Create a Demonic Scarecrow
You can give a regular scarecrow a terrifying upgrade with a custom head.
What You’ll Need:
- A “T” shaped wooden frame (a tall stake with a cross-stick)
- Old clothes (flannel shirt, jeans)
- Straw or hay
- A large, carvable foam pumpkin
- A craft knife
- Black and orange craft paint
- Battery-powered, flickering LED lights (orange or red)
- Twine
- Some gnarly tree branches
Step-by-Step Guide:
Step 1: Build and Dress the Body Assemble your scarecrow’s body just like in the “Scarecrow Army” prop. Build the T-frame, dress it in the old clothes, and stuff it with straw. Tie the wrists and ankles with twine.
Step 2: Carve the Demonic Face Ask a grown-up to help you use the craft knife to carve a truly evil face into the foam pumpkin. Give it angry, slanted eyes and a wide, jagged mouth full of sharp teeth.
Step 3: Paint the Head Paint the inside of the carved mouth and eyes with black paint. You can also dry-brush some black paint on the outside of the pumpkin to make it look dirty and rotten.
Step 4: Add the Sinister Hands Find two creepy-looking tree branches that have smaller twigs branching off like fingers. Use twine to securely tie these branches to the ends of the scarecrow’s arms, so they stick out of the sleeves.
Step 5: Assemble and Light Your Demon Place the flickering LED lights inside the carved pumpkin head. Put the head on top of the scarecrow’s post. To make it extra scary, place a solar-powered, flickering flame spotlight on the ground, aimed up at its face.
39. The Haunted Dollhouse

Even the toys are terrifying in this house. This incredibly detailed prop is a cutaway view of a multi-story dollhouse that has fallen into decay and is now home to a host of creepy dolls and ghosts. The windows are boarded up, the paint is peeling, and every room tells a different spooky story. A tiny ghost floats down the main staircase, ready to greet any visitors.
This is a masterpiece of miniature horror. The tiny, flickering lights in each room and the detailed furniture make it feel like a real, haunted home. It’s a prop that invites you to look closer, rewarding you with more creepy details the longer you stare.
DIY Instructions: How to Haunt a Dollhouse
You can create your own miniature haunted house by giving an old dollhouse a spooky makeover.
What You’ll Need:
- An old dollhouse (the kind with an open back or side)
- Dark-colored craft paints (grey, black, dark red)
- Small pieces of dollhouse furniture
- Several small, creepy-looking dolls
- Small, battery-powered “fairy” string lights
- White cheesecloth
- Popsicle sticks
- A hot glue gun
Step-by-Step Guide:
Step 1: Make it Look Old First, you need to make the dollhouse look abandoned. Paint the outside with grey paint. You can use a sponge to dab on some black or dark green paint to make it look like moss and grime.
Step 2: Decorate the Interior Paint the inside walls of the rooms with dark colors like deep red or black. You can print tiny, old-looking portraits to hang on the walls.
Step 3: Board Up the Windows Cut your popsicle sticks into smaller pieces and glue them in “X” shapes over the windows on the outside of the house.
Step 4: Furnish the Rooms Arrange the tiny furniture in each room. You can break a little chair or turn a table upside down to make it look like there was a struggle. Place your creepy dolls in the rooms, sitting on chairs or standing in dark corners.
Step 5: Add the Ghosts and Lights To make a tiny floating ghost, drape a small piece of cheesecloth over a little ball of cotton and use glue to hold its shape. Hang it from the ceiling with a piece of thread. Weave the fairy lights through the rooms to create a spooky, flickering glow, and your haunted dollhouse is ready for its eternal residents.
Your journey through 39 spooky projects is now complete. We have seen everything from cursed fairy rings to crashed alien spaceships. Each idea is a starting point for your own creativity. The best Halloween displays are the ones that show a bit of your own personality and imagination.
Do not feel overwhelmed. You do not need to build everything on this list. Just pick one or two ideas that truly excite you and give them a try. You will be surprised at how simple materials can be turned into something truly terrifying with a little paint, some clever lighting, and a touch of Halloween spirit.
Now it is your turn. Grab your tools, gather your supplies, and start creating. Make your yard a place of delightful frights that trick-or-treaters will remember for years to come. Happy haunting.
Key Takeaways
- Creativity Beats Cost: You do not need an expensive budget to create a big impact. Clever ideas and simple materials often produce the best results.
- Atmosphere is Everything: Good lighting, fog, and thoughtful placement are just as important as the props themselves. They work together to create a truly immersive and spooky experience.
- Personalize Your Props: The best decorations are the ones that are unique to you. Do not be afraid to change a design or add your own creepy details to make a project your own.
- Start Simple: If you are new to DIY, pick a straightforward project to build your confidence. Even a few spooky silhouettes or a group of floating ghosts can transform your yard.