As the days grow shorter, our homes should feel like a warm escape. Sometimes, even with the heat on, a space can feel chilly and unwelcoming. The reason often has little to do with the temperature. It is about the light.

The right lighting can completely change the atmosphere of a room. It can turn a stark, cold space into a soft, inviting sanctuary. You do not need a major renovation or a big budget to make this change. A few simple adjustments can make all the difference.
This guide will show you 35 easy ways to use light to bring warmth into every corner of your house. From the living room to the bathroom, these fixes will help you create a comfortable and cozy vibe to enjoy all winter long.
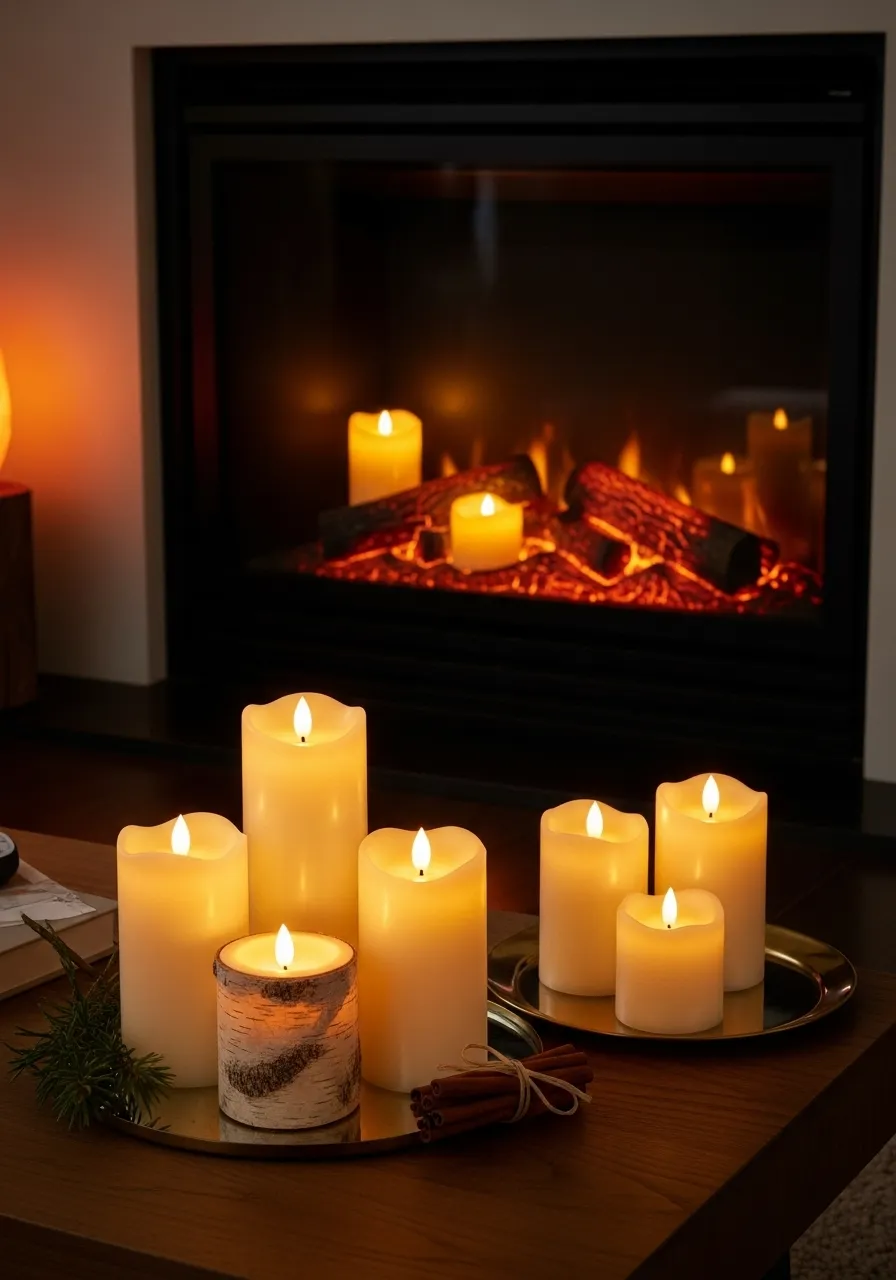
1. Warm Glow Candle Cluster

Nothing invites you in quite like the soft flicker of candlelight. This arrangement brings that gentle, moving light into your space without any worry. A collection of flameless candles offers all the beauty of real flames. You get the warm, dancing glow that makes a room feel instantly more comfortable and settled.
Grouping them together on a simple tray creates a lovely centerpiece. It concentrates the light, making a powerful statement of warmth. Place this on a coffee table, a mantel, or a side table. The room will feel cozier right away. It is a simple touch with a big impact.
DIY Instructions: Create Your Own Candle Cluster
Here is how you can make this easy decoration for your own home.
Step 1: Gather Your Supplies First, find all the things you will need.
- A set of battery-powered flameless candles. It’s nice to have them in different heights.
- A flat tray or a plate. It can be metal, wood, or ceramic.
- The right kind of batteries for your candles (check the bottom of the candles to see what they need, usually AA or AAA).
- (Optional) Fun extras like a few cinnamon sticks, some small pinecones, or a sprig of green leaves from the garden.
Step 2: Prepare Your Candles Turn each candle over. You will see a little cover on the bottom. Slide it or pop it open. Put the batteries inside, making sure the plus (+) and minus (-) sides match the pictures inside. Close the cover. Flick the switch to “On” to make sure it works, then turn it back off for now.
Step 3: Arrange the Candles on the Tray Place your tray where you want your decoration to be. Now, put the candles on the tray. A good idea is to put the tallest candles in the back or the middle. Then, place the shorter ones around them. This makes it look more interesting, like a little family of candles. Don’t worry about making it look exact; just have fun with it.
Step 4: Add Your Decorative Touches (Optional) If you have your extra items, you can add them now. Carefully place the cinnamon sticks, pinecones, or greenery around the base of the candles. Don’t cover the candles, just decorate the empty spots on the tray.
Step 5: Light It Up! This is the best part. Flick the switch on the bottom of each candle to “On.” Watch as your new decoration fills the corner of your room with a beautiful, warm glow.
2. Kitchen Counter Glow

Your kitchen is often the heart of the home, but harsh overhead lights can make it feel cold. Under-cabinet lighting changes everything. It spreads a warm, even light across your countertops. This gets rid of shadows and makes the kitchen feel much more welcoming.
This kind of lighting is practical for cooking. It also creates a lovely, soft atmosphere for a quiet cup of tea at night. The glow reflecting off the surfaces makes the whole room feel cozier. It highlights the beauty of your backsplash and countertops.
DIY Instructions: Add Under-Cabinet Lights
You can add this feature to your kitchen in an afternoon.
Step 1: Get Your Materials You will need a few things from a hardware store.
- A roll of peel-and-stick LED light tape.
- A measuring tape.
- A pair of scissors.
- A clean, dry rag.
Step 2: Measure Your Cabinets Use your measuring tape to see how long the area is under your cabinets where you want lights. Write down the measurements.
Step 3: Clean the Surface Wipe the underside of the cabinets with your dry rag. You want to remove any dust or grease so the light strip will stick well.
Step 4: Cut and Stick the Lights Roll out your LED tape and cut it to the length you measured. Look for the little scissor marks on the tape to know where to cut. Then, peel the paper off the back to reveal the sticky part. Carefully press the light strip into place under the cabinet.
Step 5: Plug In and Enjoy Most LED tape kits have a cord you just plug into a wall outlet. Plug it in, switch it on, and see how warm and inviting your kitchen looks.
3. Cascading Stairway Lights

A staircase can be more than just a way to get upstairs. By adding simple lights, you can turn it into a beautiful feature. Wrapping the handrail with tiny fairy lights creates a magical, flowing effect. It’s a gentle guide in the dark.
When you mix the lights with a bit of greenery, the stairway feels alive and festive. This approach brings a soft, warm light to a part of the house that is often overlooked. The stairway becomes a glowing centerpiece that welcomes you to the next floor.
DIY Instructions: Decorate Your Banister
Let’s make your stairway sparkle.
Step 1: Collect Your Items
- One or two long strings of fairy lights (battery-powered ones are easiest).
- A garland (either real or fake greenery).
- Green floral wire or small, clear zip ties.
Step 2: Start at the Bottom Go to the bottom of your staircase. Take the end of your garland and the end of your light string. Use a piece of floral wire or a zip tie to attach them securely to the base of the handrail.
Step 3: Wrap Your Way Up Begin to wrap both the garland and the lights around the handrail together. Keep it loose and natural-looking. Continue wrapping all the way to the top of the stairs.
Step 4: Secure the End Once you reach the top, use another piece of wire or a zip tie to attach the ends of the garland and lights. Cut off any extra wire or zip tie tail.
Step 5: Turn on the Twinkle Switch on your fairy lights. Stand back and look at your beautiful, glowing staircase.
4. Layered Reading Nook

Creating a cozy corner for reading is all about using different kinds of light. This is called layering. You need one light for your book and another to make the whole area feel soft and warm. A floor lamp you can aim is great for reading.
A second, softer light, like a wall lamp, provides a gentle background glow. This combination makes the nook functional for reading your favorite story. It also makes it a peaceful spot to just sit and relax. The layers of light create a small, cozy escape within a larger room.
DIY Instructions: Assemble Your Reading Corner
Building the best reading spot is easy.
Step 1: Pick Your Spot Find a quiet corner in your house and place your most comfortable chair there.
Step 2: Add a Task Light Bring in a floor lamp or a table lamp that you can adjust. This is your main reading light. Place it so the light shines on your book’s page from over your shoulder. This stops shadows and glare.
Step 3: Add a Soft Light Now, add a second, gentler light. This could be a small lamp on a nearby shelf or a plug-in wall sconce. This light isn’t for reading. It’s just to make the corner feel warm.
Step 4: Bring in a Table You need a small table to hold your book, a warm drink, and maybe a snack.
Step 5: Test It Out Sit in your chair. Turn on both lights. See how it feels. Adjust the lamps until the light is just right for you.
5. Dining Ambiance Duo

The light over your dining table sets the mood for every meal. Using two different styles of light fixtures together can create a special atmosphere. A large, woven shade gives off a broad, soft light that warms the whole table.
Adding a cluster of smaller glass globes with vintage bulbs brings a touch of elegance. This second fixture adds visual interest and a more focused light. The mix of natural texture and sleek glass makes the dining space feel both relaxed and stylish. It is an invitation for long conversations over dinner.
DIY Instructions: Make a Clustered Pendant Light
This project is for older kids and grown-ups.
Step 1: Gather the Parts
- A multi-port ceiling canopy (it has several holes for cords).
- Several pendant light cords of your choice.
- Decorative light bulbs (Edison-style bulbs look great).
- A screwdriver and wire strippers.
Step 2: Plan Your Cluster Decide how you want the lights to hang. Do you want them all at different lengths? Or in a spiral? Lay the cords on the floor and adjust them until you like the design.
Step 3: Thread the Cords Push the wire end of each cord through a hole in the ceiling canopy. Adjust each one to the length you decided on and tighten the screw on the canopy to hold it in place.
Step 4: Wiring (Grown-up Step!) This part is tricky. It is very important to ask an adult who understands electricity for help. You will need to connect all the wires of the same color together. All the black wires twist together, and all the white wires twist together.
Step 5: Install and Admire Have your grown-up helper connect the light to the wires in the ceiling and attach the canopy. Screw in your decorative bulbs, flip the switch, and enjoy your custom light fixture.
6. Welcoming Entryway Light

The first few steps inside your home should feel warm and safe. Good lighting in your entryway makes that happen. A simple table lamp on a console table is a great starting point. It casts a soft, welcoming pool of light.
To add another layer of coziness, place a large lantern on the floor. Put a battery-powered candle inside for a safe, continuous flicker. This combination of lights at different heights makes the entryway feel complete and thought-out. It is a warm hello every time you walk in the door.
DIY Instructions: Create a Lantern Welcome Light
This is a very simple way to add charm to your front hall.
Step 1: Find Your Supplies
- A large lantern with glass sides.
- A large, battery-operated flameless candle that will fit inside.
- The correct batteries for the candle.
Step 2: Pick the Location Find a spot on the floor in your entryway where the lantern won’t be in the way. A corner or next to the console table is often a good place.
Step 3: Prepare the Candle Put the batteries into your flameless candle. Turn it on to make sure it works. Many of these candles have a timer setting, which is very useful. You can set it to turn on every evening automatically.
Step 4: Place the Candle Inside Open the little door on the lantern and carefully place the candle inside, right in the center. Close the door.
Step 5: Let It Glow Switch the candle on. Your new lantern will give your entryway a steady, welcoming glow without any of the worry of a real flame.
7. Twinkling Bottle Display

Don’t throw away those interesting glass bottles. You can turn them into beautiful little lamps. This is a simple project that adds a touch of sparkle to any room. All you need are empty bottles and tiny, wire lights.
When you put the lights inside, the glass catches the glow and creates a magical, starry effect. Grouping different colored and shaped bottles together on a windowsill makes a stunning display. The light shines through the glass, painting colorful patterns. It’s a creative way to recycle and decorate at the same time.
DIY Instructions: Craft Your Own Bottle Lights
Let’s turn old bottles into treasure.
Step 1: Get Your Things Ready
- A few clean and completely dry glass bottles. Wine bottles or soda bottles work well.
- A set of fairy lights for each bottle. The kind with the battery pack in a fake cork are the easiest to use.
Step 2: Unwind the Lights Take one set of fairy lights and carefully unwind the thin wire. Make sure there are no tangles.
Step 3: Feed the Lights into the Bottle Gently push the end of the light string down into the bottle. Feed the rest of the wire in, letting it coil up naturally inside.
Step 4: Put in the “Cork” Once all the lights are inside, push the cork-shaped battery pack into the opening of the bottle, just like a real cork.
Step 5: Light Up Your Creation Find the small switch on the cork and turn it on. Make a few more, and arrange them together for a lovely, glowing collection.
8. Illuminated Bookshelf

Bookshelves hold our stories, but they can often be dark and shadowy. Adding light to your shelves turns them into a bright and inviting feature. This makes it easier to find your favorite book. It also adds a soft, background warmth to the whole room.
You can use different methods to light your shelves. Slim light bars that stick underneath each shelf provide an even, downward glow. Small, adjustable spotlights can be used to highlight a special vase or a stack of books. Lighting your shelves makes them feel like a cozy library corner.
DIY Instructions: Add Light to Your Shelves
Let’s make your bookshelf shine.
Step 1: Gather Your Lights and Tools
- Battery-powered, peel-and-stick LED light bars or puck lights.
- A ruler or measuring tape.
- A clean, dry cloth.
Step 2: Plan Your Lighting Decide where the lights will look best. Sticking a light bar to the front underside of a shelf is a great choice. It hides the light source and shines down on the books below.
Step 3: Clean the Area Wipe down the spot where you will stick your light. It needs to be clean and dry for the sticky tape to work properly.
Step 4: Peel and Stick Put batteries in your light. Peel the paper backing off the adhesive strips on the light. Use your ruler to make sure it’s straight, then press it firmly into place for a few seconds.
Step 5: Power On Press the button to turn on your new shelf light. Add lights to a few other shelves to create a beautiful, layered look.
9. Floating Headboard Glow

You can make your bedroom feel like a calm retreat with a simple lighting trick. Placing a strip of LED lights on the back of your headboard creates a beautiful, soft glow on the wall. This is called backlighting. It makes the bed feel like the centerpiece of the room.
This indirect light is gentle on the eyes. It is just enough to see by without being bright or harsh. The warm light washing up the wall creates a peaceful mood, which is great for relaxing before sleep. It can even make your headboard look like it is floating.
DIY Instructions: Backlight Your Headboard
This is an easy way to make your bedroom feel special.
Step 1: Get Your Supplies
- A kit of peel-and-stick LED light tape (make sure it’s long enough to go across your headboard).
- A measuring tape.
- A dry cloth.
Step 2: Measure and Clean Measure the width of your headboard. Then, use the dry cloth to wipe down the back surface where you will stick the light strip.
Step 3: Apply the Light Strip Unroll the LED strip. Peel the paper backing off the sticky side. Carefully press the strip onto the back of your headboard. Try to place it a few inches from the top edge and make sure it is straight.
Step 4: Hide the Cord Run the power cord down behind the headboard and the bed, so it is hidden from view.
Step 5: Plug In and Relax Plug the cord into a wall outlet. Many kits come with a small remote control. Use it to turn on the lights and choose a warm, sleepy color.
10. Versatile Track Lighting

Track lighting can sometimes feel like it belongs in an office, but it can be very cozy when used correctly. The key is to aim the lights with a purpose. Instead of pointing them all straight down, use them to create warm spots around the room.
Point one light at a favorite painting to make the colors pop. Aim another to skim down a brick wall, showing off its texture. Use a third to create a pool of light over a comfy chair. This technique of highlighting specific areas makes a large room feel smaller and more intimate.
DIY Instructions: How to Aim Track Lighting
If you already have track lighting, you can adjust it to feel much cozier.
Step 1: Check Your Light Bulbs First, make sure you are using the right kind of light bulbs. For a warm feel, look for bulbs that say “warm white” or “soft white” on the box.
Step 2: Turn the Lights On It’s easier to aim your lights when you can see where the beams are going.
Step 3: Pick Your Targets Look around your room. What do you want people to notice? It could be a piece of art, a collection on a shelf, or just a wall with a nice texture.
Step 4: Aim Each Light Carefully and gently, tilt and turn each light fixture on the track. Point each one at a different target you chose. Try to cross the beams of light. Avoid pointing them straight down at the floor.
Step 5: Step Back and See Take a step back and look at the effect. You have created pools of warm light that draw your eye around the room. It will feel much more interesting and comfortable.
11. Shadow-Casting Pendant Light

A lampshade does more than just cover a bulb. A woven or patterned one can paint your walls with light. This large pendant light throws beautiful, striped shadows across the room. It turns a simple ceiling into a piece of art.
This kind of light adds texture and drama. It makes a room feel more dynamic and interesting. The warm glow from the bulb mixes with the dark shadows to create a truly cozy and immersive atmosphere. It is a single light fixture that can change the feel of an entire space.
DIY Instructions: Swap a Lampshade
You can give a room a new look just by changing the shade on a hanging light.
Step 1: Gather Your Supplies
- A new woven or patterned lampshade that you love.
- A sturdy stepladder.
- A helper to hold the ladder steady.
Step 2: Turn Off the Power This is the most important step. Go to your fuse box and flip the switch that controls the lights in that room. Then, flick the light switch on the wall to double-check that the power is off.
Step 3: Remove the Old Shade Climb the ladder. Most pendant lights have a ring or cap that screws onto the base of the light socket. Carefully unscrew this ring and slide the old shade off.
Step 4: Install the New Shade Slide your new shade up over the light socket. Screw the ring back on tightly to hold the new shade in place.
Step 5: Power Up and Enjoy Climb down carefully. Go back to the fuse box and turn the power back on. Flip the wall switch and admire the new patterns on your walls.
12. Indoor Night Sky Projector

You do not need to go outside to see a beautiful night sky. A small projector can bring the magic of the aurora borealis right into your bedroom. It splashes moving waves of color across your ceiling and walls.
This creates an incredibly peaceful and dreamy environment. It is a wonderful way to unwind and relax before going to sleep. You can change the colors and patterns to match your mood. It turns a plain room into a personal light show and a sanctuary of calm.
DIY Instructions: Set Up Your Light Projector
This is not a building project, but here is how to get the best show.
Step 1: Get Your Projector You will need a star or galaxy light projector, which you can find in many stores or online.
Step 2: Pick the Best Spot Place the projector on your nightstand, a dresser, or even the floor. The goal is to give it a clear view of the ceiling.
Step 3: Plug It In and Aim Plug the projector into a wall outlet. Tilt the lens so it is pointing at the middle of your ceiling.
Step 4: Choose Your Show Most projectors come with a remote control. Use it to turn the projector on. Try out the different color combinations and settings. Some have twinkling stars, and some have moving clouds.
Step 5: Relax and Watch Turn off your other lights, lie back in bed, and enjoy the beautiful light display above you.
13. Plant Spotlight Drama

Your houseplants can be more than just green things in a corner. With a little light, you can turn them into living sculptures. Using a small spotlight to uplight a plant creates a bold and dramatic effect at night.
The light shines up through the leaves, casting big, beautiful shadows on the wall behind it. This adds depth and a touch of nature’s artistry to your room. It highlights the unique shapes of the leaves. This simple trick can make any plain corner feel special and alive.
DIY Instructions: Uplight Your Plants
Here is how to make your favorite plant the star of the room.
Step 1: Gather Your Supplies
- A small, adjustable spotlight. A clip-on one or a small can-style uplight works well.
- Your favorite tall houseplant.
Step 2: Position the Light Place the spotlight on the floor a few inches in front of your plant’s pot.
Step 3: Plug In and Aim Plug the light into a nearby outlet. Turn it on. Now, aim the light up towards the leaves of your plant.
Step 4: Play with Shadows Move the light around. See what happens to the shadows on the wall when you move the light closer to the plant, or farther away. Try aiming it from different angles.
Step 5: Find the Best Look Keep adjusting the light until you create shadows that you find beautiful. Now your plant is a piece of art.
14. Rustic Edison Bulb Sconces

Bring a warm, vintage feel to any room with the right light bulbs. Edison-style bulbs, with their visible glowing filaments, produce a soft, amber light that is very comforting. They look especially good in simple, rustic fixtures.
In this bathroom, the bulbs are paired with wood and metal pipe sconces. This industrial style adds a lot of character. It makes the space feel less like a utility room and more like a cozy, personal retreat. The warm light reflecting in the mirrors enhances the welcoming feel.
DIY Instructions: Make a Simple Rustic Sconce
This project needs a grown-up’s help for the electrical parts.
Step 1: Gather the Parts
- A nice-looking block of wood for the base.
- An industrial pipe light kit (you can find these online).
- Screws.
- A decorative Edison light bulb.
Step 2: Prepare the Wood You can sand the wood block to make it smooth. You could even paint it or stain it to match your room.
Step 3: Attach the Light Fixture Following the kit’s instructions, use screws to attach the pipe light fixture to the front of your wood block.
Step 4: GROWN-UP WIRING STEP This is the most important part. Ask an adult who knows about wiring to mount the finished sconce to the wall. They will need to safely connect it to the electrical wires inside the wall.
Step 5: Add the Bulb Once it is safely installed, you can screw in your Edison bulb. Flip the power switch and enjoy the warm, rustic glow.
15. Glowing Floating Shelf

Here is a modern and clean way to add a warm accent to a room. A simple floating shelf can become a source of light itself. By hiding an LED strip on the underside, the shelf casts a soft wash of light down the wall.
This creates a beautiful backdrop for any items you place on the shelf. The objects are turned into striking silhouettes. This technique is minimalist, meaning it is simple and not fussy. It adds a sophisticated and cozy glow without adding clutter.
DIY Instructions: Add a Glow to Your Shelf
You can easily add this feature to any floating shelf you already have.
Step 1: Get Your Supplies
- A roll of peel-and-stick LED light tape.
- A clean, dry rag.
- Your existing floating shelf.
Step 2: Clean the Shelf Use your rag to wipe the dust off the bottom surface of the shelf. The sticky tape will hold much better on a clean surface.
Step 3: Stick on the Light Peel the paper backing from the light strip. Carefully press the sticky side onto the bottom of the shelf. It is best to place it near the back edge, close to the wall.
Step 4: Hide the Wire Run the power cord straight down the wall from the shelf. You can use tiny, clear, self-adhesive clips to hold the wire neatly in place against the wall so it is less noticeable.
Step 5: Plug In and Style Plug the cord into an outlet. Turn on the light. Now, arrange a few favorite vases or books on the shelf and see how great they look.
16. Classic Fabric Shade Lamp

Sometimes, the simplest things are the coziest. A traditional table lamp with a fabric shade is a timeless way to add warmth to a room. The fabric softens the light from the bulb, getting rid of any harsh glare.
The light that filters through the shade is gentle and diffused, creating a relaxing atmosphere. A pleated shade with a floral pattern, like this one, adds a touch of classic, comfortable style. It is a homey beacon on a bedside table or in a living room corner.
DIY Instructions: Refresh an Old Lamp
Give an old lamp a new life with a new shade.
Step 1: Find an Old Lamp Base Maybe you have one in your house, or you can find one at a thrift store. Make sure the cord and plug are safe to use.
Step 2: Choose a New Shade Find a fabric lampshade that you like. To make sure it fits, you need to check the fitting type. Most lamps have a “harp,” which is a U-shaped piece of metal. The shade sits on this.
Step 3: Take Off the Old Shade At the very top of the lamp, there is a small knob called a finial. Unscrew it. Lift the old lampshade straight up and off the lamp.
Step 4: Put on the New Shade Take your new lampshade and place it down over the lamp’s harp. Make sure the little ring in the middle of the shade’s wires sits on the harp’s platform.
Step 5: Secure It Screw the finial back on top. This will hold your new shade snugly in place. Add a bulb, plug it in, and enjoy your refreshed lamp.
17. Backlit Vanity Mirror

You can make your bathroom feel like a fancy spa with a modern lighted mirror. This kind of mirror has LED lights built right into it. The light glows from behind the glass or through a frosted part of it.
This provides a soft, even light on your face, with no shadows. It is great for brushing your teeth or washing your face. Many of these mirrors let you change the color of the light. You can make it bright and white for the morning, or warm and yellow for a relaxing bath at night.
DIY Instructions: Use Your Smart Mirror
This is a special mirror you buy, and a grown-up must install it. Here is how to use its cool features.
Step 1: Find the Controls Look closely at the front of the mirror. You should see some small symbols that glow. These are touch-sensitive buttons.
Step 2: Turn It On Gently touch the button that looks like a power symbol (a circle with a line). The mirror’s light will turn on. Touch it again to turn it off.
Step 3: Change the Warmth Look for a button that might look like a sun or have a “C” on it. Touch this button. You should see the color of the light change from a cool, bluish-white to a warm, yellowish glow.
Step 4: Adjust the Brightness Some mirrors have buttons that look like a plus (+) and a minus (-). Press and hold the plus to make the light brighter, and the minus to make it dimmer.
Step 5: Find Your Favorite Setting Play with the controls until you find the light that makes your bathroom feel the most comfortable and relaxing for you.
18. Magical Light Cloche

Capture a tiny, glowing world in a jar. A glass cloche, which looks like a bell, can be turned into a magical lighted decoration. You can create a miniature winter scene inside, with little trees and sparkling lights.
This decoration becomes a beautiful focal point on a table or mantel. It is like having your own little enchanted forest that glows from within. It is a creative way to add a personal and whimsical touch of light to your home during the colder months.
DIY Instructions: Build a Winter Wonderland Cloche
Let’s build a tiny world that lights up.
Step 1: Gather Your Supplies
- A glass cloche with a base.
- A short string of battery-powered copper wire fairy lights.
- Small bottle brush trees.
- Fake snow or white glitter.
- (Optional) Tiny pinecones or a small silver ornament.
Step 2: Prepare Your Base Place the base of the cloche on your table. Arrange the string of fairy lights in a loose pile in the center, with the tiny battery pack hidden at the back.
Step 3: Create Your Scene Sprinkle a layer of fake snow over the lights. Gently push the bases of your little trees into the snow so they stand up. Add your pinecones or ornament.
Step 4: Drape the Lights Loosely drape the rest of the fairy light string around your trees and other items to make them twinkle.
Step 5: Cover Your World Switch the lights on. Carefully place the glass dome down over your scene onto the base. Now you have a beautiful, glowing decoration.
19. Under-Sofa Mood Lighting

Give your living room a cool, futuristic glow by lighting your furniture from below. Placing a strip of LED lights underneath your sofa or armchair creates an amazing effect. It makes heavy furniture look like it is floating on a cushion of light.
This is a form of indirect lighting, so it is soft and does not glare in your eyes. It is great for watching movies because it adds atmosphere without reflecting on the screen. Many LED strips are color-changing, so you can pick a light that matches your mood.
DIY Instructions: Add an Underglow to a Sofa
Here is how to make your couch look like it is from the future.
Step 1: Get Your Gear
- A kit of peel-and-stick LED light tape.
- A clean rag.
- A helper.
Step 2: Prepare the Sofa With your helper, carefully tilt your sofa forward so you can easily reach the bottom frame. Use your rag to wipe any dust off the inside edge of the frame.
Step 3: Stick on the Lights Measure the length you need. Peel the paper backing off the light strip. Carefully press the sticky side onto the bottom frame of the sofa. Run it along the front and sides if you can.
Step 4: Set the Sofa Down Gently lower the sofa back into its place. Make sure you do not pinch the wire.
Step 5: Light It Up Plug the cord into an outlet. Use the remote control that came with your kit to turn on the lights. Try all the different colors to find your favorite.
20. Festive Paper Lantern String

Add a touch of playful charm to a room with a string of paper lanterns. These are not just for parties. They create a soft, gentle light that can make a bedroom or living area feel instantly cozier and more relaxed.
The paper shades diffuse the light, meaning they spread it out and make it less harsh. This creates a dreamy, even glow throughout the space. You can hang them across the ceiling, frame a window, or drape them over a headboard for a fun and festive feeling all year long.
DIY Instructions: Hang Paper Lanterns
Let’s get these fun lights ready to hang.
Step 1: Get Your Lantern Kit You will need a string of lights and a set of small, flat-packed paper lanterns.
Step 2: Open the Lantern Take one paper lantern and gently pull it open so it makes a round shape.
Step 3: Insert the Frame Each lantern comes with a wire frame. Squeeze the frame so it gets skinny. Fit it inside the lantern. Let the frame expand. The top of the frame should hook onto the opening at the top of the lantern to hold it open.
Step 4: Attach to the Light The wire frame usually has a little hook or C-shape at the top. Use this to clip the lantern onto the light cord, right over one of the bulbs.
Step 5: Repeat and Hang Do this for all your lanterns. Once they are all on the string, you can hang them up. Use small, clear, self-adhesive hooks on your ceiling or walls to drape the string exactly where you want it.
21. Faux Fireplace Glow

There is nothing cozier than the dancing flames of a fire. You can get that same warm, flickering effect without a real fireplace. Special light bulbs that mimic flames or small electronic log sets can recreate the look.
This is a safe and easy way to make a room feel warmer and more inviting. Placing these lights in an unused fireplace brings it back to life. You can also group them in a corner or on a shelf. The moving, orange light has a calming effect that is wonderful for a relaxing winter evening.
DIY Instructions: Create a Flameless Fire
Here’s how to make a cozy fire glow anywhere.
Step 1: Gather Your Fire Starters
- A few flame-effect light bulbs. These have LEDs inside that flicker like a real fire.
- Sockets to screw them into. These could be from old lamps or simple cord kits.
- (Optional) An electric fireplace insert or a basket to hold your lights.
Step 2: Choose Your Spot Find a place where you would like a “fire.” This could be an old fireplace, a metal bucket, or a sturdy basket.
Step 3: Set Up Your Bulbs Screw the flame-effect bulbs into their sockets. If you are using a basket, arrange the bulbs and cords inside. Try to hide the cords under a few real (or fake) logs.
Step 4: Plug In Safely Plug the cords into a power strip. Make sure the cords are not stretched tight or placed under a rug.
Step 5: Enjoy the Flicker Switch on the power strip. Your flameless fire will spring to life, filling your room with a warm, dancing glow.
22. Winter Pattern Projector

Turn a blank wall into a piece of winter art. A small projector can cast beautiful, intricate patterns of light, like snowflakes or frosty branches. It is a unique and temporary way to decorate a room for the season.
This method adds a layer of visual interest without adding any clutter. The projected images create a magical, almost theatrical, feel. It is a wonderful way to bring the beauty of winter indoors. The soft light and lovely shapes make any space feel more special and enchanting.
DIY Instructions: Project Some Winter Magic
This is a fun way to decorate with light.
Step 1: Get a Projector You will need a small projector designed for patterns or “gobos.” Some holiday projectors have winter-themed slides.
Step 2: Pick Your Wall Find a plain, light-colored wall where the projection will show up best. The darker you can make the room, the brighter the images will look.
Step 3: Set Up the Projector Place the projector on a table or a shelf. Plug it in and turn it on.
Step 4: Choose a Pattern Insert the slide with the pattern you want to project. Many projectors have a few different ones to choose from.
Step 5: Focus the Image Aim the projector at the wall. You will see a blurry shape. Turn the focus ring on the lens of the projector until the image is sharp and clear. Enjoy your instant wall art!
23. Mantelpiece Candlelight Layers

A fireplace mantel is a natural focal point in a room. You can make it even cozier by layering different kinds of candle-style lights. Electric wall sconces that look like old-fashioned candles provide a steady, warm uplight.
Adding a collection of flameless pillar candles on the mantel itself creates a second, lower layer of flickering light. The glow from all these “candles” reflects in the mirror, making the display look even fuller. This combination of steady and flickering light creates a rich, warm, and inviting atmosphere.
DIY Instructions: Layer Your Mantel Lights
Let’s make your fireplace the coziest spot in the house.
Step 1: Gather Your Candles
- A collection of battery-powered flameless pillar candles. Get them in several different sizes.
- (Optional) A few glass hurricane shades to place some of the candles in.
Step 2: Clear Your Mantel Start with a clean, empty mantelpiece.
Step 3: Arrange the Tallest Items First If you are using hurricane shades, place them first. A good spot is often a little off-center. Put your tallest pillar candles in them.
Step 4: Add the Other Candles Now, arrange the rest of your flameless candles. Group them in little families of two or three. Place some in front of others to create depth.
Step 5: Turn Them All On Switch on all your candles. If you have candle-style sconces on the wall, turn those on too. Step back and see how the different layers of light work together.
24. Cascading Globe Chandelier

Make a big statement in a tall space, like a stairwell or a room with a high ceiling. A cascading chandelier with simple globe lights adds a touch of modern elegance. The lights hang at different lengths, drawing your eye downward.
The frosted glass of the globes diffuses the light, so it is soft and even. There is no harsh glare. This style of fixture fills a large volume of space with a warm, gentle light. It feels both grand and welcoming at the same time, turning a simple staircase into a beautiful feature.
DIY Instructions: Clean Your Glass Lights
This kind of fixture is bought and installed by a professional. Here is how you can keep it looking its best.
Step 1: Gather Cleaning Supplies
- A sturdy stepladder.
- A helper to hold the ladder.
- Two microfiber cloths.
- A small bowl of warm water with a tiny drop of dish soap.
Step 2: Turn Off the Power Safety first! Go to your fuse box and turn off the power to the light fixture.
Step 3: Carefully Unscrew One Globe Climb the ladder. Most of these globes simply screw off their base. Gently twist one counter-clockwise until it comes loose. Hand it down to your helper.
Step 4: Wash and Dry Dip one cloth in the soapy water and wring it out well. Gently wash the inside and outside of the globe. Then, use the second, dry cloth to polish it until it shines and has no streaks.
Step 5: Screw It Back On Carefully climb the ladder and screw the clean globe back into place. Repeat this process for all the other globes, one at a time.
25. Gentle Stairway Path Lights

Walking up or down stairs in the dark can be tricky. Small, low-level lights built into the wall make it much safer. They also add a beautiful, subtle glow to your staircase.
These lights cast small pools of warm light onto each step. This guides your feet without lighting up the whole area. It creates a very calm and peaceful mood at night. It is a thoughtful detail that is both practical and very stylish, making your home feel more secure and cozy.
DIY Instructions: Add Temporary Step Lights
Putting lights in the wall is a job for an electrician. Here’s an easy, temporary way to get a similar look.
Step 1: Get Your Lights
- A package of battery-powered, motion-activated “puck” lights. These are small, round, and stick on.
Step 2: Plan the Placement Decide where you want to put the lights. A good spot is on the wall next to every third or fourth step, about six inches above the step itself.
Step 3: Peel and Stick Put batteries in your puck lights. Peel the paper off the sticky pad on the back. Press each light firmly onto the wall where you planned.
Step 4: Set the Mode Most of these lights have a switch for “On,” “Off,” and “Auto.” Set them all to “Auto.”
Step 5: Test Them Out Wait for the room to get dark. Walk near the stairs. The lights should pop on as you get close and then turn off by themselves a little while after you leave.
26. Natural Woven Pendant Shade

Bring the warmth of natural materials into your home with a woven lampshade. Shades made from rattan, wicker, or bamboo have a relaxed and earthy feel. The open weave allows light to escape in all directions.
This creates interesting, geometric patterns on the ceiling and walls. It adds texture to your room even when the light is off. The warm color of the natural material gives the light a soft, golden quality. It is a simple way to make a space feel more comfortable and connected to nature.
DIY Instructions: Make a Simple Woven Shade
This is a fun craft project to try.
Step 1: Gather Your Materials
- A plain wire lampshade frame (you can get these at a craft store).
- A roll of natural cane webbing or seagrass cord.
- A pair of scissors.
- A bowl of warm water.
Step 2: Prepare Your Weaving Material If you are using cane webbing, soak it in the warm water for about 30 minutes. This makes it soft and bendy. If you are using cord, you do not need to soak it.
Step 3: Start Weaving Take your soft cane or your cord and tie one end to the top ring of the lampshade frame. Now, start weaving it in and out of the vertical wire supports. Go over one wire, then under the next.
Step 4: Keep Going Keep wrapping and weaving your way down the frame. Push the rows together so there are no big gaps. When you finish a piece, tie it off and start a new one.
Step 5: Finish and Dry When the whole frame is covered, tuck the final end in and tie it off securely. Let the shade dry completely. As it dries, it will shrink a little and become tight on the frame.
27. Media Center Backlight

Staring at a bright TV screen in a dark room can be hard on your eyes. Adding a soft glow behind your screen can make watching movies much more comfortable. This is called bias lighting.
It creates a gentle halo of light around the television. This reduces the contrast between the bright screen and the dark wall, which helps to prevent eye strain. It also makes the picture on the screen seem richer and more vibrant. It is a simple trick that makes your media center look great and feel better to use.
DIY Instructions: Add a TV Backlight
This is a very popular and easy project.
Step 1: Get an LED Kit
- You need a USB-powered LED strip light kit. They are made just for this purpose and are sold in many electronics stores.
Step 2: Clean Your TV Unplug your TV. Use a dry cloth to wipe the dust off the back of the television, around the outer edges.
Step 3: Stick on the Strip Peel the paper backing off the light strip. Carefully press the sticky side onto the back of your TV, about an inch in from the edge. Run it all the way around the outside.
Step 4: Plug It In The light strip will have a USB plug on the end. Most modern TVs have a USB port on the back. Plug the light strip into this port.
Step 5: Turn It On Plug your TV back in and turn it on. The light strip will get its power from the TV and will turn on and off automatically with the screen.
28. Moroccan Lantern Shadow Play

Invite a touch of exotic mystery into your home with Moroccan-style lanterns. These lanterns are made of metal with many tiny, intricate holes cut into them. When you place a light inside, they throw spectacular patterns all over the room.
The light escapes through the cutouts and paints the walls and ceiling with beautiful, lace-like shadows. Grouping several lanterns of different sizes together in a corner creates a powerful effect. It is a dramatic and beautiful way to add warm, patterned light to a space.
DIY Instructions: Light a Moroccan Lantern
Here’s how to get the best shadow show from your lantern.
Step 1: Choose Your Lanterns Find one or more metal, cutout-style lanterns that you like.
Step 2: Pick a Light Source You need a very small, bright light source. A single, clear LED bulb on a simple cord kit works very well. For smaller lanterns, you can use a bright, battery-powered fairy light string bunched up inside. A candle is not the best choice, as it can get too hot and does not make sharp shadows.
Step 3: Position the Light Inside Place your light source in the very center of the lantern. You want the bulb to be “floating” in the middle, not touching any side. This will create the sharpest, clearest shadow patterns.
Step 4: Place Your Lantern Put the lantern in a dark corner of a room, close to light-colored walls. The closer it is to a wall, the smaller and sharper the patterns will be.
Step 5: Turn It On Switch on your light. Turn off the other lights in the room and watch the beautiful patterns appear.
29. Overarching Arc Floor Lamps

How do you light the middle of a room if you do not have a ceiling fixture? An arc floor lamp is a stylish answer. These tall lamps have a heavy base and a long, curved arm that reaches out over a sofa or a table.
They provide light right where you need it without requiring any complicated wiring. A single arc lamp can define a seating area. Using two or three together, as shown here, creates a layered and very modern look. The downward-facing shades provide useful light for reading while also adding to the room’s overall warm glow.
DIY Instructions: Assemble an Arc Lamp
These lamps usually come in a box. Here is how you put one together.
Step 1: Unpack Everything Carefully open the box and lay all the pieces out on the floor. Use the box’s cardboard to protect your floor from scratches. You should have a heavy base, several curved tube pieces, a shade, and a bag of screws.
Step 2: Build the Base The first step is usually to attach the first curved tube to the heavy base. There will be a large screw or bolt that goes in from the bottom. Make this very tight.
Step 3: Connect the Arm Pieces Now, connect the curved pieces of the arm together. They usually slide into each other and are secured with small screws. Make sure the holes line up before you put the screws in.
Step 4: Run the Cord Before you attach the last piece, you may need to thread the lamp’s electrical cord up through the tube sections. Gently pull it through from the top.
Step 5: Attach the Shade The last step is to attach the lampshade and put in a light bulb. Ask a friend to help you stand the tall lamp up.
30. Bathtime Candle Sanctuary

Turn your bathroom into a peaceful spa with the simple addition of candlelight. Taking a bath is a relaxing experience, and the soft, flickering light of candles makes it even better. Using flameless candles is a great choice for the bathroom.
You can place them right on the edge of the tub or on a bath tray without any worry. Arrange a collection of them in a corner or around the tub. The warm glow reflecting off the water and tiles creates a serene and calming atmosphere. It is the perfect way to unwind after a long day.
DIY Instructions: Prepare a Candlelit Bath
Let’s get your relaxing spa bath ready.
Step 1: Get Your Candles
- A set of battery-powered, water-resistant flameless candles.
Step 2: Tidy the Tub Area Clear away any clutter from the edges of your bathtub. You want to create a calm, clean space.
Step 3: Arrange Your Candles Place your flameless candles where they will give the most glow. A group in one corner of the tub is a nice idea. If you have a bath tray, you can put a few on there, along with a book and a cup of herbal tea.
Step 4: Add Other Comforts Add some bath salts or bubble bath to the water. Grab your fluffiest towel and lay it nearby.
Step 5: Light the Scene Turn on your electric candles. Then, turn off the main bathroom lights. The room will be filled with a soft, flickering glow that is wonderfully relaxing.
31. Bright and Tidy Closet Light

A dark closet can be a frustrating space. It is hard to find what you are looking for. Adding a simple light makes a huge difference. It turns a cluttered-feeling space into an organized and functional one.
Automatic lights that turn on when you open the door are especially helpful. You no longer have to fumble in the dark to find a pull-cord. A bright, clean light helps you see the true colors of your clothes. It makes getting ready in the morning a much more pleasant experience.
DIY Instructions: Install a Closet Light
You can add a great light to your closet in just a few minutes.
Step 1: Get a Motion-Sensor Light
- You will need a battery-powered or rechargeable LED light bar that has a motion sensor. These are available at most home improvement stores.
Step 2: Choose the Best Location The best place for the light is usually on the ceiling of the closet, just inside the door frame. This way, it will shine down on all your clothes.
Step 3: Mount the Light Most of these lights come with a peel-and-stick magnetic strip. First, stick the strip to the ceiling. Then, the light bar will just click onto the magnet. This makes it easy to take down for recharging.
Step 4: Set the Mode Find the switch on the light. Set it to “Auto” or “Motion” mode.
Step 5: Test It Out Close the closet door and wait a few seconds. Now, open the door. The light should turn on all by itself. It will turn off automatically after you close the door.
32. Art Deco Accent Lamps

Lamps are more than just a source of light; they can be pieces of art. These table lamps show off a bold, glamorous Art Deco style. Their strong shapes, metallic details, and geometric patterns make them beautiful objects even when they are turned off.
When you switch them on, their ribbed or frosted glass shades cast a warm, inviting glow. They are wonderful for a sideboard or console table. They create a sophisticated and cozy atmosphere. This kind of lighting adds personality and a touch of vintage elegance to your space.
DIY Instructions: Style with Accent Lamps
This is not about building a lamp, but about arranging them beautifully.
Step 1: Choose Your Lamps Find one or two accent lamps that you love and that match your room’s style. They do not have to be a matching pair.
Step 2: Pick Your Surface Find a good home for your lamps. A buffet, a console table, or a wide dresser are all great choices.
Step 3: Create a Grouping Place your lamp or lamps on the surface. Now, add a few other decorative objects to create a pleasing arrangement. A good formula is to use something tall (your lamp), something flat (a tray or a book), and something sculptural (a vase or an interesting object).
Step 4: Add a Mirror or Art Hang a large mirror or a piece of artwork on the wall behind your table. This will anchor the whole display and make it look complete. The mirror will also reflect the lamplight.
Step 5: Check the Glow Turn on your lamps in the evening. See how the warm light creates a cozy little corner in your room.
33. Soothing Salt Rock Votives

For a truly natural and calming glow, look no further than Himalayan salt. These square candle holders are carved from solid blocks of pink salt rock. Each one is unique, with its own beautiful colors and patterns.
When you place a small light inside, the salt rock glows from within with a warm, amber-pink light. This kind of light is very soft and is said to be very relaxing. Grouping several of them together on a tray creates a serene and earthy centerpiece that brings a feeling of peace to any room.
DIY Instructions: Create a Salt Votive Display
Let’s make a simple, calming light feature.
Step 1: Get Your Votives
- You will need several Himalayan salt rock votive or tea light holders.
- A set of battery-powered flameless tea lights. (It’s better not to use real candles, as the melted wax can be messy in the salt holders).
Step 2: Find a Tray Choose a simple, flat tray to hold your collection. A dark wood or slate tray will make the pink glow of the salt stand out nicely.
Step 3: Arrange the Votives Place your salt rock holders on the tray. You can line them up neatly, or cluster them together in a more organic-looking group.
Step 4: Add the “Flame” Switch on your flameless tea lights and drop one into the hole in the top of each salt rock holder.
Step 5: Enjoy the Calm Place your new decoration on a coffee table or a bedside stand. The soft, warm light is wonderful for creating a peaceful mood for meditation or just relaxing.
34. Sparkling Holiday Garland

A simple string of greenery can be transformed into a magical holiday decoration with the addition of tiny lights. Weaving fairy lights through a pine garland makes it sparkle and come to life.
This is a classic way to decorate a mantelpiece, a doorway, or a staircase for the winter season. The warm points of light mixed with the dark green of the pine needles create a beautiful contrast. Adding natural elements like pinecones and dried oranges makes it even more festive and cozy.
DIY Instructions: Light Up a Garland
Let’s make your holiday greens twinkle.
Step 1: Gather Your Materials
- A pine garland (real or artificial).
- A long string of micro fairy lights on a thin wire. Warm white is a good color choice. Battery-powered ones are easiest to use.
Step 2: Lay Out Your Garland Lay your garland down flat on the floor. This makes it much easier to work with.
Step 3: Secure the Start Take the end of your light string (the end without the battery pack) and tuck it deep into the greenery at one end of the garland. Wrap it around a sturdy branch to hold it in place.
Step 4: Weave the Lights Start wrapping the light string loosely around the garland. As you go, poke some of the little lights deeper into the pine needles and leave some sitting on top. This will make it look more natural. Continue until you reach the other end.
Step 5: Place Your Garland Now, carefully lift your lighted garland and drape it over your fireplace mantel or wherever you want to display it. Tuck the battery pack out of sight.
35. Flattering Vanity Sconces

The lighting in a bathroom is very important. Lights placed on the sides of a mirror are much better than a light from above. Side sconces cast an even, flattering light across your face.
This gets rid of the harsh shadows under your eyes and chin that an overhead light can create. It makes tasks like shaving or putting on makeup much easier. This combination of different sconce styles adds visual interest while providing a bright, clean, and useful light that makes the whole bathroom feel more like a high-end hotel.
DIY Instructions: Choose Your Best Bathroom Lights
Installing new lights is a job for an electrician. But choosing the right ones is all you!
Step 1: Think About Placement The best place for bathroom vanity lights is on either side of the mirror. They should be at about eye level. This is called cross-illumination.
Step 2: Choose a Style Look for sconces that match the style of your bathroom fixtures, like your faucet and towel racks.
Step 3: Check the Shade Choose lights that have a frosted or shaded cover. You do not want to be looking at a bare, glaring bulb. The shade will soften the light and make it more comfortable.
Step 4: Pick the Right Bulb When you buy light bulbs, look for ones that give off a clean, natural-looking light. The box might say “daylight” or “cool white.” For a warmer, cozier feel, you can choose “soft white.”
Step 5: Call a Professional Once you have your new lights, call a qualified electrician to install them safely for you.
Transforming your home into a warm haven is simpler than you might think. Light is one of the most powerful tools in your decorating kit. It sets the mood and makes a space feel truly lived-in and comfortable.
You have seen how a simple string of lights, a well-placed lamp, or a collection of flameless candles can work wonders. Each idea is a small step toward creating a home that feels like a warm hug on a cold day.
Do not let the winter blues settle in. Choose a few of these ideas and spend an afternoon brightening your space. You will create a cozy retreat that you and your family will love all season long.
Key Takeaways
- Layer Your Lights: Combine different light sources, like floor lamps, table lamps, and accent lights, to create depth and warmth.
- Warmth is a Color: Always choose light bulbs labeled “warm white” or “soft white” for a cozy, yellowish glow instead of a harsh, blueish one.
- Go Indirect: Soften a room by bouncing light off walls and ceilings. Backlighting a TV or headboard creates a beautiful, gentle ambiance.
- Play with Shadows: Use woven shades, patterned lanterns, or spotlights on plants to create interesting textures and patterns on your walls.
- Embrace the Flicker: Flameless candles are a safe and incredibly effective way to add the gentle, moving light that makes any space feel instantly more intimate.
- Light with Purpose: Use focused lights to highlight things you love, like artwork, a reading chair, or a beautiful bookshelf.