Winter arrives with a quiet chill. The days grow shorter, and the light softens. We find ourselves looking inward, searching for warmth and comfort within the walls of our own homes. It is a natural desire to find a small, personal space for retreat.

A reading nook is more than just a chair in a corner. It becomes your personal haven. This is a quiet place for stories, warm drinks, and peaceful thoughts. It is an escape you can build with your own hands, right where you are.
You do not need a large room or a big budget to create this sanctuary. A forgotten corner, an unused alcove, or a simple spot by a window holds all the potential you need. A few thoughtful touches can transform it completely.
We have gathered 40 distinct transformations to spark your imagination. You will find ideas for every taste, from rustic cabins to celestial hideaways. Each one includes a simple DIY project, helping you add that personal element that makes a space truly yours. Let’s find your spot.
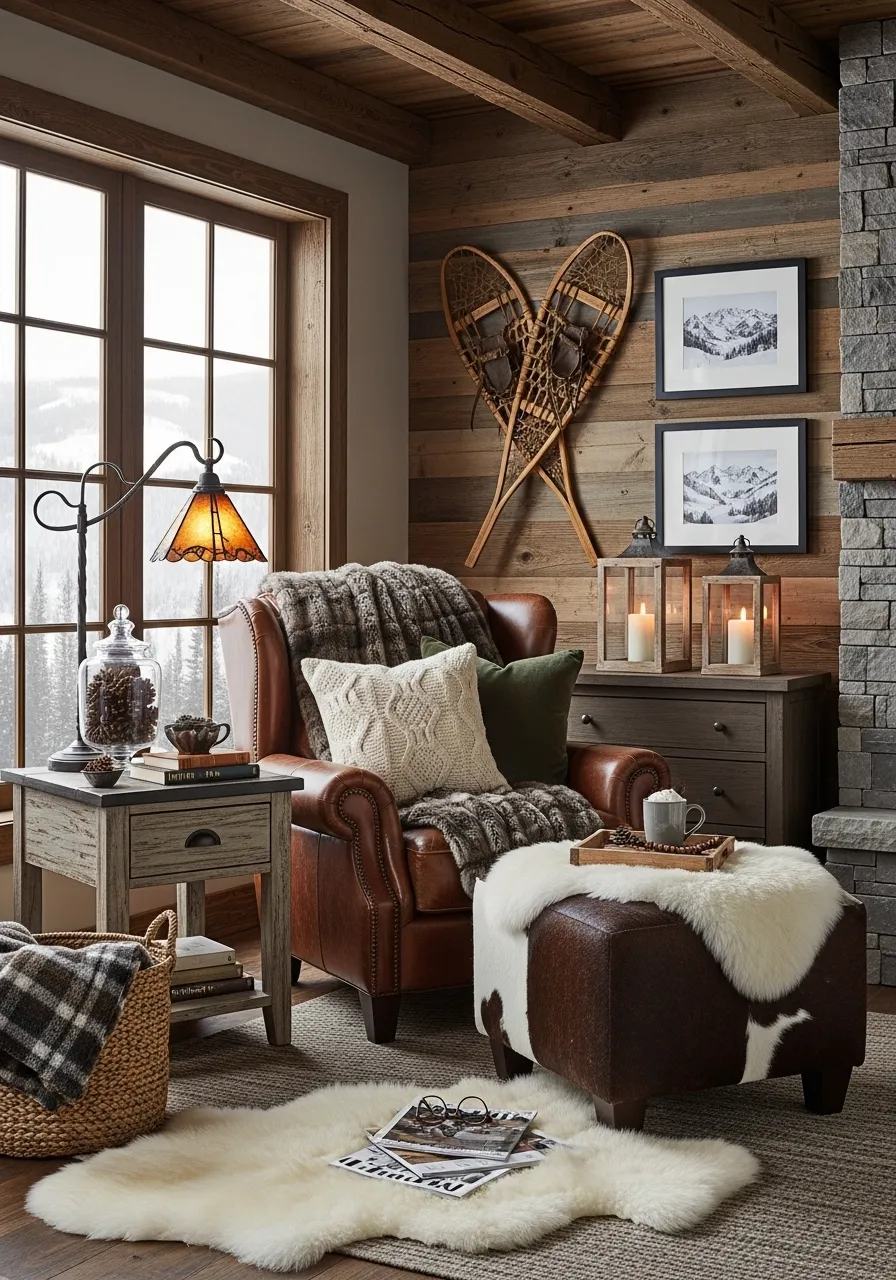
1. The Rustic Lodge Retreat

This reading spot feels like a warm mountain cabin. A comfortable leather chair provides the main invitation to relax. Nearby, a stone fireplace waits to crackle and glow. The room is wrapped in natural wood, creating a secure and snug atmosphere for a winter afternoon.
Every detail adds to the comfort. Soft faux fur and chunky knit pillows make the chair even more inviting. A plush sheepskin rug lies on the floor, a treat for cold feet. Through the window, a snowy landscape is visible. It is a quiet space to enjoy a story while the weather turns cold outside.
DIY: Easy Rustic Snowshoe Wall Decor
Let’s create some cool wall art like the one in the picture! This project is fun and gives your room a cozy cabin vibe.
Step 1: Gather Your Supplies! You will need:
- Two vintage-style snowshoes (you can find these at craft stores or flea markets).
- Some rustic twine or thin rope.
- A clean, soft cloth.
- A grown-up to help you with hanging.
- Two strong wall hooks or nails.
Step 2: Clean Your Snowshoes
- First, use your soft cloth to gently wipe all the dust and dirt from the snowshoes. You want them to look their best before they become your new decoration.
Step 3: Criss-Cross the Snowshoes
- Lay your snowshoes on the floor.
- Place one on top of the other to form an “X” shape. You can decide how wide or narrow you want the “X” to be.
- Once you like how they look, hold them together tightly.
Step 4: Tie Them Up!
- Take your twine and wrap it around the middle part where the snowshoes cross.
- Wind the twine around several times, making sure it’s snug.
- Tie a double knot to secure them together. Ask your grown-up helper to check if it’s tight enough.
Step 5: Hang Your Creation!
- Ask your grown-up to install the hooks or nails on the wall where you want your decoration.
- Carefully lift your snowshoe creation and hang it on the hooks. You can rest the top wooden frames of the snowshoes on the hooks.
- Step back and admire your new rustic wall art!
2. The Sunlit Scandi Nook

This window seat is a lesson in simple comfort. Built with light-colored wood, it creates a clean and airy space to watch the snow fall. The design feels modern and calm, letting in lots of natural light. A soft glow from underneath the seat adds extra warmth during gray winter days.
Plush gray cushions make the spot welcoming for hours of reading. A single pendant light hangs above, offering a gentle light for the evenings. Nearby, a simple floating shelf holds a few favorite books. This nook proves that a cozy corner does not need a lot of clutter, just thoughtful design.
DIY: Simple Floating Bookshelf
Let’s make a cool floating shelf just like the one in the picture. It’s a great way to display your favorite books!
Step 1: Gather Your Stuff! You’ll need:
- A flat piece of wood for your shelf (ask a grown-up to help you get one from a hardware store).
- Two “L” shaped metal brackets.
- Screws for the wall and for the shelf.
- A pencil.
- A level (it looks like a ruler with a bubble in it).
- A grown-up helper with a drill.
Step 2: Pick Your Spot
- Decide where you want your shelf to go. Hold the wood against the wall to see how it looks.
- Use your pencil to make a small mark on the wall where the bottom of the shelf will be.
Step 3: Make it Straight
- Place your level on the line you drew.
- Wiggle the level until the bubble is exactly in the middle. This means your line is straight.
- Draw a straight line across the wall using the level as your guide.
Step 4: Attach the Brackets
- This is a job for your grown-up! They will use the drill to attach the two L-brackets to the wall right underneath the line you drew. They should make sure the brackets are screwed into the strong parts of the wall.
Step 5: Add Your Shelf!
- Place your wooden board on top of the brackets.
- Ask your grown-up to use the drill one last time to put screws in from the bottom of the brackets up into the wood. This keeps your shelf from wiggling.
- Now you can decorate it with your best books, a small plant, or your favorite mug!
3. The Stargazer’s Attic Hideaway

This attic room transforms into a personal galaxy. The deep blue walls and ceiling are covered in glowing constellations, making it feel like you are floating in space. A special projector adds a moving nebula effect, filling the room with cosmic wonder. It’s a magical escape for any aspiring astronomer.
Comfort is key for stargazing. Two oversized velvet beanbag chairs offer plush seating. A telescope sits ready by the window, pointed towards the real night sky. Strands of fairy lights drape across the room, adding a soft, twinkling glow that completes this dreamy celestial retreat.
DIY: Twinkling Fairy Light Constellation
You can make the stars on your wall glow! This is a super easy way to create your favorite constellation.
Step 1: Get Your Galaxy Tools! You’ll need:
- A string of fairy lights (the kind with thin, bendy wire works best).
- Small, clear wall hooks or clear tape.
- A printout of a simple constellation, like the Big Dipper or Orion.
- A pencil.
Step 2: Choose Your Stars
- Pick a spot on your wall where you want your constellation to be.
- Look at your printout. Using your pencil, make little dots on the wall where the main stars of the constellation are.
Step 3: Place Your Hooks
- Stick your clear hooks onto the pencil dots you just made. These will be the points of your stars that hold the lights. If you are using tape, have it ready.
Step 4: Connect the Stars!
- Start at one end of your constellation. Begin wrapping and draping your fairy light string from one hook to the next.
- Follow the pattern on your printout to connect the dots and create the shape of your constellation. Use clear tape to help hold the wire in place if needed.
Step 5: Light Up the Night!
- Plug in your fairy lights or turn on the battery pack.
- Turn off the room lights and watch your very own constellation sparkle on the wall!
4. The English Countryside Corner

This cozy nook feels like a page from a classic storybook. The walls and armchair are covered in a charming floral pattern, creating a soft and gentle look. The sloped ceiling adds to the snug feeling, making it a wonderful little hideaway. Warm light from a traditional table lamp makes the space feel extra inviting.
Every detail contributes to the room’s character. A small, painted table holds a teacup and saucer, ready for a warm drink. A nearby shelf is filled with classic books and a collection of delicate china. This spot is a tribute to timeless comfort, a quiet corner to get lost in a good book.
DIY: Pretty Teacup Candle
Let’s turn a beautiful teacup into a cozy candle. It looks lovely and is really fun to make.
Step 1: Find Your Supplies! You’ll need:
- A pretty teacup you don’t use for drinking.
- Candle wax flakes (you can get these at a craft store).
- A candle wick with a little metal circle on the bottom.
- A popsicle stick or a clothespin.
- A microwave-safe bowl or measuring cup.
- A grown-up to help with the hot wax.
Step 2: Get the Wick Ready
- Place the metal bottom of the wick right in the center of the bottom of your teacup.
- Lay the popsicle stick across the top of the teacup.
- Drape the top of the wick over the stick and use a clothespin to hold it in place, or just wrap it around the stick. This keeps the wick standing up straight.
Step 3: Melt the Wax
- This is a grown-up’s job! Ask them to pour some wax flakes into the microwave-safe bowl.
- They should heat it in the microwave in short bursts until it’s all melted and clear.
Step 4: Pour the Candle
- Your grown-up helper should now carefully pour the hot, melted wax into the teacup.
- Fill it up, but leave a little space at the top.
Step 5: Let It Cool!
- Now you have to be patient. Let the teacup sit for a few hours until the wax is completely hard and white.
- Once it’s hard, take off the popsicle stick and trim the wick so it’s about half an inch long.
- Now you have a beautiful new candle! Ask a grown-up to light it for you.
5. The Autumn Spice Sanctuary

This reading corner is wrapped in the warm colors of fall. A comfy, low-slung chair in a rich terracotta color invites you to settle in. The space is filled with earthy tones of orange, brown, and mustard, creating a deeply relaxing atmosphere. It’s a great spot to curl up on a chilly day.
Textures make this nook special. A chunky, hand-knitted blanket is draped over the chair, and soft velvet pillows add another layer of comfort. A salt lamp gives off a gentle, warm light, while candles flicker on a small wooden table. This space is all about creating a feeling of warmth and well-being.
DIY: Dried Orange Garland
You can make a beautiful garland like the one in the picture. It looks pretty and makes the room smell amazing!
Step 1: Gather Your Fruity Supplies! You’ll need:
- One or two large oranges.
- A knife for slicing (a grown-up’s job!).
- An oven.
- A baking sheet lined with parchment paper.
- Paper towels.
- A long piece of twine or string.
- A large needle or a skewer.
Step 2: Slice the Oranges
- Ask your grown-up helper to carefully slice the oranges into thin, round pieces. They should be about as thick as a coin.
Step 3: Dry Them Off
- Lay the orange slices on a paper towel.
- Use another paper towel to gently press on top of them. This soaks up some of the extra juice.
Step 4: Time to Bake!
- Place the dried orange slices on your baking sheet in a single layer.
- Your grown-up will put them in the oven on a very, very low heat (around 200°F or 95°C).
- Let them bake for about 2-3 hours, flipping them over halfway through, until they are dry and a little bit see-through.
Step 5: String Them Together!
- Let the orange slices cool down completely.
- Carefully use your needle or skewer to poke a hole near the top of each slice.
- Thread your twine through the holes, leaving a little space between each orange slice.
- Tie a loop at each end, and your beautiful garland is ready to hang!
6. The Serene Candlelit Corner

This nook is a bright and peaceful retreat. A simple gray sofa sits in a corner blessed with plenty of natural light from the windows. The room’s white walls and light wood floor create a clean, minimalist feeling. It is a calm backdrop for a quiet afternoon with a cup of coffee.
The real magic happens with the lighting. A large tray on the floor holds a cluster of white pillar candles. When lit, they create a warm and mesmerizing glow. Houseplants add a touch of green life to the space, while a soft, textured rug makes the area feel complete and comfortable.
DIY: Cozy Candle Cluster Tray
Let’s make a beautiful candle centerpiece. It’s very simple and makes any corner feel warm and special.
Step 1: Find Your Centerpiece Parts! You’ll need:
- A large, flat tray with a little lip or edge. It can be round or square.
- A collection of pillar candles. Get different sizes and heights to make it interesting.
- An adult to help you with lighting the candles.
Step 2: Clean Your Tray
- Make sure your tray is clean and dry. Wipe it down with a cloth so your candles have a nice, clean place to sit.
Step 3: Arrange Your Candles
- This is the fun part! Start placing your candles on the tray.
- Put the tallest candle in the middle or slightly off-center.
- Arrange the smaller candles around the tall one. There are no rules, just place them in a way that looks good to you. Make sure they aren’t tipping over.
Step 4: Check Your Work
- Step back and look at your arrangement. Do you like it? You can move the candles around until you are happy with how they look. Make sure they are not too crowded.
Step 5: Time to Glow!
- Place your finished candle tray on the floor, on a sturdy table, or anywhere you want to add some cozy light.
- Ask your grown-up to carefully light the candles for you. Never light them yourself, and never leave them burning when you leave the room.
- Enjoy the warm, flickering light!
7. The Enchanted Forest Nook

This reading corner transports you to a magical woodland. A stunning wall mural of a misty forest creates an immersive backdrop. Real birch tree trunks stand in the corner, making it feel like you are truly among the trees. The space is a nature lover’s dream, a perfect escape from the everyday world.
The furniture and decor continue the forest theme. A deep green sofa is nestled against the wall, covered in soft pillows. Cushions shaped like mossy stones are scattered on the floor, and a small table looks just like a tree stump. Lanterns and fairy lights add a touch of gentle, mystical light to this enchanting hideaway.
DIY: Fun Mossy Stone Pillows
Let’s make some squishy “stones” for your floor! They look like they came right out of a forest but are super comfy to sit on.
Step 1: Gather Your Forest Materials! You’ll need:
- Gray fleece or felt fabric (enough to make a big pillow).
- Scissors.
- A grown-up with a sewing machine (or a needle and thread if you are patient!).
- Lots of pillow stuffing or cotton batting.
- Green craft moss.
- Fabric glue.
Step 2: Cut Your Stone Shape
- Fold your fabric in half.
- Draw a big, round, slightly wobbly stone shape on the fabric with a marker. It doesn’t have to be a perfect circle.
- Carefully cut out the shape through both layers of fabric. You should now have two identical stone shapes.
Step 3: Sew Your Stone
- Ask your grown-up to help you sew the two pieces of fabric together around the edges.
- Make sure they leave a small opening, about the size of your hand, so you can stuff it.
Step 4: Stuff It!
- Turn the fabric stone inside out so the seams are on the inside.
- Start pushing the pillow stuffing inside through the opening. Keep stuffing until your stone is plump and firm.
Step 5: Add the Moss!
- Ask your grown-up to help you sew the little opening closed.
- Now, take your fabric glue and put dabs of it on your stone pillow where you want the moss to be.
- Press small clumps of the green craft moss onto the glue. Let it dry completely.
- Now you have a cool, comfy mossy stone for your room!
8. The Gatsby Glamour Spot

This reading nook is all about luxury and style. An elegant armchair in a rich, jewel-toned velvet takes center stage. The whole corner has a vintage, glamorous feel, reminiscent of a classic movie. It is a sophisticated spot to relax with a book and a fancy drink.
The details are what make this space shine. A folding screen made of antiqued mirrors adds depth and reflects the light beautifully. Gold-accented tables, crystal lamps, and a stylish bar cart complete the opulent look. A soft faux fur blanket draped over the chair provides the final touch of cozy indulgence.
DIY: Glamorous Gold Picture Frame Tray
You can create a fancy tray for your treasures. It looks very elegant and is easy to make from an old picture frame.
Step 1: Collect Your Glam Supplies! You’ll need:
- An old picture frame with a nice, decorative edge.
- Gold spray paint.
- A piece of mirror that fits inside the frame (ask a grown-up to get this from a craft or hardware store).
- Strong glue (like E6000 or a hot glue gun).
- Newspaper or an old sheet to protect your workspace.
Step 2: Prepare Your Frame
- Take the glass and the cardboard backing out of the picture frame.
- Make sure the frame is clean and dry.
Step 3: Go for the Gold!
- In a place with lots of fresh air, like outside, lay your frame down on the newspaper.
- Shake the can of gold spray paint well.
- Spray a light, even coat of paint all over the frame. Let it dry.
- You might need to add a second coat to make it look extra shiny and solid. Let it dry completely.
Step 4: Add the Mirror
- This part is for your grown-up helper.
- They need to carefully run a line of strong glue along the inside ledge of the frame where the glass used to sit.
- Then, they will gently place the mirror into the frame, pressing it down into the glue.
Step 5: Let It Set and Style It!
- Let the glue dry for as long as the instructions say.
- Once it’s ready, you have a beautiful new tray! You can use it to hold jewelry, small decorations, or a fancy glass.
9. The Breezy Coastal Cove

This reading spot feels like a calm day at the beach. A large, comfortable white armchair is tucked into a bay window, creating a bright and airy corner. The clean white walls and natural light give the space a fresh, open feel. It is a peaceful place to escape and listen to the quiet.
The decor brings the seaside inside. A woven jute rug feels like sand underfoot, while side tables made of raw wood look like driftwood. Large seashells are placed around the room as natural art. A clear vase holding tall pampas grass adds a final, soft touch, like reeds swaying in a gentle coastal breeze.
DIY: Awesome Seashell Bookends
Let’s make some beachy bookends to hold your favorite stories. It’s like bringing a piece of the ocean to your bookshelf!
Step 1: Go on a Treasure Hunt for Supplies! You’ll need:
- Two plain wooden or metal bookends (the “L” shaped kind).
- A collection of seashells. You can use shells you found at the beach or buy a bag from a craft store.
- A hot glue gun and glue sticks.
- A grown-up to be your hot glue gun helper.
Step 2: Plan Your Design
- Lay one of your bookends down flat.
- Arrange your seashells on the upright part of the bookend. Play around with them until you create a design you really like. Put the biggest shells on first, then fill in the gaps with smaller ones.
Step 3: Get Gluing!
- Ask your grown-up to turn on the hot glue gun and let it heat up.
- Once it’s ready, they can help you put a dab of hot glue on the back of your biggest shell.
- Quickly and carefully press the shell onto the bookend where you planned for it to go.
Step 4: Build Your Shell Art
- Keep gluing your shells on one by one, following your design.
- Use smaller shells to cover any empty spots. You can even overlap them a little bit.
- Do the same thing for the second bookend. Try to make it look similar to the first one.
Step 5: Let Them Dry!
- Let your bookends sit for about an hour to make sure the glue is completely cool and hard.
- Now they are ready! Slide them onto your shelf and stack your books in between your new coastal creations.
10. The Scholar’s Attic Study

This reading nook is a classic library retreat. Tucked under the eaves of an attic, it is surrounded by floor-to-ceiling bookshelves filled with old volumes. A stately wingback chair offers a distinguished and comfortable place to sit. It’s a timeless space for deep thinking and quiet contemplation.
The atmosphere is studious and warm. A traditional wooden desk holds a vintage typewriter and writing tools. The iconic green banker’s lamp casts a focused glow on the open book, providing gentle light. With maps on the wall and stacks of books on the floor, this corner is a celebration of knowledge and history.
DIY: “Aged” Treasure Map Wall Art
Let’s make a piece of paper look like a very old and important map from a long time ago. It’s a fun trick!
Step 1: Get Your Explorer’s Kit! You’ll need:
- A piece of white paper. You can print an old-looking map or a cool drawing on it.
- A black teabag.
- A cup of warm water.
- A shallow pan or dish that is bigger than your paper.
- A picture frame.
Step 2: Brew Some “Aging” Potion
- Put the teabag in the cup of warm water and let it sit for a few minutes. You want the tea to be dark and strong. This is your magic liquid that will make the paper look old.
Step 3: Stain Your Map
- Place your paper map into the shallow pan.
- Gently pour the tea all over the paper. You can also use the wet teabag to dab onto the paper to make some spots darker than others. Make sure the whole paper gets wet.
Step 4: Add Some Wrinkles
- Very, very gently, take the wet paper out of the pan.
- Carefully crumple it into a loose ball. Don’t rip it!
- Then, just as carefully, open it back up and flatten it out. The wrinkles will make it look even older.
Step 5: Let It Dry
- Lay your wet, crinkly, tea-stained map on a flat surface to dry completely. This might take a few hours. You can also ask a grown-up to help you dry it in an oven on the lowest temperature for a few minutes.
Step 6: Frame Your Treasure!
- Once your map is totally dry, it will feel a bit stiff and look brown and ancient.
- Place it inside your picture frame. Now you have a piece of “history” to hang on your wall!
11. The Bohemian Floor Lounge

This corner is a vibrant and free-spirited retreat. Instead of a traditional chair, the seating is a collection of colorful floor cushions and layered rugs. The space feels relaxed and informal, inviting you to lounge comfortably. Piles of books and records are ready for a lazy afternoon of reading and listening to music.
Every element adds to the eclectic charm. Houseplants of all sizes bring life and fresh air to the room, while a beautiful Moroccan-style lantern hangs from the ceiling. A string of warm café lights adds a magical glow. This reading spot is a testament to personal style and cozy, creative living.
DIY: Easy Macrame Wall Hanging
Let’s make a simple and beautiful macrame hanging for your wall. It’s a classic boho decoration and is very calming to create.
Step 1: Gather Your Knotting Gear! You’ll need:
- A wooden dowel or a smooth stick from your yard.
- Macrame cord or thick cotton rope.
- Scissors.
Step 2: Cut Your Cords
- Cut six long pieces of your macrame cord. A good starting length is to make each one as long as you are tall.
- This will give you plenty of cord to work with for your knots.
Step 3: Attach the Cords to the Stick
- Take one piece of cord and fold it in half to make a loop at the top.
- Place the loop over your stick, then pull the two loose ends through the loop and pull it tight. This is called a Lark’s Head knot.
- Do this with all six of your cords, so they are all hanging from your stick.
Step 4: Start Knotting!
- Now we will make simple square knots. Take the first four cords on the left.
- Take the far left cord and cross it over the two middle cords, making a “4” shape.
- Take the far right cord, bring it under the two middle cords, and up through the loop of the “4”. Pull it tight. That’s half a knot!
- Now do the opposite: take the far right cord and cross it over the two middle cords. Take the far left cord, bring it under the middle cords, and up through the new loop. Pull tight to complete the square knot.
- Make rows of these knots to create a pattern. You can alternate which four cords you use to create a diamond shape.
Step 5: Finish It Off!
- Once you are happy with your design, you can leave the bottom cords long and loose or trim them to a point or a straight line.
- Tie another piece of cord to both ends of your stick to create a hanger. Now you have a beautiful piece of boho art!
12. The Urban Industrial Loft

This reading nook combines rugged materials with a view of the city. A worn leather club chair sits by a large window, offering a front-row seat to the skyline. The look is strong and masculine, with exposed pipes and concrete textures. It is a modern space for quiet reflection high above the busy streets.
The decor is thoughtfully chosen. A heavy, chunky-knit blanket adds softness to the tough leather chair. A side table made of wood and metal fits the industrial theme, as does the simple pipe-style floor lamp. This spot proves that comfort can be found in a bold, contemporary setting.
DIY: Cool Industrial Pipe Lamp
Let’s make a lamp that looks like it’s made of old pipes. It’s a very cool and simple project for a grown-up to help you with.
Step 1: Get Your Industrial Parts! You’ll need:
- Several pieces of black or copper pipe and pipe fittings (elbows, T-fittings, and a base flange). You can find these at a hardware store.
- A light cord kit with a socket, plug, and switch.
- An Edison-style light bulb (the kind with the cool filament inside).
- A grown-up helper who knows about basic wiring.
Step 2: Design Your Lamp
- Lay out your pipe pieces on the floor and decide what shape you want your lamp to be. You can make it tall and straight, or have it bend at an angle.
- The flange piece will be the flat base that the lamp stands on.
Step 3: Thread the Cord
- This is the most important step for your grown-up. They need to carefully thread the light cord through the pipe pieces before you screw them all together.
- Start from where the light bulb will be and feed the wire all the way down to the base.
Step 4: Build Your Lamp
- Once the cord is threaded through, start screwing all the pipe pieces together tightly.
- Your lamp should be able to stand up on its own on the flange base.
Step 5: The Electrical Part (Grown-Ups Only!)
- Your grown-up helper will now need to attach the wires from the cord to the light socket according to the kit’s instructions. This is a very important safety step.
- Once the socket is wired, it should fit snugly into the top pipe opening.
Step 6: Light It Up!
- Screw in your Edison bulb.
- Plug in your new lamp and flip the switch. You’ve made an awesome industrial light!
13. The Minimalist Zen Tea Room

This space is a peaceful corner for quiet moments. It is inspired by Japanese design, with a focus on simplicity and natural materials. Low cushions on a tatami mat provide the seating, encouraging a grounded and mindful posture. The room feels calm and uncluttered, a true escape from noise.
The beauty is in the details. A large paper lantern gives off a soft, diffused light, while a simple vase holds a single branch. A low wooden table is just big enough for a teapot and a cup. This nook is not just for reading; it is a place for finding balance and tranquility.
DIY: Simple Paper Lantern Light
You can make a beautiful paper lantern to give your room a soft, peaceful glow.
Step 1: Gather Your Zen Supplies! You’ll need:
- A plain white paper lantern (you can buy these at a craft store, they usually come folded up with a wire frame).
- A simple light cord kit that you can hang from the ceiling (get a grown-up to help pick one out).
- A low-wattage LED light bulb (it’s important that it doesn’t get hot).
Step 2: Open Up Your Lantern
- Carefully take your lantern out of the package.
- Follow the instructions to expand it. Usually, you just have to insert a wire frame inside that pops the paper ball into its round shape.
Step 3: Install the Light (Grown-Up Job!)
- This part is for your grown-up. They will need to hang the light cord from the ceiling where you want your lantern to be. This might involve installing a small hook.
- They should follow the instructions that came with the light kit.
Step 4: Put it All Together
- Before they hang it, they should feed the cord down through the top opening of your paper lantern.
- Screw in the low-wattage LED bulb into the socket at the end of the cord. The bulb will now be inside the lantern.
Step 5: Hang and Glow
- Your grown-up can now hang the entire thing from the hook in the ceiling.
- Plug it in, turn it on, and enjoy the beautiful, soft light from your new Zen lantern.
14. The Crafter’s Creative Corner

This reading spot is also a hub of creativity. A comfortable armchair is surrounded by shelves and pegboards, all neatly organized with art supplies. It’s a bright and inspiring space, showing that a cozy nook can be practical too. The room is filled with color and potential projects.
Everything has its place. Jars of pens, spools of ribbon, and baskets of yarn are all within easy reach. A rolling cart holds even more tools, ready to be moved wherever inspiration strikes. This corner is a wonderful place to not only read about new ideas but to bring them to life as well.
DIY: Super Organized Pegboard Station
Let’s make a pegboard to organize all your cool stuff, just like in the picture! It’s like a puzzle you get to design yourself.
Step 1: Get Your Organizing Tools! You’ll need:
- A pegboard (you can get these at a hardware store).
- Screws and spacers (these keep the board a little bit away from the wall so the hooks can fit).
- A variety of pegboard hooks, baskets, and holders.
- A grown-up helper with a drill and a level.
Step 2: Plan Your Layout
- Lay the pegboard on the floor.
- Place all your supplies on it to see where you want everything to go. Put your scissors, tape, markers, and other tools where they will be easy to grab.
Step 3: Hang the Pegboard
- This is a job for your grown-up. They will use the level to make sure the pegboard will be straight on the wall.
- Then, they’ll use the drill to attach the pegboard to the wall with the screws and spacers. The spacers are very important!
Step 4: Add Your Hooks
- Now for the fun part! Start putting your hooks and baskets into the little holes on the board.
- You can create a spot for everything. Use long hooks for spools of thread, small baskets for pens, and clips for important notes.
Step 5: Organize Your Stuff!
- Hang up all your tools and supplies on your new pegboard.
- You can change it around anytime you want. Now your craft corner is neat, tidy, and ready for your next project!
15. The Magical Fort Getaway

This reading nook is pure childhood magic. A cozy fort has been built with blankets and pillows, creating a secret world for stories and dreams. The space is filled with soft things to lean on and cuddle, making it the ultimate cozy hideout. It’s a wonderful place for imagination to run wild.
Twinkling star-shaped lights and glowing candles (the battery-powered kind) add to the enchanting atmosphere. Teddy bears and stuffed friends are invited to the reading party, and a small tray holds a warm drink. This fort is a reminder that you can build your own little sanctuary anywhere.
DIY: Star Garland with Twinkle Lights
Let’s make a star garland to decorate your fort or your room. It’s easy and looks so magical when it’s finished.
Step 1: Collect Your Starry Materials! You’ll need:
- Cardstock paper in your favorite colors (like blue, pink, or gold).
- A star-shaped cookie cutter or a stencil.
- A pencil.
- Scissors.
- A hole punch.
- A long piece of ribbon or string.
- A string of fairy lights.
Step 2: Make Your Stars
- Use your star stencil or cookie cutter to trace lots of star shapes onto your cardstock paper.
- Carefully cut out all of the stars with your scissors.
Step 3: Get Them Ready to Hang
- Use your hole punch to make one hole at the top point of each star.
Step 4: String the Stars
- Take your ribbon and start threading it through the holes in your stars.
- Leave a little bit of space between each star. Keep going until you have a long chain of stars.
Step 5: Add the Twinkle!
- Lay your star garland on the floor.
- Take your string of fairy lights and lay it next to the garland.
- Gently wrap the fairy light wire around the ribbon between the stars.
- Now, when you hang up your garland and turn on the lights, the whole thing will sparkle!
16. The Indoor Jungle Oasis

This reading nook is a lush, green paradise. A comfortable rattan chair is nestled among a huge collection of houseplants, making it feel like you are sitting in a vibrant greenhouse. The air is fresh and the atmosphere is incredibly peaceful. It is the best spot for a nature lover who lives in the city.
The room is designed to help the plants thrive. Grow lights provide extra sunshine, and a humidifier keeps the air moist. The many hanging and potted plants create a living curtain of green in front of the window. This corner is a beautiful reminder of the calming power of nature.
DIY: Simple Beaded Plant Hanger
Let’s make a pretty hanger for one of your plants. It’s a simple way to add some decoration and lift your plant up to the sunshine.
Step 1: Gather Your Crafting Supplies! You’ll need:
- Three long pieces of sturdy macrame cord or yarn.
- A small metal or wooden ring.
- A handful of wooden beads with large holes.
- Scissors.
- A small potted plant.
Step 2: Start Your Hanger
- Take your three long pieces of cord and thread them through the ring.
- Slide the ring to the middle of the cords. You should now have six strands of cord hanging down from the ring.
- Tie a big knot right under the ring to hold all the cords together.
Step 3: Add Some Beads
- About six inches down from the big knot, take two strands of cord that are next to each other.
- Thread a few wooden beads onto both strands.
- Tie a simple knot under the beads to keep them from sliding down.
- Do this for the other two pairs of strands, trying to make the knots at the same level.
Step 4: Create the Basket
- Now, a few inches below your first row of knots, you are going to make a second row.
- This time, take one strand from one pair and one strand from the pair next to it.
- Tie them together with a knot. Do this all the way around. This will start to create a net or basket shape.
Step 5: Finish It Off!
- Gather all six strands together at the bottom.
- Tie one last big knot to secure everything. You can leave the ends long and dangly or trim them.
- Gently place your potted plant inside the net you created. The knots will hold it securely.
- Hang your new creation from a hook near a window!
17. The Steampunk Explorer’s Study

This reading corner is a journey into a world of invention and adventure. A classic tufted leather armchair sits among a collection of fascinating gadgets and artifacts. The style is steampunk, mixing Victorian design with industrial machinery. It is a space that sparks curiosity and imagination.
The shelves are filled with wonders. Globes, telescopes, and anatomical charts sit next to vintage gauges and gears. The lighting comes from exposed-bulb lamps made of copper pipes, adding to the workshop feel. This nook is the hideout for a time-traveling inventor or a deep-sea explorer.
DIY: Awesome Steampunk Gear Art
Let’s make some cool wall art using gears and an old frame. It will look like a piece of a mysterious, ancient machine.
Step 1: Find Your Inventor’s Parts! You’ll need:
- An old picture frame.
- A piece of black or dark brown paper to fit in the frame.
- A collection of plastic or metal craft gears (you can find these at a craft store).
- Gold, copper, and bronze metallic craft paint.
- A paintbrush.
- Strong glue.
Step 2: Paint Your Gears
- Lay your gears out on a piece of newspaper.
- Paint them with your metallic paints. You can make some all gold, some all copper, or mix the colors on a single gear to make them look old and weathered.
- Let them dry completely.
Step 3: Prepare Your Background
- Put the black or dark brown paper inside your picture frame. This will be the background for your gear art.
Step 4: Arrange Your Machine
- Plan out your design. Lay the painted gears on top of the framed paper.
- You can cluster them together or have them look like they are connecting to each other. Overlap them to make your design more interesting.
Step 5: Glue Them in Place
- Once you are happy with your arrangement, it’s time to glue.
- Pick up one gear at a time, put a dab of strong glue on the back, and press it firmly onto the paper inside the frame.
- Keep going until all your gears are glued down.
- Let the glue dry completely, and then you can hang your amazing steampunk artwork on the wall!
18. The Desert Adobe Fireplace

This reading nook is inspired by the warm, earthy style of the Southwest. Cushioned benches are built into a beautiful adobe-style fireplace, creating a cozy place to sit by the fire. The space feels rustic and serene, with natural textures and a warm color palette. It’s a wonderful spot to unwind on a cool desert evening.
The decor celebrates desert living. Pillows and blankets feature geometric patterns typical of Southwestern textiles. A cow skull hangs on the wall as a bold statement piece, while cacti and clay pottery add to the authentic feel. The flickering candles inside the fireplace add a soft, inviting glow.
DIY: Mini Clay Pot Cactus Garden
Let’s make a tiny desert garden that you never have to water! It’s super cute and easy to make.
Step 1: Gather Your Desert Supplies! You’ll need:
- A few small terracotta clay pots.
- Small, smooth river rocks in different shades of green.
- A white paint pen or a fine-tipped white marker.
- Some sand or small pebbles to fill the pots.
Step 2: Fill Your Pots
- Take your clay pots and fill them almost to the top with your sand or small pebbles. This will be the “soil” for your rock cacti.
Step 3: Find Your Cactus Rocks
- Look through your collection of green river rocks.
- Find rocks that have cactus-like shapes. Some might be tall and skinny, others might be round and flat.
Step 4: Decorate Your Cacti
- This is where you bring your cacti to life!
- Use your white paint pen to draw little stars, dots, or “V” shapes on your green rocks. This will make them look like they have cactus spines.
- Let the paint dry completely.
Step 5: Plant Your Garden!
- Gently push your decorated cactus rocks into the sand in your pots.
- You can put one big rock in a pot, or a few small ones together. Arrange them until you like how your mini garden looks.
- Now you have a beautiful little desert scene that will last forever!
19. The Groovy 70s Basement Hangout

This reading nook is a blast from the past. The room is filled with the fun and funky style of the 1970s, from the wood-paneled walls to the shag carpet. A plush corduroy beanbag and a patterned armchair offer two very different but equally groovy places to relax. It is a playful and nostalgic space.
The details are spot on. A lava lamp bubbles away on a side table, while a record player is ready to spin some classic vinyl. Retro band posters hang on the walls, and a colorful crocheted blanket is thrown over the beanbag. This corner is all about good vibes and carefree fun.
DIY: Funky Mushroom Stool
Let’s make a cute mushroom stool like the one in the picture. It’s a fun and soft place to rest your feet.
Step 1: Find Your Fungi Materials! You’ll need:
- A small, round stool or a large, round cardboard box.
- Red fabric and white felt.
- Scissors.
- A hot glue gun or strong fabric glue.
- Pillow stuffing or quilt batting.
Step 2: Make the Mushroom Top
- Take your red fabric and cut out a large circle. It needs to be big enough to cover the top of your stool and hang down the sides a bit.
- Take your white felt and cut out several small circles of different sizes. These will be the mushroom spots.
- Use your glue gun (with a grown-up’s help) to glue the white felt circles onto the red fabric circle.
Step 3: Make it Puffy
- Place a layer of soft pillow stuffing or batting on top of your stool.
- Drape your decorated red fabric over the stuffing.
- Pull the edges of the fabric down and under the seat of the stool and glue them securely in place. You want the top to look puffy and rounded like a real mushroom cap.
Step 4: Cover the Stem
- If the base or legs of your stool don’t look like a mushroom stem, you can cover them!
- You can paint the base white or wrap it in white or cream-colored fabric or yarn.
Step 5: Put It in Your Pad!
- Let all the glue dry.
- Now you have a super groovy mushroom stool for your retro room!
20. The Ultimate Home Cinema Den

This reading nook doubles as a private movie theater. A deep, comfortable armchair and ottoman are positioned for the screen, but they are just as good for getting lost in a book. The room is dark and moody, designed to make the screen—or the page—the center of attention. It’s a modern and luxurious escape.
Everything is designed for an immersive experience. A projector is mounted on the ceiling, and sound-dampening panels line the walls. LED strip lighting provides a soft, cinematic glow. A mini-fridge is stocked with cold drinks, and a vintage popcorn machine stands ready for movie night.
DIY: Simple Movie Poster Frames
Let’s make your favorite posters look like they belong in a real movie theater. This is a very simple way to make them look sharp.
Step 1: Get Your Theater Supplies! You’ll need:
- Your favorite posters.
- Simple, thin black frames that are the right size for your posters.
- A grown-up to help you hang them.
- A measuring tape and a pencil.
Step 2: Frame Your Posters
- Carefully open the back of your frames.
- Place your posters inside, making sure they are straight and have no wrinkles.
- Secure the backing on the frames.
Step 3: Plan Your Gallery
- Decide where you want your posters to go. It often looks best to hang them in a straight line or in a neat grid.
- Use your measuring tape and pencil to make small, light marks on the wall where the top of each frame will go. Ask your grown-up to use a level to make sure your marks are in a perfectly straight line.
Step 4: Hang Them Up (Grown-Up Job!)
- Ask your grown-up to put nails or picture hooks in the wall where you made your marks.
- Carefully hang your framed posters on the hooks.
Step 5: Step Back and Admire!
- Look at your new poster wall! It looks professional and cool, just like the lobby of a movie theater. Now all you need is the popcorn!
21. The Gentleman’s Speakeasy Alcove

This reading corner is a sophisticated and private retreat. Tucked into a dark, moody alcove, a classic leather wingback chair provides a comfortable seat. The space feels exclusive, like a hidden room from another era. It is a refined spot to enjoy a good book and a quiet drink.
A handsome cabinet opens to reveal a well-stocked mini-bar, complete with crystal glasses and decanters. The lighting is low and warm, coming from a simple table lamp and soft candles. This nook is all about quiet luxury and timeless style, a perfect escape from the busy world.
DIY: Elegant Mirrored Serving Tray
Let’s make a fancy tray for your drinks or books. It looks very classy and is simple to create from a few basic supplies.
Step 1: Gather Your Dapper Supplies! You’ll need:
- A simple, deep-set picture frame (like a shadow box frame).
- A piece of mirror cut to fit inside the frame (a grown-up can get this from a hardware or craft store).
- Black or dark brown spray paint.
- Two small, fancy drawer handles or pulls.
- Strong glue (like E6000) and a hot glue gun.
- A grown-up helper.
Step 2: Paint Your Frame
- Remove the glass and backing from your frame.
- In a well-ventilated area (like outside), spray paint the frame with your dark paint. Apply a few light coats until it’s fully covered.
- Let it dry completely.
Step 3: Install the Mirror
- This is a job for your grown-up. They need to run a line of strong glue along the inside ledge of the frame where the glass used to sit.
- They will then gently press the mirror into the frame, letting it set into the glue. Let this dry for a few hours.
Step 4: Add the Handles
- Decide where you want your handles to go on the two shorter sides of the frame.
- Your grown-up will use the hot glue gun or the strong glue to securely attach the handles to the outside of the frame. Hold them in place for a few minutes until the glue starts to set.
Step 5: Let It Cure and Serve in Style!
- Let the whole tray sit for a full day to make sure all the glue is completely hardened.
- Now you have a very sophisticated tray that looks like it came from a fancy store. You can use it to serve drinks or display your favorite small items.
22. The Minimalist’s Quiet Alcove

This reading nook is the definition of simplicity. In a small, serene space, a plain wooden bench offers a place for a moment of peace. The walls are painted a calm, pale blue, and the room is free of all clutter. It is a testament to the idea that you do not need much to create a comfortable spot.
A single exposed bulb hangs from the ceiling, providing a clean, simple light source. A thick, chunky knit blanket is draped over the bench, adding a layer of texture and warmth to the minimalist design. This little corner is a breath of fresh air, a quiet space to simply be.
DIY: Your Own Super Chunky Arm-Knit Blanket
Let’s make one of those big, squishy blankets using just your arms! It’s really fun and much easier than it looks.
Step 1: Get Your Giant Yarn! You’ll need:
- Several skeins of super thick, chunky yarn (you can find this at a craft store). For a small lap blanket, you’ll need about 2-3 large skeins.
- A clear space on the floor or a big table to work.
- Your own two arms!
Step 2: Make the First Stitch
- Take the end of your yarn and make a slip knot, leaving a tail about a foot long.
- Place the loop from the slip knot onto your right wrist. This is your first stitch!
Step 3: Cast On Your Stitches
- With the yarn coming from the ball in your left hand, and the tail in your right, make a loop with the yarn from the ball.
- Put your right hand through that loop and grab the yarn, pulling it back through to create a new loop.
- Place this new loop onto your right wrist. That’s your second stitch.
- Keep doing this until you have about 10-12 stitches on your right arm. This will decide the width of your blanket.
Step 4: Start Knitting!
- Now, hold the working yarn (the one attached to the ball) in your right hand.
- Take the first loop on your right wrist (the one closest to your hand) and pull it up and over your hand, taking it completely off your arm.
- You are left with the yarn you were holding in your right hand. Make a loop with it and place it onto your left wrist. You’ve just moved your first stitch over!
- Do this for all the stitches on your right arm until they are all on your left arm. You’ve just finished your first row!
Step 5: Keep Going!
- Now just do the same thing in the other direction, moving the stitches from your left arm back to your right arm.
- Keep knitting back and forth until your blanket is as long as you want it to be. When you get to the end of a skein, just tie the new one on with a simple knot.
Step 6: Finish It Off!
- To finish, knit two stitches onto your new arm (let’s say, the right arm).
- Then, take the first stitch (the one on the bottom) and pull it up and over the second stitch and off your hand.
- Knit one more stitch onto your right arm. Again, pull the bottom stitch up and over the top one.
- Keep doing this until you only have one loop left. Cut the yarn, pull the tail through the last loop, and tie a knot. You made a blanket!
23. The Sweet Shoppe Corner

This reading spot is a sugary dream come true. A soft pink armchair is surrounded by pastel colors and candy-themed decorations. The room feels playful and sweet, like stepping into a whimsical bakery. It’s a cheerful and charming place to enjoy a lighthearted story.
The details are delicious. Floor cushions are designed to look like giant macarons, and glass jars on a nearby shelf are filled with colorful candies. A blanket with a sprinkle pattern is draped over the chair, and even the wall art features a beautiful cake. This nook is pure, delightful fun.
DIY: No-Sew Macaron Floor Pillow
Let’s make a giant, squishy macaron pillow for your floor! It’s so cute, and you don’t even have to know how to sew.
Step 1: Gather Your Sweet Ingredients! You’ll need:
- Two round foam cushions or two circles of thick foam.
- Fleece fabric in a fun macaron color (like pink, yellow, or blue).
- A strip of cream or white colored felt for the “filling.”
- Scissors.
- A hot glue gun and plenty of glue sticks.
- A grown-up to help with the hot glue.
Step 2: Cut the “Cookies”
- Lay your fleece fabric on the floor.
- Place one of your round foam cushions on it.
- Cut a large circle of fabric around the foam. It should be big enough to wrap up and over the sides of the foam with plenty of extra.
- Do this again so you have two large fabric circles.
Step 3: Cover the Cushions
- Place one foam circle in the center of a fabric circle.
- Your grown-up helper will start gluing the edges of the fabric to the back of the foam cushion.
- They should pull the fabric tight and fold it over as they glue to keep it smooth, like wrapping a present.
- Do the same for the second cushion. These are the top and bottom of your macaron.
Step 4: Make the Filling
- Take your strip of cream-colored felt. It should be wide enough to be the macaron filling, and long enough to go all the way around your cushion.
- Ask your grown-up to carefully glue this felt strip around the side of one of the covered cushions. Have them pleat or bunch the felt a little as they glue to make it look like fluffy filling.
Step 5: Put It All Together!
- Once the filling is attached to the bottom cushion, your grown-up will add a lot of glue to the top edge of the felt filling.
- Then, they will carefully place the other cushion on top, pressing it down firmly to create your macaron sandwich.
- Let it dry completely, and now you have a sweet seat for your reading nook!
24. The Viking’s Hearthside Lair

This reading nook feels like it was taken from an ancient Nordic hall. A throne-like wooden chair, intricately carved, sits beside a stone hearth. The room is filled with rugged, natural textures that speak of strength and history. It is a powerful and cozy spot to read tales of epic adventures.
Thick animal furs are draped over the chair and floor, providing warmth and comfort. Wrought iron candelabras hold flickering candles, casting dramatic shadows on the rough wooden walls. A drinking horn and a rustic mug sit nearby, ready for a warm drink. This corner is a true escape to a legendary past.
DIY: Your Own Faux Viking Drinking Horn
Let’s make a drinking horn that looks like it belongs to a Viking Jarl! You can’t drink from it, but it’s an awesome decoration.
Step 1: Gather Your Viking Loot! You’ll need:
- A plain plastic or metal tumbler that is wider at the top and narrower at the bottom.
- Air-dry clay.
- A butter knife or a clay modeling tool.
- Black, brown, and silver craft paint.
- A paintbrush.
- Mod Podge or a clear sealant spray.
Step 2: Sculpt Your Horn
- Take your air-dry clay and start pressing it all over the outside of your tumbler.
- Cover the whole thing, and try to shape it so it has a slight curve, like a real horn. Make the surface a little bumpy and uneven to look more natural.
- You can leave the very top rim of the tumbler uncovered.
Step 3: Add Some Details
- Use your butter knife to gently carve some lines and patterns into the clay. You can make simple lines that wrap around the horn.
- Let the clay dry completely. This might take a day or two.
Step 4: Paint Your Masterpiece
- Once the clay is hard, paint the whole horn with brown and black paint. Mix the colors together while you paint to make it look like a real, aged horn.
- Use a tiny bit of silver paint to highlight the rim at the top and any patterns you carved.
- Let the paint dry.
Step 5: Seal Your Treasure
- To protect your creation and give it a slight shine, paint a coat of Mod Podge all over it or have a grown-up help you spray it with a clear sealant.
- Once it’s dry, you have an amazing Viking horn to display on your shelf or trunk!
25. The Parisian Artist’s Atelier

This reading spot is filled with timeless elegance and creative spirit. Set in a room with beautiful architectural details, two ornate chairs create a space for conversation or quiet reflection. The large window lets in soft, natural light, illuminating the room like a classical painting. It feels like a chic apartment in Paris.
The decor is refined and artistic. A crystal chandelier hangs from the ceiling, and an easel stands in the corner, ready for the next masterpiece. A large, gilded mirror leans against the wall, making the bright room feel even larger. This nook is a beautiful blend of sophistication and cozy, creative energy.
DIY: Simple “Antique” Gilded Mirror
You can make a plain mirror look like a fancy, antique treasure from a palace in Paris. It’s a simple trick with paint!
Step 1: Find Your Artistic Supplies! You’ll need:
- A mirror with a simple wooden or plastic frame.
- Gold metallic spray paint or gold craft paint and a brush.
- A little bit of black or dark brown craft paint.
- A paper towel or an old rag.
- A grown-up helper.
Step 2: Prepare Your Mirror
- Use painter’s tape and paper to carefully cover the mirror part so you don’t get any paint on it. You only want to paint the frame.
Step 3: Go for the Gold!
- With a grown-up’s help, spray paint the frame gold or paint it using a brush.
- Apply one or two even coats until the whole frame is a beautiful, shiny gold.
- Let it dry completely.
Step 4: Make It Look Old
- This is the magic part! Put a tiny dab of your dark paint onto a paper plate.
- Dip just the tip of your rag or paper towel into the dark paint. You want very, very little paint.
- Gently rub the dark paint into the cracks and details of the frame. Then, use a clean part of the rag to wipe most of it away.
- This leaves a little bit of dark paint in the crevices, which makes the frame look old and distinguished.
Step 5: Reveal Your Masterpiece!
- Let the dark paint dry.
- Carefully peel off the painter’s tape and paper from the mirror.
- Lean your beautiful new “antique” mirror against a wall or hang it up to add a touch of Parisian glamour to your room.
26. The Ultimate Board Game Nook

This reading spot is designed for fun and friendly competition. A cozy sofa and two chairs are gathered around a table, creating the best setup for a game night. The space is bright and welcoming, with a bold blue accent wall that adds a splash of color. It is a room built for making happy memories.
The walls are lined with bookshelves, but instead of just books, they are filled with colorful board games of every kind. Two cork boards offer a place to tack up rules, score sheets, or favorite pictures. This nook is a cheerful and social hub, a place where stories are not just read, but played out.
DIY: Framed Fabric Cork Board
Let’s make a stylish cork board to pin your notes, pictures, or game scores onto. It’s much prettier than a plain brown one!
Step 1: Gather Your Game Night Gear! You’ll need:
- A plain cork board.
- A piece of fun fabric (like cotton or linen) that is a few inches bigger than your cork board on all sides.
- An open-back picture frame that is the same size as your cork board.
- A staple gun.
- A grown-up to help with the staple gun.
Step 2: Cover the Board
- Lay your fabric on a clean floor, pretty side down.
- Place the cork board on top of it, in the center.
- Fold one edge of the fabric over to the back of the cork board and ask your grown-up to put one staple in the middle to hold it.
- Go to the opposite side, pull the fabric tight, and have them put another staple in the middle.
- Do this for the other two sides.
Step 3: Finish the Corners
- Now, your grown-up can continue stapling along the sides, pulling the fabric taut as they go.
- When they get to the corners, they should fold them neatly, like they are wrapping a birthday present, before stapling them down.
Step 4: Frame Your Creation
- Carefully take your fabric-covered cork board and press it into the back of your picture frame.
- It should fit snugly. Use the tabs or clips on the back of the frame to hold it in place.
Step 5: Hang It and Pin It!
- Now you have a beautiful, custom cork board!
- Hang it on the wall and use pretty pushpins to decorate it with your favorite things.
27. The Modern Wabi-Sabi Tea Corner

This reading nook is a masterful blend of modern design and ancient tradition. Following the Japanese principle of wabi-sabi, it finds beauty in simplicity and imperfection. Low floor cushions surround a simple wooden table, creating a space for calm contemplation on a raised platform.
The textures are key. A rough, textured wall contrasts with the smooth wood floor and woven tatami mats. A round window offers a unique view, while a paper lantern casts a warm, gentle light. A hanging scroll with calligraphy adds an element of art and focus. This is a truly serene space to enjoy tea and a thoughtful book.
DIY: Simple Japanese-Style Flower Arrangement
Let’s create a beautiful and simple flower arrangement, inspired by the Japanese art of Ikebana. It’s about finding the beauty in just a few simple things.
Step 1: Find Your Natural Supplies! You’ll need:
- A simple, tall vase, preferably in a dark, solid color.
- A few interesting branches from your yard. Look for ones with nice curves or a few little buds on them.
- One or two simple flowers, like a daisy or a cherry blossom branch.
- Floral shears or strong scissors.
- A grown-up to help you with trimming.
Step 2: Start with the Main Branch
- Fill your vase with water.
- Take your longest, most interesting branch. This will be the “heaven” line and should be the tallest element.
- Your grown-up can help you trim the bottom of the branch so it’s about one and a half times the height of your vase.
- Place it in the vase, slightly off-center.
Step 3: Add the Second Branch
- Take your second branch. This is the “man” line.
- Trim it so it’s about two-thirds the height of your first branch.
- Place it in the vase, leaning in the same direction as the first branch but at a slightly different angle.
Step 4: Place Your Flower
- Now for the “earth” line. Take your flower.
- Trim the stem so it’s quite short, about one-third the height of your first branch.
- Place it low down in the arrangement, near the mouth of the vase. It should look like it’s grounding the whole arrangement.
Step 5: Admire the Simplicity
- Step back and look at your creation. It shouldn’t look crowded. The empty space is just as important as the branches and flower.
- You’ve created a piece of living art that brings a sense of calm and nature into your room.
28. The Aurora Borealis Viewing Pod

This reading nook is a high-tech gateway to the cosmos. A comfortable sofa is set within a dark, enclosed space that feels like the viewing deck of a spaceship. The ceiling glitters with a dense field of stars, but the main attraction is the stunning display of the aurora borealis on the large windows.
The atmosphere is futuristic and immersive. A telescope stands ready to peer into the real night sky. Cool blue and purple LED lights trace the edges of the room, adding to the otherworldly glow. This is a place to read science fiction and dream of other worlds, all while watching the greatest light show in the universe.
DIY: Glow-in-the-Dark Star Ceiling
You can turn your ceiling into a magical starry night sky! It’s super easy and looks amazing when you turn out the lights.
Step 1: Gather Your Galaxy! You’ll need:
- A pack of glow-in-the-dark star stickers. They come in all different sizes and shapes.
- A stool or stepladder to safely reach your ceiling.
- A clean, dry cloth.
Step 2: Prepare Your Sky
- Use the cloth to gently wipe down the part of the ceiling where you want to put your stars. This makes sure there’s no dust and the stickers will stick well.
Step 3: Start Placing Your Stars
- Peel a star sticker from the sheet.
- Reach up and press it firmly onto the ceiling.
- There are no rules here! You can place them randomly to look like a vast galaxy, or you can try to copy your favorite constellations like the Big Dipper or Orion.
Step 4: Create a Dense Galaxy
- Use lots of stars! The more you use, the more impressive it will look.
- Mix up the sizes. Put big stars next to little tiny ones to make your sky look deep and realistic. You can even make a glowing Milky Way by putting a whole bunch of tiny stars in a long, wavy line across the ceiling.
Step 5: Charge Them Up and Watch the Show!
- To make your stars glow brightly, you need to “charge” them. Leave your bedroom light on for about 15 minutes before you go to bed.
- When it’s time to sleep, turn off the light, lie back, and watch your amazing galaxy glow above you. It’s the best night light ever!
29. The Vintage Aviator’s Lounge

This reading nook captures the spirit of adventure from the golden age of flight. A unique armchair, paneled with riveted aluminum like the body of a vintage airplane, is the star of the room. The walls are covered in old world maps, charting courses to faraway lands. It is a space that inspires dreams of travel and exploration.
The theme is carried through every detail. A wooden propeller is mounted on the wall as art, and shelves display model airplanes. A stack of old suitcases serves as a side table, topped with a globe. This corner is a tribute to the daring pilots of the past and the timeless allure of the open sky.
DIY: World Map Decoupage Box
Let’s decorate a plain box with maps to make it look like a well-traveled treasure chest. It’s a fun way to upcycle an old box!
Step 1: Gather Your Explorer’s Supplies! You’ll need:
- A plain wooden or cardboard box with a lid.
- An old atlas, some map-themed scrapbook paper, or printouts of old maps from the internet.
- Mod Podge (this is a special glue, sealer, and finish all in one).
- A foam brush or a paintbrush.
- Scissors.
Step 2: Prepare Your Maps
- Cut or tear your maps into smaller pieces of different shapes and sizes. Don’t worry about being neat; jagged edges look great!
Step 3: Start Gluing!
- Use your foam brush to paint a thin layer of Mod Podge onto a small section of your box.
- Take a piece of your map paper and press it down onto the gluey section.
- Use your brush to paint another thin layer of Mod Podge on top of the map piece. This seals it down.
Step 4: Cover Your Box
- Keep doing this, overlapping the map pieces as you go. Cover the entire outside of the box and the lid.
- It’s like you’re creating a collage or a puzzle with your map pieces. Don’t forget to cover the sides and edges!
Step 5: Let It Dry and Add a Top Coat
- Let your box dry completely. It might feel a bit sticky at first, but it will dry clear.
- Once it’s dry, paint one more full coat of Mod Podge all over the outside of the box and lid. This will give it a nice, smooth finish and protect your hard work.
- Now you have a fantastic aviator’s box to store your own treasures or letters in.
30. The Royal Baroque Reading Room

This reading nook is fit for a king or queen. An incredibly ornate armchair, carved from wood and gilded in gold, is draped in rich red and gold brocade fabric. The room is a stunning display of baroque luxury, with deep jewel-toned walls and elaborate decorative moldings. It is a space of pure opulence.
Every detail adds to the regal atmosphere. A heavy velvet curtain frames the nook, and a crystal wall sconce casts a warm, glittering light. A traditional Russian tea urn, called a samovar, sits on a side table, ready to serve a formal tea. This is a place to read classic literature and feel utterly majestic.
DIY: No-Sew Royal Tassel Pillow
Let’s make a plush, velvety pillow with fancy tassels on the corners. It looks very royal and is surprisingly easy to make without any sewing.
Step 1: Gather Your Royal Materials! You’ll need:
- A square piece of velvet or other fancy fabric.
- A square pillow insert or lots of fluffy pillow stuffing.
- Four fancy tassels (you can buy these at a fabric or craft store).
- Fabric glue or a hot glue gun.
- Scissors.
- A grown-up helper for the gluing.
Step 2: Cut Your Fabric
- Lay your fabric flat. You need it to be big enough to wrap around your pillow form.
- Place your pillow insert in the middle of the fabric. You want to have enough extra fabric on all four sides to be able to tie knots.
Step 3: Make the Fringe
- On all four sides of the fabric, use your scissors to cut a fringe. The strips should be about 1 inch wide and 3-4 inches long, cutting in towards the pillow.
- When you get to the corners, cut the corner square out completely.
Step 4: Tie It Up!
- Place your pillow insert in the middle, on the un-cut part of the fabric.
- Now, take one strip from the top layer of fabric and one strip from the bottom layer of fabric and tie them together in a double knot.
- Go all the way around the pillow, tying the top and bottom fringe pieces together. Leave the four corners untied for now. The knots will hold your pillow together and create a fun fringe edge.
Step 5: Add the Tassels!
- Now for the royal touch! Take one of your tassels.
- At one of the open corners, take the top and bottom corner fringe pieces and thread them through the loop on the top of the tassel.
- Tie them in a tight double knot to secure the tassel to the corner of the pillow.
- Ask your grown-up to add a dab of glue to the knot to make it extra strong.
- Do this for all four corners. Now your pillow is complete and ready for your royal reading throne!
31. The Modern Farmhouse Fireside

This reading spot is the heart of modern farmhouse comfort. A plush, light-colored armchair sits next to a clean, contemporary fireplace. The space is bright and welcoming, with shiplap walls and a chunky wooden mantel adding rustic charm. It’s a perfect blend of new and old, designed for simple relaxation.
The decor is cozy and inviting. Black and white buffalo check pillows add a classic pattern, while a large, knitted pouf serves as a soft footrest or extra seat. A galvanized bucket holds firewood, and a simple metal basket keeps magazines tidy. This nook is all about creating a warm, family-friendly atmosphere.
DIY: Rustic Stamped Farmhouse Sign
Let’s make a charming wooden sign like the one on the mantel. It’s a classic farmhouse touch and is very easy to personalize.
Step 1: Gather Your Farmhouse Supplies! You’ll need:
- A plain piece of wood or a small wooden plaque.
- White craft paint and a paintbrush.
- Black craft paint.
- Alphabet stamps and a black ink pad.
- Sandpaper (medium grit).
- A grown-up helper.
Step 2: Paint Your Board
- Paint your entire piece of wood with the white craft paint. Don’t worry about making it look perfect; a few streaks will add to the rustic charm.
- Let the paint dry completely.
Step 3: Make It Look Old
- Once the paint is dry, take your sandpaper and gently scuff up the edges and corners of the board.
- You can also lightly sand the flat surfaces to let a little bit of the wood grain show through. This will make your sign look weathered and loved.
Step 4: Stamp Your Message
- Decide on a cozy word you want to stamp, like “gather,” “home,” or “cozy.”
- Press your first letter stamp onto the ink pad, making sure it’s evenly coated.
- Carefully press the stamp onto your wooden board. Try to keep your hand steady to get a clear image.
- Continue spelling out your word, stamping one letter at a time. It’s okay if they aren’t perfectly lined up; that’s part of the handmade charm.
Step 5: Display Your Creation!
- Let the ink dry completely.
- Now you can prop your new farmhouse sign up on a mantel, a shelf, or a table to add a touch of rustic personality to your space.
32. The Gamer’s High-Tech Command Center

This nook is an electrifying hub for gaming and relaxation. A high-backed ergonomic gaming chair is the centerpiece of a sophisticated desk setup. The room is dark, allowing the vibrant purple and blue lights from the computer and wall panels to create a futuristic, immersive atmosphere. It’s a high-energy space for digital adventures.
The setup is a gamer’s dream. Multiple monitors provide an expansive view, while shelves above display a collection of treasured figurines. A mini-fridge is stocked with drinks, ensuring refreshments are always within arm’s reach. After a long gaming session, this spot is also a great place to lean back and read a graphic novel.
DIY: Cool Geometric Wall Light Panels
Let’s create some awesome, colorful light-up shapes for your wall. This is a simple version that uses paper to get a similar effect.
Step 1: Get Your Gaming Gear! You’ll need:
- Black poster board or thick black cardstock.
- Translucent colored paper or tissue paper in cool colors like blue, pink, and green.
- Scissors and a craft knife (a grown-up’s job!).
- A ruler and a pencil.
- Glue stick.
- Battery-powered LED “puck” lights or fairy lights.
- Removable wall-mounting strips.
Step 2: Design Your Shapes
- On your black poster board, use your ruler and pencil to draw some cool geometric shapes, like hexagons or abstract polygons.
- Inside each large shape, draw a smaller version of the same shape, leaving about a one-inch border all around.
Step 3: Cut Them Out (Grown-Up Job!)
- Ask your grown-up helper to use the craft knife to carefully cut out the smaller, inner shape. This will leave you with a black geometric frame.
- Make a few of these frames.
Step 4: Add the Color
- Flip your black frame over to the back.
- Cut a piece of your colored tissue paper that is slightly larger than the opening.
- Use your glue stick to apply glue around the back of the opening and press the colored paper on, smoothing it out. This creates a “stained glass” effect.
Step 5: Light Them Up and Mount Them!
- Stick your LED puck lights or a bundle of your fairy lights to the back of the frames.
- Use the removable wall-mounting strips to attach your new light panels to the wall.
- Turn off the room lights, turn on your LED lights, and watch your wall glow with cool, geometric colors!
33. The Musician’s Melodic Corner

This reading nook is a sanctuary for music lovers. A comfortable, modern chair is surrounded by everything needed for listening, learning, and creating music. The space is stylish and functional, with sound-dampening panels on the wall to ensure a great acoustic experience. It is a harmonious blend of comfort and passion.
Guitars hang on the wall like works of art, ready to be played. A small desk holds a laptop and headphones for mixing tracks, while shelves display a curated collection of vinyl records. This corner is the ultimate spot to read a musician’s biography, then pick up an instrument and get inspired.
DIY: Floating Vinyl Record Display Shelf
Let’s make a simple, modern shelf to show off the cool artwork on your favorite record albums.
Step 1: Gather Your Rock Star Supplies! You’ll need:
- A small, flat piece of wood. A 1×4 piece of pine, cut to about 12-14 inches long, is good.
- A very thin, small strip of wood for the front lip.
- Wood glue.
- Sandpaper.
- Paint or wood stain in your favorite color.
- A grown-up with a drill and screws to hang it.
Step 2: Build Your Ledge
- Sand all the edges of your wooden pieces to make them smooth.
- Take the thin strip of wood and run a line of wood glue along one of its long edges.
- Press this strip firmly onto the front edge of your main shelf piece. This little lip is what will keep the record from sliding off.
- Wipe away any extra glue that squeezes out and let it dry completely.
Step 3: Paint or Stain It
- Once the glue is dry, paint or stain your new shelf. You can paint it a solid color to match your wall or stain it to show off the wood grain.
- Let it dry completely.
Step 4: Hang Your Shelf (Grown-Up Job!)
- Ask your grown-up to help you hang the shelf on the wall. They can drill screws directly through the back of the shelf into the wall.
- They should use a level to make sure it’s perfectly straight.
Step 5: Display Your Favorite Album!
- Now you can pick your favorite record and prop it up on your new shelf. It turns your music collection into a cool, rotating art gallery!
34. The Mediterranean Sun-Drenched Nook

This reading spot feels like a breezy vacation on a Greek island. Tucked into a beautiful arched alcove, a simple wooden chair with white cushions invites you to relax. The space is bright and airy, with whitewashed walls and natural textures that create a feeling of pure calm.
Decor inspired by the sea and sky completes the look. Pottery in shades of blue and white sits on simple wooden shelves. Potted olive trees and branches bring a touch of Mediterranean greenery indoors. This corner is a sun-kissed escape, a tranquil place to sit with a cool drink and a good book.
DIY: Easy Mosaic Tile Coaster
Let’s make a pretty coaster with a mosaic pattern, inspired by the little tile table. It’s like making a tiny piece of Mediterranean art for your drink.
Step 1: Gather Your Mediterranean Materials! You’ll need:
- A plain ceramic tile or a square piece of cork to be your base.
- Small mosaic tiles in pretty colors like blue and white (you can find these at a craft store).
- Strong craft glue.
- White, pre-mixed tile grout.
- A popsicle stick or a small plastic knife.
- A damp sponge or paper towel.
Step 2: Create Your Design
- Before you glue, arrange your small mosaic tiles on top of your coaster base.
- You can make a pattern, like a checkerboard or a border, or just place them randomly. Play with them until you have a design you love.
Step 3: Glue It Down
- Pick up one mosaic tile at a time, put a small dab of glue on the back, and press it back onto your coaster base where you planned for it to go.
- Keep doing this until all your tiles are glued down. Leave a tiny bit of space between each tile for the grout.
- Let the glue dry completely.
Step 4: Add the Grout
- This part is a little messy, so put down some newspaper!
- Use your popsicle stick to scoop some of the pre-mixed grout onto your coaster.
- Gently spread the grout all over the top, pressing it into all the little cracks between your tiles.
Step 5: Clean It Up!
- Let the grout sit for about 15 minutes.
- Then, take your damp sponge and gently wipe away the extra grout from the top of the tiles. You want the grout to stay in the cracks, but you want the tops of your pretty tiles to be clean and shiny.
- Let your coaster dry for a full day. Now you have a beautiful, waterproof coaster for your drink!
35. The Balcony Rainforest Escape

This reading nook transforms a small balcony into a lush, tropical paradise. A hanging rattan chair and a comfortable chaise lounge are nestled among an explosion of plants. The space feels like a private jungle, with green leaves creating a living wall of privacy and peace.
The atmosphere is alive and vibrant. An aquarium with a gentle waterfall adds the soothing sound of running water, while a humidifier keeps the air fresh and misty. At night, hanging lights and grow lights cast a magical glow over the entire space. This is a complete sensory retreat, a perfect place to feel connected to nature.
DIY: Twine-Wrapped Hanging Jar Lantern
Let’s make a simple and beautiful lantern by wrapping a glass jar with twine. It’s a great way to add a bit of rustic, magical light to your green space.
Step 1: Find Your Rainforest Supplies! You’ll need:
- A clean, empty glass jar.
- A ball of jute twine.
- A hot glue gun or strong craft glue.
- Scissors.
- A battery-powered tea light or a short string of fairy lights.
- A grown-up helper for the hot glue.
Step 2: Start Wrapping!
- Your grown-up will put a small dab of hot glue near the very bottom of the jar.
- Press the end of your twine into the glue to secure it.
- Start wrapping the twine tightly around the jar. Keep the rows of twine right next to each other so there are no gaps.
Step 3: Keep Going!
- Every few rows, your grown-up can add another small dab of glue to keep the twine in place.
- Keep wrapping until you have covered the entire jar, from the bottom to the top rim.
- When you reach the top, cut the twine and secure the end with a final dab of glue.
Step 4: Make a Hanger
- Cut a long piece of twine to be your handle.
- Your grown-up will put a generous dot of hot glue on one side of the jar, just below the rim. Press one end of your handle twine into it.
- Take the other end of the twine, bring it over the top of the jar, and glue it to the opposite side to create a handle. Hold it for a minute until the glue sets.
Step 5: Add the Light!
- Turn on your battery-powered tea light or fairy lights and place them inside the jar.
- The light will glow softly through the twine. You can hang your new lantern from a hook or a tree branch to add a warm, cozy glow to your evening.
36. The Southwestern Sunset Corner

This reading spot is bathed in the warm, inviting colors of a desert sunset. A built-in bench and a comfortable leather-strap chair provide ample seating around a kiva-style fireplace. The space is a celebration of Southwestern design, with its organic shapes, earthy materials, and rich, warm tones.
The decor is authentic and thoughtfully curated. Terracotta pots, hand-woven textiles, and a rustic ladder for displaying blankets all contribute to the desert vibe. Cacti add a touch of living sculpture, while candles in the fireplace provide a soft, flickering light. This is a deeply relaxing space that feels connected to the earth.
DIY: Simple “Aged” Terracotta Pot
Let’s make a new clay pot look like it has been sitting in a sunny desert garden for years. It’s a fun and easy painting trick.
Step 1: Gather Your Desert Crafting Tools! You’ll need:
- A plain terracotta (orange clay) pot.
- White craft paint.
- A little bit of water in a cup.
- A paintbrush.
- A paper towel or an old rag.
Step 2: Make Your “Whitewash”
- Pour a little bit of your white paint onto a paper plate.
- Add a few drops of water to the paint and mix it up. You want the paint to be thin and runny, like milk. This is called a wash.
Step 3: Paint Your Pot
- Use your paintbrush to apply the watery white paint all over the outside of your terracotta pot.
- Don’t worry about making it perfect. It’s okay if it’s a little streaky.
Step 4: Wipe It Back
- Before the paint dries completely, take your paper towel and gently wipe some of it off.
- This will remove some of the white paint, letting the orange terracotta color show through underneath. It will make the pot look naturally faded and aged.
- You can wipe off as much or as little as you like until you get a look you love.
Step 5: Let It Dry and Plant!
- Let your pot dry completely.
- Now it looks like a beautiful, rustic pot with a long history. It’s ready for you to plant a small succulent or cactus inside to complete the desert look.
37. The Gothic Romance Alcove

This reading nook is a dive into the dark and mysterious. A grand, black velvet wingback chair sits within an arched bookshelf, creating a dramatic and enclosing space. The room is decorated in a gothic style, with a love for dark colors, elegant details, and a touch of the macabre.
The shelves are filled with old, leather-bound books, skulls, and antique curiosities. A silver candelabra provides flickering, atmospheric light, while realistic-looking crows perch among the decor. This is a wonderfully moody spot to curl up with a classic horror story or a tragic romance on a stormy night.
DIY: Spooky Specimen Bell Jar
Let’s create a mysterious decoration that looks like a strange specimen from a scientist’s collection. It’s perfectly spooky and very easy to make.
Step 1: Gather Your Gothic Supplies! You’ll need:
- A glass cloche or bell jar with a base (you can find these at a craft store).
- An interesting object to display. A realistic-looking craft-store crow, a cool-looking rock, or a bundle of dried flowers would all work great.
- A small piece of black felt or velvet.
- A hot glue gun or craft glue.
- A grown-up helper.
Step 2: Prepare Your Base
- Trace the bottom of your bell jar onto the black felt and cut out the circle.
- Glue this felt circle onto the wooden or plastic base of your bell jar. This gives it a rich, dark platform for your specimen.
Step 3: Mount Your Specimen
- Decide how you want your object to sit on the base.
- Use a small amount of hot glue (with your grown-up’s help) to secure your object to the center of the felt-covered base. You want to make sure it won’t fall over.
Step 4: Add Some Details (Optional)
- You can add a little bit of spanish moss around the base of your object to make it look even older and more mysterious.
Step 5: Cover and Display!
- Let the glue dry.
- Carefully place the glass dome over your object and onto the base.
- Now you have a fascinating and slightly spooky piece of decor to place on your bookshelf. It will make everyone wonder about the story behind it!
38. The Backwoods Cabin Retreat

This reading nook is the essence of a rustic getaway. A simple, comfortable armchair is tucked into a corner paneled with rough, weathered wood. The space feels warm and secluded, like a small cabin deep in the woods. It is a no-fuss, comfortable spot to escape the world for a while.
The decor is simple and practical. A red and black buffalo plaid blanket provides a classic cabin touch, while a sheepskin throw adds extra softness. A sturdy log acts as a side table, and an old wooden crate holds a stack of books. An oil lantern (or a battery-powered version) gives off a warm, rustic glow, perfect for reading by.
DIY: Simple Wood Crate Side Table
Let’s turn a simple wooden crate into a cool, rustic side table for your books and a mug of hot chocolate.
Step 1: Find Your Cabin Gear! You’ll need:
- A wooden crate (you can find these at craft stores or sometimes at grocery stores).
- Sandpaper.
- Wood stain or paint (optional).
- An old rag or paintbrush.
Step 2: Smooth It Out
- Wooden crates can sometimes be a bit rough and have splinters.
- Use your sandpaper to sand all the edges and surfaces of the crate until it’s nice and smooth to the touch.
Step 3: Add Some Color (Optional)
- If you want to change the color of your crate, now is the time.
- You can use a rag to rub wood stain onto the crate to give it a darker, richer color.
- Or, you can use a paintbrush to paint it any color you like. A dark brown or a weathered gray would look great for a cabin vibe.
- Let the stain or paint dry completely.
Step 4: Set It Up!
- That’s it! You can turn the crate on its side so the opening faces out, creating a little shelf for books.
- Or, you can place it with the opening facing down to create a flat tabletop.
Step 5: Style Your Table
- Place your new crate table next to your favorite chair.
- You can stack a few books on top, add a coaster for your drink, or even place a small, battery-powered lantern on it to complete the cabin look.
39. The Mid-Century Modern Corner

This reading nook is a stylish nod to the cool, clean designs of the 1950s and 60s. An iconic womb chair and ottoman, with its organic curves and olive-green color, creates a comfortable and visually stunning place to relax. The space is bright and playful, with a focus on interesting shapes and patterns.
The decor is a perfect match for the chair. A starburst clock on the wall and an arching floor lamp are classic examples of mid-century design. A geometric-patterned wallpaper adds energy to the room, while a simple wooden side table holds a uniquely shaped lamp. This corner is a tribute to timeless, sophisticated fun.
DIY: Retro “Starburst” Clock
Let’s make a cool clock that looks like a bursting star. It’s a classic mid-century modern design and is really fun to put together.
Step 1: Gather Your Groovy Supplies! You’ll need:
- A simple, round clock mechanism with hands (you can get a kit at a craft store).
- A small, round piece of wood for the center.
- 12 long, thin wooden dowels or bamboo skewers.
- A hot glue gun.
- Gold or silver spray paint.
- A grown-up helper.
Step 2: Prepare the Center
- Your grown-up will need to drill a small hole in the very center of your round piece of wood. This is where the post from the clock mechanism will poke through.
Step 3: Create the Sunburst
- On the back of your wooden circle, use a pencil and a ruler to mark where the 12, 3, 6, and 9 o’clock positions would be. Then mark the hours in between.
- With your grown-up’s help, use the hot glue gun to attach your 12 wooden dowels to these marks on the back of the circle. They should radiate outwards like the rays of the sun.
- Let the glue dry completely.
Step 4: Paint It!
- In a well-ventilated area, spray paint your entire starburst creation—the center circle and all the rays—with your metallic paint.
- Apply a few light coats to get a nice, even finish.
- Let it dry completely.
Step 5: Add the Clock Parts
- Push the post of your clock mechanism through the hole in the center of your starburst from the back.
- Follow the instructions on the kit to attach the hands (hour, minute, second) to the front.
- Put a battery in the clock mechanism.
Step 6: Set the Time and Hang It Up!
- Hang your amazing new starburst clock on the wall. It’s a super stylish piece of art that actually tells you the time!
40. The World Traveler’s Study

This reading nook is a tribute to adventure and exploration. A comfortable leather armchair is set against a massive world map that covers the entire wall, immediately sparking a sense of wanderlust. The room is filled with souvenirs and treasures from travels, creating a space rich with stories.
Stacks of vintage suitcases serve as a side table, while globes and travel books line the shelves. A cork board is pinned with maps and photos from past journeys, and two brass desk lamps provide warm, focused light for planning the next trip. This is the ultimate corner for anyone who dreams of faraway places.
DIY: Pushpin Travel Map Board
Let’s make a personalized map where you can mark all the amazing places you’ve been and all the places you dream of going.
Step 1: Gather Your Travel Gear! You’ll need:
- A large cork board.
- A large paper map of the world or a country you love.
- Spray adhesive or a glue stick.
- A box of colorful pushpins.
- A grown-up helper.
Step 2: Mount Your Map
- Lay your cork board on a flat, clean surface.
- With your grown-up’s help, carefully apply the spray adhesive to the front of the cork board. (If using a glue stick, cover the back of the map instead.)
- Working together, carefully lay the map down onto the cork board. Start at one edge and smooth it down as you go to avoid getting any bubbles or wrinkles.
- Press down firmly all over the map to make sure it’s stuck on well. Let it dry.
Step 3: Start Pinning!
- Now for the best part! Decide on a color code. For example, you could use red pins for places you’ve already visited, and blue pins for places you want to go to next.
- Start pressing your pushpins into the map. Find the cities and countries from your family vacations or dream destinations.
Step 4: Keep Track of Your Adventures
- You can even tie a piece of string between pins to show the route of a trip you took.
- This map is a living piece of art that tells the story of your adventures.
Step 5: Display Your World!
- Hang your new travel map on the wall. It’s a fun way to remember your favorite trips and a great inspiration to start planning your next one!
We have journeyed through enchanted forests, chic city studios, and quiet, sunlit corners. We have seen 40 different ways to build a small sanctuary within a home. Each nook, with its unique character, shows that comfort can be found anywhere.
The single most important element in your reading spot is you. Your nook should be a reflection of what brings you calm and contentment. It might be a collection of soft blankets, the scent of old books, or the simple glow of a single candle.
Use these ideas and images as a starting point. Feel free to mix them, match them, and build upon them with the simple DIY projects we have shared. The goal is to create a space that feels like a true extension of yourself.
Winter is a season that invites us to slow down. It is a time for rest and reflection. Now is the time to build that quiet corner you have been wanting. A warm and welcoming spot is waiting for you to create it.
Key Takeaways
- Define Your Space. You do not need a dedicated room. Any small corner, empty alcove, or spot by a window can become a reading nook. The key is to claim the space as your own.
- Layer with Textures. Softness creates comfort. The most inviting nooks use layers of different materials. Add chunky knit blankets, faux fur throws, velvet pillows, and plush rugs to make your spot welcoming.
- Control the Lighting. A dedicated light source makes a space feel intentional and cozy. A floor lamp for reading, a string of fairy lights for magic, or a cluster of candles for warmth will transform the mood.
- Make It Personal. Your nook should feel like you. Add elements that bring you joy. Use the simple DIY projects to create something unique, display your favorite books, or keep a special mug ready for tea or coffee.