Decorating your home often feels like a balancing act between following current trends and managing a realistic budget. Many people assume high style requires high spending, leading them to ignore seemingly trendy projects that might actually be incredibly accessible. This article proves that theory wrong.

We have compiled 38 cheap DIY decor trends that are genuinely worth the time and effort. These are not passing fads but rather creative techniques—from weaving and upcycling to abstract painting—that result in custom, long-lasting pieces. Get ready to transform everyday materials into stunning, high-impact decor using only simple tools and enthusiasm.
1. Upcycled Woven Bottle Hanging Planters

Image Description
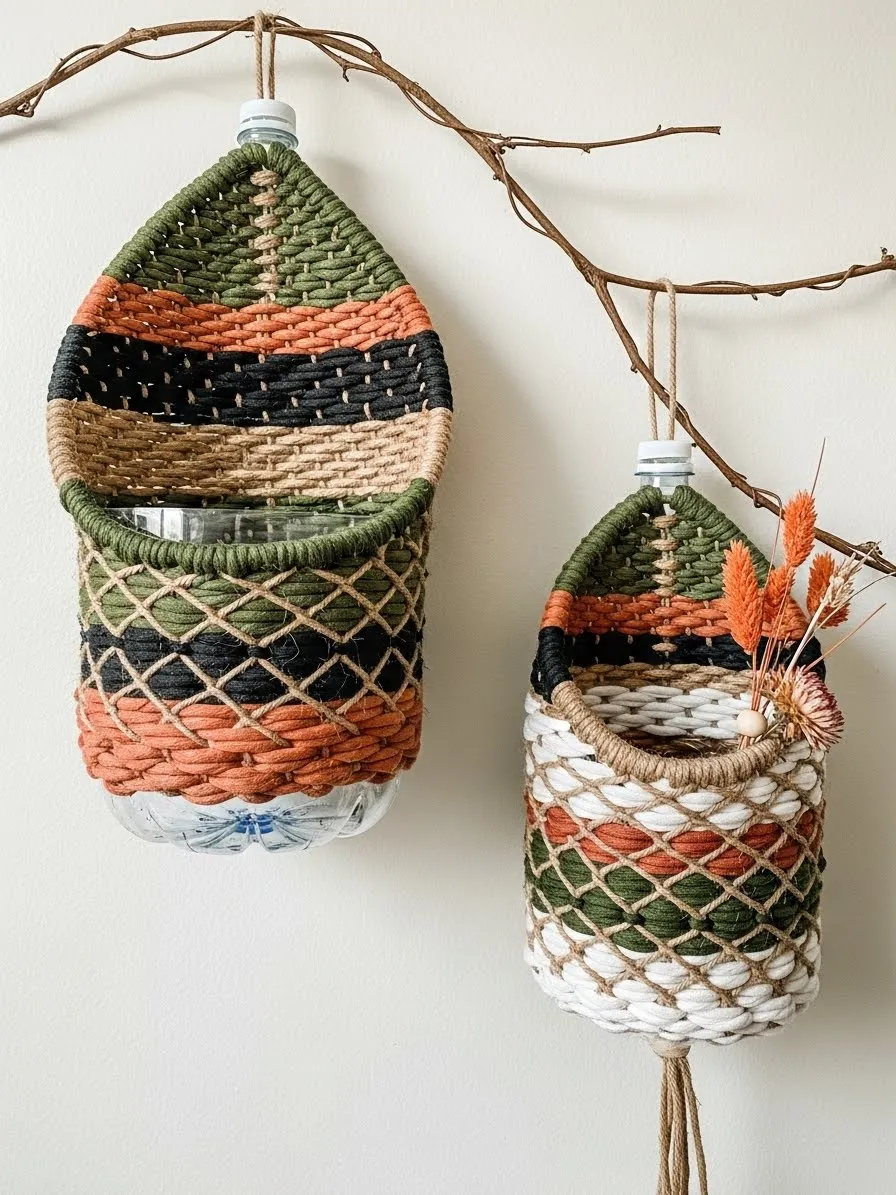
Repurposing everyday materials offers a fantastic way to update your home decor simply. Here, ordinary plastic bottles transform into charming, textured wall planters. The trend of mixing natural fibers with sustainability makes this DIY decor project truly worthwhile. This clever use of discarded containers minimizes waste while adding serious visual appeal to any wall or cozy corner.
Observe the rich, earthy color palette used in the weaving. Dark green, burnt orange, black, and natural twine create a sophisticated, boho-inspired look. The technique involves wrapping and knotting yarn around the bottle base, giving the piece a robust, basket-like texture. Hanging these items from a decorative branch enhances the rustic, found-object aesthetic, making them great for displaying dried flowers or holding small trinkets.
This budget-friendly DIY trend perfectly blends functionality with handcrafted artistry. It proves that creating stylish, personalized accents for your living space does not require a large budget or complex skills. The slight variation in size and the addition of a tassel on one piece show how easy it is to customize this project to suit your style preferences.
Materials Required
- Two empty, clean plastic bottles (2-liter size or similar)
- Various colors of yarn or thick twine (e.g., green, orange, white, natural jute)
- Hot glue sticks
- A small piece of thick wire or strong twine for the hanger loop
Equipment Required
- Sharp utility knife or strong scissors
- Hot glue gun
DIY Instruction Step by Step
Step 1: Prepare the Plastic Bottle Base
First, take one of your plastic bottles. Use a sharp utility knife or strong scissors to cut the bottle. You need to remove the top half, starting slightly below the point where the bottle’s neck begins to widen into the main body. The remaining bottom section will form the pouch or container part of your planter. Carefully ensure the cut edge is as straight and smooth as possible. Repeat this process for the second bottle.
Step 2: Create the Initial Wrap
Starting at the bottom edge of the cut plastic bottle, place a line of hot glue. Firmly press the end of your main color of yarn or twine into the glue. Hold it for a moment until the glue sets. Begin wrapping the yarn tightly and closely around the base of the bottle, ensuring no plastic shows underneath. Continue wrapping several layers until you reach a desired height, usually about one-third of the way up the bottle. Secure the end of this color with another spot of hot glue.
Step 3: Introduce Color Changes
To create the patterned look, change your yarn colors frequently. Apply a small amount of hot glue to secure the end of the previous color and the start of the new color. Continue the wrapping process, creating bands of different hues. For the more elaborate, mesh-like section, you will need a slightly different technique.
Step 4: Execute the Woven Basket Effect
Once you reach the top edge of your cut bottle (where the opening is), you will begin the weaving part that forms the pouch’s back. Cut long, equal lengths of your main vertical color (e.g., natural twine). Glue these strands vertically onto the back half of the plastic, spaced about $1/2$ inch apart, letting them extend up past the bottle top to form the woven backboard.
Step 5: Weave the Back Panel
Using your contrasting colors (e.g., green and orange), start weaving horizontally over and under the vertical strands you just glued. Weave color bands to build the tall, pointed back section. Push the woven rows down tightly as you work to keep the pattern dense. Secure the ends of your weaving yarn with small dots of glue on the back side of the piece.
Step 6: Finish the Top Edge and Add the Hanger
Once the weaving is complete, tie the vertical strands together at the top center. Loop a piece of strong twine or thin wire through this knot to create the hanger. For a decorative finish, wrap a thick strand of yarn around the entire top edge of the plastic and the start of the back panel, covering any exposed plastic or glue marks.
Step 7: Add Custom Details (Optional)
If you want a tassel like the one pictured, cut many equal lengths of thick twine. Fold them in half and tie them securely through the bottom center of the finished bottle base. Trim the ends evenly. Allow the entire piece to dry completely before hanging your beautiful new decor.
2. Textured Faux-Cracked Finish Vases
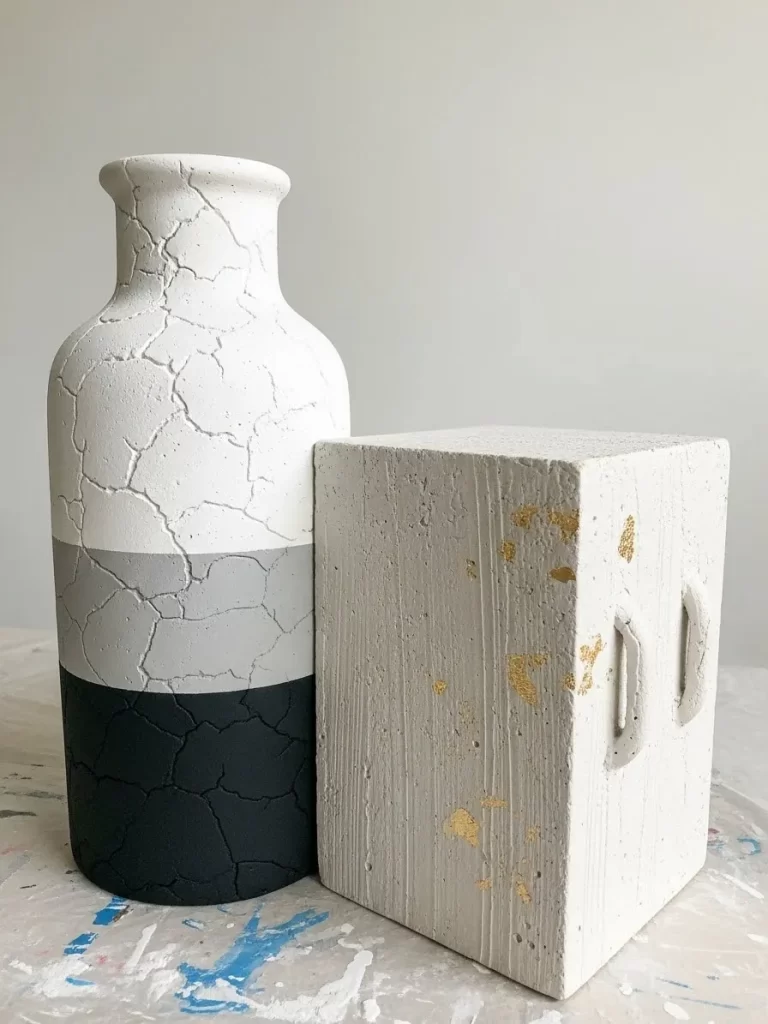
Image Description
This image shows two decorative objects featuring a captivating texture trend, showcasing how easily you can transform ordinary containers. The tall vase and the square block both feature a white, matte finish, giving them an aged, stone-like aesthetic. The vase is particularly striking, featuring a distressed, crackle-paint effect across its upper portion, creating a depth that mimics naturally weathered terracotta.
The vase is segmented with three distinct color bands: a top white section with the crackle, a gray middle section, and a matte black base, also with the textural treatment. Using a contrasting color scheme like this elevates a simple form into a statement piece. The square object is simpler, utilizing the same coarse texture and accented with small patches of metallic gold leaf, adding a touch of rustic glamour.
These pieces prove that you can achieve a high-end, sculptural look using affordable DIY techniques. The heavy texture contrasts beautifully with smooth surfaces in a home. These items tap into the trend of imperfect, handcrafted decor, bringing character and a story to your shelves or tabletops.
Materials Required
- One smooth glass vase or ceramic container
- One square wood block or a similar solid container (optional)
- Crackle paint medium (or a mixture of baking soda and matte paint for texture)
- Matte acrylic craft paint in black, gray, and white
- Small amount of gold leaf and adhesive (for the square block)
- Painter’s tape
Equipment Required
- Various paintbrushes (one large flat brush, one small detail brush)
- Mixing container (if using baking soda mixture)
DIY Instruction Step by Step
Step 1: Clean and Prepare the Surfaces
Thoroughly clean the vase and block to ensure they are free of dust or oils. This step helps the paint adhere correctly. If your vase is very slick, apply a thin coat of primer specifically formulated for glass or ceramic, and allow it to dry completely.
Step 2: Apply the Textural Base Coat (Vase)
For the vase, first tape off the sections if you want perfectly straight lines between colors. Apply a thick layer of your white paint mixed with the crackle medium (follow the product’s instructions for mixing). Alternatively, mix white matte paint with baking soda until you achieve a thick, plaster-like consistency. Dab or stipple this mixture onto the top section of the vase to create a rough, porous texture. Allow this layer to dry completely.
Step 3: Add Color Blocking
Once the top white section is dry, use painter’s tape to mark off the next two sections for the gray and black colors. Apply the gray matte paint to the middle section and the black matte paint to the bottom section. You can apply the paint smoothly or continue the thick, textural dabbing technique for a consistent finish. Remove the tape while the paint is still slightly wet for a crisp line. Allow all three sections to dry.
Step 4: Create the Crackle Effect (If Using Medium)
If you used a traditional crackle medium, the cracks should appear as the paint dries. If you used the baking soda texture method, the paint will just look rough and stone-like. For extra depth, once the entire vase is dry, you can lightly sand or dry-brush a thin, contrasting color (like a darker gray) into the textured white area to highlight the cracks or texture.
Step 5: Finishing the Square Block (Optional)
If creating the square block, cover it entirely with the textural paint mixture (white or light gray). Let it dry. To add the gold accent, use a small brush to apply gold leaf adhesive in small, random patches. Wait until the adhesive becomes tacky according to its instructions. Carefully press small pieces of gold leaf onto the tacky spots. Use a dry brush to gently wipe away the excess gold leaf, leaving only the flakes stuck to the adhesive.
3. Glitch Art Inspired Storage
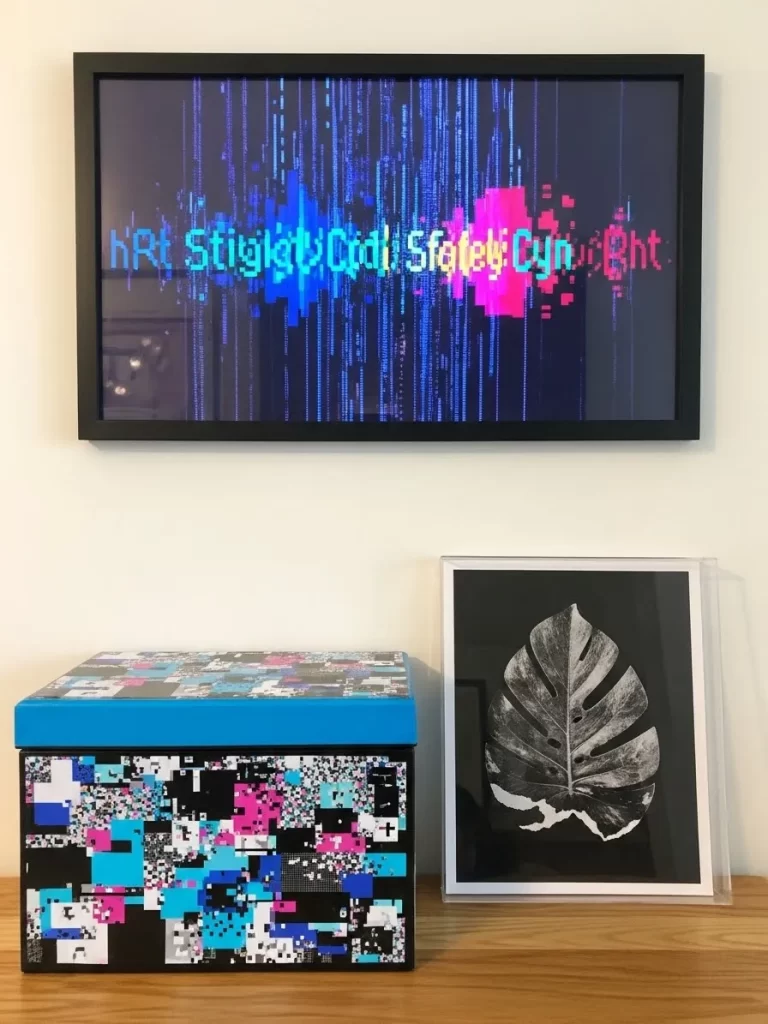
Image Description
This setup showcases a modern, tech-inspired aesthetic, centering on bold patterns and digital themes. The large horizontal picture frame displays a screen-like image featuring a colorful ‘glitch art’ effect, mimicking digital signal failure or corruption. Bright pink and electric blue vertical lines create a striking contrast against a dark background, making it an engaging piece of wall decor.
Below the wall art sits a large storage box decorated with a similar ‘pixelated’ or fragmented digital pattern. The pattern is complex, using blocks of black, white, cyan, and magenta, giving the box an energetic, contemporary look. A simple, framed botanical print rests next to the box, offering a sophisticated natural counterpoint to the vibrant digital themes.
This decor style appeals to those who enjoy a modern, slightly rebellious feel in their home. Creating storage and art with this glitch motif is a clever way to incorporate current digital trends into physical, tangible items. The deep black frame and box top provide grounding elements for the vivid colors beneath.
Materials Required
- One plain cardboard or wood storage box with a removable lid
- Black and white paint (acrylic or spray paint)
- Acrylic craft paints in vibrant colors (e.g., electric blue, magenta, cyan, lime green)
- Mod Podge or similar clear sealant
Equipment Required
- Paintbrushes (various sizes)
- Ruler or straight edge
- Pencil
- Access to a printer (optional, for printing digital patterns)
DIY Instruction Step by Step
Step 1: Prep the Box Surface
Start by ensuring your storage box is clean. Paint the entire box, including the lid, with a base coat of matte black or white paint. Black is generally better for a high-contrast, screen-like look. Allow the base coat to dry fully.
Step 2: Map Out the Pixel Grid
Using a ruler and pencil, lightly draw a grid pattern onto the surfaces of the box and lid. Keep the squares small and uniform, around $1/2$ inch by $1/2$ inch, to create the appearance of pixels.
Step 3: Apply the Glitch Colors
Select your vibrant paint colors. Now, begin carefully filling in random squares (pixels) within your grid using the different colors. The key to the glitch look is randomness and grouping colors together in small, fragmented clusters that appear to break apart. Avoid painting large, cohesive sections. Let the black background dominate the majority of the space.
Step 4: Create Digital Textural Effects (Optional)
For more complexity, you can use a fine brush to add small, single lines of color over the black areas or even paint small, blocky ‘letters’ or symbols in the style of corrupted code, enhancing the digital appearance.
Step 5: Seal and Finish
Once all the paint is dry and you are satisfied with the pixelated pattern, apply a generous coat of Mod Podge or a clear acrylic spray sealant over the entire box. This step protects the paint from scratches and gives the box a smooth, finished look. Allow the sealant to cure completely before using the box for storage.
4. Customizable Pegboard Wall Organizer
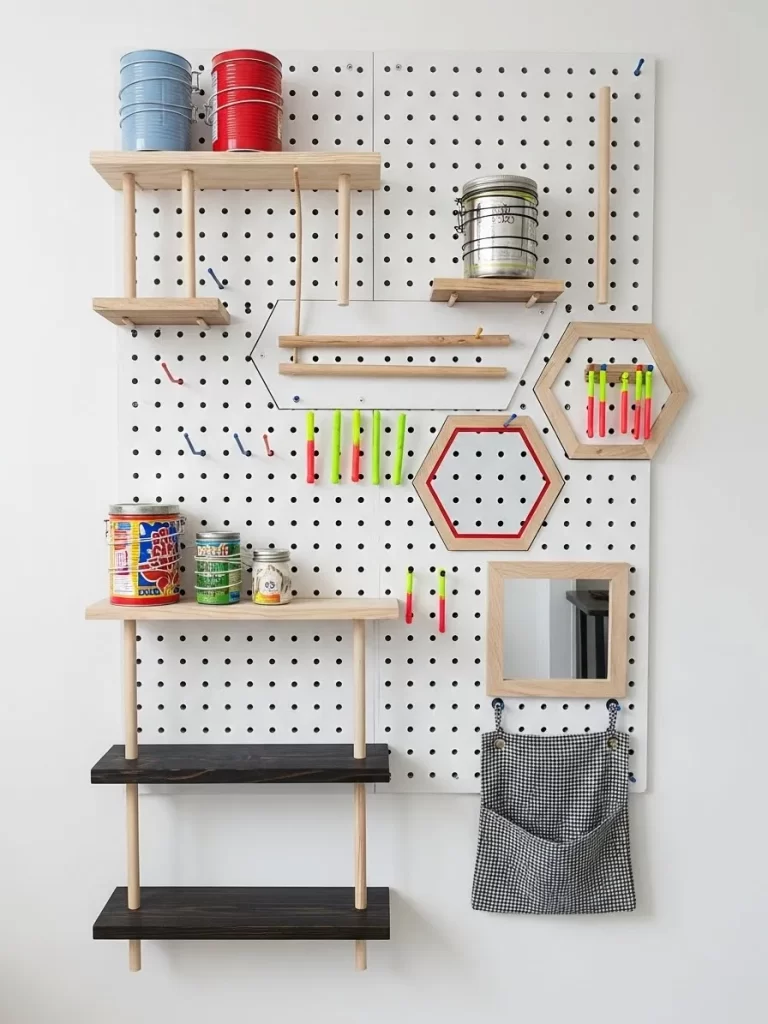
Image Description
Organization meets customization in this visually clean and highly functional DIY project. This white pegboard provides a simple yet effective foundation for a versatile wall storage system. The system uses natural wood shelves, dowels, and various hooks to hold a wide assortment of items, demonstrating its utility in a craft room, kitchen, or entryway.
The design incorporates playful geometric shapes, specifically wooden hexagons, which serve as decorative frames or shallow shadow boxes. These elements add a modern, artful touch to the purely practical pegboard. Small, colorful pegs are used to hang tools or notes, introducing pops of primary and secondary colors against the white and wood.
The arrangement is entirely adjustable, allowing the user to reposition shelves and components effortlessly to suit changing storage needs. Notice the use of different woods and finishes on the shelves, adding visual interest. This DIY trend is worthwhile because it addresses clutter in a stylish, personalized way, moving beyond generic, store-bought organization.
Materials Required
- One sheet of white painted or laminate pegboard
- Assorted wooden dowels (various thicknesses, cut to different lengths)
- Small pieces of lumber for shelves (e.g., $1 \times 4$ lumber)
- Small wood hexagons or frames (optional)
- Assorted pegboard hooks and plastic/wood pegs
- Small mirror (optional)
- Wood glue
- Wood stain or dark paint (optional, for contrasting shelves)
Equipment Required
- Drill and drill bits
- Saw (or have lumber pre-cut at the hardware store)
- Level
- Measuring tape
- Sandpaper
DIY Instruction Step by Step
Step 1: Prepare the Pegboard and Components
If your pegboard is not pre-finished, paint it white and allow it to dry. Cut your lumber pieces into the desired shelf lengths and sand all the edges smooth. Apply wood stain or a contrasting paint color to the shelves, if desired, and let them dry thoroughly.
Step 2: Install the Pegboard on the Wall
Measure and mark the desired location on your wall. Hold the pegboard in place and use a level to ensure it is straight. Since the pegboard needs space behind it for the hooks and dowels to fit, you must install spacers (small wood blocks or washers) between the wall and the board before screwing it in. Drill pilot holes and secure the board firmly to the wall studs using long screws.
Step 3: Create the Wooden Shelves
To create a shelf, you will need two vertical supports (dowels) and one horizontal shelf piece. Drill two holes into the underside of your shelf piece that align with the pegboard holes. These holes should be large enough for the dowels to fit snugly.
Step 4: Assemble and Mount the Shelves
Insert the supporting dowels through the pegboard holes at the desired height. Place a small amount of wood glue in the drilled holes on the underside of the shelf. Slide the shelf down onto the top of the dowels, pressing firmly so the dowels sit flush in the shelf holes. Ensure the shelf is level before the glue dries.
Step 5: Incorporate Hooks and Accessories
Insert the small colored pegs and various metal hooks into other holes around the board to create hanging spots for keys, tools, or accessories. If you have the wooden hexagons or mirror, attach them to the board using small dowels or strong adhesive where they will be supported by the board.
5. Bleached Stripe Effect Fabric

Image Description
This image focuses on a simple, yet highly effective textile DIY trend that creates custom, distressed fabric. The fabric features a classic vertical stripe pattern in a muted blue color over a creamy white background. This pattern is softened and made unique by a deliberate bleaching technique.
Observe the faint, uneven white streaks and speckles that run vertically through the blue stripes. This is the result of strategically applying bleach, which removes some of the pigment and gives the fabric a weathered, vintage appearance. The bottom section of the fabric is crumpled, revealing a fringed, raw edge, adding to the informal, handcrafted aesthetic.
This method allows you to transform inexpensive, store-bought striped fabric into something that looks custom-dyed and expensive. It is a fantastic way to create curtains, tablecloths, or pillows with a subtle, coastal, or farmhouse feel. This bleach technique is a worthwhile, budget-friendly option for achieving a high-style, casual texture in your home.
Materials Required
- Striped cotton or linen fabric (ensure the color is susceptible to bleach)
- Liquid household bleach
- Large container or tub
- Water
- Rubber gloves
Equipment Required
- Spray bottle (optional, for fine speckles)
- Wooden stirring stick
DIY Instruction Step by Step
Step 1: Prepare the Bleach Solution
Fill a large container or tub with water. Add the bleach, stirring it in well. A common ratio is 1 part bleach to 3 parts water, but you can test a less concentrated solution (1:5) on a fabric scrap first to gauge the speed and intensity of the color removal. Always wear rubber gloves when handling bleach.
Step 2: Test the Application Technique
Decide on your desired effect. For soft, overall fading, you will soak the fabric. For the streak or spot effect seen here, you will apply the solution directly. Test your application method on a small scrap of the fabric.
Step 3: Apply the Bleach Solution for Streaks
If you want the subtle, vertical streaking shown, carefully lay the fabric flat in the tub or on a protected surface. Dip a paintbrush or a small, folded cloth into the bleach solution. Drag the wet brush or cloth quickly and lightly down the length of the blue stripes. For a speckled effect, lightly mist the fabric with the solution using a spray bottle.
Step 4: Watch and Rinse
Monitor the fabric closely. The blue color will begin to lighten within minutes. The moment you achieve the desired level of fading—remembering the bleaching process continues slightly after removal—immediately lift the fabric and transfer it to a sink or tub.
Step 5: Neutralize and Wash
Rinse the fabric thoroughly with cold water to stop the bleaching action. Then, wash the fabric in a washing machine using a mild detergent to completely neutralize the bleach. Air-dry or tumble-dry as usual.
6. Colorful Terrazzo-Inspired Trays
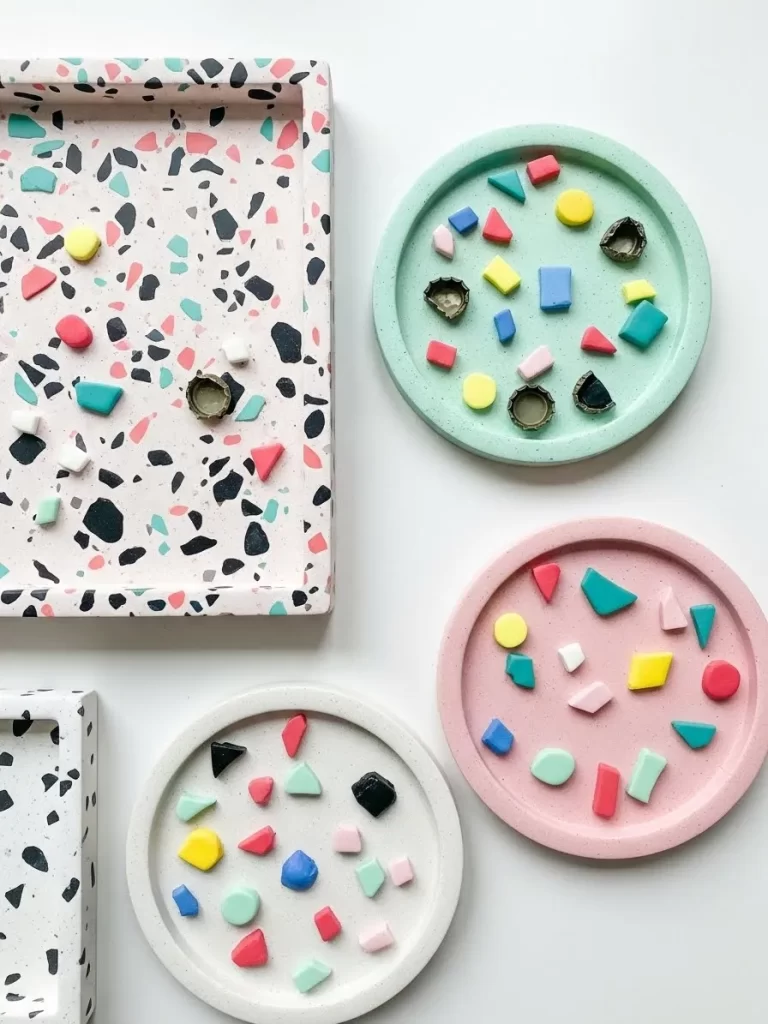
Image Description
This collection of small decorative trays expertly captures the fun, geometric aesthetic of the terrazzo trend. Each tray features a smooth, matte finish that serves as a canvas for colorful, randomly scattered chips. The pieces are varied in shape, including circular and rectangular forms, demonstrating the versatility of the technique.
The color choices are playful and modern, ranging from soft mint green and pale pink to white and a speckled pink base. The tiny chips embedded in the surface are a vibrant mix of bright yellow, teal, magenta, and black, contrasting beautifully with the pastel bases. This look is achieved using polymer clay or small bits of colored material mixed into a plaster or resin base.
These trays are useful as catch-alls for jewelry, keys, or even as decorative coasters. Creating your own terrazzo accessories is an accessible DIY decor trend that allows for endless color customization. They bring a cheerful, contemporary texture and pattern to any vanity or desk.
Materials Required
- Jesmonite, plaster of Paris, or air-dry clay (for the tray base)
- Polymer clay in various bright colors (for the terrazzo chips)
- Silicone molds for trays (circular and rectangular)
- Water (if using plaster or Jesmonite)
- Sandpaper (fine grit)
- Clear sealant or varnish
Equipment Required
- Mixing containers and stirring sticks
- Rolling pin (if using polymer clay)
- Sharp craft knife
DIY Instruction Step by Step
Step 1: Prepare the Terrazzo Chips
Condition the polymer clay by rolling and warming it until it is pliable. Roll out each color of clay into a thin sheet. Use a sharp craft knife to cut the sheets into small, random geometric shapes (triangles, squares, irregular fragments). You need a good quantity of these chips. Bake the polymer clay pieces according to the clay manufacturer’s instructions.
Step 2: Mix the Base Material
Prepare your base material (Jesmonite or plaster) according to the package directions, ensuring the mixture is smooth and lump-free. If you want a colored base (like the pink or mint green), mix a few drops of acrylic paint or pigment into the base material now.
Step 3: Incorporate the Chips
Take about half of your mixed base material and pour a thin layer into the bottom of your silicone mold. Wait a few minutes until it slightly thickens. Now, generously sprinkle your baked, colorful polymer clay chips onto this layer. Pour the remaining base material mixture over the chips until the mold is full.
Step 4: Cure and De-mold
Tap the mold gently on your work surface to release any air bubbles. Allow the material to cure completely. Jesmonite and plaster cure quickly, while air-dry clay will take longer. Once fully set, carefully pop the tray out of the silicone mold.
Step 5: Sand and Finish
The fun part is revealing the pattern! Use fine-grit sandpaper to lightly sand the surface of the cured tray. This sanding smooths the surface and exposes the colorful chips that were embedded just below the surface. Wipe away any dust. Apply a thin coat of clear sealant or varnish to protect the surface and enhance the colors.
7. Repurposed Tin Can Robot Light Sculpture
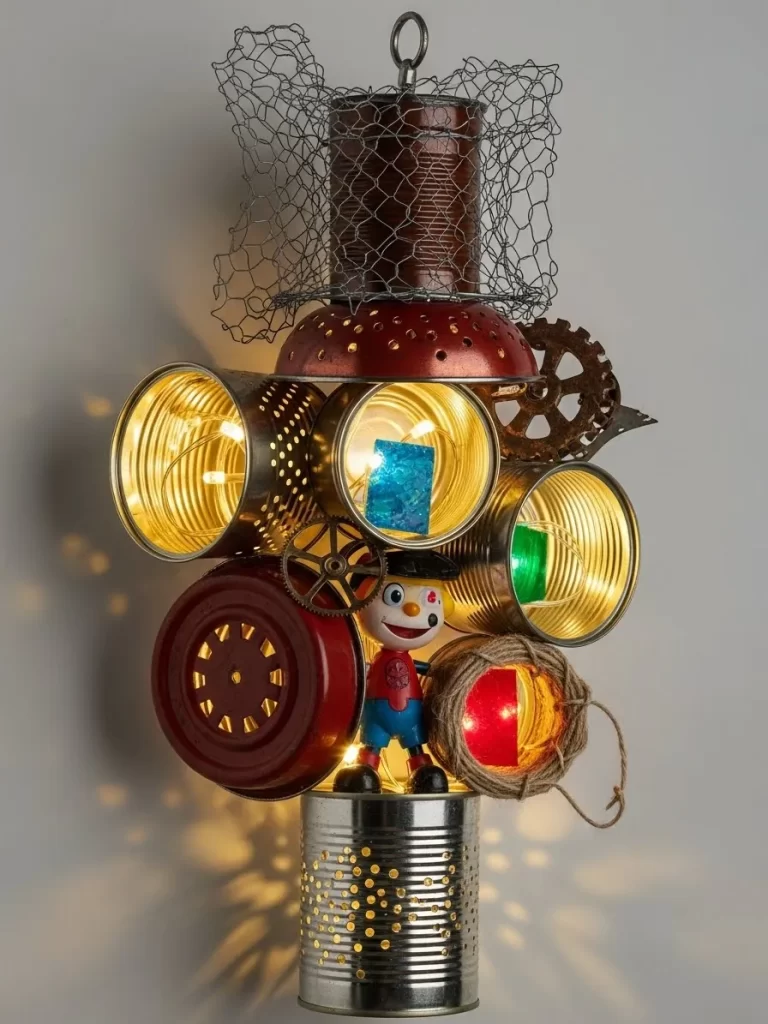
Image Description
This is an imaginative and quirky piece of upcycled art that functions as a novelty light fixture. The sculpture is constructed entirely from salvaged metal parts, including various tin cans, jar lids, gears, and wire mesh. This creative recycling project transforms household waste into a charming, steampunk-style robot figure.
The main body consists of several cans arranged to create a face or torso, with circular cutouts allowing internal lights to shine through, casting a warm, atmospheric glow. Elements like a wire mesh ‘hat,’ rusted metal gears attached to the sides, and painted sections (like the red perforated pieces) add character and complexity. A small toy figure is even incorporated into the design, lending a whimsical personality.
The project speaks directly to the trend of ‘found object’ art and sustainable DIY decor. It is a fantastic centerpiece for a playful office, a child’s room, or an eclectic living space. This is a worthwhile effort for anyone who enjoys working with metal and wants to create truly unique lighting.
Materials Required
- Various empty, clean tin cans (different sizes and shapes)
- Old metal jar lids, strainers, or colanders
- Scrap pieces of chicken wire or mesh
- Decorative metal gears or junk drawer items
- Small LED string lights or battery-powered light pucks
- Strong adhesive (epoxy or industrial metal glue)
- Spray paint (e.g., metallic red)
- Small toy figure or trinket (optional)
- Strong wire or metal loop for hanging
Equipment Required
- Can opener (to remove tops cleanly)
- Metal snips or strong scissors
- Drill or metal punch (for creating light holes)
- Pliers
DIY Instruction Step by Step
Step 1: Prepare and Paint the Metal Components
Thoroughly clean all cans and metal pieces. Using a drill or metal punch, carefully create small decorative holes or patterns in the cans that will be at the bottom or the base of the sculpture. Spray paint any pieces you want to color (like the red components) and allow them to dry fully.
Step 2: Assemble the Body Structure
Determine the arrangement of your cans and metal parts. Start at the bottom and use a strong metal adhesive (epoxy works well) to glue the base cans together. Stack and glue the cans sequentially, building the body of the robot. Wait for the adhesive to cure completely before moving to the next section.
Step 3: Integrate Lighting
As you build the structure, place the LED string lights inside the large central cans so the light shines out through the open ends. If using battery-powered puck lights, ensure the switch is accessible. You can also glue pieces of colored plastic or film over some openings to create colored light effects.
Step 4: Attach Features and Details
Use the strong adhesive to attach the decorative elements. Glue the metal gears, jar lids, and strainers to the sides, top, or between the cans to create arms, shoulders, or a head. Use pliers to shape the wire mesh into a hat or collar and secure it to the top section.
Step 5: Final Touches and Hanging Loop
Glue the small toy figure onto a secure platform on the sculpture. Once the entire structure is solid, securely fasten a strong metal wire or loop to the top-most can or component. This loop will serve as the hanging point for your completed light sculpture.
8. Kintsugi-Inspired Repaired Vase

Image Description
This project showcases an elegant and meaningful decor trend inspired by the Japanese art of Kintsugi, which means “golden joinery.” The tall, round vase features a distressed, antiqued white finish with a beautiful gold-colored fracture running vertically down its side. This gold line mimics the traditional technique of repairing broken pottery with lacquer dusted or mixed with powdered gold.
The lower portion of the vase has been painted with an abstract, deep indigo blue pattern, giving it an eroded or aged patina that blends into the white. A classic Greek key or geometric pattern is painted around the neck of the vase, enhancing its antique, neoclassical style. The piece intentionally celebrates imperfection and the history of an object, making the “damage” the most beautiful part.
This DIY approach allows you to revitalize a damaged or inexpensive vase, turning it into a unique, high-value piece of art. It is a simple yet impactful way to introduce a sense of history and philosophy into your home decor.
Materials Required
- One ceramic or glass vase
- Matte acrylic paint in white and a deep color (e.g., indigo blue)
- Painter’s tape or stencil (for the Greek key pattern)
- Gold metallic paint or gold leaf paint
- Strong epoxy or craft glue
- Fine artist’s brush
Equipment Required
- Standard paintbrushes
- Sandpaper (fine grit)
- Pencil
DIY Instruction Step by Step
Step 1: Prepare and Base Coat the Vase
Clean the vase thoroughly. Apply a matte white base coat over the entire surface. For an antique look, allow this coat to dry, then lightly sand areas to create a distressed, weathered texture, allowing some of the vase’s original color to peek through.
Step 2: Apply the Bottom Color and Pattern
Use painter’s tape to mark off the top edge for the dark, abstract base color. Paint the bottom section of the vase with the indigo blue paint, using dabbing and uneven strokes to make it look organically worn and faded. While that dries, use a stencil or painter’s tape to create the Greek key pattern around the neck of the vase and fill it in with the white or a contrasting color.
Step 3: Draw the “Fracture” Line
Using a pencil, lightly draw a realistic, jagged crack line that travels from the rim down the side of the vase. The line should look organic, not perfectly straight.
Step 4: Apply the Gold Repair
Using a fine artist’s brush, carefully paint over the pencil line with the gold metallic paint. Make the line slightly uneven and thick, giving the illusion of a filled fracture. For an extra authentic look, if you have any chips or small cracks in the vase, fill them with the epoxy and then paint the epoxy gold once cured.
Step 5: Seal and Finish
Once all the paint is completely dry, you may want to apply a matte sealant spray over the entire piece to protect the paint and gold finish, giving it a lasting, high-quality look.
9. Rope Art Cloud and Rainbow Wall Hanging
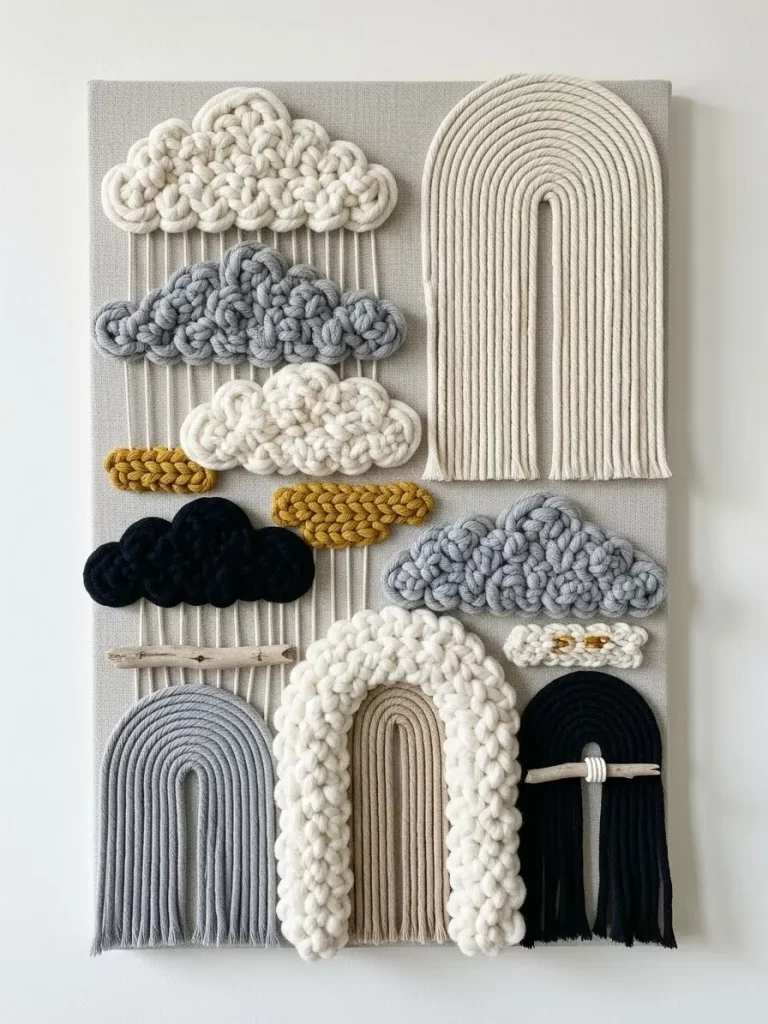
Image Description
This charming textile art piece offers a soft, three-dimensional texture, fitting perfectly into the trending neutral and woven decor style. The hanging features stylized elements of the sky—fluffy clouds and bold rainbows—all created using thick, knotted, and coiled cotton rope or cord.
The color palette is sophisticated, combining natural cream, white, warm tan, light gray, and contrasting accents of mustard yellow and deep black. The clouds are made by coiling and bunching the rope to create a plump, tactile texture. The rainbows are formed by arranging various colored ropes in semi-circular arches, some using the clean coil method and others featuring a shaggy, fringed finish.
Mounted on a simple canvas backing, this piece adds significant texture and visual interest to a nursery, bedroom, or living area. Creating this kind of rope art is a therapeutic and budget-friendly DIY decor activity that results in a unique, soft sculptural artwork. It truly elevates the traditional macrame aesthetic.
Materials Required
- Large rectangular canvas or a piece of thick felt/fabric stretched over a board
- Thick cotton cord or rope (various neutral and accent colors: white, gray, yellow, black)
- Strong fabric or craft glue (e.g., E6000 or hot glue)
- Wooden dowels or driftwood pieces (optional)
- Sharp scissors
Equipment Required
- Hot glue gun (optional, for quicker setup)
- Measuring tape or string
DIY Instruction Step by Step
Step 1: Plan the Arrangement
Lay the canvas flat. Lightly sketch the desired placement and size of your clouds and rainbows directly onto the canvas with a pencil. Use a piece of string to measure the arc of the rainbows to ensure symmetry.
Step 2: Create the Rainbow Arches
Start with the largest arch. Cut a length of rope and begin shaping it along your sketched line. Apply a continuous bead of strong craft glue to the canvas, following the line of the arch. Press the rope firmly into the glue, holding it in place until set. For multi-layered rainbows, repeat this process with smaller arcs of different colored rope, placing them inside the larger one.
Step 3: Construct the Clouds
To make the fluffy clouds, take a length of rope and begin coiling it tightly into a small, spiral shape, gluing the coils together as you go. For a textured, ‘knotted’ look, you can braid or knot the rope before coiling it. Once you have a small round section, simply continue coiling and bunching the rope in an irregular, cloud-like shape.
Step 4: Mount the Clouds
Apply generous amounts of glue to the back of the finished rope clouds and press them firmly onto the canvas in their designated spots. Hold the clouds down for several minutes or weigh them down while the glue cures to ensure maximum adhesion to the fabric.
Step 5: Add Finishing Details (Optional)
If you want the fringed rainbows, simply glue the top arc to the canvas and allow the rest of the rope strands to hang straight down. You can also glue small pieces of decorative driftwood or small woven accents to the canvas for extra visual texture.
10. Upcycled Mosaic Mirror Frame
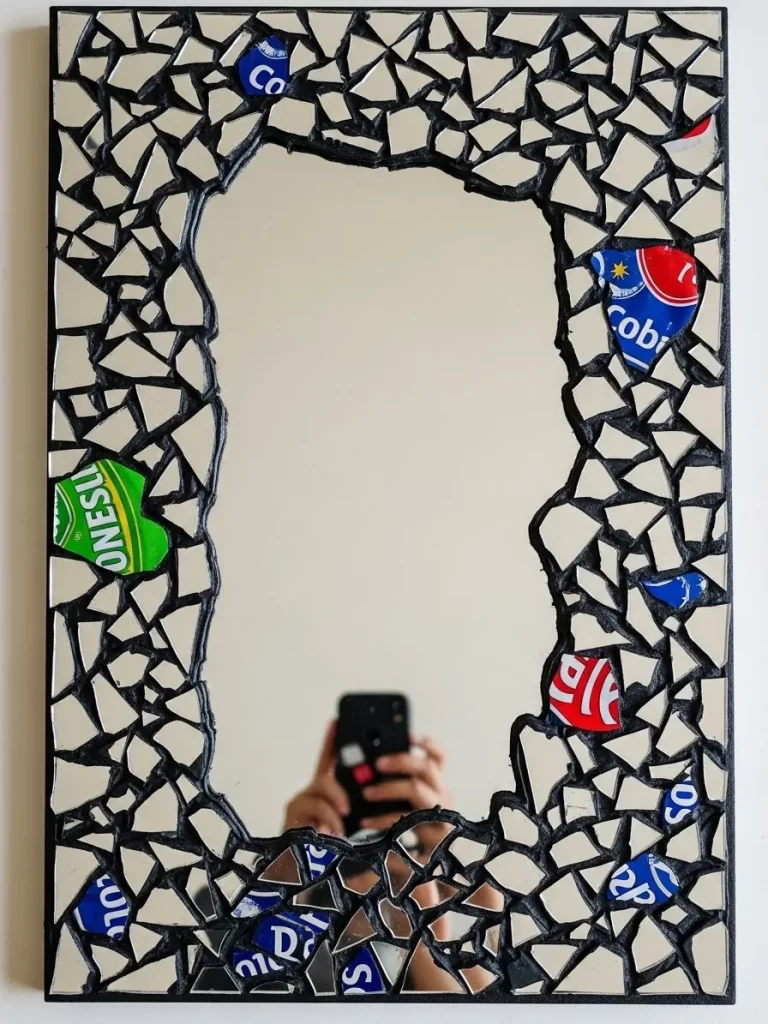
Image Description
This DIY mirror frame is a fantastic example of creative upcycling and mosaic work. The mirror itself has an irregular, organically shaped opening, framed by a thick, dark border. The mosaic is primarily composed of small, irregular pieces of shattered mirror or reflective glass, providing a dramatic, fractured effect.
The dark grout creates a strong contrast, making the broken mirror pieces stand out sharply. What truly makes this project a cheap and worthwhile trend is the incorporation of repurposed materials: colorful segments cut from aluminum beverage cans are scattered throughout the mosaic. These bright, graphic pieces—featuring branding in red, blue, and green—introduce pops of color and pattern.
This mirror is a bold, statement piece that embraces the imperfect, found-object aesthetic. It is perfect for an eclectic, industrial, or even a maximalist decor style. This project creatively addresses waste while resulting in a personalized, high-impact accessory for any wall.
Materials Required
- One plain wooden or sturdy framed mirror (rectangular shape works well)
- Small pieces of mirror or reflective glass (handle with extreme caution)
- Empty aluminum beverage cans (cleaned)
- Dark-colored grout mix (e.g., black or charcoal gray)
- Grout sealant (optional)
- Strong adhesive (e.g., E6000 or tile adhesive)
Equipment Required
- Safety goggles and heavy-duty gloves (crucial for handling glass)
- Tile nippers or strong scissors (for cutting can pieces)
- Small sponge and bucket
- Grout spreader or putty knife
- Old cloth or rag
DIY Instruction Step by Step
Step 1: Prepare the Frame and Materials
Ensure the mirror frame is clean and secure. Put on your safety goggles and heavy gloves. Use the tile nippers to break the mirror pieces into various small, irregular shapes. Use strong scissors to cut the beverage cans into small decorative pieces, focusing on the colorful graphics and letters.
Step 2: Adhere the Mosaic Pieces
Start applying the strong adhesive directly to the frame around the mirror opening. Begin placing your mirror and can pieces onto the adhesive. Arrange them randomly, leaving small, consistent gaps between the pieces for the grout. You can create the irregular inner border by simply laying the pieces in a random pattern around the glass. Allow the adhesive to cure completely (this is crucial before grouting).
Step 3: Apply the Grout
Mix the dark-colored grout according to the package instructions. Using a grout spreader or putty knife, press the grout firmly into all the spaces between the mosaic pieces, ensuring all gaps are filled. Work in small sections, wiping away excess grout as you go.
Step 4: Clean and Cure
Immediately after applying the grout to a section, use a damp sponge to wipe the excess grout off the face of the mirror pieces and can pieces. Rinse the sponge frequently. Be careful not to pull the grout out of the joints. Once the surface is clean, let the entire piece cure for the time specified by the grout manufacturer.
Step 5: Final Polish
Once the grout is fully cured, use a clean, dry cloth to polish the mirror and the mosaic surface, removing any remaining grout haze. Apply grout sealant if desired, as this helps protect the grout from moisture and staining.
11. Rustic Coastal Block Planter
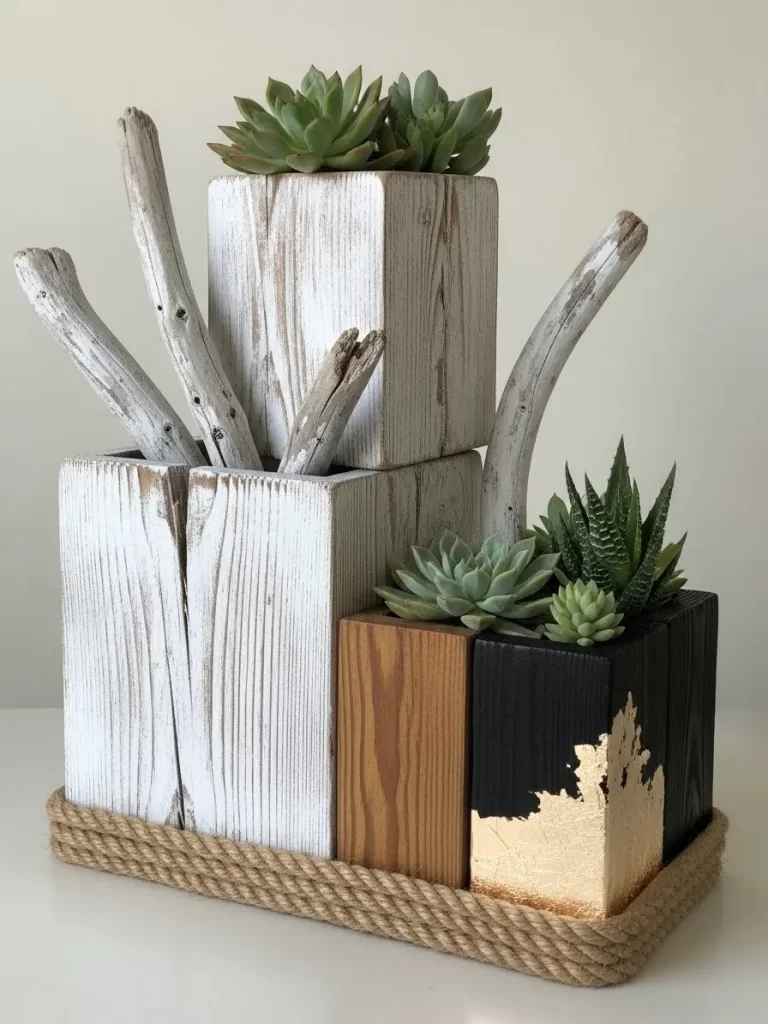
Image Description
This creative planter arrangement utilizes simple wooden blocks to create a dynamic, stacked display perfect for succulents. The design expertly blends distressed wood textures with natural rope and a touch of metallic shine. Two of the stacked blocks feature a whitewashed, crackled finish that gives them a weathered, farmhouse feel, while a third section is painted a sophisticated matte black.
The contrast between the rough, splintered white wood, the smooth natural wood, and the deep black is quite appealing. A subtle accent of gold leaf is applied randomly to the corner of the black block, introducing a luxurious element against the rustic backdrop. Found driftwood pieces are inserted into the tops of the white blocks, enhancing the overall coastal, found-object aesthetic.
This DIY is highly worthwhile because it turns inexpensive lumber scraps into a sculptural focal point. The base is neatly bordered with thick, natural jute rope, providing a grounding element for the entire multi-height display. Succulents and small plants fit perfectly into the hollow tops of the blocks, making this a stylish way to bring greenery indoors.
Materials Required
- Three square or rectangular wooden blocks (or lumber cut to size)
- White and black matte acrylic paint
- Wood stain (optional, for natural wood look)
- Gold leaf and gold leaf adhesive
- Thick natural jute or sisal rope
- Strong wood glue
- Found pieces of driftwood (optional)
- Succulents or small potted plants
Equipment Required
- Drill and large spade bit (for hollowing out planting area)
- Sandpaper (coarse and fine)
- Paintbrushes (various sizes)
DIY Instruction Step by Step
Step 1: Cut and Prepare the Wood Blocks
Cut your lumber into the desired block sizes. If your lumber is solid, use a large spade bit and a drill to carefully bore out a planting cavity in the top of each block, leaving a generous margin around the edges. Sand all surfaces smooth, focusing on creating rounded edges.
Step 2: Paint and Finish the Blocks
Apply the finishes to your blocks. Paint two blocks with the white paint. While the paint is still wet, you can dry-brush or gently scratch the surface to create a distressed, reclaimed wood look. Stain or leave one block with the natural wood finish. Paint the final block matte black. Allow all pieces to dry completely.
Step 3: Apply the Gold Accent
On the black block, use a small brush to apply gold leaf adhesive randomly around the bottom corner or edge. Wait until the adhesive becomes tacky according to its instructions. Carefully press small pieces of gold leaf onto the tacky spots. Use a dry brush to gently wipe away the excess gold leaf, leaving only the flakes stuck to the adhesive.
Step 4: Assemble the Planter Base
Arrange the blocks in the desired stacked configuration. Use strong wood glue to adhere the blocks together where they touch, creating a stable, multi-tiered structure. Allow the glue to set firmly.
Step 5: Add the Rope Base and Driftwood
Starting at the back, apply a line of strong glue around the bottom perimeter of the entire assembled structure. Begin wrapping the thick jute rope around the base, ensuring it is tight and sits flat. Continue wrapping until you have three or four rows. Insert the pieces of driftwood into the block openings for decoration. Place small potted succulents into the hollowed cavities to complete the planter.
12. Geometric Wire Hanger Mobile
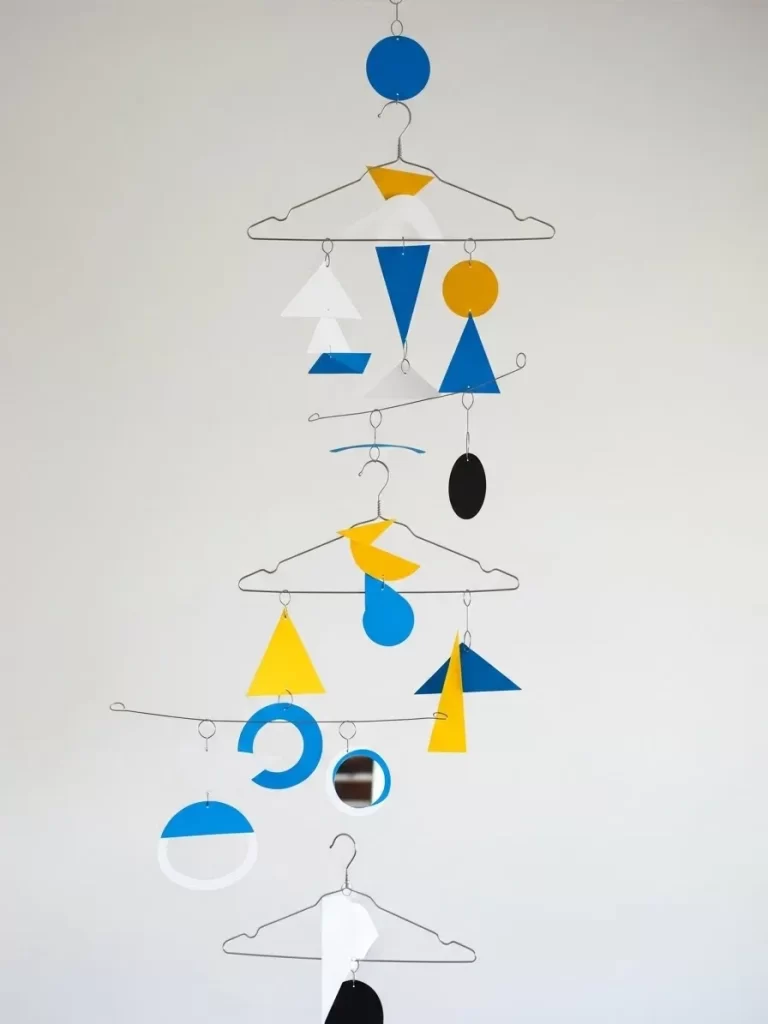
Image Description
This striking hanging sculpture transforms ordinary materials into a piece of kinetic art that evokes mid-century design. The mobile uses simple wire coat hangers as the structural arms, creating a clever, tiered balancing system. It features various geometric shapes—circles, triangles, and abstract cutouts—in a bold, primary color scheme.
The shapes are cut from flat material in solid white, bright yellow, and royal blue, with some pieces in matte black. The forms are carefully suspended by fine wires, allowing the pieces to rotate and move gently. A small mirror piece is even incorporated, adding a surprising flash of reflection.
This project is a worthwhile DIY trend because it achieves a complex, custom, gallery-quality look using very budget-friendly supplies. The design plays on asymmetry and balance, offering a sophisticated visual puzzle for any modern space. It brings a touch of playful geometry and movement to an otherwise static corner.
Materials Required
- Three to four metal wire coat hangers
- Sturdy colored paper, cardstock, or thin plastic sheets (yellow, blue, white, black)
- Thin wire (florist wire or jewelry wire)
- Small circular mirror tile (optional)
Equipment Required
- Wire cutters and pliers
- Sharp scissors or craft knife
- Hole punch or small drill bit
- Ruler and compass
DIY Instruction Step by Step
Step 1: Straighten and Shape the Hangers
Use the wire cutters and pliers to carefully unbend the wire coat hangers. Straighten them as much as possible, leaving the hook section intact for hanging. Gently re-bend the wire into several long, horizontal pieces that can act as the balancing arms of the mobile. You may need to create small loops at the ends of these arms to attach the next pieces.
Step 2: Cut the Geometric Shapes
Using the ruler and compass, draw various geometric shapes onto the colored paper or plastic. Cut out a mix of circles, half-circles, triangles, and abstract forms. You need several shapes for each tier of the mobile. Use a hole punch or small drill bit to create a small hole in the top center of each shape for hanging.
Step 3: Assemble the Tiers
Start with the bottom tier. Cut short lengths of thin wire. Attach the wire through the hole in a shape, twisting the wire end to secure it. Attach the other end of the wire to the bottom of one of the straightened hanger arms. Continue attaching shapes to the arm, balancing the weight by hanging shapes of similar size or weight opposite each other. The arm should hang horizontally when balanced.
Step 4: Stack the Tiers
Once a tier is balanced, attach a length of wire from the center of that arm (where the hook previously was) to the center of the next wire hanger hook above it. Repeat the process of balancing and stacking, ensuring the entire structure is level and moves freely.
Step 5: Final Adjustments
Hang the mobile from a sturdy hook. Use the pliers to make tiny adjustments to the lengths of the hanging wires or the position of the shapes until the entire sculpture hangs evenly and rotates with the air movement.
13. Abstract Newspaper Texture Vases
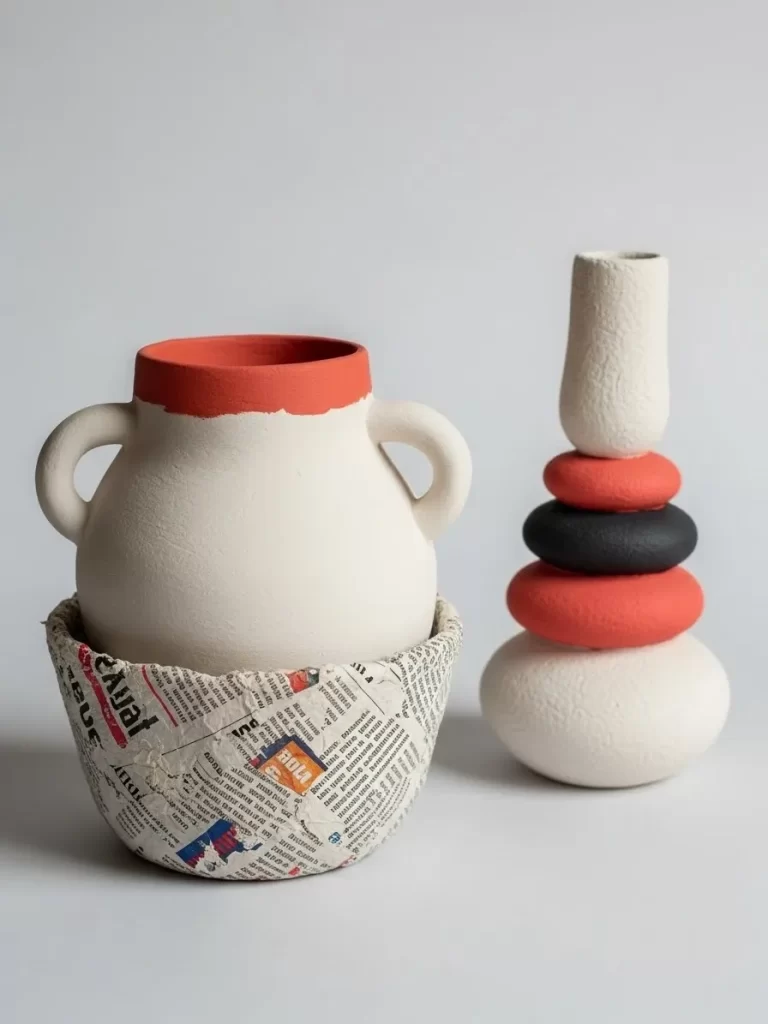
Image Description
This pairing of ceramic pieces showcases a clever mix of smooth, tactile surfaces and rough, upcycled textures. The aesthetic is modern and sculptural, focusing on simple forms and minimal color. The piece on the right is a stacked sculpture resembling river stones, using alternating textures and a bold terracotta red, black, and white palette.
The piece on the left, a traditional handled urn shape, features a striking base made from molded newspaper. The printed newspaper text remains visible beneath a layer of white sealant, providing an urban, text-based texture that contrasts with the smooth, matte white clay of the vase body. A sharp band of terracotta red paint highlights the rim, matching the stacked rings on the companion sculpture.
The use of newspaper is a cheap, sustainable DIY trend that delivers a distinctive, tactile surface. Both vases utilize a rough, almost sandy coating on the white sections, adding to the handcrafted, ceramic feel. This worthwhile project shows how accessible materials can be combined to create gallery-style decor.
Materials Required
- Two existing plain vases (or simple molded forms made from air-dry clay)
- Newspaper (printed text preferred)
- Paper clay or papier-mâché paste
- Matte acrylic paint in off-white, black, and terracotta red
- Strong clear sealant (Mod Podge or similar)
- Sand or texture medium (optional, to mix with paint)
Equipment Required
- Paintbrushes (various sizes)
- Mixing bowls
- Fine-grit sandpaper (optional)
DIY Instruction Step by Step
Step 1: Prepare the Newspaper Base (Urn)
Tear the newspaper into small, irregular strips and pieces. Mix the papier-mâché paste according to instructions. Starting at the bottom of the urn vase, coat the newspaper strips with the paste and begin applying them to the lower half of the vase, overlapping the pieces to create a rough texture. Let the text of the newspaper remain slightly visible. Allow this to dry completely.
Step 2: Base Coat and Texture
Once the newspaper base is dry, paint the entire urn and the stacked sculpture with the off-white paint. If you want the rough texture, mix a small amount of fine sand or texture medium into the white paint before applying it. Let the paint dry.
Step 3: Create the Stacked Rings (Sculpture)
If you are creating the stacked ring sculpture, you will need to mold the rings separately using paper clay or air-dry clay and allow them to cure. Paint the rings in the terracotta red and black colors. Glue the cured rings together with the painted white base and top sections to form the tall, stacked shape.
Step 4: Apply Color Accents
For the urn, use a steady hand to paint a clean, continuous band of the terracotta red paint around the rim. For the stacked sculpture, ensure the terracotta and black rings are fully covered. You can apply a thin coat of clear sealant over the red and black sections to make the colors pop.
Step 5: Seal the Newspaper Texture
Apply two to three generous coats of clear sealant (Mod Podge) over the newspaper-covered section of the urn. This step protects the paper, prevents the ink from running, and gives the piece a smooth yet dimensional finish.
14. Retro Caning Cabinet Door Upgrade
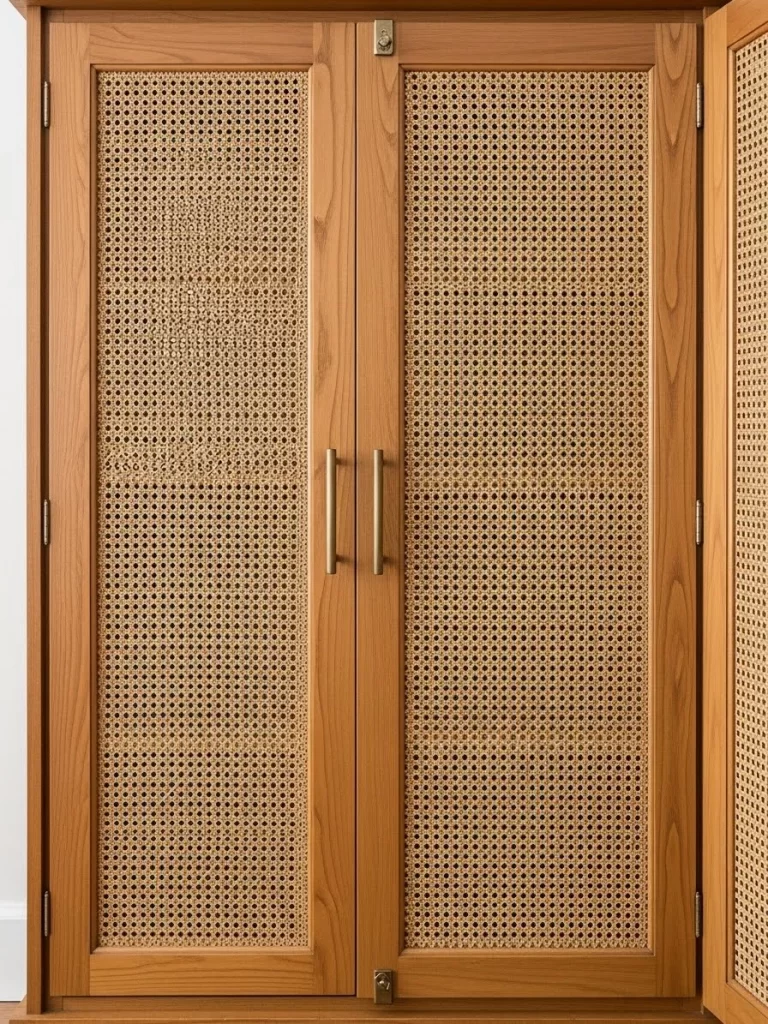
Image Description
This image highlights a stylish furniture upcycling trend: replacing solid door panels with natural woven cane or rattan material. The cabinet features a warm, honey-toned wood frame and modern, elongated brass pull handles. The doors themselves are inset with a finely woven caning panel, giving the piece a light, airy, and sophisticated texture.
The caning weave is uniform and tightly knit, allowing for airflow and subtle visibility into the cabinet interior, which adds visual depth. This material choice is a popular nod to mid-century modern and tropical decor styles. It takes a simple, enclosed cabinet and opens it up visually, transforming it into a high-end, bespoke furnishing.
This trend is worth the effort because it is relatively cheap to acquire cane webbing, and the resulting transformation drastically updates the entire piece of furniture. It makes the cabinet feel custom-designed, adding an elevated, natural element to the room.
Materials Required
- Existing cabinet doors with removable center panels or the ability to cut a recess
- Cane webbing (pre-woven sheets)
- Wood trim or beading (for securing the cane)
- Wood glue
- Wood stain or varnish (to match the existing cabinet)
Equipment Required
- Router or jig saw (if cutting new panel recess)
- Staple gun or small brad nails
- Hammer
- Measuring tape and pencil
- Utility knife
- Clamps
DIY Instruction Step by Step
Step 1: Remove and Prepare the Door Panels
Carefully remove the cabinet doors. If the doors have solid wood center panels, you will need to remove them entirely, using a router or jigsaw to create a clean opening inside the door frame. If the door already has recessed panels, you may just need to remove the trim holding the existing panel in place.
Step 2: Cut the Cane Webbing
Measure the size of the opening created in the door frame. Cut the cane webbing about two inches larger than the opening on all sides. This extra margin allows the cane to be pulled taut and secured.
Step 3: Soak and Install the Cane
Soak the cane webbing in warm water for about 30 minutes. This makes the material pliable and allows it to shrink slightly as it dries, resulting in a tight, drum-like surface. Remove the wet cane and lay it flat. Carefully center the damp cane over the door opening and staple or use small brad nails to secure the edges to the back of the door frame. Pull the cane taut as you staple.
Step 4: Secure the Edges with Trim
Apply wood glue to the back of the small wood trim or beading. Press the trim over the stapled edges of the cane webbing to hide the raw edges and provide a clean finish. Use clamps to hold the trim in place until the glue dries.
Step 5: Finish and Reinstall
Once the cane is dry and tight, and the glue has set, apply wood stain or varnish to the new trim to match the cabinet doors. Reinstall the doors onto the cabinet.
15. Mondrian-Inspired Room Divider

Image Description
This photograph captures a vibrant, modular room divider that functions as a sculptural piece of art. The structure is built with simple wooden frames, but the panels are filled with large sheets of colored acrylic or film, creating a stunning, modern color-blocking effect. The colors are bold and primary—intense orange, deep emerald green, bright pink, and vivid purple.
The divider uses black lines to separate the blocks of color, reminiscent of the geometric style of Piet Mondrian, but with a more saturated, contemporary palette. The beauty of this piece is its interaction with light; it casts dramatic, colorful shadows onto the floor, transforming the space it occupies.
The piece features a side element with small colored circles of acrylic, adding another layer of geometric complexity. Creating such a large, impactful piece is a worthwhile DIY trend because it provides flexible, stylish separation in an open-concept living area while introducing a huge dose of controlled color.
Materials Required
- Thin wood lumber or trim pieces (for the frame)
- Clear acrylic sheets or plastic film (as many as needed for the panels)
- Colored transparent plastic film or translucent paint (orange, green, purple, pink)
- Black vinyl tape or thin black paint
- Wood glue
- Hinges (three or four per connection point)
Equipment Required
- Saw (miter box recommended for clean corner cuts)
- Clamps
- Measuring tape and level
- Screwdriver
DIY Instruction Step by Step
Step 1: Construct the Individual Frames
Measure and cut the wood trim pieces to size to create three to four individual rectangular panel frames. Apply wood glue to the mitered corners and clamp the frames until the glue dries. Sand the finished frames smooth.
Step 2: Design and Color the Panels
Decide on the color layout for the entire divider. Cut the clear acrylic sheets to fit into the back of the wood frames. Apply the colored transparent film or translucent paint to the acrylic sheets. You will need to carefully tape off the sections before painting or precisely apply the film pieces to create the colored blocks.
Step 3: Apply the Black Grids
Once the color is dry or applied, use black vinyl tape or thin black paint to create the separating grid lines on the outside surface of the acrylic sheets. These lines should follow the divisions of the colors and mimic the lines of the wood frame for a unified look.
Step 4: Insert and Secure the Panels
Place the finished colored acrylic panels into the back of the wood frames. Use a strong adhesive or very small brad nails (carefully placed) to secure the panels inside the frames.
Step 5: Connect the Panels
Lay the finished panels side by side. Attach the hinges to the vertical edges where the panels meet, creating fold points. Use three to four hinges per connection for stability. Ensure the hinges allow the divider to fold both inward and outward.
16. Concrete Block Planter and Riser
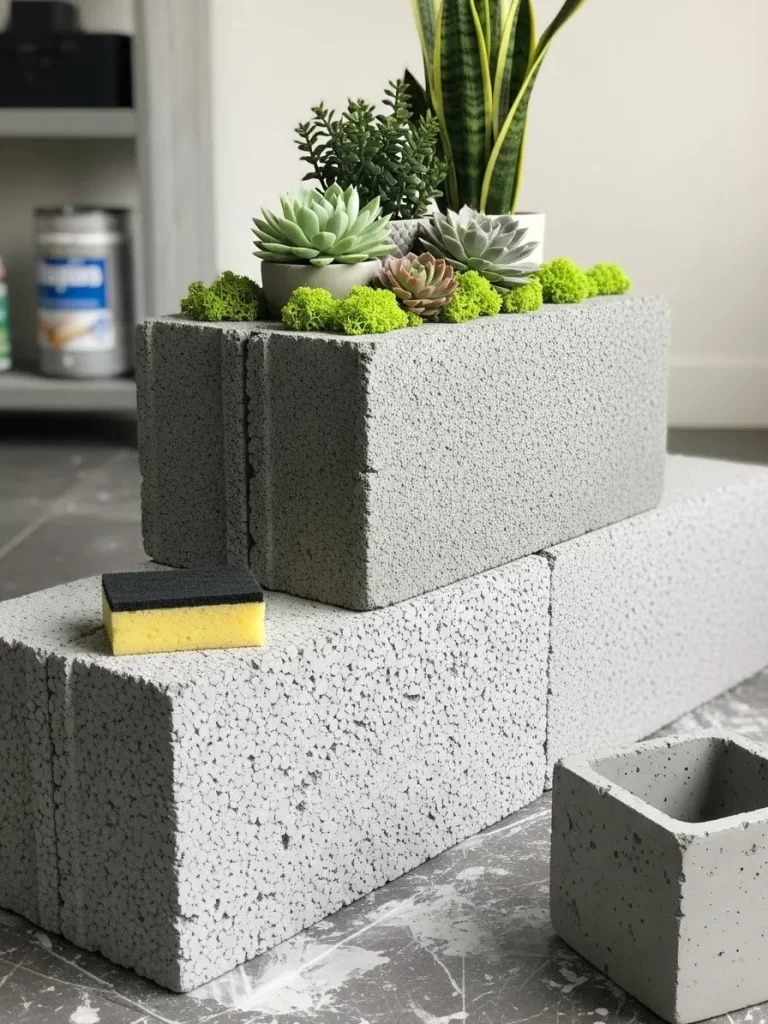
Image Description
This project demonstrates a rugged, industrial approach to home or garden decor using common cinder blocks. Two textured, porous gray cinder blocks are stacked to create a contemporary, multi-level plant display. The natural gray material and rough texture provide a minimalist, architectural base for the greenery.
The top block features a long, recessed channel that holds a collection of small potted succulents and a taller snake plant. The edges of the channel are decorated with bright, artificial green moss, providing a soft, vibrant counterpoint to the harsh gray concrete. A small, smooth concrete cube planter rests at the base, contrasting the large, rough blocks.
Repurposing cinder blocks into planters or risers is a cheap and effective DIY trend, capitalizing on the popularity of raw, exposed materials. This project is worthwhile because it creates a permanent, durable, and highly sculptural piece for either indoor or outdoor use.
Materials Required
- Two standard cinder blocks (lightweight, highly textured blocks are great)
- Small square concrete mold or ready-made small concrete planter
- Succulents and tall plants (e.g., snake plant)
- Decorative artificial green moss or lichen
- Strong outdoor adhesive (e.g., construction adhesive)
- Matte concrete sealant (optional)
Equipment Required
- Wire brush (for cleaning)
- Trowel or stick (for mixing and applying moss)
DIY Instruction Step by Step
Step 1: Clean and Prepare the Cinder Blocks
Use a wire brush to remove any loose debris or dirt from the cinder blocks. If desired, stack the blocks in the final configuration and use a strong construction adhesive to bond the upper block securely to the lower one. Let the adhesive cure.
Step 2: Prepare the Planting Area
The natural recesses in the top cinder block act as the planting channels. Place small river stones or gravel in the bottom of these channels to ensure good drainage. If using the blocks indoors, you may want to line the channels with heavy plastic sheeting to protect surfaces from water leakage.
Step 3: Arrange the Plants
Arrange your potted succulents and plants directly into the channels of the top block. Use extra gravel or soil to stabilize the pots and fill any large gaps. The snake plant or taller greenery should be placed near the back for height.
Step 4: Apply the Moss Detail
Use a strong outdoor adhesive or hot glue to carefully apply small bunches of the decorative green moss along the edges of the planting channels and around the bases of the small pots. This hides the plastic or gaps and adds a colorful, soft finishing touch.
Step 5: Finish the Display
If using a small, smooth concrete cube, place it near the base for contrast. If the planter is for outdoor use, you may want to apply a layer of matte concrete sealant to the blocks for protection against the elements.
17. Magnetic Chalkboard Spice Rack Organizer

Image Description
This highly functional wall organizer cleverly combines magnetic storage with a chalkboard surface. The base is a large, metallic panel, with the lower half featuring a matte black chalkboard coating segmented into grid squares. The top section is brushed metal, holding small tin containers for spice or supply storage.
The storage tins are silver, uniform in size, and feature custom chalkboard labels for easy identification. The containers are held securely to the magnetic board, making them easily repositionable. The chalkboard section is divided by thin white lines, creating a visual grid that can be used for notes or organization. A small wooden shelf at the bottom provides extra storage space.
This modular design is a worthwhile DIY trend because it provides vertical storage, maximizing small spaces in a kitchen or craft room. The combination of magnetic tin storage and a writable chalkboard is both practical and industrial-chic, offering a clean, monochromatic look.
Materials Required
- One large sheet of thin metal (galvanized steel or similar)
- Black chalkboard paint
- Magnetic paint (optional, to increase magnetism)
- Six to eight silver tin containers with tight-fitting lids
- Black magnetic chalkboard vinyl or labels
- Small wood board (for the bottom shelf)
- Strong adhesive or small brackets (for attaching the shelf)
- White paint pen or chalk
- Small magnets
Equipment Required
- Roller or paintbrush
- Measuring tape and pencil
- Level
- Screwdriver or drill (for wall mounting)
DIY Instruction Step by Step
Step 1: Prepare the Metal Backing
Clean the metal sheet thoroughly. Use painter’s tape to mark off the lower half of the metal sheet. Apply two to three coats of the black chalkboard paint to the taped-off section, allowing each coat to dry completely. For extra magnetic hold, you can first paint a layer of magnetic primer before the chalkboard paint.
Step 2: Create the Grid and Mount
Once the chalkboard paint is dry, use a ruler and a white paint pen or chalk to draw the grid lines on the black surface. Screw or securely mount the metal sheet to the wall using a level to ensure it is straight.
Step 3: Prepare the Spice Tins
Apply the chalkboard vinyl or labels to the front of the silver tin containers. Write the names of the contents onto the labels with a paint pen or chalk. Securely glue strong magnets to the back of each tin container. Ensure the magnets are positioned for maximum contact with the metal sheet.
Step 4: Install the Bottom Shelf
Measure the width of the organizer. Cut the small wood board to the same width. Using a strong adhesive or small metal brackets, attach the wood board horizontally to the bottom edge of the metal organizer to create a small shelf. Ensure the shelf is level and stable.
Step 5: Organize and Display
Place the magnetic spice tins onto the metal surface in the desired arrangement. Use the chalkboard section for notes, lists, or drawings, and use the bottom shelf for additional, non-magnetic items.
18. Abstract Tropical Wallpaper Collage
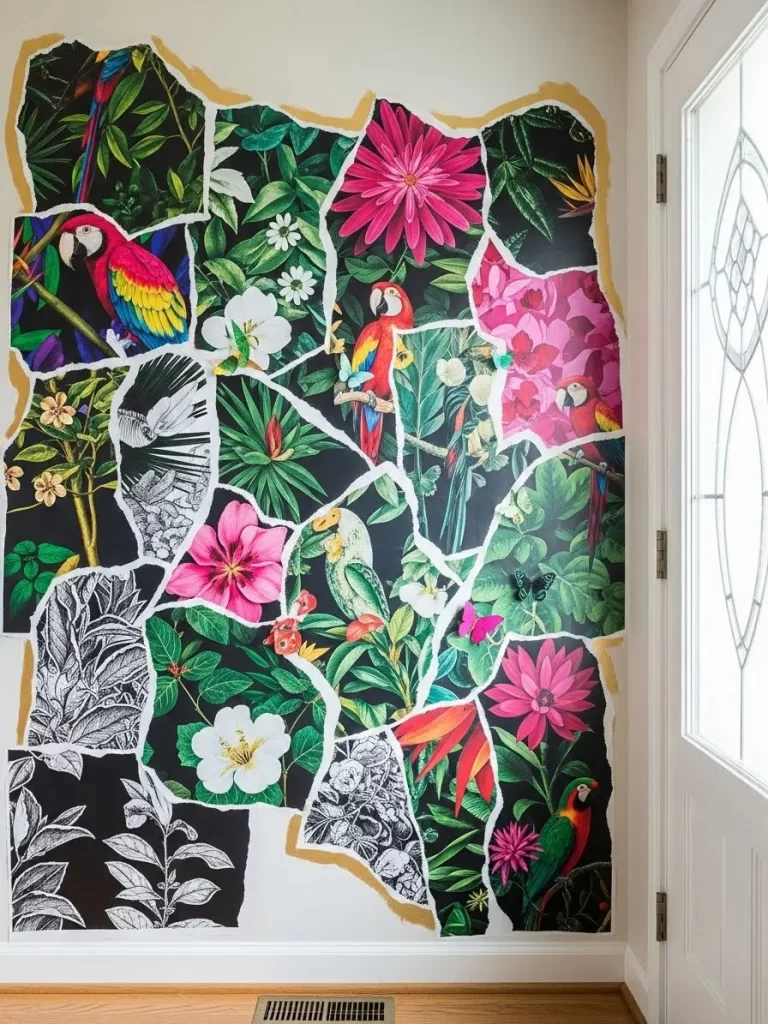
Image Description
This is an incredibly vibrant and dynamic feature wall showcasing a high-impact collage technique. The project uses large, ripped pieces of tropical-themed wallpaper featuring colorful macaws, exotic flowers, and dense green foliage. These fragments are layered over a black base, leaving jagged white borders where the wallpaper was torn.
The design is intentionally fragmented, creating a mosaic of intense color and pattern. The dark background of the wallpaper makes the hot pink, electric blue, and deep green colors incredibly saturated. The torn edges are highlighted with a flash of metallic gold paint, accentuating the break between the wallpaper and the plain wall.
This DIY decor trend is worthwhile because it uses inexpensive remnants or samples of wallpaper to create a completely custom, abstract statement piece. It is a striking alternative to painting or hanging a single roll of wallpaper and injects immediate energy and maximalist style into the entryway or any wall.
Materials Required
- Assorted tropical or high-pattern wallpaper sheets or samples
- Black matte wall paint (for the base)
- Metallic gold craft paint
- Wallpaper paste or strong clear glue (Mod Podge)
- Paintbrushes (one for paste, one for gold paint)
Equipment Required
- Large brush or roller
- Bucket for mixing paste
- Pencil
DIY Instruction Step by Step
Step 1: Prepare the Base Wall
If your wall is not black, paint the entire wall area where the collage will go with the black matte paint. Allow the paint to dry completely.
Step 2: Tear and Arrange the Wallpaper
Tear the wallpaper into large, irregular pieces. Do not cut them—the torn, jagged edges are essential for the final look. Lay the pieces on the floor to plan the collage arrangement, ensuring the patterns overlap slightly and that the white backing of the paper is visible at the torn edges.
Step 3: Glue the Wallpaper Fragments
Mix the wallpaper paste or prepare your strong clear glue. Apply the glue generously to the back of the first wallpaper piece. Press the piece firmly onto the wall in your planned position. Continue overlapping and placing the pieces until the collage area is filled, leaving some black gaps between the fragments for a dramatic effect. Smooth out any bubbles or wrinkles.
Step 4: Paint the Gold Border
Once the glue is dry, use a fine brush and the metallic gold paint to paint a thin line around the exposed, torn, white edges of the wallpaper fragments. The gold should follow the irregular outline, separating the paper from the black wall. This highlights the jagged, mosaic effect.
Step 5: Finishing Touches
Step back and assess the collage. You can lightly paint a few small gaps with gold or add a few additional torn fragments to enhance the fragmented appearance.
19. Cork and Color Block Organizational Trays

Image Description
This collection of trays demonstrates the versatility of cork and color blocking for creating chic, custom organization. The trays feature a warm, textured cork base contrasted with deep, matte navy blue or crisp white outer frames. The curved edges and simple lines give the pieces a modern, Scandinavian aesthetic.
The top tray showcases a two-tone color block design where the blue paint transitions diagonally across the rim and handles. Other trays incorporate cork into smaller, divided compartments, making them suitable for organizing jewelry or desk supplies. One tray even uses contrasting cork patterns (plain, white, and spotted) for added visual interest.
Using cork is a worthwhile and cheap DIY trend; it provides a soft, non-slip, natural surface that protects contents. These trays, with their clean lines and contrasting materials, prove that stylish organization can be easily customized to fit any decorating style.
Materials Required
- Plain wood or plastic serving trays (various sizes/shapes)
- Cork sheeting (rolls or self-adhesive tiles)
- Matte acrylic paint in desired colors (e.g., navy blue, white)
- Strong spray adhesive or wood glue
- Patterned cork or contact paper (optional)
- Small cork feet or decorative knobs (optional)
Equipment Required
- Paintbrushes (one large, one small detail brush)
- Utility knife and ruler
- Pencil
DIY Instruction Step by Step
Step 1: Prepare and Paint the Tray Frames
Clean the outside of your trays. Use painter’s tape to mask off the inside cork-lined areas if they already exist, or simply focus on painting the outer frame. Apply two coats of the matte paint (navy blue and white are shown) to the sides and edges of the trays. Allow the paint to dry completely.
Step 2: Color Blocking (Curved Tray)
For the curved tray, use painter’s tape to section off the area where the two paint colors will meet (e.g., the diagonal line across the handle). Apply the second color (if needed) or simply paint the remaining bare wood in your primary color, maintaining the clean line created by the tape.
Step 3: Line the Tray with Cork
Measure the inside surface of each tray. Cut the cork sheeting precisely to fit the bottom of the tray. If the tray has rounded corners, trace the shape onto the cork before cutting. Apply a generous layer of spray adhesive or wood glue to the bottom of the tray cavity and press the cut cork sheet firmly into place.
Step 4: Create Dividers (Optional)
For the organizational trays, use small, thin strips of lumber or rigid cardboard covered with cork. Glue these strips into the tray cavity to create the various compartments.
Step 5: Customize the Cork Surface
In the bottom-left tray, different sections of cork are used. Cut and glue plain cork, white painted cork, and a small section of patterned contact paper/cork into squares to create the segmented look before adhering them to the tray bottom. Add small cork feet or decorative knobs to the underside corners of the tray if desired.
20. Broken CD Mosaic Mirror Frame
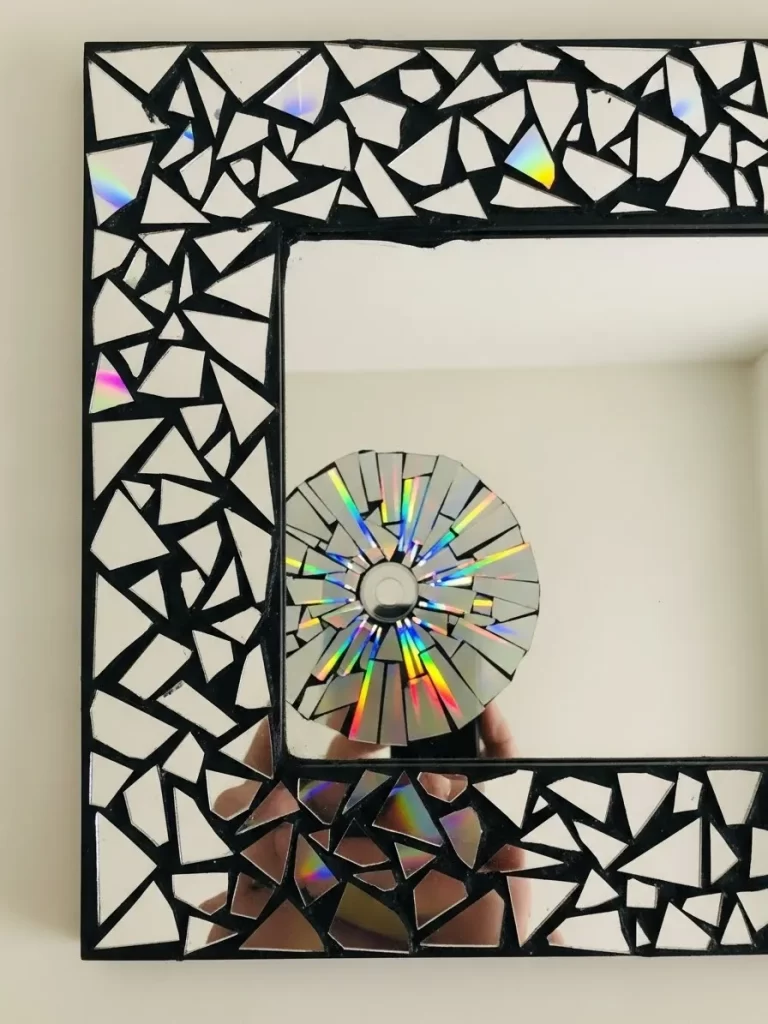
Image Description
This is an ingenious and highly reflective take on the mosaic mirror trend, utilizing discarded CDs or DVDs. The project features a plain mirror frame, painted a dark color, that serves as a canvas for the shimmering mosaic. The mosaic itself is composed entirely of small, irregular pieces cut from old compact discs.
The use of CD fragments is a fantastic example of upcycling, transforming cheap, obsolete media into high-end decor. The pieces are arranged randomly, but the striking feature is the rainbow-like holographic reflection created by the broken surface of the discs. The dark black grout makes the iridescent fragments stand out dramatically.
A smaller, circular mosaic is created within the mirror’s reflection, demonstrating a second potential application for the technique. This project is worth the effort because it produces a dazzling, conversation-starting piece that is both eco-friendly and extremely budget-conscious, while adding major sparkle to a wall.
Materials Required
- Plain wooden or sturdy framed mirror
- Old CDs or DVDs (must have the holographic layer)
- Dark-colored grout mix (e.g., black)
- Strong adhesive (e.g., E6000 or tile adhesive)
- Grout sealant (optional)
Equipment Required
- Safety goggles and gloves (essential for handling sharp plastic)
- Strong scissors or kitchen shears
- Small sponge and bucket
- Grout spreader or putty knife
DIY Instruction Step by Step
Step 1: Prepare the CD Fragments (Crucial Safety Step)
Put on your safety goggles and gloves. Use strong scissors or shears to cut the CDs into small, irregular, geometric pieces. The plastic will be sharp, so handle it carefully. You will need enough pieces to cover the entire frame.
Step 2: Adhere the Mosaic Pieces
Apply the strong adhesive directly to the frame around the mirror opening. Begin placing the CD fragments reflective-side up onto the adhesive. Arrange the pieces randomly, ensuring you leave small, consistent gaps between them for the grout. Allow the adhesive to cure completely before moving on to the next step.
Step 3: Apply the Grout
Mix the dark-colored grout according to the package instructions. Using a grout spreader or putty knife, press the grout firmly into all the spaces between the CD pieces, ensuring all gaps are filled.
Step 4: Clean and Cure
Immediately after applying the grout, use a damp sponge to wipe the excess grout off the face of the reflective CD pieces. The goal is to clean the surface of the plastic without removing the grout from the spaces. Rinse the sponge frequently. Once the surface is clean, let the entire piece cure for the time specified by the grout manufacturer.
Step 5: Final Polish
Once the grout is fully cured, use a clean, dry cloth to polish the mirror and the mosaic surface, removing any remaining grout haze.
21. Abstract Clay Sculptural Wall Art
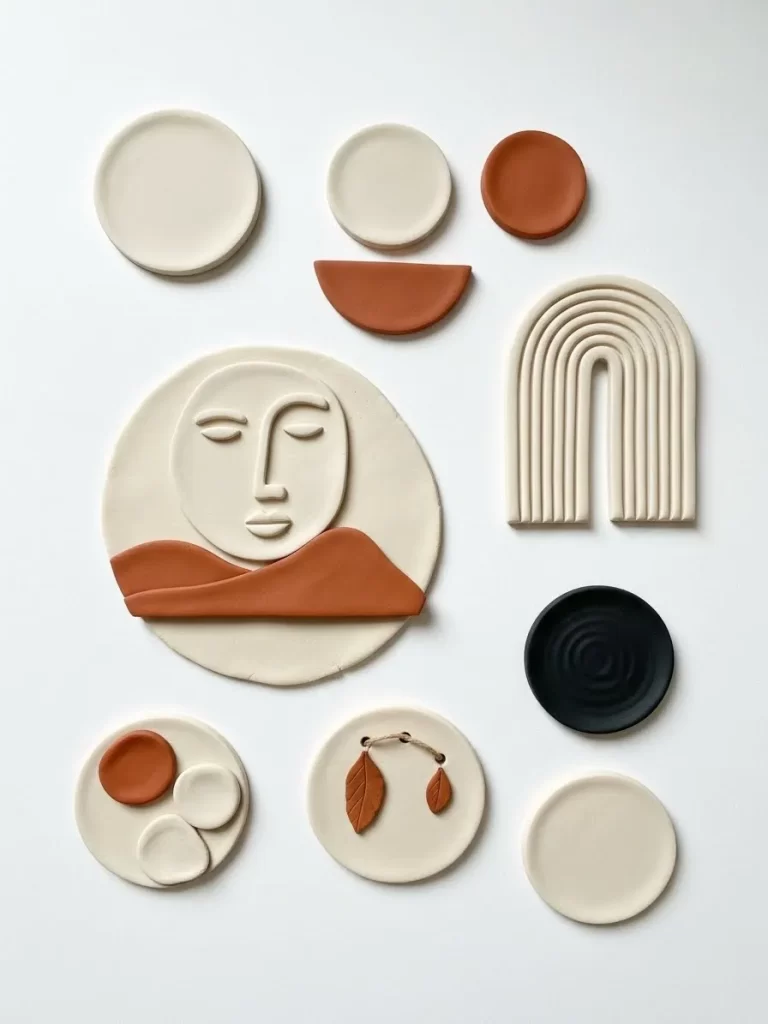
Image Description
This visually appealing arrangement features several small clay elements, creating a cohesive, modern wall collage. The pieces use a limited, earthy color palette of matte cream, terracotta brown, and deep black, tapping into the popular minimalist boho trend. The varying shapes—circles, arcs, and half-moons—provide an engaging contrast to the smooth, flat white background.
A central piece features a stylized face emerging from a terracotta landscape, giving the collection a subtle, humanistic touch. Other components show relief carving, like the ribbed rainbow arch and the layered circles, demonstrating different textural techniques. The arrangement proves that sophisticated, sculptural art does not require complex materials.
Working with simple air-dry or polymer clay is a worthwhile DIY activity. This trend allows for total artistic freedom in shape and composition. It results in customized, tactile wall decor that is simple yet highly impactful when displayed as a set.
Materials Required
- Air-dry clay or oven-bake polymer clay (cream/off-white, terracotta brown, black)
- Rolling pin
- Various circular objects (for cutting perfect circles)
- Sharp craft knife or cookie cutters
- Small leaf stamp or mold (optional)
- Fine-grit sandpaper
- Strong craft glue (for wall mounting)
Equipment Required
- Wax paper or baking sheet
- Sculpting tools (optional, for face details)
DIY Instruction Step by Step
Step 1: Condition and Roll the Clay
Condition the cream-colored clay until it is soft and pliable. Roll it out into an even thickness, approximately $1/4$ inch thick, on wax paper. Repeat with the terracotta and black clay.
Step 2: Cut and Shape the Pieces
Use the circular objects and a sharp craft knife to cut the various shapes: large and small circles, half-circles, and an arch shape. For the ribbed rainbow, cut the arch shape and use a tool or the dull side of a knife to press parallel lines down the entire length.
Step 3: Create the Central Face Piece
Take a large cream circle as the base. Roll out thin pieces of terracotta clay to form the curved “landscape” at the bottom. Use small, flat tools or your fingers to sculpt the simple, closed-eye face onto the cream base.
Step 4: Dry or Bake the Clay
If using air-dry clay, allow the pieces to dry completely according to the package directions, often taking 24-48 hours. If using polymer clay, bake the pieces following the manufacturer’s instructions.
Step 5: Finish and Assemble
Once the pieces are hard, use fine-grit sandpaper to smooth any rough edges. Lightly dust off the pieces. Arrange the finished elements on your wall in the desired pattern. Use strong craft glue to adhere the pieces to the wall, holding them firmly in place until the glue sets.
22. Custom Book Spine Decor

Image Description
This photograph captures a creative and custom approach to bookshelf styling, where the books themselves become part of the decor. A series of books are uniformly bound in deep jewel tones, primarily greens, blues, and cream. The standardization of color and material transforms the collection into a cohesive, rhythmic visual block.
The unique detail here is the personalization of the book spines with striking gold foil symbols. These symbols resemble ancient runes, astrological signs, or simplified geometric marks, adding an element of mystery and sophistication. The gold against the matte cloth binding creates an expensive, custom library aesthetic.
This is a worthwhile DIY trend because it allows you to unify a mismatched collection of books into a stylish feature. Using foil or metallic paint pens provides a budget-friendly way to achieve this high-end, custom look. The uniformity of the size and color palette makes the entire collection feel curated and intentional.
Materials Required
- Mismatched books (paperbacks or hardcovers)
- Bookbinding fabric or thick paper (various colors: deep blue, emerald green, cream)
- Strong spray adhesive or bookbinding glue
- Gold foil transfer sheets and foil adhesive pen (or metallic gold paint pen)
- Ruler
- Pencil
Equipment Required
- Craft knife or scissors
- Bone folder (optional, for smooth creases)
DIY Instruction Step by Step
Step 1: Measure and Cut the Covering Material
Choose the books you want to cover. Measure the width of the spine and the length from the top edge to the bottom edge. Cut your bookbinding fabric or paper to these dimensions, adding about one inch extra on all sides for wrapping.
Step 2: Apply the Cover
Remove any dust or debris from the book cover. Apply a thin, even layer of spray adhesive or bookbinding glue to the back of the cut fabric/paper piece. Carefully center the fabric/paper over the spine and gently press it down, smoothing out any air bubbles or wrinkles. Fold the excess material neatly over the top and bottom edges of the spine and glue them to the inside cover of the book.
Step 3: Draw and Apply the Gold Symbols
Using a ruler and pencil, lightly mark the center point on the spine where you want the symbols to be placed. If using the foil method, use the foil adhesive pen to draw the desired custom symbols onto the spine. Allow the adhesive to dry until it is tacky. Place a sheet of gold foil over the tacky design and press firmly. Carefully peel the foil sheet away, leaving the gold design adhered to the spine. If using a paint pen, simply draw the symbols carefully onto the spine.
Step 4: Dry and Display
Allow the adhesive and foil or paint to cure completely. Arrange the newly covered books on your shelf, grouping the colors for the most cohesive and dramatic visual impact.
23. Abstract Punch Needle Pillow
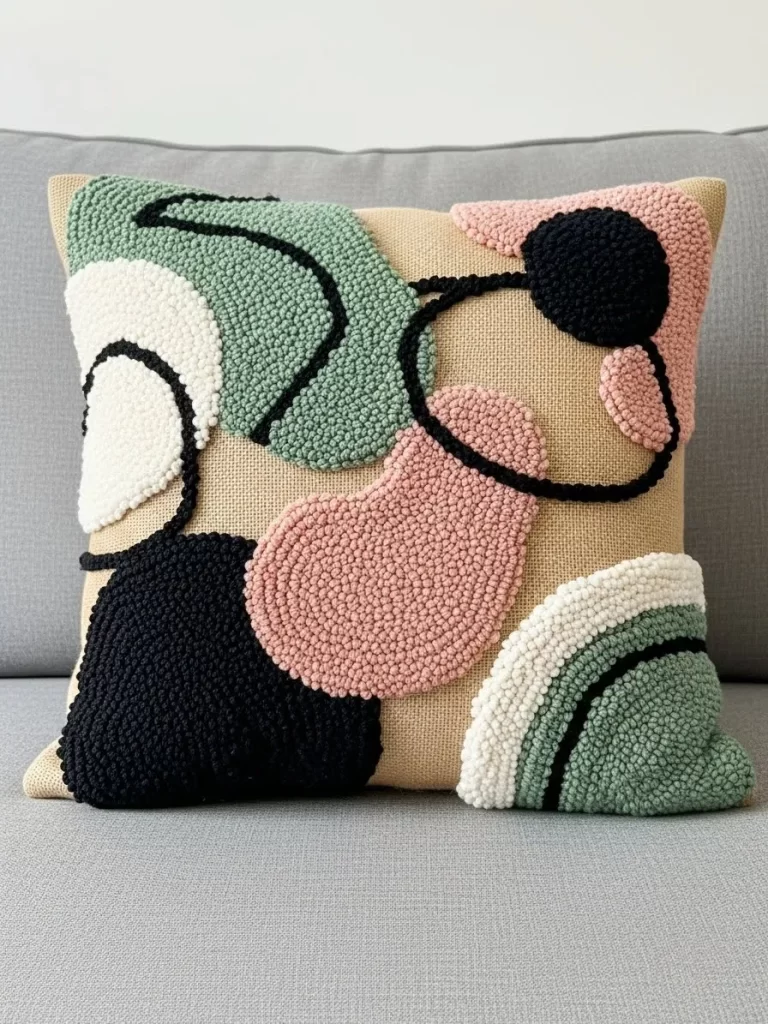
Image Description
This cozy throw pillow showcases the popular punch needle technique, which results in a highly textured, looped surface. The pillow front is made of a plain, light-brown burlap or canvas fabric, providing a rustic, neutral base. The design features a collection of abstract, organic shapes in a sophisticated color palette.
The colors—sage green, soft dusty pink, black, and off-white—are modern and muted, creating a striking contrast against the natural background. Thin black yarn outlines some of the shapes and forms abstract circles, adding definition and a hand-drawn quality to the tufted loops. The combination of the flat background and the plush, high-pile loops gives the piece a wonderful three-dimensional texture.
Making your own punch needle pillow is a worthwhile DIY trend for fabric decor because it allows for total customization of color and shape. It introduces softness and handcrafted charm to a sofa or accent chair, creating a unique textile centerpiece.
Materials Required
- Plain throw pillow cover (or fabric and a pillow insert)
- Punch needle tool
- Monks cloth or linen backing fabric
- Various colors of yarn (chunky weight recommended for faster coverage)
- Fabric glue or iron-on interfacing (optional, to secure the back loops)
Equipment Required
- Large embroidery hoop or staple gun and wooden frame (to hold the fabric taut)
- Scissors
DIY Instruction Step by Step
Step 1: Prepare the Fabric
If you are not using a pre-made cover, cut your backing fabric (monks cloth or linen) to the size needed for the pillow cover panels. Stretch the fabric tightly over a large embroidery hoop or staple it tautly to a wooden frame. The fabric must be drum-tight for the punch needle tool to work correctly.
Step 2: Transfer the Design
Lightly sketch the abstract shapes and outlines onto the stretched fabric using a pencil. Remember to reverse the image if the back side (the looped side) will be the visible front of the pillow.
Step 3: Punch the Loops
Thread the punch needle with your chosen yarn color. Hold the fabric taut beneath the hoop. Start punching from the outside edge of a shape and work inward, ensuring the needle goes all the way through the fabric with each punch. Keep the punches close together to achieve a dense, tufted look. Change colors according to your design. Use the black yarn for the outlining and linear details.
Step 4: Secure the Loops
Once the entire design is punched, remove the fabric from the hoop/frame. Trim the excess fabric around the design. To prevent the loops from pulling out, apply a thin layer of fabric glue or iron-on interfacing to the back side (the flat stitched side) of the design and allow it to dry/set completely.
Step 5: Assemble the Pillow
Sew the finished punch needle panel to the back panel fabric to create the pillow cover. Insert your pillow form or stuffing to complete the throw pillow.
24. Celestial Constellation Can Lanterns
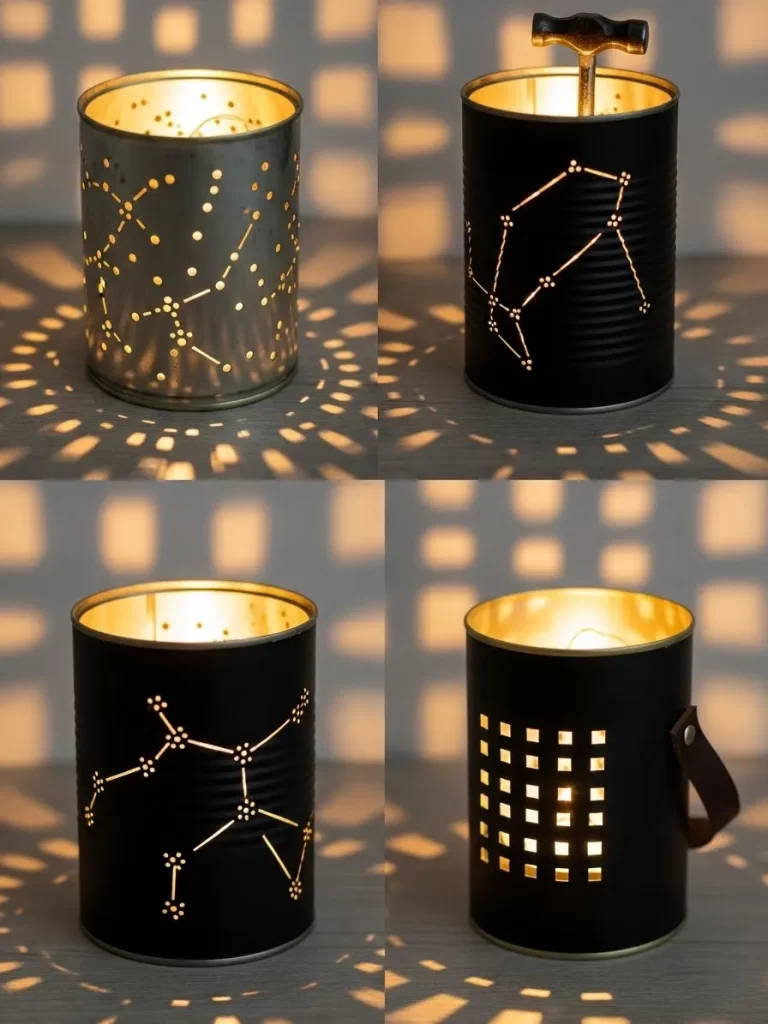
Image Description
This set of four tin can lanterns demonstrates a simple yet effective method for creating unique atmospheric lighting. Each lantern is made from a recycled metal can, some left silver and others painted matte black, providing a cohesive, rustic industrial aesthetic. The key feature is the precise arrangement of small pinprick holes.
The holes are strategically placed to map out various star constellations and geometric patterns, allowing light to stream out and cast intricate shadows. The contrast between the matte black can and the bright golden light within is especially appealing. The patterns include constellations like Leo and geometric grids, showing the versatility of the technique.
One lantern cleverly incorporates a repurposed metal T-handle, adding character and a functional element. Transforming simple tin cans into these celestial lanterns is a cheap and worthwhile DIY trend. It creates unique indoor or outdoor ambient lighting that is both functional and decorative.
Materials Required
- Four clean, empty metal tin cans (various sizes)
- Matte black spray paint (optional)
- Battery-operated LED candles or tea lights
Equipment Required
- Hammer
- Small nail, punch, or drill with a tiny bit (for piercing holes)
- Constellation patterns printed on paper
- Pliers (optional, for shaping handles)
DIY Instruction Step by Step
Step 1: Clean and Prepare the Cans
Thoroughly clean the empty cans and ensure the rim is smooth. If desired, spray paint the outside of the cans matte black (or another color) and allow them to dry.
Step 2: Choose and Attach the Pattern
Select the constellation or geometric pattern you want to use. Tape the paper pattern onto the side of the can, ensuring it is secure and smooth.
Step 3: Punch the Holes
Place the can onto a stable, protected surface. Using a hammer and a small nail or punch, carefully pierce holes through the paper and into the can wherever there is a star or point on the pattern. For best results, work slowly and ensure the holes are evenly spaced and sized. You can also use a small drill bit for this step. If you want the patterns to resemble constellations, ensure the holes that represent brighter stars are slightly larger.
Step 4: Remove the Pattern and Smooth
Carefully peel the paper pattern off the can. Use pliers to flatten any sharp edges that may have curled inward during the punching process.
Step 5: Add Finishing Details and Light
For the top-handle design, cut a hole in the lid of the can and thread a T-shaped handle through it, securing it with glue or a nut on the inside. Place a battery-operated LED candle or tea light inside the finished can. Turn off the room lights to enjoy the dramatic, projected light pattern.
25. Resin Art Coaster Set
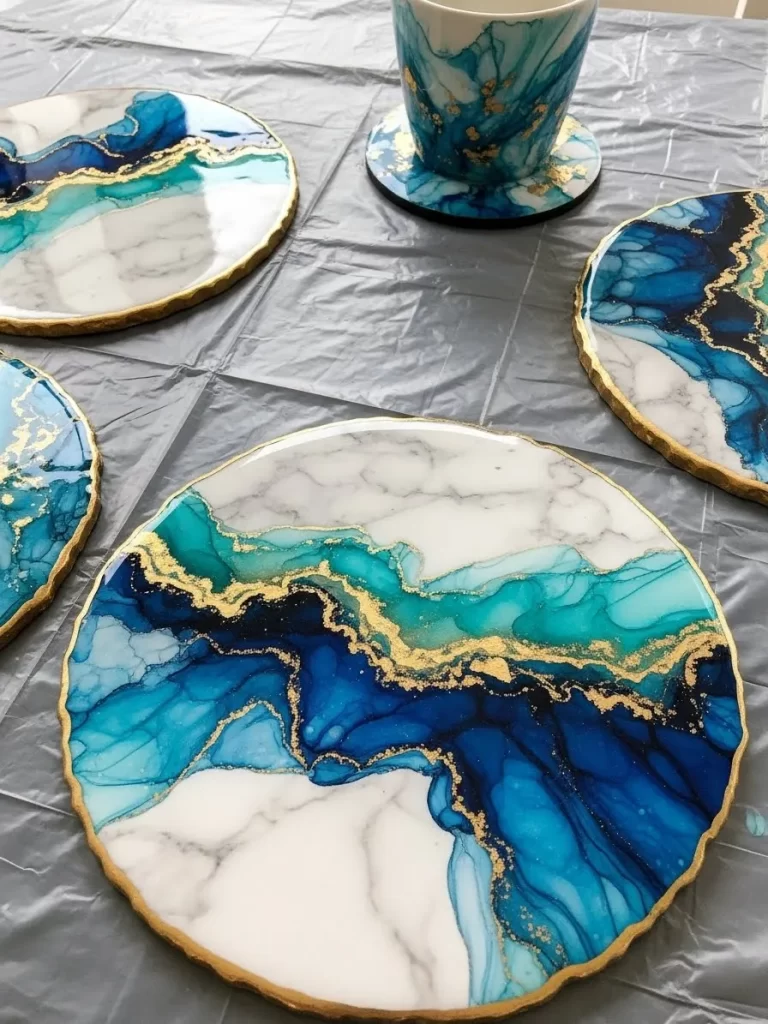
Image Description
This collection showcases a vibrant and trending approach to fluid art, resulting in stunning, marble-like coasters and a matching cup. The pieces use high-gloss epoxy resin mixed with alcohol inks in a dramatic palette of blues, teal, white, and a striking injection of gold leaf. The fluid motion of the inks creates layers of color that mimic stormy seas or polished natural stone.
Each circular piece features bold veins of white and deep blue contrasting with swirling teal and aqua. The most luxurious detail is the application of gold flake, which runs in delicate, crackling lines along the boundaries of the colors, adding a touch of metallic elegance. The outer edges of the coasters are finished with a continuous band of gold paint.
Working with resin is a highly rewarding, worthwhile DIY trend. It allows for the creation of durable, custom items with an expensive, professional finish. This set provides a stylish and functional way to introduce bright color and modern luxury to a coffee table.
Materials Required
- Epoxy resin kit (resin and hardener)
- Circular coaster molds (silicone is best)
- Alcohol ink dyes (various shades of blue, teal, white)
- Metallic gold pigment or gold leaf flakes
- Small mixing cups and stirring sticks
- Gold metallic paint (for the edges)
Equipment Required
- Heat gun or small kitchen torch (to remove bubbles)
- Protective gloves and respirator (essential for working with resin)
- Measuring cups
DIY Instruction Step by Step
Step 1: Prepare and Mix the Resin
Work in a well-ventilated area and wear your protective gear. Measure the resin and hardener according to the manufacturer’s instructions, ensuring the ratio is exact. Pour the two parts into a mixing cup and stir slowly but thoroughly for several minutes until the mixture is clear and streak-free.
Step 2: Color the Resin
Divide the clear resin into several smaller mixing cups. Add a few drops of alcohol ink to each cup to create your colors (dark blue, teal, white, etc.). You should keep one cup of resin clear or only lightly tinted.
Step 3: Pour the Coasters
Pour a small, thin base layer of one color (e.g., white or clear) into the bottom of the silicone molds. Now, begin strategically pouring and layering the different colors of resin directly into the mold, overlapping the edges. Use the clear or white resin to create the “lacing” effect typical of fluid art. You can gently tilt the mold to encourage the colors to swirl.
Step 4: Add Gold Accents and Remove Bubbles
Sprinkle small gold leaf flakes or a line of gold pigment into the still-wet resin along the color boundaries. Use the heat gun or torch (held several inches away) to carefully sweep across the surface of the resin. This removes air bubbles and encourages the inks to spread slightly.
Step 5: Cure and Finish
Allow the resin to cure completely according to the package directions (usually 24-72 hours). Once the pieces are hard, carefully pop them out of the silicone molds. Use gold metallic paint and a fine brush to carefully paint a clean border around the outer edge of each coaster.
26. Dried Citrus and Eucalyptus Window Garlands
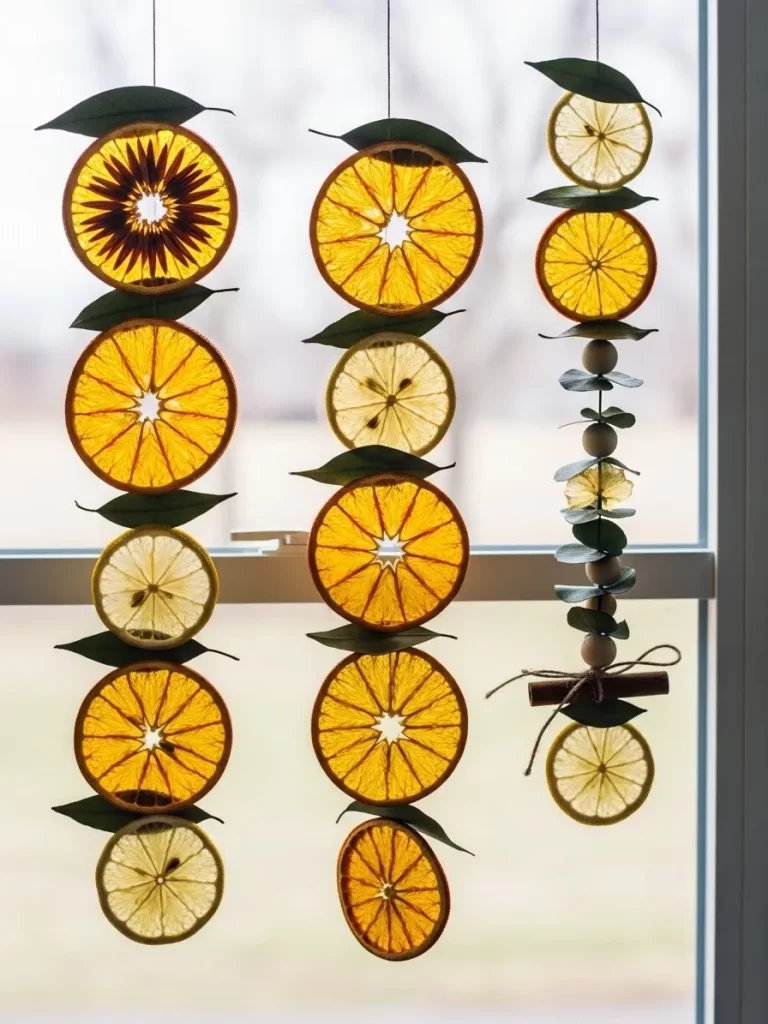
Image Description
This beautiful hanging display utilizes dried natural elements to create a translucent, aromatic window garland. Thin slices of various citrus fruits—oranges and lemons—have been dried until they are stiff and golden-yellow, allowing light to stream through their segments. These are combined with dark green eucalyptus leaves and small wooden beads.
The arrangement features three separate vertical strands. Two strands consist primarily of the sun-like citrus slices interspersed with leaves, casting warm, dappled light into the room. A third strand alternates the citrus and leaves with small, natural wood beads, adding a rustic texture. A piece of cinnamon stick is tied to the bottom, adding an extra sensory element.
Creating this garland is a simple, affordable, and worthwhile DIY trend. It provides seasonal or year-round color and aroma and looks especially stunning when backlit by a window. It embraces a natural, handcrafted aesthetic that is both charming and elegant.
Materials Required
- Oranges, lemons, or other citrus fruits
- Fresh eucalyptus leaves
- Small wooden craft beads
- Twine or fishing line
- Cinnamon sticks (optional)
Equipment Required
- Sharp knife
- Oven or food dehydrator
- Large needle (for threading)
DIY Instruction Step by Step
Step 1: Slice and Dry the Citrus
Preheat your oven to a very low temperature (around $150^\circ$F or $65^\circ$C). Slice the citrus fruits into uniform pieces, about $1/4$ inch thick. Blot them lightly with a paper towel to remove excess moisture. Place the slices directly on an oven rack or a parchment-lined baking sheet. Bake for 4 to 8 hours, flipping them occasionally, until they are completely dried out and slightly translucent. Allow them to cool.
Step 2: Prepare the Leaves and Thread
Use a hole punch or a large needle to carefully pierce a hole through the top of each dried citrus slice and through the stem end of each eucalyptus leaf. Cut long lengths of twine or fishing line for your garlands.
Step 3: Assemble the Garlands
Thread the needle with your twine. Begin stringing the elements onto the twine in your desired sequence. For a simple garland, alternate a citrus slice with an eucalyptus leaf. For the beaded garland, add wooden beads between the slices and leaves.
Step 4: Secure the Elements
After threading each element (especially the citrus slices), tie a small knot below it on the twine. This knot prevents the piece from sliding down and keeps the elements evenly spaced.
Step 5: Finish and Hang
Tie a small loop at the top of the twine for hanging. For the bottom element, tie a cinnamon stick horizontally to the twine. Hang the finished garlands in a window or doorway to catch the light.
27. Rustic Reclaimed Wood Frame
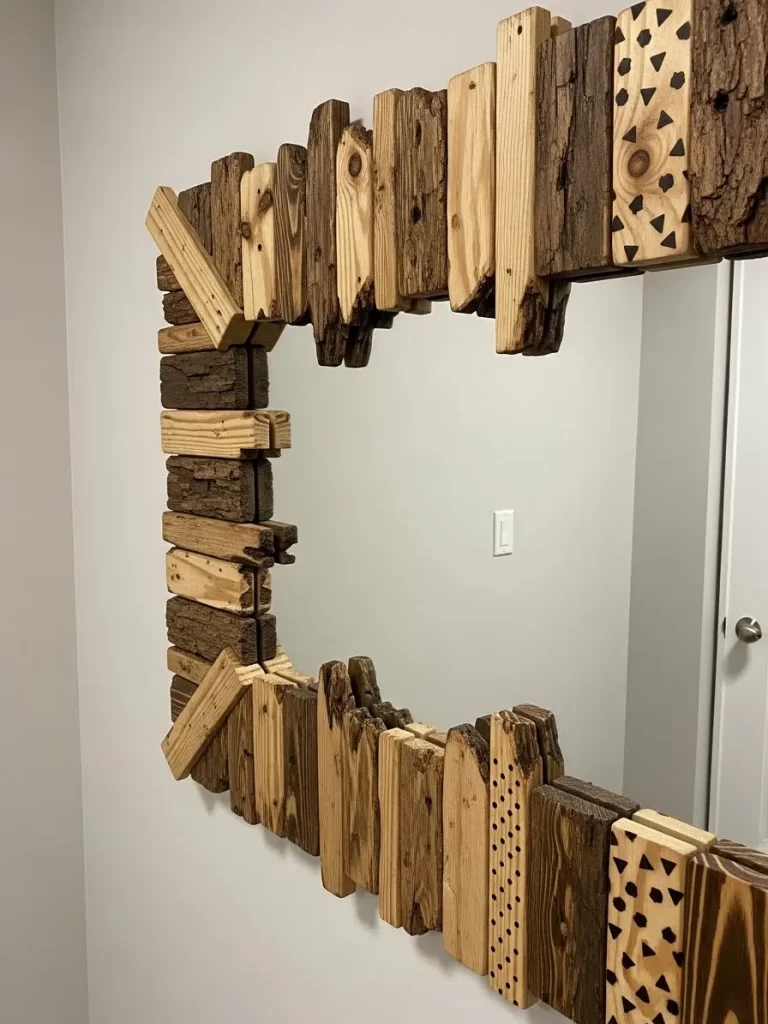
Image Description
This striking mirror frame utilizes a variety of salvaged wood pieces to create a rugged, textured border. The aesthetic is strongly rustic, using wood in different natural tones, thicknesses, and finishes, giving it a layered, asymmetrical appearance. Pieces of light, unfinished lumber alternate with dark, stained wood and even pieces featuring the natural bark still attached.
The frame cleverly uses the wood pieces to create depth, some pieces jutting out from the wall while others recess. The pattern is organic and uneven, with the wood edges purposefully left rough. Subtle design details include simple triangular stamps and small drilled hole patterns on some of the lighter wood blocks, adding a handcrafted touch.
This is a fantastic and worthwhile DIY decor trend, capitalizing on the availability of wood scraps or reclaimed pallet wood. It provides a masculine, cabin-like, or industrial feel. The contrast between the sleek mirror surface and the raw, heavy wood texture is visually engaging.
Materials Required
- Plain square or rectangular mirror (framed or unframed)
- Assorted scrap wood or reclaimed lumber pieces (varying thicknesses, colors, and textures)
- Wood stain (various shades)
- Strong wood glue and/or wood screws
- Small triangle stamp and ink pad (optional)
- Wood sealant (optional)
Equipment Required
- Saw (miter saw or hand saw)
- Drill and various drill bits
- Hammer and nails or screws
- Sandpaper (coarse)
DIY Instruction Step by Step
Step 1: Measure and Cut the Wood Pieces
Measure the perimeter of your mirror. Cut the reclaimed wood pieces into various lengths, ensuring they are long enough to completely cover the mirror’s frame or border. Use coarse sandpaper to rough up the edges and surface, emphasizing the raw, rustic appearance.
Step 2: Stain and Detail the Wood
Apply different shades of wood stain to various pieces to achieve the tonal variation shown (light natural, medium brown, dark brown). Allow the stain to dry completely. On some of the lighter, smoother pieces, use a small drill bit to create intentional patterns of small holes or use a triangle stamp to add the geometric details.
Step 3: Glue and Assemble the Frame
Start with the largest or flattest pieces and use strong wood glue to adhere them directly to the existing mirror frame. Build the frame outward by gluing the varying-length pieces around the mirror’s edge. Offset the pieces and alternate thickness and color to create the layered, staggered appearance. Ensure a couple of pieces run flush with the mirror edge to hold it securely.
Step 4: Reinforce and Dry
For extra stability, especially with heavier pieces, flip the frame over (if possible) and use small wood screws to secure the pieces from the back. Allow the wood glue to cure for the recommended time, ensuring the frame is completely stable before hanging.
Step 5: Hang the Mirror
Attach heavy-duty picture wire or mounting brackets to the back of the newly reinforced frame and hang the finished, rustic piece securely on the wall.
28. Faux Whitewashed Brick Wall
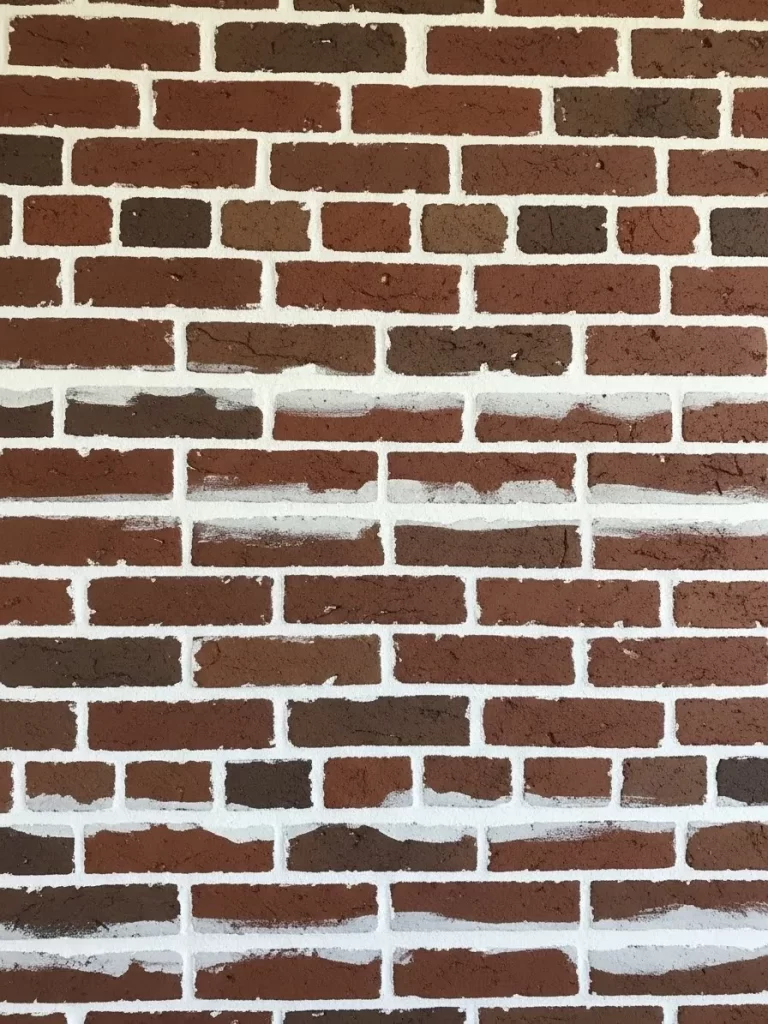
Image Description
This image provides a close-up of a wall featuring a realistic, yet custom, painted brick texture. The bricks themselves display varying natural tones, predominantly browns and deep reds, giving the surface an authentic, aged feel. The technique used here involves a controlled, messy application of white paint over the mortar and slightly onto the brick faces.
The white paint is thickest in the mortar joints, mimicking the traditional process of “lime washing” or “German schmear,” but a slightly easier, painted version. Crucially, the white paint is not a clean, uniform coating; it is streaked and unevenly applied over the brick surfaces. This intentional imperfection allows the deep color and texture of the original brick to show through.
Achieving this faux whitewashed or mortared effect is a highly worthwhile DIY trend. It brings the desirable textural element of brick indoors without the commitment of a full painting, and it drastically brightens a dark space while maintaining rustic character.
Materials Required
- Existing brick wall or a faux brick wall covering
- White latex paint (matte finish)
- Water (for thinning the paint)
- Large, stiff-bristled paintbrush or sponge
Equipment Required
- Mixing bucket
- Drop cloths
- Painter’s tape (optional)
DIY Instruction Step by Step
Step 1: Clean and Prepare the Wall
Ensure the brick surface is clean and free of dust or oils. Lay down drop cloths to protect the floor and use painter’s tape to mask off the surrounding baseboards, trim, and adjacent walls.
Step 2: Prepare the Whitewash Mixture
Mix the white latex paint with water in a mixing bucket. The desired ratio depends on how translucent you want the finish to be. Start with a ratio of 1 part paint to 1 part water. Stir thoroughly. A thinner mix will let more of the brick color show through; a thicker mix will create a more opaque, distressed look.
Step 3: Apply the Paint to the Mortar
Dip your stiff-bristled brush into the paint mixture. Start by focusing the paint mainly on the mortar lines, applying a thick, messy layer. This step immediately highlights the texture of the brick and creates the look of heavy jointing.
Step 4: Distribute the Paint Over the Brick Faces
Once the mortar joints are covered, use the remaining paint on your brush to lightly drag and smear the white mixture across the faces of the bricks. The key is inconsistency—do not try to cover every brick uniformly. Some bricks should have heavy white streaks; others should have very little, allowing the natural color to dominate. You can wipe some paint off with a damp rag immediately after applying it if it is too thick.
Step 5: Cure and Finish
Allow the paint to dry completely. The final color and opacity will be revealed once the whitewash is fully dry. Remove the painter’s tape and drop cloths.
29. Color-Block Woven Storage Basket
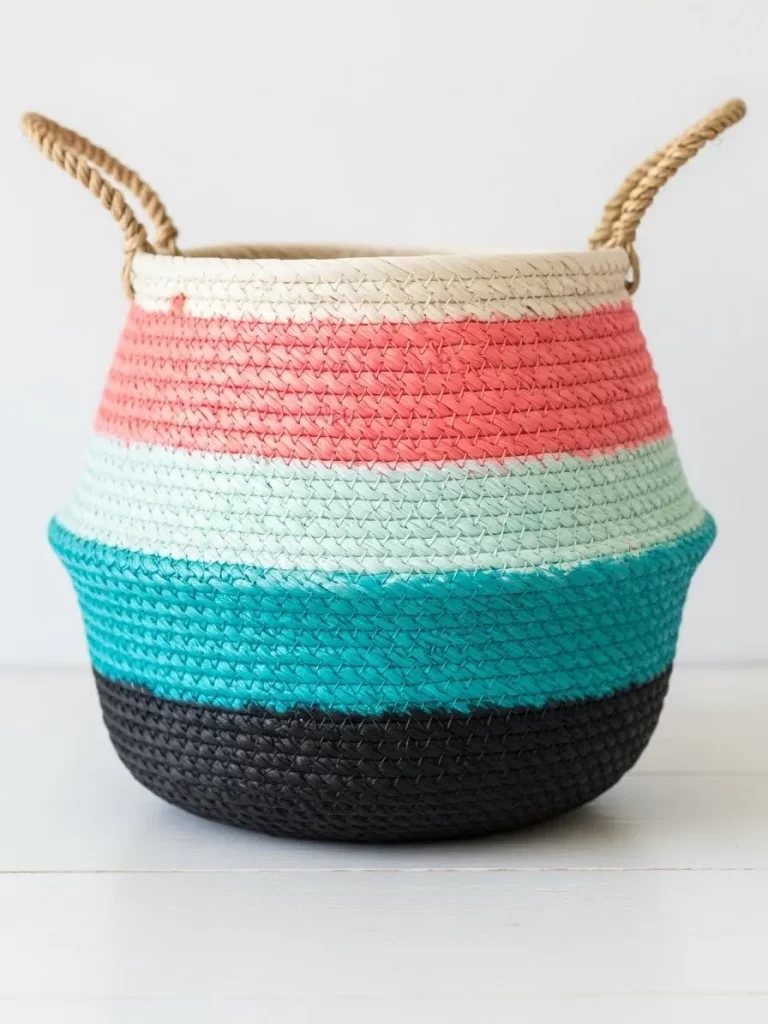
Image Description
This attractive storage basket showcases a simple but effective color-blocking technique on a woven natural fiber base. The basket has a slouchy, rounded belly and rope handles, suggesting it is made from seagrass or similar pliable material. The natural, light tan color of the fiber is segmented by bold, horizontal stripes of vibrant paint.
The color scheme is cheerful and modern, featuring bright coral pink, soft mint green, rich turquoise, and deep matte black at the base. Painting a natural basket in this way transforms an ordinary storage item into a striking piece of custom decor. The thick horizontal bands provide a dramatic contrast to the fine weave of the basket.
This DIY is a worthwhile trend because it is simple to execute and instantly updates a functional item. It allows for perfect color coordination with a room’s existing palette, turning basic storage into a stylish accent piece for linens, toys, or blankets.
Materials Required
- One plain, woven seagrass or rope storage basket
- Matte acrylic or spray paint in various colors (coral, mint, turquoise, black)
- Painter’s tape (flexible tape is best for curves)
Equipment Required
- Paintbrushes or foam brushes (for acrylic paint)
- Measuring tape or ruler
DIY Instruction Step by Step
Step 1: Clean and Prepare the Basket
Ensure the basket is clean and dry. Gently reshape the basket if necessary. Place it on a protected surface with drop cloths underneath.
Step 2: Tape the Color Bands
Using a measuring tape, determine the height and placement of your color bands. Use painter’s tape to carefully section off the areas of the basket that you want to remain the natural color and the areas you will paint. Use small pieces of tape or flexible painter’s tape to follow the curved shape of the basket, creating clean horizontal lines for the stripes.
Step 3: Apply the Paint
Start with the largest or darkest color first (the black base). Apply an even coat of paint to the first section, working the paint gently into the weave of the fiber. Allow this section to dry completely before carefully peeling away the tape, reapplying new tape over the newly painted section, and painting the next color stripe. Repeat this process for all colors, working your way up the basket.
Step 4: Finish the Rim and Handles (Optional)
Ensure the very top rim of the basket is either painted white or left the natural color. If the handles are rope, try to keep them paint-free or paint them with a single color for a clean look.
Step 5: Cure and Use
Once all the paint stripes are completely dry, remove the final pieces of painter’s tape. Allow the paint to fully cure and off-gas for a day or two before using the basket for storage.
30. Wavy Sculptural Mirror Frame
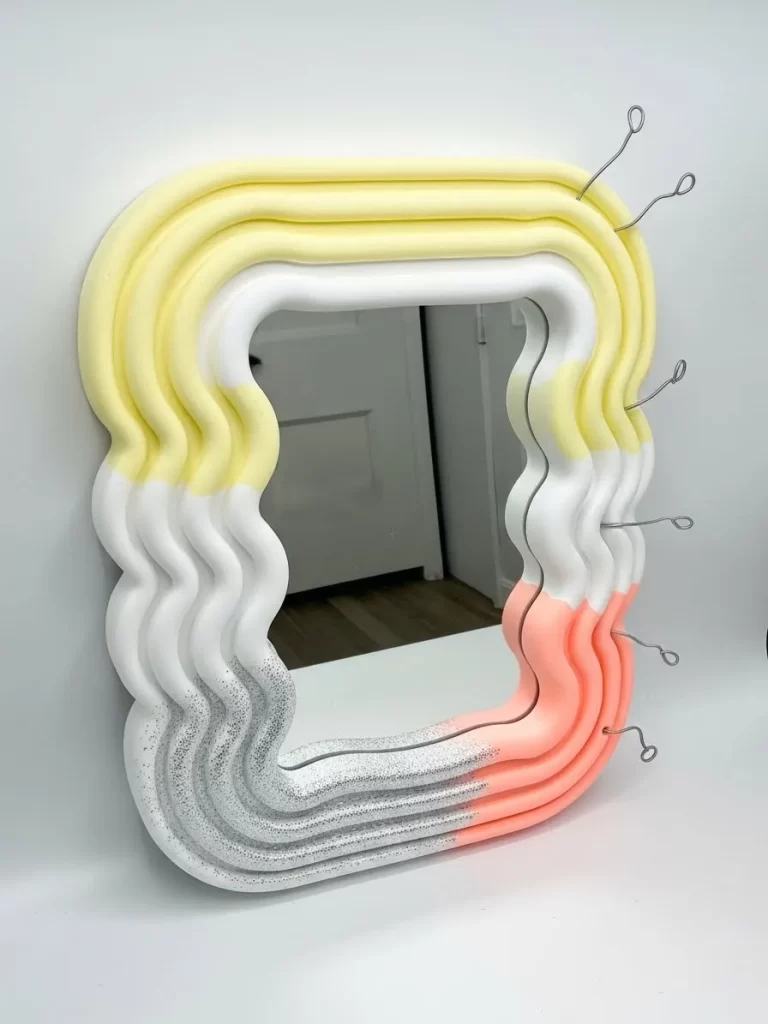
Image Description
This mirror features a highly unusual and contemporary frame that embraces the current ‘blob’ or ‘wavy’ aesthetic trend. The frame is thick, three-dimensional, and intentionally asymmetrical, appearing to bulge and ripple around the simple, rectangular mirror glass. It is made from a lightweight, putty-like material that has been carefully molded.
The frame uses a delightful, retro color gradient, moving from pale yellow at the top to white, then soft coral pink, and finally a shimmering silver with glitter at the bottom. This ombré, color-block finish enhances the playful, cartoon-like quality of the wavy form. Several thin metal wires are inserted into the sides, adding a curious, structural detail.
Creating a sculptural frame like this is a worthwhile DIY trend because it transforms a basic mirror into an energetic piece of contemporary art. It allows for endless customization in shape and color, resulting in a unique, conversation-starting accessory.
Materials Required
- Plain, inexpensive rectangular mirror
- Lightweight foam filler, spackle, or lightweight air-dry clay (multiple tubs)
- Acrylic craft paints (yellow, white, coral pink, silver)
- Silver glitter
- Strong craft glue or mounting adhesive
- Thin craft wire
Equipment Required
- Spatula or piping bag (optional, for even application)
- Small artist’s brushes (for painting)
DIY Instruction Step by Step
Step 1: Secure the Mirror
Place the mirror face-down on a protected surface. If the mirror has a thin frame, you can build directly onto it. If unframed, glue a backing board to the mirror to give you a surface to adhere the clay/spackle to.
Step 2: Create the Wavy Frame
Begin applying the foam filler or spackle thickly around the entire perimeter of the mirror. Use a spatula or your fingers to sculpt the material into the deep, wavy, and rippling shape shown. Ensure the material is thick enough to be 3D. Allow the material to cure and harden completely according to package instructions.
Step 3: Sand and Smooth
Once the frame is fully cured, use fine-grit sandpaper to gently smooth out any rough or overly sharp edges. Wipe away any dust.
Step 4: Paint the Color Gradient
Start at the top and paint the sections of the frame in bands of color (yellow, white, pink). Blend the edges of the colors slightly while they are wet to achieve the ombré effect. While the silver section is still wet, sprinkle the silver glitter generously over that area. Allow all paint to dry.
Step 5: Add Wire Details
Cut several pieces of thin craft wire. Curl the ends into small loops. Carefully poke the straight end of the wire into the sides of the foam frame at random intervals. Secure the wires with a small dab of glue if necessary.
31. Deconstructed Neo-Plasticism Canvas Art
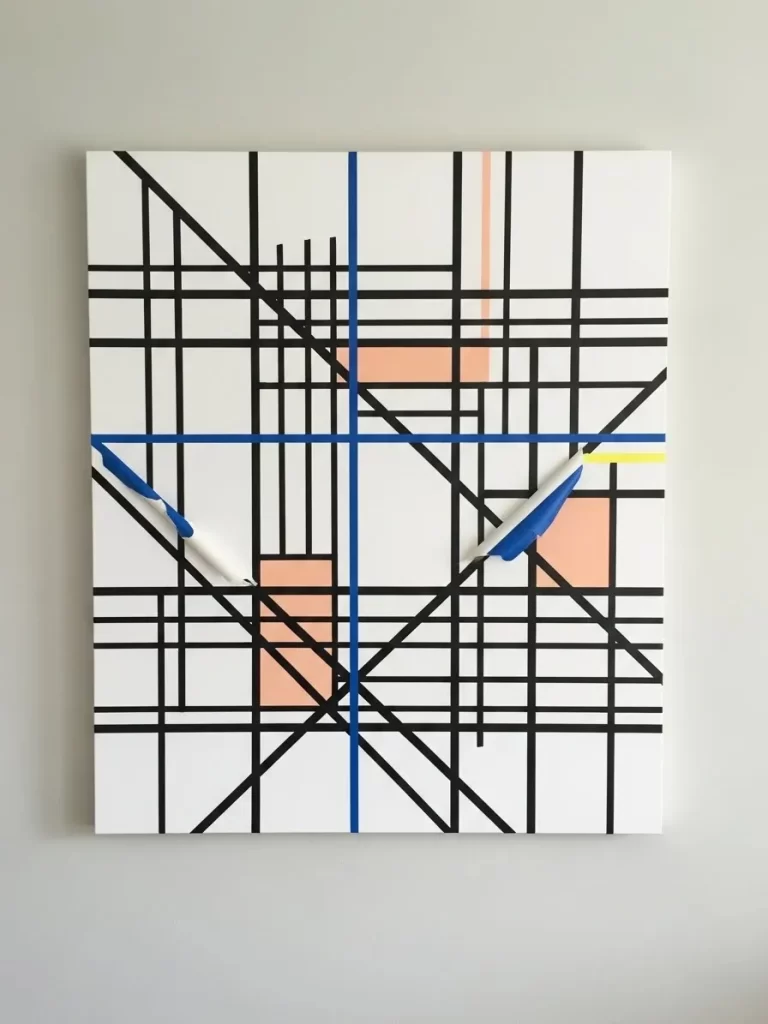
Image Description
This piece presents a bold, abstract canvas that deconstructs the structured grid associated with Neo-Plasticism, a movement championed by artists like Piet Mondrian. The canvas features a clean white background dominated by thick black lines forming a dense, overlapping grid. Several vibrant color blocks—pale pink, yellow, and royal blue—interrupt the monochrome pattern.
The unique aspect of this artwork is the addition of sculptural, three-dimensional elements. Thick white and blue painted strokes are applied to the surface, appearing as curved, heavy brushstrokes that break the linearity of the grid. This sculptural detail gives the flat painting unexpected depth and movement.
This DIY is a worthwhile trend for several reasons. It allows you to create high-impact, modern art for minimal cost. It challenges traditional painting techniques and delivers a complex, layered aesthetic that looks professionally made, offering a sophisticated focal point for any room.
Materials Required
- One square or rectangular stretched canvas
- Matte acrylic craft paint (white, black, royal blue, pale pink, yellow)
- Painter’s tape (various widths)
- Modeling paste or lightweight air-dry clay
- Strong craft glue (optional, for securing the clay)
Equipment Required
- Ruler or straight edge
- Utility knife
- Various paintbrushes and foam roller
- Spatula or small sculpting tool
DIY Instruction Step by Step
Step 1: Base Coat and Initial Grid
Apply a smooth, even base coat of white paint to the canvas using a roller. Once dry, use a ruler and pencil to lightly map out your complex grid pattern. Apply thin strips of painter’s tape to create the first set of black lines (both horizontal and vertical).
Step 2: Paint the Grid and Color Blocks
Paint over all the exposed areas and tape with the black paint. While the black paint is still wet, quickly remove the tape to reveal the clean white grid lines. Allow the canvas to dry. Now, apply painter’s tape to mark off the rectangular color blocks (pink and yellow) and paint those sections. Use tape to apply the large, clean blue vertical and horizontal lines.
Step 3: Create the Sculptural Elements
Once all the flat paint is dry, use modeling paste or air-dry clay to sculpt the thick, curved, three-dimensional brushstroke shapes. Create two or three such shapes. Immediately paint these pieces with the white and blue paint, allowing the paint to follow the curved texture.
Step 4: Integrate the 3D Pieces
While the paint is drying, gently press the back of the sculpted pieces onto the canvas, aligning them where they visually intersect the flat painted lines. Use a small amount of strong craft glue beneath them if they need extra security. This creates the illusion that the brushstrokes are floating or breaking through the grid.
Step 5: Cure and Hang
Allow the entire artwork, especially the sculptural components, to cure completely before hanging the canvas on the wall.
32. Rope-Wrapped Self-Watering Planter

Image Description
This image reveals a cleverly constructed self-watering planter system disguised by a thick rope wrap. The core of the planter is a basic plastic bucket or container, which is fully covered in heavy, natural-fiber jute rope. This wrapping instantly elevates the simple plastic base to a high-end, textured decor piece.
A small wooden bead is attached to the exterior of the rope, adding a subtle, rustic detail. The interior shows the self-watering mechanism: a plastic bottle neck is inverted into a water reservoir (the plastic bucket base), and a wick is visible, intended to draw water up to the soil. A separate, colorful container sits above the reservoir for the plant itself.
Building a self-watering planter is an incredibly worthwhile DIY trend, especially for busy plant owners. It promotes better plant health by allowing roots to draw water as needed. This rope-wrapped design demonstrates how to combine function and fashion in one easy project.
Materials Required
- One large, smooth plastic bucket or container (for the water reservoir)
- One smaller plastic pot (for the plant/soil)
- One plastic bottle (e.g., $16$-oz or similar)
- Thick jute or sisal rope
- Strong adhesive (e.g., hot glue or industrial adhesive)
- Wicking material (e.g., thick cotton cord or strip of felt)
- Wooden bead (optional)
Equipment Required
- Hot glue gun (if using hot glue)
- Sharp knife or drill
- Scissors
DIY Instruction Step by Step
Step 1: Prepare the Base Container
Ensure the plastic bucket or container is clean. Starting at the very bottom edge, apply a continuous line of strong adhesive around the bucket. Press the end of the thick jute rope firmly into the glue. Begin wrapping the rope tightly and closely around the container, ensuring no plastic shows between the wraps. Continue this process, gluing and wrapping row by row, until the entire outer surface is covered. Secure the final end of the rope with glue.
Step 2: Construct the Self-Watering Insert
Take the plastic bottle. Cut the bottom off the bottle, leaving the top half and the neck intact. Drill or cut several small holes into the base of the plastic pot that will hold the soil. Cut a length of wicking material that is long enough to reach from the bottom of the reservoir to the middle of the plant pot.
Step 3: Assemble the System
Thread the wicking material up through the neck of the inverted plastic bottle. Place the wick and bottle neck into the base reservoir bucket. Place the smaller plant pot on top of the inverted bottle neck, ensuring the wick extends through one of the holes in the pot bottom and into the soil area.
Step 4: Plant and Finish
Add soil to the small plant pot, ensuring the wick is buried within it. Place your plant in the soil. Fill the rope-wrapped reservoir bucket with water. As a final detail, glue the wooden bead to the front of the wrapped rope.
33. Layered Celestial Shadow Box Art
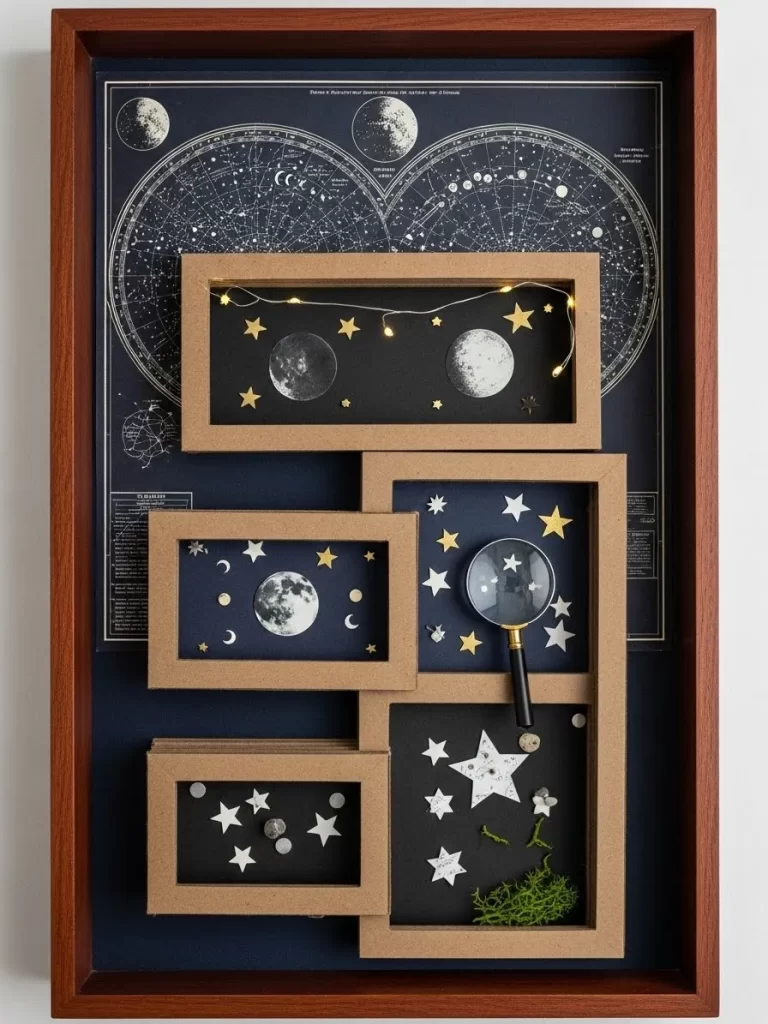
Image Description
This stunning piece is a multi-layered shadow box that creates a celestial diorama. The entire arrangement is housed within a deep, framed wooden box. The background is a vintage-style star chart in deep blue, over which several cardboard and black foam frames are layered, creating visual depth.
The smaller frames are decorated with moons, stars, and planets cut from paper or vinyl, along with tiny battery-powered string lights, giving the illusion of twinkling stars. The use of natural kraft cardboard for the inner frames contrasts beautifully with the dark blue and black backgrounds. A magnifying glass is integrated as a playful, thematic accent.
This DIY decor trend is highly worthwhile because it turns simple paper and cardboard elements into complex, three-dimensional artwork. It provides a unique, sophisticated way to display small trinkets or emphasize a theme, and the integrated lighting adds significant ambiance.
Materials Required
- One large, deep wooden shadow box frame
- Navy blue cardstock or a printed star chart (for the background)
- Kraft-colored cardboard (for the inner frames)
- Black foam board or thick black cardstock
- Assorted star, moon, and planet cutouts (white, gold, silver)
- Small, battery-operated LED string lights
- Small magnifying glass (optional)
- Craft glue
Equipment Required
- Ruler and pencil
- Utility knife
- Scissors
DIY Instruction Step by Step
Step 1: Prepare the Background
Cut the navy blue cardstock or star chart to fit the inside backing of the large shadow box. Secure it smoothly with glue.
Step 2: Construct the Layered Frames
Use the utility knife and ruler to cut out several rectangular frames from the kraft-colored cardboard and black foam board. Ensure each frame is slightly smaller than the one before it. These nested frames will create the 3D layering effect.
Step 3: Decorate the Frame Panels
Cut pieces of black cardstock or foam board to fit inside the rectangular frame openings. Decorate these pieces with the cutouts of moons, stars, and planets, using gold, silver, and white papers. Arrange them thematically.
Step 4: Integrate Lighting and Accents
For the top frame, carefully string the LED lights onto the back of the panel, allowing a few lights to poke through small holes you create. Use craft glue to attach the magnifying glass to the lower right panel.
Step 5: Assemble the Shadow Box
Begin layering the decorative panels and the kraft cardboard frames. Use small foam spacers or small blocks of foam board between the layers to physically separate them, enhancing the shadow box effect. Glue all the components securely to the background piece and to each other. Close and seal the wooden shadow box.
34. Minimalist Arch Geometric Wall Panel
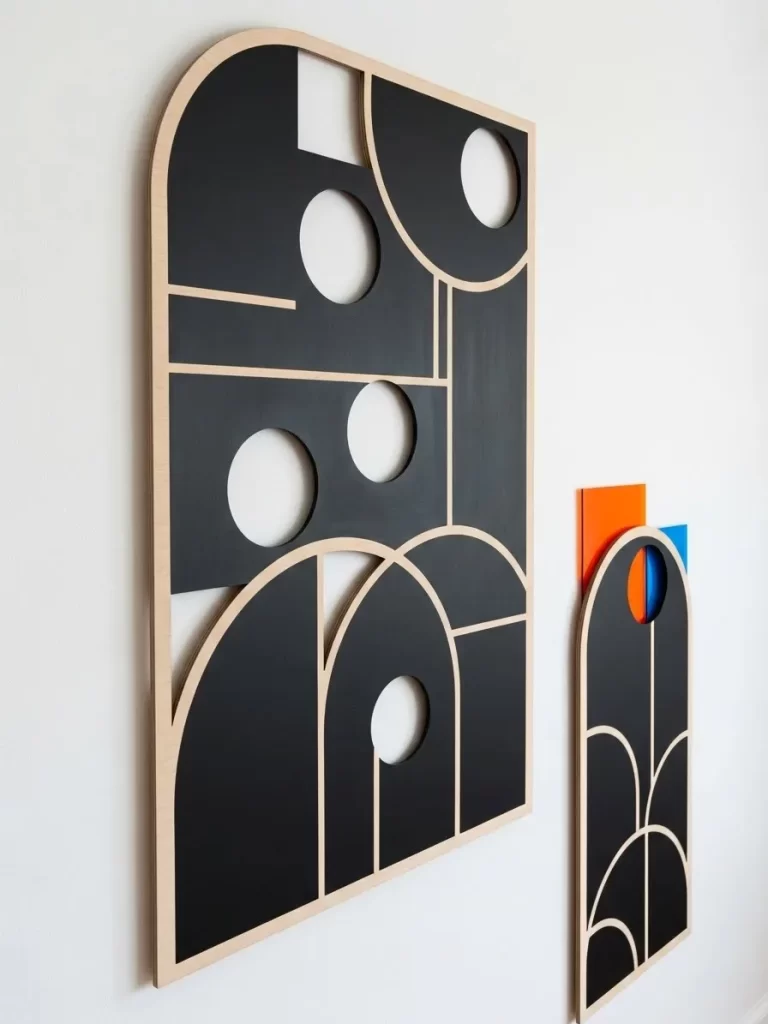
Image Description
This striking wall panel features a minimalist, geometric design composed of black shapes layered onto a light wood background. The main focus is an elongated arched rectangle. The pattern within this arch consists of interlocking black semi-circles, straight lines, and full circles, creating a clean, modern stained-glass effect.
The design utilizes negative space effectively; the unpainted light wood shows through as the connecting lines and background. Cutout circles in the black panel add depth and visual interest. A smaller companion piece features the same style and includes small pieces of bright orange and blue acrylic sheeting attached to the back, allowing color to reflect on the white wall.
Crafting these custom panels is a worthwhile DIY trend because it delivers expensive, high-design art using simple materials. The geometric arch pattern is sophisticated and fits perfectly into a contemporary or Art Deco-inspired decor scheme.
Materials Required
- Thin plywood or MDF board (for the light wood base)
- Thin black panel (MDF or high-quality cardstock)
- Black matte spray paint
- Wood glue
- Small pieces of colored acrylic or transparent plastic film (orange, blue)
Equipment Required
- Jigsaw or laser cutting service (for precise shapes)
- Ruler and compass
- Sandpaper
DIY Instruction Step by Step
Step 1: Cut the Arch Shapes
Use a jigsaw or a specialized cutting service to cut the arched base panels from the thin plywood. Sand all the edges smooth. Repeat this step for the black panel material, cutting the geometric shapes that will form the design. Ensure the pieces fit together perfectly within the arched base.
Step 2: Paint and Detail
Paint the geometric pieces with matte black spray paint. Use a compass to ensure the large circles and half-circles are precise. If your design includes cutouts, ensure these holes are clean.
Step 3: Assemble the Panel
Lay the light wood base arch flat. Carefully apply wood glue to the back of the black geometric pieces. Place the black pieces onto the light wood base, following your design plan. The light wood base should show through the unpainted areas, forming the ‘lines’ of the pattern.
Step 4: Add Color Accents (Small Panel)
For the smaller companion piece, cut small rectangles of the orange and blue acrylic sheets. Glue these pieces onto the back of the small panel where there are openings. This allows the color to refract and cast onto the wall while the panel is hung.
Step 5: Mount the Panels
Allow the glue to cure completely. Attach simple mounting hardware to the back of the panels, and hang them to create a dramatic, architectural statement on your wall.
35. Upcycled Denim Patchwork Chair
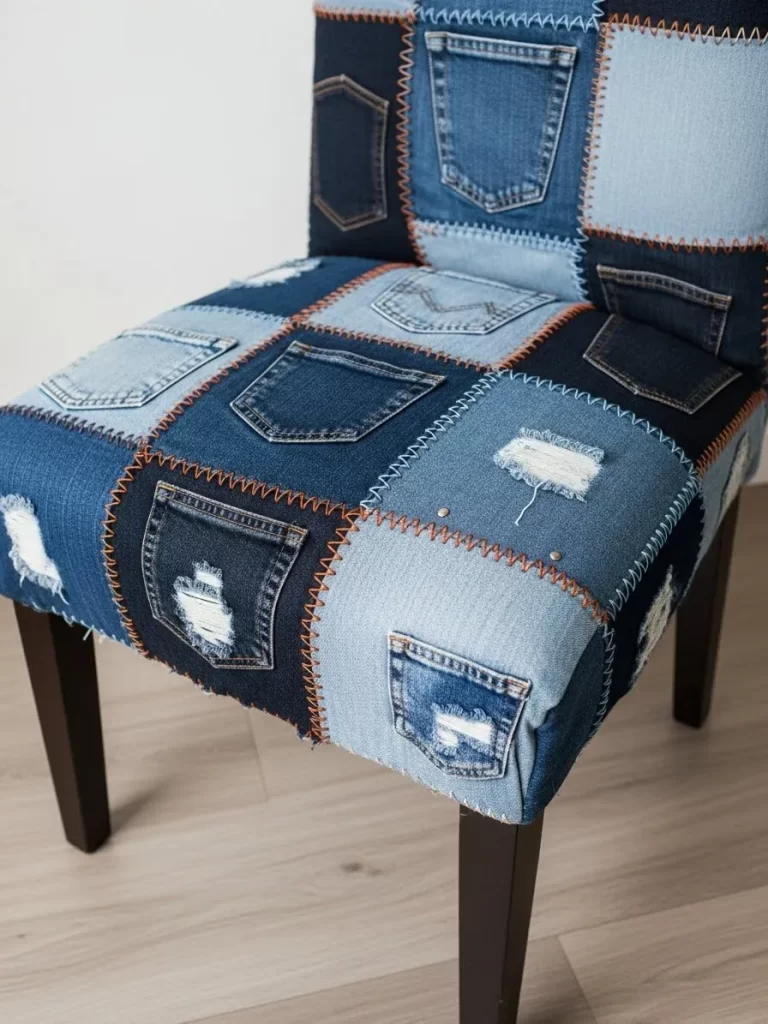
Image Description
This piece showcases a bold furniture upcycling project where an ordinary dining or accent chair is reupholstered entirely in a patchwork of denim. The fabric is composed of square patches cut from various shades of blue jeans, ranging from dark indigo to faded light wash. This variety creates a dynamic, textured mosaic.
The project incorporates functional elements from the original jeans, like pockets and distressed patches, turning them into intentional design details. The patches are stitched together with thick, contrasting orange thread, emphasizing the handmade quality and the rugged texture of the denim. The deep blue chair legs provide a grounding contrast to the busy pattern.
This DIY is highly worthwhile because it repurposes old clothing into a unique, durable furniture piece. The denim patchwork adds a playful, rustic, and casual element to a room, fitting well into eclectic or modern farmhouse styles.
Materials Required
- One chair to be reupholstered (e.g., dining chair with a removable seat pad)
- Assortment of old denim jeans (various shades and textures)
- Thick, contrasting thread (e.g., orange or rust color)
- Upholstery foam and batting (if the seat needs padding)
- Strong stapler or upholstery tacks
Equipment Required
- Sewing machine
- Scissors
- Seam ripper
- Screwdriver (for disassembling the chair)
DIY Instruction Step by Step
Step 1: Disassemble the Chair
Use a screwdriver to remove the seat pad and back panel from the chair frame. If the chair is already upholstered, remove the old fabric to expose the padding or wood base.
Step 2: Cut and Prepare the Denim Patches
Use a seam ripper to take the old jeans apart, separating the fabric into flat sheets. Cut the fabric into uniform square patches. Select pieces that include interesting details like pockets, frayed edges, or distressed patches.
Step 3: Sew the Patchwork Fabric
Lay out the squares in your desired pattern, alternating shades of denim. Pin them together. Use a sewing machine and the thick, contrasting thread to sew the patches together with a visible zigzag or running stitch, creating the final large piece of upholstery fabric. Ensure this fabric is large enough to cover the seat pad and back panel with enough margin to wrap around the edges.
Step 4: Reupholster the Seat and Back
Place the new denim fabric wrong-side up. Center the seat pad and back panel onto the fabric. Pull the edges of the fabric tightly over the back of the pads. Use the stapler or upholstery tacks to securely fasten the fabric to the underside of the pads, trimming excess fabric as you go. Ensure the fabric is pulled taut and smooth with no wrinkles.
Step 5: Reassemble the Chair
Screw the newly upholstered seat pad and back panel back onto the chair frame.
36. Sea Glass and Resin Coaster Set
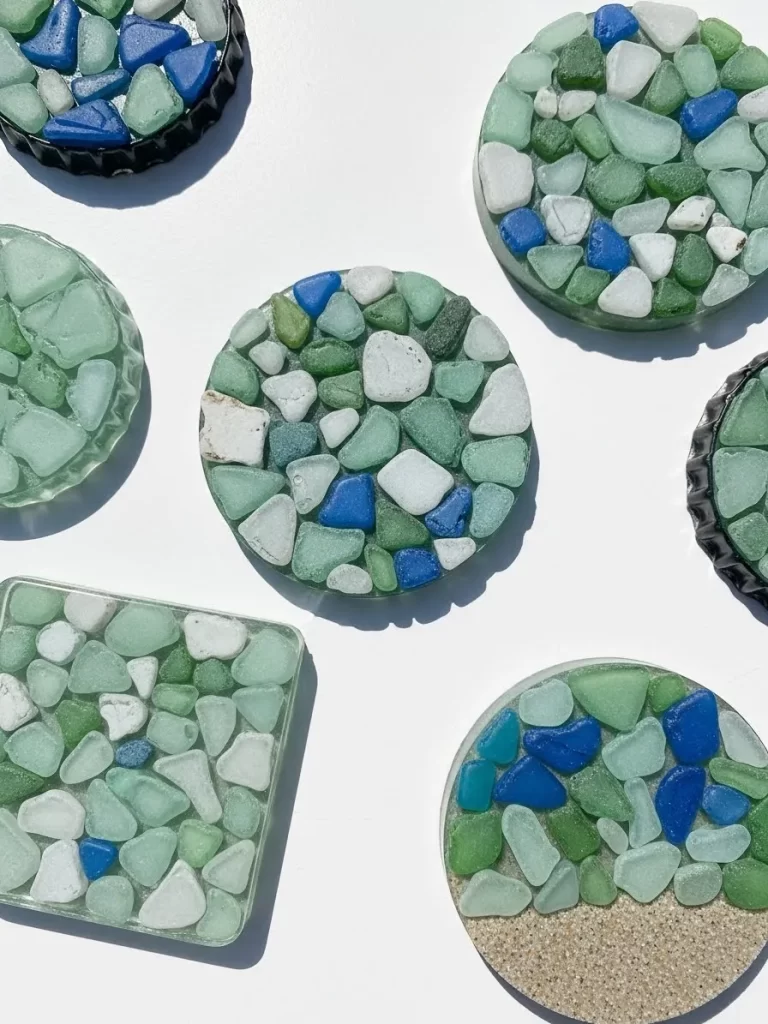
Image Description
This collection of coasters beautifully captures a coastal aesthetic by embedding authentic sea glass into clear resin. The pieces are varied in shape—circular and square—and feature a dense mosaic of found pieces of sea glass, stones, and small pebbles in shades of mint green, seafoam blue, and white.
The sea glass is suspended within the clear, high-gloss resin, which enhances the color and gives the pieces a smooth, durable surface. In one circular piece, a contrasting band of blue sea glass surrounds a central white stone, and another cleverly incorporates a layer of fine beach sand into the base. The coasters are framed by dark, scalloped bottle caps, adding an industrial-chic border.
Working with sea glass and resin is a cheap and highly worthwhile DIY trend for creating custom, beach-inspired accessories. The resulting coasters are durable, unique, and effectively showcase cherished found objects.
Materials Required
- Epoxy resin kit (resin and hardener)
- Sea glass, small beach stones, and pebbles (cleaned and dried)
- Silicone coaster molds (circular and square)
- Fine beach sand (optional)
- Small metal bottle caps or scrap metal pieces (optional, for border)
- Small mixing cups and stirring sticks
Equipment Required
- Protective gloves and respirator (essential for working with resin)
- Heat gun or small kitchen torch (for removing bubbles)
- Measuring cups
DIY Instruction Step by Step
Step 1: Prepare and Mix the Resin
Work in a well-ventilated area and wear your protective gear. Measure and mix the epoxy resin and hardener according to the manufacturer’s instructions. Stir slowly for several minutes until the mixture is completely clear.
Step 2: Layer the Elements
Pour a very thin layer of clear resin into the bottom of the silicone molds. This creates a base. Now, carefully place the sea glass pieces, stones, and sand (if using) into the resin. Arrange them tightly together to create the mosaic pattern. For the sand base, sprinkle a layer of sand into the bottom of the mold before pouring the first resin layer.
Step 3: Pour the Final Resin Layer
Pour the remaining clear resin slowly over the embedded sea glass, ensuring all the pieces are completely covered. The resin should flow into all the gaps. If using the bottle caps for a border, carefully press them into the outer edge of the wet resin. Use the heat gun or torch to carefully remove any surface air bubbles.
Step 4: Cure and Finish
Allow the resin to cure completely (usually 24-72 hours). Once the pieces are hard, carefully pop them out of the silicone molds. If any edges are sharp, you can lightly sand them.
37. Painted Rainbow Striped Rug
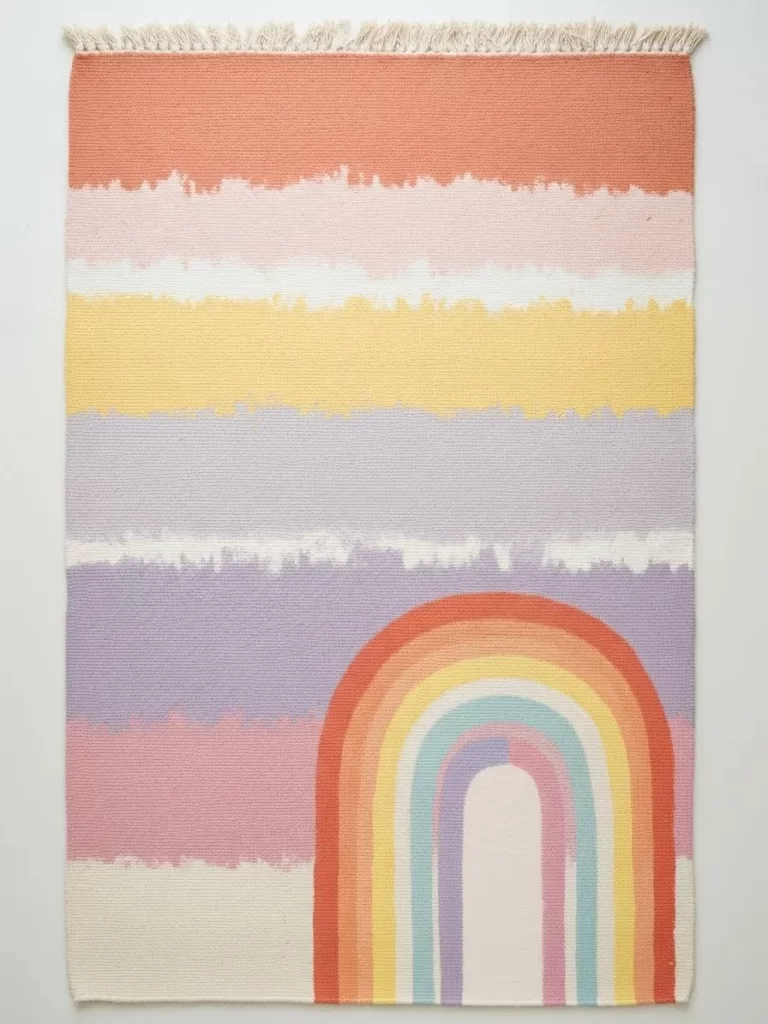
Image Description
This charming area rug features a bright, abstract rainbow design that instantly adds warmth and personality to a floor. The base is a plain woven rug (likely cotton or jute) with a fringed border. The pattern consists of bold, horizontal bands of color that are deliberately uneven and painterly, giving the rug a handcrafted, bohemian feel.
The color scheme is cheerful, utilizing muted pastel shades like dusty rose, lilac, yellow, and soft orange, contrasted with pops of warm coral. A large, stylized rainbow arch is painted onto the lower right corner, using a softer, multi-colored palette within the same family. The brushstrokes are visible and slightly streaked, enhancing the DIY quality.
Painting a plain rug is a highly worthwhile DIY trend because it provides a custom, graphic statement piece at a fraction of the cost of a patterned, store-bought rug. It allows for the perfect coordination of color with the rest of the room’s decor.
Materials Required
- One plain, flat-woven cotton, canvas, or jute rug
- Acrylic craft paint or fabric paint (various colors: orange, pink, yellow, lilac, coral)
- Painter’s tape
- Fabric medium (optional, to make acrylic paint more flexible)
Equipment Required
- Large paintbrushes (various widths)
- Foam rollers
- Ruler or measuring tape
- Protected workspace (drop cloths)
DIY Instruction Step by Step
Step 1: Prep the Rug
Lay the rug flat on a protected surface in a well-ventilated area. Use a measuring tape and painter’s tape to mark off the horizontal bands for the stripes. Press the tape down firmly to prevent the paint from bleeding under the edges.
Step 2: Mix and Apply the Stripe Colors
If using standard acrylic paint, mix a fabric medium into the paint according to the manufacturer’s directions. This helps the paint flex and prevents cracking once it dries. Using a wide brush or small roller, apply the paint within the taped sections. Deliberately use uneven, streaky strokes to achieve the distressed, hand-painted texture shown. Allow the first color to dry completely before removing and repositioning the tape for the next color.
Step 3: Paint the Rainbow Arch
Once the striped background is finished and dry, remove all tape. Lightly sketch the large rainbow arch onto the bottom corner of the rug. Use a small, steady brush to paint the concentric colored arcs of the rainbow. Again, apply the paint with uneven strokes to match the texture of the horizontal stripes.
Step 4: Cure and Set
Allow the entire rug to dry for at least 24-48 hours. If using fabric paint, you may need to heat-set the paint with an iron (according to the paint manufacturer’s instructions) to ensure it is washable and durable.
38. Industrial Pipe and Wood Closet System

Image Description
This functional storage unit showcases a popular DIY trend that uses industrial galvanized pipe and fittings combined with natural wood shelving. The system is designed for a corner, providing both open shelving and a dedicated clothes hanging area. The pipes serve as the main structural supports, attached securely to the walls with circular flanges.
The shelves are made from thick, stained wood planks, providing a warm, rustic contrast to the cool gray metal pipes. The design includes a lower hanging rack on wheels, providing flexible storage. The exposed plumbing fittings—elbows, T-joints, and reducers—are fully visible, lending a raw, architectural aesthetic to the space.
Building a custom closet or shelving unit with industrial pipes is a highly worthwhile DIY trend. It is inexpensive, incredibly sturdy, and completely customizable to fit any storage need or space configuration, giving a custom, loft-style look.
Materials Required
- Galvanized metal pipe (various lengths for vertical support and horizontal racks)
- Assorted pipe fittings (flanges, tees, elbows, couplings)
- Wood planks (for shelves, cut to desired length)
- Wood stain or varnish
- Heavy-duty screws and wall anchors
Equipment Required
- Pipe wrench
- Power drill and drill bits
- Level
- Measuring tape
- Sandpaper (for wood)
DIY Instruction Step by Step
Step 1: Measure and Plan the Structure
Determine the final configuration of your shelves and hanging rack. Measure the pipe lengths you will need and have them cut (often available at hardware stores). Measure the length of your wood planks and stain or varnish them, ensuring the color complements your walls. Allow the wood to dry.
Step 2: Assemble the Vertical Supports
Starting with the wall mounting points, use the flanges as guides to mark and drill pilot holes into the wall studs. Secure the flanges firmly to the wall with heavy-duty screws and anchors. Begin assembling the pipe structure by threading the pipe segments into the flanges and connecting them with the tee and elbow fittings to form the vertical runs.
Step 3: Create the Shelving Supports
As you build the vertical pipe runs, use the appropriate fittings (tees) at the desired shelf heights. Attach short pipe pieces to the tees, ending with a flange or coupling to support the shelf from below. Use the level frequently to ensure all horizontal supports are straight.
Step 4: Install the Shelves
Place the prepared wood planks onto the supporting pipe sections. For extra security, you may want to use pipe straps or screws to fasten the wood planks directly to the flanges or pipes below them.
Step 5: Assemble the Hanging Rack
Build the corner hanging rack and the lower rolling rack separately using the pipes and fittings. Attach the upper hanging rack securely to the main corner structure. Install casters onto the bottom of the lower hanging rack pipe segments to allow it to roll.
We have explored 38 ingenious and budget-friendly decor projects, ranging from rustic reclaimed wood frames to intricate resin art. Every one of these trends confirms that unique, personalized home styling is within easy reach, regardless of your skill level or wallet size. You can easily elevate your space by combining sustainability with creativity.
The next step is simple: choose a project that sparks your imagination and get started. Do not hesitate to adapt the materials or colors to reflect your unique taste. Transforming your home with handcrafted pieces brings immense satisfaction and character, making your space truly your own.
Key Takeaways
The most important lesson here is that expense does not equal elegance. Affordable materials like plastic bottles, old jeans, and scrap wood can be reimagined into beautiful, durable decor items. Focus on techniques that add significant texture, such as rope wrapping, painting a crackled finish, or creating mosaic patterns.
Upcycling is consistently one of the best ways to incorporate modern trends while maintaining a green approach. Techniques like Kintsugi-inspired repair and the clever use of concrete blocks ensure your decor tells a story. Every project you undertake adds personality and handmade charm to your environment.