That old piece of furniture in the corner doesn’t have to be an eyesore. Before you think about buying something new, consider the potential hiding under that worn-out finish. A little bit of creativity can completely transform a tired item into a treasure.

You do not need to be a professional to get amazing results. Many of these projects are simple, fun, and incredibly rewarding. With a bit of paint, some new hardware, or a clever idea, you can create a piece that is unique to you and your home.
This guide is filled with 36 budget-friendly ways to breathe new life into your old furniture. Forget expensive store-bought items. It’s time to roll up your sleeves and make something you can be proud of. Let’s begin.
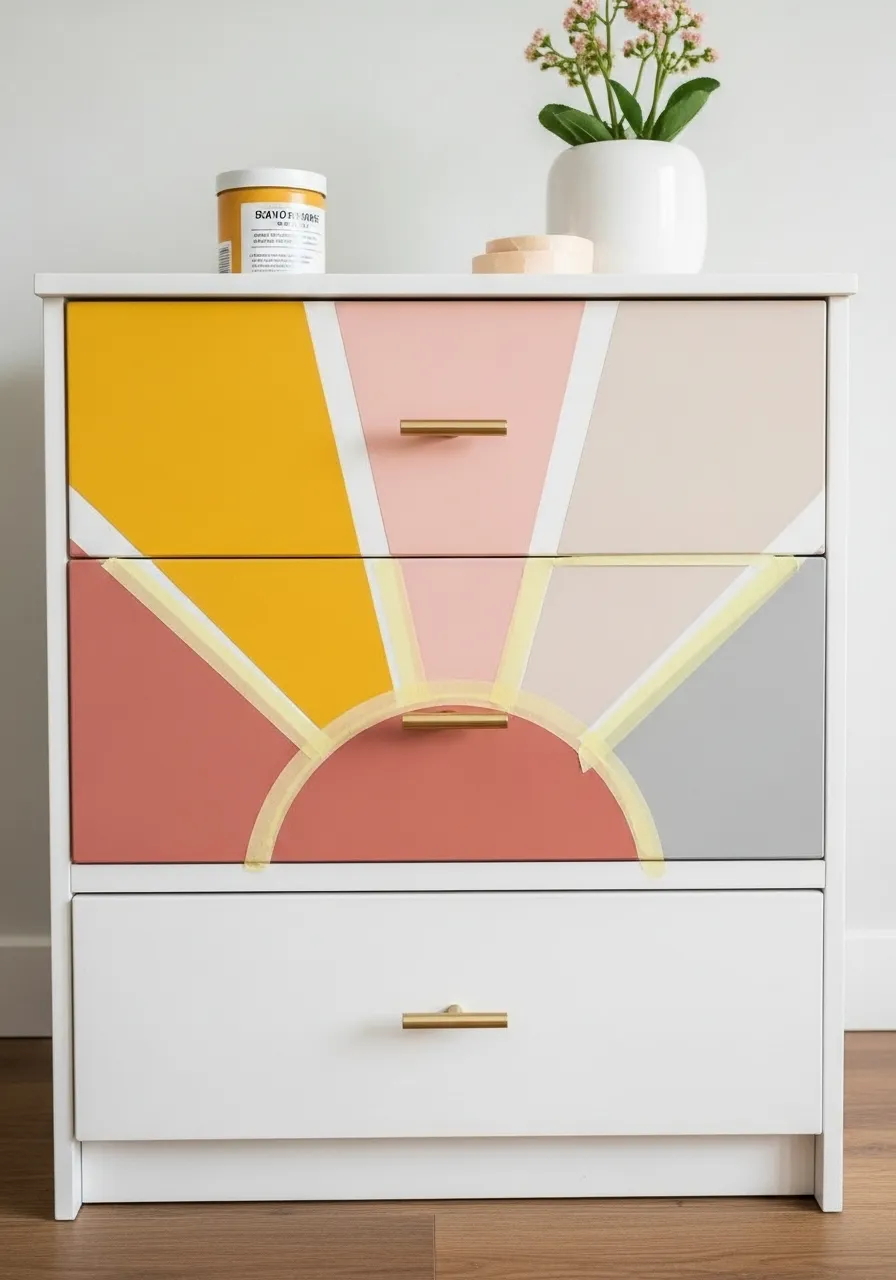
1. Create a Geometric Sunrise Ray Dresser

Brighten up any room with a dresser that features a cheerful, geometric sunrise pattern. This design uses painter’s tape to create sharp lines and blocks of color, resulting in a modern and artistic piece of furniture. It’s a simple way to turn a plain dresser into a stunning focal point.
This project is all about creativity and precision. The warm and cool colors mimic the beautiful hues of a rising sun. This technique can be adapted to any piece of furniture with a flat surface, offering a unique way to personalize your space.
DIY Instructions
What you will need:
- A dresser
- Sandpaper
- A base coat of white paint
- Several different colors of acrylic or latex paint
- Painter’s tape
- Paintbrushes or small rollers
- A ruler or straight edge
Step-by-Step Guide:
- Prep Your Dresser: First, make sure the dresser is clean. If it has an old, shiny finish, give it a light sanding so the new paint will stick better. Wipe away all the dust.
- Paint it White: Apply one or two coats of white paint to the front of the drawers you want to decorate. This will make your sunrise colors look bright and clean. Let it dry completely.
- Tape Your Sun: Use painter’s tape to create the shape of a half-circle on the drawers for the sun. You can trace a large plate or bowl to get a nice curve.
- Tape the Sun Rays: Use your ruler and long strips of painter’s tape to create the “rays” coming out from your sun. Make some rays thick and some thin for a more interesting look. Press all the tape edges down firmly.
- Start Painting: Now for the fun part! Fill in the taped-off sections with your different colors. Paint the sun a warm color like red or orange, and use other colors for the rays and the background.
- The Big Reveal: Wait until the paint is completely dry. Then, slowly and carefully peel off all the painter’s tape to reveal your beautiful, crisp design.
2. Distress a Rustic Farmhouse Dresser

Achieve a charming, weathered look by distressing a wooden dresser. This technique creates a sense of history and comfort, making a new piece of furniture feel like a treasured family antique. It’s a key element of the popular farmhouse style.
The process involves painting a piece and then strategically sanding away parts of the paint to reveal the wood underneath. This mimics the natural wear and tear that would happen over many years. Paired with vintage-style hardware, it completes the rustic transformation.
DIY Instructions
What you will need:
- A wooden dresser
- A medium-grit sandpaper block
- White or off-white chalk paint
- A paintbrush
- A clean, dry cloth
Step-by-Step Guide:
- Clean the Dresser: Start by thoroughly cleaning the dresser to remove any dust or grime. If the old hardware is in place, remove it with a screwdriver.
- Apply Your Paint: You don’t need to sand the whole piece first when using chalk paint. Apply one or two even coats of your chosen color to the parts of the dresser you want to look painted. Let the paint dry completely.
- Start Distressing: This is where you create the “old” look. Take your sandpaper block and start rubbing it along the edges and corners of the dresser and drawers. These are the spots where furniture would naturally get bumped and worn over time.
- Customize the Look: You can sand off as much or as little paint as you like. For a more heavily distressed look, you can also lightly sand some of the flat surfaces.
- Wipe it Down: Once you are happy with the look, use a clean, dry cloth to wipe away all the paint dust you created from sanding.
- Add Hardware: To finish the look, install new, vintage-style hardware like the cup pulls shown in the picture.
3. Stencil an Art Deco Glam Nightstand

Add a touch of 1920s glamour to a simple piece of furniture with a combination of rich color and metallic stenciling. This project transforms a basic nightstand into a sophisticated statement piece, reminiscent of the lavish Art Deco era.
A deep jewel tone, like this emerald green, provides a luxurious base for the shimmering gold pattern. Geometric shapes and sunburst motifs are hallmarks of the Art Deco style. The addition of new, stylish hardware completes this elegant makeover.
DIY Instructions
What you will need:
- A nightstand or small cabinet
- A rich, glossy paint color
- An Art Deco-style stencil
- Gold metallic craft paint
- A stencil brush or small sponge
- Painter’s tape
- New drawer pulls or knobs
Step-by-Step Guide:
- Prep and Paint: Clean your furniture and give it a light sanding. Apply two coats of your rich, glossy paint color. Let it dry completely according to the paint can’s instructions.
- Position Your Stencil: Decide where you want your gold design to go. Place your stencil on the furniture and use a few pieces of painter’s tape to hold it securely in place.
- Apply the Metallic Paint: Pour a small amount of your gold metallic paint onto a paper plate. Dip just the tip of your stencil brush into the paint, then dab most of it off onto a clean spot on the plate. The brush should be almost dry.
- Tap, Don’t Brush: Gently tap or swirl the brush over the open areas of the stencil. This technique, called “pouncing,” prevents paint from bleeding under the stencil’s edges.
- Lift and Repeat: Once you have filled in the design, carefully lift the stencil straight up. If you are creating a repeating pattern, wait for the paint to dry a bit before repositioning the stencil.
- Change the Hardware: After your stenciling is completely dry, replace the old knobs or pulls with new hardware that complements the glamorous Art Deco style.
4. Weave a Modern Cane Webbing Dresser

Introduce natural texture and a modern bohemian vibe to your furniture by adding cane webbing to the drawer fronts. This project is a popular way to update simple, flat-fronted dressers, giving them a high-end, designer look.
Cane webbing is a material made from the outer bark of the rattan plant. Its light color and woven pattern create a beautiful contrast with a dark-painted frame. This is a fantastic way to bring an organic, airy feel into your bedroom or living space.
DIY Instructions
What you will need:
- A dresser with flat-front drawers
- A roll of cane webbing
- A pair of sharp, heavy-duty scissors
- A staple gun
- Thin wood trim to create a “frame”
- A miter saw or miter box for cutting the trim
- Wood glue
Step-by-Step Guide:
- Prepare the Cane: Cane webbing is stiff and brittle when dry. You need to soak it in warm water for about 30 minutes to make it soft and flexible to work with.
- Cut the Cane: While the cane is still damp, lay it out on a flat surface. Place your drawer front on top and cut the cane webbing about one inch larger than the drawer front on all sides.
- Attach the Cane: Place the damp piece of cane webbing on the front of your drawer. Use your staple gun to attach it, starting with one staple in the middle of each of the four sides.
- Stretch and Staple: Continue adding staples, working from the center of each side out towards the corners. The cane will be stretched tight like a drum. As it dries, it will shrink and become even tighter.
- Cut the Frame: Measure the sides of your drawer front. Use a miter saw to cut your thin wood trim pieces at 45-degree angles at the corners so they will form a neat frame.
- Add the Frame: Apply wood glue to the back of your trim pieces and place them on the drawer front, covering the stapled edges of the cane webbing. This gives a clean, finished look. Let the glue dry.
5. Paint a Gradient Ombre Dresser

Create a beautiful and dramatic effect by painting a dresser with an ombre, or gradient, design. This technique involves blending different shades of a color, from light to dark, to create a smooth transition. It’s a unique and artistic way to make a piece of furniture truly stand out.
This project is easier than it looks. You can either use a different shade of paint for each drawer, or you can blend the colors on the sides of the dresser for a more seamless flow. It’s a modern and stylish update for any bedroom.
DIY Instructions
What you will need:
- A dresser
- Sandpaper
- A white paint
- A black paint
- Several disposable containers for mixing
- A paintbrush for each color
Step-by-Step Guide:
- Prep Your Dresser: Clean the dresser and give it a light sanding. Remove the drawers.
- Paint Your Extremes: Paint the top drawer completely white. Paint the bottom drawer completely black.
- Mix Your Grays: Now you need to create the shades for the middle drawers. In one container, mix a lot of white paint with just a tiny bit of black to create a very light gray. In another container, mix a little less white with the black for a medium gray. In a third, mix about half and half for a dark gray.
- Paint the Middle Drawers: Use your new custom gray colors to paint the middle drawers. Arrange them from lightest at the top to darkest at the bottom to create the gradient effect.
- Blend the Sides (Optional): For an advanced look, you can blend the colors on the sides of the dresser frame. While the paint is still wet, use a clean, dry brush to gently feather the area where two colors meet, blurring the line between them.
- Let it Dry and Reassemble: Let all the drawers and the frame dry completely. Then put the drawers back in and attach your hardware.
6. Apply a Vintage Postcard Decoupage Dresser

Cover a piece of furniture with paper to give it a completely new and intricate look. This technique, called decoupage, involves gluing paper cutouts onto a surface. Using vintage-style scrapbook paper, like these old letters and postcards, creates a romantic and historic feel.
This is a wonderful way to upcycle a piece that might have a damaged surface. The decoupage creates a whole new finish. It’s a project that takes some patience, but the result is a detailed and unique piece of art that tells a story.
DIY Instructions
What you will need:
- A dresser or cabinet
- Scrapbook paper with a vintage design
- A bottle of Mod Podge or other decoupage glue
- A foam brush or paintbrush
- A pair of scissors
- A clear topcoat or sealer
Step-by-Step Guide:
- Prepare Your Surface: Make sure your furniture is clean and dry. If the surface is very slick, a light sanding will help the glue stick better.
- Cut Your Paper: Cut your scrapbook paper into sizes and shapes that will be easy to work with. For a look like this, you can cut out individual postcards or just use rectangular pieces.
- Apply the Glue: Using your foam brush, apply a thin, even layer of Mod Podge to a small section of the furniture where you want to place your first piece of paper.
- Place the Paper: Carefully lay your piece of paper onto the glue. Use your fingers to smooth it out from the center to the edges, getting rid of any air bubbles or wrinkles.
- Seal the Top: Once the paper is in place, immediately brush another thin layer of Mod Podge over the top of the paper. This seals it to the surface.
- Overlap and Repeat: Continue this process, overlapping the pieces of paper slightly, until the entire surface is covered. Let it dry completely. For extra protection, you can add another coat of Mod Podge or a different clear sealer once it’s dry.
7. Install a Faux Marble Nesting Tables

Get the luxurious look of marble for a fraction of the cost by using adhesive contact paper. This project is a quick and easy way to give a modern and elegant update to any flat surface. It’s a great solution for renters as it’s not permanent.
Marble contact paper is a vinyl film with a realistic printed pattern on one side and a peel-and-stick adhesive on the other. It’s a simple way to transform tired tabletops, shelves, or even countertops. The result is a clean, sophisticated look that is easy to wipe clean.
DIY Instructions
What you will need:
- A set of tables
- A roll of marble-patterned contact paper
- A pair of scissors or a craft knife
- A ruler or measuring tape
- A smoothing tool (a credit card works well)
Step-by-Step Guide:
- Clean Your Surface: It is very important that your tabletop is perfectly clean and dry. Any little speck of dust or dirt will create a bubble under the contact paper.
- Measure and Cut: Measure your tabletop. Unroll your contact paper and cut a piece that is a few inches larger than your tabletop on all sides. This gives you some extra to work with.
- Peel a Little: Turn your cut piece of contact paper over. Peel back just the first few inches of the paper backing to expose the sticky adhesive.
- Line it Up: Carefully line up the edge of the contact paper with the edge of your tabletop. Press the sticky part down.
- Smooth it On: This is the key part. Slowly pull off the rest of the paper backing with one hand. With your other hand, use the smoothing tool to press the contact paper onto the surface. Work from the center out to the edges to push out all the air bubbles.
- Trim the Edges: Once the top is covered, use your craft knife to carefully trim away the excess contact paper around the edges of the tabletop for a clean, perfect finish.
8. Refinish a Two-Tone Farmhouse Dining Table

Give a classic dining table a fresh and modern farmhouse look by painting the base and staining the top. This two-tone finish is very popular because it brightens up a room while still celebrating the natural beauty of the wood.
This project shows the dramatic difference a new finish can make. The dark painted legs provide a strong, contemporary foundation, while the warm wood stain on the tabletop adds a traditional, inviting feel. It’s a timeless look that can make an old table the centerpiece of your dining room again.
DIY Instructions
What you will need:
- A wooden table
- An electric sander
- Sandpaper (medium and fine grit)
- Wood stain
- A paint color of your choice
- A paintbrush
- Clean rags
- A clear polyurethane topcoat
Step-by-Step Guide:
- Sand the Tabletop: This is the most labor-intensive part. You need to use an electric sander to completely remove the old finish from the tabletop, revealing the bare wood underneath. Start with medium-grit sandpaper and finish with fine-grit.
- Prep the Base: For the table legs and apron, you don’t need to sand all the way to bare wood. Just give them a light sanding (scuff sanding) to help the new paint stick.
- Stain the Top: Wipe the sanded tabletop so it is free of all dust. Apply your wood stain with a clean rag, following the directions on the can. Let it soak in, then wipe away the excess.
- Paint the Base: While the stain is drying, you can paint the table legs and apron with your chosen paint color. You will likely need two coats.
- Protect Your Work: This is a very important step for a dining table. Once the stain is fully dry, you must apply several coats of a durable, clear polyurethane topcoat to protect the wood from spills and scratches. Follow the directions on the can, sanding lightly between coats.
- Reassemble (if needed): If you took the table apart to work on it, put it back together and admire your brand new table.
9. Create Color-Dipped Table Legs

Add a playful and modern pop of color to a plain wooden table with the “color-dipped” look. This simple painting technique is a great way to introduce a small amount of a bold color without overwhelming a room. It’s a quick update that feels very contemporary.
The key to this look is creating crisp, clean lines. Using painter’s tape is essential for this. You can play with different colors and how far up the leg the “dipped” section goes. It’s a fun, graphic detail that adds a lot of personality.
DIY Instructions
What you will need:
- A wooden table or stool
- Sandpaper
- Painter’s tape
- At least two different paint colors
- A paintbrush
- A ruler
Step-by-Step Guide:
- Prep the Legs: If the legs have a shiny finish, give them a light sanding to help the paint stick. Wipe away the dust.
- Tape Your First Line: Decide where you want your first block of color to end. Use a ruler to make sure you are measuring the same distance up from the floor on each leg. Wrap a piece of painter’s tape tightly around each leg at this mark.
- Paint the Feet: Paint the section of the legs below the tape with your first color. You might need two coats.
- Remove the Tape: Let the paint dry completely. Then, carefully and slowly peel off the painter’s tape to reveal your clean line.
- Tape Your Second Line: If you want to add a second color, as shown in the picture, place another strip of tape above the section you just painted. Leave a small gap of natural wood showing, or place the tape right on the edge of your first color.
- Paint Your Second Color: Paint the next section with your second color. Let it dry completely before peeling off the tape.
10. Design a Mosaic Tile Side Table

Turn a plain outdoor table into a vibrant piece of art with a mosaic tile top. This project is a fantastic way to add color, pattern, and a personal touch to your patio or garden furniture. It’s a durable surface that can withstand the weather.
Creating a mosaic involves arranging small pieces of tile (called tesserae) into a design and then filling the gaps with grout. It’s like putting together a puzzle where you get to design the picture. You can create any pattern you can imagine, from simple geometrics to complex images.
DIY Instructions
What you will need:
- A metal side table
- A selection of small mosaic tiles
- Tile adhesive
- A small notched trowel or putty knife
- Grout
- A grout float or squeegee
- A sponge and a bucket of water
Step-by-Step Guide:
- Plan Your Design: Before you start gluing, arrange your tiles on the tabletop to plan out your pattern. This way you can make changes easily.
- Apply the Adhesive: Working in a small section, use your trowel to spread a thin, even layer of tile adhesive onto the tabletop.
- Place Your Tiles: Gently press your tiles into the adhesive, following the pattern you planned. Leave a small, even gap between each tile for the grout. Continue working, section by section, until the whole top is covered. Let the adhesive dry completely (usually 24 hours).
- Time to Grout: Mix your grout with water according to the package directions. It should be the consistency of peanut butter. Plop a bunch onto your tiles.
- Spread the Grout: Use your grout float to spread the grout all over the tiles, pushing it into all the cracks and gaps. Make sure every space is filled.
- Clean it Up: Let the grout sit for about 15-20 minutes. Then, use a damp (not soaking wet) sponge to gently wipe the excess grout off the face of the tiles. You will need to rinse your sponge many times. Let the grout cure for a day or two, and then you can polish off any remaining haze with a dry cloth.
11. Assemble a Mid-Century Modern Hairpin Leg Table

Instantly give any slab of wood a sleek, minimalist look by adding hairpin legs. This style was very popular in the mid-20th century and has made a huge comeback. It’s a simple project that results in a stylish and functional table.
The beauty of this project is its simplicity. The slender metal legs provide sturdy support without looking bulky. This allows the beauty of the wood top to be the main focus. It’s a fast way to create a coffee table, side table, or desk.
DIY Instructions
What you will need:
- A flat piece of wood (a tabletop, a slice of a log, or even an old door)
- A set of hairpin legs (they come in different heights)
- Screws (usually come with the legs)
- A power drill
- A ruler or measuring tape
Step-by-Step Guide:
- Prepare the Top: Flip your wood slab upside down on a soft surface like a rug to avoid scratching it. Wipe it down so it’s clean.
- Position the Legs: Place one hairpin leg in a corner. Use your ruler to make sure it’s the same distance from both edges. For example, you might place it one inch from each side.
- Mark the Holes: The legs will have a small plate with screw holes. Use a pencil to mark where each screw needs to go. Do this for all four legs.
- Drill Pilot Holes: It’s helpful to drill small “starter” holes where you made your pencil marks. This makes it much easier to screw the legs in straight and prevents the wood from splitting.
- Attach the Legs: Line the leg back up with your pilot holes. Use your power drill to drive the screws in until the leg is held firmly in place. Repeat for the other three legs, and then you’re ready to flip your new table over!
12. Craft a Plush Tufted Ottoman

Upgrade a plain ottoman or even build one from scratch for a touch of luxury. Tufting, the technique of creating patterns with buttons, makes any piece of furniture look more comfortable and sophisticated.
This project can dramatically change the style of a room. Choosing a rich fabric like velvet enhances the plush, elegant feel. It’s a rewarding project that turns a simple footrest into a beautiful centerpiece for your living area.
DIY Instructions
What you will need:
- An old ottoman or a strong piece of plywood for the base
- Thick foam, the same size as your base
- Fabric (enough to cover the top and sides)
- A fabric-covered button kit
- A long upholstery needle and strong thread
- A power drill
- A staple gun
Step-by-Step Guide:
- Prepare Your Base: Place the foam on top of your plywood base. Decide where you want your buttons to go and mark the spots on the foam. Then, use the drill to make a hole through both the foam and the plywood at each mark.
- Cover with Fabric: Lay your fabric out, wrong side up. Place the foam and base on top of it.
- Make Your Buttons: Follow the instructions on your button kit to cover your buttons with your chosen fabric. This is a fun and easy step.
- Start Tufting: Thread your long needle with a strong thread and push it up through one of the holes from the bottom of the plywood. Push it through the foam and fabric. Thread on a button, then push the needle back down through the fabric, foam, and the same hole.
- Pull and Secure: Pull the thread very tight. This is what creates the “tuft” or dimple. Have a friend help you hold it tight while you use a staple gun to staple the thread to the bottom of the plywood in a zigzag pattern.
- Finish the Edges: Once all your buttons are attached, pull the rest of the fabric neatly and tightly over the sides and staple it securely to the underside of the plywood.
13. Reupholster a Chair with Elegant Velvet

A new seat cushion can completely revive an old chair. This project pairs a classic black frame with a bold, blue velvet fabric for a dramatic and modern look. It’s a simple update that makes a big impact.
Changing the seat fabric is one of the easiest ways to get started with upholstery. Velvet adds a touch of richness and is comfortable to sit on. This is a great way to customize dining chairs to match your personal style.
DIY Instructions
What you will need:
- A chair with a removable seat (most dining chairs have this)
- A piece of fabric like velvet, a little larger than the seat
- A screwdriver
- A staple gun and staples
- Scissors
Step-by-Step Guide:
- Remove the Seat: Flip the chair over. You will usually see four screws holding the seat pad onto the chair frame. Use your screwdriver to remove them and take the seat off.
- Take Off the Old Fabric: If you want, you can use a flathead screwdriver or pliers to pull out the old staples and remove the old fabric. Or, you can just put your new fabric on right over the old one if it’s not too thick.
- Cut Your New Fabric: Lay your new fabric flat, with the pretty side facing down. Place the seat pad on top of it. Cut the fabric around the seat, leaving about three inches of extra fabric on all sides.
- Start Stapling: Begin on one side. Pull the edge of the fabric up and over the edge of the wooden seat bottom and put one staple in the middle.
- Keep it Tight: Go to the opposite side of the seat. Pull the fabric very tight, and put one staple in the middle there. Do the same for the other two sides.
- Finish Stapling: Now, keep working your way around the seat, pulling the fabric tight and adding staples every inch or so. Neatly fold the corners like you are wrapping a present. Once it’s all stapled, screw the seat back onto the chair frame.
14. Create a Bohemian Tie-Dye Armchair

Make a bold and artistic statement by covering an old armchair in custom tie-dyed fabric. This project turns a forgotten piece of furniture into the star of the show. It’s a great way to bring a relaxed, bohemian vibe into your home.
The unique patterns of tie-dye ensure that your chair will be truly one-of-a-kind. The deep indigo color is a classic choice for this style. This is a project for those who are not afraid of color and want to show off their creative personality.
DIY Instructions
What you will need:
- An old armchair
- Enough plain white or off-white cotton fabric to cover the chair
- A tie-dye kit (with dye, rubber bands, and gloves)
- A staple gun and staples
- Scissors
Step-by-Step Guide:
- Dye Your Fabric: First, you need to create your tie-dye patterns on the fabric. Follow the instructions on your dye kit. This usually involves bunching and tying the fabric with rubber bands and then applying the dye. Let it set, then rinse and wash it. Let it dry completely.
- Remove the Cushions: Take the seat and back cushions off the chair. You will cover these separately.
- Start with the Body: Begin covering the main body of the chair. Drape your dyed fabric over a section, like an arm. Pull it tight and smooth, then use the staple gun to attach the fabric to the wooden frame on the underside or back of the chair where it won’t be seen.
- Cut and Tuck: You will need to carefully cut the fabric to fit around curves. Tuck the fabric into the creases and crevices of the chair to get a neat look. This part is like a puzzle, so take your time.
- Cover the Cushions: Wrap your seat cushion with a piece of dyed fabric, just like you are wrapping a birthday present. Pull it tight and secure the fabric on the bottom with staples or safety pins. Do the same for the back cushion.
- Put it all Together: Place your newly covered cushions back on the chair and admire your unique creation.
15. Paint a Modern Two-Tone Spindle Chair

Give a traditional spindle chair a fresh, modern twist with a clever paint job. This project uses multiple techniques, leaving some parts natural wood while painting others. The “dipped” look on the legs adds a playful and graphic touch.
This is all about creating contrast. The black paint makes the chair’s classic shape stand out, while the natural wood spindles add warmth. The white-tipped legs are an unexpected detail that makes the whole piece feel contemporary and designed.
DIY Instructions
What you will need:
- A wooden spindle chair
- Sandpaper
- Painter’s tape
- Black paint and white paint
- Paintbrushes
- A clear topcoat or sealer (optional)
Step-by-Step Guide:
- Get it Ready: Clean the chair well. Lightly sand the entire surface to help the new paint stick. Wipe away all the dust.
- Tape Off the Spindles: This is the most important step for a clean look. Decide which parts of the spindles you want to keep as natural wood. Carefully wrap painter’s tape around those sections. Press the tape down firmly.
- Paint it Black: Paint the rest of the chair—the seat, the top rail, and the parts of the spindles and legs that are not taped off—with your black paint. Let it dry completely, then carefully remove the tape from the spindles.
- Tape for the Dip: Now, decide how high you want the white “socks” on the legs to be. Wrap a piece of painter’s tape in a straight line around each of the four legs.
- Paint the Feet White: Paint the part of the leg below the tape with your white paint. You might need two coats.
- The Final Reveal: Let the white paint dry completely. Then, slowly peel off the tape. You can add a clear topcoat to the whole chair to protect your work.
16. Finish a Coastal Whitewashed Dining Chair

Bring a light and airy, beach-house feel to your dining room with a whitewashed chair. This painting technique brightens up wood while still allowing the natural grain to show through. It creates a soft, weathered look that is very relaxing.
Paired with a classic blue and white striped fabric on the seat, the coastal theme is complete. This is a great way to update a set of old, dark wood chairs. The finished piece feels fresh, clean, and inviting.
DIY Instructions
What you will need:
- A wooden chair with a removable seat
- Sandpaper
- White paint (latex or acrylic)
- A small bucket or container for mixing
- Water
- A paintbrush and a clean, lint-free cloth
- Striped fabric
- A staple gun and screwdriver
Step-by-Step Guide:
- Prep the Chair: First, remove the seat cushion using a screwdriver. Then, lightly sand the entire wooden chair frame to get rid of any shiny finish. Wipe all the dust off.
- Make the Whitewash: In your container, mix about one part white paint with one part water. Stir it well. It should be thin and runny, like soup.
- Apply the Wash: Use your paintbrush to brush the whitewash mixture onto a section of the chair. Work it into the wood.
- Wipe it Off: Before the mixture dries, take your clean cloth and gently wipe most of it off. The idea is to leave white paint in the grain of the wood, creating the “washed” look. Continue this process, section by section, until the whole chair is done.
- Reupholster the Seat: While the chair frame dries, cover the seat pad with your new striped fabric. Make sure the stripes are straight! Pull the fabric tight and staple it to the underside of the seat.
- Put it Back Together: Once the chair frame is completely dry, use your screwdriver to reattach the new seat.
17. Stencil a Pop Art Comic Book Stool

Add a punch of fun and energy to your room with a pop art-inspired stool. This makeover uses bright colors and a bold stencil to capture the look of old comic books. It’s a quick project that can turn a boring stool into a playful accent piece.
This is a great way to add personality to a kids’ room, a game room, or any space that needs a bit of excitement. The sharp lines of the stencil and the primary colors are key to the comic book style. Your furniture will look like it jumped right off the page.
DIY Instructions
What you will need:
- A metal stool
- Spray paint suitable for metal (in a bright color like yellow)
- Painter’s tape
- A stencil with a comic book word like “POW!” or “BAM!”
- Craft paint in contrasting colors (like red and blue)
- A stencil brush or small sponge
Step-by-Step Guide:
- Clean and Paint: Make sure your stool is clean and dry. In a well-ventilated area, spray paint the entire stool with your main color, like yellow. Use several light coats for the best result. Let it dry completely.
- Tape the Edge: If you want a colored border on the seat, carefully apply painter’s tape around the top surface of the seat, leaving the thin edge exposed.
- Paint the Border: Use a small brush and your red craft paint to paint the edge of the seat. Once it’s dry, carefully remove the painter’s tape.
- Position the Stencil: Place your “POW!” stencil in the center of the seat. Use a few small pieces of tape to hold it in place so it doesn’t move.
- Stencil the Word: Put a small amount of blue paint on a paper plate. Dip the tip of your stencil brush in the paint, then dab most of it off on a paper towel. Gently tap the brush over the stencil openings. This “pouncing” motion prevents paint from getting under the stencil.
- Lift and Let Dry: Once the design is filled in, carefully lift the stencil straight up. Let the whole thing dry before using it.
18. Weave a Leather Strap Bench

Create a sophisticated and modern bench with a woven leather seat. This project adds amazing texture and high-end style to a simple wooden frame. It’s a durable and comfortable seating solution that looks impressive.
The process of weaving is repetitive and relaxing. The contrast between the warm wood and the sleek leather straps is what makes this piece so attractive. You can create all sorts of patterns depending on the colors you choose and how you weave them.
DIY Instructions
What you will need:
- A bench frame (without a top)
- Strips of leather or faux leather (you can buy them pre-cut or cut them from a larger piece)
- A heavy-duty staple gun
- A ruler or measuring tape
- Scissors
Step-by-Step Guide:
- Measure and Cut: Measure the width of your bench frame. Cut a number of leather straps that are long enough to wrap over the top and a few inches underneath on both sides.
- Attach the First Layer: Take your first strap. Lay it across the width of the bench. Staple one end securely to the underside of the bench frame with 3-4 staples. Pull the strap very tight across the top and staple the other end to the opposite underside.
- Continue the First Direction: Continue attaching straps this way, side by side, until you have covered the entire length of the bench. Keep the spacing between them even.
- Start Weaving: Now cut your straps for the other direction. Take one strap and weave it over and under the straps you already attached.
- Secure the Woven Straps: Once you’ve woven the strap all the way across, pull it tight and staple both ends to the underside of the frame, just like you did before.
- Finish the Pattern: Continue weaving the rest of your straps, making sure to alternate the pattern. If the first strap went over-under-over, the next one should go under-over-under. Keep going until the whole seat is a woven mat.
19. Line a Bookshelf with Statement Wallpaper

Give a plain bookshelf a designer touch by adding wallpaper to the back panels. This is an easy way to introduce color and pattern into a room. It turns a simple storage piece into a decorative feature.
This project creates a beautiful backdrop for your books, photos, and treasures. Using peel-and-stick wallpaper makes the job quick, clean, and easy to change later if you want a new look. It’s a small detail that makes a huge difference.
DIY Instructions
What you will need:
- A bookshelf with a solid back
- A roll of wallpaper (peel-and-stick is the easiest)
- A measuring tape or ruler
- A pencil
- A craft knife or sharp scissors
- A smoothing tool (an old credit card or a special wallpaper tool)
Step-by-Step Guide:
- Clean and Measure: Empty your bookshelf and wipe the inside clean. Measure the height and width of the first back panel that you want to cover.
- Cut the Wallpaper: Roll out your wallpaper on a flat surface. Use your measurements to mark where to cut. It’s a good idea to add an extra inch just in case. Use a ruler and a craft knife to get a straight cut.
- Peel and Stick: Carefully peel back just the top few inches of the paper backing from your wallpaper piece.
- Apply from the Top: Line up the top edge of the wallpaper with the top edge of the bookshelf’s back panel. Press it down lightly.
- Smooth it Down: Slowly continue to peel the backing off with one hand, while using your smoothing tool with the other hand to smooth the wallpaper onto the back. Work from the center outwards to push out any air bubbles.
- Trim the Excess: If you have any extra wallpaper at the bottom or sides, use your craft knife to carefully trim it away for a perfect fit. Repeat these steps for any other sections of the bookshelf you want to cover.
20. Build an Industrial Pipe Shelving Unit

Construct a sturdy and stylish shelving unit using wood planks and metal pipes. This industrial look is very popular and works well in many different rooms. It’s a custom solution that you can build to fit your exact space and needs.
This project involves some assembly, but it’s like building with a grown-up construction set. The combination of dark, rugged pipes and stained wood creates a handsome and functional piece. It’s great for displaying books, plants, or kitchen supplies.
DIY Instructions
What you will need:
- Wooden boards for your shelves
- Sandpaper
- Wood stain and a clear protective topcoat
- Black iron pipes and fittings (like flanges, tees, elbows, and caps)
- A pipe wrench
- A power drill and screws
- A level
Step-by-Step Guide:
- Prepare Your Shelves: First, get your wooden boards ready. Sand them so they are smooth. Then, apply a coat of wood stain with a cloth. Let it dry, and then add a clear topcoat to protect the wood.
- Plan Your Design: Lay out your pipes and fittings on the floor to plan how your shelf supports will look. It’s a good idea to draw a picture first.
- Assemble the Pipes: Start screwing the pipes and fittings together by hand. Once they are hand-tight, use the pipe wrench to make them very secure. Build the side supports for your shelves first.
- Attach to the Wall: This is a two-person job. Hold one of the pipe supports against the wall where you want it. Use a level to make sure it’s perfectly straight up and down. Use a pencil to mark where the screws go in the flanges (the flat, round pieces).
- Secure the Frame: Drill pilot holes on your marks, then use strong screws to attach the pipe supports to the wall. Make sure to screw into wall studs if possible for extra strength.
- Add the Shelves: Once your pipe frame is securely on the wall, you can simply rest your finished wooden boards on the horizontal pipe supports.
21. Repurpose a Color-Blocked Plant Stand Ladder

Don’t throw away that old step stool. With a few coats of bright paint, it can become a stylish and functional plant stand or decorative ladder. This project is all about being bold with color and creating a fun, eye-catching piece.
The blocks of contrasting colors give the ladder a modern, graphic look. It’s a fantastic way to add a vertical element to a room and display your favorite things. This project is quick, easy, and lets your creativity shine.
DIY Instructions
What you will need:
- An old wooden step stool or small ladder
- Sandpaper
- Painter’s tape
- At least three different colors of craft or latex paint
- Paintbrushes
Step-by-Step Guide:
- Prep Your Ladder: First, give the entire ladder a good cleaning. Then, lightly sand the surface all over. This helps the paint to stick really well. Wipe away all the sanding dust with a clean cloth.
- Tape Your First Section: Decide where you want your first block of color to end. Wrap a piece of painter’s tape tightly around that part of the ladder or leg to create a clean line.
- Paint Section One: Paint the section you’ve taped off. You might need to apply a second coat after the first one dries to get a solid, bright color.
- Reveal and Repeat: Once the paint is completely dry, carefully peel off the painter’s tape. Now, tape off a new section right next to the one you just painted.
- Add Your Next Color: Paint this new section with a different color. Let it dry, then peel off the tape.
- Keep on Coloring: Continue taping and painting new color blocks until your whole ladder is a vibrant piece of art. It’s fun to see the pattern come to life as you add more colors.
22. Fashion a Rustic Floating Crate Nightstand

Create a simple and stylish nightstand that saves on floor space. This project turns a basic wooden crate into a floating shelf with a handy drawer. It’s a clever way to add storage to a small bedroom.
The unfinished wood gives it a rustic, natural look, while mounting it to the wall feels modern and clean. It’s the best of both worlds. This is a very practical project that you can customize to fit your specific needs next to your bed.
DIY Instructions
What you will need:
- A wooden crate
- A small wooden drawer that fits inside the crate (or you can build a simple one)
- Sandpaper
- A power drill
- Long screws that can go through the crate and securely into the wall
- A level
- A wall stud finder (important for safety)
Step-by-Step Guide:
- Smooth the Crate: Use sandpaper to smooth out any rough spots on the wooden crate and the drawer. You don’t want to get any splinters!
- Find a Strong Spot: This is the most important step. Use a stud finder to locate the strong wooden beams (called studs) inside your wall. You must attach the nightstand to these studs so it doesn’t fall down. Mark the spots with a pencil.
- Hold it Up: Have a friend help you hold the crate up against the wall where you want it to go. Place your level on top to make sure the crate is perfectly straight.
- Mark Your Holes: While your friend holds it steady, use a pencil to make a mark on the inside back of the crate where it lines up with the wall studs you found.
- Drill and Attach: Take the crate down. Drill a hole through the back of the crate on your marks. Now, hold the crate back up to the wall, line up the holes with your stud marks, and use the power drill to drive the long screws through the crate and into the wall studs.
- Add the Drawer: Make sure the crate is very secure. Then, simply slide your drawer into the top section of the crate.
23. Create a Campaign-Style Traveler’s Nightstand

Give a plain nightstand a handsome and historic makeover with campaign-style hardware. This look is inspired by the portable furniture that military officers used to travel with. The metal corners and inset handles are classic features.
The combination of dark paint, a natural wood top, and brassy hardware creates a very distinguished look. It’s a project that adds a sense of adventure and timeless style to a room. This is a great way to make a simple piece look custom and expensive.
DIY Instructions
What you will need:
- A nightstand
- Sandpaper
- Dark blue and olive green paint
- Painter’s tape
- Brass or gold metal corner brackets
- Inset campaign-style drawer pulls
- A power drill and screwdriver
Step-by-Step Guide:
- Prep for Painting: Clean the nightstand. If you want a wood top like the picture, you will need to sand the old finish off the top completely. For the rest of the nightstand, just give it a light sanding.
- Tape and Paint: Use painter’s tape to protect the wood top. Paint the body of the nightstand and the bottom drawer front dark blue. Paint the top drawer front a contrasting olive green. You will probably need two coats.
- Position the Hardware: Once the paint is completely dry, it’s time to add the “jewelry.” Place a metal corner bracket on each of the eight corners of the nightstand’s body. Use a pencil to mark where the tiny screws will go.
- Attach the Corners: Use your drill or a small screwdriver to attach all the corner brackets.
- Add the Pulls: Figure out where the center of each drawer front is. This is where you will install the new drawer pulls. Follow the instructions that come with the hardware; you may need to drill new holes.
- Finish the Top: If you sanded the top, you can now add a clear protective coat to the wood to make it shine and protect it from spills.
24. Add a Kitchen Cabinet Chalkboard Menu

Turn an unused cabinet door into a handy and charming message center. This easy project uses chalkboard paint to create a reusable surface for grocery lists, menus, or doodles. It’s a functional update that adds a personal touch to your kitchen.
This is one of the quickest ways to make your kitchen more organized. The chalkboard panel integrates seamlessly into the cabinet design. It’s a fun project for the whole family to use.
DIY Instructions
What you will need:
- A kitchen cabinet with a flat inset panel
- Painter’s tape
- Chalkboard paint
- A small foam paint roller
- Chalk and a chalk pen
Step-by-Step Guide:
- Clean the Surface: First, wipe down the cabinet door really well. You want to make sure there is no grease or dirt, so the paint sticks perfectly.
- Tape Off the Area: Use painter’s tape to carefully create a border around the flat, inset panel of the cabinet door. Press the edges of the tape down very firmly to prevent any paint from sneaking underneath.
- Time to Paint: Open your chalkboard paint and stir it well. Pour some into a small paint tray. Use your foam roller to apply a thin, even coat of chalkboard paint inside the taped-off area.
- Add More Coats: Let the first coat dry completely (check the can for drying times). It’s very important to let it dry properly. Then, apply a second coat. You will probably need at least two or three coats to get a really good chalkboard surface.
- The Big Reveal: After your final coat has dried for the amount of time recommended on the paint can, it’s time for the best part. Slowly and carefully peel off the painter’s tape to reveal your crisp, clean chalkboard.
- Season the Chalkboard: Before you write on it for the first time, you need to “season” it. Take a piece of regular chalk, turn it on its side, and rub it all over the entire chalkboard surface. Then, wipe it all off with a dry cloth. Now it’s ready for your lists and drawings!
25. Install Modern Leather Drawer Pulls

Swap out boring old knobs for soft and stylish leather pulls. This is an incredibly fast and simple update that can make your furniture look much more modern and custom. It’s a small change that makes a big difference.
The warmth and texture of the leather add a touch of softness to hard furniture surfaces. This project requires no special skills and is a great way to get a high-end look on a budget. You can customize the look with different colors of leather and hardware.
DIY Instructions
What you will need:
- A strip of leather or faux leather
- A ruler
- A box cutter or very sharp scissors
- A screw and a post (sometimes called a Chicago screw or binding post) for each handle
- A power drill (if you need to make a new hole)
Step-by-Step Guide:
- Measure and Cut: Decide how long you want your leather strips to be. A good length is usually around 5 or 6 inches. Use your ruler and a pencil to mark the length on your leather strip. Use the box cutter or sharp scissors to cut it.
- Make Your First Hole: Fold the leather strip in half to create the loop for the handle. You need to make a hole through both layers of the leather at the top. You can use the tip of your box cutter, an awl, or even a drill bit to carefully make the hole.
- Unscrew the Old Handle: Use a screwdriver to remove the old knob or handle from your drawer or cabinet door.
- Attach the New Pull: Take your binding post and unscrew it into two pieces. Push the part that looks like a screw through the back of the drawer where the old screw was.
- Put it Together: On the front of the drawer, place your folded leather loop over the screw post that is sticking out.
- Screw it On: Take the top, flat part of the binding post and screw it on from the front, going through the holes in your leather and into the post on the inside. Tighten it up, and you’re done!
26. Apply Gilded Gold Leaf Table Legs

Add a touch of pure glamour to any table with the magic of gold leaf. This technique, called gilding, covers a surface with ultra-thin sheets of metal for a shimmery, luxurious finish. It makes a simple piece of furniture look like an expensive antique.
Applying gold leaf is a delicate process, but the results are breathtaking. The way the light catches the textured, metallic surface is something paint just can’t replicate. It’s a project that is sure to wow anyone who sees it.
DIY Instructions
What you will need:
- A table
- A package of gold leaf sheets
- A bottle of metal leaf adhesive (also called “size”)
- A soft-bristled paintbrush for the adhesive
- Another very soft, dry brush (like a makeup brush) for the gold leaf
- A clear sealer
Step-by-Step Guide:
- Prep the Legs: Make sure the legs of your table are clean and dry. It’s a good idea to put some newspaper down on the floor to catch any mess.
- Apply the Glue: Use your first paintbrush to apply a very thin, even coat of the metal leaf adhesive to the parts of the legs you want to cover.
- Wait for it to Get Tacky: This is a very important step. You have to wait for the adhesive to dry a little bit. It shouldn’t be wet, but it should feel sticky or “tacky” when you touch it. Check the instructions on the bottle, but this usually takes about 20-30 minutes.
- Add the Gold Leaf: The gold leaf sheets are very delicate. Carefully pick one up (it might be attached to a piece of tissue paper) and press it onto the tacky surface of the table leg.
- Gently Press and Brush: Use your fingers or the soft, dry brush to gently pat the gold leaf sheet down. Don’t worry if it breaks or wrinkles; that’s part of the look. Continue adding sheets, overlapping them slightly, until the whole area is covered.
- Brush Off the Extra and Seal: Use your soft, dry brush to gently brush away all the loose, flaky bits of extra gold leaf. This will smooth the surface. Finally, to protect your beautiful work, apply a thin coat of clear sealer over the gold leaf.
27. Decorate a Bohemian Hand-Drawn Dresser

Unleash your inner artist by drawing custom patterns directly onto your furniture. This project uses paint pens to create intricate, bohemian-inspired designs. It’s a completely unique way to express your personal style.
The high contrast of white on black makes the geometric patterns pop. You don’t need to be a professional artist; simple shapes like triangles, dots, and lines can combine to make a stunning design. It turns a boring dresser into a true piece of functional art.
DIY Instructions
What you will need:
- A dresser (painting it black and white first is a great base)
- A white oil-based paint pen (fine or medium tip)
- A ruler
- A pencil
- An eraser
Step-by-Step Guide:
- Plan Your Design: It’s a good idea to practice your pattern on a piece of paper first. Think about what kind of repeating shapes you want to use.
- Draw Your Guidelines: Use your ruler and a pencil to lightly draw straight lines on the drawer fronts. These lines will help you keep your hand-drawn patterns straight and even. Don’t press too hard with the pencil.
- Start Drawing: Shake your paint pen well to get the ink flowing. Carefully start tracing over your pencil lines and adding your designs. Take your time and work in a small section.
- Build Your Pattern: Continue adding rows of different patterns. You can make rows of triangles, zig-zags, circles, or dots. The key is to repeat the pattern all the way across the drawer.
- Let it Dry and Erase: Let the paint pen ink dry completely. This is important so you don’t smudge it. Once it’s dry, use a good eraser to gently rub away any of the pencil guidelines that are still showing.
- Add a Topcoat (Optional): If the dresser is going to get a lot of use, you might want to spray a thin layer of a clear protective sealer over your drawings to protect them from scratches.
28. Construct a Rustic Pallet Wood Headboard

Bring the warm, rustic charm of reclaimed wood into your bedroom by building a unique headboard. This project uses old pallet wood or other scrap lumber to create a piece with a lot of texture and character.
The beauty of this headboard is in its imperfections. The different colors, nail holes, and grain patterns of the wood tell a story. Arranging the planks at different heights creates a skyline effect that is visually interesting and artistic.
DIY Instructions
What you will need:
- Old pallet wood or other reclaimed wood planks
- A large piece of plywood for the backing
- A saw
- A power drill and screws
- A sander or sandpaper
- Wood glue
Step-by-Step Guide:
- Prepare the Wood: Pallet wood can be rough. You need to carefully inspect it and remove any old nails. Then, sand all the planks to get rid of splinters, but don’t sand them so much that you lose all the old character.
- Cut Your Planks: Decide how you want your “skyline” to look. Cut your wooden planks into various lengths using a saw. It’s good to have a mix of short, medium, and long pieces.
- Plan Your Layout: Lay your plywood backing on the floor. Start arranging your cut planks on top of it vertically (standing up). Play around with the arrangement until you have a look that you love.
- Glue and Screw: Start at one end. Pick up your first plank. Apply a generous amount of wood glue to the back of it and press it down onto the edge of the plywood.
- Secure from the Back: Carefully flip the plywood and the one attached plank over. From the back of the plywood, drive a few screws through the plywood and into the back of the plank to hold it extra securely.
- Keep Going: Flip it back over. Continue gluing and screwing on your planks one by one until the entire piece of plywood is covered. Once it’s all dry, you can mount your new headboard to the wall behind your bed.
29. Assemble an Industrial Copper Pipe Magazine Rack

Build a chic and modern magazine holder using parts you can find at the hardware store. This project combines shiny copper pipes with a simple fabric sling. It’s a stylish way to keep your magazines and books organized.
The mix of industrial metal and soft fabric creates a beautiful contrast. The simple, clean lines make it a great fit for a modern or minimalist living room. It’s a surprisingly simple project that looks very high-end.
DIY Instructions
What you will need:
- Copper pipes, cut to the sizes you need for your design
- Copper pipe fittings (like “T” fittings and “elbow” fittings)
- A strong fabric like canvas or faux leather
- A sewing machine or strong fabric glue
- A pipe cutter (or have the store cut them for you)
Step-by-Step Guide:
- Plan and Cut: First, draw a picture of your magazine rack and decide on the measurements. You will need pieces for the legs, the top rails, and the crossbars. Use a pipe cutter to cut all your copper pipe pieces to the right lengths.
- Make the Fabric Sling: Cut your piece of fabric. The width should be just a little less than the length of your top rails. The length should be long enough to create the deep “U” shape for holding magazines.
- Sew the Loops: Fold over a few inches of fabric on each of the two shorter ends and sew it down to create a loop or channel. This is where the top copper pipes will slide through.
- Assemble the Sides: Start building the two “A” shaped sides of the frame. Push the pipes and fittings together. You don’t need any glue; a tight push-fit is strong enough for this project. Build two identical side pieces.
- Connect the Sides: Slide your two top rail pipes through the loops you sewed in your fabric sling.
- Put it All Together: Now, connect the two side pieces together using the top rails (with the fabric on them) and the bottom crossbar pipes. Make sure everything is pushed together tightly.
30. Stack a Vintage Suitcase Side Table

Turn old, forgotten luggage into a charming and whimsical piece of furniture. This project involves stacking vintage suitcases and adding legs to create a one-of-a-kind side table or nightstand. It’s a wonderful way to add a sense of travel and history to your room.
This is more of an assembly project than a building project. The character comes from the suitcases themselves. It’s a fantastic conversation starter and provides a little bit of hidden storage inside.
DIY Instructions
What you will need:
- One or two vintage-style suitcases
- A set of four furniture legs
- Four top plates (these are mounting brackets for the legs)
- A power drill and screws
- A piece of plywood cut to fit inside the bottom suitcase
Step-by-Step Guide:
- Reinforce the Bottom: A suitcase is not very strong on its own. Open up the suitcase that will be on the bottom and place your piece of plywood inside it. This creates a strong, flat base to attach the legs to.
- Position the Plates: Close the suitcase. Flip it upside down. Place one of the leg mounting plates in each corner of the bottom of the suitcase. Use a pencil to mark where the screw holes are.
- Drill and Attach: Remove the plates. Use your power drill to make small pilot holes on your marks, going through the suitcase material and into the plywood inside. Then, use screws to attach the four mounting plates securely.
- Screw on the Legs: Now for the easy part! The furniture legs should have a screw sticking out of the top. Simply twist each leg into one of the mounting plates until it is tight.
- Stack Them Up: Flip your suitcase with its new legs over. If you are using a second suitcase, you can simply place it on top. For more stability, you could add some strong double-sided tape or a bit of construction adhesive between the two suitcases.
31. Brighten with a Whitewashed Slatted Cabinet

Give a plain pine cabinet a light, coastal makeover with a simple whitewashing technique. This finish brightens the wood and gives it a breezy, relaxed feel, perfect for a modern farmhouse or beach-inspired room.
Unlike thick paint, a whitewash allows the beautiful natural wood grain to show through. This adds texture and a rustic charm to the piece. It’s a subtle finish that makes a big impact, turning a simple storage item into a stylish feature.
DIY Instructions
What you will need:
- A wooden slatted cabinet or crate furniture
- Sandpaper
- White latex or craft paint
- A container for mixing
- Water
- A paintbrush
- A clean, lint-free rag
Step-by-Step Guide:
- Prep the Wood: Start by making sure your cabinet is clean. Then, give the entire piece a light sanding with medium-grit sandpaper. This will help the whitewash soak into the wood. Wipe away all the dust.
- Mix Your Wash: In your container, mix together one part white paint and one part water. Stir it until it’s smooth and has a thin, milky consistency.
- Brush it On: Dip your paintbrush into the whitewash mixture and apply it to the cabinet. Work in small sections, making sure to get the wash into all the slats and grooves.
- Wipe it Back: This is the key step. Before the wash has a chance to dry, take your clean rag and gently wipe off the excess. This leaves the white pigment in the wood grain and creates that soft, “washed” look.
- Control the Look: If you want a more transparent look, wipe off more of the wash. For a more opaque, whiter look, let the wash sit for a minute before wiping it back.
- Let it Dry: Continue this process until the entire cabinet is finished. Let it dry completely. You can add a clear matte topcoat to protect it if you like.
32. Create a Vintage Library Card Catalog Cabinet

Capture the nostalgic charm of an old library or apothecary with a card catalog-inspired makeover. This project transforms a simple set of drawers into a piece full of character and vintage appeal.
A fresh coat of black paint provides a classic backdrop for the antique-style hardware. The label pulls are the most important detail for achieving this look. It’s a sophisticated way to organize small items and add a touch of intellectual style to your office or living room.
DIY Instructions
What you will need:
- A small chest with multiple drawers
- Sandpaper
- Black paint
- A paintbrush or roller
- Card catalog label holder pulls (one for each drawer)
- A screwdriver or power drill
- Paper and a pen for labels
Step-by-Step Guide:
- Prep and Paint: Remove all the drawers and any old hardware. Lightly sand all the surfaces you plan to paint. Wipe away the dust, then apply two coats of black paint to the cabinet frame and all the drawer fronts.
- Position the Hardware: Once the paint is completely dry, you can install the new pulls. On one drawer front, find the exact center. Use a ruler to help you position the label pull right in the middle.
- Mark and Drill: Use a pencil to mark where the screws for the pull need to go. If there aren’t holes there already, use a power drill to make small pilot holes.
- Attach the Pull: Use a screwdriver to attach the new label pull to the drawer front.
- Repeat for All Drawers: Carefully repeat this process for every single drawer. Taking the time to measure and get them all centered is the key to making it look great.
- Add Your Labels: Cut small slips of paper to fit inside the label holders. You can write on them with a fancy pen, use a typewriter, or print them from a computer for a clean look. Slide them into the holders to complete the project.
33. Craft a Modern Concrete Slab Console Table

Combine industrial and natural elements by creating a unique concrete top for a table. This project uses a simple mold to cast concrete slabs, which then sit on a wooden or metal base. The result is a sleek, modern, and very durable piece.
Working with concrete is easier than you might think and offers a high-end designer look. The cool, textured gray of the concrete contrasts beautifully with the warmth of a wood frame. It’s a statement piece that is both rugged and refined.
DIY Instructions
What you will need:
- A table base
- A bag of concrete mix
- A bucket for mixing
- A trowel or shovel
- Water
- A mold (you can build a simple one from wood, called a form)
- Cooking spray or a mold release agent
Step-by-Step Guide:
- Build Your Mold: Create a shallow, rectangular wooden box (a form) that is the size and shape you want your concrete slabs to be. Make sure the corners are sealed so the wet concrete won’t leak out.
- Prepare the Mold: To make sure you can get the concrete out later, spray the inside of your mold with a light coating of cooking spray.
- Mix the Concrete: In your bucket, pour in some of the dry concrete mix. Slowly add water and stir with your trowel, following the directions on the bag. You want the consistency of thick oatmeal.
- Pour and Smooth: Carefully pour the mixed concrete into your mold. Use the trowel to spread it out evenly and smooth the top surface as best you can. Tap the sides of the mold to help release any air bubbles.
- Let it Cure: This is the waiting game. Concrete needs to dry and harden, which is called curing. Cover the mold with a plastic sheet and let it sit for at least two days, or as long as the package directions say.
- De-mold and Place: Once the concrete is fully cured, you can carefully remove the sides of your wooden mold. The concrete slab will be heavy, so get a friend to help you lift it out and place it on top of your table base. Repeat the process to make more slabs if needed.
34. Paint a Hand-Painted Terrazzo Tabletop

Get the trendy and playful look of terrazzo without working with stone chips and resin. This clever project uses paint to mimic the popular speckled pattern. It’s an artistic and budget-friendly way to bring color and personality to a plain tabletop.
This is a fun and forgiving project where you can’t really make a mistake. The random arrangement of abstract shapes is what gives terrazzo its charm. You can choose any color palette you like to match your room perfectly.
DIY Instructions
What you will need:
- A table with a plain, light-colored top
- Several small pots of craft paint in various colors
- A few small, fine-tipped paintbrushes
- A paper plate to use as a palette
Step-by-Step Guide:
- Choose Your Colors: Make sure your tabletop is clean and dry. Squeeze a little bit of each of your chosen paint colors onto your paper plate. A good terrazzo look usually has 4-6 different colors.
- Start with the Biggest Shapes: Pick one color and a brush. Start painting random, blob-like shapes on the tabletop. These should be your largest shapes. Don’t think too hard about it – they should look like little pebbles or torn pieces of paper.
- Spread Them Out: Scatter these first shapes all over the tabletop. Leave plenty of white space between them. Let them dry a little.
- Add a Second Color: Take a new color and start adding more shapes. Make these shapes a little smaller than the first ones. Tuck some of them close to the bigger shapes and put others in the empty spaces.
- Keep Layering: Continue adding more and more shapes with your other colors, making the shapes smaller and smaller with each new color. The smallest shapes will be like little dots and speckles that fill in the last of the gaps.
- Seal Your Design: Let all the paint dry completely. To protect your beautiful new tabletop from spills and scratches, it’s a good idea to apply two coats of a clear, water-based polyurethane sealer over the top.
35. Add Detail with a Fluted Wood Statement Cabinet

Elevate a plain, flat-pack cabinet into a sophisticated designer piece with decorative wood molding. This project adds texture and architectural detail, making basic furniture look custom-built. The vertical lines of the fluted wood create a sense of height and elegance.
This technique is a fantastic way to hide the look of cheap materials. The process is like a puzzle, fitting the pieces of molding together to create a seamless, ribbed surface. It’s a project that looks complicated but is surprisingly straightforward.
DIY Instructions
What you will need:
- A flat-front cabinet or wardrobe
- Several lengths of half-round or fluted wood molding
- A miter saw or a small hand saw with a miter box
- A measuring tape
- Strong construction adhesive
- A caulk gun
Step-by-Step Guide:
- Measure and Cut: Measure the height of the cabinet doors where you want to add the molding. Use your miter saw to cut your first piece of molding to that exact length. A miter saw will help you get a perfectly straight cut.
- Dry Fit: Hold the first piece up against the edge of the door to make sure it’s the right length. It should fit perfectly from top to bottom.
- Apply the Glue: Take your first piece of molding. On the flat back of it, apply a thin, wavy line of construction adhesive using the caulk gun.
- Stick it On: Carefully press the molding onto the face of the cabinet door, lining it up with the edge. Press it firmly for a few seconds to make sure it sticks well.
- Create the Pattern: Cut your next piece of molding to the same length. Apply glue to the back of it and press it onto the door right next to the first piece. Make sure there is no gap between them.
- Cover the Surface: Keep cutting and gluing pieces of molding one by one until you have covered the entire surface of the door. Let the adhesive dry completely according to the package directions. You can leave the wood natural or paint it the same color as the cabinet for a seamless look.
36. Install a Farmhouse Wire Mesh Cabinet Door

Swap out a solid cabinet panel for wire mesh to create a light, airy, farmhouse look. This project is a great way to display pretty dishes while still keeping them tucked away. It adds texture and rustic charm to any kitchen or storage piece.
This is a classic look that feels both vintage and modern. The wire mesh, sometimes called hardware cloth, is an inexpensive material that makes a big impact. It helps to break up a long line of solid cabinet doors, adding visual interest to the room.
DIY Instructions
What you will need:
- A cabinet door with a removable center panel
- A roll of wire mesh or “hardware cloth”
- A pair of wire cutters or tin snips
- A heavy-duty staple gun
- A flathead screwdriver or putty knife
- Pliers
Step-by-Step Guide:
- Remove the Panel: Look at the back of your cabinet door. Most doors with a panel will have small clips or a thin piece of wood holding the panel in place. Use a screwdriver to carefully pry these up and remove the center panel.
- Measure and Cut the Mesh: Unroll your wire mesh on a flat surface. Measure the opening in your cabinet door. Use your wire cutters to cut a piece of mesh that is about one inch larger than the opening on all sides. Be careful, as the cut edges can be sharp.
- Place the Mesh: Put the cabinet door face down on a soft surface. Place your cut piece of wire mesh into the recess where the old panel was.
- Staple One Side: Start on one side. Use your staple gun to put one staple in the middle, securing the mesh to the wooden door frame. Pull the mesh tight to the opposite side.
- Pull and Staple: Pull the mesh tight and put a staple in the middle of the opposite side. Then do the same for the other two sides. This makes sure the mesh is stretched evenly.
- Finish Stapling: Continue working your way around the frame, pulling the mesh tight and adding staples every few inches until it is very secure. If any sharp edges are sticking out, use pliers to bend them down flat.
Giving your old furniture a new look does more than just save you money. It allows you to create a home that truly reflects your personality. Each piece you transform adds a layer to your story, turning a simple house into a home with character and soul.
Don’t be afraid to start small. A simple hardware change or a quick paint job can build your confidence for bigger projects. The most important step is the first one. Choose an idea that inspires you, gather your supplies, and begin your creative journey.
Key Takeaways
- A Fresh Coat of Paint is Powerful: A new color is the fastest and most effective way to completely change the look of any furniture piece.
- Hardware is Like Jewelry: Swapping out old knobs, pulls, and legs for new ones provides an instant and often inexpensive upgrade.
- Texture Adds Depth: Materials like cane webbing, fabric, or wood molding introduce a tactile element that makes furniture look more interesting and custom-made.
- Think Beyond the Brush: Techniques like decoupage, stenciling, and gold leaf allow you to add intricate patterns and luxurious finishes without being an artist.
- Repurpose with a Purpose: An old ladder can become a plant stand and a vintage suitcase can become a table. Look at an object’s shape, not just its original function.