Winter invites us to gather indoors, sharing warmth, stories, and meals around the table. This season is a wonderful opportunity to make those shared moments feel special. A beautifully set table does more than just hold the food; it creates an atmosphere and shows your guests how much you care.

You do not need to be a professional designer to create a memorable winter tablescape. Often, the most beautiful ideas are the simplest. They can be inspired by nature, a favorite color, or a cherished memory. Little details, like a unique napkin ring or a thoughtfully placed candle, can transform your dining area.
This guide offers 42 distinct ideas for your winter table. You will find everything from rustic woodland themes to glamorous holiday parties. Each one includes a simple, step-by-step guide to create your own napkin decorations. Use these concepts as a starting point to craft a table that is uniquely yours.
1. Nordic Winter Mood

This table setting captures the quiet stillness of a winter forest. The color scheme uses deep charcoal and black, creating a cozy and sophisticated feel. This moody backdrop makes the simple, natural elements stand out. Matte black plates rest on dark slate placemats, adding interesting textures that feel both modern and down-to-earth.
The centerpiece is a collection of grey and white candles on a rustic wood plank. Their gentle light provides warmth and a welcoming glow. Simple touches from nature, like fresh pine sprigs and scattered pinecones, complete the look. It is a beautiful example of how minimalism can create a strong impression for your winter gathering.
DIY Rosemary Twine Napkin Rings
This simple napkin decoration adds a touch of green and a lovely scent to your table.
What You’ll Need:
- Fabric napkins (a light color like beige or grey works well)
- A roll of natural twine or string
- Fresh rosemary sprigs (one for each napkin)
- Scissors
Step-by-Step Instructions:
- Fold Your Napkin: Lay one napkin out flat on the table, like a square piece of paper. Fold it in half to make a rectangle. Then, fold it in half again the same way to make a smaller, thicker rectangle.
- Place the Rosemary: Take one sprig of fresh rosemary and lay it right in the middle of your folded napkin.
- Cut the Twine: Cut a piece of twine that is long enough to wrap around the napkin and be tied easily. About 12 inches should be plenty.
- Wrap it Up: Carefully pick up the napkin and rosemary. Wrap the twine around the middle of the napkin two or three times, so it holds the rosemary in place.
- Tie a Knot: Tie a simple knot or a small bow on top to secure the twine. You can ask a grown-up for help if the knot is tricky!
- Snip the Ends: Use your scissors to carefully snip off any extra twine hanging from the ends of your knot. Now it looks neat and tidy!
- Repeat! Do the same for all your other napkins.
2. Starry Winter Night

This tablescape brings the magic of a clear winter sky to your dining room. A deep navy blue velvet tablecloth serves as the night sky. Gold cutlery and tiny star confetti add a gentle shimmer, like distant stars. The plates, featuring constellation patterns, continue the celestial theme.
The centerpiece is a collection of floating candles in glass globes. They seem to hover in the air, creating a dreamy and enchanting atmosphere. This setting is all about capturing a sense of wonder and elegance for an unforgettable evening.
DIY Crescent Moon Napkin Ring
Add a little piece of the night sky to each place setting with this simple craft.
What You’ll Need:
- Gold craft wire (a medium thickness that holds its shape)
- A plain, thin gold napkin ring
- Wire cutters
- Pliers (small ones are best)
Step-by-Step Instructions:
- Cut the Wire: Ask a grown-up to help you cut a piece of the gold craft wire, about 4-5 inches long.
- Shape the Moon: Use your fingers to carefully bend the wire into a crescent moon shape, like a smiling banana. You can make it as skinny or as wide as you like.
- Make the Loops: Using the pliers, carefully bend a tiny loop at each tip of your crescent moon. These little loops will be how you attach the moon to the ring.
- Attach to the Ring: Cut another very small piece of wire, about 1 inch long. Thread it through one of the loops on your moon and wrap it tightly around the napkin ring.
- Secure the Other Side: Repeat the last step with the other loop on your moon, attaching it to the other side of the napkin ring. Make sure it’s secure and doesn’t wiggle too much.
- Adjust Your Moon: Gently bend the moon so it sits nicely on top of the ring. Now it’s ready to hold a napkin!
3. Classic Holiday Charm

This table setting is a timeless celebration of the holiday season. A crisp white tablecloth creates a bright and clean canvas for classic Christmas colors. A lush garland of fresh pine and vibrant red berries runs down the center of the table, bringing the beauty of winter greenery indoors.
Tall, elegant taper candles in brass holders cast a warm and inviting light. The place settings feature gold chargers that shine beautifully, paired with classic white plates. Crystal glasses add a touch of sparkle, completing a look that is both traditional and wonderfully festive.
DIY Holly Berry Napkin Ring
This little decoration looks just like a tiny holly branch for your napkin.
What You’ll Need:
- Plain napkin rings (wood or metal)
- Hot glue gun (ask a grown-up for help!)
- Small fake holly leaves (from a craft store)
- Tiny fake red berries (these often come on a wire)
Step-by-Step Instructions:
- Warm Up the Glue Gun: First, have a grown-up plug in the hot glue gun and let it get warm. Remember, the tip is very hot!
- Arrange Your Leaves: Take two or three of the little holly leaves and arrange them in a small bunch. You can make them overlap a little bit.
- Glue the Leaves: Ask your grown-up helper to put a small dot of hot glue on the napkin ring. Quickly and carefully, press your bunch of leaves onto the glue. Hold it for a few seconds until it sticks.
- Add the Berries: Take a couple of the tiny red berries. Have the grown-up put another small dot of glue on top of the leaves you just attached.
- Stick the Berries On: Press the red berries into the glue. Now it looks just like a real piece of holly.
- Let it Dry: Set the napkin ring aside for a few minutes to make sure the glue is completely cool and hard. Then, it’s ready for your table!
4. Frosty Winter Wonderland

This tablescape creates the feeling of a bright, snowy day. The color palette is a beautiful mix of crisp white and shimmering silver. A glittery silver runner adds sparkle down the center of the table, mimicking glistening snow.
The centerpiece is a stunning arrangement of white painted branches in a vase. They are decorated with tiny silver ornaments and delicate fairy lights, adding to the magical feel. Each place setting features a silver placemat that looks like it’s made of spun ice, with a silvery satin napkin held by a beautiful snowflake ring.
DIY Beaded Snowflake Napkin Ring
Make your own sparkly snowflake to decorate your napkins.
What You’ll Need:
- A plain silver napkin ring
- Silver craft wire
- Small silver or clear beads
- Wire cutters
- Hot glue gun (with a grown-up’s help)
Step-by-Step Instructions:
- Create the Snowflake Base: Ask a grown-up to cut three pieces of wire, each about 3 inches long. Lay them on top of each other to make a star shape with six points. Twist a tiny piece of wire around the very center to hold them all together.
- Add the Beads: Thread the small beads onto each of the six “arms” of your snowflake. You can fill them all the way up, or leave a little space at the end.
- Secure the Beads: To stop the beads from falling off, use pliers to bend a tiny loop at the very tip of each wire arm.
- Add More Detail: For an extra snowy look, you can twist smaller pieces of wire onto the arms to make them look more like a real snowflake.
- Glue it to the Ring: Have your grown-up helper put a dot of hot glue on the silver napkin ring.
- Attach Your Snowflake: Carefully press the center of your finished snowflake onto the hot glue. Hold it in place for about 10 seconds until the glue sets. Let it cool completely before using.
5. Spiced Harvest Gathering

This table is full of the warm colors and scents of the winter harvest. The rich magenta napkins and table runner create a feeling of warmth and welcome. The centerpiece is a rustic wooden bowl overflowing with nature’s bounty, including bright red pomegranates, whole walnuts, and fragrant cinnamon sticks.
Oranges studded with cloves add a wonderful spicy aroma to the air. The glassware has a warm amber tint, and the cutlery has a beautiful copper finish that complements the fruity colors. Each napkin is simply tied with twine, holding a cinnamon stick and a dried orange slice.
DIY Dried Orange and Cinnamon Napkin Tie
This napkin decoration smells as good as it looks!
What You’ll Need:
- One or two fresh oranges
- A roll of natural twine
- Cinnamon sticks (one for each napkin)
- Scissors
- Baking sheet and an oven (get a grown-up’s help)
Step-by-Step Instructions:
- Slice the Oranges: Ask a grown-up to help you carefully slice the oranges into thin, round slices, like little wheels.
- Bake the Slices: The grown-up should preheat the oven to a low temperature (around 200°F or 95°C). Place the orange slices on a baking sheet. Let them bake for 2-3 hours, flipping them over halfway through, until they are dry.
- Let Them Cool: Once the orange slices are out of the oven, let them cool down completely. They will feel hard and look a bit like stained glass.
- Cut Your Twine: Cut a piece of twine for each napkin, about 15 inches long.
- Fold Your Napkin: Roll or fold your fabric napkin neatly.
- Assemble the Tie: Lay a cinnamon stick and one of your dried orange slices on top of the napkin.
- Tie it all Together: Wrap the twine around the napkin, the cinnamon stick, and the orange slice. Tie a simple bow or knot on top to hold everything in place.
6. Roaring Twenties Glamour

Step back in time with this glamorous and celebratory table setting. The look is defined by a bold black, white, and gold color scheme. A sparkling gold sequin table runner lays the foundation for this luxurious display. The centerpieces are tall vases filled with dramatic white ostrich feathers and gold-painted leaves.
The plates have a striking black and gold geometric pattern, which is very stylish. Black taper candles in modern gold holders add height and a warm glow. Even the napkins get a touch of drama, with a single white feather tucked into a gold ring.
DIY Feather Napkin Accent
This simple touch adds a lot of style to your place setting.
What You’ll Need:
- Plain gold napkin rings
- Small, elegant white craft feathers (about 4-5 inches long)
- Hot glue gun (and a grown-up to help)
Step-by-Step Instructions:
- Heat Up the Glue: Have a grown-up plug in the hot glue gun so it can warm up.
- Pick Your Feather: Choose a nice, fluffy feather for your first napkin ring.
- Apply the Glue: Ask the grown-up to put a very small line of hot glue on the inside of the gold napkin ring.
- Place the Feather: Gently press the bottom tip of the feather (the hard part) into the line of glue.
- Hold it Steady: Hold the feather in place for about 10-15 seconds until the glue starts to harden.
- Let it Cool: Set the napkin ring aside and let the glue cool down all the way. The feather should now be stuck securely inside the ring, ready to be used.
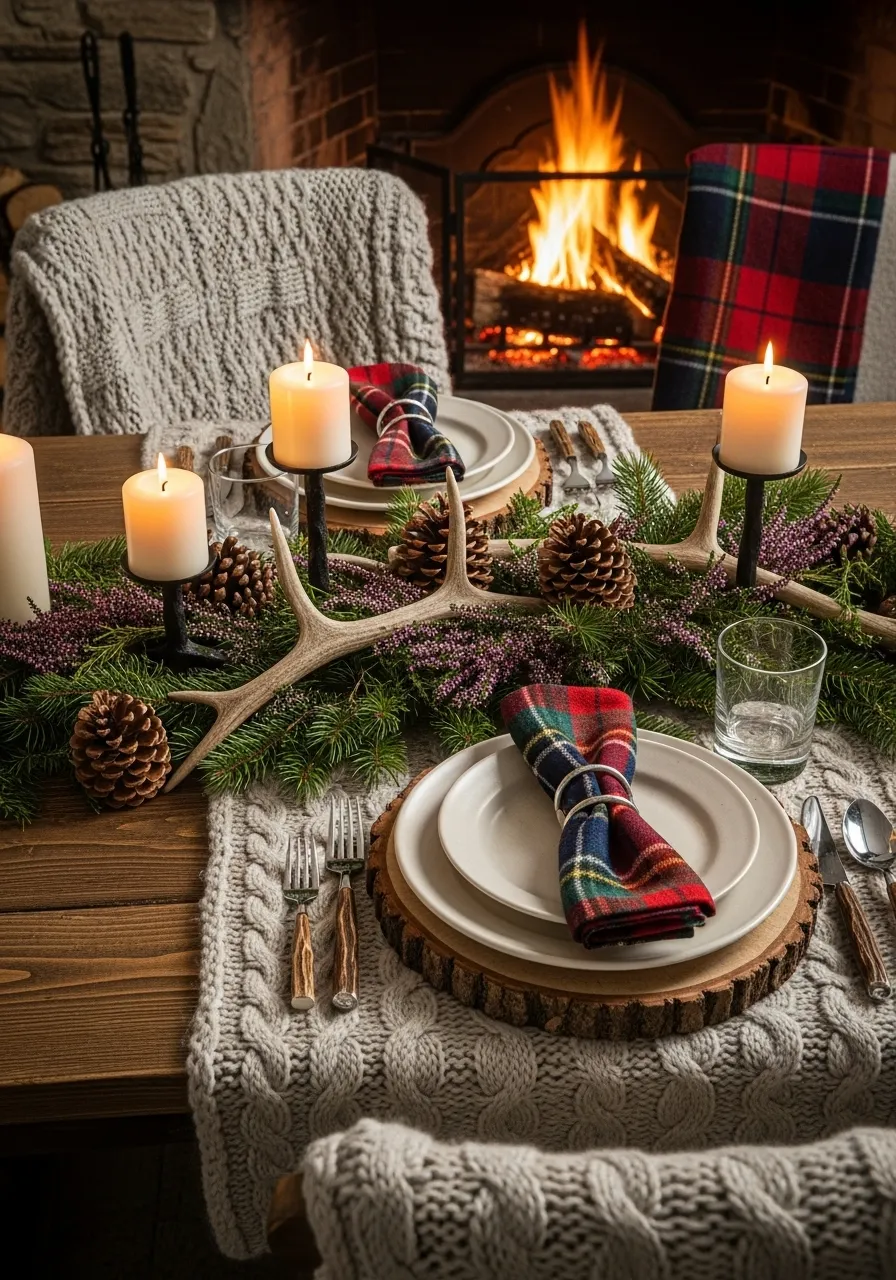
7. Rustic Cabin Charm

This table setting feels like a warm and cozy dinner in a mountain cabin. The foundation of the look is natural wood and cozy textures. A large wood slice is used as a charger, bringing an authentic outdoor element to each plate. Red and black buffalo plaid napkins add a classic, rustic touch of color.
The centerpiece features black lanterns with flickering pillar candles inside, creating a safe and warm glow. Pinecones are scattered around the lanterns, adding to the woodland feel. Antler-shaped napkin rings complete this charming and inviting tablescape.
DIY Faux Antler Napkin Ring
This craft is an easy way to get that rustic cabin look.
What You’ll Need:
- Plain wooden or twine-wrapped napkin rings
- Small faux antler charms (you can find these at a craft store, sometimes in the jewelry section)
- Hot glue gun (with a grown-up to help you)
Step-by-Step Instructions:
- Get Ready to Glue: Ask a grown-up to plug in the hot glue gun and let it get hot. Make sure you are working on a protected surface, like an old newspaper.
- Position the Antler: Decide where you want the little antler to go on your napkin ring. It usually looks best right on top.
- Glue it On: Have the grown-up put a dot of hot glue on the back of the antler charm.
- Press it in Place: Quickly and carefully, press the antler charm onto the napkin ring where you wanted it to go.
- Hold and Wait: Hold it firmly for about 15 seconds to make sure it sticks well as the glue begins to cool.
- Cool Down: Let the napkin ring sit for a few minutes until the glue is completely hard. Now your rustic napkin ring is ready!
8. Whimsical Pastel Wonderland

This table setting is straight out of a fairytale. It uses a dreamy palette of soft pastels like pink, mint green, and lavender. The whole scene is light, fun, and full of sweet details. A silver glitter table runner adds a touch of magical sparkle.
The table is decorated with a forest of colorful bottlebrush trees in different sizes. Tiny ballerina figurines and delicate cupcakes under glass cloches add to the whimsical theme. The napkins are a soft lavender, tied with a pink ribbon and a tiny jingle bell that makes a gentle sound.
DIY Jingle Bell Ribbon Napkin Bow
This sweet and simple napkin tie adds a little color and sound to your table.
What You’ll Need:
- Soft fabric napkins
- A spool of thin ribbon in a pastel color (like pink or lavender)
- Small jingle bells (one for each napkin)
- Scissors
Step-by-Step Instructions:
- Fold the Napkin: Fan-fold your napkin by folding it back and forth like you’re making a paper fan. Pinch it in the middle.
- Cut the Ribbon: Cut a piece of ribbon that is long enough to wrap around the napkin and tie a bow. About 18 inches should be good.
- Thread the Bell: Take one of your little jingle bells and thread the ribbon through the loop on top. Slide the bell to the middle of the ribbon.
- Wrap the Napkin: Lay the ribbon down and place the pinched middle of your napkin on top of the jingle bell.
- Tie it Up: Bring the two ends of the ribbon up and around the napkin.
- Make a Bow: Tie a simple, pretty bow right on top. The jingle bell should be sitting in the middle of the knot.
- Fluff it Out: Gently pull on the folded parts of the napkin on each side of the bow to make it look like a fan or a butterfly.
9. Moody Crystal Gathering

This tablescape is modern, dramatic, and a little mysterious. The entire setting is built on a deep black color scheme, from the tablecloth to the napkins and plates. This creates a bold canvas for the interesting textures and shapes to stand out.
Chunky black candles of different heights are grouped together on a simple silver tray. The “centerpiece” is a scattering of beautiful minerals. Glistening pyrite, also known as “fool’s gold,” and clear quartz crystals are placed along the table, catching the candlelight and adding a touch of natural sparkle.
DIY Faux Pyrite Napkin Ring
Create a napkin ring that looks like it’s covered in cool, sparkly minerals.
What You’ll Need:
- Plain, wide napkin rings (black or silver would work well)
- Small gold or silver rocks (from a craft store) or gold glitter
- Strong craft glue (like E6000, which a grown-up should handle)
Step-by-Step Instructions:
- Prepare Your Workspace: Put down some newspaper to protect your table. Make sure you are in a room with good airflow if you are using strong glue.
- Apply the Glue: Ask a grown-up to help you apply the craft glue all over the outside of the napkin ring.
- Add the Rocks: If you are using small rocks, start pressing them into the glue one by one. Cover the whole surface, fitting them together like a puzzle.
- Glitter Method: If you are using glitter, hold the gluey napkin ring over a paper plate and sprinkle the glitter all over it. Turn it as you sprinkle to cover all sides.
- Let it Dry: Set the napkin ring aside in a safe place to dry completely. This might take a few hours, so be patient!
- Tap Off the Extra: Once it’s totally dry, gently tap the napkin ring to knock off any loose rocks or glitter. Your cool crystal napkin ring is now finished.
10. Enchanted Woodland Feast

This tablescape looks like a magical meal on the forest floor. The design is completely inspired by a runner of real green moss creates a lush, living centerpiece that is beautifully unique. Pieces of weathered driftwood, pinecones, and tiny mushrooms are nestled into the moss.
Woven placemats add another layer of natural texture. The napkins are a deep forest green, matching the moss. Each one is held by a simple napkin ring made from a real slice of wood. The whole setting feels earthy, organic, and very peaceful.
DIY Wood Slice Napkin Ring
Bring a little piece of the forest to your napkin with this simple project.
What You’ll Need:
- Small wood slices with the bark still on (about 2 inches across, from a craft store)
- A drill with a small drill bit (a grown-up job!)
- A piece of twine or thin ribbon
Step-by-Step Instructions:
- Mark the Holes: Take one wood slice. Imagine a line going across the middle. Make two little pencil marks on that line, about half an inch apart.
- Drill the Holes: This is a step for a grown-up. They will need to use the drill to make a hole on each of the marks you made. The holes should go all the way through the wood slice.
- Thread the Twine: Cut a piece of twine about 10 inches long. Push one end of the twine down through one hole and up through the other, like you are sewing a big button. You should have a loop of twine on the front of the wood slice and two loose ends on the back.
- Roll Your Napkin: Roll a fabric napkin into a neat tube.
- Secure the Napkin: Place the rolled napkin on top of the two loose ends of twine at the back of the wood slice.
- Tie a Knot: Tie the two ends of the twine together in a tight knot or a small bow to hold the napkin in place. The wood slice should sit right on top.
11. Jewel-Toned Winter Feast

This vibrant table is a celebration of rich, bold colors. A deep red tablecloth creates a luxurious base for layers of jewel tones like royal blue, emerald green, and deep purple. Gold is the metal of choice here, shining in the ornate lanterns, detailed cutlery, and delicate vases.
Small bouquets of colorful anemone flowers add life and softness to the setting. Golden pomegranates are scattered for an extra touch of opulence. This look is warm, inviting, and full of energy, proving that winter tables don’t have to be muted.
DIY Jeweled Napkin Ring
Add a pop of rich color to your napkin with this easy-to-make ring.
What You’ll Need:
- Plain gold napkin rings
- Large, flat-backed craft jewels in different colors (like blue, red, or green)
- A strong glue gun (with a grown-up’s help)
Step-by-Step Instructions:
- Choose Your Jewel: Pick out a shiny craft jewel for your first napkin ring. Make sure the back is flat so it’s easy to glue.
- Heat the Glue Gun: Ask a grown-up to plug in the glue gun and let it get hot.
- Apply the Glue: Have the grown-up put a generous dot of hot glue on the back of the jewel.
- Stick it On: Quickly and carefully, press the jewel onto the top of the gold napkin ring.
- Hold and Cool: Hold the jewel in place for about 15 seconds. Then, set it aside to cool down completely before you use it.
12. Bohemian Winter Calm

This tablescape has a soft, relaxed, and natural feel. The color palette is gentle, with shades of cream, beige, and the natural color of dried grasses. A woven macrame runner adds beautiful texture down the center of the table.
The decorations are simple and organic. Fluffy pampas grass and eucalyptus sprigs stand in simple ceramic vases. The napkins are made of a soft, crinkly fabric and are tied in a simple knot, which looks casual and chic. This style is all about creating a peaceful and welcoming space.
DIY Simple Knotted Napkin
For this look, the napkin itself becomes the decoration.
What You’ll Need:
- Soft, thin fabric napkins (gauze or cheesecloth works well)
Step-by-Step Instructions:
- Lay it Flat: Spread your napkin out on the table in a square.
- Make a Rope: Starting from one corner, scrunch the napkin together with your hands until it forms a long, soft rope.
- Find the Middle: Pick up the napkin rope and find the center.
- Tie a Knot: Hold the rope in both hands and tie a single, loose knot right in the middle.
- Adjust it: Gently pull on the ends to make the knot look nice and neat. You don’t want it to be too tight.
- Place it: Lay your knotted napkin on the plate. That’s it!
13. Zesty Winter Citrus

Brighten up a cold day with this fresh and cheerful table setting. A lush garland made of green olive branches and eucalyptus leaves creates a beautiful centerpiece. Tucked among the leaves are bright yellow lemons, orange kumquats, and whole oranges, adding pops of sunny color.
The color scheme is complemented by deep blue napkins and blue-tinted glassware. Woven placemats add a rustic, natural texture. This tablescape is a wonderful reminder of the bright things in life, even in the middle of winter.
DIY Greenery Sprig Napkin Tuck
This simple trick adds a touch of fresh green to each plate.
What You’ll Need:
- Plain napkin rings (silver or white look great)
- Fresh greenery sprigs (like olive branches, eucalyptus, or rosemary)
- Scissors
Step-by-Step Instructions:
- Cut Your Sprigs: Cut small sprigs of your greenery, about 4-5 inches long. One sprig for each napkin.
- Fold Your Napkin: Fold or roll your napkin neatly.
- Slide it Through: Push the folded napkin through the napkin ring.
- Add the Greenery: Take one of your greenery sprigs and gently tuck the stem inside the napkin ring, right alongside the fabric.
- Adjust it: Make sure the leafy part of the sprig is showing nicely on top of the napkin.
14. Serene Tulip Welcome

This table setting is the definition of simple elegance. It uses a soft and calming color palette of light grey and pure white. The centerpiece is a collection of fresh white tulips arranged in modern, frosted glass vases. This creates a look that is clean and uncluttered.
The gentle light from candles in mercury glass holders adds a warm, silvery shimmer. The plates are layered in shades of grey and white, resting on soft, felt-like placemats. The entire setting feels peaceful, sophisticated, and very welcoming.
DIY Faux Agate Napkin Ring
Create an elegant napkin ring that looks like it has a beautiful stone on it.
What You’ll Need:
- Plain silver napkin rings
- A flat-backed faux stone or pearl bead (from a craft store)
- Strong craft glue or a hot glue gun (with adult supervision)
Step-by-Step Instructions:
- Prepare Your Ring: Make sure your napkin ring is clean and dry.
- Get Your Stone: Choose the faux stone or pearl you want to use. Make sure it has a flat side for gluing.
- Apply the Glue: Ask a grown-up to help you put a small dot of strong glue on the flat back of the stone.
- Press it On: Carefully press the stone onto the top of the silver napkin ring.
- Let it Set: Hold it in place for about 20 seconds. Then, let the napkin ring sit for at least an hour to make sure the glue is completely dry and strong.
15. Hygge Candlelight Glow

This rustic tablescape is all about creating a feeling of “hygge,” which means cozy contentment. A bare wooden table serves as the natural backdrop. The only centerpiece is a large cluster of white pillar candles in simple glass jars of all different sizes.
The candlelight creates a warm and intimate atmosphere that is very inviting. The place settings are simple, with stoneware plates and soft linen napkins. This look shows that you don’t need a lot of decoration to create a beautiful and memorable setting.
DIY Knotted Linen Napkin
This casual knot is a simple and beautiful way to present your napkin.
What You’ll Need:
- Soft linen or cotton napkins
Step-by-Step Instructions:
- Fold it Long: Lay your napkin flat. Fold it in half to make a rectangle. Fold it in half again the long way to make a long, skinny rectangle.
- Find the Center: Pick up the long strip of napkin and find the middle point.
- Tie the Knot: Loosely tie a simple knot in the center of the napkin strip.
- Fluff it Out: Gently pull on the two ends to make the knot look relaxed and not too tight.
- Place on the Plate: Lay the knotted napkin in the center of your plate. It’s simple and beautiful.
16. Modern Ice Palace

This tablescape is cool, modern, and truly unique. It creates the feeling of dining inside a glowing ice sculpture. The centerpiece is made of clear blocks and spheres that look like ice, with lights glowing from within them.
Everything on the table is white, clear, or silver to continue the icy theme. The plates are square and made of clear glass. The napkin rings are simple, square, and metallic. This minimalist and futuristic design is incredibly striking and memorable.
DIY Clay Square Napkin Ring
Make your own modern, square-shaped napkin ring.
What You’ll Need:
- White air-dry clay
- A rolling pin or round bottle
- A knife or clay cutter
- A small square box (to use as a mold)
- Silver craft paint and a paintbrush
Step-by-Step Instructions:
- Roll the Clay: Take a piece of clay and roll it out into a flat slab, about a quarter-inch thick.
- Cut a Strip: Use the knife to cut a long, straight rectangular strip from the clay.
- Wrap the Box: Carefully wrap your clay strip around the small square box. This will help you make a nice square shape.
- Seal the Seam: Where the two ends of the clay meet, gently press them together and smooth the line with your finger so it looks like one piece.
- Let it Dry: Carefully slide the clay square off the box and let it sit for a day or two until it is completely hard.
- Paint it: Once it’s dry, use your paintbrush to paint the whole napkin ring with the silver paint. Let the paint dry, and it’s ready!
17. Grand Manor Christmas

This table setting is full of traditional elegance and grandeur. It feels like a festive dinner in a historic home, with a warm fire glowing in the background. Ornate silver candelabras hold tall taper candles, casting a formal light on the table.
The centerpiece is a magnificent silver bowl filled with red roses, holly, and winter greens. The napkins are a deep, rich tartan plaid, held by intricate silver rings. Every detail, from the crystal glasses to the silver plates, contributes to a sense of timeless holiday splendor.
DIY Vintage-Look Napkin Ring
Give a plain napkin ring an old-fashioned, fancy look.
What You’ll Need:
- Plain silver napkin rings
- An old, shiny button with a fancy design, or a small silver brooch
- A hot glue gun or strong craft glue (and a grown-up’s help)
Step-by-Step Instructions:
- Find Your Treasure: Look for an old, ornate button. If it has a loop on the back for sewing, ask a grown-up to help you carefully snip it off with pliers so the back is flat.
- Get the Glue Ready: If you’re using a hot glue gun, have a grown-up plug it in.
- Apply the Glue: Put a dot of glue on the back of your button or brooch.
- Attach to the Ring: Press the button firmly onto the top of the silver napkin ring.
- Let it Set: Hold it for about 20 seconds, then set it down to cool and dry completely. It will look like a fancy, antique napkin ring.
18. Geometric Copper & Slate

This table has a bold, modern, and stylish look. A dark grey tablecloth creates a moody backdrop for the shining metallic accents. The main decoration is a collection of geometric shapes made of copper-colored wire and metal.
The place settings continue this theme with shiny copper chargers and matching copper cutlery. The dark grey napkins provide a nice contrast, while the warm glow from the candles reflects beautifully off all the metallic surfaces. It’s a sophisticated and artistic way to set a winter table.
DIY Copper Bead Napkin Ring
This simple craft gives you a modern, metallic napkin ring.
What You’ll Need:
- A plain, thin copper napkin ring
- A large wooden bead with a hole through it
- Copper metallic craft paint
- A paintbrush
- Hot glue gun (with an adult’s help)
Step-by-Step Instructions:
- Paint the Bead: Paint the entire wooden bead with the copper paint. You might need to do two coats to make it look nice and shiny. Let it dry completely.
- Heat the Glue: Ask a grown-up to warm up the hot glue gun.
- Apply Glue: Put a dot of hot glue on the plain copper napkin ring.
- Attach the Bead: Press the painted wooden bead onto the dot of glue. Make sure the holes of the bead are facing the sides, not the top and bottom.
- Cool Down: Hold it for a few seconds and then let it cool all the way. Now you have a cool, geometric-looking napkin ring.
19. Moody Enchanted Forest

This tablescape creates a feeling of a mysterious and beautiful forest at twilight. The colors are muted and earthy, with sage green plates on a dark wood table. The centerpiece is a stunning wreath of tangled vines, dried hydrangeas, moss, and dark, dramatic flowers.
Small lanterns cast a soft, gentle light, adding to the magical atmosphere. The napkin is a natural linen color, tied with a soft green velvet ribbon. A single, silvery fern leaf is tucked in, completing the enchanted woodland look.
DIY Velvet & Fern Napkin Tie
This napkin tie is simple, elegant, and looks like something from a fairytale.
What You’ll Need:
- A spool of thin velvet ribbon (in a color like green or grey)
- Small faux fern leaves (you can find these at a craft store)
- Silver spray paint (optional, for the leaves)
- Scissors
Step-by-Step Instructions:
- Prepare the Leaf: If your fern leaf isn’t already silver, take it outside and spray paint it. Ask a grown-up for help and let it dry completely.
- Roll the Napkin: Neatly roll up your fabric napkin.
- Cut the Ribbon: Cut a piece of your velvet ribbon, about 15 inches long.
- Assemble: Lay the ribbon flat. Place the silver fern leaf in the middle of the ribbon. Then, place your rolled napkin on top of the leaf’s stem.
- Tie a Knot: Bring both ends of the ribbon up and around the napkin and tie a simple, neat knot or a small bow on top.
20. New Year’s Eve Sparkle

This table is set for a celebration! The black, white, and gold color scheme is classic for New Year’s Eve. A black table runner is sprinkled with gold and black confetti, adding a fun and festive touch. Tall glass vases with floating candles create a beautiful, elegant glow.
The place settings are sharp, with square black chargers and gold-rimmed plates. Glasses of bubbly champagne are ready for a toast. The white napkin is folded neatly and held by a gold ring, decorated with a tiny, smart-looking black bow tie.
DIY Bow Tie Napkin Ring
This cute napkin ring is a fun way to “dress up” your table for a party.
What You’ll Need:
- Plain gold napkin rings
- A small piece of black felt or thick black ribbon
- Scissors
- A hot glue gun (and a grown-up to handle it)
Step-by-Step Instructions:
- Cut the Bow: Cut a rectangle out of the black felt, about 2 inches long and 1 inch wide.
- Make the Bow Shape: Pinch the rectangle right in the middle to make it look like a bow tie.
- Add the Centerpiece: Cut a very tiny, skinny strip of felt. Ask a grown-up to put a dot of hot glue on the pinched middle of your bow, and wrap the tiny strip around it. Add another dot of glue at the back to hold it.
- Glue it to the Ring: Have the grown-up put one more dot of hot glue on the back of your finished bow tie.
- Attach and Dry: Press the bow tie firmly onto the gold napkin ring. Let it cool completely, and it’s ready to party!
21. Country Christmas Charm

This table setting is full of homespun, rustic warmth. A red and white plaid tablecloth sets a cheerful and traditional base. Burlap placemats add a layer of natural texture, paired with simple enamelware plates that have a charming, old-fashioned feel.
The centerpiece is a galvanized metal tray filled with fresh pine sprigs, red berries, and large pinecones. A single red candle and a string of fairy lights add a cozy glow. Mason jars serve as casual drinking glasses, completing this comfortable and inviting farmhouse look.
DIY Pinecone Name Tag Tie
This simple napkin tie also doubles as a place card for your guests.
What You’ll Need:
- Red and white baker’s twine
- Small pinecones
- Small cardboard tags
- A pen or marker
- Scissors
- A hot glue gun (and an adult’s help)
Step-by-Step Instructions:
- Write the Names: Use your pen to write each guest’s name on a cardboard tag.
- Cut the Twine: For each napkin, cut a piece of baker’s twine about 15 inches long.
- Attach the Pinecone: Ask an adult to put a small dot of hot glue on the bottom of a pinecone. Press the middle of a piece of twine into the glue and hold it for a few seconds.
- Thread the Tag: Take the name tag and thread one end of the twine through the hole.
- Roll Your Napkin: Roll your fabric napkin into a neat tube.
- Tie it Together: Place the pinecone on top of the napkin. Wrap the twine around and tie a bow at the back or underneath.
22. Winter White Elegance

This tablescape is a vision of pure, snowy white. The setting is incredibly romantic and soft, using different textures to create interest. A chunky white knit runner feels like a cozy sweater for the table. The centerpiece is a lavish display of white flowers, including roses, hydrangeas, and baby’s breath in various white ceramic vases.
The plates have delicate, raised patterns, adding to the textural quality. Silver cutlery and mercury glass votives provide a gentle sparkle. The look is completed with an ornate, pearly napkin ring that adds a final touch of grace.
DIY Faux Pearl Cluster Napkin Ring
This napkin ring looks very fancy but is simple to make.
What You’ll Need:
- A plain silver napkin ring
- A handful of faux pearls in different small sizes
- A hot glue gun (with an adult helper)
Step-by-Step Instructions:
- Heat the Glue Gun: Ask a grown-up to get the hot glue gun ready. Work on a protected surface.
- Start with a Big Pearl: Pick one of your bigger pearls. Have the grown-up put a dot of glue on it and stick it to the top of the napkin ring.
- Build Your Cluster: Now, take the smaller pearls. Add them one by one, gluing them around the first pearl.
- Fill in the Gaps: Keep adding pearls, clustering them close together until you have a small, bumpy pile that you like.
- Let it Dry: Let the napkin ring sit for about 10 minutes to make sure all the glue is completely cool and the pearls are secure.
23. Winter Coastal Serenity

This setting proves that beachy isn’t just for summer. It captures the peaceful, muted feeling of a winter shoreline. A large piece of weathered driftwood creates a stunning natural centerpiece. It’s surrounded by sea glass, oyster shells, and delicate sea urchin skeletons, all in soft, ocean-toned colors.
The plates are a dusty blue, set on woven rattan placemats that feel like seagrass. The napkins are a sandy beige, tied in a simple knot. Tucked into the knot is a single, beautiful oyster shell, completing this calm and unique winter theme.
DIY Oyster Shell Napkin Knot
Bring a piece of the ocean to your table with this easy napkin decoration.
What You’ll Need:
- Cleaned oyster shells (one per napkin)
- Soft linen or cotton napkins
Step-by-Step Instructions:
- Find a Good Shell: Look for an oyster shell that has a nice shape and is not too big. Make sure it is clean and dry.
- Make a Napkin Rope: Lay your napkin out flat. Scrunch it together from corner to corner to make a long, soft rope.
- Tie a Loose Knot: Find the middle of the napkin rope and tie a very loose knot. Don’t pull it tight yet.
- Tuck the Shell: Gently tuck the pointy end of the oyster shell into the middle of the loose knot.
- Tighten Gently: Carefully pull on the ends of the napkin to tighten the knot around the shell. You want it to be snug enough to hold the shell in place.
- Adjust and Place: Fluff the ends of the napkin and place it on your plate.
24. Van Gogh’s Starry Night

This artistic tablescape is inspired by the famous painting. A deep blue velvet tablecloth and a backdrop of the iconic swirling sky set a dramatic scene. The table is scattered with gold star and moon confetti, twinkling like the night sky.
Tall, slender brass candlesticks hold yellow candles, representing the bright stars in the painting. The plates are a rich royal blue, layered on top of gold chargers. This is a creative and memorable theme for an art lover’s winter dinner party.
DIY Gold Star Napkin Topper
This simple gold star adds a touch of artistic flair to your napkins.
What You’ll Need:
- A plain gold napkin ring
- A small, flat wooden or plastic star shape (from a craft store)
- Gold metallic spray paint (with a grown-up’s help)
- A hot glue gun (and a grown-up)
Step-by-Step Instructions:
- Paint the Star: In a well-ventilated area (like outside), ask a grown-up to spray paint the star shape gold. Let it dry completely.
- Warm the Glue Gun: Have your adult helper plug in the hot glue gun.
- Glue the Star: Put a small dot of hot glue on the back of the golden star.
- Attach to the Ring: Press the star firmly onto the top of the gold napkin ring.
- Let it Cool: Hold it for a few seconds, then set it aside to cool down. It’s now ready to shine on your table!
25. Peppermint Candy Lane

This table setting is a sweet and playful celebration of a favorite holiday treat. The crisp white and bright red color scheme is cheerful and fun. The centerpiece is a collection of beautiful glass apothecary jars, each filled with different kinds of peppermint candies and candy canes.
The glasses are made extra festive with red sugar-rimmed edges. The plates are layered on bold red chargers. The entire look is bright, happy, and sure to make your guests smile. It’s a wonderful theme for a family gathering or a holiday brunch.
DIY Candy Cane Heart Napkin Holder
This sweet napkin holder is made from real candy!
What You’ll Need:
- Two candy canes for each napkin
- A spool of thin red ribbon
- A hot glue gun (and a grown-up to help with it)
- Scissors
Step-by-Step Instructions:
- Get the Glue Ready: Ask a grown-up to warm up the hot glue gun. Be careful, it’s hot!
- Form the Heart: Take two candy canes. Turn them so their hooks are facing each other to make a heart shape.
- Glue the Top: Have the grown-up put a small dot of glue where the two straight ends of the candy canes meet at the top. Press them together and hold for 20 seconds.
- Glue the Bottom: Put another dot of glue where the two hooks meet at the bottom. Press those together and hold.
- Tie a Bow: Cut a small piece of red ribbon and tie it into a tiny bow.
- Add the Bow: Put one last dot of glue on the front of the heart (where the hooks meet) and press the bow on top.
- Slide it On: Once it’s cool, you can gently slide your rolled napkin through the heart.
26. Cozy Alpine Fondue

This fun table is themed around a cozy ski lodge and a warm fondue dinner. The color palette is earthy and warm, with olive green and mustard yellow plates set on woven placemats. The centerpiece is the fondue pot itself, ready for dipping bread and vegetables.
Playful details like ski goggles and vintage-style lift tickets are used as decorations. The napkins are held by wooden snowflake rings and are cleverly tucked with mini fondue forks. This interactive setting is all about sharing good food and fun times.
DIY Lift Ticket Name Card
This fun detail helps guests find their seat and adds to the ski theme.
What You’ll Need:
- Yellow or orange cardstock paper
- A printer (optional)
- A pen
- Scissors
- A hole punch
- Twine or string
Step-by-Step Instructions:
- Create the Ticket: Cut the cardstock into small rectangles, about the size of a real ticket. You can use a pen to draw lines and write “Admit One” or “Ski Pass” at the top to make it look official.
- Write the Name: In the middle of the ticket, write your guest’s name.
- Punch a Hole: Use the hole punch to make a hole in the top corner of the ticket.
- Add the String: Cut a piece of twine and loop it through the hole.
- Attach to the Napkin: You can either tie the lift ticket around the napkin ring or simply tuck it next to the plate.
27. Emerald City Glamour

This tablescape is a vision of monochromatic luxury. The theme is built around the deep, rich color of emerald green. A green velvet runner, layered green plates, and stunning emerald green glassware create a powerful and cohesive look.
Gold accents in the cutlery and candlesticks provide a beautiful contrast. The stunning centerpiece is a large, geometric glass terrarium filled with sparkling fairy lights and green mineral stones. The entire setting glows with a magical, gem-like quality.
DIY Faux Emerald Napkin Accent
Add a touch of jewel-toned glamour to a simple napkin ring.
What You’ll Need:
- Plain gold napkin rings
- A large, green, jagged-shaped craft jewel (to look like a raw emerald)
- A hot glue gun or strong craft glue (with a grown-up’s help)
Step-by-Step Instructions:
- Choose Your Gem: Pick out a green craft jewel. One with an uneven shape looks more like a real, raw stone.
- Prepare the Glue: Have a grown-up get the hot glue gun or strong glue ready.
- Glue it On: Put a good amount of glue on the back of the green jewel.
- Stick it to the Ring: Press the jewel firmly onto the top of the gold napkin ring.
- Let it Set: Hold it for about 20 seconds. Then let it dry completely before using it on your napkins.
28. Sweet Gingerbread Village

This table is designed to be fun, interactive, and delicious. The centerpiece is a beautifully decorated gingerbread house, sitting on a plate of powdered sugar “snow.” Around the house, small bowls are filled with colorful candies, inviting guests to decorate their own cookies.
The placemats are made of brown kraft paper, so kids (and adults!) can doodle on them. The napkins are simply tied with red and white baker’s twine, holding a fragrant cinnamon stick. This setup is less about formality and more about making sweet holiday memories.
DIY Cinnamon & Rosemary Napkin Tie
This fragrant napkin tie is simple, natural, and smells like the holidays.
What You’ll Need:
- Red and white baker’s twine
- Cinnamon sticks (one per napkin)
- Fresh rosemary sprigs (one per napkin)
- Scissors
Step-by-Step Instructions:
- Cut the Twine: Cut a piece of twine about 15 inches long for each napkin.
- Roll the Napkin: Roll your white fabric napkin into a tube.
- Make a Bundle: Lay a cinnamon stick and a sprig of rosemary on top of the rolled napkin.
- Wrap it Up: Take your piece of twine and wrap it around the napkin, the cinnamon stick, and the rosemary several times.
- Tie a Knot: Tie a simple knot or a small bow on top to hold the little bundle securely in place.
- Trim the Ends: Snip any extra twine with your scissors.
29. Cranberry Frost

This tablescape is a beautiful blend of modern simplicity and festive color. The look is clean and bright, with a white table and square plates. The centerpiece provides a wonderful pop of red, with tall glass hurricanes filled with water and vibrant fresh cranberries.
Floating candles on top of the cranberry-filled vases add a warm, flickering light. Frosted evergreen sprigs and silver ornaments are tucked between the vases for a touch of winter frost. This is an elegant and striking look that is easy to put together.
DIY Mini Frosted Wreath Napkin Ring
This tiny wreath looks like it’s been touched by a winter frost.
What You’ll Need:
- A small, plain grapevine wreath (about 3-4 inches across)
- White craft paint
- A small paintbrush
- Faux frosted berries (from a craft store)
- A hot glue gun (and a grown-up)
Step-by-Step Instructions:
- Frost the Wreath: Dip your paintbrush in the white paint. Lightly brush the paint all over the grapevine wreath. You don’t need to cover it completely; just let the white paint hit the high spots to make it look like snow. Let it dry.
- Prepare the Berries: Snip a small bunch of the faux frosted berries from their stem.
- Glue the Berries: Ask a grown-up to put a dot of hot glue on the wreath.
- Attach and Dry: Press the little bunch of berries into the glue. Let it cool completely.
- Use as a Ring: Once dry, you can pull your folded napkin through the center of the mini wreath.
30. Mystic Bohemian Gathering

This tablescape is eclectic, earthy, and full of spiritual energy. Richly patterned textiles are used for the table runner and placemats, creating a vibrant base. The centerpiece is a collection of potted succulents and air plants, mixed with beautiful raw crystals like amethyst and selenite.
The glow on the table comes from colorful taper candles and Himalayan salt candle holders. The napkins, in earthy tones of teal and rust, are tied with simple twine. The finishing touch is a piece of raw quartz crystal tied into the knot, adding to the mystical vibe.
DIY Raw Crystal Napkin Tie
This napkin tie adds a touch of natural, beautiful energy to each place setting.
What You’ll Need:
- A roll of natural twine
- Small raw crystal points (like quartz or amethyst, with a natural shape)
- A hot glue gun (and a grown-up’s help)
Step-by-Step Instructions:
- Cut Your Twine: Cut a piece of twine long enough to wrap around your napkin a few times, about 18 inches.
- Find the Middle: Find the center point of your piece of twine.
- Glue the Crystal: Ask a grown-up to put a line of hot glue along one side of the raw crystal.
- Attach the Twine: Press the middle of the twine into the hot glue and wrap it around the crystal a couple of times to make sure it’s secure.
- Let it Cool: Let the glue dry completely.
- Tie it On: Roll your napkin and place the crystal on top. Wrap the ends of the twine around and tie a knot underneath.
31. Contemporary Copper & Pine

This table setting is a great example of modern winter style. A simple, dark wood table provides a clean backdrop for the decor. The centerpiece is a fresh pine garland that runs down the middle, but the candlesticks are the main feature. Their slender, copper-colored bases add a warm metallic shine and a contemporary, minimalist feel.
The place settings are kept simple with dark plates and slate placemats. The grey linen napkins are held by matching copper rings, tying the whole look together. It’s a sophisticated and uncluttered style that is both festive and chic.
DIY Copper Hoop Napkin Ring
This minimalist napkin ring is very modern and easy to make.
What You’ll Need:
- Thick copper craft wire
- A small round object (like a vitamin bottle or a thick marker)
- Wire cutters
- Pliers
Step-by-Step Instructions:
- Cut the Wire: Ask a grown-up to help you cut a piece of copper wire, about 6-7 inches long.
- Shape the Ring: Wrap the wire tightly around your round object (like the vitamin bottle) two or three times to create a coil.
- Create the Hoop: On the last wrap, use the pliers to bend the end of the wire upwards, creating a small open semi-circle shape on top.
- Finish the Other Side: Bend the other end of the wire to mirror the first semi-circle, creating a small, open hoop on top of the main ring.
- Trim if Needed: If the ends are too long, have a grown-up trim them with the wire cutters. The finished ring should look like a coil with a small “C” shape on top.
32. Shimmering Silver Bells

This tablescape is bright, glamorous, and full of celebratory sparkle. A mirrored tabletop reflects all the light, making the entire setting glow. The centerpiece is a collection of elegant mercury glass vases and candlesticks, which have a beautiful, speckled silver finish.
Small silver jingle bells are scattered across the table, adding to the festive feel. The napkins are a soft, silvery-grey satin, and the napkin rings are covered in tiny jingle bells that make a lovely sound. This is a dazzling look for a special holiday dinner or New Year’s party.
DIY Jingle Bell Cluster Napkin Ring
This napkin ring looks and sounds festive!
What You’ll Need:
- A plain, wide silver napkin ring
- A bag of small silver jingle bells
- A hot glue gun (with a grown-up’s help)
Step-by-Step Instructions:
- Warm the Glue Gun: Ask an adult to plug in the hot glue gun so it can get ready.
- Start Gluing: Have the adult put a dot of hot glue on the napkin ring. Quickly press one jingle bell into the glue.
- Build Your Cluster: Continue gluing the jingle bells onto the ring, one by one. Place them close together so they are all bunched up.
- Cover the Top: Keep adding bells until the top half of the napkin ring is completely covered in a sparkly, bumpy cluster.
- Let it Cool: Set the napkin ring aside for a few minutes until the glue is completely hard.
33. Fireside Lodge Retreat

This table setting is the definition of cozy. Set in front of a roaring fireplace, it uses warm and rustic textures to create an inviting atmosphere. A thick, cable-knit runner feels like a favorite sweater, and wood slice chargers bring the outdoors in.
A garland of pine and heather is decorated with antlers and pinecones. The napkins are a classic tartan plaid, adding a touch of traditional holiday color. This entire scene makes you want to sit down, get comfortable, and enjoy a warm meal on a cold winter’s night.
DIY Tartan Ribbon Napkin Tie
This simple napkin tie is classic and cozy.
What You’ll Need:
- A roll of wide tartan (plaid) ribbon
- Scissors
Step-by-Step Instructions:
- Cut a Piece of Ribbon: Cut a length of ribbon about 12 inches long. You can cut the ends at an angle to make them look nice.
- Fold Your Napkin: Lay your plaid napkin out flat. Fold it into a neat rectangle.
- Wrap it Up: Take your piece of ribbon and wrap it around the middle of the folded napkin.
- Tie a Simple Knot: Tie a simple, clean knot on the top. You don’t need a bow.
- Adjust and Place: Straighten the knot and the ends of the ribbon. Now it’s ready for your plate!
34. A Literary Winter’s Tale

This unique tablescape is a dream for any book lover. Instead of a traditional centerpiece, there are artfully stacked piles of old books running down the center of the table. Twinkling fairy lights are woven between the books, creating a magical, warm glow.
The placemats look like pages from a classic novel, and each place setting has a tiny book as a favor. The whole atmosphere is cozy, intellectual, and nostalgic, making it a wonderful setting for long conversations and shared stories.
DIY Mini Book Charm Napkin Tie
This charming napkin tie is a tiny gift for your guests.
What You’ll Need:
- Tiny blank books (from a craft store) or a small, old-looking notebook
- Twine or thin leather cord
- Red and white baker’s twine
- A pen
Step-by-Step Instructions:
- Write a Message: Open the tiny book and write a small message inside, like “Happy Holidays” or the guest’s name.
- Wrap the Book: Close the little book. Wrap the thin leather cord around it a few times and tie a knot.
- Add the Twine: Cut a piece of baker’s twine and tie a small bow around the leather cord.
- Attach to the Napkin: Cut a longer piece of twine. Roll your fabric napkin, and use the long piece of twine to tie the little book bundle onto the top of the napkin.
35. Woodland Cardinals & Birch

This tablescape is inspired by a snowy forest scene. A crisp white tablecloth looks like a blanket of fresh snow. The centerpiece is made of beautiful white birch logs, piled in the center of the table. Nestled among the logs are pinecones, red berries, and a tiny bird’s nest.
Bright red cardinals are perched on the logs, providing a striking pop of color against the white. The placemats even have a birch bark pattern. This is a lovely, nature-inspired theme that brings the quiet beauty of the woods to your table.
DIY Faux Cardinal Napkin Perch
Add a little red bird to each of your place settings.
What You’ll Need:
- Plain, rustic-looking napkin rings (twine or wood is great)
- Small faux cardinal birds (from a craft store)
- A hot glue gun (and a grown-up to help)
Step-by-Step Instructions:
- Heat the Glue: Ask an adult to get the hot glue gun warmed up.
- Find the Spot: Decide where you want your little bird to sit on the napkin ring.
- Apply the Glue: Have the adult put a dot of hot glue on the feet of the faux cardinal.
- Press it On: Carefully press the bird onto the napkin ring.
- Hold and Cool: Hold the bird in place for about 20 seconds until the glue sets. Let it cool down completely before using.
36. Gothic Forest Romance

This tablescape is dark, dramatic, and beautifully moody. A bed of green moss creates a lush, living runner on the black table. The decorations feel foraged from an enchanted forest, with twisted branches, dark mushrooms, and juicy pomegranate halves.
The flowers are a deep, velvety black and rich purple. The napkins are made of two different velvet fabrics, one olive green and one deep red, held together by an ornate, gothic-style silver ring. This is a bold and unforgettable look for a unique winter gathering.
DIY Twin Velvet Napkin Fold
This simple technique layers two beautiful fabrics.
What You’ll Need:
- Two different colored velvet napkins (like olive and red) for each setting
- An ornate napkin ring
Step-by-Step Instructions:
- Lay Them Out: Place your two velvet napkins on top of each other. Stagger them slightly so you can see a bit of the bottom napkin peeking out from behind the top one.
- Pinch the Middle: Find the center of the layered napkins and pinch them together.
- Pull them Through: Pick up the layered napkins by the pinched center. Gently pull this center point through your ornate napkin ring.
- Fluff and Arrange: Let the four corners of the napkins drape naturally. You can arrange them so that both colors are visible.
37. Zen Winter Garden

This tablescape is inspired by the calm and minimalist beauty of a Japanese zen garden. The elements are simple, natural, and thoughtfully placed. A bed of moss holds small tea light candles, and a simple ceramic vase holds a single, bare branch in the ikebana style.
The plates are beautiful, handcrafted pottery with an earthy, organic feel. A floating candle in a bowl of water with smooth river stones adds to the tranquil atmosphere. This setting is all about creating a sense of peace, balance, and mindful appreciation.
DIY Clay Pebble Napkin Ring
This napkin ring looks like a smooth river stone.
What You’ll Need:
- A small block of grey or beige air-dry clay
- A round object about the size of a napkin (like a cardboard tube)
- A little water
Step-by-Step Instructions:
- Form the Ring: Take a piece of clay and roll it into a thick rope. Wrap the rope around the cardboard tube and smooth the ends together to form a ring shape.
- Create the Pebble: Take another piece of clay and roll it into a ball. Gently flatten it and shape it with your fingers until it looks like a smooth, flat pebble.
- Attach the Pebble: Dip your finger in a little water and wet the spot on the ring where you want to attach the pebble. Also, wet the back of the pebble. Press the pebble firmly onto the ring.
- Smooth it Out: Use your finger to smooth the clay where the pebble and the ring meet, so it looks like one piece.
- Let it Dry: Carefully remove the ring from the cardboard tube and let it air dry for one or two days until it’s completely hard.
38. Rugged Lumberjack Feast

This table has a fun, rustic, and masculine feel, like a meal at a logging camp. The centerpiece is an old-fashioned camping lantern, surrounded by pinecones and antlers. A black and white cowhide runner adds a rugged texture.
The plates are classic speckled enamelware in shades of blue and green. The napkins are red and black buffalo plaid, a lumberjack staple. They are held by simple leather rings, some with initials branded on them, adding a personal touch to this hearty, welcoming table.
DIY Leather & Initial Napkin Ring
This rustic napkin ring is simple and can be personalized.
What You’ll Need:
- A strip of brown leather (about 1 inch wide and 6 inches long)
- A metal alphabet stamp (with the initial you want)
- A hammer
- Strong glue or a leather snap kit (with a grown-up’s help)
Step-by-Step Instructions:
- Stamp the Initial: Place the leather strip on a hard, sturdy surface. Position the metal letter stamp where you want the initial to be. Ask a grown-up to give the stamp one firm tap with the hammer. This should leave an impression of the letter in the leather.
- Form the Ring: Wrap the leather strip into a circle, overlapping the ends by about half an inch.
- Secure it: Ask a grown-up to help you secure the ring. They can either use a very strong glue or install a metal snap so you can open and close the ring.
- Let it Dry: If you used glue, let it dry completely before using.
39. Hollywood Regency Glamour

This tablescape is all about over-the-top, unapologetic glamour. A shiny black table and a glittering crystal chandelier set the stage. The decor is bold and luxurious, featuring multiple gold pineapple statues and sleek golden greyhound figures.
The place settings are just as opulent, with black chargers and intricately patterned plates. The napkins are a rich emerald green, providing a beautiful pop of color. The napkin rings are shaped like golden sunbursts, adding to the dramatic and high-end feel of the entire setting.
DIY Golden Sunburst Napkin Ring
This glamorous napkin ring makes a big statement.
What You’ll Need:
- A plain gold napkin ring
- A small, flat, sun-shaped metal charm or wooden shape
- Gold spray paint (if the shape isn’t already gold)
- A hot glue gun (and a grown-up to help)
Step-by-Step Instructions:
- Make it Golden: If your sun shape isn’t gold, have a grown-up help you spray paint it in a well-ventilated area. Let it dry completely.
- Heat the Glue: Ask an adult to plug in the hot glue gun.
- Apply Glue: Put a dot of hot glue on the back of the golden sun shape.
- Press it On: Firmly press the sun shape onto the top of the plain gold napkin ring.
- Let it Cool: Hold it in place for about 15 seconds, and then set it aside to cool down completely.
40. Southwestern Winter Warmth

This table brings the warm, earthy spirit of the American Southwest to a winter gathering. The centerpiece is a collection of real cacti in terracotta pots, set in front of a cozy kiva fireplace. The placemats are woven textiles with traditional Southwestern patterns.
The plates have a beautiful, hand-painted geometric design, and the cutlery has striking turquoise-colored handles. The napkin ring is a simple silver band with a single polished turquoise stone, perfectly capturing the essence of the desert style. This look is unique, warm, and full of character.
DIY Faux Turquoise Napkin Ring
This craft gives you the look of silver and turquoise.
What You’ll Need:
- Plain, flat silver napkin rings
- A small, light-blue or turquoise-colored stone with a flat back (from a craft store)
- A black permanent marker
- Strong craft glue (like E6000, with a grown-up’s help)
Step-by-Step Instructions:
- Add Detail to the Stone: Use the tip of the black permanent marker to draw a few thin, squiggly lines on your blue stone. This will make it look more like a real piece of turquoise with natural veins.
- Get the Glue: In a room with good airflow, ask a grown-up to help you with the strong glue.
- Glue the Stone: Put a small dot of glue on the back of your decorated stone.
- Attach to the Ring: Press the stone firmly onto the middle of the silver napkin ring.
- Let it Dry: Let the napkin ring sit for several hours to make sure the glue is completely dry and the stone is very secure.
41. Dramatic Theatre Night

This tablescape sets the stage for a dramatic and luxurious evening. A black tablecloth provides a dark, theatrical backdrop for the rich red and gold accents. A lush bouquet of red roses and amaryllis creates a stunning centerpiece. Gold is everywhere, from the cutlery to the ornate vase.
The theme is made clear with theatrical masks and thick, rope-like details. The red velvet napkins are held by a beautiful golden tassel, which feels like a curtain tie from an old-time theatre. This is a bold, opulent, and unforgettable setting for a special occasion.
DIY Golden Tassel Napkin Ring
This napkin ring adds a touch of theatrical flair to your table.
What You’ll Need:
- Plain gold napkin rings
- Small gold tassels (from a fabric or craft store)
- A hot glue gun (with a grown-up’s help)
Step-by-Step Instructions:
- Heat the Glue Gun: Ask an adult to plug in the hot glue gun and let it warm up.
- Find the Loop: Look at the top of your tassel. There should be a small loop of string.
- Apply the Glue: Have the adult put a dot of hot glue on the napkin ring where you want the tassel to hang from.
- Attach the Tassel: Press the string loop of the tassel into the dot of hot glue.
- Hold and Cool: Hold it in place for about 15 seconds until the glue sets. Let it cool completely before putting a napkin through it.
42. A Sea of Candlelight

This table setting is breathtaking in its simplicity and warmth. The entire centerpiece is a dense cluster of dozens of candles in various heights and thicknesses. The sheer number of flames creates an incredible, magical glow that fills the room with soft, flickering light. No other decoration is needed.
The rest of the table is kept simple to let the candlelight be the star. A bare wooden table, simple plates, and soft linen napkins ensure the focus remains on the stunning display of light. This is a deeply romantic and intimate setting.
DIY Wax-Dipped Monogram Napkin Ring
This personalized napkin ring has a lovely, rustic, old-world feel.
What You’ll Need:
- Plain wooden napkin rings
- A metal letter stamp (for your initial)
- A hammer
- An old candle or plain paraffin wax
- An old, small pot for melting wax (a grown-up’s job)
Step-by-Step Instructions:
- Stamp the Initial: Place the wooden napkin ring on a sturdy surface. Put the metal letter stamp on top and have a grown-up give it one firm tap with a hammer. This will press the letter into the wood.
- Melt the Wax: This part is for adults only! They need to carefully melt the old candle or wax in the small pot over low heat.
- Dip the Ring: Once the wax is melted, an adult should carefully hold the napkin ring with tongs or pliers and dip it into the wax.
- Coat and Cool: Swirl it around to coat it, then quickly pull it out. The wax will harden almost instantly, giving the ring a smooth, sealed finish.
- Set to Dry: Place the wax-dipped ring on a piece of parchment paper to cool completely.
As you can see, a winter table can be anything you imagine. It can be a quiet, minimalist space for reflection or a vibrant, colorful setting for a joyous celebration. The common thread is the act of creation itself—taking the time to build a beautiful space for the people you love.
We hope these 42 examples have sparked your imagination. Remember that the best tablescapes reflect your own personality. Mix and match ideas, experiment with different materials, and most importantly, have fun with the process. Your effort will create a warm and welcoming backdrop for many happy memories this winter.
Key Takeaways
- Bring Nature Indoors: Elements like pinecones, fresh greenery, birch logs, and even driftwood add texture and an organic feel to any table.
- Embrace the Glow: Candles are essential. Whether it’s a few elegant tapers or a sea of pillar candles, their warm light creates an instant cozy atmosphere.
- Texture is Your Friend: Combine different materials like rough linen, smooth velvet, chunky knits, and rustic wood to create a layered, interesting look.
- A Personal Touch Matters: Simple DIY projects, from name tags to handmade napkin rings, make your guests feel special and your table unique.
- Don’t Fear Color: While winter often brings whites and silvers, rich jewel tones, festive reds, or even bright citrus colors can create a stunning and unexpected tablescape.