When the first chill of winter arrives, our thoughts turn inward. We close the doors to our patios, balconies, and decks, abandoning them until spring. These valuable spaces often sit empty and unused for months, waiting for warmer weather to return.

But it doesn’t have to be this way. Your outdoor space holds potential for year-round enjoyment. With a few thoughtful additions, you can create a warm and inviting retreat to enjoy the crisp beauty of the season. It’s about creating a cozy haven, not shutting the door on nature.
This guide offers 35 distinct ideas to help you reclaim your outdoor areas. From rustic cabins to modern city balconies, you’ll find inspiration to transform your space. Each idea includes a simple DIY project, making it easy to add a personal touch and embrace the outdoors all winter long.
1. Urban Hygge Balcony

A small city balcony can become a warm retreat. This space uses a compact, glass-enclosed fire pit for a safe and central glow. The warmth invites you to sit and stay awhile, even when the air is crisp.
Soft textures are everywhere. A chunky knit blanket drapes over the bench, ready for snuggling. Faux sheepskin throws add another layer of comfort on the seats. Simple string lights along the railing provide a gentle twinkle, creating a magical feeling against the evening sky.
Touches of nature complete the look. Small evergreen plants bring life to the space. Lanterns with glowing candles sit on the floor, and a bowl of pinecones adds a rustic element. This setup creates a comfortable spot to enjoy a hot drink outdoors.
DIY: Make Your Own Glowing Lanterns
Let’s make some safe and pretty lanterns just like the ones in the picture! It’s super easy.
What You’ll Need:
- A lantern with glass sides (you can find these at a craft store or home store).
- A battery-powered LED candle (make sure it fits inside your lantern!). Using a battery one is much safer than a real flame.
- Optional: A handful of small pinecones, fake snow, or a tiny bit of green garland.
Step-by-Step Instructions:
- Get Ready: First, lay out your lantern and your battery candle on a table or the floor. Make sure your lantern is clean and the glass is shiny.
- Open the Door: Find the little latch on your lantern and carefully open its door. It swings open just like a tiny fairy house door!
- Place Your Candle: Turn on your battery candle (there’s usually a small switch on the bottom). Gently place it right in the middle of the lantern’s floor.
- Add Some Fun (Optional): If you have pinecones or fake snow, you can sprinkle a little bit around the base of the candle inside the lantern. This makes it look extra wintry!
- Close It Up: Swing the little door shut and make sure the latch is closed so it stays secure.
- Find the Right Spot: Now you can place your glowing lantern on your balcony floor, on a small table, or near a plant. You can make a few of them to create a lovely, warm light all around your space.
2. Fireside Flannel Porch

This porch invites you to wrap up in warmth. A sturdy chiminea fire pit sits at the center, its flames dancing and casting a warm glow. The dark wood of the house creates a cozy backdrop, making the scene feel private and snug. String lights overhead add a soft, festive sparkle.
Comfort is key here. Deep blue chairs are made inviting with faux fur pillows and classic red plaid blankets. A bucket of birch logs waits by the fire, promising hours of warmth. This space is a rustic haven, a simple and comfortable spot to enjoy the crisp winter air.
DIY: Make Your Own Rustic Log Bucket
You can make a cool bucket to hold logs, just like in the picture. It’s a great way to keep your firewood handy and looking neat.
What You’ll Need:
- A metal bucket (you can find these at a hardware store or a farm supply store).
- A piece of rough sandpaper.
- A clean, dry cloth.
- Optional: White paint and a small paintbrush if you want to add a design.
Step-by-Step Instructions:
- Clean Your Bucket: First, make sure your bucket is clean and dry. Wipe it down with a cloth to get rid of any dust or dirt.
- Make It Look Old (Optional): If you want your bucket to look a little rustic, you can gently rub the sandpaper on the outside. This will scuff it up a bit and give it a weathered look. Don’t press too hard!
- Add a Design (Optional): If you want to paint something on it, like a simple star or your initial, now is the time. Use your white paint to draw your design on the side of the bucket. Let it dry completely.
- Get Your Logs: Go outside and gather some small logs or pieces of firewood. Birch logs with their white bark look really nice.
- Stack Them Up: Carefully stack the logs inside your new bucket. You can stand them up on their ends to fit more.
- Place It Proudly: Put your finished log bucket next to your chair or fire pit. Now you have a stylish way to store your wood!
3. Zen Winter Garden

This small patio is a pocket of peace. It uses simple, natural materials to create a calm feeling. A single, beautifully shaped bonsai tree stands as the focal point, its green needles a sign of life in the winter. The dark walls and bamboo screens make the space feel secluded and quiet.
A stone water basin sits in the corner, the gentle sound of trickling water adding to the tranquility. Smooth river stones cover the ground, creating a clean, textured floor. A heater on the wall provides warmth without clutter, and a heated seat cushion on the bench offers extra comfort. This is a place for quiet thought.
DIY: Create a Mini Zen Rock Garden
Let’s make a small, calming zen garden for a tabletop. It’s like a tiny sandbox for you to relax with.
What You’ll Need:
- A shallow wooden box or a sturdy tray.
- Fine sand (you can get this at a craft store).
- A few smooth, interesting-looking stones of different sizes.
- A small stick or a tiny rake (you can even use a fork!).
Step-by-Step Instructions:
- Fill Your Box: Take your wooden box or tray and pour the sand into it. Fill it up about halfway to the top.
- Smooth It Out: Gently shake the box or use your hand to smooth the sand out so it’s nice and flat. It should look like a tiny, untouched beach.
- Place Your Rocks: Now, choose your favorite smooth stones. Carefully place them on the sand. You can group them together or spread them out. Think of them as little islands.
- Make Some Patterns: Take your tiny rake, stick, or fork. Slowly drag it through the sand to make wavy lines or circles around your rocks. This is the fun and relaxing part!
- Find a Calm Spot: Put your mini zen garden on a table on your balcony. When you want to relax, you can change the rocks around or make new patterns in the sand.
4. Bohemian Winter Balcony

This balcony is a vibrant and cozy escape. It feels like a warm hug, filled with soft things and interesting textures. A hanging wicker chair, piled high with fluffy cushions, creates a personal nest for reading or dreaming. The space is decorated with macrame wall hangings, adding a handmade, artistic touch.
The floor is layered with patterned rugs and plush sheepskin throws. Poufs and floor cushions in warm, earthy colors invite casual, comfortable seating. Lanterns on the floor cast a gentle, flickering light. A garland of dried oranges and spices hangs on the wall, adding a touch of natural color and fragrance to the air.
DIY: Make a Dried Orange Garland
You can make a beautiful garland just like the one in the picture. It looks pretty and smells amazing!
What You’ll Need:
- One or two large oranges.
- A knife (ask a grown-up for help with this part!).
- A baking sheet.
- Parchment paper.
- A needle with a large eye.
- Some string or twine.
Step-by-Step Instructions:
- Slice the Oranges: Ask a grown-up to help you carefully slice the oranges into thin, round pieces. They should be about as thick as a quarter.
- Dry Them Out: Lay the orange slices in a single layer on a baking sheet covered with parchment paper. You can gently pat them with a paper towel to soak up extra juice.
- Bake Them: Have a grown-up put the baking sheet in the oven on a very low temperature (around 200°F or 93°C). Let them bake for about 2-3 hours, flipping them over halfway through, until they are dry.
- Let Them Cool: Once they’re done, take them out and let them cool down completely. They will look like little stained-glass windows!
- String Them Together: Thread your string or twine through the needle. Carefully poke the needle through the fleshy part of an orange slice, near the peel.
- Build Your Garland: Keep adding orange slices, leaving a little space between each one. You can make it as long or as short as you want.
- Hang It Up: Tie a loop at each end of your string and hang your beautiful, sweet-smelling garland on your balcony wall.
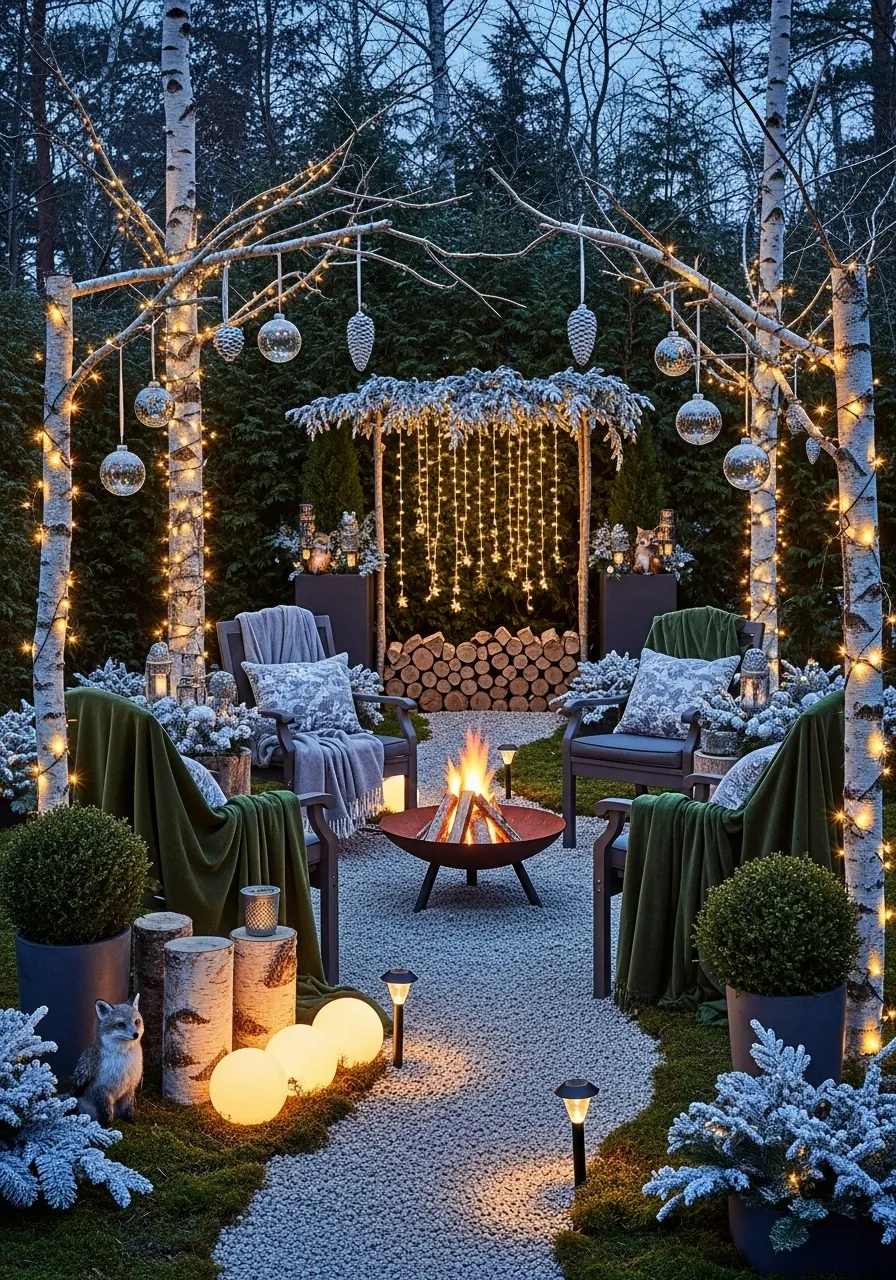
5. Enchanted Forest Nook

This backyard corner feels like a secret, magical place. Bare birch trees, wrapped in tiny string lights, frame the scene and glow against the evening sky. A simple fire pit sits in the center, its flames providing warmth and a cheerful crackle. The ground is covered in white gravel, which looks like a dusting of snow.
Large, glowing orbs are scattered on the ground, adding a soft, mysterious light. Ornaments hang from the tree branches, sparkling in the firelight. Comfortable chairs with plush throws are arranged around the fire, making it an inviting spot for storytelling. This space turns a simple winter evening into a fairytale.
DIY: Make Your Own Glowing Garden Orbs
Let’s make some magical glowing balls for your yard. They are easy to make and look so cool at night.
What You’ll Need:
- A clear or frosted glass globe (you can often find these at a hardware store as replacement light covers).
- A string of battery-powered fairy lights (the kind with a small battery pack).
- A small piece of clear tape.
Step-by-Step Instructions:
- Get Your Lights Ready: Turn on your string of fairy lights to make sure they work.
- Feed the Lights Inside: Carefully begin feeding the string of lights into the opening of the glass globe. Push them in gently until the whole string is inside, except for the little battery pack.
- Arrange Them: Gently swirl the globe around to help the lights spread out inside. You want the little lights to be all over, not just in a clump at the bottom.
- Hide the Pack: Let the battery pack hang out of the opening. You can tape it to the back or bottom of the globe where no one will see it.
- Place Your Orb: Set your new glowing orb on the ground in your garden, on your patio, or nestle it near a plant. Make a few more and scatter them around for an enchanted look!
6. Classic Evergreen Patio

This patio has a timeless, elegant feel. The space is structured and green, even in winter. Potted boxwood topiaries, shaped into neat spheres, add a touch of formal garden style. A tall, stainless steel patio heater stands in the center, ready to provide warmth for an outdoor meal.
Wrought iron chairs and a small table offer a place to sit and enjoy a cup of tea. A soft, quilted blanket is draped over a chair, adding a layer of comfort. Climbing ivy and red-berried vines grow up the walls, bringing color and life to the scene. This patio is a sophisticated and peaceful spot to enjoy a winter afternoon.
DIY: Make a Winter Evergreen Planter
You can make a beautiful pot of winter greens that will look great all season long.
What You’ll Need:
- A medium-sized flower pot.
- Some potting soil.
- A few small branches from an evergreen tree (like a pine or fir tree).
- A few pinecones.
- Some twigs with red berries (real or fake ones from a craft store).
- Gardening gloves.
Step-by-Step Instructions:
- Fill Your Pot: Put on your gloves and fill your flower pot about three-quarters full with potting soil. Pat it down gently.
- Add Your Greens: Take your evergreen branches and stick the cut ends deep into the soil. Arrange them so they look nice and full. You can put the taller ones in the middle and shorter ones around the edges.
- Place Your Pinecones: Now, nestle your pinecones into the arrangement. You can push them into the soil a little bit to make them stay put.
- Add a Pop of Color: Take your berry twigs and stick them in among the green branches. The red color will look really pretty against the green.
- Water It: Give your new planter a little bit of water. The soil should be damp, but not soaking wet.
- Find a Home: Place your beautiful winter planter on your patio, by your front door, or anywhere that needs a touch of color.
7. Aurora Borealis Rooftop

This rooftop lounge is modern and exciting. The design is sleek and minimalist, with a dark color scheme that makes the lights pop. Colorful LED strip lights line the edges of the space, casting a vibrant glow that resembles the northern lights against the dark night sky.
A long, rectangular fire pit provides warmth and a mesmerizing focal point. The furniture is low-profile and modular, with clean lines and comfortable cushions. Small, heated pads on the seats offer extra warmth for guests. Glass tables and geometric decor add to the futuristic feel. This is a stylish spot for a sophisticated evening under the stars.
DIY: Make a Geometric Terrarium Centerpiece
Let’s make a cool, modern centerpiece like the one on the table. It’s like a tiny glass house for a plant.
What You’ll Need:
- A geometric glass terrarium with an opening (you can find these at craft stores).
- A handful of small pebbles or gravel.
- A bit of activated charcoal (this keeps it fresh).
- Some potting soil for succulents.
- One or two small air plants or succulents (these are easy to care for!).
Step-by-Step Instructions:
- First Layer: Pour a thin layer of small pebbles into the bottom of your glass terrarium. This helps with water drainage.
- Charcoal Time: Sprinkle a very thin layer of activated charcoal over the pebbles. This is like a filter for your tiny garden.
- Add the Soil: Spoon a layer of potting soil on top of the charcoal. Make it deep enough for your plant’s roots.
- Time to Plant: Gently take your succulent out of its little pot. Make a small hole in the soil with your finger and place the plant inside. Pat the soil around it gently. If you are using an air plant, you can just set it on top of the soil!
- Clean Up: If you got any dirt on the glass, use a small paintbrush or a piece of paper towel to wipe it clean.
- Place and Admire: Put your finished terrarium on a table on your rooftop or balcony. It’s a tiny, living piece of modern art!
8. Coastal Winter Balcony

This balcony captures the calm, moody feeling of a winter beach. The color scheme is soft and neutral, with shades of gray that echo a cloudy sky and weathered driftwood. Sturdy Adirondack chairs provide a classic, comfortable place to sit and watch the ocean.
A thick, gray curtain can be pulled to block the wind, creating a more sheltered space. Lanterns with candles cast a warm, steady light, a welcome contrast to the cool tones. Natural, nautical elements like thick rope and a driftwood decoration add texture and character. A soft blanket with a simple stripe pattern is ready for chilly evenings.
DIY: Make a Simple Sailor’s Knot Decor
You can make a cool rope knot to use as a decoration, just like the ones on the table and chair.
What You’ll Need:
- A piece of thick, natural rope (about 3-4 feet long). You can find this at a hardware store.
- A flat surface to work on.
- Optional: A hot glue gun (ask a grown-up for help).
Step-by-Step Instructions:
- Make a Loop: Lay your rope on the table. Take one end and make a loop, crossing the end over the top of the long part of the rope. It should look like the number “6”.
- Go Underneath: Now, take the very end of the rope you just crossed over. Tuck it under the place where the ropes cross.
- Weave It Through: Continue to bring that same end up and over the top part of your “6” loop. Then, tuck it down through the center of the loop. It’s like you are weaving the rope.
- Gently Tighten: Slowly pull on both ends of the rope. You will see a flat, pretzel-like knot start to form. Adjust the loops so they look even and nice. This is called a monkey’s fist or a Carrick bend knot.
- Secure It (Optional): To make sure your knot doesn’t come undone, ask a grown-up to help you put a tiny bit of hot glue on the back where the ends are.
- Show It Off: You can place your finished knot on a table, hang it on a wall, or use it as a paperweight. It’s a simple touch of the seaside.
9. Winter Market Terrace

This outdoor space feels like a festive European holiday market. A long wooden bar and high-top tables create a social atmosphere, ready for friends to gather. Tall patio heaters are placed throughout the area, ensuring everyone stays warm. The scene is bright and cheerful.
Strings of colorful lights and green garlands are draped across the wooden pergola overhead. Chalkboard menus add a rustic, charming touch. Baskets filled with red plaid blankets are available for guests to grab and snuggle into. It’s a lively and inviting setup for serving hot cider or cocoa on a cold winter day.
DIY: Cozy Blanket Baskets
Keeping blankets in a basket is a simple way to make your space feel welcoming and stay organized.
What You’ll Need:
- A large wicker or wire basket.
- Two or three soft, warm blankets (plaid ones look extra cozy!).
- A flat surface for folding.
Step-by-Step Instructions:
- Fold Your First Blanket: Take one of your blankets and lay it out flat. Fold it in half lengthwise (the long way). Then, fold it in half again the same way, so you have a long, skinny rectangle.
- Roll It Up: Starting from one of the short ends, roll the blanket up tightly. It should look like a cozy sleeping bag.
- Do It Again: Do the same thing with your other blankets. Fold and roll each one so you have a few neat blanket rolls.
- Arrange in the Basket: Take your rolled blankets and stand them up inside the basket. You can arrange them so the different colors and patterns show.
- Place Your Basket: Put the basket in a corner of your patio or next to a seating area. Now when you or your friends get chilly, you can just grab a warm blanket!
10. Stargazer’s Rooftop

This rooftop is designed for looking up at the night sky. Sleek, comfortable lounge chairs are positioned for the best view of the stars. A telescope stands ready for a closer look at the moon and planets. The whole space has a cool, cosmic theme.
Red LED lights glow from beneath the furniture, creating a futuristic ambiance that doesn’t spoil the view of the dark sky. A wall-mounted heater provides focused warmth. Even the small details fit the theme, with coasters that look like constellations and a tray of drinks that shimmer like ice. This is a unique and inspiring place to connect with the universe.
DIY: Make Your Own Constellation Coasters
Let’s make some cool coasters that look like the night sky. They’re fun to make and great for your drinks.
What You’ll Need:
- Round or square black tiles or pieces of black craft foam.
- A white paint pen or a silver permanent marker.
- A pencil.
- Pictures of simple constellations (like the Big Dipper or Orion). You can find these online.
Step-by-Step Instructions:
- Choose Your Star Pattern: Look at the pictures of constellations and pick your favorite simple ones.
- Draw the Stars: On one of your black tiles, use your pencil to lightly make dots where the main stars of the constellation go. Don’t worry if it’s not exact!
- Connect the Dots: Once you have your star dots, use your white paint pen or silver marker to make a bright dot over each pencil mark. Then, gently draw lines to connect the dots and form the shape of the constellation.
- Let It Dry: Set the coaster aside and let the paint or marker dry completely.
- Make a Set: Do the same thing with your other tiles, drawing a different constellation on each one.
- Ready for a Drink: Now you have a set of awesome stargazer coasters! Place them on your table and enjoy a warm drink while you look at the real stars.
11. Ice Palace Balcony

This balcony is a glamorous winter wonderland. The theme is all about ice and sparkle. Clear acrylic chairs are draped with fluffy white faux fur throws, looking like snowy thrones. Mirrored tables reflect the light, adding to the dazzling effect. A tall patio heater provides essential warmth to the frosty scene.
Sparkling crystals hang from the railing and from silver branches in a vase, catching the light like icicles. A special projector casts glowing blue snowflake patterns on the wall, creating a magical, chilly atmosphere. This space is a fantasy world, a chic and frosty escape for a winter party.
DIY: Make Your Own Sparkly Crystal Branches
You can make some beautiful, icy branches to decorate your balcony, just like in the picture.
What You’ll Need:
- A few bare tree branches from your yard.
- A can of silver or white spray paint.
- Craft glue that dries clear.
- A small paintbrush.
- Coarse clear or silver glitter.
- A tall, heavy vase.
Step-by-Step Instructions:
- Paint Your Branches: Take your branches outside and lay them on some old newspaper. With a grown-up’s help, spray paint them silver or white. Let them dry completely.
- Add Some Glue: Once the paint is dry, use your paintbrush to put a thin layer of craft glue on some parts of the branches. You don’t need to cover the whole thing.
- Time to Sparkle: Before the glue dries, sprinkle the glitter all over the glued areas. The glitter will stick and look like sparkling ice crystals.
- Shake It Off: Gently shake the branches to get rid of any extra glitter. Let the glue dry all the way.
- Arrange Your Branches: Carefully place your new, sparkly branches in a tall vase. They will look like they came from a frozen forest!
12. Lumberjack’s Nook

This patio is a celebration of rustic cabin life. A huge, neatly stacked wall of firewood creates a stunning and practical backdrop. Simple, sturdy wooden Adirondack chairs are gathered around a large, bowl-shaped fire pit. The air here likely smells of pine and woodsmoke.
Red and black buffalo plaid cushions and blankets add a classic pop of color and comfort. Old-fashioned lanterns sit on tree stump tables, providing a warm, steady light. It’s a simple, honest space built for good conversation and enjoying the elemental pleasure of a crackling fire.
DIY: Make an Easy Evergreen Wreath
You can make a simple wreath like the one hanging on the woodpile. It’s a nice touch of green for your outdoor space.
What You’ll Need:
- A wire wreath frame (from a craft store).
- Flexible green floral wire.
- A pair of garden clippers.
- Lots of small branches from an evergreen tree (like pine, fir, or cedar).
Step-by-Step Instructions:
- Gather Your Greens: Go on a nature walk and collect small evergreen branches. You’ll need a good pile of them.
- Make Little Bundles: Take 3 or 4 small branches and hold them together to make a little bundle.
- Attach the First Bundle: Lay your first bundle on top of the wire frame. Take your floral wire and wrap it tightly around the stems of the bundle and the frame 3 or 4 times. Don’t cut the wire yet!
- Add Another Bundle: Make another little bundle of greens. Place it on the frame so it overlaps the stems of the first one. Use the same long piece of wire to wrap it tightly to the frame.
- Keep Going: Continue adding bundles and wrapping them with wire, always covering the stems of the previous bundle. Go all the way around the wreath.
- Finish It Up: When you get back to the beginning, tuck the last bundle under the first one and wrap it tightly. Now you can cut the wire and twist the end to secure it. Hang your beautiful wreath up!
13. Winter Greenhouse Haven

This small greenhouse is a warm, fragrant escape from the cold. It’s filled with life and color, even in the middle of winter. Shelves are packed with potted plants and blooming flowers, creating a vibrant wall of green. A small electric heater on the floor keeps the space toasty for both the plants and people.
A simple bench with a heated cushion offers a comfortable spot to sit and enjoy the earthy smells. Strings of fairy lights are woven throughout, adding a magical twinkle. This little room is a sanctuary for any plant lover, a place to tend to your garden and forget about the frost outside.
DIY: Decorative Ribbon Pot Hangers
Let’s make some pretty ribbon hangers for your pots, like the red ones in the picture.
What You’ll Need:
- A roll of wide, strong ribbon in your favorite color.
- Scissors.
- A flower pot that has a lip around the top edge.
Step-by-Step Instructions:
- Measure Your Ribbon: Take the end of the ribbon and wrap it around the top of your flower pot, just under the lip. Add a few extra inches for tying a bow, and then cut the ribbon.
- Tie It On: Wrap the piece of ribbon you just cut around the pot again. Tie it in a tight knot to make sure it’s secure.
- Make a Bow: With the two loose ends of the ribbon, tie a simple, pretty bow. You can make the loops as big or as small as you like.
- Trim the Ends: If the ends of your bow are too long, you can cut them on an angle to make them look neat.
- Make More: Do the same thing for a few more pots to add a splash of color to your greenhouse or porch!
14. Moroccan Courtyard

This covered patio is transformed into a rich and exotic lounge. The space is filled with the warm colors of a desert sunset, like deep red and terracotta. A large, brass fire bowl sits in the middle, its golden surface reflecting the flickering flames and casting a warm light all around.
Low couches and colorful floor poufs create a relaxed and communal seating area. The space is rich with patterns, from the intricate designs on the rug to the varied textiles of the cushions. Hanging metal lanterns with colored glass add a touch of mystery. It is a warm, inviting space for sharing stories and food.
DIY: Make a Celestial Star and Moon Mobile
You can make a hanging decoration with stars and moons, similar to the ones by the window.
What You’ll Need:
- Gold or yellow craft paper or thin cardboard.
- A pencil.
- Scissors.
- A hole punch.
- Thin gold or clear string.
- A small stick or dowel.
Step-by-Step Instructions:
- Draw Your Shapes: On your craft paper, use a pencil to draw some simple star shapes and crescent moon shapes. Make them in different sizes.
- Cut Them Out: Carefully cut out all the stars and moons you drew.
- Punch the Holes: Use your hole punch to make a small hole at the top of each shape.
- Cut Your Strings: Cut a few pieces of string in different lengths.
- Tie on the Shapes: Take one piece of string and tie one of your paper shapes to the end of it. You can add one or two more shapes to the same string, tying them a few inches apart.
- Attach to the Stick: Do this with all your strings, then tie the other end of each string to your small stick. Space them out so they can hang freely.
- Hang It Up: Tie one more piece of string to both ends of the stick to make a hanger. Now you can hang your celestial mobile!
15. Après-Ski Deck

This deck has the sleek, sophisticated feel of a mountain ski resort. A modern bar with a glowing front panel offers a stylish spot for drinks. The view of the snowy mountains is the main attraction. A tall, flaming patio heater and a rectangular fire table provide plenty of warmth against the chill.
Bar stools are draped with fuzzy sheepskin throws, adding a touch of cozy texture to the modern design. Vintage skis and a sled lean against the wall, giving a nod to fun on the slopes. This is a great space for socializing after a day outdoors, a comfortable spot to unwind and take in the view.
DIY: No-Sew Faux Fur Seat Covers
You can make a simple, cozy cover for a stool or chair without any sewing.
What You’ll Need:
- A piece of faux fur fabric, big enough to cover the seat of your stool and hang over the edges.
- Scissors.
- A stool or chair with a hard seat.
- Optional: A few safety pins.
Step-by-Step Instructions:
- Measure Your Fabric: Place your fabric over the seat of the stool. You want it to cover the top and drape down the sides a little.
- Cut to Size: If your fabric is way too big, use your scissors to trim it into a square or circle that is a bit larger than your seat. It doesn’t have to be exact.
- Just Drape It: Simply lay the piece of faux fur over the top of the stool’s seat. Let the edges hang down naturally.
- Secure It (Optional): If you’re worried about it slipping off, you can use a few safety pins on the underside of the seat to hold the fabric in place. Just pin the fabric to itself.
- Get Cozy: That’s it! Now you have a super soft and fancy-looking seat cover to make your chair more comfortable.
16. Country Christmas Porch

This red country porch is overflowing with sweet, rustic charm. A white rocking chair sits by the door, draped with a chunky knit blanket, inviting you to sit and relax. The decorations have a handmade, heartwarming feel, with garlands of gingerbread cookies and dried apple slices.
A wreath on the door is decorated with natural elements like dried fruit and wooden ornaments. An old-fashioned sled leans against the wall, adding to the nostalgic feeling. Even the window box is filled with fresh evergreen sprigs. This porch feels like a warm welcome, a happy and wholesome holiday greeting.
DIY: Make a Faux Gingerbread Cookie Garland
Let’s make a cute garland that looks like gingerbread cookies but will last forever!
What You’ll Need:
- Brown craft foam sheets.
- A gingerbread man cookie cutter.
- A pencil.
- Scissors.
- A white paint pen.
- A hole punch.
- Some festive ribbon or twine.
Step-by-Step Instructions:
- Trace Your Cookies: Place the cookie cutter on the brown foam sheet and trace around it with a pencil. Do this several times to make a bunch of “cookies.”
- Cut Them Out: Carefully cut out all of the gingerbread man shapes.
- Decorate Them: Use your white paint pen to draw on a happy face, buttons, and some squiggly lines for icing on their arms and legs. Let the paint dry.
- Punch the Holes: Use the hole punch to make one hole in each of the gingerbread man’s hands.
- String Them Together: Weave your ribbon or twine through the holes. Go in through the front of one hand and out through the back, then across its belly and in through the back of the other hand.
- Build Your Garland: Add more foam cookies, leaving a little bit of ribbon showing between each one. Hang your sweet, un-eatable garland across a window or railing.
17. Industrial Urban Balcony

This small balcony uses simple, strong materials to create a cool, industrial look. Cinder blocks are cleverly used as a base for a bench and as a planter stand. The color palette is mostly gray and black, which makes the green of the plants stand out.
A metal grid is attached to the wall, serving as a trellis for a climbing vine and a place to hang tools or lights. The furniture is practical and movable, like a folding chair that can be stored away. This space shows how you can create a functional and stylish garden in a very small, modern area.
DIY: Make a Cinder Block Bench
You can easily make a bench just like the one in the picture. It’s strong and looks very cool.
What You’ll Need:
- Four cinder blocks (you can get these at a hardware store).
- One thick, strong piece of wood for the seat (like a 4×4 or a 2×6 board), cut to the length you want your bench to be.
- Optional: Sandpaper and outdoor paint or sealer for the wood.
Step-by-Step Instructions:
- Prepare Your Wood (Optional): If you want a smoother seat, rub the sandpaper all over your wooden board. If you want to paint it, now is the time to do it. Let it dry completely.
- Place Two Blocks: Take two of your cinder blocks and stand them up on their ends, with the holes facing up. Place them where you want one end of your bench to be.
- Place the Other Two: Do the same thing with the other two cinder blocks where you want the other end of the bench to go.
- Slide the Wood In: Take your wooden board. Carefully slide one end through the top holes of the two cinder blocks on one side.
- Finish the Bench: Slide the other end of the board through the top holes of the blocks on the other side. Make sure the board is even on both sides.
- Have a Seat: That’s it! You have a new, sturdy bench. You can even put a cushion on top to make it more comfortable.
18. Modern Farmhouse Porch

This porch is bright, clean, and inviting. It has a modern farmhouse style, with a crisp white and black color scheme. A large, comfortable sectional sofa provides plenty of seating for family and friends. The space is softened with lots of pillows and throws in a cozy gray and white plaid pattern.
A simple black fire bowl is the center of the seating area, ready for making s’mores. Buckets of birch logs add a rustic touch. Wreaths with simple striped ribbons hang on the double doors, adding a touch of classic holiday charm. This porch is a comfortable and stylish extension of the home.
DIY: Simple Farmhouse Wreath
You can make a classic and simple wreath like the ones on the doors.
What You’ll Need:
- A pre-made evergreen wreath (real or fake).
- A roll of wide ribbon with a simple pattern, like black and white stripes.
- Scissors.
- A piece of floral wire.
Step-by-Step Instructions:
- Fluff Your Wreath: If your wreath is fake, spend a minute fluffing up all the branches so it looks nice and full.
- Make a Big Loop: Take your ribbon and make a very long loop. This loop should be long enough to go around the top of your wreath and hang down to the middle of it.
- Attach the Ribbon: Place the middle of your long ribbon loop behind the top of your wreath.
- Loop It Through: Bring the two ends of the ribbon down in front of the wreath and pull them through the loop you made. Gently pull it tight. The ribbon should now be holding the wreath.
- Trim the Ends: Let the two ends of the ribbon hang down. You can cut the ends at an angle or in a “V” shape to make them look finished.
- Hang It Up: Use the top of the ribbon loop to hang your wreath on a hook on your door. It’s a simple, elegant decoration.
19. Japanese Soaking Tub Oasis

This outdoor area is a private, tranquil spa. The main feature is a round soaking tub set into a wooden deck. The space is enclosed by tall green bamboo screens, creating a feeling of being in a hidden garden. The design is simple and natural, focusing on relaxation.
A paper lantern hangs from above, casting a soft, warm light. A small stone lantern sits on the polished black river rocks that cover the ground. A simple wooden stool holds a teapot, ready for a warm drink after a soak. This is a place of peace and calm, designed to soothe the mind and body.
DIY: Make a Simple Wooden Stool
You can make a small, rustic stool that is great for holding a plant or a cup of tea.
What You’ll Need:
- A round or square slice of wood from a log (you can find these at craft stores).
- Three wooden furniture legs (from a hardware store). They often come with screws already in them.
- A pencil.
- A drill (ask a grown-up for lots of help with this!).
Step-by-Step Instructions:
- Plan Your Legs: Turn your wood slice upside down. Use your pencil to make three marks where you want the legs to go. They should be in a triangle shape and not too close to the edge.
- Drill the Holes: This is a grown-up’s job. Ask them to drill a small hole at each of the three marks you made. The hole should be a little bit smaller than the screw on the furniture leg.
- Screw in the Legs: Take your first furniture leg and find the screw at the top. Carefully twist the screw into one of the holes you drilled. Keep twisting until it’s tight.
- Add the Other Legs: Do the same thing with the other two legs.
- Flip It Over: Once all three legs are tight, flip your new stool over. Now you have a simple, beautiful piece of furniture for your tranquil space.
20. Desert Twilight Patio

This patio captures the warm, earthy spirit of the desert. A clay chiminea provides heat and a rustic focal point, its fire glowing against the terracotta-colored walls. Potted cacti of various shapes and sizes are placed around the space, connecting it to the surrounding landscape.
Comfortable leather camp chairs invite you to sit back and watch the sunset. Textiles with bold, geometric patterns add color and texture to the scene. A cowhide rug lies on the ground, adding another layer of rustic style. This patio is a serene spot to enjoy the vast, open feeling of the desert evening.
DIY: Make a Chili Pepper Garland
You can make a fun string of “chili peppers” to add a pop of color to your patio.
What You’ll Need:
- Red polymer clay (the kind you bake in the oven).
- A small piece of green polymer clay.
- A toothpick.
- A baking sheet and parchment paper.
- A string of plain fairy lights.
Step-by-Step Instructions:
- Make the Pepper Shape: Take a small piece of red clay and roll it between your hands to make a little log shape. Gently pinch and curve one end to make it look like a chili pepper. Make about 10-15 of them.
- Add the Stem: Take a tiny pinch of green clay. Roll it into a small ball and then flatten it into a little star shape. Press this onto the top of your red pepper.
- Make a Hole: Carefully use a toothpick to poke a hole through the green stem from side to side. This is where the light will go later.
- Bake Them: Place all your clay peppers on a baking sheet lined with parchment paper. Ask a grown-up to help you bake them according to the directions on the clay package. Let them cool down completely.
- String Them On: Carefully poke the little bulbs of your fairy light string through the holes you made in the chili pepper stems. The peppers will hang right from the lights.
- Hang and Glow: Hang your new chili pepper lights along a wall or railing for a festive, Southwestern glow.
21. Mystical Night Nook

This balcony feels like a small, magical corner of the world. A cast-iron cauldron serves as a unique fire pit, its flames dancing with an enchanting light. The atmosphere is mysterious, set by a projector that casts a purple galaxy onto the wall. It’s a space for quiet wonder and imagination.
Hanging glass terrariums hold tiny gardens, and wind chimes wait for a breeze. A mobile of moons and stars dangles from a branch overhead. The seating is low and comfortable, with plush cushions and soft blankets in deep, rich colors. This little nook is a private escape to a world of magic.
DIY: Make a Crystal Wind Chime
Let’s make a pretty wind chime that sparkles in the light.
What You’ll Need:
- A small, interesting-looking stick or branch.
- Clear fishing line or thin string.
- A handful of assorted crystals or glass beads with holes in them.
- Scissors.
Step-by-Step Instructions:
- Prepare Your Strings: Cut a few pieces of fishing line, all in different lengths. Some can be long and some can be short.
- Tie on the First Crystal: Take one piece of string and tie a crystal or bead to the very end. Make a good, tight double knot so it doesn’t fall off.
- Add More Sparkles: You can tie a few more crystals or beads onto the same string, leaving some space between them.
- Create Your Chimes: Do this with all of your strings, creating several hanging strands of sparkly crystals.
- Attach to the Branch: Take one of your finished crystal strands and tie the top end to your stick. Do this with all your strands, spacing them out along the branch.
- Hang and Admire: Tie one more long piece of string to both ends of the stick to make a hanger. Find a place on your balcony to hang your beautiful new wind chime.
22. Arctic Explorer’s Balcony

This balcony has a cool, adventurous theme, like a base camp in the Antarctic. The furniture is made of simple, industrial metal, built to be tough. A map of the polar region hangs on the wall, inspiring thoughts of exploration. Everything here is functional and has a purpose.
A silver survival blanket is used as a throw, adding a surprising and modern touch. Metal storage trunks serve as tables, providing both surface area and storage. Mugs hang neatly from carabiners on a wire grid. This is a minimalist and imaginative space for the modern adventurer.
DIY: Make a Carabiner Mug Rack
You can create a cool and useful rack for hanging mugs, just like in the picture.
What You’ll Need:
- A wire grid panel (you can find these at home improvement or office supply stores).
- A few screws and wall anchors to hang the grid.
- A pack of carabiners (from a hardware or outdoor store).
- Your favorite mugs.
Step-by-Step Instructions:
- Hang the Grid: Ask a grown-up to help you securely attach the wire grid panel to a wall on your balcony. Make sure it’s straight and won’t fall down.
- Open a Carabiner: Take one carabiner. Find the part that opens (it’s called the gate) and push it inward.
- Clip It On: Clip the carabiner onto one of the horizontal wires of the grid. Let the gate snap shut.
- Add Your Mug: Now, just hang the handle of one of your mugs on the bottom curve of the carabiner.
- Create Your Rack: Do this with as many carabiners and mugs as you want. You can line them up in a neat row or scatter them around the grid. Now your mugs are organized and easy to grab!
23. Vineyard Tasting Porch

This porch feels like a rustic tasting room at a vineyard. The centerpiece is a large wine barrel used as a high-top table, a classic and charming choice. A tall pyramid patio heater provides a column of dancing flame, keeping the space warm and adding to the romantic ambiance.
A vintage candelabra adds a touch of old-world elegance. A wine rack is stocked and ready for guests. Even the decorations fit the theme, with a large glass jug filled with glowing corks and a wreath made from them. It is a warm, sophisticated space for enjoying good wine and good company.
DIY: Make a Wine Cork Wreath
This is a fun way to use old wine corks and make a great decoration.
What You’ll Need:
- Lots of wine corks (you’ll need about 50-100).
- A foam or straw wreath form from a craft store.
- A hot glue gun (this is a job for a grown-up!).
Step-by-Step Instructions:
- Get Ready: Lay your wreath form flat on a table. Ask a grown-up to plug in the hot glue gun so it can warm up.
- Start Gluing: Have your grown-up put a line of hot glue on the side of one cork.
- Stick It On: Quickly and carefully press the cork onto the wreath form. Hold it for a few seconds until the glue sets.
- Build Your First Layer: Keep gluing corks onto the wreath, side-by-side. Try to make them stand up straight. Go all the way around to cover the form.
- Add More Layers: Now, start gluing more corks on top of the first layer. You can place them in different directions to create an interesting, jumbled texture. Fill in any gaps you see.
- Let It Dry: Once you are happy with how your wreath looks, let the glue dry completely. Now you can hang your unique, rustic wreath on your door or wall.
24. Canadian Mountain Deck

This deck is a tribute to the great outdoors, with a stunning view of snow-covered mountains. Bright red Adirondack chairs provide a cheerful pop of color against the white snow. They look sturdy and inviting, ready for you to sit and take in the scenery.
Cozy blankets with a classic striped pattern and a maple leaf add warmth and a touch of national pride. A stone fire pit is ready for a bonfire. A simple evergreen wreath and a small frosted tree bring a festive, natural touch to the space. It’s a simple, beautiful spot to enjoy the crisp mountain air.
DIY: Make Your Own Tree Stump Table
You can make a rustic side table from a piece of a log.
What You’ll Need:
- A slice of a log or a short, level tree stump.
- A piece of coarse sandpaper.
- A clean, dry cloth.
- A can of clear polyurethane sealer (for outdoor use).
- A paintbrush.
Step-by-Step Instructions:
- Smooth the Top: Your log might be a little rough. Use the sandpaper to rub the flat top surface until it’s nice and smooth.
- Wipe It Clean: Use your dry cloth to wipe away all the sawdust. Make sure the log is completely clean and dry.
- Seal It Up: This part is best to do outside. Use your paintbrush to apply a thin, even coat of the clear sealer all over the log—top, bottom, and sides. This will protect it from the weather.
- Let It Dry: Let the first coat dry completely. It might take a few hours.
- Add a Second Coat: Once it’s dry, you can add a second coat of sealer to make it extra strong. Let that dry all the way.
- Ready to Use: Now your tree stump table is ready! Place it next to your chair to hold a book or a mug of hot chocolate.
25. The Aviator’s Lounge

This balcony is styled like a vintage pilot’s lounge. The standout piece is a stunning aviator chair, made with riveted aluminum and brown leather. The whole space has a cool, industrial feel, with a metal trunk for a coffee table and a large stage light for dramatic lighting.
The decor is all about flight. A wooden propeller hangs on the wall as art, and framed airplane blueprints add to the theme. A rolling bar cart is stocked for evening cocktails. It’s a sophisticated and masculine space, a tribute to the golden age of aviation.
DIY: Frame a Blueprint or Map
You can easily create cool, themed art for your walls.
What You’ll Need:
- A cool-looking print, like a vintage map, an old patent drawing, or an airplane blueprint (you can find these online and print them).
- A simple picture frame that fits your print.
- Scissors or a paper trimmer.
Step-by-Step Instructions:
- Choose Your Art: Find a picture online that you think is interesting. It could be anything from a map of your city to a drawing of a spaceship. Print it out on a nice piece of paper.
- Open the Frame: Turn your picture frame over and find the little tabs. Bend them up so you can remove the back piece.
- Check the Fit: Place the glass or plastic from the frame on top of your print. Make sure your picture is centered. If the paper is too big, you’ll see where you need to trim it.
- Trim to Size: Carefully use scissors to trim the edges of your paper so it will fit perfectly inside the frame.
- Put It Together: Place your trimmed print inside the frame, put the back piece on, and push the little tabs back down to hold everything in place.
- Hang It Up: Now you have a professional-looking piece of art to hang on your balcony wall!
26. Traditional Holiday Entryway

This entryway is decorated with classic, timeless elegance. A beautiful, ornate cast-iron bench is the centerpiece, made cozy with velvet and plaid pillows. The dark green brick of the house provides a rich backdrop for the festive decorations. The scene feels warm and welcoming.
Large, stately black urns are filled with lush winter greenery and bright red berries. A slender evergreen tree wrapped in fairy lights adds height and a gentle sparkle. A small chiminea is ready to offer warmth to arriving guests. This is a picture of sophisticated holiday cheer.
DIY: Make a Tiered Planter Stand
Create a stand to show off your plants at different heights.
What You’ll Need:
- Three terracotta pots in small, medium, and large sizes.
- Two terracotta saucers (the little plates that go under pots) that are wider than your small and medium pots.
- Some small rocks or gravel.
Step-by-Step Instructions:
- The Base: Take your largest pot and place it where you want your stand to be. This is the bottom level. You can fill it with a plant if you like.
- Create the First Tier: Take one of your saucers and flip it upside down. Place it over the opening of the large pot.
- Add the Second Level: Place your medium-sized pot right-side-up on top of the upside-down saucer.
- Create the Second Tier: Now, take your second saucer, flip it upside down, and place it on top of the medium pot.
- Add the Top Level: Place your smallest pot on top of the second upside-down saucer. You can fill this one with a plant, too!
- All Done: You now have a three-tiered planter! It’s a great way to add height and interest to your porch decor.
27. The Herbalist’s Sunroom

This enclosed balcony looks like a rustic apothecary or an herbalist’s workshop. The main feature is a simple wooden branch hanging from the ceiling, used to dry bunches of herbs, peppers, and oranges. The air in here must be wonderfully fragrant.
A wooden potting bench holds tools and supplies. Baskets on the shelves below are filled to the brim with pinecones. Wreaths made of twigs and nuts hang on the wall. This space is a celebration of nature’s bounty, a place for quiet, useful work and natural beauty.
DIY: Make a Branch Herb-Drying Rack
This is a very easy and beautiful way to dry herbs from your garden.
What You’ll Need:
- A sturdy, interesting-looking tree branch.
- Two equal lengths of strong rope or twine.
- Two hooks to screw into the ceiling.
- Bunches of fresh herbs (like rosemary, sage, or lavender).
- Some extra twine.
Step-by-Step Instructions:
- Prepare the Branch: Tie one piece of your rope securely to one end of the branch. Tie the other piece of rope to the other end.
- Hang the Rack: Ask a grown-up to help you screw the two hooks into the ceiling of your sunroom or covered porch, spaced as far apart as your branch is long.
- Tie It Up: Tie the loose ends of your ropes to the ceiling hooks. Adjust them so the branch hangs level, like a swing.
- Bundle Your Herbs: Take a few sprigs of one kind of herb and use a small piece of twine to tie the stems together tightly, leaving a long tail on the twine.
- Hang to Dry: Take your little herb bundle and use the long tail of the twine to tie it to your hanging branch so the herbs are hanging upside down.
- Fill Your Rack: Do this with all your different herbs, spacing them out on the branch. They will look beautiful and make your space smell amazing as they dry.
28. Mid-Century Modern Patio

This covered patio is bright and playful, with a fun mid-century modern style. The furniture has the classic shapes of that era, like a kidney-bean coffee table and a sleek wire chair. Bold pops of orange and turquoise stand out against the white walls and snowy background.
A geometric-patterned rug anchors the seating area. A tall, chrome arc lamp provides light, and a small electric fireplace adds a touch of warmth. Even the Christmas tree is decorated with simple, colorful ball ornaments that fit the retro vibe. This is a cheerful and stylish space for any season.
DIY: A Bowl of Festive Ornaments
This is one of the easiest and most stylish ways to decorate for the holidays.
What You’ll Need:
- A simple, stylish bowl (white, silver, or glass looks great).
- A box of round, shatterproof ball ornaments. For the best look, choose ornaments in just one or two colors.
Step-by-Step Instructions:
- Clean Your Bowl: Make sure your bowl is clean and dry.
- Start Filling: Take your ornaments and begin placing them in the bowl.
- Arrange Them: Gently arrange the ornaments until the bowl is full. You don’t need to do anything fancy, just pile them in.
- Find the Right Spot: Place your finished bowl of ornaments on a coffee table or a side table as a simple, modern centerpiece. That’s it! It’s a beautiful decoration that takes less than a minute to create.
29. Colorful Snow Day Patio

This backyard is set up for a day of winter fun. The scene is full of bright, happy colors that pop against the fresh snow. Sturdy plastic Adirondack chairs in red, yellow, and blue are gathered around a simple black fire pit, ready for warming up after playing.
The focus here is on games. A target stands ready for snowball practice, and an assortment of sleds are propped against the fence. A friendly snowman and a small igloo add to the playful atmosphere. Colorful string lights overhead make the space feel festive. This is a yard where memories are made.
DIY: Make a Snowball Target
This is a super fun project to set up on a snow day.
What You’ll Need:
- A large piece of cardboard or a sturdy poster board.
- A large plate and a small plate to trace circles.
- A pencil.
- Red paint and a paintbrush.
- A wooden stake or pole and some strong tape or string.
Step-by-Step Instructions:
- Draw the Outer Circle: Place your large plate in the middle of your cardboard and trace around it with a pencil.
- Draw the Inner Circle: Now, place the smaller plate in the very center of your first circle and trace around it.
- Paint the Bullseye: Use your red paint to fill in the very center circle. This is the bullseye!
- Paint the Outer Ring: Now, paint the outer ring red, leaving the ring in the middle white. Let the paint dry completely.
- Attach the Stake: Once it’s dry, flip the target over. Use strong tape or string to securely attach the wooden stake to the back of the target.
- Set It Up: Take your target outside and push the stake firmly into the snow. Now you’re ready for a snowball throwing contest!
30. Cozy Reading Solarium

This tiny, enclosed balcony has been turned into the ultimate cozy reading nook. A comfortable leather chair is made extra warm with a sheepskin throw and a glowing orange heating pad. The space is small, but every inch is used to create a feeling of warmth and comfort.
A small desk holds a book and a classic green lamp, perfect for reading on a gray day. A powerful floor heater provides serious warmth, while a collection of candles in a lantern adds a soft, flickering glow. This is a personal sanctuary, a quiet and warm escape from the winter weather just outside the glass.
DIY: Make a Safe Candle Lantern Cluster
Create a warm glow without any real flames, which is safer for small spaces.
What You’ll Need:
- A metal or glass lantern with a door.
- Three battery-powered LED candles of different heights (a tall one, a medium one, and a short one).
Step-by-Step Instructions:
- Open Your Lantern: Open the little door on your lantern. Make sure the inside is clean.
- Turn On Your Candles: Find the switches on the bottom of your battery-powered candles and turn them on.
- Arrange the Candles: Place the tallest candle in the back of the lantern. Place the medium one to one side, and the shortest one in the front. Grouping them together like this looks nice.
- Close It Up: Carefully close the lantern door.
- Find a Cozy Corner: Place your lantern on the floor in a corner of your balcony or on a sturdy table. It will give you a beautiful, warm glow that is completely safe.
31. Backyard Sauna Retreat

This backyard deck is a luxurious wellness escape. The star of the show is a beautiful wooden barrel sauna, glowing warmly from the inside. Next to it, a steaming wooden hot tub sends up clouds of steam into the chilly air. It’s a space designed for ultimate relaxation and warmth.
Sleek wooden loungers are ready with fresh, fluffy towels. A tall patio heater adds extra warmth to the deck area. Every detail, from the wooden bucket to the neatly hung robes, contributes to the feeling of a professional spa. This setup turns a backyard into a personal health sanctuary.
DIY: Make a Perfect Spa Towel Roll
You can make your towels look neat and fancy, just like at a spa.
What You’ll Need:
- A clean, fluffy bath towel.
- A flat surface, like a bed or a clean floor.
Step-by-Step Instructions:
- Lay It Flat: Lay your towel out flat on your surface.
- Fold a Corner: Take one corner of the towel and fold it diagonally over to the opposite side. The short edge should line up with the long edge, creating a point at one end.
- Fold in Half: Now, fold the towel in half lengthwise. You will have a long, skinny shape with a point at one end and a straight edge at the other.
- Start Rolling: Starting from the straight-edged end, begin to roll the towel up as tightly as you can.
- Tuck It In: When you get to the end, you’ll have a little pointy flap left. Simply tuck this flap securely into the rolled part of the towel to hold it all together.
- Stack Them Up: Make a few more of these and you can stack them in a pyramid or line them up in a basket for a clean, spa-like look.
32. Tropical Winter Getaway

This enclosed balcony is a vibrant, tropical party that defies the winter outside. Bright neon lights in the shape of a flamingo and palm trees create a fun, warm glow. The space is filled with lush, green artificial plants, giving the feeling of a jungle oasis.
Rattan chairs with colorful floral cushions provide a cheerful place to sit. A matching bar cart is stocked and ready for mixing fruity drinks. The decor is all about fun and escapism, a sunny slice of the tropics even on the grayest of days.
DIY: Make a Pineapple Drink Cooler
Create a fun centerpiece that also keeps your drinks cold.
What You’ll Need:
- A real, large pineapple.
- A long, sharp knife (a job for a grown-up!).
- A cutting board.
- A small spoon or an ice cream scoop.
- Ice.
Step-by-Step Instructions:
- Cut the Top: Ask a grown-up to carefully slice the leafy top off of the pineapple. Set the top aside.
- Hollow It Out: This is also a grown-up’s job. Have them use the knife to carefully cut around the inside edge of the pineapple, leaving about a half-inch border. Then, they can cut the inside fruit into chunks.
- Scoop It Out: Use a spoon to scoop out all the chunks of fruit. You can save these to eat later! Keep scooping until the pineapple is mostly hollow inside.
- Fill with Ice: Take your hollow pineapple shell and fill it with ice.
- Add Your Drinks: You can now stick a bottle or a can into the ice to keep it cool. Place the leafy top next to it for decoration. It’s a natural and fun party cooler!
33. Old Hollywood Movie Patio

This covered patio is transformed into a glamorous black-and-white movie theater. A large projector screen shows a classic film, creating a unique entertainment experience. The design is all about drama and sophistication, with a bold striped rug and ornate, silver-and-black furniture.
Fluffy white and black stools and throws add texture and comfort. A vintage-style stage light adds to the movie-set feel. A rolling bar cart holds elegant glasses, ready for a fancy drink. It’s a stylish and creative way to host a movie night, full of Hollywood glamour.
DIY: Make a “Now Showing” Chalkboard Sign
You can make a fun sign to announce what movie you’re watching.
What You’ll Need:
- A small, simple chalkboard (you can find these at a craft store).
- A piece of white chalk.
- A ruler.
Step-by-Step Instructions:
- Write the Title: At the top of your chalkboard, write the word “TITLE” or “NOW SHOWING” in big, clear letters.
- Add a Line: Use your ruler to help you draw a straight line underneath your heading.
- Write the Movie Name: Below the line, write the name of the movie you are planning to watch. You can try to write it in a fancy or fun way.
- Add Details: If you want, you can add other fun details, like “STARRING: Mom and Dad” or “ADMISSION: One Hug.”
- Display Your Sign: Prop your finished chalkboard up on a small table or an easel near your movie screen for everyone to see.
34. English Cottage Porch

This porch is the definition of “cottagecore” charm. It feels like a cozy corner of an English country garden. A comfortable wicker sofa is piled high with cushions in a lovely floral chintz pattern. The whole space is soft, pretty, and very inviting.
A string of lights with tiny lampshades provides a gentle, whimsical glow. A small electric fireplace heater offers warmth on a cool evening. Quilts and plaid throws are ready for snuggling. This porch is a sweet and romantic spot for reading a book or enjoying a cup of tea.
DIY: Make a Simple Lavender Sachet
Create a little scented pouch that will make your space smell wonderful.
What You’ll Need:
- A small square of breathable fabric, like cotton or linen.
- A spoonful of dried lavender buds.
- A piece of ribbon or twine.
- Scissors.
Step-by-Step Instructions:
- Lay Out Your Fabric: Lay your fabric square flat on a table.
- Add the Lavender: Spoon the dried lavender into the very center of the fabric square.
- Gather It Up: Carefully pick up all four corners of the fabric and bring them together, making a little pouch with the lavender inside.
- Tie It Closed: While pinching the fabric together, take your piece of ribbon and tie it tightly around the gathered fabric, just above the lavender.
- Make a Bow: Tie the ends of the ribbon into a pretty bow. You can trim the ends if they are too long.
- Enjoy the Scent: You can place your little sachet on a table, tuck it into a cushion, or hang it from a hook. Give it a gentle squeeze whenever you want to release a lovely, calming scent.
35. Modern Porch Reading Retreat

This covered porch is a peaceful and modern retreat for one. The design is clean and simple, with a soothing gray color scheme. A comfortable recliner with an ottoman provides the perfect spot to put your feet up with a good book. The focus here is on quiet and personal comfort.
A small, efficient heater sits on the ottoman, providing direct warmth. A sleek floor lamp gives focused light for reading as evening falls. Soft blankets and a textured pillow add layers of coziness. It’s an uncluttered and calming space, designed for solitary relaxation.
DIY: Make a Tassel Bookmark
Create a simple and stylish bookmark so you never lose your page.
What You’ll Need:
- A skein of embroidery floss or thin yarn in your favorite color.
- A piece of stiff cardstock or a thin piece of cardboard.
- Scissors.
Step-by-Step Instructions:
- Wrap the Floss: Start wrapping the embroidery floss around the piece of cardboard. Don’t wrap it too tightly. Keep wrapping until it’s as thick as you want your tassel to be.
- Tie the Top: Cut a separate 6-inch piece of floss. Slip it under all the wrapped threads at the top of the cardboard and tie a tight double knot. This holds everything together.
- Cut the Bottom: Slide the bundle of floss off the cardboard. Use your scissors to cut through all the loops at the bottom, opposite of your knot. You now have a fringe.
- Make the “Neck”: Cut one more 6-inch piece of floss. About half an inch down from the top knot, wrap this piece around the tassel several times and tie it in a tight knot. This creates the little head of the tassel.
- Trim It: Your tassel fringe might be a little uneven. Use your scissors to give it a neat trim at the bottom. The long strings from the top knot are what you’ll use to mark your page.
Leaving your outdoor space empty all winter is a missed opportunity. As these 35 ideas show, you don’t need to wait for spring to step outside. A few simple changes can turn a cold, forgotten patio into a warm, magical extension of your home.
The key is to focus on comfort. By adding sources of warmth, layering soft textiles, and casting a gentle glow with lights, you create an environment that feels just as inviting as your living room. It’s about making your outdoor space a destination, not an afterthought.
Don’t feel like you need to do everything at once. Start with one project that speaks to you. Add a fire pit, drape a blanket over a chair, or hang a string of lights. You might be surprised how a small change can make a big difference, giving you a new way to appreciate the quiet beauty of the season.
Key Takeaways
- Introduce Warmth: The most important step is adding a heat source. This can be a fire pit, a standing or wall-mounted heater, or even small heated cushions and blankets.
- Layer Soft Textiles: Instantly add comfort and coziness with layers. Use outdoor rugs, chunky knit blankets, faux fur throws, and plush pillows.
- Create a Warm Glow: Lighting is crucial for ambiance. Use outdoor string lights, battery-powered candles in lanterns, and solar-powered garden lights to make the space feel magical.
- Incorporate Natural Elements: Bring life to your winter decor with hardy evergreens, pinecones, birch logs, and dried floral wreaths.
- Personalize with DIY: Simple, handmade projects make your space feel unique. A DIY touch adds character and charm that you can’t buy in a store.