The days grow shorter and the air turns crisp, signaling the absolute best time to cocoon inside. Your living room transforms into the heart of your home during these colder months. Moving away from summer’s breezy energy, we look for materials and colors that promise warmth and security.

This season requires a shift in focus, embracing layers, rich textures, and deep, inviting color palettes. Comfort becomes the priority, making spaces that feel less like a room and more like a retreat. We are bringing in the elements of nature, like wood, stone, and plush textiles, to create a genuinely restorative environment.
We believe that achieving this sought after winter haven doesn’t require a total renovation. Small, intentional updates using strategic decor and clever DIY projects can dramatically increase the cozy factor. Get ready to explore a curated collection of 35 diverse ideas, each guaranteed to make your living room the warmest, most welcoming spot this winter.
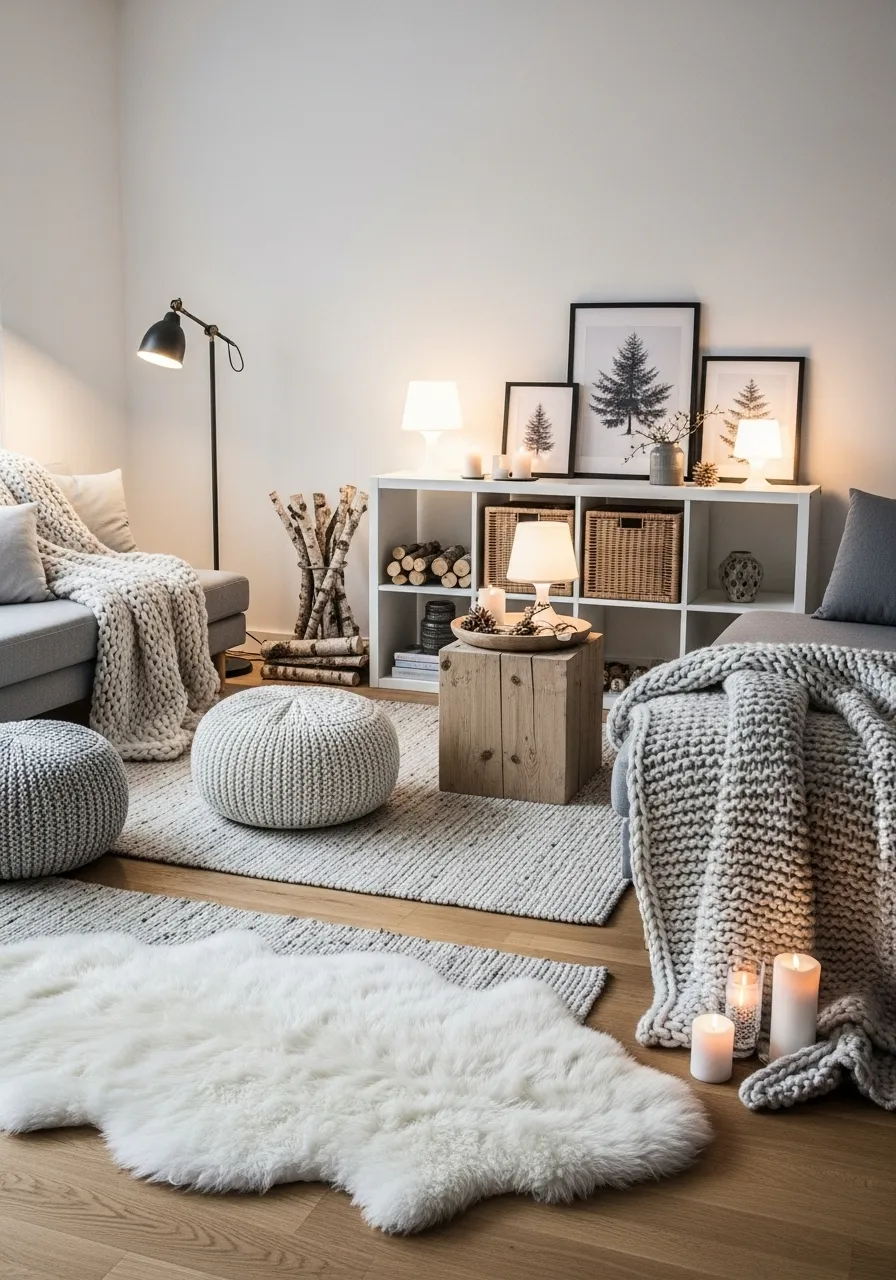
1. Chunky Knit and Faux Fur Hygge Haven

This living room setup truly embodies the Scandinavian concept of hygge. Soft textures are layered generously, making the entire space feel like a warm embrace. Notice the stunning chunky knit throws draped invitingly over the gray sectional sofa, practically begging you to curl up. A luxurious white faux sheepskin rug anchors the seating area, adding amazing texture and reflecting the soft lamplight.
Natural elements bring the outdoors in, including the stack of birch logs nestled beside the sofa and the raw wood side table. The low light from the table lamps and candles creates an enveloping, golden glow that instantly relaxes the eye. Tonal variations of cream, gray, and white keep the aesthetic crisp and clean while still feeling incredibly welcoming. This combination of plush materials and rustic accents elevates the winter comfort level wonderfully.
Required Material List: DIY Chunky Knit Throw
A chunky knit throw is a cornerstone of this cozy look. You can easily make your own using just your arms—no needles required!
- Chunky Yarn: Approximately 5-7 skeins (about 40 ounces total) of extra bulky or jumbo weight yarn, typically made from acrylic or merino wool blend. Choose a color like light gray, cream, or beige.
- A Large, Flat Surface: A clean floor or large table to work on.
- Scissors
- A Ruler or Measuring Tape (optional, for checking tension)
DIY Instruction: Arm Knitting a Chunky Throw
This method is surprisingly simple and creates that highly sought after, large knit texture.
Preparation and Casting On
- Unwind the Yarn: Unravel your first skein and find the yarn end. Do not cut the yarn yet; you will connect skeins later as needed.
- Measure the Tail: Pull out a generous tail of about three feet of yarn. You will use this to tie off the blanket at the end.
- Create a Slip Knot: Form a loop with the yarn, then tuck another loop of the yarn through the first one. Pull on the long piece of the yarn (the working yarn) to tighten the knot. This is your first stitch. Place this loop onto your dominant arm (the one you write with).
- Cast On the Next Stitches: Hold the working yarn (the yarn connected to the skein) in your free hand. Lay the tail and working yarn across your free hand, forming a loose triangle shape. Scoop your dominant arm under the top strand of the triangle, grab the bottom strand with your fingers, and pull it up and through the loop on your arm.
- Repeat the Cast On: Slide the new loop onto your dominant arm. Repeat this process until you have about 15-20 stitches on your arm. The number depends on how wide you want the blanket. Aim for a width you like, ensuring the stitches aren’t too tight.
Knitting the Rows
- Start Row One: Switch the working yarn so it is draped behind your dominant arm. Take a loop from your dominant arm, and with your free hand, grab the working yarn and pull a loop of it through the first loop.
- Move the Stitch: Slide the original loop off your dominant arm and place the new loop you just pulled through onto your other arm (your non-dominant arm). This completes your first knit stitch.
- Complete the Row: Repeat this process for all stitches on your dominant arm. When you’re done, all the stitches should be on your non-dominant arm. This is the first row knitted.
- Start Row Two: To begin the next row, simply switch the working yarn back so it is draped behind your non-dominant arm. Repeat the knitting process, moving the stitches back onto your dominant arm.
- Connect New Yarn (If Needed): When one skein is almost finished, simply tie the end of the old skein to the beginning of the new skein with a secure, small knot. Continue knitting with the new yarn.
Binding Off (Finishing)
- Knit Two Stitches: When the blanket is the length you desire, knit the first two stitches of the final row onto your non-dominant arm.
- Pass Over: Use your free hand to lift the first stitch on your non-dominant arm and pull it completely over the second stitch and off your arm. You now have one stitch remaining on that arm.
- Knit One, Pass Over: Knit one more stitch onto the non-dominant arm. Repeat the process of lifting the second-to-last stitch over the last one.
- Finish: Continue this until only one loop remains on your arm. Cut the working yarn, leaving a long tail (about two feet). Pull the tail completely through the last remaining loop and tug gently to secure the knot. Weave in the tail ends using your fingers to hide the knots and raw edges.
2. Rustic Stone Hearth Lodge

This grand room embraces the rustic lodge aesthetic, perfect for feeling warm during the coldest months. The towering stone fireplace, stretching high to the vaulted ceiling, serves as an impressive focal point. Rich, dark leather sofas and armchairs invite guests to sink in, layered with plush, patterned pillows that add a welcome touch of texture.
Above the thick, wooden mantelpiece hangs a simple yet elegant mirror, reflecting the soft, flickering light from the fire. The large, circular iron chandelier contributes to the cozy atmosphere with its warm, multiple points of light. Beautiful wall sconces shaped like antlers reinforce the charming, cabin like theme. This masterful combination of natural textures and deep, earthy tones creates an unequivocally warm and strong winter retreat.
Required Material List: DIY Faux Antler Wall Sconce
Achieving that rustic, lodge feel is easier than you think with a simple faux antler sconce project.
- Two Faux Antlers: Look for lightweight resin or plastic replicas. Ensure they are sized appropriately for your wall space.
- Two Small Wooden Plaques or Disks: These will serve as the mounting base, roughly the diameter of the antler base.
- Two Battery Operated Flickering Taper Candles: Choose ones with a built-in timer for convenience.
- Dark Walnut or Espresso Wood Stain: A small can to match the wood accents in the room.
- Mounting Hardware: Two keyhole hangers or D-rings and screws (for attaching to the plaque).
- Strong Adhesive: Such as construction adhesive or epoxy, for bonding the antler to the plaque.
- Drill and Screws: For mounting the finished piece to the wall.
- Safety Glasses and Gloves
- Rags or Foam Brush: For applying the stain.
DIY Instruction: Creating the Faux Antler Wall Sconce
This project gives you that charming, natural detail without the need for complex wiring.
Preparing and Assembling the Sconce
- Stain the Base: Put on your gloves and apply the wood stain to the small wooden plaques or disks using a rag or foam brush. Follow the manufacturer’s instructions, usually letting it sit for a few minutes before wiping off the excess. Allow the wood to dry completely, which may take several hours.
- Attach Mounting Hardware: Once the stain is dry, flip the wooden plaque over to the back. Measure and attach the keyhole hanger or D-ring near the top center of the back using small screws and a drill. This hardware will be used to hang the sconce on the wall.
- Attach the Antler: Locate the flattest part of the faux antler base. Apply a generous amount of strong adhesive (epoxy works well here) to the flat back of the antler base.
- Bond the Pieces: Carefully press the antler onto the front center of the stained wooden plaque. Press firmly and hold for a few moments. Use painter’s tape to secure the antler to the plaque temporarily while the adhesive cures. Allow the adhesive to dry fully according to the product instructions, which may be 12 to 24 hours.
Finishing and Installation
- Mount to the Wall: Decide on the placement for your sconces. Use a level and measuring tape to ensure they are at the same height and distance from the fireplace or wall center. Mark the spot where the screw needs to go for the keyhole hanger.
- Install the Screws: Drill a pilot hole and insert a wall anchor if necessary, then securely screw a long screw into the wall, leaving the head slightly exposed.
- Hang the Sconce: Carefully hang the finished antler plaque onto the exposed screw head using the keyhole hanger. Check that it is level.
- Add the Candle: Place a battery operated taper candle directly onto a tine or branch of the antler, or secure it gently with a small piece of removable mounting putty if needed. Turn the candle on for a lovely, flickering glow.
3. Minimalist Zen Retreat

This design captures a stunning feeling of tranquil simplicity and mindful living. The room features a serene, muted palette of whites, grays, and soft beige, creating a calm atmosphere. A large, spherical paper lantern pendant casts a gentle, ambient light over the whole area. The seating is low and inviting, built into the wall with plush cushions and soft pillows, emphasizing relaxation.
Framing the seating nook are lovely shoji style wooden dividers with opaque panels, which add architectural interest while maintaining a sense of openness. Floor cushions and nesting black metal tables define the gathering space, inviting low to the ground conversation. This aesthetic, utilizing clean lines and natural materials, offers a welcome contrast to the harshness of winter outdoors.
Required Material List: DIY Oversized Paper Lantern Floor Lamp
To recreate the soft, diffused light, you can build a simple floor lamp that uses a large paper lantern.
- Extra Large Paper Lantern Shade: (Approximately 24 to 30 inches in diameter). Make sure it includes the wire frame expander.
- Simple Floor Lamp Base: A basic, tall floor lamp with a standard bulb socket and a stable, heavy base. Remove the existing shade or harp.
- LED Bulb: A low wattage, warm white LED bulb (avoid high heat bulbs).
- Twine or Thin Rope: A few feet for decoration and stability.
- Small Metal Ring or Carabiner Clip: For attaching the lantern to the lamp structure.
DIY Instruction: Assembling the Paper Lantern Floor Lamp
This project repurposes an existing lamp base to give you a large, softly glowing fixture.
Preparing the Base and Lantern
- Unpack the Lantern: Carefully remove the paper lantern shade and its wire expander from the packaging. Fully expand the lantern and secure the wire frame inside to hold its shape.
- Remove Old Shade: Take the old shade and any shade harp components off the floor lamp base. You want the bare socket housing and the tall pole.
- Check Height: Place the fully expanded lantern next to the lamp base. Determine if the lantern shade is tall enough to completely cover the bulb socket and pole structure, resting on the floor or the base of the lamp. You may need to adjust the height of the lamp pole slightly if possible, or choose a shorter base.
Assembly and Final Touches
- Position the Bulb: Screw the warm LED bulb into the socket. Ensure the lamp is unplugged during all assembly steps.
- Attach the Lantern: Carefully lower the large paper lantern over the lamp pole, allowing it to rest gently on the floor or the weighted base of the lamp. The hole at the top of the lantern should align near the top of the pole.
- Secure the Lantern (Optional but Recommended): Use the small metal ring or clip to lightly attach the top wire loop of the lantern to the lamp pole, just below the socket housing. This prevents the lantern from shifting or tipping.
- Wrap for Detail: For an added natural touch, wrap the visible lamp pole just below the lantern with a piece of twine or thin rope. This provides a subtle contrast against the paper.
- Test the Light: Plug the lamp in and turn it on. The low wattage LED bulb will provide beautiful, diffused light, mimicking the soft glow of the image. The paper shade must not touch the bulb.
4. Classic Library Winter Study

Here is a sophisticated setting, evoking the feel of a classic, cozy study or library. Dark wood cabinetry with rich grain covers one entire wall, displaying an impressive collection of leather bound books and intriguing globes. This dark, handsome shelving unit provides tremendous visual warmth through its deep, beautiful color. The paint on the walls is a gorgeous deep forest green, a hue that pairs elegantly with the wood tones.
Two handsome cognac leather wingback chairs stand prominently, offering extremely comfortable seating for reading or contemplation. The brass hardware on the bookcases and the matching brass candle holders on the desk add a lovely sparkle to the dark room. Everything about this space speaks to quiet luxury and the deep comfort of settling in with a good book during a chilly afternoon.
Required Material List: DIY Antiqued Book Stacks
To achieve the genuine “old library” look, you can easily transform inexpensive or thrifted books into antiqued book stacks with a uniform, classic color.
- A Stack of Used Hardcover Books: Choose books of varying thicknesses and heights.
- Brown Craft Paper or Butcher Paper: Enough to cover all the books.
- White Glue: Standard school glue or PVA glue.
- Strong Brewed Coffee or Tea: Cooled down, for achieving an aged paper look.
- Small Paintbrush
- Ruler or Straight Edge
- Pen or Pencil
- Twine or Ribbon: In a complementary color like burgundy or dark green.
DIY Instruction: Creating the Antiqued Book Stacks
This process gives disparate books a uniform, aged, and classic look, making them look like a valuable collection.
Preparing the Book Covers
- Measure and Cut Paper: Take one book and measure the area you want to cover: the spine and the front and back covers. Cut a rectangular piece of brown craft paper slightly larger than your measurements.
- Affix the Paper: Brush a thin, even layer of white glue onto the spine and covers of the book. Carefully wrap the paper around the book, smoothing out any bubbles or wrinkles as you go. Fold the edges inside the front and back cover for a clean finish, just like a book jacket. Repeat this step for all your books.
- Allow to Dry: Place the covered books under something heavy (like a cutting board) overnight to ensure the paper adheres flat and smooth.
The Antiquing Process
- Brew the Stain: Brew a very strong pot of black coffee or tea. Let it cool completely. The darker the brew, the stronger the antique effect.
- Apply the Stain: Using a paintbrush, gently brush the cool coffee or tea over the paper on the spine and covers of the books. Focus on the edges and corners where natural aging would occur. Do not saturate the paper, just apply a light, even coat.
- Dry Thoroughly: Allow the books to dry completely, preferably overnight. The coffee will leave a subtle, sepia toned stain that looks like aged leather or parchment.
Finishing Touches
- Optional Spine Labels: If desired, you can cut small rectangles from slightly lighter colored paper and lightly stain them as well. Print or hand write classic titles onto these labels and glue them onto the book spines.
- Stack and Tie: Arrange the books in small stacks of two or three. Tie a piece of twine or ribbon around each stack, securing it with a simple knot or bow.
- Display: Place your finished antiqued stacks throughout the bookshelf and on tables to achieve that charming, classic study look.
5. Sleek Winter White Lounge

This living space features a cool, modern aesthetic that perfectly mirrors the crisp winter landscape outside the enormous window. The design utilizes a stunning palette of whites, frosty grays, and soft powder blue accents, achieving a sophisticated and contemporary look. Built in seating and modular sofas keep the lines clean and low profile, maximizing the view.
A plush area rug adds a welcoming softness underfoot, crucial for balancing the room’s sleek surfaces. The marble topped coffee table grounds the seating area and provides a chic stage for simple, organic winter branches displayed in clear glass vases. Subtle lighting integrated into the window ledge provides a soft ambient glow, making the room feel connected to the snowy sky outside. This style proves that a minimalist approach can still feel very inviting.
Required Material List: DIY Frosted Winter Branches Centerpiece
A beautiful, simple way to bring the winter feel indoors is by creating a frosted branch display.
- Dry Tree Branches: Collect thin, clean, dry branches from outside or purchase decorative ones.
- Matte White Spray Paint: (Optional, for a cleaner, whiter base).
- Spray Adhesive: A can of strong hold spray glue.
- Epsom Salt or Glitter: Use Epsom salt for a realistic, crystalline frost effect, or fine silver glitter for a sparkling finish.
- Glass Vase or Clear Container
- Safety Glasses and Drop Cloth
DIY Instruction: Creating the Frosted Winter Branches Centerpiece
This project is quick, easy, and yields a dramatic, sculptural winter accent.
Preparing the Branches
- Clean and Prepare: Ensure the branches are dry and free of debris. If using matte white spray paint, lay the branches out on a drop cloth in a well ventilated area. Apply a light, even coat of white paint and let it dry completely. This step helps the final “frost” color pop.
- Prepare the “Frost”: Pour a generous amount of Epsom salt or glitter into a wide, shallow container.
Applying the Frost
- Apply Adhesive: Working with one branch at a time, hold the branch at arm’s length over the drop cloth. Spray a light, consistent layer of spray adhesive onto the surface of the branch. Focus on the twigs and tips.
- Apply the Salt/Glitter: Immediately after spraying the adhesive, hold the branch over the container of Epsom salt. Gently sprinkle, scoop, or roll the branch through the salt/glitter mixture. Ensure the adhesive is coated thoroughly. The wet adhesive will grab the salt, mimicking a coat of frost.
- Set the Branches: Carefully lift the coated branch and gently shake off any excess salt back into the container. Lay the branch down on the drop cloth to dry completely. Do not touch the coated areas until the adhesive is fully cured. Repeat the process for all remaining branches.
Displaying the Centerpiece
- Arrange in Vase: Once the branches are completely dry and the salt is securely adhered, gather them. Place the branches into your clear glass vase or container.
- Add Base Support (Optional): If the branches wobble, you can fill the bottom of the vase with small white stones or marbles for stability.
- Placement: Place the finished frosted branches on your coffee table or windowsill to achieve a beautiful, winter inspired, sculptural display.
6. Mid-Century Geometric Pop

This living room bursts with mid-century modern personality and cheer, proving that winter decor can be bright and lively. A saturated mustard yellow sofa and matching armchair provide vibrant seating, contrasting nicely against the deep, rich green accent wall. The plush, high pile shag rug with a black geometric pattern introduces incredible texture and warmth underfoot.
The teak wood media console and nesting coffee tables exemplify classic mid-century lines. Above the console, a large abstract artwork featuring strong geometric shapes in orange, green, and gray becomes a beautiful focal point. Warm brass floor lamps flank the console, adding a lovely metallic element and casting a soft glow. This room uses bold color and texture to maintain energy even on the cloudiest days.
Required Material List: DIY Mid-Century Nesting Coffee Tables
A set of nesting tables provides the necessary mid-century silhouette and functional, space saving design.
- Three Round or Square Wood Blanks: Three different sizes (e.g., 18, 16, and 14 inches) in a suitable wood like pine or birch.
- Pre made Hairpin Legs: Purchase three sets of different height hairpin legs (e.g., 18, 16, and 14 inches tall) in black or brass.
- Screws: Short wood screws appropriate for attaching the legs.
- Wood Stain: A medium to dark brown stain (like Teak or Walnut).
- Rag or Foam Brush: For applying the stain.
- Drill and Screwdriver
- Pencil and Measuring Tape
- Safety Glasses
DIY Instruction: Building the Mid-Century Nesting Tables
This project requires minimal woodworking skills and is a fast way to achieve that iconic mid-century shape.
Staining the Tabletops
- Prepare the Wood: Lightly sand the wood blanks to ensure a smooth, clean surface. Wipe off any sawdust.
- Apply the Stain: Put on your safety glasses and apply the wood stain to the tops and sides of all three wood blanks using a clean rag or foam brush. Apply the stain in the direction of the wood grain.
- Wipe and Dry: After a few minutes (check the stain instructions), wipe off any excess stain. Allow the tabletops to dry completely, which may take up to 24 hours.
Attaching the Hairpin Legs
- Lay Out the Legs: Flip one of the stained tabletops upside down. Place the appropriate set of hairpin legs onto the underside of the tabletop. Arrange them evenly around the perimeter. Typically, the legs are placed about an inch or two from the edge.
- Mark and Drill: Use a pencil to mark the position of the screw holes through the leg bases onto the wood. It is helpful to drill small pilot holes at each mark. This prevents the wood from splitting.
- Screw the Legs: Use the drill and screwdriver to secure the hairpin legs to the tabletop with the wood screws. Ensure the screws are tight but do not strip the wood.
- Repeat for All Tables: Repeat the entire leg attachment process for the remaining two tabletops, using the corresponding taller legs for the larger tabletops. The heights should descend as the table sizes decrease to ensure they nest properly.
Final Arrangement
- Place and Arrange: Flip the tables right side up. Arrange them in your living room so that the smaller tables tuck neatly underneath the larger ones. Pull them out when you need extra surfaces for snacks or drinks.
7. Coastal Winter Whites

This beautiful space blends the softness of a winter palette with a touch of relaxed coastal charm. Light gray shiplap walls and rough hewn wooden beams create a breezy, natural texture that feels incredibly inviting. A huge, chunky knit throw in a lovely dusty blue drapes over the linen sofa, introducing a cooling but soft color.
Natural materials abound, including the large, rustic wicker storage chest serving as a side table and the rough driftwood pieces gathered in white ceramic vases. The overall palette is dominated by whites, grays, and soft blues, reminiscent of a crisp, quiet beach in the off season. Tall, adjustable floor lamps provide focused light for reading, enhancing the room’s serene and relaxed atmosphere.
Required Material List: DIY Driftwood and Rope Mirror Accent
To emphasize the coastal and rustic elements, you can easily create a rope and driftwood accent to place near your mirrors.
- Two Pieces of Dry Driftwood: Select two pieces that are about 12-18 inches long and visually interesting.
- Thick Natural Jute Rope: Approximately 4-6 feet of thick, natural fiber rope.
- Hot Glue Gun and Hot Glue Sticks
- Scissors
- Small Metal Hook or Nail: For hanging the accent.
DIY Instruction: Crafting the Driftwood and Rope Mirror Accent
This quick DIY project adds a tactile, nautical element that complements the serene, coastal style.
Preparing the Rope Hanger
- Measure and Cut Rope: Take the jute rope and cut two lengths, each approximately 2-3 feet long. These will be the decorative hangers.
- Create a Loop: Take one piece of rope and tie a secure, decorative knot at the top, forming a large loop that can easily hook over a wall hook. You can use a simple overhand knot or a figure eight knot for texture.
- Tie to Driftwood: At the opposite end of the rope, tie the rope securely around the center of one piece of driftwood. A strong knot like a square knot or a whipping knot works best. Ensure the driftwood piece hangs horizontally. Repeat this process for the second piece of rope and driftwood.
Finishing and Display
- Reinforce with Glue (Optional): For extra security, apply a small amount of hot glue beneath the rope where it wraps around the driftwood to prevent slippage.
- Hang the Accent: Install a small hook or nail on the wall above and between your mirrors, or near them as shown in the photo.
- Drape the Rope: Hang the rope loop over the hook, allowing the rope to drape gently and the driftwood to hang below. The overall effect should be relaxed and natural.
- Complete the Look: Place simple shell accents or sea glass in a bowl nearby to complete the coastal theme.
8. Warm Autumnal Jewel Tones

This space captures the rich, deep colors associated with the coziest parts of autumn and winter. The color scheme revolves around gorgeous, earthy olives and vibrant, spicy oranges. A deep olive green velvet sofa and matching armchairs feel wonderfully plush and inviting. Contrasting burnt orange throws and pillows are layered across the seating, providing a dramatic yet warm focal point.
A large, textured natural fiber rug grounds the room, adding a neutral but soft base. The dark, antique steamer trunk used as a coffee table introduces a fantastic vintage element. Amber glass lanterns and small bowls filled with pinecones and cinnamon sticks enhance the visual warmth and create an intoxicating sense of aroma. This rich color combination is a wonderfully decadent way to combat the cold.
Required Material List: DIY Scented Winter Bowl Centerpiece
A beautiful, fragrant centerpiece is a multisensory way to invite winter warmth into your home.
- Medium Sized Wooden Bowl: A rustic, natural wood bowl is best.
- Pinecones: Collect or purchase clean, dry pinecones.
- Cinnamon Sticks: A generous handful of whole cinnamon sticks.
- Star Anise: A small bag of star anise pods for visual texture.
- Dried Orange Slices (Optional): You can dry these yourself or purchase them pre sliced.
- Clove Essential Oil (Optional): For boosting the natural scent.
- Small Glass Jar or Container: For holding the essential oil.
DIY Instruction: Assembling the Scented Winter Bowl
This incredibly simple project relies on natural elements to create a beautiful, aromatic display.
Preparing the Scent Elements
- Dry the Pinecones: If you gathered your pinecones outside, bake them on a parchment lined baking sheet at $200^\circ\text{F}$ for about an hour. This opens the cones and eliminates any pests or moisture. Let them cool completely.
- Scent the Pinecones (Optional): If you want a stronger, longer lasting scent, place the cooled pinecones in a large sealable plastic bag. Add a few drops of clove or cinnamon essential oil to a small piece of cotton ball, then place the cotton ball in the bag. Seal it and let it sit for 24 hours to allow the scent to infuse. Remove the cotton ball before arranging.
Assembling the Bowl
- Start with Pinecones: Place the majority of the pinecones into the wooden bowl, filling the base and giving it volume.
- Layer the Spices: Gently arrange the cinnamon sticks and star anise on top of and around the pinecones. Place them strategically so their shapes and colors are visible.
- Add Orange Slices (If Used): If using dried orange slices, tuck them vertically between the pinecones for a pop of bright color.
- Display: Place the finished, beautifully scented wooden bowl on your coffee table or sideboard, letting the natural aromas fill your cozy room.
9. Regal Jewel Tone Drawing Room

This room exudes drama and luxury, utilizing deep jewel tones and highly reflective surfaces for a sophisticated winter ambiance. Rich, dark navy blue walls provide a stunning backdrop for the opulent emerald green velvet Chesterfield sofas. The room feels lavish and deeply inviting due to the contrast between the dark walls and the brilliant colors.
The crystal chandelier and mirrored wall panels multiply the light sources, giving the whole room an intense, glittering effect. Stunning brass accents on the bar cart and the gilded frames add a touch of timeless elegance. Plush pillows in coordinating blues and greens complete the seating arrangement, making this space feel exceptionally rich and decadent for entertaining during the cold season.
Required Material List: DIY Gilded Table Accessories
To achieve the glamorous, regal look, you can easily add gilded gold accents to simple items.
- Small, Simple Candle Holders or Trays: Choose ceramic, glass, or metal items from a thrift store or craft shop.
- Gold Leaf Kit: Includes adhesive size (glue), gold leaf sheets, and a sealer.
- Small, Soft Brush: For applying the size and smoothing the leaf.
- Cotton Swabs or Small Sponge
- Rubbing Alcohol (Optional): For cleaning surfaces.
- Safety Glasses and Gloves
DIY Instruction: Creating Gilded Table Accessories
This project uses gold leaf to add that beautiful, polished brass and gold detail found in luxurious rooms.
Preparing the Surface
- Clean the Items: Wipe down the candle holders or trays with rubbing alcohol to ensure they are completely clean and dry. This helps the adhesive bond properly.
- Section Off (Optional): If you only want to apply gold leaf to specific areas (like the base of a candle holder), use painter’s tape to tape off the sections you want to protect.
Applying the Gold Leaf
- Apply the Size: Put on your gloves and glasses. Using the small brush or cotton swab, apply a thin, even coat of the gold leaf adhesive size (glue) to the areas you want to gild. Follow the manufacturer’s directions for the required drying time—the size should become tacky (sticky to the touch but not wet). This usually takes 5-20 minutes.
- Apply the Leaf: Carefully pick up a sheet of gold leaf and gently lay it over the tacky surface. Pat it down very lightly with the soft brush. Do not press hard.
- Burnish and Remove Excess: Once the leaf is on, use the soft brush to gently smooth and burnish (polish) the surface. The excess leaf will flake away, leaving the gold adhered only to the tacky size. Use a clean, dry brush to whisk away all the loose flakes. Repeat this process until the entire desired area is covered.
Sealing and Finishing
- Apply Sealer: Once you are happy with the coverage, apply the gold leaf sealer (usually a clear varnish) over the finished gold areas. This protects the delicate gold leaf from tarnishing and chipping. Allow the sealer to dry completely.
- Remove Tape (If Used): Carefully peel off any painter’s tape you used.
- Display: Arrange your new gilded accessories on the coffee table or bar cart to bring a brilliant, regal sparkle to your winter room.
10. Industrial Cozy Loft

This urban loft blends the raw character of industrial style with comforting, cozy elements. The exposed brick wall and concrete finishes provide a wonderfully strong, masculine foundation. The modular, low profile gray sofa is incredibly appealing, layered with simple, textured pillows that soften the angular design. A white, plush shag rug anchors the entire space, adding much needed softness and warmth against the hard flooring.
The lighting choices are a key feature; simple Edison bulbs hang from the high ceiling, and the adjustable black metal floor lamp provides focused, warm light. Metal shelving units and vintage style lanterns introduce that classic, rustic industrial touch. This setting shows how clean lines and raw materials can still feel genuinely warm and comfortable when balanced with soft textiles.
Required Material List: DIY Industrial Lantern Display
Recreate the warm glow by making a simple display using industrial style lanterns.
- Two or Three Metal or Wood Framed Lanterns: Choose lanterns of varying heights for visual interest.
- Battery Operated Pillar Candles: Select candles with a warm white flame color and a flickering effect.
- Small Bags of Decorative Filler (Optional): Like small pebbles, moss, or dried lentils to place at the base of the candles.
- Metal Cleaner (If using vintage lanterns)
DIY Instruction: Creating the Industrial Lantern Display
Lanterns are an easy way to introduce warm, flicker light without the safety concerns of an open flame.
Preparing the Lanterns
- Clean the Glass: Wipe down the outside and inside of the lanterns, especially the glass panels, to remove any dust or fingerprints. If you are using vintage metal lanterns, you may want to clean or lightly polish the metal frames.
- Set the Base (Optional): If using filler, pour a thin layer of pebbles or lentils into the bottom of each lantern. This provides a stable base and a slight rustic texture.
Assembling the Display
- Insert the Candles: Place a battery operated pillar candle inside each lantern. Choose the appropriate size so the candle is easily visible through the glass panels. Ensure the candle is centered and stable.
- Set the Timer: Most battery candles have a timer function (e.g., six hours on, 18 hours off). Set the timer so the candles automatically turn on in the evening, maximizing the cozy effect.
- Arrange the Display: Place the assembled lanterns near your seating area, perhaps on the floor next to the sofa or on a side table. Group the lanterns together, using the varying heights to create a cohesive and visually appealing cluster. The flickering light will cast a beautiful, soft glow that wonderfully contrasts with the industrial materials.
11. Shabby Chic French Country Winter

This beautifully bright room offers a light and airy take on French country charm, perfect for bringing brightness to winter days. Crisp, white slipcovered seating and a vintage style wrought iron daybed provide incredibly comfortable spots for relaxation. Large, antique style gilded mirrors flank the window, dramatically reflecting the soft light and making the space feel expansive.
Soft touches of pale lavender in the pillows and the abundance of dried lavender sprigs introduce a gentle, calming color contrast. The room relies heavily on layered textures, including the woven jute rug and the thick cotton throws stored in wicker baskets under the daybed. A delicate crystal chandelier hangs above, contributing to the romantic, slightly shabby chic aesthetic.
Required Material List: DIY Lavender Centerpiece Urn
A beautiful arrangement of dried lavender in a classic urn elevates the French country feel.
- Ceramic Urn or Large Classic Vase: Choose one in white, cream, or a distressed finish.
- Dried Lavender Bunches: Purchase several large bundles of dried lavender (ensure they are fully dry to prevent mold).
- Floral Foam or Pebbles (Optional): To anchor the stems inside the urn.
- Ruler and Scissors
- White or Gray Chalk Paint (Optional): To distress the urn if it is too new looking.
- Fine Grit Sandpaper (Optional): For distressing the paint.
DIY Instruction: Creating the Lavender Centerpiece Urn
This simple project provides both beautiful visual texture and the calming scent of a French country home.
Preparing the Urn (If Distressing)
- Clean the Urn: Ensure the ceramic urn is clean and dry.
- Apply Chalk Paint: If the urn looks too modern, apply one or two coats of white or light gray chalk paint. Allow it to dry completely between coats.
- Distress: Once the paint is fully dry, lightly rub areas like the rim, handles, and raised details with fine grit sandpaper. This exposes the original color underneath, giving it that charming, shabby chic aged look. Wipe away dust.
Arranging the Lavender
- Prepare the Stems: Unpack the bundles of dried lavender. You may need to trim the stems to fit the height of your urn. The heads of the lavender should extend well above the rim, typically about one third the height of the urn.
- Anchor the Stems: If your urn is very wide, you can fill the base with a piece of floral foam or heavy pebbles to prevent the lavender from falling over.
- Create the Arrangement: Begin placing the lavender stems into the urn. Work in small clusters, rotating the urn as you go to ensure the arrangement is full and evenly distributed on all sides. Arrange the stems so they stand upright but look natural and abundant. The goal is a dense, beautiful, fragrant mound of purple.
- Placement: Place the finished lavender urn on your coffee table or sideboard. The beautiful scent and visual texture bring a charming softness to your winter decor.
12. Southwestern Desert Hearth

This living room beautifully captures the vibrant spirit of the American Southwest and desert decor. The focal point is the large, strikingly patterned woven rug hung as unique wall art, featuring rich colors like rust red, turquoise, and black. A neutral sofa provides a calm backdrop, allowing the bold patterns of the assorted throw pillows to really shine.
Warm, low slung pendant lamps featuring hammered metal and geometric designs cast an incredibly cozy, dappled light across the textured walls. The weathered, slightly distressed wood coffee table adds a rustic layer, displaying natural artifacts like a copper vase and a decorative skull. This layered combination of earthy tones, bold geometry, and natural textures ensures the space feels both energetic and profoundly warm for the winter season.
Required Material List: DIY Layered Moroccan Style Lanterns
To recreate the beautiful, warm, geometric light, you can easily turn simple hanging pendants into Moroccan style lanterns.
- Three Basic Hanging Pendant Light Kits: These include the wire, socket, and canopy.
- Three Simple Geometric Metal Cages/Frames: Look for thin metal lantern frames or geometric wire shapes of varying sizes.
- Warm White LED Edison Bulbs: Three bulbs with a visible filament for an antique look.
- Black or Brown Spray Paint (Optional): To unify the look of the metal cages.
- Chain or Rope: To hang the lanterns at varying heights.
DIY Instruction: Creating the Layered Moroccan Style Lanterns
This project turns simple pendants into dramatic, shadow casting light fixtures.
Preparing the Frames (If Painting)
- Clean the Frames: Ensure the three metal cages or frames are clean and dry.
- Spray Paint (Optional): If the frames are different colors or you want a unified dark look, hang them in a well ventilated area. Apply a light, even coat of black or deep brown spray paint. Allow them to dry completely.
Assembling the Lanterns
- Wire the Pendants: Follow the instructions for your basic pendant light kit. Wire the socket onto the cord end. Ensure the power is off at the breaker if installing directly to ceiling wiring.
- Insert the Bulb: Screw the LED Edison bulb into the socket of each pendant.
- Attach the Cage: Slide the painted metal cage or frame up the pendant cord until it covers the light bulb and socket. Use a small zip tie or a piece of wire to secure the metal cage to the light cord just above the socket housing. This ensures the cage stays in position and doesn’t slide down.
Hanging the Display
- Determine Heights: Decide on three varying lengths for the pendants. The variation in height is crucial for the layered look.
- Install: Install the three pendants into your junction box, ensuring they are positioned close together. Use the chain or rope to set each pendant at its predetermined height.
- Test: Turn the power back on. The beautiful patterns of the geometric metal frames will cast intricate shadows, giving the room a truly warm and dramatic effect.
13. Modern Minimalist Study Nook

This cozy area provides a dedicated space for reading and working, perfectly blending modern minimalism with warm, rich textures. The focal point is the sumptuous Eames style lounge chair in rich cognac leather and curved wood, providing luxurious winter comfort. A lovely, muted yellow throw blanket and matching cushion are draped over the chair, injecting a pop of warm color against the neutral wall.
The backdrop features a sleek, floor to ceiling wooden bookshelf stocked with colorful books, offering both storage and visual appeal. Below, long, clean line wooden cabinets support a desktop area. The arrangement of a vintage typewriter and scattered notebooks on the rug speaks to the focused, quiet nature of the space, inviting you to settle in with a hot drink and your favorite reading material.
Required Material List: DIY Leather and Canvas Storage Bucket
A structured leather and canvas bucket is both functional for storing magazines or small blankets and adds a textural element that complements the lounge chair.
- Heavyweight Canvas Fabric: One yard in cream or natural color.
- Faux or Real Leather Scraps: Enough to create a sturdy handle and base accent.
- Thick Cardboard or Plastic Canvas: For the base insert, about 10 inches in diameter.
- Strong Fabric Glue or Heavy Duty Needle and Thread: For assembly.
- Scissors, Ruler, and Pencil
- Leather Punch Tool (Optional): For creating holes in the leather.
DIY Instruction: Constructing the Leather and Canvas Storage Bucket
This project creates a tailored, sophisticated storage piece using contrasting materials.
Cutting the Pieces
- Canvas Body: Cut a rectangular piece of canvas (e.g., 35 inches long by 14 inches high) and a round piece for the base (e.g., 10 inches diameter). The long piece needs to wrap around the base circle with seam allowance.
- Leather Handle: Cut two long, thin strips of leather (e.g., 1 inch wide by 18 inches long) for the handle.
- Base Insert: Cut the cardboard or plastic canvas into a 10 inch diameter circle for rigidity.
Assembling the Bucket
- Form the Cylinder: Take the canvas rectangle. Fold it in half lengthwise and sew or glue the two short ends together to create a cylinder. This forms the side of the bucket.
- Attach the Base: Pin, sew, or glue the round canvas base to the bottom edge of the canvas cylinder. Ensure the seam is strong.
- Make the Handle: Glue or sew the two leather strips together for a thicker, sturdier handle. Use the leather punch to create attachment holes at both ends, or simply stitch the ends.
- Attach the Handle: Position the handle ends opposite each other near the top edge of the canvas bucket. Securely sew or glue the handle ends to the outside of the bucket.
Finishing Touches
- Insert the Base: Slide the rigid cardboard or plastic base insert into the bottom of the canvas bucket. This gives the bucket structure and prevents the bottom from sagging.
- Cuff the Top (Optional): Fold the top edge of the canvas down a few inches to create a neat cuff, showing the clean interior of the canvas.
- Placement: Place your finished leather and canvas bucket next to your reading chair. Use it to hold a throw blanket, magazines, or the latest book you are enjoying.
14. Retro Ski Lodge Chic

This lively room channels a fun, retro ski lodge vibe with bold colors and playful patterns. A curved, white corduroy sectional sofa offers plenty of deep seating, providing a comfortable, modern base. The furniture is offset by colorful knit poufs and pillows featuring geometric chevron and square patterns in bright orange, turquoise, and teal.
Vintage style ski posters adorn the white walls, while a pair of authentic wooden skis lean charmingly in the corner, instantly establishing the theme. A low slung mid-century console provides a beautiful wooden element and surface area. This space successfully uses bright, saturated colors and unique textures to create a wonderfully energetic and cheerful atmosphere, preventing the winter from feeling dull.
Required Material List: DIY Retro Ski Poster Wall Art
To capture the mid-century resort feeling, you can easily create reproductions of vintage ski posters.
- Two or Three Large Prints of Vintage Ski Posters: Source images online and have them printed in a large format (e.g., $18 \times 24$ inches). Use matte paper for an authentic feel.
- Simple Wood Frames: Matching frames (e.g., black, white, or light wood) for the prints.
- Spray Adhesive (Optional): For mounting the prints neatly within the frames.
- Ruler and Pencil
- Wall Hanging Hardware
DIY Instruction: Framing and Displaying Retro Ski Posters
This is a fast, high impact project that instantly establishes the retro ski lodge theme.
Preparing the Prints
- Clean the Frames: Ensure the glass or acrylic in the frames is clean and dust free.
- Mount the Prints (Optional): If you wish to ensure a flat, wrinkle free result, carefully apply spray adhesive to the back of the print. Center the print on the backing board of the frame and smooth it down completely.
Framing and Installation
- Frame the Art: Place the mounted prints into the wood frames and secure the backing.
- Plan the Layout: Determine the placement on your wall. For a ski lodge look, placing one poster on either side of a large furniture piece, or creating a vertical stack, works well. Use a level and measuring tape to ensure the spacing is even.
- Hang the Art: Install the wall hanging hardware. Hang the framed retro ski posters at eye level.
- Complete the Look: Place actual wooden skis or snowshoes nearby to complete the resort inspired display.
15. Modern Zen Fireplace

This living room showcases a striking modern minimalist approach centered entirely around the fireplace. The expansive, floor to ceiling gray chimney breast creates a commanding, architectural statement in the room. Below, the horizontal shelf mantel is clean and utterly simple, providing a beautiful perch for sculptural objects and a bowl of smooth, natural stones.
The hearth features a sleek, built in gas fireplace, providing instant, beautiful warmth and a cozy, mesmerizing flame. Neutral colored seating flanks the fire, with a simple yet luxurious cashmere throw tossed casually over the chair for easy access. The entire aesthetic is about serene simplicity, focusing on light, texture, and the elemental warmth of the fire.
Required Material List: DIY Smooth River Stone Bowl
A decorative bowl of smooth river stones adds a quiet, natural, and tactile element to the stark mantelpiece.
- Shallow Decorative Bowl: Choose a smooth ceramic, wood, or stone bowl in a dark color or natural tone.
- Smooth River Stones: Purchase a bag of clean, smooth, polished river stones or beach stones. Choose stones that are uniform in color (gray, brown, or white).
- Clear Matte Sealer Spray (Optional): To give the stones a damp, polished look.
DIY Instruction: Creating the Smooth River Stone Bowl
This project offers the simplest way to add an organic, calming element to a modern space.
Preparing the Stones
- Clean the Stones: Wash the river stones thoroughly to remove any dust or residue. Allow them to dry completely.
- Seal for Polish (Optional): If you prefer a look that suggests wet, polished stone, lay the stones on a drop cloth. Apply a light, even coat of clear matte sealer spray. Let them dry completely, then turn them over and repeat on the other side. This step enhances their color and shine.
Arranging the Bowl
- Fill the Bowl: Carefully place the finished river stones into the decorative bowl. Do not pack them too tightly; arrange them naturally so that the varying shapes and textures are visible. Fill the bowl until it reaches just below the rim.
- Display: Place the bowl of river stones on your minimalist mantelpiece or coffee table. The beautiful, organic texture contrasts nicely with the clean, modern lines of the room.
- Pair with Wood: For added warmth, place a stack of neatly cut birch logs next to the fireplace.
16. Ultra Modern Bouclé and Brass

This luxurious room combines modern sculptural design with incredibly cozy, tactile textures. The seating area is dominated by a stunning, modular sofa upholstered in thick, white bouclé fabric, which looks immensely soft and warm. The entire palette is monochromatic, focusing on layered shades of white and cream.
The decor introduces high contrast elements with beautiful gilded brass accents, including nesting side tables and an hourglass shaped stool. The brass finish adds necessary warmth against the cool, smooth white walls. Above, a spherical, feather light fixture hangs, providing soft, diffused lighting. This arrangement proves that even a highly contemporary space can achieve profound winter coziness through rich texture.
Required Material List: DIY Feather Orb Pendant Light
To capture the cloud like softness of the light fixture, you can create a similar feather orb pendant.
- Large Paper Lantern Shade: A simple white globe lantern (approximately 18-24 inches in diameter).
- White Craft Feathers: Purchase several large bags of white, fluffy craft feathers.
- Hot Glue Gun and Plenty of Hot Glue Sticks
- Hanging Cord Kit: A basic white cord pendant kit with a socket.
- Warm LED Bulb: A low wattage bulb that stays cool.
- Scissors
DIY Instruction: Making the Feather Orb Pendant Light
This project requires patience but results in an incredibly soft, textural, and luxurious light fixture.
Preparing the Orb
- Assemble the Lantern: Fully expand the paper lantern and insert the wire frame to hold its shape.
- Start Gluing: Heat up the hot glue gun. Start at the bottom center of the paper lantern. Apply a small, quarter sized circle of hot glue and immediately press the quill end of a feather into the glue. Hold for a moment to set.
- Layer the Feathers: Continue working around the circumference of the lantern. The key is to layer the feathers like shingles on a roof, slightly overlapping the previous layer to hide the paper and the glue. Point the fluffy ends outwards.
- Work in Sections: Work your way up the lantern, completing one circular ring at a time. Take care not to crush the feathers you have already attached. Continue until the entire paper lantern is covered, leaving a small, clean opening around the socket hole at the top.
Finishing and Hanging
- Let the Glue Set: Allow the glue to cool and set completely (usually 30 minutes to an hour).
- Insert the Cord: Thread the pendant cord through the top opening of the feather covered lantern. Screw in the warm LED bulb.
- Hang and Adjust: Hang your finished feather orb pendant from the ceiling. Gently fluff the feathers if necessary. Ensure the bulb remains cool and is not touching any feathers. The final result is a dramatically soft and textural light that casts a gentle glow.
17. Nautical Winter Cabin

This unique space marries coastal nautical elements with deep winter warmth, creating a charming aesthetic. The blue and white striped sofa and armchair provide a strong, classic base, evocative of seaside style. The walls are adorned with framed maps, rope knots, and ship models, reinforcing the maritime theme.
To transition this look for winter, a striking chunky cable knit throw in a vibrant, rich red is draped over the chair, providing incredible warmth and a bold, festive color pop. The addition of small pine branches and clear hurricane lanterns with white pillar candles introduces a subtle, refreshing holiday feel. Dark, vintage storage trunks serve as a coffee table, anchoring the room with a deep, rustic color.
Required Material List: DIY Nautical Knot Table Accents
Adding decorative nautical knots made from thick rope provides an authentic maritime texture to the tabletop.
- Thick Natural Jute or Manila Rope: Purchase several feet of rope with a diameter of at least one inch.
- Hot Glue Gun and Hot Glue Sticks (Optional): For securing complex knots.
- Scissors
- Tape or Lighter (Optional): To prevent rope ends from fraying.
- Clear Hurricane Lanterns: Two simple glass lanterns to showcase the knots.
DIY Instruction: Crafting Nautical Knot Table Accents
Simple rope work can add authentic texture and depth to your nautical decor.
Preparing the Rope
- Cut the Rope: Cut the rope into a few different lengths (e.g., 2 feet, 4 feet, 6 feet).
- Prevent Fraying: Secure the cut ends of the rope by wrapping a small piece of tape around them, or carefully melting the synthetic rope ends with a lighter.
Tying the Knots (Choose one or two)
- Simple Coiled Knot (The Easiest): Take one length of rope. Simply start coiling the rope tightly around a central point, keeping it flat like a mat. Once the knot is the size you want, secure the tail end of the rope on the underside using a generous amount of hot glue. This creates a rope trivet or accent mat.
- Monkey’s Fist (More Complex): This knot requires wrapping the rope around a central object (like a ball or small dowel) multiple times to form a tight, spherical knot. Secure the ends with glue or a tightly woven finishing wrap.
- Square Knot or Figure Eight: Simply tie a loose, decorative square knot or a large figure eight knot in a piece of rope. Leave the loops loose for a relaxed look.
Displaying the Accents
- Placement: Place the finished rope knots in small groupings on the coffee table or the back console.
- Lantern Accents: Place one simple coiled rope knot directly inside the base of your clear hurricane lanterns, then place the candle on top of it.
- Arrange: Pair the rope accents with the lanterns and small sprigs of pine for a delightful mix of sea and seasonal style.
18. Bohemian Global Layers

This room is wonderfully rich in texture and color, capturing the true essence of bohemian global decor. Multiple patterned area rugs are layered over one another, creating immense softness and a beautiful, complex visual foundation. The seating arrangement features a low slung sofa and an array of highly tactile Moroccan leather poufs and fringed footstools.
A striking white macramé wall hanging dominates the space above the sofa, balancing the vibrant patterns with its neutral texture. Warm, woven rattan pendant lights hang at varying heights, casting a beautiful, soft light. Piles of colorful, embroidered pillows and brass trays filled with candles and small trinkets invite lounging, making the space feel incredibly grounded and comforting for the winter.
Required Material List: DIY Macramé Wall Hanging
A large macramé wall hanging adds texture and a strong bohemian focal point above the sofa.
- Wooden Dowel or Driftwood Stick: About 3 to 4 feet long.
- Natural Cotton Macramé Cord: (3mm to 5mm thickness) Purchase a large spool, about 300 yards.
- Measuring Tape and Scissors
- Metal or Wooden Rings (Optional): For decorative loops.
DIY Instruction: Creating a Large Macramé Wall Hanging
This project uses repetitive knots to create a beautiful, textural piece of wall art.
Preparing the Cord
- Cut Strands: Cut numerous long strands of macramé cord. For a 3 foot wide dowel, you will need between 30 and 50 strands, each around 10 to 12 feet long. Remember, the cord length is doubled when attached, and knitting consumes a lot of length.
- Attach to Dowel: Using a Lark’s Head Knot (folding the cord in half, looping it over the dowel, and pulling the ends through the loop), attach all the cords evenly across the width of the wooden dowel.
Tying the Knots (Focus on a simple design)
- Half Hitch Knot (The Top Line): Starting with the first two cords on the left, use the left cord as the “holder” and tie a series of half hitch knots around it using the other cords, working horizontally across the dowel. This creates a neat horizontal line that defines the top of the design.
- Square Knot: This is the basic knot used for most macramé. It uses four cords. Tie one row of square knots across the width of the piece, leaving a small space between each knot.
- Diagonal Rows: Below the first row, leave a gap (about 2 inches). Start the next row of square knots, but offset them so they are centered in the gap of the row above. This creates a beautiful, netted pattern.
- Creating a V-Shape (Optional): Use the half hitch knot to create two diagonal lines meeting in the middle. This creates the classic chevron or V shape seen in many large hangings.
Finishing and Hanging
- Trim the Bottom: Once you have reached the desired length (usually half the wall height), let the remaining cords hang loose for a long fringe. Use scissors to trim the fringe into a clean, straight line or a V shape.
- Hang: Attach a sturdy hanging cord to the ends of the wooden dowel. Hang the finished macramé wall hanging above the sofa.
19. Year Round Indoor Garden

This room is an absolute green sanctuary, using plants to provide life and incredible texture throughout the cold months. The decor is centered on bringing the vibrant energy of a garden indoors. A bright white sofa and pillows keep the focus on the surrounding lush greenery. Natural materials like rattan and wicker in the shelving and peacock chair reinforce the organic feel.
Warm fairy lights are woven through the bamboo shelving units, casting a gentle, enchanting glow on the plants during the evening. The sheer abundance of different leaf shapes and plant sizes creates a wonderful, layered visual landscape. This is the ultimate cozy retreat, offering a vibrant burst of life that feels wonderfully restorative in the middle of winter.
Required Material List: DIY Tiered Rattan Plant Shelf
To maximize your plant display, a simple tiered shelf made of natural materials is essential.
- Three to Four Rattan or Bamboo Trays/Shelves: Rectangular or square, uniform in size.
- Four Bamboo or Wooden Dowels: Long dowels (e.g., 4 feet long), cut to be uniform in length for the vertical supports.
- Strong Twine or Natural Rope: For binding the shelves to the dowels.
- Scissors and Ruler
- Hot Glue Gun (Optional): For added stability.
DIY Instruction: Building a Tiered Rattan Plant Shelf
This project uses binding techniques to create a beautiful, natural looking plant display.
Preparing the Shelves and Supports
- Mark the Dowels: Lay one dowel down. Use a ruler to mark where the center of each rattan shelf will sit. Ensure the spacing is even (e.g., every 12 inches). Repeat this marking on all four dowels.
- Position the Dowels: Stand two dowels upright. Place the rattan shelf at the bottom marked line, perpendicular to the dowels.
Binding the Shelf
- Start the Binding: Take a long piece of strong twine. Start by tying the twine tightly to the dowel just above where the shelf sits.
- Bind Securely: Wrap the twine tightly several times around the dowel, then cross it over the edge of the rattan shelf, and wrap it tightly around the dowel again under the shelf. You are essentially creating a figure eight pattern to lock the shelf in place against the dowel. Pull the twine as tight as possible. Secure the end with a knot and a dab of hot glue if needed.
- Attach the Corners: Repeat this binding process for all four corners of the shelf, securing it to the four dowels. This completes the first tier.
Building the Remaining Tiers
- Continue Upwards: Repeat the binding process using the next shelf at the next marked level on the dowels. Continue until all three or four rattan shelves are securely attached.
- Display: Place your finished tiered rattan shelf against a wall. Add a warm grow light behind the shelves, and arrange your favorite houseplants, allowing vines to drape down naturally.
20. Bold Navy and White Preppy Classic

This sophisticated living room utilizes a timeless palette of crisp navy and clean white, giving it a polished, classic feel. The strong color scheme is balanced by beautiful textures and striking brass accents. Deep blue seating, accented with tailored white piping, contrasts beautifully with the white slipcovered sofas.
Beautiful blue and white ginger jars serve as lamp bases and decor, lending an elegant, traditional flair to the clean lined white credenza. The use of gold throughout the room—in the large mirror frame, the lamps, and the classic chandelier—adds necessary warmth against the cool colors. This cohesive, balanced design feels exceptionally refined and organized, perfect for entertaining in winter.
Required Material List: DIY Blue and White Ginger Jar Lamp Base
You can create a custom look by turning a large decorative ginger jar into a stylish lamp base.
- Large Blue and White Ceramic Ginger Jar: Ensure the lid is easily removable. Choose one with a relatively flat base.
- Lamp Wiring Kit: Includes the socket, cord, and plug.
- Drill with a Ceramic/Glass Drill Bit: Essential for drilling the hole for the cord.
- Lamp Harp and Lampshade: A plain white shade is usually best.
- Masking Tape, Safety Glasses, and Water: For drilling.
DIY Instruction: Converting a Ginger Jar into a Lamp Base
This project is precise and requires careful drilling, but the result is a high end, custom piece.
Drilling the Jar
- Preparation: Put on your safety glasses. Clean and dry the bottom of the ginger jar. Place a piece of masking tape over the spot where you want the cord to exit the jar (near the bottom edge). The tape prevents the drill bit from slipping.
- Drill Slowly: Place the jar on a non slip mat. Using a ceramic or glass drill bit, begin drilling slowly and steadily through the tape and the ceramic. Crucially, keep the area wet with a small stream of water or a wet sponge. This prevents overheating and cracking the jar.
- Clean the Hole: Once the hole is drilled, remove the tape and clean up the edges.
Wiring the Lamp
- Run the Cord: Thread the end of the lamp cord through the hole you just drilled and pull it up through the neck of the jar.
- Secure the Socket: Follow the instructions on the lamp wiring kit. Secure the socket assembly to the top opening of the ginger jar. You may need a small cork stopper (included in many kits) to ensure a snug fit in the jar’s neck. Wire the cord to the socket terminals.
- Attach the Harp: Attach the harp (the metal piece that holds the shade) to the socket base.
Finishing Touches
- Add the Shade: Place the lampshade onto the harp and secure it with the finial (the decorative screw at the top).
- Test the Lamp: Plug in your new ginger jar lamp and turn it on. The classic blue and white pattern combined with the warm lamplight provides a sophisticated winter accent.
21. Glamorous Velvet and Amethyst Retreat

This luxuriously deep space embraces a jewel tone palette perfect for creating dramatic winter warmth. The walls feature a beautiful, moody blend of deep greens and black, giving the room immense depth. A stunning, plush moss green velvet sofa anchors the room, layered with vibrant purple and patterned pillows for a rich textural contrast.
The decor includes striking accents like large, raw amethyst crystal geodes displayed on the mantel and coffee table, which introduce a mystical, natural element. Sprigs of fresh green pine are draped elegantly over the mantelpiece, providing a welcome seasonal texture and scent. A chunky, bright purple knit throw tossed over the chair adds a pop of bright, comforting color. This bold combination is both dramatic and profoundly cozy.
Required Material List: DIY Dramatic Amethyst Bookends
Replicate the dramatic presence of the large amethyst geodes with beautiful, functional amethyst bookends.
- Two Large, Flat Sided Amethyst Geodes: Choose geodes that have one flat side for stability and an appealing crystalline interior. They should be heavy enough to hold books.
- Small Wood Base Blocks: Two small, flat pieces of wood (e.g., $4 \times 4$ inches) painted black, to adhere the geode to.
- Strong Adhesive: Such as two part epoxy or construction adhesive, designed for stone and wood.
- Rubber Gloves and Safety Glasses
DIY Instruction: Creating the Dramatic Amethyst Bookends
This simple assembly project turns natural crystals into functional, high impact decorative pieces.
Preparing the Geodes and Base
- Clean the Geodes: Ensure the flat bottom of the amethyst geodes and the small wooden bases are clean and dry.
- Mix the Adhesive: Put on your gloves and glasses. Carefully mix the two parts of the epoxy or construction adhesive according to the product instructions. Work quickly, as epoxy sets fast.
Assembling the Bookends
- Apply Adhesive: Apply a generous amount of the mixed adhesive to the top surface of one of the black painted wood bases.
- Attach the Geode: Carefully place the flat, stable side of one amethyst geode onto the adhesive on the wood base. Press down firmly and hold for a minute.
- Position for Curing: Ensure the geode is straight and the base is flat. Wedge it gently so it does not shift while the adhesive cures. Repeat this process for the second geode and wood base.
- Cure Time: Allow the adhesive to cure completely, which may take 12 to 24 hours depending on the product. Do not move the pieces during this time.
Display
- Placement: Place the finished amethyst bookends on a shelf or side table. Use them to flank a small stack of books. The stunning purple crystals provide a beautiful, natural sparkle against the darker tones of the room.
22. Classic Equestrian Hunt Room

This elegant room offers a sophisticated, traditional British hunt country aesthetic, emphasizing enduring materials and deep warmth. The centerpiece is a pair of handsome cognac leather Chesterfield sofas, their rich, glossy hue providing instant, deep comfort. Plaid wool pillows in green and red are tucked into the corners, introducing a lovely, textural pattern.
Framed equestrian drawings hang above the fireplace, reinforcing the classic theme. Simple, robust dark wood side tables hold warm lighting fixtures and a handsome copper lantern. Beautifully folded tartan blankets draped over the chairs, along with vintage riding boots and a horn displayed on the mantelpiece, complete this look. This timeless style is inherently cozy and welcoming for cold evenings.
Required Material List: DIY Tartan Blanket Throw
A classic plaid or tartan wool throw is essential for the traditional equestrian look.
- Wool or Wool Blend Fabric: Approximately 2 yards of heavy wool fabric in a traditional tartan or plaid pattern (e.g., reds, greens, blues).
- Sharp Fabric Scissors
- Sewing Machine and Thread (Matching or contrasting color)
- Ruler or Measuring Tape
- Iron and Ironing Board
DIY Instruction: Creating the Tartan Blanket Throw
Making a simple, tailored throw with a neat edge instantly elevates the traditional style of your room.
Preparing the Fabric
- Pre Wash (If Applicable): If your wool blend fabric is washable, pre wash and dry it according to the instructions to prevent future shrinkage. Iron the fabric flat.
- Measure and Cut: Lay the fabric flat. Measure the desired size for your throw (e.g., $55 \times 70$ inches). Use sharp scissors to cut the fabric to size, ensuring all edges are straight.
Creating a Hem
- Fold the Edge: Working on one side, fold the raw edge of the fabric over by a quarter of an inch and press it flat with an iron.
- Create the Hem: Fold the edge over again by one inch, encasing the raw edge. Pin the hem down and press it flat with the iron.
- Stitch the Hem: Using a sewing machine, stitch a straight seam close to the inner folded edge of the hem. This creates a neat, durable finish. Repeat this process for all four sides of the throw blanket.
Finishing Touches
- Press and Drape: Give the entire finished tartan wool throw one final press with the iron.
- Display: Drape the throw casually over the back or arm of a leather sofa or chair. The classic plaid pattern adds a beautiful layer of color and texture that is wonderfully warm and inviting.
23. Bold Geometric Cubist Warmth

This room is energized by a playful Cubist inspired aesthetic using bright, saturated color blocks against a neutral background. The soft gray sofas and walls provide a calm canvas, allowing the bold accents to command attention. Two large pieces of abstract canvas art dominate the walls, featuring strong geometric shapes in yellow, burnt orange, black, and white.
The warmth is generated by the accessories: vibrant yellow and rust colored pillows, and matching square coffee tables in primary and secondary hues. The low profile seating and light wood flooring maintain a modern, crisp feel. This is a brilliant example of using warm, lively colors and strong shapes to keep a space feeling cheerful and grounded during the cold months.
Required Material List: DIY Abstract Geometric Cube Table
Create the look of the colorful cubic side tables using simple wood cubes and bright paint.
- Two or Three Solid Wood Cube Blocks: Pre made blocks in varying sizes (e.g., $15 \times 15 \times 15$ inches).
- Latex or Acrylic Paint: Small cans of paint in the desired colors (e.g., matte yellow, burnt orange, charcoal gray).
- Paint Brushes and Rollers: Small foam rollers for a smooth finish.
- Painter’s Tape and Ruler
- Primer (Optional)
DIY Instruction: Painting the Abstract Geometric Cube Table
This easy painting project brings a burst of sophisticated color to your seating area.
Preparing the Cubes
- Sand and Prime: Lightly sand the wood cubes to smooth any rough edges. Wipe off all dust. Apply a coat of primer if desired for better paint adhesion, and let it dry completely.
Painting the Cubes
- Base Coat: Apply two smooth, even coats of your chosen base color (e.g., yellow, orange, or gray) to each cube. Use a small foam roller for a clean, even finish. Allow the paint to dry completely between coats.
- Creating the Geometric Design (Optional): If you wish to add a geometric accent, use a ruler and painter’s tape to mask off a section of the cube (e.g., a thick stripe or a quarter section) on one side.
- Apply Accent Color: Paint the masked section with a contrasting color (e.g., black or white). Remove the painter’s tape immediately after painting while the paint is still wet to ensure clean lines.
Finishing and Display
- Cure Time: Allow the painted cubes to cure for several days before placing heavy objects on them.
- Arrangement: Place your finished geometric cube tables next to your sofas, using them to hold lamps or small stacks of books. The bright blocks of color instantly cheer up the winter gray.
24. Farmhouse Red Gingham Comfort

This room perfectly captures a charming, rustic farmhouse aesthetic ideal for a cozy winter retreat. The walls are covered in beautiful shiplap or beadboard, and exposed wooden ceiling beams reinforce the rustic, cabin like feel. Crisp, white slipcovered seating provides a comfortable base, contrasting beautifully with the heavy use of red gingham or buffalo check patterns.
Gingham pillows and throws layered over the seating introduce a strong, welcoming pattern and color. Natural elements abound, including a large wooden pallet coffee table and buckets filled with birch logs and cotton bolls. Rustic metal light fixtures and dark wood accents complete the look. This combination of white, wood, and red pattern feels profoundly comforting and nostalgic.
Required Material List: DIY Cotton Wreath Door Accent
A cotton wreath provides the perfect rustic, snowy texture to accent windows or walls in a farmhouse setting.
- Grapevine Wreath Form: Choose a natural, rustic wreath base.
- Artificial Cotton Bolls: Purchase multiple stems of artificial cotton bolls from a craft store.
- Hot Glue Gun and Hot Glue Sticks
- Wire Cutters
- Burlap or Gingham Ribbon (Optional): For hanging.
DIY Instruction: Creating a Rustic Cotton Wreath
This quick project adds a soft, white, snowy texture that works beautifully with the rustic farmhouse style.
Preparing the Cotton Bolls
- Cut the Stems: Use wire cutters to cut the individual cotton bolls off the main stems. Leave a small stub of wire or stem attached to each boll—about an inch long—to help secure them into the wreath.
Assembling the Wreath
- Determine Placement: Decide whether you want the cotton to cover the entire grapevine wreath form or just clusters of it. For a full, abundant look, you will need more bolls.
- Attach the Bolls: Start tucking the small wire stub of a cotton boll into the woven branches of the grapevine form. When you find a good spot, pull out the wire and apply a dab of hot glue to the boll’s base before firmly pressing it back into the grapevine.
- Fill the Form: Continue this process, placing the cotton bolls close together to create a full, fluffy appearance. Ensure the placement is even and covers the desired areas. The white cotton contrasts beautifully with the brown grapevine.
Finishing and Display
- Add Ribbon (Optional): Once the glue is dry, tie a loop of burlap or gingham ribbon to the top of the wreath for hanging.
- Placement: Hang your finished cotton wreath on the wall, door, or centrally in a window frame. The soft texture instantly evokes a cozy, snow kissed farmhouse feel.
25. Sweet Pink Christmas Fantasy

This stunning room embraces a highly feminine and whimsical Christmas theme centered on pink and white decor. A large, snow flocked Christmas tree is adorned entirely with pink ribbons, candy canes, and delicate ornaments, serving as the main focus. The white sofa provides a clean base for layers of textural pink and brown pillows and a matching pom pom throw.
Garlands made of chunky, soft pom poms drape across the mantelpiece and windows, providing a soft, continuous, textural accent. Small pink and white bottle brush trees and gingerbread themed snow globes are displayed on the coffee table. This look is exceptionally cheerful, inviting, and wonderfully sweet for embracing a playful holiday season.
Required Material List: DIY Oversized Pom Pom Garland
A large, soft pom pom garland is the key textural element for this whimsical look.
- Chunky Yarn: Multiple skeins of yarn in various shades of pink, white, and brown/mocha.
- Pom Pom Maker Tool: Purchase an oversized pom pom maker (3 to 4 inches in diameter).
- Scissors
- Long Needle and Strong Thread or Thin Rope: For stringing the pom poms together.
DIY Instruction: Making the Oversized Pom Pom Garland
This project is repetitive but creates an incredibly soft, visually impactful, and festive accent.
Making the Pom Poms
- Wrap the Yarn: Use the oversized pom pom maker tool. Tightly wrap the yarn around both arms of the pom pom maker. Use one color, or mix different colors together for a multicolored pom pom. The more yarn you wrap, the denser the final pom pom will be.
- Cut and Tie: Once fully wrapped, close the pom pom maker. Use sharp scissors to carefully cut the yarn all the way around the groove between the two arms.
- Secure the Center: Take a separate, strong piece of yarn (about 8 inches long). Wrap it tightly around the center groove of the pom pom maker and tie a very secure knot. Do this twice for extra security.
- Release and Trim: Open the pom pom maker arms and release the yarn ball. Fluff the pom pom and use the scissors to trim any uneven strands until you achieve a perfectly round shape. Repeat this process until you have enough pom poms for your mantel or window frame.
Stringing the Garland
- Thread the Needle: Thread a long needle with the strong thread or thin rope.
- String the Pom Poms: Push the needle directly through the center of a finished pom pom. Pull it down the thread to the desired starting point. Continue stringing the pom poms, alternating the colors (e.g., pink, white, brown) as you go, leaving about $1 \text{ to } 2$ inches of space between each one.
- Hang: Secure loops at the ends of the thread for hanging. Drape the finished oversized pom pom garland across your mantel, windows, or doorway for a delightful, textured holiday look.
26. Neon Glow Futuristic Lounge

This striking room transports the concept of cozy into a futuristic, minimalist space using light and color. The furniture is white, simple, and low slung, creating a clean, modern envelope. The unique warmth is generated entirely by vibrant LED strip lighting that casts an intense purple and magenta glow over the walls and floor.
Neon tube lighting accentuates abstract wall art, giving the room a gallery like, high tech feel. The light sources are integrated into the architecture, emphasizing the clean lines of the space. While conventionally cold, the deeply saturated light colors make the space feel intensely moody and intimate, offering a different, modern take on winter retreat ambiance.
Required Material List: DIY Backlit Art Frame
To recreate the ambient glow around the art, you can easily add LED strip lighting to the back of a canvas or mirror.
- Pre Stretched Canvas or Mirror: Choose a piece of art or a mirror you already have.
- LED Strip Light Kit: Purchase a spool of color changing (RGB) or single color (purple/magenta) adhesive LED strip lighting. Ensure it comes with a power adapter.
- Measuring Tape and Scissors
- Double Sided Mounting Tape (Optional): For extra security.
DIY Instruction: Installing Backlit LED Strip Lighting
This project adds a dramatic, colorful halo effect to wall mounted decor or art.
Preparing the Art
- Clean the Back: Turn the canvas or mirror over. Ensure the back of the frame is clean and dry.
- Measure the Perimeter: Measure the distance around the entire perimeter of the back of the frame where you will place the LED strip. This determines how much strip you will need.
Installing the LED Strip
- Cut to Size: Cut the LED strip light at the designated cut marks to match the perimeter measurement.
- Apply the Strip: Peel the adhesive backing off the LED strip. Begin at one corner and carefully stick the strip to the back frame of the canvas or mirror, facing the lights outwards toward the wall, not inwards toward the center of the frame. The goal is for the light to spill onto the wall, creating the halo. Run the strip around the entire perimeter, folding it neatly at the corners.
- Attach the Connector: Plug the power connector and adapter into the end of the LED strip.
Mounting and Testing
- Mount the Art: Mount the finished piece of art or mirror onto the wall. Position it a few inches away from the wall to allow the light to spread effectively. Ensure the power cord is discretely routed down the back of the wall.
- Test the Light: Plug in the adapter. Turn on the LED strip lights using the remote control. The backlighting will create a striking, colorful glow that instantly transforms the atmosphere of the room.
27. Arctic White Snowscape

This room is dedicated to an all white, monochromatic winter aesthetic, providing a peaceful, serene, and incredibly textural environment. Every surface is clad in white, from the walls and ceiling to the deep, plush shag rug and the oversized, modern sectional sofa. The look relies entirely on varying textures to maintain visual interest.
A massive faux sheepskin throw is layered over the sofa, inviting maximum lounging comfort. Tall, white ceramic urns display delicate, white painted branches, evoking the look of a beautiful, snow covered landscape. Acrylic or clear glass coffee tables provide necessary utility without interrupting the stunning, snowy visual flow. This pristine, layered look is the definition of winter serenity.
Required Material List: DIY Layered Faux Fur Throw
A large, textural faux fur throw adds immense visual and physical warmth to an all white space.
- Two Yards of High Quality Faux Sheepskin or Fur Fabric: Choose a fabric with a long, dense pile in pure white or cream.
- Two Yards of Fleece or Minky Fabric: Choose a coordinating white or cream fabric for the backing (optional, but adds bulk and softness).
- Sharp Fabric Scissors
- Straight Pins
- Sewing Machine and Thread (Matching color)
DIY Instruction: Sewing a Layered Faux Fur Throw
This project uses the simplest sewing technique to create a huge, luxurious, double sided throw.
Preparing the Fabric
- Cut the Fabrics: Lay the faux fur fabric face down. Lay the fleece or minky backing fabric on top of the fur, lining up the edges. Use sharp scissors to trim both pieces to the same desired size (e.g., $60 \times 80$ inches).
- Pin Together: Pin the two pieces of fabric together around the edges, with the right sides facing in (the fur side and the soft backing side touching). Leave an opening of about 8 to 10 inches unpinned along one edge—this is for turning the blanket right side out.
Sewing the Throw
- Stitch the Edges: Using the sewing machine, stitch a straight seam all the way around the perimeter of the blanket, using a half inch seam allowance. Start and stop stitching right next to the unpinned opening. Remove the pins as you sew.
- Clip Corners: Carefully trim the excess fabric away from the four corners close to the stitching, cutting diagonally. This helps the corners lay flat when turned.
Finishing Touches
- Turn Right Side Out: Reach through the unstitched opening and gently pull the entire blanket through the hole. The soft fur and backing should now be facing outwards. Poke out the corners neatly.
- Close the Opening: Fold the raw edges of the opening inside the blanket and pin them closed. Hand stitch this opening using a small, invisible slip stitch.
- Display: Drape the huge, luxurious faux fur throw over your sofa. The tactile texture is the key element that makes this monochromatic room feel incredibly warm.
28. Chic Art Deco Teal Gem

This luxurious room embraces the dramatic flair of Art Deco style with bold color and geometric patterns. A plush, curved teal velvet sofa commands attention, serving as a bright, stunning focal point against the matte black walls. The deep wall color makes the vibrant teal and the brass accents truly pop.
Pillows feature strong geometric prints in shades of green, black, and white, matching the striking geometric pattern on the floor rug. The decor is all about reflection and shine, with brass framed mirrors and lamps that feature ornate glass detailing, such as the fan shaped table lamps. This sophisticated, glamorous aesthetic is utterly perfect for chic winter evening gatherings.
Required Material List: DIY Geometric Pattern Pillows
To recreate the stunning, patterned pillows, you can easily customize plain pillow covers with paint.
- Plain Pillow Covers: Two or three covers in white or cream linen/canvas fabric.
- Fabric Paint: Small tubes of black and green fabric paint.
- Ruler and Pencil
- Painter’s Tape (Thin)
- Small Foam Brush or Sponge
- Cardboard Insert: To place inside the pillow cover.
DIY Instruction: Painting Geometric Pattern Pillows
Adding a strong, geometric pattern is a quick way to achieve that Art Deco flair.
Preparing the Pillow Cover
- Insert Cardboard: Slide a piece of cardboard inside the pillow cover. This prevents the fabric paint from bleeding through to the back side.
- Mark the Grid: Using a ruler and pencil, lightly mark the pillow cover with a grid pattern. Decide on your geometric design (e.g., diamonds, chevrons, or labyrinth).
Creating the Geometric Pattern
- Apply Tape: Apply thin painter’s tape along the lines of the design you do not want painted. Press the tape down firmly to seal the edges and prevent bleed.
- Apply Paint: Use the foam brush or sponge to apply a thin, even layer of black or green fabric paint to the exposed areas. You may need two coats. Allow the paint to dry slightly between coats.
- Remove Tape: While the paint is still damp (but not wet), carefully peel off the painter’s tape. This ensures crisp, clean edges. Allow the paint to fully dry and cure according to the fabric paint instructions (usually 24 hours).
Finishing Touches
- Heat Set: Most fabric paints require heat setting to become permanent. Iron the finished pillow covers on the reverse side without steam.
- Stuff and Display: Insert the pillow forms into your new geometric print covers. Toss them onto the sofa for a vibrant, patterned contrast to the solid teal velvet.
29. Modern Dark Hygge Den

This stunningly monochromatic room embraces a dark, moody hygge aesthetic, creating a feeling of ultimate retreat. The walls and ceiling are painted a deep, matte black, contrasting beautifully with the light, natural wood accents. The sofa is simple and low profile, but layered with incredibly soft, shaggy black faux fur throws that provide abundant tactile comfort.
A large, deep pile black shag rug covers the floor, absorbing light and muffling sound for a truly quiet space. Vertical wood slats create a stylish bookshelf that is illuminated by numerous small candles, casting a beautiful, soft flickering light. Natural wood block side tables introduce an organic texture. This design uses darkness and heavy texture to generate a unique, highly intimate form of winter warmth.
Required Material List: DIY Wooden Block Side Table
To achieve the raw, natural look, you can create a simple wooden block side table.
- Large, Clean Wood Block: Source a heavy, rustic wood block, possibly from a lumber yard (e.g., a thick stump or a solid square of rough cut wood).
- Wood Sanding Block or Electric Sander
- Clear Matte Wood Sealer or Wax: For protection.
- Brush or Rag
DIY Instruction: Creating the Rustic Wooden Block Side Table
This project is minimal, relying on the natural beauty and texture of the wood itself.
Preparing the Wood
- Shape the Block (If Needed): If the block is very rough, use a saw to ensure the top and bottom surfaces are level, allowing the block to sit flat and provide a usable surface.
- Sanding: Use the electric sander or sanding block to smooth the top surface and the side edges. You want the top to be smooth enough for a glass or book, but the sides can retain a lot of the rustic, rough cut texture. Wipe off all sawdust.
Sealing the Wood
- Apply Sealer: Use a brush or rag to apply a coat of clear matte wood sealer or wax to all exposed surfaces of the wood block. This protects the wood from moisture and staining.
- Cure Time: Allow the sealer or wax to dry and cure completely according to the product instructions.
Display
- Placement: Place the finished wooden block side table next to the sofa or chair. The raw, natural wood texture stands out beautifully against the dark, moody setting, providing an essential organic element for cozy balance.
30. Contemporary White and Aqua Serenity

This living room offers a beautifully serene, contemporary aesthetic dominated by light and subtle color. The walls and large sectional sofa are clean white or very pale gray, creating an airy, light filled atmosphere. The introduction of soft aqua and pale gray pillows and a matching throw adds a cooling, yet calming, accent color.
The decor is minimal and intentional, using natural elements for subtle warmth. A round, light wood coffee table is centered, displaying simple candles and clear vases holding beautiful cotton bolls. Large woven baskets on the floor add great texture and functional storage. The overall look is crisp, clean, and incredibly peaceful, a lovely, organized space for winter contemplation.
Required Material List: DIY Natural Cotton Stems Display
A simple display of cotton stems brings a unique, delicate texture that suggests soft snowfall.
- Clear Glass Vases: Two to three vases of varying heights and shapes (e.g., a wide, short one and a tall, slender one).
- Dried Cotton Stems: Purchase a bundle of long, dried cotton stems from a craft or floral shop.
- Small White Candles (Unscented): A tray of small pillar candles.
- Small Pebbles or White Sand (Optional): For stabilizing the stems in the vases.
DIY Instruction: Arranging the Natural Cotton Stems Display
This project highlights unique natural texture against a clean, contemporary backdrop.
Preparing the Vases
- Clean: Ensure the clear glass vases are spotless and dry.
- Stabilize (Optional): Pour a layer of small white pebbles or sand into the bottom of the vases. This provides weight to anchor the long stems.
Arranging the Stems
- Cut the Stems: Decide on the desired height for the cotton stems within each vase. Use strong scissors or wire cutters to trim the stems at an angle. The stems should extend at least one third the height of the vase above the rim.
- Place the Stems: Place the cut cotton stems into the vases. Arrange them simply and sparsely—this display is meant to look airy, not dense. For the wider vase, fan the stems out slightly. For the tall vase, keep them more upright.
- Create the Vignette: Place the vases on the coffee table alongside a tray of small, unscented white pillar candles. The delicate white fluff of the cotton bolls contrasts beautifully with the clean lines of the table and the warmth of the candle light.
31. Maximalist Moroccan Jewel Box

This incredibly rich and vibrant room embraces a maximalist, global aesthetic that feels profoundly warm and inviting. The space is a feast of color and pattern, with dark walls allowing the saturated textiles to truly glow. Stunning jewel toned Moroccan lanterns hang from the ceiling, casting beautiful, colorful light throughout the room.
Plush yellow velvet sofas, adorned with bright magenta and turquoise patterned pillows, invite luxurious lounging. The layering of intricate Oriental rugs, patterned drapes, and detailed black lacquer furniture creates immense visual depth. This design uses bold, saturated colors and abundant textiles to generate an unparalleled feeling of exotic warmth, ideal for escaping the winter gloom.
Required Material List: DIY Layered Brass Serving Tray
To capture the feeling of exotic luxury, a layered brass serving tray is essential for displaying colorful glasses and trinkets.
- Simple Wooden Tray: A medium sized, plain wooden tray with low sides.
- Gold Spray Paint: A can of highly reflective metallic gold or brass spray paint.
- Mirror Tiles (Optional): Small, thin mirror tiles cut to fit the bottom of the tray.
- Strong Adhesive: Such as construction adhesive or strong craft glue.
- Painter’s Tape and Safety Glasses
DIY Instruction: Creating a Layered Brass Serving Tray
This project turns a simple tray into a shimmering, reflective centerpiece.
Preparing the Tray
- Clean and Prep: Ensure the wooden tray is clean and dry. Lightly sand any rough spots.
- Tape Off (If needed): Use painter’s tape to cover the interior bottom surface if you plan to add a mirror later. You only need to paint the frame and handles.
Gilding the Frame
- Spray Paint: Put on your safety glasses. In a well ventilated area, apply several light, even coats of the metallic gold spray paint to the frame and sides of the tray. Ensure you hold the can steady to avoid drips. Allow the paint to dry completely between coats. The goal is a high sheen brass finish.
Adding the Reflective Base
- Remove Tape: Once the paint is fully cured, remove the painter’s tape.
- Attach Mirror (Optional): Apply a thin layer of strong adhesive to the bottom of the painted tray interior. Carefully press the pre cut mirror tile(s) into place. Wipe away any excess adhesive immediately. Allow the adhesive to cure fully. If not using a mirror, simply paint the bottom a dark, glossy color.
Display
- Style the Tray: Place the finished layered brass serving tray on the coffee table. Fill it with colorful glassware, small antique objects, and maybe a decorative bottle. The reflective surface will bounce light beautifully, enhancing the room’s luxurious, jewel box feel.
32. Woodland Whimsy Grotto

This delightful corner creates an enchanting mossy woodland retreat that feels like stepping into a fairytale. Plush green velvet chairs are softened with incredibly warm, textured faux fur throws, inviting long hours of relaxation. The color palette focuses on soft greens and earthy browns, bringing the feeling of a forest floor indoors.
The mantelpiece and floor are decorated with thick, beautiful faux moss accents, illuminated by tiny fairy lights woven through dry, twisted branches. Ceramic owls, deer figurines, and illuminated mushroom decor add a whimsical, playful element. The pleated shade lamps cast a beautiful, soft light, ensuring this little grotto remains magically cozy throughout the winter evenings.
Required Material List: DIY Moss and Twig Fireplace Garland
To create the rustic, enchanting mantelscape, you will need a moss and twig garland base.
- Flexible Wire Garland: A long piece of thick, flexible craft wire or an inexpensive faux pine garland (to act as the base form).
- Faux Sheet Moss: Purchase sheets of bright green faux moss from a craft store.
- Thin, Dry Twigs or Grapevine Pieces: Collect or purchase small, delicate pieces of dried wood.
- Hot Glue Gun and Hot Glue Sticks
- Battery Operated Fairy Lights (Optional): Warm white lights.
- Wire Cutters
DIY Instruction: Building the Moss and Twig Fireplace Garland
This project builds beautiful texture and dimension for a truly enchanting woodland feel.
Preparing the Garland Base
- Form the Base: Measure your mantelpiece. Cut the flexible wire garland or craft wire to the appropriate length. Twist it gently to give it a little bulk and shape.
- Attach the Moss: Cut the sheets of faux moss into irregular shapes. Use the hot glue gun to attach these pieces sporadically along the top and sides of the wire base. You want to see patches of moss interspersed with the base, not a fully covered snake. This provides the first layer of woodland texture.
Adding Twigs and Lights
- Add Twigs: Take the small, dry twigs and use small amounts of hot glue to attach them horizontally and vertically to the moss covered garland base. Let some twigs stick out loosely to create that wild, overgrown forest look.
- Weave the Lights: If using fairy lights, gently wrap the battery operated fairy lights loosely around the finished moss and twig garland. Secure the small battery pack out of sight at the end of the garland.
Display
- Place and Style: Lay the finished moss and twig garland across your mantelpiece. Tuck in a few ceramic mushrooms or small animal figurines for that whimsical grotto effect. The warm fairy lights bring the whole scene to glowing life.
33. Classic Crimson Library

This opulent room captures the refined comfort of a traditional, masculine library or study. Deep, rich crimson walls envelop the room in a strong, warm color, creating an incredibly cozy, den like atmosphere. Two handsome red leather Chesterfield sofas face each other, their deep button tufting and rich color providing immediate luxurious comfort.
The room is framed by tall, dark wood built in bookshelves, complete with a rolling ladder, reinforcing the classic library theme. Large black lamps with brass accents flank the seating, casting a warm, down light. The patterned, traditional area rug, heavy drapes, and antique busts further enhance the old world charm and deep, enveloping warmth, inviting you to settle in for a long winter reading session.
Required Material List: DIY Classic Book Stack Lamp Base
Mimic the look of the stacked books on the side tables by using them as a lamp base accent.
- Three to Four Old Hardback Books: Choose books of varying thickness with neutral or classic colored spines (e.g., black, brown, deep red).
- Drill with a Long Bit: Long enough to drill through the entire stack of books.
- Lamp Wiring Kit: Includes the cord, socket, and harp (or use the one from an existing lamp).
- Strong Wood Glue
- Safety Glasses and Clamp
DIY Instruction: Constructing the Classic Book Stack Lamp Base
This project transforms simple books into a unique, sophisticated decorative lamp base.
Preparing and Gluing the Stack
- Arrange the Stack: Lay out the books in the order you want them stacked.
- Glue the Stack: Apply a strong layer of wood glue between the cover of one book and the cover of the next. Stack them neatly, ensuring the spines are aligned. Clamp the books tightly and allow the glue to cure completely (at least 24 hours).
Drilling the Stack
- Mark the Center: Once the glue is dry, use a pencil to mark the exact center point on the top and bottom of the entire book stack.
- Drill the Hole: Wearing safety glasses, carefully and slowly drill a hole straight through the center of the entire book stack. This requires a long, sharp drill bit. The hole should be wide enough for the lamp cord to pass through.
Wiring the Lamp
- Run the Cord: Thread the lamp cord from the wiring kit up through the hole in the book stack.
- Attach Socket: Follow the lamp wiring kit instructions to attach the socket base to the top of the books. Secure the cord at the bottom using a knot or strain relief (often included in the kit).
Finishing and Display
- Add Shade: Attach the harp and a simple black or neutral lampshade.
- Placement: Place the finished classic book stack lamp on your side table. The unique base adds a wonderful, intellectual charm to your cozy library theme.
34. Urban Industrial Concrete Loft

This incredibly cool space utilizes a backdrop of raw concrete walls and exposed ceilings, perfectly embodying an urban industrial aesthetic. The smooth, cool materials are offset by strong, warm primary colors. A modular blue sectional sofa provides a comfortable block of color and deep seating. Textured gray and blue pillows introduce a layered, soft contrast.
The floor is softened by a large, woven natural fiber rug and a contrasting paper lantern pendant light. A simple, low slung wooden coffee table, seemingly built from reclaimed pallets, adds a wonderful rustic and warm texture against the cold concrete. The combination of the cool grays and blues with the warm natural wood and fiber creates a sophisticated, balanced urban retreat.
Required Material List: DIY Pallet Coffee Table
A pallet style coffee table is an authentic rustic touch for an industrial space.
- Two or Three Wooden Pallets (Clean): Source small, clean, heat treated (HT stamp) pallets. Disassemble them for wood if needed, or use them whole.
- Wood Sanding Block or Electric Sander
- Four Swivel Casters/Wheels: With screws suitable for wood.
- Wood Screws and Drill
- Wood Stain (Optional): A light or natural tone.
- Safety Glasses
DIY Instruction: Building the Rustic Pallet Coffee Table
This project utilizes simple, rustic wood to introduce essential warmth to a concrete space.
Preparing the Pallets
- Clean and Sand: Thoroughly clean the pallets. Use an electric sander to heavily sand the top and sides of the wood, focusing on removing any rough edges or splinters. Wipe off all sawdust.
- Stain (Optional): Apply a light or natural toned wood stain if desired, to emphasize the grain. Allow it to dry completely.
Assembling the Table
- Attach the Pallets (If using layers): If stacking two pallets for height, line them up and securely screw them together using long wood screws.
- Attach the Wheels: Flip the pallet assembly upside down. Measure and mark the four corners. Place a swivel caster at each corner and use the drill to screw the casters securely into the base of the pallet structure. Ensure the wheels can rotate freely.
Finishing and Display
- Wipe Down: Flip the finished pallet coffee table right side up and give it one final wipe down.
- Placement: Place the table centrally in your seating area. The distressed wood on wheels provides an excellent rustic counterpoint to the raw concrete walls and the blue modular sofa.
35. Minimalist Terracotta and Bouclé

This design is a masterclass in soft, quiet minimalism, relying on texture and warm earthy tones for its cozy factor. The room is dominated by clean white walls and flooring, creating a bright, serene envelope. A small, curved white bouclé sofa provides a textural focal point, layered with a stunning terracotta colored throw.
The warmth is derived entirely from the collection of beautiful, sculptural ceramic vases in terracotta, cream, and rust hues displayed on the floor. Simple candles and a sprig of dried pampas grass continue the natural, organic theme. Two tall, simple floor lamps flank the sofa. This peaceful, highly textural design proves that warmth can be achieved with a minimal color palette when grounded by beautiful, organic materials.
Required Material List: DIY Sculptural Terracotta Vases
To achieve the striking earthy color, you can update inexpensive vases using terracotta paint and texture medium.
- Assortment of Vases: Choose inexpensive vases in varying shapes and sizes (e.g., glass, ceramic, or plastic).
- Terracotta Colored Paint: Matte acrylic or chalk paint in a burnt orange/terracotta hue.
- Baking Soda (Optional): For adding a rough, matte, stoneware texture.
- Paint Brushes and Mixing Bowl
- Primer (Optional)
DIY Instruction: Creating the Sculptural Terracotta Vases
This technique gives smooth vases a textured, matte, organic look perfect for the minimalist aesthetic.
Preparing the Paint
- Mix the Texture: Pour a generous amount of terracotta colored paint into a mixing bowl. If you want a rough, stoneware texture, mix in about one part baking soda to three parts paint. Stir well until the mixture is thick and slightly gritty.
Painting the Vases
- Base Coat: Ensure the vases are clean and dry. Apply the textured paint mixture to the outside of the vases using a brush, dabbing and stippling slightly to emphasize the texture. Do not worry about making it perfectly smooth; uneven texture looks more authentic.
- Apply Second Coat: Allow the first coat to dry (the drying time will be longer due to the baking soda). Apply a second coat if the coverage is uneven.
Finishing and Display
- Cure Time: Allow the painted vases to dry and cure fully (at least 24 hours). Do not seal, as you want to maintain the matte, porous terracotta look.
- Arrangement: Place your collection of sculptural terracotta vases on the floor or a side table. Group them in varying heights. The warm, earthy color provides a stunning contrast and cozy grounding element in the bright white room.
We have journeyed through 35 diverse ideas, proving that true warmth lies in the thoughtful layering of textures, lighting, and intentional color. Whether you prefer the bright simplicity of Scandinavian Hygge or the rich drama of a jewel toned maximalist room, there is a path to a cozy winter haven for every style.
Remember, the goal is to create a personal sanctuary—a place where you can genuinely relax and find refuge from the outside world. This season is about more than just surviving the cold; it is about embracing the comfort and beauty of staying home.
By incorporating soft fabrics, ambient lighting, and natural elements, you can transform your space into a deeply inviting retreat. Gather your materials, light a candle, and let the long, cozy winter evenings begin.
???? Key Takeaways
- Layer Textures: Successful winter warmth hinges on layering tactile materials. Combine chunky knits, faux fur, velvet, and plush rugs to maximize coziness on sofas and floors.
- Embrace Warm Lighting: Shift away from harsh overhead light. Rely on table lamps, floor lamps, and candles to create multiple points of low, golden ambient light.
- Use Natural Elements: Bring the outdoors in by utilizing materials like wood, stone, birch logs, dried branches, and terracotta. These elements ground the space and add rustic charm.
- Find Your Color Depth: Whether you choose moody jewel tones, deep earth hues, or clean Arctic whites, ensure your palette feels intentional and cohesive for maximum impact.
- Personalize with DIY: Simple weekend projects—like creating scented centerpieces, painting geometric tables, or assembling custom lighting—add unique character and are budget friendly.