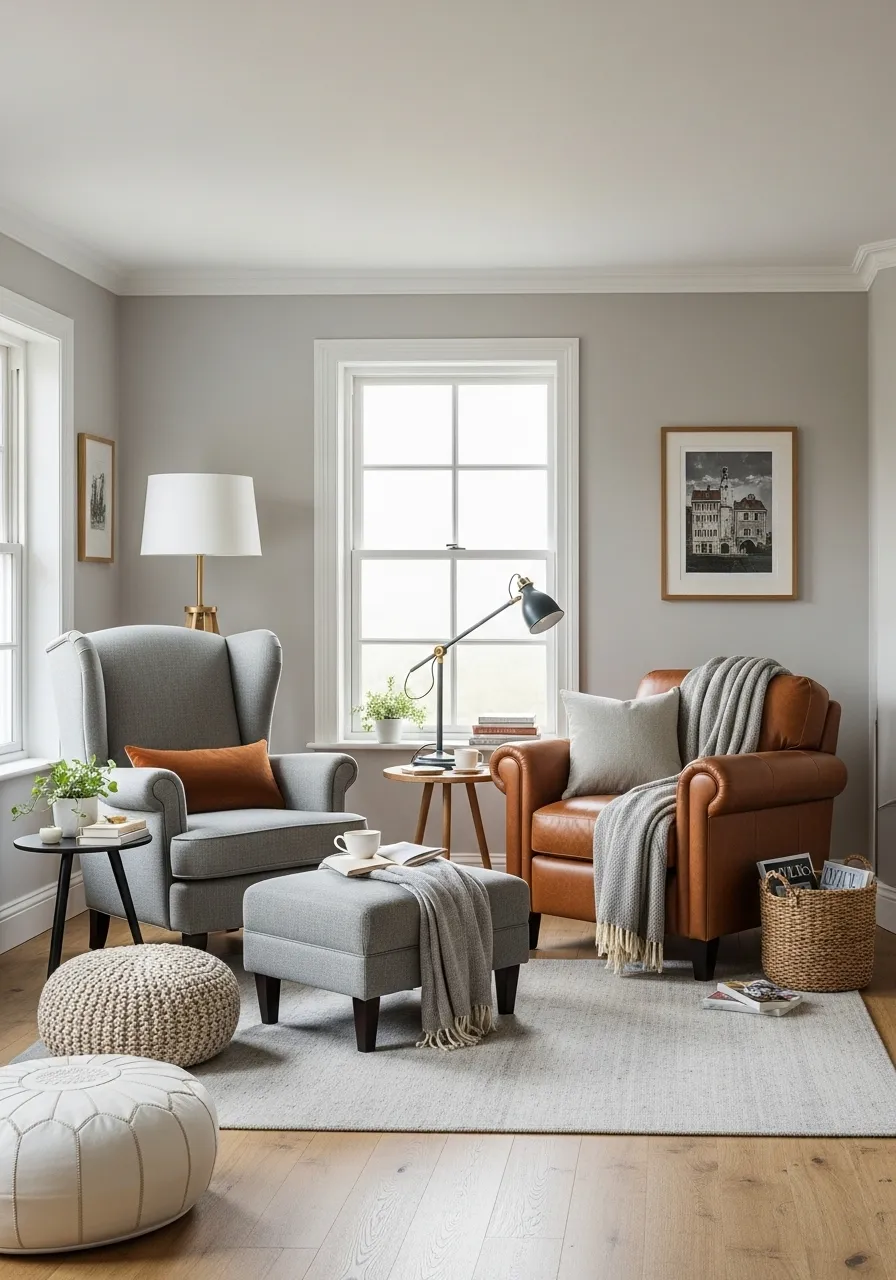
As the days grow shorter and a distinct chill enters the air, we naturally begin to spend more time inside. The living room, a place of relaxation and gathering, becomes the heart of the home. But sometimes, the same space that felt bright and airy in the summer can feel stark and unwelcoming in the winter.

You might find yourself looking around and feeling that something is missing. The room may feel cold, not just in temperature, but in atmosphere. It lacks that essential feeling of comfort, that sense of a warm and safe haven from the world outside. Creating that cozy feeling doesn’t require a complete renovation.
This guide is about simple, effective changes. We’ve gathered 38 easy decor swaps you can make to transform your living room into the warm, inviting retreat you crave this winter. From rich textures and soft lighting to natural elements and personal touches, these ideas will help you create a space you’ll love spending time in.
1. Swap Thin Curtains for Plush Velvet

Your windows can let in a surprising amount of winter chill. Thin, airy curtains that felt great in summer now seem to invite the cold inside. A simple change to a heavier fabric can make a world of difference. Consider swapping them for rich velvet drapes.
The weight of the material provides an extra layer of insulation against drafts. Velvet also absorbs sound, making your living room feel quieter and more serene. The soft texture adds a layer of visual warmth, transforming the entire space into a comfortable haven away from the winter winds. It’s a functional change that feels incredibly luxurious.
DIY No-Sew Velvet Curtains
You can create this cozy look without touching a needle or thread. Here is how you can make your own simple velvet curtains.
Step 1: Get Your Supplies You will need:
- Enough velvet fabric to cover your window (we’ll measure in a bit!)
- A measuring tape
- Fabric scissors
- Iron-on hemming tape (you can find this at a craft store)
- An iron and ironing board
Step 2: Measure Your Window First, measure how high you want to hang your curtains. Measure from the curtain rod down to the floor. Write that number down. Now, add 8 inches to it. This extra bit is for making folds at the top and bottom. Next, measure how wide your window is. Double that number so your curtains look full and wavy, not stretched flat.
Step 3: Cut the Fabric Lay your velvet fabric flat on the floor. Use your measuring tape and some chalk to mark the height and width you calculated. Take your time and carefully cut the fabric with your scissors. If you’re making two curtain panels, cut the width in half to get two equal pieces.
Step 4: Iron the Hems Lay one fabric panel down, with the pretty side facing the floor. Fold one of the side edges over by about 1 inch. Press it flat with the iron (ask a grown-up for help with this part). Now, place the sticky hemming tape inside the fold you just made. Iron over it according to the tape’s instructions. The heat will glue the hem down! Do this for both long sides of your curtain.
Step 5: Make the Top and Bottom For the bottom hem, fold the fabric up by 4 inches. Iron it flat, place the hemming tape inside, and iron again to seal it. For the top, you’ll make a pocket for the rod. Fold the top edge down by 4 inches. Iron it, use the hemming tape, and seal it just like the bottom. Make sure you don’t glue the very ends of the pocket shut, so the rod can slide through.
Step 6: Hang Your New Curtains! Once the fabric is cool, gently slide your curtain rod through the top pocket you created. Hang it up, arrange the folds, and enjoy your super-cozy new velvet curtains!
2. Layer Your Rugs for Extra Softness

A bare floor can feel cold and uninviting, especially on a chilly morning. You can easily fix this by layering rugs. This technique adds instant warmth and visual interest to your living room. It’s a great way to define a seating area and make it feel more contained and comfortable.
Start with a larger, neutral rug made of a natural fiber like jute. Then, place a smaller, plusher rug on top. This second rug can introduce a pop of color, a bold pattern, or a much softer texture. The combination makes your floor feel much warmer underfoot and adds a sophisticated, decorated dimension to the room.
DIY Guide to Layering Rugs
This is more about styling than making, but here’s how to do it like a pro.
Step 1: Choose Your Base Rug Think of this as the foundation. It should be large enough so that the front legs of your main furniture (like your sofa and armchairs) can sit on it. Simple patterns or solid, neutral colors work well for the base layer.
Step 2: Pick Your Top Rug This is your statement piece! It should be significantly smaller than the base rug. Choose something with a texture you love, like a soft shag or a wool rug. This is also where you can play with colors and patterns that tie your room together.
Step 3: Position Your Rugs First, place your large base rug. Then, center the smaller rug on top of it. You can place it right in the middle, or have it slightly off-center under your coffee table. Make sure there’s a generous border of the bottom rug showing on all sides.
Step 4: Keep It Safe Rugs on top of other rugs can sometimes slip around. To prevent this, use a rug pad or double-sided carpet tape between the two layers to keep everything securely in place.
3. Introduce Plush Faux Fur Accents

Nothing says “cozy” quite like the soft touch of faux fur. Adding a few pieces to your living room is a quick way to increase the comfort factor. A faux fur throw blanket draped over the arm of a sofa or a chair immediately looks welcoming.
This material adds a layer of luxurious texture that invites you to relax and get comfortable. You can also use faux fur pillows to soften a seating area. They provide a wonderful tactile experience and a touch of rustic charm, making your space feel like a warm and stylish winter retreat.
DIY No-Sew Faux Fur Pillow
You can make a fuzzy pillow cover without any sewing at all.
Step 1: Gather Your Materials You’ll need a piece of faux fur fabric, a pillow insert (like an old pillow you want to cover), fabric scissors, and strong fabric glue.
Step 2: Measure and Cut the Fabric Lay your fabric on the floor with the furry side down. Place your pillow insert on top. Cut out two squares of fabric that are each about 2 inches wider than your pillow on all four sides.
Step 3: Glue the First Three Sides Take your two fabric squares and place them on top of each other, with the furry sides touching. You should be looking at the flat backing of the fabric. Apply a line of fabric glue along the edge of three sides, leaving one side open. Press the edges together firmly and let the glue dry completely.
Step 4: Turn and Stuff Once the glue is dry, carefully turn your pillowcase right-side out. The furry part should now be on the outside. Gently push your pillow insert all the way inside.
Step 5: Seal the Final Side Neatly fold the open edges of the fabric inward by about 1 inch. Apply a line of fabric glue to the inside of the fold and press it shut. You might need to hold it with clips while it dries. And you’re done!
4. Drape an Oversized Chunky Knit Blanket

A chunky knit blanket is both a cozy accessory and a statement piece. Its oversized loops and substantial weight create a powerful visual cue for comfort. When you see one artfully draped over a sofa, you immediately want to curl up underneath it.
These blankets add a huge amount of texture to a room. They break up the smooth surfaces of furniture and add a handmade, personal quality to your decor. Whether it’s made from soft wool or chenille, this type of throw is an invitation to slow down, grab a warm drink, and enjoy the comfort of your home.
DIY Arm-Knit a Chunky Blanket
You can make one of these amazing blankets using just your arms!
Step 1: Get Your Yarn You’ll need several balls of super thick, chunky yarn. For a good-sized throw, you’ll probably need about 5 or 6 skeins.
Step 2: Make Your First Stitch First, make a slip knot at the end of your yarn, leaving a little tail. A slip knot is a loop that can get bigger or smaller. Make the loop big enough to slide onto your right arm. This is your first stitch.
Step 3: “Cast On” More Stitches With the loop on your right wrist, use your left hand to grab the yarn coming from the ball. Pull it through the loop on your arm to create a new loop. Place this new loop onto your right arm as well. Repeat this until you have about 20 loops, or stitches, on your right arm.
Step 4: Knit Your First Row Now, hold the working yarn (the part from the ball) in your right hand. Take the first stitch on your right wrist and pull it up and over your hand. Don’t drop it! With your left hand, grab the working yarn and pull a new loop through that stitch. Slide this new loop onto your left wrist. You’ve just knitted one stitch! Do this for all the stitches on your right arm until they are all on your left arm.
Step 5: Keep Going! Now all your stitches are on your left arm. Just do the same thing in the other direction to move them back to your right arm. Keep knitting back and forth until your blanket is as long as you want it.
Step 6: Finish the Blanket Knit two stitches onto one arm. Then, take the first stitch and pull it over the second stitch and off your arm. You’ll have one stitch left. Knit one more stitch, so you have two again. Repeat this process until you only have one loop left. Cut the yarn, pull the end through the last loop, and tie a tight knot.
5. Mix in Boucle and Textured Pillows

Take a look at your sofa pillows. Are they all made from the same smooth fabric? Swapping them out for pillows with different textures is a subtle change with a big impact. Look for materials like boucle, which has a nubby, fleecy feel, or other fabrics like wool, corduroy, or cable knits.
Mixing these different surfaces adds depth and makes your seating more visually interesting. You can stick to a simple color palette, like shades of cream and gray, and let the textures do the talking. The result is a sofa that looks and feels much more comfortable and thoughtfully designed.
DIY Textured Pillow from an Old Sweater
Give an old, cozy sweater a new life as a decorative pillow.
Step 1: Find a Sweater and a Pillow Find an old knit sweater that you don’t wear anymore. One with a cool pattern like a cable knit is great. You’ll also need a pillow insert that will fit inside the body of the sweater.
Step 2: Get Your Supplies You’ll need the sweater, the pillow insert, sharp scissors, and either a needle and thread or strong fabric glue.
Step 3: Cut the Sweater Lay your sweater flat. Figure out where you want to cut it to make a case for your pillow. You’ll want to cut a large rectangle out of the main body of the sweater. Cut straight across under the armpits and then cut the bottom hem off. You should have a tube of sweater material.
Step 4: Close One End Turn the sweater tube inside out. Using your needle and thread or fabric glue, seal one of the open ends completely shut. Make sure it’s a strong seam.
Step 5: Stuff and Close the Other End Turn your new pillow cover right-side out. Gently push the pillow insert inside. Now you just need to close the final opening. You can do this neatly by folding the raw edges inward and sewing them shut with a simple stitch.
6. Add Warmth with Classic Plaid Throws

Plaid is a pattern that feels like winter. It brings to mind cozy cabins, warm fires, and holiday cheer. Bringing this classic pattern into your living room with a few throw blankets is an easy way to signal the season.
You don’t need to go overboard. A single plaid throw tossed over a leather armchair creates a welcoming contrast. You could also roll up a few different plaid blankets and store them in a wire basket by the sofa. This adds a touch of rustic style and ensures a warm blanket is always within reach for anyone feeling a bit chilly.
DIY No-Sew Fringed Fleece Blanket
You can make a cozy plaid blanket in under an hour with no sewing required.
Step 1: Get Your Fabric and Tools Go to a fabric store and buy one and a half to two yards of plaid fleece fabric. You’ll also need a good pair of scissors and a ruler.
Step 2: Prepare Your Fabric Lay your fleece out on a large table or the floor. Most fleece has a weird-looking edge from the factory called the selvage. Trim this thin strip off of both sides.
Step 3: Cut the Corners From each of the four corners of your fabric, cut out a square. A 4-inch by 4-inch square is a good size. Removing these corners will make your fringe look neat later.
Step 4: Cut the Fringe Now it’s time to make the fringe! Pick one side to start. Use your ruler to help you cut straight lines from the edge of the fabric in toward the center. Make your cuts about 4 inches deep and 1 inch apart. Do this all the way down one side, and then do the other three sides.
Step 5: Knot the Fringe (Optional) Your blanket is finished now if you like the look of the cut fringe. If you want to make it look even more finished, you can tie the strips. Take two strips that are next to each other and tie them together in a single, simple knot. Continue this all the way around the blanket.
7. Soften the Floor with a High-Pile Rug

A cold, hard floor can make an entire room feel less welcoming. The solution is to add a rug with a deep, soft texture. A high-pile or shag rug provides a wonderfully plush surface that feels amazing on bare feet.
This type of rug does more than just warm up the floor. It also absorbs sound, reducing echo and making your living room feel more peaceful and quiet. The visible softness of the rug’s texture instantly makes the entire space feel more comfortable and grounded. It’s like giving your room a warm, cozy sweater.
DIY Your Own Small Shag Rug
This project takes time, but it’s very easy and relaxing to do while watching a movie.
Step 1: Get Your Supplies You’ll need three things from a craft store: a latch hook tool, a piece of blank rug canvas, and lots of pre-cut rug yarn in your favorite colors.
Step 2: Get Ready to Hook Sit in a comfy chair and lay the canvas on your lap. Have your yarn nearby. Take one piece of yarn and fold it in half to make a loop. Drape this loop over the shaft of your latch hook tool.
Step 3: The Latch Hook Knot This is the one simple move you’ll repeat. Push the end of the hook under one thread of the canvas and then back up through the hole right next to it. As you do this, wrap the two tails of the yarn around the hook.
Step 4: Pull to Create a Knot Now, pull the handle of the tool back towards you. The little latch on the hook will close, trapping the yarn. As you pull it all the way out, the yarn will be perfectly tied onto the canvas with a strong little knot called a Ghiordes knot.
Step 5: Repeat, and Repeat! That’s all there is to it! Just keep adding knots, one by one, row by row. You can follow a pattern or just place colors randomly. Once your whole canvas is filled with fluffy yarn, your rug is complete.
8. Bring in a Comfy Knit Pouf

A pouf is a wonderfully versatile piece of furniture. It doesn’t take up much space, but it adds a lot of function and comfort. When it’s covered in a soft, sweater-like knit, it also becomes a powerful tool for making a room feel cozier.
Use it as a comfortable footrest while you’re relaxing on the sofa. Pull it out as an extra seat when you have guests over. You can even place a small tray on top and use it as a low side table. The chunky texture and soft form make it a casual and inviting addition to your winter decor.
DIY Pouf from an Old Sweater
Turn a large, chunky sweater into a brand-new place to sit.
Step 1: Find a Big Sweater The best sweaters for this are adult-sized large or extra-large. A thick, cable-knit sweater is a great choice because the texture looks good and the fabric is strong.
Step 2: Gather Your Filling and Tools You will need your sweater, scissors, a needle, and some very strong thread. For the inside, you can use Poly-fil stuffing from a craft store, or you can recycle old pillows, blankets, or even clothes.
Step 3: Sew the Top Openings Closed Turn the sweater inside out. Using your needle and thread, sew the neck hole shut. Make your stitches strong! Then, sew both of the armholes closed as well.
Step 4: Stuff Your Pouf Turn the sweater right-side out again. The only opening should be the bottom hem. Start stuffing it! Pack the filling in tightly so your pouf will be firm enough to sit on. Keep adding stuffing until it’s a nice, round shape.
Step 5: Cinch and Sew the Bottom Once it’s fully stuffed, use your needle and thread to make a running stitch (a simple in-and-out stitch) all the way around the bottom opening. When you’ve gone all the way around, pull the thread tight like a drawstring. This will gather the fabric and close the hole. Sew it shut securely with a few extra stitches.
9. Hang a Quilt or Textile on the Wall

Bare walls can contribute to a room feeling cold and empty. While framed pictures are nice, hanging a textile like a quilt or a woven blanket adds a different kind of warmth. The soft material absorbs sound, which instantly makes a room feel more intimate and quiet.
This is a great way to add a large-scale piece of art to your room without a heavy frame. The texture, color, and pattern of the fabric create a focal point that is both beautiful and comforting. It’s a simple swap for a traditional painting that can completely change the feeling of a space.
DIY Easy Textile Wall Hanging
You don’t need a fancy quilt to create this look. A pretty blanket will work just as well.
Step 1: Find Your Textile and a Branch First, choose the piece you want to hang. It could be a small quilt, a decorative blanket, or even a large, beautifully patterned scarf. Next, find a stick or a wooden dowel from a craft store that is a few inches wider than your textile.
Step 2: Get Your Hanging Supplies You will need your textile, your branch or dowel, some twine or string, and a few bulldog clips from an office supply store.
Step 3: Attach the Clips to the Textile Lay your blanket or scarf flat on the floor. Take your clips and clip them evenly across the top edge of the fabric. For a blanket that is 3 feet wide, you might use 4 or 5 clips.
Step 4: Assemble the Hanging Tie a long piece of twine to one end of your branch. Slide the metal loops of the bulldog clips onto the branch. Then tie the other end of the twine to the other end of the branch. Make sure the twine is long enough to form a triangle for hanging.
Step 5: Put It on the Wall All you need now is a single nail in the wall. Hang your new textile art from the center of the twine. Adjust the fabric so it hangs nicely, and you’re done!
10. Use Warm, Earth-Toned Pillows

Color has a huge effect on how warm or cool a room feels. If your living room is filled with cool blues, bright whites, or stark grays, it can feel a bit chilly in the winter. An easy fix is to swap out your pillow covers for ones in warm, earthy tones.
Think of colors like rich terracotta, deep olive green, warm caramel, and mustard yellow. These shades are naturally grounding and relaxing. Using fabrics like suede, corduroy, or velvet in these colors enhances their warmth. This simple change can make your sofa look much more inviting.
DIY Simple Envelope Pillow Cover
This is the easiest way to make a pillow cover because there are no zippers or buttons.
Step 1: Get Your Fabric and Pillow Choose a piece of fabric in a warm, earthy color. You will also need a square pillow insert.
Step 2: Cut Your Fabric Pieces You need to cut three pieces of fabric.
- Front Piece: Cut one square that is the exact same size as your pillow insert.
- Back Pieces: Cut two rectangles. They should be the same height as your pillow, but only about three-quarters of the width. These will overlap in the back.
Step 3: Hem the Back Pieces Take one of your back rectangles. On one of the long edges, fold the fabric over about half an inch and press it with an iron. Fold it over again and sew a straight line to create a clean, finished edge. Do the exact same thing for the second back rectangle.
Step 4: Pin Everything Together Lay your front fabric piece down with the pretty side facing up. Now, place one of your back pieces on top, with its pretty side facing down. Line it up with the edge of the front piece. The hemmed edge should be in the middle. Place the second back piece on top, lining it up with the other side. The two back pieces will overlap in the center. Pin everything in place.
Step 5: Sew It All Up Sew a straight line all the way around the outside of the entire square.
Step 6: Finish Your Pillow Trim any extra fabric from the corners. Then, turn the entire pillowcase right-side out through the opening in the back. Use a pencil to poke the corners out so they are sharp. Now, just stuff your pillow insert inside!
11. Create Pools of Light with Floor Lamps

A single, bright overhead light can feel harsh and impersonal. To create a cozier atmosphere, use floor lamps to create smaller pools of warm light around the room. An arc lamp can illuminate a seating area, while a tripod lamp can add character to a forgotten corner.
This approach, known as layering light, makes a room feel more intimate and dynamic. The focused light from a floor lamp is great for reading or relaxing. It draws attention to specific zones in your living room, making the entire space feel more thoughtfully arranged and much more welcoming.
DIY Tripod Lamp Update
Give a basic tripod lamp a custom look with this simple trick.
Step 1: Get Your Lamp and Supplies You’ll need a simple tripod floor lamp. You will also need some string, twine, or thin rope and a hot glue gun.
Step 2: Start Wrapping Start at the very top of one of the lamp’s legs, right under the lampshade. Put a small dot of hot glue on the leg and press the end of your twine into it.
Step 3: Wrap Tightly Begin wrapping the twine tightly around the leg. Make sure each new wrap is snug against the last one so none of the original leg shows through. Every few inches, add another small dot of hot glue to the back of the leg to keep the twine secure.
Step 4: Continue to the Bottom Keep wrapping all the way down to the bottom of the leg. When you reach the end, cut the twine and secure the final bit with a generous dot of hot glue.
Step 5: Repeat on the Other Legs Do the exact same thing for the other two legs of the lamp. The result is a lamp with a beautiful, rustic texture.
12. Group Candles for a Warm Glow

There is nothing quite like the gentle, flickering light from a candle. While a single candle is nice, grouping several together creates a powerful and inviting focal point. Their collective glow provides a soft, warm light that is much more soothing than electric lighting.
Arrange candles of different heights and sizes on a tray on your coffee table. Mixing pillar candles, taper candles, and small votives creates a visually interesting display. The dancing flames are captivating and instantly make a room feel more special and serene. It’s a simple way to add a touch of magic to a dark winter evening.
DIY Cinnamon Stick Candles
These candles look rustic and smell like winter.
Step 1: Gather Your Supplies You will need a few plain pillar candles in glass holders, a bundle of cinnamon sticks, a hot glue gun, and some twine or ribbon.
Step 2: Glue on the Sticks Take one cinnamon stick and run a thin line of hot glue down the back of it. Quickly and carefully press it vertically onto the side of the glass candle holder.
Step 3: Cover the Candle Keep gluing cinnamon sticks one by one, right next to each other, until you have gone all the way around the candle holder.
Step 4: Add a Finishing Touch Once all the sticks are in place, take a piece of twine or festive ribbon. Wrap it around the center of the cinnamon sticks and tie it in a simple knot or a bow. This helps hold the sticks on and adds a decorative touch.
13. Change to Warmer Light Bulbs

The type of light bulb you use can completely change the mood of a room. Many standard LED bulbs give off a cool, blue-white light that can feel sterile and unwelcoming. For a cozier feel, switch them out for bulbs that produce a warmer, more yellow-toned light.
Look for bulbs labeled “warm white” or “soft white” on the packaging. Edison-style bulbs with visible filaments are another great option, as they cast a very warm, vintage-style glow. This small and inexpensive change can have one of the biggest impacts on making your living room feel like a comfortable retreat.
DIY Lamp Cord Upgrade
Hide an ugly plastic lamp cord by wrapping it in something more stylish.
Step 1: Choose Your Materials You’ll need a lamp, a roll of jute twine or colorful yarn, and some electrical tape.
Step 2: Start at the Plug Unplug your lamp! Start at the end of the cord with the plug. Tightly wrap a small piece of electrical tape around the cord right where it meets the plastic plug.
Step 3: Begin Wrapping Take your twine or yarn and begin wrapping it tightly around the cord, starting right over the electrical tape. You can hold the end in place by just wrapping over it.
Step 4: Work Your Way Up Continue wrapping the cord, making sure each new loop is tight against the last one. It’s a slow process, so put on some music! As you go, push the wrapped section down toward the plug to keep it compressed and tight.
Step 5: Finish at the Lamp Keep going until you reach the base of the lamp. When you get to the end, cut your twine, leaving a small tail. Secure the end tightly against the lamp base with another piece of electrical tape.
14. Add the Soft Glow of a Salt Lamp

Himalayan salt lamps are a popular way to add a unique and soothing light source to a room. These lamps, made from large crystals of pink salt, cast a gentle, warm, pinkish-orange glow.
The light is soft and diffused, not harsh or direct, which makes it very relaxing on the eyes. Many people find the warm color to be calming and centering. Placing one on a side table or a bookshelf can create a peaceful corner in your living room, adding a touch of natural beauty and a serene ambiance.
DIY Faux Crystal Lamp
Create the look of a glowing crystal lamp with a few simple craft supplies.
Step 1: Get Your Supplies You’ll need a clean glass vase or jar, a bag of glass gems or decorative rocks from a craft store, and a short string of battery-powered fairy lights.
Step 2: Put the Lights Inside First, make sure your fairy lights are turned on. Carefully feed the entire string of lights into the glass vase, leaving the small battery pack hanging outside the back.
Step 3: Add the Gems Gently pour the glass gems or rocks into the vase. As you pour, the gems will surround the little lights and fill up the vase.
Step 4: Arrange and Display Arrange the gems so they cover the light string completely. The light will shine through the glass, creating a beautiful, glowing effect. Hide the battery pack behind the vase and enjoy your new lamp.
15. Use Mirrors to Reflect Light

During the short days of winter, maximizing natural light is important. Mirrors are a decorator’s secret weapon for making a room feel brighter and more open. When placed opposite a window, a mirror will catch the daylight and bounce it back into the room.
In the evening, mirrors work the same magic with your cozy indoor lighting. They will reflect the warm glow from your lamps and candles, amplifying their effect and making the whole room feel warmer and more luminous. A mirror with a rustic wood or warm metallic frame also adds its own decorative warmth.
DIY Rustic Twig Mirror Frame
Turn a plain, cheap mirror into a beautiful, rustic piece.
Step 1: Gather Your Twigs and a Mirror You’ll need a simple mirror with a flat frame. Then, go outside and collect a bunch of small, straight twigs. You’ll also need a pair of garden clippers and a hot glue gun.
Step 2: Prepare Your Twigs Use your clippers to trim your twigs into different lengths. You want a good variety of sizes. Make sure they are clean and dry.
Step 3: Start Gluing Start with your longest twigs. Put a line of hot glue on the back of a twig and press it firmly onto the mirror’s frame. You can arrange them in a sunburst pattern, with the twigs pointing outward.
Step 4: Layer the Twigs Keep gluing on twigs, layering shorter ones on top of longer ones to create a rich, textured look. There is no right or wrong way to do this, just keep adding twigs until you’ve covered the whole frame and you’re happy with how it looks.
16. Weave in Twinkling Fairy Lights

Fairy lights aren’t just for holidays. These tiny, delicate lights, also known as string lights, are a wonderful way to add a touch of whimsy and warmth to your living room all winter long. Their gentle sparkle creates a magical and inviting atmosphere.
They are incredibly versatile. You can place a string of them in a large glass vase or cloche for a contained glow. Drape them over a mantelpiece, weave them through the leaves of a houseplant, or run them along a bookshelf. Because they use LEDs, they stay cool to the touch and use very little energy.
DIY Fairy Light Lantern
This is one of the easiest and most effective DIY projects.
Step 1: Find a Glass Vessel You need a clean, empty glass container. A large jar, a vase, or even a decorative glass bottle will work well.
Step 2: Get Your Lights Buy a set of battery-operated fairy lights. The ones with thin, flexible wire are the easiest to arrange.
Step 3: Put Them Inside Turn the lights on. Carefully begin feeding the string of lights into your jar. Don’t just drop them in a pile; try to guide them so they fill the space evenly.
Step 4: Hide the Pack and Enjoy Once the entire string is inside, tuck the small battery pack behind the jar or tape it to the back. Your beautiful, glowing lantern is ready to be placed on a shelf or table.
17. Layer Your Lighting

Relying on a single overhead light is a common decorating mistake that can make a room feel flat and uninviting. The key to a cozy space is using multiple sources of light at different levels. This is called layered lighting.
Combine your main light with task lighting, like a reading lamp by a chair, and accent lighting, like a small table lamp on a console. Using several smaller, warmer light sources instead of one big, bright one allows you to create a softer, more nuanced mood. It gives you control over the atmosphere of the room, letting you make it as bright or as dim as you like.
DIY Bottle Lamp Base
Turn a beautiful glass bottle into a unique lamp.
Step 1: Get Your Supplies You’ll need an empty glass bottle that you find attractive. You’ll also need to buy a “bottle lamp kit” from a hardware or craft store. These kits come with the socket, cord, and special stoppers to fit different bottle openings.
Step 2: Assemble the Kit Read the instructions on your lamp kit. Usually, you just have to choose the right size rubber stopper for your bottle’s opening. Then you thread the lamp cord through the stopper and attach it to the socket.
Step 3: Put it on the Bottle Firmly press the stopper into the opening at the top of your bottle. It should be a snug fit.
Step 4: Add a Shade All you have to do now is screw in a light bulb and add a lampshade of your choice. You have a custom lamp!
18. Hide Clutter with a Storage Ottoman

A cluttered room can feel stressful and chaotic, which is the opposite of cozy. One of the best ways to keep your living room tidy is with clever storage. A storage ottoman is a hardworking piece of furniture that looks great and hides your mess.
It provides a soft place to put your feet up, can serve as an extra seat, and acts as a coffee table if you add a tray. But its biggest benefit is the hidden space inside. It’s the perfect spot to quickly stash extra blankets, magazines, remote controls, and kids’ toys, instantly making your room feel calmer and more relaxing.
DIY Crate Storage Seat
Make a simple, rustic storage seat from a wooden crate.
Step 1: Get a Crate and Plywood Find a sturdy wooden crate from a craft or home store. Then, have a piece of plywood cut at the hardware store that is the exact same size as the top of the crate. This will be your lid.
Step 2: Get Your Cushion Supplies You’ll need a piece of 2-inch thick foam, some fabric you like, and a staple gun.
Step 3: Make the Padded Lid Cut your foam to the same size as the plywood lid. Then, cut your fabric so it’s about 4 inches wider than the lid on all sides. Lay the fabric down, then the foam, then the plywood.
Step 4: Staple the Fabric Pull one side of the fabric up and over the edge of the plywood and secure it with a few staples. Then do the same on the opposite side, pulling the fabric tight. Continue this on the other two sides, neatly folding the corners as if you were wrapping a gift.
Step 5: Use Your New Storage! Place the padded lid on top of your crate. You now have a comfy seat and a place to hide things inside.
19. Carve Out a Cozy Reading Nook

Even if you don’t have a lot of space, creating a dedicated spot for reading and relaxing can make your whole living room feel more comfortable. This “nook” signals that this is a home designed for comfort, not just for looks.
All you need is a comfortable armchair, a small side table for a cup of tea, and a good reading lamp. Tucking these three things into a quiet corner creates a purpose-built zone for unwinding. Adding a soft pillow and a warm blanket to the chair completes the invitation to sit down, take a break, and get lost in a good book.
DIY Floating Bookshelf
This simple shelf is great for a reading nook.
Step 1: Get Your Supplies You will need a small L-shaped bracket from the hardware store, a few screws, and one hardcover book that you don’t mind not being able to read again.
Step 2: Attach the Bracket to the Wall Decide where you want your shelf. Use screws to attach the flat part of the L-bracket to the wall. The part that sticks out will be your shelf.
Step 3: Attach the Book Open your hardcover book to the very last page. Use strong glue or a couple of screws to attach the back cover of the book to the top of the bracket that is sticking out from the wall.
Step 4: Create the Illusion Close the book. The bracket will be completely hidden inside. Now you can stack a few more books on top. It will look like they are magically floating on the wall!
20. Swap a Large Coffee Table for Nesting Tables

A single, large coffee table can sometimes make a living room feel rigid and blocked off. Swapping it for a set of nesting tables can make the space feel more open, flexible, and casual.
Nesting tables provide surface area when you need it and tuck away neatly when you don’t. You can pull them apart to give multiple guests a place to set their drinks, or use one as a small side table next to a chair. This adaptability makes your living room more functional for everyday life, which in itself creates a more relaxed and comfortable environment.
DIY Wooden C-Table
This simple table is shaped like the letter C and can slide right under your sofa.
Step 1: Get Your Wood Cut Go to a hardware store. You’ll need three pieces of wood. Have them cut two pieces that are the same size (for the top and bottom) and one taller piece (for the side). For example, two pieces of 12×18 inches and one piece of 12×24 inches.
Step 2: Get Your Tools You will need some wood glue and a few long wood screws. A power drill will make this much easier.
Step 3: Build the “C” Shape Take the tall side piece. Stand it up on its long, thin edge. Apply a line of wood glue along the top edge. Place one of the other boards on top to be the tabletop, making sure the edges are perfectly lined up. Secure it with two screws, drilling down from the top.
Step 4: Add the Base Now, carefully flip the “L” shape you just made upside down. Apply wood glue to the other end of the tall side piece. Place the final board on it to be the base. Secure it by drilling two screws up from the bottom.
Step 5: Let It Dry Wipe away any extra glue that squeezed out. Let the table dry for a few hours. You can paint or stain it, or leave it natural.
21. Style Shelves with Natural Elements

Your bookshelves don’t have to be crammed with only books. Think of them as display areas for creating small, cozy scenes. During winter, clearing a little space to add natural, rustic elements can bring a sense of the quiet outdoors inside.
Intersperse your books with items like pinecones, small wooden bowls, or interesting stones. You can also lean a small piece of art depicting a winter landscape at the back of a shelf. This breaks up the monotony of book spines and adds layers of texture and interest, making your shelves a beautiful feature rather than just storage.
DIY Gold-Leaf Pinecones
This simple project makes a natural object look very elegant.
Step 1: Get Your Supplies You will need some clean, dry pinecones. You’ll also need a bottle of metal leaf adhesive, some gold leaf sheets, and a small, soft paintbrush. You can find these at a craft store.
Step 2: Apply the Adhesive Using your paintbrush, apply a thin, even layer of the adhesive to the tips of the pinecone’s scales. You don’t need to cover the whole thing. Just hitting the edges will look very pretty. Let the adhesive dry for a bit until it feels sticky, not wet.
Step 3: Apply the Gold Leaf Carefully take a sheet of gold leaf. It’s very delicate! Gently press the sheet onto the sticky parts of the pinecone. The gold will stick to the adhesive.
Step 4: Brush Away the Extra Use a clean, dry paintbrush to gently brush away the excess gold leaf. The gold will remain on the parts where you put the adhesive. You’re left with a beautiful, gilded pinecone.
22. Incorporate Warm Wood Tones

If your living room is full of cool metal, glass, or painted furniture, it can feel a little stark in the winter. Bringing in pieces made of warm-toned wood is an instant way to make a space feel more grounded and inviting.
This could be as simple as adding a rustic wooden console table or a small bench. The natural grain and rich color of the wood add a layer of organic texture that is inherently comforting. Wood has a visual warmth that connects us to nature, making a room feel more like a safe and sturdy shelter from the cold.
DIY Rustic Wood Riser
This is a small shelf you can use to add height to decorations.
Step 1: Find Your Wood You’ll need one thick, rustic-looking board for the top. You’ll also need two smaller, thick blocks of wood for the legs. You can get these from a hardware store, a craft store, or even from your backyard.
Step 2: Get Your Tools You will need some strong wood glue and a few screws. A drill is helpful.
Step 3: Position the Legs Flip your main board upside down. Decide where you want your two leg pieces to go, near each end.
Step 4: Attach the Legs Apply a generous amount of wood glue to the top of one of the leg blocks. Press it firmly onto the bottom of the main board. Do the same for the other leg.
Step 5: Secure with Screws For extra strength, flip the whole thing over. From the top of the main board, drill one or two screws down into each of the leg blocks. This will make your riser very sturdy. Let the glue dry completely before using it.
23. Swap Art for Moody Landscapes

The art on your walls has a big impact on the feeling of a room. Bright, sunny beach scenes that felt great in July can feel out of place in December. Consider swapping some of your art for pieces with a more wintry, atmospheric mood.
Look for landscapes that feature misty forests, snowy mountains, or calm winter lakes. These scenes have a quiet, contemplative quality that complements the cozy feeling of being indoors. The cool tones in the art create a beautiful contrast with the warm textures inside your room, making your cozy space feel even more like a special retreat.
DIY “Watercolor” Photo Art
Turn one of your own photos into a piece of art with a soft, painted look.
Step 1: Choose and Print a Photo Find a digital photo you’ve taken of a landscape. It could be from a hike or a vacation. Using a photo editing app, you can often add a “watercolor” or “painting” filter to it. Print the photo on matte photo paper.
Step 2: Get Your Supplies You will need your printed photo, a small bottle of Mod Podge (matte finish), and a paintbrush.
Step 3: “Paint” Over Your Photo Pour a little Mod Podge onto a plate. Using your paintbrush, paint a thin layer of the Mod Podge directly onto your photo print. Make your brushstrokes follow the lines and shapes in your picture.
Step 4: Add Texture As the Mod Podge starts to dry, it will hold the texture of your brushstrokes. This makes the flat print look like a real painting.
Step 5: Frame and Hang Let the Mod Podge dry completely. It will dry clear. Now you can frame your new piece of custom art and hang it on the wall.
24. Add Texture with Woven Wall Hangings

Smooth, bare walls can feel cold. A simple way to add instant warmth and softness is by hanging textiles. Woven wall hangings, particularly those made from natural fibers like wool and cotton, are excellent for this.
The rich texture of a woven or macrame piece absorbs sound, making your room feel quieter and more peaceful. The intricate patterns and soft materials are visually comforting. Hanging one above a sofa or on a large, empty wall can create a beautiful, bohemian-style focal point that makes the entire room feel more relaxed and inviting.
DIY Simple Macrame Wall Hanging
Learn the most basic macrame knot and make a small wall hanging.
Step 1: Get Your Supplies You’ll need some macrame cord, a stick or dowel to hang it from, and scissors.
Step 2: Cut and Attach Your Cords Cut eight pieces of cord that are each about 6 feet long. Take one piece, fold it in half, and place the looped end over your stick. Then pull the two loose ends through the loop to attach it to the stick. This is called a Lark’s Head knot. Do this with all eight cords. You should have 16 strings hanging down.
Step 3: Learn the Square Knot This is the main knot. Take the first four strings on the left. Let’s call them 1, 2, 3, and 4.
- Take string 1 and cross it over strings 2 and 3.
- Take string 4 and bring it over string 1.
- Now, take string 4 and pass it behind strings 2 and 3, and bring it through the loop made by string 1. Pull it tight. That’s half the knot.
- Now do the reverse. Take string 1 and pass it under strings 2 and 3.
- Take string 4 and pass it under string 1.
- Bring string 4 over strings 2 and 3, and through the loop made by string 1. Pull tight. You’ve made a square knot!
Step 4: Make a Pattern Make square knots using the first four strings, the next four, and so on. Then, on the next row, leave the first two strings alone and make a square knot with strings 3, 4, 5, and 6. By alternating like this, you create a net pattern. Keep going until you’re happy with the length.
Step 5: Finish the Bottom You can leave the bottom strings long, or you can trim them into a V-shape or a straight line.
25. Create a Moody Gallery Wall

A gallery wall is a wonderful way to fill a large, empty space with personality. For a cozy winter feeling, choose art and frames that have a slightly darker, more vintage aesthetic. A collection of moody floral paintings, old black-and-white photos, and landscapes can create a rich, layered look.
Mix and match frame styles and sizes, but keep the colors cohesive. Using frames in warm woods, antique gold, and black helps tie everything together. This approach turns your wall into a fascinating collection of stories and images that draws you in and makes the room feel deeply personal and comfortable.
DIY Guide to Planning a Gallery Wall
The secret to a great gallery wall is planning it on the floor first.
Step 1: Gather Your Art Collect all the framed pictures and objects you want to hang.
Step 2: Use Paper Templates For each frame, trace its shape onto a piece of newspaper or craft paper and cut it out. Use a little piece of painter’s tape to stick the paper templates to the wall.
Step 3: Arrange the Templates Move the paper shapes around on the wall until you find a layout that you love. This lets you see exactly how it will look without making any nail holes. A good tip is to start with your biggest piece in the middle and build out from there.
Step 4: Mark and Hang Once you are happy with the layout, you can hang your art. For each piece of paper, figure out where the nail should go, hammer a nail right through the paper, and then tear the paper away. Hang your picture on the nail.
26. Install a Dark, Moody Accent Wall

Painting a whole room a dark color can be intimidating, but creating a single accent wall can add depth and intimacy without overwhelming the space. A deep navy blue, charcoal gray, or forest green wall can make a living room feel incredibly cozy and sophisticated.
A dark color on one wall, especially the one behind your sofa or television, creates a dramatic backdrop. It makes the other walls feel brighter in comparison and adds a snug, cocoon-like feeling to the room. Using wallpaper with a rich pattern can have a similar effect, adding both color and texture.
DIY Fabric Wallpaper
This is a great temporary way to create an accent wall, especially for renters.
Step 1: Get Your Supplies You will need enough lightweight fabric (like cotton) to cover your wall, a bucket, liquid starch, a paint roller, and a sharp utility knife.
Step 2: Prepare the Wall and Fabric Make sure your wall is clean and smooth. Cut your fabric into panels that will be easy to work with.
Step 3: Apply the Starch Pour some liquid starch into a paint tray. Use your roller to apply a generous coat of starch to a section of the wall.
Step 4: Put Up the Fabric Take a panel of your fabric and press it onto the starched section of the wall. Use your hands to smooth out any wrinkles or bubbles.
Step 5: Top Coat Once the fabric is in place, roll another coat of liquid starch over the top of the fabric. This will help it stick and give it a stiff, wallpaper-like finish. Continue this process until the whole wall is covered. Use your utility knife to trim the edges neatly. When you’re ready to remove it, you can just peel it off!
27. Add Warmth with a Wood Slat Wall

For a more modern take on a cozy accent wall, consider installing vertical wood slats. This feature adds incredible texture, warmth, and architectural interest to a room. The clean, repeating lines have a calming effect, while the natural wood material provides a strong connection to nature.
A slat wall can serve as a beautiful backdrop for a television, making it feel more integrated into the room. It can also be used behind a sofa to create a stunning focal point. This design element adds a layer of sophistication and organic warmth that can transform a plain room into a high-end, comfortable space.
DIY Faux Wood Slat Panel
Get the look of a slat wall without a complicated installation.
Step 1: Get Your Supplies You will need several long, thin pieces of wood trim from the hardware store (like 1×2 boards). You’ll also need a piece of thin plywood painted black, some strong construction adhesive, and a saw.
Step 2: Cut Your Slats Decide how tall you want your decorative panel to be. Cut all of your wood trim pieces to that same length.
Step 3: Glue the Slats to the Plywood Lay your black plywood on the floor. Apply a line of construction adhesive to the back of one of your wood slats. Press it down firmly at one edge of the plywood.
Step 4: Use a Spacer To make sure your slats are evenly spaced, use a spare piece of the same wood trim as a spacer. Place it next to the slat you just glued down. Then apply glue to your next slat and press it down against the spacer.
Step 5: Continue and Hang Remove the spacer and repeat the process until you have covered your plywood. Once the glue is dry, you can hang your new panel on the wall like a large piece of art.
28. Display Dried Botanical Arrangements

Fresh flowers are beautiful, but they don’t last long. For a more sustainable and long-lasting touch of nature in the winter, switch to dried botanicals. Arrangements of pampas grass, dried eucalyptus, cotton stems, and hydrangeas have a soft, sculptural quality.
The muted, earthy tones of dried flowers and grasses are inherently calming and fit perfectly with a cozy winter color scheme. They add texture and a touch of rustic elegance to a side table or mantelpiece. Best of all, they require no water and will look beautiful all season long.
DIY Foraged and Dried Bouquet
Create a beautiful arrangement for free.
Step 1: Go for a Walk Go to a park, a field, or even your own backyard and look for interesting natural items. Collect long grasses, interesting seed pods, and sturdy weeds.
Step 2: Bundle and Hang Gather your findings into small bundles. Use a rubber band or a piece of twine to tie the stems together.
Step 3: Find a Dry Spot Find a dark, dry place with good air circulation, like a closet or an attic. Hang your bundles upside down from a hook or a hanger.
Step 4: Wait Patiently Let your botanicals hang for two to three weeks until they are completely dry and stiff to the touch.
Step 5: Arrange Your Bouquet Once they are dry, you can arrange your foraged treasures in a vase. They will make a beautiful, long-lasting display.
29. Use Pinecones as a Natural Accent

Sometimes the simplest decorations are the most effective. Bringing natural elements from the outdoors inside is a classic way to make a home feel cozy for winter. Pinecones are a wonderful and free resource for this.
Their rustic texture and sculptural shape are beautiful on their own. You can fill a large wooden bowl with them to create a simple, organic centerpiece for your coffee table. You can also tuck them into the branches of your houseplants or line them up on a mantelpiece. They add a touch of woodland charm that feels both festive and natural.
DIY Scented Pinecones
Make your home smell like winter with this easy project.
Step 1: Collect and Clean Your Pinecones Go outside and gather some pinecones. To get rid of any little bugs or dirt, you should bake them. Place them on a foil-lined baking sheet in an oven set to 200°F (93°C) for about 30 minutes. Let them cool completely.
Step 2: Get Your Scent You will need a large sealable plastic bag and your favorite essential oil. Cinnamon, clove, or pine are great scents for winter.
Step 3: Scent the Pinecones Place your cooled pinecones in the plastic bag. Add about 15-20 drops of your essential oil. Seal the bag and shake it gently to coat the pinecones.
Step 4: Let Them Marinate Leave the pinecones in the sealed bag for at least a week. This gives them time to really absorb the scent.
Step 5: Decorate! After a week, take your pinecones out of the bag. They are now beautifully scented and ready to be placed in a bowl or basket.
30. Build a Terrarium for a Touch of Green

Winter can feel gray and lifeless outside. Creating a terrarium is like building your own miniature, self-contained garden that brings a vibrant splash of green into your living room. A closed terrarium creates its own ecosystem, so it’s a very low-maintenance way to keep plants.
Looking at the tiny landscape you’ve created can be incredibly calming and satisfying. It’s a living piece of art that adds life and a sense of wonder to your space. Placing a terrarium on a coffee table or bookshelf provides a focal point and a welcome reminder of nature’s resilience, even in the middle of winter.
DIY Simple Bottle Terrarium
You don’t need a fancy container to make a beautiful terrarium.
Step 1: Find a Jar and Get Your Supplies You will need a clean glass jar with a lid. You’ll also need small pebbles for drainage, activated charcoal from a pet store, potting soil, and small plants that like humidity, such as moss or ferns.
Step 2: Add the Drainage Layer Put a 1-inch layer of small pebbles or gravel at the bottom of your jar. This is so extra water has a place to go.
Step 3: Add the Charcoal Sprinkle a thin layer of activated charcoal over the pebbles. This helps keep the soil fresh and clean.
Step 4: Add the Soil Add a layer of potting soil that is deep enough for your plants’ roots.
Step 5: Plant Your Plants Use your fingers or a long spoon to dig small holes in the soil. Gently place your little plants in the holes and pat the soil down around them.
Step 6: Water and Close Give your new garden a little bit of water, just enough to moisten the soil. Put the lid on your jar. Place it in a spot with indirect light and watch your little world thrive!
31. Hang a Natural Winter Wreath

Wreaths are not just for the front door. Bringing a beautiful, rustic wreath indoors is a simple way to add a touch of nature and seasonal cheer to your living room. A wreath made from a grapevine base and adorned with natural elements feels both festive and elegant.
You can hang it on a wall, place it over a mirror, or even lay it flat on a coffee table with a candle in the center. Using materials like eucalyptus, pine, dried orange slices, and cinnamon sticks adds layers of texture and a wonderful, subtle fragrance to the room, enhancing the cozy winter atmosphere.
DIY Grapevine and Greenery Wreath
This project is easy to customize with your favorite natural elements.
Step 1: Get Your Base and Greenery You will need a blank grapevine wreath from a craft store. You’ll also need some flexible greenery, like seeded eucalyptus or small pine branches, and a roll of floral wire.
Step 2: Create Small Bundles Cut your greenery into smaller, manageable pieces. Take two or three pieces and arrange them into a small bundle. Wrap the stems together tightly with a piece of floral wire. Make about 10-15 of these small bundles.
Step 3: Attach the Bundles Take your first bundle and lay it on the grapevine wreath. Use another piece of floral wire to wrap around the stems and a branch of the wreath, securing it tightly.
Step 4: Overlap and Continue Take your next bundle and place it so the leafy part covers the stems of the first bundle. Secure this one to the wreath with wire. Continue this process, overlapping the bundles and making sure they all face the same direction, until you have covered the wreath.
Step 5: Add Embellishments You can use a hot glue gun to add extra decorations like small pinecones, dried orange slices, or a few cinnamon sticks.
32. Force Bulbs Indoors for a Glimpse of Spring

In the depths of winter, it can be a joy to watch something new grow. Forcing bulbs like paperwhites or amaryllis indoors brings a welcome touch of life and color into your home. It’s a simple process that allows you to enjoy beautiful, fragrant blooms long before they appear outside.
Watching the green shoots emerge and grow taller each day is a satisfying process. It’s a living decoration that changes over time and serves as a hopeful reminder that spring is on its way. Grouping several pots of forced bulbs on a side table creates a lovely, garden-like display.
DIY Forcing Paperwhite Bulbs
You don’t even need soil to grow these beautiful flowers.
Step 1: Choose a Container Find a shallow bowl or vase that does not have a drainage hole. A clear glass container is nice because you can watch the roots grow.
Step 2: Add a Layer of Stones Fill the bottom of your container with a 2 to 3-inch layer of small stones, pebbles, or decorative glass beads.
Step 3: Position the Bulbs Take your paperwhite bulbs and place them, pointed-side up, on top of the stones. You can place them very close together.
Step 4: Secure the Bulbs Add a few more stones around the bulbs to help hold them in place. You want the top half of the bulbs to be exposed.
Step 5: Just Add Water Carefully pour water into the container until it just reaches the bottom of the bulbs. You don’t want the bulbs themselves to be sitting in water, or they might rot. Place the container in a sunny spot and watch them grow!
33. Style a Cozy Coffee Table Tray

A coffee table can quickly become a dumping ground for remotes, magazines, and mugs. A simple way to make it look intentionally styled and cozy is to use a decorative tray. A tray acts like a frame, corralling various objects into one cohesive and attractive display.
Choose a tray with a warm texture, like woven rattan or aged brass. Then, group a few items of different heights inside it. A small vase with some greenery, a scented candle, a couple of interesting books, and a small bowl for smaller items is a classic combination. This keeps your table organized and adds a beautiful, personal touch.
DIY Woven Tray Makeover
Give a cheap tray a high-end, textured look.
Step 1: Get Your Tray and Rope Find a simple, flat tray. It can be plastic, wood, or metal. You’ll also need a hot glue gun and a roll of rope or jute twine.
Step 2: Start from the Center Put a dot of hot glue in the very center of the tray’s inside surface. Press the end of your rope into the glue to secure it.
Step 3: Create a Spiral Begin coiling the rope around this central point. Apply a thin line of hot glue to the tray and press the rope into it as you go. Keep the coils tight against each other.
Step 4: Cover the Base Continue this spiral pattern until you have covered the entire bottom of the tray. Cut the rope and secure the end with a final dot of glue.
Step 5: Cover the Sides (Optional) If your tray has sides, you can cover them as well. Just glue and wrap the rope around the sides of the tray until they are completely covered.
34. Group Earthy and Handmade Pottery

There is a special kind of warmth that comes from objects that feel like they were made by hand. Swapping out generic glass vases for a collection of earthy, handmade pottery can make your living room feel more grounded and personal.
Look for pieces with matte glazes, speckled finishes, and slightly imperfect, organic shapes. The colors of natural clay, like terracotta and stoneware, are inherently warm and inviting. Grouping several of these vessels of different shapes and sizes on a console table or a shelf creates a beautiful, sculptural display that adds a touch of rustic sophistication.
DIY Faux Pottery Look
You can make any old vase look like expensive, textured pottery.
Step 1: Get a Vase and Some Paint Find an old glass or ceramic vase that you don’t like anymore. You’ll also need some acrylic craft paint in an earthy color and a container of baking soda.
Step 2: Mix Your “Pottery” Paint Pour some of the paint into a disposable cup. Start adding a little bit of baking soda and mix it in. Keep adding baking soda until your paint has become thick and has a slightly gritty texture.
Step 3: Paint Your First Coat Use a paintbrush to apply a thick coat of your textured paint all over the outside of your vase. The brushstrokes will add to the handmade look. Let it dry completely.
Step 4: Paint a Second Coat Apply a second coat to make sure the original surface is completely covered. You can even dab the paint on with your brush to create more texture. Let it dry, and you’re done!
35. Display a Bowl of Winter Potpourri

Scent is a powerful tool for creating a cozy atmosphere. While candles are great, a bowl of potpourri offers a constant, gentle fragrance and acts as a beautiful piece of decor. A winter-themed mix can make your living room look and smell warm and inviting.
Create a mix of dried orange slices, cinnamon sticks, star anise, and small pinecones. The rich colors and varied textures are beautiful when displayed in a wooden or ceramic bowl. The natural, spicy scent is a wonderful way to welcome guests and make your home feel like a festive, comfortable retreat from the cold.
DIY Oven-Dried Potpourri
Making your own potpourri is easy and fills your home with a wonderful aroma as it dries.
Step 1: Slice Your Fruit Take one or two oranges and an apple. Slice them into thin, even rounds, about 1/4 inch thick.
Step 2: Arrange on a Baking Sheet Line a baking sheet with parchment paper. Arrange your fruit slices in a single layer. You can also add some whole cinnamon sticks, star anise, and fresh cranberries to the baking sheet.
Step 3: Bake Low and Slow Place the baking sheet in an oven set to its lowest possible temperature, usually around 200°F (93°C). Let the items dry in the oven for 2 to 3 hours, flipping them halfway through.
Step 4: Cool and Display The fruit is done when it is dry to the touch and not sticky. Let everything cool completely. You can add a few drops of essential oil for a stronger scent. Then arrange your beautiful, homemade potpourri in a decorative bowl.
36. Stack Books for an Intellectual Touch

Books are not just for reading; they are also wonderful decorative objects. A simple stack of books can add color, texture, and a sense of personality to a coffee table or a side table. It’s a simple way to create a small, curated moment in your living room.
Choose a few hardcover books with beautiful spines that fit your color scheme. You can stack them horizontally and use them as a riser for a small plant or a decorative object. This adds height and interest to your display. It’s a look that feels both intelligent and lived-in, suggesting a home where people relax and enjoy the simple pleasures.
DIY Decorative Bookmarks
Every stack of books needs a beautiful bookmark.
Step 1: Get Your Supplies You will need some stiff paper or cardstock, scissors, a hole punch, and some embroidery floss or thin ribbon.
Step 2: Cut Your Bookmark Cut the cardstock into a classic bookmark shape, about 2 inches wide and 6 inches long.
Step 3: Decorate It This is the fun part! You can draw a pattern, use watercolor paints, or glue on a pressed flower or leaf.
Step 4: Add a Tassel Punch a hole in the top center of your bookmark. To make a simple tassel, wrap embroidery floss around four of your fingers about 20 times. Carefully slide it off. Tie a separate piece of floss tightly around the top of the loops. Cut the bottom of the loops to create the tassel fringe.
Step 5: Attach the Tassel Thread the tie from the top of your tassel through the hole in your bookmark and tie a secure knot.
37. Drape a Strand of Wooden Beads

Sometimes a room just needs a simple, finishing touch. A strand of wooden beads is a versatile and stylish accessory that can add a soft, textural element to your decor. This small detail can make a styled area look more complete and thoughtfully arranged.
The natural wood material adds a touch of rustic, bohemian warmth. You can drape a bead garland over a stack of books, coil it in a decorative bowl, or hang it from the knob of a cabinet. It’s a simple way to soften the hard edges of furniture and add a layer of casual, handmade charm to your living room.
DIY Wooden Bead Garland
Making one of these is as easy as stringing beads.
Step 1: Get Your Beads and Twine Go to a craft store and buy some plain wooden beads. You can get a mix of different sizes for more interest. You will also need a roll of jute twine.
Step 2: Make Your First Tassel A tassel at one end will keep the beads from sliding off. Wrap twine around your four fingers about 30 times. Slide it off, and tie a separate piece of twine tightly around the top. Cut the bottom loops. You have a tassel! Tie one end of your long piece of twine securely to the top of this tassel.
Step 3: String Your Beads Start threading your wooden beads onto the long piece of twine. You can create a pattern with different sizes or just string them on randomly.
Step 4: Finish the Other End Keep stringing beads until your garland is as long as you want it to be. Make a second tassel and tie it securely to the other end. Your beautiful bead garland is ready to be displayed.
38. Create a Stovetop Simmer Pot

The most powerful way to make a home feel cozy is through scent. A stovetop simmer pot is a natural and wonderful way to fill your entire living space with the comforting aromas of winter. It’s like a warm hug for your nose.
Unlike artificial air fresheners, a simmer pot creates a rich, complex, and all-natural fragrance. Simply combine water with classic winter ingredients like citrus, spices, and herbs in a small saucepan and let it gently simmer on the stove. The warm, fragrant steam will drift through your home, creating an incredibly welcoming and festive atmosphere.
DIY Winter Simmer Pot Recipe
This is a simple recipe to get you started.
Step 1: Gather Your Ingredients You will need:
- 1 orange or a couple of small clementines
- A handful of fresh cranberries
- 2-3 cinnamon sticks
- 1-2 sprigs of fresh rosemary
- A teaspoon of whole cloves
Step 2: Prepare the Ingredients Slice the orange into rounds. You don’t need to peel it.
Step 3: Combine in a Pot Place all of your ingredients into a small saucepan.
Step 4: Add Water and Simmer Fill the pot about three-quarters full with water. Place it on your stove over medium-high heat and bring it to a boil.
Step 5: Enjoy the Aroma Once it’s boiling, reduce the heat to low so the water is just barely simmering. As the water evaporates, the amazing smell will fill your home. Just be sure to check on it every so often and add more water as needed so it doesn’t burn.
Creating a cozy living room is about more than just adding a blanket. It’s about thoughtfully engaging all of your senses. By focusing on soft textures, warm and layered lighting, natural elements, and personal touches, you can fundamentally change the feeling of your space. Each small swap, from changing a light bulb to adding a bowl of pinecones, contributes to a larger sense of comfort and well-being.
You don’t need a large budget or a lot of time to make a significant impact. The most inviting rooms are those that feel personal and lived-in. Use these ideas as a starting point, and don’t be afraid to adapt them to your own style. Your living room should be your sanctuary, a place that feels uniquely yours and welcomes you home every day.
Key Takeaways
- Layer Your Textures: Mix different materials like velvet, chunky knits, faux fur, and warm woods to add physical and visual warmth.
- Embrace Warm Lighting: Swap harsh overhead lights for multiple, softer light sources like floor lamps, table lamps, and candles with warm-toned bulbs.
- Bring Nature Indoors: Use natural elements like wood, plants, pinecones, and dried botanicals to create a grounding, organic connection to the outdoors.
- Engage More Than Sight: Incorporate elements that appeal to other senses, such as the fragrance of a simmer pot, the soft feel of a plush rug, or the quiet ambiance created by sound-absorbing textiles.
- Personalize Your Space: A cozy room reflects its owner. Use gallery walls, handmade items, and meaningful objects to make your living room feel like a true home.