The fireplace is the heart of the home when winter arrives. It’s where we gather for warmth, share stories, and watch the flames dance on cold nights. A bare mantel can feel cold, but a thoughtfully decorated one can transform your entire room into a cozy sanctuary. It becomes a true focal point, reflecting your personal style.

This collection of ideas is here to inspire you. We will explore a wide range of styles, from quiet minimalist scenes to joyful holiday explosions of color. You will find looks for every taste and space.
Each idea also comes with simple, step-by-step instructions to help you create these beautiful displays yourself. You can follow them exactly or mix and match elements to make something uniquely yours. Let’s warm up your home.
1. Minimalist Scandi Charm

This look celebrates clean lines and natural textures. The fireplace stands as a quiet centerpiece in the room. A simple garland of fresh eucalyptus and pine drapes gently across the light wood mantel, adding a touch of organic life. White space is important here; it allows each element to breathe. The design feels uncluttered and peaceful.
Stacked firewood brings rustic warmth, neatly framing the hearth. Soft textures from a sheepskin rug and a cozy pouf invite you to relax. The arrangement creates a calm, welcoming atmosphere without any fuss. It is a simple and beautiful way to decorate for the winter months.
DIY Simple Eucalyptus Garland
Creating this look is all about simplicity. Here is how you can make the beautiful, natural garland for your own mantel.
What You’ll Need:
- A long piece of strong string or thin rope (like twine)
- Bunches of fresh eucalyptus branches
- A few small pine or fir branches
- Thin, green floral wire
- Scissors
- A measuring tape
Step-by-Step Instructions:
- Measure Your Mantel: First, use your measuring tape to see how long your fireplace mantel is. Decide how much you want the garland to hang down on the sides. Add that extra length to your measurement and cut your main string to this size.
- Make Little Greenery Bundles: Take one branch of eucalyptus and one small piece of pine. Lay them on top of each other to make a small bundle. Cut a small piece of your green floral wire (about 4-5 inches long).
- Wrap Your First Bundle: Tightly wrap the wire around the stems of your little bundle to hold it together. Don’t cut the extra wire off yet!
- Attach it to the Rope: Place your first bundle at one end of your long string. Use the ends of the floral wire to wrap the bundle tightly onto the string.
- Keep Adding More: Make another little bundle just like the first one. Place it so it slightly overlaps the stems of the first bundle, covering up the wire. Attach it the same way. Keep doing this, always pointing the leaves in the same direction, until your whole string is covered in greenery.
- Hang and Fluff: Carefully lift your garland and place it on your mantel. Let the ends drape down the sides. Gently fluff and arrange the branches to make it look full and beautiful. You can hang little wooden stars from it with more string for an extra touch!
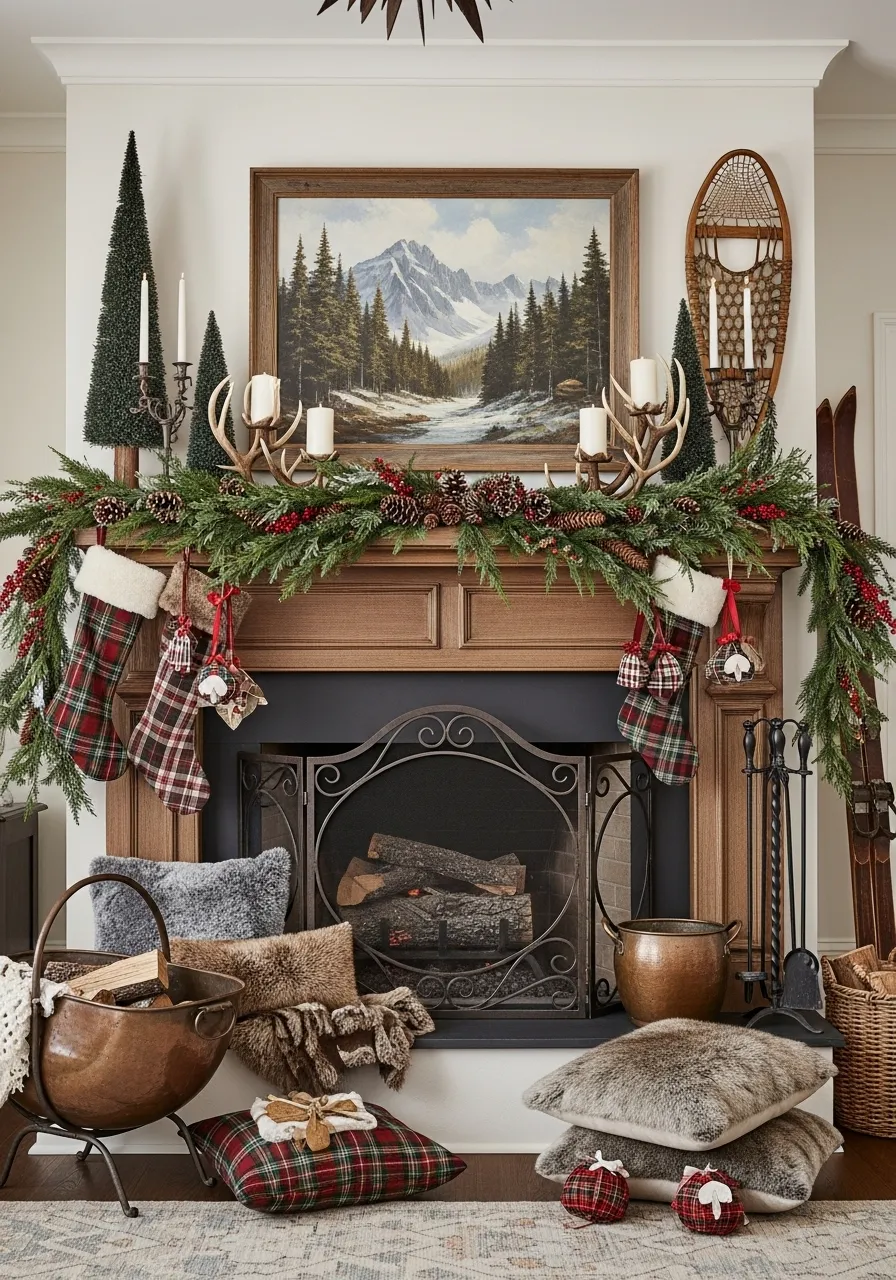
2. Rustic Mountain Lodge

This hearth brings the spirit of a cozy mountain cabin right into your living room. The thick, evergreen garland is bursting with pinecones and bright red berries, creating a classic winter look. Antler candle holders add a natural, woodsy element that feels both rugged and graceful. Plaid stockings wait patiently for holiday treats.
Above the mantel, a painting of a snow-capped mountain sets the scene. Every piece, from the vintage snowshoes to the warm copper pots, tells a story of snowy adventures and warm nights by the fire. This decor is all about comfort.
DIY Faux Antler Candle Holders
You don’t need real antlers to get this look. You can make your own rustic candle holders that are safe and look great.
What You’ll Need:
- Small, faux antlers (you can find these at a craft store)
- A small, flat wooden disc or plaque for each candle holder
- Strong glue (like E6000 or hot glue, with adult help)
- White spray paint or craft paint
- A paintbrush
- Pillar candles (the battery-operated kind are safest!)
Step-by-Step Instructions:
- Prepare Your Base: Make sure your wooden discs are clean and dry. If you want, you can paint them white or a wood-stain color. Let them dry completely.
- Paint the Antlers: If your antlers aren’t already white, lay them on some newspaper outside or in a well-ventilated area. Spray paint them white, or use a brush to apply a couple of coats of white craft paint. Let them dry.
- Glue the Antlers: Take two antler pieces. Arrange them on top of a wooden disc in a “V” or cradle shape, making sure there is a flat spot in the middle where your candle can sit securely.
- Ask for Help with Gluing: This is a good step for an adult to help with. Apply a generous amount of strong glue to the bottom of the antlers where they touch the wood disc. Press them down firmly and hold for a minute.
- Let it Set: Let the glue dry completely. This might take a few hours, so be patient!
- Add Your Candle: Once everything is dry and sturdy, place your battery-operated pillar candle in the cradle you made with the antlers. Your rustic candle holder is now ready for the mantel!
3. Frosted Woodland Wonderland

Step into a quiet, snowy forest with this enchanting mantel decor. A lush moss garland forms the base, looking as if it were just gathered from the woods. Glistening silver ferns and frosty branches weave through it, sparkling next to delicate hanging glass icicles. The look is gentle and magical.
Birch log candle holders of different heights add a natural, rustic touch. Small figurines of deer and owls peek out from behind miniature Christmas trees. The entire scene is reflected in a beautiful ornate mirror, making the woodland feel even bigger. This hearth is a peaceful winter dream.
DIY Birch Log Candle Holders
These candle holders look like they came straight from the forest and are very simple to make.
What You’ll Need:
- Birch branches or logs of various thicknesses (you can buy these at a craft store)
- A handsaw (adult supervision is a must here!)
- A measuring tape
- A pencil
- Sandpaper
- Tea light candles (battery-operated are safest)
Step-by-Step Instructions:
- Plan Your Heights: Decide how tall you want your candle holders to be. It’s nice to have a few different heights, like one short, one medium, and one tall.
- Mark the Wood: Use your measuring tape and a pencil to mark where you need to cut the birch log.
- Adults Only: The Cutting Part: Ask an adult to use the handsaw to carefully cut the log at the marks you made. You will have several small log pieces when you are done. Safety is very important for this step.
- Smooth the Edges: The cut ends of the logs might be a little rough. Use a piece of sandpaper to rub the top and bottom of each log piece until they are smooth.
- Place Your Candle: The top of the log is the holder! Just place a battery-operated tea light on top of each birch log. You don’t need to drill a hole, which is much safer.
- Arrange Your Forest: Group your new candle holders on the mantel to create a mini birch tree forest.
4. Gilded Age Glamour

This fireplace exudes elegance and drama. A magnificent gold-framed mirror immediately draws the eye, reflecting the room’s chandelier. The decor is rich with deep colors and metallic sheens. A thick evergreen garland, heavy with silver and dark teal ornaments, cascades down the sides of the mantel.
Luxurious velvet ribbons are woven throughout the greenery, adding a soft, opulent texture. Tall, golden candelabras stand like sentinels on either end, holding dark, moody candles. The entire arrangement feels grand and celebratory, like a scene from a classic holiday movie. It is a very sophisticated and timeless style.
DIY Luxurious Velvet Ribbon Tails
Adding these simple velvet ribbon tails to any garland can make it look much more expensive and custom.
What You’ll Need:
- A spool of wide velvet ribbon in a rich color like emerald, burgundy, or navy blue
- A plain evergreen garland (real or fake)
- Scissors
- A ruler or measuring tape
Step-by-Step Instructions:
- Decide on Length: Figure out how long you want your ribbon tails to be. A good length is usually between 12 and 24 inches. This gives you enough to tie a knot and have a nice tail hanging down.
- Cut Your Ribbon Pieces: Use your ruler and scissors to cut several pieces of ribbon to the same length. For a standard mantel, you might want 5 to 7 pieces.
- Find a Spot: Lay your garland out on the floor. Find a strong branch near the front of the garland where you want to add your first ribbon.
- Tie a Simple Knot: Take one piece of ribbon and tie it in a simple, single knot around the branch. Don’t make the knot too tight, just snug enough to hold.
- Let the Tails Hang: Let the two ends of the ribbon hang down. You can leave them as they are, or for a fancy touch, cut a “V” shape, also called a dovetail, into the bottom of each end.
- Space Them Out: Move down the garland and add another ribbon tail. Try to space them out evenly along the front of the garland. Once you hang the garland, the ribbons will add a beautiful pop of color and texture.
5. Coastal Winter Calm

Who says winter can’t be a day at the beach? This hearth uses a calming coastal theme to celebrate the season. Instead of a green garland, a large piece of driftwood is the star, decorated with frosted greenery, starfish, and delicate sand dollars. The colors are soft whites, sandy beiges, and gentle sea blues.
Silver lanterns filled with sand hold glowing candles, reminding you of a lighthouse. A collection of blue and seafoam green glass bottles stands nearby, like treasures washed ashore. This decor feels light, airy, and peaceful, proving that a winter sanctuary can be inspired by the sea.
DIY Frosted Starfish Garland
You can create a beautiful piece of coastal art to hang on your mantel or a wall.
What You’ll Need:
- A long piece of driftwood (or a few smaller ones you can tie together)
- Several starfish of different sizes
- Fake frosted greenery or dusty miller sprigs
- Hot glue gun (with adult supervision)
- Thin, clear fishing line or twine
- Scissors
- Sand dollars or other small shells (optional)
Step-by-Step Instructions:
- Clean Your Driftwood: Make sure your driftwood is clean and dry. Wipe off any sand or dirt.
- Arrange Your Greenery: Lay your driftwood on a flat surface. Take your frosted greenery sprigs and arrange them along the wood. Tuck them into the natural curves and holes of the wood.
- Glue the Greens: Once you like how the greenery looks, ask an adult to help you use the hot glue gun. Put a dab of glue on the stem of a greenery sprig and press it firmly onto the driftwood. Hold it for a few seconds until it sticks. Do this for all your greenery.
- Add the Starfish: Now, decide where you want your starfish to go. Put a generous dot of hot glue on the back of a starfish and press it onto the greenery and driftwood. Add as many as you like.
- Hang Your Ornaments: To hang the sand dollars, cut a piece of fishing line. Loop it through the sand dollar (they often have natural holes) or carefully glue the line to the back. Tie the other end to the driftwood so it hangs down.
- Display Your Creation: Your coastal garland is complete! You can place it on your mantel or add a loop of twine to the back to hang it on the wall.
6. Modern Farmhouse Gathering

This fireplace is the heart of a cozy, modern farmhouse. The clean white shiplap provides a bright backdrop for the rustic wooden mantel. A simple pine garland is dressed up with large, charming burlap bows, giving it a touch of country elegance. Creamy, cable-knit stockings add texture and warmth.
The decor is simple and welcoming. A sign with the word “gather” invites family and friends to come together. Little bottle brush trees and galvanized metal buckets filled with pine saplings complete the scene. It’s a style that feels both fresh and timelessly comfortable.
DIY No-Sew Burlap Bows
These big, beautiful bows are very easy to make and you don’t even need a needle and thread.
What You’ll Need:
- A roll of wide burlap ribbon (at least 4-5 inches wide)
- A roll of thin twine or floral wire
- Scissors
- A ruler
Step-by-Step Instructions:
- Cut a Long Piece: First, cut a long piece of your burlap ribbon. For a nice big bow, start with a piece that is about 30 inches long.
- Make Two Loops: Lay the ribbon flat. Take one end and fold it over to the middle to make a loop. Now take the other end and fold it over the first one to make a second loop, so it looks like the shape of a raising awareness ribbon.
- Pinch the Middle: Use your thumb and finger to pinch the spot where the ribbons cross in the middle. Scrunch it together tightly.
- Tie it Tight: While still pinching, take a 6-inch piece of twine or floral wire. Wrap it around the scrunched-up middle several times very tightly. Tie a knot in the back to secure it.
- Make the Tails: Cut another piece of burlap ribbon that is about 15 inches long. Cut a “V” shape into both ends to make it look finished.
- Attach the Tails: Use the same piece of twine or wire you used to tie the middle to attach the tailpiece to the back of your bow loops.
- Fluff and Attach: Fluff out the loops to make them look big and full. Leave the ends of your twine or wire long so you can use them to easily tie your new bow onto your garland.
7. Moody Monochrome Moment

This decor is for those who love a bold, modern look. The entire scene is a study in shades of gray, charcoal, and black. There is a strong focus on interesting shapes and textures instead of bright colors. Sculptural objects, like a white ring vase and a black geometric sphere, create a gallery-like feel.
Smoked glass hurricanes and sleek black candle holders hold flickering candles, creating a warm glow against the dark background. Even the eucalyptus branches in the vase are a deep, muted gray. A neat stack of firewood in a minimalist holder provides the only touch of natural brown. This style is sophisticated and strikingly beautiful.
DIY Modern Painted Vases
You can give old vases or bottles a modern, matte makeover with just a little bit of paint.
What You’ll Need:
- Old glass bottles or ceramic vases in different shapes and sizes (you can find these at a thrift store)
- Matte black or gray spray paint (chalk paint also works well)
- Newspaper or a drop cloth
- Rubbing alcohol and a paper towel
Step-by-Step Instructions:
- Clean Your Vases: First, make sure your vases are super clean. Wipe them down with a little rubbing alcohol on a paper towel. This helps the paint stick better. Let them dry.
- Set Up Your Paint Station: Find a spot outside or in a garage with lots of fresh air. Lay down your newspaper or drop cloth to protect the area from paint.
- Start Painting: Place a vase in the middle of the newspaper. Hold the spray paint can about 8-10 inches away from the vase. Start spraying in a steady, sweeping motion from side to side. It is better to do a few thin coats than one thick coat.
- Let it Dry and Repeat: Let the first coat of paint dry for about 20-30 minutes. It might look a little patchy, but that’s okay. Once it’s dry to the touch, add a second coat.
- Get All the Angles: Make sure you spray the top and a little bit inside the rim of the vase. You might need to turn it upside down (once the outside is dry) to get the bottom edge.
- Let it Cure: Once you are happy with the coverage, let the vases dry completely. This can take a few hours or even a full day. Once they are dry, you can group them on your mantel for a modern, sculptural look.
8. Retro Holiday Kitsch

This fireplace is a joyful explosion of color and nostalgia. It is all about having fun and embracing the playful side of the holidays. Shelves are filled to the brim with a cheerful collection of colorful bottle brush trees in every shade imaginable, from pink and teal to classic green. A happy jumble of vintage-inspired ceramic houses adds to the miniature village scene.
Shiny silver tinsel garlands are draped everywhere, catching the light and adding sparkle. A classic needlepoint stocking and bowls filled with shiny ornaments complete the look. This decor doesn’t take itself too seriously; it’s meant to make you smile and remember happy holidays from the past.
DIY Colorful Bottle Brush Trees
You can easily change plain bottle brush trees into any color you want to match your decor.
What You’ll Need:
- White or cream-colored bottle brush trees (you can find these at craft stores)
- Household bleach (adults only!)
- Liquid fabric dye in fun colors (like pink, teal, or yellow)
- A few glass jars or plastic bowls (that you don’t use for food)
- Rubber gloves
- Water
- Paper towels
Step-by-Step Instructions:
- Lighten the Trees (Adults Only): If you can only find green trees, an adult needs to do this step. In a well-ventilated area, mix one part bleach with three parts water in a jar. Wearing gloves, dip the green tree into the bleach water. It will turn a yellowish-white color in a few minutes. Rinse it very well with clean water.
- Prepare Your Dye Bath: In a separate jar, mix a few drops of your fabric dye with about a cup of warm water. Stir it up. The more dye you add, the darker the color will be.
- Time to Dye: Take your light-colored bottle brush tree and dip it into the dye bath. Swirl it around for a minute or two until it’s the color you want.
- Rinse and Dry: Take the tree out of the dye and quickly rinse it under cool water to get rid of any extra dye.
- Blot it Dry: Gently blot the tree with a paper towel to soak up some of the water.
- Let it Fluff: Stand the tree up on some paper towels and let it dry completely. As it dries, the bristles will fluff back up. You can use your fingers to gently shape it. Now you have a custom-colored tree for your collection!
9. Celestial Night Sky

This fireplace channels the magic of a starry winter night. The deep blue wall creates a stunning backdrop for a collection of shimmering gold celestial symbols. Moons in all their phases, radiant suns, and twinkling stars hang from the mantel and adorn the wall.Celestial Night Sky It feels mystical and enchanting.
A beautiful garland made of dried orange slices adds a touch of natural color and a wonderful scent. The entire hearth is bathed in the warm, flickering light of many candles, placed among sparkling quartz crystals. This decor is for the dreamer who loves to gaze at the night sky.
DIY Dried Orange Slice Garland
This is a classic winter craft that smells as good as it looks. It’s easy and fun to make.
What You’ll Need:
- 2-3 large oranges
- A sharp knife (an adult should do the cutting)
- A baking sheet
- Parchment paper
- A needle with a large eye
- Twine or string
Step-by-Step Instructions:
- Preheat Your Oven: Turn your oven on to its lowest possible temperature, usually around 200°F (95°C).
- Slice the Oranges: Ask an adult to carefully slice the oranges into thin, even rounds, about 1/4 inch thick. Try to make them all the same thickness so they dry evenly.
- Blot Them Dry: Lay the orange slices on a layer of paper towels. Use another paper towel to gently press on them to get out as much extra juice as you can. This will help them dry faster.
- Arrange on Baking Sheet: Cover your baking sheet with parchment paper. Arrange the orange slices on the paper in a single layer, making sure they don’t overlap.
- Slowly Bake: Place the baking sheet in the oven. Let the slices bake for 2 to 4 hours. You’ll need to flip them over every 30-45 minutes so they dry out on both sides. They are done when they are dry to the touch and slightly translucent, like stained glass.
- String Them Up: Let the slices cool completely. Thread your twine through the large eye of your needle. Gently poke the needle through the fleshy part of an orange slice, near the rind. Pull the string through and continue adding more slices until your garland is the length you want. Tie loops at each end for easy hanging.
10. Traditional Tartan Heritage

This fireplace wraps you in the warmth of timeless tradition. The classic plaid wallpaper sets a cozy, heritage tone for the entire room. A full and festive garland drapes over the mantel, woven with rich tartan ribbons that match the two large stockings hanging below. It feels like a scene from a beloved storybook.
The mantel is personalized with an array of framed family photographs, telling the story of generations. Ornate porcelain jars and a classic landscape painting add to the feeling of history and elegance. Every detail, from the brass fire dogs to the leather armchair, invites you to settle in and enjoy the season.
DIY No-Sew Tartan Garland Ties
You can add a touch of this classic plaid look to any garland without any sewing.
What You’ll Need:
- A roll of wide, wired tartan or plaid ribbon
- A plain evergreen garland
- Scissors
Step-by-Step Instructions:
- Cut Your Ribbon: Decide how big you want your ribbon accents to be. Cut several pieces of ribbon, each about 20 inches long. The wire in the edges will help you shape them.
- Find a Spot on the Garland: Lay your garland out. Pick a spot where you want to add your first splash of plaid.
- A Simple Twist: Take one piece of ribbon and wrap it around a strong branch of the garland from front to back.
- Tie and Tuck: Instead of a full knot, just cross the two ends at the back of the branch and give them a tight twist or two. Because the ribbon is wired, it will hold its shape. Tuck the twisted part into the greenery so you can’t see it.
- Arrange the Tails: Pull the two ends of the ribbon forward, letting them hang down like short tails. You can curl them slightly or fan them out. The wire makes them easy to pose.
- Repeat Down the Line: Keep adding these simple ribbon ties every 10-12 inches along your garland. It’s a very quick way to add a lot of color and pattern, making your garland look custom and full.
11. Bohemian Desert Warmth

This setting is bathed in the warm, earthy tones of a desert sunset. It combines soft textures with natural elements for a relaxed and inviting feel. A fluffy swag of pampas grass and eucalyptus hangs above the fireplace opening, adding a touch of wild nature. Terracotta vases in various organic shapes are scattered around the hearth.
The space is softened by layered rugs with tribal patterns and a comfortable leather pouf. Strings of globe lights and an array of candles cast a gentle, welcoming glow. This style feels free-spirited and deeply connected to the earth.
DIY Pampas Grass and Eucalyptus Swag
This beautiful, feathery swag is easy to make and brings a wonderful texture to your wall or mantel.
What You’ll Need:
- A sturdy branch or a thick piece of floral wire for the base
- Several stems of dried pampas grass
- A few branches of dried eucalyptus
- Thin floral wire
- Scissors or garden shears
Step-by-Step Instructions:
- Create Your Base: Start with your branch or piece of heavy wire. This will be the backbone of your swag. Bend it into a gentle, slightly curved shape.
- Make Small Bundles: Take one stem of pampas grass and one sprig of eucalyptus. Lay them together to create a small, fluffy bundle.
- Attach the First Bundle: Place your first bundle at one end of your branch base. Use a small piece of thin floral wire to wrap tightly around the stems and the branch, securing them together.
- Overlap and Cover: Make another small bundle. Place it so it slightly overlaps the stems of the first one, hiding the wire. Attach it the same way.
- Work from Both Ends: For a symmetrical look, go to the other end of your branch and start adding bundles facing the opposite direction, working your way back towards the middle.
- Fill the Center: Add a final, fuller bundle in the very middle, pointing straight down, to cover all the stems and wires. Hang your beautiful, bohemian swag above the fireplace.
12. Art Deco Holiday Sparkle

Step back into the roaring twenties with this glamorous and graphic fireplace setting. The look is defined by bold contrasts and luxurious details. A thick pine garland is woven with a striking black-and-white geometric ribbon and accented with dramatic black feathers. Everything has a sense of energy and opulence.
A gold sunburst mirror gleams on the wall, flanked by vintage Art Deco posters. The sharp lines of the furniture and accessories, mixed with the sparkle of a gold bar cart, create a scene that is ready for a festive party.
DIY No-Sew Art Deco Ribbon Garland
This simple technique adds a huge amount of graphic punch to a plain garland.
What You’ll Need:
- A plain pine garland
- A roll of wide, wired ribbon with a bold black-and-white geometric pattern
- Scissors
Step-by-Step Instructions:
- Start at One End: Take the end of your ribbon and tuck it deep into the greenery at one end of the garland. You can secure it by twisting a piece of the garland’s wire around it.
- Create a Pouf: Move down the garland about 10-12 inches. Pinch the ribbon and tuck it into the garland again, creating a soft, billowy “pouf” of ribbon.
- Twist to Secure: Once the ribbon is tucked in, grab a piece of the garland’s own wired greenery and give it a twist around the ribbon to hold it in place.
- Keep Going: Continue this “pouf and tuck” method all the way down the length of the garland. This creates a beautiful, flowing look that seems woven in.
- Fluff it Up: Once you reach the other end, cut the ribbon and tuck the end in securely. Go back and fluff each of the ribbon poufs, using the wire in the ribbon to make them look full and shapely.
- Add Feathers (Optional): For extra glam, you can gently tuck single black feathers into the garland near each ribbon pouf.
13. Wabi-Sabi Winter Peace

This decor finds beauty in simplicity and nature. It creates a calm, meditative space that feels clean and balanced. There is no traditional garland; instead, the focus is on a few carefully chosen objects. A stack of smooth, gray stones brings a sense of Zen, while beeswax candles provide a warm, natural light.
A miniature bonsai tree sits on a soft cushion, a symbol of patience and nature. A simple bamboo ladder leans against the wall. The art is minimal, featuring calligraphy and a simple branch. This style is about creating a quiet moment of peace during a busy season.
DIY Stacked Stone Cairn Candle Holder
This is a very simple and peaceful project that brings a natural element indoors.
What You’ll Need:
- 3-4 flat, smooth river stones of different sizes (largest on the bottom, smallest on top)
- Strong, clear-drying glue (like E6000)
- A small, battery-operated tea light candle
Step-by-Step Instructions:
- Wash Your Rocks: First, make sure your stones are clean and completely dry. Wash off any dirt and let them sit in the sun.
- Find the Balance: Before you glue, practice stacking your stones. Start with the biggest one on the bottom. Try to find the most stable way for them to sit on top of each other. Wiggle them a bit to make sure they won’t fall over.
- Glue the First Layer: Take the second-biggest stone. Put a circle of strong glue on the bottom of it. Press it firmly onto the center of the largest stone.
- Keep Stacking: Do the same thing for the next stone. Put glue on the bottom and press it onto the one below it.
- Let it Dry: It is very important to let the glue dry completely. This might take several hours. Don’t try to move it until it’s totally solid.
- Add Your Light: Once your stone stack, or cairn, is dry and sturdy, you can place a small battery-operated tea light on the very top stone. It creates a beautiful, gentle glow.
14. Sweet Candyland Christmas

This fireplace is a sugary dream come true. It’s decorated with all the delights of a candy shop in cheerful shades of pink, mint green, and red. A fluffy felt ball garland is draped across the mantel, looking like a string of colorful gumballs. Instead of traditional decor, this mantel is loaded with treats.
Gingerbread houses, candy canes, and faux cupcakes create a playful scene. Even the stockings are adorned with sweet-looking cupcake ornaments. Pink and turquoise bottle brush trees complete the whimsical look. This style is all about fun, color, and holiday sweetness.
DIY Felt Ball and Candy Garland
This soft and colorful garland is fun to make and looks good enough to eat!
What You’ll Need:
- A bag of wool felt balls in different colors (pinks, reds, whites, mint green)
- A few pieces of felt in red and white
- A long needle with a large eye
- Strong thread or thin twine (like embroidery floss)
- Scissors
- Hot glue gun (with adult supervision)
Step-by-Step Instructions:
- Make Peppermint Candies: To make the little candies, cut a small white circle from your felt. Then, cut thin, squiggly red strips and have an adult help you hot glue them onto the white circle in a swirl pattern. Make a few of these.
- Thread Your Needle: Cut a very long piece of your thread or twine. Thread it through your needle and tie a big knot at the end, but don’t cut the tail.
- Start Stringing: Push your needle straight through the center of your first felt ball. Pull it all the way down the thread to the knot.
- Create a Pattern: Decide on a pattern. Maybe you’ll do two colored balls, then one white ball, then a felt candy. To add the candy, just poke the needle through the edge of the felt circle.
- Keep Going: Continue stringing your felt balls and candies until your garland is the length you want it to be. You can push the balls close together or leave little spaces in between.
- Finish it Off: When you’re done, make another big knot after the last ball so nothing can slide off. Now you have a super sweet garland for your mantel!
15. Woodland Naturalist’s Display

This decor looks like a beautiful collection of treasures gathered on a winter walk in the woods. There is no tinsel or bright sparkle here. Instead, the beauty comes from natural textures and muted, earthy colors. A garland made of dried hydrangeas, pinecones, and lotus pods hangs gracefully against the white wall.
A large vase is filled with bare branches, feathers, and more dried flowers. A rustic wooden log crate holds firewood, ready for the hearth. This style celebrates the quiet, subtle beauty of nature during the winter season. It is both rustic and very elegant.
DIY Pinecone and Wood Slice Hangers
These simple, natural ornaments are easy to make and look lovely hanging from a garland or on their own.
What You’ll Need:
- A few small pinecones
- Small wood slices with holes drilled in them (from a craft store)
- Twine or jute string
- Scissors
- A hot glue gun (optional, with adult help)
Step-by-Step Instructions:
- Prepare Your String: Cut a piece of twine about 12 inches long. This will be for your first hanger.
- Attach the Wood Slice: Thread the twine through the hole in one of the wood slices. Pull the twine so the wood slice is in the middle, and then tie a knot at the top, leaving a loop for hanging. You will have two twine tails hanging down from the wood slice.
- Get the Pinecone Ready: Take a pinecone. If you want to make it extra secure, you can ask an adult to put a small dot of hot glue in the very top center of the pinecone.
- Tie on the Pinecone: Take the two twine tails hanging from your wood slice and tie them in a tight double knot around the top stem or scales of the pinecone.
- Secure with Glue (Optional): Press the knot into the dab of hot glue if you used it. This will make sure it never comes untied.
- Make a Few More: Repeat these steps to make a few more hangers. You can hang them from your mantel or group them together on a doorknob for a rustic touch.
16. Aurora Borealis Glow

This striking decor captures the mysterious beauty of the Northern Lights. The room is dark and dramatic, allowing the vibrant colors to take center stage. An evergreen garland, filled with silver disco ball ornaments, twists and turns, lit by a string of purple and green lights that cast a cosmic glow.
The real magic is the light effect on the wall, which mimics the shifting colors of the aurora. Mirrored pedestals and shimmering glass objects reflect the light, making the scene feel even more dynamic. This look is modern, moody, and absolutely mesmerizing.
DIY Galaxy Painted Ornaments
You can create your own mini galaxies on plain ornaments to match this cosmic theme.
What You’ll Need:
- Clear glass or plain silver plastic ball ornaments
- Craft paint in dark blue, purple, black, and white
- A small sponge or a piece of a dish sponge
- A small, stiff paintbrush or an old toothbrush
- Paper plate
- Paper towels
Step-by-Step Instructions:
- Base Coat: Squeeze a little black or dark blue paint onto your paper plate. Use a piece of sponge to dab the paint all over your ornament until it’s completely covered. Let it dry.
- Add Nebula Colors: Now, squeeze a little purple and dark blue paint onto your plate. Use a clean corner of your sponge to lightly dab patches of these colors on top of the black. Don’t cover it all, just create colorful cosmic clouds.
- Let it Blend: Gently dab the colors with a clean part of the sponge to blend the edges a little bit so they look soft and cloudy. Let this layer dry.
- Time for Stars: This is the fun part! Dip the tip of your stiff paintbrush or old toothbrush into a tiny bit of white paint.
- Flick the Stars: Hold the ornament in one hand. With your other hand, hold the brush a few inches away and use your thumb to flick the bristles. This will create a spray of tiny white dots that look like distant stars.
- Add Big Stars: For a few bigger, brighter stars, you can use the wooden end of your paintbrush. Just dip it in the white paint and gently dot it onto your ornament. Let it dry completely before hanging.
17. Cozy Library Corner

This fireplace creates the feeling of a classic, scholarly library. It is a warm and inviting space for reading a good book on a cold winter day. The mantel is not just decorated; it’s used as a bookshelf, with stacks of beautiful, old, cloth-bound books arranged across its length.
A simple, delicate ivy garland weaves between the books, adding a touch of life. Tweed and plaid stockings hang at the sides. A comfortable leather wingback chair, a warm throw, and a brass reading lamp complete the scene. This decor is handsome, intelligent, and deeply comforting.
DIY Book Page Garland
This is a wonderful way to recycle an old, broken book and turn it into something beautiful.
What You’ll Need:
- An old book that is falling apart (don’t use a good one!)
- Twine or string
- Scissors or a paper cutter
- A hole punch
- A ruler
Step-by-Step Instructions:
- Choose Your Pages: Carefully tear out a few pages from the old book. Look for pages with just words, or maybe some with small, simple pictures.
- Cut Your Shape: You can leave the pages as rectangles, or you can cut them into a pennant shape. To do this, fold a page in half lengthwise. Then, cut from the bottom corner of the open side up to the middle of the folded side to make a point.
- Make a Lot: Keep cutting out shapes until you have enough to make a garland as long as you want. Try to make them all the same size.
- Punch the Holes: Take your hole punch and punch one hole in each of the top corners of your book page shapes.
- String it All Together: Cut a long piece of twine. Take your first book page shape and thread the twine through the two holes. Go in through the front of the left hole and out through the back, then across the back of the page, and in through the back of the right hole and out the front.
- Keep Going: Slide that page down and add the next one the same way. Keep adding pages until your garland is full. You can leave small gaps between them or push them close together.
18. Icy White Winter Palace

This fireplace is a vision of pure winter elegance. The color scheme is a strict white and silver, creating a look that is frosty, glamorous, and bright. A thick, heavily flocked garland is loaded with silver ornaments, white berries, and snowy pinecones, draping dramatically down the sides of the mantel.
A fluffy white feather boa is tucked into the garland, adding incredible softness and texture. Mercury glass vases and candle holders shimmer and shine in the light. The entire hearth is a sparkling wonderland, like a scene from a fairy tale ice palace.
DIY Fluffy Feather Boa Garland
Adding a feather boa is the quickest and easiest way to make any garland look softer and more luxurious.
What You’ll Need:
- A plain flocked (snowy) evergreen garland
- A long, fluffy white feather boa (you can find these at a craft or party store)
- Thin, white floral wire or pipe cleaners
Step-by-Step Instructions:
- Lay Out Your Garland: Start by laying your evergreen garland flat on the floor so you can see the whole thing.
- Place the Boa: Take your feather boa and lay it on top of the garland, right down the middle.
- Attach the End: Go to one end of the garland. Use a small piece of white floral wire or a white pipe cleaner to attach the end of the boa to the garland’s main “stem.” Wrap it tightly, but gently, so you don’t crush the feathers.
- Weave and Secure: As you move down the garland, gently weave the boa in and out of the green branches. Every 12 inches or so, use another piece of wire to secure the boa to the garland. This keeps it from slipping off.
- Keep it Loose: Don’t pull the boa too tight. You want it to look soft and billowy, like a fresh layer of snow.
- Fluff and Hang: Once the whole boa is attached, fluff up the feathers and the garland’s branches together. Now you can hang your super-soft and glamorous garland on the mantel.
19. Vibrant Southwestern Fiesta

This fireplace is filled with the warmth and vibrant color of the American Southwest. The adobe-style hearth has a beautiful, earthy terracotta finish. Instead of a traditional evergreen garland, a festive ristra made of dried red and yellow chili peppers hangs around the firebox opening.
The decor celebrates handcrafted artistry. Woven baskets and blankets, hand-painted pottery, and colorful ornaments bring texture and pattern to the space. The colors are warm and spicy, reflecting the desert landscape. This look is unique, soulful, and full of regional character.
DIY Faux Chili Pepper Ristra
You can get the look of a traditional chili ristra using fake peppers, so it will last forever!
What You’ll Need:
- A bag of artificial red chili peppers (from a craft store)
- A few artificial yellow chili peppers (optional)
- A long, thick piece of green twine or thin rope
- Green floral wire
- Scissors or wire cutters
Step-by-Step Instructions:
- Make a Loop: First, take your thick twine and fold the top over to make a loop for hanging. Wrap some floral wire tightly around the base of the loop to secure it. This will be the top of your ristra.
- Wire Your First Pepper: Take your first fake chili pepper. Cut a 4-inch piece of floral wire. Poke the wire straight through the thickest part of the pepper, near the green stem.
- Attach it to the Twine: Hold the pepper against the twine, just below the top loop. Wrap the two ends of the wire tightly around the twine to hold the pepper in place.
- Add Another: Now wire a second pepper the same way. Place it right next to the first one and attach it. You want to start building a cluster of peppers at the top.
- Work Your Way Down: Keep wiring peppers and attaching them to the twine. As you move down, let the peppers point outwards and downwards. Try to cover the twine as much as you can. Mix in a yellow pepper here and there for a pop of color.
- Finish the Tip: When you get near the bottom, use just one or two peppers to make a pointed tip. Your festive ristra is now ready to hang!
20. Mid-Century Modern Merriment

This setting is cool, clean, and retro. It captures the fun and optimistic spirit of Mid-Century Modern design from the 1950s and 60s. The furniture has simple shapes and peg legs, and the color palette is a playful mix of olive green, orange, and teal against a clean white wall.
There is no formal garland here. Instead, a simple pine bough is casually placed on the wall. The decor is all about graphic shapes and interesting objects, like a starburst clock, modern art, and sleek candle holders. This is a fresh and stylish way to decorate for the winter.
DIY Geometric Felt Ornaments
These simple, modern ornaments are easy to make and capture the retro vibe perfectly.
What You’ll Need:
- Sheets of felt in mid-century colors (orange, teal, olive green, white)
- Sharp scissors
- Cardboard for making stencils (like from a cereal box)
- A pen or marker
- Embroidery floss or thin string for hanging
- A needle
Step-by-Step Instructions:
- Draw Your Shapes: On the cardboard, draw some simple geometric shapes. Think of a stretched-out diamond, a teardrop, or a simple triangle. These will be your stencils.
- Cut Out the Stencils: Carefully cut out your cardboard shapes.
- Trace onto Felt: Place a stencil on a piece of felt and use a pen to trace around it. For each ornament, you will need two identical felt shapes (a front and a back).
- Cut the Felt: Carefully cut out the felt shapes. Try to cut just inside your pen line so you don’t see it on the finished ornament.
- Add a Hanger: Cut a 6-inch piece of embroidery floss. Fold it in half to make a loop. Place the two cut ends inside, between your two identical felt shapes, at the very top.
- Stitch it Up: Thread a needle with a contrasting color of floss (like white floss on a teal ornament). Starting at the bottom, use a simple running stitch or a blanket stitch to sew all the way around the edge of the shape, sewing the front and back pieces together and securing the hanger at the top. Tie a knot when you are done.
21. Frozen Ice Palace Fantasy

This fireplace is a breathtaking winter fantasy. It is an explosion of icy blues and shimmering whites, creating the look of a magical frozen castle. Glistening, snowy branches reach for the ceiling, dripping with crystal beads and baubles. An illuminated ice castle sits as the grand centerpiece, flanked by two proud white reindeer.
The entire scene sparkles with an ethereal blue light, from the lanterns to the piles of glittering ornaments at the base. It is a maximalist approach to winter decorating that is absolutely enchanting and full of fairy-tale wonder.
DIY Glitter Icicle Ornaments
You can add some of that icy sparkle to your own decor with these easy, glistening icicles.
What You’ll Need:
- Clear plastic icicle ornaments (from a craft store)
- White school glue (like Elmer’s)
- A small paintbrush
- White, silver, or iridescent glitter
- A paper plate or tray
- Thin ribbon or clear fishing line for hanging
Step-by-Step Instructions:
- Set Up Your Glitter Station: Lay down some newspaper first, as glitter can get messy! Pour a good amount of glitter onto your paper plate or into a shallow tray.
- Paint with Glue: Take one plastic icicle ornament. Use your paintbrush to apply a thin, even coat of white glue all over the outside of it.
- Add the Sparkle: Hold the icicle by its top loop over the plate of glitter. Sprinkle the glitter all over the glue-covered surface, turning the icicle to make sure you cover all sides.
- Tap Off the Extra: Gently tap the icicle to shake off any loose glitter back onto the plate.
- Let it Dry: Find a place to hang the ornament to dry. You could tie a string to it and hang it from a doorknob or a hook. Let it dry completely for a few hours.
- Add a Hanger: Once it’s dry, the glue will be clear and the glitter will be stuck on. Thread a piece of thin ribbon or fishing line through the loop at the top, and it’s ready to hang!
22. Classic Christmas Plaid

This hearth is the picture of a timeless Christmas celebration. It’s wrapped in the familiar comfort of festive plaid and fresh pine. A lush evergreen garland is woven with a beautiful red and green plaid ribbon, creating a classic and cheerful look. A simple pine wreath hangs above, continuing the natural theme.
A handsome nutcracker stands guard on the mantel. Below, a row of matching plaid stockings hangs ready for gifts. Baskets of firewood and cinnamon sticks complete the cozy scene. This style feels warm, traditional, and full of holiday spirit.
DIY Woven Plaid Ribbon Garland
This technique makes it look like your ribbon is woven right through the garland branches.
What You’ll Need:
- A plain pine garland
- A roll of wide, non-wired plaid ribbon
- Scissors
Step-by-Step Instructions:
- Anchor Your Ribbon: Start at one end of the garland. Tuck about 6 inches of the ribbon into the back of the garland and secure it by wrapping a flexible branch around it.
- Go Over and Under: Gently weave the ribbon through the garland. Go over a bunch of branches for about 8-10 inches, then go under the next bunch of branches.
- Create Soft Drapes: As you pull the ribbon through, let it drape softly. Don’t pull it tight. You want it to look relaxed and natural, like it’s part of the greenery.
- Keep Weaving: Continue this “over and under” pattern all the way to the other end of the garland.
- Finish it Off: When you get to the end, leave a 6-inch tail. Tuck it into the back and secure it with a branch, just like you did at the start.
- Adjust the Look: Step back and look at your garland. You can adjust the drapes of the ribbon, making some bigger or smaller, until you like how it looks.
23. Cozy Bohemian Hangout

This fireplace is all about creating a warm, comfortable, and free-spirited vibe. The hearth is transformed into the coziest spot in the house with a mountain of plush floor cushions in earthy tones and tribal patterns. It’s a clear invitation to sit down and relax.
The mantel is a joyful collection of textures and colors. A large macrame wall hanging is layered with a colorful pom-pom garland and a string of soft tassels. Dried flowers and colorful candles in mismatched holders complete the eclectic look. This style feels personal, creative, and incredibly inviting.
DIY Yarn Pom-Pom Garland
Making pom-poms is a fun and easy craft, and they create a wonderfully cheerful garland.
What You’ll Need:
- A few skeins of chunky yarn in different colors
- A fork
- Sharp scissors
- A long piece of twine or yarn for the garland string
Step-by-Step Instructions:
- Wrap the Yarn: Hold the end of your yarn against the tines of the fork with your thumb. Start wrapping the yarn around the outside of the fork tines. Keep wrapping until you have a thick, puffy bundle of yarn.
- Tie the Middle: Cut a separate 8-inch piece of yarn. Slide it through the middle fork tine, right through the center of your yarn bundle. Pull it tight and tie a single, snug knot.
- Slide it Off: Carefully slide the yarn bundle off the fork. Pull the knot you just made as tight as you can and tie it again to make a secure double knot.
- Cut the Loops: You will see loops of yarn on both sides of the center knot. Take your scissors and carefully cut through all of the loops.
- Give it a Haircut: Your pom-pom will look a little shaggy. This is the fun part! Use your scissors to trim all around the pom-pom, giving it a haircut until it’s a nice, fluffy, round ball.
- String Them Up: Make a bunch of pom-poms in all your different colors. Use the long tails from the center knot to tie each pom-pom onto your main piece of twine. Space them out however you like!
24. Crimson Berry Elegance

This fireplace decor is a beautiful example of classic elegance. The look is simple but makes a strong statement with a bold use of color. A thick garland, absolutely full of bright red winterberries, drapes gracefully across the dark wood mantel. It provides a stunning contrast of color and texture.
Tall, polished silver candlesticks of varying heights stand on the hearth and mantel, holding matching crimson candles. The polished metal shines, reflecting the warm candlelight. A few silver bowls filled with more berries and ornaments add to the display. This style is sophisticated, festive, and timeless.
DIY Faux Berry Candle Rings
These simple rings add a beautiful pop of color to the base of any pillar candle.
What You’ll Need:
- A few sprigs of artificial red berries (you can find these on a garland or as individual picks at a craft store)
- A thick, sturdy floral wire
- Thin, green floral wire
- Wire cutters
- A pillar candle (battery-operated is safest)
Step-by-Step Instructions:
- Form the Ring: Take your thick floral wire. Wrap it loosely around the base of your pillar candle two or three times to get the right size. Cut the wire, leaving a little extra. Twist the ends together to form a sturdy wire circle.
- Cut Your Berry Sprigs: Use your wire cutters to cut your faux berry branches into smaller, manageable pieces, about 3-4 inches long.
- Attach the First Sprig: Lay your first berry sprig against the wire ring. Take a small piece of thin, green floral wire and wrap it tightly around the stem of the berries and the wire ring to secure it.
- Overlap and Cover: Take another berry sprig and lay it so it slightly overlaps the stems of the first one, hiding the wire. Attach it the same way.
- Keep Going Around: Continue this process, adding berry sprigs and pointing them all in the same direction, until you have covered the entire wire ring.
- Fluff and Place: Gently fluff out your berries to make the ring look full. Now you can slip it over your candle for a beautiful, elegant touch.
25. Industrial Loft HoIndustrial Loft Holidayliday

This fireplace celebrates a cool, urban aesthetic with an industrial edge. The combination of exposed red brick and a stark concrete hearth creates a strong, textural background. A simple, wispy pine garland adds a touch of natural green without hiding the raw materials.
Large, metal marquee letters spelling “NOEL” are the clear focal point, bringing a fun, vintage vibe. A string of Edison bulb lights is casually draped over the industrial steel beam, adding a warm, atmospheric glow. This style is effortlessly cool and brings festive cheer to a modern loft space.
DIY Faux Metal Marquee Letters
You can get the look of vintage metal letters using simple cardboard craft letters.
What You’ll Need:
- Large paper mache or cardboard letters (from a craft store)
- Silver or galvanized metal-effect spray paint
- Black craft paint
- A small sponge
- Paper towels
- A craft knife (for an adult to use)
- A string of battery-operated globe lights
Step-by-Step Instructions:
- Paint the Letters: In a well-ventilated area, spray paint your cardboard letters with the metallic silver paint. Give them a couple of good, even coats. Let them dry completely.
- Make Them Look Old: To give them an aged look, put a tiny bit of black paint on a paper towel. Dab most of it off, then lightly smudge the black paint along the edges and corners of the letters. This makes them look more like real, old metal.
- Mark the Bulb Holes: Place your globe light string on the letter to see where you want the bulbs to go. Use a pencil to make a small dot for each bulb.
- Adults Only: Cut the Holes: Ask an adult to use a craft knife to carefully cut small “X” shapes where you made your pencil marks.
- Insert the Lights: Gently push one bulb from your light string through each “X” from the back of the letter. The cardboard will hold the bulb in place.
- Light it Up: Put the batteries in your light string and turn it on. Your faux marquee letters will have a wonderful vintage glow, ready for your mantel.
26. Victorian Dollhouse Christmas

This fireplace is a step into a romantic, bygone era. The decor is rich, detailed, and full of antique charm. Against a backdrop of beautiful blue damask wallpaper, a lush garland heavy with roses and ribbons frames an ornate gold mirror. The scene is filled with a collection of beautiful porcelain dolls in period clothing.
Needlepoint stockings and elaborate, handcrafted ornaments hang from the mantel. The entire display feels like a treasured page from a Victorian storybook. It is a deeply nostalgic and intricate style that celebrates the art of collecting and detailed craftsmanship.
DIY Vintage Style Ornaments
Create the look of antique ornaments using old images and simple craft supplies.
What You’ll Need:
- Small wooden discs or oval plaques
- Vintage images printed on paper (you can find these online – search for “vintage Christmas cards”)
- Mod Podge glue
- A foam brush
- Scissors
- A small drill or a thumbtack
- Thin ribbon
Step-by-Step Instructions:
- Find and Cut Your Image: Find a vintage picture you like. It could be an angel, a Santa, or a portrait. Cut it out carefully to fit onto your wooden disc.
- Glue the Image Down: Use your foam brush to apply a thin layer of Mod Podge to the front of the wooden disc. Carefully place your paper image on top and smooth out any bubbles with your finger.
- Seal the Top: Once the first layer is dry (about 15 minutes), paint another thin layer of Mod Podge over the top of the picture. This will seal it and give it a nice, finished look. Let it dry completely.
- Make a Hole for Hanging: Ask an adult to help you drill a tiny hole near the top of the ornament. If you don’t have a drill, you can carefully push a strong thumbtack through to make a hole.
- Add the Ribbon: Cut a 7-inch piece of thin ribbon. Thread it through the hole and tie a knot at the top to create a hanging loop.
- Hang Your Creation: Your new “antique” ornament is ready to hang on a tree, a garland, or from a hook on your mantel.
27. Natural Citrus and Spice

This fireplace is a feast for the senses, decorated with the fresh and fragrant gifts of nature. A rustic burlap runner lays the foundation for a mantel filled with the vibrant colors of fresh oranges, pomegranates, and dried citrus slices. The natural beauty is simple and smells wonderful.
Pillar candles wrapped in cinnamon sticks add another layer of warm, spicy fragrance. The decor is completed with a beautiful garland made of bay leaves, cinnamon sticks, and more dried oranges. This style is wholesome, colorful, and brings a cheerful, organic feel to the winter home.
DIY Cinnamon Stick Candle Wraps
This is one of the easiest and best-smelling crafts you can do for the holidays.
What You’ll Need:
- A smooth pillar candle (battery-operated is safest and won’t melt)
- A bundle of whole cinnamon sticks
- A hot glue gun (with adult supervision)
- A piece of twine or ribbon
Step-by-Step Instructions:
- Get Ready to Glue: Ask an adult to plug in the hot glue gun and let it heat up.
- Sort Your Sticks: Try to find cinnamon sticks that are all about the same height as your candle. If they are too long, an adult might be able to carefully snap them to size.
- Glue the First Stick: Take your first cinnamon stick. An adult should put a line of hot glue down the length of the stick. Quickly and carefully press the stick straight up and down against the side of the candle.
- Add the Next One: Do the same thing with the next cinnamon stick, placing it right beside the first one.
- Keep Going Around: Continue gluing sticks side-by-side all the way around the candle until it is completely covered.
- Tie a Bow: Once the glue is cool, take a piece of twine or ribbon and wrap it around the middle of the cinnamon sticks. Tie a simple knot or a bow to finish the look. Your candle now looks beautiful and smells amazing!
28. Enchanted Forest Floor

This amazing fireplace looks as if a piece of a magical forest floor was brought right inside. The decor is incredibly organic and textural, using elements you would find in deep woods. A thick, lush blanket of real moss covers the entire hearth and mantel, creating a living green landscape.
Clusters of fascinating mushrooms, both real and artificial, sprout from the moss. Ferns, pinecones, and interesting branches are tucked in, creating a scene of natural discovery. The candlelight from simple bottle vases casts a mysterious glow. This style is for the true nature lover and feels like something from a fairy tale.
DIY Faux Mushroom Cluster
You can make your own cute mushrooms to tuck into plants, wreaths, or a mossy display.
What You’ll Need:
- Air-dry clay (white or tan)
- A small bowl of water
- A toothpick or wooden skewer
- Red and white craft paint
- Small paintbrushes
Step-by-Step Instructions:
- Make the Stem: Take a small piece of clay and roll it between your palms to make a short, thick snake shape. This is the mushroom stem. Pinch the bottom to make it a little wider so it can stand up.
- Make the Cap: Take another, slightly larger piece of clay and roll it into a ball. Gently flatten it into a thick disc shape. This is the mushroom cap.
- Join Them Together: Dip your finger in water and wet the top of the stem and the underside of the cap. Gently press the cap onto the stem. Use the toothpick to blend the clay where they join.
- Let it Dry: Let your clay mushroom dry completely. This might take a full day. It will feel hard and light when it’s ready.
- Paint the Cap: Use your paintbrush to paint the top of the mushroom cap red. Let it dry.
- Add the Dots: Once the red paint is dry, dip the wooden end of your paintbrush into some white paint. Use it to carefully dot white spots all over the red cap. Now you have a classic woodland mushroom! Make a few in different sizes to create a cluster.
29. Glittering Gold and Silver Cascade

This fireplace decor is all about glamorous abundance. A snowy, flocked garland is absolutely overflowing with a cascade of shimmering metallic ornaments. The mix of shiny gold and glistening silver balls creates a look that is incredibly festive and luxurious. It feels like a grand holiday celebration.
The most dramatic feature is the fire screen, which is completely filled with more ornaments, turning the dark firebox into a solid wall of sparkle. Tall silver candlesticks and a few silver lanterns add height and even more reflective surfaces. This style is bold, bright, and full of celebratory cheer.
DIY Ornament-Filled Fire Screen
This is a safe and stunning way to fill the “black hole” of your fireplace when it’s not in use.
What You’ll Need:
- A sturdy, metal fireplace screen
- Lots of shatterproof plastic ornaments in various sizes (in your chosen colors)
- Thin floral wire or green pipe cleaners
- Wire cutters
Step-by-Step Instructions:
- Start at the Bottom: Place your fire screen where you want it. Start by creating a base layer. Take your largest ornaments and attach them to the inside of the screen’s metal grid at the very bottom.
- How to Attach: Cut a 5-inch piece of floral wire. Thread it through the ornament’s hanger loop. Then, poke the ends of the wire through the screen’s grid and twist them together tightly at the back to hold the ornament in place.
- Build Your Way Up: Continue adding ornaments, working your way up from the bottom. Use a mix of large and medium sizes. You are basically building a wall of ornaments from the inside of the screen.
- Fill in the Gaps: As you get higher, you might see small gaps. Use your smallest ornaments to fill in these holes so you can’t see through the screen.
- Check for Stability: Make sure all the ornaments are wired on securely so they don’t fall off.
- The Final Look: You will have a solid, sparkling wall of color that completely hides the firebox. It’s a high-impact look that is very easy to achieve.
30. The Nutcracker Ballet Suite

This charming display brings the magic of the classic holiday ballet, “The Nutcracker,” to life. The decor is a tribute to the beloved story, filled with toy soldiers and dancing fairies. An army of nutcrackers in all shapes and sizes stands at attention, ready to march.
Delicate ballerina and fairy ornaments with fluffy tulle skirts seem to float in the air, hanging from the garland and the walls. Vintage-style posters of the ballet add to the theatrical theme. It’s a whimsical and nostalgic style that captures the heart of a cherished holiday tradition.
DIY Tulle Ballerina Ornaments
These little dancers are delicate and very easy to make, with no sewing required.
What You’ll Need:
- A wooden bead with a hole through it (for the head)
- A pipe cleaner (any color)
- A roll of tulle (6 inches wide) in any color you like
- Thin ribbon
- A black permanent marker
- Scissors
Step-by-Step Instructions:
- Make the Body: Fold your pipe cleaner exactly in half. Push the two loose ends through the hole in the wooden bead until the folded loop is tight against the bottom of the bead. This loop will be for hanging.
- Create Arms: Twist the pipe cleaner together for about an inch below the “neck” to make the body. Then, separate the two pieces of pipe cleaner and bend them out to the sides to make arms.
- Make the Skirt: Cut a piece of tulle that is about 12 inches long. Accordion-fold it (like you’re making a paper fan) along its short edge.
- Tie on the Skirt: Pinch the folded tulle in the middle. Tie it tightly around the ballerina’s pipe cleaner “waist” with a small piece of ribbon.
- Fluff the Tutu: Gently separate and fluff the layers of tulle to create a full, round tutu. You can trim the bottom of the tutu with scissors to make it even.
- Draw a Face: Use your permanent marker to draw two simple dots for eyes on the wooden bead. Your little ballerina is now ready to dance on your mantel!
31. Sugared Berry & Birch

This clean and cheerful look is all about crisp color and rustic texture. A snowy pine garland dotted with what looks like sugar-frosted red berries creates a bright, festive line. Simple red ball ornaments and clean white snowflakes hang with red ribbons, adding a classic Christmas touch without any clutter.
The real charm comes from the stack of birch logs on the hearth. Their papery white bark provides a natural, woodsy feel that contrasts beautifully with the bright red accents. This style is fresh, simple, and has a hint of woodland charm.
DIY Frosted Berry Branches
You can give any faux berry sprigs a beautiful, sugary coating that looks like freshly fallen snow.
What You’ll Need:
- A few sprigs of artificial red berries
- White school glue
- A small bowl
- A little bit of water
- A paintbrush
- Epsom salt or clear crystal glitter
- A paper plate
Step-by-Step Instructions:
- Prepare Your Glue: In your small bowl, mix about two tablespoons of white glue with one teaspoon of water. Stir it until it’s smooth and a little bit runny, like paint.
- Set Up Your “Snow”: Pour a good amount of the Epsom salt or clear glitter onto your paper plate and spread it out.
- Paint a Branch: Take one of your berry sprigs. Use your paintbrush to apply a thin coat of the glue mixture all over the berries and a little on the stems.
- Add the Frost: Hold the sticky branch over the plate. Sprinkle the Epsom salt or glitter all over it, turning the branch to make sure you cover all the glue.
- Let it Dry: Gently shake off any extra “snow” back onto the plate. Set the branch aside on a clean piece of paper or hang it up to dry completely.
- Tuck them In: Once your branches are dry, you can tuck them into a garland, a wreath, or a vase for a beautiful frosted look.
32. Emerald & Malachite Jewel Box

This fireplace is the definition of opulence. It uses a rich, jewel-toned palette of deep emerald green and gold against a dramatic black wall. A lush garland of eucalyptus and cedar is studded with green and gold ornaments. Long, luxurious emerald velvet ribbons hang down, adding to the decadent feel.
The real stars are the stunning malachite-patterned boxes and spheres, which have a beautiful, swirling green design. A collection of gleaming gold mirrors and candlesticks reflects the light, making the entire scene feel like a peek inside a precious jewelry box.
DIY Faux Malachite Box
You can create the stunning look of the gemstone malachite with a little paint and a simple box.
What You’ll Need:
- A plain wooden or paper mache box with a lid
- Craft paint in three shades of green: one light (like mint), one medium (like kelly green), and one dark (like emerald or forest green)
- A piece of corrugated cardboard (with the bumpy ridges)
- A paper plate
Step-by-Step Instructions:
- Base Coat: Paint your entire box, inside and out, with the lightest shade of green. Let it dry completely.
- Prepare Your Tool: Squeeze a good amount of your medium and dark green paints onto a paper plate, right next to each other.
- Dip the Cardboard: Take your piece of corrugated cardboard. Dip one of the long, ridged edges into both paint colors at once, so you pick up a mix of the two greens.
- Create the Pattern: Press the paint-covered edge of the cardboard onto the box. Gently rock it back and forth or wiggle it as you pull it away. This will create wavy, striped lines that look like the natural pattern of malachite.
- Cover the Box: Continue this process, dipping and stamping, until you have covered the whole outside of the box and lid. Overlap your stamps to create a rich, layered look.
- Let it Dry: Let your beautiful new box dry completely. It’s a wonderful place to store treasures or to use as a unique gift box.
33. Japandi Winter Stillness

This hearth area is a lesson in beautiful, warm minimalism. It blends the clean simplicity of Scandinavian design with the natural, rustic elements of Japanese style. There are no bright colors or glitter here. The focus is on the calm beauty of natural materials like light wood and white ceramics.
A collection of matte white vases in organic shapes stands on rustic wooden stumps. The decor is spare, with just a few sprigs of cotton stems. This style is not about adding more, but about appreciating the form and texture of each carefully chosen piece. It creates a feeling of peace and tranquility.
DIY Wood Bead Garland
This simple, natural garland is a staple of Scandinavian and Japandi design and is very easy to make.
What You’ll Need:
- A bag of unfinished wooden beads in various sizes
- A long piece of twine or thin leather cord
- Scissors
- A large needle or a piece of thin wire
Step-by-Step Instructions:
- Prepare Your String: Cut a piece of twine or cord to your desired length. Make it a little longer than you think you’ll need. Tie a big, thick knot at one end so the beads can’t slip off.
- Make a “Needle”: If your twine is too floppy to go through the beads, you can make a simple needle. Just take a 3-inch piece of thin wire, bend it in half, and loop it through the end of your twine. Twist the wire to hold the twine, and now you have a stiff end to work with.
- Start Stringing: Begin pushing your wooden beads onto the twine.
- Create a Pattern (or Don’t!): You can create a pattern if you like, such as “big bead, small bead, medium bead.” Or, for a more organic look, just add the beads randomly without thinking about it too much. Both ways look beautiful.
- Keep Going: Continue stringing beads until your garland is almost the length you want.
- Finish it Off: Leave a few inches of empty twine at the end. Tie another big knot so the beads are secure. You can also add a tassel to each end for an extra touch.
34. Midnight Blue Cosmos

This enchanting fireplace decor transports you to a starry winter night. The scene is set in a deep, celestial palette of midnight blue and sparkling silver. A thick garland, woven with rich navy velvet ribbon and lit with starry twinkle lights, frames the space beautifully.
An array of silver stars and crescent moons hang as if floating in space. The theme is carried through with a framed star chart and pillows embroidered with constellations. The deep blue candles and accessories complete this dreamy, cosmic look that is both magical and sophisticated.
DIY Clay Star & Moon Ornaments
These simple ornaments look beautiful hanging on a garland or used as gift tags.
What You’ll Need:
- White air-dry clay
- A rolling pin
- Star and moon shaped cookie cutters
- A straw or a wooden skewer
- Silver craft paint and a paintbrush (optional)
- Twine or silver thread for hanging
Step-by-Step Instructions:
- Roll Out the Clay: Take a good-sized chunk of your air-dry clay and knead it for a minute to make it soft. On a flat, smooth surface, use your rolling pin to roll it out to about 1/4 inch thick.
- Cut Your Shapes: Use your star and moon cookie cutters to press firmly into the clay and cut out your shapes.
- Peel Away the Extra: Gently peel away the extra clay from around your cut-out shapes.
- Make a Hole: Before the clay dries, use a straw or a skewer to poke a hole near the top of each ornament. This is where the string will go.
- Let Them Dry: Carefully place your clay shapes on a flat surface and let them dry completely. This usually takes 24-48 hours. You should flip them over halfway through so they dry evenly.
- Decorate and Hang: Once they are dry, you can leave them plain white or paint them silver. When the paint is dry, thread a piece of twine through the hole, tie a loop, and your celestial ornaments are ready!
35. Cozy Cable Knit Comfort

This fireplace is the definition of “hygge.” It is completely wrapped in the soft, touchable texture of chunky cable knits. The color palette is a calming mix of neutral tones like oatmeal, beige, and soft gray, which makes the space feel incredibly serene and restful.
Giant cable knit stockings are the main feature, complemented by matching pillows and a basket overflowing with more cozy knits. A simple felt and wood bead garland adds a touch of handmade charm. This decor invites you to curl up with a hot drink and enjoy a quiet winter moment.
DIY Yarn-Wrapped Ornaments
You can give old ornaments a cozy new life with this simple yarn-wrapping technique.
What You’ll Need:
- Old ball ornaments (any color or finish)
- Chunky or textured yarn in neutral colors
- A hot glue gun (with adult help)
- Scissors
Step-by-Step Instructions:
- Get Ready to Glue: Ask an adult to heat up the hot glue gun. Remove the metal cap from the top of your ornament.
- Start at the Top: An adult should put a small dot of hot glue right next to the hole at the top of the ornament. Press the very end of your yarn into the glue.
- Begin Wrapping: Put another small dot of glue next to your starting point. Begin to carefully wrap the yarn around the top of the ornament in a tight spiral. The goal is to cover the surface completely so you can’t see the original ornament underneath.
- Keep Going: Continue adding a thin line of glue and wrapping the yarn around the ornament. Work in small sections at a time.
- Finish at the Bottom: Keep wrapping until you get to the very bottom. Cut the yarn, put a final dot of glue on the bottom, and press the end of the yarn down securely.
- Add a Hanger: Put the metal cap back on the ornament. You can tie a piece of twine or a matching piece of yarn through the loop to hang it.
36. Gilded Birch Minimalism

This fireplace decor is a stunning example of modern, high-contrast style. The setting is clean and minimalist, using a simple palette of black, white, and a dramatic touch of gold. The stars of the show are the tall, slender white birch branches, which add a graphic, natural element to the scene.
A beautiful garland of gilded golden leaves drapes across the white mantel, providing a warm, metallic shimmer. The look is completed with sleek, black minimalist candle holders and a simple black-framed round mirror. It is a very chic and sophisticated take on winter decorating.
DIY Gilded Leaf Garland
You can create a beautiful, shimmering garland using faux leaves and gold paint.
What You’ll Need:
- A basic, inexpensive faux leaf garland (like ivy or eucalyptus)
- Gold metallic spray paint
- Newspaper or a drop cloth
Step-by-Step Instructions:
- Find a Good Spot: This is a messy job, so it’s best to do it outside on a calm, windless day. Lay your drop cloth or a lot of newspaper on the ground.
- Lay Out Your Garland: Place your faux leaf garland on the newspaper, spreading out the leaves as much as you can.
- First Coat: Shake your can of gold spray paint very well. Holding the can about 10-12 inches away, spray the garland with a light, even coat of paint. Try to spray from different angles to get the sides of the leaves.
- Let it Dry: Let the paint dry for about 20-30 minutes.
- Flip and Repeat: Carefully flip the garland over. Spray the other side with a nice, even coat of gold paint.
- Final Touches: Once the second side is dry, hold the garland up and look for any green spots you missed. Touch them up with a little more spray paint. Let the whole thing dry completely for a few hours before you bring it inside to hang.
37. Rose Gold Romance

This fireplace is pretty in pink. It’s a soft, glamorous, and very modern take on holiday decor, using a beautiful palette of blush pink, rose gold, and deep burgundy. A snowy flocked garland is filled with ornaments in various shades of pink and metallic rose gold.
The textures are what make this look so special. Plush faux fur stockings, a fluffy pink throw, and soft velvet ribbons create a scene that is incredibly luxurious and inviting. The whole space glows with the warm, rosy light from the metallic accents. It is a chic and romantic winter vision.
DIY No-Sew Faux Fur Stocking Trim
You can give any plain stocking a quick, glamorous update with this simple trick.
What You’ll Need:
- A plain stocking
- A strip of white or pink faux fur fabric (from a fabric store)
- A hot glue gun (with adult supervision)
- Scissors
- A measuring tape
Step-by-Step Instructions:
- Measure Your Stocking: Take your measuring tape and measure all the way around the top opening, or cuff, of your stocking.
- Cut the Fur: Lay your faux fur fabric with the furry side down. Cut a strip that is about 5 inches wide and as long as the measurement you just took, plus one extra inch.
- Get Ready to Glue: Ask an adult to heat up the hot glue gun.
- Attach the Fur: Lay the stocking on a flat surface. An adult should apply a line of hot glue along the top seam of the stocking cuff.
- Press it On: Carefully press the edge of your fur strip onto the hot glue, with the furry side facing out. Work in small sections, gluing and pressing all the way around the stocking cuff.
- Finish the Seam: When you get back to where you started, overlap the fur by about an inch. Glue the edge down to create a clean seam. Now your plain stocking has a fabulous, fluffy new cuff!
38. Nostalgic Needlepoint Christmas

This fireplace is like a warm hug from Christmases past. It is steeped in tradition and nostalgia, from the crackling fire to the milk and cookies set out for a special visitor. The rich wood mantel is decorated with a simple pine and berry garland, accented with classic red velvet bows.
The true heart of this scene is the row of beautiful needlepoint stockings, each one showing a different cheerful Santa Claus. Brass candlesticks and a vintage-style clock add to the timeless feel. This is a classic, heartwarming display that is all about family memories and holiday traditions.
DIY Simple No-Sew Felt Bows
These classic bows are incredibly simple to make and add a festive touch to anything.
What You’ll Need:
- A sheet of red felt
- A hot glue gun (with adult supervision)
- Scissors
- A ruler
Step-by-Step Instructions:
- Cut Your Pieces: From your red felt, cut three pieces: one big rectangle (about 4×6 inches), one small rectangle (about 1×2 inches), and one long, thin rectangle for the tails (about 1.5×7 inches).
- Make the Bow Loops: Take your big rectangle. Fold the two short ends so they meet in the middle and slightly overlap. Ask an adult to put a dot of hot glue in the center to hold them in place.
- Pinch the Center: Pinch the middle of the felt you just glued, so it makes a classic bow shape with two loops.
- Add the Center Piece: Take your small rectangle. Wrap it around the pinched middle of your bow and have an adult secure it in the back with a dot of hot glue.
- Add the Tails: Take your long, thin rectangle. You can cut a “V” shape into each end to make it look fancy. An adult can glue the center of this tail piece to the back of the bow.
- You’re Done! Your classic red felt bow is complete. You can glue it onto a garland, a wreath, or a present.
39. Modern Buffalo Check Farmhouse

This fireplace has a clean, graphic, and cozy farmhouse style. The design is built around the bold pattern of black and white buffalo check, which is used in the stockings, the rug, and even some of the ornaments. It creates a look that is modern yet comfortable.
Against a clean white shiplap wall, a simple pine garland is draped asymmetrically. A large chalkboard in a natural wood frame is ready for a festive message. Black lanterns hang from the garland, adding to the modern farmhouse charm. This style is crisp, inviting, and effortlessly stylish.
DIY Personalized Chalkboard Sign
A chalkboard sign is a fun way to add a personal touch that you can change anytime.
What You’ll Need:
- A chalkboard (any size)
- A piece of white chalk
- A pencil
- A damp paper towel
- A dry paper towel
Step-by-Step Instructions:
- Season Your Chalkboard: This is a very important first step for a new chalkboard! Lay the chalk on its side and rub it all over the entire surface until it’s covered in a layer of chalk dust.
- Wipe it Clean: Use a dry paper towel to wipe all the chalk dust off. Now your board is “seasoned” and it will be easier to erase in the future without leaving “ghost” images.
- Sharpen Your Chalk: For nice, clean writing, it helps to have a sharp point on your chalk. You can sharpen it with a pencil sharpener or by rubbing it on the sidewalk.
- Plan Your Message: Think about what you want to write. “Merry Christmas,” “Let it Snow,” or “Welcome” are all great choices. You can lightly sketch out your letters with a pencil first (it will show up on the black surface).
- Write Your Message: Carefully trace over your pencil lines with the chalk. Press firmly for bright white lines.
- Clean Up Mistakes: If you make a mistake, just use the corner of a damp paper towel to wipe it away. Let the spot dry, and then you can write on it again.
40. Winter Garden Conservatory

This fireplace brings the vibrant life of a greenhouse indoors. It is a celebration of living things, creating a lush, green sanctuary against the winter cold. The mantel is overflowing with an abundance of houseplants, from trailing ivy and ferns to a blooming amaryllis.
The plants are housed in classic terracotta pots, which add an earthy, warm color to the scene. An ivy garland is woven along the mantel, lit with tiny fairy lights. Glass cloches are placed over candles, creating a magical terrarium effect. This beautiful style is a gardener’s dream.
DIY Candle Cloche Terrarium
This is a beautiful and safe way to create a miniature garden scene around a candle.
What You’ll Need:
- A glass cloche (a bell-shaped glass cover) with a base
- A battery-operated pillar candle that is shorter than your cloche
- A handful of small rocks or pebbles
- Some soil or sand
- A few small pieces of moss (you can buy this at a craft store)
- A tiny pinecone or a pretty rock (optional)
Step-by-Step Instructions:
- Create the Base: Start with the base of your cloche. Place your battery-operated candle right in the center.
- Add Your Foundation: Sprinkle your small rocks, soil, or sand onto the base, all around the bottom of the candle.
- Lay the Moss: Gently press small pieces of moss on top of the soil, tucking it in around the candle base to create a green, mossy ground.
- Add a Focal Point: You can place a tiny pinecone or a special, pretty rock on top of the moss to add a little more interest.
- Cover it Up: Carefully place the glass cloche over your scene and onto the base.
- Turn it On: Turn on your battery-operated candle. The light will glow beautifully through the glass, highlighting your miniature winter garden.
41. New Year’s Eve Bash

Ring in the new year with a fireplace that is ready to party. This look is all about sparkle, celebration, and the excitement of a midnight countdown. A thick, shimmering silver tinsel garland frames the scene, while a bold “Happy New Year” banner takes center stage. The color scheme is a classic and glamorous mix of black, gold, and silver.
The hearth is overflowing with a pile of shiny disco balls, reflecting light in every direction. Party hats, noisemakers, and confetti are scattered about, ready for the festivities. This decor transforms your fireplace into the ultimate backdrop for a memorable New Year’s Eve celebration.
DIY Disco Ball Vases
Add some sparkling fun to your party with these easy and glamorous floral arrangements.
What You’ll Need:
- A few small, inexpensive glass vases
- A bag of tiny mirror ball ornaments or disco ball vase fillers
- A hot glue gun (with adult supervision)
- Faux gold or silver decorative branches
Step-by-Step Instructions:
- Get Your Supplies Ready: Make sure your glass vases are clean and dry. Ask an adult to plug in the hot glue gun.
- Start at the Bottom: An adult should apply a small dot of hot glue to the back of one of the tiny mirror balls.
- Press it On: Quickly and carefully press the mirror ball onto the glass vase, near the bottom. Hold it for a few seconds until the glue sets.
- Create a Mosaic: Continue gluing the mirror balls onto the vase, placing them right next to each other. You are trying to cover the entire outside of the vase, like you’re making a mosaic.
- Cover it All: Keep going until the whole vase is covered in a layer of sparkling disco balls.
- Arrange Your Stems: Let the glue cool completely. Once it’s ready, you can fill your new, sparkly vase with some fun faux gold or silver branches to complete the festive look.
We’ve journeyed through 41 different worlds, all centered around the simple warmth of a fireplace. From a lush indoor garden to a sparkling New Year’s Eve bash, each design shows how the hearth can tell a unique story. It is more than just a source of heat; it is a canvas for your creativity.
Hopefully, these ideas have sparked your imagination. You can see that a few simple changes—a fresh garland, a collection of candles, or a handmade treasure—can make all the difference. The goal is to create a space that feels like you, a place where you and your loved ones can feel comfortable and content all winter long.
Key Takeaways
- Embrace Greenery: Whether it’s fresh pine, dried eucalyptus, or a collection of houseplants, greenery adds life and natural texture to any display.
- Layer with Light: Don’t rely on just the fire. Use a mix of candles, fairy lights, and lanterns to create a warm, layered, and inviting glow.
- Texture is Key: A cozy space is all about how it feels. Mix soft textiles like knits and faux fur with rustic elements like wood and stone for a rich, interesting look.
- Tell a Story: The most memorable mantels reflect a personality. Use themes like a cozy library, a starry night, or a family photo gallery to make the space your own.
- DIY Adds Charm: You don’t need to spend a lot to create a beautiful hearth. Simple handmade projects like garlands, painted ornaments, or candle wraps add a personal and heartfelt touch.