Winter nights are long. A cold bedroom feels unwelcoming. You might find your space lacks the warmth you need for good rest. It feels bare, not like a sanctuary.
This feeling is easy to change. The solution is thoughtful layering. You can build a truly comfortable room piece by piece. It does not require a complete redesign.

Adding different textiles and textures creates depth. A soft blanket here, a plush rug there. These elements work together to build warmth.
This guide explores 41 simple ways to layer your room. Use these tips to create a personal haven. Get ready to build your ultimate winter sleep sanctuary.
1. The Chunky Knit Throw

A giant knit blanket brings serious comfort. It adds a layer of texture that looks as warm as it feels. The thick yarn creates a bold pattern, making the bed the true center of the room.
You can drape it casually over your duvet for an inviting look. This creates a relaxed, lived-in feeling. The soft grey color here works well with many palettes. It complements simple whites and soft pastels beautifully. Adding this single piece is a simple way to make a modern room feel much cozier for winter nights.
DIY Arm-Knitted Chunky Blanket
You can make your own super soft blanket using just your arms! It’s like finger knitting, but bigger.
What You’ll Need:
- Several skeins of super chunky yarn (it should feel like a soft, fluffy rope)
- Your own two arms
- A pair of scissors
Step-by-Step Instructions:
- Make the First Loop: First, we need a starting loop, called a slip knot. Take the end of your yarn and make a loop, then pull a piece of the yarn through that loop to make a new loop you can tighten. It’s a bit like the first step of tying your shoes. Place this loop onto your right wrist. Don’t make it too tight!
- Create Your First Row: This is called “casting on.” With the loop on your right wrist, use your left hand to grab the long piece of yarn (the one attached to the ball) and pull it through the loop. Place this new loop on your right wrist too. Keep doing this until you have about 10-12 loops on your right arm. This will decide how wide your blanket is.
- Knit from Arm to Arm: Now, hold the long yarn in your right hand. Take the first loop on your right wrist (the one closest to your hand) and pull it off, over your hand. Grab the long yarn with your left hand and pull a new loop through the one you just took off. Place this new loop onto your left wrist. Repeat this for all the loops, moving them from your right arm to your left arm. That’s one row!
- Keep Going: Now, you’ll do the same thing but from left to right. Keep knitting back and forth, moving the loops from one arm to the other, until the blanket is as long as you want it to be.
- Finish It Up: To finish, we “cast off.” Knit two loops onto your new arm like usual. Then, take the first loop you made (the one closer to your elbow) and pull it up and over the second loop, completely off your arm. You’ll have one loop left. Knit one more loop onto that arm, then do the same thing. Keep repeating this until you only have one loop left.
- The Final Knot: Cut the yarn, leaving a tail about 6 inches long. Pull this tail all the way through the very last loop and tighten it to make a knot. Weave the leftover yarn tail into the blanket stitches to hide it. All done!
2. The Lodge Retreat

This room feels like a cozy cabin in the mountains. A thick, faux fur throw blanket adds a layer of rustic luxury. Leather pillows and plaid bedding complete the classic lodge look. It’s a warm and inviting space, perfect for escaping the cold.
The style uses natural textures and deep colors. An antler chandelier and snowy mountain pictures add to the theme. This is a room designed for comfort and relaxation after a day outdoors.
DIY No-Sew Faux Fur Pillow
You can create a luxurious faux fur pillow without a single stitch.
What You’ll Need:
- A piece of faux fur fabric
- An old pillow or a pillow insert
- Sharp fabric scissors
- Fabric glue or a hot glue gun
Step-by-Step Instructions:
- Cut Your Fabric: Lay your faux fur fabric on the floor with the furry side down. Place your pillow insert in the middle. Cut the fabric so you have about 4-6 inches of extra fabric on all four sides.
- Fold it Like a Present: Think of this like wrapping a gift. Take one side of the fabric and fold it over the pillow. Take the opposite side and fold it over the first one. Use a line of fabric glue or hot glue to secure the seam where they overlap.
- Glue the Ends: Now you have two open ends. At one end, fold the fabric in, just like you would when wrapping a present, to create neat, triangular folds.
- Secure the Folds: Use your glue to secure these folds down.
- Repeat on the Other Side: Do the exact same thing on the other open end. Let the glue dry completely, and you have a brand-new, super-soft pillow.
3. The Minimalist Knit Throw

A simple knit throw in a soft, neutral color adds warmth without the clutter. It complements a clean, minimalist design by adding a single layer of texture. The blanket looks inviting, tossed casually across the crisp white duvet.
This approach shows that coziness doesn’t require a lot of stuff. A few well-chosen soft items are all you need. The focus is on clean lines and a calm feeling. The throw makes the room feel soft and complete.
DIY Round Tufted Pillow
That cute little round pillow is easy to make and adds a professional touch to your bed.
What You’ll Need:
- Round piece of fabric (like velvet or soft cotton), about 20 inches across
- A second round piece of fabric the same size
- Pillow stuffing (like Poly-fil)
- A needle and strong thread
- Two matching buttons
- Scissors
Step-by-Step Instructions:
- Cut Your Circles: Use a large dinner plate or a round platter to trace two big circles onto your fabric. Cut them out.
- Sew the Edges: Place the two fabric circles on top of each other, with the nice-looking sides facing inward. Sew all the way around the edge, leaving a small opening about the size of your hand.
- Turn and Stuff: Turn the fabric right-side out through the opening you left. The pretty side of the fabric should now be on the outside. Start pushing pillow stuffing inside until it’s full and round.
- Close the Hole: Neatly fold the raw edges of the opening inward. Use your needle and thread to carefully sew the opening shut.
- Add the Tuft: Thread a long piece of strong thread onto your needle, but don’t knot it yet. Push the needle straight through the very center of the pillow, from one side to the other.
- Button It Up: String one of your buttons onto the needle and then push the needle back through the center of the pillow to the other side. Pull the thread tight to create a little dimple. String the second button on, and then sew back and forth through the pillow and buttons a few times to make sure they are secure. Tie a strong knot, and you’re done!
4. The Bohemian Dreamscape

Layering is the heart of bohemian style. A vibrant quilt is just the beginning. It’s topped with textured pillows in warm, earthy colors like orange and gold. The different patterns and fabrics work together to create a fun and energetic feel.
The cozy feeling extends beyond the bed. A macrame wall hanging and lots of floor cushions make the whole room a comfortable lounge. String lights add a warm, gentle glow. This room is full of life and personality.
DIY Simple Macrame Wall Hanging
You can create a beautiful piece of wall art using just a few simple knots.
What You’ll Need:
- A wooden dowel or a clean stick from outside
- Macrame cord or thick cotton rope
- Scissors
Step-by-Step Instructions:
- Cut Your Cords: Cut about 10-12 pieces of macrame cord. Each piece should be about twice as long as you want your final wall hanging to be.
- Attach Cords to the Dowel: We’ll use a “lark’s head knot.” Take one piece of cord and fold it in half to make a loop at the top. Place the loop over the top of the dowel. Then, pull the two loose ends of the cord through the loop and pull tight. The cord is now attached to the dowel. Do this with all your pieces of cord.
- Tie Square Knots: The most common macrame knot is a square knot. It uses four cords. Take the first four cords on the left.
- Take the far-left cord (cord 1) and cross it over the middle two cords (cords 2 and 3) and under the far-right cord (cord 4).
- Now take the far-right cord (cord 4) and bring it under the middle two cords and up through the loop you made with cord 1.
- Pull it tight. That’s half a knot!
- To finish, do the reverse. Take the far-right cord (cord 4) and cross it over the middle two and under the far-left one (cord 1). Then take cord 1 and bring it under the middle two and up through the new loop. Pull tight. That’s one full square knot!
- Create a Pattern: Continue making square knots across the first row. On the next row, you can leave the first two cords alone and start your square knot with the next four cords. This will create a triangle or diamond pattern.
- Finish the Look: Keep tying knots in any pattern you like. When you’re happy with it, you can leave the bottom cords hanging loose. You can trim them straight across, in a V-shape, or at an angle. Tie one last piece of cord to both ends of the dowel for hanging.
5. The Romantic Vintage Retreat

Softness is everywhere in this vintage-style room. The bedding features delicate details like lace trim and subtle embroidery. A fluffy, plush throw adds another layer of gentle comfort. The colors are muted, with soft pinks and grays.
This style feels personal and charming. It’s like stepping into a room from another time. The floral curtains and antique-style mirror add to the story. It creates a peaceful and dreamy place to rest.
DIY Lace-Trimmed Pillowcases
Add a touch of romance to your plain pillowcases with a little bit of lace.
What You’ll Need:
- A plain pillowcase
- A strip of lace trim (long enough to go around the open edge of the pillowcase)
- A needle and thread that matches your pillowcase
- Straight pins
- Scissors
Step-by-Step Instructions:
- Measure Your Lace: Take your lace trim and wrap it around the open cuff of the pillowcase to see how much you need. Add about one extra inch for overlap, and then cut the lace.
- Pin the Lace: Lay the pillowcase flat. Starting at one of the side seams, place the lace along the edge of the cuff. Use straight pins to hold the lace in place all the way around.
- Time to Sew: Thread your needle and tie a knot at the end. Start sewing the lace onto the pillowcase using a simple “running stitch.” This is just a basic up-and-down stitch, like you’re making a dotted line with the thread.
- Keep it Neat: Try to keep your stitches small and straight. Sew along the top edge of the lace. If your lace is wide, you might want to sew along the bottom edge, too, to keep it from flopping around.
- Finish Up: When you get all the way back to where you started, overlap the lace ends slightly. Make a few small stitches to secure the thread, tie a knot, and cut the extra thread. Your plain pillowcase is now much fancier!
6. The Calm Coastal Vibe

A chunky, cable-knit blanket brings the feeling of a favorite cozy sweater to your bed. It adds a thick, comforting texture that makes you want to curl up. The mix of sandy beige and a soft seafoam green creates a relaxed, beach-house mood.
The room feels bright and airy. Light-colored wood and simple window shades keep things simple. The blue glass vases look like sea glass found on the shore. This space is a peaceful retreat, like a quiet morning by the ocean.
DIY Rope-Wrapped Basket
You can give a plain basket a coastal makeover with some simple rope.
What You’ll Need:
- A plain basket (wicker, plastic, or even a cardboard box)
- Thick rope (like cotton or jute rope)
- A hot glue gun and glue sticks
- Scissors
Step-by-Step Instructions:
- Start at the Bottom: Start at the base of your basket. Put a dot of hot glue on the basket and press the end of your rope into it. Hold it for a few seconds until the glue sets.
- Wrap It Around: Put a line of hot glue along the basket, about 6 inches at a time. Carefully press the rope onto the glue, keeping it tight against the first row.
- Keep Going: Continue this process: add a line of glue, then press the rope down. Go round and round, working your way up the basket. Make sure each new row of rope is snuggled up right next to the one before it.
- Finishing the Top: When you reach the top edge of the basket, cut the rope. Put a final dot of hot glue on the basket and press the end of the rope down firmly so it won’t unravel.
- Add Handles (Optional): If you want to add handles, cut a separate piece of rope. Use hot glue to attach the ends to the inside of the basket, creating a loop. Do the same on the other side. Now you have a stylish, coastal-inspired basket.
7. The Urban Industrial Mix

In a room with strong industrial features, a soft blanket is essential. The plush, furry throw here softens the hard edges of the brick wall and concrete. It provides a warm contrast and makes the space feel more livable.
This style is about balance. The cool, modern elements need a touch of comfort to feel like home. The simple gray bedding and soft rug help, too. The blanket is the final touch that invites you to relax in this stylish, urban space.
DIY Abstract Art
You can create modern art like the pieces in this room with a canvas and some paint.
What You’ll Need:
- A blank canvas
- Craft paint in a few colors (like black, white, and one accent color)
- A few different-sized paintbrushes
- A paper plate to use as a palette
- A cup of water for rinsing brushes
Step-by-Step Instructions:
- Plan Your Colors: Decide on your main colors. The art in the picture uses mostly black and white with a tiny bit of red.
- Create a Background: If you want, you can paint the entire canvas a single background color first. Let it dry completely.
- Make Your Marks: There are no rules in abstract art! Squeeze some paint onto your paper plate.
- Try making big, bold strokes with a large brush.
- Try dripping or splattering the paint onto the canvas.
- Use a smaller brush to make sharp lines or scribbles.
- Layer the Colors: Let one color dry a little before adding another one on top. This will keep the colors from getting muddy. Try to create contrast with light and dark areas.
- Know When to Stop: The hardest part of abstract art is deciding when it’s finished. Step back and look at it. If you like how it looks, you’re done! Don’t feel like you need to cover every inch of the canvas.
- Let it Dry: Let your masterpiece dry completely before you hang it on the wall.
8. The Zen Retreat

This room is all about peace and simplicity. A simple runner with a tie-dye pattern adds a touch of handmade beauty. It brings a gentle pattern to the calm, solid-colored bedding. The deep blue color is calming.
The style is inspired by Japanese design. Natural materials like wood and paper are used. The low bed and simple lamp create a feeling of being close to the earth. It is a space designed for quiet reflection and rest.
DIY Shibori Tie-Dye Pillowcases
Shibori is a Japanese style of dyeing fabric that creates beautiful patterns.
What You’ll Need:
- A white cotton pillowcase
- A bottle of indigo or navy blue fabric dye
- A bucket or large bowl
- Rubber bands or string
- Rubber gloves
- A small wooden block or even a LEGO brick (optional)
Step-by-Step Instructions:
- Prepare Your Dye: Follow the instructions on your fabric dye bottle to mix the dye with water in your bucket. Make sure to wear your rubber gloves!
- Fold and Tie: This is the fun part. There are many ways to fold for shibori. For a pattern like the one on the runner:
- Fold your pillowcase like an accordion, making long, skinny folds.
- Now, fold that long strip like an accordion again, making a small square.
- (Optional) You can place a wooden block on the top and bottom of your fabric square and wrap it all tightly with rubber bands. This will create white squares in your pattern.
- Or, you can just wrap the folded square tightly with rubber bands.
- Dye the Fabric: Get the folded fabric wet with clean water first, then squeeze it out. Carefully place your tied-up fabric into the dye bath. Let it soak for the time recommended on the dye bottle.
- Rinse and Reveal: Take the fabric out of the dye. While the rubber bands are still on, rinse it under cool water until the water runs clear.
- The Big Reveal: Carefully cut or remove the rubber bands and unfold your pillowcase. You’ll see a unique, beautiful pattern. Wash and dry it according to the dye instructions before using it.
9. The Classic Library Room

A dark plaid comforter sets a cozy, scholarly mood. It feels like a classic blanket from a historic university. Paired with deep blue walls and rich leather, it creates a warm and enclosing space.
This room is a sanctuary for reading and relaxing. The built-in bookshelves are filled with old books, adding to the classic feel. Candlelight and a soft lamp give off a warm glow. It is the kind of room you want to settle into on a cold winter night.
DIY Aged Paper Wall Art
You can create art that looks old and historic, just like the botanical prints in the picture.
What You’ll Need:
- A piece of thick paper or cardstock
- A black tea bag
- A cup of hot water
- A simple picture to trace (like a leaf or a flower from a book or online)
- A fine-tipped black pen
- A simple picture frame
Step-by-Step Instructions:
- “Age” the Paper: Brew a strong cup of black tea and let it cool down a little. Take the wet tea bag and gently dab it all over your piece of paper. This will give it a yellowish, old-looking stain. Let the paper dry completely.
- Find Your Image: Find a simple outline of a plant, flower, or even a map.
- Trace the Image: Place the paper with the image you want to use underneath your tea-stained paper. If you can see through it, you can trace the outline directly with your black pen. If not, you can use a sunny window as a lightbox to help you see.
- Add Details: Once you have the outline, you can add little details with your pen. Add veins to the leaves or little lines for shading. You can also write the name of the plant at the bottom in cursive for a scientific look.
- Frame It: Place your finished drawing into a simple frame. You can make a few different ones and hang them together to create a collection.
10. The Glamorous Art Deco Room

This bedroom is pure Hollywood glamour. A soft faux fur throw at the end of the bed adds a touch of classic luxury. It contrasts beautifully with the sleek lines of the Art Deco-style furniture. The room feels sophisticated and elegant.
Rich textures and metallic finishes are key to this look. The dramatic black walls, gold accents, and crystal chandelier create a sense of opulence and style.
DIY Gold Sunburst Mirror
You can create a dramatic, starburst-shaped mirror with simple craft supplies.
What You’ll Need:
- A small, round craft mirror
- Wooden dowels or bamboo skewers in various lengths
- A hot glue gun or strong craft glue
- Gold spray paint
- A piece of cardboard for the back
Step-by-Step Instructions:
- Create the Base: Trace your round mirror onto a piece of cardboard and cut the circle out. This will be the backing.
- Glue the Rays: Start gluing your wooden dowels or skewers to the back of the cardboard circle. Create a pattern, alternating between long and short sticks to create the sunburst effect.
- Spray Paint it Gold: Once all the rays are glued on and the glue is dry, take it outside and spray paint the entire thing—cardboard and rays—with gold spray paint. Let it dry completely.
- Attach the Mirror: Add a generous amount of glue to the center of your painted sunburst and press the craft mirror firmly into place.
- Add a Hanger: Glue a small loop of string or a picture hanger to the back of the cardboard so you can hang it on the wall.
11. The Winter White Wonderland

An all-white room can feel incredibly warm with the right textures. A classic cable-knit blanket adds a traditional, sweater-like comfort. Fluffy, fuzzy pillows bring a softer, more modern touch. The key is layering different types of white fabrics.
Shiny silver accents, like the lamps and vases, add a bit of sparkle. They reflect the light and keep the room from feeling flat. This creates a serene and elegant space. It feels like a peaceful, snowy landscape indoors.
DIY Mercury Glass Vases
You can give any glass vase or jar an antique, mirrored look.
What You’ll Need:
- A clean glass vase or jar
- Krylon Looking Glass spray paint (this specific kind works best)
- A spray bottle filled with a 50/50 mix of white vinegar and water
- Paper towels
Step-by-Step Instructions:
- Prepare Your Space: Do this project outside or in a well-ventilated area, and put down some newspaper to protect your surfaces.
- Clean Your Vase: Make sure your glass vase is completely clean and dry on the inside.
- Spray the Inside: Lightly spray the inside of your vase with the vinegar and water mixture. You just want little droplets, not big puddles.
- Add the Mirror Effect: Immediately after spritzing with water, spray a light coat of the Looking Glass paint inside the vase. Swirl it around a bit.
- Blot and Repeat: Let it sit for about a minute. Then, take a paper towel and gently blot the inside. This will create the speckled, antique pattern. Repeat the process—spritz with water, spray with paint, wait, and blot—a few more times until you like the look.
- Let It Dry: Let the vase dry completely. The mirrored finish will be on the inside, so you can fill it with faux branches or flowers.
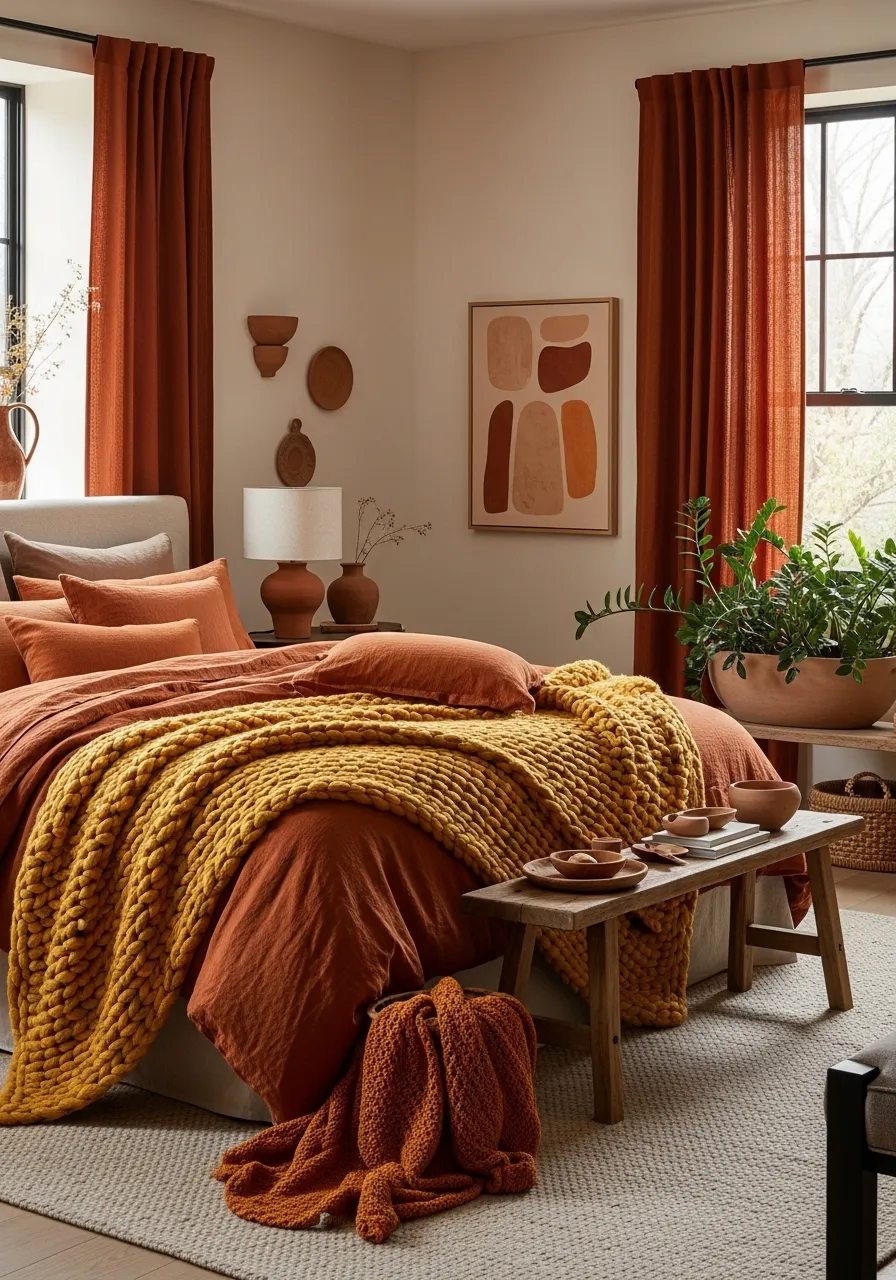
12. The Earthy Terracotta Tones

Warm, sun-baked colors create a room that feels instantly comforting. A chunky mustard-yellow knit blanket makes a bold statement against the rust-colored duvet. The colors are inspired by deserts and clay, feeling natural and grounding.
The layers of the same color family build a rich, cohesive look. Natural materials like the wooden bench and terracotta pots continue the theme. This space wraps you in warmth. It is a cozy and inviting place to be.
DIY Clay Pinch Pots
Create small, earthy pots for holding jewelry or small items, using just your hands.
What You’ll Need:
- Air-dry clay
- A small bowl of water
- Your hands!
- Acrylic paint (optional, for decorating)
Step-by-Step Instructions:
- Start with a Ball: Take a piece of air-dry clay and roll it between your hands to make a smooth ball, about the size of a golf ball.
- Make a Pinch: Hold the ball in one hand. Gently press the thumb of your other hand into the center of the ball, going about halfway down.
- Pinch and Turn: Now, start pinching the clay between your thumb and your fingers. Your thumb stays on the inside, and your fingers are on the outside. Gently pinch and turn the ball in your hand.
- Shape Your Pot: Keep pinching and turning, and you’ll see a little pot shape start to form. Try to keep the walls of the pot an even thickness.
- Smooth It Out: If the clay starts to crack, dip your finger in a little bit of water and smooth it out. Tap the bottom of your pot on the table gently to make a flat base.
- Let it Dry: Let your clay pot dry for a day or two until it is hard. Once it’s dry, you can leave it natural or paint it with acrylic paints.
13. The Moody Floral Dream

A dark floral pattern on the bedding and walls creates a sophisticated and cozy atmosphere. It is a bold choice that feels both romantic and modern. A soft, quilted velvet throw in a deep green adds another layer of rich texture.
The room uses dark colors to feel like a private hideaway. Warm brass lamps and candle holders glow against the dark background. This creates a dramatic yet calming space. It is a luxurious retreat from the outside world.
DIY Pressed Flower Art
You can preserve beautiful flowers and turn them into art for your walls.
What You’ll Need:
- Fresh flowers and leaves
- A heavy book (like a phone book or textbook)
- Parchment paper or coffee filters
- A simple picture frame with a glass front
- A piece of cardstock that fits your frame
Step-by-Step Instructions:
- Pick Your Flowers: Choose flowers that are not too thick, like pansies, ferns, or daisies.
- Press Them: Open your heavy book to the middle. Lay down a piece of parchment paper. Arrange your flowers and leaves on the paper, making sure they don’t overlap. Place another piece of parchment paper on top.
- Time to Wait: Carefully close the book. The weight of the book will press the flowers flat. You might want to stack a few more heavy books on top. Now, you have to wait for about 2-4 weeks for them to dry completely.
- Create Your Art: Once the flowers are dry and feel like paper, they are ready. Carefully open the book and lift them off the paper.
- Arrange and Frame: Arrange your beautiful pressed flowers on the piece of cardstock. When you’re happy with the design, carefully place the glass from the frame over it and secure it in the frame.
14. The Modern Farmhouse Charm

This style is clean, simple, and very inviting. A cozy knit throw and a striped blanket add soft layers to the crisp white bedding. The neutral colors of beige and grey create a calm and restful environment.
The room mixes modern and rustic touches. The white shiplap wall is a farmhouse classic. The black metal fan and light fixtures add a modern industrial feel. It is a bright and comfortable space that feels both fresh and timeless.
DIY Cotton Stem Arrangement
Create a simple farmhouse-style decoration using cotton stems.
What You’ll Need:
- A few faux cotton stems from a craft store
- A rustic-looking vase or a small metal bucket
- Floral foam (optional)
- Wire cutters (optional)
Step-by-Step Instructions:
- Prepare Your Vase: If you’re using floral foam, cut a piece to fit snugly in the bottom of your vase or bucket. This will help hold the stems in place.
- Trim Your Stems: Look at the height of your vase. You’ll want the cotton stems to be taller, but not so tall they fall over. If the stems are too long, you can use wire cutters to trim them, or simply bend the bottom of the stem.
- Arrange Them: Start placing the cotton stems into the vase one by one. If you’re using foam, just poke them right in.
- Create a Full Look: Arrange the stems so they spread out a bit and look natural. Turn the vase as you work to make sure it looks good from all sides. You don’t need many stems to create a simple, beautiful look.
15. The Serene Minimalist Sanctuary

This room proves that simple can be incredibly cozy. A single, soft gray blanket acts as a runner across the bed. It adds a layer of color and texture without any fuss. The clean lines of the low platform bed create a sense of calm.
The focus here is on tranquility and mindfulness. The color palette is soft and muted, with gentle greens and grays. Natural elements like the orchid and the wood bed frame bring a touch of the outdoors in. This space is a true retreat for rest.
DIY No-Sew Linen Bed Runner
You can make a simple runner for the end of your bed without any sewing.
What You’ll Need:
- A piece of linen or soft wool fabric (long enough to drape across your bed)
- Iron-on hem tape
- An iron and ironing board
- Scissors
- A ruler or measuring tape
Step-by-Step Instructions:
- Measure and Cut: First, decide how wide you want your runner to be (usually about 20-24 inches). Then, measure the width of your bed and add about 12 inches so it can hang over the sides. Cut your fabric to this size.
- Fold the Edges: Lay your fabric on the ironing board. Fold over one of the long edges about one inch and press it flat with the iron.
- Use the Hem Tape: Open up the fold you just made. Place a strip of the iron-on hem tape inside the fold.
- Iron it Shut: Fold the edge back down over the tape and press it firmly with a hot iron. Hold the iron there for a few seconds, according to the tape’s instructions. This will glue the hem in place.
- Repeat on All Sides: Do this for all four edges of your fabric. You’ll be left with a beautiful, professionally-finished runner, and nobody will know you didn’t sew it.
16. The Biophilic Forest Haven

This room brings the calming feeling of a forest inside. A chunky brown knit blanket adds a cozy, handmade texture that feels like a warm hug. It complements the deep green bedding and the many plants around the room.
The style, called biophilic design, is all about connecting with nature. A live-edge wood headboard, a tree stump side table, and botanical art all help. This space is a peaceful escape that feels fresh and alive.
DIY Kokedama (Moss Ball)
Kokedama is a Japanese art form where you grow a plant in a ball of moss.
What You’ll Need:
- A small plant (like a fern or pothos)
- Peat moss
- Bonsai soil (or another heavy soil)
- Sheet moss (the kind that comes in a flat piece)
- Twine or string
- A bowl for mixing
- Water
Step-by-Step Instructions:
- Make the Mud Ball: In your bowl, mix about two parts peat moss with one part bonsai soil. Slowly add water and mix with your hands until it holds together like a thick mud pie.
- Prepare the Plant: Gently remove your small plant from its pot. Carefully dust off the loose soil from its roots.
- Form the Ball: Take your mud mixture and form it into a ball around the roots of the plant. Pack it firmly so it holds its shape.
- Wrap in Moss: Take your sheet moss and get it a little damp. Carefully wrap the moss around the mud ball, covering it completely.
- Tie it Up: Use your twine to wrap around the moss ball. Go around in all different directions, like you’re wrapping a ball of yarn, until the moss is secure. Tie a knot and leave a long piece of string for hanging.
17. The Desert Modern Warmth

This room captures the warmth of a desert sunset. A quilted terracotta-colored blanket adds a soft, subtle pattern. It is layered over crisp white sheets, creating a beautiful contrast. The long, patterned pillow adds a touch of global-inspired design.
The style is clean and warm. The large abstract painting sets the color scheme. A simple wood bed frame and a live cactus add to the natural, desert vibe. This is a bright and welcoming space that feels calm and connected to the landscape.
DIY Abstract Landscape Painting
You can paint a simple, modern landscape with just a few colors and shapes.
What You’ll Need:
- A blank canvas
- Craft paint in 3-4 colors that look good together (like the orange, red, and pink in the picture)
- A medium-sized paintbrush
- A pencil
Step-by-Step Instructions:
- Sketch Your Hills: Use a pencil to lightly draw a few simple, wavy lines across your canvas to be your hills or mountains. Don’t make them too detailed, just simple curves.
- Paint the Top Layer: Start with the “hill” that is supposed to be the farthest away (usually the one near the top). Paint that whole section with one of your colors.
- Paint the Next Layer: Now, paint the next hill with a different color. Don’t worry about being perfectly neat where the colors meet.
- Keep Going: Continue painting each section with your different colors until the whole canvas is filled.
- Let it Dry: Let the paint dry completely. You’ve created a simple and beautiful piece of modern art for your room.
18. The English Country Cottage

This style is all about mixing patterns for a cozy, lived-in look. A classic patchwork quilt is layered with floral pillows and a plaid dust ruffle. The combination feels charming and comfortable, not chaotic.
The room feels like a welcoming inn in the countryside. The floral curtains match the pillows, which ties the room together. Everything feels soft and traditional. It is a sweet and cheerful space to wake up in.
DIY Simple Envelope Pillow Cover
This is an easy way to make a pillow cover with no zippers or buttons.
What You’ll Need:
- A piece of fabric
- An old pillow or pillow form
- Scissors
- A sewing machine or a needle and thread
- A ruler and straight pins
Step-by-Step Instructions:
- Cut Your Fabric:
- First, cut one piece of fabric that is the same size as your pillow form. (If your pillow is 16×16 inches, cut a 16×16 inch square). This is the front.
- Next, cut two pieces for the back. They should be the same width as the front piece, but only about two-thirds of the height. (For a 16×16 pillow, you would cut two pieces that are 16 inches wide and about 11 inches tall).
- Hem the Back Pieces: Take one of your back pieces. On one of the long edges, fold the fabric over about half an inch, and then fold it again. Sew a straight line down this fold to make a nice, clean edge. Do this for both back pieces.
- Pin it Together: Lay your front piece down with the pretty side facing up. Now, lay your two back pieces on top, with their pretty sides facing down. The hemmed edges should overlap in the middle. Pin all around the outside edges.
- Sew Around the Edge: Sew all the way around the outside of the square.
- Turn it Right-Side Out: Trim any extra threads, and then turn the pillow cover right-side out through the opening in the back. Poke out the corners so they are nice and sharp. Just stuff your pillow inside, and you’re done!
19. The Moody Monochrome Retreat

A dark room can be the ultimate cozy space. Here, a black sheepskin throw adds a primal, rustic texture to the smooth gray bedding. It breaks up the solid colors and invites you to touch it.
The style is dramatic and intimate. Heavy blackout curtains block out the world. The only light comes from the warm glow of candles, creating a peaceful and focused atmosphere. This is a space designed for deep, uninterrupted rest.
DIY Rolled Beeswax Candles
These are the easiest candles to make, and they smell wonderful.
What You’ll Need:
- Sheets of beeswax (they come in many colors and often have a honeycomb pattern)
- Candle wick
- Scissors
- A hairdryer (optional)
Step-by-Step Instructions:
- Cut Your Wax: Lay a sheet of beeswax on a flat surface. You can leave it as a full sheet for a tall candle or cut it in half for two shorter candles.
- Place the Wick: Lay a piece of candle wick along one edge of the beeswax sheet. The wick should be about an inch longer than the wax.
- Start Rolling: Carefully fold the edge of the beeswax over the wick. Press it down firmly.
- Roll it Tight: Begin rolling the beeswax sheet as tightly and evenly as you can. Use your fingertips to keep the roll straight. If the wax is cold and cracking, you can warm it up for a few seconds with a hairdryer to make it softer.
- Seal the Edge: When you get to the end, press the final edge down firmly against the candle. The warmth of your hand should be enough to seal it. Trim the wick at the top to about half an inch, and your candle is ready.
20. The Retro 70s Groove

This room is a fun trip back in time. Round, tufted pillows in groovy greens and oranges add a playful touch. A shaggy faux fur throw adds to the lush, textured feel of the space. The bold, geometric patterns are pure 70s style.
The look is all about fun and self-expression. Wicker furniture, a lava lamp, and a macrame plant hanger complete the retro vibe. This is a cheerful and energetic room.
DIY Tufted Floor Cushions
You can create big, comfortable floor pillows for extra seating.
What You’ll Need:
- Two large squares of durable, soft fabric (like corduroy or velvet)
- Lots of pillow stuffing
- A needle and extra-strong thread
- Two large, matching buttons
- A sewing machine
Step-by-Step Instructions:
- Cut and Sew: Cut two identical squares of fabric, about 24×24 inches. Place them with the nice sides facing each other and sew around three of the sides.
- Turn and Stuff: Turn the cover right-side out. Start stuffing it with your pillow filling. Make it as full and firm as you can.
- Close the Seam: Neatly fold the raw edges of the open side inward and sew it shut. You can do this by hand with a neat stitch.
- Add the Tuft: Just like with the small round pillow, use a long needle and strong thread to sew through the center of the cushion.
- Secure with Buttons: Add a large button on each side, pulling the thread tight to create the tufted dimple in the middle. Sew back and forth a few times and tie a secure knot.
21. The Wabi-Sabi Retreat

This room finds beauty in simple, natural things. A soft wool blanket and fringed pillows add warmth to the cool concrete walls. The textures are subtle and calming. Everything feels raw and honest.
The style is inspired by wabi-sabi, a Japanese idea of finding peace in imperfection. A piece of weathered driftwood and a stack of smooth stones bring nature indoors. This is a space for quiet and calm, away from the busy world.
DIY Stacked Stone Cairn
You can create a peaceful, zen-like sculpture for your nightstand.
What You’ll Need:
- 5-7 smooth, flat stones of different sizes
- Strong craft glue (like E6000 or Gorilla Glue)
Step-by-Step Instructions:
- Gather Your Stones: Find smooth, flat stones. You can buy them at a craft store or find them outside. Wash and dry them completely.
- Plan Your Stack: Arrange your stones on a table. Start with the largest stone on the bottom. Stack the others on top, from biggest to smallest, until you like how it looks. Make sure it’s balanced.
- Start Gluing: Take the second-biggest stone. Put a small dot of strong glue on the bottom of it.
- Press it Down: Carefully place the glued stone onto the center of the biggest stone (the base). Press down gently and hold it for about a minute.
- Keep Stacking: Continue gluing your stones one by one. Put glue on the bottom of each stone and place it on top of the one before it.
- Let it Dry: Once your stack is complete, let the glue dry for at least a few hours. Now you have a beautiful, calming stone sculpture.
22. The Celestial Escape

This room is a gateway to the cosmos. A soft, textured gray blanket adds comfort to the deep navy bedding. The color scheme is inspired by the night sky. It creates a dark and cozy backdrop for dreaming.
The magic comes from the details. A star projector casts a galaxy onto the ceiling. Wall art shows the phases of the moon. This space is a wonderful escape, full of wonder and mystery.
DIY Moon Phase Wall Art
You can create a beautiful piece of art showing the phases of the moon.
What You’ll Need:
- A long, narrow piece of black or dark blue paper
- A round object to trace (like a cup or a small bowl)
- White or silver paint
- A small sponge or paintbrush
- A pencil
Step-by-Step Instructions:
- Trace Your Moons: Use your pencil and round object to trace about five circles in a line down your dark paper.
- Paint the Full Moon: The circle in the very middle will be your full moon. Use your sponge or brush to fill it in completely with white or silver paint.
- Paint the Crescent Moons: Now for the phases. For the circle next to the full moon, imagine a “C” shape and paint that. This is a crescent moon. For the circle at the very end, paint a much skinnier crescent.
- Paint the Other Side: Do the same thing on the other side of the full moon, but make the “C” shapes face the other way.
- Add Craters: While the paint is still a little wet, you can use the corner of your sponge or a balled-up paper towel to gently dab the moons. This will give them a textured, crater-like look. Let it dry completely.
23. The Writer’s Nook

This room feels like a story waiting to be written. Soft linen bedding in neutral tones creates a comfortable place to think. A simple throw blanket adds an extra layer of warmth for long nights of reading or writing.
The space is filled with inspiration. A large bookcase holds countless stories. A corkboard is ready for new ideas. This is a personal and productive retreat, made for creativity and quiet focus.
DIY Inspiration Corkboard
Create a place to pin your favorite photos, notes, and ideas.
What You’ll Need:
- A plain corkboard
- A simple wooden frame
- Tacks or small nails
- A hammer
- Fabric (optional, to cover the board)
- Pushpins
Step-by-Step Instructions:
- Frame the Board: If your corkboard doesn’t have a frame, you can easily add one. Measure the sides of your corkboard and have four pieces of simple wood trim cut to size at a hardware store.
- Attach the Frame: Place the frame pieces around the edges of the corkboard. Use a hammer to gently tap small nails through the wood and into the edge of the corkboard to hold it in place.
- (Optional) Cover with Fabric: For a more custom look, cut a piece of fabric (like linen or burlap) that is a few inches bigger than your board on all sides. Lay the fabric flat, place the corkboard face down on top, and wrap the extra fabric around to the back, stapling it securely.
- Hang it Up: Hang your new board on the wall near your desk.
- Start Pinning: Use pushpins to add photos, ticket stubs, inspiring quotes, and anything else you love.
24. The Modern Mountain Chalet

This room is the height of ski-lodge luxury. A heavy, striped faux fur blanket provides incredible warmth and texture. It makes the minimalist four-poster bed feel much more cozy. The gray and white palette is inspired by snow and stone.
The centerpiece of the room is the modern fireplace. It creates a warm glow that makes the whole space feel inviting. Large windows offer a view of the mountains. This is a sophisticated and comfortable place to unwind after a day on the slopes.
DIY No-Sew Faux Fur Blanket
You can make an incredibly soft blanket with no sewing machine required.
What You’ll Need:
- Two pieces of soft fabric, one faux fur and one fleece or flannel (the same size)
- Sharp fabric scissors
- A ruler
Step-by-Step Instructions:
- Lay Out Your Fabric: Place your two pieces of fabric on the floor. The fleece should be on the bottom, and the faux fur should be on top with the furry side facing up. Smooth out any wrinkles.
- Trim the Edges: Make sure both pieces of fabric are exactly the same size. Trim the edges so they line up perfectly.
- Cut the Corners: Cut a small square out of each of the four corners, going through both layers of fabric. A 4×4 inch square is a good size.
- Cut the Fringe: Now, you’ll cut a fringe around all four sides. Use your ruler to make cuts that are about 1 inch wide and 4 inches deep. Make sure to cut through both layers of fabric at the same time.
- Tie the Knots: Take one strip of fur and the matching strip of fleece underneath it. Tie them together in a simple, tight double knot.
- Keep Tying: Continue tying the fringe pieces together all the way around the blanket. Your super-soft, no-sew blanket is finished!
25. The Mid-Century Modern Vibe

This room is a blast from the past, in the best way. A simple gray throw softens the clean lines of the bed. Bold pillows in yellow, blue, and orange add a pop of cheerful color. The look is playful and stylish.
The style is defined by its furniture and art. The teak headboard with built-in nightstands is a classic. Geometric art and a starburst clock complete the mid-century look. This space is cool, confident, and full of character.
DIY Mid-Century Abstract Art
Create colorful, geometric art with a cool, retro feel.
What You’ll Need:
- A blank canvas or a piece of thick white paper
- Craft paint in mid-century colors (like mustard yellow, teal, orange, and black)
- A pencil and a ruler
- Painter’s tape
- Different-sized paintbrushes
Step-by-Step Instructions:
- Draw Your Shapes: Look at mid-century art for inspiration. It often uses simple shapes like rectangles, circles, and boomerangs. Lightly sketch a few overlapping shapes on your canvas with a pencil.
- Tape Off a Section: Choose one shape to paint first. Place painter’s tape along the edges of that shape to get a nice, clean line.
- Paint Your First Color: Paint inside the taped-off area with one of your colors. Don’t worry if you get a little paint on the tape.
- Peel and Repeat: Carefully peel off the painter’s tape while the paint is still a little wet. Let the paint dry. Then, tape off another section and paint it with a different color.
- Build Your Design: Keep taping and painting different sections until you’re happy with your design. Let it dry completely before hanging.
26. The Indoor Jungle

This bedroom is a lush, green paradise. A simple green throw blanket adds another layer of soft texture to the dark green velvet quilt. The room is filled with so many plants that it feels like you’re sleeping in a garden.
The style celebrates life and nature. Natural materials like the wicker chair and macrame hangers are used throughout. Big windows let in lots of sunlight to keep the plants happy. This space feels fresh, healthy, and incredibly peaceful.
DIY Simple Hanging Planter
You can hang your plants from the ceiling with this very easy knotting project.
What You’ll Need:
- Cotton rope or macrame cord
- A small potted plant
- Scissors
- A metal or wooden ring (optional)
Step-by-Step Instructions:
- Cut Your Ropes: Cut eight pieces of rope, all the same length. About 4-5 feet long is a good place to start.
- Tie a Big Knot: Take all eight pieces of rope and tie them all together in one big knot at the bottom. Leave a little tassel of rope at the end.
- Group and Knot: Lay the ropes out like an octopus. Separate them into four groups with two ropes in each group. About two inches up from the big knot, tie a simple knot in each pair of ropes.
- Group and Knot Again: Now, you’ll make a second row of knots. Take one rope from one pair and one rope from the pair next to it. Tie them together in a knot about two inches above the first row of knots. Continue this all the way around, creating a diamond pattern that will form the basket.
- Hang it Up: You can either tie all the ropes together in one big loop at the top, or you can attach them to a metal ring for easier hanging. Carefully place your plant pot inside the net you’ve created.
27. The Parisian Apartment

This room has an effortless, romantic elegance. A simple, slightly rumpled linen throw adds a touch of casual comfort to the bed. It shows that you don’t need a lot of layers to create a cozy feeling.
The beauty is in the architecture. High ceilings, an ornate marble fireplace, and a gilded mirror create a grand backdrop. The style is about mixing old, fancy things with simple, comfortable ones. It feels chic and lived-in.
DIY Antique Gold Mirror
Give a plain mirror a touch of Parisian glamour with a simple paint technique.
What You’ll Need:
- A mirror with a plain wooden or plastic frame
- Gold metallic craft paint
- A bit of black or dark brown craft paint
- A paintbrush
- A paper towel or old rag
Step-by-Step Instructions:
- Clean the Frame: Make sure the frame of your mirror is clean and dry. You can put painter’s tape around the edge of the mirror glass to protect it.
- Paint it Gold: Paint the entire frame with the gold metallic paint. Let it dry completely. You might need two coats.
- Add the “Antiquing”: Put a tiny bit of black or brown paint on a paper plate. Dip the tip of your rag or paper towel into the paint, then wipe most of it off.
- Wipe and Smudge: Gently rub the dark paint into the crevices and details of the frame. This will make it look older and more interesting.
- Blend It In: Before the dark paint dries, use a clean part of your rag to wipe away some of it, especially from the high points. This will leave the dark color in the shadows and make the gold pop. Let it dry completely.
28. The Cozy Log Cabin

This room is the definition of cabin coziness. A classic patchwork quilt is the main feature. It’s layered with a chunky knit throw, creating a bed that is full of pattern, texture, and warmth.
The decor is rustic and charming. A small electric fireplace adds a warm glow. Old snowshoes and skis on the wall tell a story of winter adventures. This is a cheerful and nostalgic space, made for snuggling up with a hot drink.
DIY No-Sew Patchwork Pillow
You can get the look of a quilt without all the complicated sewing.
What You’ll Need:
- A plain pillow cover
- Scraps of different fabrics (like plaid, floral, and solid colors)
- Iron-on adhesive sheets (like Heat’n Bond)
- An iron
- Scissors
Step-by-Step Instructions:
- Cut Your Squares: Cut your fabric scraps into squares of the same size. 3×3 inches is a good size to work with.
- Add the Adhesive: Follow the instructions on your iron-on adhesive package. Usually, you will iron the adhesive sheet onto the back (the not-so-pretty side) of your fabric squares.
- Peel and Arrange: Let the fabric cool, then peel the paper backing off the adhesive. Now you have fabric “stickers.” Arrange your squares on the front of your pillow cover in a pattern you like.
- Iron Them On: Carefully place a thin cloth (like a tea towel) over your design. Press down firmly with a hot iron. This will melt the glue and attach your patches to the pillow cover permanently.
- Let it Cool: Let the pillow cover cool down completely. Now you have a cute patchwork pillow!
29. The Japandi Calm

This room is a beautiful blend of simple Japanese and Scandinavian styles. A single, neatly folded wool throw is the only layer on the bed. It adds just enough warmth and texture without disturbing the room’s peaceful feeling.
Everything here is simple and has a purpose. The light wood bed frame has clean lines. The walls are a warm, earthy neutral. This is a space designed to clear your mind and help you feel calm and centered.
DIY Simple Wooden Stool
You can make a small, rustic stool that’s great as a plant stand or a tiny side table.
What You’ll Need:
- A round slice of wood (from a craft store)
- Three wooden furniture legs (you can buy these at a hardware store)
- Three angled leg mounting plates and screws (these usually come with the legs)
- A drill or screwdriver
- Sandpaper
Step-by-Step Instructions:
- Smooth the Top: Use sandpaper to smooth the top and edges of your round wood slice.
- Attach the Plates: Flip the wood slice over. Arrange the three mounting plates on the bottom, spaced out evenly in a triangle shape. Use your screwdriver or drill to attach them with screws.
- Screw in the Legs: Now, simply screw the three wooden legs into the mounting plates. They should screw in easily by hand.
- Flip it Over: Flip your new stool over. You now have a simple, beautiful piece of furniture that’s full of rustic charm.
30. The Dreamy Aurora Borealis

This room captures the magic of the Northern Lights. A thick, white faux fur blanket feels like a soft snowdrift on the bed. It adds a luxurious and cozy layer to the crushed velvet bedding.
The atmosphere is otherworldly. An aurora projector paints moving green and purple lights across the walls. A crystal mobile hangs from the ceiling, catching the light like ice. This space is a magical, dreamy escape from reality.
DIY Crystal Suncatcher Mobile
Create a beautiful mobile that will catch the light and cast rainbows around your room.
What You’ll Need:
- A small embroidery hoop or a metal ring
- Clear string or fishing line
- A bag of crystal beads or chandelier prisms (from a craft store)
- Scissors
Step-by-Step Instructions:
- Cut Your Strings: Cut several pieces of your clear string. Make them different lengths so your crystals will hang at different heights.
- Tie on the Crystals: Take one piece of string. Tie a crystal bead or prism to one end. Make a tight double knot.
- Add More Crystals: You can tie more crystals onto the same piece of string, spacing them out a few inches apart.
- Attach to the Hoop: Tie the other end of the string to the embroidery hoop.
- Keep Going: Continue tying crystals onto strings and then tying the strings to the hoop. Space them out all the way around the hoop.
- Create a Hanger: Cut three long, equal-length pieces of string. Tie them to the hoop, spaced out evenly (like a triangle). Then, bring the three strings together at the top and tie them in a single knot. You can use this to hang your beautiful new mobile.
31. The Earthen Shelter

This room feels like it grew right out of the earth. The walls, made of rammed earth, create a natural, textured backdrop. A simple knit throw in a complementary beige tone adds a soft, touchable layer to the cool green quilt.
The style is deeply connected to nature and sustainability. A living wall of plants brings a vibrant splash of life indoors. Sunlight streams through the windows, highlighting the natural materials. It is a calming, grounding space that feels both ancient and modern.
DIY Living Wall Art
Create a small, vertical garden to hang on your wall.
What You’ll Need:
- A shallow wooden shadow box or a picture frame with the glass removed
- A piece of chicken wire or hardware cloth
- A staple gun
- A piece of plastic sheeting (like from a trash bag)
- Cactus and succulent soil
- Small succulent cuttings
Step-by-Step Instructions:
- Prepare Your Frame: Take your shadow box or frame. Cut a piece of plastic sheeting to fit the inside back and staple it in place. This will protect your wall from water.
- Add the Wire: Cut a piece of chicken wire that is slightly larger than the opening of your frame. Staple it securely to the front of the frame.
- Fill with Soil: Lay the frame flat and fill it with cactus and succulent soil. Pack it in firmly, right up to the wire mesh.
- Plant Your Succulents: Take your small succulent cuttings. Use your finger or a pencil to poke a hole through the wire into the soil. Gently place the stem of a succulent cutting into the hole and pack the soil around it.
- Let it Root: Keep the frame lying flat for a few weeks to give the succulents time to grow roots and establish themselves. Water it lightly. Once they feel secure, you can hang your living art on the wall.
32. The Grandmillennial Charm

This room is a beautiful example of traditional style with a fresh twist. A soft, cream-colored cashmere or wool throw adds a simple, luxurious layer. It provides a calm resting spot for the eyes amidst the busy blue and white patterns.
The style, sometimes called “grandmillennial,” embraces classic design. The paisley-like bedding, curtains, and shades all match. Antique landscape paintings in gold frames and a ceramic lamp complete the look. It feels elegant, comfortable, and timeless.
DIY No-Sew Patterned Curtains
Get a custom look for your windows without any sewing.
What You’ll Need:
- Fabric of your choice
- Iron-on hem tape
- An iron and ironing board
- Fabric scissors
- A measuring tape
- Curtain clip rings
Step-by-Step Instructions:
- Measure Your Window: Measure the height and width of your window. You’ll want your fabric panel to be a few inches wider than the window and several inches longer than where you want it to end.
- Cut Your Fabric: Cut your fabric to the size you determined. You’ll likely need two separate panels for one window.
- Create the Hems: This is just like making the no-sew bed runner. On one of the long sides, fold the edge over by about one inch and press it with the iron. Place a strip of hem tape inside the fold and iron it shut.
- Finish All Sides: Do this for all four sides of your fabric panel.
- Hang Them Up: Use curtain clip rings to clip onto the top edge of your new curtain panel. Space them out evenly. Then, just slide the rings onto your curtain rod.
33. The Weighted Blanket Calm

This room is designed for a deep and restful sleep. The main feature is a gray weighted blanket. Its quilted pockets are filled with tiny beads that provide gentle, even pressure, which can feel like a comforting hug.
The style is simple and distraction-free. Heavy blackout curtains create a dark, cave-like environment. The color palette is a calming mix of dark navy and gray. This space is a true sanctuary, optimized for relaxation and stress relief.
DIY Simple Weighted Lap Pad
You can create a small version of a weighted blanket that’s great for relaxing on the couch.
What You’ll Need:
- A piece of durable fabric (like cotton, flannel, or fleece), about 20×40 inches
- Poly-pellets (the little plastic beads used for weighted blankets)
- A sewing machine or needle and thread
- A kitchen scale
- A funnel or a rolled-up piece of paper
- Straight pins and a ruler
Step-by-Step Instructions:
- Create the Bag: Fold your fabric in half so it measures 20×20 inches, with the nice sides facing inward. Sew around two of the three open sides, leaving one side open.
- Turn and Press: Turn the fabric bag right-side out and press the seams flat with an iron.
- Sew the Channels: Using your ruler, draw vertical lines down the bag, about 4 inches apart. Sew along these lines to create long, empty channels.
- Fill the Pockets: This is the tricky part. Use your scale to measure out a small amount of poly-pellets (about 3-4 ounces to start). Use your funnel to pour the pellets into one of the channels.
- Sew it Shut: Shake the pellets down to the bottom. Sew a horizontal line across all the channels, just above the pellets, to trap them in their own little pocket.
- Repeat: Continue this process: add a row of pellets, then sew a horizontal line. Keep going until you are a few inches from the top.
- Close the Top: To finish, fold the raw edges of the opening at the top inward and sew it shut.
34. The Maximalist Toile Dream

More is more in this cheerful and charming bedroom. A light yellow floral quilt is layered over blue and white toile bedding. The mix of patterns and textures is playful and energetic. Ruffles and embroidered pillows add to the delightful clutter.
This maximalist style is all about expressing personality. The wallpaper, the curtains, and even the lampshades are all covered in beautiful patterns. It is a happy, vibrant space that is full of life and character.
DIY Needlepoint “Motto” Pillow
Create a small, personalized pillow with a fun message.
What You’ll Need:
- A small piece of needlepoint canvas
- Embroidery floss or yarn in a few colors
- A tapestry needle (it has a big eye)
- A small pillow form or stuffing
- A piece of fabric for the back of the pillow
Step-by-Step Instructions:
- Plan Your Design: On a piece of graph paper, sketch out a simple word or monogram. Each square on the paper will be one stitch on your canvas.
- Start Stitching: The simplest needlepoint stitch is the “tent stitch.” It’s just a small diagonal stitch that goes over one intersection of the canvas grid.
- Follow Your Pattern: Following your graph paper pattern, start stitching your letters onto the canvas. Use different colors to make it fun.
- Fill in the Background: Once your letters are done, fill in the entire background area with stitches in a single color.
- Make it a Pillow: Once your needlepoint is finished, trim the canvas, leaving a small border. Cut a piece of backing fabric to the same size. Place the two pieces with the nice sides facing each other and sew around three sides. Turn it right-side out, stuff it, and sew the final side shut.
35. The Bright Industrial Loft

Even a room with industrial bones can feel soft and inviting. A super-chunky knit blanket in a neutral beige is the star of the show. It adds a massive dose of texture and comfort, softening the hard lines of the brick walls and metal bed frame.
The style is about creating warmth within a raw space. Sheer white curtains let in lots of natural light. A soft, patterned rug adds another layer of comfort underfoot. The blanket makes this cool loft feel like a cozy home.
DIY Giant Tassel for a Throw Blanket
Add a big, fun tassel to the corner of any blanket.
What You’ll Need:
- Chunky yarn (the same kind used for arm knitting)
- A piece of cardboard (about 6-8 inches wide)
- Scissors
Step-by-Step Instructions:
- Wrap the Yarn: Take your chunky yarn and start wrapping it around the width of your piece of cardboard. Keep wrapping until it’s as thick as you want your tassel to be.
- Tie the Top: Cut a separate piece of yarn about 12 inches long. Slide it between the cardboard and the wrapped yarn at the top. Tie a tight knot. This will hold all the loops together.
- Cut the Bottom: Slide the wrapped yarn off the cardboard. You’ll have a bundle of loops. Use your scissors to cut through all the loops at the bottom.
- Create the “Neck”: Cut another piece of yarn. About an inch down from the top knot, wrap this piece tightly around the tassel several times to create a “neck.” Tie a secure knot.
- Attach and Trim: Use the two long pieces of yarn from the top knot to tie the tassel securely to the corner of your blanket. Trim the bottom of the tassel so all the ends are even.
36. The Southwestern Adobe

This room is filled with the warmth and spirit of the American Southwest. A vibrantly striped wool blanket is the centerpiece. Its bold colors and geometric patterns are a hallmark of the style. It’s layered with rich leather pillows for a mix of textures.
The setting is an adobe home, with thick, curved walls and a corner fireplace. The look is rustic and deeply connected to the desert landscape. Terracotta pots with succulents and handcrafted pottery complete the scene.
DIY Painted Terracotta Pots
Give plain terracotta pots a fun, Southwestern-inspired makeover.
What You’ll Need:
- Plain terracotta pots
- White acrylic craft paint
- A few other colors of craft paint (like black, turquoise, or orange)
- A small paintbrush
- A pencil
Step-by-Step Instructions:
- Paint a Base Coat: Paint the top half or a wide band around your terracotta pot with white paint. You might need two coats. Let it dry.
- Sketch a Design: Use your pencil to lightly draw a simple geometric pattern onto the white paint. Think about simple shapes like triangles, lines, and dots.
- Paint Your Pattern: Use a small paintbrush and your other colors to carefully paint over your pencil lines.
- Let it Dry: Let the paint dry completely. You can seal it with a clear craft sealer if you plan to put it outside. Plant a small cactus or succulent inside to complete the look.
37. The High-Tech Sleep Lab

This room uses technology to create a personalized sleep environment. The bedding itself is part of the system, with sensors that might track your movement or temperature. The clean, simple lines of the blue comforter reflect the room’s modern, scientific approach to rest.
The focus is on data-driven comfort. An adjustable bed allows for customized positions. An air purifier and a temperature regulator create the finest conditions for sleep. This is the future of the bedroom, where technology helps you get the best rest possible.
DIY LED “Art” Display
Create a simple, light-up piece of art for your wall.
What You’ll Need:
- A black canvas or a piece of black foam board
- A string of battery-powered LED “fairy” lights
- A nail or a skewer
- Tape
Step-by-Step Instructions:
- Plan Your Design: Decide on a simple shape or pattern you want to create with your lights. It could be a simple wave, a geometric shape, or even your initial.
- Poke the Holes: Lay your canvas or foam board face up. Use your nail or skewer to gently poke small holes through the board, following the pattern you planned.
- Insert the Lights: Starting from the back, push the tiny LED bulbs through the holes you made, so the little lights are sticking out the front.
- Secure the Wires: Use tape on the back of the board to secure the wires and the battery pack.
- Light it Up: Turn on the lights. You now have a cool, modern piece of light-up art.
38. The Tropical Breeze

This bedroom feels like a breezy, tropical vacation. A chunky beige knit throw adds a layer of cozy, sandy texture. It contrasts beautifully with the crisp white bedding and the leafy green pillows.
The style is light, airy, and full of natural materials. Rattan and wicker are used for the headboard and chairs, bringing an organic feel to the room. Large palm plants and coral decor complete the beachy, relaxed vibe.
DIY Painted Palm Leaf Pillow
Add a touch of the tropics to a plain pillow with fabric paint.
What You’ll Need:
- A plain, light-colored pillow cover
- Green fabric paint
- A small paintbrush
- A piece of cardboard
- A pencil
Step-by-Step Instructions:
- Find a Template: Find a simple outline of a palm leaf or a monstera leaf online and print it out.
- Prepare Your Pillow: Place a piece of cardboard inside your pillow cover. This will prevent the paint from bleeding through to the other side.
- Trace the Leaf: Place your paper leaf template on top of the pillow cover where you want it. Use a pencil to lightly trace the outline onto the fabric.
- Paint it In: Use your paintbrush and the green fabric paint to carefully fill in the shape you traced. Try to make your brush strokes smooth.
- Let it Dry and Set: Let the paint dry completely. Most fabric paints need to be “heat set” to make them permanent. Follow the instructions on your paint, which usually involves ironing the design (with a cloth over it).
39. The Jewel-Toned Luxury

This room is a decadent, glamorous escape. A heavy, dark faux fur blanket adds a final layer of opulent texture. It is draped over rich, emerald green velvet bedding. Jewel tones like purple and sapphire on the pillows add to the luxurious feel.
The style is moody and dramatic. An emerald green tufted headboard, gold accents, and heavy velvet curtains create a sense of theater. Candlelight and modern lighting add a warm, inviting glow. This is a space for feeling pampered and sophisticated.
DIY Gilded Abstract Art
Create a dramatic piece of art with a touch of gold.
What You’ll Need:
- A black or dark-colored canvas
- Gold leaf sheets and gilding adhesive (the special glue)
- Black and blue craft paint
- A paintbrush
Step-by-Step Instructions:
- Create a Textured Background: On your dark canvas, use your paintbrush to create some abstract swishes and marks with your black and blue paint. Don’t cover the whole canvas, just create some movement. Let it dry.
- Apply the Adhesive: Decide where you want your gold accents to be. Use a small brush to dab the gilding adhesive randomly onto the canvas, almost like you’re splattering it.
- Wait for it to Get Tacky: Let the glue dry until it’s clear and sticky (about 15-20 minutes).
- Add the Gold Leaf: Gently press sheets of gold leaf onto the sticky areas. Don’t worry about making it perfect.
- Brush Off the Extra: Use a dry, stiff brush to brush away all the loose bits of gold leaf. The gold will only stick where you put the glue, leaving behind a beautiful, abstract, gilded pattern.
40. The Masculine Industrial Loft

This room has a cool, collected, and masculine feel. A simple wool throw with a fringe adds a soft, classic touch. It breaks up the solid gray bedding and complements the warm leather of the headboard and armchair.
The style is a mix of industrial and classic elements. The textured concrete walls and large windows are industrial. The leather furniture and vintage-style accessories add a timeless quality. It is a sophisticated and comfortable space that feels both modern and established.
DIY Framed Photo Gallery
Create a clean, curated gallery wall for your favorite photos.
What You’ll Need:
- 4-6 simple black frames of the same size
- Your favorite black and white photos
- A ruler or measuring tape
- A pencil
- Nails and a hammer
Step-by-Step Instructions:
- Choose Your Photos: Select a few of your favorite photos. Using all black and white photos creates a very cohesive and sophisticated look. Print them to fit your frames.
- Plan Your Layout: Lay your frames out on the floor. A simple grid is a classic layout that always looks good. Arrange them in two rows of two, or whatever fits your space.
- Measure, Measure, Measure: Decide where you want the gallery to hang on your wall. Use your ruler and pencil to make small marks on the wall where the nail for each frame needs to go. Make sure they are level and evenly spaced.
- Hang the Frames: Gently tap a nail into the wall at each mark you made.
- Place Your Photos: Put your photos in the frames and hang them on the nails. Step back and admire your personal, professional-looking photo gallery.
41. The Cloud-Like Sanctuary

This bedroom is all about soft, luxurious comfort in varying shades of white and cream. A fluffy, faux fur throw blanket is lavishly draped across the bed, inviting you to sink into its softness. It’s layered over crisp white bedding, creating a cloud-like escape.
The overall style is serene and sophisticated, with a focus on texture to create warmth within a neutral palette. An upholstered headboard and a bouclé ottoman add to the plush feel. Abstract art with subtle pastel hints provides a gentle touch of color, enhancing the tranquil atmosphere.
DIY Fluffy Bouclé Ottoman Cover
Give a simple ottoman a cozy, textured makeover with bouclé fabric.
What You’ll Need:
- A plain round or square ottoman
- Bouclé fabric (enough to cover the ottoman plus extra for seams and a slight overhang)
- Fabric scissors
- Hot glue gun and glue sticks (or strong fabric glue)
- Measuring tape or ruler
Step-by-Step Instructions:
- Measure Your Ottoman: Measure the top diameter (for round) or length and width (for square), and the height of your ottoman. Add 2-3 inches to each measurement for seams and stretch.
- Cut Your Fabric:
- For a Round Ottoman: Cut a large circle for the top and a long rectangle for the sides.
- For a Square Ottoman: Cut a square for the top and four rectangles for the sides.
- Attach the Top:
- Round: Place your fabric circle over the top of the ottoman, ensuring it’s centered. Use hot glue around the edge of the top, pulling the fabric taut and pressing it down.
- Square: Place your fabric square over the top, centering it. Secure the edges with glue around the top perimeter.
- Attach the Sides:
- Round: Take your long rectangle. Start at the back seam of the ottoman (if it has one). Apply hot glue to the top edge of the side fabric and press it firmly along the top edge of the ottoman, just below the top piece. Work your way around, keeping the fabric taut.
- Square: Do the same for each of the four side panels, starting and ending at the corners.
- Finish the Bottom Edge: Once all sides are covered, fold the bottom raw edge of the fabric under by about an inch. Secure it with hot glue to the underside of the ottoman. If your ottoman has legs, you can cut slits in the fabric to go around them for a cleaner finish.
Creating a warm bedroom is not a big project. It is about adding thoughtful touches. You see how different layers build on each other.
A chunky knit, a velvet pillow, or a soft rug can transform a space. Each small addition builds a more inviting room.
You have 41 ideas to get started. You do not need to use them all. Pick the ones that feel right for you.
Start with one or two. Make your bedroom a place you truly want to be this winter. A cozy, personal retreat is within your reach.
Key Takeaways
- Texture is Essential: Mixing materials like chunky knits, faux fur, velvet, and linen is the fastest way to add warmth.
- Start with the Bed: The bed is your centerpiece. Layering throws, quilts, and pillows makes an immediate impact.
- Do Not Forget Floors: A soft rug adds a crucial layer of warmth underfoot, making the whole room feel cozier.
- DIY Adds Personality: Simple, handmade projects like a no-sew pillow or a painted pot make your space unique.
- Warmth is Visual: Using warm colors, moody tones, or soft lighting from candles and lamps makes a room feel more comfortable.