When the temperature drops, our homes become our havens. The instinct to hibernate is strong, and no room calls for that cozy retreat more than the bedroom. It should be a place of ultimate comfort, a sanctuary to escape the winter chill.

Giving your personal space a seasonal reset can make all the difference. It doesn’t require a complete overhaul. Instead, small, thoughtful updates can transform your room into a warm and inviting escape.
Ready to create your winter sanctuary? We have gathered 39 warm and inviting updates to inspire you. From simple DIY projects to stylistic themes, there is something here for every taste and budget.
1. Rustic Ski Lodge Charm

A bedroom can feel like a mountain getaway with a few simple touches. This look brings the outdoors inside, creating a space that feels both rugged and comfortable. Heavy, knitted blankets add layers of warmth to the bed. A soft sheepskin rug on the floor provides a pleasant spot for your feet on cold mornings.
The decor tells a story of winter adventures. Vintage ski posters and a pair of old wooden skis create a focal point. Natural elements, like faux antlers, complete the rustic theme. This style makes you want to curl up with a hot drink and watch the snow fall outside your window.
DIY Cozy Candle Tray Instructions
What you will need:
- A wooden or metal tray
- One big candle in a glass jar (called a hurricane glass)
- Two or three small mugs
- A few old books
- A scent diffuser with reeds (it looks like a small bottle with sticks)
Step-by-Step Guide:
- Find Your Base: Start with your tray. Place it on the floor, a sturdy coffee table, or a bench at the end of your bed. Make sure it’s in a safe spot where it won’t get knocked over.
- Place the Big Candle: Put the large candle in its glass holder on one side of the tray. This will be your main light source.
- Add Your Mugs: Next, place your mugs on the tray. You can group them together next to the candle. They are there to make it feel like a warm drink is ready for you.
- Stack Some Books: Slide a couple of books underneath the other side of the tray, letting them stick out a little. This adds height and makes it look more interesting.
- Add the Final Touch: Place your scent diffuser on the tray. The reeds will help make your room smell nice and wintery, like cinnamon or pine. Now you have a beautiful, cozy centerpiece.
2. Serene Scandi Pastel

Soft colors can make a room feel calm and open, even in winter. This style uses gentle pinks, blues, and grays to create a peaceful space. The furniture is simple, with clean lines and light-colored wood. Throws and pillows in different textures add a layer of comfort without clutter.
Everything feels light and airy. Abstract art on the walls adds a touch of modern style. Small strings of fairy lights and candles give off a soft glow, making the room feel warm and inviting. It is a quiet place to relax and unwind after a long day.
DIY Winter Twig Display
What you will need:
- A clean, empty vase
- A handful of small twigs or thin branches from your yard
- A string of battery-powered fairy lights with thin wire
Step-by-Step Guide:
- Gather Your Branches: Go outside and find some interesting-looking twigs. They don’t have to be straight. Look for ones with little buds or curves. Make sure they are dry.
- Arrange the Twigs: Place the twigs inside your vase. Move them around until you like how they look. Some can be tall, and some can be shorter.
- Add the Sparkle: Take your string of fairy lights. Carefully wrap the wire around the twigs, starting from the bottom and going up. Hide the small battery pack behind the vase.
- Light It Up: Turn on the lights. You now have a beautiful, glowing centerpiece that brings a little bit of winter nature inside.
3. Regal Velvet Escape

Deep, rich colors can turn a bedroom into a luxurious retreat. This room uses bold blues and emerald greens to create a dramatic and cozy feel. The velvet headboard is soft to the touch and adds a sense of opulence. Mirrored and gold furniture reflects the light, adding a bit of sparkle.
The room is layered with soft textures. A faux fur throw across the bed invites you to rest. Heavy curtains block out the cold and make the space feel private and secure. It is a bold design that feels both grand and comfortable.
DIY Gilded Leaf Art
What you will need:
- A simple picture frame with glass
- A piece of dark blue or black paper that fits the frame
- A real leaf with a nice shape (like a maple or oak leaf)
- Gold spray paint
- Glue dots or a hot glue gun
Step-by-Step Guide:
- Prepare Your Leaf: Take your leaf outside or to a well-ventilated area. Place it on an old newspaper.
- Make it Golden: Spray the leaf with the gold paint. Make sure you cover the whole front of it. Let it dry completely. This might take about 30 minutes.
- Frame Your Background: Open your picture frame and place the dark paper inside. Clean the glass and close the frame up.
- Attach the Leaf: Place a few small glue dots on the back of your golden leaf. Press the leaf firmly onto the outside of the picture frame’s glass. Now you have elegant, three-dimensional art.
4. Cozy Farmhouse Comfort

A farmhouse bedroom is all about comfort and charm. This style mixes warm colors and rustic textures to create a welcoming space. A quilt with a simple pattern adds a homey touch to the bed, while a chunky knit blanket provides extra warmth. The iron bed frame gives the room a classic, sturdy look.
Natural elements are important here. Framed botanical prints of plants and flowers hang on the wall. An old-fashioned lantern and a metal pitcher add to the rustic feeling. It is a style that feels familiar and deeply relaxing.
DIY Pressed Botanical Art
What you will need:
- Some interesting leaves or flowers from your garden
- A heavy book
- Two pieces of paper towel
- A simple picture frame
- White or off-white paper for the background
Step-by-Step Guide:
- Collect Your Plants: Find some flat leaves or flowers. Make sure they are not wet.
- Press Them Flat: Open your heavy book to the middle. Lay down a paper towel. Arrange your leaves on the paper towel so they are not overlapping. Place another paper towel on top, and then close the book.
- Wait Patiently: Leave the book in a dry spot for about one or two weeks. The weight will press the leaves flat and dry them out.
- Frame Your Art: Once dried, carefully take the leaves out. Arrange them on your background paper and put them in the frame. You’ve created your own beautiful piece of nature art.
5. Earthy Bohemian Haven

Bring the calmness of nature into your bedroom with a bohemian style. This look uses earthy colors like green, brown, and terracotta. The bed is covered in soft linens, and a chunky knit throw adds a cozy texture. A wooden headboard provides a warm, natural backdrop.
Plants are the main decoration here. Hanging plants and potted snake plants breathe life into the space. Macrame wall hangings add a handmade, artistic touch. The result is a room that feels peaceful, grounded, and connected to the outdoors.
DIY Simple Macrame Wall Hanging
What you will need:
- A stick or dowel (about 1 foot long)
- Macrame cord or thick yarn
- Scissors
Step-by-Step Guide:
- Cut Your Cords: Cut 10 pieces of cord, each about 4 feet long.
- Attach Cords to the Stick: Take one piece of cord and fold it in half to make a loop. Place the loop over the stick. Pull the two loose ends through the loop and tighten it. This is called a Lark’s Head knot. Do this with all 10 cords.
- Tie Simple Knots: You can leave the cords hanging straight, or tie a few simple knots. Take two cords next to each other and tie a basic knot, like you would with a shoelace. You can do this a few times down the cords to make a pattern.
- Trim the Ends: Use your scissors to trim the bottom of the cords. You can cut them straight across or in a “V” shape. Hang your new creation on the wall.
6. Midnight Celestial Dream

Transform your bedroom into a magical galaxy. This theme uses a dark color palette of deep blue and black to mimic the night sky. A star projector casts a dreamy starfield onto the ceiling, creating a sense of wonder. Moon and star decorations on the walls enhance the celestial vibe.
Comfort is still key. The bed is piled with plush, dark bedding and shimmering pillows that catch the light. Twinkling string lights around the headboard add a soft, warm glow. This room is a unique escape that inspires dreams of exploring the cosmos.
DIY Clay Moon Phase Garland
What you will need:
- A block of white air-dry clay
- A rolling pin
- A round cookie cutter or a small cup
- A straw or toothpick
- String or twine
- Black and white paint
- A small paintbrush
Step-by-Step Guide:
- Make Your Moons: Roll out the clay until it’s about as thick as a cookie. Use your round cutter to make five circles.
- Shape the Phases: Leave one circle whole for the full moon. Cut a sliver off another circle to make a crescent moon. Cut a little more off the next one. For the half-moon, just cut a circle in half.
- Make Holes for Hanging: Use your straw or toothpick to poke a hole at the top of each clay moon shape.
- Let Them Dry: Let the clay pieces dry completely. This might take a day or two.
- Paint and String: Paint your moons to look like the real phases. Once they are dry, thread your string through the holes to create your garland.
7. Timeless Vintage Romance

Create a bedroom that feels like a page from a classic storybook. This vintage style uses ornate furniture with curved legs and carved details. A metal bed frame adds a touch of old-world elegance. The color palette is soft, with creamy whites, gentle pinks, and warm blues.
Little details make this look special. An old-fashioned telephone, classic alarm clocks, and framed black-and-white photos tell a personal story. A beautiful tray on a stool holds perfume bottles, turning everyday items into a lovely display. The room feels personal, charming, and full of history.
DIY Vintage-Inspired Vanity Tray
What you will need:
- A simple, flat tray (wood or metal)
- A piece of pretty wrapping paper or scrapbook paper
- Scissors and a pencil
- Mod Podge glue or craft glue
- A foam brush
Step-by-Step Guide:
- Trace Your Shape: Place the tray on the back of your decorative paper. Trace around the bottom of the tray with a pencil. Cut the shape out.
- Glue it Down: Use your foam brush to spread a thin, even layer of Mod Podge on the inside bottom of the tray.
- Place the Paper: Carefully place your cut-out paper onto the glue. Smooth it out with your fingers to get rid of any air bubbles.
- Seal It: Brush another thin layer of Mod Podge over the top of the paper. This will protect it. Let it dry completely. Now you have a beautiful tray for your jewelry or perfumes.
8. Modern Industrial Loft

For a clean and sophisticated look, try a modern industrial style. This design uses a cool color palette of grays, black, and white. An exposed brick wall adds texture and a raw, urban feel. The furniture is simple and functional, with clean lines and no extra frills.
A large piece of abstract art serves as the focal point above the bed. The lighting is functional, with a sleek bedside lamp providing light for reading. The result is an uncluttered, calming space that feels both stylish and restful.
DIY Minimalist Abstract Art
What you will need:
- A blank canvas
- Two or three craft paint colors (like black, white, and gray)
- A wide, flat paintbrush
- A paper plate for your paint
Step-by-Step Guide:
- Prepare Your Canvas: Make sure your canvas is clean. You can leave it white or paint the whole thing a solid color like gray and let it dry.
- Add Your First Shape: Squeeze some black paint onto your paper plate. Use your brush to paint a big, bold shape, like a large rectangle or square, on your canvas. Don’t worry about making it neat.
- Layer Another Color: Without cleaning your brush, dip it into the white paint. Paint another smaller shape that overlaps your first one. The colors will mix a little, and that’s okay.
- Finish and Dry: You can add one more small shape with your third color if you like. The key is to keep it simple. Let your painting dry completely before hanging it up.
9. Lush Indoor Jungle

Turn your bedroom into a green sanctuary by filling it with plants. This “jungalow” style creates a space that feels alive and fresh. A bed with a rattan or cane headboard adds a natural, tropical texture. The bedding is in shades of green, tying the whole room together.
The key is to have plants of all shapes and sizes. Hang them from the ceiling, place them on shelves, and group them on the floor. Botanical posters on the wall add to the theme. This style is great for anyone who loves nature and wants to create a vibrant, energizing space.
DIY Easy Rope Plant Hanger
What you will need:
- A small potted plant
- Jute rope or thick yarn
- Scissors
Step-by-Step Guide:
- Cut Your Ropes: Cut eight pieces of rope, each about 3 feet long.
- Tie a Big Knot: Take all eight pieces of rope and tie them together in one big knot at the bottom. Leave a few inches of rope at the end like a tassel.
- Make Your Net: Separate the ropes into four groups of two. About two inches up from the big knot, tie each pair of ropes together in a simple knot.
- Knot Again: Now, take one rope from one pair and one rope from the pair next to it. A few inches up, tie these two ropes together. Do this all the way around. It will start to form a net. Do this one more time.
- Hang It Up: Carefully place your plant pot inside the net. Gather all eight ropes at the top and tie one more big knot to hang it from.
10. Classic Reading Nook

Create a studious and cozy bedroom inspired by classic libraries. This style uses dark wood, rich leather, and traditional patterns like plaid. A tall bookshelf filled with books makes a statement and provides endless entertainment. An armchair in the corner creates a comfortable spot for reading.
The lighting is soft and warm. A green banker’s lamp on the desk is a classic touch that provides focused light for reading or writing. A plaid blanket on the bed adds a layer of warmth and pattern. This room is a warm and inviting haven for any book lover.
DIY Aged Paper for Framing
What you will need:
- A piece of white printer paper
- A shallow dish or baking pan
- A used black tea bag or instant coffee
- Warm water
- An oven
Step-by-Step Guide:
- Make Your “Tea”: Put the warm water in your shallow dish. If you are using coffee, mix in a spoonful. If you are using a tea bag, let it soak in the water for a minute.
- Soak Your Paper: Gently crumple your piece of paper into a ball, then flatten it out again. Place the paper in the tea water and let it soak for a few minutes. The longer it soaks, the darker it will get.
- Time to Bake: Ask a grown-up to help you with this part. Preheat your oven to the lowest temperature (around 200°F or 90°C). Carefully take the wet paper out of the dish and place it on a baking sheet.
- Dry It Out: Bake the paper for about 5 to 10 minutes. Watch it carefully to make sure it doesn’t burn. When it’s dry and looks old, take it out. You can now draw on it or frame it as is.
11. Monochromatic Modern Calm

A bedroom decorated in shades of gray can feel incredibly peaceful. This modern style uses different tones of the same color to create a sophisticated and unified look. The interest comes from mixing textures. A chunky knit blanket on the bed and a soft area rug make the room feel cozy, not cold.
The lines of the furniture are clean and simple. Wall paneling adds architectural detail without adding clutter. This minimalist approach creates a serene atmosphere, a true retreat from the busy world outside.
DIY Textured Vase
What you will need:
- An old glass vase or jar
- A hot glue gun
- Spray paint in a matte gray or stone color
Step-by-Step Guide:
- Make Your Pattern: Make sure your vase is clean and dry. Use your hot glue gun to create a pattern on the outside. You can make stripes, dots, squiggles, or any design you like. Let the glue dry completely.
- Get Ready to Paint: Take your vase and spray paint outside or to a place with good airflow. Put down some old newspaper to protect the area.
- Paint Your Vase: Spray a light, even coat of paint all over the vase. Let it dry for about 20 minutes, then add a second coat to make sure you have covered everything.
- Let it Cure: Let the vase dry completely for a few hours. The hot glue lines will create a raised, textured pattern under the paint.
12. Desert Boho Retreat

Warm up your space with a style inspired by the desert. This look uses earthy colors like terracotta, sand, and blush pink. Natural materials are everywhere, from the woven pendant lights to the wooden crate bed frame. A plush diamond-patterned rug makes the floor soft and inviting.
This style is all about texture and natural elements. Pampas grass in a large vase adds a soft, feathery touch. Himalayan salt lamps cast a warm, soothing glow. It is a relaxed and spiritual space that feels connected to the earth.
DIY Pampas Grass Display
What you will need:
- A tall, clean vase
- A few stems of dried pampas grass
- Hairspray
Step-by-Step Guide:
- Prepare the Grass: Take your pampas grass stems outside. Gently shake each one to fluff it up and get rid of any loose bits.
- Set the Plumes: To stop the grass from shedding everywhere, hold a can of hairspray about a foot away and give each plume a light spray.
- Arrange and Display: Let the hairspray dry for a few minutes. Then, arrange your pampas grass stems in the vase. You have an instant, long-lasting floral arrangement.
13. Hollywood Glam Elegance

Bring a touch of old Hollywood glamour into your bedroom. This style is bright, luxurious, and sophisticated. A neutral color scheme of white, cream, and gray creates a serene backdrop. A tufted headboard and bench add a soft, classic texture.
Mirrored and metallic surfaces are key to this look. A large, ornate mirror makes the room feel bigger, while silver accents on furniture add sparkle. A beautiful chandelier provides a grand focal point. This room is a polished and elegant sanctuary.
DIY Silver Leaf Frame
What you will need:
- A plain wooden picture frame
- A package of silver leaf sheets (from a craft store)
- Special glue for metal leaf, called “sizing”
- A soft, small paintbrush
Step-by-Step Guide:
- Apply the Glue: Paint a thin, even layer of the special sizing glue all over the front of your picture frame. Let it sit for about 15-20 minutes until it feels tacky, like the back of a sticker.
- Add the Silver: Carefully pick up a sheet of silver leaf and lay it on the sticky frame. Gently pat it down with your fingers or a clean, dry paintbrush. Cover the whole frame, overlapping the sheets a little.
- Brush it Off: Once the frame is covered, use your soft brush to gently wipe away all the extra, flaky bits of silver leaf. This will leave a smooth, metallic finish.
- Frame Your Photo: Put your favorite black-and-white photo in the frame for a classic, glamorous look.
14. Wintry Coastal Escape

You can enjoy the feeling of the seaside even in winter. This coastal style uses a cool color palette of stormy blues, grays, and sandy whites. A large mural of a beach scene behind the bed creates a stunning view. Natural textures like driftwood and rope add a rustic, nautical touch.
Layers of chunky knit blankets on the bed make the room feel warm and cozy. Collections of seashells and sea glass in jars serve as beautiful, natural decorations. This style creates a calm and peaceful room that reminds you of the wild beauty of the ocean.
DIY Sea Glass Jars
What you will need:
- One or two large, clear glass jars with lids
- Bags of sea glass (you can buy this at a craft store)
- A few pretty seashells
Step-by-Step Guide:
- Clean Your Jars: Make sure your glass jars are clean and completely dry on the inside.
- Fill Them Up: Carefully pour the sea glass into the jars. You can fill them all the way to the top or just halfway.
- Add a Special Shell: Place one or two of your favorite seashells right on top of the sea glass inside the jar.
- Put a Lid On It: Place the lid on the jar. You can group two or three jars of different sizes together on your floor or on a nightstand for a simple, beach-inspired decoration.
15. English Country Garden

Fill your bedroom with the charm of an English cottage garden. This style uses beautiful floral patterns on everything from the bedding to the headboard and curtains. The colors are soft and pretty, like those of a fresh bouquet of flowers.
The furniture is classic and often painted a creamy white. Framed botanical prints on the walls continue the garden theme. Fresh flowers in a simple pitcher add life and a lovely scent. This look creates a romantic and cheerful room that feels like springtime all year round.
DIY Fabric-Covered Lampshade
What you will need:
- A simple, plain lampshade with straight sides
- A piece of floral fabric, big enough to wrap around the shade
- Fabric spray adhesive
- Scissors
Step-by-Step Guide:
- Cut Your Fabric: Lay your fabric flat. Roll the lampshade along the fabric and trace the shape you need, leaving an extra inch of fabric on all sides. Cut out the fabric piece.
- Spray the Shade: In a well-ventilated area, spray the outside of the lampshade with the fabric adhesive.
- Attach the Fabric: Carefully roll the sticky lampshade onto your fabric piece, smoothing it out with your hands as you go to prevent wrinkles.
- Finish the Edges: Trim any extra fabric. Fold the extra inch at the top and bottom over the edge and into the inside of the shade. You may need a little craft glue to hold it in place.
16. Raw Industrial Comfort

Create a cool, urban vibe with an industrial bedroom style. This look features raw materials like exposed brick, concrete walls, and visible pipes. A simple metal canopy bed frame creates a strong centerpiece. The lighting is simple, often with exposed Edison bulbs hanging from cords.
To make this style cozy, it’s important to add soft textures. A chunky knit blanket, a leather armchair, and a soft shag rug contrast with the hard surfaces. The mix of raw and soft elements creates a space that is both stylish and comfortable.
DIY Wooden Crate Nightstand
What you will need:
- A simple wooden crate (from a craft store)
- Sandpaper
- Wood stain or paint (optional)
- A clean rag
Step-by-Step Guide:
- Smooth the Wood: Use your sandpaper to sand down all the surfaces of the crate, especially any rough spots or splinters.
- Add Some Color (or Not): If you want to change the color, use your rag to apply a thin coat of wood stain, wiping off any extra. Or, you can paint it. If you like the natural wood color, you can skip this step.
- Let it Dry: Let the stain or paint dry completely.
- Set it Up: Turn the crate on its side and place it next to your bed. The inside of the crate works as a shelf for books.
17. Global Bohemian Bazaar

This bedroom is a vibrant explosion of color, pattern, and texture from around the world. The style is all about layering. Rugs are layered on the floor, and textiles with bold patterns are hung on the walls as tapestries. The bed is low to the ground and covered in pillows of all shapes and sizes.
This look feels like a collection of treasures gathered from travels. A peacock chair, macrame hangings, and Moroccan-style lanterns add to the eclectic feel. It is a warm, inviting, and free-spirited space that is full of personality.
DIY Colorful Yarn Tassels
What you will need:
- A few different colors of yarn
- A piece of cardboard (about 4 inches tall)
- Scissors
Step-by-Step Guide:
- Wrap Your Yarn: Hold the end of the yarn against the cardboard. Wrap the yarn around the cardboard about 20 times. The more you wrap, the fluffier your tassel will be. Cut the yarn.
- Tie the Top: Cut a new piece of yarn about 6 inches long. Slide it under all the wrapped yarn at the top of the cardboard and tie a tight knot. This piece will be what you use to hang the tassel.
- Cut the Bottom: Slide the yarn off the cardboard. Use your scissors to cut through all the loops at the bottom.
- Make the “Neck”: Cut one more piece of yarn. A little bit down from the top knot, wrap this piece tightly around all the strands several times and tie a knot to secure it. Trim the ends to make them even. Make a few in different colors!
18. Arctic Minimalist Sanctuary

Create a space of ultimate calm with a minimalist, arctic-inspired design. This room uses a palette of crisp white and cool blue. The furniture is low-profile and simple, which makes the room feel spacious and open. The focus is on clean lines and an uncluttered environment.
Soft textures are used to add warmth to the cool theme. A fluffy faux fur throw and a deep-pile shag rug feel wonderful to the touch. The lighting is soft and indirect, glowing from behind the headboard. It is a serene and restful space, like a quiet winter landscape.
DIY No-Sew Faux Fur Pillow
What you will need:
- A piece of faux fur fabric
- A pillow insert or old throw pillow
- Fabric glue or iron-on hem tape
- Scissors
Step-by-Step Guide:
- Cut Your Fabric: Lay the fabric flat with the furry side down. Place your pillow in the middle. Cut the fabric so you have enough to fold over the pillow from all four sides, like you’re wrapping a present.
- Glue the First Two Sides: Fold two opposite sides of the fabric in to the middle of the pillow so they overlap slightly. Use your fabric glue or iron-on tape to secure the top piece of fabric to the bottom piece.
- Finish the Ends: Now you have an open tube with the pillow inside. For the open ends, fold the fabric corners in neatly (again, like wrapping a present) and use more glue or tape to seal them shut.
- Let it Dry: Press the glued seams firmly and let the glue dry completely. Now you have a new, cozy pillow with no sewing needed.
19. Art Deco Glamour

Step back into the roaring twenties with a glamorous Art Deco bedroom. This style is all about bold patterns, luxury, and symmetry. A striking geometric wallpaper creates a dramatic backdrop. The headboard has a beautiful scalloped shell shape, a classic Art Deco motif.
Sunburst mirrors and metallic light fixtures add sparkle and shine. Mirrored nightstands reflect the light and add to the opulent feel. This design is confident and sophisticated, creating a bedroom that feels like a suite in a grand hotel.
DIY Art Deco Sunburst Mirror
What you will need:
- A small, round craft mirror
- Bamboo skewers or thin wooden dowels
- A hot glue gun
- Gold spray paint
Step-by-Step Guide:
- Paint Your “Rays”: Lay your skewers on some newspaper and spray paint them gold. Let them dry completely, then flip them over and paint the other side.
- Glue Your Rays: Turn your mirror over so the back is facing up. Use your hot glue gun to glue the skewers to the back of the mirror, pointing outwards like sun rays.
- Make a Pattern: Glue on long skewers first at the 12, 3, 6, and 9 o’clock positions. Then fill in the spaces with more long skewers. You can then glue shorter skewers in between the long ones to create a pattern.
- Hang It Up: Let the glue dry completely. You can glue a small loop of ribbon to the back for hanging.
20. Preppy Plaid Hideaway

Create a timeless and cozy bedroom with a classic, preppy style. This look is built around traditional patterns, especially plaid. A plaid duvet cover in navy and green sets a comfortable, collegiate tone. A cable-knit throw blanket adds another layer of classic texture.
The room feels established and smart. Framed maps on the wall suggest a love of travel and history. A brass bed frame and leather accents add warmth and a sense of quality. This is a comfortable and distinguished style that never goes out of fashion.
DIY Stenciled Monogram Pillow
What you will need:
- A plain, light-colored pillow cover
- A letter stencil for your initial
- Black or navy fabric paint
- A stencil brush or a small sponge
- A paper plate
Step-by-Step Guide:
- Get Ready: Place a piece of cardboard inside your pillow cover to stop the paint from bleeding through.
- Position Your Stencil: Place your letter stencil in the middle of the pillow cover. You can use a little bit of tape to hold it in place.
- Paint Your Letter: Squeeze a small amount of fabric paint onto your paper plate. Dip your stencil brush or sponge into the paint, then dab most of it off on the plate. You want a “dry” brush.
- Dab, Don’t Brush: Use an up-and-down dabbing motion to apply the paint inside the stencil. This prevents the paint from getting under the edges. Let it dry, then carefully remove the stencil.
21. Mid-Century Modern Warmth

This style brings back the cool, clean lines of the 1950s and 60s. The furniture is made of warm-toned wood with simple, tapered legs. A mix of textures, like a soft gray blanket and a shaggy rug, keeps the look from feeling too stark. Color is used in small, confident bursts.
The decor is playful and artistic. Pillows with geometric patterns and abstract art add personality. Unique shapes, like a starburst clock and interesting vases, serve as focal points. It is a style that feels both retro and completely current.
DIY Geometric Art
What you will need:
- A blank canvas
- Painter’s tape
- Three or four craft paint colors that you like
- A paintbrush
Step-by-Step Guide:
- Create Your Design: Use the painter’s tape to make a pattern of lines and shapes on your canvas. Press the edges of the tape down firmly.
- Paint Your Shapes: Paint inside the taped-off sections with your different colors. Don’t worry about being too neat, the tape will keep your lines clean.
- The Big Reveal: While the paint is still a little wet, carefully peel off the painter’s tape.
- Let it Dry: Let your canvas dry completely. You now have a sharp, modern piece of art.
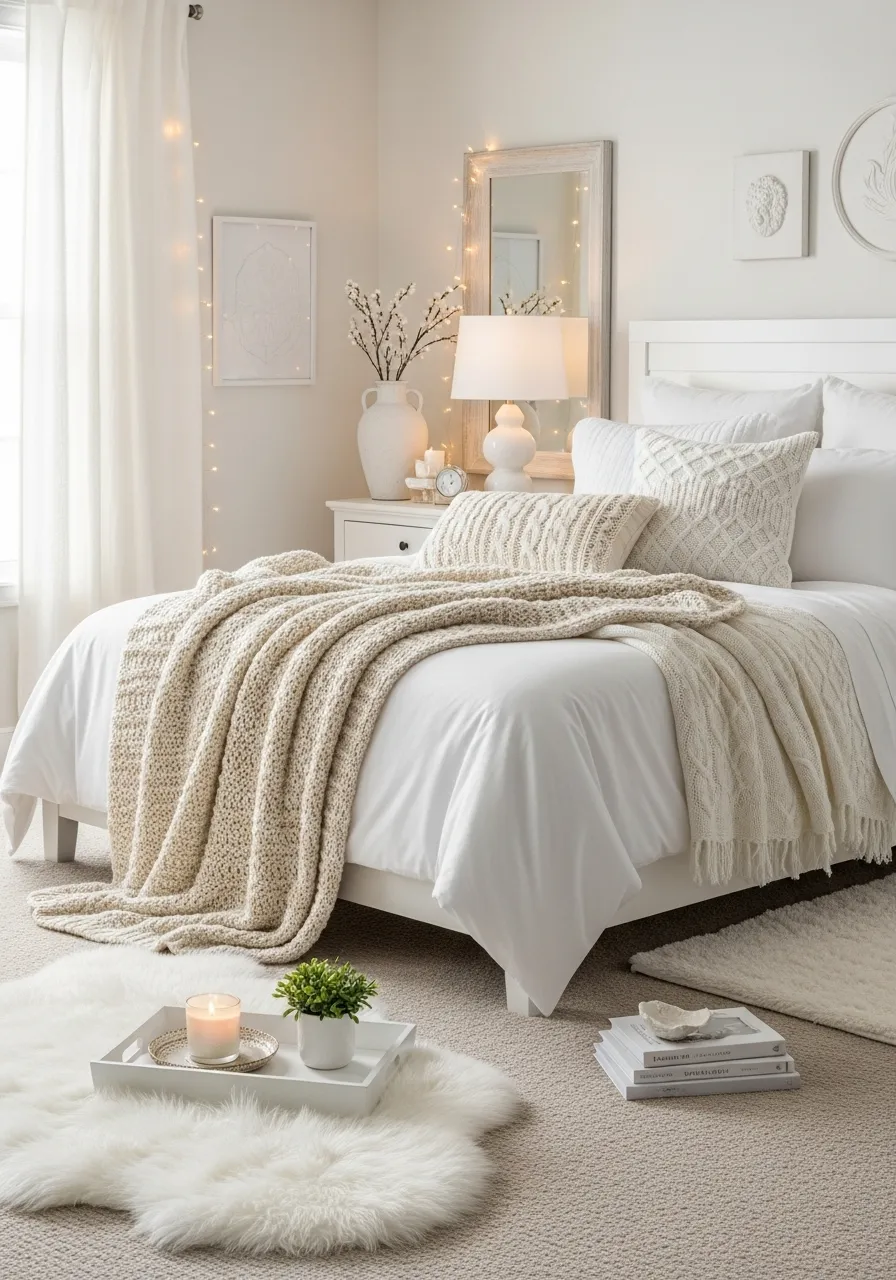
22. Winter White Wonderland

An all-white bedroom can be a peaceful escape during the winter months. This look is about layering different shades of white and cream to create a soft, serene space. The key is to use a lot of different textures to add warmth and interest.
A chunky knit blanket, a fluffy faux sheepskin rug, and textured pillows make the room feel incredibly cozy. Soft light from a simple lamp and twinkling fairy lights adds to the dreamy atmosphere. It is a clean, calm, and inviting room that feels like a soft cloud.
DIY Yarn-Wrapped Mirror
What you will need:
- A simple round or square mirror with a frame
- A ball of chunky, cream-colored yarn
- A hot glue gun
Step-by-Step Guide:
- Start Wrapping: Put a small dot of hot glue on the back of the mirror frame to secure the end of the yarn.
- Keep Going: Begin wrapping the yarn around the frame. Keep the strands close together so none of the original frame shows through.
- Add Glue as You Go: Every few inches, add another small dot of hot glue on the back of the frame to keep the yarn tight and in place.
- Finish It Off: When the whole frame is covered, cut the yarn and secure the final end on the back with a good amount of glue.
23. Enchanted Forest Retreat

Bring the deep, quiet feeling of a forest into your bedroom. This style uses dark, moody colors like forest green and charcoal gray. A large wall mural of a misty woods creates a dramatic and immersive backdrop. The furniture is made from natural, rustic wood.
Lighting is kept low and warm, with exposed-bulb lamps casting a soft glow. Botanical posters of ferns and mushrooms add to the woodland theme. The space feels mysterious, natural, and deeply calming, like a secret cabin hidden among the trees.
DIY Mossy Terrarium
What you will need:
- A clean, clear glass jar or container
- A few small pebbles or rocks
- A small amount of activated charcoal (from a pet store)
- Potting soil
- A piece of moss from your yard or a garden store
Step-by-Step Guide:
- Add Drainage: Place a one-inch layer of pebbles at the bottom of your jar. This helps with water drainage.
- Filter the Water: Sprinkle a thin layer of charcoal over the pebbles. This will help keep the water clean.
- Put in the Soil: Add a layer of potting soil, about two inches deep.
- Plant Your Moss: Gently place your piece of moss on top of the soil. You can add a small rock or a tiny toy figurine to create a scene. Lightly spray it with water and put the lid on.
24. Parisian Chateau Elegance

This style captures the romance and grandeur of an old French chateau. The furniture is ornate, with beautifully carved wood and curved lines. A large, gilded mirror and a sparkling crystal chandelier serve as magnificent focal points. The color palette is soft and muted, with shades of gray and antique white.
The room feels historic and luxurious. Soft fabrics, like the upholstered headboard and bench, add comfort. Stacks of old books and elegant candelabras complete the look. It is a timeless and sophisticated style that is full of grace.
DIY Distressed Mini Frame
What you will need:
- A small, plain wooden picture frame
- Two colors of craft paint (one dark, one light)
- A paintbrush
- A piece of sandpaper
Step-by-Step Guide:
- Paint the First Coat: Paint your whole frame with the dark color of paint. Let it dry completely.
- Paint the Second Coat: Now, paint over the dark color with your light-colored paint. Let this coat dry completely, too.
- Make it Look Old: Take your sandpaper and gently rub it along the edges and raised details of the frame. The top layer of paint will come off, revealing the darker color underneath.
- Wipe it Down: Use a soft cloth to wipe away any paint dust. You’re left with a beautiful, vintage-looking frame.
25. The High-Tech Haven

This bedroom combines modern comfort with smart technology. The style is clean and minimalist, with a cool color palette of gray and blue. An adjustable bed allows for customized comfort, while LED strip lighting behind the headboard provides ambient mood lighting.
The focus is on function and creating an optimized environment for sleep and relaxation. Smart devices like air purifiers and sunrise alarm clocks help improve well-being. This is a bedroom for the future, designed for ultimate convenience and rest.
DIY Wooden Block Charging Stand
What you will need:
- A small block of wood (like a piece of a 4×4 post)
- Sandpaper
- A drill (with an adult’s help)
- Mineral oil or wood wax (optional)
Step-by-Step Guide:
- Sand it Smooth: Use your sandpaper to make all the sides and edges of the woodblock nice and smooth.
- Drill the Slot: Ask an adult to help you drill a shallow hole or a wide slot into the top of the block. This is where your phone will sit.
- Make a Cord Hole: Have the adult drill another, smaller hole from the back of the block that connects to the bottom of the phone slot. This is for your charging cable.
- Finish the Wood: You can rub a little mineral oil or wax into the wood with a cloth to protect it and make it look nice. Thread your cable through, and your stand is ready.
26. Global Artisan Collection

This bedroom is a celebration of handmade crafts from around the world. The style is colorful, textured, and deeply personal. A carved wooden panel and a woven textile create beautiful focal points on the walls. The bedding features a mix of patterns, from block prints to intricate embroidery.
The room feels like a well-traveled soul’s personal collection. A Moroccan-style lantern hangs from the ceiling, casting intricate shadows. The furniture is simple and
rustic, letting the vibrant textiles be the stars. It is a warm, inviting, and wonderfully eclectic space.
DIY No-Sew Tie-Dye Pillowcase
What you will need:
- A plain white cotton pillowcase
- A tie-dye kit with a few colors
- Rubber bands
- A plastic bag
Step-by-Step Guide:
- Twist and Tie: Lay your pillowcase flat. Pinch the center and twist it into a spiral. Wrap a few rubber bands around the twisted fabric to hold it in a tight bundle.
- Add the Color: Following the dye kit instructions, squirt different colors of dye onto different sections of your bundled pillowcase.
- Let it Sit: Place the dyed bundle into a plastic bag and let it sit for 6-8 hours for the colors to set.
- Rinse and Wash: Take the bundle out of the bag. While the rubber bands are still on, rinse it under cold water until the water runs clear. Then, take the bands off, and wash the pillowcase by itself in your washing machine.
27. Japandi Minimalist Comfort

This style is a beautiful blend of Japanese and Scandinavian design. The room feels calm, simple, and connected to nature. The color palette is very neutral, with shades of beige, cream, and soft brown. Textures, like a super chunky knit blanket and a bouclé armchair, add warmth and coziness.
The focus is on natural materials and simple shapes. Paper lanterns provide a soft, diffused light. The art is minimal and textural. This is a serene and uncluttered space that encourages rest and mindfulness.
DIY Textured Plaster Art
What you will need:
- A small, blank canvas
- Pre-mixed wall joint compound or plaster
- A putty knife or an old gift card
Step-by-Step Guide:
- Get Your Plaster: Scoop some of the joint compound onto your canvas.
- Make Your Texture: Use your putty knife or gift card to spread the compound across the canvas.
- Create a Pattern: You can make swoops, ridges, or any pattern you like. There’s no right or wrong way to do it. Have fun making interesting textures.
- Let it Dry: Let your plaster art dry completely. This might take a full day. Once it’s hard, you can hang it on the wall.
28. Dreamy Canopy Escape

A simple curtain canopy can transform a bed into a magical and romantic retreat. This look uses sheer white fabric to create a light and airy feel. The curtains are tied back during the day and can be closed at night for a sense of privacy.
Fairy lights are woven through the top of the canopy, casting a soft, starry glow. The bedding is soft and inviting, with plush pillows and cozy faux fur and knit blankets. This simple addition creates a beautiful focal point and makes the entire room feel more special.
DIY No-Frame Bed Canopy
What you will need:
- Four small, strong hooks and ceiling anchors
- Two long, sheer curtain panels
- A drill (with an adult’s help)
Step-by-Step Guide:
- Mark Your Spots: With an adult’s help, measure a rectangle on your ceiling that is slightly larger than your bed. Mark where the four corners are.
- Install the Hooks: The adult will drill holes at the marks and install the ceiling anchors and hooks. Make sure they are secure.
- Drape the First Panel: Take one curtain panel. Thread one corner through a hook at the head of the bed, and the other corner through the hook on the same side at the foot of the bed.
- Drape the Second Panel: Do the same thing on the other side of the bed with the second panel. The fabric should swoop down gracefully in the middle.
29. The Modern Gentleman’s Quarters

This bedroom has a sophisticated and tailored feel. The dark, moody wall color creates a cozy and intimate atmosphere. A mix of leather, wood, and textured fabrics like wool gives the room a classic masculine quality. The decor is curated and intentional.
Framed architectural drawings and maps add a scholarly touch. A valet stand is a classic piece for keeping clothes neat. The bar cart adds a touch of hospitality and old-world charm. This is a polished and comfortable space for the modern man.
DIY Faux Leather Valet Tray
What you will need:
- A square piece of faux leather or thick felt (about 8×8 inches)
- Scissors
- A ruler
- A hot glue gun or strong fabric glue
Step-by-Step Guide:
- Mark Your Corners: Use your ruler to measure and draw a small 1-inch square in each of the four corners of your fabric piece.
- Make Your Cuts: Cut a straight line from the edge of the fabric to the inner corner of the square you drew. Do this on one side of each corner square.
- Form the Walls: Pick up one corner. Overlap the two flaps you created by cutting the line. This will make the corner stand up and form a tray wall.
- Glue it Together: Place a line of hot glue on the bottom flap and press the top flap firmly onto it. Hold for a few seconds. Do this for all four corners, and your tray is complete.
30. Warm Terracotta Dreams

This bedroom is wrapped in the warm, earthy tones of a desert sunset. A rich terracotta-colored accent wall creates a cozy and inviting atmosphere. The furniture is made of light-colored, natural wood and rattan, which keeps the look feeling fresh and modern.
Natural textures are everywhere. Large vases filled with fluffy pampas grass, woven pillows, and a jute rug add layers of interest. Abstract art on the wall pulls all the warm colors together. This is a stylish and comforting space that feels grounded and serene.
DIY Clay Pinch Pot
What you will need:
- A small block of terracotta-colored air-dry clay
- A small bowl of water
Step-by-Step Guide:
- Make a Ball: Take a piece of clay and roll it between your hands to make a smooth ball about the size of a golf ball.
- Start Pinching: Push your thumb into the center of the ball.
- Form Your Pot: Gently pinch the clay between your thumb and fingers, slowly rotating the ball. As you pinch and turn, the walls of the pot will get thinner and taller.
- Smooth and Dry: Dip your finger in a little water and smooth out any cracks or rough spots. Let your pinch pot sit for a day or two to dry completely. It’s a great spot to hold rings or small treasures.
31. Playful Pop Art Paradise

This bedroom is full of energy and fun. The style is defined by its bright colors, playful shapes, and modern art. A soft, curved headboard creates a gentle focal point, while a neon sign adds a touch of vibrant personality. The room doesn’t take itself too seriously.
Comfort comes in quirky forms. Unique knot pillows and colorful floor cushions make the space feel relaxed and ready for lounging. A bold, multicolored blanket adds another layer of cheerful pattern. It is a creative and happy space that is sure to make you smile.
DIY No-Sew Knot Pillow
What you will need:
- An old pair of leggings or a few pairs of long tube socks
- Soft stuffing (like Poly-Fil)
- A rubber band or hair tie
Step-by-Step Guide:
- Make Your Tube: If using leggings, cut off the waistband. You now have two long fabric tubes.
- Stuff the Tube: Take one leg and start pushing stuffing inside. Use a ruler or a stick to pack it in firmly until the whole tube is full and plump.
- Tie it Off: Use a rubber band or hair tie to tightly close the open end of the tube.
- Tie Your Knot: Now, simply tie your long, stuffed tube into a pretzel-like knot. You can look up “monkey’s fist knot” or “celtic knot” for ideas. Tuck the ends in, and you have a fun new pillow.
32. The Sophisticated Library Bedroom

This bedroom is a calm and intelligent retreat. The design centers around a beautiful built-in bookcase that surrounds the bed, turning the whole wall into a personal library. The color palette of muted blues and grays is soothing and sophisticated.
Comfort and style are balanced. A plush upholstered headboard invites you to lean back and read. Modern, textured art adds interest without overwhelming the space. This room is a quiet haven, made for relaxing with a good book on a cold winter’s night.
DIY Textured Canvas Art
What you will need:
- A blank canvas
- Pre-mixed wall joint compound or plaster
- A putty knife
- One or two shades of gray or blue craft paint
Step-by-Step Guide:
- Add Texture: Scoop some joint compound onto your canvas. Use the putty knife to spread it around, creating a thick, textured layer. You can make lines, swirls, or rough patches. Let it dry completely.
- Paint Your Base: Once the texture is hard, paint the entire canvas with your lighter shade of paint. Let it dry.
- Add Dimension: Water down your darker paint just a little bit. Brush this watery paint over the whole canvas, then quickly wipe it off the high spots with a damp cloth.
- Let it Dry: The darker paint will stay in the low spots, making your texture pop. Let it dry, and your custom art is ready to hang.
33. Rustic Reclaimed Charm

This bedroom tells a story with every piece. The unique headboard, made from a collection of old, weathered doors, is the heart of the room. This “found object” style celebrates the beauty of imperfections and items with a past. It creates a space that feels one-of-a-kind.
The decor is a mix of rustic and vintage finds. A patchwork quilt adds a touch of handmade comfort. Old suitcases are cleverly stacked to serve as a bedside table. The room feels cozy, creative, and full of character.
DIY Stacked Suitcase Stand
What you will need:
- Two or three old, hard-sided suitcases of different sizes
- A clean cloth
Step-by-Step Guide:
- Clean Your Cases: Wipe down the outside of your suitcases with a damp cloth to get rid of any dust or grime. Let them dry.
- Find a Good Spot: Choose a spot next to your bed for your new stand.
- Stack Them Up: Place the largest suitcase on the bottom. Center the next-largest suitcase on top of it.
- Add the Final Layer: Place the smallest suitcase on the very top. Make sure your stack is stable and doesn’t wobble. You can now use the top as a surface for a lamp, a book, or a cup of tea.
34. Sunrise Serenity

Wake up in a room that feels like a warm sunrise. This style uses a soft and optimistic color palette of peach, pink, and sunny yellow. A painted arch behind the bed mimics the rising sun and creates a beautiful, gentle focal point. The room is filled with a happy, welcoming glow.
The decor is light and airy. A round mirror reflects the light and enhances the feeling of brightness. A sunrise alarm clock on the nightstand adds to the theme and helps you wake up naturally. This bedroom is a cheerful and serene space to start your day.
DIY Painted Wall Arch
What you will need:
- A can of paint in a warm color
- A paintbrush and a small roller
- A pencil and a long piece of string
- A thumbtack
- Painter’s tape
Step-by-Step Guide:
- Find Your Center: Decide how wide you want your arch to be. Mark the center point on the wall, near the floor.
- Draw the Curve: Tie the pencil to one end of the string. Hold the other end of the string on your center mark. Stretch the string tight to the desired width of your arch and draw the curved top part.
- Tape the Sides: Use your painter’s tape to make straight, vertical lines from the ends of your curve down to the floor.
- Time to Paint: Use your paintbrush to carefully paint along the edges of the tape and the curved line. Then, use your roller to fill in the rest of the arch. Let it dry, and then add a second coat.
35. Layered Neutral Luxury

This bedroom is a masterclass in quiet luxury. The style is built on a simple, neutral color palette of beige, taupe, and cream. By layering these soft tones in different textures, the room feels incredibly warm, sophisticated, and inviting. It is a calm and elegant retreat from the world.
Comfort is the highest priority. Soft, high-quality fabrics are used for the bedding and throws. The lighting is gentle and diffused, adding to the serene atmosphere. This is a timeless look that proves simplicity can be incredibly beautiful and comforting.
DIY Calming Linen Spray
What you will need:
- A small, clean spray bottle
- Distilled water
- Witch hazel or vodka
- Your favorite essential oil (like lavender or chamomile)
Step-by-Step Guide:
- Add the “Fixer”: Fill your spray bottle about one-quarter full with the witch hazel or vodka. This helps the oil and water mix.
- Add Your Scent: Add about 10-15 drops of your chosen essential oil.
- Fill it Up: Fill the rest of the bottle with distilled water, leaving a little space at the top.
- Shake and Spray: Screw the top on and shake the bottle well. You can lightly mist your pillows and blankets a few minutes before bed to create a relaxing scent.
36. Graphic Glamour

This bedroom combines bold graphics with a touch of glamour. A high-contrast black and white color scheme creates a sharp, modern look. The strong lines of the black canopy bed anchor the room, while a geometric rug adds a layer of dynamic pattern.
The style feels like a chic art gallery. A curated wall of black and white photographs adds a personal and sophisticated touch. A single pop of color, like a bright yellow pillow, keeps the design feeling fresh and exciting. This is a confident and stylish space.
DIY Black and White Gallery Wall
What you will need:
- Three to five black frames of the same size
- Your favorite black and white photos or art prints
- A measuring tape and a pencil
- A level
- Picture hanging nails and a hammer
Step-by-Step Guide:
- Plan Your Layout: Lay your frames on the floor and arrange them how you want them to look on the wall. A simple straight line above the headboard works well.
- Measure and Mark: Decide where you want the center of your arrangement to be. Measure and mark that spot on the wall. Then, measure and mark where each nail should go, using your level to make sure they are all in a straight line.
- Hang the First Frame: Gently hammer in the nail for your center frame and hang it up.
- Hang the Rest: Hammer in the rest of your nails and hang the other frames, using your level to check that each one is straight.
37. Wabi-Sabi Simplicity

This bedroom finds beauty in simplicity and imperfection. The “wabi-sabi” style is about appreciating natural, humble, and handmade things. The room feels calm and soulful. The colors are muted and earthy, and the textures are raw and natural.
Everything has a purpose and a quiet beauty. Rumpled linen bedding, a simple wooden stool, and a pendant light made of fabric or paper feel authentic and unpretentious. A vase of dried branches brings a touch of nature indoors. This is a peaceful space for quiet reflection.
DIY Dried Branch Wall Hanging
What you will need:
- An interesting-looking branch from your yard
- A few dried flower stems or sprigs of lavender
- Thin twine or string
- Scissors
Step-by-Step Guide:
- Find Your Branch: Look for a branch that is strong but not too heavy. Make sure it is completely dry.
- Create a Hanger: Cut a piece of twine about twice as long as your branch. Tie each end of the twine securely to the ends of the branch. This will be your hanger.
- Add Your Flowers: Take your dried flower stems and use small pieces of twine to tie them onto the branch.
- Hang and Admire: You can space them out or group them together. Hang your simple, natural creation on the wall above your bed.
38. Moody Floral Romance

This bedroom is dramatic, romantic, and cozy all at once. A dark, floral wallpaper creates a stunning feature wall that feels like a classic painting. The pattern is repeated in the bedding, wrapping the room in lush, beautiful blooms.
The dark color palette makes the space feel intimate and enveloping. Gold accents in the mirrors and lamps add a touch of warmth and luxury. Soft, ambient lighting from shaded lamps creates a soft glow, making this the perfect romantic escape.
DIY Gold-Trimmed Votive Holders
What you will need:
- A few small, clear glass candle holders (votives)
- Gold metallic craft paint
- A small, thin paintbrush
Step-by-Step Guide:
- Clean Your Glass: Make sure your glass votive holders are clean and dry.
- Get Your Paint Ready: Shake your gold paint well and put a small amount on a paper plate.
- Paint the Rim: Carefully dip your thin paintbrush in the gold paint. Slowly and steadily, paint a thin gold line around the top rim of the glass holder.
- Let it Dry: Let the paint dry completely. You can also add a gold stripe to the bottom for extra detail. Place small tea light candles inside for a beautiful, moody glow.
39. The Layered Rug Look

Add instant warmth and texture to your bedroom by layering rugs. This technique creates a cozy, eclectic, and well-traveled look. Start with a large, neutral rug made of a natural fiber like jute or sisal to cover most of the floor.
Then, add smaller, more colorful, and patterned rugs on top. You can overlap them at different angles to create a relaxed, bohemian feel. This is a great way to add personality to a room and make it feel extra soft and comfortable underfoot.
DIY No-Sew Faux Sheepskin Stool Cover
What you will need:
- A small footstool or ottoman
- A small faux sheepskin rug
- Scissors
- A hot glue gun or strong fabric glue
Step-by-Step Guide:
- Position Your Rug: Turn your stool upside down and place it in the center of the back of your faux sheepskin rug.
- Trim the Excess: Trim the rug so that you have about four inches of extra material all the way around the stool’s top.
- Start Gluing: Run a line of hot glue along one edge of the underside of the stool top. Pull the faux sheepskin tight and press it into the glue.
- Finish the Job: Continue working your way around the stool, pulling the fabric tight and gluing it to the underside until the entire top is covered smoothly.
Creating a bedroom that feels like a warm hug during the coldest months is simpler than you might think. As we have seen, a winter reset is not about spending a lot of money, but about being intentional with colors, textures, and light.
Whether you are drawn to the rustic charm of a ski lodge or the clean calm of a Japandi retreat, the goal is the same: to create a space that feels personal and deeply restful. So, pick a favorite idea, try a simple DIY project, and enjoy your new cozy sanctuary all season long.
Key Takeaways
- Layering is Key: The easiest way to add warmth is by layering textures. Think chunky knit blankets, velvet pillows, faux fur throws, and multiple rugs.
- Embrace Warm Lighting: Swap out cool-toned light bulbs for warmer ones. Add candles, fairy lights, and shaded lamps to create a soft, inviting glow.
- DIY Adds Personality: You don’t need to buy new things to make a big impact. Simple, handmade projects make your space unique and reflect your personal style.
- Nature is Nurturing: Bringing natural elements indoors—like plants, wood, stone, and dried branches—can create a calming and grounded atmosphere.