Do you struggle to shut your closet door every morning? If pulling out one sweater causes an avalanche of clothes, you are not alone. That feeling of clutter and chaos prevents you from truly enjoying your wardrobe and simplifies the daily process of getting dressed.

The start of a new year—or any season—is the excellent time to tackle that overwhelming clutter head on. We spent weeks researching the most creative, high efficiency storage solutions designed by professional organizers. Forget quick fixes; we found long term, structural solutions.
This guide shares 39 genius wardrobe organization systems, complete with materials lists and easy DIY steps. Get ready to transform your stuffed closet into a calm, functional, and organized space you love.
1. Modular Wood and Fabric Closet System

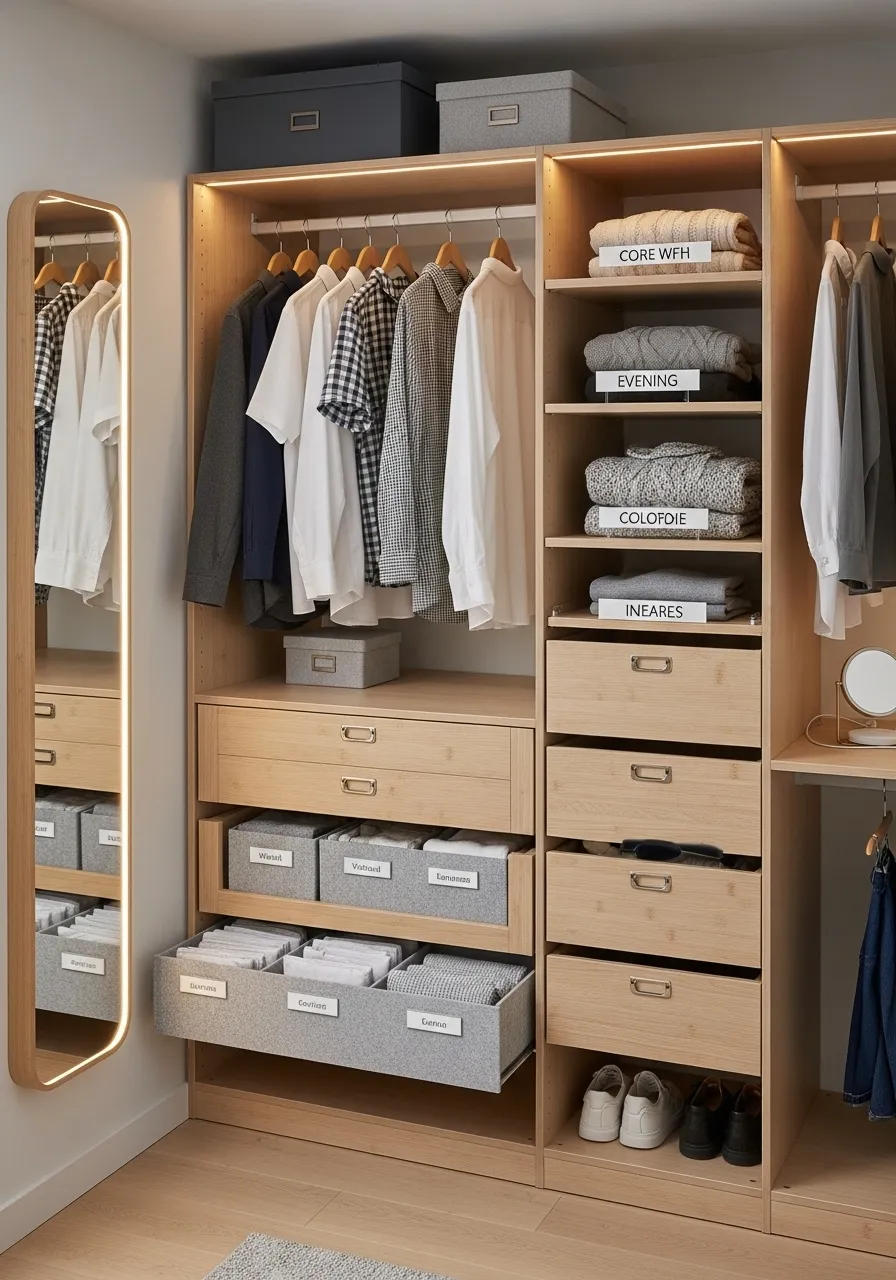
Are you tired of rummaging through stacks of disorganized clothes? This modular system showcases how a mix of custom drawers, open shelving, and hanging space can revolutionize your daily routine. Notice how the light-toned wood creates a calm, spa-like environment, making getting dressed a pleasurable experience rather than a chore.
The brilliance of this design lies in its segmented approach. Upper hanging rails handle crisp shirts and jackets, while deep, sturdy drawers below are reserved for items you want neatly tucked away. Clever use of fabric storage bins, clearly labeled with categories like “Weekend” or “Work Essentials,” prevents small items from becoming a jumbled mess. Furthermore, incorporating open shelves for folded sweaters ensures garments breathe and remain visible. A full-length, illuminated mirror adds function and light, making this a true dressing sanctuary. This smart combination of storage types is exactly how you tame an unruly wardrobe.
???? DIY Closet Segmentation Project
This project focuses on adding modular storage components—shelves, drawers, and fabric bins—to an existing open closet space to mimic the segmented look.
???? Material Required
- Plywood or melamine boards (3/4 inch thickness) for new shelves and drawer facings
- Wooden drawer slides (full extension recommended)
- Drawer pulls or handles (matching metallic finish)
- Pre-cut or foldable fabric storage bins with label holders
- Wood screws (various lengths)
- Wood glue
- Shelf pins or brackets (if adding adjustable shelves)
- Primer and paint or wood stain/sealer
????️ Equipment Required
- Measuring tape
- Stud finder and level
- Power drill and various drill bits
- Screwdriver set
- Circular saw or table saw (unless wood is pre-cut)
- Clamps
- Safety glasses and ear protection
???? DIY Instruction Step by Step
- Measure and Plan the Zones: First, completely empty the closet. Accurately measure the height, width, and depth of the existing space. Decide exactly where your hanging, shelving, and drawer zones will be located. Sketch a simple diagram showing the dimensions of each new shelf and drawer unit.
- Cut or Order Wood Pieces: Based on your plan, cut the plywood or melamine into the required sizes for the shelf pieces and the drawer box components (front, back, sides, and base). Important: If you are not experienced with saws, have a local hardware store cut the wood for you.
- Assemble the Shelving Unit: Determine the height for your fixed shelves. Mark the wall studs and drill pilot holes. Secure shelf brackets or cleats directly into the wall studs using long screws. Place your pre-cut shelves onto these supports. If using adjustable shelf pins, first drill small holes along the sides of the closet interior and insert the pins before setting the shelves.
- Construct the Drawer Boxes: Use wood glue and small screws to assemble the four sides of each drawer box, ensuring they are square. Attach the drawer base (usually a thinner piece of wood) to the bottom. Once the boxes are dry, attach the decorative drawer facing (the front panel you see) from the inside.
- Install Drawer Slides: Following the manufacturer’s instructions, mount one part of the drawer slide system inside the closet space where the drawers will sit, ensuring it is perfectly level. Attach the corresponding part of the slide system to the sides of the newly built drawer boxes. Test the slides to confirm smooth movement.
- Insert Drawers and Hardware: Carefully insert the assembled drawers onto their slides. Screw the decorative pulls or handles onto the drawer facings.
- Organize with Fabric Bins: Place your new fabric storage bins onto the shelves or inside the open drawer boxes. Use the label holders to clearly mark the contents, such as “Socks,” “Belts,” or “Gym Wear.” This labeling step is crucial for maintaining long term organization.
- Final Touches: Wipe down the surfaces and begin reloading your clothes, keeping similar items grouped together in their newly designated zones.
2. Industrial Pipe and Open Shelf Wardrobe

Seeing this beautifully organized space demonstrates the power of utilizing vertical room. This system uses sturdy, industrial style piping paired with warm wooden shelves, giving the room a modern, loft apartment feel. It’s an exceptional solution for a bedroom that lacks built-in closet space or for those who prefer to see their entire collection.
Notice the clever use of color coordination, particularly with the bright shirts arranged in a stunning rainbow gradient—this immediately elevates the aesthetic and makes outfit selection faster. Double hanging rods maximize the storage capacity for shirts and trousers, preventing clothes from becoming crushed. The central multi level shelving unit offers a home for folded essentials, shoes, and small accessories, keeping everything contained. Furthermore, the storage boxes placed on the top shelves hide items that are used less frequently, maintaining a clean visual line. This open design is truly a masterclass in making organization attractive.
???? DIY Industrial Pipe Clothes Rack
This project involves creating a free standing or wall supported open wardrobe unit using metal pipes and wooden boards.
???? Material Required
- Black metal piping (3/4 inch or 1 inch diameter), cut to desired lengths for vertical supports and horizontal hanging rods
- Metal pipe fittings (elbows, tees, and floor flanges) to connect the pipes and secure them to the wall/floor
- Wooden boards (1 inch thickness) for shelves (e.g., pine or oak)
- Wood screws and wall anchors (heavy duty, appropriate for your wall material)
- Primer and spray paint (optional, if changing the pipe color)
- Wood stain or clear sealant for the shelves
????️ Equipment Required
- Measuring tape
- Level and stud finder
- Pipe wrench or channel locks (for tightening fittings)
- Power drill and drill bits
- Screwdriver
- Sandpaper (medium and fine grit)
- Safety glasses and gloves
???? DIY Instruction Step by Step
- Design and Measure: Decide the total height and width of your open closet. Map out where the vertical support pipes will be placed. You must ensure that any wall mounted parts are screwed directly into wall studs for maximum stability, so use your stud finder to locate these spots.
- Prepare the Wood: Sand the wooden boards until they are smooth. Apply wood stain or a clear sealant according to the product directions, allowing them to dry completely. These will become your shelves.
- Assemble the Pipe Framework: Begin by connecting your pipe pieces using the various fittings (tees and elbows). For example, attach floor flanges to the bottom of the vertical pipes. Next, attach the horizontal pipes that will serve as the hanging rods using the tee and elbow fittings to form a sturdy, rectangular frame. Hand tighten all connections initially.
- Secure the Structure: Position the assembled framework against the wall and floor. Use the level to ensure all vertical and horizontal pipes are straight. Mark the location of the wall and floor flanges. Drill pilot holes and secure the flanges to the wall studs using heavy duty screws and to the floor using appropriate screws or bolts. Tighten all pipe connections securely with a pipe wrench.
- Install the Shelves: Place the prepared wooden shelves onto the horizontal pipe sections that are designated as shelf supports. You may choose to simply rest the shelves on the pipes or secure them from underneath with pipe straps or small screws drilled into the pipes (only if the pipes are soft metal or if you are experienced in tapping metal).
- Add Lighting (Optional): If you are installing track lighting like the example, consult an electrician or follow the specific installation instructions for your light fixture, ensuring it is centered above the hanging rods.
- Organize by Color and Type: Hang your garments on thin, matching hangers. Start with the most formal wear and transition to casual pieces. Utilize the rainbow method for visual appeal, arranging colors from light to dark or according to the spectrum. Place accessories and folded items on the new shelves.
3. Dedicated Seasonal Garment Archiving Closet

This stunning closet demonstrates a sophisticated method for managing an extensive wardrobe: active versus archive storage. The dark, rich wood and classic brass hardware give the space an air of traditional luxury. It is evident that maximizing the life and quality of clothes is a priority here, especially through the use of vacuum sealed bags and clear containers.
On the left, “Zone A” holds the active 60% of the wardrobe—items currently in season and frequently worn, such as suits and dress shirts, hung at easily accessible levels. The right side, “Zone B,” archives the remaining 40% (off season or special occasion wear), neatly compressed and protected on deep shelves. The central column features dedicated drawers and open shelving for accessories and year round basics. Adopting this strategy ensures your daily essentials are never buried, while protecting valuable items from dust and humidity during storage.
???? DIY Vacuum Bag Seasonal Archiving
This project focuses on implementing the “active vs. archive” strategy by adding dedicated deep shelving and utilizing vacuum storage for long term garment protection.
???? Material Required
- Melamine or stained wood boards (3/4 inch thickness) for adding or deepening shelves
- Shelf pins or cleats
- Large capacity vacuum storage bags (various sizes)
- Large, clear plastic storage bins or canvas totes (optional, to house the vacuum bags neatly)
- Labels or label maker
- Small finishing nails or screws
- Wood glue
????️ Equipment Required
- Measuring tape
- Level
- Power drill and drill bits
- Screwdriver
- Hand saw (if cutting shelves yourself)
- Household vacuum cleaner with a hose attachment (for the vacuum bags)
- Safety glasses and gloves
???? DIY Instruction Step by Step
- Assess and Assign Zones: First, sort your entire closet into two main categories: Active (items worn now) and Archive (seasonal items, special occasion wear, or rarely used items). Dedicate a specific area of your closet, like the right side shown here, exclusively for archive storage.
- Install or Adjust Deep Shelves: Archive storage works best on deep shelves. Measure the depth and width of your dedicated archive zone. If your existing shelves are too shallow, install new, deeper shelves or adjust the current ones using shelf pins to create optimal stacking height for the vacuum bags and containers. Ensure the shelves are completely level before securing them with cleats or pins.
- Prepare Garments for Storage: Wash or dry clean all archive garments before storage. Do not vacuum seal anything damp. This prevents mildew and ensures clothes are ready to wear when you retrieve them later. Fold items neatly into stacks appropriate for the bag size.
- Seal Items in Vacuum Bags: Place a stack of similar items (e.g., all winter sweaters or all ski gear) into a single vacuum storage bag. Carefully zip the bag shut, ensuring the seal is fully closed. Attach your household vacuum cleaner hose to the bag’s air valve and turn on the suction. Watch as the bag compresses, removing all the air.
- Label and Stack: Once the bag is flat and fully compressed, quickly remove the vacuum hose and close the valve cap. Write a clear, concise label (e.g., “Winter Coats,” “Holiday Dresses”) and affix it directly to the bag or, better yet, to the clear storage bin housing the bag.
- Place in Archive Zone: Neatly stack the sealed, labeled bags on the newly installed deep shelves in your designated Zone B. Utilize the front of the shelf for a secondary label if the item description is not clearly visible. This strategy keeps your active wardrobe organized and prevents the archive items from taking up valuable daily hanging space.
4. Custom Dress Shirt and Accessory Organization

This handsome custom closet emphasizes meticulous organization for formal wear and accessories, demonstrating that even a large collection can be managed with grace. The deep, rich wood paired with chunky brass label holders and pulls evokes the feel of a sophisticated men’s haberdashery. Everything has a designated home, eliminating clutter completely.
Notice the specialized storage: dress shirts are neatly folded and stacked on illuminated shelves, making selection easy and preventing wrinkles. Below, the drawers are thoughtfully segmented. One drawer features tailored compartments for neckties and pocket squares, keeping them separate and preventing them from sliding around. A separate pull out tray provides a safe display for watches and cufflinks. Utilizing wooden hangers ensures suits and trousers maintain their shape. This system proves that investing in high quality, dedicated storage pieces is the key to maintaining a sharp and professional appearance.
???? DIY Drawer Divider Insert for Accessories
This project focuses on building custom dividers to organize small items like ties, belts, and jewelry within existing dresser or closet drawers.
???? Material Required
- Thin plywood or balsa wood sheets (1/8 inch or 1/4 inch thickness) for the dividers
- Wood glue
- Fine grit sandpaper
- Felt or velvet fabric (optional, for lining the bottom of the compartments)
- Spray adhesive (if lining with fabric)
????️ Equipment Required
- Measuring tape
- Utility knife or small hand saw
- Ruler or straight edge
- Clamps or heavy weights
- Pencil
???? DIY Instruction Step by Step
- Measure the Drawer Interior: Completely empty the drawer you plan to divide. Measure the interior length, width, and depth of the drawer box accurately. Note these measurements down carefully.
- Design the Grid Layout: Decide on the size and shape of the compartments you need. For ties, long narrow rectangles are effective. For cufflinks and watches, you’ll need smaller squares. Draw your grid design on paper, transferring the internal measurements of the drawer.
- Cut the Wood Dividers: Using your measurements, cut the thin wood sheets into strips for the dividers. You will need two types of strips: long strips for the length and shorter strips for the width. Ensure the height of the strips is slightly less than the drawer depth so the drawer closes easily.
- Create Interlocking Slots (Optional but recommended): To make the grid sturdy, use a utility knife to cut small, narrow slots halfway through the height of each divider strip where they will intersect. These slots should be the exact width of the wood thickness. This allows the pieces to slide and lock together like puzzle pieces.
- Assemble the Grid: Slide the long and short divider pieces together via the slots, forming your custom grid insert. If you opted not to use slots, use wood glue at each intersection point to secure the pieces.
- Secure the Insert: Once the glue is dry, test fit the assembled grid inside the drawer. Apply a small amount of wood glue to the edges of the grid where they touch the drawer walls to secure the insert in place. You can use clamps or place heavy objects in the empty compartments while the glue dries.
- Add Finishing Touches (Optional): If using felt, spray the bottom of the compartments with adhesive and carefully press the felt fabric into place for a luxury finish that protects delicate accessories. Now you can neatly store and display your accessories in their new, tailored homes.
5. Wire Shelving Unit with Color Coded Bins

This flexible and highly effective storage solution shows how easily organization can be achieved, particularly in small spaces or rental properties. The heavy duty wire shelving is easy to assemble and offers remarkable versatility. Its open structure allows light to reach every corner, which is especially helpful in dark closets.
The ingenious element here is the use of bright, color coded canvas storage bins. Assigning a specific color and clear label to a category—like pale blue for “Packing Station” or mint green for “Chill”—makes finding things quick and putting them away simple. On the left, there is ample vertical hanging space for dresses and blouses. The robust metal shelves on the right accommodate stackable bins and specialized boxes for folded items and accessories. This system demonstrates that achieving maximum organization does not require custom carpentry; often, it just requires a smart approach to containers.
???? DIY Wire Shelving with Labeled Bin System
This project involves setting up a utilitarian wire shelving unit and maximizing its storage capacity using a coordinated, labeled container strategy.
???? Material Required
- Multi tier chrome or white wire shelving unit (appropriate height and width for your space)
- Adjustable shelf clips (usually included with the unit)
- Numerous fabric storage bins or canvas cubes (in various colors for coding)
- Clear adhesive labels or small cardstock inserts for bins
- Permanent marker or label maker
????️ Equipment Required
- Rubber mallet (for securing shelves, optional)
- Measuring tape
- Level
- Safety gloves (optional, for handling wire edges)
???? DIY Instruction Step by Step
- Measure and Purchase: Carefully measure the width, depth, and height of the space where the unit will go. Ensure the chosen wire shelving unit fits without obstructing doors or other fixtures. Purchase bins that fit the depth of the shelves perfectly, maximizing the available space.
- Assemble the Uprights: Stand the four vertical poles upright. Note the markings on the poles; these help ensure the shelves are level. Snap the plastic shelf clips around the poles at the desired height for the bottom shelf, making sure the clips on all four poles are positioned at the exact same mark.
- Install the First Shelf: Slide the bottom shelf down over the four poles, locking it securely over the plastic clips. Lightly tap the shelf corners with a rubber mallet, if necessary, to ensure it is seated firmly and level.
- Determine Shelf Heights: Use your tallest bin or item as a guide to determine the spacing between shelves. Repeat the process of installing clips and then placing the wire shelves until the entire unit is assembled. Use a level to double check the horizontal position of each shelf.
- Assign Categories and Color Code: Decide what contents will go into each bin (e.g., green for work attire, blue for travel items, pink for seasonal accessories). Assign a color to each category. This color coding is essential for visual organization.
- Label the Bins: Write clear, concise labels for each bin (e.g., “Sweaters,” “Summer Gear,” “T-shirts”). If the bins have label holders, insert the cardstock labels. If not, use adhesive labels and stick them prominently on the front of each container.
- Load and Organize: Place the labeled bins neatly on the shelves, grouping similar colors or categories together for a clean appearance. Use the hanging rod section (if your unit includes one) for wrinkle prone items. This straightforward system transforms a messy closet into an easy to navigate storage wall.
6. Shelf Dividers for Folded Garments

This crisp, minimalist closet showcases the importance of proper folding and containment for knitwear and casual tops. The all white shelving combined with neutral gray fabric boxes creates a supremely calm and orderly appearance. It immediately makes the space feel luxurious and well managed.
The crucial element here is the use of clear acrylic shelf dividers. These dividers slide onto existing shelves, creating individual vertical compartments for stacks of clothes. This simple addition prevents a stack of sweaters from toppling over or blending into the next one, maintaining a tidy look even when one item is pulled out. The inclusion of subtle, focused lighting under the shelves highlights the contents beautifully. Furthermore, the upper and lower storage boxes conceal clutter, while the hanging rod on the left reserves space for garments that wrinkle easily. This system turns a simple shelf into a highly organized, functional display case for your wardrobe.
???? DIY Shelf Divider Installation
This project is quick and focuses on adding non permanent shelf dividers to maximize the neatness of folded clothes storage.
???? Material Required
- Clear acrylic shelf dividers (clip on or slide under style)
- Non slip shelf liner (optional, to provide grip)
????️ Equipment Required
- Measuring tape
- Cleaning supplies (to clean shelves before installation)
???? DIY Instruction Step by Step
- Prepare the Shelves: First, empty the shelves designated for folded clothes. Dust and wipe down the shelves completely. Ensure they are dry before proceeding.
- Determine Stack Width: Decide how wide you want each stack of folded items (e.g., sweaters or T shirts) to be. The width should be consistent to maintain the organized look. This measurement will guide where you position your dividers.
- Install the First Divider: Take one shelf divider. If it is a clip on style, slide the flat bottom piece onto the front edge of the shelf and push the base until the divider stands vertically at your desired starting point (usually a few inches from the closet wall). If it is a slide under style, simply place it on the shelf surface and slide it to the desired position.
- Set Subsequent Dividers: Use a measuring tape to precisely space out the next divider, matching the stack width you determined earlier. Install the second divider, then the third, and so on, working across the shelf. Uniform spacing is key to achieving the clean aesthetic seen in the image.
- Fold and Load Clothes: The key to using these dividers successfully is the folding technique. Fold all your garments into uniform rectangles that fit neatly within the space you have created. Stand the stacks vertically between the dividers, placing similar colors or categories together. The dividers will keep your stacks straight and prevent them from migrating.
- Repeat on All Shelves: Continue this process on every shelf that holds folded clothing. This quick upgrade instantly maximizes vertical storage and keeps your entire inventory visible and accessible.
7. Central Wardrobe Island with Display Storage

This luxurious walk-in closet represents the ultimate in organization and style, centered around a stunning wardrobe island. The clean white cabinetry, brass accents, and marble countertop elevate the space, transforming a simple closet into a boutique experience. This design is exceptional for handling accessories and shoes in an elegant, accessible way.
The central island is the focal point, featuring glass-fronted drawers and display trays. This allows the owner to quickly see and access smaller, high-value items like watches, jewelry, and sunglasses, protecting them from dust while keeping them visible. Below, glass-door cabinets provide a dedicated, beautiful display space for shoes. The surrounding wall cabinetry maximizes hanging and shelf storage, reserving precious drawer space for smaller goods. Incorporating a seating area or vanity space on the island further enhances the functionality of this beautifully managed wardrobe.
???? DIY Conversion of a Standard Dresser into a Closet Island
This project details how to take a standard, sturdy dresser or cabinet and modify it with a new top and display elements to mimic a central closet island.
???? Material Required
- Sturdy, existing wooden dresser or cabinet (preferably with shallow drawers)
- Thick wooden board (for new top)
- Marble or Butcher block slab (cut to size for the countertop)
- Clear acrylic sheets (for adding display windows or replacing drawer fronts)
- Wood trim and molding (for base and side panels)
- Furniture legs or casters (if needed to adjust height)
- Cabinet paint (white or chosen color) and primer
- Wood glue and construction adhesive
- Drawer pulls and hardware
????️ Equipment Required
- Measuring tape and level
- Circular saw or hand saw
- Power drill and bits
- Screwdriver
- Sandpaper (medium and fine grit)
- Paintbrushes and rollers
- Caulk gun and caulk
- Safety glasses and gloves
???? DIY Instruction Step by Step
- Prep the Base Unit: Remove all existing hardware (knobs, pulls) and drawers from the dresser. Lightly sand the entire exterior of the dresser and apply a coat of primer. Once dry, apply two coats of your chosen cabinet paint color.
- Modify Drawers for Display (Optional): If you want display sections, remove the front panel of one or two shallow drawers. Cut a window opening in the front panel. Secure a clear acrylic sheet from the inside using wood glue and small finishing nails, creating a “display window.” Reinstall the drawer fronts.
- Build or Source the Top: Cut a wooden board to the dimensions slightly wider and deeper than the dresser base to create an overhang. Secure this board to the top of the dresser using wood screws from the inside of the cabinet for a cleaner look.
- Install the Countertop: Place the marble or butcher block slab onto the new wooden top. Use strong construction adhesive (like Liquid Nails) to permanently affix the slab. Ensure it is centered before the adhesive sets.
- Add Architectural Detail: Cut and attach decorative wood trim or molding to the side and base panels of the dresser using wood glue and small finishing nails. Paint the newly added trim to match the dresser body.
- Organize and Display: Line the modified display drawers with velvet or felt for an elegant backdrop. Place your accessories (watches, jewelry) in these trays. Use the non-display drawers for folded items. The beautiful central island is now ready to showcase your organized collection.
8. Dedicated Pre-Packed Travel Storage

This thoughtfully designed closet focuses on efficiency, particularly for the frequent traveler. The neutral color palette, combining light wood tones with gray and linen, creates a refined and highly functional space. This system eliminates the stress of last minute packing by preparing essential items in advance.
The brilliance here lies in the specialized, clearly labeled sections. Note the containers marked “Business Trip Essentials” and “Beach Vacation.” These boxes hold non clothing items (like adaptors, sunscreens, or toiletries) required for specific trips. On the right, packing cubes and actual suitcases are stacked, clearly labeled with their function (“Carry On Storage,” “Large Suitcase”). This method ensures you simply grab the correct container for immediate readiness. Furthermore, the inclusion of a pull out folding station with electrical outlets makes the task of organizing and packing incredibly convenient. Utilizing shallow, transparent drawers for rolled shirts and casual wear also maximizes visibility and saves time.
???? DIY Pull Out Packing Station with Power
This project details how to install a dedicated, drop down or pull out shelf that serves as a temporary packing station and includes accessible power for charging or ironing small items.
???? Material Required
- Sturdy plywood board (3/4 inch thickness) for the shelf/packing surface
- Heavy duty sliding drawer rails or pull down hinges (choose based on whether you want the shelf to slide out or fold down)
- Shallow electrical box and power outlet (must be installed by a licensed electrician)
- Short length of wiring (rated for wall use)
- Wood screws and mounting hardware
- Shelf paint or laminate (for a smooth, cleanable surface)
????️ Equipment Required
- Measuring tape and level
- Stud finder
- Power drill and various drill bits
- Screwdriver
- Jigsaw (for cutting the shelf and outlet holes)
- Safety glasses and gloves
???? DIY Instruction Step by Step
- Select Location and Safety Check: Identify a lower shelf area in your closet where a pull out station would be ergonomically comfortable (waist to hip height). Use a stud finder to locate the wall studs; the unit must be secured into these for stability. Note: All electrical work (steps 3 and 4) must be performed or overseen by a qualified electrician to ensure safety and compliance with local codes.
- Prepare the Shelf: Cut the plywood to the desired size for your packing station. Cut a rectangular hole in the back corner of the shelf for the electrical box. Sand the shelf smooth and apply a durable, cleanable finish (paint or laminate).
- Install the Electrical Box and Wiring (Electrician Required): An electrician will cut a hole in the back wall of the closet corresponding to the location of your packing shelf. They will install the shallow electrical box and run the required wiring from a nearby power source to the new outlet box.
- Secure the Outlet: Mount the new power outlet into the box and install the faceplate on the surface of the shelf, where the cutout was made in step 2. This makes the power easily accessible when the shelf is deployed.
- Mount the Sliding Rails or Hinges: If using sliding rails, install one half of the rails inside the cabinet opening and the other half onto the sides of the prepared shelf. Ensure both sides are level before securing. If using fold down hinges, install the hinges on the bottom of the shelf and the closet side walls, making sure the shelf locks securely in the horizontal position when open.
- Test and Finalize: Slide the shelf into place or test the fold down mechanism. The finished station provides a sturdy, powered surface for laying out clothes, running a small travel steamer, or charging devices while you pack.
- Implement Pre Packing: Fill and label various packing cubes or plastic containers with travel essentials. Stack these neatly on the shelves, ready to be dropped into a suitcase at a moment’s notice, leveraging your new packing station.
9. Smart Garment Digital Tracking System

This futuristic, high technology closet represents the cutting edge of wardrobe management, designed for the individual who values data driven organization. The dark, sleek cabinetry provides a sophisticated backdrop for the digital interfaces and the subtle technology integrated throughout. This system moves beyond simple storage by actively tracking garment usage and history.
Notice the digital overlay displayed in the center, which tracks critical information like “Last Worn Date,” “Dry Clean Status,” and “Outfit History.” Tiny NFC or RFID tags, seen as glowing blue icons on the shirts, communicate with the system, providing real time inventory. This technology not only eliminates the need for manual logging but also helps the owner avoid wearing the same item too frequently and prompts laundry requests. Below, transparent, divided bins allows for quick visual checks of accessories while the central drawers conceal other folded items. This organization system uses technology to make wardrobe maintenance entirely effortless and exceptionally smart.
???? DIY NFC Tag Garment Tracking System
This project focuses on a simple, low cost way to mimic the digital tracking system by integrating NFC (Near Field Communication) tags with a smartphone app or spreadsheet.
???? Material Required
- Small, adhesive NFC tags (washable and durable recommended)
- Clear packing tape or waterproof fabric glue (optional, for securing tags)
- Smartphone with NFC reading capability
- Inventory app or spreadsheet software (e.g., Google Sheets, specialized NFC app)
????️ Equipment Required
- None needed beyond the phone and materials.
???? DIY Instruction Step by Step
- Select Garment Location: Choose a discreet, non irritating spot on your clothes to attach the tags. Common places include the inside of the collar label, the inner waistband, or a sewn in side seam. For ease of use, select a location that is consistent across all garments.
- Affix the NFC Tags: Peel the backing and stick the NFC tag firmly onto the chosen spot. If the tag is not rated as completely waterproof, cover it with a layer of clear packing tape or apply a dab of waterproof fabric glue around the edges for extra protection during washing. Allow any glue to dry fully before proceeding.
- Choose Your Tracking Method: Download a simple NFC writer app and decide how you will store your data. A free option is to create a shareable Google Sheet with columns for “Item Name,” “Last Worn Date,” “Dry Clean Status,” and “Notes,” then generate a share link for the sheet. Alternatively, use a specialized NFC inventory app.
- Program the Tags: Open your NFC writer app. For each garment, program the tag to either open the specific link to your online spreadsheet, or to simply identify the garment within the app. For example, program one tag to link to Row 15 of your spreadsheet, which corresponds to “Blue Pin Stripe Shirt.”
- Log Initial Inventory: For each tagged garment, tap the NFC tag with your phone. The link will open or the app will prompt you. Enter the initial details (e.g., “New,” “Just Cleaned”).
- Implement Daily Tracking: After you wear an item, tap the tag with your phone before hanging it back up. Quickly update the field for “Last Worn Date” and change the “Dry Clean Status” to “Worn.” This habit ensures you always have a real time, digital inventory of exactly what is in your closet, making laundry and outfit planning much easier.
10. Minimalist Shared Wardrobe Zoning

This bright, minimalist closet design successfully tackles the challenge of a shared wardrobe by clearly defining distinct zones for different users or categories. The pale wood finish and neutral tones contribute to a feeling of openness and tranquility. Utilizing similar modular units across the entire width ensures a cohesive and balanced look.
The central division is the key feature here, making the system highly functional for two people. Each side offers equal hanging space, drawers, and open shelving. Cleverly, the central column provides specific storage for shared or accessory items, such as the small wooden drawer organizer for jewelry and cosmetics. The labels “Grouping by User” and “Categorization Method” emphasize the importance of distinct boundaries, preventing clutter migration. Furthermore, the incorporation of a small, hidden mirror and cloth hampers at the bottom adds practicality without disrupting the clean aesthetic. This balanced layout proves that shared spaces can remain organized and appealing.
???? DIY Shared Closet Zoning with Divider
This project focuses on creating a physical and visual divider in a shared open closet space and adding designated accessory zones.
???? Material Required
- Plywood or melamine board (3/4 inch thickness) for the central divider
- Decorative wooden or plastic storage boxes (matching the aesthetic)
- Shelf pins or small L brackets
- Wood screws
- Primer and paint or wood stain (to match existing closet)
- Small desktop drawer organizer (for jewelry/cosmetics)
- Cloth hampers or bins for the bottom section
????️ Equipment Required
- Measuring tape and level
- Power drill and drill bits
- Screwdriver
- Hand saw or circular saw (unless wood is pre-cut)
- Sandpaper (medium grit)
- Safety glasses
???? DIY Instruction Step by Step
- Measure and Plan the Zones: First, completely empty the closet. Accurately measure the height, width, and depth of the existing space. Decide exactly where your hanging, shelving, and drawer zones will be located. Sketch a simple diagram showing the dimensions of each new shelf and drawer unit.
- Cut or Order Wood Pieces: Based on your plan, cut the plywood or melamine into the required sizes for the shelf pieces and the drawer box components (front, back, sides, and base). Important: If you are not experienced with saws, have a local hardware store cut the wood for you.
- Assemble the Shelving Unit: Determine the height for your fixed shelves. Mark the wall studs and drill pilot holes. Secure shelf brackets or cleats directly into the wall studs using long screws. Place your pre-cut shelves onto these supports. If using adjustable shelf pins, first drill small holes along the sides of the closet interior and insert the pins before setting the shelves.
- Construct the Drawer Boxes: Use wood glue and small screws to assemble the four sides of each drawer box, ensuring they are square. Attach the drawer base (usually a thinner piece of wood) to the bottom. Once the boxes are dry, attach the decorative drawer facing (the front panel you see) from the inside.
- Install Drawer Slides: Following the manufacturer’s instructions, mount one part of the drawer slide system inside the closet space where the drawers will sit, ensuring it is perfectly level. Attach the corresponding part of the slide system to the sides of the newly built drawer boxes. Test the slides to confirm smooth movement.
- Insert Drawers and Hardware: Carefully insert the assembled drawers onto their slides. Screw the decorative pulls or handles onto the drawer facings.
- Organize with Fabric Bins: Place your new fabric storage bins onto the shelves or inside the open drawer boxes. Use the label holders to clearly mark the contents, such as “Socks,” “Belts,” or “Gym Wear.” This labeling step is crucial for maintaining long term organization.
- Final Touches: Wipe down the surfaces and begin reloading your clothes, keeping similar items grouped together in their newly designated zones.
11. Vertical Access Rolling Ladder System

This beautiful, bright closet shows how to effectively utilize every inch of vertical space, right up to the ceiling. The classic combination of white cabinets, light wood interiors, and simple linen storage boxes creates a timeless, airy feel. This design is especially useful in rooms with high ceilings where upper storage is otherwise inaccessible.
The centerpiece of the organization is the sliding library ladder. This practical addition allows the owner to safely access the highest cabinets, where off season or bulk items are stored in matching, labeled boxes. The primary hanging area features efficient double rods, maximizing the space for daily wear. Furthermore, the ladder itself serves a secondary function as a place to hang a planning chart or outfit of the day list, integrating task management into the organization system. This solution proves that even forgotten high spaces can be turned into useful, valuable storage areas.
???? DIY Rolling Ladder Rail Installation
This project focuses on installing a rail system and using a simple, store bought ladder to access high closet storage. Note: A full sliding ladder system requires specialized hardware for safety and should be installed following manufacturer instructions precisely.
???? Material Required
- Rolling ladder kit (includes rail, brackets, end stops, and ladder hardware)
- Sturdy wooden header board (if securing rail directly to the cabinet face is not possible)
- Heavy duty mounting screws (appropriate length for securing to wall studs or cabinet frame)
- Primer and paint (to match the ladder and rail to the cabinets)
- Matching storage boxes with handles
????️ Equipment Required
- Measuring tape and level
- Stud finder
- Power drill and bits
- Wrench set (for securing rail hardware)
- Safety glasses and gloves
???? DIY Instruction Step by Step
- Measure and Determine Rail Location: Accurately measure the height and width of the upper cabinets. The rail must be installed at a height that allows the ladder to rest securely against the cabinet face while being easily reached. Use a level to mark a perfectly straight line across the top edge of the cabinets.
- Install the Header Board (If Needed): If your cabinet face frames are too thin to support the weight of the rail and ladder, you will need to install a decorative wooden header board above the cabinets, secured directly into the wall studs, to provide a solid mounting surface for the rail. Paint this board to match the cabinets.
- Mount the Rail Brackets: Following the ladder kit instructions, position and mark the locations for the rail mounting brackets along your marked line or on the newly installed header board. Drill pilot holes and secure the brackets firmly into the studs or strong cabinet supports using the recommended heavy duty screws.
- Install the Rail: Lay the track rail onto the secured brackets. Attach the rail to the brackets and slide the end stops onto the rail to prevent the ladder from rolling off the end. Tighten all hardware securely with a wrench.
- Assemble and Attach the Ladder: Assemble the rolling ladder according to the kit instructions. This usually involves attaching the top roller wheels or hooks and the bottom rubber feet. Lift the ladder onto the rail, ensuring the top rollers fit securely onto the track.
- Load the High Storage: Place rarely used items, seasonal clothes, or bulk linens into the matching storage boxes. Label each box clearly and stack them neatly in the high cabinets. The new rolling ladder now makes this previously dead space fully accessible and useful.
12. Rainbow Coordinated Open Wardrobe

This vibrant closet is a true visual feast, designed around the highly effective principle of color coding. The room maximizes light exposure with crisp white walls and ceiling track lighting, making the full spectrum of clothes easily visible. This system is exceptionally motivating and makes finding garments instantaneous.
The entire wardrobe is arranged on open, double hanging rods, creating a dramatic, flowing display that transitions from white through blues, greens, yellows, and reds. This gradient organization prevents “wardrobe blindness” where items are missed because they blend together. Below, the corner features a central mirror flanked by specialized drawers and open shelving for accessories and shoes. Notice the colorful heels displayed on the open shelf; they serve as both storage and decorative elements. This color centric approach to organization proves that functionality and high style can work together beautifully.
???? DIY Color Gradient Hanging System
This project is a high impact, low effort task focused entirely on the reorganization and aesthetic display of your existing garments and accessories.
???? Material Required
- Matching slimline hangers (to ensure uniform hang height and maximize space)
- Storage containers or drawers for accessories
- Labels and marker (optional, for sectioning colors)
????️ Equipment Required
- None required besides your hands and a clean space.
???? DIY Instruction Step by Step
- Empty and Prep the Space: Remove all garments from the hanging rods. Use this opportunity to clean and dust the rods and the surrounding shelving. Install slimline, matching hangers throughout the space.
- Sort by Garment Type: Before sorting by color, group all similar items together (e.g., all blouses with blouses, all t shirts with t shirts, all skirts with skirts). This ensures that when you start the color gradient, you are comparing like items.
- Establish the Color Spectrum: Decide on the order of your rainbow gradient. A common order is: White/Creams $\rightarrow$ Yellows $\rightarrow$ Oranges $\rightarrow$ Reds $\rightarrow$ Pinks $\rightarrow$ Purples $\rightarrow$ Blues $\rightarrow$ Greens $\rightarrow$ Browns/Grays $\rightarrow$ Black.
- Implement the Gradient: Starting with the first category (e.g., white tops), hang them on the rod. Move immediately to the next category (light yellow tops), ensuring the lightest shades of one color blend seamlessly into the next. Continue this process for all garment types, maintaining the color order across the entire hanging space.
- Refine the Hues: Stand back and look for any jarring color jumps. You may need to shift a bright cyan shirt closer to the green section than the royal blue section to make the transition smoother. This refinement creates the visually pleasing, gradient effect.
- Organize Accessories by Color: Extend the color concept to your accessories and shoes. If you have colorful shoes (like the example), arrange them on open shelves according to the same color spectrum. Store neutral items (black, tan) in clearly marked drawers. This systematic color coordination makes any closet look instantly organized and professionally styled.
13. Rolling Under Eave Storage Bins

This ingenious design solves the tricky problem of organizing clothes in sloped ceiling spaces, like attic rooms or under stairs. The combination of high hanging space for wrinkle prone items and low, customized rolling storage boxes maximizes every unique dimension of the closet. The clean white and light wood look keeps the area feeling spacious, despite the architectural challenge.
The most practical feature is the large, wheeled storage boxes built to fit perfectly beneath the lowest part of the ceiling. These boxes are clearly labeled for seasonal archiving, such as “SUMMER ACTIVE” and “WINTER ARCHIVE.” Crucially, the “Summer Active” bin incorporates internal dividers and fabric liners, making it an effective spot for small accessories or casual wear. Because they are on casters, these boxes can be easily pulled out for access or pushed back to keep the floor clear. This system is a brilliant way to reclaim storage space often lost in unconventional closets.
???? DIY Rolling Under Eave Storage Boxes
This project focuses on building large, shallow storage boxes with internal dividers and wheels, suitable for use under sloped ceilings or beds.
???? Material Required
- Plywood (1/2 inch thickness) for the box frame and bottom
- Casters (small, sturdy wheels)
- Drawer pulls or handles (for pulling the boxes out)
- Canvas or linen fabric (for internal bin liners and dividers)
- Wood screws and wood glue
- Primer and paint (white or light neutral)
- Large wooden signage (for clear labels) and vinyl lettering or paint
????️ Equipment Required
- Measuring tape and level
- Power drill and various drill bits
- Circular saw or table saw (unless wood is pre cut)
- Staple gun or strong fabric adhesive
- Screwdriver
- Safety glasses
???? DIY Instruction Step by Step
- Measure the Space: Accurately measure the height, width, and depth of the space under the slope where the boxes will sit. Remember to subtract the height of the casters from your maximum height measurement so the boxes roll easily.
- Cut and Assemble the Box: Cut the plywood into four sides and a bottom panel for each box. Use wood glue and wood screws to assemble the rectangular box frame, ensuring all corners are square and the bottom is securely fastened. Repeat for the number of boxes you plan to build.
- Install Casters and Handles: Flip the assembled boxes over. Screw the casters securely into each corner of the box bottom. Flip them back over and attach the pull handles to the center of the front panel of each box.
- Finish the Exterior: Apply primer and then paint the boxes to match the closet interior. This protects the wood and gives a clean, professional finish.
- Create Internal Dividers (for Active Storage): If creating a divided box, cut thin strips of wood to fit the interior width and length. Create interlocking slots halfway through the height of the strips, then assemble a removable grid insert. Line each compartment of the grid with canvas or linen fabric using a staple gun or strong adhesive.
- Attach the Labels: Cut the plywood signs to your desired size. Apply the vinyl lettering or paint the clear labels (“SUMMER ACTIVE,” “WINTER ARCHIVE”) onto the signs. Screw the labeled signs firmly onto the front panel of each box, below the handles.
- Organize and Store: Place the divided box insert into its designated container. Load the bins with seasonal clothes or accessories. Roll the finished boxes into the under eave area, immediately creating functional, accessible storage.
14. Modular Stackable Drawer Towers

This image perfectly illustrates a highly flexible, contemporary approach to wardrobe organization, characterized by its bright white aesthetic and clear storage containers. This system is especially well suited for spaces that are transitioning or require non built in, movable storage solutions.
The core of the organization involves multiple freestanding towers made of clear, stackable plastic drawers. This design is exceptional because the transparent fronts allow for instant visual inventory, eliminating the need to label every drawer. The use of a simple white wire shelf above adds space for bulkier boxes, while a small hanging rod accommodates wrinkle prone shirts. Items are neatly file folded and stacked in the drawers by category and color. This simple, modular system maximizes storage density and visibility, making it easy to see exactly how much you own and where everything is located.
???? DIY Stackable Drawer System Assembly and Integration
This project focuses on selecting, assembling, and integrating stackable drawer units to create a cohesive storage wall.
???? Material Required
- Modular, clear plastic or acrylic stackable drawer units (various sizes)
- Shelf liner (optional, to prevent items from sliding)
- Hanging rod and brackets (if adding a central hanging section)
- Wall anchors and screws (if securing the hanging rod)
????️ Equipment Required
- Measuring tape
- Level
- Power drill and screwdriver
- Safety glasses
???? DIY Instruction Step by Step
- Measure and Plan the Towers: Measure the closet space carefully, paying attention to the corner. Map out the configuration of the drawer towers, ensuring you leave space for a small hanging section if desired. Purchase units that are designed to stack securely.
- Assemble and Stack the Towers: Following the manufacturer’s instructions, assemble the individual drawer units. Start with the lowest unit and stack the next one directly on top, utilizing the built in interlocking features for stability. Place the tallest towers in the corners or against the wall.
- Create the Hanging Section: If you are incorporating a hanging rod, install the mounting brackets on the wall or between two drawer towers (if the towers are sturdy enough and designed for that). Ensure the rod is level and secure using appropriate wall anchors and screws.
- Fold and Load the Drawers: The success of this system depends on consistent folding. Use the file fold technique (folding clothes into neat rectangles so they stand upright) to load the drawers. This allows you to see every item at a glance when the drawer is opened. Dedicate each drawer to a single item type (e.g., “White Tees,” “Socks,” “Athletic Wear”).
- Maintain Visual Clarity: Because the drawers are clear, take advantage of the visual inventory. Store similar colors together in the stacks. For a polished look, consider lining the bottom of each drawer with a thin piece of shelf liner to prevent clothes from slipping. This simple system ensures you always know what you have.
15. Multi Compartment Laundry Sorter Station

This brilliant and specialized organization system tackles the often neglected issue of laundry management right at the source: the closet. The clean white cabinetry provides a streamlined, built in look, while the focus on clear labeling and segmentation makes the process highly efficient.
The centerpiece is the vertical organization column dedicated entirely to laundry action. Instead of one hamper, there are multiple labeled, pull out mesh baskets, clearly categorized for specific treatments: “WASH COLD/DELICATES,” “DARK WASH,” and “DRY CLEAN.” This eliminates the need for sorting later, saving significant time. Open shelves above the hampers store “READY WEAR” items waiting for action and supplies. Furthermore, a central writing board provides a space for “LAUNDRY ACTION” and “MENDING/REPAIR” notes, ensuring no item is forgotten. This proactive approach turns a daily chore into a seamless, automatic part of the dressing routine.
???? DIY Built In Laundry Sorter Cabinet
This project involves creating a cabinet unit with dedicated slots for multiple pull out laundry hampers within an existing or new closet structure.
???? Material Required
- Narrow cabinet enclosure or plywood to build one
- Metal mesh pull out hampers or wire baskets (must have sturdy edges for sliding)
- Sliding drawer rails (full extension, compatible with the baskets)
- Clear vinyl labels and a marker or label maker
- Small whiteboard or clipboard for notes
- Wood screws and wood glue
- Paint and primer
????️ Equipment Required
- Measuring tape and level
- Power drill and various drill bits
- Screwdriver
- Clamps
- Safety glasses
???? DIY Instruction Step by Step
- Design the Compartments: Measure the dimensions of the metal mesh hampers you purchase. The cabinet housing must be slightly wider and taller than the hampers to allow for the sliding rails and easy access. Design a vertical cabinet with stacked, separate openings for each hamper.
- Build the Cabinet Structure: Cut the plywood into the vertical sides, top, and bottom of the cabinet. Use wood glue and screws to assemble the main box. Cut internal horizontal divider shelves for the base of each hamper section.
- Install the Sliding Rails: Install the sliding drawer rails onto the interior sides of each compartment opening, ensuring they are perfectly level. You must install the rails at a height that allows the mesh hamper to slide in and out smoothly without dragging.
- Finish the Cabinet: Sand and paint the entire cabinet unit, ensuring a durable, moisture resistant finish. Allow the paint to dry completely.
- Insert the Hampers: Slide the metal mesh baskets onto their corresponding rails. Test the pull out action for smooth, easy gliding.
- Label the Sections: Create clear, descriptive labels for each hamper (e.g., “WASH COLD,” “DRY CLEAN,” “MENDING”). Affix the labels prominently to the front of the corresponding shelf or hamper front. Install a small whiteboard or note area nearby for detailed notes on garment care. This dedicated system organizes dirty clothes and simplifies the entire laundry process.
16. Vertical Pegboard Organization Wall

This innovative display transforms a simple wall into a highly customizable storage and display hub. The large wooden pegboard provides limitless options for organization, making it an excellent system for managing small accessories, tools, or creating a daily outfit planning area. It is a fantastic solution for entryways, mudrooms, or any small, unused wall space.
The system’s flexibility is its strongest asset. You can easily adjust hooks, small shelves, and wire baskets to fit the size of the items being stored, from small keys and sunglasses to larger jackets and belts. The addition of stylish, focused lighting fixtures illuminates the display and highlights the items, making selection simple. A designated area with a chalkboard sign, labeled “OUTFIT IN PROGRESS,” is brilliant for laying out the next day’s attire, which saves time during a busy morning. This pegboard system is the ultimate example of maximizing vertical space with adjustable, clever components.
???? DIY Oversized Pegboard Installation and Setup
This project involves installing a large sheet of pegboard and customizing it with various hooks, baskets, and shelves for accessory storage.
???? Material Required
- Large sheet of pegboard (1/4 inch thickness recommended)
- Furring strips or small wooden spacers (to hold the pegboard off the wall)
- Wood screws (long enough to go through the pegboard, spacers, and into wall studs)
- Variety pack of pegboard hooks, holders, and baskets
- Small wooden shelves (optional)
- Primer and paint (to finish the pegboard and blend it with the wall)
????️ Equipment Required
- Measuring tape and level
- Stud finder
- Power drill and drill bits
- Screwdriver
- Hand saw or circular saw (for cutting pegboard/spacers)
- Safety glasses and gloves
???? DIY Instruction Step by Step
- Prep and Finish the Pegboard: Cut the pegboard to the desired size. Sand the edges smooth. Apply primer and two coats of paint to the board and the furring strips for a polished, clean look. Allow the finish to dry completely.
- Locate Wall Studs: Use a stud finder to locate the vertical studs in the wall where the pegboard will be installed. Mark these locations clearly.
- Attach Furring Strips/Spacers: Cut the wooden furring strips into short spacers. These must be attached to the wall studs first, as they create the essential gap between the pegboard and the wall, allowing the hooks to fit. Drill pilot holes and secure the strips to the studs.
- Mount the Pegboard: Hold the finished pegboard up against the wall, aligning it so the mounting holes line up with the secured furring strips. Use long wood screws to attach the pegboard securely to the strips and into the wall studs. Check with a level to ensure it is straight.
- Customize the Layout: Begin installing your accessories. Insert heavy duty hooks for coats and jackets along the bottom. Place shelves and wire baskets higher up for sunglasses, wallets, keys, and small electronics. Use small single hooks for belts and jewelry.
- Install Lighting and Planning Area: If adding lights, secure them to the top of the pegboard or wall above it. Designate a visible section for a small chalkboard or frame labeled “OUTFIT IN PROGRESS.” This final step creates a highly customized, functional command center for your accessories and clothes.
17. Dedicated High Value Accessory Center

This spectacular corner closet setup is designed purely for the organization and security of high value accessories, such as fine jewelry, watches, and shoes. The high gloss white lacquer and brass hardware exude luxury and sophistication. This system prioritizes easy visibility while ensuring that delicate items are protected.
The key features are the specialized display units. One vertical cabinet is lined in velvet and features holders for an entire collection of watches. Next to it, a concealed safe provides secure storage for especially valuable pieces. Shallow drawers with clear glass fronts beautifully display rings and earrings, making selection effortless. Furthermore, a pull out drawer lined in plush velvet creates a safe surface for laying out jewelry. The mirror, flanked by soft vanity lighting, completes the transformation, turning the closet corner into a fully equipped, private dressing room.
???? DIY Velvet Lined Jewelry Drawer and Watch Display
This project focuses on transforming a standard drawer into a jewelry organizer and adding a wall mounted watch display unit.
???? Material Required
- Thin plywood or foam core board (for drawer dividers)
- Deep red or black velvet fabric
- Spray adhesive
- Small drawer organizers or watch pillows (for the watch display)
- Small safe (optional, for security)
- Wood glue and staples
????️ Equipment Required
- Measuring tape
- Utility knife or sharp scissors
- Ruler
- Screwdriver
- Hot glue gun (optional)
???? DIY Instruction Step by Step
- Prepare the Jewelry Drawer: Select a shallow drawer for your jewelry. Measure the drawer’s interior length, width, and depth. Cut the velvet fabric to line the entire bottom and sides, adding an inch or two overlap. Spray the interior of the drawer with adhesive and carefully press the velvet into place, folding neat corners.
- Create Custom Dividers: For jewelry, you want small, square or rectangular compartments. Cut thin plywood or foam core board into strips for the dividers. Wrap and glue velvet fabric tightly around all sides of these strips.
- Assemble and Install Dividers: Place the velvet wrapped dividers inside the lined drawer, gluing them into place using wood glue or a hot glue gun. Ensure the compartments are sized appropriately for different jewelry types (e.g., small squares for earrings, longer sections for bracelets).
- Install the Watch Display: Purchase a simple, vertical watch display case or cabinet. Secure it to the interior wall of the closet using screws and wall anchors, ensuring it is level and sturdy. If using open shelves, line them with velvet and use individual watch pillows for display.
- Add a Pull Out Display Tray (Optional): If your closet has an existing surface, place a velvet lined tray there. This tray serves as a dedicated, soft surface where rings and watches can be temporarily placed without risk of scratching while you get dressed. This combination of protected storage and display elevates your organization game.
18. Hanging Rod Daily Outfit Planner

This clever system is a time management hack disguised as a storage solution. It addresses the morning chaos by making outfit selection a simplified, daily task. The light oak cabinetry and simple floating design give the area a modern, clean appeal.
The core of this organization system is the clearly labeled hanging rod. Small, distinct labels for each day of the week (M, T, W, TH, F) are clipped or hung onto the rod. This allows garments to be pre selected and hung in order, creating a full week’s worth of outfits in advance. This approach is exceptional for saving time and reducing decision fatigue every morning. The open, floating drawers below are strategically placed for quick access to complementary accessories and underwear. The rod is positioned at a low, easily accessible height, turning the routine of getting dressed into a stress free, planned event.
???? DIY Daily Outfit Hanger Labels
This project focuses on creating and implementing a labeled system on the hanging rod to facilitate weekly outfit planning.
???? Material Required
- Blank, sturdy white plastic or cardstock tags (one for each day of the week, plus extras)
- Fine tip permanent marker or label maker
- Small S hooks or metal binder clips (to attach the labels to the rod)
- Matching slimline hangers
????️ Equipment Required
- Ruler or straight edge
- Hole punch (if using cardstock tags)
???? DIY Instruction Step by Step
- Prepare the Tags: Using a ruler, ensure all your blank tags are the same size. Using the permanent marker or label maker, clearly write the abbreviations for the days of the week on the tags (M, T, W, TH, F, SA, SU). If using cardstock, use the hole punch to create a clean hole at the top of each tag.
- Attach to the Rod: Slide the S hooks or clip the metal binder clips onto the main hanging rod. Space them out evenly so there is enough room for one full outfit on a hanger between each label.
- Apply the Labels: Hang the “M” tag from the first hook. Skip a space for the Monday outfit, then hang the “T” tag. Continue this process until all seven days are represented on the rod.
- Plan and Hang: At the start of your week, or the night before, pre select the clothes you plan to wear. Hang the full outfit (shirt, jacket, trousers) on one hanger and place it immediately next to the corresponding day’s label. For example, Monday’s outfit goes next to the “M” tag.
- Maintain Consistency: After you wear an outfit, immediately move the empty hanger to the far end of the rod and replace the worn clothes in the laundry. This practice ensures the “outfit of the day” is always fresh and ready to go, simplifying your morning routine drastically.
19. Shallow Drawer Grid for Small Items

This beautifully customized drawer provides a stunning solution for organizing the smallest, yet most difficult, garments: socks, underwear, scarves, and jewelry. The light washed wood and subtle under drawer lighting give the space an elevated, tailored feel. The drawer design maximizes storage density and visibility.
The key organizational element here is the fixed drawer grid insert. The drawer is divided into dozens of small, uniform square compartments. This precise segmentation forces items to be neatly folded into small squares or rolls, maximizing the quantity of items stored while keeping them entirely separated. The integrated lighting casts a soft glow, making it easy to see colors and patterns at a glance. By using a shallow drawer for small items, you reserve deeper drawers for bulkier clothes. This system ensures every small piece has its own dedicated, easy to find home, preventing the common problem of jumbled sock drawers.
???? DIY Fixed Grid Drawer Divider Insert
This project details building a permanent, multi compartment grid to fit a specific shallow drawer, perfect for small accessories and undergarments.
???? Material Required
- Thin plywood or fiberboard (1/8 inch or 1/4 inch thickness) for the grid dividers
- Wood glue
- Fine grit sandpaper
- Light neutral paint or clear varnish (optional)
- Wood screws (optional, for securing the frame)
- Small LED strip lighting (optional, battery operated)
????️ Equipment Required
- Measuring tape and ruler
- Utility knife or small hand saw
- Clamps
- Pencil
???? DIY Instruction Step by Step
- Measure and Plan: Completely empty the shallow drawer. Measure the interior length, width, and depth of the drawer box accurately. Decide on the size of the compartments (e.g., 4×4 inches is good for socks). Draw the final grid pattern to determine the exact number and length of all the divider strips needed.
- Cut and Slot the Dividers: Cut the thin wood into strips corresponding to your drawn plan (you will have a set of long strips and a set of short strips). Using a utility knife or saw, cut small, precise slots halfway through the height of each strip where they will intersect. The width of the slot must match the thickness of the wood strip perfectly.
- Assemble the Grid: Slide the long and short divider pieces together via the slots, interlocking them to form a sturdy, removable grid. Apply a small amount of wood glue at each intersection point for extra strength.
- Finish the Grid: Once the glue is dry, lightly sand the top edges of the grid. Apply paint or varnish, if desired, and allow it to dry.
- Install Lighting (Optional): If using battery operated LED strip lighting, adhere the strip along the interior sides of the drawer box, just beneath the rim, so the light shines down into the compartments.
- Secure and Load: Place the completed grid insert into the drawer. It should fit snugly. Fold all your small items (socks, underwear, pocket squares) into small rectangles that fit vertically inside the compartments. This organization method makes selecting an item easy while ensuring the drawer stays impeccably neat.
20. Full Height Drawer Storage with Visual Window

This custom wardrobe showcases a classic, sophisticated organization strategy centered around a tall column of deep drawers. The muted sage green color of the cabinetry provides a calming, elegant backdrop for the organized clothing. This design maximizes concealed storage while offering a few strategic display options.
The vertical stack of drawers is the system’s focus, offering ample space for folded clothes, eliminating the need for excessive shelving. A strategically placed glass front drawer allows for a quick view of its contents (like sweaters or accessories) without having to pull the drawer fully open. Another brilliant feature is the integrated pull out accessory tray, located high up, which keeps high value items safe and dust free. Hanging space on either side handles wrinkle prone items, while a dedicated shoe shelf unit sits neatly beside the drawers. This design proves that deep drawers are a highly efficient way to manage a large collection of folded garments.
???? DIY Glass Front Drawer Conversion
This project details how to modify a standard drawer front by installing a clear glass or acrylic panel, allowing for a quick, visual inventory.
???? Material Required
- One existing drawer front
- Safety glass or clear acrylic sheet (sized for the window)
- Wood router or handheld rotary tool
- Wood glue and sealant (clear silicone caulk)
- Primer and paint (to touch up the drawer front)
????️ Equipment Required
- Measuring tape and ruler
- Power drill
- Wood router or rotary tool (or access to a wood shop)
- Clamps
- Safety glasses and ear protection
???? DIY Instruction Step by Step
- Remove and Measure: Carefully remove the drawer front from the drawer box. Measure the center of the drawer front and mark the dimensions for your desired window opening, ensuring a minimum two inch border around all sides for stability.
- Cut the Window Opening: Use a power drill to create a starting hole inside the marked border. Use a jigsaw or router to carefully cut out the rectangular opening, creating a clean hole for the window.
- Create the Rabbet/Groove: This is the most critical step. Using a wood router, carve a shallow groove (rabbet) around the inside edge of the window opening on the back side of the drawer front. This groove should be deep enough to hold the glass/acrylic securely without protruding.
- Prepare and Insert the Glass: Have the glass or acrylic sheet cut to fit snugly into the groove. Apply a thin bead of wood glue around the groove. Gently press the glass into the groove from the back of the drawer front. Allow the glue to dry completely.
- Seal and Finish: Apply a bead of clear silicone caulk around the perimeter of the glass on the back side to fully seal and secure it. Once dry, touch up any chipped paint on the drawer front.
- Reinstall and Organize: Reinstall the finished drawer front onto the drawer box. Place neatly folded sweaters or accessories inside. The new window offers a clear view of the contents, merging the benefit of open shelving with the dust protection of a closed drawer.
21. Layered Knitwear and Capsule Wardrobe

This sophisticated closet highlights a streamlined approach to building a cohesive, color curated wardrobe, particularly effective for business or minimalist style. The light wood interior, strip lighting, and minimalist mirror create an elegant, contemporary feel.
The organization here is built on the concept of capsule wardrobes and smart layering. The hanging garments are arranged in a clean gradient from deep navy blues to soft creams and whites, making it effortless to mix and match jackets, shirts, and trousers. Above the hanging space, the knitwear is rolled and stacked in clear, labeled cubbies, categorized by color and weight (“MID LAYER,” “NAVY,” “INDIGO”). This rolling technique prevents the sweaters from getting creases and allows for instant visibility. By organizing garments by both type and color shade, this system ensures every piece coordinates with the next, simplifying the daily process of getting dressed.
???? DIY Rolling and Labeled Knitwear Storage
This project focuses on adapting an existing shelf to store knitwear using the rolling method and clear, custom labels.
???? Material Required
- Clear acrylic or plastic shelf dividers (clip on or slide under style)
- Small rectangular tags (cardstock or acrylic)
- Vinyl lettering or label maker
- Double sided tape or small shelf clips
- LED strip lighting (battery operated, optional)
????️ Equipment Required
- Measuring tape
- Ruler
- Cleaning supplies
???? DIY Instruction Step by Step
- Clean and Prepare Shelf: Completely empty the shelf designated for knitwear storage. Wipe the surface clean and dry.
- Install Shelf Dividers: Determine the optimal width for each rolled stack (usually 8 to 12 inches wide). Install the clear shelf dividers across the shelf, creating uniform vertical sections. This prevents the rolls from leaning or merging.
- Roll the Garments: Instead of folding, carefully lay each sweater or knit top flat. Fold the sleeves inward. Beginning from the bottom hem, tightly roll the garment upward until it is a compact cylinder. Rolling helps reduce creasing and saves space.
- Categorize and Stack: Group the rolled knitwear by color, layer type (“mid layer,” “heavy”), or fabric. Stack the rolls neatly, with the most frequently worn colors (like navy or cream) facing forward.
- Create and Apply Labels: Use the label maker to create clear, simple labels corresponding to the categories (e.g., “NAVY,” “CREAM,” “LAYER”). Affix the labels to the front edge of the shelf directly above the corresponding stack using double sided tape or small clips.
- Add Lighting (Optional): Attach the battery operated LED strip lighting to the underside of the shelf above the hanging rod. This illuminates the stored knitwear, making the labeled categories highly visible and adding a luxury touch. This rolling and labeling system ensures knitwear remains tidy and easy to find.
22. Montessori Style Children’s Wardrobe

This charming and functional cabinet is designed using Montessori principles, prioritizing independence and accessibility for children. The white cube shelving and colorful base drawers create a cheerful, inviting storage space that is perfectly scaled for a child.
The key feature is the low, open hanging rod and the accessible cube shelves. Hanging clothes are kept at the child’s height, allowing them to choose and put away outfits independently. The central section provides a low mirror and open space for a light, fun accessory display. Below, the large fabric boxes are color coded and feature simple picture labels, indicating the contents (e.g., a shoe icon for shoes, a pants icon for trousers). There is even a dedicated bin for clothes that are “Too Small/Donate.” This combination of visual cues, accessibility, and fun colors encourages children to take ownership of their own organization.
???? DIY Picture Labeled Base Drawers
This project focuses on adding a colorful, picture labeled system to a child’s wardrobe, promoting independence and organization skills.
???? Material Required
- Cube shelving unit or low cabinet base with open slots
- Colorful fabric storage bins (one color per category is helpful)
- Printable graphics of clothing items (e.g., shoe, shirt, pants)
- Clear contact paper or laminating sheets
- Strong fabric glue or safety pins
- Small, low level mirror (child safe, acrylic recommended)
????️ Equipment Required
- Printer and paper
- Scissors
- Ruler
- Glue stick or tape
???? DIY Instruction Step by Step
- Assess and Assign Categories: Determine the primary categories needed for the child’s clothes (e.g., Tops, Bottoms, Shoes, Play Clothes, Donate). Assign a unique color bin to each category.
- Source and Print Graphics: Find simple, clear graphic images (icons) representing each category (e.g., a simple drawing of a sneaker for shoes, a shirt for tops). Print these graphics onto cardstock.
- Prepare the Picture Labels: Cut the printed graphics into neat squares. Cover the front of each label completely with clear contact paper or laminate them. This protects the label from moisture and tears, making them durable.
- Attach Labels to Bins: Use strong fabric glue or small safety pins to affix the laminated picture labels securely to the center front of the corresponding fabric storage bins. Ensure the labels are straight and clearly visible.
- Place Bins and Hanging Clothes: Slide the labeled bins into the cube shelving slots. Place the hanging clothes (shirts, dresses) on the low rod above the bins. Keep the categories aligned (e.g., the shoe bins should be near where the child puts on their shoes).
- Integrate the Mirror: Position a child safe, low level mirror (acrylic or shatterproof) in the central hanging or shelf area. This allows the child to see their entire outfit, encouraging mindful dressing. This picture based system makes tidying up intuitive and fun for young users.
23. Industrial Pipe and Cube Base Open System

This striking organization setup combines the rugged aesthetic of industrial piping with the clean structure of cube shelving. This is a robust, affordable, and highly customizable solution, particularly well suited for a bedroom or studio apartment where a closed closet is not available.
The system utilizes heavy duty metal pipes for the upper structure, providing double hanging rods for maximum capacity. Below this, modular cube storage units act as a sturdy base. The open cubes are perfectly sized to hold woven wicker baskets, which conceal bulky items like extra blankets or winter accessories, maintaining a tidy look. Clear labels above the hanging sections segment the wardrobe by style (“BOHO ESSENTIALS,” “POWER LOOKS”), making it easier to pull together outfits based on mood or event. The top shelf, supported by the metal frame, offers additional display space for decor or infrequently used boxes.
???? DIY Industrial Pipe and Cube Base Integration
This project involves securely installing an industrial pipe frame and integrating it with ready made cube storage units below.
???? Material Required
- Black metal piping (3/4 inch or 1 inch diameter) and fittings (tees, elbows, floor flanges)
- Ready made, open cube storage shelving units (often 1×2 or 2×2 cube size)
- Woven storage baskets (sized to fit the cube openings)
- Wood screws and heavy duty wall anchors (secure into studs is mandatory)
- Labels for hanging sections
- Wood boards (for the top shelf)
????️ Equipment Required
- Measuring tape and level
- Stud finder
- Pipe wrench or channel locks
- Power drill and drill bits
- Screwdriver
- Safety glasses and gloves
???? DIY Instruction Step by Step
- Assemble the Cube Base: Assemble the cube storage units according to the manufacturer’s instructions. Position them directly beneath where you plan to install the hanging rods. The cubes must be level and stable, as they will support the structure.
- Measure and Mark Pipe Placement: Measure the height from the top of the cube unit to the ceiling or wall. Cut the vertical pipe pieces to the required length. Use the stud finder to locate and mark the wall studs where the pipe flanges will be secured.
- Install the Pipe Framework: Using pipe fittings, assemble the vertical supports and the horizontal hanging rods. Attach the wall flanges to the ends of the horizontal pipes and secure them firmly into the wall studs using heavy duty screws and anchors. The bottom of the vertical pipes may rest directly on the floor or the cube units, depending on the design. Tighten all fittings with a pipe wrench.
- Install the Top Shelf: If using a top shelf, secure the wooden board across the top of the entire pipe structure, resting it on the appropriate pipe fittings. This adds stability and storage space.
- Label and Fill: Place the woven baskets into the open cubes. Label the baskets for items like “Shoes,” “Bedding,” or “Gym Gear.” Above the hanging rods, create large labels for your style sections (e.g., “WORK,” “CASUAL”). Organize your clothes by type and hang them in the appropriate, labeled zone.
24. Full Height Drawer Storage with Visual Window

This custom wardrobe showcases a classic, sophisticated organization strategy centered around a tall column of deep drawers. The muted sage green color of the cabinetry provides a calming, elegant backdrop for the organized clothing. This design maximizes concealed storage while offering a few strategic display options.
The vertical stack of drawers is the system’s focus, offering ample space for folded clothes, eliminating the need for excessive shelving. A strategically placed glass front drawer allows for a quick view of its contents (like sweaters or accessories) without having to pull the drawer fully open. Another brilliant feature is the integrated pull out accessory tray, located high up, which keeps high value items safe and dust free. Hanging space on either side handles wrinkle prone items, while a dedicated shoe shelf unit sits neatly beside the drawers. This design proves that deep drawers are a highly efficient way to manage a large collection of folded garments.
???? DIY Glass Front Drawer Conversion
This project details how to modify a standard drawer front by installing a clear glass or acrylic panel, allowing for a quick, visual inventory.
???? Material Required
- One existing drawer front
- Safety glass or clear acrylic sheet (sized for the window)
- Wood router or handheld rotary tool
- Wood glue and sealant (clear silicone caulk)
- Primer and paint (to touch up the drawer front)
????️ Equipment Required
- Measuring tape and ruler
- Power drill
- Wood router or rotary tool (or access to a wood shop)
- Clamps
- Safety glasses and ear protection
???? DIY Instruction Step by Step
- Remove and Measure: Carefully remove the drawer front from the drawer box. Measure the center of the drawer front and mark the dimensions for your desired window opening, ensuring a minimum two inch border around all sides for stability.
- Cut the Window Opening: Use a power drill to create a starting hole inside the marked border. Use a jigsaw or router to carefully cut out the rectangular opening, creating a clean hole for the window.
- Create the Rabbet/Groove: This is the most critical step. Using a wood router, carve a shallow groove (rabbet) around the inside edge of the window opening on the back side of the drawer front. This groove should be deep enough to hold the glass/acrylic securely without protruding.
- Prepare and Insert the Glass: Have the glass or acrylic sheet cut to fit snugly into the groove. Apply a thin bead of wood glue around the groove. Gently press the glass into the groove from the back of the drawer front. Allow the glue to dry completely.
- Seal and Finish: Apply a bead of clear silicone caulk around the perimeter of the glass on the back side to fully seal and secure it. Once dry, touch up any chipped paint on the drawer front.
- Reinstall and Organize: Reinstall the finished drawer front onto the drawer box. Place neatly folded sweaters or accessories inside. The new window offers a clear view of the contents, merging the benefit of open shelving with the dust protection of a closed drawer.
25. Compact Built In Wardrobe with Hidden Utility

This organization system is a marvel of space efficiency, demonstrating how a small, recessed space can be transformed into a comprehensive dressing area. The neutral taupe color and tall, symmetrical design provide an uncluttered, tailored aesthetic.
The key to this system is the central utility core. The tall, illuminated central cabinet is dedicated to hidden utility storage. Behind the mirror, which is mounted on a sliding or hinged panel, is a space specifically designed to store an ironing board and iron. This eliminates the need to clutter up other rooms with laundry tools. The side cabinets offer deep drawer storage and hanging rods at a single height, maximizing space for long garments like dresses and coats. The use of matching storage boxes on the highest shelves provides discrete storage for off season items. This design proves that even small closets can provide everything needed for a complete, organized dressing routine.
???? DIY Hidden Ironing Board Nook
This project details how to create a recessed space, often hidden behind a mirror or door, to store an ironing board and iron securely.
???? Material Required
- Plywood or MDF (3/4 inch thickness) for the recessed cabinet frame
- Small hinges and magnetic latches
- Full length, illuminated mirror (mounted to a piece of backing board)
- Mounting brackets or hooks for hanging the iron and board
- Heat resistant material (small section to line the iron storage spot)
- Wood screws, wall anchors, and wood glue
- Paint and primer
????️ Equipment Required
- Measuring tape and level
- Stud finder
- Power drill and bits
- Circular saw or hand saw
- Screwdriver
- Safety glasses
???? DIY Instruction Step by Step
- Select the Recessed Area: Identify a wall space between two studs that is wide and tall enough to accommodate a folded ironing board. Use a stud finder to confirm the placement.
- Build the Recessed Cabinet: Cut the plywood into five pieces: a back panel, top, bottom, and two side pieces. Assemble these into a box shape. Important: The box depth should be sufficient to hold the folded board and iron (usually 4 to 6 inches).
- Install the Cabinet: Cut the drywall and insert the assembled cabinet box into the wall opening. Secure the cabinet frame directly to the wall studs using long screws.
- Install Storage Hooks: Line the interior of the cabinet with hooks or specialized brackets to securely hold the folded ironing board and the iron. Use heat resistant material (like a metal plate or ceramic tile) to line the spot where the iron will rest.
- Create the Door: Mount the full length mirror onto a sturdy piece of backing board (the “door”). Attach hinges to the side of the mirror door and the cabinet frame. Install a magnetic latch to keep the door securely closed.
- Finish and Integrate: Paint the cabinet frame and the edges of the mirror door to match the surrounding closet. When closed, the illuminated mirror provides a functional dressing reflection. When opened, the utility items are easily accessible, making this space saving solution both practical and visually appealing.
26. Built In Corner Revolving Hanger

This smart closet solution solves the age old problem of wasted corner space in a walk in wardrobe. The crisp white cabinetry and bright accent lighting create a refined, contemporary look. This system is exceptionally clever for maximizing the hanging capacity of a usually inefficient corner.
The brilliant centerpiece is the revolving circular hanging system. A hanging rod is suspended from a central pole and rotates a full 360 degrees, bringing all hanging items to the front with a simple turn. This eliminates the need to reach deep into a dark corner. The open shelves and specialized corner shoe cubbies on the sides provide additional organized storage. The base of the unit, a circular plinth, completes the sleek, built in look. This revolving unit is a genuinely innovative way to make every garment accessible, ensuring no piece of clothing is ever forgotten in the back of the closet.
???? DIY Corner Revolving Hanging Rod
This project focuses on installing a specialized corner system that utilizes a central pole and turntable mechanism to make hanging clothes fully accessible. Note: Due to structural requirements, using a pre fabricated corner revolving system kit is highly recommended.
???? Material Required
- Corner revolving closet kit (includes central support pole, rotating base platform, and circular hanging rod/brackets)
- Mounting hardware (screws, bolts) appropriate for ceiling and floor materials
- LED ring light (optional, for illumination)
- Shoe cubbies or shelves (for adjacent corners)
????️ Equipment Required
- Measuring tape and level
- Stud finder (for ceiling joists)
- Power drill and bits (for mounting)
- Wrench set
- Safety glasses and gloves
???? DIY Instruction Step by Step
- Prepare the Corner: Empty the closet corner completely. Ensure the floor and ceiling are structurally sound and clean. Use the stud finder to locate the ceiling joist directly above the center point of the corner.
- Install the Central Pole Mounts: Following the kit instructions, secure the base plate of the central support pole to the floor and the corresponding mounting bracket to the ceiling joist in the exact center of the corner. These must be perfectly aligned.
- Assemble and Install the Pole: Assemble the support pole and secure it between the floor and ceiling mounts. Ensure the pole is perfectly plumb (vertical) using a level.
- Attach the Rotating Components: Mount the circular base platform to the bottom of the pole (this acts as a rotating floor). Attach the circular hanging rod bracket, which holds the clothes, to the pole at the desired hanging height. Ensure both components rotate smoothly and freely.
- Add Illumination (Optional): If using an LED ring light, mount it to the ceiling around the central pole mount. This illuminates the full circular area, making it easy to view all garments.
- Load and Categorize: Hang your garments on the new circular rod, reserving the corner for items that need to stay hanging (dresses, suits, jackets). Utilize the adjacent corner spaces for specialized storage like shoe cubbies. Gently rotate the unit to access any item.
27. High Capacity Mobile Garment Racks

This commercial grade setup demonstrates a powerful strategy for managing an extremely large inventory, especially effective for clothing professionals or large families in open storage areas. The exposed chrome structure and high ceilings give the space a minimalist warehouse feel.
The brilliance of this system is the high density, mobile storage. Heavy duty, multi tiered metal racks on casters are lined up, allowing entire sections of the wardrobe to be rolled out for access or inventory. The sheer capacity of the double hanging rods maximizes vertical space. Large, brightly colored signage clearly designates major categories like “SUMMER TOPS” and “WORK TROUSERS,” preventing clutter migration and making selection quick. Furthermore, transparent plastic bins stored beneath the racks provide concealed, yet visible, space for folded items or off season wear. This robust, adaptable solution focuses on pure functional volume.
???? DIY Mobile Rolling Rack Setup and Labeling
This project involves assembling and deploying heavy duty garment racks and creating large, highly visible signs for categorization.
???? Material Required
- Heavy duty chrome or metal garment racks on casters (adjustable height recommended)
- Clear plastic storage bins (low profile, sized to fit beneath the rack)
- Large, bright colored cardstock or thin plastic sheets for signs
- Permanent marker or vinyl lettering for labels
- Metal clips or zip ties (for attaching signs to the rack)
????️ Equipment Required
- Measuring tape
- Wrench (often included with the rack kit)
- Hole punch or utility knife
???? DIY Instruction Step by Step
- Assemble the Racks: Following the manufacturer’s instructions, assemble the mobile garment racks. If the height is adjustable, set the upper rod to a height that allows space for a second, lower rod without clothes dragging. Ensure the casters are properly attached for easy rolling.
- Create Signage: Cut the bright colored cardstock or plastic sheets into large, uniform signs. Use vinyl lettering or a bold permanent marker to write broad category labels (e.g., “WORK SHIRTS,” “WEEKEND CASUAL,” “SEASONAL OCCASIONS”).
- Install the Labels: Use metal clips or zip ties to securely attach the signs to the top rail of each rack section. The signs should be high enough to be clearly visible from a distance, extending above the hung garments.
- Load and Categorize: Separate your entire wardrobe into the categories you created on the signs. Load the upper and lower hanging rods, ensuring all clothes on a single rack adhere strictly to the labeled category.
- Under Rack Storage: Slide the low profile, clear plastic storage bins under the racks. Use these bins for bulkier folded items like sweaters or jeans. Although they are clear, add small internal labels to the bins for precision. The mobile nature of the racks means you can roll them away to easily access the bins underneath.
28. Humidity Controlled Garment Care Cabinet

This luxurious, dark grey closet demonstrates a deep commitment to high quality garment preservation and care. The use of custom wood boxes and drawers combined with the charcoal color palette creates a sophisticated, refined atmosphere. This system is designed to protect delicate fabrics from environmental damage.
The most unique and important feature is the focus on environmental control. A dedicated machine, likely an air purifier or dehumidifier, is placed directly inside the closet to manage air quality and moisture. Custom wooden boxes with labels like “SILK & CASHMERE” are used to store delicate natural fibers, further protecting them from pests and dust. The closet door itself is optimized for storage, featuring hooks for frequently used accessories like garment brushes and lint removers. Furthermore, the specialized trouser rack below the hanging shirts ensures pants are stored without creases. This organization system treats the wardrobe as an investment, requiring specialized climate control and care.
???? DIY Humidity Control and Garment Care Setup
This project focuses on adding environmental control devices and specialized storage tools to maximize the longevity of delicate clothes.
???? Material Required
- Small, dedicated closet dehumidifier or air purifier
- Hygrometer (a device to monitor humidity levels)
- Cedar blocks or specialized pest repellent sachets
- Custom wooden storage boxes or breathable garment bags (labeled for delicate fabrics)
- Hooks or over the door organizers (for storing brushes, rollers)
????️ Equipment Required
- Measuring tape
- Level
- Safety glasses
???? DIY Instruction Step by Step
- Assess Climate and Purchase Device: Use a hygrometer to measure the average humidity in your closet space. Purchase a small, closet sized dehumidifier or air purifier appropriate for the room size. Note: Check the device’s power requirements and ensure you have a safe, nearby power source.
- Install the Device: Position the dehumidifier/air purifier in an open, accessible area on the closet floor, away from clothes, as seen in the image. Ensure the device has room to vent and that the water reservoir (if applicable) is easily accessible for emptying.
- Implement Pest and Moisture Control: Place cedar blocks or cedar oil sachets strategically throughout the closet, particularly inside drawers and storage boxes, to naturally repel pests. Use moisture absorbing packets (silica gel) in any sealed boxes.
- Create Specialized Storage: Transfer delicate fabrics like silk, wool, and cashmere into custom wooden boxes or breathable cotton garment bags labeled with their contents. These natural containers prevent static build up and provide a protective layer against environmental changes. Stack these neatly on shelves.
- Organize Care Tools: Install small hooks or an over the door organizer on the inside of the closet door. Hang garment care tools here, such as lint rollers, fabric shavers, and soft brushes. Keeping these tools visible and accessible encourages regular maintenance, ensuring your clothes are always ready to wear.
29. Fully Labeled Clear Bin Storage Wall

This organization system is a masterclass in transparency and categorization, creating an incredibly visual and highly efficient storage center. The all white cabinetry provides a clean foundation, allowing the well structured organization to be the main feature.
The key component is the comprehensive use of clear, stackable drawers and storage bins, all of which are meticulously labeled. This system is built on maximum visibility—you can immediately see the type and quantity of every folded item, from “T-SHIRTS” on the open shelves to “ATHLEISURE” and “LOUNGEWEAR” in the clear drawers below. The drawers on the bottom use transparent fronts, combining the dust protection of a drawer with the visual benefit of open shelves. A central mirror and dedicated space for a floral arrangement soften the look, preventing the functional focus from feeling too sterile. This method ensures that every garment has a precise, labeled location, making both retrieval and tidying effortless.
???? DIY Clear Drawer and Cubby Labeling System
This project focuses on implementing a clear, comprehensive labeling strategy across all open and clear storage components for maximum efficiency.
???? Material Required
- Clear storage bins, pull out drawers, and shelving cubes
- Small, rectangular acrylic or magnetic label holders
- Printable label paper or vinyl lettering
- Double sided tape (for non magnetic holders)
- Pen or label maker
????️ Equipment Required
- Ruler
- Scissors or utility knife
- Printer (optional)
???? DIY Instruction Step by Step
- Categorize Everything: Empty all the cubbies and clear drawers. Create a definitive list of every category of clothing and accessory (e.g., “SOCKS,” “DENIM,” “SWEATERS,” “WORKOUT GEAR”).
- Prepare the Labels: Print or write out the category names onto small, uniform rectangular tags. Using a bold, clear font is essential for readability. Ensure the text fits neatly inside the label holders.
- Install Label Holders: Affix the label holders to the front of every single storage unit—drawers, bins, and boxes. Use magnetic holders for metal frames, or secure acrylic holders with strong double sided tape to the front of plastic drawers and shelves. Consistency in label placement is key to the clean look.
- Insert Labels: Slide the corresponding category tag into each holder (e.g., the tag that says “COCKTAIL DRESSES” goes on the box where they are stored).
- Fold and Load: Place your clothes and accessories into the appropriately labeled unit. This system requires consistent folding (like the file fold) for stacks to fit neatly in their assigned space. The clear visibility of the drawers and the detailed labels combine to create an intuitive and fully organized system.
30. Dressing Vanity with Shoe Pull Outs

This elegant, all white closet integrates a functional vanity desk and specialized shoe storage, creating a cohesive, high end dressing area. The combination of bright lighting, glass surfaces, and pristine white millwork gives the space a feeling of luxury and cleanliness.
The key features are the multi functional vanity and the innovative shoe storage. The vanity area includes a full width, glass topped desk with a makeup mirror surrounded by vanity bulbs. Crucially, a shallow, divided drawer is built directly into the desk, keeping jewelry and makeup neatly organized and instantly accessible. To the left, dedicated pull out shoe trays are stacked vertically. These trays provide clear, easy access to footwear while keeping them protected from dust. The ample hanging space for long, flowing garments completes the transformation of this closet into a comprehensive beauty and dressing suite.
???? DIY Vanity Desk and Pull Out Shoe Shelves
This project details how to create a simple vanity section and install specialized, sliding shoe shelves within a cabinet.
???? Material Required
- Plywood or MDF boards (for the vanity desk and shoe shelves)
- Glass or clear acrylic sheet (for the vanity countertop)
- LED strip lighting and round vanity bulbs (for the mirror)
- Full extension drawer slides (for both the jewelry drawer and shoe shelves)
- Cabinet paint and primer
- Felt or velvet lining (for the jewelry drawer)
????️ Equipment Required
- Measuring tape and level
- Power drill and bits
- Screwdriver
- Saw (circular or hand saw)
- Glue and clamps
- Electrical wiring and installation tools (for vanity lighting)
???? DIY Instruction Step by Step
- Build the Vanity Desk: Cut and assemble the vanity desk frame (top, sides, and supporting legs/cabinetry). Paint and finish the unit. Install a shallow, lockable drawer using drawer slides. Create a divided insert for the jewelry drawer (as detailed in System 19) and line it with felt.
- Install the Countertop: Secure the glass or acrylic sheet to the top of the desk using small silicone spacers or specialized mounting hardware. The clear top protects the wood surface and adds elegance.
- Install Vanity Mirror Lighting: Mount a large mirror above the desk. Wire the vanity bulbs around the perimeter of the mirror or install a pre wired illuminated mirror unit. Note: All permanent electrical work must be done by a licensed electrician.
- Build Shoe Trays: For the shoe storage cabinet, cut shallow shelf trays (lacking high sides) from plywood. Attach full extension drawer slides to the sides of the cabinet opening and to the sides of each shoe tray. Ensure the trays are spaced vertically to accommodate the height of your shoes.
- Install and Test Shoe Trays: Insert the finished shoe trays onto the slides. Test the pull out action for smooth, easy gliding. Load the shoes onto the trays, organizing them by style or color. This combination provides a streamlined space for accessorizing and dressing.
31. Adjustable Pipe Wardrobe for Small Spaces

This highly versatile organization solution is designed for maximum function in small or challenging areas, such as apartments or dorm rooms. The simple grey wall and flooring provide a neutral backdrop, making the modular storage the key focus.
This system relies on the affordability and flexibility of metal pole racks. The tall, thin metal poles are stabilized by the ceiling and floor, supporting multiple adjustable horizontal rods. This allows for customized height settings for double hanging space and shelving. The central mirror and small shelf provide a practical dressing area. Crucially, the base features open shelving, which is perfect for shoe storage and small accent pieces. This design is easily assembled and disassembled, making it a wonderful non permanent solution that provides extensive vertical storage without damaging walls.
???? DIY Tension Rod Wardrobe Assembly
This project focuses on assembling a pre manufactured, adjustable metal pole wardrobe system, often using tension to secure it between the floor and ceiling.
???? Material Required
- Adjustable metal pole wardrobe kit (includes vertical poles, horizontal rods, shelves, and connectors)
- Small hammer or rubber mallet (for tapping fittings, optional)
- Matching storage boxes (for the upper shelf)
????️ Equipment Required
- Measuring tape and level
- Screwdriver (if fittings require screws)
???? DIY Instruction Step by Step
- Measure and Position: Measure the height of your room. Adjust the vertical poles to the necessary height, ensuring the spring loaded or tension mechanism is ready for compression. Mark the exact placement of the unit on the floor.
- Install the Vertical Poles: Place the vertical poles in their designated spots. Extend the poles until they create a secure, stable tension between the floor and ceiling. Use a level to ensure they are perfectly vertical.
- Attach Horizontal Rods: Using the included plastic or metal fittings, attach the horizontal hanging rods and shelves to the vertical poles at your desired heights. Secure the lower rods for trousers and the upper rods for shirts and jackets.
- Check Weight Distribution: Once fully assembled, give the unit a gentle shake to ensure stability. Distribute the weight of the clothes evenly across the rods to maintain the integrity of the tension.
- Organize and Accessorize: Place shoes neatly on the lowest shelves. Use the high shelves for lightweight, matching storage boxes to hide miscellaneous items. Position the mirror and a small decorative item in the center to create a simple, appealing dressing area. This simple structure offers surprisingly robust, organized storage.
32. Bohemian Wicker Basket and Wood Storage

This warm, inviting closet utilizes natural wood finishes and woven wicker baskets to create an appealing, rustic aesthetic. This organization system successfully blends storage with soft, appealing design elements, making the closet feel like a cozy dressing room.
The system relies heavily on the use of labeled wicker baskets, which conceal clutter and add texture. These baskets are clearly marked for specific items, such as “TOWELS” and “COTTON,” ensuring every category has its own natural container. The open shelving provides space for decorative elements, such as an aromatherapy diffuser and a small writing nook for notes, integrating self care into the routine. Below, large, shallow drawers provide organized storage for folded items, while a dedicated low shelf is used for easy access to shoes. This natural, earth toned system demonstrates that storage can be both appealing and highly organized.
???? DIY Labeled Wicker Basket Storage
This project focuses on using affordable wicker baskets and customized tags to create a coordinated, appealing organization system.
???? Material Required
- Wicker or woven baskets (various sizes, some with linen liners)
- Small metal or wooden rectangular tags (one per basket)
- Vinyl lettering or fine-tip permanent marker
- Small binder clips or wire (for attaching tags to baskets)
- Small shoe bench or open shelving unit
????️ Equipment Required
- Ruler
- Screwdriver (if assembling the shoe bench)
- Drill and bits (if assembling the shoe bench)
???? DIY Instruction Step by Step
- Assess and Assign Baskets: Count the number of storage categories you need (e.g., Towels, Socks, Underwear). Assign a basket to each category. Choose baskets with a linen liner for delicate items.
- Prepare the Tags: Use the permanent marker or vinyl lettering to create clear, simple labels corresponding to the category names on the metal or wooden tags. Keep the font bold and easy to read.
- Attach the Labels: Use small metal binder clips or a piece of wire to securely fasten the labeled tags to the front rim of each basket. Ensure the tag hangs straight and is easily visible.
- Install/Place Shelving and Baskets: Position the wicker baskets neatly onto open shelves. Use the top shelves for less frequently used items, and the lower shelves for daily essentials.
- Integrate Shoe Storage: Place the small shoe bench or low shelf unit on the floor beneath the hanging garments. This provides a designated, ventilated space for everyday shoes.
- Add Aesthetic Touches: Use one or two open shelves to display appealing items like a small plant, a diffuser, or a notepad. This prevents the area from feeling purely utilitarian, enhancing the cozy, organized atmosphere.
33. Seasonal Color Palette and Theme Sorting

This bright, organized closet is managed around the concept of seasonal color palettes and themes, making it easy to build outfits that match specific moods or times of the year. The white cube shelving and tracking lighting create a clean, gallery like display.
The most innovative feature is the large, colorful, and clearly labeled signage placed above the hanging rods. These signs designate categories like “SPRING BRIGHTS,” “JEWEL TONES,” and “AUTUMN CRISPS.” This organization strategy encourages the owner to select garments based on color and emotional association, simplifying the creative process of dressing. Below the hanging rods, large canvas bins provide concealed storage for “WRITING TOOLS” and “ACCESSORIES.” The central area offers a spot for outfit planning inspiration, integrating a mood board or cork board for visual planning.
???? DIY Seasonal Theme Labeling System
This project focuses on creating and installing large, eye catching labels to organize a wardrobe based on seasonal color palettes rather than just garment type.
???? Material Required
- Large, sturdy cardstock or foam board (for the signs)
- Brightly colored paper (to mat the labels and add visual pop)
- Vinyl lettering or bold permanent markers
- Small hooks or wires (for hanging the signs)
- Craft glue or spray adhesive
????️ Equipment Required
- Ruler and scissors
- Hole punch
- Safety glasses
???? DIY Instruction Step by Step
- Define Themes and Colors: Create a list of 4 to 6 categories based on color and season (e.g., “WINTER BLUES,” “SUMMER VIVIDS,” “EARTH TONES”). Assign a unique color to each category. Select a different, coordinating bright color for the background of each sign.
- Create the Signs: Cut the foam board or cardstock into uniform rectangles. Cut the bright colored paper slightly smaller to create a border effect (the “mat”). Glue the bright paper onto the center of the foam board.
- Apply Labels: Use the vinyl lettering or marker to write the category names boldly on the center of the signs (e.g., “SPRING BRIGHTS”).
- Install the Signs: Punch two holes in the top of each sign. Thread wire or string through the holes and attach the signs to the shelf lip or the wall directly above the designated hanging rod or cubby. Ensure they are spaced evenly.
- Group Garments by Theme: Now, group all your garments according to the newly labeled themes. For example, all your bright yellow, lime green, and fuchsia dresses go under the “SUMMER VIVIDS” sign. This visual organization makes outfit assembly much faster and more creative.
34. Dedicated Clothing Airing Station

This minimalist and serene storage system, set against a calming pale green wall, highlights the importance of garment care and proper air circulation. The light wood shelves and simple chrome accents give the area a clean, spa like feel.
The key feature is the designated “Airing” spot. The hanging rod on the left is reserved for clothes that have been worn but are not yet dirty enough for the laundry, indicated by the tag that clearly says “AIRING.” This prevents half worn clothes from migrating to the floor or mixing with clean items. The tall shelving unit on the right is perfect for storing folded linens and towels, or even clothes, using organized stacks and wire baskets for smaller items. The low shoe rack beneath the hanging rod keeps daily footwear organized and off the floor. This simple addition of an airing station is a practical step in managing a tidy wardrobe.
???? DIY Airing Station Setup and Labeling
This project focuses on dedicating a section of a hanging rod for worn clothes that need to air out before being worn again or put away.
???? Material Required
- Small section of existing hanging rod
- Simple wooden hanger (designated for the “Airing” sign)
- Cardstock or thick paper tag
- Permanent marker or label maker
- Wire or string (for hanging the tag)
????️ Equipment Required
- Ruler
- Hole punch
- Scissors
???? DIY Instruction Step by Step
- Designate the Airing Spot: Choose the far end of an existing hanging rod or an empty wall area. This space should be large enough for 2 to 4 worn items to hang freely without touching other clean clothes.
- Create the Tag: Cut a piece of sturdy cardstock into a simple rectangular tag. Use a bold permanent marker or label maker to clearly write the word “AIRING” on the tag. Punch a clean hole in the top.
- Install the Sign: Tie the tag to the designated wooden hanger with string or wire. Hang this sign hanger at the start of the airing zone. This clearly marks the boundary for worn clothes.
- Practice the Routine: Adopt the habit of immediately placing any item of clothing that has been worn for only a few hours (e.g., a jacket, a dress shirt) into this “AIRING” zone instead of putting it back with clean clothes. Allow the garment to hang and air for 24 hours before making a decision to re wear it or place it back in the clean section.
- Organize Adjacent Shelves: Utilize nearby shelving for clean folded items, like towels or linen, placing them in neat stacks to reinforce the tidy aesthetic of the room. This small, dedicated space is highly effective for maintaining order and extending the life of your garments.
35. Built In Multi-Drawered Jewelry Wardrobe

This luxurious, traditional closet showcases a stunning example of customized, secure storage for an extensive collection of accessories. The dark wood and velvet linings exude a feeling of old world elegance and security.
The core of this system is the tall stack of shallow, velvet lined display drawers. Each drawer pulls out on full extension slides, providing instant access and visibility to different categories of jewelry, scarves, and accessories. The velvet lining protects delicate metal and stones from scratches. The top shelf features specialized inserts for hanging necklaces and displaying rings, keeping them untangled and dust free. A small vanity mirror is positioned for last minute checks. The narrow drawers on the right are sized perfectly for rolled ties and small scarves. This specialized organization is essential for maintaining and protecting a valuable accessory collection.
???? DIY Velvet Lined Sliding Accessory Trays
This project focuses on modifying existing shallow drawers with specialized velvet liners and compartment trays for jewelry and accessories.
???? Material Required
- Shallow drawer boxes (existing or new)
- Pre made velvet jewelry tray inserts (modular pieces for rings, earrings, etc.)
- Velvet fabric and spray adhesive (if building custom liners)
- Thin plywood or foam core (if building custom dividers)
- Full extension drawer slides (if replacing existing drawers)
????️ Equipment Required
- Measuring tape
- Utility knife or scissors
- Ruler
???? DIY Instruction Step by Step
- Measure and Source Trays: Measure the interior dimensions of the shallow drawers. Source pre made velvet jewelry tray inserts that fit snugly into the drawer, utilizing every inch of space.
- Install the Trays: Simply place the modular velvet trays directly into the drawer boxes. If using different sizes, ensure the arrangement is uniform. Tip: Dedicate one drawer solely to necklaces (using long, narrow sections) and another to earrings and rings.
- Create Custom Dividers (Optional): If the pre made trays do not fit, cut thin plywood strips to fit the drawer. Cover the strips completely with velvet fabric using spray adhesive. Assemble the dividers in a grid pattern inside the drawer, gluing them to the sides and to each other.
- Load by Category: Fill the velvet lined drawers. Organize items strictly by category and color within each drawer: watches in one section, small ties rolled in another, and rings/earrings separated by metal type. The velvet protects the accessories and provides a luxurious backdrop for display.
- Integrate Standing Displays: On an adjacent shelf, place a standing ring holder or a velvet bust for displaying a favorite necklace. This combination of concealed and visible storage makes getting ready feel like a true ritual.
36. Day-to-Day Themed Drawer Organization

This visually appealing system uses segmented, deep drawers to organize entire outfits or clothing categories based on activity or day of the week. The high contrast of the dark grey drawer fronts against the white cabinet body gives the setup a very modern, tailored look.
The brilliance of this organization system lies in the activity based labeling on the drawer fronts: “FORMAL TUESDAY,” “CASUAL SATURDAY,” and “RAINY DAY LOOK.” This categorization goes beyond sorting by item type and instead organizes by usage, simplifying decision making immensely. Inside, the drawers feature internal dividers, keeping folded items like ties, socks, and pocket squares neatly separated and standing upright (file folded). A small clipboard on the shelf above is available for creating detailed outfit checklists, complementing the visual organization. This system transforms the morning routine from chaotic searching to simple, pre-planned selection.
???? DIY Themed Drawer Labeling and Segmentation
This project focuses on adding dividers and large, easy to read labels to organize drawers based on activity or theme.
???? Material Required
- Drawer divider inserts (plastic or wooden)
- Large, simple label holders (magnetic or clip on)
- Cardstock or thick paper
- Black vinyl lettering or a bold permanent marker
????️ Equipment Required
- Measuring tape
- Ruler
- Scissors
???? DIY Instruction Step by Step
- Install Drawer Dividers: Purchase adjustable or modular drawer dividers. Install these into the drawer box, creating small compartments suitable for standing folded items (shirts, ties, socks). Tip: Use small dividers at the back for socks and wider ones in the front for folded clothes.
- Define Themes: Create specific usage based categories that reflect your life (e.g., “Gym Gear,” “Office Formal,” “Date Night,” “Weekend Errands”). These will be the labels for your drawers.
- Create Large Labels: Cut the cardstock into neat rectangles to fit your label holders. Use the vinyl lettering or marker to write the usage based themes in a clear, bold font. Ensure the labels are prominent and easy to read.
- Affix Labels to Drawer Fronts: Attach the label holders to the center of the drawer fronts using a strong adhesive or the built in clip mechanism. Insert the category label into its corresponding holder.
- Organize by Usage: Load the drawers according to the new labels. For the “FORMAL TUESDAY” drawer, include the specific socks, tie, shirt, and underwear you might wear for that formal day. This system dramatically reduces the time spent mixing and matching every morning.
37. Integrated Laundry Chute and Vertical Sorter

This highly functional, streamlined closet focuses on integrating the management of dirty clothes directly into the storage system. The white, clean cabinetry and use of breathable hampers maintain a sanitary and orderly environment.
The ingenious feature here is the vertical laundry chute/sorter. Instead of a single hamper, three stacked, clearly labeled cloth bins (“DRY CLEAN,” “DARK WASH,” “LIGHT WASH”) are positioned in a narrow cabinet column. This vertical design saves floor space, and the separation simplifies the initial sorting process. A chute or opening, marked “DROP HERE,” above the bins provides a direct path for dirty clothes. Furthermore, the inside of the door is utilized with pockets for laundry supplies like stain removers and fabric sprays. This integrated, multi bin system is a highly efficient way to keep dirty clothes organized and out of sight.
???? DIY Vertical Laundry Sorting Column
This project involves installing a vertical stack of removable hampers within a narrow cabinet space, utilizing the space under a hanging rod.
???? Material Required
- Narrow cabinet enclosure or plywood to build one
- Three stackable, breathable mesh or fabric hampers (labeled)
- Custom wooden shelving or metal rods (to support the hampers)
- Plywood (for the bottom hamper drop box)
- Wall screws and wood glue
- Paint and primer
????️ Equipment Required
- Measuring tape and level
- Power drill and bits
- Screwdriver
- Saw (if building the cabinet)
???? DIY Instruction Step by Step
- Build the Vertical Cabinet: Identify a narrow, tall cabinet space, or build a custom column with plywood. The width must be just slightly larger than the hampers. Ensure the bottom of the cabinet is sealed to act as the base for the lowest hamper.
- Determine Hamper Placement: Place the lowest hamper on the bottom. Mark the height of the hamper top. Install a horizontal divider shelf or support rod just above that mark, secured firmly to the cabinet walls. Repeat this for the second and third hampers.
- Install the Top Drop Slot: Cut an opening in the top shelf of the cabinet column. This opening should be large enough to allow clothes to drop easily into the top hamper. Label the top of the cabinet column “DROP HERE.”
- Label the Hampers: Use permanent labels to clearly designate each hamper: “DRY CLEAN,” “DARK WASH,” and “LIGHT WASH.” Place the hampers in their corresponding slots, making sure they are easily removable for transport to the laundry room.
- Utilize the Door: Install small wire baskets or pockets on the inside of the cabinet door to store laundry detergent pods, fabric spray, and stain removal pens. This keeps all necessary items conveniently located with the sorter.
38. On Demand Garment Label Printing Station

This technologically advanced organization system is designed for meticulous inventory management, particularly useful for people with large or frequently changing wardrobes who need quick, temporary labels. The clean white backdrop provides a distraction free environment for the technology.
The central feature is the integrated thermal label printer and organizer. This device is mounted directly onto a shelf, allowing the owner to print garment tags, inventory codes, or care instructions on demand, without needing a full sized computer. The roll of printed photo labels demonstrates how technology can aid in outfit recall and tracking. The hanging rods on either side provide space for color coordinated garments, showing that the physical organization is as neat as the digital. This system represents the ultimate in detail oriented organization, allowing for quick, professional labeling of every item in the closet.
???? DIY Integrated Label Printer Station
This project focuses on mounting and integrating a dedicated thermal label printer into an existing closet shelf.
???? Material Required
- Compact thermal label printer (dedicated closet printer recommended)
- Wall mounting hardware (screws, brackets) specific to the printer model
- Power strip or extension cord (if outlet is not nearby)
- Double sided tape or glue (for securing printer paper)
????️ Equipment Required
- Measuring tape
- Power drill and bits
- Screwdriver
???? DIY Instruction Step by Step
- Select Printer Location: Choose an open shelf area with a nearby power outlet. The area should be high enough to be accessible but should not interfere with hanging clothes.
- Mount the Printer: Following the printer’s instructions, secure the mounting brackets to the underside of the shelf or to the back wall of the closet using screws. Ensure the brackets are level and secure. Attach the printer to the brackets.
- Organize Paper Flow: Position the paper roll feeding into the printer so it unrolls neatly, as shown in the image. You may need to use a small holder or guide to ensure the labels print without curling.
- Connect Power: Plug the printer into the power source. If an outlet is not directly on the shelf, run a discreet extension cord down the back of the cabinet to a nearby outlet.
- Implement Immediate Labeling: Use the printer’s companion app on your phone or tablet to design simple labels for new items, care instructions, or temporary outfit tags. The ability to quickly print a neat, professional label on the spot removes the excuse for not labeling and keeps the inventory management consistent.
39. Illuminated Cubby and Drawer System

This stunning, contemporary closet features a clean blend of warm wood and bright white surfaces, utilizing integrated lighting to showcase the contents. This system is centered around highly accessible open shelving, making it a dream for quick outfit assembly.
The central organization strategy uses a wall of deep cubbies and drawers. The cubbies are framed in light wood and separated by white divider shelves. Recessed LED strip lighting illuminates every cubby, highlighting folded sweaters and accessories. This lighting not only adds a luxury aesthetic but also removes shadows, making color selection easier. The central white drawers provide contrasting concealed storage, while the hanging rods on the side handle coats and shirts. The strategic placement of a full length mirror and dedicated low shelves for shoe display completes this system, which maximizes light and visibility for effortless dressing.
???? DIY Integrated Cubby LED Lighting
This project focuses on adding low voltage LED strip lighting to the inside of shelves and cubbies for enhanced visibility and aesthetic appeal.
???? Material Required
- Low voltage LED strip lighting (flexible, adhesive backed)
- Connecting wires and corner connectors (if needed for seamless light flow)
- Power supply unit (transformer)
- Switch (inline or wireless remote)
- Small wire clips or wire hiding strips
????️ Equipment Required
- Measuring tape and scissors (for cutting the LED strips)
- Cleaning supplies
- Screwdriver (for securing the power unit)
???? DIY Instruction Step by Step
- Clean and Measure: Empty the shelves and cubbies. Wipe down the underside of each shelf lip where the light will be placed. Measure the length of the shelf lip to determine how much LED strip you need.
- Cut and Connect Strips: Cut the LED strip lighting at the designated cut points to match the shelf lengths. Use corner connectors to run the wires neatly around corners or between shelves for a continuous look.
- Install the Lights: Peel the adhesive backing and firmly press the LED strips onto the underside of the shelf lips, facing downward. This placement hides the strip but illuminates the contents of the shelf below.
- Install Power and Switch: Run the power wires discreetly down the back of the cabinet to a hidden location (like the top or back of the base drawer) where the power supply unit will be secured. Connect the strips to the power supply, and connect the switch into the circuit.
- Test and Finalize: Turn on the switch to test the illumination. Use small wire clips or adhesive strips to neatly hide all visible wires. The finished installation illuminates every cubby, making the folded clothes and displayed accessories look crisp and easy to find.
Conclusion and Key Takeaways
An overstuffed closet is simply a symptom of a storage system that doesn’t fit your life. Moving forward, the goal is not merely to tidy up, but to install structures that force organization and prevent future clutter accumulation.
Remember the major themes we explored. Segmentation is key; divide your space by user, activity, or season. Accessibility matters; use clear bins, open shelves, and smooth pull outs so you can see and reach everything quickly. Technology can help; smart tracking and dedicated care stations protect your clothes and simplify maintenance.
You have 39 actionable blueprints, from rolling under eave bins to revolving corner racks. Choose one system that addresses your biggest pain point today. Taking this initial step means you can start the year enjoying a calmer, more efficient, and beautifully organized wardrobe.