Opening your closet door can be a stressful start to the day. You are faced with a jumble of clothes, but that “nothing to wear” feeling is strong. The truth is, the problem is not your clothes. It is the lack of a good system.

A cluttered wardrobe costs you time. It hides the outfits you love and makes getting dressed a chore. This chaos can spill over, making your entire bedroom feel messy.
It is time for a fresh start. We have found 48 genius wardrobe organization systems to help you take back control. This list has everything. You will find simple DIY projects, clever ways to use bins, and full-scale setups. Get ready to build a closet that works for you.
1. The Modern Modular Organizer
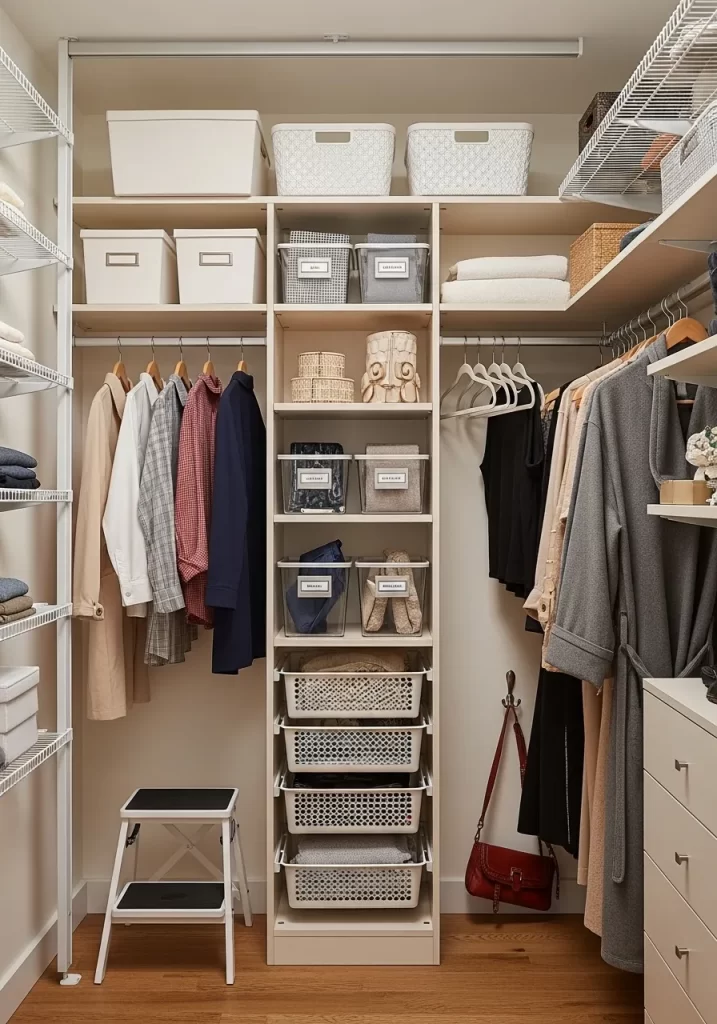
This setup brings clarity to your wardrobe. It uses a smart mix of storage types. White drawers keep folded items neatly tucked away. Open wood cubbies at the bottom offer quick access to shoes or baskets.
A separate vertical shoe rack neatly lines up footwear, saving valuable floor space. The dual hanging rods provide ample room for shirts, blouses, and jackets. This system works well in many closets, keeping everything visible and orderly. Its simple lines and two-tone look feel fresh and clean.
DIY Assembly: The Modern Modular Organizer
This system uses pre-built modules. Your job is to assemble and secure them.
Tools You’ll Need:
- Phillips-head screwdriver
- Hammer
- Level
- Stud finder
- Drill with various bits
- Tape measure
- Pencil
Instructions:
- Prep Your Space: Empty your closet completely. Use the stud finder to locate the wall studs. Mark their centers lightly with a pencil. You will anchor the system to these studs for safety and stability.
- Build the Drawers: Unpack the flat-box for the white drawer unit. Lay a blanket on the floor to prevent scratches. Following the manual, build the outer frame first. Then, assemble each drawer. Attach the small runner wheels or slides to the drawers and the inside of the frame. Make sure they are level.
- Build the Cubbies: Assemble the wood-tone cubbies. These are often simpler, just an outer box and maybe a divider.
- Assemble the Shoe Rack: Build the vertical shoe rack unit, attaching the shelves as shown in its instructions.
- Position and Level: Place the drawer unit, cubby, and shoe rack in their final spots. Put the level on top of each piece. If a unit wobbles or isn’t level, use small plastic shims (sold at hardware stores) underneath until it is steady.
- Secure Units: For a clean look, clamp the units together. Drill small, hidden pilot holes and use short screws to join the drawer unit and shoe rack side-by-side.
- Install Hanging Rods: Measure for your top rod. Install the rod’s support brackets into the wall studs you marked. Make sure the brackets are level with each other. Repeat this process for the lower rod. Set the rods in place.
- Final Steps: Slide the assembled drawers into the drawer unit. Wipe down all surfaces to remove any dust from assembly.
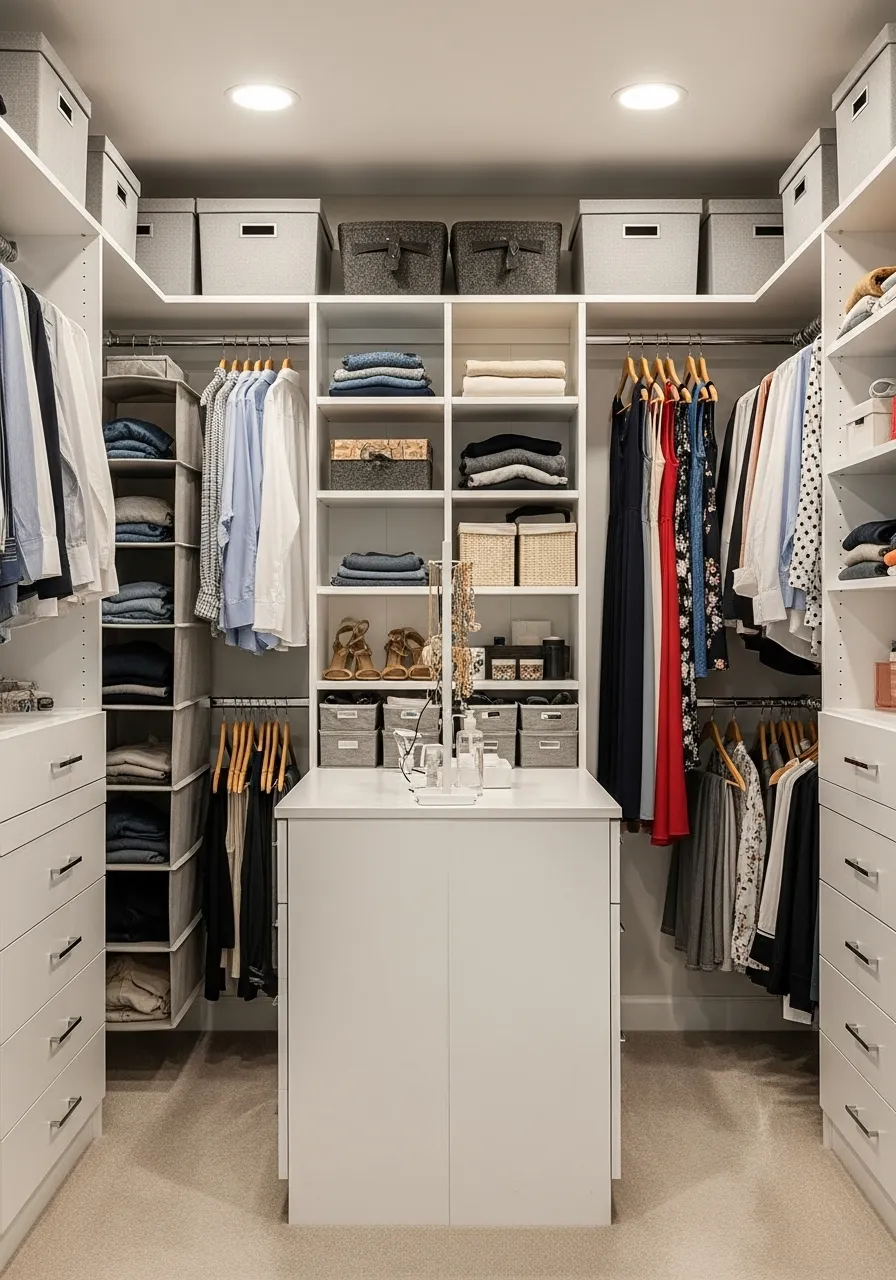
2. The Boutique Walk-In Island
This system turns a closet into a personal boutique. The centerpiece is a large island. It has a marble top and specialized pull-out drawers lined with velvet for jewelry and watches.
Glass-front cabinets and angled shoe shelves let you see your collection at a glance. Integrated LED lighting under the shelves highlights key items. This design is all about making your wardrobe a showcase. It separates and displays everything, from handbags to shoes.
DIY Assembly: The Boutique Walk-In Island
A full custom build is complex. Here is how to create a similar feel.
Tools You’ll Need:
- Drill and drill bits
- Screwdriver
- Level
- Tape measure
Instructions:
- Create the Island: Start with a sturdy base. A standard kitchen island or a large, flat-topped dresser works well. Place it in the center of your walk-in.
- Add a Top: For a clean look, have a countertop cut to fit. A hardware store can cut a piece of marble-effect laminate or butcher block. Secure this to your base with L-brackets from the inside.
- Make Jewelry Drawers: You do not need a custom drawer. Buy pre-made velvet-lined jewelry trays online. Measure the inside of your dresser drawers. Find trays that are slightly smaller and simply drop them in.
- Install Angled Shelves: Buy “angled shoe shelves” as a kit. These are sold online or at closet supply stores. Following their instructions, install them onto a free wall. Use a level to keep them straight.
- Add Lighting: This is the easiest win. Buy battery-powered, motion-sensor LED strip lights. They have a sticky back. Peel and stick them to the underside of your existing shelves or inside dark cabinets.
3. The Warm Bamboo Organizer
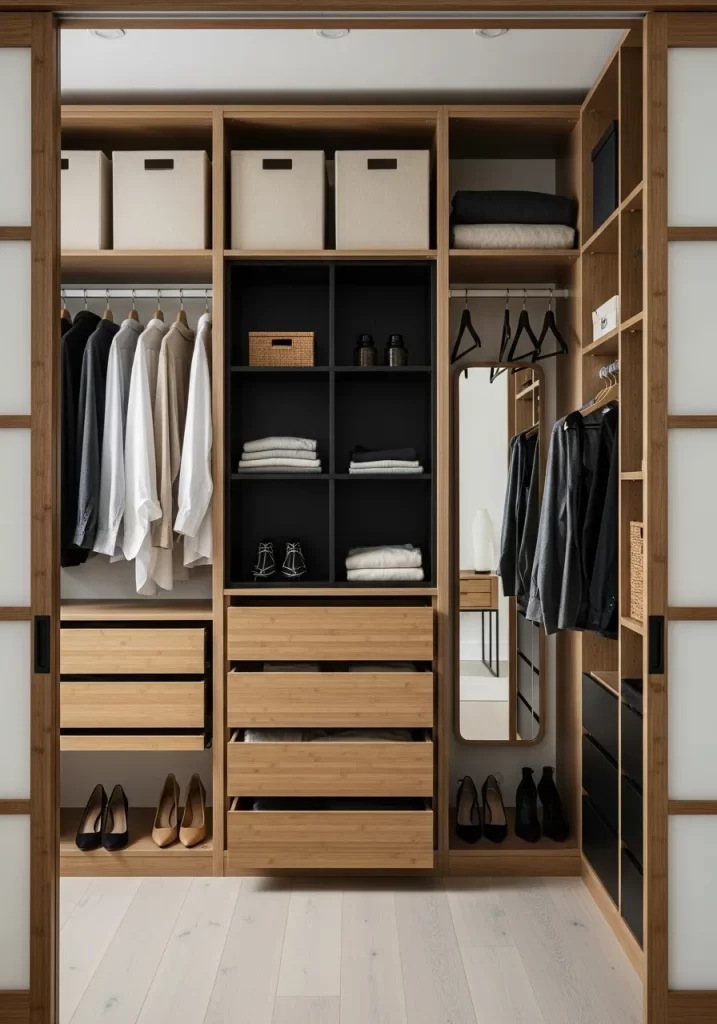
This system creates a calm, spa-like feeling. It uses warm, natural bamboo (or a similar wood-tone) for all its parts. The design feels unified and clean.
It features a smart mix of storage. Deep drawers hide clutter. Open shelves hold folded items like sweaters and jeans. Black metal shelves in a central tower add a sharp visual contrast. This setup looks like a custom, built-in piece of furniture.
DIY Assembly: The Warm Bamboo Organizer
This system is usually a kit you assemble. The job is about careful building, not cutting wood.
Tools You’ll Need:
- Phillips-head screwdriver
- Hammer (for tapping in small dowels or back panels)
- Level
- Stud finder and drill
- Allen wrench (it will be in the box)
Instructions:
- Clear and Prep: Empty your closet. Use a stud finder to find and mark the wall studs with a pencil. You must anchor the system to these.
- Unpack and Inventory: Open all boxes. Lay all parts on a soft rug or blanket. Check every single piece against the parts list in the manual. This saves headaches later.
- Build the Frames: Following the instructions, build the main vertical towers first. Do this on the floor. Attach the side panels, top, and bottom.
- Stand and Secure: Carefully stand the first tower up. Move it into its final position against the wall. Use your level to make sure it is perfectly vertical.
- Anchor to Wall: This is the most important step for safety. Use the L-brackets and screws from the kit. Drill pilot holes into the wall studs you marked. Screw the brackets to the top of the tower and to the wall stud.
- Add Components: Once the tower is secure, add the shelves, install the drawer slides, and build the drawers. Slide the drawers in.
- Install Rods: Attach the hanging rod brackets to the towers. Place the metal rods in the brackets.
4. The Airy Wire and Tower System
This popular setup is a “hybrid” system. It combines the strength of a central tower with the low cost of open-wire shelving.
The laminate tower in the middle provides sturdy drawers and shelves for shoes and folded items. This creates a solid anchor point. The wire shelves on the sides are good for long hanging items like coats and dresses. It gives you the best of both worlds.
DIY Assembly: The Airy Wire and Tower System
This is a very common project. You build the tower first, then add the wire.
Tools You’ll Need:
- Drill and bits
- Level (a 4-foot one is helpful)
- Tape measure
- Stud finder
- Bolt cutters (for wire shelves)
- Screwdriver
Instructions:
- Build the Tower: Assemble the central tower unit first, following its specific manual. Do this on the floor.
- Position and Secure: Stand the tower up in the center of your closet. Use your level to make sure it is straight. Use shims under the bottom if your floor is uneven. Anchor the tower to a wall stud using its L-brackets.
- Mark for Shelves: Decide how high you want your wire shelves. Use a tape measure and level to draw a faint, perfectly level pencil line on the side walls.
- Install Wall Brackets: Use your stud finder to locate studs along your line. Drill and install the main wall brackets for the wire shelves. Make sure they hit studs.
- Cut Wire Shelves: Measure the space from your tower to the side wall. Cut your wire shelves to this length using bolt cutters. (Many hardware stores will cut these for you if you bring measurements).
- Place Shelves: Rest the wire shelves on the brackets. Use the plastic clips (included in the kit) to snap the shelves firmly onto the brackets so they cannot move.
- Add Rods: Clip the hanging rods into the special brackets that attach below the wire shelves.
5. The Entryway Command Center
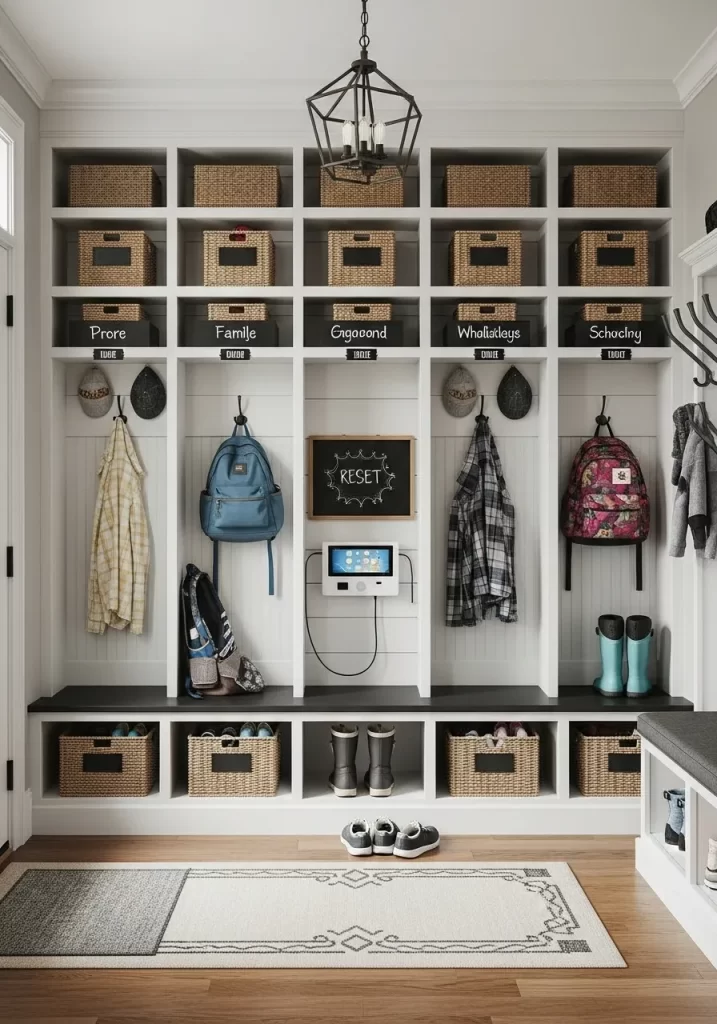
This is a brilliant system for organizing a family at the front door. It is often called a “mudroom” locker.
Each person gets their own vertical cubby. This personal space has hooks for coats and backpacks. A basket above stores seasonal items like hats or gloves. The bench provides a place to sit and put on shoes. Baskets below the bench hide messy footwear.
DIY Assembly: The Entryway Command Center
Building this exact unit is advanced carpentry. Here is a way to create the same function with store-bought items.
Tools You’ll Need:
- Drill and bits
- Level
- Stud finder
- Tape measure
Instructions:
- Get a Base Bench: Start with a sturdy, pre-built bench. A “cubby bench” with open squares at the bottom is a great choice. Assemble it and place it against your entryway wall.
- Add Vertical Storage: You will not build the tall dividers. Instead, buy two tall, narrow bookshelves (like the IKEA “Billy”).
- Position Towers: Place one bookshelf on the left side of the bench and one on the right.
- Secure Everything: This is a major safety step. The bench and both bookshelves must be anchored to the wall studs. Use L-brackets at the top of the bookshelves.
- Add a Hook Rail: Buy a 1×4 wood plank. Cut it to fit the space between the two bookshelves. Find the studs on the wall and screw this plank directly to the studs.
- Install Hooks: Now, screw your coat hooks into the 1×4 plank. This is much stronger than screwing hooks into plain drywall.
- Add Baskets: Get wicker or canvas baskets that fit the cubbies in your bench and the shelves on your new towers.
6. The Industrial Pipe & Wood Unit
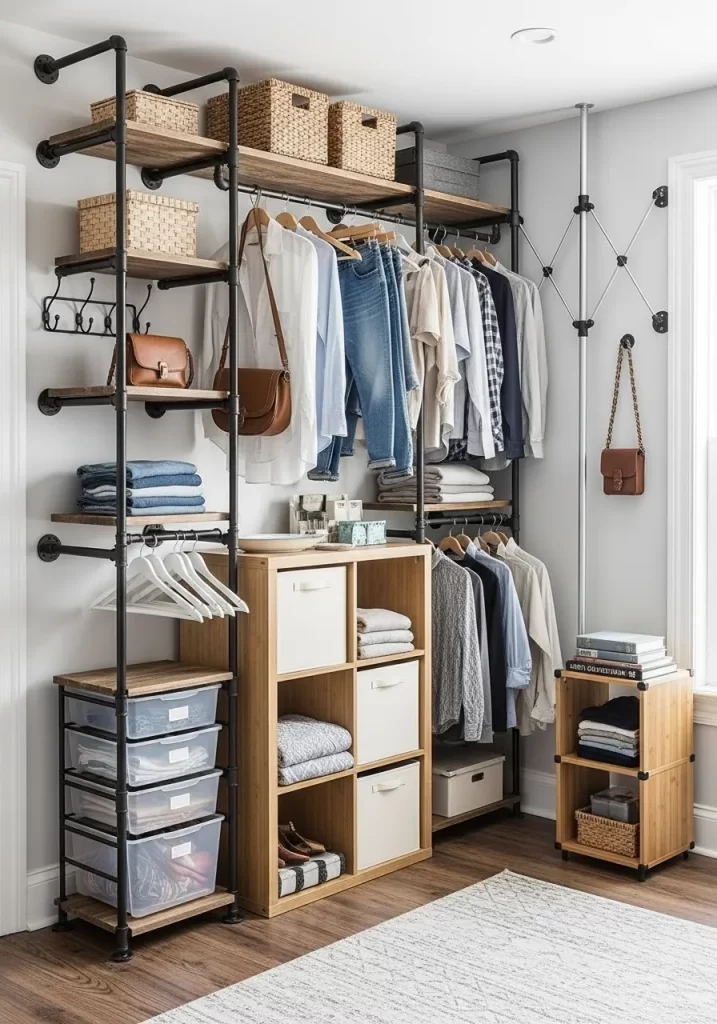
This system has a strong, urban look. It is built from black metal pipes and thick wood shelves. Because it’s open, it makes a room feel bigger.
This setup is great for rooms that do not have a built-in closet. It is very functional. It gives you shelves for baskets, stacking drawers, and two levels of hanging rods for shirts and pants.
DIY Assembly: The Industrial Pipe & Wood Unit
This is a fun project. You build the frame from plumbing parts.
Tools & Materials:
- Drill
- Pipe wrench
- Level
- Stud finder
- Sandpaper
- Pre-cut and threaded black iron pipes (e.g., 1/2-inch or 3/4-inch)
- Fittings: Floor flanges, T-fittings, elbow fittings
- Wood shelves (1×12 pine boards are good)
- Wood stain or paint
Instructions:
- Plan Your Design: Sketch your unit. Make a list of every pipe piece and fitting you need. (Hardware stores can help you with this).
- Clean the Pipes: The black pipes are often oily. Wipe them all down with a degreaser and a rag.
- Prep the Shelves: Cut your wood boards to the same length. Sand the edges smooth. Stain or paint them and let them dry completely.
- Assemble the Frame: On the floor, start connecting the pipes and fittings. Hand-tighten everything first. Then, use a pipe wrench for a final, firm twist to lock it.
- Stand and Level: Carefully stand the unit up against the wall. Place your level on the parts that will hold the shelves. Adjust until it’s straight.
- Secure to Wall: This unit must be anchored. Use floor flanges as “feet.” Use more floor flanges at the top to connect the unit to the wall. Use your stud finder and screw these flanges directly into wall studs.
- Add Organizers: The plastic drawers and cube units are pre-built. You just slide them into place under the shelves.
7. The “Workout” Closet Conversion
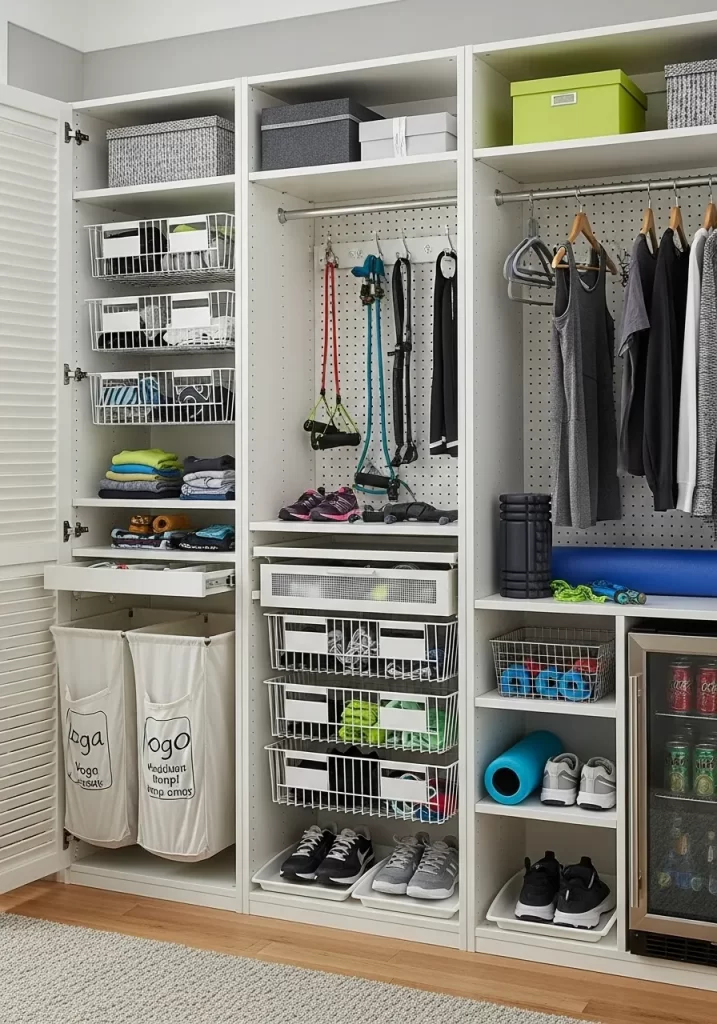
This is a very clever use of a standard closet. It has been transformed into a home gym and fitness station.
One side of the closet holds workout clothes on a hanging rod. The other side is all about gear. A pegboard wall neatly organizes resistance bands, straps, and accessories. Wire drawers below hold shoes, foam rollers, and yoga mats.
DIY Assembly: The Fitness Pegboard Wall
The pegboard is the key to this. You cannot mount it flat.
Tools You’ll Need:
- Drill and bits
- Stud finder
- Level
- Saw (for wood strips)
- A sheet of pegboard
Instructions:
- Buy Pegboard: Measure the back wall of your closet. Have the hardware store cut a sheet of pegboard to this size.
- Create Spacers: Pegboard hooks need space behind the board to work. Buy 1×2 wood strips. Cut four strips to create a rectangle “frame” that is slightly smaller than your pegboard.
- Mount the Frame: Find the wall studs on your closet’s back wall. Screw the 1×2 wood strips horizontally into the studs. Put one at the top and one at the bottom.
- Mount the Pegboard: Place the pegboard sheet over the 1×2 spacer strips. Screw the pegboard into the strips. Now there is a gap behind it.
- Add Drawers: Buy a freestanding wire drawer unit (like the one shown). Assemble it according to its instructions. Then, simply slide it into the closet.
- Add Hooks: Buy a “pegboard hook assortment” kit. Use the different hooks to hang your bands, ropes, and other gear.
8. The Accessory Display Closet
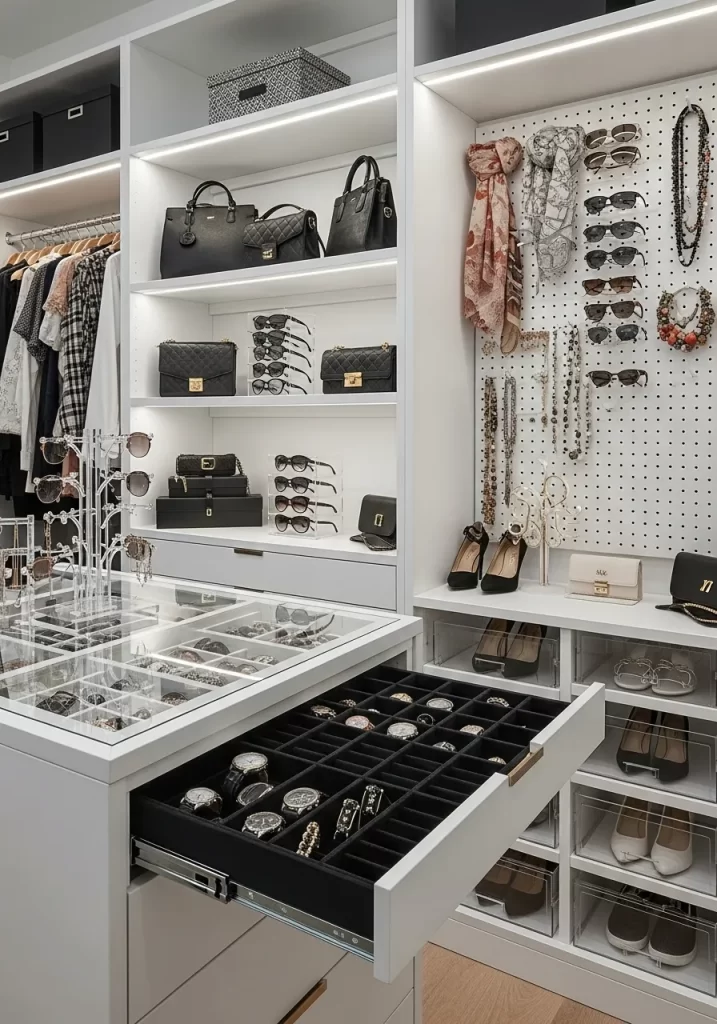
This closet is designed for a person with a large collection of accessories. It is less about clothes and more about the details.
A central island with a glass top displays watches and small items. Velvet-lined drawers pull out to show more. A white pegboard wall is a smart way to hold sunglasses, scarves, and necklaces. Handbags are given their own shelves, like in a luxury store.
DIY Assembly: The Accessory Pegboard Organizer
You can re-create that sunglass and jewelry wall easily.
Tools You’ll Need:
- Drill and bits
- Level
- Pegboard and spacer kit
- Screwdriver
Instructions:
- Get Pegboard: Buy a sheet of pegboard. You can paint it to match your closet.
- Buy Spacers: The easiest way to mount pegboard is with a “pegboard spacer kit.” These are small plastic or metal parts that create the needed 1-inch gap behind the board.
- Find Studs: Locate the studs on your wall. You want to anchor the pegboard to at least one stud if possible.
- Mount the Board: Follow the spacer kit’s instructions. This usually involves screwing the spacers into the wall (and stud). Then, you screw the pegboard to the spacers.
- Get Hooks: Buy a variety of pegboard hooks.
- For sunglasses, use small, 1-inch L-hooks. Hang the glasses by their folded arm.
- For necklaces, use longer 4-inch or 6-inch L-hooks.
- For purses, you can get special pegboard shelves or heavy-duty hooks.
- Arrange Your Collection: Lay out your items on your bed first. Then, place the hooks on the board and hang your accessories.
9. The Smart QR Code System
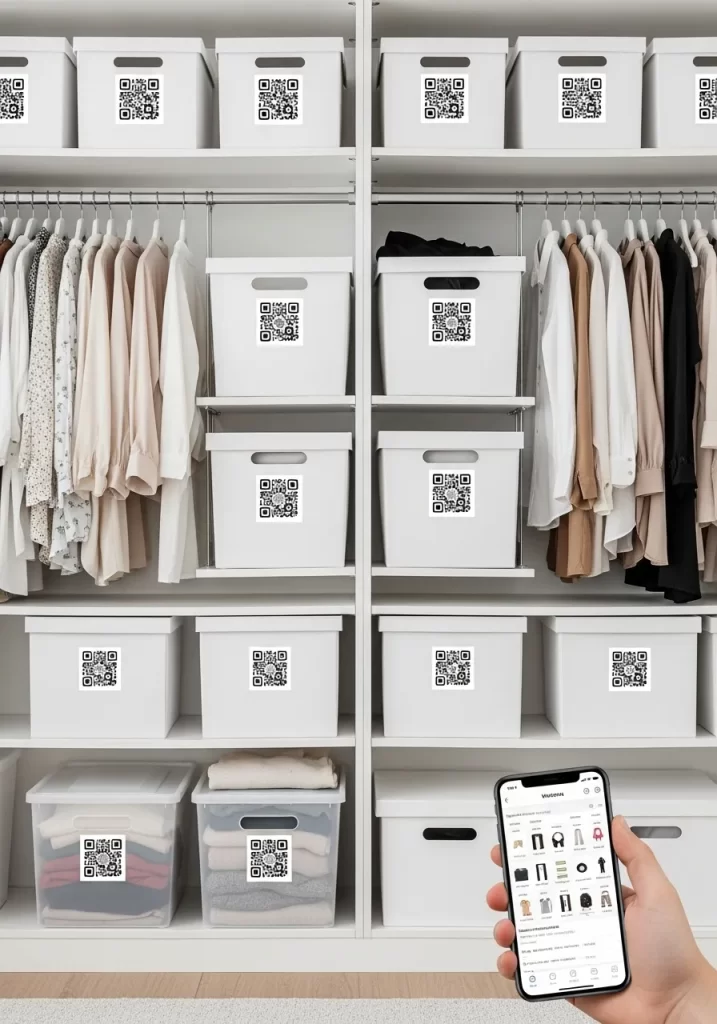
This is a high-tech way to solve a common problem: “Which box is that in?” This system is a digital inventory.
Every single box, bin, and container has a unique QR code sticker. When you need to find your winter-only jacket, you scan the code with your phone. An app on your phone instantly shows you a list (or photos) of every single item stored in that bin.
DIY Assembly: Setting Up Your QR Code Closet
This is not a building project. It is an organizing project.
Tools You’ll Need:
- A smartphone
- A home inventory app (search “QR inventory” in your app store)
- Printable sticker labels (like Avery labels) or cardstock tags
- A printer
Instructions:
- Download an App: Find a home inventory app that lets you create QR codes. Many are free.
- Start with One Box: Take your first storage box (e.g., “Guest Room Linens”).
- Use the App: In the app, select “Create New Box” or “Add Container.”
- List the Contents: As you place each item in the box, add it to the list in the app. Be specific: “Queen-size blue sheet set,” “2 extra bath towels.”
- Generate the Code: When the box is full and your list is done, tap the button to “Generate QR Code.” The app will create a unique code for just this box.
- Print and Stick: Print this single QR code onto your sticker paper. Cut it out and stick it to the outside of the box.
- Repeat: Do this for every single box in your closet. It takes time at first, but it saves you from ever having to dig through boxes again.
10. The Natural Rattan Organizer
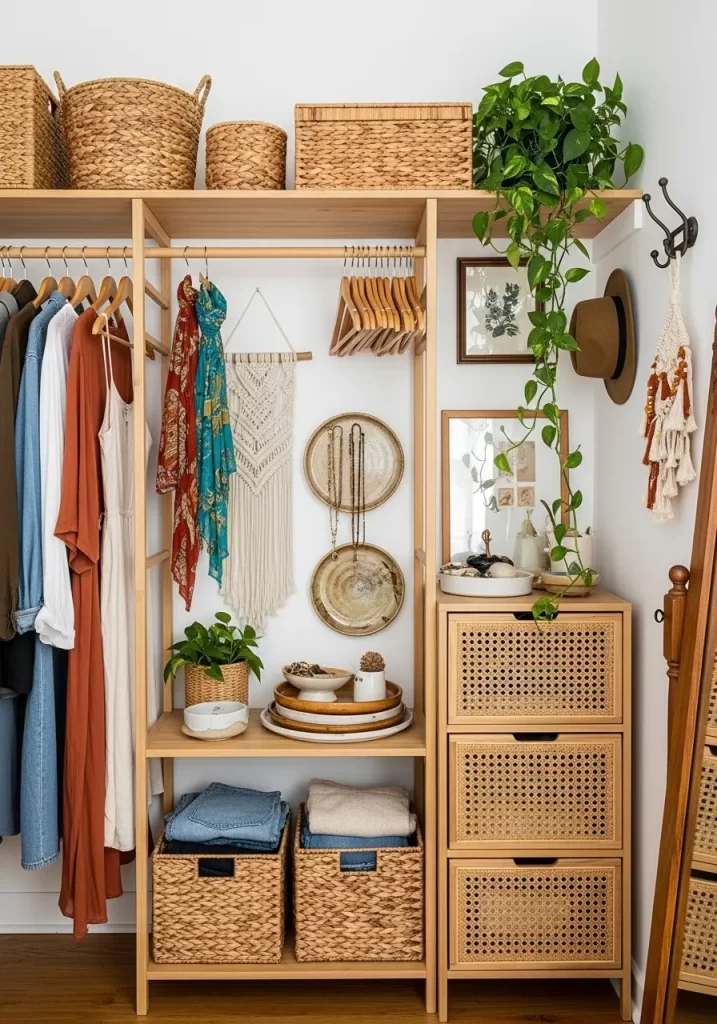
This closet has a relaxed, bohemian style. It feels warm and personal. The system is built from light wood and uses natural textures like rattan and wicker.
A simple wood shelving unit provides hanging space and open shelves. A separate 3-drawer unit made of rattan holds folded clothes or accessories. Wicker baskets on the top and bottom shelves store bulky items like extra blankets or shoes.
DIY Assembly: Creating a Bohemian Closet Vibe
This system is about mixing and matching pre-built pieces.
Tools You’ll Need:
- Screwdriver or drill (for assembly)
- Level
- Stud finder
Instructions:
- Start with a Frame: Get a simple, light-wood closet frame or shelving unit. (The IKEA IVAR or VILTO systems have this look). Assemble this main unit first.
- Anchor the Frame: For safety, anchor the main shelving unit to a wall stud using an L-bracket.
- Add Drawers: The 3-drawer rattan unit is a separate piece of furniture. Buy one that fits your space. Assemble it and place it next to the main frame.
- Buy Baskets: This is the key to the look. Measure your shelves. Buy large, rectangular wicker baskets that fit the bottom shelf. Get softer, rounder baskets for the top shelf.
- Switch to Wood Hangers: A very simple step. Get rid of all your mismatched plastic hangers. Buy a single, large set of matching wooden hangers. This makes the whole closet look cohesive.
- Style It: The final “DIY” step is the styling. Add a small, easy-care plant (like a Pothos) to the top shelf. Hang a small macrame wall hanging. Use pretty ceramic bowls on a shelf to hold your keys or jewelry.
11. The Industrial Loft System
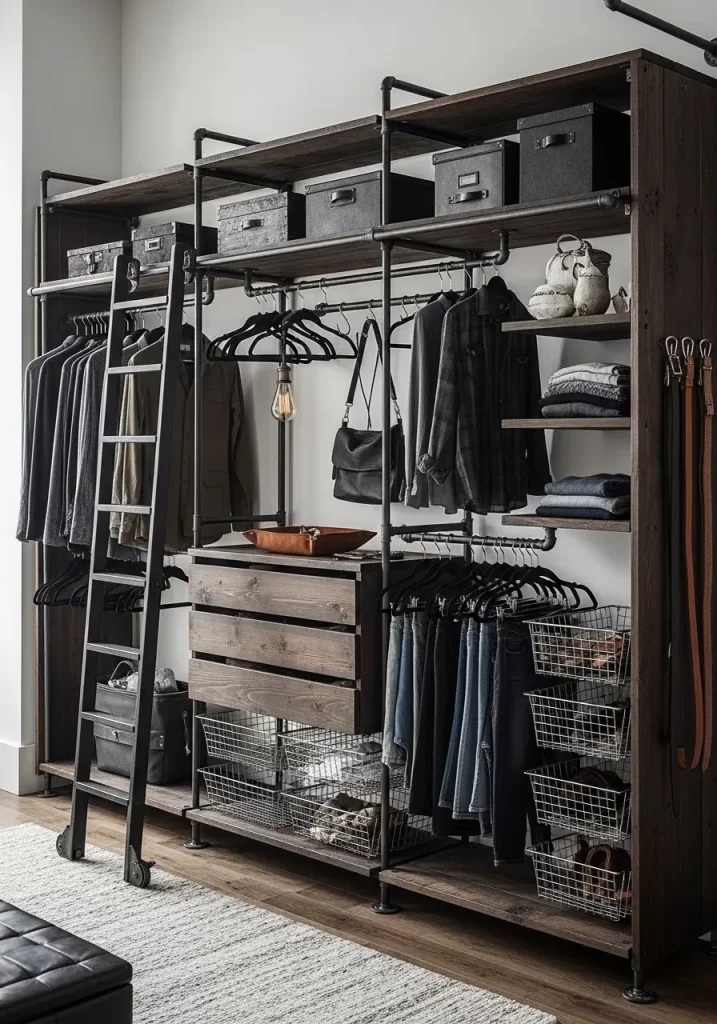
This system uses dark wood and metal pipes for a strong, handsome look. It is a freestanding unit, which is great for rooms without closets or for renters.
The design is very practical. It features a rolling ladder for easy access to high shelves. Open wire baskets pull out for storing accessories. Drawers and multiple hanging rods create a complete wardrobe in one piece.
DIY Assembly: The Industrial Loft System
This is a large project. It combines pipe assembly with woodworking.
Tools & Materials:
- Drill and bits
- Pipe wrench
- Level
- Screwdriver
- Dark-stained wood shelves and drawer boxes
- Pre-cut and threaded black iron pipes and fittings
- Rolling ladder kit
- Sliding drawer hardware
- Wire baskets
Instructions:
- Build the Frames: Start by assembling the main vertical “ladders” from the iron pipes. Connect them on the floor.
- Attach Side Panels: This unit uses dark wood panels as the main vertical supports. Attach your pre-built pipe frames to these wood supports using floor flanges and screws.
- Stand and Connect: Stand up your two end units. Place your long wood shelves on the support brackets. Secure them. Use more pipes at the top to connect the two end units, making the whole structure rigid.
- Install Ladder Rail: Attach the metal rail for the rolling ladder kit just below the top shelf. Follow the kit’s specific instructions. Assemble the ladder and attach its wheels.
- Add Drawers and Baskets: Install the drawer slides into the wood frame. Slide in your pre-built drawers. Attach slides or supports for the wire baskets and place them in the unit.
- Secure the Unit: Even if freestanding, this unit is tall. For safety, use L-brackets or pipe flanges to anchor the top of the unit to wall studs.
12. The Tidy Drawer Divider System
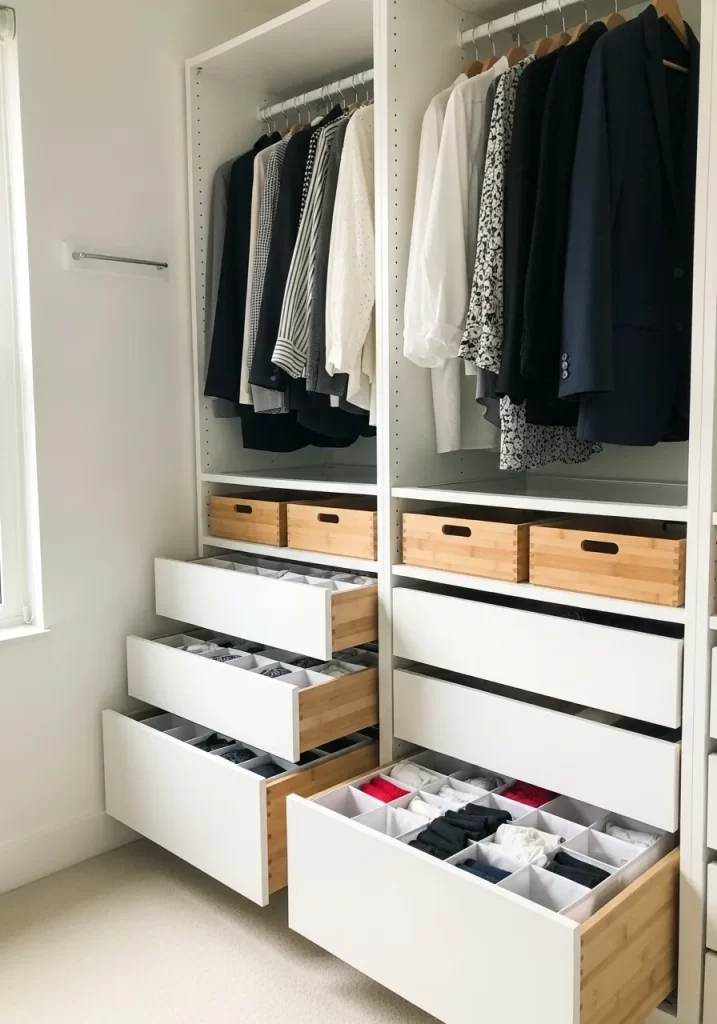
This setup looks clean and simple from the outside. Its genius is hidden inside the drawers.
The deep drawers pull out to reveal custom-fit dividers. This creates a small, individual “cubby” for every single sock, tie, or undergarment. Small, open-top bamboo boxes are used for larger items. This method stops drawers from becoming a jumbled mess.
DIY Assembly: Tidy Drawer Dividers
This is an easy upgrade you can do in an afternoon.
Tools & Materials:
- Tape measure
- Adjustable drawer dividers (buy these online)
- Small bamboo boxes or trays
- Non-slip drawer liner
Instructions:
- Empty and Clean: Take everything out of your drawers. Wipe them clean.
- Add a Base: Cut a piece of non-slip drawer liner to fit the bottom of the drawer. This stops your new dividers from sliding around.
- Install Main Dividers: Get “spring-loaded” or “adjustable” drawer dividers. Measure your drawer. Buy dividers that match the depth.
- Create Rows: Insert the long dividers first, running them from front-to-back. This will create 2 or 3 long “lanes” inside your drawer.
- Add Sub-Dividers: Now, use shorter dividers to cut across the long lanes. This creates the small, square cubbies.
- Use Boxes: For items that do not fit the small squares (like belts), place a small bamboo tray or box in one of the larger sections.
- Organize: Fold or roll your socks, ties, and underwear. Place one item (or pair) into each cubby.
13. The U-Shaped Walk-In
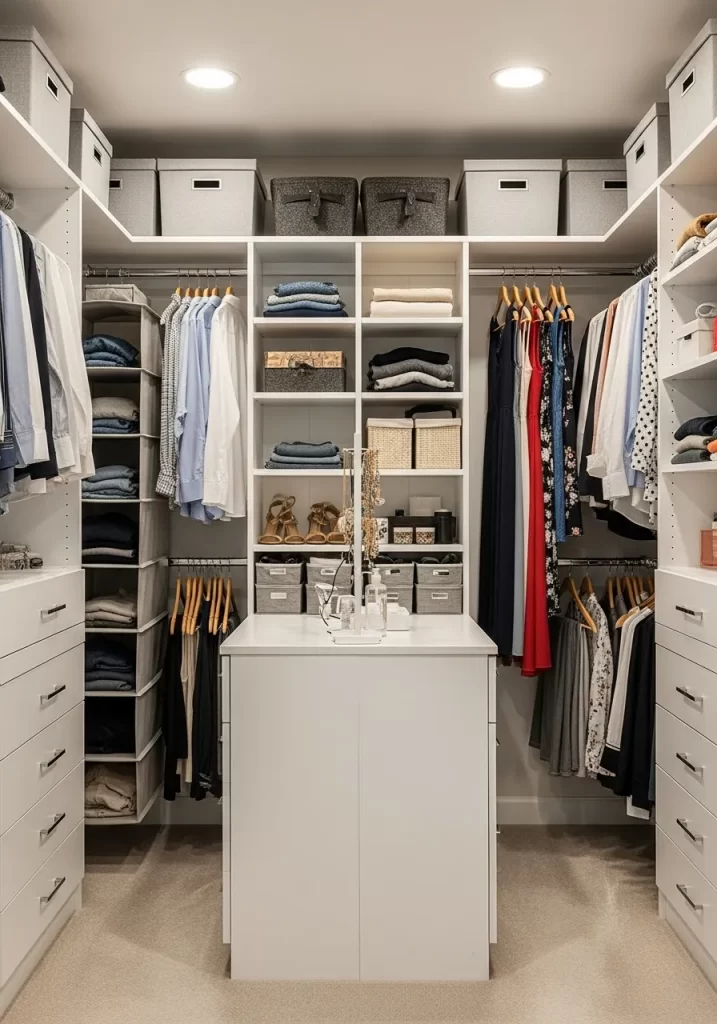
This design uses three walls of a walk-in closet to maximize storage. It creates a “U” shape of counters and hanging space.
The system is all white, which makes the space feel bright and clean. It uses a smart “high-low” hanging method. A high rod for shirts and a low rod for folded pants. A small central island provides a surface for folding or laying out accessories.
DIY Assembly: The U-Shaped Closet
This project involves installing multiple pre-built closet towers.
Tools You’ll Need:
- Drill and bits
- Stud finder
- Level (a 4-foot one is helpful)
- Tape measure
- Screwdriver
- Hacksaw (for closet rods)
Instructions:
- Plan Your Layout: Measure all three walls. Plan to put a tower unit in each corner and in the center of the back wall.
- Build Towers: Assemble all your “closet tower” kits first. Do this on the floor.
- Position and Secure: Place the center tower on the back wall first. Use your level to make sure it is straight. Use L-brackets to anchor it to a wall stud.
- Install Corner Towers: Place your corner towers. Secure them to the wall studs as well.
- Measure for Rods: Now, measure the empty space between your towers. This is where your hanging rods will go.
- Cut and Install Rods: Cut your closet rods to the lengths you measured. Install the cup-shaped rod brackets onto the sides of the towers. Place the rods in the brackets.
- Add Top Shelf: Install a long shelf (often called a “closet shelf”) across the top of all three towers. This links everything together and gives you high storage for baskets.
14. The Dual-Panel Wall Organizer
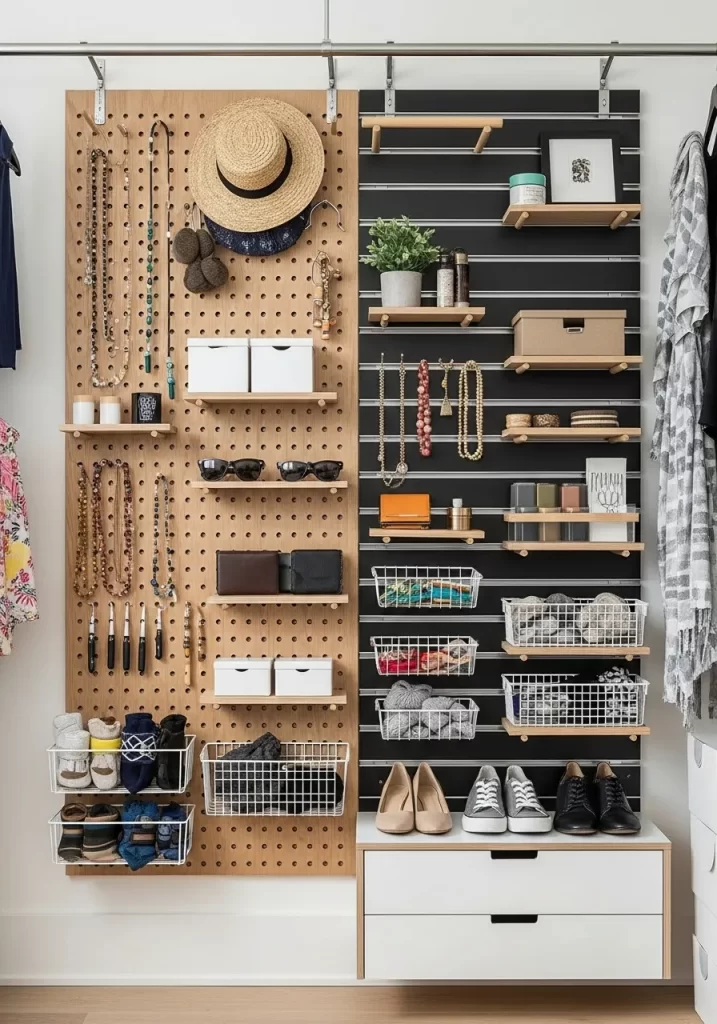
This is a powerful, space-saving system. It mounts directly to the wall, taking up zero floor space.
The wall is split into two parts. One side is a classic wood pegboard. It uses dowel-and-shelf inserts to hold jewelry, glasses, and small items. The other side is a modern black slatwall. This side uses hooks, shelves, and baskets for shoes and heavier items.
DIY Assembly: The Dual-Panel Wall
You will build and mount two separate panel systems side-by-side.
Tools & Materials:
- Drill and bits
- Level
- Stud finder
- Tape measure
- A sheet of pegboard
- A set of slatwall panels
- Pegboard hook and shelf kit
- Slatwall hook and basket kit
Instructions for the Pegboard Side:
- Create a Gap: Pegboard needs space behind it. Screw 1×2 wood strips (spacers) horizontally to your wall, directly into the studs.
- Mount Pegboard: Screw your pegboard sheet onto the 1×2 wood strips.
- Add Hooks: Insert the pegboard hooks, shelves, and wire baskets.
Instructions for the Slatwall Side:
- Find Studs: Slatwall must be attached to studs. Use your stud finder to mark all studs from top to bottom.
- Mount Panels: Slatwall panels are designed to be screwed directly through the panel and into the wall studs. Start with the top panel. Use your level. Drill and screw it into every stud it crosses.
- Stack Panels: The next panel’s groove will lock into the one above it. Screw this one into the studs as well. Repeat until you reach the floor.
- Add Hooks: The slatwall accessories (hooks, baskets) are now ready. They simply clip or slide into the horizontal grooves.
15. The Sneaker Showcase
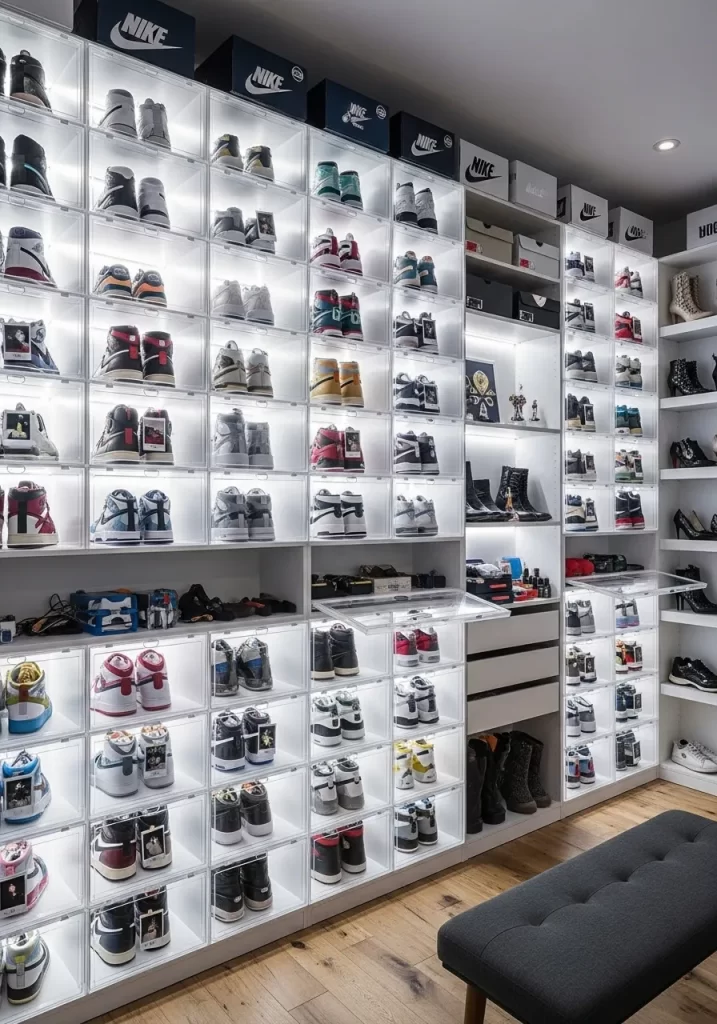
This is the ultimate system for a sneaker collector. It turns a shoe collection into a display of art.
The entire wall is fitted with clear, hard-plastic “drop-front” shoe boxes. Each box acts as its own display case. Built-in LED lighting inside the shelving makes the collection glow. This keeps every pair visible, protected from dust, and easy to grab.
DIY Assembly: The Sneaker Showcase
This is less about building and more about stacking and lighting.
Tools & Materials:
- Drop-front shoe boxes (many)
- A sturdy shelving unit (like an IKEA KALLAX) OR…
- Small “cleats” or L-brackets
- LED light strips
Instructions:
- Choose Your Method:
- Easy Method: Buy a cube shelving unit (like KALLAX). Assemble it. Place one sneaker box inside each cube.
- “Floating” Method: This is what is shown. The boxes are stacked.
- Start Stacking: The drop-front boxes are designed to “lock” together when stacked. Start by building a level base row on the floor.
- Build Up: Stack the next row on top. Press down so the boxes lock. Use your level to check.
- Safety Bracket: As your wall of boxes gets high (over 4 feet), it can get top-heavy. You must secure it. Use small L-brackets to anchor a few of the top-row boxes to the wall.
- Add Lights: The easiest way is to run LED light strips behind the clear boxes, along the shelving unit. For the look in the picture, you need to stick LED strips inside the shelving unit, just above the box.
16. The Clear Bin Zoning System
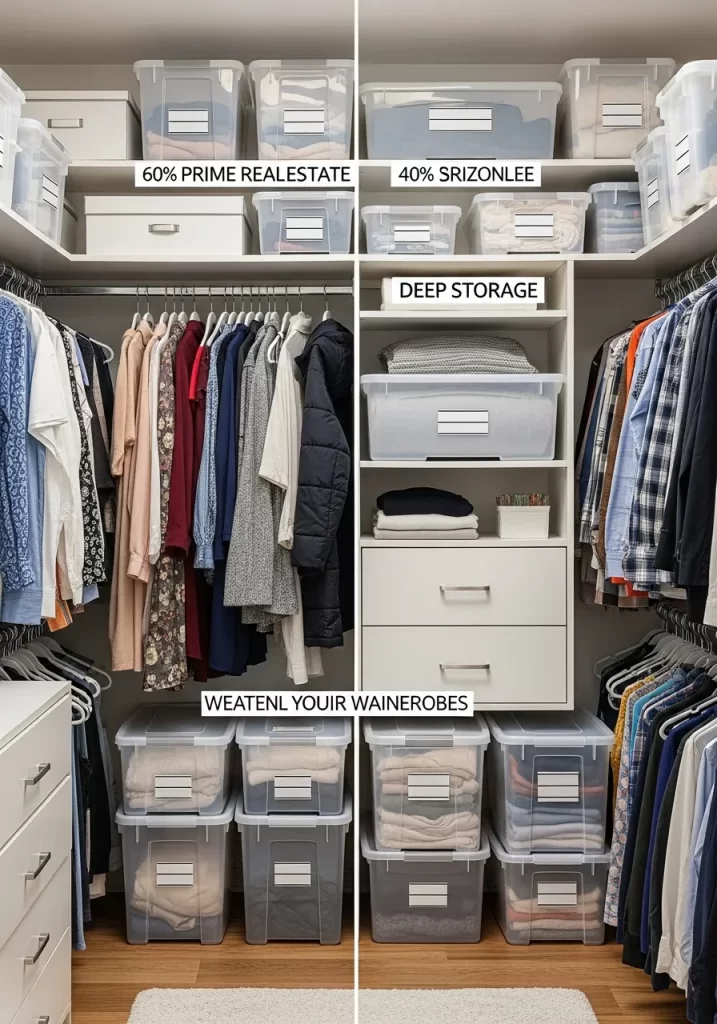
This is a storage strategy, not a specific product. It is about “zoning” your closet.
The closet is divided into areas. “Prime Real estate” (the middle) is for daily clothes. The top shelf is for “Deep Storage” (seasonal). The floor is for heavy items. Using clear, stackable bins with labels is the key. You can see what is inside without opening the lid.
DIY Assembly: Zoning Your Closet
This is a pure organization project. No building is required.
Tools &Materials:
- Clear plastic storage bins with lids (in various sizes)
- A label maker (or masking tape and a marker)
- A step-stool
Instructions:
- Empty Everything: Take every single item out of your closet.
- Sort and Purge: Create three piles: “Keep,” “Donate,” and “Trash.” Be ruthless.
- Create Your Zones:
- Zone 1: Prime Real Estate. This is the hanging rod and shelves between your waist and your eyes. Only your current, everyday clothes go here.
- Zone 2: Deep Storage (High). The top shelf. This is for items you use 1-2 times per year (seasonal decor, old baby clothes).
- Zone 3: Deep Storage (Low). The floor. This is for heavy or bulky items (suitcases, boots).
- Pack the Bins:
- Put all your “Deep Storage” items into the clear plastic bins. Do not mix categories. Make one bin “Winter Sweaters,” one “Beach Towels,” etc.
- Label Everything: Use your label maker to create a clear, simple label for every single bin. Stick it on the front.
- Reload the Closet: Place your “Deep Storage” bins on the top shelf and floor. Hang your “Prime” clothes on the rod.
17. The “Lifestyle” Closet
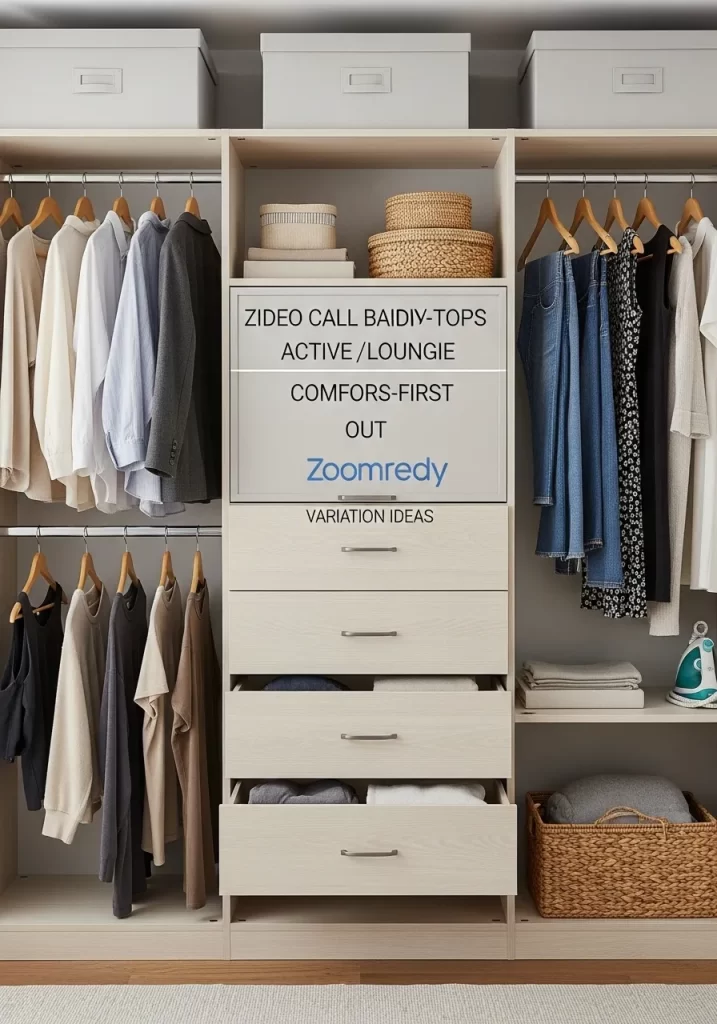
This system organizes clothes based on your life, not just by item type. It is a very practical way to get dressed faster.
The closet is divided into sections: “Video Call” (business-casual tops), “Active/Loungie” (comfy clothes), and “Comfors-First Out” (errands). A central drawer unit holds items that are used for all categories, like undergarments and t-shirts.
DIY Assembly: The Lifestyle Closet
This is another organization project. You are re-arranging your existing closet.
Tools & Materials:
- “Closet Rod Dividers” (they look like round tags)
- A marker or label maker
Instructions:
- Empty Your Rod: Take all your hanging clothes off the rod.
- Define Your Lifestyles: On a piece of paper, write down your main activities. Examples: “Work,” “Gym,” “Weekends,” “Going Out,” “Lounging.”
- Sort Your Clothes: Go through your pile of clothes. Place each item into one of your new lifestyle categories.
- Label Your Dividers: Write one lifestyle category on each closet rod divider.
- Re-hang Your Clothes:
- Slide your first divider (“Work”) onto the rod.
- Hang all your “Work” clothes behind it.
- Slide your next divider (“Gym”) onto the rod.
- Hang all your “Gym” clothes behind it.
- Repeat for all categories. Now your closet is sorted by activity.
18. The Rustic Branch Hanger
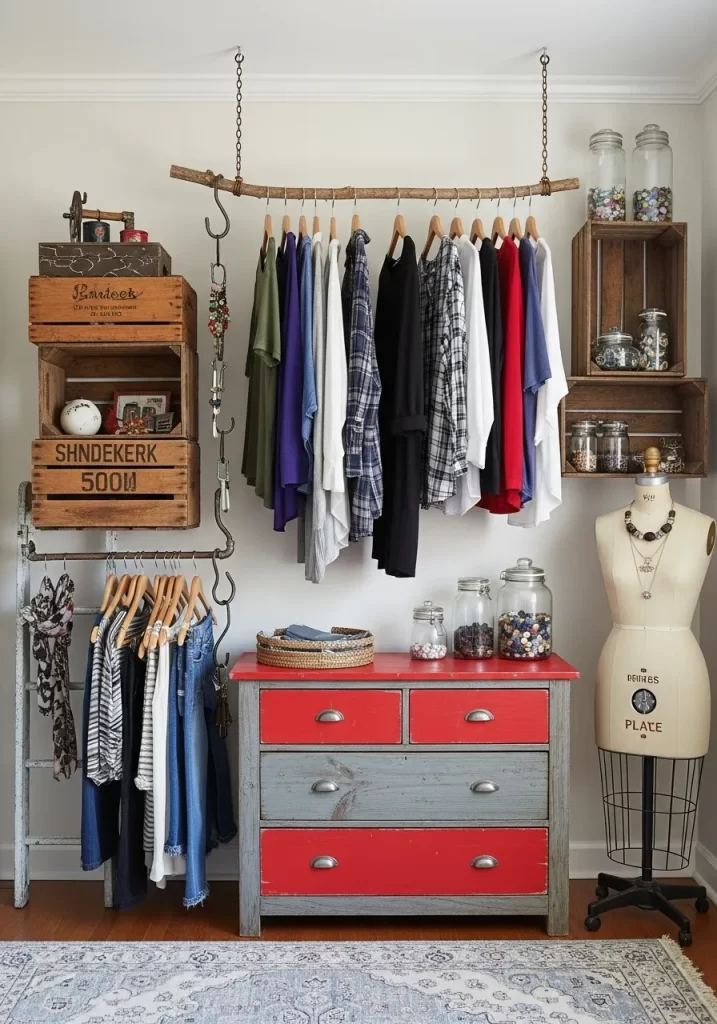
This is a creative, low-cost system with a lot of personality. It uses re-purposed items to create a rustic, farmhouse look.
The main hanging rod is a large, sturdy tree branch. It is suspended from the ceiling by chains. Old wooden crates are stacked to create shelves. A distressed ladder is used as a secondary rack for scarves or jeans.
DIY Assembly: The Rustic Branch Hanger
This is a fun DIY. The main job is finding and preparing the branch.
Tools & Materials:
- A sturdy, dry tree branch (at least 2-3 inches thick)
- Sandpaper (medium and fine grit)
- Metal chain (two lengths)
- 2 heavy-duty “S” hooks
- 2 heavy-duty “J” hooks (or ceiling hooks) with anchors
- Drill
- Stud finder
Instructions:
- Prep the Branch: Find a fallen branch (do not cut from a live tree). Let it dry indoors for a few weeks. Peel off any loose bark. Sand the entire branch, especially the top, so it is smooth.
- Find Ceiling Joists: Use your stud finder to locate the wood joists in your ceiling. You must anchor the hooks into these joists. Drywall will not hold the weight.
- Install Hooks: Drill pilot holes into the joists. Screw in your two heavy-duty J-hooks (or ceiling hooks).
- Attach Chains: Hang one “S” hook from each ceiling hook. Attach a length of chain to each S-hook.
- Hang the Branch: Get a helper. Lift the branch and rest it in the bottom links of the two chains. Use your level to make sure the branch is horizontal. Adjust the chain links as needed.
- Add Crates: Find vintage (or new) wood crates. Stack them on the floor to create your shelving.
19. The Handbag Organizer
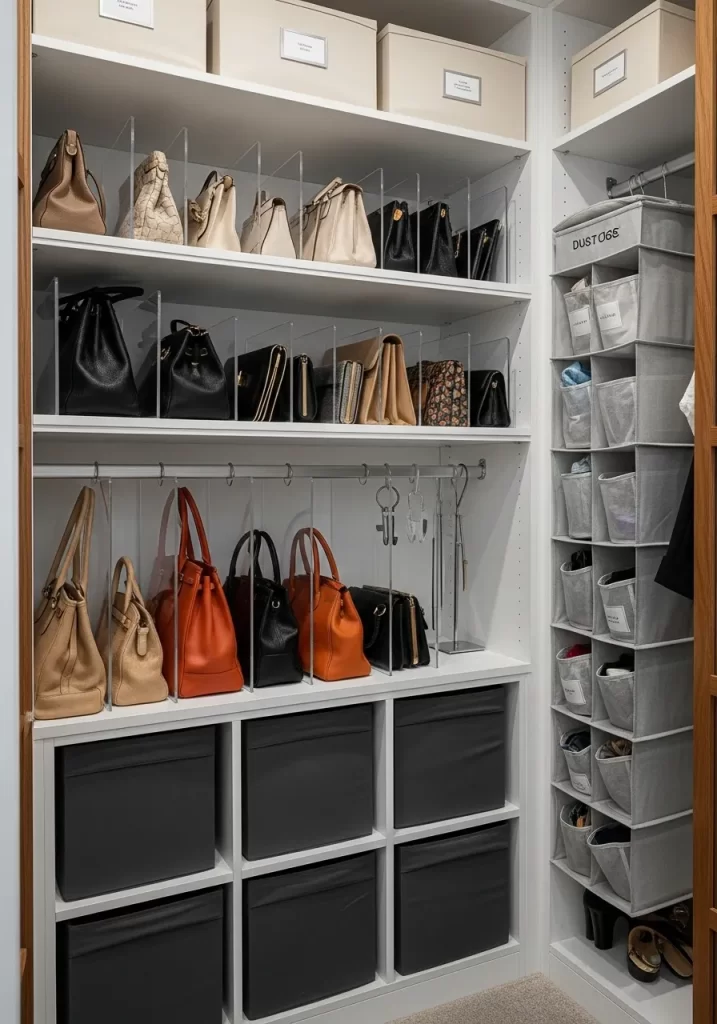
This closet corner is dedicated to storing a handbag collection. It uses several smart methods to keep bags in shape and easy to see.
On the top shelves, clear acrylic dividers are used. These act like “bookends” to keep purses upright. On the hanging rod, special “handbag hooks” are used. In the corner, a fabric “over-the-door” organizer is hung on the wall to hold dust bags and smaller items.
DIY Assembly: The Handbag Corner
You can do this in minutes with the right products.
Tools & Materials:
- Clear acrylic “shelf dividers”
- Handbag hooks (these are S-shaped or C-shaped hooks for a closet rod)
- A hanging fabric shelf organizer
- (Optional) Cube shelving unit
Instructions:
- Clear a Space: Designate one corner or section of your closet for your bags.
- Use Shelf Dividers: On your main wood shelf, place the acrylic dividers. They usually have a flat base that slides onto the shelf. Space them out. This creates an individual “slot” for each handbag.
- Use Hooks: For bags with long straps, use the handbag hooks. Hang them from your closet rod. This prevents the straps from getting creased or tangled.
- Use Fabric Shelves: Assemble a hanging fabric organizer. Hang it in the corner. This is a great place for small clutches, wallets, or the dust bags that come with your purses.
- Use Cubes: (As shown in the image) Assemble a simple cube shelving unit. Place one handbag in each cube.
20. The Valet Station
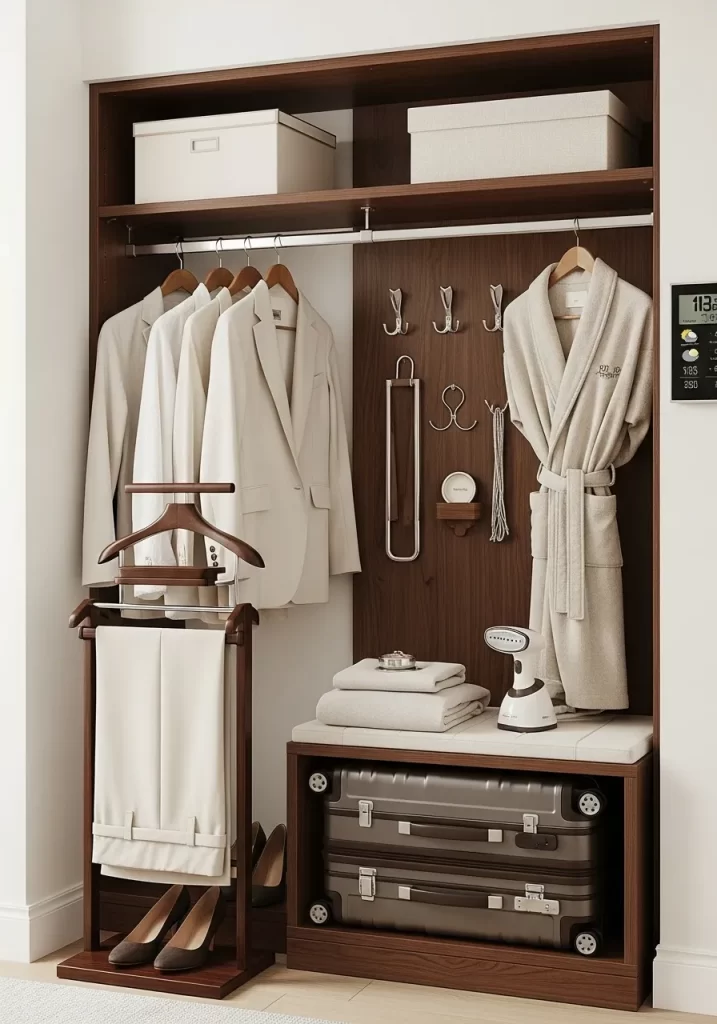
This is a small, dedicated space for “get ready” tasks. It is like a mini mudroom, but for leaving the house or for a guest room.
It features a hanging rod for suits or robes. A wall-mounted hook system holds belts and ties. A cushioned bench provides a seat and a place for luggage. A pants-press or valet stand holds the next day’s outfit, and a small steamer gets out any wrinkles.
DIY Assembly: The Valet Station
You can create this station by assembling a few key pieces.
Tools You’ll Need:
- Drill and bits
- Level
- Stud finder
- (For assembly) Screwdriver, Allen wrench
Instructions:
- Start with a Bench: Buy a sturdy storage bench. Assemble it and place it against the wall.
- Install a Wall Hook Rack: Buy a “hook rail” (a piece of wood with multiple hooks). Use your stud finder to find wall studs. Screw the hook rail into the studs above the bench.
- Add a Hanging Rod (Optional): If you are inside a closet, you already have one. If not, you can install a small rod between two walls or between a wall and a shelving unit.
- Buy a Valet Stand: This is a key piece. Buy a “men’s valet stand” (like the one shown). Assemble it according to its instructions. Place it next to your bench.
- Add the Extras: Place a small, handheld clothes steamer on the bench. You have now created a complete station for preparing an outfit.
21. The Moody Monochrome Closet
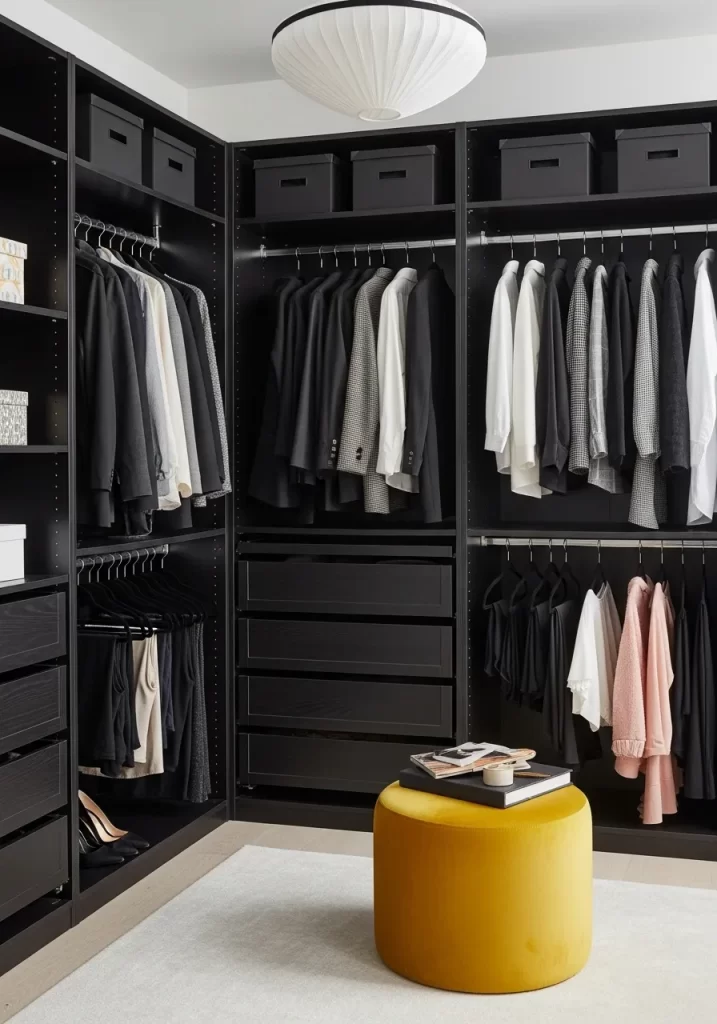
This system creates a sleek, dramatic effect by using a single dark color. The all-black design feels sophisticated and modern.
This walk-in closet uses multiple hanging rods at different heights. This “high-low” method is great for suits, pants, and shirts. A set of drawers in the middle provides hidden storage, keeping the look clean. The pop of a single bright color, like the yellow stool, makes the space feel personal.
DIY Assembly: The Monochrome Closet
This project involves installing a pre-built closet system, often from a kit.
Tools You’ll Need:
- Drill and drill bits
- Stud finder
- Level
- Tape measure
- Screwdriver
- Allen wrench (usually included in the kit)
- Hacksaw (for closet rods)
Instructions:
- Prep Your Space: Empty the closet. Use your stud finder to mark the wall studs.
- Build the Towers: Unpack your closet kit. Assemble the main vertical tower units on the floor first.
- Position and Secure: Stand the first tower in a corner. Use your level to make sure it is perfectly vertical. Anchor this tower to the wall studs using L-brackets.
- Install Other Towers: Install your other towers, making sure each one is level and anchored to the wall.
- Measure and Cut Rods: Measure the open space between the tower units. Use your hacksaw to cut the metal closet rods to fit these spaces.
- Install Rod Brackets: Screw the round or cup-shaped rod brackets onto the inside walls of the tower units.
- Place Rods: Set your cut rods into the brackets.
- Add Drawers: Install the drawer slides into the tower unit and slide in your pre-built drawers.
22. The Natural Harmony Closet
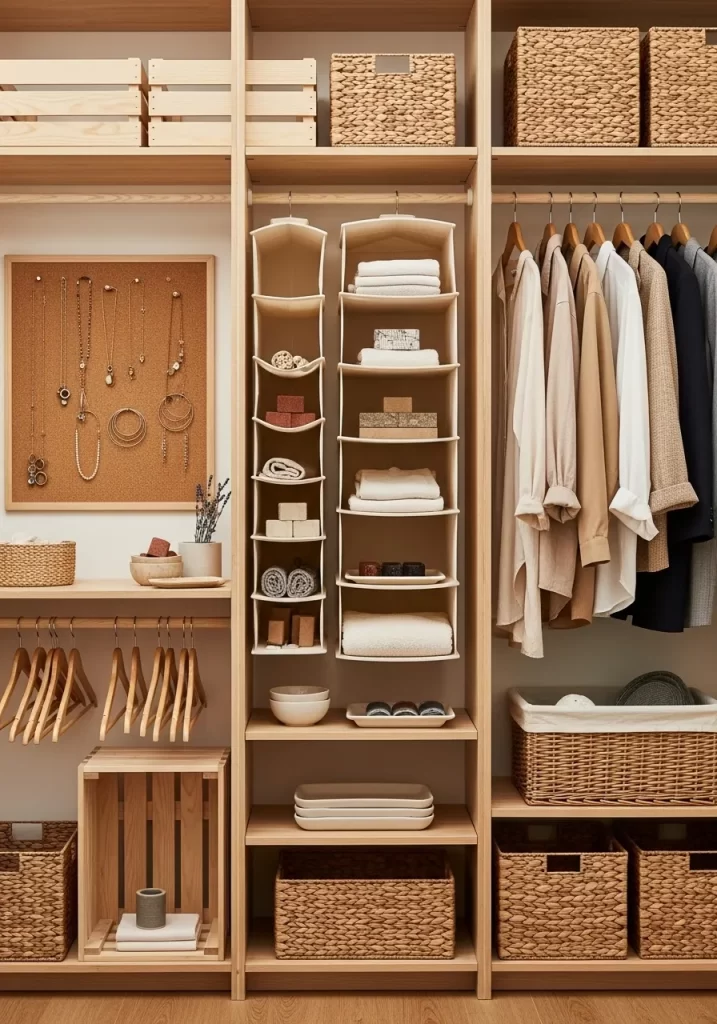
This system uses light wood and natural, woven textures. It creates a calm, clean, and organic feeling.
The setup is based on a light-wood shelving unit. It mixes hanging space with open shelves. Wicker baskets and wooden crates are used instead of drawers. A corkboard on the wall provides a place for jewelry. Hanging fabric shelves add soft storage for towels or folded items.
DIY Assembly: The Natural Harmony Closet
This is an easy project. You are adding organization to an existing closet system.
Tools & Materials:
- A pre-built wood shelving unit (the “base”)
- Hanging fabric shelves (buy these online)
- Wicker baskets (various sizes)
- Wooden crates
- A framed corkboard
- Push pins
Instructions:
- Start with the Base: Assemble your main wood shelving unit (if it’s not already built).
- Add Soft Shelves: Buy a “hanging closet organizer.” This fabric unit has a strong hook or velcro top. Simply hang it from your existing closet rod. Use it to store folded towels, t-shirts, or small items.
- Use Baskets and Crates: Measure your open shelves. Go to a craft or home store and find wicker baskets and wood crates that fit. These will act as your “drawers.”
- Create a Jewelry Board: Buy a framed corkboard. Mount it to the wall inside your closet.
- Organize Jewelry: Hang your necklaces and bracelets from simple push pins stuck into the corkboard. This keeps them from tangling.
23. The Great Denim Debate: Fold vs. Hang
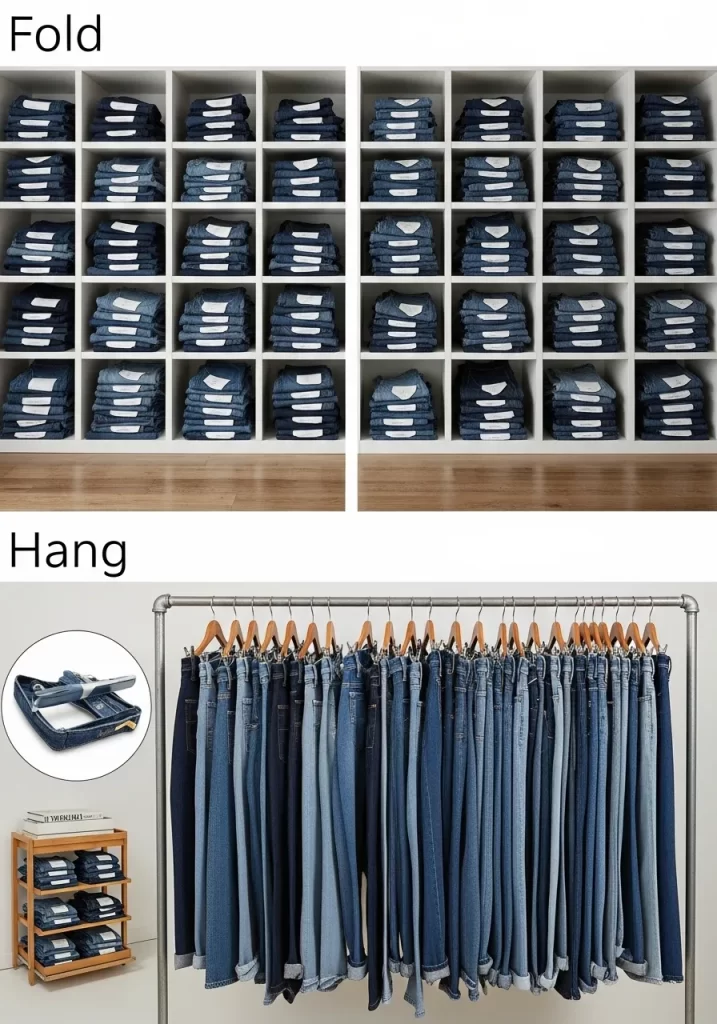
This image shows the two main ways to store a large denim collection. It is less a “system” and more a “strategy.”
The Fold method uses a cube-style shelving unit. Each pair of jeans is folded neatly and gets its own cubby. This is great for quickly seeing the wash and style. The Hang method uses a simple metal clothing rack. Jeans are hung by their belt loops, often on “S” hooks or special hangers. This prevents folding creases.
DIY Assembly: The Fold Method (Cubby Wall)
This is the easiest way to build a “jean wall.”
Tools & Materials:
- Cube shelving unit (like the IKEA KALLAX)
- Screwdriver or Allen wrench (came with the unit)
- (Optional) L-bracket for safety
Instructions:
- Buy a Unit: Choose a cube shelving unit. A 5×5 (25 cubbies) or 4×4 (16 cubbies) is a popular choice.
- Assemble: Following the manual, build the unit. Do this on the floor to make it easy.
- Stand and Secure: Stand the unit up against your wall. If it is tall, you must use an L-bracket to anchor the top of the unit to a wall stud. This stops it from tipping.
- Fold Your Jeans: Learn the “retail fold.” Fold your jeans in half (back pocket to back pocket). Fold them in half again, then in thirds. This creates a small, neat rectangle.
- Stock the Shelves: Place one folded pair of jeans in each cubby.
DIY Assembly: The Hang Method (Pipe Rack)
This is also a very simple project.
Tools &Materials:
- A pre-built rolling garment rack OR…
- Pre-cut and threaded black pipe and fittings (if you want to build it)
- “S” hooks or clip hangers
Instructions:
- Assemble the Rack: If you bought a garment rack, follow its instructions. This usually takes just a few minutes.
- Choose Your Hanger:
- S-Hooks: Buy a pack of large “S” hooks from a hardware store. Hook one end to the rack. Hook the other end through a belt loop on your jeans.
- Clip Hangers: Use hangers with clips (like those for skirts). Clip the waistband of the jeans.
- Hang Your Collection: Hang your jeans one by one. You can organize them by color or style.
24. The High-Tech Rotating Closet
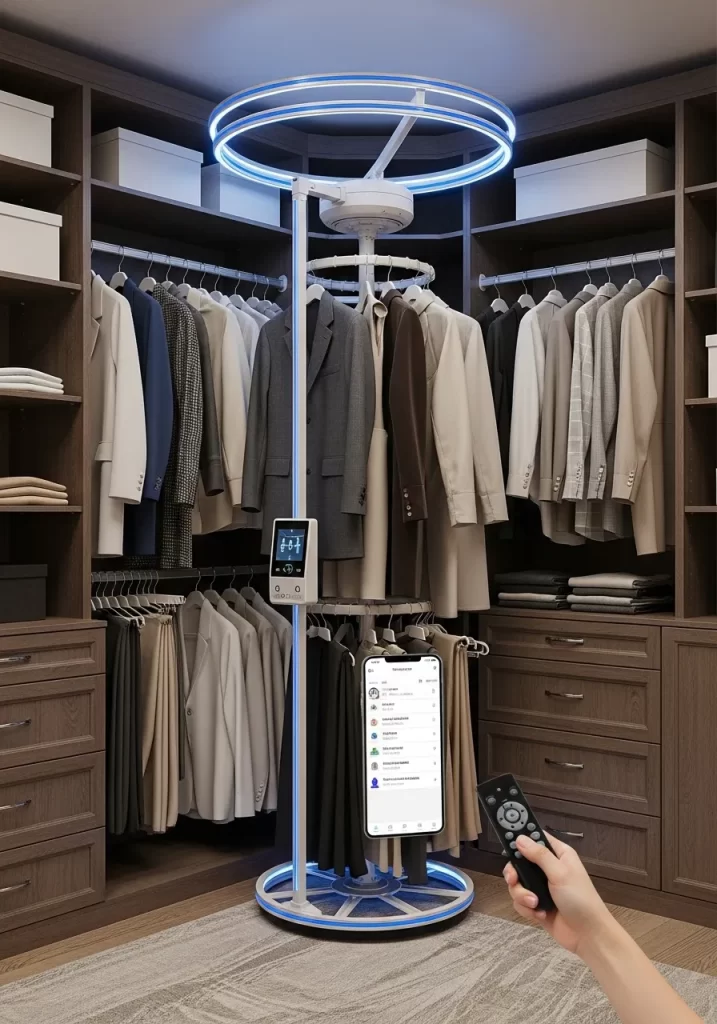
This is a futuristic, automated closet system. It brings your clothes to you.
A central, motorized pole features multiple levels of rotating clothing racks. You use a remote control or a smartphone app to spin the rack and find the item you want. A built-in screen and light ring add to the high-tech feel. This is a great solution for corner spaces.
DIY Assembly: The High-Tech Rotating Closet
You cannot build this motor system from scratch. This is a product you install.
Tools You’ll Need:
- Drill and bits
- Level
- Screwdriver
- Wrenches (will be in the box)
- A helper (this is a two-person job)
Instructions:
- Buy the Kit: This is a specialized item. You must purchase a “motorized” or “rotating” closet rack kit online or from a custom closet company.
- Clear the Space: You need a large, open corner in your walk-in closet.
- Assemble the Base: Follow the kit’s manual. The first step is always to build the heavy, stable base. This base will sit on the floor.
- Build the Pole: Attach the sections of the central pole. This pole will house the motor and wiring.
- Secure Top and Bottom: The pole is held in place by pressure. It will have “feet” on the bottom and a bracket that presses against the ceiling (or a top shelf).
- Attach Racks: Once the pole is secure, you will attach the “carousel” rack levels.
- Plug It In: These units need power. They will have a cord that needs to be plugged into a nearby wall outlet.
- Test It: Use the remote control to test the rotation before you add any clothes.
25. The Sloped-Ceiling Solution
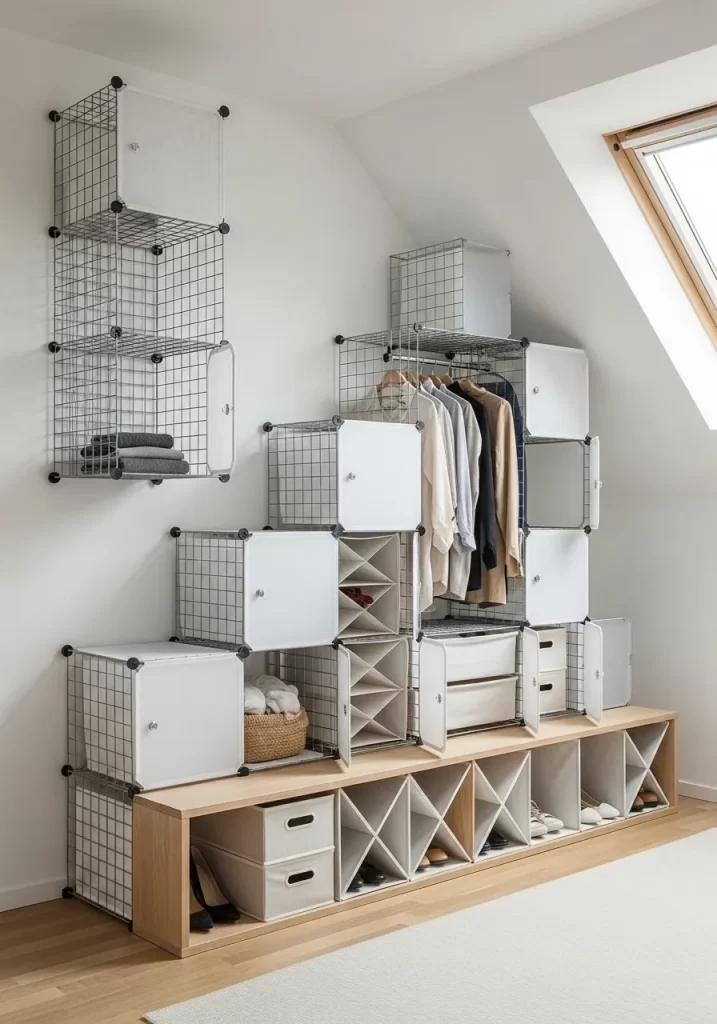
This system uses modular wire cubes to fit a difficult space. It is a smart way to get storage in an attic or room with angled walls.
The wire cubes are built one by one. This lets you “stair-step” the unit to follow the exact line of the ceiling. A low wood bench adds shoe storage. Some cubes have doors, some are open, and one is even fitted with a small hanging rod.
DIY Assembly: The Modular Cube System
This is like building with LEGOs. It is very easy and requires no tools.
Tools & Materials:
- A “wire cube” or “modular cube” storage kit. (This kit contains all the square wire panels and all the round plastic connectors.)
- (Optional) A small rubber mallet
Instructions:
- Unpack: Lay out all your wire panels and plastic connectors.
- Start the Base: Take one of the round connectors. They have “X” shaped slots. Snap four wire panels into the slots to form the back of your first cube.
- Build Forward: Snap four more connectors and four more panels to build the sides, top, and bottom.
- Connect the Next Cube: Use the side panel of your first cube as the back panel of your second cube. Keep snapping panels and connectors together.
- Tap to Secure: As you build, the fit can get tight. Use a small rubber mallet (or the heel of your shoe) to gently tap the panels. This makes sure they are pushed all the way into the connector slots.
- Follow the Roof: As you build upward, just stop adding cubes where the ceiling gets low. This will naturally create the “stair-step” shape.
- Add Accessories: The kit will come with doors or shelves. You can clip these in wherever you want.
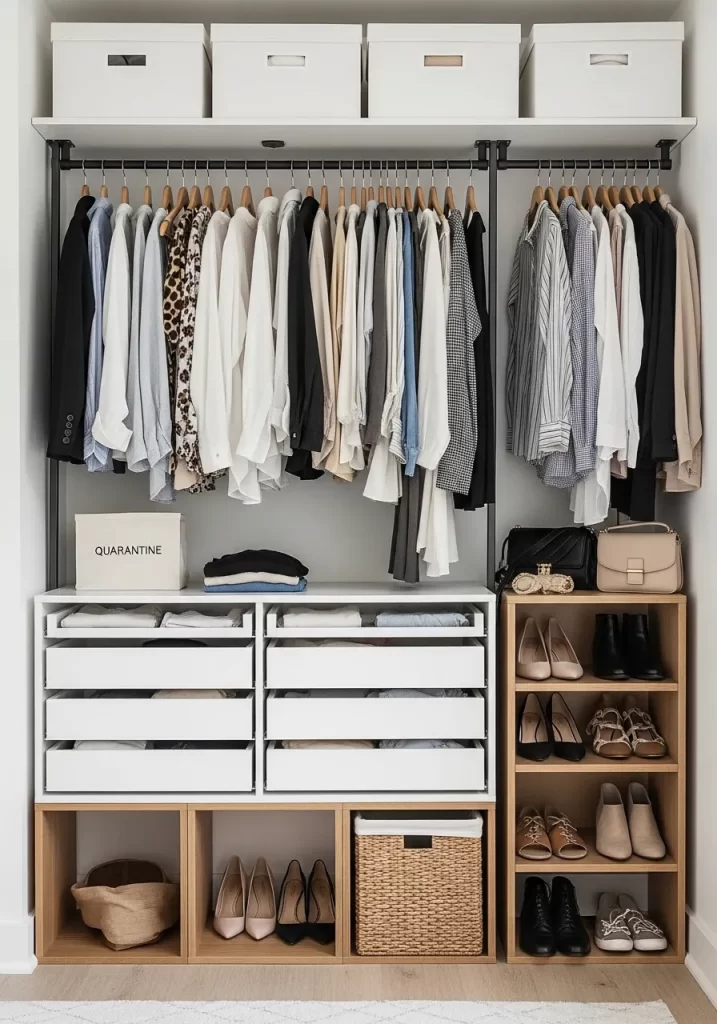
26. The “Starter Kit” Wall System
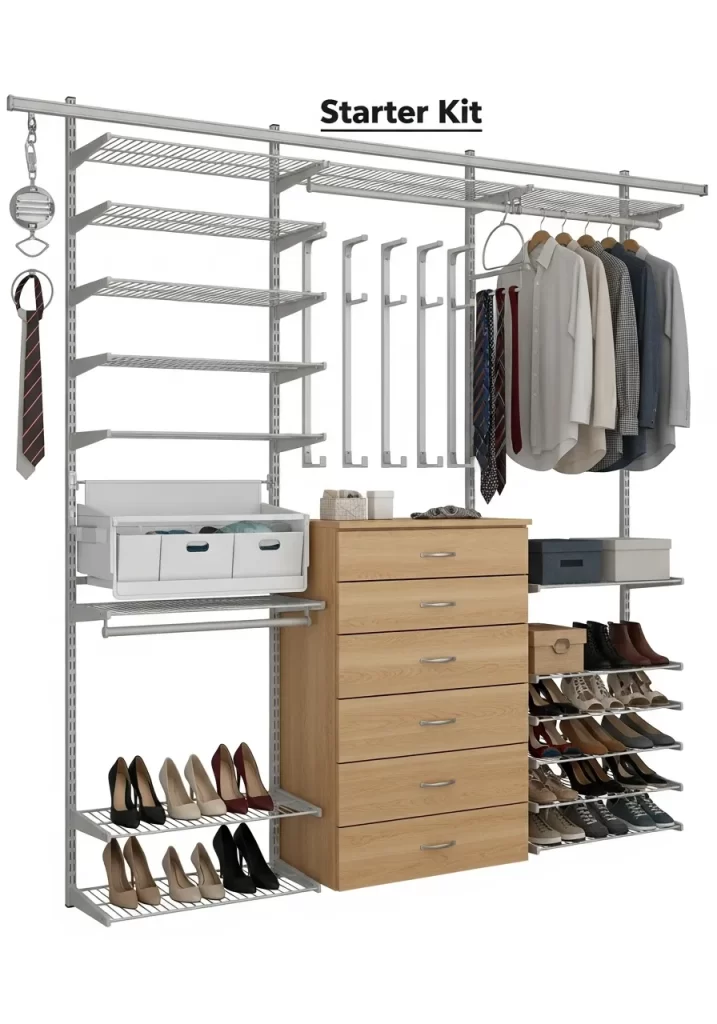
This is a classic “track” or “rail” organization system. It is very strong and very easy to change.
The whole system hangs from a single metal track that is screwed to the wall (near the ceiling). Vertical standards (the long, slotted rails) hook onto this track. Then, all the shelves, drawers, and rods just clip into the vertical standards.
DIY Assembly: The Track and Rail System
This is a very popular DIY project.
Tools You’ll Need:
- Drill and bits
- A 4-foot Level
- Stud finder
- Tape measure
- Screwdriver or impact driver
- Hacksaw (for cutting the top track)
Instructions:
- Find Studs: Use your stud finder to find and mark every single stud across the top of your wall.
- Mount the Top Track: This is the most important step. The top track must be perfectly level and screwed into every stud.
- Place the top track on the wall. Put your level on it.
- Drill pilot holes through the track and into the studs.
- Secure the track with heavy-duty screws.
- Hang Verticals: Now the easy part. Just hook the long, vertical standards onto the top track. You can slide them left and right.
- Add Brackets: Clip the shelf brackets into the slots on the vertical standards. You can place them at any height.
- Place Shelves: Lay your wire shelves or wood shelves on top of the brackets.
- Add Rods: Clip the closet rod hooks into the brackets and set the rod in place.
- Add Drawers: (Optional) You can add a pre-built dresser, like the one shown, that just sits on the floor underneath the system.
27. The Simple Entry Closet
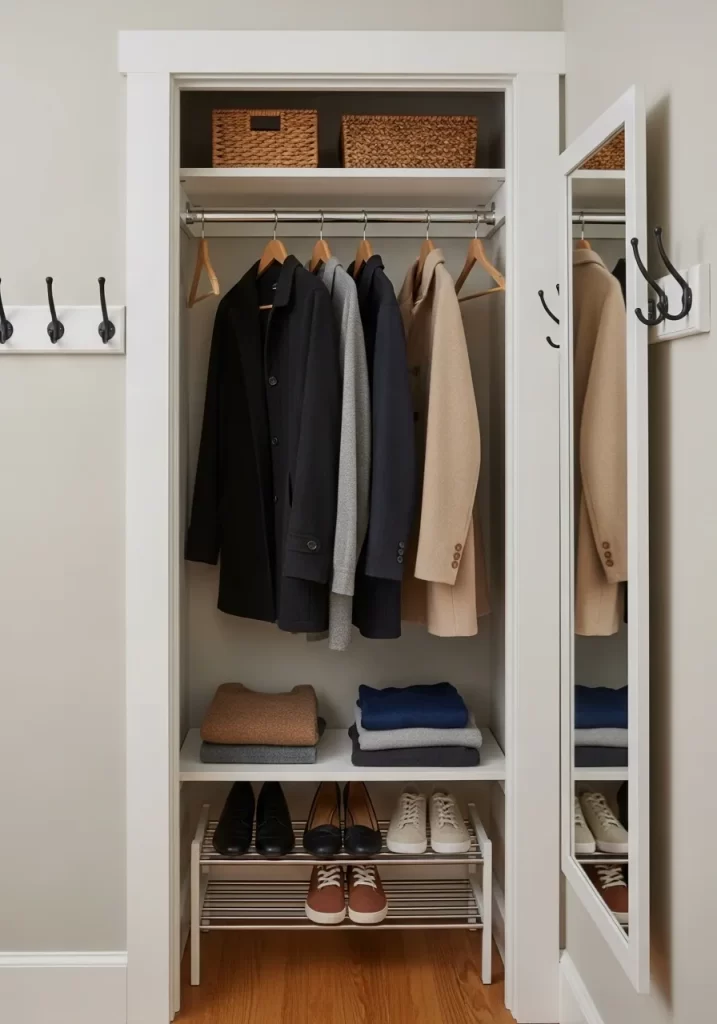
This is a classic, clean, and simple coat closet. It does the basics very well.
The system is just three parts. A single, sturdy hanging rod for coats. A shelf above that for baskets or hats. And a freestanding, expandable shoe rack on the floor. A full-length mirror on the door is a smart, space-saving touch.
DIY Assembly: The Simple Entry Closet
This is a basic upgrade for any small closet.
Tools You’ll Need:
- Drill and bits
- Level
- Tape measure
- Screwdriver
- (For the mirror) Door-mounting hardware
Instructions:
- Install the Shelf: Most closets have a shelf. If yours does not, buy a “closet shelf kit.” Use your level and tape measure to draw a straight line on the side walls.
- Install Shelf Brackets: Screw the shelf’s side-wall brackets (or a back-wall cleat) into the wall studs.
- Install the Rod: Attach the “closet rod cups” to the side-wall brackets. Measure the space, cut your rod, and drop it in.
- Add the Shoe Rack: Buy a “freestanding, expandable” shoe rack. This requires zero installation. Just take it out of the box, expand it to fit your closet, and place it on the floor.
- Hang the Mirror: Buy a “full-length, over-the-door” mirror. It will come with brackets that just hook over the top of your closet door. No drilling is needed.
28. The Cedar-Lined Wardrobe
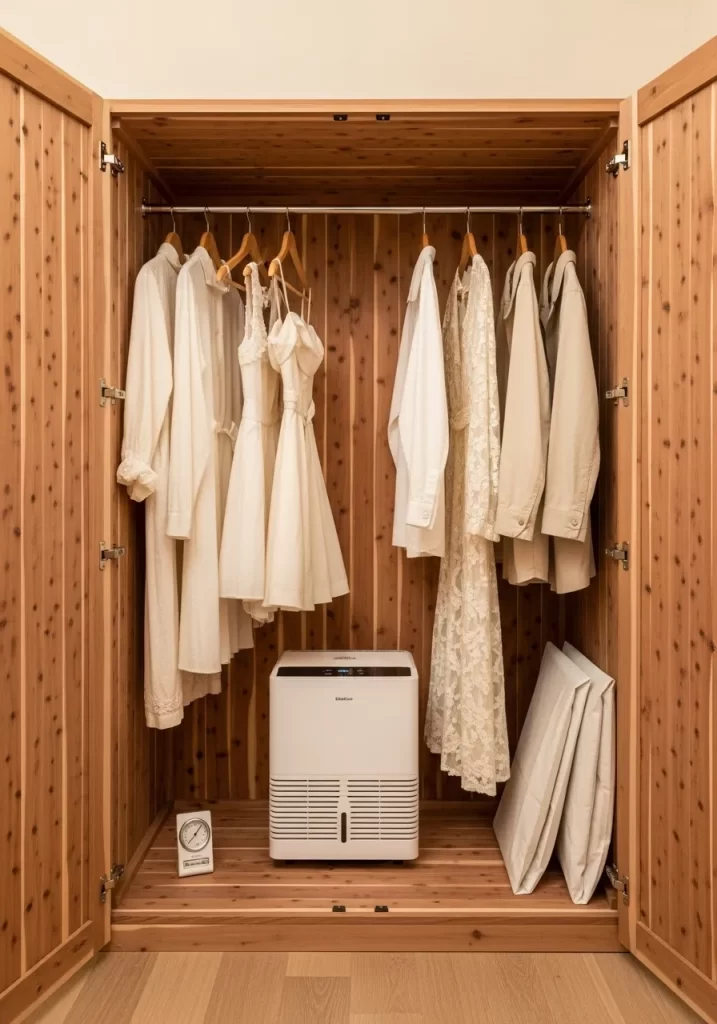
This is a functional upgrade for protecting valuable clothing. The entire inside of this wardrobe is lined with aromatic red cedar.
Cedar wood naturally repels moths and other pests. It also absorbs moisture, which helps prevent mildew. This is a classic way to store wool suits, coats, and delicate dresses. A small dehumidifier is added for extra moisture control.
DIY Assembly: The Cedar-Lined Wardrobe
You are not building a wardrobe. You are adding cedar to your existing closet.
Tools & Materials:
- Packs of “cedar closet liner” planks (sold at hardware stores)
- Tape measure
- A hand saw or jigsaw
- A “finish nailer” (a brad nailer) or small finishing nails and a hammer
- Level
Instructions:
- Empty and Clean: Empty your closet. Wipe down the walls.
- Measure and Cut: The cedar planks have “tongue and groove” edges so they lock together. Start at the bottom. Measure your wall. Cut your first plank to fit.
- Install the First Row: Place the first plank at the bottom of the wall. Use your level. Nail it to the wall into the studs using small finishing nails.
- Build Upward: Take your next plank. The groove on this plank will lock over the “tongue” of the one below it. Tap it into place. Nail this plank to the studs.
- Repeat: Keep going, row by row, until you have covered the entire wall.
- Add the Dehumidifier: This is not a DIY. Buy a small, portable dehumidifier. Place it on the floor of your new cedar closet.
29. The Open-Concept Bedroom Closet
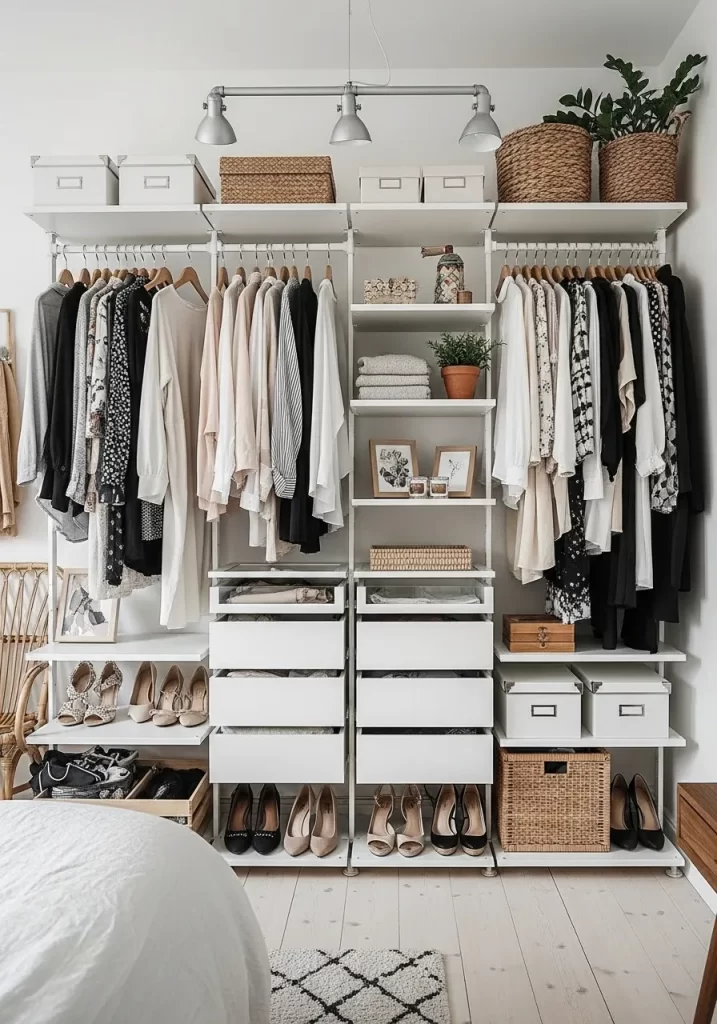
This system is for a bedroom that does not have a built-in closet. It turns a blank wall into a fully functional wardrobe.
It is a “wall-mounted” system. Two main vertical beams are attached to the wall. All the other parts (shelves, drawers, and rods) are then attached to these beams. This makes it look like it is “floating.” Wicker and canvas baskets add a soft, warm touch.
DIY Assembly: The Wall-Mounted System
This is a very common system from stores like IKEA (the “ELVARLI” or “BOAXEL” system).
Tools You’ll Need:
- Drill and bits
- Stud finder
- Level
- Tape measure
- Screwdriver
- Allen wrench (in the kit)
Instructions:
- Find Studs: Use your stud finder to find and mark the studs on your wall.
- Mount the Verticals: The main vertical posts must be screwed into the wall studs. This is the most important step. Use your level to make sure they are perfectly straight.
- Add Brackets: The kit comes with brackets. These brackets now clip or screw into the vertical posts. You can place them at any height.
- Add Shelves: Lay your wood shelves on top of the brackets.
- Add Rods: A special rod bracket will attach to the shelf brackets. This lets you hang a closet rod under a shelf.
- Add Drawers: The drawer units are pre-built. They slide into a special frame that also clips onto the vertical posts.
- Add Baskets: Place wicker and canvas baskets on the shelves.
30. The Pull-Out Pantry Closet
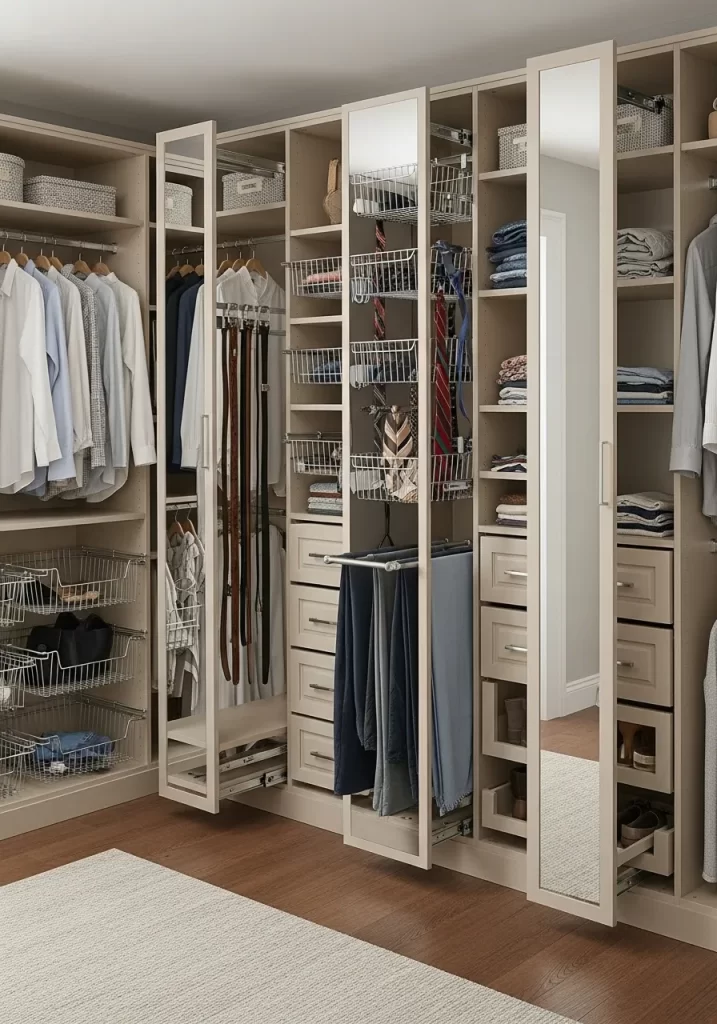
This system is a masterpiece of hidden storage. It looks like a normal closet, but the shelves pull out to meet you.
This closet uses pull-out wire baskets, a pull-out pants rack, and a full-length mirror mounted on a pull-out slide. Even the belt and tie racks are on slides. This is a great system for a deep, narrow closet where items in the back are hard to reach.
DIY Assembly: The Pull-Out Upgrades
This project is about adding “sliding hardware” to your existing closet shelves.
Tools & Materials:
- Drill and bits
- Screwdriver
- Tape measure
- Pull-out wire basket kits
- Pull-out pants rack kit
- Heavy-duty side-mount drawer slides
- A full-length mirror
Instructions:
- Measure First: This is critical. Measure the exact width, depth, and height of your closet cabinet openings.
- Buy Kits: Buy pull-out basket kits that are smaller than your openings.
- Install Baskets: The kits are easy to install. A small “frame” is screwed to the bottom shelf of your closet. The basket then slides into this frame.
- Install Pants Rack: A pull-out pants rack installs the same way. Its frame screws to the side-wall or the shelf of your closet.
- DIY the Mirror: This is the most custom part.
- Mount two heavy-duty drawer slides to the side wall of your closet, one high and one low.
- Attach the other half of the slides to a sturdy, flat piece of 1×4 wood.
- Mount your full-length mirror to the front of that 1×4 wood.
- Now, the whole mirror-and-wood unit will slide in and out of the closet.
31. The Weekly Wardrobe Planner
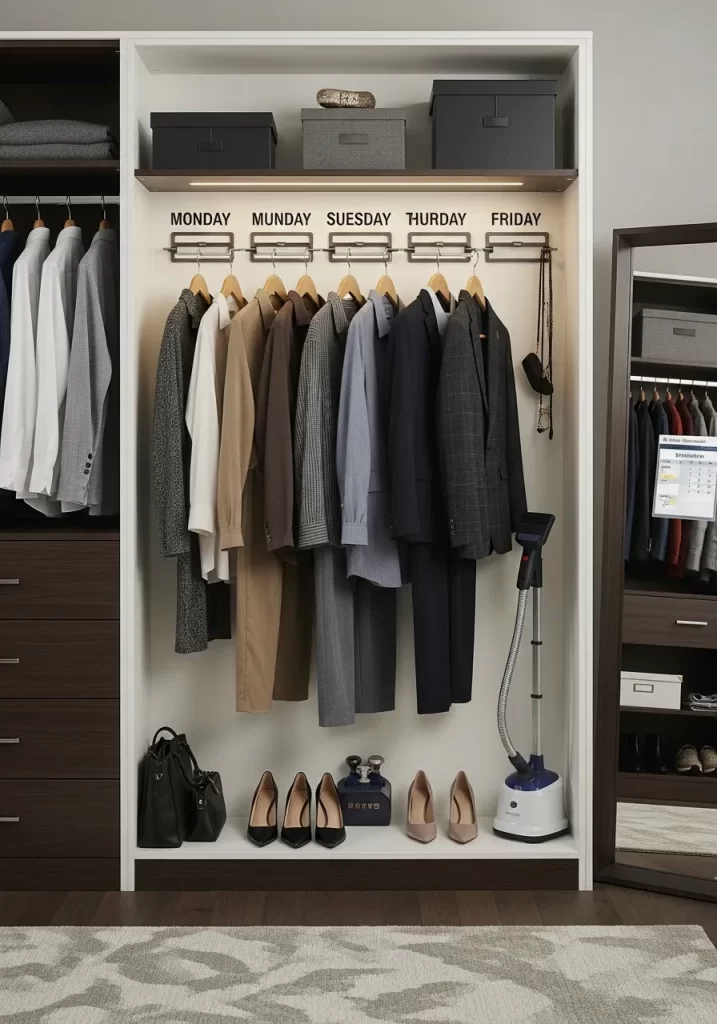
This system takes the stress out of daily dressing. It allows you to plan and organize your outfits for the entire work week.
A dedicated section of the closet features individual hanging rods, each labeled for a day of the week. This keeps your chosen outfits wrinkle-free and ready. Below, a steaming station and organized shoe shelf ensure everything is prepared. This makes mornings much calmer.
DIY Assembly: The Weekly Wardrobe Planner
This is a simple addition to an existing closet.
Tools & Materials:
- Small, straight closet rods (12-18 inches long, 5 of them)
- Rod mounting brackets (10 total, 2 for each rod)
- Drill and drill bits
- Level
- Tape measure
- Label maker (or cardstock and a marker)
- Small hooks (for accessories)
Instructions:
- Plan Your Spacing: Measure the width of your closet section. You want to space out five small rods. Use a pencil to mark where each rod bracket will go.
- Mount the First Rod: Start with the “Monday” rod. Use your level to ensure the two brackets are at the same height. Drill pilot holes and screw the brackets into the wall. Place the small rod.
- Repeat for All Rods: Continue mounting the remaining four rods, spacing them evenly.
- Add Labels: Use your label maker to create labels for “Monday,” “Tuesday,” “Wednesday,” “Thursday,” and “Friday.” Stick these labels above each rod.
- Install Accessory Hooks: Add a few small hooks to the side wall for belts, scarves, or watches.
- Organize Shoes: Arrange your shoes neatly on the floor below the rods.
- Set Up Steamer: Place your clothes steamer on the floor, ready for use.
32. The Smart Glass Wardrobe
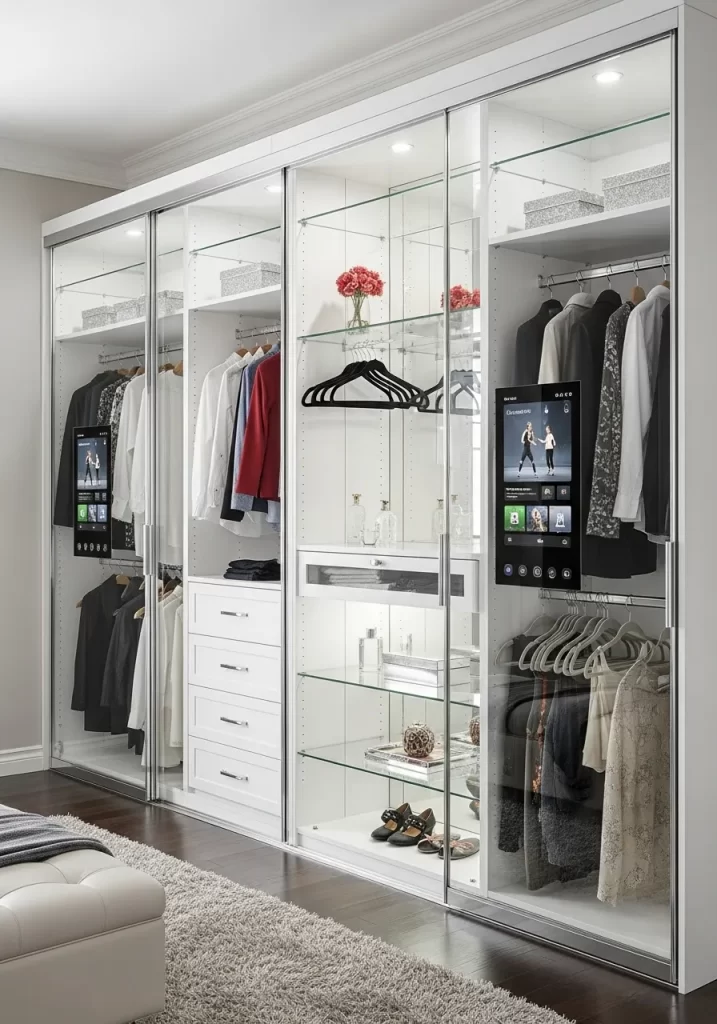
This system is modern and high-tech. It uses clear glass sliding doors and integrated smart screens.
The glass doors let you see your wardrobe at a glance, making it easy to choose outfits. The integrated screens provide interactive features, like virtual try-ons or outfit suggestions. LED lighting inside the cabinets highlights your clothes and accessories. This is truly a personalized shopping experience at home.
DIY Assembly: The Smart Glass Wardrobe
Creating this exact system is a very complex custom build. Here is how to create a similar look and function with simpler steps.
Tools & Materials:
- Pre-built closet system with open shelves and hanging rods
- Sliding door hardware kit (for glass doors)
- Acrylic sheets (instead of glass, for safety)
- LED strip lights (battery-operated or plug-in)
- Small, wall-mounted tablet or smart display
- Double-sided tape or command strips
Instructions:
- Build Your Closet Frame: First, build a standard closet frame with shelves and hanging rods.
- Install Sliding Doors (Acrylic):
- Purchase a “sliding door hardware kit.” This includes tracks for the top and bottom.
- Instead of glass, buy “acrylic sheets” cut to the size of your doors. These are much lighter and safer.
- Install the top and bottom tracks.
- Carefully set your acrylic sheets into the tracks.
- Add Internal Lighting: Stick battery-operated LED light strips to the underside of each shelf. This makes your clothes glow.
- Mount a Smart Display:
- Buy a small tablet (like an iPad or Android tablet).
- Use strong double-sided tape or Command Strips to mount the tablet to the inside of one of the acrylic doors. (You may need to reinforce the door if it’s too thin.)
- Download a “virtual closet” app that helps you organize outfits.
33. The Organized Drawer System
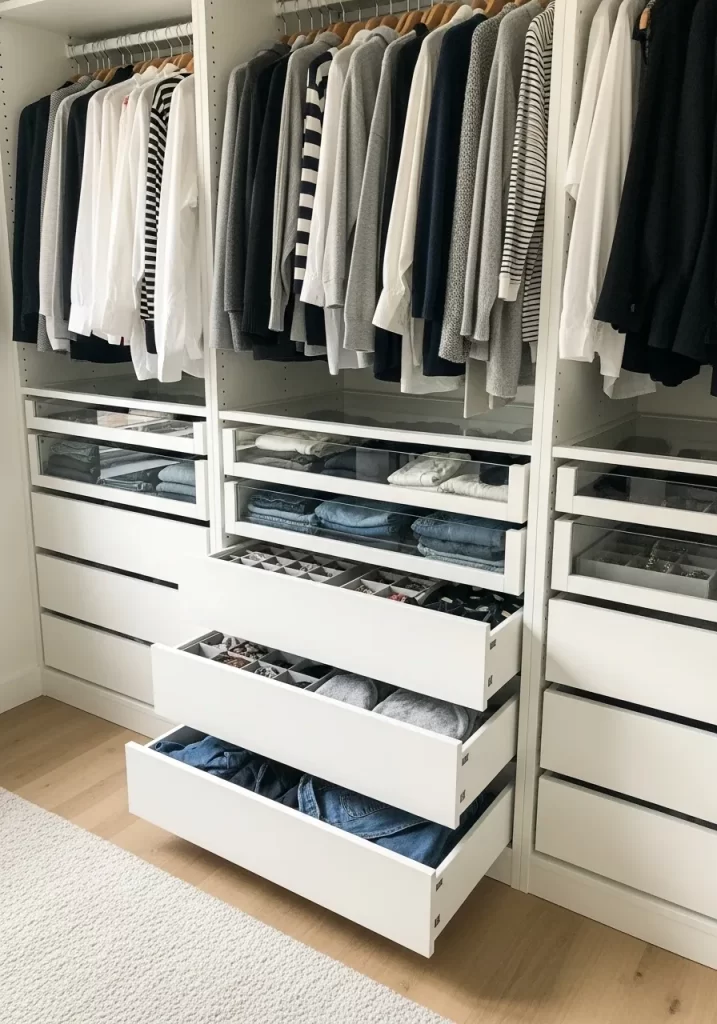
This system is all about making the most of every drawer. It combines different types of inserts and dividers for small items.
Clear, shallow trays are used in the top drawers for jewelry. Deeper, segmented dividers keep socks and undergarments separate. Below, the large, open drawers hold neatly folded jeans and sweaters. This ensures everything has its place.
DIY Assembly: The Organized Drawer System
This is a simple organization project that takes little time.
Tools & Materials:
- Drawer organizer trays (clear plastic or bamboo)
- Segmented drawer dividers (for socks/underwear)
- Non-slip drawer liner
- Scissors
Instructions:
- Empty and Clean: Remove everything from your drawers. Wipe them clean.
- Add Liner: Cut non-slip drawer liner to fit the bottom of each drawer. This prevents items and organizers from sliding.
- Install Jewelry Trays: For your top, shallow drawers, place clear plastic or bamboo trays. These are great for rings, earrings, and necklaces.
- Add Segmented Dividers: For socks and underwear drawers, use segmented dividers. These create individual cubbies. Place one item (or pair) in each section.
- Fold Large Items: For deeper drawers, fold your jeans, t-shirts, and sweaters into neat rectangles. Stack them vertically (like files) rather than horizontally. This makes it easier to see everything.
34. The “Ready-to-Go” Closet
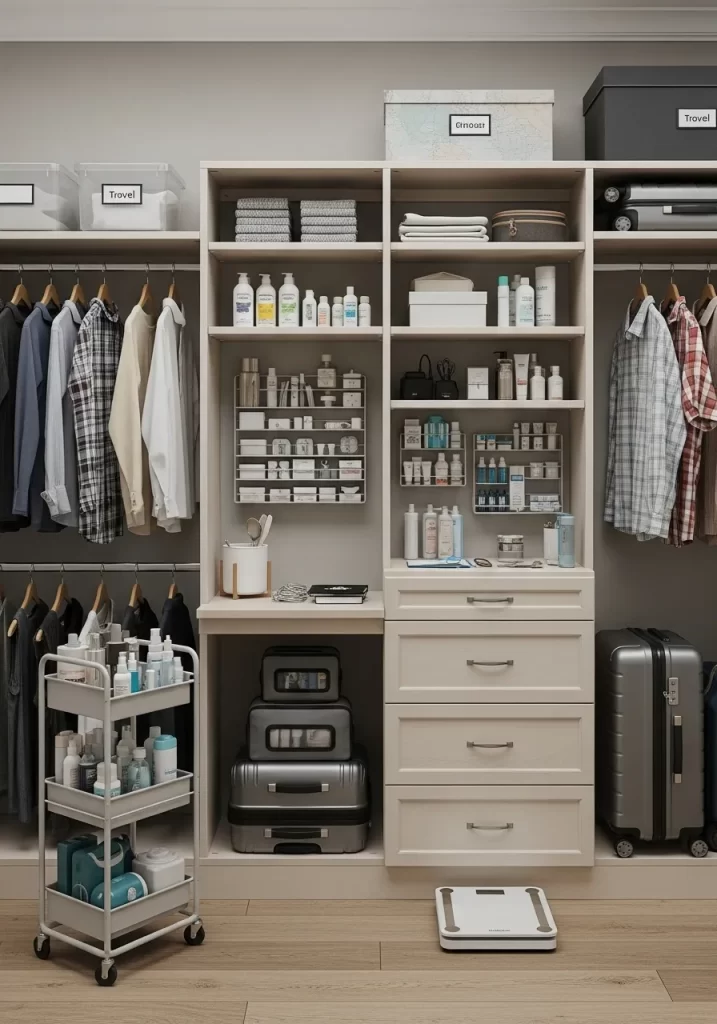
This is a highly functional closet system designed for daily routines and travel. It centralizes all your getting-ready essentials.
One section features neatly hung clothes. The middle tower has open shelves dedicated to toiletries, hair products, and skincare, using clear wall-mounted organizers. A rolling utility cart holds more products. A luggage scale is kept on the floor, ready for packing.
DIY Assembly: The “Ready-to-Go” Closet
You are adding accessories to an existing closet system.
Tools & Materials:
- Wall-mounted clear organizers (for toiletries)
- Rolling utility cart
- A luggage scale
- Small containers or trays for shelves
- Drill and bits (for wall organizers)
- Level
Instructions:
- Clear Shelf Space: Designate a few shelves in your central tower for toiletries.
- Mount Wall Organizers: Choose your clear, wall-mounted organizers. Use your level to position them neatly on the back wall of the closet tower. Drill pilot holes and screw them securely into place.
- Organize Toiletries: Place your bottles and containers into the organizers and on the shelves. Use small trays to group similar items.
- Assemble Utility Cart: Assemble your rolling utility cart. Fill it with extra supplies or items you use regularly. Park it in an empty corner of the closet.
- Place Luggage Scale: Keep your luggage scale on the floor, ready for whenever you need to pack.
- Store Luggage: Stack your empty suitcases neatly on the floor under a hanging rod.
35. The Kids’ Reach-In Closet
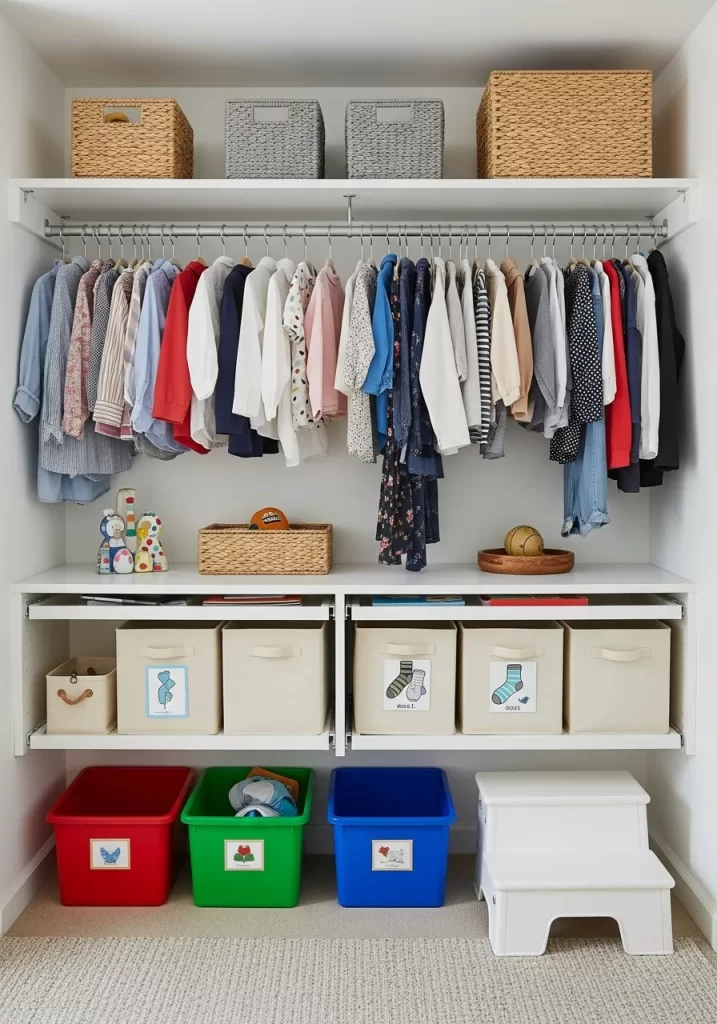
This closet is designed for little ones. It is colorful, accessible, and helps teach independence.
The main hanging rod is low, so kids can reach their clothes. Below, a shelf holds colorful fabric bins, each labeled with a picture (like socks or shirts). Even lower, bright plastic bins hold toys. A small step stool is available for reaching higher items.
DIY Assembly: The Kids’ Reach-In Closet
This is an easy and fun project for a child’s closet.
Tools & Materials:
- Small, colorful plastic storage bins
- Fabric storage bins (with cut-out handles)
- A label maker OR…
- Printer, paper, scissors, and clear tape (for picture labels)
- A small step stool
- (Optional) Lowering your existing closet rod
Instructions:
- Lower the Rod (Optional): If your child’s closet rod is too high, you can lower it.
- Unscrew the existing rod brackets.
- Measure a new, lower height that your child can reach.
- Drill new pilot holes and re-mount the rod brackets at the lower height. Cut the rod to fit if needed.
- Add a Lower Shelf: Many kids’ closets do not have a lower shelf. Buy a shelf kit. Install it at a height where the fabric bins will fit underneath.
- Create Picture Labels:
- Print out small pictures of clothes (socks, t-shirts, pants, underwear).
- Cut them out.
- Tape one picture to the front of each fabric bin.
- Fill the Bins:
- Put all the child’s socks in the “socks” bin.
- Put shirts in the “shirts” bin.
- Place the filled fabric bins on the lower shelf.
- Add Toy Bins: Place the large, colorful plastic bins on the floor for toys.
- Add Step Stool: Keep the step stool in the closet for safe reaching.
36. The Heirloom Armoire
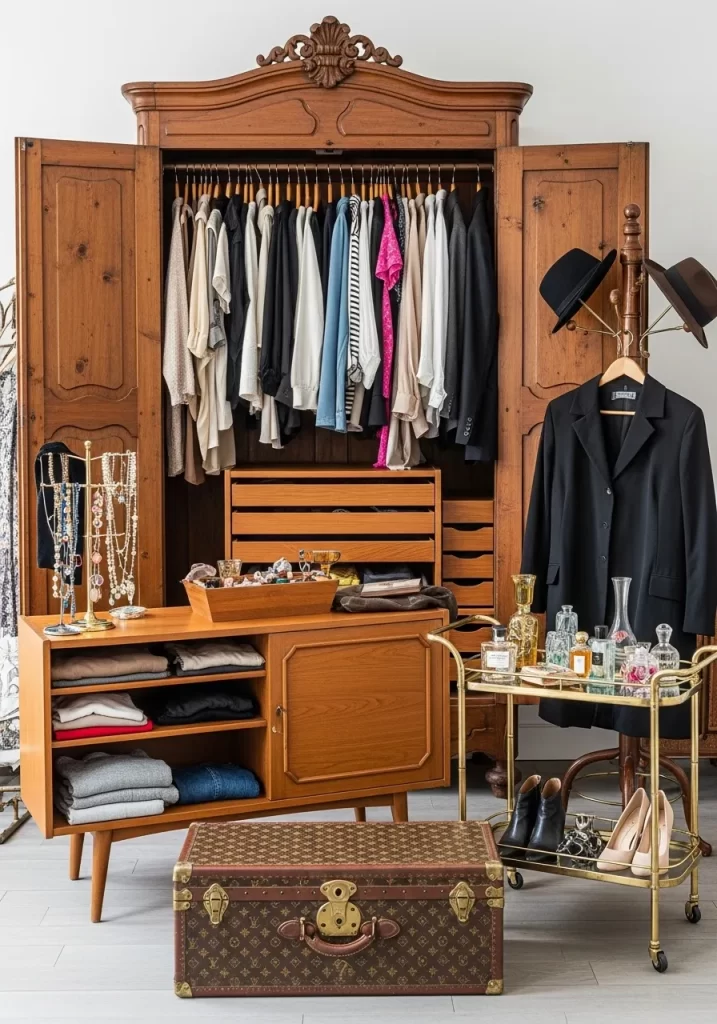
This system uses a beautiful antique armoire as a central closet. It brings charm and character to a room.
The large wooden doors open to reveal a hanging rod and shelves. A matching wooden console or dresser sits next to it, providing drawers and open cubbies for folded items. A rolling bar cart holds perfumes and accessories. This setup feels luxurious and personal.
DIY Assembly: The Heirloom Armoire
This is about selecting and arranging existing furniture.
Tools & Materials:
- A large, antique-style armoire (or a new one with an antique look)
- A matching (or complementary) console table or dresser
- A bar cart
- Jewelry stand
- Decorative boxes
Instructions:
- Choose Your Armoire: Find a suitable armoire. Many older pieces are solid wood.
- Position the Armoire: Place the armoire in its chosen spot. If it is heavy, it is a two-person job.
- Add a Rod and Shelves: Many armoires come with a rod or shelves. If yours does not, you can install a simple, small closet rod and a few shelves inside.
- Position Companion Furniture: Place the console table or dresser next to the armoire.
- Style the Console: Use the console’s drawers for folded items. Use open shelves for more folded clothes.
- Set Up the Bar Cart: Assemble your bar cart. Place your perfumes, colognes, and small accessories on its shelves.
- Add Jewelry Stand: Place a freestanding jewelry stand on top of the console.
- Decorate: Use decorative boxes for smaller items. Hang hats on a hat stand.
37. The Wall Art Jewelry Display
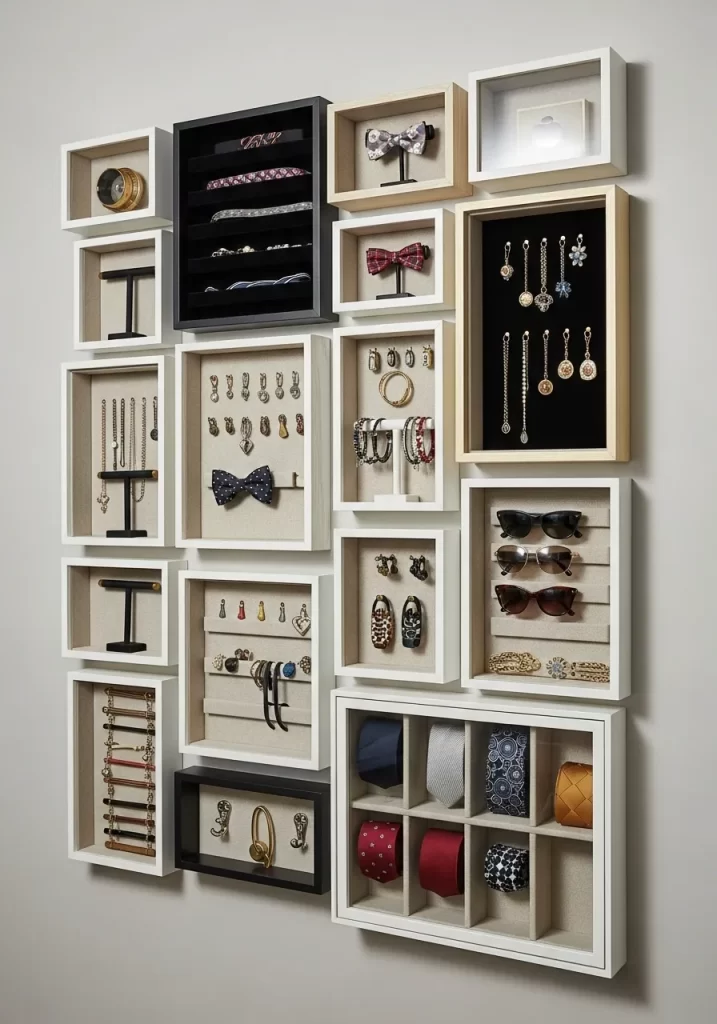
This system turns your accessories into decorative art. It is a stunning way to organize and display a large collection.
Individual shadow boxes and framed displays are hung together on the wall, creating a gallery. Each box is lined with fabric and holds a specific type of jewelry: earrings, necklaces, or ties. The different sizes and depths add visual interest.
DIY Assembly: The Wall Art Jewelry Display
This is a creative project that lets you show off your style.
Tools & Materials:
- Various-sized shadow boxes with removable backs
- Fabric (velvet, linen, or felt)
- Spray adhesive
- Small jewelry stands (for necklaces)
- Small hooks (for earrings)
- Glue gun
- Drill and screws (for mounting to wall)
- Level
- Tape measure
- Pencil
Instructions:
- Prep the Shadow Boxes:
- Remove the back from each shadow box.
- Cut your fabric pieces slightly larger than the back.
- Spray the back with spray adhesive. Smooth the fabric onto the back, wrapping it over the edges.
- Let dry.
- Add Inserts:
- For necklaces, use small jewelry stands (like “T-bar” stands). Glue them to the fabric-covered back.
- For earrings, use a glue gun to attach small hooks to the fabric-covered back.
- For rings, you can use ring rolls (small fabric tubes) or small dishes.
- Reassemble: Put the fabric-covered and decorated back into each shadow box.
- Plan Your Layout: Lay your shadow boxes on the floor. Arrange them in a way you like. Use your pencil to mark where each one will go on the wall.
- Mount to Wall: Using a drill and screws, mount each shadow box to the wall. Use your level to keep them straight.
38. The Garment Bag Guardian
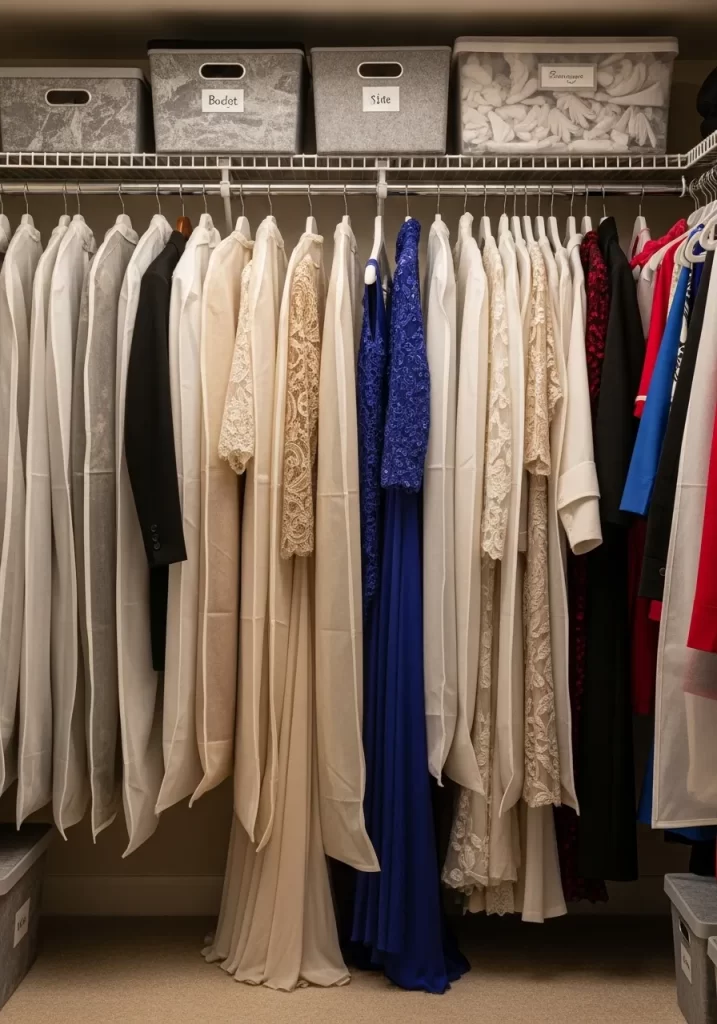
This system is all about protecting your treasured clothing. It is especially good for formal wear, seasonal items, or delicate fabrics.
The entire hanging rod is filled with clothes stored inside breathable garment bags. These bags shield items from dust, light, and insects. Clear, labeled storage bins on the top shelf keep seasonal accessories safe.
DIY Assembly: The Garment Bag Guardian
This is a very simple organizing project.
Tools & Materials:
- Breathable garment bags (many)
- Labels (or a label maker)
- Clear storage bins with lids
Instructions:
- Empty and Clean: Clean out your closet.
- Sort Clothes: Identify clothes that need extra protection: suits, dresses, coats, out-of-season items.
- Choose Bags:
- For long items like dresses, use full-length garment bags.
- For suits or jackets, use shorter garment bags.
- Choose breathable fabric bags (like cotton or non-woven polypropylene), not plastic dry-cleaning bags. Plastic traps moisture.
- Place Clothes in Bags: Put one item (or a matching set) in each garment bag.
- Label Bags (Optional): If you have many bags, use a label maker to stick a label to the outside of each bag (e.g., “Winter Coats,” “Formal Dresses”).
- Hang Clothes: Hang the bagged clothes neatly on your closet rod.
- Use Storage Bins: For items on the top shelf (hats, gloves), use clear, labeled storage bins.
39. The Extreme Shoe Library
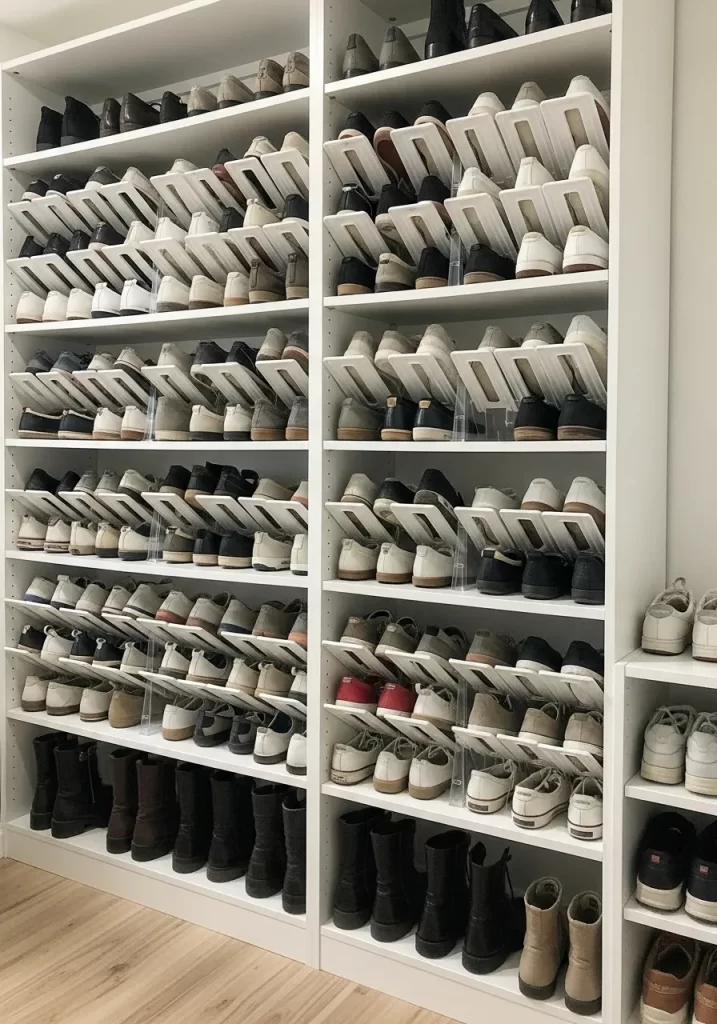
This system turns an entire wall into a shoe-lover’s dream. It is a vast, organized library for footwear.
Tall, custom-built shelving units run from floor to ceiling. Each shelf is angled. This lets you see every pair of shoes at a glance. The uniform white color of the shelves makes the collection pop. Boots are stored on the bottom shelf, keeping them upright.
DIY Assembly: The Extreme Shoe Library
This is a custom build. You are adding angled shelves to an existing tall bookshelf or closet tower.
Tools & Materials:
- Tall, narrow bookshelves (at least two)
- Wood planks (1×4 or 1×6) for the angled shelves
- Wood glue
- Small finishing nails
- Small wood “cleats” (small wood blocks)
- Drill and bits
- Level
- Tape measure
- Saw (circular saw or miter saw)
- White paint and primer
Instructions:
- Assemble Bookshelves: Assemble your tall bookshelves. Prime and paint them white.
- Plan Shelf Angles: Decide on the angle for your shoes. A 20-30 degree angle is often good.
- Cut Cleats: Cut small wood “cleats” from your 1×4 or 1×6 planks. These will be the small supports that the angled shelf rests on.
- Install Cleats: Inside your bookshelf, measure and mark where you want each shelf. Screw two small cleats (one on each side) to the side walls of the bookshelf. Make sure they are level. Repeat for all shelves.
- Cut Angled Shelves: Measure the width inside the bookshelf. Cut your 1×4 or 1×6 planks to this length. Cut a slight angle on the front edge for a cleaner look.
- Install Angled Shelves: Place your cut shelves on top of the cleats. Nail them down from above to secure them.
- Repeat: Continue installing all your angled shelves.
40. The Dual Hat Display
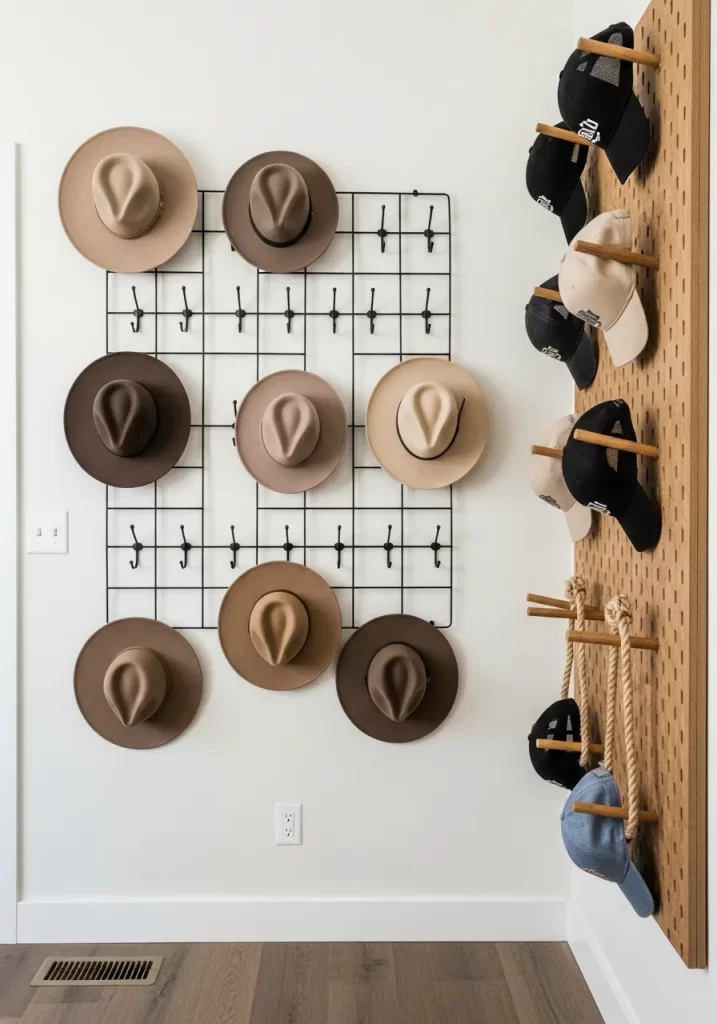
This system is a smart way to organize and display a hat collection. It uses two different wall-mounted solutions.
On the left, a black metal grid with hooks holds wide-brimmed fedoras. This creates an artistic display. On the right, a custom wooden pegboard has wooden dowels. This is used for hanging baseball caps, which are stacked vertically.
DIY Assembly: The Dual Hat Display
You are installing two separate wall organizers.
Tools & Materials:
- Metal grid wall panel with hooks (or a wire grid)
- A sheet of pegboard
- Wooden dowels (1/2-inch or 3/4-inch diameter)
- Wood glue
- Drill and drill bits (matching dowel size)
- Stud finder
- Level
- Screws and anchors (for metal grid)
- Spacers and screws (for pegboard)
Instructions for the Metal Grid:
- Position: Hold the metal grid panel on the wall. Use your level.
- Mount: Drill pilot holes through the grid and into the wall. If you hit a stud, use a wood screw. If not, use drywall anchors. Screw the grid securely to the wall.
- Add Hooks: Hang your hats on the built-in hooks.
Instructions for the Pegboard:
- Mount Pegboard: Mount the pegboard to the wall, remembering to use spacers behind it so the dowels have room to insert. (Refer to DIY for “The Fitness Pegboard Wall” if you need details on this).
- Drill Holes for Dowels: Decide where you want your hats to hang. Drill holes through the pegboard and into the 1×2 wood spacers behind it. The drill bit should be the same size as your wooden dowels.
- Insert Dowels: Put a dab of wood glue on one end of each wooden dowel. Push the dowels into the drilled holes. Let the glue dry.
- Hang Hats: Stack your baseball caps or hang other hats on the dowels.
41. The Hidden Wardrobe Door
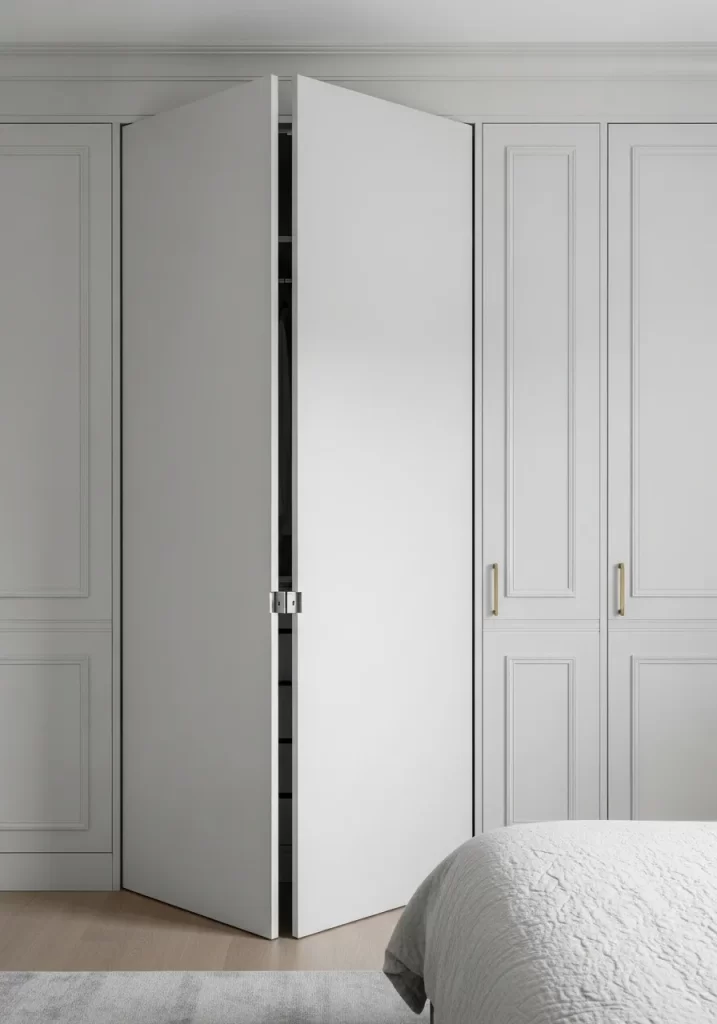
This system is all about blending storage seamlessly into your room’s design. It makes a closet “disappear” by matching the door to the surrounding wall panels.
The closet door is a flat, paintable panel that looks just like the wall it is built into. It often has hidden hinges for an even smoother look. This design creates a very clean, quiet aesthetic in a bedroom, reducing visual clutter.
DIY Assembly: The Hidden Wardrobe Door
This is an advanced carpentry project. Here is how to create a similar look with less construction.
Tools & Materials:
- A flush, hollow-core interior door (no panels, just flat)
- Priming paint
- Wall paint (matching your walls exactly)
- Sandpaper (fine grit)
- Hinges (standard or concealed, if possible)
- Door handle (minimalist or push-latch)
- Pre-made wall molding/trim
- Miter saw
- Wood glue
- Small finishing nails
- Nail gun (or hammer)
- Caulk
- Filler
Instructions:
- Prepare the Door: If your current closet door has panels, you need a new, flat, flush door. Sand it lightly. Prime it.
- Paint the Door: Paint the door the exact same color as your walls. Apply multiple thin coats for a smooth finish.
- Install Hinges: Install the hinges. For a truly hidden look, use “concealed” or “invisible” hinges if you have the skill. Otherwise, standard hinges are fine.
- Install Door Handle: Choose a minimalist door handle or a magnetic push-latch system. This reduces how much the handle sticks out.
- Add Wall Panels (Façade): This is the key to the “blended” look.
- Buy simple, pre-made wall molding or trim from a hardware store.
- Use a miter saw to cut the molding into rectangles.
- Use wood glue and small finishing nails to attach these molding pieces to your wall, around the closet door.
- Crucially, attach some molding pieces directly onto the closet door itself, mimicking the pattern on the wall.
- Fill any nail holes with wood filler. Caulk around the edges of the molding for a smooth finish.
- Paint the molding to match the wall and door.
42. The Linen Closet Powerhouse
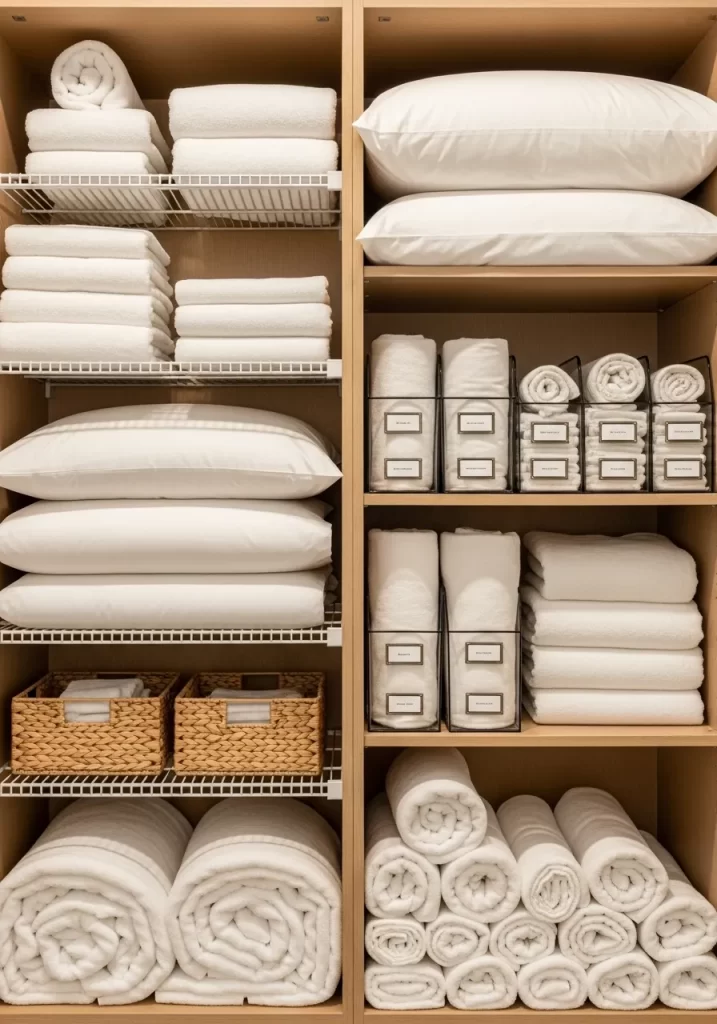
This system is designed for maximum linen storage. It combines open shelves and organized bins to keep towels and bedding tidy.
The left side uses open wire shelving. This is great for stacking folded towels and neatly rolled blankets. The right side features sturdy wood shelves. It uses clear, labeled bins to organize smaller items like washcloths or pillowcases.
DIY Assembly: The Linen Closet Powerhouse
This is about maximizing your existing shelves.
Tools & Materials:
- Small, clear plastic bins with lids
- A label maker
- Wicker baskets
- Non-slip shelf liner
- Fabric softener sheets (for scent)
Instructions:
- Empty and Clean: Take all linens out. Vacuum and wipe down shelves.
- Add Liner: Cut non-slip shelf liner to fit all shelves. This prevents items from sliding and keeps shelves clean.
- Sort and Fold:
- Towels: Fold all towels into neat, uniform rectangles. Stack them by size or color.
- Sheets: Fold matching sheet sets together. Place them in a pillowcase to keep the set together.
- Pillows: Fluff pillows and store them on top shelves.
- Use Clear Bins: For small items (like hand towels, washcloths, or spare pillowcases), use the clear plastic bins.
- Label each bin (e.g., “Washcloths,” “King Pillowcases”).
- Place the bins on shelves.
- Use Wicker Baskets: For larger items (like extra blankets or seasonal throws), use the wicker baskets.
- Add Freshness: Place a fabric softener sheet inside each bin or folded stack of linens for a fresh scent.
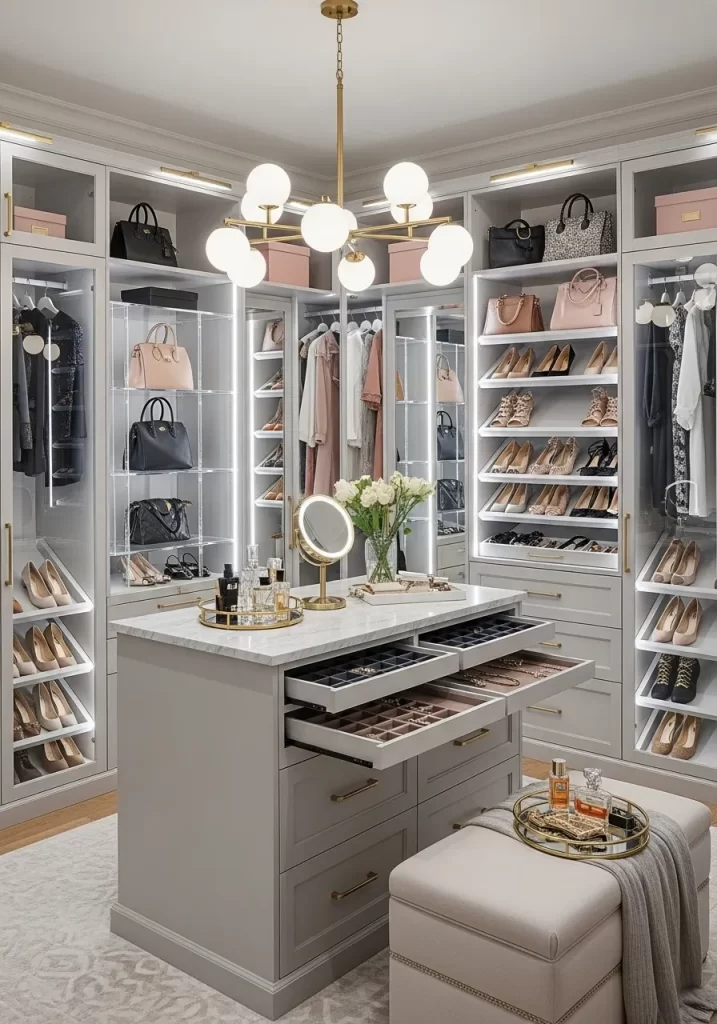
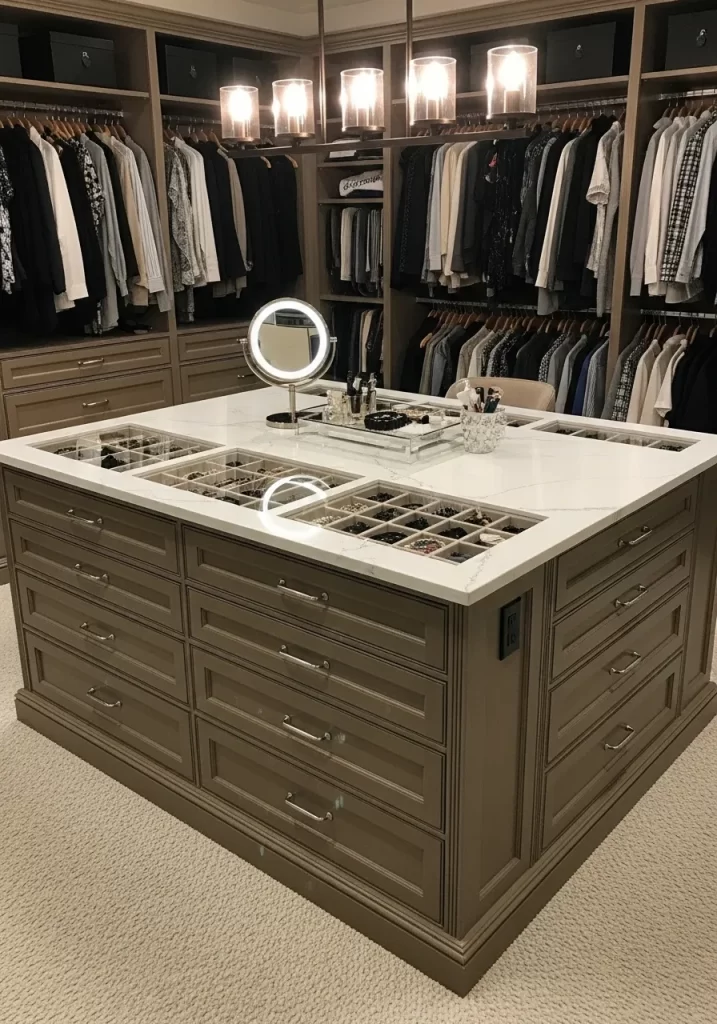
43. The Grand Island Closet
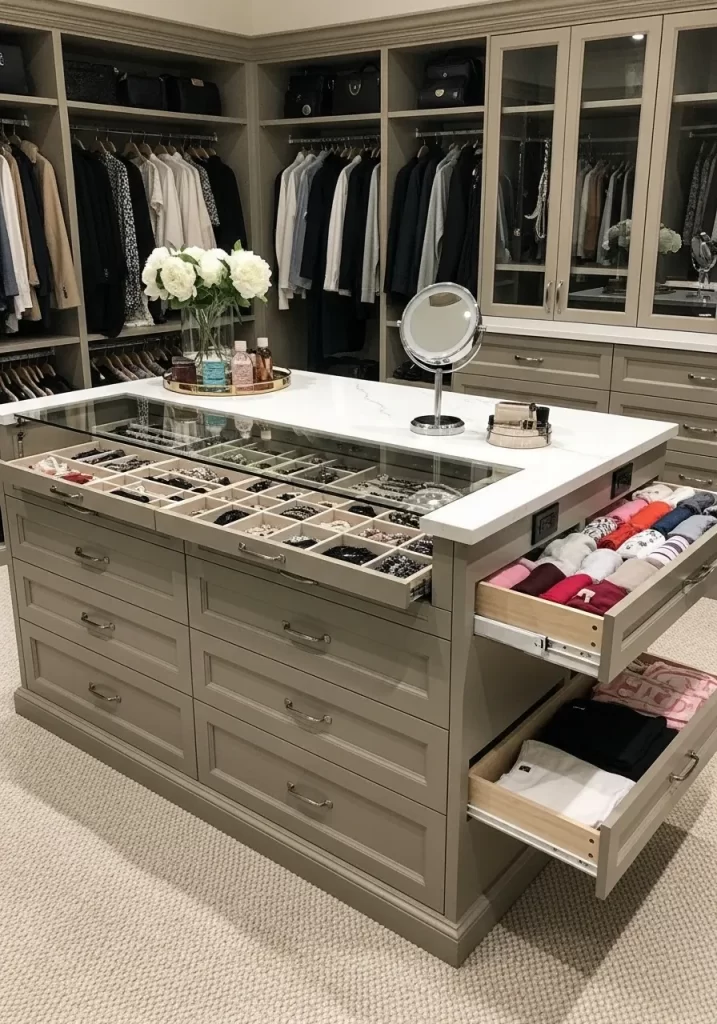
This is the ultimate walk-in closet island. It combines expansive storage with a luxurious feel.
The oversized island features a white countertop, suitable for displaying accessories or folding clothes. It has many drawers. Some are shallow and velvet-lined for jewelry, while others are deep for folded items. The entire closet is a custom, built-in system with ample hanging space.
DIY Assembly: The Grand Island Closet
Building a custom island of this size is a major project. Here is how to create a similar, smaller island from existing furniture.
Tools & Materials:
- Two identical dressers (3-4 drawers each)
- Long piece of countertop material (laminate, butcher block, or quartz remnant)
- Strong adhesive (construction adhesive)
- Small L-brackets and screws
- Velvet-lined jewelry trays (pre-made)
- Non-slip drawer liner
Instructions:
- Assemble Dressers: Assemble your two dressers. Place them back-to-back in the center of your closet.
- Join Dressers: Use small L-brackets and screws to connect the two dressers from the inside. This makes one solid unit.
- Add Countertop:
- Apply a strong construction adhesive to the top edges of the joined dressers.
- Carefully place your custom-cut countertop on top. Press down firmly.
- You may want to add a few small L-brackets from inside the top drawers, screwed up into the countertop, for extra security.
- Organize Drawers:
- Line some drawers with non-slip liner.
- Place velvet-lined jewelry trays in the shallow drawers.
- Use deeper drawers for folded items like t-shirts or underwear.
44. The Rustic Barn Door Closet
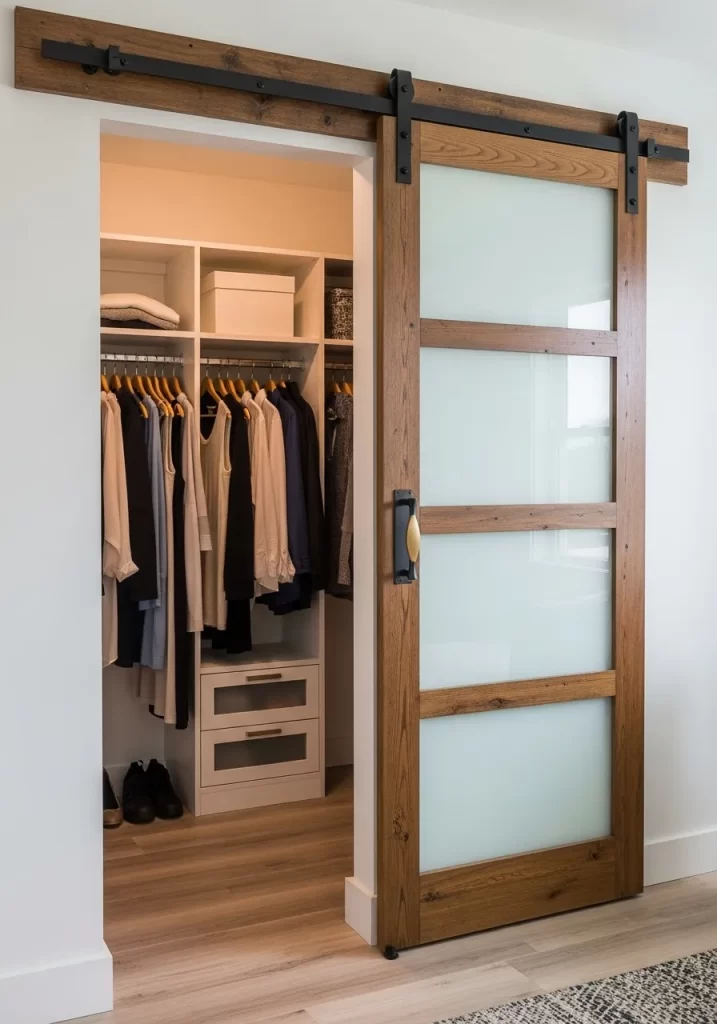
This system features a beautiful barn door, which adds a rustic-chic touch to a closet. Barn doors save space because they slide along the wall rather than swinging open.
The door is made of distressed wood with frosted glass panels. The dark metal track and hardware give it a strong look. Inside, the closet is a standard, bright system with shelves and hanging rods, keeping clothes organized and accessible.
DIY Assembly: The Rustic Barn Door Closet
Installing a barn door is a popular DIY project.
Tools & Materials:
- Barn door kit (includes door, track, rollers, and handle)
- Drill and bits
- Level (long)
- Stud finder
- Tape measure
- Wrench
- Socket set
Instructions:
- Measure Opening: Measure the width and height of your closet opening. Your barn door should be wider and taller than the opening.
- Find Studs: Use your stud finder to locate the studs above your closet opening, along the wall where the track will go. Mark them.
- Mount the Header Board (Optional but Recommended): If your track does not align with studs, buy a sturdy piece of wood (a 1×6 or 1×8). Paint it to match your wall or trim. Screw this “header board” into the studs above your opening. Then, you will attach the barn door track to this board.
- Install the Track: Following the kit’s instructions, mount the long metal track to the header board (or directly into studs). Use your level to ensure it is perfectly horizontal.
- Attach Rollers to Door: Attach the roller hangers to the top of the barn door.
- Hang the Door: With a helper, lift the door and hook the rollers onto the track.
- Install Floor Guide: Install the small floor guide. This stops the bottom of the door from swinging out.
- Add Handle: Attach the handle to the front of the door.
45. The Ultimate Closet Island
This walk-in closet features a large, luxurious island as its centerpiece. It is designed for both storage and aesthetic appeal.
The island has a bright white countertop for display or folding. Multiple drawers provide hidden storage for clothing and accessories. Integrated, velvet-lined trays inside the top drawers keep jewelry and watches perfectly organized. Overhead lighting spotlights the island.
DIY Assembly: The Ultimate Closet Island
As with other islands, building a custom one is complex. You can use pre-built units for a similar effect.
Tools & Materials:
- Two identical dressers (3-4 drawers each)
- Long piece of countertop material (white quartz, marble-effect laminate)
- Strong construction adhesive
- Small L-brackets and screws
- Velvet-lined jewelry trays (pre-made)
- Non-slip drawer liner
- (Optional) Small, battery-operated LED puck lights
Instructions:
- Assemble Dressers: Assemble your two dressers. Position them back-to-back in the center of your walk-in closet.
- Secure Dressers: Use L-brackets and screws to connect the two dressers from the inside. This creates one stable island base.
- Attach Countertop:
- Apply construction adhesive to the top edges of the joined dressers.
- Carefully place your custom-cut countertop on top. Press down.
- For extra security, you can screw small L-brackets from inside the top drawers up into the underside of the countertop.
- Organize Drawers:
- Line selected drawers with non-slip liner.
- Insert pre-made velvet-lined jewelry trays into the shallow top drawers.
- Use deeper drawers for folded clothes.
- Add Lighting (Optional): If you do not have ceiling lights directly over the island, stick small, battery-operated LED puck lights to the underside of your existing closet shelves, aiming down at the island.
46. The Rustic Glass Barn Door Closet
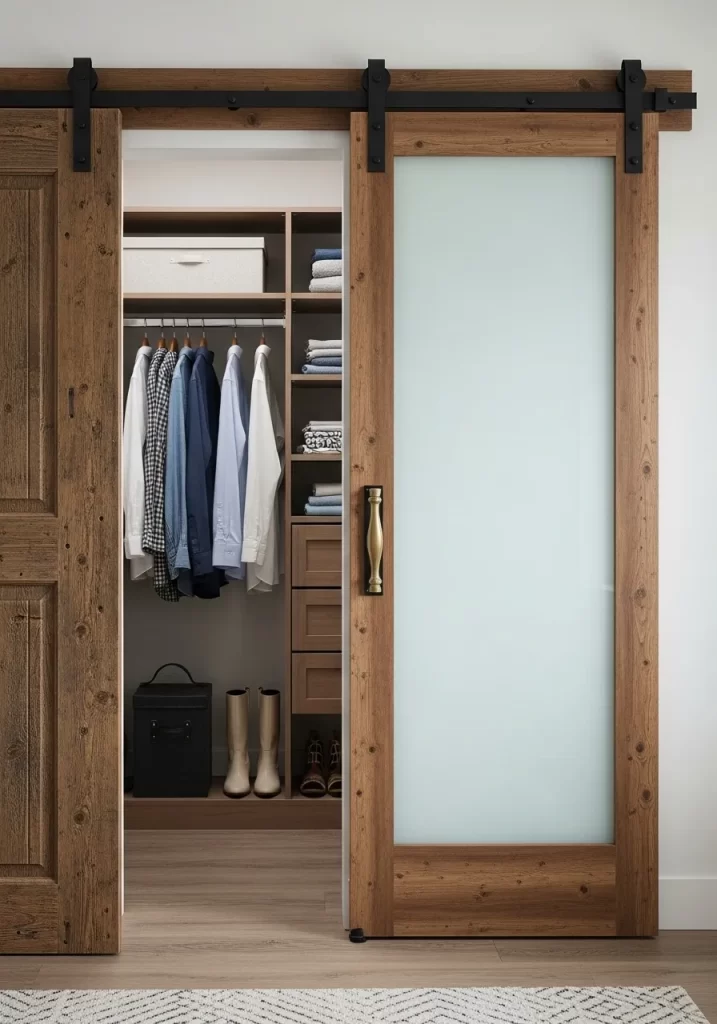
This system combines the rustic look of a wooden barn door with modern frosted glass panels. It offers both style and privacy.
The door features rough-hewn wood frames with translucent glass inserts, letting light pass through but obscuring the view. The dark metal barn door hardware is a strong design element. Inside, the closet is a modern, light-colored system with good organization.
DIY Assembly: The Rustic Glass Barn Door Closet
The installation is the same as any barn door. The door itself is the key.
Tools & Materials:
- Barn door kit (includes door, track, rollers, handle – ensure the door has frosted glass panels)
- Drill and bits
- Level (long)
- Stud finder
- Tape measure
- Wrench
- Socket set
Instructions:
- Measure Accurately: Measure your closet opening. Remember, the barn door should overlap the opening by a few inches on each side.
- Locate Studs: Use your stud finder to find and mark all the wall studs above your closet opening. The track must be securely mounted.
- Install Header Board (if needed): If your studs do not align with the track mounting points, screw a sturdy wood board (a 1×6 or 1×8) into the studs. This “header board” provides a solid anchor for the track.
- Mount the Track: Following the kit’s instructions, mount the long metal track to the header board or directly into the studs. Use your long level to ensure it is perfectly straight.
- Attach Door Hangers: Attach the roller hangers to the top edge of the barn door.
- Hang the Door: With assistance, lift the door and carefully place the roller hangers onto the track.
- Install Floor Guide: Install the small floor guide at the bottom of the door opening. This prevents the door from swinging away from the wall.
- Attach Handle: Secure the handle to the front of the door.
47. The Door-Mounted Storage Hub
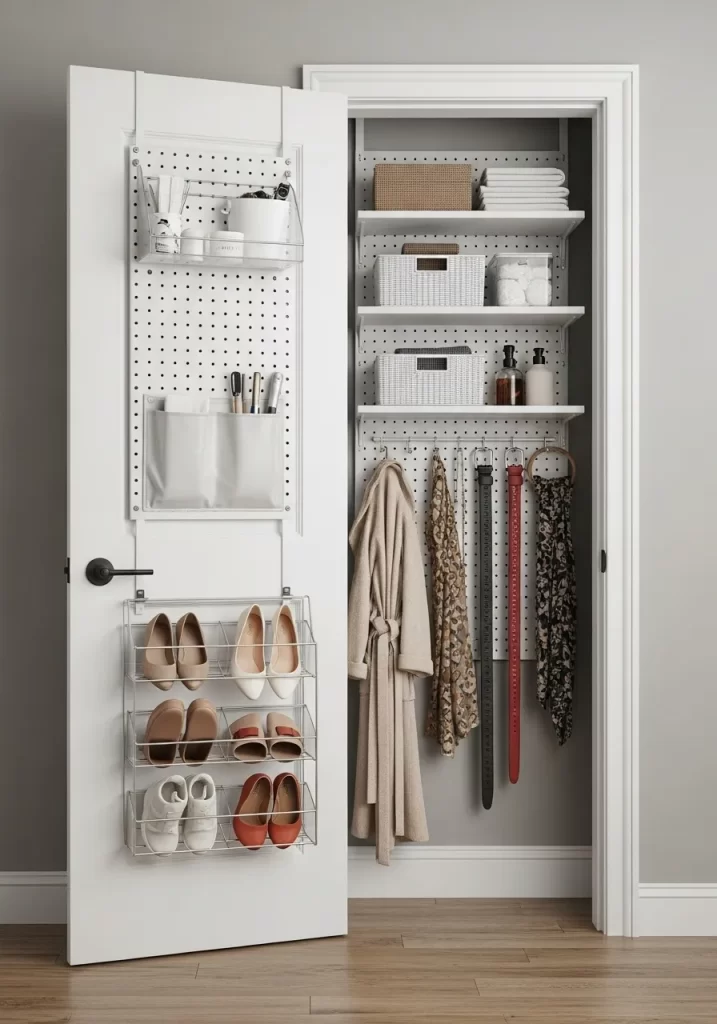
This system uses the often-overlooked back of a closet door for extra storage. It is an amazing space-saver for small closets.
A white pegboard is mounted to the inside of the closet door. It holds small clear bins for toiletries, pen holders for tools, and a wire shoe rack for flats and sandals. The closet itself is clean and organized with white shelves and hanging space.
DIY Assembly: The Door-Mounted Storage Hub
This is a fast and effective way to gain storage.
Tools & Materials:
- A sheet of pegboard (cut to fit your door)
- Short wood strips (1x2s) for spacers
- Small screws and drill (for attaching pegboard to door)
- Pegboard accessories: clear bins, cup holders, hooks, small shelves
- Over-the-door wire shoe rack
Instructions:
- Cut Pegboard: Measure the flat, inside surface of your closet door. Have a sheet of pegboard cut to fit.
- Create Spacers: Cut four short lengths of 1×2 wood strips. These will act as spacers so the pegboard hooks can fit behind the board.
- Mount Spacers to Door: Screw the 1×2 wood strips horizontally to the inside of your closet door, forming a frame where the pegboard will go.
- Mount Pegboard to Spacers: Place the cut pegboard over the spacers. Drill small pilot holes and screw the pegboard to the wood strips.
- Add Pegboard Accessories: Now, insert your pegboard hooks, clear bins, and small shelves.
- Hang Shoe Rack: Buy an “over-the-door shoe rack” that can be screwed directly to the door or hangs over the top. Mount it to the lower part of your door.
48. The Craft Closet Nook
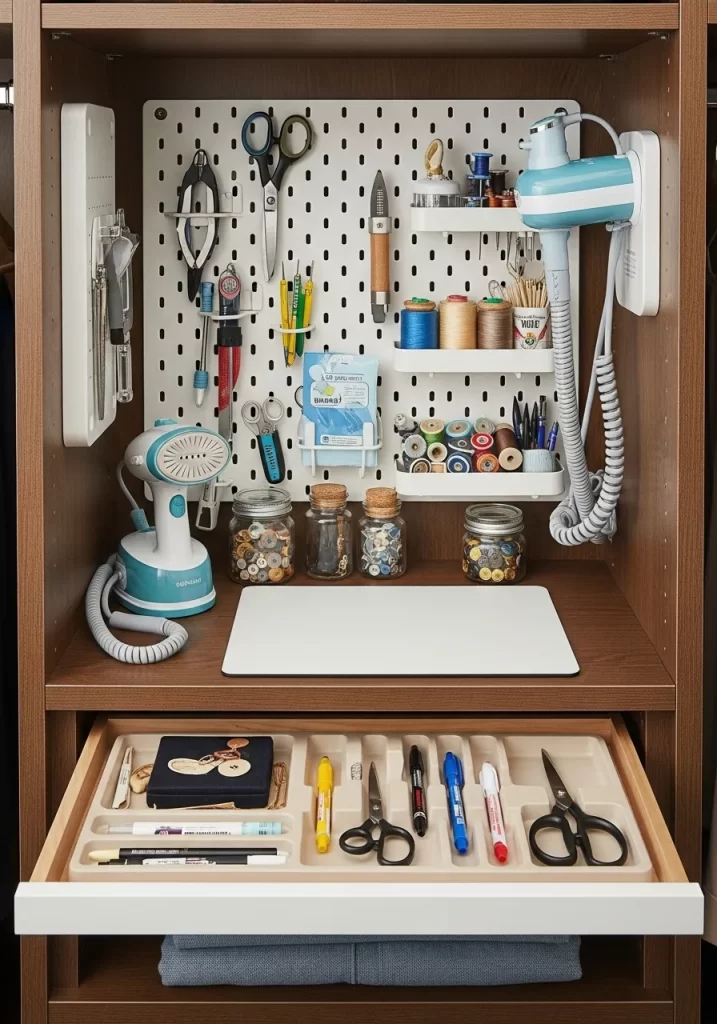
This clever system transforms a deep closet into a dedicated craft or hobby station. It organizes many small tools and supplies.
A central desk-like shelf provides a workspace. Above it, a pegboard wall holds scissors, rulers, and spools of thread. Below, a pull-out drawer with segmented trays keeps pens, markers, and small tools separated. A handheld steamer is also ready for fabric projects.
DIY Assembly: The Craft Closet Nook
You are adding a workstation to an existing closet.
Tools & Materials:
- A pre-built shelf or small desk unit (for the work surface)
- A sheet of pegboard
- Short wood strips (1x2s) for pegboard spacers
- Drill and screws
- Level
- Tape measure
- Pegboard accessories (hooks, small shelves, cups)
- Drawer organizer trays (segmented for small items)
- Handheld steamer
Instructions:
- Install the Work Surface:
- Measure the width and depth of your closet.
- Buy a pre-built shelf, desktop, or cut a piece of sturdy wood to fit.
- Install this shelf inside your closet at “desk height” (around 28-30 inches). Use strong L-brackets or cleats screwed into wall studs to support it.
- Mount the Pegboard:
- Measure the wall space above your new work surface.
- Have a sheet of pegboard cut to fit.
- Use 1×2 wood strips as spacers behind the pegboard. Screw the strips to the wall, then screw the pegboard to the strips. (Refer to previous pegboard DIYs if needed).
- Add Pegboard Accessories: Install various pegboard hooks, shelves, and cups to hold your craft tools (scissors, pens, thread).
- Organize the Drawer:
- If you have a drawer under your work surface, line it with non-slip material.
- Insert segmented drawer organizer trays. Use them to separate markers, small buttons, beads, or other craft supplies.
- Add Steamer: Keep your handheld steamer within reach for pressing fabric.
Key Takeaways
- Use Every Inch: The best systems use all available space. This includes the back of your door, the high top shelf, and the floor.
- Visibility is Crucial: You are more likely to wear what you can see. Use clear bins, shelf dividers, and smart lighting to keep items visible.
- Create Zones: Grouping items by function makes life easier. Create “zones” for workout gear, work clothes, or seasonal items.
- Protect Your Items: Good organization is also about protection. Use garment bags, cedar, and proper handbag storage to keep your clothes in good shape.
- Start Small: A total overall is not always needed. A simple drawer divider, a new set of hangers, or a pegboard can have a big impact.
An overstuffed closet is a problem you can solve. You do not have to settle for a space that causes you stress. A calm, functional wardrobe is within your reach.
You now have 48 different ideas to get you started. You do not need to do them all. Find one or two that spark an idea. Choose a solution that fits your space and your budget.
Start with a single, small project this weekend. Organize one drawer. Put up one shelf. The first step is the most important. You can build a peaceful, orderly closet that makes your daily routine feel easier.