Bare walls can make a house feel unfinished. You walk into a room and something feels missing. It lacks the warmth and character that turns a space into a home. Your walls are large, empty canvases waiting for a personal touch.

Decorating them doesn’t need to be expensive or complicated. It is about telling your story. It is about surrounding yourself with things that bring you joy, spark memories, or simply make you smile. Your walls should reflect who you are.
This guide offers 35 distinct ideas to help you get started. Each one comes with simple, step-by-step instructions designed for anyone to follow. It is time to turn those blank spaces into beautiful expressions of you.
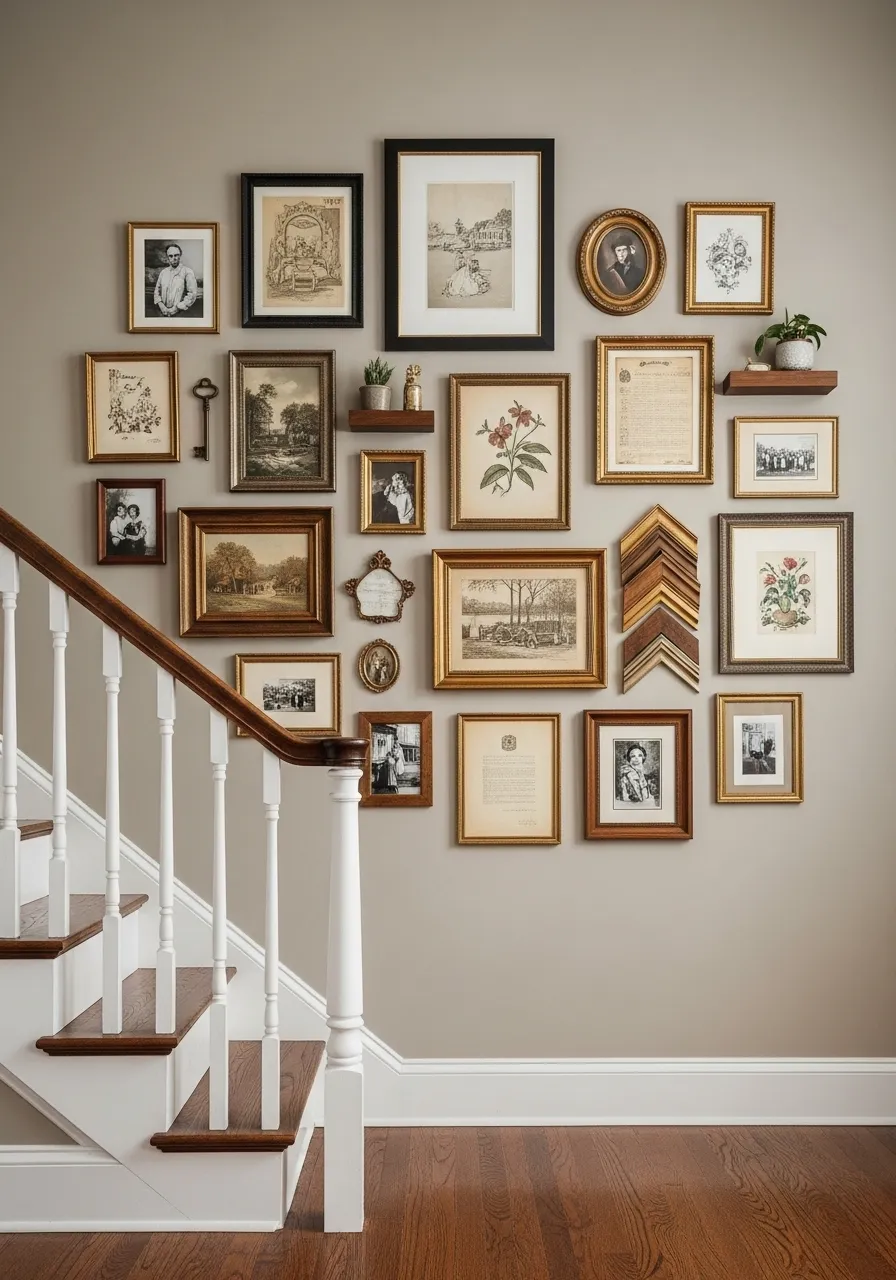
1. Curated Gallery Wall

A gallery wall turns a blank space into a story about you. It gathers your favorite memories, art, and objects into one place. This creates a powerful focal point in any room. Your eyes can wander from a family photo to a vintage postcard, then to a beautiful landscape.
The collection on a stairway wall, as shown here, makes a commonly overlooked area interesting. Different frame styles, from simple black to ornate gold, add character. Mixing in small shelves or unique items like an old key makes the arrangement feel alive. It is a wonderful way to showcase what you love.
DIY: Your Own Story Wall
What You’ll Need:
- A collection of pictures, drawings, postcards, or letters.
- Picture frames in different sizes and styles.
- A few small, interesting objects (like an old key, a small souvenir, or a pretty plate).
- Craft paper or old newspaper.
- Scissors and tape.
- Hammer and nails or picture hooks.
- A pencil and a ruler or measuring tape.
Step-by-Step Instructions:
- Gather Your Treasures: Go on a treasure hunt in your home. Find photos that make you smile, drawings from when you were younger, or postcards from trips. Anything that tells a part of your story works.
- Find Your Frames: Collect picture frames. You can use old ones or find inexpensive ones at a thrift store. Don’t worry if they don’t match. Having different styles makes it more interesting.
- Make Paper Shapes: For each frame, trace its shape onto craft paper and cut it out. This gives you a paper version of every item. It’s much easier to move paper around than a heavy frame.
- Plan Your Layout: Tape your paper cutouts to the wall. Arrange them however you like until the layout looks balanced. A good tip is to start with your biggest frame near the center.
- Time to Hang: Once you love your paper layout, hang the real frames. Take one paper shape off the wall, mark where the nail should go, and gently hammer in a hook. Hang your frame and repeat for all pieces.
2. Minimalist Floating Shelf

A single floating shelf offers a clean, uncluttered look. It provides a simple stage for a few chosen items. Here, it holds a mix of natural and artistic pieces. A plant adds life, while calligraphy brings a personal touch. The vases and small sculpture complete the scene.
This setup feels calm and thoughtful. It shows that you don’t need a lot of things to make a statement. A few well-placed objects can speak volumes about your taste.
DIY: Simple Floating Shelf
What You’ll Need:
- A wooden board (pine or oak works well).
- Floating shelf brackets.
- Screws and wall anchors.
- A drill, a level, and a pencil.
- Sandpaper and paint or wood stain (optional).
Step-by-Step Instructions:
- Prepare Your Board: If your board is rough, sand it until it’s smooth. You can leave it natural or paint or stain it to match your room. Let it dry completely.
- Mark the Wall: Decide where you want your shelf. Hold the level against the wall and draw a light, straight pencil line where the bottom of the shelf will be.
- Attach Brackets: Place the shelf brackets on the wall along your line. Mark where the screws need to go. Drill holes for the screws. If you are not drilling into a wall stud, push wall anchors into the holes first. Then, screw the brackets tightly to the wall.
- Mount the Shelf: Most floating shelves are designed to slide right over the brackets. Slide your wooden board onto the brackets until it is flush with the wall. Some kits have small screws to secure the shelf from underneath.
- Decorate It: Now for the fun part. Arrange your favorite books, a small plant, or a couple of pictures on your new shelf.
3. Versatile Wire Grid Organizer

A wire grid turns a wall into a functional piece of art. It’s a flexible system that you can change anytime. Clip on photos, hang small baskets for supplies, or attach shelves for plants. This grid is a creative person’s dream.
The industrial look of the metal contrasts nicely with the warmth of wooden shelves and green plants. It’s a stylish way to stay organized and display your inspirations.
DIY: Grid Memo Board
What You’ll Need:
- A wire grid panel (from a hardware or home improvement store).
- Wall hooks or screws that can hold the weight of the grid.
- Small binder clips or clothespins.
- Accessories like small baskets or shelves made for grid walls.
Step-by-Step Instructions:
- Choose Your Spot: Find an empty wall in your office, kitchen, or bedroom that could use some organization.
- Hang the Grid: Ask a friend to help you hold the grid against the wall. Use a pencil to mark where your hooks or screws will go. Make sure it’s level. Install the hooks or screws and hang your grid securely.
- Get Clipping: Use your binder clips or clothespins to attach photos, postcards, important notes, or your favorite drawings directly to the grid wires.
- Add Accessories: Hook on small baskets to hold things like pens, scissors, or your keys. You can also add small clip-on shelves to hold a little plant or a mug.
- Change It Up: The best part about this organizer is that you can rearrange it whenever you want a new look or need to organize different things.
4. Modern Acoustic Art Panels

These colorful panels do more than just look good. They help make a room quieter by absorbing sound. The geometric shapes and bold colors create a modern art installation. It feels like a custom piece made for the space.
The soft texture of the fabric adds warmth. This contrasts with the hard surfaces of a room. This is a smart way to add both style and function to a bedroom or home office.
DIY: Sound-Dampening Wall Panels
What You’ll Need:
- Wooden frames (or build your own with 1×2 wood strips).
- Acoustic foam, or thick towels or blankets for a budget option.
- Fabric in colors you like.
- A staple gun and scissors.
- Picture hanging hardware.
Step-by-Step Instructions:
- Make Your Frames: Build simple rectangular or square frames from the wood strips. You can make them any size you want. Think of it like making a picture frame.
- Add the Filling: Cut the acoustic foam or folded towels to fit snugly inside the frames. This is the part that will soak up the sound.
- Cover with Fabric: Lay your fabric flat on the floor with the pretty side facing down. Place a frame on top, foam-side down. Pull the fabric tightly around the frame and use the staple gun to attach it to the back. It’s like wrapping a present.
- Hang Your Panels: Attach picture hanging hardware to the back of each panel. Then, hang them on the wall. You can create a cool pattern by arranging them in a group.
5. Bohemian Macrame Plant Hanger

This large macrame piece brings a soft, bohemian feel to the room. The intricate knots and patterns show skilled handiwork. What makes this one special are the built-in pockets for air plants. The dip-dyed threads add a beautiful gradient of color.
Hung from a piece of driftwood, it feels connected to nature. It’s a statement piece that adds texture, color, and a touch of green to the wall.
DIY: Simple Macrame Wall Hanging
What You’ll Need:
- A stick, dowel rod, or piece of driftwood.
- Macrame cord or thick yarn.
- Scissors.
Step-by-Step Instructions:
- Cut Your Cords: Cut several long pieces of cord. They should all be the same length. A good starting point is to make them twice as long as you want your finished piece to be.
- Attach Cords to the Stick: Take one piece of cord and fold it in half to make a loop. Place the loop over the stick, then pull the two loose ends through the loop. This is called a lark’s head knot. Repeat this with all your cords.
- Start Knotting: The most basic macrame knot is the square knot, which uses four strands of cord. You can find many simple videos online that show you how to do it. Make a few rows of square knots to get started.
- Create a Pattern: You can leave spaces between knots, alternate the strands you use, or try different types of knots to make a unique design.
- Finish the Bottom: Once you’re happy with your knotted design, you can finish the bottom. Leave the ends hanging long, trim them into a V-shape, or tie them off in smaller knots.
6. Ascending Staircase Bookshelves

This clever bookshelf design turns a wall into a mountain of stories. The shelves zigzag up the wall, creating a dynamic, eye-catching shape. It’s a practical way to store a large book collection while also making a strong design statement.
The white shelves pop against the dark blue wall. This makes the book spines look like little jewels. Adding a small plant or a clock breaks up the lines of books and adds a personal touch.
DIY: Zigzag Shelves
What You’ll Need:
- Several floating shelves, some short and some long.
- A level, a pencil, a drill.
- Screws and wall anchors.
Step-by-Step Instructions:
- Plan Your Design: On a piece of paper, sketch out how you want your shelves to zigzag up the wall. Think about creating a stair-step or mountain-like pattern.
- Mark the First Shelf: Start with the bottom shelf. Hold it against the wall, use the level to make sure it’s straight, and use a pencil to mark where the screw holes will go.
- Install the First Shelf: Drill holes on your marks. If you’re not drilling into a wall stud, push in wall anchors. Then, screw the shelf bracket to the wall and attach the shelf.
- Create the Zigzag: Take your next shelf. Place it so one end is a little higher than the end of the first shelf, creating an upward angle in your design. Use your drawing as a guide. Mark and install this shelf.
- Keep Going: Continue this process, building your zigzag pattern up the wall. Double-check with the level each time to make sure the individual shelves are straight.
7. Geometric Wood Accent Wall

Thin wood strips create a stunning geometric pattern on a dark wall. This technique adds texture and architectural interest to a plain room. The light wood contrasts sharply with the deep teal paint, making the design pop.
It’s a modern and sophisticated way to create a feature wall. The clean lines guide the eye around the room and provide a beautiful backdrop for a bed or sofa.
DIY: Wood Trim Wall Design
What You’ll Need:
- Thin wood strips (like 1×2 pine boards).
- A tape measure, a pencil, and a level.
- A saw to cut the wood (a miter box is great for angles).
- Strong construction adhesive or a nail gun.
Step-by-Step Instructions:
- Paint Your Wall: First, paint the wall the background color you want. A dark color often makes the wood stand out more. Let it dry completely.
- Plan Your Pattern: On paper, draw the geometric design you want. It can be simple squares, triangles, or a more random pattern. Measure your wall so you can plan the design to fit the space.
- Cut Your Wood: Carefully measure and cut your wood strips according to your design. If you have diagonal lines, you will need to cut the ends at an angle so they fit together neatly.
- Attach the Wood: Start with the biggest pieces of your design, like an outside border. Use a level to make sure they are straight. Apply a line of construction adhesive to the back of a strip and press it firmly onto the wall. Or, use a nail gun to secure it.
- Build Your Pattern: Continue cutting and attaching the wood strips, one by one, until your amazing design is complete.
8. Repurposed Architectural Art

Old things can find new life as wall art. This collection uses salvaged pieces—an old door, a window frame, and shutters—to create a rustic display. The peeling paint and weathered wood tell a story of a life lived before.
Arranging them together creates a collage of textures and history. It’s a unique approach that brings a sense of farmhouse warmth and character to a home.
DIY: Found Object Wall Art
What You’ll Need:
- An interesting old object (an old window, a piece of a fence, an empty antique frame).
- Cleaning supplies and sandpaper.
- Paint or a clear sealer (optional).
- Strong picture hanging hardware (hooks or brackets).
Step-by-Step Instructions:
- Go on a Hunt: Visit flea markets, antique stores, or garage sales. Look for things with interesting shapes and textures that catch your eye.
- Clean It Up: Your found treasure will probably be dirty. Clean it well with soap and water. If it has splinters or rough, flaky paint, use sandpaper to smooth it down a little. You want to keep its old character, but make it safe for your home.
- Add Your Touch (Optional): You can leave your object looking old and rustic, or you can paint it a bright color to match your room. A light coat of clear sealer can also protect the old finish without changing the look.
- Hang It Safely: Old wooden or metal items can be heavy. Make sure to use very strong hooks or brackets to hang them on the wall. It’s best to screw them into the studs (the strong wooden beams inside the wall) for safety.
- Create a Collection: One piece can look great on its own, or you can collect a few different items and arrange them together on the wall.
9. Vertical Air Plant Garden

Bring nature indoors with a living wall. This display uses various small holders to showcase a collection of air plants. These unique plants don’t need soil, so they can be placed in creative ways. Pieces of cork bark, wire frames, and ceramic pods serve as homes.
The arrangement on the dark wall makes the green and silver leaves stand out. It’s a low-maintenance garden that adds life and fresh air to your space.
DIY: Air Plant Holders
What You’ll Need:
- Air plants (from a garden store or online).
- Interesting objects to mount them on (driftwood, cork bark, seashells, rocks).
- Waterproof glue (like E6000 or a hot glue gun).
- Small hooks or nails for hanging.
Step-by-Step Instructions:
- Choose Your Plants and Mounts: Pick out some healthy-looking air plants and find some cool objects to be their homes. Make sure the objects are clean and dry.
- Glue Your Plant’s Base: Put a small dot of waterproof glue on your chosen object. Gently press the very bottom of the air plant (the part without leaves) into the glue. Hold it for a minute until it sticks. Be very careful not to get glue on the leaves.
- Let it Dry: Let the glue dry completely before you hang it up. This might take a few hours.
- Hang Your Creations: Attach a small hook to the back of your mount or simply hang it from a nail on the wall. Arrange them in a group for a bigger impact.
- Care For Your Plants: Air plants are easy to care for. About once a week, take them off the wall and let them soak in a bowl of water for 20-30 minutes. Gently shake off the extra water and let them dry completely before putting them back on the wall.
10. Personalized Neon Light Sign

A neon sign adds a vibrant splash of personality to any room. It can spell out a favorite word or a meaningful phrase. The bright glow creates a modern and fun atmosphere, especially in a dimly lit room.
Here, the sign serves as the main piece of art above the sofa. The cool blue and bright pink colors give off an energetic vibe. It’s a bold choice that instantly makes a space feel more personal.
DIY: Faux Neon Sign
What You’ll Need:
- EL wire (a flexible plastic tube that glows).
- A piece of clear acrylic, wood, or a canvas for the backing.
- A drill with a small drill bit.
- Strong, clear glue or small, clear zip ties.
- The battery pack that comes with the EL wire.
Step-by-Step Instructions:
- Design Your Word or Shape: On a piece of paper, write the word or draw the shape you want to make. It’s easiest to use cursive or a connected script so the wire can flow in one continuous line.
- Prepare Your Backing: Place your paper design on top of your acrylic, wood, or canvas.
- Map Out the Path: Using a pencil, mark small dots along your design where you will need to thread the wire through. You’ll need a hole at the beginning, the end, and at any sharp corners to hold the wire in place.
- Drill the Holes: Carefully drill small holes through your backing on the dots you marked.
- Thread the Wire: Starting from the back, poke the EL wire through the first hole to the front. Use your design as a guide to shape the wire. You can use dabs of clear glue on the front or small zip ties threaded through the holes to hold the wire tightly in place.
- Power It Up: Once your design is finished, the end of the wire and the battery pack will be on the back. Tape the battery pack securely to the back of your sign, plug in the wire, and turn it on to see it glow.
11. Layered Textile Wall Hanging

Hanging textiles adds softness and texture to a room. This display layers different fabrics for a rich, collected feel. A shaggy, neutral rug provides a base. A tie-dyed cloth adds a pop of indigo color and pattern.
This is a wonderful way to display travel souvenirs or beautiful fabrics. The different textures and patterns create a cozy, bohemian vibe.
DIY: Layered Fabric Art
What You’ll Need:
- A thin curtain rod or a wooden dowel.
- Two or three different textiles (like a small rug, a scarf, a tea towel, or a piece of fabric).
- String or yarn for hanging.
- Safety pins or fabric glue.
Step-by-Step Instructions:
- Choose Your Fabrics: Pick out two or three fabrics that look nice together. Think about mixing different textures (like something fluffy with something smooth) and colors.
- Hang Your Rod: Install your curtain rod or hang your dowel from a string tied to a nail on the wall.
- Layer the Base: Drape your largest piece of fabric over the rod to be your background layer.
- Add More Layers: Place your second piece of fabric on top of the first. You can hang it straight or at an angle. Use a few small, hidden safety pins or a little bit of fabric glue on the back to hold it in place.
- Add a Final Touch: Add your smallest, most interesting piece of fabric on top of the others to complete the look.
12. Abstract Metal Sculpture

A metal wall sculpture adds a touch of modern elegance. This piece uses geometric wire shapes and folded metal to create a sense of movement. The flock of birds flying through abstract forms is both artistic and dynamic.
The mix of gold, copper, and black tones works well in a contemporary dining room. It’s a sophisticated piece that catches the light and creates interesting shadows.
DIY: Simple Wire Sculpture
What You’ll Need:
- Craft wire (a medium thickness that is easy to bend but holds its shape).
- Wire cutters and pliers.
- Spray paint in metallic colors (gold, silver, copper).
- A small piece of wood or a canvas for the base (optional).
Step-by-Step Instructions:
- Plan Your Shapes: Think about some simple shapes you can make, like circles, triangles, squares, or spirals.
- Bend the Wire: Use your hands and the pliers to bend the craft wire into your chosen shapes. Make several different ones. Don’t worry about them being exact. The handmade look is part of the charm.
- Paint Your Pieces: Take your wire shapes outside or to a well-ventilated area and spray paint them in different metallic colors. Let them dry completely.
- Arrange Your Sculpture: You can hang the individual wire shapes directly on the wall using small nails. Arrange them in a group that looks pleasing to you.
- Create a Base (Optional): You can also glue your wire shapes onto a painted piece of wood or a canvas to create a single piece of art to hang.
13. Plywood Pegboard Organizer

A large pegboard is a wonderfully versatile storage solution. It keeps items organized and easy to find. This one uses a combination of shelves, baskets, and hooks to hold everything from plants to headphones.
The natural wood and copper accessories give it a warm, stylish look. It’s a functional display that you can customize and rearrange as your needs change.
DIY: Custom Pegboard Wall
What You’ll Need:
- A sheet of plywood pegboard.
- Screws to attach it to the wall.
- A drill and a level.
- Pegboard hooks, shelves, and baskets.
Step-by-Step Instructions:
- Get Your Pegboard: You can buy sheets of pegboard at a hardware store. They can often cut it to the size you need.
- Mount it on the Wall: Pegboards need a small space behind them so the hooks can fit in. You can create this space by screwing a few small wood blocks to the back of the board before you hang it. Ask a friend to help you hold the pegboard against the wall, make sure it’s level, and then screw it securely into the wall studs.
- Organize Your Stuff: Now comes the fun part. Start putting the hooks into the pegboard holes.
- Add Shelves and Baskets: Place your shelves and baskets on the hooks.
- Arrange Your Items: Hang your tools, craft supplies, keys, or kitchen utensils. Put small plants or books on the shelves. You can move everything around until you have a setup that works for you.
14. Statement Abstract Painting

A single, oversized piece of art can define an entire room. This large abstract canvas is full of energy and color. The bold brushstrokes and layered paints create a sense of depth and emotion.
Hanging a large painting like this over a sofa makes it the undeniable focal point. It sets the color palette for the room and shows off a confident, artistic style.
DIY: Your Own Abstract Art
What You’ll Need:
- A large blank canvas.
- Acrylic paints in three or four colors you like, plus white and black.
- A few different sized paintbrushes.
- A palette or a paper plate for mixing colors.
- A cup of water and paper towels.
Step-by-Step Instructions:
- Set Up Your Space: Lay down some newspaper or an old sheet to protect your floor. Put on some old clothes that you don’t mind getting paint on.
- Choose Your Colors: Squeeze some of your chosen colors onto your palette.
- Make Big Shapes: Take your biggest brush and paint some large blocks of color onto the canvas. Don’t think too much about it. Just have fun filling the space.
- Add Layers and Lines: Once your first layer is on, try adding some different colors on top. Use a smaller brush to make lines or scribbles. You can drip some watered-down paint or use a paper towel to smudge some areas.
- Know When to Stop: The trick to abstract art is knowing when it’s finished. Step back from the canvas and look at it. If you like what you see, stop painting. Let it dry completely before you hang it on the wall.
15. Shadow Box Curio Cabinets

Shadow boxes turn your collections into art. They are like mini-museums for your wall. This arrangement uses boxes of different sizes and colors to display a variety of objects, from seashells and cameras to butterflies.
The grouping creates a fascinating 3D collage. It’s a wonderful way to protect and showcase your small treasures and memories.
DIY: Shadow Box Display
What You’ll Need:
- A few shadow box frames.
- Your collection of small items (shells, rocks, old keys, small toys, jewelry).
- A hot glue gun or strong craft glue.
- Scrapbook paper or fabric for the background (optional).
Step-by-Step Instructions:
- Prepare Your Boxes: Open the back of your shadow boxes. If you want a decorative background, cut a piece of scrapbook paper or fabric to fit inside and glue it down.
- Arrange Your Items: Plan out how you want to arrange your treasures inside each box. Try a few different layouts before you start gluing.
- Glue Everything in Place: Use a small dot of hot glue or craft glue to attach each item to the background of the shadow box. For heavier items, you might need a stronger glue.
- Let it Dry: Let the glue dry completely with the box lying flat.
- Close and Hang: Once everything is dry and secure, put the back on the shadow box. Now you can hang your beautiful collections on the wall.
16. Soothing Landscape Mural

A wall mural can transport you to another place. This one features a peaceful mountain landscape with layers of hills and trees. The soft, muted colors create a calm and relaxing atmosphere in this bedroom.
A mural acts like a giant piece of art that covers the entire wall. It’s a bold decorating choice that has a huge impact on the feel of a room.
DIY: Wall Mural with Stencils
What You’ll Need:
- Wall paint in a few different shades of a color (like light blue, medium blue, and dark blue for mountains).
- Large stencils of shapes you want (like mountains, trees, or clouds). You can buy these or make your own from large pieces of cardboard.
- A paintbrush or a small roller.
- Painter’s tape.
Step-by-Step Instructions:
- Paint the Background: Start with a clean wall. Paint the entire wall the color of your lightest shade. This will be your sky or the farthest mountains. Let it dry.
- Stencil the Farthest Shapes: Take the stencil for your farthest shapes (like the mountains in the distance). Use painter’s tape to hold it in place on the wall. Use your next darkest color to paint inside the stencil.
- Create Layers: Let the paint dry. Then, move your stencil to a new spot, overlapping the first shape a little bit. This creates the look of layers. Continue until you have a row of these shapes.
- Add Closer Shapes: Now, use a different stencil (like for trees) and your darkest color. Place these shapes in the foreground, so they look like they are closer to you.
- Let It All Dry: Carefully remove the stencils and let your beautiful mural dry completely.
17. Layered Topographic Wood Map

This unique piece of art is a map made from layers of wood. Each layer represents a different elevation, creating a 3D topographic map. The detailed street grid is etched into the top layer, while the blue layers show the depth of the water.
It’s a sophisticated and personal piece, especially if it shows a city or place that is meaningful to you. It’s a true conversation starter.
DIY: Layered Paper Map Art
What You’ll Need:
- A map of a place you love (you can print one from the internet).
- Several sheets of thick cardstock paper in different colors (like shades of blue and tan).
- A craft knife or scissors.
- Foam mounting tape or cardboard pieces for layering.
- A picture frame.
Step-by-Step Instructions:
- Trace Your First Layer: Take your map and your darkest blue paper. Trace the outline of the deepest water onto the blue paper and cut it out.
- Trace More Layers: Now, take your next lightest shade of blue. On your map, trace the outline of the water plus the next level of land. Cut this shape out. Repeat this process with a few shades of tan paper for the different land levels. You should have several cut-out shapes that get bigger each time.
- Layer Them Up: Take your largest shape (the top land layer) and place it in the picture frame. Now, use small pieces of foam mounting tape or little squares of cardboard to stick the next layer on top. The foam tape creates the 3D effect.
- Keep Building: Continue adding each layer on top of the last one, using the foam tape each time.
- Add Details: You can use a fine-tip pen to draw some roads or mark a special spot on your map before putting the glass back on the frame.
18. Eclectic Mirror Collection

A collection of mirrors can make a room feel bigger and brighter. This wall features an array of mirrors in different shapes, sizes, and styles. Ornate gold frames mix with simple silver and bold black ones.
The mirrors reflect light and the view of the room, adding depth and life to the dark wall. It’s a glamorous and interesting alternative to a traditional gallery wall.
DIY: Mirror Gallery Wall
What You’ll Need:
- A collection of mirrors in various shapes and sizes.
- Paint (optional).
- Craft paper and a pencil.
- Tape.
- A hammer and strong picture hooks for each mirror.
Step-by-Step Instructions:
- Hunt for Mirrors: Go to thrift stores, flea markets, and garage sales to find interesting and inexpensive mirrors. Look for different shapes—round, oval, square, and rectangular.
- Unify with Paint (Optional): If your mirror frames are all different colors and you want them to look more cohesive, you can spray paint them all the same color, like gold, white, or black.
- Make Paper Templates: Just like with a picture gallery wall, trace each mirror onto a piece of craft paper and cut it out.
- Plan Your Arrangement: Use tape to stick your paper mirror shapes to the wall. Move them around until you get a layout that you like. Try to balance the different shapes and sizes across the wall.
- Hang Your Mirrors: Take down one paper shape at a time. Mark on the wall where the hook needs to go. Gently hammer in a strong picture hook and hang your mirror. Repeat until your whole collection is on the wall.
19. Modular Cube Shelving

This shelving system uses simple boxes to create a custom storage and display unit. The mix of natural wood, white, and black boxes adds visual interest. The asymmetrical arrangement feels modern and playful.
This is a great way to display books, plants, and photos. You can add or rearrange the boxes to fit your space and your collection.
DIY: Crate Bookshelf Wall
What You’ll Need:
- Several wooden crates or boxes (you can buy these at a craft store).
- Sandpaper.
- Paint or wood stain in different colors.
- Strong screws and a drill.
- A level and a pencil.
Step-by-Step Instructions:
- Prepare Your Crates: If your wooden crates are rough, sand them until they are smooth.
- Paint or Stain: Paint or stain your crates. You can make them all one color, or use a few different colors that match your room. Let them dry completely.
- Plan Your Layout: Arrange the crates on the floor to figure out how you want them to look on the wall. You can stack them, stagger them, or turn them in different directions.
- Hang the First Crate: Start with a crate near the bottom of your design. Hold it against the wall, use a level to make sure it’s straight, and use a pencil to mark where you will put the screws.
- Secure It: Drill screws through the inside back of the crate directly into the wall. It’s best to hit a wall stud to make it extra strong. Continue hanging the crates one by one according to your design, sometimes screwing them into the wall and sometimes screwing them to the crate next to them.
20. Indoor Living Wall Garden

A living wall brings a lush, vibrant feel to an indoor space. This vertical garden is filled with a variety of green plants, creating a tapestry of textures and shades. Integrated grow lights ensure the plants get the light they need to thrive.
This is a beautiful way to incorporate nature into your home decor. It purifies the air and provides a constant connection to the outdoors.
DIY: Pocket Planter Wall
What You’ll Need:
- A fabric wall pocket planter (you can buy these online or at garden stores).
- Strong hooks or a rod to hang the planter.
- A variety of small indoor plants.
- Potting soil.
Step-by-Step Instructions:
- Hang Your Planter: Find a spot that gets some natural light. Install strong hooks or a curtain rod on the wall. Hang your fabric pocket planter from the hooks or rod. Make sure it’s very secure, as it will be heavy when it’s full of plants and wet soil.
- Prepare for Planting: Put a towel or newspaper on the floor underneath the planter to catch any mess.
- Fill the Pockets: Put a scoop of potting soil into each pocket of the planter.
- Add Your Plants: Gently take each plant out of its nursery pot. Loosen the roots a little bit with your fingers. Place one plant into each pocket and add more soil around it until it is snug.
- Water Carefully: Water each plant slowly until the soil is moist. Some pocket planters have a waterproof backing, but it’s still a good idea to be careful not to overwater. Enjoy your new living wall.
21. Architectural Medallion Art

Architectural pieces bring a sense of history and elegance to a wall. These ornate medallions, which are usually used on ceilings, become interesting 3D art when hung on a wall. Their intricate patterns add texture and a classic touch.
Arranged with a simple framed picture, they create a balanced and sophisticated display. Painting them the same color as the wall creates a subtle effect, while a contrasting color would make them pop.
DIY: Medallion Wall Decor
What You’ll Need:
- Lightweight ceiling medallions (from a hardware store).
- Paint in the color of your choice.
- A paintbrush.
- Strong adhesive or small nails for hanging.
Step-by-Step Instructions:
- Choose Your Medallions: Find a few plastic or plaster medallions in different sizes and patterns that you like.
- Paint Them: Paint your medallions. You can paint them all one color, or use a few different colors. Let them dry completely.
- Plan Your Layout: Decide where you want to hang them. You can arrange them in a cluster, in a straight line, or around a picture or mirror.
- Hang Them Up: For lightweight medallions, you can use a strong construction adhesive on the back. Press the medallion firmly against the wall and hold it for a minute. For heavier ones, it’s safer to use a small nail.
22. Colorful Washi Tape Mural

Washi tape is a fun and temporary way to make a big statement. This wall uses colorful tape to create a graphic mountain range. The overlapping stripes of color within the black outlines give it a playful, modern look.
This is a wonderful idea for a kid’s room or a creative workspace because it’s so easy to change. You can create any design you can imagine without damaging the walls.
DIY: Washi Tape Wall Design
What You’ll Need:
- Washi tape in several different colors and widths.
- A pencil and a ruler or yardstick.
- Scissors.
Step-by-Step Instructions:
- Sketch Your Design: Lightly draw your design on the wall with a pencil. A simple geometric shape, like mountains, a cityscape, or a big diamond, works well.
- Create the Outline: Use a dark-colored washi tape, like black, to create the main outline of your shape. Use the ruler to help you make straight lines.
- Fill with Color: Now, use your different colored tapes to fill in your shape. You can make straight stripes, diagonal lines, or random patterns.
- Press It Down: Press all the tape down firmly to make sure it sticks well.
- Change Your Mind?: The great thing about washi tape is that it usually peels off easily without leaving a mark. If you get tired of your design, you can just pull it off and create a new one.
23. Stylish Hat Wall Display

Turn your hat collection into a piece of art. Hanging hats on a wall is a practical storage solution that also looks great. This display uses simple hooks to arrange a variety of straw and felt hats in a pleasing grid.
The different shapes and neutral colors of the hats add texture and a relaxed, bohemian feel to the bedroom. It’s a simple way to fill a large wall with personal style.
DIY: Hat Wall
What You’ll Need:
- Your collection of hats.
- Small, simple wall hooks or nails for each hat.
- A tape measure and a pencil.
Step-by-Step Instructions:
- Choose Your Wall: Find a blank wall where you want to display your hats.
- Plan Your Arrangement: Lay your hats out on the floor to decide how you want to arrange them. You can make a neat grid, a random cluster, or a swooping line.
- Mark Your Hooks: Once you have a layout you like, start marking where the hooks will go on the wall. Use your tape measure to get the spacing even if you want a grid.
- Install the Hooks: Gently hammer in your nails or install your hooks on the pencil marks.
- Hang Your Hats: Simply hang one hat on each hook. Step back and admire your stylish and practical new wall decor.
24. Leaning Art Ledge

A picture ledge offers a casual and flexible way to display art. Instead of hanging frames, you can simply lean them against the wall. This allows you to easily swap out pictures and create layered arrangements.
Here, a collection of frames in different sizes and finishes creates a relaxed yet curated look. The mix of photos and art, along with a couple of small plants, adds depth and personality.
DIY: Picture Ledge Shelf
What You’ll Need:
- A picture ledge shelf (from a home goods store).
- A drill, a level, and a pencil.
- Screws and wall anchors.
Step-by-Step Instructions:
- Choose Your Spot: Decide where you want to hang your picture ledge.
- Mark the Wall: Hold the ledge against the wall. Use the level to make sure it is perfectly straight. Use a pencil to mark on the wall where the screw holes are.
- Drill and Anchor: Put the shelf down. Drill holes on your pencil marks. If you are not drilling into a wall stud, push wall anchors into the holes.
- Attach the Shelf: Hold the shelf up to the holes again and screw it tightly to the wall.
- Style Your Ledge: Now for the fun part. Gather your favorite framed pictures, small plants, and little objects. Arrange them on the ledge. Try layering a smaller frame in front of a larger one.
25. Painted Wall Arch

A painted arch is a simple way to create a big architectural impact without any construction. This one, in warm, earthy tones, creates a beautiful focal point for a desk area. The layered colors give it depth and a modern, trendy feel.
Painting a shape like this on a wall is a creative way to define a space or just add a pop of color and personality to a room.
DIY: Painted Arch
What You’ll Need:
- Wall paint in two or three colors.
- A pencil and a long piece of string.
- A thumbtack or a small nail.
- Painter’s tape and a paintbrush.
- A level.
Step-by-Step Instructions:
- Draw the Straight Sides: Decide how wide you want your arch to be. Use your level and pencil to draw two straight, vertical lines up the wall.
- Draw the Curve: To make the curved top, tie one end of your string to the pencil. Find the center point between your two lines. Tack the other end of the string to that center point. The length of the string should be half the width of your arch. Keeping the string tight, swing the pencil up and over to draw a half-circle that connects the two lines.
- Tape the Edges: Carefully place painter’s tape along the outside of your pencil lines.
- Get Painting: Paint the inside of your arch with your chosen color. You may need two coats.
- Peel and Reveal: While the last coat of paint is still a little wet, carefully peel off the painter’s tape to reveal your crisp, clean arch.
26. Vintage Plate Collection

A collection of decorative plates makes for charming and unexpected wall art. This display uses a variety of plates with different patterns and colors, arranged in an organic, free-flowing shape. It adds a touch of country elegance to this dining area.
This is a wonderful way to display heirloom plates or fun flea market finds that might otherwise be hidden in a cabinet.
DIY: Plate Wall
What You’ll Need:
- A collection of decorative plates.
- Wire plate hangers for each plate.
- A hammer and picture hooks.
- Paper and scissors.
Step-by-Step Instructions:
- Choose Your Plates: Gather the plates you want to display. Mixing different sizes and colors can make the display more interesting.
- Make Paper Templates: Trace each plate onto a piece of paper and cut it out.
- Plan the Layout: Use tape to arrange your paper circles on the wall. Move them around until you find a design you love. You could make a big swoop, a circle, or a heart shape.
- Attach Hangers to Plates: Attach a wire plate hanger to the back of each plate. Make sure it is tight and secure.
- Hang the Plates: Take one paper circle off the wall. In its place, gently hammer in a picture hook. Hang your plate. Repeat this for all your plates until your beautiful collection is on display.
27. Natural Branch Mobile

This beautiful mobile brings the outdoors in. A simple tree branch serves as the base for a collection of delicate hanging objects. Air plants, dried flowers, beads, and origami birds create a whimsical and calming piece of art.
Hanging above a sofa or in a corner, it adds a touch of nature and handmade charm. It’s a piece that can be personalized with your own found treasures.
DIY: Hanging Nature Mobile
What You’ll Need:
- A nice-looking stick or piece of driftwood.
- String, twine, or fishing line.
- A collection of small, lightweight items (feathers, beads, small bells, air plants, dried flowers, seashells).
- A ceiling hook.
Step-by-Step Instructions:
- Find Your Branch: Go for a walk and find a sturdy, interesting-looking stick. Clean it off and let it dry.
- Prepare Your Hanger: Cut a long piece of string. Tie each end securely to the ends of your branch so you can hang it.
- Create Your Danglers: Cut several more pieces of string in different lengths. Tie one of your small treasures to the end of each string.
- Attach to the Branch: Tie the other end of these strings to your branch. Spread them out along the branch so they don’t get tangled.
- Hang Your Mobile: Screw a hook into the ceiling and hang your beautiful new mobile. Make sure to hang it high enough that people won’t bump their heads on it.
28. Multi-Panel Canvas Print

Splitting a single image across multiple canvases creates a dramatic and modern piece of art. This wall features a city scene spread over five different panels. The central panels are taller, creating an interesting shape.
This technique, known as a triptych or polyptych, adds an architectural feel to the artwork. The small pop of abstract color on the side adds an unexpected, creative twist.
DIY: Split Photo Art
What You’ll Need:
- A large photo that you love, printed out.
- Three or five blank canvases of the same height.
- A ruler and a pencil.
- Spray adhesive or Mod Podge.
- A craft knife.
Step-by-Step Instructions:
- Choose Your Canvases: Get three or five blank art canvases. They should all be the same height, but they can be different widths.
- Position Your Photo: Lay your canvases on the floor, leaving a small gap (about one inch) between each one. Place your large photo print on top of them. Move the photo around until you like the part of the image that is on each canvas.
- Mark and Cut: Carefully flip the photo over without moving the canvases. Use your pencil and ruler to draw lines on the back of the photo where the gaps between the canvases are. Then, carefully cut the photo into separate panels along these lines.
- Glue the Panels: Take one piece of your photo and one canvas. Spray the front of the canvas with spray adhesive or brush on a thin layer of Mod Podge. Carefully place the photo panel onto the canvas, smoothing it out so there are no bubbles.
- Hang Your Art: Let all the panels dry completely. Then, hang them on the wall in the correct order, leaving a small, even gap between each one.
29. Woven Basket Collage

A collection of woven baskets and plates brings global texture and warmth to a room. This display groups together many different flat baskets, creating a large, circular piece of art. The various patterns and natural tones are beautiful against the plain white wall.
This is an easy way to fill a large space with interesting shapes and patterns. It feels both rustic and modern at the same time.
DIY: Basket Wall
What You’ll Need:
- A collection of flat, lightweight baskets or woven trays.
- Small nails or hooks.
- A hammer.
Step-by-Step Instructions:
- Go Basket Hunting: Look for shallow, decorative baskets at thrift stores, home goods stores, or flea markets. Try to find a mix of different sizes, textures, and patterns.
- Plan Your Design: Lay all your baskets out on the floor. Arrange them in a way that looks good to you. A good idea is to start with your largest basket in the middle and then place the smaller ones around it.
- Start Hanging: Start with the central basket. Hammer a small nail into the wall where you want the top of the basket to be. Many baskets have a small loop on the back for hanging, or you can just hang them from the woven edge.
- Build Your Collage: Add the other baskets one by one, arranging them closely together so they overlap a little bit.
- Step Back and Adjust: Every few baskets, step back to look at your arrangement. You can easily move them around until you are happy with your finished wall.
30. Accent Wallpaper Nook

Using a bold wallpaper in a small, unexpected place is a great design trick. Here, a vibrant floral wallpaper highlights a doorway and the small room beyond. It turns a simple architectural feature into a beautiful moment of surprise and color.
This technique is a good way to use a bold pattern you love without it overwhelming a whole room. It adds character and a custom feel to your home.
DIY: Peel-and-Stick Wallpaper Accent
What You’ll Need:
- A roll of peel-and-stick wallpaper.
- A tape measure and a pencil.
- A craft knife or scissors.
- A plastic smoother or a credit card.
Step-by-Step Instructions:
- Choose Your Spot: Find a small area you want to highlight, like the back of a bookshelf, the wall inside a closet, or a small nook.
- Clean the Wall: Make sure the wall is clean and dry.
- Measure and Cut: Measure the height of the wall you are covering. Cut your first piece of wallpaper a few inches longer than you need.
- Peel and Stick: Peel about a foot of the backing off the top of the wallpaper. Line it up with the top of the wall and press it on. Slowly pull the rest of the backing off while you use the plastic smoother to smooth the wallpaper onto the wall. Work from the center out to push out any air bubbles.
- Match the Pattern: For your next piece, carefully line up the pattern on the wallpaper with the piece you just hung. Overlap the edges just a tiny bit. Peel and stick this piece just like the first one.
- Trim the Edges: Once all your wallpaper is up, use the craft knife to carefully trim any extra wallpaper at the top and bottom.
31. Minimalist Line Art Gallery

Simple line drawings bring a touch of modern elegance to a room. This type of art uses a single, continuous line to create a shape or a face. It is stylish and sophisticated.
Hanging a few line art prints together in a simple grid creates a clean, cohesive look. The light wood frames add warmth. This is a calm and artistic way to decorate a bedroom or living space.
DIY: Create Your Own Line Art
What You’ll Need:
- A few sheets of thick white paper.
- A black marker with a fine tip.
- A pencil.
- Simple picture frames.
Step-by-Step Instructions:
- Find Your Subject: Find something simple to draw, like a leaf, a flower, your own hand, or a simple object like a cup.
- Study the Outline: Look closely at the main outline of your object. The idea of line art is to capture that main shape.
- Do a Practice Run: On a scrap piece of paper, try drawing the outline of your object without lifting your marker. It doesn’t have to be exact. The little wiggles and imperfections are part of the style.
- Draw for Real: Once you feel confident, take a clean sheet of paper and draw your final version.
- Frame Your Masterpiece: Let the ink dry completely, then place your new piece of art in a frame. Make a few different drawings and hang them together.
32. Skateboard Deck Art Display

Your passions can be your best decorations. This wall uses a collection of skateboard decks as art. The colorful and graphic designs on the boards create a cool, urban vibe.
This is a fantastic way to show off your personality. It turns a collection that might be hiding in a garage into a dynamic feature wall. It’s a tribute to skate culture and personal style.
DIY: Display Your Decks
What You’ll Need:
- Your favorite skateboard decks.
- Skateboard wall mounts (you can buy these online or at a skate shop).
- A drill, a level, and a pencil.
Step-by-Step Instructions:
- Gather Your Boards: Pick out the skateboards with your favorite designs. They can be old, used decks or new ones.
- Plan the Layout: Arrange the boards on the floor to see how you want them on the wall. You can hang them vertically in a neat row or create a more scattered design.
- Mark the First Mount: Start with one board. Hold it on the wall where you want it to go. Use a pencil to mark where the mount needs to be screwed in. Use a level to make sure the board will be straight.
- Install the Mount: Use your drill to install the wall mount. Most mounts are very easy to install with just one or two screws.
- Hang Your Boards: Attach your skateboard to the mount. Continue this process for all your other boards until your awesome display is complete.
33. Hanging Stained Glass Panels

Stained glass isn’t just for old churches. Hanging a panel of stained glass in a window can fill your room with colored light. It’s like a suncatcher and a piece of art all in one.
The vibrant colors and intricate patterns become a beautiful focal point. As the sun moves through the sky, the colors will dance around your room.
DIY: Faux Stained Glass Art
What You’ll Need:
- A simple glass picture frame.
- Black puffy paint or a thick black permanent marker.
- Clear school glue.
- Food coloring in different colors.
- Small cups and a paintbrush.
Step-by-Step Instructions:
- Create Your Design: Draw a simple design on a piece of paper that is the same size as your picture frame glass.
- Outline on the Glass: Carefully take the glass out of the frame. Place it on top of your drawing. Use the black puffy paint to trace the lines of your design directly onto the glass. Let the paint dry completely. It will look like the lead lines in real stained glass.
- Mix Your “Paints”: In your small cups, mix a little bit of clear glue with a drop or two of food coloring. Make a few different colors.
- Fill in the Colors: Use your paintbrush to carefully fill in the sections of your design with the colored glue. Try not to go over the black lines.
- Let It Dry: Let your masterpiece dry flat for at least a full day until the glue is clear and hard. Then, put it back in its frame and hang it in a sunny window.
34. Textured 3D Wall Panels

Turn a boring, flat wall into a work of art with 3D panels. These panels have geometric shapes that pop out from the wall. They add a ton of texture and modern style to a room.
The way light and shadow play across the surface creates a constantly changing look. It’s a dramatic and sophisticated way to create an accent wall.
DIY: Geometric Foam Board Wall Art
What You’ll Need:
- Several sheets of thick foam board.
- A craft knife and a ruler.
- A hot glue gun.
- Paint that is the same color as your wall.
Step-by-Step Instructions:
- Cut Your Tiles: Use your craft knife and ruler to carefully cut the foam board into many identical squares.
- Score and Fold: On each square, draw a few lines from the corners to the center. Use your craft knife to gently cut along these lines, but don’t cut all the way through the foam board. This is called “scoring.”
- Create the 3D Shape: Gently fold the foam board along your scored lines to make some parts pop out. Use a little bit of hot glue in the folds to hold the 3D shape in place.
- Make a Bunch: Repeat this process to make a lot of identical 3D tiles.
- Paint to Match: Paint all of your finished tiles the same color as the wall you want to decorate. Let them dry.
- Create Your Wall: Use hot glue or construction adhesive to stick your tiles to the wall in a neat grid pattern.
35. Layered Memory Box

A memory box is a beautiful way to display treasures that tell a story. This display goes a step further by layering smaller boxes and frames inside one large shadow box. This creates a fascinating collage with a lot of depth.
You can mix photos with 3D objects like old keys, ticket stubs, and dried flowers. It’s a deeply personal piece of art that gathers your favorite memories in one place.
DIY: A Box of Memories
What You’ll Need:
- One large, deep shadow box.
- A few smaller, empty picture frames that can fit inside.
- A piece of scrapbook paper or fabric for the background.
- Your collection of mementos (photos, tickets, keys, jewelry, dried flowers).
- Straight pins and strong craft glue or a hot glue gun.
Step-by-Step Instructions:
- Prepare the Big Box: Open up your large shadow box and line the back of it with a pretty piece of paper or fabric.
- Fill Your Small Frames: Put your favorite photos or flat paper mementos into the smaller picture frames.
- Arrange Everything: Place your small frames and your other objects inside the big box. Move them around until you like the way they look.
- Glue Down the Frames: Use your glue to stick the small frames in place inside the big box.
- Pin Your Mementos: Use straight pins to attach your tickets, dried flowers, and other lightweight items to the background. For heavier things like keys, use a small dot of hot glue to secure them.
- Close It Up: Once you are happy with your arrangement, carefully close the back of the shadow box and hang it on the wall.
Your walls do not have to be bare. As these 35 ideas show, there are endless ways to fill them with personality and style. You can tell your story with a collection of photos, add warmth with textiles, or bring in nature with a living garden.
The best wall decor is a reflection of your life and your passions. It is not about buying expensive art. It is about creating a space that feels uniquely yours. Do not be afraid to try something new. Start with one small project and see how it transforms your room.
Key Takeaways
- Decorate with Your Story: Use personal items like photos, souvenirs, hats, or skateboards to make your decor meaningful.
- Embrace Texture: Mix different materials like wood, metal, fabric, and plants to add depth and interest to your walls.
- Start with a Focal Point: A single large piece, like a mural, an abstract painting, or a mirror collage, can define an entire room.
- DIY is Accessible: You do not need to be an expert artist or builder. With simple instructions, you can create beautiful, custom decor for your home.